#completeresources
Explore tagged Tumblr posts
Visit Tumblr Blog
Explore Tumblr blogs with no restrictions, modern design and the best experience.
Last Seen Tumblr Blogs


Fun Fact
Tumblr Inc. has $15.1M in annual revenue.
Text

9f5f15 - edad55 - face79 - fffce - ffe8a3
#hisources#allresources#completeresources#itsphotoshop#yeahps#color palette#color name#five#moodboard#yellow#orange
139 notes
·
View notes
Text
THUNDERBOLTS* PSD PACK requested by Anon, created by tana
includes [ 8 ] psds made by me. i tried to include various scenes from the movie. if you need a particular scene from thunderbolts, don't hesitate to reach out. i used the 4k movie, colored for general monitors. not hdr compatible. click to download. please credit or tag me in your sets if you use. can probably be used on other dark movies!
#psd#gif resources#usergif#gif psd#dailyresources#allresources#completeresources#tuserhan#tuserbailey#usersugar#nessa007#userdeetz#usertj#userzil#userdickon#psds*#*
55 notes
·
View notes
Text

AFFAIR PSD COLORING by @loviestudio
This coloring was made in Photoshop CC; it might work on Photopea!
TERMS
Like and/or reblog to help a creator.
Don’t repost, re-upload or put it on packs and/or google drive. Don’t claim my resources as your own, and don‘t share them without my consent! Don’t use my resources as a base or copy them.
Credits are not mandatory, although I’d love to see your edits!
My resources are free for personal or non-commercial use only. For commercial use, you must pay for the download. If you paid for the download, you are authorized to use it commercially. Reach out to me for more information or if you have questions about my resources licenses.
Follow me for more resources! ♡
This is a free resource, you can download it on Ko-Fi. Thank you!
DISCLAIMER: I don’t own any of the pictures used to make the preview and I have no intention to violate the copyright rules. If any picture in the preview belongs to you and you want me to remove it, please, contact me!
#dailypsd#supportcontentcreators#dailyresources#allresources#completeresources#chaoticresources#dearindies#psd coloring#psd download#psd for icons#photoshop resources#photoshop psd#resources#for icons#psds#psd#coloring psd#icon psd#free resources#free#free psds
134 notes
·
View notes
Text

Hi! I got asked if I have an icon tutorial so I thought I'd do my best to go through my (probably way too long) process :) I'm going to show how I made that icon up there 👆
When I first started making icons I used this great tutorial by @/strwrs and then slowly added my own preferences to make this chaotic process 💕
First for getting screencaps of things i normally just google "[name of show/movie] screencaps" but one of the ones I use a lot is this site.
1. Open the pic in photoshop and crop it
Here's the full image:

Here's where I'm cropping it:

I like to make the size of my icons 250x250 but it can be more of a preference thing, a lot of people use 200x200 or I've seen 100x100 too.
I also like to crop a little above the image sometimes to give more space above the head
2. Removing the background
Removing the background is way easier on animation than on real people sometimes so I can show 2 examples even though I do it the same way...
First I go to select > select and mask:

Then I use the quick selection tool to select as much of the head as i can and the brush tool to remove/re-add parts that got missed so it should look like this:


(is the quick selection tool great? not all the time but when it works well it's great 🤡)
For something like this where her hair has a lot of texture in it and it's difficult to get a good outline, I'll zoom in really far and use the brush tool to get as many of the big pieces as I can so it looks a little more natural when the background color is added

Sometimes there can be a white/black line around the icon that got missed from erasing the background and you can use the brush tool to erase that as well.
3. resizing and sharpening
Now everything should look like this:

I'm going to go to the right where my layers are at and create a new group by clicking on the folder at the bottom
Then I drag the layer mask up to link it to the group instead of just the image and drag the image into the folder:

Next I like to sharpen before I resize the image so I open the group and highlight the image layer and then go filter > convert for smart filters and then for sharpening: filter > sharpen > smart sharpen with these settings:

Now with the image layer still highlighted i go to image > image size and set it to 250x250

4. the fun part ✨
Now we can add the background color and everything else ✌️
I have a lot of previous templates saved to save me time so what I normally do is open a psd template I have then highlight the group layer i just made then right click > duplicate group and have the destination be the psd and then I can just change the colors of gradients i've already made (For this tutorial though I'll show you how I make the gradients/paint layers)
For coloring this is pretty much what my process usually looks like (im probably going way overboard with it but oh well lol) it really depends on the pic being used, some don't need to be colored as much.
I have found that over brightening/upping the vibrance isn't necessarily a bad thing sometimes (not all the time though) because of how small the icons are it kind of helps the image stand out more when they're used but it's up to you!
(I also put all the adjustment layers into one group because it gets a little chaotic if I don't)

Next we're going to make a gradient ✨ first i go to the adjustment fill button (?) and pick gradient

Then I just pick one of the generic photoshop options that kind of has the look I want ( it doesn't matter too much since it will be edited so it can be any color)

Now to change the color of the gradient click on the color part in the gradient section and you'll see this

I deleted the bottom middle square because I didn't want it, but to change the colors double click on the bottom left or right squares and a color wheel will pop up.
When I pick the lighter color i normally just go up to a lighter section above the darker color
This is the change i made, you can move the middle diamond slider to have the darker or lighter color be more prominent

Next is playing with the angle/scale until it's how you want it, these are what mine ended up being

I also normally adjust the angle so that the lightest part of the gradient is in the top corner where the light source is coming from in the icon pic to make it look more natural
Next I add a solid color layer over the coloring layers with a color that's similar to the background gradient color im using and switch to the brush tool with black paint and with the layer mask selected on the solid color layer paint over everything i don't want colored with black
Then I do a second solid color layer set to a lightish brown, normally on just the hair, to add a bit more contrast

then i set the color fill layer that matches the background to either overlay, soft light, or color (depending on which one looks best for the image) and adjust the opacity/fill to where I want it.
I always set the brown layer to soft light with the opacity at around 80%
And NOW just when you think I might be done...I'm not...because I have to make this process as long as possible 😂
Now I do another color fill layer but this time over the entire image group layer. I normally make the color a slightly lighter color than the darkest part of the background color, set it to soft light, lower the opacity/fill to about 50% or lower, (depending on how much it changes the pic) and then right click > create clipping mask so it only effects the image and not the background
This kind of just tints the image a little with the color to bring it together a little more

Now the icon looks like this:

You can add more fun stuff like doodles/background textures i've used these and these but there's a lot of resource blogs like @/completeresources and @/allresources that have long lists of different textures
If i wanted to add a texture though i would put it over the gradient layer and set it to overlay or soft light


And to add a doodle you just put it at the very top of everything and resize it/turn it using the move tool :)


Then you're done! you can go file > export > quick export as png and thats it 👏
Hopefully this makes sense! I've uploaded the template i made in the tutorial here if that's easier to follow but feel free to ask if you have any questions!
#icon tutorial#dailyresources#completeresources#icons#tutorial#tutorial*#photoshop tutorial#usertana#userzo#tusertha#ps*
73 notes
·
View notes
Note
hello, those gifset for ready or not is great!!
https://www.tumblr.com/billysjoel/781204370023972864/sleeping-inside-a-hearse-kizzyedgelll-requested?source=share
i was wondering if you could explain how made this second and fourth gif, splitting the gif into two with each a different colouring
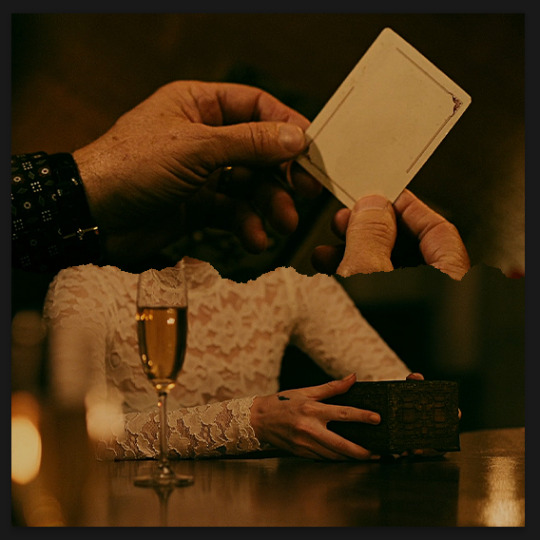
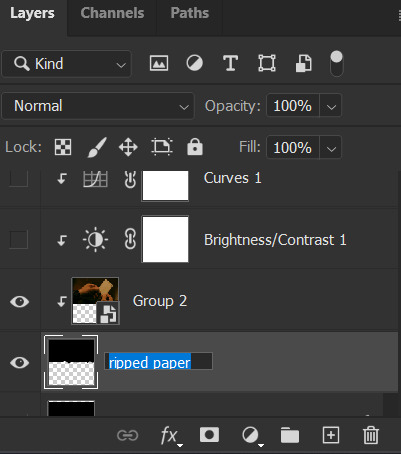
hi, first of all, thank you so much!! i ended up pretty proud of this set! below the cut, i'll walk you through how to do the ripped paper effect with different coloring for both gifs!

first, i made both gifs separately. when i'm combining multiple gifs into one canvas, i typically do not crop them beforehand and instead leave them at their original dimensions so i can move them where necessary on the final canvas. this is totally personal preference.
in this case, my final canvas was 540px by 540px. i create this canvas separately and then bring both gifs over to it. i've sharpened them, but left them uncolored and uncropped.
once both gifs are on the same canvas, i add the ripped paper texture/brush. now, you can do this effect with any sort of texture or brush, not just one that looks like ripped paper, but that's what i used for this set. you can find all sorts of brushes on my resource blog or you can search for them on google or other PS resource websites. you can do the same with textures as well -- here's that tag on my resource blog.
the most important parts are the order of your layers and using clipping masks. for this effect to work, you need the brush/texture layer to go IN BETWEEN your two gif layers. if you're using a texture, you don't really need to do anything other than using either the transform tool (ctrl+t) or move tool (v) to position your texture where you'd like it. it depends on the look you're going for, but with both of the gifs in this set that use this technique, they're divided approximately in half.
if using a brush instead of a texture, you need to create a new layer in between both of your gifs first before stamping the brush in the desired location.
without any clipping masks, your canvas will just show the topmost layer, which we'll call gif #2. gif #1 is your bottom/lowest layer with the brush/texture layer above it and gif #2 at the very top. this is what my canvas looks like with gif #2 hidden so you can see the positioning of my ripped paper brush:

to create a clipping mask, right-click on the gif #2 layer and select "create clipping mask." now you should see both gifs with gif #2 only appearing where your brush/texture appears:
you can see that depending on your texture/brush and its positioning, you can end up with a lot of cool and dynamic arrangements! clipping masks and the order of our layers are going to continue to be very important in order to keep the coloring separate. if it gets hard to keep track of what is where, you can always rename your layers by double-clicking on them!
let's color gif #1 first. before adding your first adjustment layer, make sure you have gif #1 selected as any coloring layers need to be above gif #1 but BELOW your texture/brush layer. because gif #2 and the texture/brush layer are above gif #1 and whatever coloring layers, they will only apply to gif #1. you do NOT need to use clipping masks for gif #1. here are my coloring/adjustment layers and their settings (click to enlarge):


the coloring layers for gif #2 need to be above gif #2 and all of them must utilize clipping masks! with adjustment layers, there are a couple ways to do this. you can right-click on each of them and select "create clipping mask" like we did before or you can click this button underneath the properties tab of each layer:

here are these coloring layers and their settings:


the last thing i did was add the drop shadow part of the texture/brush. to do this, i duplicated that layer and moved it down a handful of pixels using the transform tool (ctrl+t).
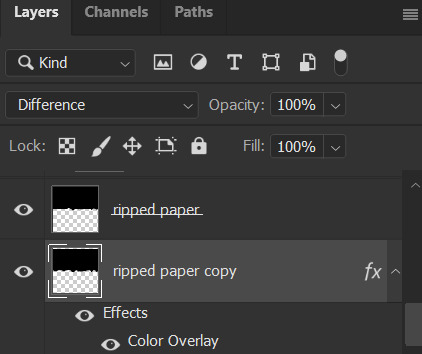
to add the color overlay effect (making it pink), double click the layer, select color overlay, and choose your color and applicable blending mode. i just chose a pink color and left its blending mode at normal and 100% opacity.
and that's pretty much it! as usual, please let me know if you have any additional questions -- about this tutorial or any of my other sets! (and so sorry this one took me so long!)
#answered#Anonymous#gif tutorial#coloring tutorial#overlay tutorial#gifmakerresource#completeresources#dailyresources#tutorials#my tutorials
29 notes
·
View notes
Text
Hello! I've decided to make an updated tutorial on how I gif, since some of my giffing methods have changed since I made my first one (and this one is still valid, by the way! I've just changed a few things and I thought the update would be good.)
In this tutorial you'll find:
A download link for Photoshop CC 2020;
Step-by-step instructions on how to make gifs and color them;
A sharpening action for your gifs;
A base psd for gifs.
Get the tutorial here (just type 0 to get it for free, and if you'd like to support me, any amount is extremely appreciated).
I accept commissions for tutorials + support me on ko-fi?
#tuserdee#dailyresources#completeresources#userbecca#gif tutorial#gif resources#mine#resources#*#my tutorials#tutorials#my resources#gif#my psds#my actions#psds#actions#reposting it on main bc fucking sideblog is shadowbanned LOL!!!!!!!!!!!
421 notes
·
View notes
Text


LOKI GIF HEADERS
640x380 Goes with any kind of theme color (transparent border) No need to zoom in when adding the header, just save. There's a bonus gif header in the page you gonna find out 😈 Go on headers page • just right-click › save image as…
› Don't repost like yours, thank you. › Putting credit on your description will be much appreciated. › Don't hesitate to make a request if you'd like a specific moment for a gif header. › REBLOG IF YOU USE
#artists on tumblr#loki#header#headers#marvel#lokiedit#marveledit#userjessie#dailyresources#allresources#userelenagilbert#mcuchallenge#marveladdicts#marvelgifs#dailymarvelgifs#filmedit#tvedit#completeresources#resourcemarket#codingcabin#tuserheidi#tusercat#usercardigan#folkloreresources
825 notes
·
View notes
Note
how do you apply the smart filters to the whole gif? It only works on the first layer for me (rookie question iknow sorry)
Hi! sorry for the late answer ( • ᴖ • 。) (i was away for the weekend celebrating my birthday)
I believe you mean applying sharpen to your gifs, right? In order to do so, you need to convert your gif into a smart object:
After loading your files into stack and cropping it to the desired size, select all frames and layers...

And change it to a video timeline by pressing this little icon

then select all your frames and convert to smart object

Now with your smart object selected, go to filter > sharpen > smart sharpen

with these settings...

and i like to apply twice to get a better result:

And just like that your gif will be perfectly sharpened. It may change depending if you're working with different type of media (such as animation) but these are the general settings

Hope this helped and send me another ask if you need anything else!
#*tutorial#answered#allresources#completeresources#dailypsd#dreamcreations#dailyresources#gifmakerresource#yeahsources
14 notes
·
View notes
Text


poppy | theme by sage
get the code: static preview v1 / preview v2 header theme with a sticky headerbar
features (more info below the cut):
toggle: tags on click, updates tab, explore menu
responsive headerbox includes an uploadable image, custom title & description, and up to 5 info stats
sticky headerbar includes home/ask/archive & up to 3 extra links, updates, explore button or search bar, and day/night button
updates tab includes up to 5 updates with an icon & text
explore menu includes about text, up to 3 skills, up to 4 blogs, and up to 8 extra links, and a search bar
customizable: title, colors, body & title fonts, and font size
npf supported, responsive design, 3 post width options, 4 corner options, scroll to top, tabler icons
nothing needs to be changed in the code, everything can be changed in the customize panel!
terms:
reblog if using
do not touch the credit
all terms / faq
credits listed in the code / credits page
please consider tipping or supporting me ♡
blog name !! important
make sure you fill out the blog name field, this is what will show on the top of all your original posts. to clarify: your blog name is your blog’s url - for example: phantomcodes
custom title
similar to the blog name, your custom title will show on the header, i recommend not making this too long
headerbox
uploadable image - this will default to your icon if nothing is uploaded
up to 5 info stats each with an icon & text - if you don't want the info stats leave the info 1 field blank
updates tab
the updates tab is toggleable, it has up to 5 updates each with an icon & text
explore menu
the explore menu is toggleable and has:
about text: this is can be as long as you want! it will scroll
(optional) skills section: up to 3 - you can use this for statuses, projects, progress, etc. leave the explore skill 1 field blank if you don’t want this section
(optional) blogs section: up to 4 blogs - leave the explore blog 1 field blank if you don’t want this section
(optional) links section: up to 8 links - leave the explore link 1 field blank if you don’t want this section
reminders
remember tumblr’s customize panel is buggy, make sure to toggle all the options on/off before saving
i’m still on a sort of semi-hiatus, i’ll be around for questions but please check my faq, answered asks, etc. before asking - i will not answer repeat questions!
#themehunter#theme hunter#tumblr themes#tumblr resources#completeresources#allresources#userbru#userdre#usernik#useraashna#tuserlucie#userrajan#usercharithra#usermaguire#usertj#useralien#tusermels#phantom code#phantom theme#poppy
985 notes
·
View notes
Text


[2] Beast by sheathemes
preview | code
Features
full support for NPF posts
responsive to all screen sizes
post sizes between 350px - 640px
unlimited amount of custom links
like and reblog buttons
Optional
right/left sidebar position or sidebar as a header option
sidebar image
tags on all display or by toggle
custom links
dark mode
search bar
Important
full credits are here
sidebar image is 120px x 120px
you will use google fonts to change the main font. Search for the font of your choosing and copy/paste the title of said font into the appropriate text field
659 notes
·
View notes
Text
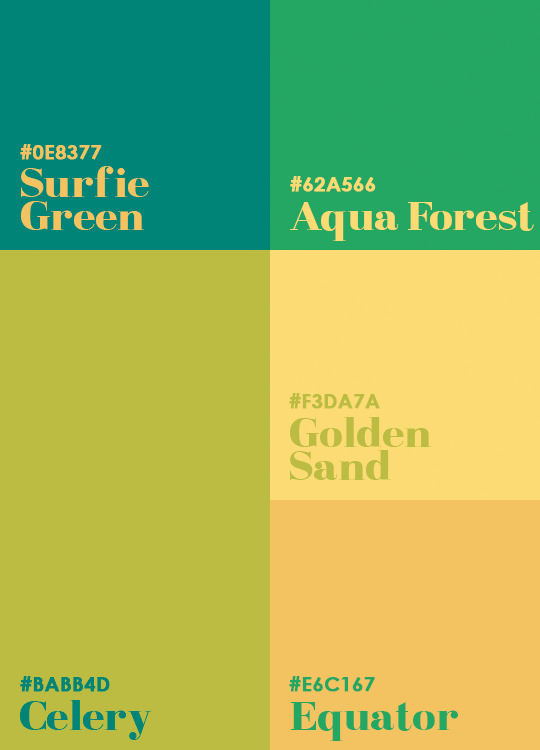
0e8377 - 62a566 - babb4d - f3da7a - e6c167
#hisources#allresources#completeresources#itsphotoshop#yeahps#color palette#color name#five#moodboard#green#yellow#orange
147 notes
·
View notes
Text
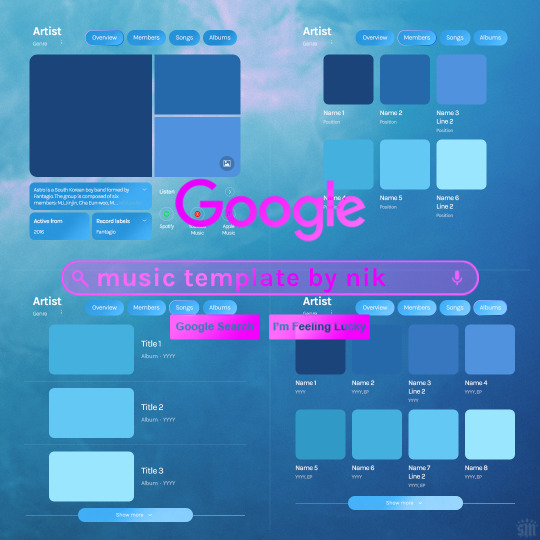
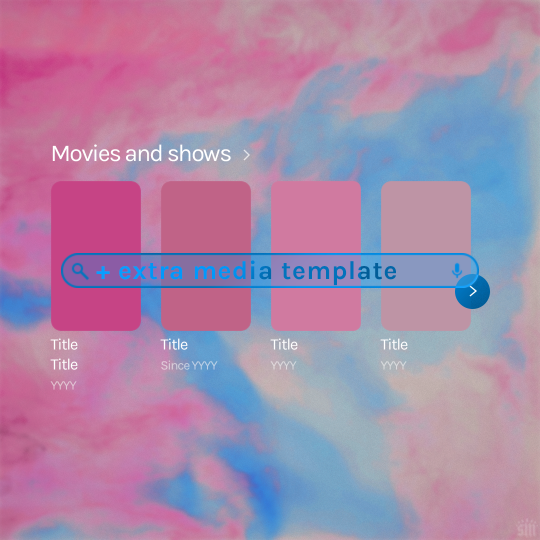
Hi! I've had these templates sitting with me for a while and never got around to uploading them lol. Here are Google templates for musical artists, a newer style originally seen in this set. Plus, an extra template that goes with my previous layouts, showcasing media titles (seen in this set). As always, my templates are free — all I ask is that you give me proper credit in your caption if you use my template or take inspo from my design. Enjoy! :)
Get the NEW Google templates free via ko-fi: MUSIC TEMPLATE | MEDIA TEMPLATE (Donations appreciated but not required <3) Includes PSD/PSB templates with pre-made layer masks, shapes, and tips for the following designs: – Overview – Members – Songs – Albums – Movies and shows (.psb)
Additional resources: – My original animated Google search overlay tutorial & template – Extended Google template (image search results, biography, related searches, animated "no search results") – Karla Google Font (this is the only font used) – Backgrounds via Unsplash: [Blue] [Pink]
#gif tutorial#completeresources#usershreyu#useryoshi#userzaynab#usersalty#alielook#tuserabbie#useraish#userabs#mialook#resource*#gfx*#google*
410 notes
·
View notes
Text


MUSIC LYRICS TEMPLATES PACK by @loviestudio
The templates were made in Photoshop CC; it will work on Photopea!
TERMS
Like and/or reblog to help a creator.
Don’t repost, re-upload or put it on packs and/or google drive. Don’t claim my resources as your own, and don‘t share them without my consent! Don’t use my resources as a base or copy them.
Credits are not mandatory, although I’d love to see your edits!
My resources are free for personal or non-commercial use only. For commercial use, you must pay for the download. If you paid for the download, you are authorized to use it commercially. Reach out to me for more information or if you have questions about my resources licenses.
Follow me for more resources! ♡
This is a free resource, you can download it on Ko-Fi. Thank you!
DISCLAIMER: I have no affiliation, endorsement, or sponsorship by Apple Inc., Spotify AB, or their affiliates. Logos are registered trademarks of their respective owners and are used under fair use principles for non-commercial, creative projects. This is a free template intended for personal or educational use. Do not redistribute or sell this design.
#templates#template psd#supportcontentcreators#dailyresources#allresources#completeresources#chaoticresources#dearindies#lyrics template#lyrics templates#photoshop templates#resources#ps help#free resources#free#free templates
364 notes
·
View notes
Text

The Pitt Headers - 6 headers (640x360) | 4 different border versions under the cut - all versions + 2 extra border options here - please like or reblog if you take one - credit isn’t required but it’s appreciated - requests are open for other headers!


#the pitt#thepittedit#the pitt headers#completeresources#allresources#resources#headers#thepittsource#michael robinavitch#jack abbott#samira mohan#mel king#frank langdon#dana evans#heather collins#*#headers*#i made these for my blog but decided to share with the class lol
499 notes
·
View notes
Text
here is the colouring tutorial i promised to go with my beginner's gifmaking tutorial.
to save image space, i've written up a simple explanation of how each adjustment layer works here, so i'm just going to over my colouring for these 4 different gifs.
as always, very image heavy underneath
there are many ways to get the same results and i'll use various methods usually just based on what i'm feeling at the moment. some of it is a little convoluted, but hopefully this will give you a rounded idea of how it all works so you feel more comfortable playing around with your own colouring
NADJA
this is the base gif with zero colouring adjustments, just resized and sharpened.
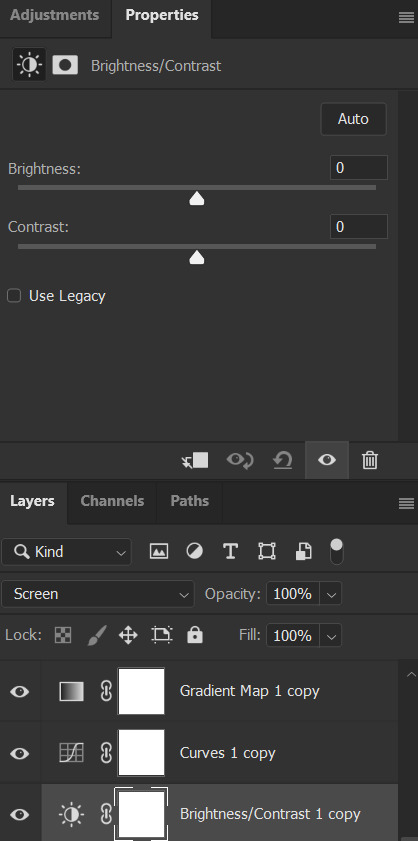
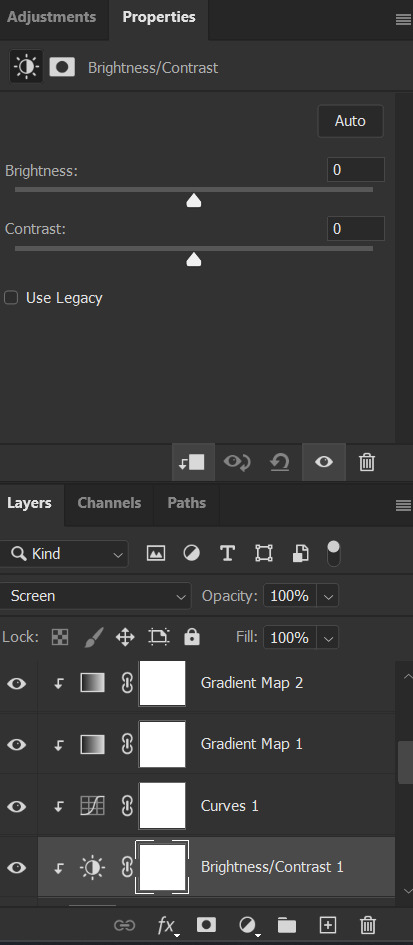
unless the base gif is already very bright, which doesn't often happen because directors nowadays are allergic to light, the first layer i add is always a brightness/contrast layer. i don't adjust any of the sliders, i just change the blending mode to "screen", and then adjust the opacity if needed. this gif was pretty dark, so i left it at 100%,
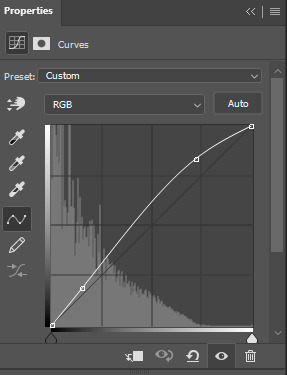
my next layers are always curves to even out the white and blacks. i use two curves layers, one for white and one for black. i used the white drop-picker and selected just below the lightshade on the lamp behind her, and for the black drop-picker i selected her hair near her neck which gives us this
it's already looking much better, it's not as green tinted, but i want to make the red of her dress pop a bit more. in order to do that without making her face too red, i'm gonna remove some of the yellow. so next i'm gonna add a selective colour layer, and under the yellow channel i moved the yellow slider to -5 and the black slider to -52. now
now that the yellow is reduced, i add another selective layer, and under the red i move the cyan slider to -66 and the black slider to +29. now the red of her dress pops and her face is still a realistic tone. when i first made the gif, i added the red selective layer first, then added another selective layer under it and adjusted the yellows to offset it. you can always shift layers around or add a new layer underneath as you go.
voila
TOMMY
here is our base gif

this scene is better lit than the nadja one, but i prefer bright and colourful gifs, so i'm gonna once again add a brightness/contrast level and keep it at 100%
and then the curves layers to even it all out. since there isn't a spot that is immediately noticeable as white, you can hold the alt button with the white dropper selected and it will highlight all the white/very near white pixels. you can also zoom real close in to select specific pixels. i selected a from the white area around his chin/mouth. the same process works for finding a black spot with the black dropper, and for that i selected from a dark spot in his hair
the curves layers evened it out but also made the gif a bit more red and warm toned, and since i've decided i want the end result to be more blue/green, so i'm gonna add a colour balance layer. in the shadows channel i moved the cyan/red slider to -16, and the yellow/blue slider to +11

now the gif already looks great, it's bright, skin tone is accurate, he's not washed out, but like i said i like my gifs colourful, so i'm gonna add two more selective colour layers. in the first i'm gonna adjust the greens, bringing the magenta slider to -87, and the black slider to +81. in the second layer i'm gonna adjust both the blues and cyans, because when you see blue in a gif it's rarely ever straight blue or straight cyan, so always adjust both. (you could adjust the blue and green in the same layer, but i prefer to do them separately in case i need to move the layers around)
now finally i'm gonna add a hue/saturation layer because i think the blue of his suit is too blue when the sky behind him is more cyan. (also, since you only have 256 different colours to work with, you don't want too many different colours otherwise it will distort the colouring.) in the blue channel i move the hue slider to -12 to make the blue a bit more cyan, and i also move the saturation to +38 to make it pop more
and voila
RHAENYRA
here is the base gif (this one is going to get very convoluted and imo best exemplifies what colouring gifs is like most of the time)
as always, a brightening layer set to screen
now the curves layers. for the white i clicked on her hair at the top of her head, and for the black i i clicked in the shadows to the left of her.
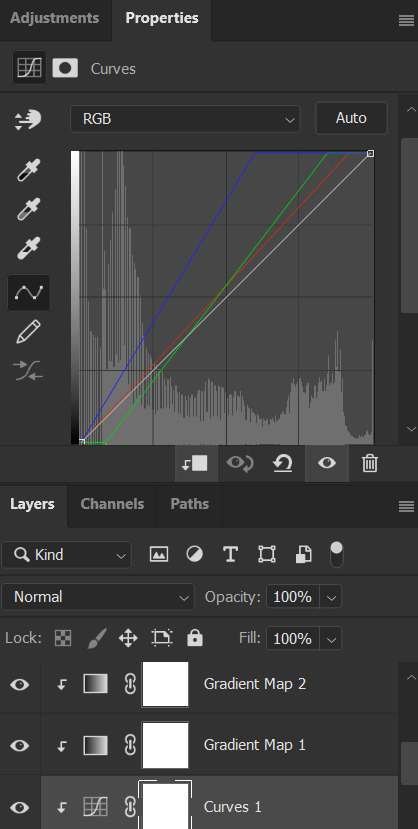
but as you can see, while it added contrast, it also made the gif more green tinted than it was. you could click around more, or manually adjust the red, green, and blue lines on the curves until it looks better but i decided to add a channel mixer layer instead. in the green channel i set the greens to -95, and in the blue channel i set the blue to -97
next i wanted to add a little contrast, but i find that using the contrast in brightness/contrast can saturate it too much, so instead i added a levels layer. first i adjusted the bottom bar, moving the right slider to 230 which reduces the overall brightness of the gif, so when i adjust the top bar it doesn't brighten the gif too much. on the top bar, i moved the right slider to 212, and the left slider to 9
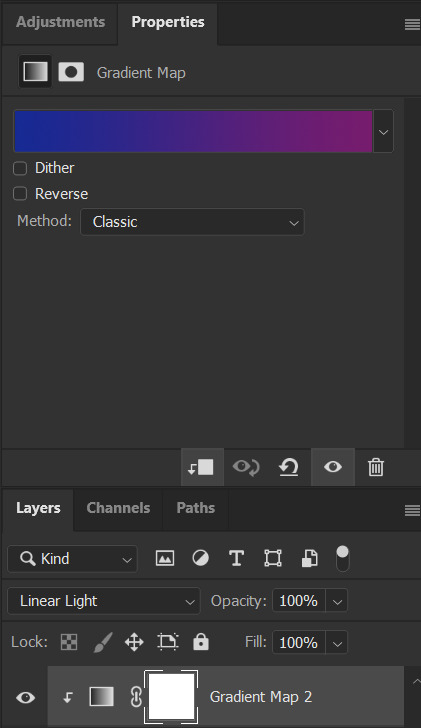
now, i'd like it to be not exactly warm toned, but less cool, and while i could use colour balance or a photo filter, i'm instead going to add a gradient map, using the default gradient pink 08, and setting it to blend mode soft light at 50% opacity

next i just want to increase the blacks a little, so i'm gonna add a selective colour layer and under black i'm gonna set the black slider to +10
it's still not as warm as i'd like, so i'm gonna add a colour balance layer, in the midtones setting the cyan/red to +10 and the yellow/blue to -5
we're almost done, but i want to make her dress pop a bit more, so first i'm gonna add another selective colour to bring the yellows down a bit, setting the black slider to -15

and finally one more selective colour layer, in the reds, setting the cyan slider to -50, the yellow slider to +10, and the black slider to +15
voila
NATALIE
here's the base gif
as always the brightness/contrast layer set the screen
now the curves layer. for the white, i zoomed in and selected a pixel on her cheek under her right eye. for the black i the dark spot just above her head
now she's very yellow, so i added a channel mixer layer. in the red channel i set the reds to +88. in the blue channel i set the reds to +10
she's still a little too yellow for my liking, so i'm gonna add a hue/saturation layer, and under the yellows i'm gonna adjust the saturation to -60
finally, i want her to be a it brighter, so i'm gonna add another curves layer, but instead of using the drop, i'm going to manually adjust it. the two points along the line are where i selected it and then i dragged until it looked how i wanted. i start with the upper dot, which made it brighter and moved the line into an arch, and then selected at the lower end of the line and dragged in back closer to centre to add some darkness and contrast
voila
and that's how i do my colouring. it's generally all trial and error, using a layer to fix one thing and then needing another layer to fix something the previous layer did.
play around, have fun, see what works for you and what doesn't. it will take a while for you to develop your own method and style, and even then you'll come across scenes that make you question if you have any sills at all. you do, directors just hate us
have fun and feel free to ask any questions
#tutorial#gif tutorial#colouring tutorial#photoshop tutorial#gifmakerresource#completeresources#*tutorials
276 notes
·
View notes
Text
A couple people expressed interest in this template (used here) after I showed it in a server. I want to give everyone access to it, so rather than have others suffer as I did, you can now find it here!
What you'll need: - Basic understanding of giffing w/ timeline - Basic understanding of using keyframes
If you're uncertain about anything with this template, my ask is always open. I am happy to help however I can. My one ask is that you please provide proper credit if using (aka link back to here in the caption of your post). Happy giffing!
#*template#c*#*ps#photoshop#template#resources#gifmakerresource#usergif#completeresources#userbuckleys#usertina#usercamena#useraudrey2#userlockescoles#userbambie#tuserheidi#tuserhol#userkimchi#tusermels#userholloway#tuserambs#userarrow#tusermona#uservivaldi#userchibi#userroza#useraljoscha#usermagic#userrobin#userzaynab
350 notes
·
View notes