#Bitaxe
Explore tagged Tumblr posts
Visit Tumblr Blog
Explore Tumblr blogs with no restrictions, modern design and the best experience.
Last Seen Tumblr Blogs


Fun Fact
Post activity is at the highest at 4:00 pm EDT; notes peak at 10:00 pm EDT.
Text
💥 Bitaxe Gamma 601 vs 600💥
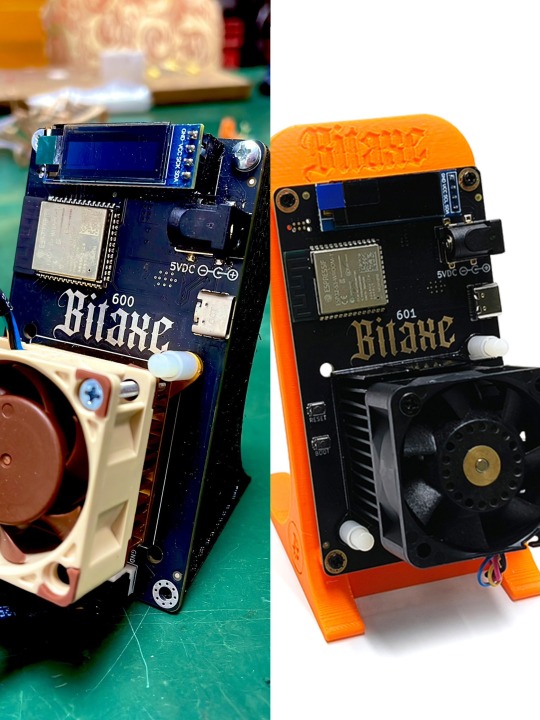
👉Bitaxe Gamma 601 is an upgraded version of Bitaxe Gamma 600
✅ More powerful computing power
601 has higher mining efficiency than 600, running at 1.2TH/S
✅ More power-saving
601 uses the new generation BM1370 ASIC chip, with energy consumption of only 15W/TH
✅ Heat dissipation upgrade
601 optimizes the heat dissipation structure and has low noise
✅ Easier operation
601 can be easily set up even by novices, with built-in WiFi

#Mining #Cryptocurrency #Bitcoin #repair #Lottery #Bitaxe #Gamma #silencer #dissipation #tecnologiablockchain #cryptomining #bitaxegamma #cryptomining #tecnologia #tecnologiablockchain #bm1370 #hash
#antminer#silencer#heat dissipation#mining#whatsminer#noise reduction#cryptocurrency#bitcoin#repair#lottery#bitaxegamma#bitaxe#gamma#tecnologiablockchain#cryptomining#tecnologia#bm1370#hash#NoiseReduction#Noise#Reduction#zeus
6 notes
·
View notes
Text
💬Feel free to leave a comment if you have any other ideas Click my profile for more information.
#mining#cryptocurrency#blockchain#repair#lottery#Bitaxe#Gamma#silencer#silent#bitcoinmining#tecnologia#tecnologiablockchain#support#cryptomining#miningpower#hashrate#zeus#antminer#chip#controlboard
0 notes
Text

A solo Bitcoin miner found a block today, claiming the full block reward of 3.15416949 BTC. https://bitref.com/block/904989
1 note
·
View note
Text

0 notes
Text
So findest du das richtige Netzteil für deinen Bitaxe Gamma Miner
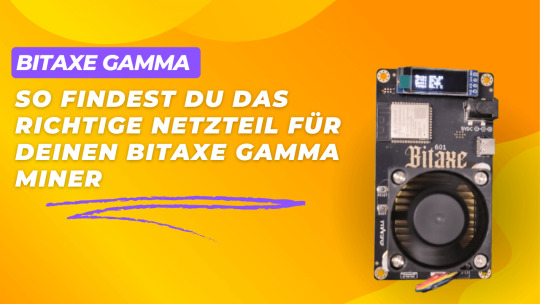
Wenn du dir einen Bitaxe Gamma 601 zugelegt hast, möchtest du natürlich das Maximum aus dem kleinen Solo-Miner herausholen. Doch was viele Nutzer unterschätzen: Die Wahl des richtigen Netzteils ist entscheidend für einen stabilen und zuverlässigen Betrieb. Ich habe verschiedene Netzteile getestet – vom mitgelieferten 5 V/5 A-Netzteil bis hin zu einem leistungsstärkeren 5 V/10 A-Modell – und dabei deutliche Unterschiede festgestellt. In diesem Beitrag zeige ich dir, warum dein Bitaxe vielleicht nicht die volle Leistung bringt und wie du mit dem passenden Netzteil nicht nur Stabilität, sondern auch eine niedrigere Betriebstemperatur erreichst. https://youtu.be/emFg8N2_uiI Hinweis: Der in diesem Beitrag verwendete Bitaxe Gamma 601 wurde mir von der Firma BitcoinMerch.com kostenlos für ein Review zur Verfügung gestellt. Die hier dargestellten Meinungen, Tests und Empfehlungen basieren jedoch auf meinen eigenen Erfahrungen und wurden unabhängig vom Hersteller verfasst.
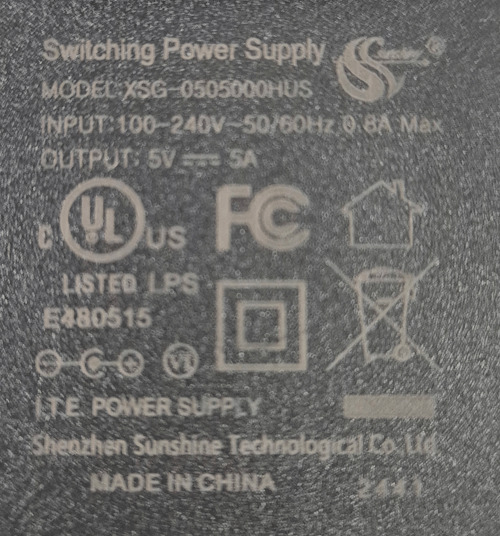
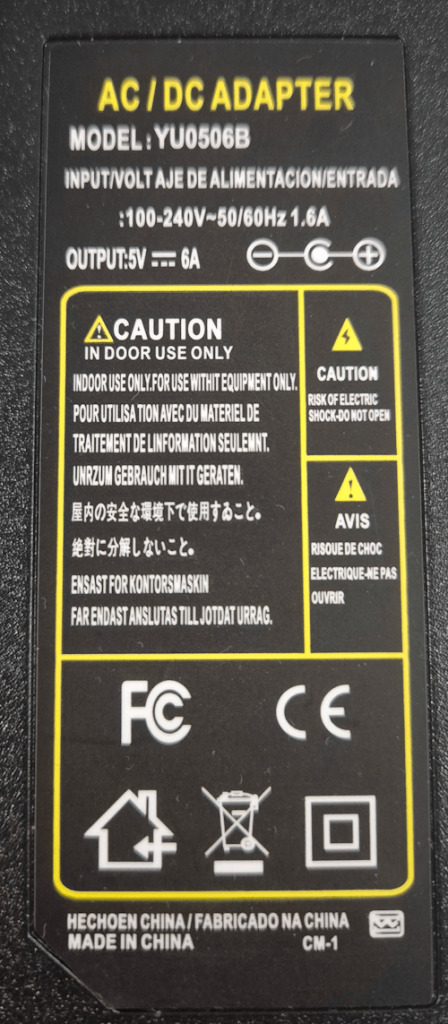
technische Daten des originalen Netzteils zum Bitaxe Gamma 601
alternatives Netzteil mit 30 Watt für den Bitaxe Gamma 601
Warum das Netzteil so wichtig ist
Der Bitaxe Gamma 601 ist ein energiehungriges Gerät – besonders im Dauerbetrieb. Zwar liefert das mitgelieferte Netzteil laut Aufdruck 5 V bei 5 A (25 Watt), doch in der Praxis reicht diese Leistung oft nicht aus. Das zeigt sich nicht nur an einer deutlich erhöhten Temperatur des Spannungsreglers, sondern vor allem an kritischen Spannungsausfällen an der ASIC-Stromversorgung – was letztlich zu instabilem oder ganz aussetzendem Miningbetrieb führt.
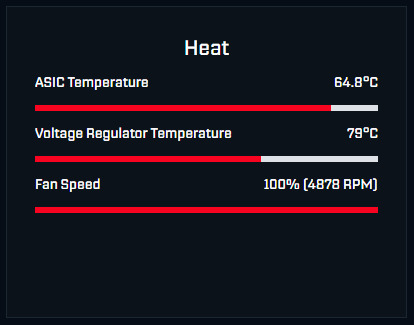

Erste Anzeichen für eine unzureichende Stromversorgung - Stark steigende Temperaturen am Spannungsregler (>80 °C) - Abbrüche im Miningbetrieb - Spannungseinbrüche unter Last
Warum ein 25-Watt-Netzteil für den Bitaxe Gamma trotzdem nicht ausreicht
Auf dem Papier scheint alles zu passen: Der Bitaxe Gamma 601 hat eine maximale Leistungsaufnahme von etwa 15 Watt, das mitgelieferte Netzteil liefert 5 V bei 5 A, also 25 Watt – theoretisch mehr als genug.

In der Praxis zeigt sich jedoch schnell: Das reicht nicht. Warum? 1. Leistungsangabe ist nur ein Idealwert Die meisten günstigen Netzteile erreichen ihre maximale Leistung nur kurzfristig oder unter idealen Bedingungen. Unter realer Last sinkt die Ausgangsspannung oft leicht ab – gerade bei 5 V ist das kritisch. 2. Spannungseinbrüche unter Last Schon ein kleiner Spannungsabfall (z. B. auf 4,8���V) kann zu Instabilität führen. Der Bitaxe benötigt eine stabile Versorgung mit möglichst konstanten 5 V, um zuverlässig zu arbeiten. 3. Startstrom & Lastspitzen Beim Einschalten oder bei schnellen Lastwechseln entstehen kurzzeitig Stromspitzen, die deutlich über dem Durchschnitt liegen. Diese können 3–4 A zusätzlich ausmachen – das Netzteil muss also Reserven haben, um das abzufangen. 4. Verluste durch Kabel und Anschlüsse Vor allem bei 5 V spielen Kabelqualität und Länge eine große Rolle. Dünne oder lange Kabel verursachen Spannungsverluste – wodurch am Bitaxe letztlich weniger Spannung ankommt als das Netzteil liefert. 5. Dauerbetrieb belastet Netzteile Ein 25 Watt-Netzteil, das ständig mit 60–70 % seiner Leistung läuft, erwärmt sich stark. Das führt zu Effizienzverlust, thermischem Stress und auf Dauer zu Leistungseinbußen oder Abschaltung.
Der erste Versuch: 5V, 6A – bringt das was?
Ein Netzteil mit 6 A (30 Watt) klang zunächst nach der Lösung. Doch: Im Dauerbetrieb kam es weiterhin zu Leistungseinbrüchen. Die Spannung sackte teilweise ab und der Bitaxe stellte die Arbeit ein.
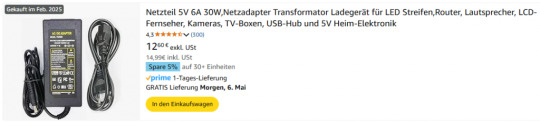
Das Netzteil habe ich für günstige 15 € bei Amazon.de bestellt – die Lieferung erfolgte, wie gewohnt, sehr schnell.
Die Lösung: 5V, 10A – endlich Stabilität
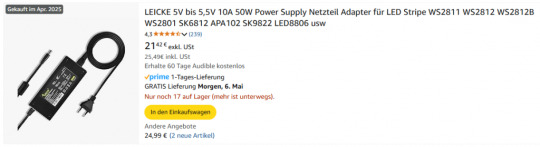
Nach dem Wechsel auf ein Netzteil mit 10 A (50 Watt) läuft der Bitaxe Gamma 601 stabil: - Miningbetrieb ohne Unterbrechungen - Temperatur des Spannungsreglers bei unter 70 °C - Genug Leistungsreserven für Dauerbetrieb

Das leistungsstärkere Netzteil mit 50 Watt habe ich ebenfalls bei Amazon.de bestellt – der Preis lag bei rund 26 €. Die Lieferung über Prime war wie gewohnt kostenlos und innerhalb weniger Tage da. Wichtig war mir diesmal, ein Produkt von einer deutschen Firma zu wählen. Das Netzteil stammt von Leicke, einem Hersteller mit Sitz in Leipzig, der auf hochwertige Netzteile und Elektronikkomponenten spezialisiert ist (→ leicke.de).
Fazit
Die Stromversorgung spielt beim Bitaxe Gamma 601 eine entscheidende Rolle – das mitgelieferte 25-Watt-Netzteil reicht im Dauerbetrieb schlicht nicht aus. Erst mit einem 50-Watt-Netzteil läuft der Miner bei mir stabil, ohne Spannungseinbrüche oder kritische Temperaturanstiege am Spannungsregler. Die Investition in ein stärkeres und hochwertiges Netzteil hat sich also voll ausgezahlt und sorgt seither für einen zuverlässigen Solo-Miningbetrieb.
Deine Erfahrungen?
Wie sind deine Erfahrungen mit dem Bitaxe Gamma und der Stromversorgung? Hast du ähnliche Probleme festgestellt oder vielleicht sogar andere Lösungen gefunden? Ich freue mich auf deinen Kommentar und den Austausch mit dir! Read the full article
0 notes
Text
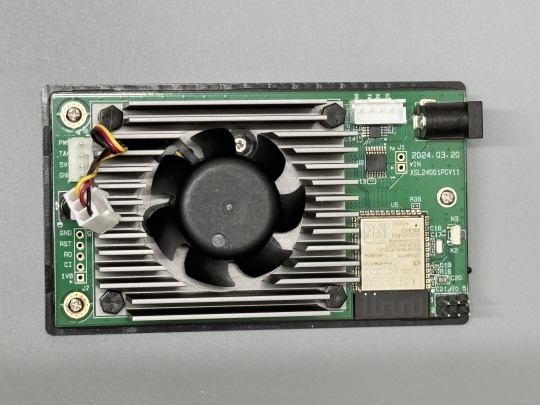
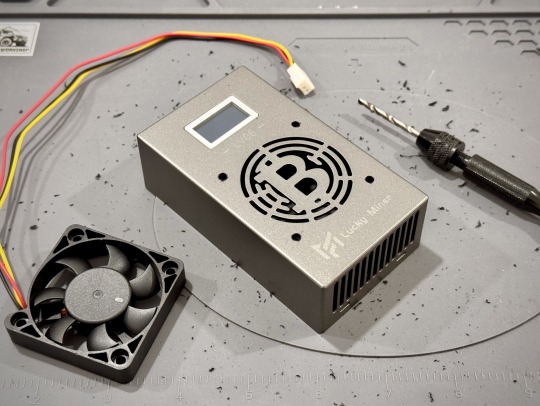
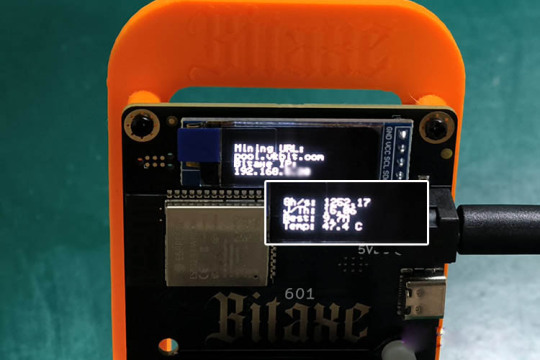
Changing Lucky Miner LV06 Fan
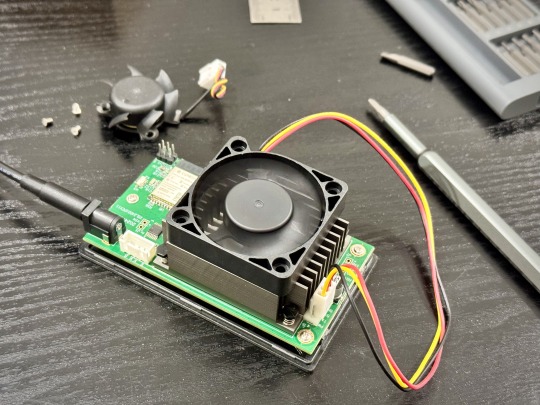
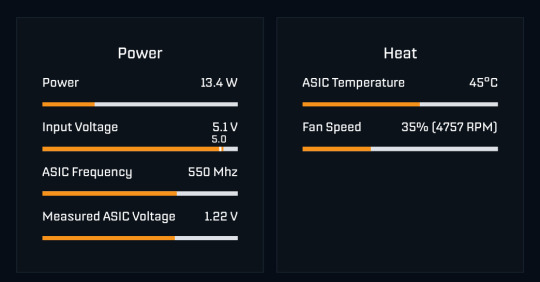
My Lucky Miner LV06 runs at around 56° C at settings of 550MHz/1.2V. The tiny 4cm fan in there is also pretty noisy, so I decided to get a 5cm fan to replace it. A 5cm fan running at the same RPM as the built in fan should be able to push 50-60% more air.
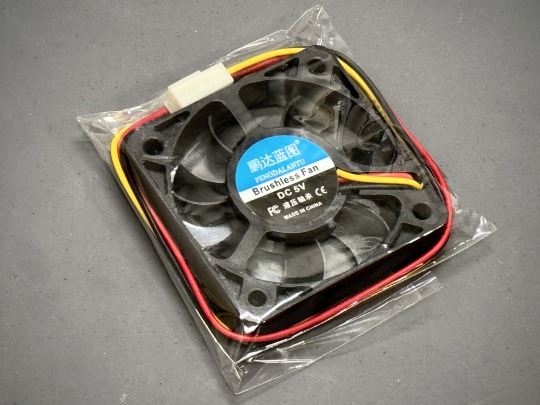
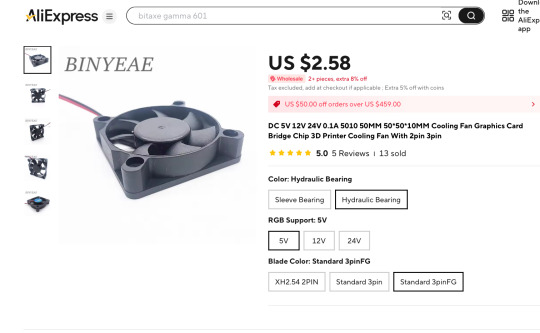
I bought the following fan from AliExpress. Take note that it should be 5V and 3pinFG version. I also picked the hydraulic bearing version as it lasts longer and stays quieter. Important update, see the note at the end of this article.
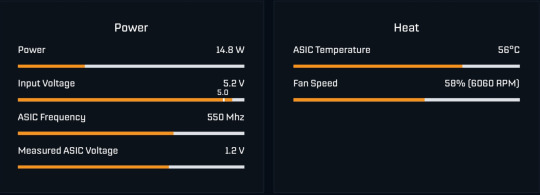
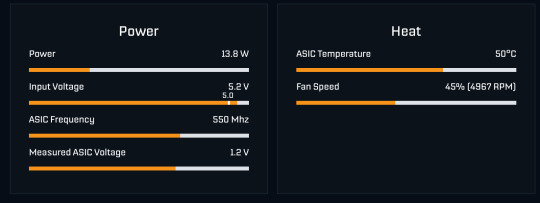
Just so that we have a baseline to compare to, this is the temperature and fan speed of the built-in fan.
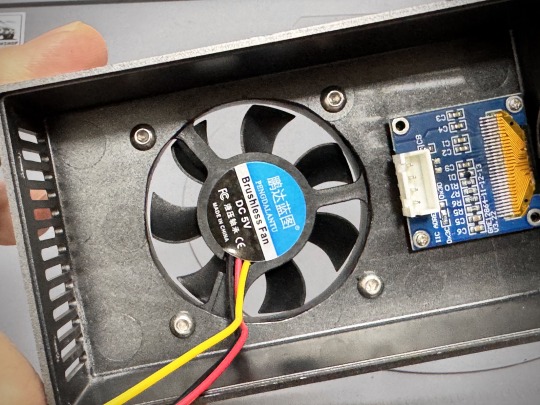
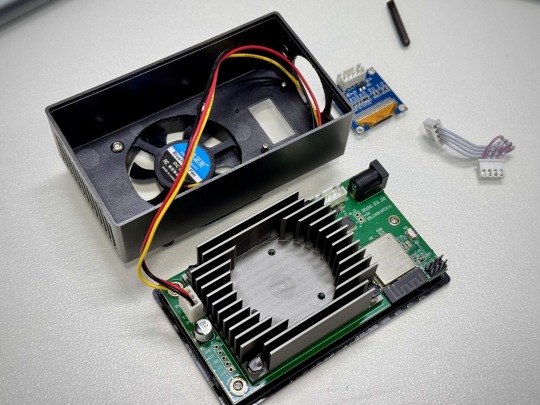
Next, we open up the Lucky Miner’s case. There are 3 screws holding the built-in fan to the heatsink. They are accessible between the fins of the fan. Unscrew them and disconnect the cable from the PCB.
Here, just for testing, I plugged in the replacement 5cm fan and ran it without the case on. The temperature was 11° C lower! Awesome!
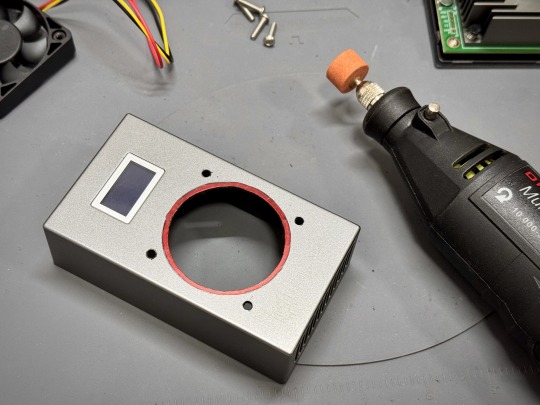
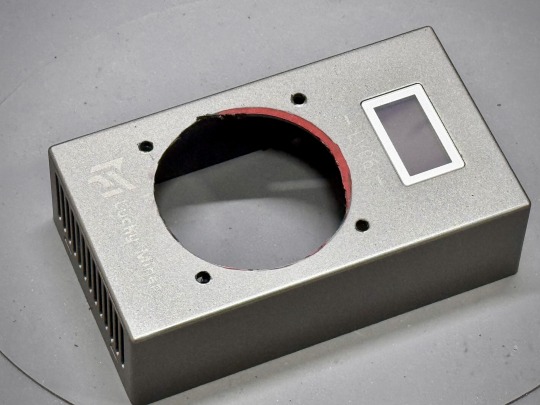
Now we can proceed to mod the case. I used a cutter to just cut the plastic grill off, followed by drilling 4 holes for the fan screws.

As you can see in the first photo below, the hole is just a bit too small for the fan. We don’t want the airflow to get disrupted. I used a marker pen to mark the area that needs to be filed down. I used a Dremel to make a quick job of this. Now we can go ahead and attach the fan to the top of the case.
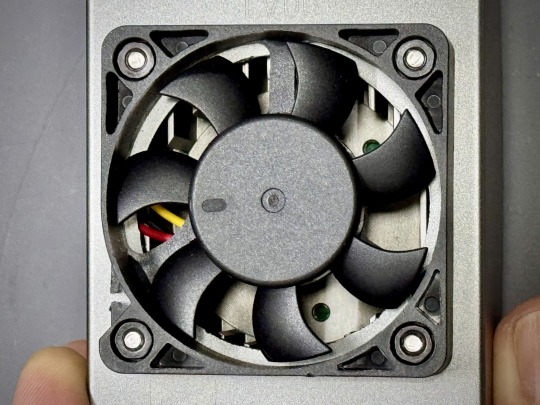
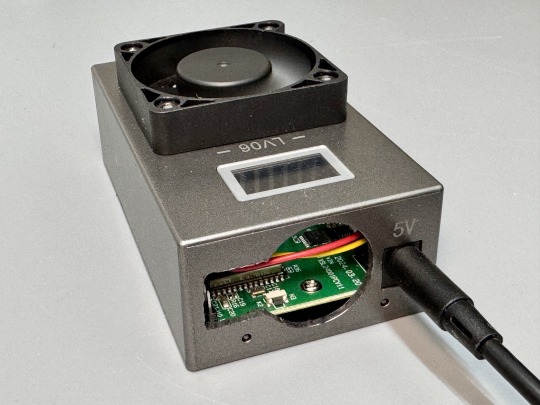
Lastly, connect the cables for the fan and display, and snap the cover back in place. That’s it! We’re done.

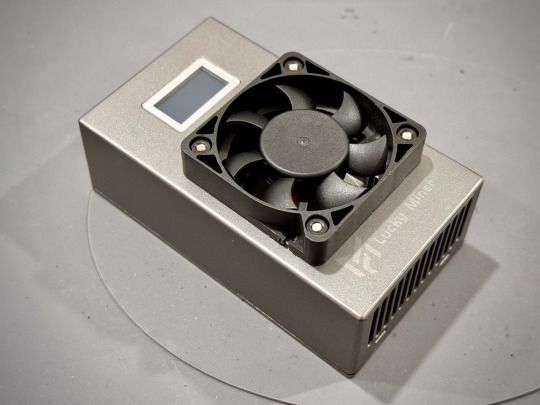
With the case back on, the temperature is around 50° C.
It’s not bad, but not as good as with the cover off. I guess there are insufficient ventilation holes to exhaust the hot air, so I decided to also cut off the round grill on one end, and cut a bigger hole with a Dremel and also also removed the display altogether, as the display connector is blocking the airflow too. Removing the display does not affect the function of the miner, no worries!
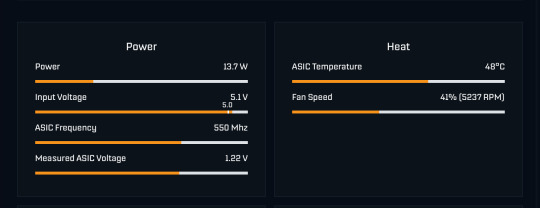
With all of that done. I was able to get the temperature down to about 48° C. This fan runs way quieter than the built-in fan.
Now that it runs much cooler, I pushed the frequency up to 575MHz and it only increases the temperature to about 49° C. It’s a simple mod, and I highly recommend it.
Important Update
The fan that I used in this mod didn't last very long. It started to get a bit noisy after just a week and there was a little oil leak. My mistake for using a cheap fan. Anyway, I decided to get a Sunon Maglev KDE0505PFV2 instead. It's also a 5cm fan that runs at 5V 0.8W. The only thing to note is that the power pins are reversed in the connector and I had to switch it before connecting it to the LV06. Here is the LV06 with the Sunon. Note that this fan is a bit noisier than the crappy fan I used earlier.

0 notes
Link
Solo Bitcoin Miner Strikes It Rich with Pocket-Sized Bitaxe A solo Bitcoin miner equipped with a compact Bitaxe machine successfully mined block 887,212, earning a potential reward of approximately $263,000. This achievement underscores the possi #Blockchain #Crypto
1 note
·
View note
Text
? #Mining ? The Future Of Home Bitcoin Mining Is Bright Perhaps the best way to decentralize the Bitcoin network is through home mining, and things are trending in the right direction. Yesterday, Solo Satoshi announced the Bitaxe Touch, the latest device in the world of home bitcoin mining. This new device will utilize the BM1370 ASIC chip from the Bitmain S21 Pro and will be able to reach a hashrate of up to 1.6 TH/s. It will also feature a touch scr...(read more) #Bitcoin #Bright #Future #Home #mining ?
0 notes
Text
Bitaxe: A Newcomer's Mining Choice

Cryptocurrency mining has always been perceived as a realm for tech-savvy enthusiasts and seasoned players. However, as the digital currency space evolves, new tools emerge that make the mining process more accessible to a broader audience. Bitaxe, a modern entrant in the crypto mining landscape, aims to change the status quo and position itself as the go-to choice for newcomers. With its innovative approach and user-centric features, particularly the groundbreaking "Bitaxe 1397," it promises a mining experience like no other.
1. Bitaxe: Bridging the Gap
Historically, the learning curve for mining has been steep. From setting up rigs, selecting the right software, to optimizing for efficiency, there were numerous hurdles for newcomers. Bitaxe, with its intuitive platform and user-focused tools, seeks to bridge this gap, enabling novices to step into the world of mining with ease.
2. Features Tailored for the Newbie Miner
a) User-Friendly Interface: Bitaxe understands the importance of first impressions. For someone new to mining, a complex interface can be intimidating. Bitaxe offers a clean, intuitive dashboard that makes navigating and understanding the mining process a breeze.
b) Comprehensive Tutorials: Bitaxe provides an extensive library of tutorials and guides. Whether it's setting up, choosing the right parameters, or troubleshooting, there's a resource available, ensuring that newcomers are never left in the dark.
c) Efficient Power Management: One of the primary concerns for new miners is the energy consumption associated with mining. Bitaxe addresses this with advanced algorithms that ensure optimal power usage without compromising on mining efficiency.
3. The Bitaxe 1397: A Game-Changer
Among the array of features that Bitaxe boasts, the Bitaxe 1397 stands out as a hallmark of innovation. This specialized mining hardware combines cutting-edge computational capabilities with energy-efficient design principles. The Bitaxe 1397 is:
Powerful: Tailored for both seasoned miners and newcomers, its processing capabilities ensure competitive hash rates.
Energy-Efficient: Designed with sustainability in mind, it optimizes power consumption, ensuring that mining doesn't result in exorbitant electricity bills for users.
Cool and Quiet: One of the gripes many have with traditional mining rigs is the heat generated and the noise from cooling fans. The Bitaxe 1397, with its advanced cooling solutions, runs cooler and quieter, making it ideal for home environments.
4. Community and Support
Bitaxe's commitment to newcomers doesn't end with its software and hardware offerings. They have nurtured a thriving community of miners, experts, and enthusiasts. New users can tap into this community for advice, tips, and best practices. Furthermore, Bitaxe offers robust customer support, ensuring that any issues or queries are addressed promptly.
Conclusion
Bitaxe, with its user-friendly approach and the unparalleled capabilities of the Bitaxe 1397, has reshaped the mining landscape, making it more inclusive and accessible. For newcomers looking to delve into the world of crypto mining, Bitaxe offers a seamless, efficient, and supportive entry point. As the crypto world continues to evolve, tools and platforms like Bitaxe will play a crucial role in ensuring that everyone, irrespective of their tech prowess, can be a part of the digital currency revolution.
1 note
·
View note
Text
While lacking in performance, micro Bitcoin mining devices should be seen as a stand against the Bitcoin ecosystem’s purportedly biggest flaw, its inventors argue.Micro Bitcoin mining devices — often open-source and pocket-sized — have been serving a niche part of the market, offering buyers a fully assembled device or a do-it-yourself-kit to mine Bitcoin (BTC) solo.Speaking to Cointelegraph, developers behind these kits admit that buyers won’t likely see much profit but argue that it’s important to fight the “secrecy and exclusivity” of the Bitcoin mining industry. One company, BitMaker, recently claimed that one could be made for as little as $3, offering an output of 50 kilohashes per second. BitMaker’s $3 50Kh/s portable miners. Source: BitMakerA spokesperson from BitMaker — a company working on micro miners since as early as June 2022 — argued that all the well-known Bitcoin ASIC mining rigs are closed-source, very much unlike Bitcoin’s source code. This has limited the manufacturing and supply of Bitcoin miners to commercialized entities, they said. “The bitcoin mining machine is arguably the most important piece of hardware in the bitcoin ecosystem — and they are all made in complete secrecy.”Data shows 35.4% of the Bitcoin hash rate comes from the United States, followed by Kazakhstan (18.1%), Russia (11.2%) and Canada (9.6%). U.S.-based Marathon Digital, Riot Blockchain and Singapore's Bitdeer Technologies Group are among the largest mining firms in the world.Skot, a builder of Bitaxe miners, shared a similar sentiment, explaining to Cointelegraph that open-sourcing the design enables much-needed transparency in the industry.“The mining industry has traditionally been treated in secrecy and exclusivity. The advent of these open-source projects serves to shed light on this often opaque area, making it more transparent and accessible to the public,” Skot explained.There is a growing trend of opensource ASIC-mining going on. ( See #NerdMiner , @DCentralTech , @skot9000 ,...) making it affordable once again and more decentralized. #Bitcoin is rife with innovation on all fronts. You only need to know where to look.— Dimitri-H (@Dimi_h) September 1, 2023 A Bitaxe spokesperson said the engineers behind these projects are open-sourcing documents detailing how to make a hashboard and other mining equipment without needing to rely on large-scale manufacturers:“This allows anyone who is interested to build their own miner, or multiple miners, thereby contributing, to some extent, to the decentralization of the system.”Skot, however, acknowledged that buyers shouldn’t expect to earn much Bitcoin right away. He said while Bitaxe engineers are working to make the miners more efficient, he also argued that the purpose of the portable miners isn’t about profit: “It's not necessarily about profit, it's about learning, understanding and in some cases being part of a community.”Skot also stressed that the portable miners weren’t built to compete with the commercialized players in the space but rather offer an opportunity for people to run a rig at home without needing to pay for a clunky, overheated and expensive mining rig.ESP-Miner & ESP32 SoC based #BitAxe & #Nerdminer are pivotal developments in Bitcoin mining. These free & open source projects developed by Bitcoin plebs like @skot9000 @BitMaker_ @Public_Pool_BTC & others, are laying the foundation for next-gen #Bitcoin mining hardware ⛏️ pic.twitter.com/FDBTi0PsG1— Altair Technology® ⛏️ (@altair_tech) August 30, 2023 Other small form-factor Bitcoin miners in the market include Bitmain AntRouter and Mars Lander. Meanwhile, innovators are also experimenting with how Bitcoin can be mined via mobile phones. Source
0 notes
Text
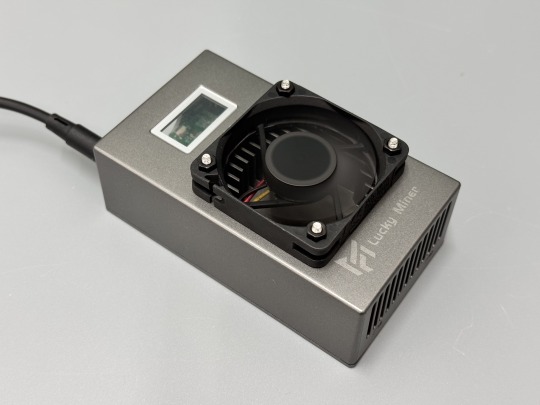
Great! This Bitaxe Gamma 601 is the perfect example of "small size but great functionality."


#Mining#Cryptocurrency#Blockchain#repair#Lottery#Bitaxe#Gamma#silencer#dissipation#BitcoinMing#tecnologia#tecnologiablockchain#support#cryptomining#miningpower#Hash#zeus
0 notes
Text
Great!
This #Bitaxe Gamma 601 is the perfect example of "small size but great functionality."
#Mining#Cryptocurrency#Blockchain#repair#Lottery#Bitaxe#Gamma#silencer#dissipation#BitcoinMing#tecnologia#tecnologiablockchain#support#cryptomining#miningpower#Hash#zeus
0 notes
Text
Bitaxe Gamma absichern: VPN statt unsicherer Portweiterleitung

Im letzten Beitrag Bitaxe Gamma: Datenzugriff von überall – ein Leitfaden habe ich dir gezeigt, wie ein Bitaxe via Portweiterleitung freigegeben werden kann. In diesem Beitrag soll es nun einen Schritt weiter gehen und ich zeige dir, wie du eine VPN-Verbindung einrichtest und du über diese auf dein Bitaxe zugreifen kannst. https://youtu.be/e0KTUtzgn8k Disclaimer: Obwohl die Nutzung einer VPN-Verbindung den Zugriff auf das Bitaxe Gamma erheblich sicherer macht, können Sicherheitsrisiken nicht vollständig ausgeschlossen werden. Angreifer könnten Schwachstellen im VPN-Protokoll oder in der verwendeten Hardware ausnutzen, insbesondere wenn diese nicht regelmäßig aktualisiert werden. Die VPN-Lösung bietet jedoch einen erheblich höheren Schutz als eine direkte Portweiterleitung auf HTTP 80, da sie den Zugriff verschlüsselt und für unautorisierte Nutzer deutlich erschwert. Regelmäßige Updates und starke Passwörter bleiben dennoch essenziell, um ein Höchstmaß an Sicherheit zu gewährleisten.
Was ist eine VPN-Verbindung?
Eine VPN-Verbindung (Virtual Private Network) ist eine Technologie, die eine verschlüsselte und sichere Verbindung zwischen deinem Gerät (z. B. Smartphone oder Computer) und einem entfernten Netzwerk herstellt. Mit einer VPN-Verbindung werden deine Daten durch einen „sicheren Tunnel“ geleitet, der vor Dritten geschützt ist. Sie verschleiert deine IP-Adresse und schützt dich vor Abhörversuchen, besonders in unsicheren Netzwerken wie öffentlichen WLANs. In deinem Heimnetzwerk ermöglicht ein VPN den sicheren Fernzugriff auf Geräte, als ob du direkt mit dem lokalen Netzwerk verbunden wärst. So wird verhindert, dass der Zugriff über ungesicherte Ports wie HTTP 80 erfolgt, was das Risiko von Cyberangriffen deutlich reduziert.
Einrichten einer VPN-Verbindung in der Fritz!Box
Für diesen Beitrag verwende ich meine Fritz!Box 7580 mit dem aktuellen OS 8.00. Auf der Seite IPSec-VPN zur FRITZ!Box unter Android einrichten findest du eine einfache Anleitung, wie du einen Benutzer einrichtest und eine VPN-Verbindung mit einem Smartphone aufbaust. Nachfolgend werde ich dir die Schritte jedoch genau erläutern (im oben verlinkten Video findest du dieses natürlich ebenso). Im ersten Schritt öffnen wir die Oberfläche der Fritz!Box und navigieren über Internet (1) > Freigaben (2) zum Reiter VPN(IPSec) (3). Dort wählen wir die Schaltfläche VPN-Verbindung hinzufügen (4).

Fritz!Box - Einrichten einer VPN-Verbindung - Step 1 Im neuen Dialog hast du verschiedene Optionen, wie die VPN-Verbindung genutzt werden kann. Zum einen kannst du einen Benutzer einrichten, der über die VPN-Verbindung auf das Netzwerk zugreifen darf (siehe Markierung 5). Diese Option werden wir in diesem Leitfaden verwenden, da sie ideal für den Fernzugriff einzelner Geräte ist. Darüber hinaus besteht die Möglichkeit, Netzwerke miteinander zu verbinden. Hierbei kannst du beispielsweise zwei Fritz!Boxen miteinander verknüpfen, um ein gemeinsames Netzwerk zu schaffen, oder ein bestehendes Unternehmensnetzwerk in die Verbindung einbinden. Diese Variante ist besonders nützlich, um größere Netzwerke oder Standorte miteinander zu verbinden.

Fritz!Box - Einrichten einer VPN-Verbindung - Step 2 Zuerst wählen wir den Punkt „VPN-Zugang für einen FRITZ!Box-Benutzer einrichten“ aus (siehe Markierung 5) und klicken anschließend auf die Schaltfläche „Weiter“ (6). Im folgenden Schritt richten wir einen neuen Benutzer ein, indem wir auf die Schaltfläche „Benutzer hinzufügen“ (7) klicken. Im nächsten Dialog vergeben wir einen Benutzernamen (8) und ein Kennwort (9). Weiter unten setzen wir zusätzlich den Haken bei „VPN“ (10), um die VPN-Funktion für diesen Benutzer zu aktivieren, und bestätigen die Eingabe mit einem Klick auf „Übernehmen“ (11). Um die Einrichtung des neuen Benutzers abzuschließen, wird die Bestätigung durch Drücken einer Taste an der Fritz!Box erforderlich. Hierfür kann beispielsweise die WLAN-Taste verwendet werden. Sobald die Bestätigung erfolgt ist, können wir den Einrichtungsassistenten durch einen Klick auf „OK“ (12) verlassen. Damit ist der neue Benutzer erfolgreich eingerichtet und für den VPN-Zugriff bereit.


Einrichten von MyFRITZ! für eine öffentliche Adresse der Fritz!Box
Damit wir eine öffentliche Adresse bekommen, müssen wir MyFRITZ! einrichten. Dieser Service ist kostenfrei und du benötigst lediglich eine gültige E-Mail-Adresse. Navigieren wir zunächst über Internet (1) > MyFRIZT! Konto (2). In diesem Dialog geben wir eine gültige E-Mail-Adresse ein (3) und bestätigen diese mit der Schaltfläche Übernehmen (4). Wir erhalten nun eine Bestätigungsmail, in welcher wir einen Link finden, welchen wir anklicken müssen, damit dieses Konto aktiv wird.


Wenn das MyFRITZ! Konto eingerichtet wurde, dann erhalten wir eine Adresse, mit welcher wir aus dem Internet direkt auf unsere Fritz!Box zugreifen können.

MyFRITZ! Adresse
Einrichten einer VPN-Verbindung unter Android
Damit wir mit dem Handy auf das lokale Fritz!Box Netzwerk zugreifen können, haben wir jetzt einen Benutzer für die VPN-Verbindung sowie das MyFRITZ! Konto eingerichtet. Damit haben wir die Vorbereitung geschaffen, mit unterschiedlichen Geräten auf das lokale Netzwerk zugreifen zu können. Zugangsdaten zur Fritz!Box Wir haben dem neuen Benutzer der Fritz!Box ein Passwort vergeben, dieses ist jedoch nicht das Passwort für die VPN-Verbindung. Um die Zugangsdaten zur Fritz!Box zu ermitteln, navigieren wir über Internet Freigaben zum Reiter VPN (IPSec) und wählen dort den Link "VPN Einstellungen" (1). Im neuen Dialog werden nun die Daten zur Fritz!Box angezeigt, welche wir nachfolgend benötigen werden.


VPN-Verbindung unter Android einrichten Für diesen Beitrag verwende ich mein Redmi Note 13 Pro mit Android 14. Wenn du ein anderes Android-Gerät hast, kann es ggf. unterschiedliche Ansichten geben, jedoch sollte der Weg sehr ähnlich sein. In den Einstellungen suchen wir zunächst nach "vpn" dort wählen wir VPN aus.


Im neuen Dialog tippen wir unten auf "VPN hinzufügen". Die zuvor ermittelten Zugangsdaten geben wir im neuen Dialog ein und bestätigen diesen Dialog mit dem Haken oben rechts.

VPN-Einstellungen


Wir sollten jetzt auf der Übersichtsseite der VPN-Verbindungen sein. Der Haken an der Verbindung bedeutet nicht das eine Verbindung existiert, damit wir die VPN-Verbindung aufbauen müssen wir den Schieberegler bei VPN nach rechts bewegen. Wenn die VPN-Verbindung erfolgreich aufgebaut wurde, dann wird dieses in dem blauen Feld angezeigt und oben in der Leiste sollte ein VPN Symbol erscheinen. Da wir jetzt mit dem Netzwerk verbunden sind, können wir ganz einfach die Adresse vom Bitaxe Gamma im Browser eingeben und gelangen wieder zum AxeOS.

Zugriff auf den Bitaxe via VPN
Fazit & Abschluss
Ich habe dir hier nun gezeigt, wie eine VPN-Verbindung auf der Fritz!Box und unter Android eingerichtet wird und du damit auf deine Netzwerkgeräte wie dem Bitaxe Gamma zugreifen kannst. Wenn du ein Microsoft Windows 11 PC hast und eine VPN-Verbindung einrichten möchtest, dann empfehle ich dir die Seite WireGuard-VPN zur FRITZ!Box am Computer einrichten, wo dieses sehr ausführlich erläutert wird. Read the full article
0 notes
Text
Vendor has been paid in full, but NBR is still without a successful online tax return filing system
Vendor has been paid in full, but NBR is still without a successful online tax return filing system
[ad_1]
Everything was going well for the online tax return filing project until the end of 2019.
The first online tax return filing scheme — Bangladesh Integrated Tax Administration System (BITAX) — completed on June 2018 and the National Board of Revenue’s agreement with the vendor expired on 29 November 2019.
Just a month later, the first blow came from the then NBR Chairman Md Mosharraf…
View On WordPress
0 notes