#Building cost estimating
Explore tagged Tumblr posts
Visit Tumblr Blog
Explore Tumblr blogs with no restrictions, modern design and the best experience.
Last Seen Tumblr Blogs


Fun Fact
The “We are the 99%” Tumblr blog became the slogan for the Occupy Wall Street movement.
Text
Integrating Project Management Tools with a Cost Estimating Service
In the fast-paced and complex world of construction, infrastructure, and development projects, integration is key to ensuring smooth operations and successful outcomes. One of the most valuable integrations is between project management tools and a cost estimating service. These two functions, when combined effectively, can significantly improve project tracking, cost management, and overall efficiency.
Project management tools are designed to help organize and manage tasks, resources, timelines, and communication across teams. On the other hand, a cost estimating service focuses on providing accurate and detailed cost predictions to ensure projects stay within budget. When these two systems work together, they streamline workflows and provide stakeholders with a comprehensive understanding of both the project's progress and its financial standing.
Understanding Project Management Tools
Project management tools are software platforms designed to aid in planning, scheduling, resource allocation, and collaboration within a project team. Popular tools like Microsoft Project, Trello, Asana, and Primavera allow project managers to assign tasks, monitor progress, track milestones, and communicate with the team.
These tools can handle a wide range of activities, including:
Scheduling and Timelines: Ensuring that the project is completed on time by monitoring progress against set milestones.
Task Allocation: Assigning tasks and resources to the appropriate team members or departments to maintain workflow efficiency.
Collaboration: Providing a platform for team members to communicate, share documents, and report progress.
Risk Management: Identifying and mitigating potential risks by monitoring project variables.
Integrating these tools with a cost estimating service enhances the overall project management process.
How Integration Benefits Cost Estimating
When integrated with project management tools, a cost estimating service can contribute in several ways. The most significant benefits are in improving cost control, enhancing data accuracy, and promoting better decision-making throughout the project lifecycle.
Real-Time Cost Tracking
One of the most significant advantages of integrating cost estimating services with project management tools is real-time cost tracking. Construction costs, labor wages, and material prices can fluctuate over time due to various factors, such as market conditions or unexpected changes in scope. By connecting the estimating service to project management software, estimators and project managers can continuously track how the actual costs align with initial predictions.
For instance, as materials are purchased or labor hours are logged, the cost estimating service can update the overall budget, providing real-time feedback on the project's financial health. This live data ensures that project managers can make informed decisions if costs start to exceed estimates, allowing them to implement corrective measures before things spiral out of control.
Improved Budget Forecasting and Allocation
By integrating project management tools with cost estimating services, project managers can improve budget forecasting and allocation. When estimating services are integrated with scheduling tools, they can adjust cost predictions based on time constraints and resource availability.
For example, if a task takes longer than anticipated due to resource limitations or delays, the cost estimate can be updated in real time to reflect the impact on the budget. This allows the project manager to reallocate resources efficiently, ensuring that the project remains within the approved budget.
Enhanced Collaboration Across Stakeholders
Collaboration between all stakeholders—clients, contractors, suppliers, and team members—is critical for project success. By integrating project management tools with cost estimating services, all team members can access a centralized platform where they can see both the progress of the project and its financial status.
This transparency fosters greater communication and ensures that everyone is working from the same set of data. For instance, when a design change is proposed, the cost estimator can update the estimated cost immediately, and project managers can assess the impact of that change on the schedule and budget. With everyone on the same page, changes can be reviewed and approved quickly, minimizing delays.
Efficient Resource Allocation
Project management tools help in tracking the availability and usage of resources, including labor, equipment, and materials. When this information is integrated with cost estimating services, project managers can assess how resource utilization impacts the project’s overall costs.
For example, if a certain piece of equipment is underutilized, it may be more cost-effective to reallocate it to another task rather than renting new equipment. Cost estimating services can factor in these changes to provide up-to-date financial forecasts. The integration of resource and cost tracking allows project managers to allocate resources more efficiently, ensuring cost-effective execution of the project.
Mitigating Risks and Preventing Overruns
Risk management is a vital component of any project. By integrating cost estimating services with project management tools, project managers can better track risks related to costs and timelines. If the cost estimates start to deviate from the budget, these tools can flag the issue in real time, allowing project teams to take corrective actions.
Additionally, these systems can help prevent cost overruns by identifying potential risks early. For instance, if a specific material's cost is projected to rise, the system can notify the team to explore alternative options or adjust the budget accordingly. Being able to foresee such issues helps mitigate potential delays or unexpected expenses before they arise.
Automated Reporting and Documentation
Tracking progress and costs through multiple tools manually can be time-consuming and error-prone. Integrating project management software with a cost estimating service automates many of these processes. This automation ensures that cost updates, project timelines, and resource allocations are documented consistently.
The automated systems generate real-time reports on various aspects of the project, providing stakeholders with easy-to-understand and accurate data. These reports help ensure that all parties are aligned on the financial and operational status of the project, making it easier to track the project’s performance and make adjustments as needed.
Choosing the Right Integration Solution
For seamless integration, it is essential to choose the right project management tools and cost estimating services that work well together. Many modern project management tools and cost estimating platforms offer built-in integration options, which allows them to share data in real-time.
Project managers should consider the following factors when choosing the best integration solution:
Compatibility: Ensure that the estimating software can integrate with your chosen project management tool.
Scalability: Choose a solution that can scale as the project grows in size and complexity.
User-Friendliness: The software should be intuitive, enabling easy access to real-time data without significant training.
Customization: The solution should be adaptable to meet the specific needs of the project and the team.
Conclusion
The integration of project management tools with a cost estimating service is a game-changer for managing construction and development projects. This combination allows for real-time tracking of costs, improved resource allocation, better budget forecasting, and enhanced collaboration across teams. With seamless integration, stakeholders can stay on the same page, ensuring that the project stays on track both financially and operationally. The ability to predict and respond to changes in cost or schedule in real time can help mitigate risks and prevent overruns, leading to more successful project outcomes.
#Construction estimating services#Construction project management#Construction cost forecasting#Construction budgeting tools#Building cost estimating#Construction scheduling software#Cost control in construction#Construction material costs#Project cost management#Construction labor costs#Construction bid estimating#Construction cost analysis#Construction cost planning#Pre-construction cost estimating#Residential construction estimates#Commercial construction estimating#Construction cost estimation software#Construction risk management#Construction change orders#Construction budgeting process#Cost escalation in construction#Construction cost overrun prevention#Construction financial management#Construction project costs breakdown#Construction contract management#Construction cost reconciliation#Construction project estimation software#Estimating construction timelines#Construction project bidding#Cost optimization in construction
0 notes
Link
Our team at OptiBuild Services can offer you advice on tender responses, and provide you with building takeoff and construction cost estimations. Learn more today by giving us a call.
0 notes
Link
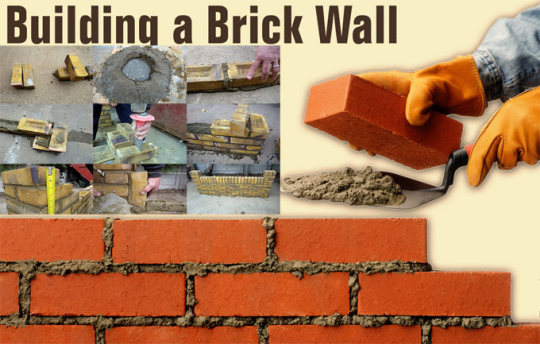
Bricklaying is treated as one of the most vital construction skills specifically when the structural walls are constructed.
In this useful construction article, you will learn the step-by-step methods to construct a garden wall. The steps involve setting out the footprint and maintaining level and square to blend the mortar, bedding the bricks and finishing joints efficiently.
Prior to start the project, find out the number of necessary bricks. Standard types are 215mm x 102.5mm x 65mm.
To obtain a perfect result, there should be 10mm mortar bed. Now, enter your brick size as 225mm x 102.5mm x 75mm for standard products.
The following equipments will be required for this purpose :-
1. Brick trowel 2. Old board 3. Tape measure 4. Spirit level 5. Brick/string line 6. Shovel 7. Club hammer 8. Bolster 9. Stiff brush
Step 1: As soon as the foundation is set properly, arrange the bricks at both ends of the wall where the pillars will be constructed. With the help of the string line, create a straight guideline at brick height among the two exterior bricks.
Step 2: Stack five shovels filled up with sand and one of cement on an old board. Turn shovel for being blended with a uniform color. Create a central hollow, pour in water and mix. Reiterate the steps unless a smooth, creamy texture is produced that’s wet but not excessively loose.
Step 3: Place a 1-2cm mortar bed along the string line. Start from one end, place the first brick and tap a little to ‘bed in’. ‘Butter up’ one end of the next brick with mortar and abut it to the first. Reiterate with string line as a guide.
Step 4: At the point where the pillars should be located, arrange a brick side-on to the end of the wall. While constructing the wall, each successive course of pillar bricks should be placed in the opposite direction.
Step 5: While constructing pillars, at specific courses, it is required to place half-bricks. To create a cut, arrange the brick on its side, trace the bolster at the split point and strike the head tightly by a club hammer. It should rupture neatly first time.
To get more details, go through the following link self-build.co.uk
#Retaining Wall#Laying Brick Wall#How to Build Brick Wall#Building Brick Steps#Building Cost Estimating#Different Mixes of Concrete
0 notes
Link
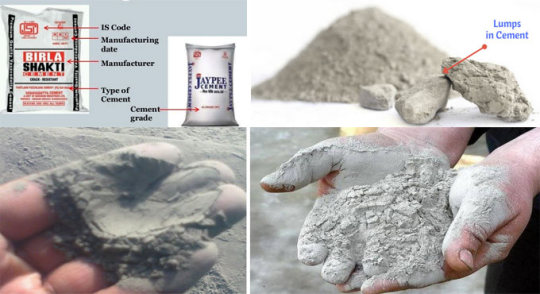
The quality of cement should be examined properly prior to utilize it in concrete, plastering or any other purpose at construction work site.
For quality checking, initial inspection is very crucial. It may not always feasible to check all the engineering qualities required for utilizing cement on site but the quality of cement can be checked roughly through some recognized field test in the construction site. But the other crucial tests should be performed in laboratories.
Field Tests to verify the quality of Cement
1. Date of Packing Cement: Before purchasing cement, make proper investigation regarding the date of manufacture provided on the cement bags. It is very crucial since the strength of cement is decreased with age.
2. Colour: The color of cement should be consistent. Usually, the colour of cement remains grey with a light greenish shade. The colour of cement symbolizes surplus lime or clay and the degree of burning.
3. Rubbing: Take a pinch of cement among fingers and rub it, It should appear smooth at the time of rubbing. If it feels rough, there is adulteration with sand.
4. Temperature Test of Cement: Push your hand into the cement bag and it should feel cool. It means that there is no hydration reaction in the bag.
5. Float Test: Provide a small quantity of cement in a bucket of water. It should submerge and should not float on the surface.
6. Smell Test: Select a bit of cement and smell it. If there is excessive pounded clay and silt as an adulterant in the cement, the paste will provide an earthy smell.
7. Existence of Lumps: Open the bag and check that no lumps exist in the bag. It will make sure that no setting has occured.
8. Shape Test: Select 100g of cement and make a stiff paste. Make a cake with sharp edges and placed on the glass plate. Submerge this plate in water. Verify that the shape should remain as it is at the time of settling. It should have the capability for being set and obtained strength. Cement has the capacity of being set under water also and for this reason it is known as ‘Hydraulic Cement’.
9. Strength of Cement Test: A block of cement 25 mm*25 mm and 200 mm long is arranged and absorbed for 7 days in water. It is then set on supports 15000 mm apart and it is loaded with a weight of 340 N. The block should not demonstrate any sign of failure.
0 notes
Link
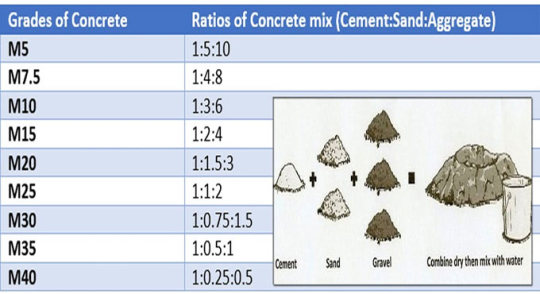
Mix Design refers to the method of choosing perfect materials of concrete and finding out their proportionate ratios with the purpose of developing concrete with minimum specific strength and stability as reasonable as possible.
To form concrete maintaining desired strength and properties, choosing of components and their quantity should be determined and it is defined as concrete mix design.
The site engineer should provide following information at the time of delivering material for mix design to the mix design laboratory :-
A) Grade of concrete (the characteristic strength) B) Necessary workability regarding slump C) Other properties (if necessary)
Retardation of initial set (to get rid of cold joints for longer leads or ready mix concrete)
Slump retention (for ready mix concrete)
Pumpability (for ready mix concrete)
Expedition of strength (in case of precast members or where initial deshuttering is required)
Flexural strength (generally necessary concrete pavements)
Determine whether condition of exposure to concrete is mild, moderately severe or very severe. Exact analysis of soil should be made to determine existence of sulphates & chlorides for any doubt.
The degree of control at construction site is based on the following factors :-
Batching – Weigh batching/volume batching
Type of aggregates – Whether the type of aggregate will be mix graded or 10 mm, 20 mm aggregates should be utilized independently.
Testing of concrete – Whether casting & testing of concrete cubes should be performed at construction site on regular basis.
Source of aggregate – Whether sources of sand and aggregate are standard or should be altered regularly.
Supervision – Whether skilled staffs are there to superintendent concreting work and make require changes like rectification of moisture in sand and alteration in material properties.
Site laboratory – Whether the site will contain required laboratory tools like sieves, weighing balance etc. for the verification of material properties.
#Building Cost Estimating#Concreteworks#Plastic Concrete#Mix Design Software#Download Mix Design#Type of Concrete Mix
0 notes
Link
A structure may collapse or becomes defective because of substandard quality control. Re-construction becomes necessary and facility operations get damaged due to even small defects.
The construction cost is raised and construction delays occur. Also, there may be personal injuries or fatalities because of collapsing of structure.
Accidents throughout the construction process can also lead to personal injuries and greater costs. Indirect costs related to insurance, inspection and regulation are also raised significantly because of these inflated direct costs.
A knowledgeable project manager is liable for completing the construction work in scheduled time and he ensures that no major accidents take place on the project.
As with cost control, the most vital decisions concerning the quality of a completed facility are taken throughout the design and planning phases in spite of construction.
It is throughout these initial phases that component configurations, material specifications and functional performance are settled efficiently. Quality control throughout construction mainly comprises of insuring conformance to these original design and planning decisions.
Besides, unanticipated circumstances, inaccurate design decisions or modifications required by an owner in the facility function will involve reassessment of design decisions throughout the course of construction. These modifications are caused by the concern for quality, they characterize occasions for re-design with all the accompanying objectives and hindrances.
Some designs are based on the reasonable and perfect decision making throughout the construction process itself. As for instance, some tunneling methods will allow taking decisions concerning the amount of shoring essential at various locations on the basis of inspection of soil conditions throughout the tunneling process. Since such decisions are taken on the basis of superior information about actual site conditions, the facility design may be economical as a result.
By giving emphasis on conformance as the measure of quality throughout the construction process, the specification of quality requirements in the design and contract documentation becomes significantly vital. Quality requirements should be concise and valid, so that all the project stakeholders can recognize the requirements for conformance.
Safety during the construction project is also a great concern for the decisions taken throughout the planning and design phase. Some designs or construction plans are indigenously critical and hazardous for execution, whereas other equivalent plans may significantly lessen the chance of accidents. As for instance, clear segregation of traffic from construction zones throughout roadway rehabilitation can considerably minimize the chance of accidental collisions. Besides, safety is mostly based on education, vigilance and cooperation all through the construction process. Proper alert should be sent to the workers repeatedly to get rid of accidents and refrain from taking nonessential risks.

#Quality Control#Quality Assurance#Quality Inspection#Building Cost Estimating#Construction Civil#Building Construction Of
0 notes
Link
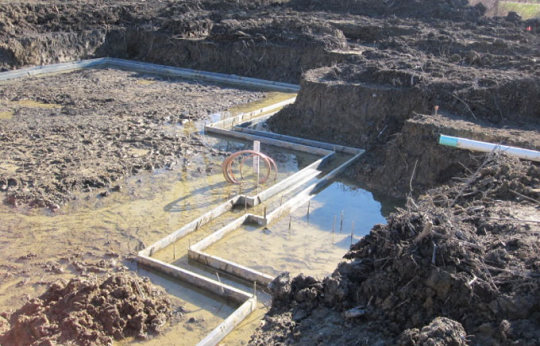
The foundations should remain as shallow as possible, in conformity with climatic effects and strength of the surface soil; specifically in waterlogged ground.
For large underground structure, shoring work design details should be perfectly defined. The structure should be considerably inflexible.
Foundation design should be inexpensive & supported with updated technology to curtail piling cost. Ground treatment work should be carried on consequently.
Designers should be well versed with the presumptions provided in design, the changeability of ground conditions, the occasional in-applicability of refined soil analyses and the feasibiity of construction.
Soil investigation report should be prepared by an experienced Geo-technical Engineer. The assessment report should comprise of all essential data.
The construction on ground properties provides various impacts like vibration from piling, damage of ground due to excavation in unfavorable weather conditions, elimination of overburden, periodical change in the water-table, compaction of the ground by construction plant.
Impact of unstable shape, length and inflexibility of the foundation, and the requirement for movement and settlement joints.
After-effects on completed foundations concerning sulfate attack on concrete, ground movements because of frost heave, shrinkable clay, and the impacts of trees; also alterations in local environment, e.g. new construction, re-routing of heavy traffic, installation of plant in adjacent factories creating impact and vibration.
Fast but expensive construction may be more economic than low-cost but slow construction to clients needing quick return on capital investment.
Impact of new foundation loading on current adjacent structures.

#Building Cost Estimating#Wall Construction Work#Concrete Foundation Wall#Foundation Design#House Foundation Construction
0 notes
Link
The adjoining buildings are greatly impacted with trench excavation and lead to settlement. This construction article briefly explains how to gauge the impact of trench excavation on adjoining buildings with rule of thumb.
The two factors are mainly responsible for impact of trench excavation on the buildings:
• Soil relaxation because of excavation • Diminishing of groundwater owning to excavation
Soil relaxation because of excavation
When a trench is excavated adjoining a building, soil relaxation and subsequent settlement of the building is increased.
So, there should be sufficient support for the trench to resist soil relaxation. On the other hand, excavate the trench far from the foundation but it will not be a legitimate option always.
Besides, a rule of thumb is applied to examine whether the trench excavation affects the nearby building or not. Draw a line with 2H:1V from the bottom of the foundation. If the trench remains within this line, then engineer shall look forward to soil relaxation and eventual settlement of building foundation.
Lastly, if the soil at job site comprises of loose sandy soil, then draw the line with 3H:1V instead of 2H:1V.
Diminishing of Groundwater due to excavation: Generally, groundwater proceeds and seeps into the excavation from the adjacent areas of the trench. It will reduce the level of ground water in the trench vicinity area. Effective stresses are raised due to groundwater lowering and accordingly the foundation experiences settlement.
Last but not least, diminishing ground water raises effective stress in clay layer and higher effective stress leads to foundation settlement.
#Building Cost Estimating#Excavation Trench#Excavation Wall#Construction Excavation#Building Excavation#Construction Trench
0 notes
Link
Setting survey process is applied to set out the exact position of a projected structure inside the legal boundaries of a plot of land.
The objective of setting out is to set out perfect position & levels of building lines and road alignments for a projected structure as per construction plans by applying different techniques and instruments.
This type of survey is very vital while going to set up any type of construction work.
Generally, a set-out survey comprises of the process for transforming a building design onto the land itself in order that the builders can abide by the process throughout construction. Throughout the process, major points are set up and markers are applied for the progression of the building process and maintain perfectness.
For large scale projects like high rise buildings and developments, multiple set-out surveys are required as the construction advances. This type of survey is mainly undertaken for the earthworks, roads, car parks, sewerage, water and the actual buildings themselves.
Methods of Setting Out Survey
1. Setting out buildings by coordinates 2. Setting out with theodolite and level 3. Examining verticality
4. Setting out and alignment in steel framed buildings 5. Alignment and verticality in form work 6. Control and computation for route surveying
Setting Out Building by Coordinates
A building is set out by adopting referencing from an already established baseline. An asymmetrical building or a building with complicated geometry can also be established by applying the equivalent process. For each corner of the building, a grid line is set up from the baseline.
Examine Verticality - The verticality of points in a building is examined with the following surveying instruments:
1. Plumb Bob (For buildings less than 20m in height) 2. Optical Plummet (A transparent plastic sheet is used as a target for checking verticality of tall buildings) 3. Theodolite
Setting out Survey works also contains the following :-
Calculations and setting out Methods for:
1. Simple Circular Curves 2. Compound Curves 3. Reverse curves 4. Transition curves 5. Vertical curves
To get more details, go through the following video tutorial
youtube
#Building Cost Estimating#Boundary Survey#Land Surveying#Surveying Equipment#Civil Surveying#Construction Survey
0 notes
Link
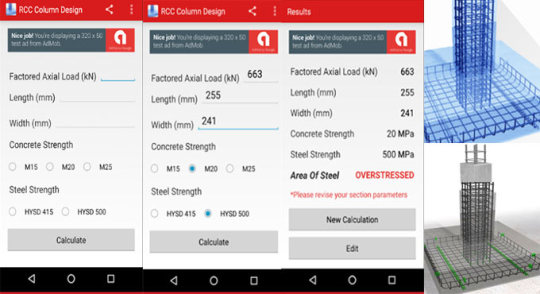
RCC Column Design is an exclusive app for civil and structural engineers. This app is available in google play store. It can only work in windows platform.
The app is very user-friendly. There are several fields in the app which range from Factored Axial Load (kN), Length (mm), Width (mm), Concrete Strength (M15, M20 and M25), Steel Strength (HYSD 415, HYSD 500).
Just enter the values in these fields and click on calculate button to get the desired values.
This app is designed on the basis of the Limit State Method with adherence to Indian standard code IS 456:2000. This app takes into account the axial load on a column to recommend a secure design depending on input of column size, concrete strength and steel strength. The app is also very useful for Uniaxial and biaxial bendings.
This app can design a rectangular slender RCC column that contains standard height. It works out necessary reinforcement for a specified axial load for the assumed inputs.
This app is developed for educational purposes only. The answers should be double checked manually.
To download the app, click on the following link play.google.com
#Building Cost Estimating#Construction estimating sheets#retaining walls#Concrete Calculator#Construction Cost Calculator
0 notes
Link
This construction video tutorial sifts through some vital factors which should be abided by a civil engineer to apply them in the jobsite.
The factors are discussed in below :-
Compressive strength of bricks should be 3.5 N/mm2
Water immersion of bricks should not surpass 15%
Free fall of concrete is permissible up to 1.50 m
Lowest thickness of slab is 125 mm
Longitudinal reinforcement should not be under 0.8% and over 6% of gross C/S
Lowest bars required for square column is 4 Nos and for circular column is 6 Nos
If the bars contain diameter over 36 mm., lapping is not permissible
Compressive strength of bricks is 3.5 N/mm2
Earthwork excavation toward basement over 3 m should remain in stepped form
Cement should be preserved in dry places on a raised platform roughly 200 mm
Electrical conduits should not be set in column
For more information, watch the following construction video.

#Building Cost Estimating#Construction Jobs#Electrical Estimating#Construction Estimate#Civil Engineers#Construction Civil
0 notes
Link
Suppose the proportion of nominal mix is 1:2:4 (one part cement, 2 part sand and 4 part aggregate)
Wastage of cement is taken as 2% Output of mix is provided as 67%.
For 1 cum output, the requirement of dry mix is 1/0.67 = 1.49 say 1.50 cum. After including the wastage (2%), the output will be (1.50 + 0.02) = 1.52 cum. Volume of cement = (cement/cement+sand+aggregate) × Total material
= (1/1+2+4) × 1.52 =0.2171 cum The density of cement is 1440 kg/cum and Weight of 1 bag cement = 50 kg.
So, volume of 1 bag cement = 50/1440 =0.0347 cum. No. of cement bags essential in 1 cubic meter = 0.2171/0.0347 = 6.25 bags. The above formula can be utilized for measuring cement for other nominal mixes.
To get more details, watch the following video tutorial.
youtube
#Building Cost Estimating#Concrete Cubic Meter#Cement Concrete Ratio#Bag Cement#Calculation Concrete Mix
0 notes