#CameraButton
Explore tagged Tumblr posts
Visit Tumblr Blog
Explore Tumblr blogs with no restrictions, modern design and the best experience.
Last Seen Tumblr Blogs


Fun Fact
Total funding amounts to $125.3M.
Text
Nothing Phone 3a Teaser Hints at iPhone-like Camera Button Design
The upcoming Nothing Phone 3a may introduce a fresh design element that fans of iPhone's camera controls will find familiar. A new teaser has suggested that the phone could feature a camera button reminiscent of Apple’s iconic shutter button, offering a more user-friendly and intuitive way to capture photos.

A Camera Button Inspired by iPhone
Nothing, the innovative tech brand founded by Carl Pei, has been known for pushing boundaries with its unique designs. Now, it seems the company is drawing inspiration from Apple’s simplicity and usability, incorporating an iPhone-like camera button into the Nothing Phone 3a.
This new feature is expected to make taking photos even easier, with a dedicated camera button that offers quick access to the camera app, similar to what iPhone users have enjoyed for years. While the specifics of the button’s functionality haven’t been fully revealed, early teasers suggest it will enhance the user experience by allowing one-click access to the camera, speeding up the process of capturing moments.
What We Know So Far
The teaser, which was shared across Nothing’s official social channels, hints at an evolution of their design philosophy. The company is clearly placing a strong emphasis on usability, with the camera button serving as a standout feature in the Nothing Phone 3a’s interface. If the feature does make it to the final release, it will be a significant design departure from other Android devices, giving Nothing a unique edge in the competitive smartphone market.
While we’re still waiting for more details, this teaser indicates that the Nothing Phone 3a will continue the brand’s trend of combining minimalist aesthetics with functional design. For fans of Nothing’s previous phones, the addition of a dedicated camera button could mark a major leap forward in simplifying the photography experience.
Could This Be a Game Changer for Android Devices?
The camera button feature could be a game changer for Android users who appreciate the ease and convenience offered by iPhone’s well-known design. By introducing this element into the Nothing Phone 3a, the company is demonstrating that it is committed to enhancing the overall user experience, not just with performance, but with intuitive design choices.
It’s also worth noting that Nothing has been one of the most exciting new entrants in the smartphone market, known for creating devices that combine cutting-edge technology with aesthetic appeal. If the Nothing Phone 3a does indeed feature an iPhone-like camera button, it could set the stage for more Android manufacturers to adopt similar features in future designs.
Looking Ahead
The Nothing Phone 3a is shaping up to be an exciting release, and as more teasers emerge, we’ll learn whether the iPhone-inspired camera button is just the beginning of what could be a groundbreaking phone for Nothing fans. Stay tuned for more updates as we inch closer to the official unveiling of the Nothing Phone 3a.
#NothingPhone3a#Nothing#CameraButton#SmartphoneDesign#AndroidInnovation#TechTeasers#iPhone#AndroidCamera#TechTrends#SmartphoneNews#NothingTech#CarlPei
0 notes
Text
ill make a blog for selfies @camerabutton
1 note
·
View note
Text
👉🏻@camerabutton here
posts 50 selfies in a row of barely different camera angles and grts banned for spam
3 notes
·
View notes
Text
Best dash cam 2018: 10 car-ready cameras for peace of mind
It's never a bad idea to have a dash cam mounted in your car - you never know when you'll need footage from your windshield.

Finding the best dash cam in 2018 can feel overwhelming; there are so many models out there, and many companies make more than one.
But, once you find the best dash cam for you, it can be one of the most crucial bits of tech you own, coming in handy in the event of an accident, or in case something really amazing happens on the road that helps you become YouTube famous.
We've sifted through some of the top dash cams to nail down the very best dash cameras for 2018. It's important to point out that dash cams are much more than GoPros mounted on your car's dashboard; these are car-ready cameras that perform some critical functions and can even help you save time and money that would be better spent going back into your vehicle.
Whether used to provide evidence to your insurance company or help you avoid paying for a crash-for-cash scheme, dash cams provide some peace of mind wherever your journey takes you.
Don't get lost with the best sat navs of 2018
Best dash cam: what to look for
Generally the best dash cams have similar technology to one another, and for the most part mount somewhere along a car's front windscreen, or windshield. Of course, wherever you place your dash cam must not block your view of the road.
Dash cams record smaller snippets of footage, usually in increments of one to two minutes at a time. The cameras continually record over the oldest clip in order to keep the memory card from filling up as well.
And while older models typically required the user to manually save or tag the appropriate clip in the event of an accident, new G-Sensor-based incident detection technology has taken over, and now takes care of this automatically.
There are also dash cams that boast additional features that, just like any other technology, see the price increase
There are also dash cams that boast additional features that, just like any other technology, see the price increase.
These extra features can include multiple lenses for front- and rear-facing coverage, improved sensor and image quality (HD recording, for example), night vision, built-in Wi-Fi for easy file transfer and numerous parking modes.
These modes use a time-lapse feature as a surveillance function to capture details of those irksome car park prangs when you're off running errands.
Whenever we get a new dash cam review in, we'll update this list with more of the best we've tested. Keep reading to find out which rank among the best dash cams 2018!
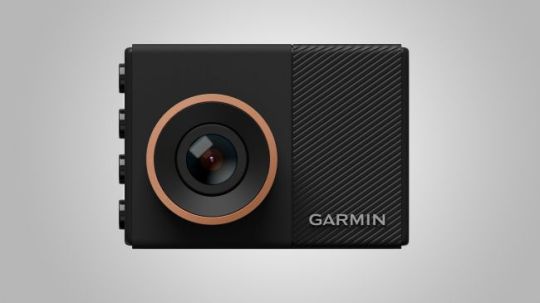
1. Garmin Dash Cam 55
It It might be small, but it packs in a lot into a compact body.
Video quality: 1440p | Viewing angle: 122 degrees | GPS tracker: Yes | Memory: MicroSD card (included)
CHECK AMAZON INDIA
Compact sizeExcellent video qualityApps offer limited controlSmall battery
Garmin has applied its knowledge of action cameras and fitness trackers to the world of dash cams, and its mid-range Dash Cam 55 model offers sharp imagery and enough additional features to make it our top choice.
Offering 1440p video capture at 30p, video footage for a dash cam is great, while the 122 degree viewing angle is pretty good, though there are wider optics out there. A nice touch is the inclusion of an attachable polarizing filter to cutout unwanted glare from your car's windscreen on dash camera with gps tracking .
Vital clips are automatically stored via the built-in G-Sensor technology, and thanks to the built-in GPS unit, all footage is stamped with time and location so there's no disputing when and where an incident happens.
Chuck in the voice control, drive awareness warnings and the neat little travelapse feature, and the Garmin Dash Cam 55 is one great best dash cam.
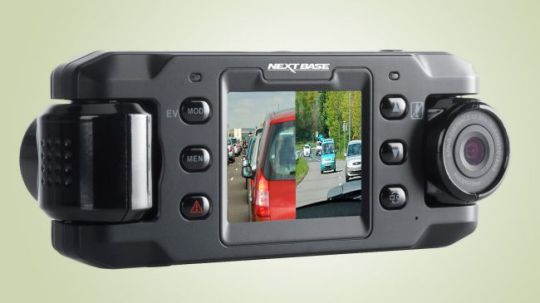
2. Nextbase Duo
Offers both front- and rear-facing cameras
CHECK AMAZON INDIA
Two cameras in oneGPS functionalityNo Wi-Fi or Bluetooth connectivityLow image resolution
Nextbase has long been a leading name on the dashcam market, and this dual camera unit offers both front- and rear-facing coverage in one simple unit, as opposed to running unsightly wires to a separate unit in the rear windscreen.

The Wide Dynamic Range (WDR) image processor makes low light and night time recording possible, while the crystal clear two-inch display makes it simple to interact with menus and change settings before setting off.
At 720p resolution, the footage isn't the sharpest on the market, but the unit cleverly stitches both front and rear imagery together into one handy, side-by-side film for easier reviewing.
Naturally, the Nextbase features a loop recording function, which will automatically delete older files as required. But it will also automatically detect and incident and save important clips to the on-board microSD card.
It also features a built-in GPS module, which allows for the vehicle's exact route, speed and position to be recorded, while a date and time stamp embedded on to the recorded footage provide further additional evidence.
Unfortunately, there isn't any Wi-Fi or Bluetooth compatibility, so retrieving footage will require extraction of the memory card and synching up with a laptop or PC.
3. Thinkware TW-F770
Onboard Wi-Fi for quick video transfer
Video quality: 1080p Full HD | Viewing angle: 140 degrees | GPS tracker: Yes | Memory: MicroSD card (included) and internal memory
CHECK AMAZON INDIA
Crystal-clear footageGreat night modeNo rear cameraButtons fiddly
The super 2.19MP Sony Exmor CMOS sensor provides excellent quality from this sleek and diminutive package, while the additional extra flourishes are an added bonus.
Designed to be mounted just beneath the rear-view mirror, the TW-F770 features just a few small buttons and no external screen – this is because it can be linked to a smartphone via its on-board Wi-Fi.
This enables clips to be quickly and easily sent to a smart device, should you need to access them quickly, for example, but it does add an additional step to any settings and menu changes.
A Super Night Vision feature boosts low-light settings for improved image quality at night, while a neat Time Lapse feature acts as a CCTV camera when the vehicle is parked.
Bear in mind, though, that this mode will require hard-wiring the unit into the vehicle's power supply, as is the case with most cameras featured on this list, rather than simply using a standard 12V lighter adaptor.
An on-board GPS tracker, as well as speed and upcoming red traffic signal warnings make this a very accomplished piece of kit.
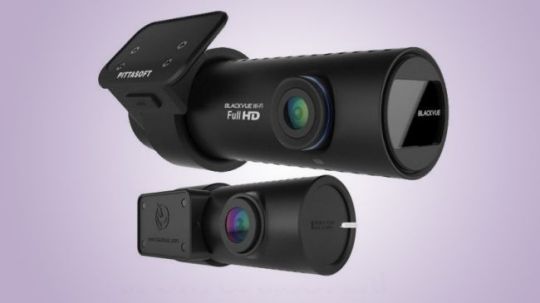
4. BlackVue DR650S-2CH 32G Dash Cam
The choice of professional drivers
Video quality: 1080p Full HD | Viewing angle: 129 degrees | GPS tracker: Yes | Memory: MicroSD card (included)
CHECK AMAZON INDIA
A professional solutionFull HD recordingExpensiveInitial set-up can be tricky
Often cited as one of the best solutions for regular or professional drivers, the dual-camera BlackVue covers many bases and boasts numerous additional features that go some way to justifying the lofty price tag.
To get the most out of its features, including a detailed parking surveillance mode, the cameras require hard-wiring to the car's power supply, but BlackVue makes this easier with an OBD II port converter, which plugs into most vehicle on-board diagnostics ports with ease.
The 2MP CMOS sensor and 129-degree lens capture excellent-quality HD video footage from the front camera, while a smaller unit at the rear records in 720p, with incident detection technology automatically flagging the appropriate video footage.
The BlackVue's clear advantage over some of the rivals listed here is its Over-the-Cloud abilities, which mean drivers can check live footage from the car via a smartphone, laptop or PC, even when it's parked.
The small, sleek unit is also neat and doesn't look out of place on modern vehicles, although the lack of screen and limited buttons mean it does require smartphone tethering to adjust settings.
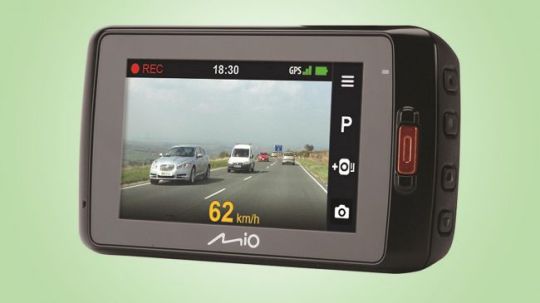
5. Mio MiVue 698 Dual 1080p
It may be getting old, but it's still one of the best
Video quality: 1080p Full HD | Viewing angle: 150 degrees | GPS tracker: Yes | Memory: MicroSD card
Great all-round packageCrisp video footageNo memory card includedStarting to age
Although the Mio MiVue 698 has been on the market for a year or so, it still remains one of the best packages around, offering superb image quality, front and rear coverage and a clear touchscreen for simple control.

The screen automatically blacks out when it detects movement, to abide with some country's road laws and avoid unwanted distractions, but clear audio prompts take over to warn of upcoming speed traps once the screen is dimmed.
Built-in GPS takes care of speed and location video overlays, while built-in Wi-Fi makes video and image transfer to smartphones and other devices simple.
Above all else, the extra-wide 150-degree lens does an excellent job of capturing the action, while a high-performing sensor ensures the resulting video footage is some of the best around.
6. Z-Edge Z3
Simple to use with razor-sharp images
Video quality: 2K and 1080p Full HD | Viewing angle: 145 degrees | GPS tracker: No | Memory: MicroSD card (included)
Superb image qualityEasy auto operationFewer features than rivalsNo GPS tracker
With its sharp 'Ultra 2K HD’ image quality, broad 145-degree field of view and super-simple user interface, the Z-Edge Z3 has regularly been voted one of the best devices in its class.
The CMOS sensor and advanced image processor ensure the resulting footage is razor sharp, making it easier to read licence plates and capture incidents with superb clarity.

A 3-inch touchscreen display makes interacting with the camera extremely easy, although you'll likely just set the camera up and let it do its thing, as most of the functionality has been automated for ease of use.
Like most cameras on the list, the unit will power up and instantly start recording when the ignition is switched on (so long as it's plugged into a power source), and turn off when power is cut.
Memory is managed via a loop recording function, and incident detection ensures vital clips aren't erased.
In short, it's a great package for those who simply want a fuss-free camera that delivers quality images without the hassle.
7. TaoTronics TT-CD06
A great low-light performer
Video quality: 2K and 1080p Full HD | Viewing angle: 160 degrees | GPS tracker: No | Memory: MicroSD card (included)
Super-wide field of viewGood low-light capabilitiesNo GPSSmall buttons
Considering the price point, it's very difficult to fault this TaoTronics model, even if it doesn't boast GPS for speed and location recording or some of the added niceties of more expensive rivals.

That said, there's plenty in the box to get excited about, chiefly the various well-made suction or adhesive mounts, the extra-long power cable and a 12V lighter socket adapter that features two ports, meaning you can still charge your phone with the dashcam running.
The unit itself boasts a G-sensor, for automatic saving of important incident footage, as well as a super-wide 160-degree field of view that's able to capture five lanes of traffic.
Low-light video footage is very good, and the audio quality is surprisingly good at this price.
Minor foibles include the small and fiddly buttons, while the lack of speed and positioning information might be a deal-breaker for some.
8. Cobra CDR 840
Looks great and easy to use
Video quality: 1080p Full HD | Viewing angle: 118 degrees | GPS tracker: Yes | Memory: MicroSD card (included)
Great priceStylish packageStruggles in low lightGPS can be unreliable
A dashcam isn't exactly the sort of thing you purchase for its smouldering looks, but the Cobra CDR 840 is one of the very few units on this list that seems to have been designed with aesthetics in mind.

The rear touchscreen may be small, but it's sharp and very easy to navigate thanks to a simple joypad-style switch interface, with a clearly labelled, bright red button for manually saving important clips.
Built-in GPS will take care of speed and location, while the G-Sensor tech will automatically save clips should the device detect an accident.
The GPS system can prove a little touch-and-go if satellites are difficult to reach or if adverse weather is playing havoc with the signal, but this is another unit that's very quick and easy to set up, with minimal on-going attention required.
9. YI Smart Dash Camera
Lots of tech in a small package
Video quality: 1080p Full HD | Viewing angle: 165 degrees | GPS tracker: No | Memory: MicroSD car
Lane departure warningBuilt-in Wi-FiLack of GPSSuction mount could be better
Yi is a recent entrant into the action camera arena, and is also busy plying its trade in the world of dashcams with some neat units that cram a large amount of technology into their small forms.
The huge field of view on its Smart Dash Camera model means it can monitor the surrounding area and even warn the driver if the vehicle is straying out of its lane. Plus, a forward collision warning sounds if the device senses an impending impact with the vehicle ahead.
This is all part of the Advanced Driver Assistance System (ADAS) package, which works in conjunction with G-Sensor technology and sees the camera automatically record and save clips in an emergency situation.
An impressive all-glass, high-resolution lens and f/1.8 aperture means that video recorded in low-light situations is crisp and clear.
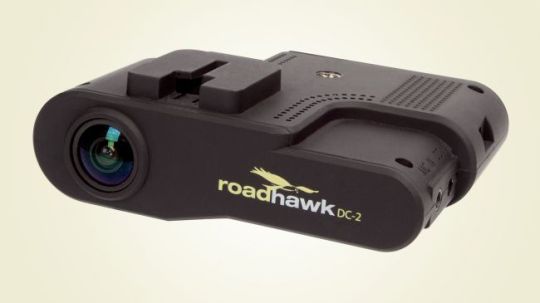
10. RoadHawk DC-2 HD GPS Dash Cam
Great image quality, but lacks looks
Video quality: 1080p Full HD | Viewing angle: 120 degrees | GPS tracker: Yes | Memory: MicroSD card (included)
Image stabilizationExternal audio inputNot very stylishLimited features
Simplicity is the name of the game here, and what the RoadHawk DC-2 lacks in exterior looks and additional features it more than makes up for with great image and audio quality.

Gyro-balanced image stabilization and a high-quality sensor team up to create excellent footage, even in low-light scenarios, while an audio-in connection allows additional microphones to be added.
GPS technology is included to take care of speed and location data, although an external GPS antenna connection is also offered should you require a more powerful and reliable signal.
0 notes
Text
CameraButton
Instagram-like button for taking photos or recording videos.
from The Android Arsenal http://ift.tt/2CDIR8j
0 notes
Text
Tesseract OCR Tutorial for iOS
Update note: This tutorial has been updated to Swift 4, iOS 11, and Xcode 9 by Lyndsey Scott. The original tutorial was written by Lyndsey Scott.
Recognize anyone!
You’ve undoubtedly seen OCR before… It’s used to process everything from scanned documents, to handwritten scribbles, to the Word Lens technology in Google’s Translate app. And today you’ll learn to use it in your very own iPhone app with the help of Tesseract! Pretty neat, huh?
So… what is it?
Optical Character Recognition (OCR) is the process of extracting digital text from images. Once extracted, a user may then use the text for document editing, free-text searches, compression, etc.
In this tutorial, you’ll use OCR to woo your true heart’s desire. You’ll create an app called Love In A Snap using Tesseract, an open-source OCR engine maintained by Google. With Love In A Snap, you can take a picture of a love poem and “make it your own” by replacing the name of the original poet’s muse with the object of your affection. Brilliant! Get ready to impress.
U + OCR = LUV
Getting Started
Download the starter package here and extract it to a convenient location.
The archive contains the following folders:
LoveInASnap: The Xcode starter project.
Images: Images of a love poem.
tessdata: The Tesseract language data.
Open LoveInASnap\LoveinASnap.xcodeproj, build, run, tap around, and get a feel for the UI. The current app does very little, but you’ll notice the view shifts up and down when selecting and deselecting the text fields. It does this to prevent the keyboard from blocking necessary text fields, buttons, etc.
Starter Code
Open ViewController.swift to check out the starter code. You’ll notice a few @IBOutlets and @IBAction functions that link the view controller to its pre-made Main.storyboard interface. Within most of those @IBActions, view.endEditing(true) resigns the keyboard. It’s omitted in sharePoem(_:) since the share button will never be visible while the keyboard is visible.
After those @IBAction functions, you’ll see performImageRecognition(_:). This is where Tesseract will eventually perform its image recognition.
Below that are two functions which shift the view up and down:
func moveViewUp() { if topMarginConstraint.constant != originalTopMargin { return } topMarginConstraint.constant -= 135 UIView.animate(withDuration: 0.3) { self.view.layoutIfNeeded() } } func moveViewDown() { if topMarginConstraint.constant == originalTopMargin { return } topMarginConstraint.constant = originalTopMargin UIView.animate(withDuration: 0.3) { self.view.layoutIfNeeded() } }
moveViewUp animates the view controller’s view’s top constraint up when the keyboard shows. moveViewDown animates the view controller’s view’s top constraint back down when the keyboard hides.
Within the storyboard, the UITextFields’ delegates were set to ViewController. Take a look at the methods in the UITextFieldDelegate extension:
// MARK: - UITextFieldDelegate extension ViewController: UITextFieldDelegate { func textFieldDidBeginEditing(_ textField: UITextField) { moveViewUp() } func textFieldDidEndEditing(_ textField: UITextField) { moveViewDown() } }
When a user begins editing a text field, call moveViewUp. When a user finishes editing a text field, call moveViewDown.
Although important to the app’s UX, the above functions are the least relevant to this tutorial. Since they’re pre-coded, we can get into the fun coding nitty-gritty right away.
Tesseract Limitations
Tesseract OCR is quite powerful, but does have the following limitations:
Unlike some OCR engines (like those used by the U.S. Postal Service to sort mail), Tesseract is unable to recognize handwriting. In fact, it’s limited to about 64 fonts in total.
Tesseract’s performance can improve with image pre-processing. You may need to scale images, increase color contrast, and horizontally-align the text for optimal results.
Finally, Tesseract OCR only works on Linux, Windows, and Mac OS X.
Wait… What?
Uh oh…Linux, Windows, and Mac OS X… How are you going to use this in iOS? Luckily, there’s an Objective-C wrapper for Tesseract OCR written by gali8 which you can use in Swift and iOS.
Phew! :]
Installing Tesseract
As described in Joshua Greene’s great tutorial, How to Use CocoaPods with Swift, you can install CocoaPods and the Tesseract framework using the following steps.
To install CocoaPods, open Terminal and execute the following command:
sudo gem install cocoapods
Enter your computer’s password when requested.
To install Tesseract in the project, navigate to the LoveInASnap starter project folder using the cd command. For example, if the starter folder is on your desktop, enter:
cd ~/Desktop/OCR_Tutorial_Resources/LoveInASnap
Next, create a Podfile for your project in this location by running:
pod init
Next, open the Podfile using a text editor and replace all of its current text with the following:
use_frameworks! platform :ios, '11.0' target 'LoveInASnap' do use_frameworks! pod 'TesseractOCRiOS' end
This tells CocoaPods that you want to include the TesseractOCRiOS framework as a dependency for your project. Finally, save and close Podfile, then in Terminal, within the same directory to which you navigated earlier, type the following:
pod install
That’s it! As the log output states, “Please close any current Xcode sessions and use ‘LoveInASnap.xcworkspace’ for this project from now on.” Close LoveinASnap.xcodeproj and open OCR_Tutorial_Resources\LoveInASnap\LoveinASnap.xcworkspace in Xcode.
Preparing Xcode for Tesseract
Drag tessdata, i.e. Tesseract language data, from the Finder to the Supporting Files group in the Xcode project navigator. Make sure Copy items if needed is checked, the Added Folders option is set to Create folder references, and LoveInASnap is checked before selecting Finish.
Note: Make sure tessdata is placed in the Copy Bundle Resources under Build Phases otherwise you’ll receive a cryptic error when running stating the TESSDATA_PREFIX environment variable is not set to the parent directory of your tessdata directory.
Back in the project navigator, click the LoveInASnap project file. In the Targets section, click LoveInASnap, go to the General tab, and scroll down to Linked Frameworks and Libraries.
There should be only one file here: Pods_LoveInASnap.framework, i.e. the pods you just added. Click the + button below the table then add libstdc++.dylib, CoreImage.framework, and TesseractOCR.framework to your project.
Add libstdc++.dylib, CoreImage.framework, and TesseractOCR.framework
After you’ve done this, your Linked Frameworks and Libraries section should look something like this:
Almost there! A few small steps before you can dive into the code…
Wipe away those happy tears, Champ!
In the LoveInASnap target’s Build Settings tab, find C++ Standard Library and make sure it’s set to Compiler Default. Then find Enable Bitcode and set it to No.
Similarly, back in the left-hand project navigator, select the Pods project and go to the TesseractOCRiOS target’s Build Settings, find C++ Standard Library and make sure it’s set to Compiler Default. Then find Enable Bitcode and set it to No.
That’s it! Build and run your project to make sure everything compiles. You’ll see warnings in the left-hand issue navigator, but don’t worry too much about them.
All good? Now you can get started with the fun stuff!
Creating the Image Picker
Open ViewController.swift and add the following extension at the bottom under your class definition:
// 1 // MARK: - UINavigationControllerDelegate extension ViewController: UINavigationControllerDelegate { } // MARK: - UIImagePickerControllerDelegate extension ViewController: UIImagePickerControllerDelegate { func presentImagePicker() { // 2 let imagePickerActionSheet = UIAlertController(title: "Snap/Upload Image", message: nil, preferredStyle: .actionSheet) // 3 if UIImagePickerController.isSourceTypeAvailable(.camera) { let cameraButton = UIAlertAction(title: "Take Photo", style: .default) { (alert) -> Void in let imagePicker = UIImagePickerController() imagePicker.delegate = self imagePicker.sourceType = .camera self.present(imagePicker, animated: true) } imagePickerActionSheet.addAction(cameraButton) } // Insert here } }
Here’s what’s going on in more detail:
Set ViewController as the delegate for UINavigationControllerDelegate and UIImagePickerController, since it must conform to both when using a UIImagePickerController.
Inside presentImagePicker(), create a UIAlertController action sheet to present a set of capture options to the user.
If the device has a camera, add a Take Photo button to imagePickerActionSheet. Take Photo creates and presents an instance of UIImagePickerController with a sourceType of .camera.
To finish off this function, replace // Insert here with:
// 1 let libraryButton = UIAlertAction(title: "Choose Existing", style: .default) { (alert) -> Void in let imagePicker = UIImagePickerController() imagePicker.delegate = self imagePicker.sourceType = .photoLibrary self.present(imagePicker, animated: true) } imagePickerActionSheet.addAction(libraryButton) // 2 let cancelButton = UIAlertAction(title: "Cancel", style: .cancel) imagePickerActionSheet.addAction(cancelButton) // 3 present(imagePickerActionSheet, animated: true)
Here you do the following:
Add a Choose Existing button to imagePickerActionSheet. Choose Existing creates and presents an instance of UIImagePickerController with a sourceType of .photoLibrary.
Add a cancel button to imagePickerActionSheet.
Present your instance of UIAlertController.
Finally find takePhoto(_:) and add the following:
presentImagePicker()
This makes sure to present the image picker when you tap Snap/Upload Image.
If you’re using your device, build, run and try to take a picture. Chances are your app will crash. That’s because the app hasn’t asked for permission to access your camera; so you’ll add the relevant permission requests next.
Request Permission to Access Images
In the project navigator, navigate to LoveInASnap‘s Info.plist located in Supporting Files. Hover over the Information Property List header and tap + to add Privacy – Photo Library Usage Description and Privacy – Camera Usage Description keys to the table. Set their values to the text you’d like to display to the user alongside the app’s photo library usage and camera usage requests.
Build and run your project, tap Snap/Upload Image and you should see your new UIAlertController like so:
Note: If you’re using the simulator, there’s no physical camera available so you won’t see the Take Photo option.
If you tap Take Photo and grant the app permission to access the camera if prompted, you should now be able to take a picture. If you tap Choose Existing and grant the app permission to access the photo library if prompted, you should now be able to select an image.
Choose an image though, and your app will currently do nothing with it. You’ll need to do some more prep before Tesseract is ready to process it.
As mentioned in the list of Tesseract’s limitations, images must be within certain size constraints for optimal OCR results. If an image is too big or too small, Tesseract may return bad results or even crash the entire program with an EXC_BAD_ACCESS error.
So you’ll need to create a method to resize the image without altering its aspect ratio.
Scaling Images to Preserve Aspect Ratio
The aspect ratio of an image is the proportional relationship between its width and height. Therefore, to reduce the size of the original image without affecting the aspect ratio, you must keep the width to height ratio constant.
When you know both the height and width of the original image, and you know either the desired height or width of the final image, you can rearrange the aspect ratio equation as follows:
So height2 = Height1/Width1 * width2 and, conversely, width2 = Width1/Height1 * height2. You’ll use these formulas to maintain the image’s aspect ratio in your scaling method.
Open ViewController.swift and add the following helper method within a UIImage extension at the bottom of the file:
// MARK: - UIImage extension extension UIImage { func scaleImage(_ maxDimension: CGFloat) -> UIImage? { var scaledSize = CGSize(width: maxDimension, height: maxDimension) if size.width > size.height { let scaleFactor = size.height / size.width scaledSize.height = scaledSize.width * scaleFactor } else { let scaleFactor = size.width / size.height scaledSize.width = scaledSize.height * scaleFactor } UIGraphicsBeginImageContext(scaledSize) draw(in: CGRect(origin: .zero, size: scaledSize)) let scaledImage = UIGraphicsGetImageFromCurrentImageContext() UIGraphicsEndImageContext() return scaledImage } }
In scaleImage(_:), take the height or width of the image — whichever is greater — and set that dimension equal to the maxDimension argument. Next, to maintain the image’s aspect ratio, scale the other dimension accordingly. Next, redraw the original image into the new frame. Finally, return the scaled image back to the calling function.
Whew! </math>
Now you’ll need to create a way to find out which image the user selected.
Fetching the Image
Within the UIImagePickerControllerDelegate extension, add the following below presentImagePicker():
// 1 func imagePickerController(_ picker: UIImagePickerController, didFinishPickingMediaWithInfo info: [String : Any]) { // 2 if let selectedPhoto = info[UIImagePickerControllerOriginalImage] as? UIImage, let scaledImage = selectedPhoto.scaleImage(640) { // 3 activityIndicator.startAnimating() // 4 dismiss(animated: true, completion: { self.performImageRecognition(scaledImage) }) } }
Here’s what’s happening:
imagePickerController(_:didFinishPickingMediaWithInfo:) is a UIImagePickerControllerDelegate function. When the user selects an image, this method returns the image information in an info dictionary object.
Unwrap the image contained within theinfo dictionary with the key UIImagePickerControllerOriginalImage. Then resize that image so that its width and height are less than 640. (640 points since it returned the best results through our trial and error experimentation.) Unwrap that scaled image as well.
Start animating the activity indicator to show that Tesseract is at work.
Dismiss the UIImagePicker and pass the image to performImageRecognition for processing.
Build, run, tap Snap/Upload Image and select any image from your camera roll. The activity indicator should now appear and animate indefinitely.
Don’t let it hypnotize you! There’s still more coding to do.
You’ve now triggered the activity indicator, but how about the activity it’s supposed to indicate? Without further ado (…drumroll please…) you can finally start using Tesseract OCR!
Using Tesseract OCR
Open ViewController.swift and immediately below import UIKit, add the following:
import TesseractOCR
This will import the Tesseract framework allowing objects within the file to utilize it.
Next, add the following code to the top of performImageRecognition(_:):
// 1 if let tesseract = G8Tesseract(language: "eng+fra") { // 2 tesseract.engineMode = .tesseractCubeCombined // 3 tesseract.pageSegmentationMode = .auto // 4 tesseract.image = image.g8_blackAndWhite() // 5 tesseract.recognize() // 6 textView.text = tesseract.recognizedText } // 7 activityIndicator.stopAnimating()
This is where the OCR magic happens! Here’s a detailed look at each part of the code:
Initialize a new G8Tesseract object with eng+fra, i.e. the English and French data. The sample poem you’ll be using for this tutorial contains a bit of French (Très romantique!), so adding the French data will help Tesseract recognize French vocabulary and output accented characters.
There are three OCR engine modes: .tesseractOnly is the fastest, but least accurate. .cubeOnly, is slower but more accurate since it uses more artificial intelligence. .tesseractCubeCombined runs both .tesseractOnly and .cubeOnly; and thus it’s the slowest mode of the three. For this tutorial, you’ll use .tesseractCubeCombined since it’s the most accurate.
Tesseract assumes by default that it’s processing a uniform block of text. Since your sample poem has paragraph breaks though, it’s not uniform. Set pageSegmentationMode to .auto so Tesseract can automatically recognize paragraph breaks.
The more contrast there is between the text and the background, the better the results. Use Tesseract’s built-in g8_blackAndWhite filter to desaturate, increase the contrast, and reduce the exposure of tesseract‘s image.
Perform the optical character recognition.
Put the recognized text into textView.
Remove the activity indicator to signal that OCR is complete.
Now it’s time to test this first batch of code and see what happens!
Processing Your First Image
Here’s the sample image for this tutorial as found in OCR_Tutorial_Resources\Images\Lenore.png:
Lenore.png contains an image of a love poem addressed to a “Lenore”, but with a few edits, it’s sure to capture the attention of the one you desire! :]
If you’re running the app from a device with a camera, you could snap a picture of the poem to perform the OCR. But for the sake of this tutorial, add the image to your device’s camera roll so you can upload it from there. This way, you can avoid lighting inconsistencies, skewed text, flawed printing, etc.
Note: If you’re using a simulator, drag and drop the image file onto the simulated device to add it to your camera roll.
Build and run your app. Select Snap/Upload Image then select Choose Existing. Allow the app to access your photos if prompted, then choose the sample image from your photo library.
And… Voila! The deciphered text should appear in the text view after a few seconds.
OCR Complete!
But if the apple of your eye isn’t named “Lenore”, he or she may not appreciate this poem as is. And considering “Lenore” appears quite often in the text, customizing the poem to your tootsie’s liking is going to take a bit of work…
What’s that, you say? Yes, you COULD add a function to find and replace these words. Brilliant idea! The next section shows you how to do just that.
Finding and Replacing Text
Now the OCR engine has turned the image into text, you can treat it as you would any other string.
As you’ll recall, ViewController.swift already contains a swapText function triggered by the app’s swap button. How convenient. :]
Find swapText(_:), and add the following code below view.endEditing(true):
// 1 guard let text = textView.text, let findText = findTextField.text, let replaceText = replaceTextField.text else { return } // 2 textView.text = text.replacingOccurrences(of: findText, with: replaceText) // 3 findTextField.text = nil replaceTextField.text = nil
The above code is pretty straightforward, but take a moment to walk through it step-by-step:
Only execute the swap code if textView, findTextField, and replaceTextField aren’t nil.
Within the text view, replace all occurances of findTextField‘s text with replaceTextField‘s text.
Erase the values in findTextField and replaceTextField once the replacements are complete.
Build and run your app, upload the sample image again and let Tesseract do its thing. Once the text appears, enter Lenore in the Find this… field and enter your true love’s name in the Replace with… field. (Note that find and replace are case-sensitive.) Tap the swap button to complete the switch-a-roo.
Presto chango — you’ve created a love poem custom-tailored to your sweetheart.
Swap other words as desired to add your own artistic flare.
Bravo! Such artistic creativity and bravery shouldn’t live on your device alone. You’ll need some way to share your masterpiece with the world.
Sharing The Final Result
To make your poem shareable, add the following within sharePoem():
// 1 if textView.text.isEmpty { return } // 2 let activityViewController = UIActivityViewController(activityItems: [textView.text], applicationActivities: nil) // 3 let excludeActivities:[UIActivityType] = [ .assignToContact, .saveToCameraRoll, .addToReadingList, .postToFlickr, .postToVimeo] activityViewController.excludedActivityTypes = excludeActivities // 4 present(activityViewController, animated: true)
Taking each numbered comment in turn:
If textView is empty, don’t share anything.
Otherwise, initialize a new UIActivityViewController with the text view’s text.
UIActivityViewController has a long list of built-in activity types. Here you’ve excluded the ones that are irrelevant in this context.
Present your UIActivityViewController to allow the user to share their creation in the manner they wish.
Once more, build and run the app. Upload and process the sample image. Find and replace text as desired. Then when you’re happy with your poem, tap the envelope to view your share options and send your ode via whatever channel you see fit.
That’s it! Your Love In A Snap app is complete — and sure to win over the heart of the one you adore.
Or if you’re anything like me, you’ll replace Lenore’s name with your own, send that poem to your inbox through a burner account, stay in alone, have a glass of wine, get a bit bleary-eyed, then pretend that email you received is from the Queen of England for an especially classy and sophisticated evening full of romance, comfort, mystery, and intrigue… But maybe that’s just me…
Where to Go From Here?
Download the final version of the project here.
You can find the iOS wrapper for Tesseract on GitHub at http://ift.tt/1hNCkae. You can download more language data from Google’s Tesseract OCR site. (Use language data versions 3.02 or higher to guarantee compatibility with the current framework.)
Examples of potentially problematic image inputs you can correct for improved results. Source: Google’s Tesseract OCR site
As you further explore OCR, remember: “Garbage In, Garbage Out”. The easiest way to improve the quality of the output is to improve the quality of the input, for example:
Add image pre-processing.
Run your image through multiple filters then compare the results to determine the most accurate output.
Create your own artificial intelligence logic, such as neural networks.
Use Tesseract’s own training tools to help your program learn from its errors and improve its success rate over time.
Chances are you’ll get the best results by combining strategies, so try different approaches and see what works best.
As always, if you have comments or questions on this tutorial, Tesseract, or OCR strategies, feel free to join the discussion below!
The post Tesseract OCR Tutorial for iOS appeared first on Ray Wenderlich.
Tesseract OCR Tutorial for iOS published first on http://ift.tt/2fA8nUr
0 notes
Text
How to Get iOS 5 Features Now
How to Get iOS 5 Features Now
Expand for more info! MobileNotifier – Notification Center – Free – Available from Cydia, add this source: http://phajas.xen.prgmr.com/repo CameraButtons – Volume buttons to control camera – $0.99 – Available from Cydia Kik – iMessage – Free – Available from the App Store Wi-Fi Sync – $9.99 – Available from Cydia Adobe Photoshop Express – Photo Editing – Free – Available from the App Store…
View On WordPress
0 notes
Text
How to Get iOS 5 Features Now
youtube
Expand for more info! MobileNotifier - Notification Center - Free - Available from Cydia, add this source: http://phajas.xen.prgmr.com/repo CameraButtons ... source
0 notes