#Computerized Fabric Machine
Explore tagged Tumblr posts
Visit Tumblr Blog
Explore Tumblr blogs with no restrictions, modern design and the best experience.
Last Seen Tumblr Blogs


Fun Fact
Tumblr Inc. has $15.1M in annual revenue.
Text
Of course Eliot knows how to sew, between his military service, medical skills, and the likelihood that he's slept with a seamstress or two. He can, at minimum, hem a pair of pants and do most types of repairs.
Hardison, though? Sure, word of God is that he makes the disguises that the team uses during cons, which could just mean he's ironing "FBI" transfer letters onto windbreakers.
HOWEVER.
Hardison is a cosplayer in the early 2010s. I did my first con cosplay at AnimeNext in '08. Before 2013 or so, you could not Google a character and find sales listings for a ready-made cosplay. If you wanted to cosplay a character who doesn't wear readily available normal clothes, you had two options: you either found someone who could sew and were very, very nice to them, or you learned how to make stuff yourself. I know several people who taught themselves how to sew by taking apart thriftstore finds for cosplay, and I had a side hustle taking on sewing and patterning commissions.
Hardison could have commissioned his first cosplay, but I think he'd get sucked in. He'd get really excited about computerized sewing machines. He'd get himself a machine that he can hack and reprogram so it's got extra stitches, multiple buttonhole settings, automatic seam guidance, a controlled heat setting that does a fused edge finish on synthetic fabrics. He digitizes his own embroidery patterns.
At some point Eliot asks to borrow a sewing machine because his job is as rough on his clothes as it is on his body, and he nearly has an aneurysm trying to do a basic darning patch on Hardison's beeping whistling computer-monster. A couple days later, a second sewing machine shows up. It's an old one with sturdy metal innards and mechanical dials to set stitch length and width. It has no screen, no control buttons, and only a handful of settings. One of them is a darning stitch.
1K notes
·
View notes
Text
Athletes Go for the Gold with NASA Spinoffs
NASA technology tends to find its way into the sporting world more often than you’d expect. Fitness is important to the space program because astronauts must undergo the extreme g-forces of getting into space and endure the long-term effects of weightlessness on the human body. The agency’s engineering expertise also means that items like shoes and swimsuits can be improved with NASA know-how.
As the 2024 Olympics are in full swing in Paris, here are some of the many NASA-derived technologies that have helped competitive athletes train for the games and made sure they’re properly equipped to win.

The LZR Racer reduces skin friction drag by covering more skin than traditional swimsuits. Multiple pieces of the water-resistant and extremely lightweight LZR Pulse fabric connect at ultrasonically welded seams and incorporate extremely low-profile zippers to keep viscous drag to a minimum.
Swimsuits That Don’t Drag
When the swimsuit manufacturer Speedo wanted its LZR Racer suit to have as little drag as possible, the company turned to the experts at Langley Research Center to test its materials and design. The end result was that the new suit reduced drag by 24 percent compared to the prior generation of Speedo racing suit and broke 13 world records in 2008. While the original LZR Racer is no longer used in competition due to the advantage it gave wearers, its legacy lives on in derivatives still produced to this day.
Trilion Quality Systems worked with NASA’s Glenn Research Center to adapt existing stereo photogrammetry software to work with high-speed cameras. Now the company sells the package widely, and it is used to analyze stress and strain in everything from knee implants to running shoes and more.
High-Speed Cameras for High-Speed Shoes
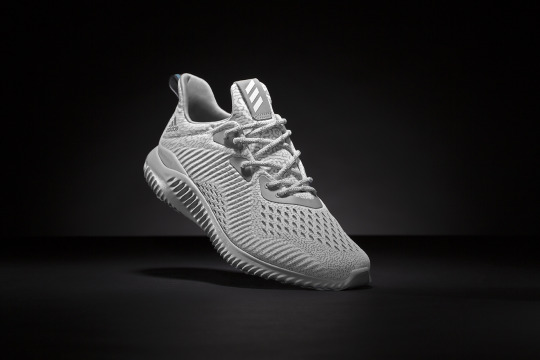
After space shuttle Columbia, investigators needed to see how materials reacted during recreation tests with high-speed cameras, which involved working with industry to create a system that could analyze footage filmed at 30,000 frames per second. Engineers at Adidas used this system to analyze the behavior of Olympic marathoners' feet as they hit the ground and adjusted the design of the company’s high-performance footwear based on these observations.

Martial artist Barry French holds an Impax Body Shield while former European middle-weight kickboxing champion Daryl Tyler delivers an explosive jump side kick; the force of the impact is registered precisely and shown on the display panel of the electronic box French is wearing on his belt.
One-Thousandth-of-an-Inch Punch
In the 1980s, Olympic martial artists needed a way to measure the impact of their strikes to improve training for competition. Impulse Technology reached out to Glenn Research Center to create the Impax sensor, an ultra-thin film sensor which creates a small amount of voltage when struck. The more force applied, the more voltage it generates, enabling a computerized display to show how powerful a punch or kick was.

Astronaut Sunita Williams poses while using the Interim Resistive Exercise Device on the ISS. The cylinders at the base of each side house the SpiraFlex FlexPacks that inventor Paul Francis honed under NASA contracts. They would go on to power the Bowflex Revolution and other commercial exercise equipment.
Weight Training Without the Weight
Astronauts spending long periods of time in space needed a way to maintain muscle mass without the effect of gravity, but lifting free weights doesn’t work when you’re practically weightless. An exercise machine that uses elastic resistance to provide the same benefits as weightlifting went to the space station in the year 2000. That resistance technology was commercialized into the Bowflex Revolution home exercise equipment shortly afterwards.
Want to learn more about technologies made for space and used on Earth? Check out NASA Spinoff to find products and services that wouldn’t exist without space exploration.
Make sure to follow us on Tumblr for your regular dose of space!
2K notes
·
View notes
Text
Well it’s done! I can officially say, I finished my first quilt.
I think it came out great and my mom loved it. Definitely room for improvement. Things to remember for next time…
1. Buy more needles. I was surprised at how often needle changes are recommended. In the past, I changed needles when there was problem but that’s about it. I was a good girl and followed the guidebook that said 80/12 for piecing and 90/14 for quilting. I had titanium quilting needles but honestly, I didn’t see a difference between the regular universal and the titanium quilting. I know I prefer the color coded needles so I know what size is on the machine. Only ants and microscopes can read that writing on the needle.
2. Buy enough thread at the get go. Those smaller Gutermann spools you got in a pack as a gift won’t be enough and you’ll run out the one day the fabric store is closed.
3. Trim ALL loose threads. Especially if you’re using light colored borders. If you don’t, they’ll look varicose veins.
4. Computerized machines don’t save your stitch settings. Bastards.
5. Is Pfaff’s IDT the same as a good walking foot? Jury’s out on that one. I still had a fair bit of shifting when quilting but no puckers. Fought that binding all the way around too. I tried adjusting the presser foot pressure (increased it) but didn’t notice a difference. I’ll be playing around with this next quilt.


202 notes
·
View notes
Text
If yyour cheap computerized Brother sewing machine stops advancing the fabric, or only going backwards, here's what to do.
First of all, do not put oil in there. In the last year, I've seen 5 machines where this would have worked, except that someone decided to drown the circuit board in oil. Basically zero parts of an entry level computerized brother can be fixed with oil. Put the oil away.
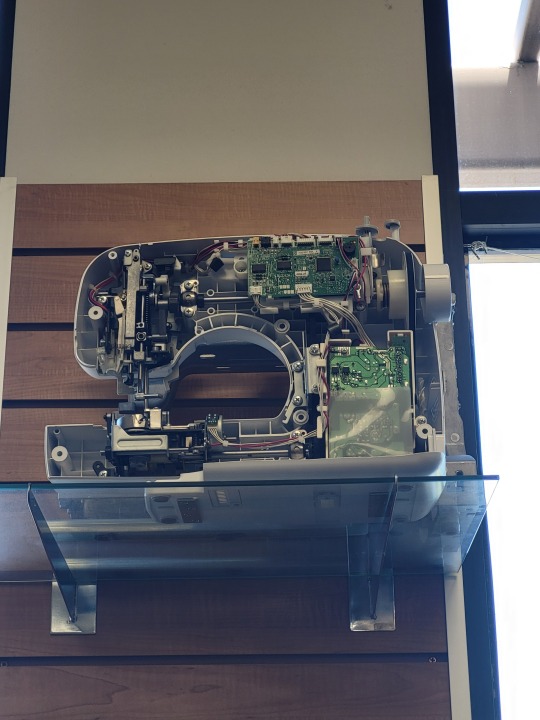
See how there's nothing stopping the oil you put on your feed teeth from going to your main circuit board? Don't do it.
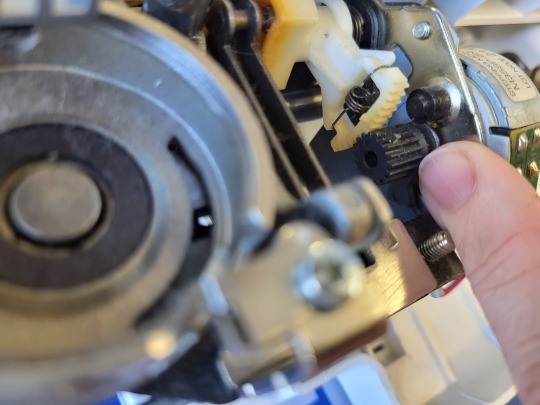
See that combo of that little black gear and the white rack? That controls your feed. Sometimes, your machine gets stuck in reverse because the rack overshoot the gear, and then there's no connection to get it back down.
You can see this rack by taking off your stitch plate, and usually access it by poking at it with tweezers. Push it down a little bit, if it's going in reverse. Push it up a little bit if it's stuck at almost 0. Make sure you have theachinevturned off and unplugged before you dick around with this stepper motor, or the machine can get confused, try to fight you, and break itself more than it already is.
Stick it back together, and see if it's feeding now. If it is feeding semi-properly, try adjusting your stitch length.
Best case, this actually fixes your problem, and now your machine works again. If it doesn't, and the machine only sews at one length, wiggle the rack up and down until you get a good general-purpose stitch length, and you can just sew exclusively at that length until you've saved up enough to get a new machine. It ain't fixed, but it's better than broken.
187 notes
·
View notes
Text
Figuring Out Presser Foot Pressure On My Juki DDL-8700 (success!) (pictures!)
I had difficulty finding any detailed or visual breakdown on how to achieve optimal presser foot pressure, and since this is my first Big Girl sewing machine...I never really had an option before. My goal was to not only adjust the presser foot, top + bottom thread tension to suit machine quilting, but to be able to recreate that setting whenever I switch between garments and quilting. My only rule/limitation was that I would figure this out using a plain 1/4" presser foot, and not rely on the comfort of a walking foot. My captions will be beneath the photos they're referring to.

My test piece: lightweight cotton batting sandwiched between two pieces of cheap cotton, pin basted. Approximately 6"x6". If I was going to test things out, I didn't want it to be obscured with nice fabric.


My initial top thread tension. Any adjustments will happen while the presser foot is down.


My initial presser foot pressure knob measurement. This was the aspect that I felt I needed most explained to me. Measured in centimeters for accuracy. If using a sewing gauge like this one, I stood it next to the knob in a way that allowed the slider to stop at the top. Measured at 3.4cm. Adjustments to this knob will happen while the presser foot is up.

To keep it familiar, initial stitch length set at 2.5. I tend to go all over with stitch lengths, as I make a variety of things.

"Unchanged tension. 3.4cm. 2.5 length"
This stitch line is what those settings produced, using 40wt Glide thread for top (gray green) and bottom (white). Looks fine-ish, but bottom thread is pulled up, and stitches aren't consistent. The foot additionally pushed the fabric around unfavorably.

Here, "threads" refers to threads of the SCREW that are exposed. I initially thought that my solution was to tighten the top thread tension, but as the bottom thread never changed...I realized the opposite was true lol.

These are all of my experiments with the pressure knob at 3.4cm. Likely unintelligibly, when I tightened the bobbin case I drew how the screws were now oriented when looking at the case from that perspective. The tightened bobbin stitch line was the only one where there was no bottom thread showing. Ultimately the fabric was being pushed around too much, still.


Next, I loosened the pressure knob to 3.6cm, and loosened the top thread tension until the convex part of the screw was just barely poking out. Bobbin tension stayed the same.

These are what my experiments with 3.6cm looked like, with the arrows indicating "this is the same, but..." I experimented with 3.0 stitch length partially through this knob height. Ultimately, I am most pleased with the presser foot pressure knob sitting at 3.6cm, the bottom thread tension like my drawing, and top thread tension with screw barely showing. CRITICALLY, however, was that within these last stitch lines, I tried regular overlock thread for the bottom. It 100% made a positive difference. I actually kind of dislike shiny slippery thread, but wanted to throw an extra curveball to the test.
There are so many variables that go into settings, and compared to our computerized automatic machine cousins (soft hands), the task of creating reliable settings every single time can be daunting. Struggling with it has been a little upsetting, because it's affected my ability to produce things worth selling. Hopefully soon I'll TRULY put it to the test :) I also need to figure out the settings for lightweight + weird fabrics. I hope that even if my own numbers aren't useful, maybe someone can benefit from seeing the process.
#personal#sewing tips#juki#juki ddl 8700#industrial sewing machine#quilting#machine quilting#sewing tutorial
20 notes
·
View notes
Text
1. Essential Sewing Techniques
Basting: Temporary long stitches to hold fabric before final sewing.
Backstitch: Strong hand stitch for seams that need durability.
French Seam: Elegant finish that hides raw edges inside a folded seam (common in high-end garments).
Gathering: Creates controlled fullness (e.g., ruffles on sleeves or skirts).
Zigzag Stitch: Prevents fabric fraying on raw edges; used in stretch fabrics.
Quilting: Combines piecing (sewing fabric patches) and stitching through layers for texture.
2. Cultural & Historical Significance
Ancient Egypt: Linen garments were hand-sewn with flax thread; some stitches survive today.
Japan: Sashiko embroidery (functional decorative stitching) reinforced workwear.
Europe: The 18th-century mantua dress required intricate draping and sewing skills.
Industrial Revolution: Sewing machines (like Singer’s 1851 model) democratized fashion but also fueled sweatshop labor debates.
3. Must-Have Sewing Tools
Fabric Shears: Sharp scissors reserved only for fabric.
Seam Ripper: Fixes mistakes without damaging material.
Tailor’s Chalk/Marking Pens: For tracing patterns.
Thimble: Protects fingers when hand-sewing thick fabrics.
Bobbins: Hold thread in sewing machines.
Rotary Cutter & Mat: Precision cutting for quilters.
4. Modern Sewing Innovations
Computerized Machines: Auto-threading, embroidery designs via USB, and touchscreen controls.
3D Printing: Custom buttons, accessories, or even fabric-like materials.
Smart Fabrics: Sewable LED circuits, conductive thread for wearable tech.
Sustainable Stitches: Growing use of upcycled materials and zero-waste pattern design.
5. Famous Figures in Sewing
Coco Chanel: Started as a seamstress; revolutionized women’s fashion.
Elizabeth Keckley: Former enslaved woman who became Mary Todd Lincoln’s dressmaker.
Yves Saint Laurent: Master of precision tailoring.
Contemporary Makers: Blogs like Tilly and the Buttons and YouTube sewists inspire DIY fashion.
6. Sewing’s Psychological & Social Benefits
Mindfulness: Repetitive stitching can reduce stress (like "textile therapy").
Community: Quilting bees, online sewing forums, and #SewingTwitter foster connection.
Empowerment: Self-sufficiency in making/modifying clothes challenges fast fashion.
8 notes
·
View notes
Text
Remember to clean your sewing machine between projects. The reason you may be dealing with things like pinched seams and skipped stitches is your sewing machine needs some attention. Do not blow into the machine!!! You will only push lint deeper into the gears.
Remember to change your sewing needles. The seams may be messy because of this, as well as torn threads. Seeing needles are very inexpensive unless you buy them at a fabric store.i purchase mine from Organ Neddles Co, in packs of 100, for less than $20 USD online.
Remember to sharpen your scissors and change your rotary cutter blades. There are scissor sharpeners sold at fabric and craft stores, and they are very inexpensive. If you're unable to acquire one, take some aluminum foil, about 18 inches, fold it in half, and cut down the middle. Put the layers on top of each other and cut again. Do this one more time and cut it into thin strips. Voila, your blade is sharpened. There are rotary blade sharpeners as well, but they're more expensive. Save your used blades for sharpening you can do at a later date.
Your machine will thank you by not breaking and requiring parts be replaced.
Oh, and you do need to get your machine into a shop for full maintenance at least once a year. Folks who specialize in this may even be willing to do this in your home, especially for antique machines. Shops that are approved by retailers will cost significantly more than independent specialists. The only place approved by retailers here charges $150 USD per machine, regardless of whether it's manual or computerized. I went on the NextDoor app and asked for references for finding an independent specialist. It was $89 USD per machine, and he had them back to me in less than two weeks whereas the retailer approved shop gave me an ETA of four months. Give your machine the spa treatment it deserves. When it's returned to you, you will discover it's suddenly quieter, running smoothly, and working significantly better because these were things that built up so gradually, you didn't even notice.
You're welcome.
198 notes
·
View notes
Text
Your Comprehensive Guide to Successful Sewing

Guide to Successful Sewing
Whether you're a beginner just starting your sewing journey or an experienced seamstress looking to refine your skills, the Guidelines offer a wealth of knowledge to help you succeed in your sewing projects. This comprehensive collection of educational articles covers all aspects of sewing, from basic techniques to advanced methods. Exploring the Guidelines The Guidelines are organized into various categories, each focusing on different aspects of sewing. Let's take a closer look at what you can find: 1 - Sewing Tools Basic Tools Sewing Tools More Sewing Tools Mats for Rotary Cutters Rotary Mat Q&A Scissors and Shears Rotary Cutters Measuring Tools Marking Tools Tube Turners Part 1 Tube Turners Part 2 2 - Equipment Setting Up a Sewing Room Sewing Machine Basics Buying a Sewing Machine Pressing Equipment Ironing Boards Sergers Presses & Home Pressing Systems Serger Stitches Computerized Sewing Machines 3 - Understanding Patterns Pattern Markings Part 1 Pattern Markings Part 2 4 - Fabric The Right Fabric Preparing to Sew - Fabric and Pattern Preparation Cotton Identifying Fibers & Fabrics Denim - More Than Just Jeans Napped Fabrics Unconventional Fabric Sources Straightening Fabric Grain Sewing with Knits Working with Napped Fabrics Wool Slick Tricks: Laminated Fabrics and Vinyls Sewing with Handwovens Identifying Plaids Sewing with Minkee-like Fabrics 5 -Linings & Interfacings Interfacing 101 6 - Notions Button, Button Pins Invisible Thread Elastic - the Notion that Gives Selecting Snaps Bindings & Tapes Using Bias Tape Rick Rack 7 - Home Dec Bed Coverings Drapery Types Table Treatments: Tablecloths Table Treatments: Placemats, Napkins and Runners Decorating with Quilts 8 - Home Dec How To Pillows Fabric Napkins Covering a Lampshade with Fabric Making Rod Pocket Curtains Tab Top Curtains Making a Shower Curtain Covering a Bench Top Tassels 9 - Quilting Quilting Tools Quilting Terms Notions for Quilters Pre-Cut Quilting Fabrics Quilting Rulers Quilting Designs Making Bias and Bias Binding Binding a Quilt Prairie Points Yo-Yos Seminole Piecing
10 - Fashion/Apparel
Body Types Clothing Care and Repair 11 - General How-To Pressing Pants Simple Seaming Techniques Seam Finishes Part 1 Fold-Down Casings Simple Hems Staystitching Easing, Gathering & Shirring Working with Fold-over Elastic Applied Casings Twin-Needle Sewing Seam Finishes Part 2 Ruffles Working with Stripes Piping Princess Seams Flat Fell Seams Bound and Hong Kong Seam Finishes Beading Part 1 Beading Part 2 12 - Garment How-To Attaching Buttons Easy Waistband Casings Centered Zipper Button Loops Covered Buttons Understitching Dart Basics Topstitching Shirt Collar Pointers Read the full article
12 notes
·
View notes
Text
99% of the random decorative stitches in computerized sewing machines are in fact unneeded like when people say you only really need a straight stitch and maybe a zigzag stitch for stretch fabrics or something they are correct BUT. my moms like 20 year old memory craft has this one satin heart stitch and its very cute. everything is improved by it. put lines of hearts on Everything.
#also that thing has text which is fun to mess with. its a really old machine so it takes forever to program#since it was one of the earlier computerized machines it has. glitches and issues#BUT. the heart stitch. so so so so so cute.
11 notes
·
View notes
Text
Loftus Bralette MK2 Go!
So the thing about the bralette pattern was that it was fiddly. There are a few seams where the seam allowance is one millimeter. That's hard to do. I am capable of that but have not the habit of the necessary carefulness. And I know a lot of the fit issues of the muslin-- which I did shorten the straps of, and put on to check the fit, and again then did not want to remove, so while it is not perfect it is currently the best bra I have (I have some decent RTW ones but forgot them at the farm so my need is dire right now). Anyway a lot of the fit issues of that could stem from careless sewing, so. I immediately cut out a second one with no alterations, just being MEGA SUPER ULTRA careful to cut EXACTLY on the lines.
I used a kit I bought from Porcelynne when I bought all the other materials. I'd meant to make a couple practice ones but then, you know, the kit wasn't that expensive and I might as well just. Do it!
It's black heavy-duty powermesh, black nylon cup lining, and pretty red lace, with black picot elastic and other findings, and then the 2" wide band elastic is metallic silver. Which is so cute and I wish I'd been able to buy just lengths of that elastic, but I wasn't able to find any on the site.
Anyway, the pattern is fiddly but not that challenging, and like 90% of the battle is remembering which way each thing goes. So I figure, if I make another one immediately I've a high chance of the best possible outcome. So here's some of that progress. Well, mostly I'm going to talk about equipment and setup.
I cut out all the materials while on a Zoom call with friends-- someone I know started hosting weekly Zooms to "meet up" with friends and work on crafts sometime during the pandemic I think, and I joined in somewhere in that time. That person has since become my sister's roommate so sometimes I go over there and participate in person, LOL. Anyway I set up my computer at the kitchen counter, got out my little cutting mat and rotary cutter, and just spent two full hours very carefully cutting out pieces and this time I labeled them with the tape before I even cut them out.
The red lace won't take a mark from anything but a Sharpie, which won't wash out, so I wasn't able to mark notches. So I just carefully stacked every copy of the pieces on top of the paper pattern piece, and put them into a baggie that way. I was so so so so careful to get the fabric cut right on the cutting lines, because the sewing lines are marked but I can't transfer those marks, and I discovered sewing the muslin that I can't sew on a line like that anyway (and often it was on the wrong side of the fabric for me to see.)
I'm home alone for two or three days, so I've taken over the living areas of the house to work in. This involved setting up a spare sewing machine on the absolutely-not-for-sewing desk that Dude uses to wfh, temporarily. I had forgotten I owned this machine, and it is a more modern one than the ten-stitch mechanical Kenmore that's my primary axe these days. This one is a Singer 6235 from the 80s, one of the most sophisticated mechanical ones they made before computerized machines were introduced; it's not high in resale value because some of the gears are nylon, but this particular individual one has clearly not been used much. It has wildly nonstandard bobbins, but I got a baggie of like twelve of them with it.
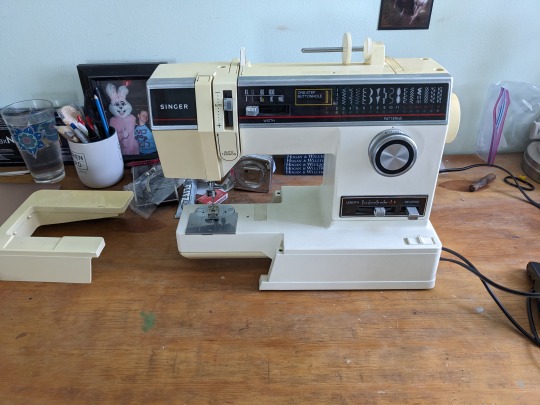
[image description: a Singer 6235 sewing machine, made of beige plastic and beige-enameled metal with black control panels, sits on a wooden desktop. In the background is a framed photo of a pink Easter bunny and a girl in a blue shirt, this is me and Dude from 2007. He rented that costume and wore it to a roller derby bout and got his ass grabbed SO much by many many people who absolutely did not suss that he was a dude in there. But the fluffy tail, he says, protected him.]
And when I opened the top, I found every single accessory lovingly stored there, including the package of needles it came with, still all in their package. So.
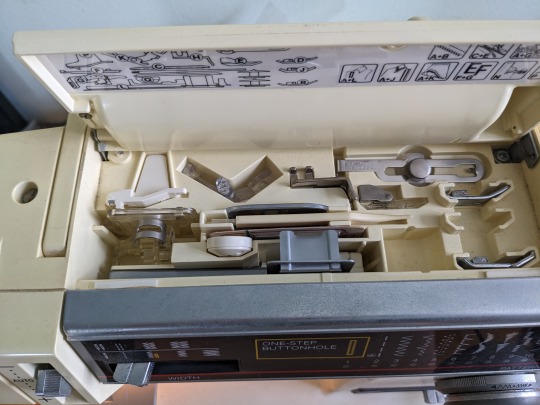
[Image description: looking down into the top of the sewing machine, which is molded plastic and has a number of esoteric plastic and metal items carefully stowed within custom-shaped cradles, with a letter key on top which is useless without a manual to decode it but good news I found a PDF copy of the manual on Al Gore's Blessed Internet so all is well.]
The single accessory I'm most excited about, however, is the reason I'm telling you all about all of this, which is otherwise not particularly relevant-- you can sew this bra on any machine that can do a zig-zag, and most of it is constructed with straight stitch because it is almost entirely non-stretch, you just need the zig-zags for the elastic attachments. It is:
A SEAM GUIDE. Which i cannot BELIEVE is no longer standard with sewing machines. It's in the above photo at top right, a metal thing with a knob in the middle. It screws into a hole in the machine bed and then you position it to hold your fabric as you sew, to make sure you do not stray over too far.
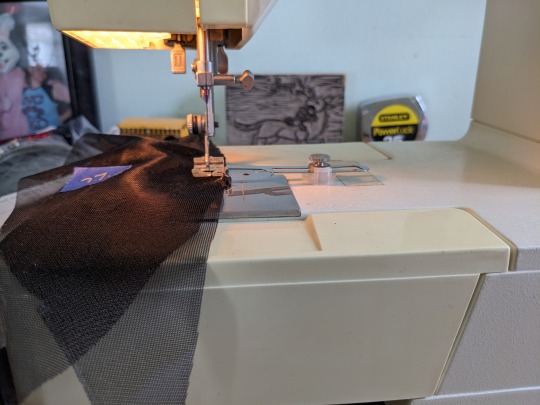
[Image description: a view through the sewing machine's active area, showing the presser foot down, the needle in some sheer black fabric, and the little metal item in question screwed into place with the metal arm of it pushed all the way over, actually touching the presser foot, holding the fabric at a 1/4" seam allowance.]
Indispensible. Though, I should have switched presser feet, because when the seam guide touches the edge of this presser foot it's actually slightly over 1/4". Just a fraction, so I've let it be because at least it's consistent and it's better than i was doing in the previous version.
so. This machine is needlessly complicated but works pretty darn well so I'm going to keep using it at least until dude gets back from his work trip on friday night.
I'm a bunch of the way through assembling the second bralette, but I think I'll talk about that in its own post, this has descended into sewing machine wittering. Suffice to say, knowing what i'm doing and what to expect means I'm doing a lot better. I'm also doing all the fiddly shit like pressing seams, and let me tell you, ironing synthetics is pointless LOL, so I'm just topstitching everything. I stopped for the day because the bobbin ran out, it was 9pm, and I looked it up and the way you wind the bobbin on this machine is by keeping the whole thing threaded including the needle and just winding it inside the bobbin case, which is So wild I definitely did not want to attempt it at 9pm after a long day. So, tomorrow I will actually talk about sewing this bralette.
But, I did have one more thing to show off-- I actually have purchased an after-market, universally-compatible seam guide that can just magnet itself to the throat plate of any machine, and was fully intending to use it on this project.
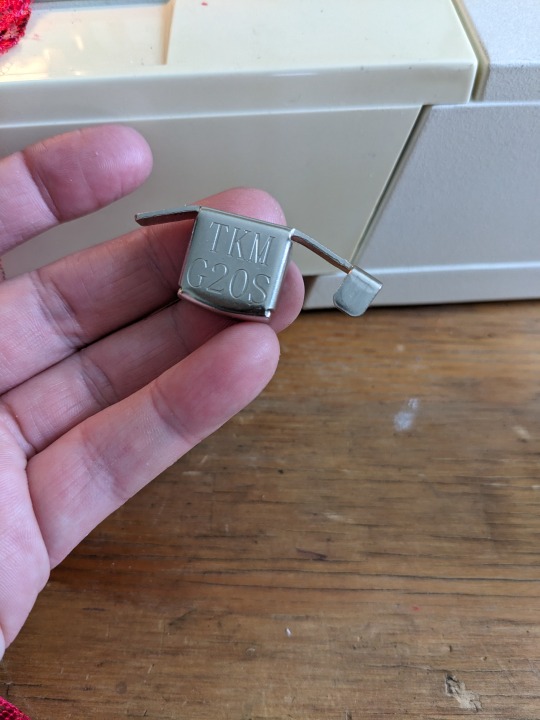
[img description: my hand holding a little metal gizmo with some arcane writing on the front; it's a square with a solid longer piece coming off the top, angled down on both sides.] This one came from Madam Sew or something, and comes with a plastic ruler with holes in it, and the idea is you put the ruler down, put your needle down so it goes through the hole marked at the distance you want, put your presser foot down to hold it, and then snap this magnetic guide at the edge of the plastic, and then it's foolproof. The thing is it doesn't work great at 1/4" either because again, that's where the presser foot is. So. I can't find the plastic ruler currently either because I am a disaster. But if your machine doesn't have a seam guide you can buy one of these and then you have a seam guide. I recommend it 100%; learning to sew a straight line is one thing, learning to follow a seam allowance is another, and you can improve your sewing immensely by taking the easy approach to it. You have to remove the guide for things like topstitching or other fiddly things, but for the vast majority of seams, including curved ones, this works a treat, makes it so you basically don't have to think, and just-- well, as long as your cutting-out was precise, you're guaranteed to get an accurate fit if you just use this kind of dealie to be precise about seam allowances.
The free version is that you get a piece of masking tape, put it down on your throat plate, and mark in Sharpie exactly where your seam should go, a big thick bold line as long as you can get it. That helps a ton too. Cashmerette's knit patterns all have 3/8" SAs, which aren't a standard marking on throat plates, and their wovens are all 1/2" instead of 5/8", so that's *also* not a standard marking, so I have long ago put the masking tape on but sometimes I also just use the seam guide because then I don't have to keep paying attention.
18 notes
·
View notes
Text
BI-890 Rebar Tier Machine in BD
Transform your development location with the Programmed BI-890 Rebar Tier Machine. Boost rebar Tier productivity, spare time, and improve security. Contribute in advance today! In the ever-evolving world of development, effectiveness and exactness are foremost.
One groundbreaking innovation that has revolutionized the way fortification is dealt with on development destinations is the Programmed Rebar Level Machine. This imaginative gadget not as it were assists the rebar-tying handle but too improves by and large efficiency, guaranteeing ventures are completed on time and inside budget.
Methods Programmed Rebar Tier Machine
Traditional strategies of physically tying rebar are not as it were time-consuming but moreover physically requesting. The Programmed Rebar Tier Machine is outlined to ease these challenges by robotizing the handle of securing strengthening steel bars with speed and exactness. This compact and versatile gadget altogether diminishes the labor required for rebar tying, empowering development teams to center on other basic perspectives of the project.
Time Efficiency:
Time is cash in the development industry, and the Sagartexbd Programmed Rebar Tier Machine demonstrates to be a important venture by definitely diminishing the time went through on rebar tying. The machine’s computerized prepare guarantees reliable and dependable ties, disposing of the inconstancy related with manual tying. This, in turn, quickens extend timelines, permitting development groups to meet due dates and take on extra ventures more efficiently.
Enhanced Safety:
Construction destinations are inalienably unsafe, and the well-being of the workforce is a best need. The Programmed Rebar Tier Machine contributes to upgraded security by minimizing the require for manual labor in the rebar-tying prepare. With decreased presentation to physically requesting assignments, laborers are less inclined to weariness and wounds, making a more secure working environment.
Rebar Tier Machine Fetched Saving:
While the beginning venture in an Programmed Rebar Level Machine may appear noteworthy, the long-term fetched reserve funds are irrefutable. The machine’s capacity to increment efficiency and diminish labor costs comes about in a quick return on venture. In addition, the reliable and exact ties created by the machine contribute to minimizing fabric squander, encourage optimizing venture budgets.
Versatility in Application:
The Programmed Rebar Tier Machine is flexible and congruous with different rebar sizes and sorts, making it appropriate for a wide run of development ventures. Whether working on private buildings, commercial structures, or large-scale foundation ventures, this machine adjusts to the particular needs of the work. Its transportability guarantees that it can be effortlessly transported to distinctive zones of the development location, maximizing its utility.
Ease of Use:
Construction experts appreciate apparatuses that are instinctive and simple to utilize, and the Sagartexbd Programmed Rebar Tier Machine fits the charge. With user-friendly controls and ergonomic plan, administrators can rapidly gotten to be capable in working the machine. This ease of utilize interprets to diminished preparing time and expanded on-site efficiency.
Environmental Impact:
In an time where maintainability is a key thought, the Programmed Rebar Machine too plays a part in lessening the natural impression of development ventures. By optimizing the utilize of materials and minimizing squander through exact tying, the machine contributes to a more eco-friendly development prepare.

3 notes
·
View notes
Text
How to Use Brother Sewing Machine (Beginners Guide)
If you've recently purchased a Brother sewing machine, you're in for an exciting journey! This device has advanced features for your everyday sewing routine. If you love to sew clothes, this machine would be perfect. However, if you’re a beginner who is just getting started with sewing, I’ll teach you how to use Brother sewing machine in this blog.

I have done multiple projects with this sewing machine, and they all turned out great. I’ll explain each step clearly to help you stitch like a pro. So, let’s get started using the Brother Sewing machine.
Step 1: Connect the Machine to Power
As the first step, you need to connect your sewing machine to the power supply. So, grab the power cord and connect it to your sewing machine and to the power outlet on the wall. Now, turn on the power switch. After that, you can turn the power off and on as needed.
Step 2: Connect the Foot Pedal
This step is only for mechanical Brother sewing machines. Hence, if you like machines with foot pedals, you can connect them to your machine according to the instructions. You can connect them to the side of your power cable. When I was learning how to use Brother sewing machine, I had no guides, and I made lots of mistakes. But, you should take care of the important points to avoid any type of mistakes.
It is worth noting that you don’t need a foot pedal if you prefer a computerized sewing machine. In some machines, both options are available. In computerized machines, you’ll get a start and stop button in place of the pedal. Hence, it’s up to you which machine you prefer for stitching.
Step 3: Adjust the Presser Foot
To continue learning how to use Brother sewing machine, you need to keep following each step carefully. In this step, you need to turn your sewing machine off and check whether your pressor feet are adjusted or not. This presser foot helps keep your material flat during sewing tasks. The Brother Sewing machine has a huge collection of presser feet with different abilities.

You can select the pressor feet that you use. You need to lift the presser foot up on normal sewing machines to place the fabric underneath. However, if you’re using a mechanical sewing machine, it will have a lever and a needle shaft that you can lift up and down. Lastly, if you’re using a computerized sewing machine, you’ll get a button on your machine to raise or lower the foot pedal.
Step 4: Insert the Needle
After adjusting the presser foot, you need to insert the needle in your machine. To get started, take a new needle from the machine pack you’ve got. There are many sewing needles for different types of stitches.
Now, grab a screwdriver from your machine’s accessories kit. Then, find the needle shaft and the screw on the right side of the needle. After that, loosen the screw, and insert the needle into the place, and again tighten the screw. Ensure that the needle is placed correctly and securely.
Step 5: Install Your Sewing Machine
Once you’re ready with your sewing machine, find a comfortable place to sit it. Make sure that the surface is flat and stable before placing your machine. Also, keep it away from running water. Moreover, check that the power cable is long enough to reach the power outlet and that there is no extra strain on it.
While installing your sewing machine, ensure that your room has sufficient space to keep your legs comfortably on the presser foot. Otherwise, you’ll end up getting uncomfortable.
Step 6: Thread Your Machine
I hope you’re enjoying this how to use Brother sewing machine guide with me. Well, let’s move on to the next step after installing your machine. Proper threading is an important step once you install the machine. If you don’t do this step the right way, you won’t get the right stitches.

And the best part is that your sewing machine displays all the threading instructions. First of all, insert the bobbins in place. Now, thread your machine, and before that, raise the presser foot. Raising the presser foot is important to pass the thread easily.
After that, place the spool of thread on the machine and follow the instructions to thread your machine. Ensure that the thread smoothly passes through the spool, and follow every step of threading carefully.
Threading the needle in your machine can either be done manually or mechanically in some specific sewing machines.
Step 7: Start Stitching Your Projects
Finally, when you’re done threading your machine, you need to do some test stitches to understand how it works. If you have any issues, you can fix them immediately. To follow this method, take an old cloth to practice. Now, place it underneath the pressor foot and lower down the pressor foot.

Finally, choose a stitch pattern and start stitching. Different sewing machines may have different methods to select stitch styles, so it’s better to review your user manual.
Once you finish the stitching, lower the pressor foot pedal; if you have a mechanical machine, hit the Stop button and perform reverse stitching to keep the stitching secure. After that, gently take off your legs from the pedal and remove the cloth.
Conclusion
I hope you’ve learned how to use Brother sewing machine for beginners. Using a sewing machine may seem a little complicated at first, but once you get used to it, it’s quite comfortable. As you know, Brother produces different types of sewing machines, so you should always review the user manual, which is provided to help you with every step. Once you learn the right method, you’re ready to stitch anything like a pro.
#Brother Sewing Machine#How to Use Brother Sewing Machine for beginners#How to Use Brother Sewing Machine
2 notes
·
View notes
Text
Good morning. 🌸💮🌸
17 December 2024

The first long arm quilting machine that we got for my wife was a just a free-motion quilting machine where the machine stayed stationary, and the person quilting would move the fabric to create the designs. Even that machine costed thousands of dollars. My wife used that machine for a few years until we got a computerized quilting machine. My wife is president of the local quilting guild and there is a younger woman who is a member of the guild but didn't have a machine, because of cost, of course. My wife just up and gave her the older machine. There is a duo motive there, my wife is a giving person, and she wanted make room in her shop.
"I have found that among its other benefits, giving liberates the soul of the giver." - Maya Angelou
3 notes
·
View notes
Text
On to quilting…
This was probably the step I was most concerned about. My machine is a bit on the small side. It’s a Pfaff Passport. It’s my first computerized machine… just basic mechanical machines up to this point. There is certainly a learning curve when it comes to a major jump like that but I must admit… working with a mechanical machine that you have to do all the little adjustments yourself… it helps to understand what is happening, especially when something goes wrong. And something always goes wrong.
So far I’ve…
Bent a needle
Forgot to move the needle back to center position after switching a foot and the needle hit the foot. Luckily it didn’t break but the machine made a god awful sound.
I still can’t get the bobbin case out of the top load space (always had a front load) so I can’t clean out lint. The manual says to just “lift it straight up and to the right to remove” once u remove the needle plate but there’s a trick they’re not saying and i haven’t figured it out yet.
While the space between the needle and the arm to the right is small, it did just fine. I didn’t need to worry about that. A lot of Pfaff machines have a dual feed system which is kinda like an integrated walking foot so that certainly helps move the layers thru. I played around with the presser foot pressure but I didn’t really see a difference. One thing I did notice…. Managing all that fabric isn’t easy. I have a tendency to try a control the fabric too much (hence I bent a needle) and I can see that I may have pushed fabric out of alignment a bit. I did have to re-baste a bit and I had to take out a whole seam that was too wonky for words.
It’s certainly not perfect. Fabric shifted a bit. My stitches aren’t perfectly straight. I forgot to change my stitch length this morning so half a line is the default 2.5mm instead of the 3mm I wanted (this doesn’t happen with a mechanical machine!! It stays until u change it!). But for a first quilt attempt, I think it’s pretty good!
I have to head back out to the store tomorrow since I ran out of the lavender thread. Shout out to Three Little Birds in Hyattsville, MD. They’re awesome. I was just there yesterday… did I have the lavender thread in my hand? Yes I did. But I put it back because “What are the chances I’ll need it? Pretty fucking high.
I’ve got a few more lines to do after I get the thread and then on to squaring up and binding!
My cat doing a very cat thing… sitting on whatever I’m trying to work on.


9 notes
·
View notes
Text

Are sewing machine viruses a thing? How about curses?? Hauntings???
In the past 36 hours, I have had ALL THREE of my sewing machines randomly stop looping the bobbin thread, making them functionally useless. It's happened with different thread, different fabric, different needles, different presser feet, and I have NO FREAKING CLUE why it happened or how to fix it. I have cleaned and checked all user-serviceable areas of the machines and can't find anything wrong.
Any sewing machine gurus out there have suggestions? Google hasn't been helpful, and my only other option is to hit it with a brick.
At this point I am less than a week out from ACEN with no way to actually finish my costume. I have one machine left to try (a vintage Husqvarna that hasn't been tested since it fell out of a car onto pavement), but since 3 of 3 machines are down, I'm not holding out a lot of hope for that one. T_T
(For reference, the machines that are down include two computerized Husqvarna Vikings and a fully manual Juki.)
6 notes
·
View notes
Text
Bernette 79 sewing machine and embroidery machine review - initial thoughts
I doubt anyone reading this has "embroidery machine" money in their bank account, so it would be helpful to no one, but I appreciated other people putting in their honest reviews when I make big purchases, so I will post mine in case it would be relevant in society.
First, I got this machine because I wanted a computerized machine with more options than my Hello Kitty Janome sewing machine which has 5 stitches, no ability to sew a zipper, and the button hole function/zig zag stitch no longer works properly, making it useful only for sewing straight lines. Most people would advise, stick with the antiques or non-computer ones because of planned obsolescence with newer technology, a statement I would normally go by except my mom finally messed up her retro machine built into the table, and I felt the Hello Kitty was relatively cheap so I got more than its money worth out of it sewing costumes and such over several years. Time for a big upgrade. Also I have the money and still plan to do a lot of sewing if society doesn't break down into a post-apocalyptic Mad Max dystopia.
However, I didn't need an embroidery machine at all. I do embroidery by hand if needed for costumes, my mom taught me the basics, and hand embroidery looks perfectly fine from a distance. But what I do want is a good deal, and reviews stated the combo machine is an excellent bargain bundled with the super expensive embroidery designer software and extra doodads in the Yaya Han version. Not too big or complicated, but versatile especially for costumers, which I am.
So far, after using it for sewing some skirts and two costumes, lots of mending and simple embroidery, I would say I made a good decision. There is a bit of a learning curve in the sewing machine itself and a huge learning curve for the embroidery part, which I expected. The computerized machine does some things that are inconvenient to me, although I suspect this inconvenience is to prevent you from sewing over your fingers by accident. I do like the semi-automatic needle threader, it only works like 50% of the time and seems to shred the thread when it does work, but at least I don't have to struggle to see the hole to thread with my elderly eyes. The automatic thread cutter and the semi-automatic bobbin winder is also great once I figured out how they worked. And the variety of stitches and machine feet is reassuring, though I've only used a few stitches and two feet lol. I already used the buttonhole maker, works just as I had hoped. The sewing is smooth and fairly fast compared to the old machines, and seems to not have much problem with thick fabric, although I haven't tried really thick fabrics yet.
The embroidery function requires taking several parts off the sewing machine and switching out with other parts, which is a bit of a pain if I ever want to switch between functions quickly. Embroidery machines are noisy and require monitoring because sometimes the thread tangles over nothing, like molecules of air are too big sometimes. But I like the possibilities of embroidering tougher materials that would cause me pain in my fingers to try to push a needle through, or perhaps making multiples of identical items, like patches with text. The auto digitizer is not bad for simple designs, and if I had a really cool design to digitize, I think I can wrangle the software into working without too much trouble. Currently trying to think of original designs to digitize, though.
There is an extra cost of having to buy multiple colors of machine embroidery thread which is different from regular thread and more expensive, and lots of stabilizer which is required for smooth results. But I managed to get a bargain lot of new threads from a reseller online, and I found advice on how to sort of reuse stabilizer scraps (though I still have to buy rolls of it especially for larger designs.)
So far I haven't broken anything except one needle. I'm happy with my investment, and look forward to several years of sewing, assuming the world doesn't destroy itself by then. If you are interested in perusing sewing machines be sure to check @20dollarlolita !
2 notes
·
View notes