#sewing tutorial
Explore tagged Tumblr posts
Visit Tumblr Blog
Explore Tumblr blogs with no restrictions, modern design and the best experience.
Last Seen Tumblr Blogs


Fun Fact
Tumblr’s website traffic is steadily declining.
Text

tada!!! doot doot!!! a new free sewing project from me has just dropped!!!
🎪 with a couple of socks, a scrunchie, and some yarn, you could make a little clown guy like this for yourself! 🎪
you're welcome, enjoy, and i hope to see some clowns from yall ^_^
164 notes
·
View notes
Text

How To Make A Market Wallet (medieval bag)
First, you’re going to get a rectangle of fabric that’s as long, and twice as wide as you want the bag to be. A nice big one is about 1.5 metres by 1 metre. The fabric should be something sturdy - a thick linen is probably most period-accurate, but a sturdy cotton drill works quite nicely.
You also want 2-4 little squares, about 1 to 1.5 inches. These are a surprise tool that will help us later.

First off, fold the rectangle in half across the width. Work out how big you want the pockets of the bag to be, and pin on both sides (I usually fold lengthwise to get similar proportions). Make sure to leave a good amount of space in the middle, as this will become your opening.

It should now look like this.

Next, backstitch from the ends up to where you’ve pinned, leaving a slit in the centre.

Fell the seam by cutting one side of the seam allowance down by half, folding the other side around it, and securing with a whipstitch (this stops it from fraying AND creates a very strong seam).
(Sorry for the bad lighting I was in the car).

Next, fold the bag so the seam is in the centre. This is almost what the finished bag will look like.

Sew along the ends with more backstitches, and fell the seam. We’re nearly done!

Then you wanna hem the centre slit. I rolled the fabric over twice, and whipstitched into place.
Next, you want those little squares of fabric. At each end of the opening slit, you’re going to position them diagonally, with their edges folded inward. I like to do one on the front and reverse sides (so 4 squares total), but you might be able to get away with just 2. Whipstitch these into place. They will stop the slit ripping open (this is a real problem).

Well done, your bag should be finished!! Wear it by folding it across the centre slit, twisting it slightly, and slinging it over your shoulder. It is best to weight the sides fairly evenly, but I’ve never found this to be too difficult. The wide “strap” does make it very comfortable though.
Feel free to comment/reblog, or send an ask if you have any questions, or I haven’t made anything quite clear enough! The photo limit makes it difficult to show every step as it happens unfortunately. I am considering doing some video tutorials in future for a couple of my bigger projects (likely hosted on YouTube with the link sent here). Let me know if you’re interested!

#medieval reenactment#sewing#market wallet#tutorial#sewing tutorial#medieval history#medieval#history#historical sewing#i’ll be on my merry way now
251 notes
·
View notes
Text
Wednesday, November 29.
You reap what you sew.
Never have truer words been spoken. But they come as good news for Tumblr's sewing community, however, who have been sewing some absolute delights. Some real œuvres d'art. Some winner-winner chicken dinners.
As luck would have it, #sewing is trending. And it's trending right now, so we have reaped a selection of these very dinners for your eyes only. We have then asked ourselves just what did we do to deserve y'all, and your resplendent talents.
#today on tumblr#sewing#sew#sewblr#crafts#sewing machine#crafting#sewing project#textile arts#crochet#sewing patterns#sewing tutorial#sewing tag#craftblr#contemporary art#artists#artists on tumblr
1K notes
·
View notes
Text
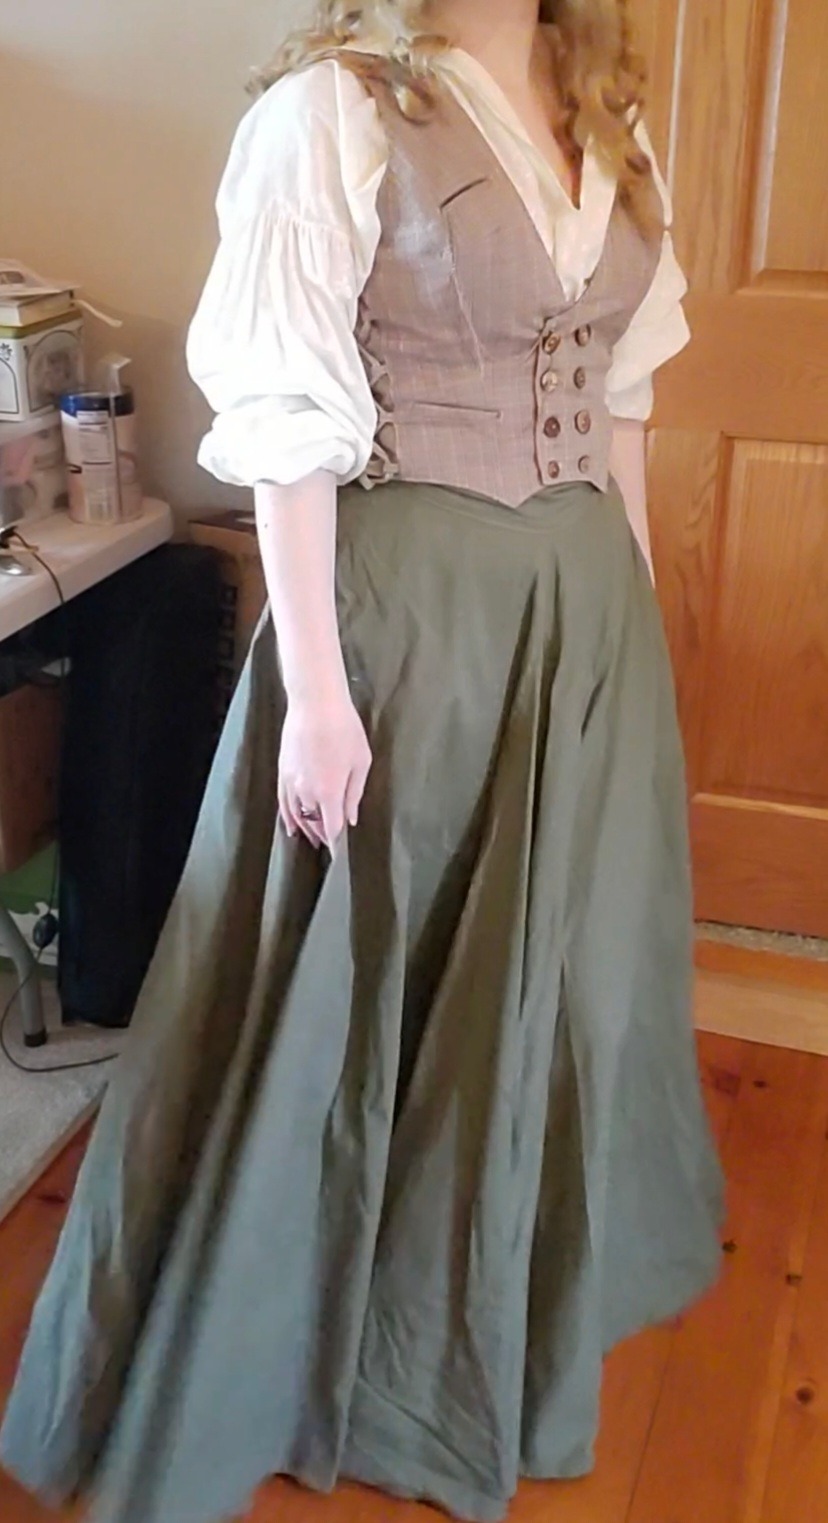
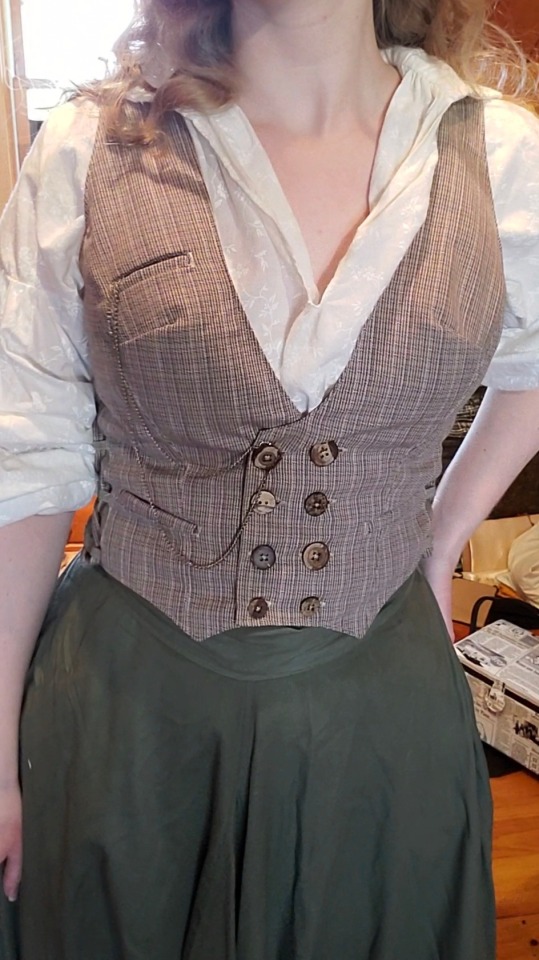
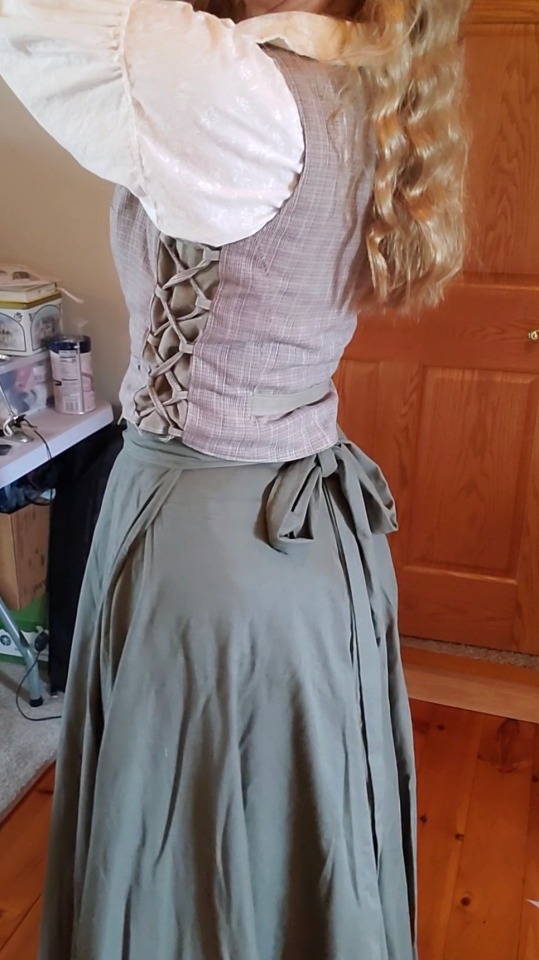
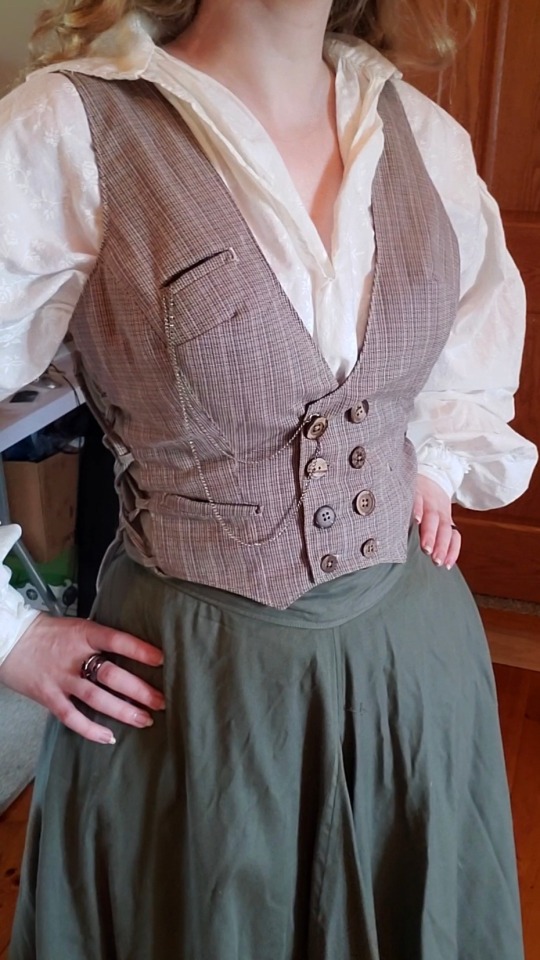
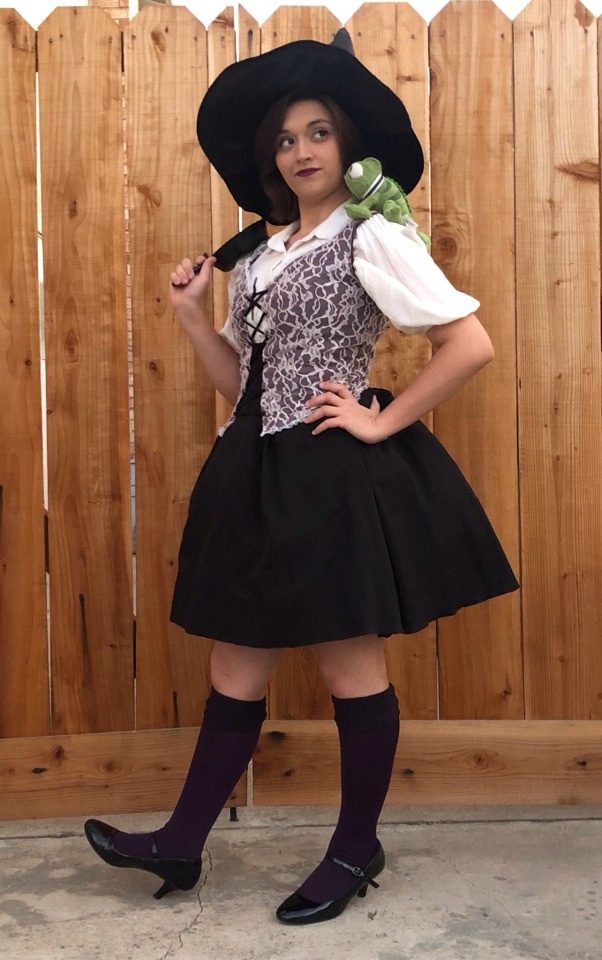
Hobbit vest is finished! I wanted to wait to post the reveal until I had the pattern finished (which of course took way longer than I was originally expecting) and then I edited the video and then I had to switch hosting providers on my website so I've been very busy the last few weeks but it's all finally finished and everything is live!
I love how this vest turned out honestly, it's exactly what I was going for when I started designing it. That being said though I'm just as excited to finally move onto something new. The hobbit skirt is still on my to do list too so I should be starting on that soon!
--------------
LINKS AND OTHER HELPFUL WHATEVERS
Links
○ Shop: https://pendress.com/shop/
○ Website: https://pendress.com/homepage/
○ Linktree: https://linktr.ee/DevynConstance
○ YouTube: https://youtu.be/vNleqYBcuvs?si=21NTETTinkGepv7I
Pattern Links
○ The Belladonna Vest Pattern: https://pendress.com/product/the-belladonna-vest-digital-download-sewing-pattern/
○ Harvesting Apron Pattern: https://pendress.com/product/harvesting-apron-pattern/
What's Included in the Patterns
○ A comprehensive sewing pattern with step-by-step instructions and detailed illustrations
○ Printable in both A4 and US Letter formats
○ Projector-friendly files
○ Printable pattern envelope for easy storage and labeling
Materials List
○ Main Fabric: 1 yard cotton
○ Lining Fabric: 1 yard cotton
○ 8 Buttons
○ Lacing (optional): 2 yards
Other Helpful Resources
○ How to Sew Welt Pockets: https://www.youtube.com/watch?v=e8uLgW5GRsc
#sewing#my sewing#sewing project#vintage fashion#fashion design#handmade#sewblr#historical costuming#hobbit vest#hobbit costume#hobbit cosplay#hobbit#sewing pattern#hand sewing#sewing resources#small business#history bounding#sewing history#finished project#historical dress#waistcoat#sewing waistcoat#historical waistcoat#sewing patterns#fiber art#lotr cosplay#lotr#sewing tutorial#youtube tutorial#diy
98 notes
·
View notes
Text
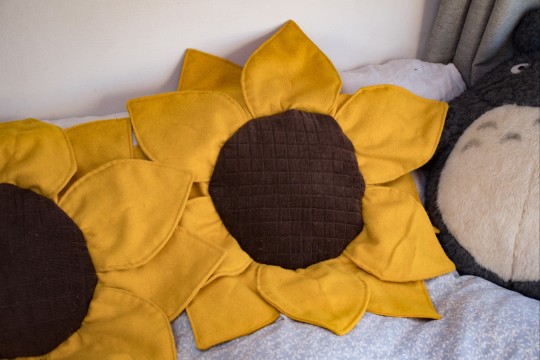
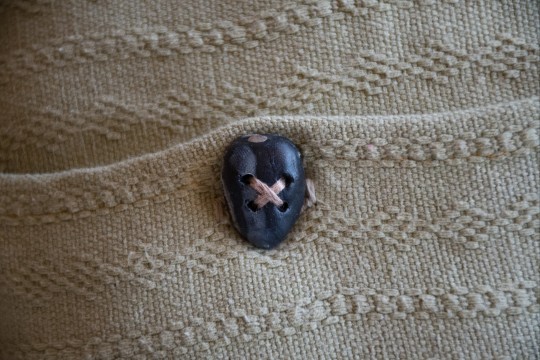
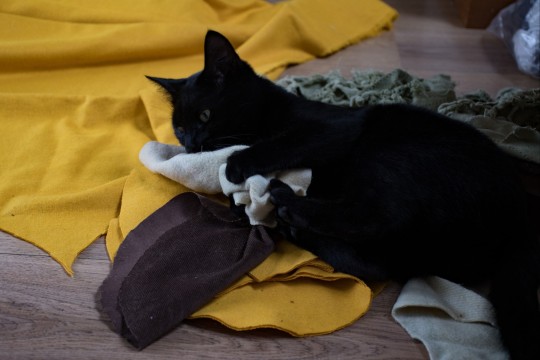
I made some cute sunflower pillows out of scrap fabrics I had been saving from the dump. I couldn't find the right buttons so I made some out of polymer clay I had in my stash 🌻

Here's some instructions if you also want to make some 😊
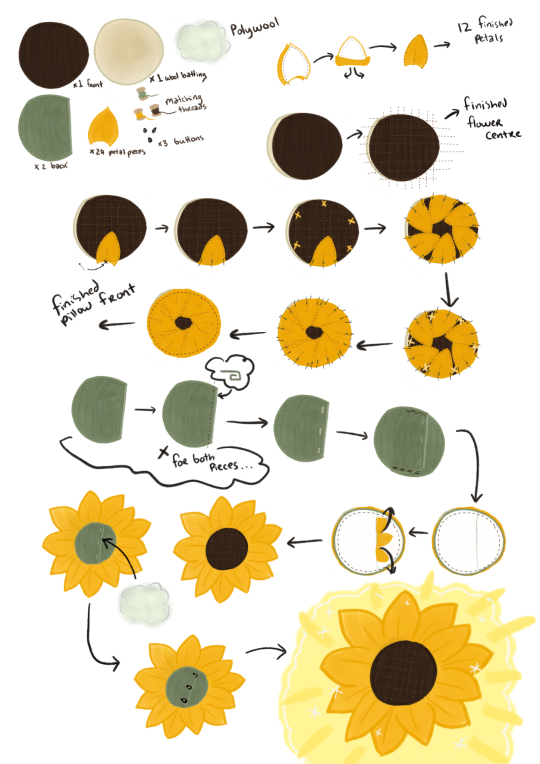
I still need to draw up a sized petal template but I've also made a youtube video (my first one, it's horrible 😂) if you are more of a visual learner.
youtube
1. Cut 1 brown corduroy circle 1 wool batting circle and 2 green 2/3 circles (for the back)
2. Cut 12 pairs of petals (24 pieces total)
3. Sew petal pieces right sides together 1cm away from edges. Turn right sides out and top stitch along the edge. Stitch centre petal seam. Repeat for all petals
4. Quilt your brown centre to the wool. I made lines about 1.5cm apart making a grid.
5 Pin 6 of your petals centre first evenly spaced around the edge. Pin the last 6 over the gaps. Sew 1 cm from the edge
6 Roll hem the straight edge of the 2/3 circle pieces (a rol hem to folding and then folding again)
7 make 3 button holes evenly spaced on one back piece
8 secure the pieces to eachother both having right sides up, creating a pocket
9 fold on your petals and pin your back piece right sides together to your flower front. Sew 1.5cm around the edge and turn out through the pocket.
10 stuff your pillow then add buttons to fit the holes you made earlier. I do the buttons last to make sure they fit nicely when fully puffed.
11 yayyyy pillow!
#cottagecore#slow living#cottagecore aesthetic#hobbitcore#sewityourself#diy#sewing tutorial#free sewing pattern#cottage life#Youtube
654 notes
·
View notes
Text
The Why of Sewing 5: Avoiding Bad Tutorials
There are so many tips and tricks and tutorials online and some of them are handing out great advice, but not all the advice is good. Here are a few things that if you see happen in that video you should immediately take a larger grain of salt.
Red Flag #1: Sewing over pins
Sewing over pins is controversial. Some will tell you it is fine, and it almost never causes a problem. Which may be true, but what they don’t tell you is what actually happens if your needle hits a pin. The best case scenario of a needle hitting a pin is a bent pin and a damaged needle.
Sewing machine needles are not designed to hit metal, ever. At the very least every time the needle passes through the fabric it becomes less and less sharp. Hitting a pin will destroy the tip. It can also bend the needle. Or it can break the needle. It can cause the needle to jam up and disrupt the timing of the moving parts inside the machine. A machine with broken timing is generally repairable by a professional, but do you want to spend $100 and loose access to your hobby for a week because you didn’t want to remove a pin? That may be the worst case scenario to you - but remember that broken needle? If you are lucky, the thread through the eye keep all the bits of the needle in one place, but when the needle breaks fragments sometimes go flying. They can fly into your machine, causing damage (again $100 and a week of lost sewing time). Or they can fly out into your room, lurking to be stepped on by yourself, or your child, or your pet. OR they can fly into your face. Many a sewist has a tale of a needle fragment bouncing off their glasses or having to take a trip to the ER because they didn’t have glasses on. It isn’t how frequently a problem occurs when sewing over pins, it is how disastrous the outcome has the potential to be when it does occur.
When it comes down to it, sewing pins is a dangerously bad habit that can damage your machine and your person. If you see someone sewing over pins in the tutorial you can lay money down that they a) do not know better or b) know and do not value your safety.
Red Flag #2 Not Pressing Seams
If you are watching the tutorial and you never see the creator pressing, or see evidence that seams are pressed be wary. I see this most often in "tutorials" made by folks who have just learned a very little bit and want to monetize their new knowledge. If the seams in their final product look like they laid a hardcover book open on a table, that is a big red flag.
I saw something somewhere long ago that said “Sewing is just ironing with extra steps” and no truer meme has ever been made. Wish I could find it. No teacher worth your time is skipping the ironing. Look for the following things: ironing on camera, mentioning that pressing should be done at certain points, and of course nice flat seams.
Red Flag #3 Big Changes with an "Easy Method"
Beware of “easy” tutorials that make a significant change to a garment. Your jeans will not become high or low waisted from anything short of taking them apart and remaking them. They can become shorts rather easily. Yes it is possible to turn jeans into a skirt but I am old enough to know better. It won’t be easy and it will not be cute. Best case scenario you will look fundamentalist.
Making one garment into another kind of garment is usually more difficult than sewing from scratch.
Orange Flag #1 Unfinished Seams
I am calling this an orange flag, but ONLY an orange flag if the original tutorial was focused on costumes and cosplay. If the tutorial is teaching you to make anything that needs to survive more than a couple wears and washes this becomes a red flag.
It is common in cosplay to leave seams unfinished, as an item has limited wear and washing in its future. Unfinished fabric edges fray from washing and friction, some fabrics fray faster than others and leaving your seam allowances on a regularly worn garment as naked as a jaybird is a glaring mark of inexperience.
There are many types of seam finishes, and there are times when seams DON'T need extra finishing, but a good tutorial will either show the finishing, describe ways to finish the seams, or explain why they don't need to be finished. Some examples of seams that can be left to fly free are seams on the bias, most knit fabrics, and seams that will be enclosed in a lining.
Orange Flag #2 Gimmicks and "Hacks"
Lifehack has become code for a gimmicky trick that rarely works the way it is shown via television magic. If you see a nifty trick in a short video, look at the account it comes from. If everything they post is about gimmicks or shortcuts - using straws or cardboard contraptions to do things in sewing with no explanation of how they are normally done, be wary. It is one thing to show a tip, but if all they do are 30 second gimmick videos - it is unlikely that those tricks will actually work when you try them. Most will likely be no better or worse than a waste of your time.
Now that I've given you things to avoid, here are some youtube channels I personally watch and love and learn from.
If you do not know how to sew - start here https://www.youtube.com/@Evelyn__Wood Even if you are not into vintage style I think Evelyn Wood is one of the best at explaining how sewing is done to the beginner.
This is the only channel I actually tune in for live videos, but even if you don't catch it live Saremy has a wealth of knowledge and always goes into why things work the way they do. https://www.youtube.com/@SewSewLive
Sewing therapy is another channel where you can just watch someone go through the process of sewing from start to finish. She shares tips, and there is nothing better about learning the order of operations than just watching someone sew an item. https://www.youtube.com/@SewingTherapy
If you do not have or want a sewing machine start here. https://www.youtube.com/@sewncompany - Many years ago the creator and I lived in the same city and would occasionally cross paths. I don't think she knows me from Adam but I love her tutorials and she has been kind and gracious in every encounter we had. Her tutorials include both right and left handed instructions!
General tutorials from someone who knows what they are doing https://www.youtube.com/@ProfessorPincushion
Garment Sewing content that includes tips as well as styling ideas. Karina does a lot of pattern testing and I think does a really good job at showing how to incorporate the garments into everyday life. https://www.youtube.com/@LiftingPinsandNeedles
If you want to learn to quilt, start here https://www.youtube.com/@JustGetitDoneQuilts
and here https://www.youtube.com/@thelasthomelyhouse - this one is a lot more inspiration for me than a tutorial but its kind of a combination.
Stitch with Rachel has lots of quilting tutorials and inspiration and is really great for English and Foundation Paper Piecing tutorials. https://www.youtube.com/@stitchwithrachel
#quilting#sewing#sewing tutorial#fabric#textile art#sewing tips#sewing techniques#the why of sewing#fabric grain#Youtube
126 notes
·
View notes
Note
Hi! I just saw your quilted butterflies photo, and I was wondering if you would willing to share how to make them, or link to a tutorial? They're gorgeous and I'd love to try, but i don't know the right search terms to find those, i think.
Oh absolutely! Everyone needs an easy craft to do right now. This will be a photo tutorial, so if you need a video the search terms are "origami butterfly bookmark". The instructions will be pretty similar.
*If you are using a sewing machine a single butterfly should take between 15-30mins, and if hand stitching my guess is ~1hr
Tools: -2 Scrap fabrics or 2x fat quarters, one for the main/outer fabric, one for the inner contrast -I recommend quilting cotton, though any easily ironable, non-stretch fabric will work -ruler and marking tools -scissors OR rotary cutter and mat -Pins (if desired) -Thread in a matching OR contrast colour - depending on preference -Iron and Ironing board - You can use a piece of cotton folded into a thin pad in a pinch as long as it's flat!
Step 1: Cut out two rectangles. You can make the butterflies as big or small as you'd like, as long as it's in keeping with the 2:3 ratio. For me, I like to use 4" x 6" rectangles. Use your marking tools to mark out the rectangle on the back/wrong side of the fabric, then cut them out!
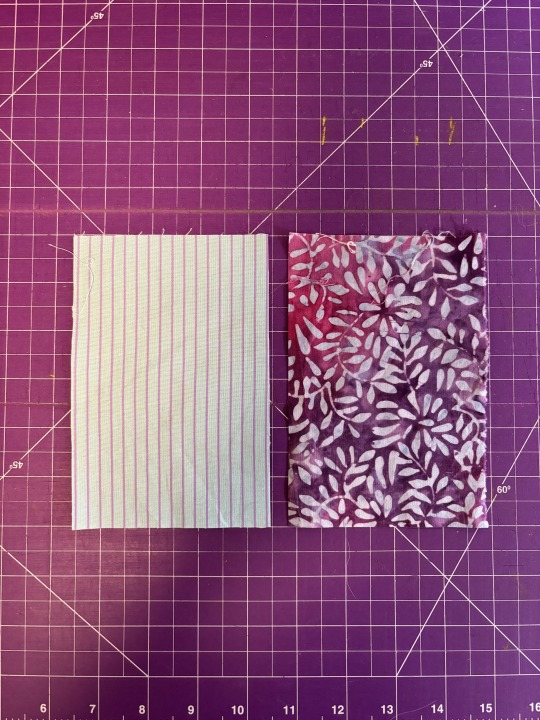
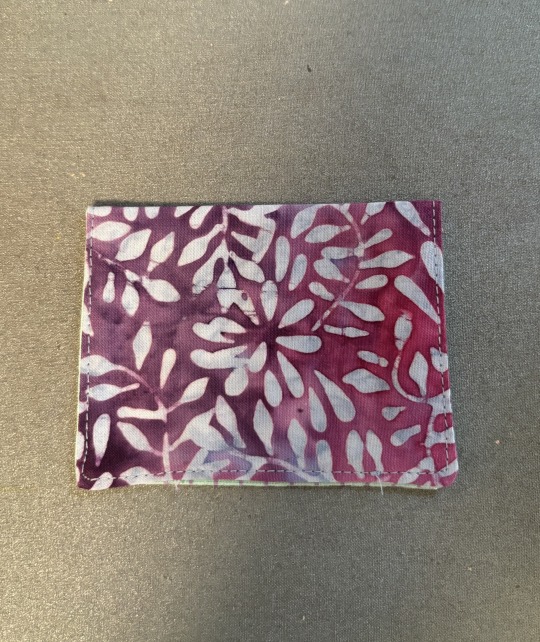
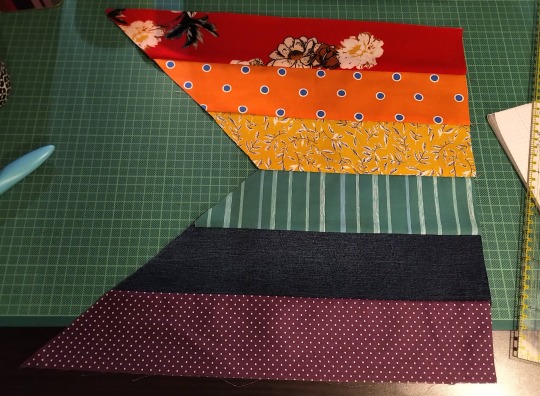
Step 2: Put the rectangles on top of each other, with right/patterned sides facing each other. Make sure all your corners and edges line up. Pin in place if using pins. (in this example one of my fabrics has the pattern on both sides of the fabric)
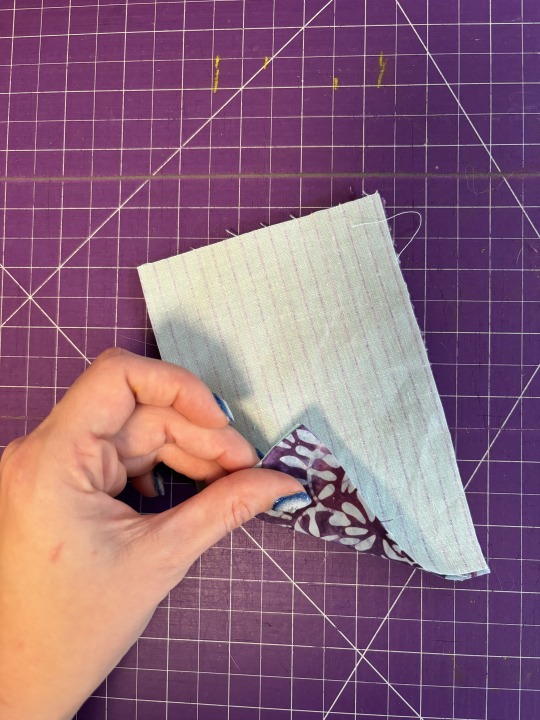
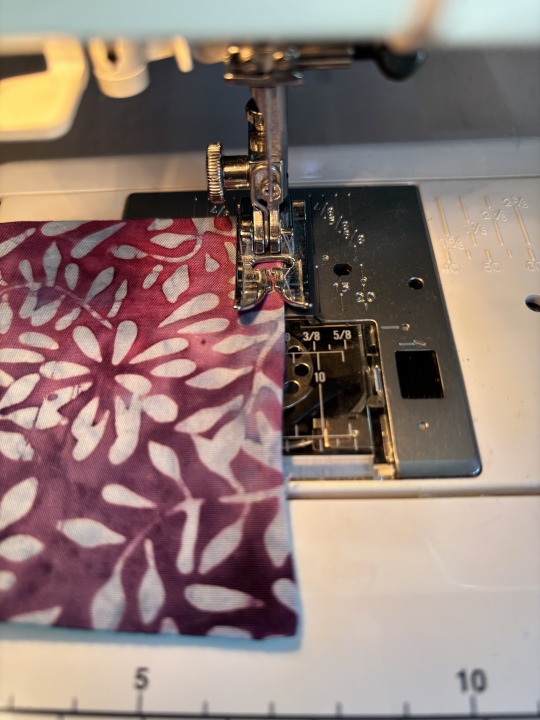
Step 3: Sewing! Mark a 2" gap on one of the short edges. If using hand needle mark out 1/4" distance from the edges. Sew. If using a machine, line up the edge with the 1/4" inch mark and sew. (Image is completed stitching, not placement on machine)
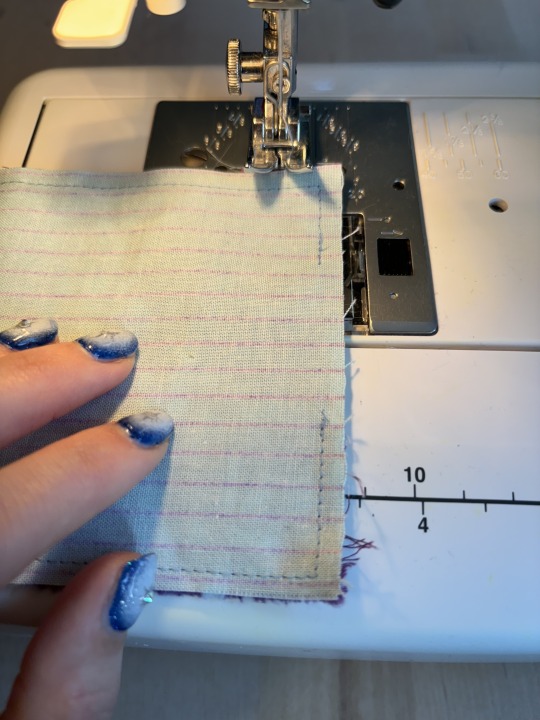
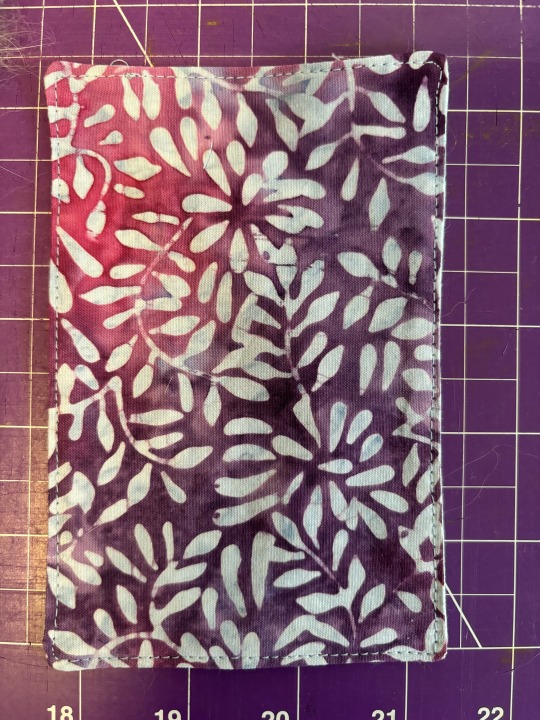
Step 4: Trim the corners without cutting into the stitching line, then flip the fabric inside out through the 2" gap you left. Make sure to stick your finger or something blunt but pokey -like a chopstick- into the corners to make sure they are nice and crisp!

Step 5: Press all your frustrations out by pressing that fabric! Get it nice and flat and crisp! Make sure you've folded in the edges of the 2" gap to match the seam allowance of the already-sewn edges before you press. Then, if hand sewing, slipstitch the gap closed. If using a machine, set your fabric at a 1/8" distance and sew around the edges, effectively closing the gap and giving you a lovely topstitch detail.
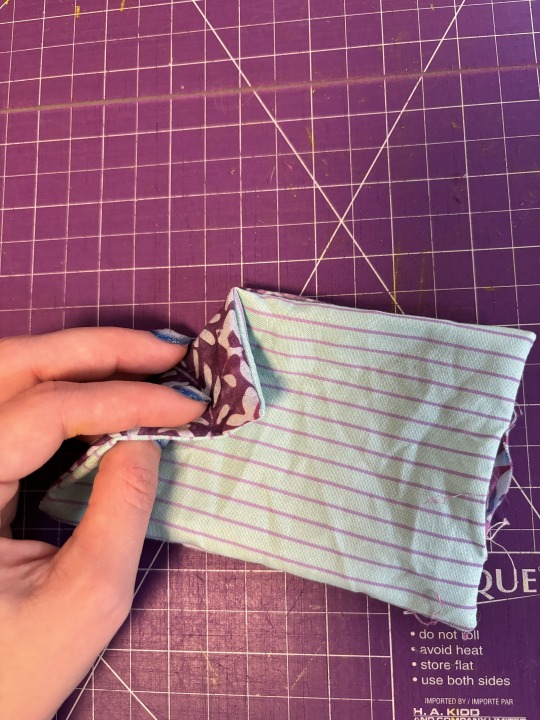
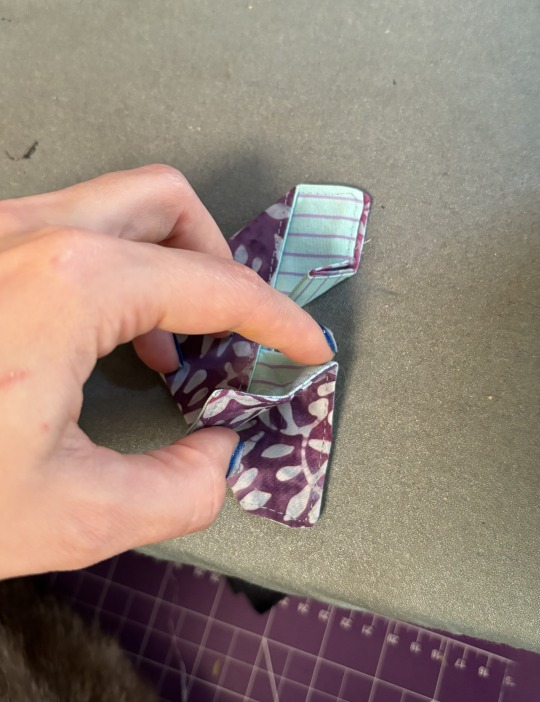
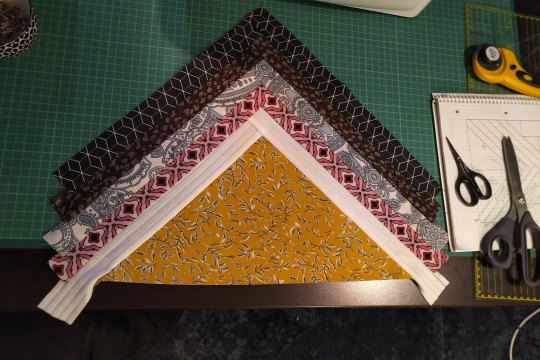
Step 6: Let's start folding! First move we're going to make is folding it in half, bringing the short edges together. Keep in mind, whichever fabric is on the outside will be the main fabric of your butterfly, and what is on the inside will be the contrast! Press hard! Then, make sure the edges you just brought together are facing you for the next step.
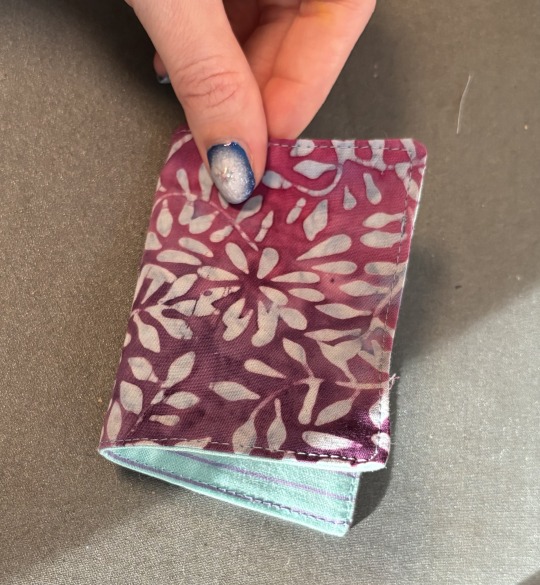
Step 7: Take the top fabric of the right open edge and bring it to the left side of the open edge. It will tent up in the corner, use this and press that tent down until you have what looks like a triangle of the outside fabric on top of two rectangles of the contrast fabric. Press! (I forgot to take pics of the whole process with the first one, don't mind the fabric switch).
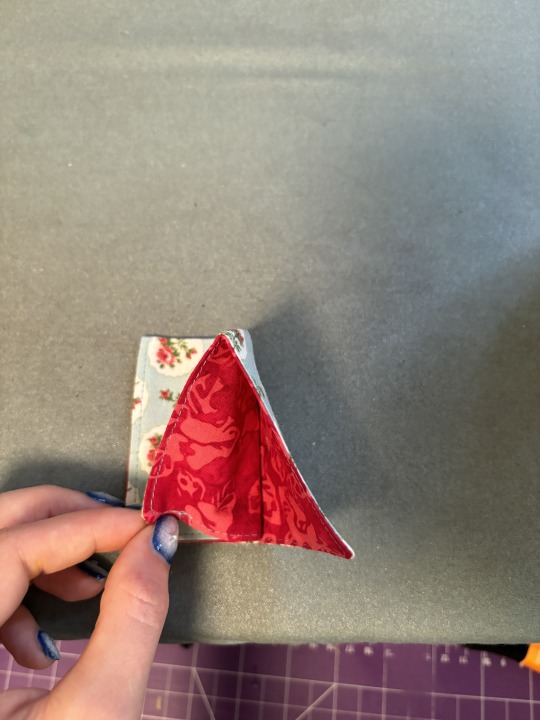
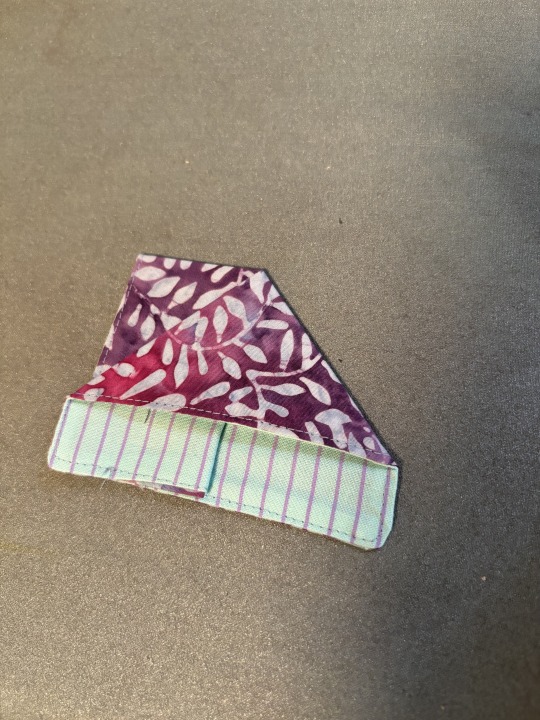
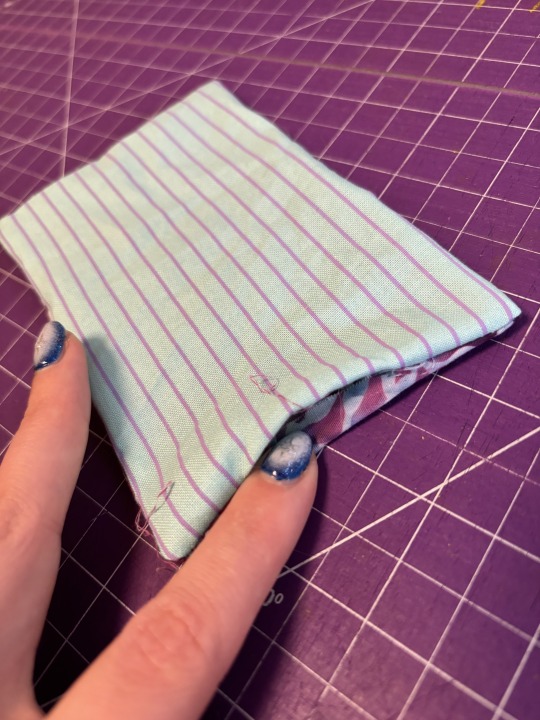
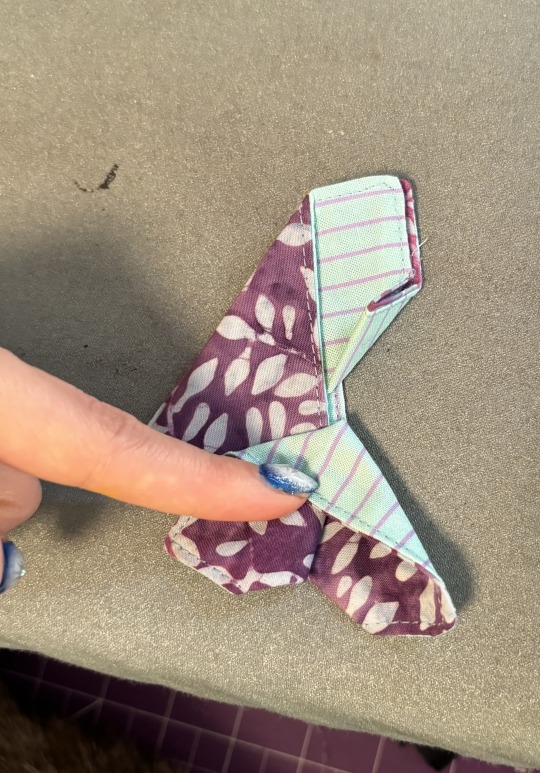
Step 7.5: Flip your butterfly and repeat step 7 on the other side until you have a strange looking triangle like this.
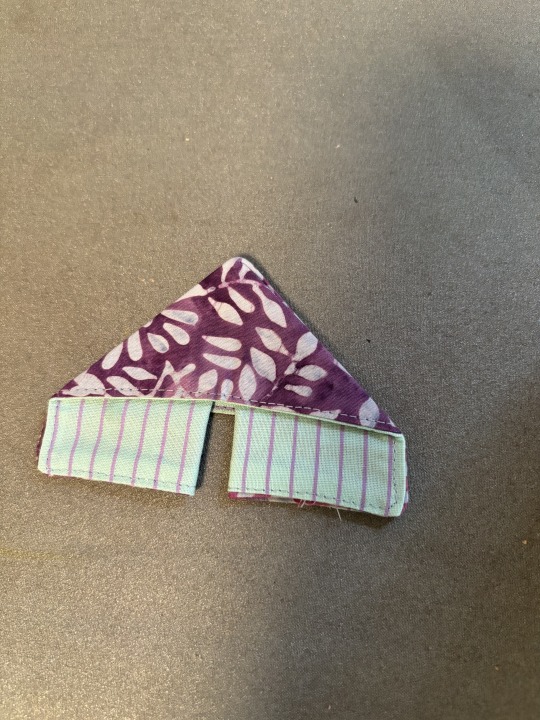
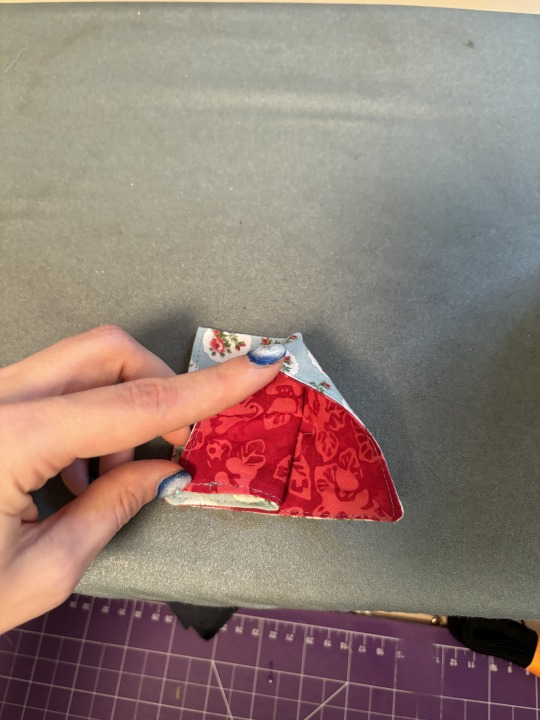
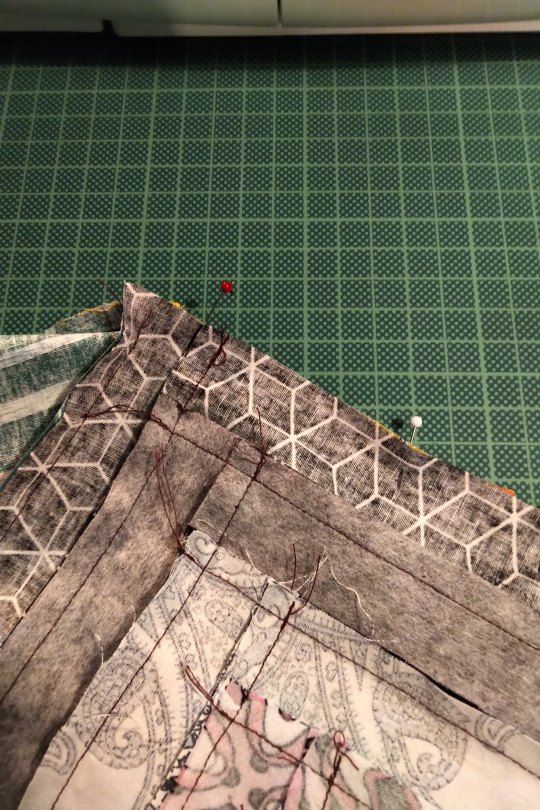
Step 8: Take the inner corners of the contrast fabric and fold it up towards the outer fabric. The bigger this fold, the more contrast fabric you will see in the final butterfly. Press.
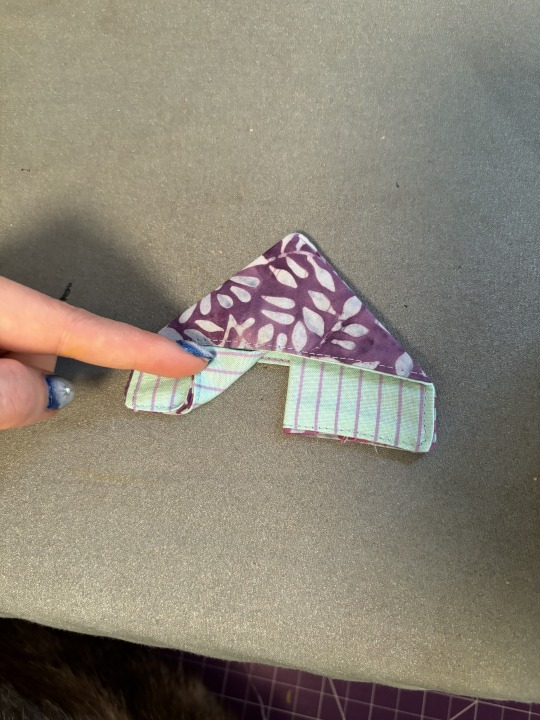
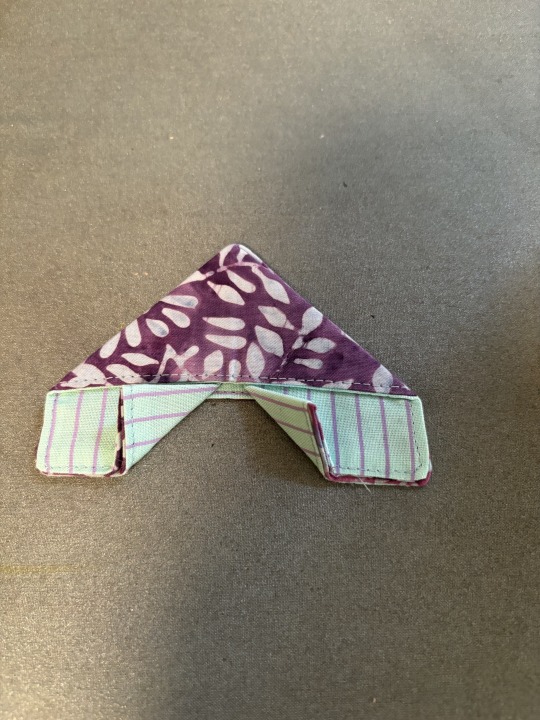
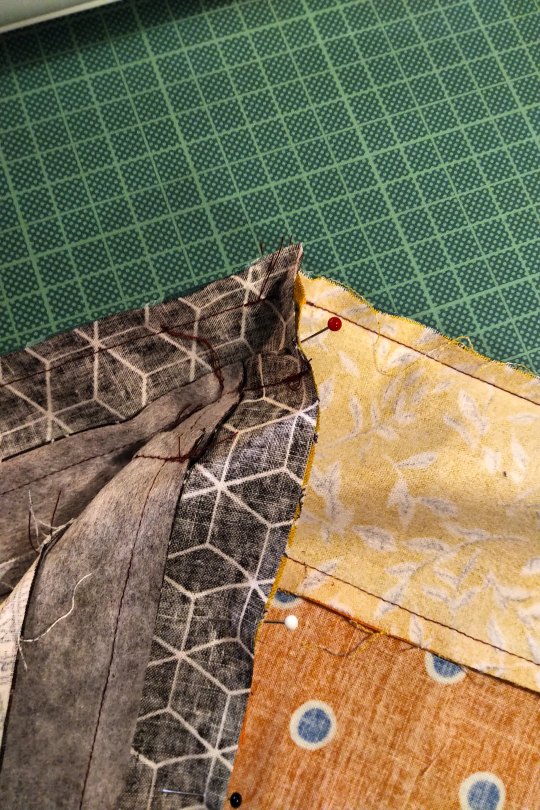
Step 9: Take the tip of one of the corners you just pressed up and bring it back to it's original position. Do not press. Gently press down on the tip of the corner, letting the fabric unfold. The butterfly wing should unfold, with the contrast fabric showing in the centre. Adjust until you have as much contrast showing as you'd like, then press hard. Repeat on the other side.
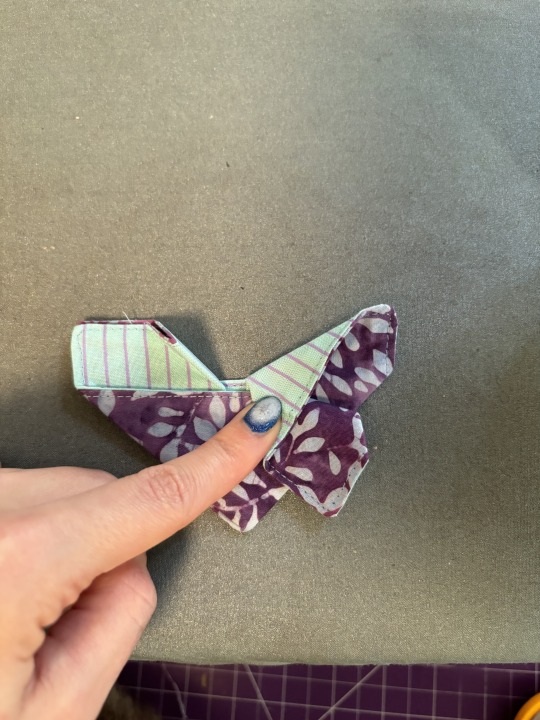
Congratulations!! You now have a butterfly!! You can make a garland, stick them on hairclips, or simply put them on your windowsill to keep you company! If you want to ensure that your butterfly doesn't unfold, you can add a small hand stitch in the centre of the two triangles that make up the "body" of the butterfly right along where the topstitching is.
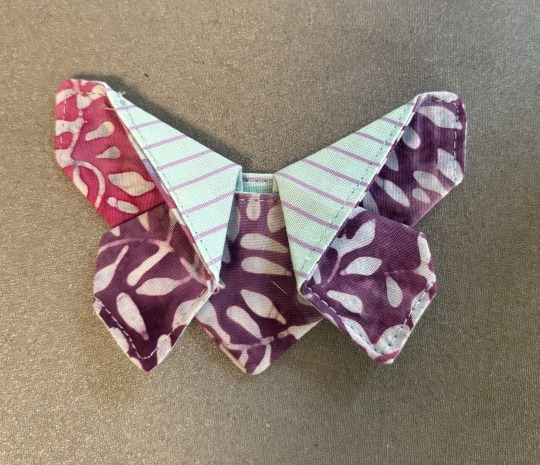
Hopefully this was clear to follow, but if you have any questions, let me know!
235 notes
·
View notes
Text

interested in making your very own YIPPIE? the power is in your hands.
#plush#plushie#daylikescookies#plushies#artists on tumblr#plushcore#kidcore#tbh#tbh creature#yippee#yippie creature#yipeeee#yippy#yipee#yippie#yipppeeee#sewing tutorial#sewing pattern#sewing
411 notes
·
View notes
Text
Free Pattern w/ Tutorial: Simple Belt Bag by Sew Very Crafty
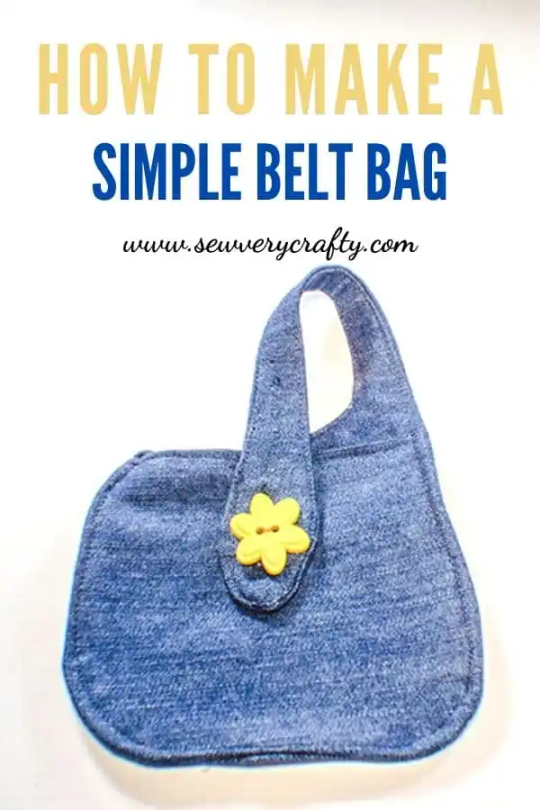
This free tutorial, found here, teaches you how to make a simple belt bag!
The CovidSafeCosplay blog and its admin are unaffiliated with the patternmaker or website, and are simply sharing the resource. Blog admin has not personally tested this pattern. Please thoroughly read the pattern and tutorial for full instructions.
Do you have a favorite free pattern resource? Share in the comments or via a reblog! Bonus points for those that are free, include image descriptions, or contain detailed tutorials for newbies to follow.
#free sewing patterns#free sewing pattern#sewing pattern#cosplay tutorial#sewing tutorial#sewing#originals#original post#id in alt text
89 notes
·
View notes
Text
Hot & Cold Rice Bag Tutorial
I put a new tutorial up on my blog Craft Witch! I made a tutorial for an easy, beginner-friendly, but super useful project: a rice bag that you can freeze or heat for pain relief. It's great for headaches, muscle aches, period cramps, minor injuries...you get the idea.
Like all of my sewing tutorials, this uses hand-sewing and does not assume you have any expensive equipment or even experience in sewing. So if you've been wanting to pick up sewing (or wanting to get back into it) but you've been intimidated by other tutorials, maybe give this one a shot?
This is one of the easiest hand sewing projects you can do, so that makes it great for new sewists of any age! It’s just a rectangle and some back stitches, and some rice that you probably already have on hand. You don’t need to iron or do anything fancy. It doesn’t take very long—I didn’t time it, but each of the two bags I made for this project took less time than an episode of Columbo. And, since it gets turned inside-out, it’s absolutely fine if your stitches aren’t very even or pretty, if you cut the fabric badly, if your thread isn’t well-matched, or anything else.
Let me know what you think, and share if you like! Thanks for reading, and if you enjoy my work, I have a Ko-Fi and a Patreon! Also I'm running a promotion on Patreon right now, 50% off your first month with code DISCOUNT1.
#craft witch#crafts#sewing#sewing tutorial#free tutorial#blogging#beginner sewing#chronic pain#migraine
52 notes
·
View notes
Text
How to add tucks to any bodice/ skirt/ sleeve
I LOVE tucks. I don’t know what it is. They can be for utility (growth tucks allow for hemlines to be lowered), to add shape (as in, release tucks to form a quasi yoke) or for pure decoration. They can be
right next to each other (blind tucks),
spaced evenly,
sewn with lace behind,
pressed and sewn in different directions for chevrons (twisted tucks)
made perpendicularly to make a grid,
sewn then turned onto the bias
stitched on top with embroidery or at intervals to gather up and make shells/ scallops.
There’s so many possibilities!
The most common of these are the spaced tuck. They can be made as wide or as narrow as the maker prefers.


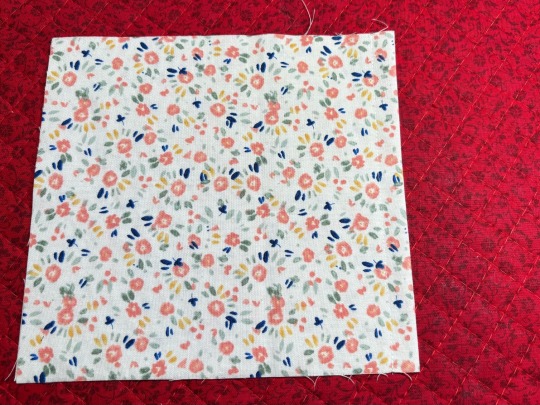
Begin with a rectangular panel at least double the width needed for the unaltered pattern piece.
Fold in half and iron.


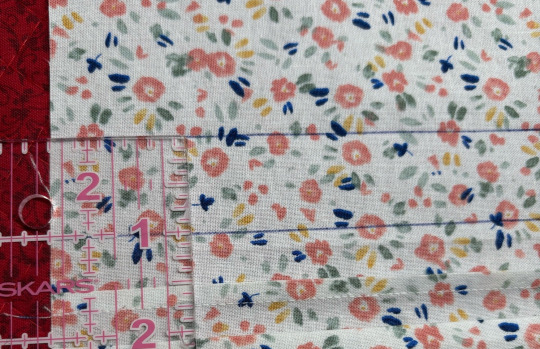
Take that to the machine and stitch your preferred depth. I sewed 1/2” away from the edge. For the center I like to make a wider tuck, which is then ironed flat to mimic a placket.


To make more tucks, use heat erasable pen to mark a line 1/2” away from the edge of the placket/ last tuck. This is the fold line. Iron the fabric again, folding along that mark.


Stitch. I did 1/4” width on these.
Iron flat, and mark the other side. Repeat for as many tucks as you want to add. Check while working to make sure the tucks are a suitable width for the project. With a dress bodice, I make sure not to sew tucks into the shoulder/ sleeve seam. Going by the pair makes it easier.
It is possible to mark multiple fold lines at once, but it’s easier to go step by step. The lines can be easily erased when pressing the other folds, and you have to go carefully or risk having to undo errors.
As far as I can tell, doubling the marking width will work to make the consecutive fold marks when the work is still flat.
In this case, instead of 1/2”, that became an entire 1”.

Once you have the desired amount of tucks, transfer the pattern.
I mark the panel while it is flat, take it to the machine, and baste down the tucks. That way, there’s less risk of them getting turned around or coming undone during future handling. See below.


Once the tucks are basted within the seamlines, you can continue constructing the garment as usual.
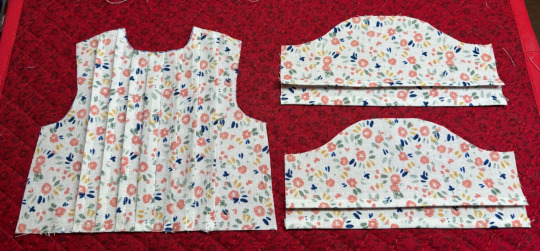
There they are! Ready to be sewn up like usual. Here, I've done some sleeves too. This technique can be used on anything you like. Bodices, apron bibs, skirts, pockets, sleeves, bonnet brims, waistbands, and more.


Quarter inch tucks can look very pretty, and are plenty cute on this scale. I’m copying one of my older designs with this dress, so I stuck with the 1/4"s for an easier make.
However! It is possible to make narrower tucks— more akin to pintucks— by lining the fabric up to the inner part of the presser foot instead of the outer. On my machine with the standard (J) foot, that gives a scant 1/8” tuck (see below for seam gauge).
Here are some examples as well. Overall, it gives a daintier touch, but it can be fiddly, especially on longer lengths of fabrics like skirts.


Very long post, but I hope this inspires someone to give tucks a try! I love them so much!! Please reach out if you would like further links to video tutorials or reference books recommendations :)
31 notes
·
View notes
Text
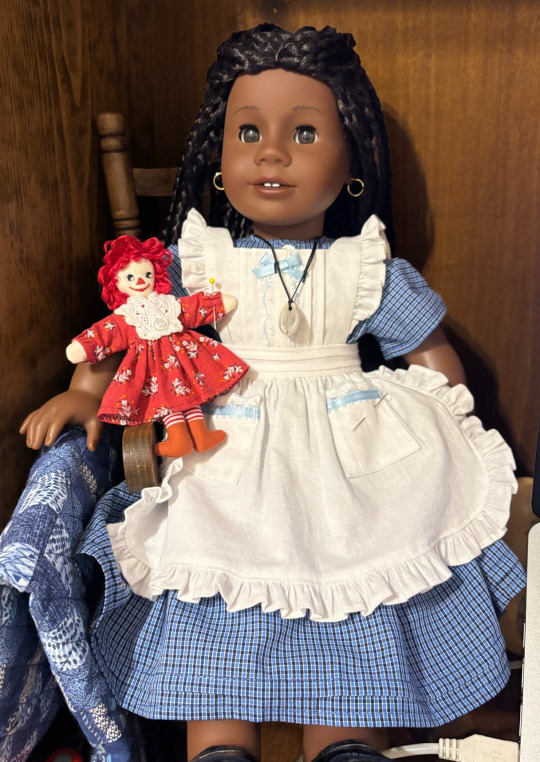
Progress Pride Flag Quilt Block Pattern & Tutorial
Don't you just love the flag of our people? Do you have an inner grandma that years to make stuff? Do you want to combine these two things and make a queer quilt?
Well, I've got you.
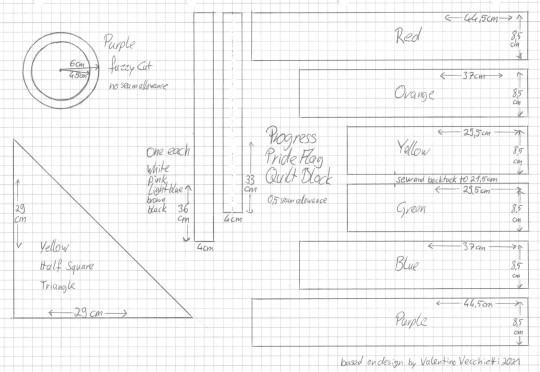
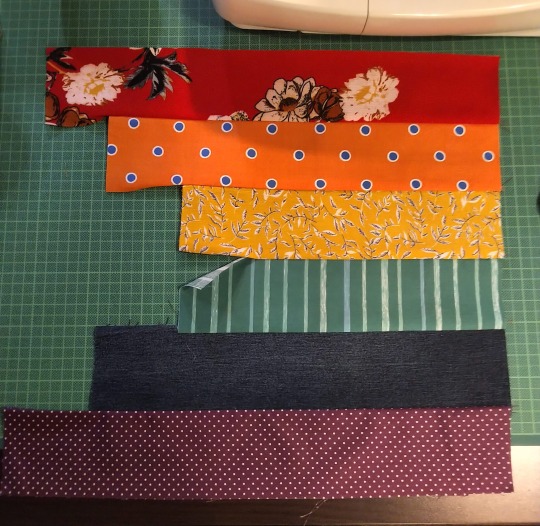
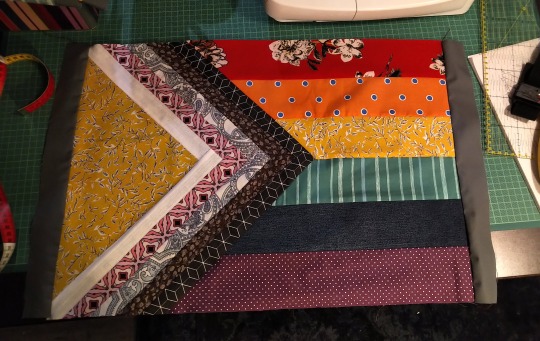
Behold the pattern! And my lack of graphic skills, so I drew it on paper!
Basically it's a bunch of rectangles, one half square triangle and a fuzzy cut circle. I don't know shit about quilting and I was able to come up with it. Why centimeter, you ask? Because I'm German and that's what I'm familiar with. Why weird measurements and not jelly rolls and layer cakes and stuff? Because I'm German and quilting is not really a thing here.
Onto the tutorial!
You'll need:
A scrap of fabric of red, orange, yellow, green, blue, purple, black, brown, light blue, pink, white each
additional fabric for the border
Cutting mat, quilting ruler, roll cutter
sewing machine
thread
pins
double sided interfacing
iron and ironing board
fabric sheers
compasses
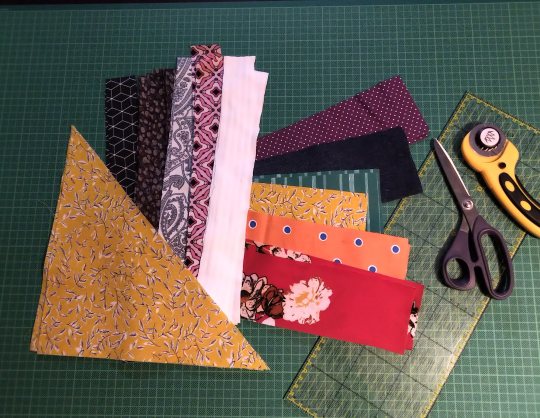
Step 1: Cut everything. Duh. We'll take care of the circle later, don't worry about that now. The half square triangle is exactly what it sounds like. A square and then you cut it diagonally. That's why I didn't give the length of the hypotenuse.
(Note: I'm making two blocks at the same time, that's why there's so much fabric. Also this is a middle of the night project, hence the lighting.)
I'm using all kinds of different fabrics, different weights and drapes, some stretchy, some transparent, so I needed to interface some of them.
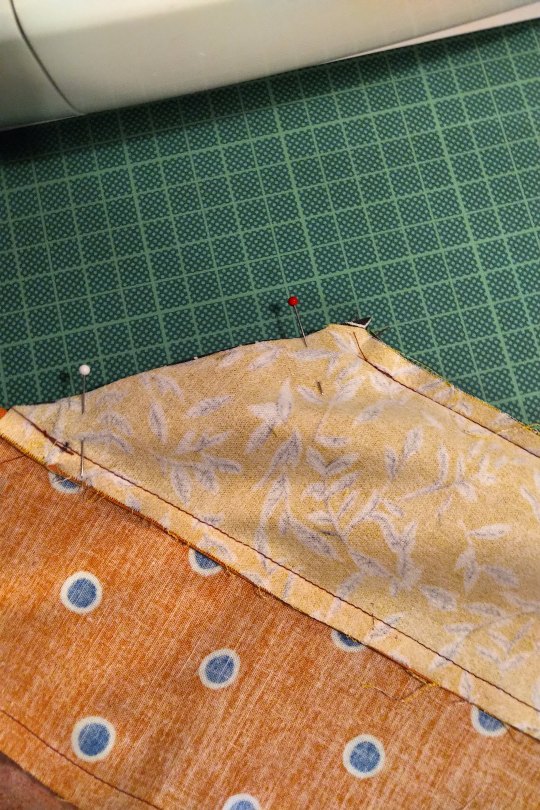
Step 2: Sew the rainbow together. 0,5cm seam allowance on everything, that's exactly the edge of the foot on your machine. Double and triple check that everything is facing the right direction before sewing. The seam of yellow and green does not get sewn fully, only 21,5 cm! That's important later! Also backtack there. Don't forget to iron.
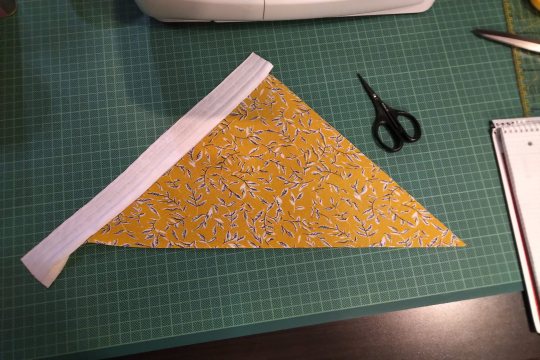
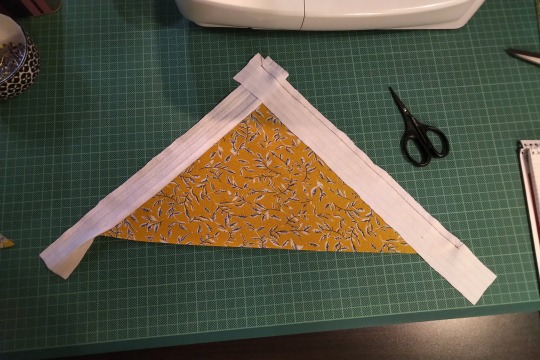
Step 3: Sew the strips to the half square triangle. For this you have to switch between the sewing machine and the ironing board constantly. Attach the shorter strip diretly to one side of the HST, iron it open. The second strip of the same colour gets attatched to the other side of the HST and the first strip. Look at the pictures closely if you're unsure how that works. Also the strips are longer than the triangle. We'll square that up later.
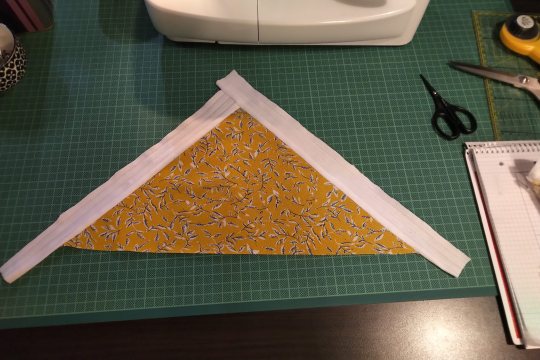
All strips attatched will look like this. See how the two strips meet at the tip!
Step 4: Cut the rainbow part to size. The length between yellow and green is 22cm long. The shorter seam from before plus some seam allowance. The outsides of red and purple are 44,5cm long. These two points are the beginning and end of your cutting line. You will cut a little triangle from every single colour. Do this slowly and carefully. Maybe your fabrics have stretched a bit (mine did). Don't worry, it will be ok.

Step 5: The Y seam, part one. Y seams are tricky, but there's only one for this block. So put your strips part on your rainbow part and line them up so that the tip of the strip part overhangs the seam between yellow and green by about half a centimeter. Remember that it's not about the edges of the fabric, but where the seam will be. But don't sew all the way! Leave 0,5cm at the tip!
You can also mark on your strip piece two lines 0,5cm from the edges of the black. They should form a little square at the tip. There they meet is where the actual tip on the finished block will be. So place this spot directly on the seem between yellow and green and only sew right up to it. Not beyond.
Step 6: The Y seam, part two. Now, fold both the rainbow part and the strips part in half and if you've done the last step correctly, the remaining two edges will allign. Pin and sew.
I can't explain it better than I've done here, I'm sure there are tutorias out there. Good luck!
Step 7: Square up. Iron your block to that everything is nice and straight and flat. Then use the fabric edges of the red and purple to cut the remaining ends of the strips. Use the HST to cut the white. Be careful, the long side of the triangle is on the bias and likely stretched a bit.
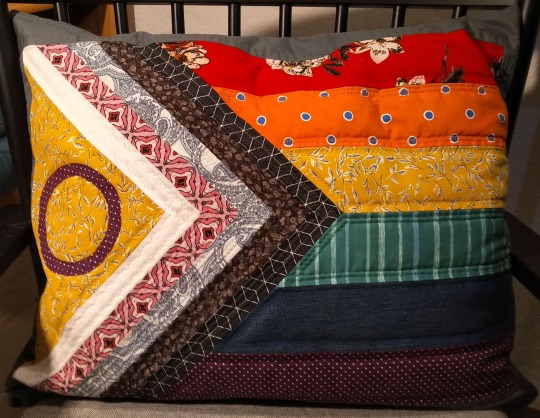
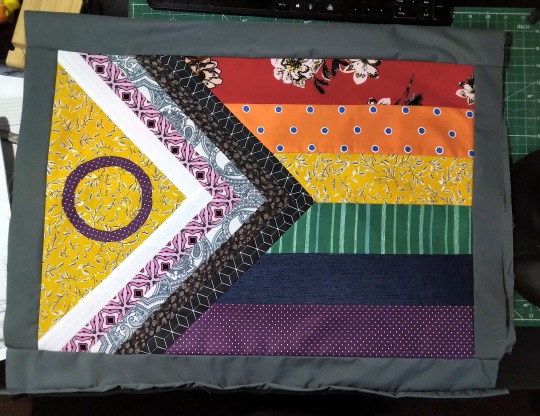
I already added borders here. I'm making a pillow case.
Step 8: Fuzzy cut and raw edge applique. Double sided iron on interfacing is essentially double sided tape. It has two types of glue, one gets activated by 2 seconds of heat, the other by 5 or so (depends on the product). The second side is also covered with a paper that needs to be removed before the second gluing. Read the instructions of the product you are using!
Use your compasses to draw a circle on the protective paper side of the interfacing. It's actually two circles from the same middle point, see pattern. Cut it out roughly. Then place it with the rougher side on the backside of your purple fabric and iron for 2 seconds on middle heat. If you've just ironed your fabric before and the ironing board is still hot, wait for it to cool down. Also let the fabric cool down after applying. Then cut out your circle. The interfacing will have stiffened the fabric, so that shouldn't be a problem. Then remove the protective paper, place the circle on the yellow triangle where you want it and iron for 5 seconds. Let cool.
And you're done! The applique at this point is only secured with the interfacing, but it should hold fairly well. The quilting will secure it further.
And that's it. BTW, did you know that this design was made by Valentino Vecchietti for Intersex Equality Rights UK in 2021? Now you do. Happy quilting!
#lgbt+#lgbtq+#lgbtq community#pride flag#progress pride flag#valentino vecchietti#quilting#quilt#quilt block#quilt pattern#quilt tutorial#sewing#sewing machine#sewing tutorial#sewing pattern
285 notes
·
View notes
Text
I had to use Ban Rol today to hem some sheer fabric, so I figured I'd make this!
#cosplay#amazonmandy#cosplaycommission#commission#sewing#seamstress#gown#tutorial#cosplay tutorial#sewing tutorial#video#cosplayvideo
22 notes
·
View notes
Text
From Bodice to Corset (ish): A walkthrough
A quick insight requested by @shykitten28 about how I altered an ill-fitting bodice to a well-fitting corset!
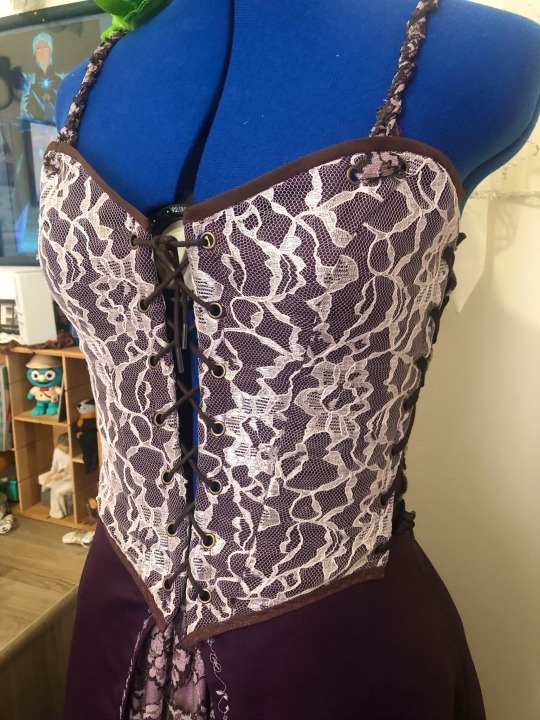
Suitable for: Turning a lace-up top into a boned corset
note: This is not a REAL corset! Real corsets are supportive undergarments measured to your exact shape. This is a CORSET-STYLE BODICE, often used in cosplays!
Difficulty: Intermediate, probably
Directions:
1. Cut up the side seams and cut off the straps to separate the back from the front
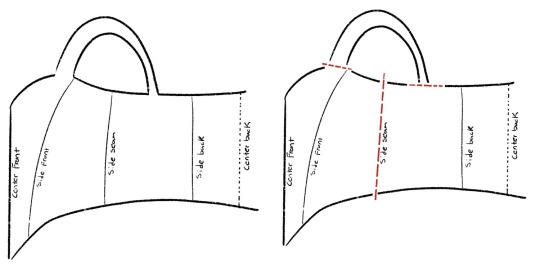
2. Reshape the bust curve, top of side panels, and back panels to adjust fit for lack of straps
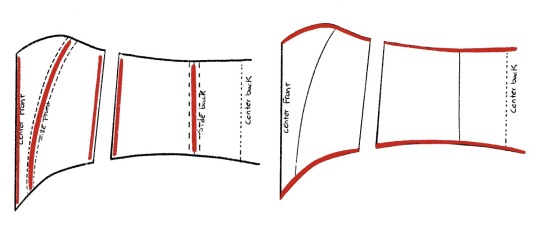
3. Create a new casing out of the old side seams by turning them under 3/4” (the sides will become lace-up for versatile fitting). Do the same for the original front lacing if there is no boning.
3a. If there isn’t boning in the side front/side back seams, I recommend adding a casing by stitching twill tape inside. This will keep the waistline from bunching like in the original picture!

4. Add boning to all seam casings (I recommend doubling up if you are using the thin plastic stuff, the metal stuff is sturdier but much harder to work with)
5. Bind top and bottom edges with bias tape (creates a nice border and you don’t need to worry about seam allowance to turn under)
(Plastic vs metal boning, I’ve used both!)

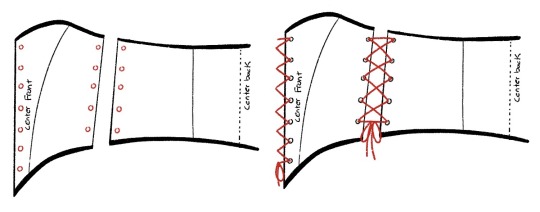
6. Install grommets to center front and sides (follow directions and practice beforehand!)
7. Lace-up to size
This grommet pack is great for beginners, I’ve been using the same one for years. And a trusty RUBBER mallet! (Don’t use a hammer, it destroys the grommets)

For strap replacement:
1. Add grommets where strap met up with bodice
2. Create strap with fabric ties, lacing, or old strap pieces (with matching grommets and small ties)
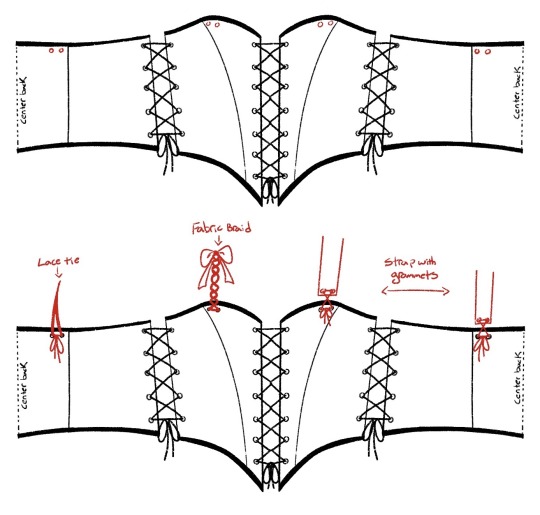
Done! Now you have a beautiful boned corset!
All pictures and sewing by me! This is just my personal process, find what works best for you! :)
#cosplay#my cosplay#cosplay tutorial#sewing#sewing tutorial#tangled cosplay#rapunzel cosplay#tutorial
21 notes
·
View notes
Text
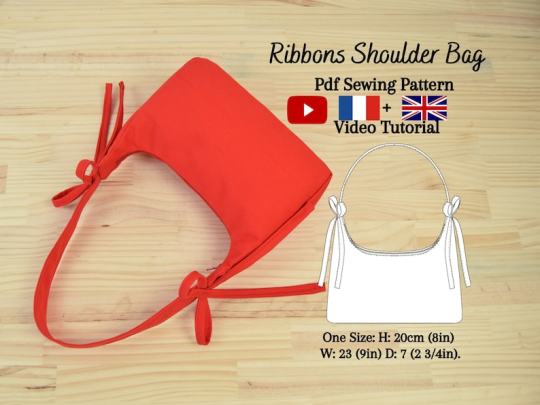
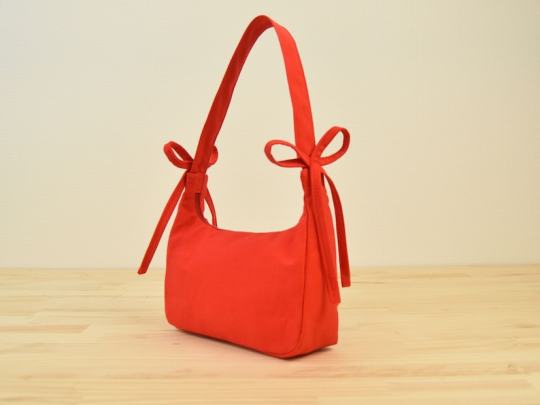
Mini Shoulder Bag With Ribbons and an Inner Pocket - PDF Sewing Pattern & Video Tutorial by MimiCouturePatterns
#sewing tutorial#sewing pdf pattern#sewing#pdf pattern#pdf pattern download#shoulder bag#MimiCouturePatterns
106 notes
·
View notes
Text
The Why of Sewing 3: Fabric Anatomy (Fiber Content)
This post is in a series I am starting that is going to talk about concepts in sewing and fiber arts and try and explain some of the whys behind the hows.
The beginner sewist is often (correctly) advised at the beginning of their journey to start with cotton fabric, sometimes specifically woven cotton, but not always. Nevermind that cotton fabric can vary from a tshirt to denim and canvas.
We have learned the difference between a knit and a woven fabric in my previous posts (check the tag #the why of sewing which should bring up the whole series). Let's talk fiber content.
Like fabric structure I basically break fiber down into two groups: natural fibers and synthetic fibers. Below I am going to talk about the fibers you are most likely to encounter as you shop as a home sewist. It is NOT a complete list of fibers, nor could I list the entirety of fabric types made with each fiber.
Natural fibers: these are fibers that come from plants and animals and require minimal processing to be made into fabric.
Wool: This comes from sheep, which are sheared 1-2 times a year. The animal is not hurt in the process and even sheep not raised for fiber production must be sheared for their health. Wool is warm, but breathable. It can be easy to work with in some ways, but it does shrink when washed and so many modern sewists avoid wool. Some folks have sensitivities to wool as well. Wool is most commonly used in suitings and knits.

Image: Shorn sheep in a verdant field (Source: By Roger Kidd, CC BY-SA 2.0, https://commons.wikimedia.org/w/index.php?curid=13035358)
Silk: Silk is made from the cocoons of silkworms, and generally harvested prior to the hatching of silkworm larvae. Silk is expensive to produce and considered a luxury good. Silk is shiny and lightweight, it can be surprisingly warm. Silk can loose its sheen in the wash and because the fiber is so delicate it can be difficult to sew. There is a lot of misinformation on the production of both silk and wool online. Worm Spit has been educating fiber artists about the process of making silk since 2002.

Image: a vintage style poster showing various stages of the silkworm moth (By Bibliographisches Institut, in Leipzig - Meyers Konversations-Lexikon, 4th Auflage, Band 14, Seite 826a (4th ed., Vol. 14, p.826a), Public Domain, https://commons.wikimedia.org/w/index.php?curid=2317808)
Cotton: Cotton comes from the cotton plant, there are several varieties commonly grown and it is the most common natural fiber used in textile production. The cotton fiber comes from the seed head of the plant. Cotton can be made into light breathable fabrics and warm cosy fabrics. The list of fabrics made from cotton might actually be endless but here are a few you might encounter: jersey knits, denim, quilting cotton, gauze, lawn, voile, sweatshirting, twills, poplin, oxford cloth, canvas...
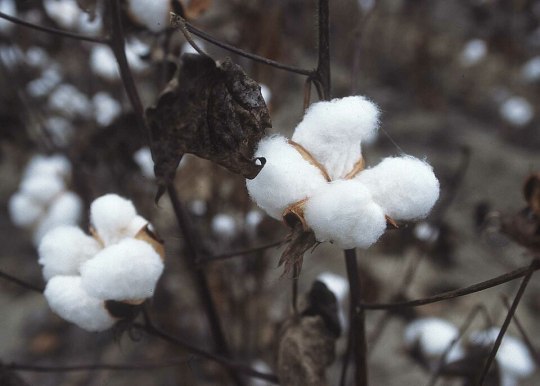
Image: the cotton boll, or seed pod (source: Public Domain, https://commons.wikimedia.org/w/index.php?curid=689304)
Linen: Linen comes from the flax plant. The fiber comes from the long stem of the flax plant and can be difficult to break down into a usable state. It is also difficult for modern spinning equipment to make into threads, which is why linen tends to be quite expensive in comparison to cotton. Linen is cool to the touch and very strong. It also wrinkles very easily. Coarsely woven linen can be uncomfortable for some to wear. Linen tends to be made into simple plain woven fabric, occasionally knit fabrics, and can vary in weight from handkerchief linen (very fine, almost transparent) to canvas. I recently reblogged THIS POST which had some incredible links regarding linen production.
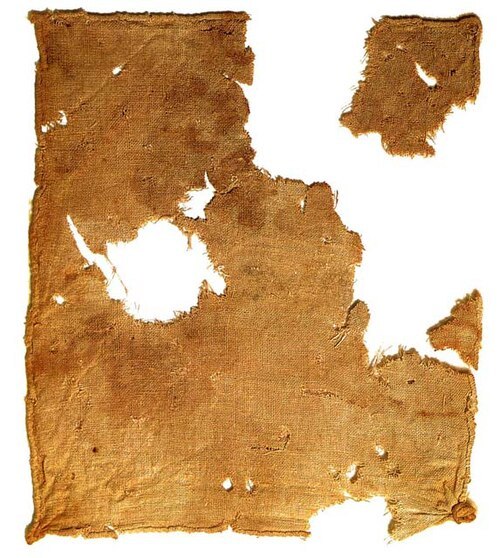
Image: linen cloth recovered from Qumran Cave 1 near the Dead Sea (Public Domain, https://commons.wikimedia.org/w/index.php?curid=248420)
Synthetic fabrics: these are fibers that have been manufactured through industrial processes.
Polyester/Acrylic/Nylon: These fabrics are plastic. They are made from different types of plastic, but ultimately a liquid petrolum product is extruded into a long filiment and made into cloth. They can be made into woven or knit fabric. The way they are made can have many different properties. Generally polyester is what you find in the home sewing world. Polyester is not breathable and because it is oil based it tends to hold on to smells. It melts when it is too hot and therefore can only be ironed carefully. Polyester also tends to be very strong and can help make very sturdy fabrics. Because polyester is very inexpensive to produce it is frequently combined with other fibers to reduce production cost.
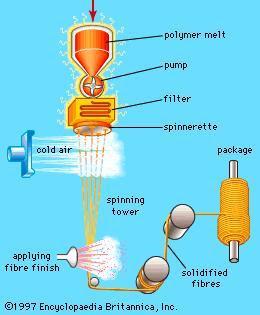
A diagram of "dry spinning" polyester fibers (source: https://encyclopedia.che.engin.umich.edu/fiber-spinning/)
Spandex/Lycra/Elastine: this is the stretchy stuff! Generally found in combination with other materials this is what makes fabric go beyond the mechanical stretch that is produced by the fabric structure. In small amounts mixed with cotton it makes a fantastic tshirt jersey, 100% spandex is great for swim and dancewear. As we discussed in the knit article I posted previously adding stretch to sewing does make it more complicated to work with, but used wisely spandex is your friend. Best not pressed excessively as the fiber has a protein structure that breaks down when it is hot. Also if you have a garment or fabric with a lot of spandex content you might want to consider avoiding the dryer.
Rayon/Viscose/Bamboo/Lyocell/Cupro/Tencel: There are SO MANY names for cellulose fabrics. These are sometimes categorized as semi-synthetic fibers, or even put in with natural fibers. They are all the same thing deep down. Cellulose (generally sourced from trees and plants) is chemically broken down into its most essential parts and then extruded into a filiment. These fibers were originally developed as a silk substitute. Rayons are fine, breathable, and have a drape that clings to the body. They shrink in the wash and can continue to shrink through several washes. They also can be fragile when wet. Rayons are made into both woven fabrics and knits and they tend to be thin and fine fabrics. Rayon fabrics, especially those labeled as bamboo are frequently greenwashed as environmentally friendly, because they are sourced from a renewable resource, but the process of producing cellulose fibers is highly polluting and uses significant amounts of water.
While there are outliers, most textiles you will encounter while shopping for fabric will be made of the above fibers. A deeper dive into these would be fun, but I find at least 3 potential rabbit holes I could go down every single post I make here.
#quilting#sewing#sewing tutorial#fabric#textile art#sewing tips#sewing techniques#the why of sewing#fabric content#fiber#fiber content#cotton#wool#linen#silk#rayon
107 notes
·
View notes