#Concrete Flooring DIY Installation Guide
Explore tagged Tumblr posts
Visit Tumblr Blog
Explore Tumblr blogs with no restrictions, modern design and the best experience.
Last Seen Tumblr Blogs


Fun Fact
Mobile Tumblr US users spend an average of 4.04 minutes per session on the app.
Text
The Versatility of Concrete Flooring: From Industrial to Modern Interior Design
Concrete flooring has come a long way from its utilitarian roots and is now celebrated for its exceptional versatility and aesthetic appeal in both industrial and modern interior design. As a durable and cost-effective flooring option, concrete has emerged as a popular choice for homeowners and designers seeking to create stylish and functional spaces. Let's explore how concrete flooring seamlessly transitions from industrial to modern interior design, transforming spaces with its unique charm and adaptability.

Industrial Charm:
In industrial interior design, concrete flooring is a hallmark feature that exudes a raw and rugged appeal. The exposed concrete surfaces, often with visible imperfections and patina, bring an authentic and industrial look to spaces. Whether it's a loft apartment, warehouse conversion, or commercial setting, the inherent strength and durability of concrete lend an unmistakable character to the overall design.
Minimalist Elegance:
In modern interior design, concrete flooring takes on a new identity as a minimalist canvas that complements clean lines and sleek aesthetics. The smooth and polished surfaces of concrete provide a sophisticated backdrop for contemporary furnishings and decor. Its neutral gray tones serve as an ideal foundation to enhance the visual impact of furniture, artwork, and accent pieces.
Stained and Decorative Finishes:
Concrete flooring's versatility shines through with stained and decorative finishes. In industrial settings, acid stains can create rich earthy tones, enhancing the concrete's natural texture. For modern interiors, decorative techniques like stenciling, engraving, or embedding aggregates offer opportunities for creative expression, adding subtle patterns or unique designs to the floor.
Seamless Transition between Indoors and Outdoors:
One of the remarkable aspects of concrete flooring is its ability to create a seamless transition between indoor and outdoor spaces. By extending concrete flooring from the interior to patios or outdoor living areas, homeowners can achieve a harmonious flow, blurring the boundaries between the two realms.
Sustainability and Eco-Friendliness:
In an era of increasing environmental consciousness, concrete flooring gains admiration for its sustainability. Concrete is often sourced locally, reducing the environmental impact of transportation. Additionally, its thermal mass properties can help regulate indoor temperatures, reducing the need for excessive heating or cooling.
Low Maintenance and Longevity:
Another advantage of concrete flooring is its low maintenance and long-lasting qualities. Properly sealed and maintained, concrete floors can withstand heavy foot traffic and daily wear, making them an enduring investment for any space.
Conclusion:
From the raw charm of industrial settings to the minimalist elegance of modern interiors, concrete flooring showcases its remarkable versatility as a design element. Its adaptability, sustainability, and longevity make it a popular choice for homeowners and designers seeking to create distinctive spaces that stand the test of time. Whether you embrace the industrial aesthetic or opt for a contemporary flair, concrete flooring provides the perfect foundation for transforming your interior spaces into stylish havens of creativity and comfort.
#Concrete Flooring#Pros and Cons of Concrete Flooring#How to Install Concrete Flooring#Concrete Flooring Ideas for Modern Homes#Cost of Concrete Flooring per Square Foot#Best Sealer for Concrete Flooring#Concrete Flooring Maintenance Tips#How to Polish Concrete Flooring#Concrete Flooring for Industrial Spaces#Decorative Concrete Flooring Trends#Concrete Flooring DIY Installation Guide
0 notes
Text
How to Install Rubber Gym Flooring: Tips and Tricks for Perfect Results

Creating a gym space—whether at home or in a commercial setting—starts with the right foundation. One of the most crucial and underrated aspects of gym setup is the flooring. Among the many options available, rubber gym flooring stands out as one of the best for durability, shock absorption, and safety. But to get the best performance out of it, you need to install it correctly. In this guide, we’ll walk you through how to install rubber gym flooring step-by-step, with expert tips and tricks for a flawless finish.
Why Choose Rubber Gym Flooring?
Before diving into the installation process, it's essential to understand why rubber gym flooring is such a popular choice:
Shock Absorption: Protects joints and reduces fatigue.
Durability: Withstands heavy weights, equipment, and foot traffic.
Noise Reduction: Helps dampen sound from weights and cardio machines.
Slip Resistance: Enhances safety during workouts.
Easy Maintenance: Simple to clean and maintain over time.
If you're planning a fitness area that’s safe, long-lasting, and professional-looking, rubber flooring is a wise investment.
Types of Rubber Gym Flooring
Understanding the different types of rubber flooring helps you make an informed decision. Here are the most common formats:
Rubber Tiles: Interlocking or straight-edge tiles are ideal for DIY installations.
Rubber Rolls: Cover large areas quickly but may require adhesives and precise cuts.
Rubber Mats: Great for spot coverage under heavy equipment or benches.
Each type has slightly different installation methods, but the principles generally remain the same.
Tools and Materials You'll Need
Before starting, gather all necessary tools and supplies to make the installation smooth and hassle-free:
Measuring tape
Utility knife with extra blades
Chalk line
Straight edge or ruler
Double-sided flooring tape or adhesive (depending on flooring type)
Rubber mallet (for interlocking tiles)
Broom or vacuum
Clean, dry mop
Step-by-Step Guide: How to Install Rubber Gym Flooring
Let’s now walk through how to install rubber gym flooring efficiently and effectively:
Step 1: Prepare the Subfloor
A clean and level subfloor is the key to a successful installation.
Clean Thoroughly: Remove all dirt, dust, and debris using a vacuum and mop.
Check for Moisture: Ensure the area is dry, especially if installing over concrete. Use a moisture barrier if needed.
Level the Floor: Patch any holes or cracks. Uneven surfaces can cause rubber tiles or rolls to shift or warp.
Step 2: Measure and Plan the Layout
Good planning helps avoid mistakes and wastage.
Measure the Area: Accurately calculate the square footage.
Dry Layout First: Lay out a few tiles without adhesive to visualize the setup.
Mark Centerlines: Use a chalk line to find the center of the room and plan your layout outward from there to ensure symmetry.
Step 3: Cut Rubber Tiles or Rolls to Fit
Whether you’re working with tiles or rolls, chances are you’ll need to cut pieces to fit edges or around obstacles.
Use a Straight Edge: Guide your utility knife for clean, straight cuts.
Score Multiple Times: Make several shallow passes rather than one deep cut to avoid slipping.
Allow Expansion Room: Leave a small gap (about 1/8 inch) between the rubber and walls to allow for thermal expansion.
Step 4: Install the Flooring
Now the fun begins! Here’s how to install rubber gym flooring based on type:
For Interlocking Tiles:
Start from the Center: Begin at the centerline and work outward.
Snap Tiles Together: Align the tabs and press down. Use a rubber mallet to ensure a tight fit.
Trim Edges as Needed: Fit the outer edges against the wall with trimmed pieces.
For Rubber Rolls:
Lay Rolls Flat: Let the rolls acclimate to the room for 24 hours if possible.
Apply Adhesive or Tape: Use double-sided tape around the edges or full glue for permanent installations.
Roll and Press: Lay the roll in place and press down firmly to bond.
For Rubber Mats:
Simply place mats where needed. For better grip, use double-sided tape underneath.
Step 5: Secure the Edges (Optional)
For added stability, especially in high-traffic or commercial gyms:
Apply flooring tape along the seams and edges.
Seal edges with a floor transition strip if adjoining another type of flooring.
In extreme use areas, consider using a cold-weld seam sealer or edge adhesive.
Step 6: Clean and Inspect
Before you start lifting weights:
Vacuum and Mop: Remove any installation debris.
Inspect for Gaps or Bumps: Press down uneven areas or make additional cuts if necessary.
Congratulations—your gym is now ready for action!
Expert Tips for Best Results
Acclimate the Rubber: Let your flooring adjust to room temperature before installation to reduce expansion or contraction later.
Use Sharp Blades: Dull utility knives tear the rubber instead of cutting it cleanly.
Check for Compatibility: If placing rubber over carpet, ensure it’s low-pile. High-pile carpet may cause instability.
Go Modular: Choose interlocking tiles if you plan to move or reconfigure your space later.
Clean as You Go: Dust and particles can interfere with adhesive bonding.
Where to Buy Quality Rubber Gym Flooring
For high-quality flooring that’s easy to install and built to last, check out Freedom Fitness Equipment. They offer a wide range of gym flooring solutions perfect for home and commercial use.
Explore their collection here:
Final Thoughts
Installing rubber flooring may seem like a small detail, but it sets the stage for every workout. Whether you’re a casual lifter, CrossFit enthusiast, or professional gym owner, knowing how to install rubber gym flooring ensures your space is safe, durable, and visually appealing.
By following the steps and tips above, you can enjoy a clean, professional-quality gym environment that stands the test of time. So grab your tools, roll out your mats or tiles, and get ready to transform your workout space from the ground up!
0 notes
Text
Concrete Floor Levelling: The Ultimate Guide to a Smooth and Durable Surface
What is Concrete Floor Levelling?
Concrete floor levelling is the process of correcting uneven or sloped concrete surfaces to create a flat, smooth, and stable base for flooring installations. Whether you're installing tiles, vinyl, hardwood, or carpet, a level subfloor is essential for durability and aesthetic finish.
Why is Floor Levelling Important?
An uneven concrete floor can lead to:
Cracked or damaged floor coverings
Poor drainage and water pooling
Tripping hazards
Reduced structural integrity
By levelling the concrete floor, you ensure a safer and more durable surface that extends the life of your flooring investment.
Common Causes of Uneven Concrete Floors
Foundation settlement
Poor initial concrete pouring
Moisture infiltration
Structural movement over time
Improper curing
Understanding the cause is crucial before choosing the right levelling method.
Methods of Concrete Floor Levelling
1. Self-Leveling Concrete
One of the most popular methods for interior floors, self-leveling concrete is a polymer-modified cement that flows easily and sets quickly. Ideal for:
Minor dips and undulations
Preparing surfaces for tiles or laminate
Fast-track renovations
Pros: Easy application, fast drying, smooth finish Cons: Not suitable for major floor variations
2. Grinding High Spots
Diamond grinders or scarifiers are used to grind down high points on concrete slabs. Best for:
Removing raised areas
Preparing surface for overlays or epoxy
Pros: Cost-effective for localized issues Cons: Dusty process without proper equipment
3. Floor Levelling Compound
These are trowel-applied or poured compounds that harden to fill dips or low spots. They may be cementitious or polymer-based.
Applications:
Filling voids
Creating gradual slopes
Smoothing transitions
4. Underlayment Installation
When the subfloor is highly irregular, installing a plywood or cement board underlayment may be the best solution. This is common in wood-framed floors or when moisture sensitivity is an issue.
Concrete Floor Levelling Process
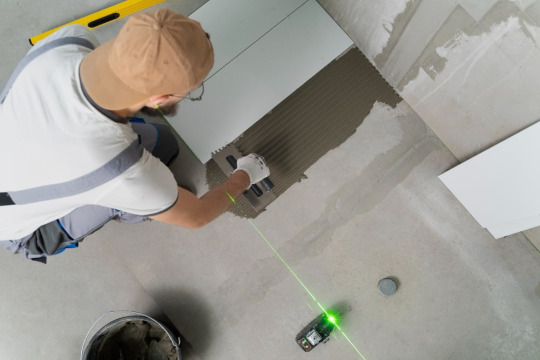
Inspection & Measurement – Laser or bubble levels are used to assess uneven areas.
Cleaning the Surface – Dirt, dust, and loose concrete must be removed.
Priming – Primers enhance adhesion of levelling materials.
Application – Depending on the method, material is poured, trowelled, or ground.
Curing & Drying – Proper curing ensures longevity and strength.
Final Check – Floors are re-checked before installing the final floor finish.
DIY vs Professional Floor Levelling
While minor levelling can be a DIY project, hiring a professional concrete contractor ensures:
Correct diagnosis of the problem
Use of high-grade materials
Accurate levelling with industrial equipment
Long-lasting, warrantied results
Ideal Applications for Floor Levelling
Residential homes (kitchens, living rooms, basements)
Commercial spaces (retail stores, offices, warehouses)
Prepping for epoxy or polished concrete floors
Renovations and floor replacement
Cost of Concrete Floor Levelling
The cost depends on factors like:
Size of the area (per square meter/square foot)
Severity of the unevenness
Chosen levelling method
Labor and material rates in your area
Average cost: $5 – $15 per square foot
Conclusion
Concrete floor levelling is a crucial step in achieving a flawless and durable surface for any flooring project. Whether you're fixing minor imperfections or correcting major structural issues, choosing the right method and professional help can save time, money, and stress.
Need Professional Concrete Floor Levelling?
At Brisbane Concrete Floor Levelling, we specialize in residential and commercial floor levelling solutions. Our experienced team uses top-tier materials and equipment to deliver smooth, even surfaces every time.
📞 Contact us today for a free quote or on-site inspection!
0 notes
Text
Durable, Stylish & Affordable: The Ultimate Guide to Epoxy Flooring
Epoxy flooring has rapidly become the go-to solution for residential, commercial, and industrial spaces looking for durable, attractive, and low-maintenance floor systems. Whether you want to transform your garage, warehouse, or retail shop, epoxy floors provide unmatched performance and style. In this guide, we explore what epoxy flooring is, its benefits, types, applications, and why it’s a smart investment for any property.
What is Epoxy Flooring?
Epoxy flooring is a surface coating made from epoxy resins and hardeners. When mixed, these two components chemically react to form a hard plastic material that bonds tightly to concrete, creating a smooth, durable, and long-lasting floor surface. Epoxy is often used over concrete in commercial buildings, garages, basements, and even stylish modern interiors.
Benefits of Epoxy Flooring
Choosing epoxy flooring comes with a wide range of advantages:
1. Durability & Strength
Epoxy is extremely resilient, making it ideal for high-traffic areas and heavy equipment. It resists wear, chemicals, impact, and abrasions far better than standard flooring options.
2. Low Maintenance
Epoxy-coated floors are seamless and easy to clean. Dust, dirt, and spills can be quickly wiped away without affecting the floor’s integrity or appearance.
3. Moisture & Chemical Resistance
Epoxy provides excellent resistance against water, oil, chemicals, and stains. This makes it perfect for garages, workshops, kitchens, and industrial environments.
4. Aesthetic Appeal
Available in various colours, finishes, and designs, epoxy flooring can be customized to match your brand or interior theme. Options like metallic epoxy or decorative flake systems add a modern, high-end look.
5. Cost-Effective
With minimal maintenance and long life expectancy, epoxy flooring is a cost-efficient solution. It reduces the need for frequent repairs and replacements.
Popular Types of Epoxy Flooring
Depending on your space and functional needs, you can choose from several epoxy flooring systems:
Self-Leveling Epoxy Floors – Ideal for commercial and residential spaces; creates a smooth, level surface.
Epoxy Flake Floors – Contain colored chips for texture and visual interest, often used in garages.
Metallic Epoxy Floors – Aesthetic option that produces a marble-like effect; perfect for showrooms or luxury interiors.
Quartz-Filled Epoxy Floors – Combine durability with a textured finish, commonly used in industrial kitchens and laboratories.
Anti-Static Epoxy Floors – Designed for environments sensitive to static electricity, like electronics manufacturing.
Common Applications of Epoxy Flooring
Epoxy flooring is versatile and suited for a wide range of uses, including:
Residential Garages and Basements
Commercial Kitchens and Showrooms
Warehouses and Factories
Retail Stores and Offices
Healthcare and Cleanroom Facilities
Automotive Workshops
Why Hire a Professional Epoxy Flooring Installer?
While DIY epoxy kits are available, professional installation ensures proper surface preparation, application, and curing. An experienced epoxy flooring contractor will deliver a long-lasting, flawless finish that enhances both functionality and aesthetics.
How Long Does Epoxy Flooring Last?
With proper care and installation, epoxy flooring can last anywhere from 10 to 20 years, depending on usage and traffic. Regular maintenance and prompt cleaning of spills can significantly extend its lifespan.
Boost Property Value with Epoxy Floors
Adding epoxy flooring can increase your property’s value thanks to its durability, attractive finish, and low upkeep. Whether you're renovating a home or updating a commercial space, epoxy floors offer both performance and polish.
Final Thoughts
Epoxy flooring offers the perfect combination of strength, style, and savings. Whether you need a sleek commercial showroom, a durable garage floor, or a clean industrial workspace, epoxy delivers. Make the smart choice and invest in epoxy flooring today — your floors will thank you.
0 notes
Text
Is Epoxy Flooring a Good Option for Residential Garages?
When considering flooring upgrades for residential garages, many homeowners in Australia are turning to epoxy flooring for its durability, aesthetic appeal, and long-term value. This flooring solution, once reserved primarily for industrial and commercial settings, has become increasingly popular in homes, particularly in garage spaces that require a robust and low-maintenance surface.
Below is a comprehensive guide exploring why epoxy flooring is regarded as a superior choice for residential garages, especially in the Australian climate.

What is Epoxy Flooring?
Epoxy flooring is a surface coating made by mixing a resin with a hardener. When combined, these materials form a strong, chemical-resistant layer that bonds seamlessly to concrete. The result is a glossy, smooth, and resilient surface that can withstand heavy use and environmental stressors.
In garage applications, this coating transforms dull concrete floors into bright, professional-looking surfaces that are both functional and visually appealing.
Advantages of Epoxy Flooring for Residential Garages
1. Exceptional Durability
One of the most significant benefits of epoxy flooring is its incredible durability. It resists impact, stains, and abrasions, making it ideal for high-traffic areas like garages. Whether the garage is used for vehicle storage, DIY projects, or as a home gym, epoxy stands up to daily wear without chipping or cracking easily.
2. Chemical and Stain Resistance
Garages are often exposed to oil spills, gasoline, brake fluids, and other harsh chemicals. Epoxy flooring is resistant to these substances, preventing unsightly stains and damage. This makes cleanup easier and keeps the floor looking new for longer.
3. Low Maintenance
Unlike porous concrete, which absorbs liquids and is prone to cracking, epoxy flooring is non-porous and easy to maintain. Simple sweeping and occasional mopping are usually sufficient to keep it clean. Its seamless finish also prevents dust accumulation, contributing to a cleaner environment.
4. Aesthetic Enhancement
A major appeal of epoxy flooring lies in its visual transformation. Available in various colours, patterns, and finishes—including metallic and flake options—this flooring can enhance the appearance of any garage. A well-coated floor adds brightness and modern flair, making the space more inviting and functional.
5. Cost-Effectiveness
Considering its longevity and minimal maintenance requirements, epoxy flooring presents excellent value for money. While the initial installation cost might be higher than traditional concrete sealing, the long-term savings on repairs and replacements make it a cost-efficient solution.
Suitability for the Australian Climate
The Australian climate, known for its temperature fluctuations and varying humidity levels, demands flooring that can endure without degrading. Epoxy flooring performs well in such conditions, especially when professionally installed with moisture-resistant primers and topcoats.
Its ability to withstand temperature changes without expanding or contracting excessively ensures structural integrity over time. This stability is particularly beneficial in regions experiencing both hot summers and cooler winters.
Installation Considerations
While epoxy flooring offers numerous advantages, proper installation is crucial for achieving its full potential. The surface must be meticulously prepared—free from dust, moisture, and existing coatings. Improper installation may lead to peeling, bubbling, or uneven finishes.
Professional installation is highly recommended to ensure a smooth, long-lasting result. A skilled technician will assess the concrete substrate, address any pre-existing damage, and apply the epoxy in layers for optimal adhesion and strength.
Potential Drawbacks to Consider
Though epoxy flooring is a strong contender for garage applications, there are a few considerations to keep in mind:
Slipperiness: The glossy surface can be slippery when wet. However, anti-slip additives can be incorporated during installation to improve traction.
Curing Time: It requires a curing period, often between 24 to 72 hours, during which the garage should remain unused.
UV Sensitivity: Some epoxy coatings may yellow over time with prolonged UV exposure. UV-resistant topcoats are available to mitigate this issue.
Long-Term Performance and Lifespan
With proper maintenance and care, epoxy flooring can last 10 to 20 years or more. Regular cleaning, prompt spill management, and avoiding harsh abrasives during maintenance will prolong its appearance and structural integrity. In many Australian homes, it has proven to be a reliable flooring investment that adds value and utility to residential garages.
Conclusion
Epoxy flooring stands out as a smart, durable, and stylish solution for residential garages in Australia. Its resistance to wear, chemicals, and environmental conditions—combined with its aesthetic flexibility—makes it a top-tier choice for homeowners seeking long-lasting value. When installed correctly, it not only enhances the functionality of a garage but also elevates the overall appearance of the home.
For those considering a practical and visually striking upgrade to their garage floors, epoxy flooring is undeniably a compelling option.
0 notes
Text
Epoxy Flooring: The Ultimate Guide to Durable, Stylish, and Easy-to-Maintain Floors
Epoxy flooring has become one of the most popular flooring solutions for both residential and commercial spaces. Known for its durability, aesthetic appeal, and easy maintenance, epoxy floors offer a perfect blend of functionality and style. In this comprehensive guide, we'll explore what epoxy flooring is, its benefits, applications, installation process, and maintenance tips.
What Is Epoxy Flooring?
Epoxy flooring is a type of coating applied over concrete floors made from epoxy resins and hardeners. When mixed, these components chemically react to form a tough, rigid plastic surface that bonds tightly to the concrete beneath. This creates a seamless, glossy, and highly durable floor finish ideal for heavy-traffic areas.
Benefits of Epoxy Flooring
Durability and Strength Epoxy floors are extremely resistant to wear and tear, making them perfect for industrial environments, garages, warehouses, and commercial spaces.
Chemical and Stain Resistance Epoxy coatings protect floors from spills, chemicals, oil, and other substances that might otherwise cause damage or staining.
Easy to Clean and Maintain The seamless nature of epoxy floors prevents dust, dirt, and bacteria buildup, making them hygienic and easy to clean with just a mop and mild detergent.
Aesthetic Appeal Available in a variety of colors, patterns, and finishes—including metallic, matte, and high-gloss—epoxy flooring can enhance the look of any space.
Safety Features Epoxy floors can be made slip-resistant by adding texture, reducing the risk of slips and falls in workplaces.
Common Applications of Epoxy Flooring
Industrial and Manufacturing Facilities
Commercial Warehouses
Residential Garages and Basements
Retail Stores
Hospitals and Healthcare Facilities
Restaurants and Food Processing Plants
How Is Epoxy Flooring Installed?
Surface Preparation The concrete surface must be clean, dry, and free of cracks or contaminants. Preparation often involves grinding, shot blasting, or acid etching.
Primer Application A primer is applied to improve adhesion between the concrete and epoxy coating.
Epoxy Coating Application The mixed epoxy resin and hardener are applied evenly, sometimes in multiple layers depending on the desired thickness.
Optional Topcoat A clear topcoat may be applied for extra protection and gloss.
Curing Time Epoxy floors typically cure within 24 to 72 hours, depending on temperature and humidity.
Maintenance Tips for Epoxy Flooring
Sweep or vacuum regularly to remove dust and debris.
Clean spills promptly to prevent stains.
Use a mild detergent and warm water for cleaning; avoid harsh chemicals.
Place protective pads under heavy furniture or equipment.
Avoid dragging sharp or heavy objects across the floor.
Why Choose Professional Epoxy Flooring Installation?
While some DIY epoxy kits exist, professional installation ensures proper surface prep, even application, and a longer-lasting finish. Experts can also provide customized options and warranties for peace of mind.
Conclusion
Epoxy flooring offers a highly durable, visually appealing, and low-maintenance flooring option suitable for various environments. Whether you're upgrading a garage, outfitting a warehouse, or improving a commercial space, epoxy floors provide excellent value and long-term performance.
0 notes
Text
Maximize Your Space with Smart Garage Wall Storage Solutions
In today’s fast-paced world, organizing our living spaces has become a necessity, not a luxury. One of the most overlooked areas of a home is the garage. Often reduced to a dumping ground for seasonal items, tools, and miscellaneous storage, the garage can quickly become chaotic. However, with well-designed garage wall storage and thoughtfully installed garage storage systems, this space can be transformed into an efficient and tidy extension of your home. These two tools can make your garage feel brand-new—and give every item a proper place.
The key to a clutter-free garage is using vertical space. Walls offer ample room for storage, yet most homeowners rarely make full use of it. Garage wall storage solutions like panels, pegboards, and adjustable shelving can help store everything from bicycles to gardening tools, power equipment to sports gear. These systems aren't just about clearing the floor; they’re about creating accessibility and maintaining long-term order.
When selecting a garage storage system, it’s essential to consider flexibility. Modular systems are particularly effective, as they allow homeowners to adapt their setup over time as their storage needs evolve. A well-structured system includes not only shelves but also bins, hooks, and racks to accommodate various shapes and sizes of items. This comprehensive approach reduces clutter and prevents future mess from accumulating.
Beyond practicality, a neat garage can increase your home’s value and enhance its appeal. Potential buyers often view the garage as a major bonus room, and a professionally organized space can make a strong impression. That’s why investing in quality garage wall storage isn’t just about aesthetics—it’s a smart financial decision, too.
Norsk-stor.com offers a wide range of garage organization solutions designed to help you take full advantage of your wall space. From heavy-duty wall-mounted racks to sleek cabinets, the brand focuses on durability and design. With products suited for both small and large spaces, their storage systems cater to various homeowner needs and budgets.
Another advantage of using specialized garage storage systems is safety. Items left on the floor can pose tripping hazards, while improperly stored tools may cause injury. Wall-mounted systems help to keep dangerous equipment out of reach of children while also preventing damage to tools that are sensitive to moisture or rust when stored incorrectly.
Installing wall storage is not only practical but also surprisingly straightforward. Many systems available today are DIY-friendly and come with clear installation guides. Some require minimal tools and can be customized based on your wall type—whether concrete, drywall, or brick. Once installed, you'll notice an immediate transformation in how your garage looks and functions.
Consistency in maintenance is the next step. After setting up your garage wall storage, it’s crucial to establish a habit of placing items back in their designated spots. This behavior ensures the longevity of your organized system and saves time in the long run. Seasonal check-ups can also help refine the system and make room for new additions without creating clutter again.
For homeowners with multi-purpose garages—those used as home gyms, hobby workshops, or even home offices—storage plays an even bigger role. Keeping zones separated through distinct wall storage sections allows for smooth transitions between activities and maintains a clean appearance.
Finally, remember that you don’t need to invest in the most expensive systems to see results. Even basic racks and panels can make a significant impact when used strategically. Norsk-stor.com features a curated selection of these budget-friendly options, combining form and function in a way that supports everyday use.
0 notes
Text
How Professional Flooring Services Can Transform Your Space
Flooring services play a critical role in both residential and commercial property improvement. Whether you're building a new home, remodeling a space, or updating your business premises, the quality and type of flooring you choose can dramatically impact aesthetics, functionality, and even property value. From installation to repair and maintenance, professional flooring services ensure that your floors are durable, safe, and visually appealing.
Choosing the right flooring service provider begins with understanding your needs and preferences. Flooring options vary widely in terms of material, cost, appearance, and maintenance requirements. Hardwood, laminate, vinyl, tile, carpet, and concrete are among the most common materials used in today's flooring projects. Each has its own advantages and best-use cases, and a reliable flooring contractor can guide you through the decision-making process to find the best fit for your space.

Types of Flooring Services Offered
A full-service flooring company typically offers a range of services to meet different customer needs. These can include:
Consultation and Planning The process usually starts with a consultation, where you discuss your vision, budget, and timeline. Flooring experts can then suggest suitable materials and layouts, taking into account room usage, foot traffic, moisture levels, and existing décor.
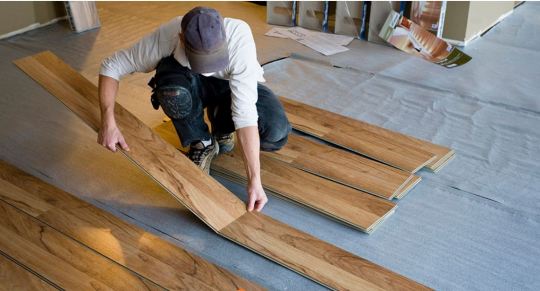
Installation Installation is the core service offered. Whether it’s installing new hardwood planks, laying carpet, or fitting tiles, professionals ensure a clean, level surface and precise work. Proper installation is essential for maximizing durability and minimizing future repair needs.
Repairs and Replacements Over time, even the best flooring can suffer wear and tear. Flooring services include repair work such as replacing damaged tiles, refinishing hardwood, or fixing uneven surfaces. In cases of severe damage, full replacement may be recommended.
Maintenance Maintenance services help prolong the life of your flooring. This might include cleaning, sealing, polishing, or waxing, depending on the material. Regular maintenance not only preserves the appearance but also prevents structural issues.
Popular Flooring Materials and Their Benefits
Different materials serve different purposes. Choosing the right one is crucial for long-term satisfaction. Here’s a brief overview of popular flooring materials:
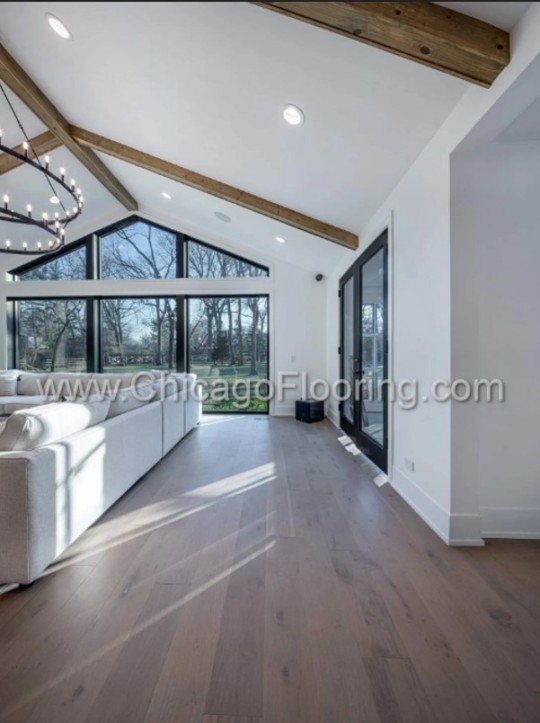
Hardwood Flooring Timeless and elegant, hardwood is known for its durability and natural beauty. It’s ideal for living rooms, bedrooms, and hallways. It can be sanded and refinished multiple times over its lifespan.
Laminate Flooring A cost-effective alternative to hardwood, laminate offers a similar look with added resistance to scratches and dents. It's easy to clean and works well in high-traffic areas.
Vinyl and Luxury Vinyl Plank (LVP) Vinyl is waterproof and extremely versatile, making it perfect for kitchens, bathrooms, and basements. LVP mimics the look of wood or stone at a lower cost and with better moisture resistance.
Tile Flooring Commonly used in bathrooms and kitchens, tiles are water-resistant and come in countless designs. Porcelain and ceramic are the most common options.
Carpet Flooring Comfortable and warm, carpet is popular in bedrooms and family rooms. It helps reduce noise and is available in various colors and textures.
Concrete Flooring Durable and modern-looking, concrete is increasingly used in commercial spaces and modern homes. It can be stained, polished, or textured for different looks.
Why Hire Professional Flooring Services?
DIY flooring may seem cost-effective at first, but mistakes in installation can lead to costly repairs down the road. Here are a few reasons why hiring professionals is often the better choice:
Expertise and Experience Professionals understand the nuances of different materials and have the tools needed for proper installation. They can handle unexpected challenges like uneven subfloors or moisture issues.
Time Efficiency What could take a homeowner a week or more to complete, a trained flooring team can finish in a fraction of the time, allowing you to use the space sooner.
Warranty and Insurance Reputable flooring companies offer warranties on their work and are insured. This protects you in case of damage or unsatisfactory results.
Access to Quality Materials Flooring professionals often have access to better-grade materials than what’s available at big-box stores. They also know where to find eco-friendly or specialized products if needed.
Flooring Services for Commercial Spaces
Flooring in commercial spaces must meet different demands than residential flooring. In offices, retail stores, restaurants, and industrial facilities, durability and safety are top priorities. Commercial flooring services often include high-traffic carpet tiles, polished concrete, vinyl composite tile (VCT), and anti-slip coatings. These installations need to comply with building codes and accessibility standards, which professionals are trained to follow.
Additionally, many commercial providers offer flexible installation schedules to minimize disruption to your business. They may also provide regular maintenance packages to keep floors looking and performing their best over time.
What to Consider Before Hiring a Flooring Service
Before hiring a flooring contractor, do your research. Look for companies with:
Positive customer reviews and ratings
Proper licenses and insurance
Transparent pricing and free estimates
A portfolio of past work
Clear communication and timelines
It’s also wise to ask about warranties, subcontractor use (if any), and cleanup after the project is completed. Getting everything in writing before work begins helps prevent misunderstandings.
Conclusion
Flooring services are a vital part of any property upgrade or maintenance plan. From choosing the right materials to expert installation and ongoing care, flooring professionals bring knowledge and precision that ensures your floors not only look great but last for years. Whether you're installing hardwood in your living room or vinyl tiles in a commercial space, hiring the right flooring service provider is a smart investment in your property's value and functionality.
0 notes
Text
Quality Hardwood Flooring Installation Near You in Wheaton
When it comes to upgrading your home, few improvements offer the warmth, beauty, and lasting value of hardwood flooring. In Wheaton, a picturesque suburb known for its charming homes and vibrant community, more homeowners are turning to hardwood flooring as a timeless and elegant solution. Whether you’re renovating your entire house or just looking to improve a single room, quality hardwood flooring installation near you in Wheaton can make all the difference in enhancing your space.
This comprehensive guide will walk you through everything you need to know about hardwood flooring—from the benefits and types of wood to the installation process and how to choose the best hardwood flooring contractor near Wheaton.
Why Choose Hardwood Flooring for Your Wheaton Home?
Hardwood flooring is more than just a trend—it’s a long-term investment in your home’s aesthetic and value. Here’s why it continues to be a top choice for Wheaton homeowners:
1. Timeless Beauty
Hardwood floors have a classic, versatile look that never goes out of style. They complement both traditional and modern interior designs, making them a smart choice for any home.
2. Increased Home Value
Homes with hardwood floors often appraise higher and sell faster. If you're thinking of selling your home in the future, hardwood can be a significant asset.
3. Durability and Longevity
When installed and maintained correctly, hardwood floors can last for decades. Some types of wood flooring, such as oak and maple, are exceptionally hard and resistant to wear.
4. Easy to Clean and Maintain
Hardwood floors are simple to clean—just a quick sweep or vacuum and occasional mopping is all that’s needed. They don’t trap allergens like carpet, making them ideal for allergy sufferers.
5. Eco-Friendly Options
Today’s market offers sustainable hardwood flooring options harvested from responsibly managed forests or recycled materials.
Types of Hardwood Flooring Available in Wheaton
Understanding the different types of hardwood flooring will help you make an informed choice. Here are some popular options:
1. Solid Hardwood Flooring
Solid hardwood is made from a single piece of wood and can be sanded and refinished multiple times. It's durable, but sensitive to moisture, making it better for living areas rather than basements or bathrooms.
2. Engineered Hardwood Flooring
Engineered wood has a top layer of real wood backed by multiple layers of plywood or fiberboard. It’s more stable in humid conditions and works well in below-grade spaces.
3. Prefinished vs. Unfinished Hardwood
Prefinished hardwood comes with a factory-applied finish, meaning quicker installation and less mess. Unfinished hardwood allows for a more custom, on-site finish but requires more time and effort.
4. Exotic vs. Domestic Wood Species
Domestic species like oak, maple, and hickory are popular in Wheaton for their classic appeal. Exotic species like Brazilian cherry or tigerwood offer unique patterns and rich colors.
The Hardwood Flooring Installation Process
When you choose quality hardwood flooring installation near you in Wheaton, a professional contractor will guide you through each step:
1. Consultation and Assessment
Your contractor will assess your current flooring, subfloor conditions, and room layout. They’ll help you choose the right wood type, finish, and installation method.
2. Preparing the Space
Before installation, furniture must be removed, and the subfloor may need to be leveled or cleaned. This step is crucial for long-term durability.
3. Acclimation
Hardwood flooring needs time to acclimate to your home’s temperature and humidity levels. This usually takes a few days.
4. Installation Methods
Common installation methods include:
Nail-down: Used for solid wood on wooden subfloors.
Glue-down: Best for engineered wood on concrete.
Floating: Easy and quick installation, great for DIY or laminate-style flooring.
5. Finishing Touches
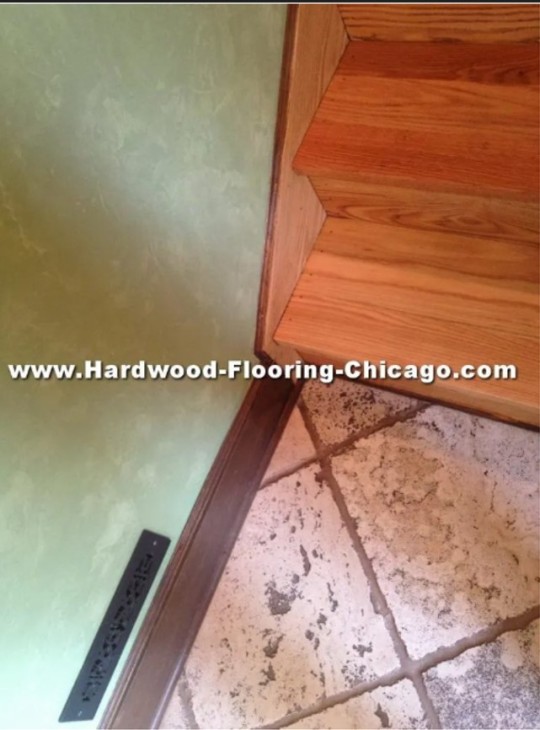
After the planks are in place, trim and molding are installed. If the wood is unfinished, it will be sanded and stained on-site.
Benefits of Hiring a Local Wheaton Hardwood Flooring Installer
Working with a local contractor brings several advantages:
1. Knowledge of Local Climate
Wheaton experiences a mix of humid summers and cold winters. Local installers understand how temperature and humidity affect hardwood and can recommend the best materials and installation techniques.
2. Quick Response and Personalized Service
Being nearby allows for faster service and easier communication. You can also visit showrooms or view samples quickly.
3. Reputation You Can Verify
It's easier to check reviews, visit previous job sites, and speak to other Wheaton residents about their experiences.
How to Choose the Best Hardwood Flooring Contractor Near Wheaton
Choosing the right contractor is just as important as choosing the right flooring. Here are some tips for finding the best hardwood flooring contractor near Wheaton:
1. Check Credentials
Make sure the contractor is licensed, bonded, and insured. Ask about any industry certifications or memberships in professional organizations like the National Wood Flooring Association (NWFA).
2. Read Reviews and Ask for References
Look at online reviews and ask the contractor for local references. Speaking directly with past clients gives you a better idea of the contractor's workmanship and reliability.
3. Review Their Portfolio
Ask to see photos or visit completed installations to assess their style and quality.
4. Get Detailed Estimates
A reputable contractor will provide a detailed quote that includes labor, materials, and a timeline. Avoid vague estimates or unusually low bids, which can be red flags.
5. Communication and Customer Service
Good communication is key. Choose someone who listens to your needs, answers your questions, and keeps you informed throughout the project.
Cost of Hardwood Flooring Installation in Wheaton
The cost of hardwood flooring varies depending on the material and complexity of the job. On average, Wheaton homeowners can expect:
Materials: $4 to $15 per square foot, depending on the species and finish.
Labor: $3 to $8 per square foot.
Total Installed Cost: $7 to $23 per square foot.
Keep in mind, additional charges may apply for subfloor repairs, moldings, or custom patterns.
Tips for Maintaining Your New Hardwood Floors
After investing in new hardwood floors, it’s essential to keep them looking great for years to come:
1. Regular Cleaning
Sweep or vacuum regularly to remove dirt and debris. Use a damp (not wet) mop with a hardwood-friendly cleaner.
2. Avoid Water Damage
Clean up spills immediately. Use area rugs in moisture-prone areas like kitchens and entryways.
3. Use Furniture Pads
Place felt pads on furniture legs to prevent scratches when moving them.
4. Keep Pets’ Nails Trimmed
Long nails can easily scratch the floor. Regular grooming helps maintain your floor’s finish.
5. Recoat Periodically
Every few years, a light sanding and recoating can restore the finish without the need for a full refinish.
Hardwood Flooring Trends in Wheaton
Homeowners in Wheaton are embracing both classic and modern hardwood styles. Popular trends include:
Wide Planks: These offer a more spacious and contemporary look.
Matte Finishes: Less reflective and better at hiding scratches and dust.
Gray and Neutral Tones: These shades provide a modern, versatile backdrop.
Herringbone and Chevron Patterns: Add a touch of sophistication and luxury.
Sustainable Wood Options: Environmentally conscious homeowners are opting for FSC-certified or reclaimed wood.
Frequently Asked Questions (FAQs)
How long does hardwood flooring installation take?
Most standard installations take 2 to 5 days depending on room size and preparation requirements.
Can hardwood be installed over existing flooring?
In some cases, yes. Engineered wood can be installed over tile or vinyl if the subfloor is level. Solid hardwood usually requires removal of the old floor.
Is hardwood flooring suitable for kitchens or bathrooms?
Engineered hardwood can work in kitchens with proper sealing. Bathrooms are riskier due to high humidity; tile may be a better choice there.
Will my hardwood floors scratch easily?
No floor is completely scratch-proof, but high-quality finishes and proper care greatly reduce the chances.
Final Thoughts
When it comes to enhancing your Wheaton home with timeless style, warmth, and long-lasting value, hardwood flooring is a smart choice. But the key to a successful project lies in choosing quality materials and, just as importantly, the right professionals for the job.
Whether you're looking to install brand-new floors or upgrade your existing ones, quality hardwood flooring installation near you in Wheaton is just a call away. Be sure to do your research, review local options, and choose the best hardwood flooring contractor near Wheaton who can deliver the expertise, craftsmanship, and service your home deserves.
Let your floors speak of elegance, durability, and pride—right from the heart of Wheaton.
youtube
#Quality Hardwood Flooring Installation Near You in Wheaton#hardwood flooring Wheaton#hardwood flooring installers near Wheaton#best hardwood flooring company near Wheaton#best hardwood flooring contractor near Wheaton#Youtube
1 note
·
View note
Text
The Ultimate Guide to Water Damage Repair: Causes, Process, and Prevention

Water damage is one of the most common and costly problems homeowners and property managers face. Whether caused by a burst pipe, roof leak, flooding, or appliance failure, water intrusion can lead to structural issues, mold growth, and significant property loss if not addressed promptly and properly.
In this comprehensive guide, we’ll cover everything you need to know about water damage repair, including its causes, the repair process, potential risks, and preventive measures.
What Causes Water Damage?
Water damage can originate from a variety of sources, both internal and external. Understanding the most common causes can help property owners stay vigilant and take preventive steps.
1. Plumbing Failures
Burst pipes, leaky faucets, and faulty water heaters are leading causes of water damage. Poor pipe insulation during cold weather can cause freezing and ruptures, leading to flooding.
2. Roof Leaks
Damaged or missing shingles, clogged gutters, or flashing failures can allow water to penetrate the roof and seep into walls and ceilings.
3. Appliance Malfunctions
Washing machines, dishwashers, and refrigerators with faulty hoses or seals can leak significant amounts of water over time.
4. Flooding and Storms
Heavy rainfall, hurricanes, and snowmelt can cause external flooding that enters homes through foundations, doors, or basement windows.
5. Sewage Backups
Backed-up sewer lines can release contaminated water into homes, creating a health hazard and requiring specialized cleanup.
The Risks of Untreated Water Damage
Ignoring or delaying water damage repair can lead to serious consequences, including:
Mold Growth: Mold begins to develop within 24 to 48 hours in damp environments, posing health risks and requiring costly remediation.
Structural Damage: Prolonged exposure to water weakens drywall, wood, and concrete, affecting the structural integrity of the property.
Electrical Hazards: Water intrusion near outlets, wiring, or appliances can cause short circuits, fire risks, or electrocution.
Decreased Property Value: Signs of water damage, even if repaired, can deter potential buyers or lower a property’s market value.
Unpleasant Odors: Lingering moisture often leads to musty smells that are hard to eliminate without professional drying.
The Water Damage Repair Process
Proper water damage repair is a multi-step process that requires specialized tools, training, and expertise. Here's how the typical process unfolds:
1. Emergency Response and Inspection
Time is critical. The first step is to stop the source of the water (if possible) and call in professionals. A thorough inspection is conducted to assess the extent of the damage and moisture saturation using infrared cameras and moisture meters.
2. Water Extraction
Standing water is removed using powerful pumps and wet vacuums. The faster the water is extracted, the less chance there is for secondary damage like mold and warping.
3. Drying and Dehumidification
After surface water is removed, dehumidifiers and industrial air movers are used to draw moisture from walls, flooring, and furniture. Drying may take several days depending on the severity of the damage.
4. Cleaning and Sanitizing
All affected areas are cleaned and disinfected to prevent mold, mildew, and bacteria. Antimicrobial treatments are applied to porous materials, and unsalvageable items are disposed of safely.
5. Repairs and Restoration
The final phase involves restoring the property to its pre-damage condition. This could include replacing drywall, painting, installing new flooring, or rebuilding structural elements.
Can You Handle Water Damage Repair Yourself?
While small leaks or spills might be manageable with DIY tools, most water damage situations require professional intervention. Hidden moisture, potential mold growth, and structural issues are difficult to address without the right expertise and equipment. Hiring professionals ensures the problem is resolved thoroughly and reduces the risk of future complications.
How to Prevent Water Damage
Preventing water damage is more cost-effective than repairing it. Here are some actionable steps to protect your property:
1. Inspect Plumbing Regularly
Check for signs of corrosion, leaks, and loose fittings. Consider replacing old pipes before they fail.
2. Maintain the Roof and Gutters
Keep gutters clean and inspect the roof for damaged shingles or flashing. Ensure proper drainage away from the foundation.
3. Install Water Leak Detectors
Smart leak detectors can alert you to leaks early, even when you’re not home. Some systems can automatically shut off water to prevent flooding.
4. Insulate Pipes
During winter, make sure pipes are well-insulated to prevent freezing and bursting.
5. Sump Pump Maintenance
If you have a basement, ensure your sump pump is working correctly. Install a backup battery in case of power failure during storms.
When to Call for Professional Help
If you experience any of the following, it’s time to call in a water damage repair specialist:
Water has saturated large areas or has been present for more than 24 hours.
You see signs of mold or smell a musty odor.
The source of the leak is unknown or cannot be stopped.
Electrical systems or structural components have been affected.
The water came from a contaminated source, such as sewage or floodwater.
Professional services not only restore your home but also assist with insurance claims by providing detailed documentation and estimates.
Final Thoughts
Water damage can be a stressful and overwhelming experience, but with timely action and professional support, your home or business can be restored efficiently and safely. Understanding the causes, recognizing the risks, and knowing what to expect from the repair process can help you stay prepared and protected.
Whether you’re dealing with a sudden pipe burst or recovering from a major storm, water damage repair is not something to delay or handle alone. A proactive approach today can save you thousands in repairs and give you peace of mind tomorrow.
1 note
·
View note
Text
Concrete Cleaning and Densification: The Ultimate Guide for Long-Lasting Floors
Discover the benefits of concrete cleaning and densification for durable, stain-resistant, and low-maintenance flooring. Learn expert tips for commercial and residential spaces.
Concrete Cleaning and Densification: The Ultimate Guide for Long-Lasting Floors
Concrete is one of the most durable and cost-effective flooring materials available today. However, to ensure its longevity and maintain its appearance, regular concrete cleaning and densification are essential. Whether for industrial warehouses, retail stores, or residential garages, understanding how to properly clean and densify concrete can significantly improve performance and aesthetics.
What is Concrete Cleaning?
Concrete cleaning is the process of removing dirt, grime, stains, oil, and other contaminants from the surface of concrete floors. Over time, foot traffic, vehicle movement, and environmental factors can cause concrete to look dull and deteriorated.
Benefits of Concrete Cleaning:
Enhances appearance and shine
Prevents slip hazards
Prepares the surface for densification or sealing
Prolongs the life of concrete surfaces
Common Concrete Cleaning Methods:
Pressure Washing: Ideal for removing surface-level dirt and debris.
Chemical Cleaners: Used to treat oil, grease, rust, and other stubborn stains.
Mechanical Scrubbing: Perfect for large commercial areas that require deep cleaning.
Steam Cleaning: A chemical-free method for sanitizing indoor concrete surfaces.
What is Concrete Densification?
Concrete densification is a chemical treatment that penetrates concrete surfaces and reacts with free lime to form a harder, denser surface. The process strengthens concrete and reduces porosity, making it more resistant to wear, stains, and water absorption.
Why Densify Concrete?
Increases surface hardness and abrasion resistance
Improves durability and longevity
Minimizes dusting and cracking
Enhances the results of polished concrete floors
Types of Concrete Densifiers:
Sodium Silicate: Affordable but requires more applications.
Potassium Silicate: Offers better penetration and quick results.
Lithium Silicate: Premium densifier with deeper penetration, ideal for polished concrete.
Ideal Applications for Concrete Cleaning and Densification
These services are suitable for a variety of environments, including:
Warehouses and distribution centers
Commercial and retail spaces
Garages and workshops
Industrial manufacturing plants
Schools and public buildings
When to Perform Concrete Cleaning and Densification
Regular maintenance and timely densification extend the life of concrete floors:
Cleaning: Monthly for high-traffic areas, quarterly for light-use spaces
Densification: Typically applied once during installation or prior to polishing, but periodic reapplication may be necessary in industrial environments
Step-by-Step Process
Initial Cleaning: Remove all debris, dust, and surface contaminants.
Deep Cleaning: Use appropriate cleaners for stains and grease.
Surface Preparation: Ensure concrete is dry and porous before applying densifier.
Densifier Application: Apply evenly and allow it to react and cure.
Final Polish (optional): For decorative or commercial spaces, polishing enhances gloss and performance.
Professional vs. DIY: Which is Better?
While DIY solutions exist for basic concrete cleaning, densification is best handled by professionals. Trained technicians use commercial-grade equipment and industry-specific densifiers to ensure deep penetration and lasting results.
Conclusion
Concrete cleaning and densification are critical steps in maintaining strong, beautiful, and long-lasting floors. Whether you're managing a commercial facility or upgrading your home, these services offer immense value in durability, appearance, and cost savings. For best results, trust experienced professionals to assess, treat, and maintain your concrete surfaces.
0 notes
Text
Concrete Floor Levelling: Everything You Need to Know
If you're renovating a home, preparing for tile or hardwood flooring, or fixing uneven concrete, concrete floor levelling is essential. It ensures a smooth, even surface, improving both the appearance and structural integrity of floors. In this guide, we’ll explore the benefits, process, and professional tips for effective concrete floor levelling.
What Is Concrete Floor Levelling?
Concrete floor levelling is the process of correcting uneven or sloped concrete surfaces by applying a self-levelling compound or using traditional screeding methods. This is commonly done before installing new flooring materials such as tile, vinyl, laminate, carpet, or hardwood.
There are two main types of floor levelling:
Self-levelling compound – a cement-based mixture that flows and sets on its own.
Manual levelling (screeding) – involves tools to spread and flatten the mixture.
Why Is Concrete Floor Levelling Important?
An uneven floor can cause a range of issues including:
Cracks in tiles or floorboards
Poor drainage or pooling water
Uneven wear and damage to flooring materials
Tripping hazards and safety concerns
Level floors are also critical for:
Maximizing durability of surface flooring
Achieving professional-grade finishes
Ensuring furniture sits properly without wobbling
Signs Your Floor Needs Levelling
You may need concrete floor levelling if you notice:
Sloping or dips in the surface
Visible cracks or chips
Gaps under skirting boards
Bouncing or squeaking floors
Difficulty installing flooring evenly
The Concrete Floor Levelling Process
Here’s a typical workflow professionals follow:
1. Inspection and Measurement
The floor is inspected using a laser level or straightedge to identify high and low spots.
2. Surface Preparation
The floor is cleaned thoroughly. Any loose debris, old adhesives, or coatings are removed to help the levelling compound adhere properly.
3. Priming
A primer is applied to ensure the levelling compound bonds to the concrete surface.
4. Mixing and Application
A self-levelling compound is mixed and poured. It spreads evenly to fill in low spots and create a smooth surface.
5. Drying and Curing
The compound dries and hardens over several hours. Depending on the product, full curing may take 24-48 hours.
DIY vs Professional Floor Levelling
While some DIYers attempt small-scale concrete levelling, professional services are recommended for larger or more uneven areas. Professionals have:
Access to commercial-grade levelling compounds
Tools for accurate surface measurement
Experience to avoid costly mistakes
Hiring a professional ensures a flat, smooth result that lasts.
Choosing the Right Floor Levelling Contractor
When searching for a concrete floor levelling expert, consider:
Experience with both residential and commercial projects
Positive customer reviews and testimonials
Use of high-quality materials
Transparent pricing and clear communication
Always request a site inspection and quote before proceeding.
Concrete Floor Levelling Costs
Costs can vary depending on:
Size of the area
Severity of unevenness
Type of levelling compound used
Accessibility and preparation needed
On average, expect to pay between $30 to $80 per square metre for professional levelling services.
Conclusion
Concrete floor levelling is a critical step in any flooring project. Whether you're upgrading a home or prepping a commercial space, ensuring your concrete surface is smooth and even will protect your investment and deliver a high-end finish. For the best results, work with experienced professionals who specialise in concrete floor levelling services.
0 notes
Text
Why Hiring Trusted Foundation Repair Experts Is Essential for Your Home’s Safety
Your home’s foundation is its backbone — supporting the entire structure and ensuring long-term stability. Yet, it’s often one of the most overlooked parts of a house until something goes wrong. Cracks in the walls, uneven floors, or doors that won’t close properly can be early warning signs of foundation problems. When these issues arise, it’s crucial to act fast — and more importantly, to trust the job to experienced foundation repair professionals.
In this blog, we’ll explore why hiring trusted foundation repair experts is not just a smart choice, but a critical step in protecting your home, your safety, and your investment.
1. Foundation Problems Are More Common Than You Think
Foundation issues can affect homes of all sizes, ages, and construction types. They’re especially common in areas with clay-rich soil, frequent rainfall, or extreme temperature fluctuations. Over time, soil beneath the foundation can shift, contract, or expand — creating movement that affects the stability of the structure above.
Here are some typical signs of foundation issues:
Wall or floor cracks, especially near windows or doors
Uneven or sloping floors
Gaps around window frames or exterior doors
Doors and windows that stick or won’t latch properly
Bowing or leaning basement walls
Water pooling around the foundation
While these symptoms can vary in severity, they all warrant a professional inspection to avoid long-term damage.
2. DIY Isn’t an Option for Foundation Repairs
Unlike other home repairs, fixing a foundation isn’t a weekend project you can tackle on your own. Foundation repair involves engineering principles, specialized equipment, and a deep understanding of soil behavior. Attempting to fix structural issues without the proper training can worsen the damage and put your safety at risk.
Trusted foundation repair experts come equipped with the right tools and experience to identify the underlying cause and apply appropriate solutions. Whether it’s installing helical piers, slab jacking, underpinning, or fixing drainage systems, their work is guided by safety, precision, and building codes.
3. Experience Means Accurate Diagnosis
Not all cracks or structural issues mean the foundation is failing — and not all foundation issues look obvious. That’s why a trained eye is essential. Trusted foundation repair professionals start with a comprehensive inspection, which may include:
Visual assessments of walls, floors, and framing
Elevation measurements to detect settling or shifting
Soil analysis around the home
Moisture level detection
Inspection of crawlspaces, basements, and slabs
By identifying the true source of the problem, experts can avoid unnecessary repairs and ensure the right method is used for long-lasting results.
4. Trusted Experts Use Proven Repair Methods
The best foundation repair companies don’t rely on guesswork. They use proven techniques and industry-standard practices tailored to the specific type of foundation and damage involved. Common repair methods include:
Pier and Beam Repair: Adjusting or replacing piers and beams to restore level support in homes with crawl spaces.
Slabjacking (Mudjacking): Injecting material beneath a concrete slab to lift and level it.
Helical or Steel Piers: Driven into the ground to stabilize or lift the foundation.
Wall Anchors or Braces: Used to support bowing basement or retaining walls.
French Drains or Sump Pumps: Installed to redirect water and reduce hydrostatic pressure on the foundation.
Each technique requires precision and an understanding of the building’s load-bearing structure, making professional expertise a necessity.
5. Protecting Your Investment and Property Value
A home with unresolved foundation issues loses value quickly. Buyers and appraisers look for signs of structural integrity — and visible cracks, sloped floors, or moisture intrusion can be major red flags. By hiring a trusted foundation repair expert, you not only resolve the issue but also help maintain or increase your home’s resale value.
Additionally, some repairs may be covered by warranties that only apply if work is performed by licensed professionals. Cutting corners with unqualified contractors or DIY fixes can void these protections and end up costing more in the long run.
6. Foundation Repairs Help Prevent Secondary Damage
Foundation issues don’t exist in isolation — they often lead to other problems, such as:
Water damage in basements or crawl spaces
Mold growth due to moisture intrusion
Cracked tiles or damaged flooring
Plumbing issues caused by shifting pipes
Framing problems and roofing misalignments
By addressing foundation concerns early with trusted professionals, you prevent a domino effect of costly repairs elsewhere in the home.
7. Peace of Mind Through Warranties and Guarantees
One of the major benefits of hiring experienced foundation repair specialists is the peace of mind that comes with professional warranties. Trusted contractors often provide transferable warranties on structural repairs, which can be a selling point if you plan to move in the future.
These guarantees reflect their confidence in the quality of their work — and give you the reassurance that if something goes wrong, you're covered.
8. Choosing the Right Foundation Repair Expert
Not all repair services are created equal. When choosing a trusted foundation expert, here are a few qualities to look for:
Experience and certifications in structural repair and local building codes
Positive reviews and testimonials from past clients
Comprehensive inspections and clear repair plans
Transparent pricing with no hidden fees
Warranties and guarantees on labor and materials
Licensed and insured professionals
Always ask for references and get multiple quotes before choosing a contractor — a reliable expert will be happy to explain their process and provide documentation.
Conclusion: Don’t Wait — Hire a Foundation Expert Today
Foundation problems can escalate quickly — and the longer you wait, the more damage (and cost) you may face. Trusted foundation repair experts bring the skills, tools, and knowledge needed to protect your home from long-term structural issues. Whether you're dealing with minor cracks or significant settling, their professional insight ensures your home remains safe, strong, and secure.
If you've noticed signs of foundation trouble, don’t delay. Reach out to a qualified foundation repair professional in your area and schedule an inspection. Your home — and your peace of mind — depend on it.
1 note
·
View note
Text
Epoxy Coatings: The Ultimate Guide to Durable and Versatile Surface Protection
What Are Epoxy Coatings?
Epoxy coatings are a type of durable, high-performance resin used to protect and enhance surfaces such as concrete floors, countertops, walls, and more. Composed of two components—resin and hardener—epoxy creates a strong, chemical-resistant surface ideal for industrial, commercial, and residential applications.
Benefits of Epoxy Coatings
1. Exceptional Durability
Epoxy coatings are highly resistant to wear, abrasion, and heavy traffic. They're commonly used in warehouses, garages, and manufacturing plants for their long-lasting performance.
2. Chemical and Stain Resistance
Epoxy floor coatings provide excellent protection against oil spills, chemical agents, and cleaning products, making them perfect for workshops, auto shops, and laboratories.
3. Easy Maintenance
The smooth, non-porous surface of epoxy makes cleaning effortless. Dust, dirt, and spills can be easily wiped away, reducing the need for harsh cleaning agents.
4. Aesthetic Appeal
Available in a variety of colors, patterns, and finishes—including high gloss, metallic, and flake—epoxy can transform dull concrete into a visually appealing surface.
5. Improved Safety
Epoxy coatings can be customized with anti-slip additives to enhance traction, reducing the risk of slips and falls in wet or high-traffic areas.
Common Applications of Epoxy Coatings
Garage Floors: Ideal for transforming dusty, cracked concrete into a sleek, easy-to-clean surface.
Industrial Flooring: Provides a robust, chemical-resistant surface for factories, warehouses, and production areas.
Commercial Spaces: Used in retail stores, restaurants, and showrooms for its aesthetic and functional advantages.
Basements and Utility Rooms: A practical solution for moisture-prone areas.
How Epoxy Floor Coatings Are Applied
Step 1: Surface Preparation
The existing surface is cleaned, degreased, and sometimes mechanically ground to ensure proper adhesion.
Step 2: Primer Application
An epoxy primer is applied to seal the surface and improve the bond of the topcoat.
Step 3: Epoxy Application
The epoxy mixture is spread evenly using rollers or squeegees. Multiple coats may be applied depending on the desired thickness and finish.
Step 4: Curing
The coating is left to cure for 24 to 72 hours. During this time, the epoxy hardens into a seamless, resilient surface.
Choosing the Right Epoxy Coating
There are several types of epoxy coatings available, including:
100% Solid Epoxy: Highly durable and used for industrial applications.
Water-Based Epoxy: Easier to apply and ideal for residential use.
Solvent-Based Epoxy: Offers a thinner application and strong adhesion.
Consider the location, traffic level, and exposure to chemicals when choosing the best epoxy for your needs.
Maintenance Tips for Epoxy Floors
Sweep and mop regularly to prevent dirt buildup.
Use soft bristle brooms and non-abrasive cleaners.
Avoid dragging sharp or heavy objects across the floor.
Final Thoughts
Whether you're upgrading a home garage or renovating a commercial space, epoxy coatings offer an unbeatable combination of durability, aesthetics, and low maintenance. Their versatility and strength make them a top choice for anyone seeking long-lasting floor protection.
Ready to transform your space with epoxy floor coating? Contact a professional installer or explore DIY epoxy kits to get started today.
0 notes
Text
Fix Concrete Cracks Before It’s Too Late
Concrete repair is more than just patching cracks—it's about protecting your home’s safety, stability, and value. If you're noticing signs of concrete damage around your property, it’s time to act. Whether it’s your driveway, patio, walkway, or slab, the issues won't go away on their own. In fact, they’ll only get worse, leading to more costly repairs. In this guide, we’ll walk you through what concrete repair involves, how to know when you need it, and why calling our team at (352) 730- 9554 is your smartest move.

Fix Concrete Cracks Before It’s Too Late
When cracks appear in concrete, they’re more than cosmetic. They can be signs of shifting foundations, moisture intrusion, or soil settlement. Over time, small cracks become big ones, allowing water to seep in and worsen the damage. In Florida, the sandy soil and regular rain cycles speed up this process. Waiting only makes it worse. Our team specializes in proactive, lasting concrete repair that restores both structure and appearance.
What Causes Concrete Cracks in Florida Homes?
Cracks can result from many factors, including:
Soil erosion or settlement
Poor drainage or pooling water
Tree roots growing beneath the surface
Improper installation or curing
Homes in Marion County, Lake County, and cities like Ocala, The Villages, and Gainesville are especially prone due to shifting ground conditions. We serve all of these areas and more, offering local expertise you can count on.
How Concrete Repair Saves You Money
Concrete issues don't just sit still—they grow. That sinking sidewalk or cracking patio could become a safety hazard or affect your home’s resale value. A fast fix today prevents a costly replacement tomorrow. With our experienced team, we target the root of the problem, not just the symptoms.
Learn More About Foundation Cracks
Want to understand the deeper issues? Explore our guide to foundation repair to see how cracks may indicate underlying foundation movement.
Should You Try DIY Concrete Repair?
It’s tempting to try DIY patch kits, but most only offer temporary surface fixes. Without fixing what’s beneath—like voids, water issues, or shifting soil—the cracks come back. If you’re comfortable patching a minor surface crack, go for it. But if the area is large, uneven, or sinking, don’t risk it. Call the experts at (352) 730- 9554 and schedule a professional inspection.
How Long Does Concrete Repair Take?
Every job is different. A small walkway fix might take a few hours, while larger jobs like driveway leveling or slab repairs could take a day or two. We provide clear timelines up front, and we don’t leave until the job is done right.
Why Locals Trust APD Foundation Repair
We’re not just a crew with tools—we’re your neighbors. Based in Central Florida, we’ve helped families across Spring Hill, Inverness, Leesburg, Crystal River, and Wildwood restore their concrete surfaces for years. We know the soil. We know the weather. And we know how to fix your concrete problems the right way.
Learn More About Slab Issues
Uneven floors or sunken spots? Check out our slab repair page to learn about your options and when to act.
Signs You Need Concrete Repair Right Now
Still unsure if it's time? Look out for these warning signs:
Cracks wider than 1/8 inch
Chipping, flaking, or crumbling surfaces
Sections sinking or becoming uneven
Pooling water near cracks
Rust spots or exposed rebar
Don’t wait until it gets worse. Call (352) 730- 9554 now and talk to our friendly team.
How We Repair Concrete So It Lasts
At APD Foundation Repair, we don’t just slap on a patch. We assess the cause, address the underlying issue, and apply durable repair techniques suited for Florida’s climate. We use high-quality materials, proven leveling methods, and expert craftsmanship.
Learn More About Waterproofing Solutions
Worried about moisture damaging your concrete? Visit our waterproofing services page to see how we keep your surfaces safe.
Why Waiting Costs You More Later
The longer you wait, the deeper the problem gets—and the more expensive it becomes. Minor repairs can quickly turn into major rebuilds. That’s why acting fast is smart, and getting a free estimate from APD is even smarter.
Learn More About Crawl Space Damage
If you’re noticing musty smells or damp floors, read our crawl space repair guide to find out what’s really going on under your home.
Call Now for Professional Concrete Repair You Can Trust
Don't let cracks and damage drag down your home's value, safety, and appearance. Call us now at (352) 730- 9554 to speak with an expert and schedule your no-pressure inspection. Or contact us online and let’s restore your concrete with care.
0 notes
Link
0 notes