#Debian Tutorial
Explore tagged Tumblr posts
Visit Tumblr Blog
Explore Tumblr blogs with no restrictions, modern design and the best experience.
Last Seen Tumblr Blogs


Fun Fact
70% of Tumblr users say the Dashboard is their favorite place to spend time online.
Text

Shut the fuck up.
#i explain my choices in the fucking tutorial jfc#you try getting your boomer parents set up with jellyfin that sounds like a nightmare tbh#ubuntu is just more beginner friendly than straight debian that's why i suggest it#fuck off#people on this website fucking piss poor reading comprehension
9 notes
·
View notes
Text
How to enable Hardware acceleration in Firefox ESR
For reference, my computer has intel integrated graphics, and my operating system is Debian 12 Bookworm with VA-API for graphics. While I had hardware video acceleration enabled for many application, I had to spend some time last year trying to figure out out how to enable it for Firefox. While I found this article and followed it, I couldn't figure out at first how to use the environment variable. So here's a guide now for anyone new to Linux!
First, determine whether you are using the Wayland or X11 protocol Windowing system if you haven't already. In a terminal, enter:
echo "$XDG_SESSION_TYPE"
This will tell you which Windowing system you are using. Once you've followed the instructions in the article linked, edit (as root or with root privileges) /usr/share/applications/firefox-esr.desktop with your favorite text-editing software. I like to use nano! So for example, you would enter in a terminal:
sudo nano /usr/share/applications/firefox-esr.desktop
Then, navigate to the line that says "Exec=...". Replace that line with the following line, depending on whether you use Wayland or X11. If you use Wayland:
Exec=env MOZ_ENABLE_WAYLAND=1 firefox
If you use X11:
Exec=env MOZ_X11_EGL=1 firefox
Then save the file! If you are using the nano editor, press Ctrl+x, then press Y and then press enter! Restart Firefox ESR if you were already on it, and it should now work! Enjoy!
#linux#debian#gnu/linux#hardware acceleration#transfemme#Honestly I might start doing more Linux tutorials!#Linux is fun!
6 notes
·
View notes
Text
Las 5 mejores distribuciones de Linux
youtube
0 notes
Text
youtube
Conheça essa nova versão do linux brasileiro, O mauana linux versão cristã.
#linux#best linux distro#linux distro#linux distros#best linux distro for beginners#best linux distro 2024#top linux distro#linux mint#best linux distros#best linux distro for gaming#linux for beginners#arch linux#top linux distros#best linux distro for laptops#best linux distro for programming#best linux distros for coding#linux tutorial#how to choose a linux distro#best linux distros for 2024#best linux distro for developers#debian linux#debian#debian 12#linux debian#arch linux vs debian#debian vs arch linux#debian 11 vs arch linux#debian vs#debian gnu/linux#debian 9
0 notes
Text
Cara Menjalankan Paket .deb di Linux tanpa Instalasi
Halo Pembaca! Saya adalah pengguna ArchLinux. Namun, seringkali aplikasi yang saya butuhkan hanya tersedia untuk distro Ubuntu, Debian, atau distribusi populer lainnya. Biasanya, aplikasi-aplikasi tersebut hanya tersedia di apt atau hanya dapat diunduh dalam format .deb. ArchLinux tidak mendukung program-program Debian tersebut secara bawaan—dan mungkin itulah sebabnya distro ini tidak terlalu…
0 notes
Video
youtube
How to Install Webmin and Virtualmin on Linux Servers
# About Webmin Webmin is a web-based system configuration tool for Unix-like systems, including Linux. It provides a graphical interface that allows administrators to manage various aspects of their server, such as: • User accounts • Disk quotas • Services • Configuration files • Hardware devices • Software package management • System logs By using Webmin, administrators can perform complex tasks without needing to manually edit configuration files or use command-line interfaces, making server management more accessible and efficient.
# About Virtualmin Virtualmin is a powerful and flexible web hosting control panel built on top of Webmin. It is designed for managing multiple virtual hosts through a single interface and is suitable for both shared and dedicated hosting environments. Key features of Virtualmin include: • Management of multiple domains and websites • Mail server configuration and management • Database management (MySQL/PostgreSQL) • DNS server management • Security enhancements and monitoring • Backup and restore functionalities • Support for multiple PHP versions • Integration with popular web applications Virtualmin simplifies the process of managing web hosting environments, providing tools for administrators to efficiently handle various hosting-related tasks. Purpose of the Tutorial Video: In this tutorial video, we will walk you through the process of installing Virtualmin on a Debian 12 server. By the end of this video, you will have a fully functional Virtualmin setup, ready to manage your web hosting environment with ease. This tutorial covers: 1. Preparing your Debian 12 system for installation. 2. Downloading and executing the Virtualmin installation script. 3. Completing the initial configuration and post-installation setup. 4. Accessing and navigating the Virtualmin web interface. Whether you're new to server management or looking for an easier way to handle your hosting needs, this tutorial will guide you step-by-step to get Virtualmin up and running smoothly.
In this tutorial we will install Webmin + Virtualmin on a Linux Debian 12 server and log into its panel. The commands used in this tutorial go below.
# Log into the server via SSH ssh root@SERVER_IP
# Update and upgrade the system apt update && apt upgrade -y
# Install the required packages apt install wget curl
# Download the installer wget https://software.virtualmin.com/gpl/scripts/install.sh
# Make the installer executable chmod +x install.sh
# Run the installer ./install.sh
# Then you can log into the panel by calling the server IP address or panel URL on port 10000. Ex: https://10.10.10.10:10000
All Open Source!
Arashtad provides high quality tutorials, eBooks, articles and documents, design and development services, over 400 free online tools, frameworks, CMS, WordPress plugins, Joomla extensions, and other products.
More Courses ▶ https://tuts.arashtad.com/
Business Inquiries ▶ https://arashtad.com/business-inquiries/ Affiliate Programs ▶ https://arashtad.com/affiliate-programs/
eBooks ▶ https://press.arashtad.com/ Our Products ▶ https://market.arashtad.com/ Our Services ▶ https://arashtad.com/services/ Our Portfolio ▶ https://demo.arashtad.com/ Free Online Tools ▶ https://tools.arashtad.com/ Our Blog ▶ https://blog.arashtad.com/ Documents ▶ https://doc.arashtad.com/ Licensing ▶ https://arashtad.com/licensing/ About us ▶ https://arashtad.com/about/
Join Arashtad Network ▶ https://i.arashtad.com/
Our Social Profiles ▶ https://arashtad.com/arashtad-social-media-profiles/ Vimeo ▶ https://vimeo.com/arashtad Udemy ▶ https://www.udemy.com/user/arashtad GitHub ▶ https://github.com/arashtad Linkedin ▶ https://www.linkedin.com/company/arashtad Twitter ▶ https://twitter.com/arashtad
#youtube#webmin#virtulmin#linux#debian#virtualmin install#webmin install#virtualmin tutorial#webmin tutorial
0 notes
Text
Como instalar o Debian GNU/Linux no Subsistema do Windows para Linux
Sabia que você pode instalar uma distribuição Linux no ambiente do Windows 11? Confira neste vídeo o passo a passo de instalação do Debian GNU/Linux no Subsistema do Windows para Linux (WSL) após atualização do Windows PowerShell para a versão 7.4.1.

View On WordPress
0 notes
Note
Any recommendations/cautions about using Alpine Linux on the desktop? It's always intrigued me and you're the only person I've seen post about it
Alpine is pretty good for desktop, very stable, good security practice, professional development philosophy, broad package availability. You will run into some very obvious pitfalls, although they can mostly be obviated by using some modern applications.
The Alpine wiki is a little sparse and at times can be weirdly focussed, like spending a lot of the installation page talking about the very specific usecase of a diskless install. Nonetheless, it's quite good and should be your first port of call. A lot of the things I'm mentioning here are well covered in the article on Daily Driving for Desktop use. I'm basically just editorializing here.
The installation procedure is command-line only, but pretty straightforward, you run setup-alpine and follow the prompts, assuming you want a basic system. If you need special disk partitioning, you'll usually have to do it yourself. There's a whole whackload of helpers to get you set up, like setup-desktop which will help you install any of 'gnome', 'plasma', 'xfce', 'mate', 'sway', or 'lxqt'. Most of these are called by setup-alpine for you, but not the desktop one. You can call it at any time though.
Most obviously, musl libc, no glibc. Packaged software will work fine. There's a compatibility shim called gcompat that will usually work, but might fall apart on more complicated software expecting glibc, for example I've had no luck running glibc AppImages. For more complex software, Flatpaks are a good option, e.g. Steam runs great on Alpine as a Flatpak, I run the Homestuck Companion Flatpak. Your last ditch is containerization and chroots, which are fortunately really easy to handle, just install podman and Distrobox and you can run anything that won't run on Alpine inside a Fedora or Debian or Whatever container seamlessly with your desktop.
Less obviously: no systemd. Systemd underpins some really common features of modern Linux and not having it around means you have to use a few different tools that are anywhere from comparable to a little worse for some tasks. Packaged applications will work smoothly, just learn the OpenRC invocations, Alpine has a really great wiki. For writing your own services, it's a lot more limited than SystemD, you're not going to have full access to like, udev functionality, instead you get the good but kind of weird eudev system.
If you're mainly installing things from the repos you'll barely notice the difference, other than that every package is split up into three, <package>, <package>-docs, and <package>-dev. This is a container-y thing, to allow Alpine container images to install the smallest possible packageset. If you need man pages you'll have to install them specifically.
Alpine has a very solid main repo, and a community repo that's plenty good, and worth enabling on any desktop system. It'll generally be automatically enabled when you set up a desktop anyway, but just a notice if you're going manual. You can run Stable alpine, which updates every six months, or if you want you can run Edge, which is a rolling release of packages as they get added. Lots of very up-to-date software, and pretty stable as these go. You can go from Stable->Edge pretty easily, going back not so much.
There's also the Testing repo, only available on Edge, which I don't really recommend, especially since apkbuild files are so easy to run if you just need one thing that has most of its dependencies met.
Package management is with APK, which is fast and easy to work with. The wiki page will cover you.
Side note: if you want something more batteries-included, you could look at Postmarket, an Alpine derivative mainly focussed on running on smartphones but that is a pretty capable desktop OS, and which has a fairly friendly setup process. I run this on an ARM Chromebook and it's solid. Installation requires some reading between the lines because it's intended for the weird world of phones, so you'll probably want to follow the PMBootstrap route.
8 notes
·
View notes
Text
Did you know? You can actually use your mouse in Vim! 🖱️ Perfect for those coming from a Windows world or just wanting a smoother workflow. Here is how to enable mouse support with vim and unleash your editing skills ;)
15 notes
·
View notes
Text
Tutorial De Instalação Do The Sims 2 No Linux
Oi Pessoal! Tudo Bem?… Hoje Iremos Instalar o The Sims 2 No Nosso Linux! Mais Antes De Tudo Gostaria de Deixar Uns Avisos…
Instale o Linux Se Por Acaso Deseje Sair Do Windows Aqui Está Um Video Passo A Passo
Para Instalar o linux Em Qualquer Pc: Clique Aqui Para Assitir
2: Atualize Seus Drivers.. Se Por Acaso Você Não Saiba Instalar/Atualizar Os Drivers No Linux Vou Deixar Aqui 3 Vídeos Para Vocês… Só Clicar Se Caso Sua Placa De Video For:
NVIDIA
AMD / DEDICADA OU INTEGRADA
INTEL / DEDICADA OU INTEGRADA
Atualizando Seus Drivers Vamos Começar O Passo a Passo Completo
1: Requisitos Para Começar..
Antes De Começarmos Instale Esses Seguintes Programas:
Wine
Lutris
Winetricks
Qbittorent
Todos Esses Programas Podem Ser Encontrados a Loja de Apps Da Sua Distro Linux..
No Caso A Do Linux Mint (distro que uso) o Nome Dela È Gerenciador De Aplicativos
Caso Use Outra Distro No Exemplo: ZORIN OS O Nome Da Loja è Software….
Instalando Tudo Vamos Ao Próximo Passo…………….
2: Instalando O Mono..
Para instalar o mono: Clique nesse link
Selecione A distribuição Onde Seu Sistema È Baseado Exemplos:
Linux Mint: Ubuntu
ZORIN OS: Ubuntu
q4OS: Debian
Debian: Debian
Ubuntu: Debian
Selecionando Abra O Terminal E Cole Os Comando Um Por Um ….
Terminou? Vamos Ao Próximo Passo
3: Instalando O The Sims 2
Acesse Um Desses Sites e Instale o Game Via Qbittorent:
KNYSIMS
SIMSTARAC
REDDIT (recomendo Muito)
Terminando De Instalar Caso Tenha Instalado Pelo Simtarac:
Extaria A Iso Usando O Power Iso (Instale Na loja De Apps Da Sua Distro)
Terminado Tudo.. Agora Sim Vamos Ao Proximo Passo:
4: Configurando o Prefixo Com o Wine
Para Fazermos Um Prefixo.. Faça Uma Pasta No Seu Diretorio Home Do Gerenciador de Arquivos
Recomendo Criar Uma Pasta Com o Nome Pequeno Como Essa:
Pasta Criada Agora Feche o Gerenciador De Arquivos e Abra o Terminal
Ele Está Localizado No Menu Iniciar Da Sua Distro (Caso Não Saiba, Pressione a tecla Windows Do Seu Teclado)
Com Seu Terminal Aberto Digite Ou Copie E cole Esse Comando:
WINEPREFIX=~/pasta que você criou winecfg
Dê enter E espere….
Abrindo A Janela Do Wine Coloque Essas Configurações:

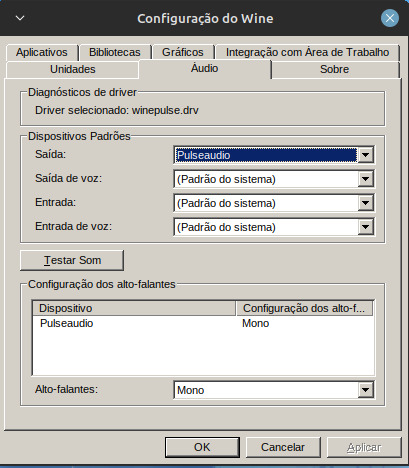
Aplique Tudo E Clique Em Ok.
Com O Terminal Ainda Aberto Digite Ou Copie esse Comando
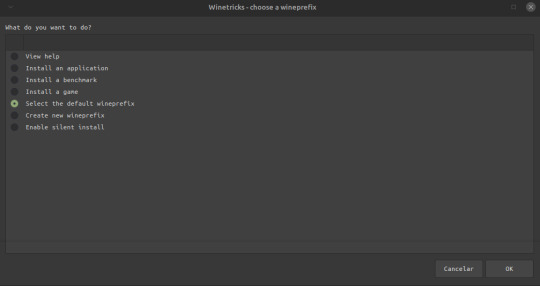
WINEPREFIX=~/pasta que Você Criou winetricks
Abrindo A Janela Clique em Select the Default Prefix
Install a windows DLL or Component
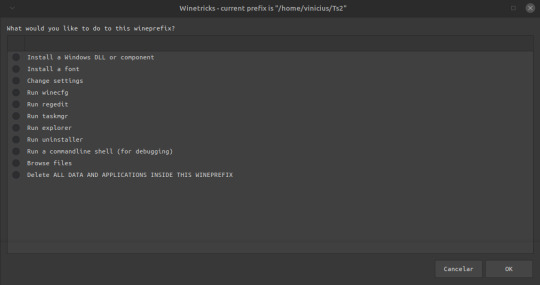
Selecione o vcrun6sp6 e o vcrun6 e clique em ok pra instalar, Terminado De Instalar Feche a janela…
5 Instalando o Jogo
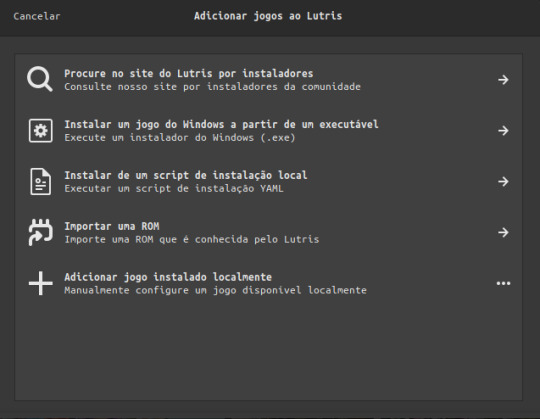
Abra o Lutris… Lutris Aberto Clique em +
Adicionar Jogo Instalado Manualmente:
E Coloque Essas Configurações:
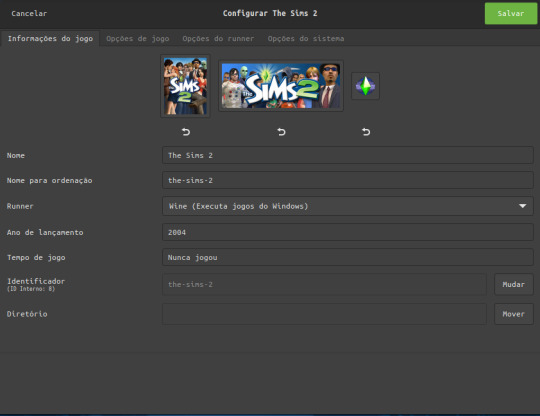
Em Runner Coloque O Wine Para Rodar o Executável de instalação do The sims 2..
Em Opções de jogo:
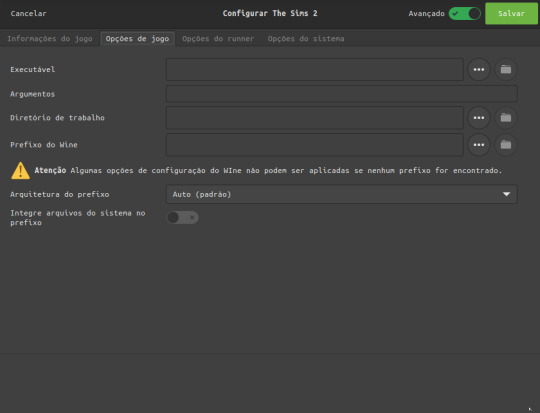
Clique Nos Tres Pontinhos para Selecionar Onde você fez o Download O Torrent Do The Sims 2
(caso você instalou pelo simstarac é a onde você extraiu a iso)
em prefixo wine é a mesma coisa só que iremos escolher a pasta onde criamos nosso prefixo no Diretorio Home
E marque a opção integre arquivos do sistema Ela é Crucial Para Instalar Os Mods
Em Opçoes Do runner:
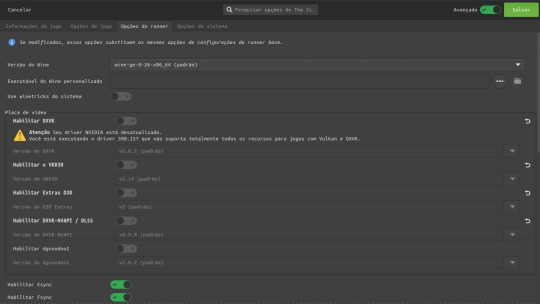
Deixe a versão do wine padrão
Desabilite o dxvk, vkd3d, extras d3d, dxvk nvapi e o dgvoodoo
E deixe Somente Habilitado O Esync e o Fsync
Descendo a Pagina Em Driver De Audio Coloque alsa, e
Ative a opção de mostrar caixas de dialogo de falha..
LEMBRANDO QUE PARA ESSAS CONFIGURAÇÕES ACONTECER TEM QUE ATIVAR AS OPÇÕES AVANÇADAS!
Terminando Tudo Clique Em Salvar E Clique em Jogar e instale o jogo…….
(pode demorar dependendo do pc)
Jogo Instalado Agora Iremos Configura-lo
Como Por Padrão no Linux O The Sims 2 Dá Erro Por Conta Do Wine Que o Lutris Usa Dando Esse Erro:
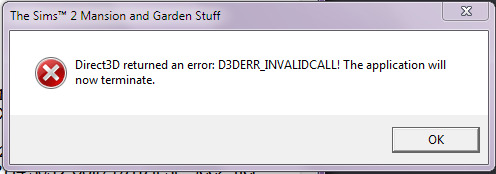
Vamos Prevenir Isso!
Acesse Esse Link: Clique Aqui
Após Ter Baixado o Arquivo Entre no Diretório Home do Gerenciador De Arquivos Da Sua Distro..
Entrando Lá Pressione as Teclas CTRL + H Após Isso Você Pode Ver Varias Pastar Começando Com Ponto “.” Localize A pasta .var Entrando Nela Faça Esse Caminho:
.var/app/net.lutris.Lutris/data/lutris/runners/wine/ E cole A pasta Que Você baixou Com O Link que Disponibilizei… Após Colocar A Pasta Renomeie Para: sims2 Após Isso Feche O gerenciador de Arquivos E Abra O Lutris Clique Com o Botão Direito No The Sims 2 E Clique Em Configurar, Após Abrir A Janela, Clique em Opçoes de Jogo, e mude o Executavel do jogo, Localizado no seu prefixo Após Isso Mude A Versão Do Wine Que Você colocou Lá Na Pasta Do Lutris… Após Isso Rode O jogo… A Seguir Os Passos Listados São Para pessoas Que Tem Placa De video Com O driver Mais Atualizado Caso Não Tenha, Pule Para O Passo Da Tradução Se você Instalou O Jogo
Pelo SimsTarac Ou Pelo Knysims..
6: DXVk (somente Placas De Video Avançada)
No Lutris Clicando Com o Botão Direito Do Mouse No The Sims 2 E indo Em Configurações Vá Em Opçoes Do runner Habilite As Seguintes Opçoes
Mude A Versão Do Wine Para A Padrao e Habilite O
DXVK
VKD3
EXTRAS D3D
DXVK-NVAPI (placas De Video Nvidia)
Dgvooodo
(lembrando que se você tiver Vulkan na sua placa de vídeo não será necessário rodar esse patch que coloquei pra download)
Como Na Imagem:

Salve E Rode O Jogo
7 Traduzindo o Jogo (SOMENTE VERSÃO MR DJ)
No Lutris Ao Lado Do Jogar Clique Na Taça De Vinho E Clique Em Registro Do Wine
Espere Carregar..
Caso Não Carregue Abra o Terminal E Digite ou Cole Esse Comando:
WINEPREFIX=~/Pasta que você criou regedit E Espere Carregar Tudo..
Abrindo A Janela Siga Este Caminho:
HKEY_LOCAL_MACHINE/Software/WOW6432NODE/EA GAMES Após isso Clique em The sims 2 e em seguida em 1.0 ao Lado Localize o Language, Clique Duas Vezes e coloque a letra “a’ como valor faça Isso Com Todas As Expansões…..
8:Instalando Mods
Para Instalar Mods è bem Simples
Abra O Gerenciador de Arquivos E Entre em Documentos/EA GAMES/ The Sims 2/Downloads
Se Caso Não Tenha Esta Pasta Crie Uma Ai é Só Colocar Seus Conteúdos lá E Ser Feliz!
Muito Obrigado Por Ter Lido este Tutorial.. caso Tenha duvida Me Mande Uma Mensagem.. Ficarei Muito Feliz em Te Responder! Caso Não Consiga Me Contacte Nas Minhas redes!
Discord: iam_saiko
Intagram:sales.xz__
Muito Obrigado e até o Proximo Tutorial!
Duvidas Frequentes:
Precisa otimizar? Não O Wine ele Faz todo o processo do 4gb patch, Grafic Rules Maker e afins
Como rodo o Rpc? Mude A VERSÃO DO WINE Para a Padrão do lutris e ative o dxvk para seu jogo rodar Caso Não Tenha Vulkan Na Sua Placa Infelizmente Não será Possível Rodar o Jogo Causando O erro Do DirectX
O Original funciona? Sim Funciona, O Lutris Irá Instalar o EA App Para você Ai só logar na sua conta e instalar o jogo, Mais Lembrando que Travamentos, Lags, Bugs E crashs Irão Acontecer Pelo Fato Do Jogo Ser Mal Otimizado Com o EA APP
Precisa das dependencias? Sim E Não, o Lutris Carrega Todas as Dependencias Do Jogo Antes De Executa-lo, Mais Caso Precise, Abra O Terminal e Digite Seguinte Comando: WINEPREFIX=~/SEU PREFIXO WINE winetricks, Dê enter e espere a janela abrir, Abrindo A janela Instale as DLLS Do Windows e as Fontes E Rode O Jogo
2 notes
·
View notes
Text
i’m not some kind of apple fan boy, i use macos, windows, and linux in my house
but i will say it is insane in year of our lord 2025 to say that you Prefer to use windows
now you might Need to use windows whether it’s to play games, specific applications are only available on windows, etc. this is why i keep windows around. but to use windows is fucking horrible. and my hope is that one day the year of the linux desktop finally arrives but saying that is a meme in and of itself
my biggest complaints with macos, not the hardware of a mac but the software itself, are basically that Deleting an app does not remove various other files it puts in various Libraries and other locations. there is no Uninstall on mac os
and it’s annoying when there is an update to an Apple App that you get a what’s new tutorial
my list for windows is so long i would need a small book. just to name some of the more egregious shit;
- can’t avoid opening edge even with default browser settings
- the deeper you go into settings menus, the worse and less intuitive the interface is. and some settings are burried deep in a weird part of control panel with a 2009 interface. why is it like this?
- too many programs don’t behave on windows. background processes stay open, multiple instances of apps happen if the rhythm of your double click is wrong or it just gets sick
- uninstalling copilot and then it getting reinstalled every time you update windows
- windows updates just ignore activity window settings and just happen whenever they want, and sometimes after doing an update you have to go thru that “give us all of your information” check boxes screen again to “get the best experience”
- make sure you connect to one drive, and teams, and use a microsoft account
literally i can keep going. linux is fucked too but that’s a whole separate can of worms. i will tell you the biggest hurdle to me using linux as a desktop os is the fact that basic shit just does not happen without entering a terminal and editing fstab or using a systemd setting that i don’t understand, and there is a 50% chance your hardware doesn’t work with Debian
anyways that’s it i saw a person say online that they were switching from a macbook air to some lenovo thin and light because they missed windows and i think that is the most insane position to take. the second linux becomes usable as a daily driver to me i am shooting windows with a machine gun
2 notes
·
View notes
Text
MX Linux 23 Xfce Edition Customization
Hey there, fellow Linux enthusiasts! Are you ready to take your MX Linux 23 Xfce Edition experience to the next level? 🚀
In this journey, we're diving deep into the world of customization, leveraging the fantastic features of MX Linux 23 Xfce, including the Xfce desktop 4.18 series. It's time to make your Linux environment uniquely yours. 🖥️
But here's the real kicker: this isn't just for MX Linux 23 Xfce users. We've got you covered, no matter if you're using Debian-based distributions, Fedora-based distributions, or Arch-based distributions. You can get our comprehensive documentation here: Download Documentation. 🔗
Here's what we have in store for you:
🎥 Video Final Result: Witness the stunning transformation in our final result video: Video Final Result.
📹 Video Tutorial Step-by-step: Follow along step by step and master the art of MX Linux 23 Xfce Edition customization: Video Tutorial Step-by-step.
🛠️ Video Additional Setups: Take your customization to the next level with additional setup tips and tricks: Video Additional Setups.
💾 Download Resource Files: Grab essential resource files to enhance your MX Linux 23 Xfce experience: Download Resource Files.
🖼️ Download Default Wallpaper: Add a touch of personalization with our default wallpaper: Download Default Wallpaper.
Get ready to make your MX Linux 23 Xfce Edition desktop truly your own. Let's unleash the full potential of your Linux journey together! 🔓
42 notes
·
View notes
Note
Where do I learn how to code and use linux? I want to try it but I don't know anything about coding.
I will do my best to help! The answer to that question is very long if I write it all out here, but a lot of it has been answered by other people, so I'll give you an overview and link you to some resources along the way.
The good thing is that you don't need any programming knowledge to use Linux. If you just want to try out the Linux operating system and see what it's like, I would start by downloading a program like Oracle's VirtualBox: https://www.virtualbox.org/
This will allow you to basically run a second, simulated, computer on your actual computer. From there, you can download a Linux image and install it, run it inside VirtualBox, and get familiar with the operating system. This has the additional benefit that if you do something wonky to your Linux virtual machine (VM for short) by mistake, you can just delete it and recreate it and no harm will be done to your actual computer. For a step-by-step explanation, see: https://ubuntu.com/tutorials/how-to-run-ubuntu-desktop-on-a-virtual-machine-using-virtualbox#1-overview
Short aside: Linux is not a monolithic operating system like Windows or MacOS. Linux, written by a man named Linus Torvalds, is a "kernel" made up of certain very basic computer functions, and the rest of the operating system, things like the graphical user interface (GUI, to nerds like me) doesn't come with it. To be usable by normal people, Linux has to have that functionality filled in by other programmers, which creates something called a distribution, or distro for short. Ubuntu, Debian, RedHat, Linux Mint, and OpenSUSE are all Linux distros. Different distros are designed for different purposes. Ubuntu and Mint are both pretty friendly to normal folks who want to write documents, check their email, etc. RedHat is for large companies. There's a distro called Kali that's for cybersecurity and penetration testing. Etc. etc. etc. There are tons of distros. If you don't know which one to pick, I recommend Ubuntu or Mint, as I have experience with both, and they're fairly easy to use.
From this point out, a search engine will be your best friend. There are lots of helpful tutorials online, and also answers to almost any question you can imagine. If you're unsure where to start, documentation from the website of an official Linux distribution, like Ubuntu, is usually reliable, though it can be kind of opaque if you're not used to reading tech-ese. The tutorials on Ubuntu's site, however, seem to be structured with beginners in mind, and I would run through this one to start with: https://ubuntu.com/tutorials/command-line-for-beginners#1-overview
Once you get to the point of having specific questions about how a command works or how to make the operating system do something, I would take a good look at any answers from StackOverflow, which is basically a website for computer people of all skill levels to ask each other questions ranging from the basic to the ridiculously obscure. If you're wondering it, chances are good someone on StackOverflow has asked it.
Other than that, click around your new VM, create files, find programs, etc. If you really get stuck, I'll try and help, but keep in mind I may very well be searching StackOverflow myself. XD
The other cool thing about VMs is that you can try multiple operating systems, i.e. Linux Mint (https://linuxmint-installation-guide.readthedocs.io/en/latest/) which is pretty user-friendly, as I recall.
Once you get to the point where you actually want to install Linux, you'll want to back up your computer to an external hard drive so you can restore from the backup if something goes wrong, and then follow the instructions for your chosen Linux distro. LibreOffice runs on Linux and can open most Microsoft file types, so you shouldn't need to move your files to a different type, you'll just need to copy them somewhere (like another external hard drive or a thumb drive) and then copy them back when you're done with the installation. Obligatory word of warning: installing Linux on your actual machine, as opposed to a VM, WILL OVERWRITE YOUR ENTIRE HARD DRIVE. Do this with caution. Restoring from a backup is possible, so as long as you backed everything up you will not lose any data, but it can be a pain in the neck and if you're not particularly tech-savvy, you may have to go to a computer repair store to get them to do it.
Now, as to your question about learning to code: this requires no VM and no new installation; you can start doing that today. There are almost infinite tutorials online about how to start coding. CodeCademy.com is a pretty decent one, as I recall, though it's been a long time since I used it. There's also a channel on YouTube called BroCode that puts up free 'how to get started in this programming language' tutorials, which are pretty beginner-friendly. I would recommend that you start with either Python or Java (NOT JavaScript; it's not the same thing as Java, and it's a really annoying programming language, so don't do that to yourself). Python has syntax that is more similar to English than most programming languages and it is pretty powerful, but it may confuse you when you start moving to other programming languages. Java is less immediately comprehensible but probably more representative of programming languages as a whole.
Hope this helps! Feel free to send me follow-up questions or ask for clarification if I lapsed into tech-speak and this doesn't make sense.
2 notes
·
View notes
Text
How to install the native gog(and maybe steam? I dont own it to check) linux version of Star of Providence (monolith: relics of the past)! a very niche tutorial for maybe 6 people in the world.
This also might slightly help as a base guide in learning how to troubleshoot programs and games on linux.
This guide assumes you have Steam installed and can be trusted to find certain library files if you do not already have them installed. On my personal system I am running openSUSE tumbleweed and will be using Lutris to launch the game, but equivalent steps for launching through Steam will be provided when needed.
Firstly, turn off hidden files.
the base game is 32-bit only and requires files from /.steam/bin/steam-runtime/lib/1386-linux-gnu Base game+DLC is 64-bit only and requires files from /.steam/bin/steam-runtime/lib/x86-64-linux-gnu
if you're using Lutris. inside your monolith game directory place a new folder named "lib" place "libcrypto.so.1.0.0" and "libssl.so.1.0.0" from your respective steam-runtime/lib folders into the monolith lib directory in lutris, right click and confiure on monolith, select toggle "advanced" on the top right of the window under game options "add directory to LD_LIBRARY_PATH" add your lib directory in the monolith folder
on Steam.
into your game properties tab paste either
for base game
LD_PRELOAD="~/.steam/bin/steam-runtime/lib/1386-linux-gnu/libssl.so.1.0.0 ~/.steam/bin/steam-runtime/lib/1386-linux-gnu/libcrypto.so.1.0.0" %command%
OR
for base + DLC
LD_PRELOAD="~/.steam/bin/steam-runtime/lib/x86_64-linux-gnu/libssl.so.1.0.0 ~/.steam/bin/steam-runtime/lib/x86_64-linux-gnu/libcrypto.so.1.0.0" %command%
for the base game we should be done and the game is playable however, with the DLC at this point we're still missing (on opensuse tumbleweed, your system might be different, check your games logs while trying to launch)one library file to make the game launch, it wants to look for libcurl-gnutls.so.4 which is unavailable in the repos of non ubuntu/debian based distros, however this file (seems to be) completely cross compatible with libcurl.so.4 so we're going to be making a symbolic link, so when the game searches for libcurl-gnutls.so.4 it will find libcurl.so.4
open a terminal in your system's /lib64/ folder, with Dolphin this can be done by right clicking an empty space and under actions select "open terminal here", alternatively just move to the directory inside of your terminal paste | sudo ln -s libcurl.so.4 libcurl-gnutls.so.4
(now, this might have negative consequences however, I do not know what they would be and someone who actually codes might be able to pitch in here. if so, just add it to the lib directory for the game for lutris or add a new folder under LD_PRELOAD on the steam properties) the game should now be playable
Alternatively to all of this, just use proton. on Steam just change the compatibility mode to the latest version and in Lutris install the base games windows version and run it using proton or wine-ge, to get the dlc to work select "Run EXE inside Wine prefix, this can be found to the right of the play button at the bottom of the list to the right of the wine button. Now launch the DLC installer. Congrats! You got the game to work in hopefully a quarter of the time it took me to both figure this out and document all of this!
3 notes
·
View notes
Text
chat this fuckin tutorial is telling me to download an ISO file of Debian 11.1 how do I do that. there's so many broken links idk what to click on. who is this. who am I. should I just get version 12 and pray it works
3 notes
·
View notes
Video
youtube
BTRFS Subvolumes On Debian Trixie - Easiest Tutorial #linux #FOSS #CachyOS #Nobara #EndeavourOS
0 notes