#Docker Desktop settings adjustment
Explore tagged Tumblr posts
Visit Tumblr Blog
Explore Tumblr blogs with no restrictions, modern design and the best experience.
Last Seen Tumblr Blogs


Fun Fact
Tumblr was created by web developers David Karp and Marco Arment.
Text
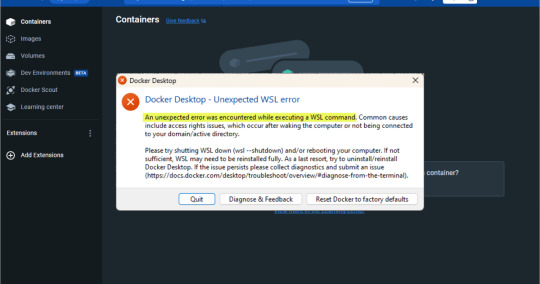
Docker Desktop Unexpected WSL Error Fix
Docker Desktop Unexpected WSL Error Fix #docker #containers #DockerDesktopWSLError #WSLCommandErrorFix #DockerDesktopSettingsAdjustment #WindowsSubsystemForLinuxError #DockerDesktopConfigModification #DockerOnWindowsTroubleshooting #DockerDesktop
Docker Desktop is a great tool for developers, DevOps pros, and home lab enthusiasts and allows you to interact with the tool without having to install Docker and use it from the command line in Linux. However, the unexpected WSL error often appears post-Docker Desktop installation when executing a WSL command. Several different issues, including access rights, can trigger this error. This post…
View On WordPress
#Docker Desktop and Azure VMs#Docker Desktop command line solution#Docker Desktop config modification#Docker Desktop nested virtualization#Docker Desktop settings adjustment#Docker Desktop version-specific fix#Docker Desktop WSL error#Docker on Windows troubleshooting#Windows Subsystem for Linux error#WSL command error fix
0 notes
Text
The Docker and Kubernetes | Docker and Kubernetes Training in Ameerpet
How to Install Docker on Windows and Linux
Docker is a popular containerization platform that allows developers to create, deploy, and manage applications in lightweight, portable containers. Installing Docker on Windows and Linux is a straightforward process, but each operating system has different steps and requirements. This guide provides a step-by-step approach to installing Docker on both platforms.

Prerequisites for Installing Docker
Before installing Docker, ensure that your system meets the following requirements:
A 64-bit processor with virtualization enabled
At least 4 GB of RAM for smooth operation
Administrative or root access to install software
A stable internet connection for downloading the installation files
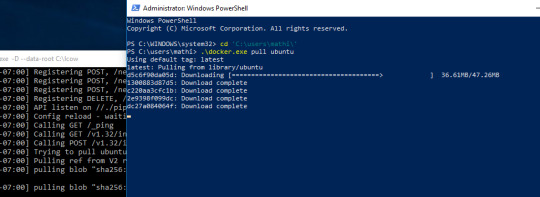
Installing Docker on Windows
Docker provides an easy-to-use application called Docker Desktop for Windows. Follow these steps to install Docker on a Windows machine: Docker and Kubernetes Training
Step 1: Download Docker Desktop
Go to the official Docker website and navigate to the Docker Desktop for Windows section.
Download the latest version compatible with your Windows operating system.
Step 2: Install Docker Desktop
Locate the downloaded setup file and double-click to launch the installer.
Follow the installation wizard by accepting the license agreement and selecting the default installation settings.
Ensure that the WSL 2 (Windows Subsystem for Linux) integration is enabled if you plan to use Linux containers.
Click Install and wait for the installation process to complete.
Step 3: Start Docker Desktop
After installation, restart your computer if prompted.
Open Docker Desktop from the Start menu.
Wait for Docker to initialize, and check the status to confirm that it is running.
Step 4: Verify Installation
To confirm that Docker is installed successfully:
Open Command Prompt or PowerShell.
Type Docker --version and press Enter. This should display the installed Docker version.
You can also open Docker Desktop and check the dashboard to ensure it is running without errors. Docker and Kubernetes Course
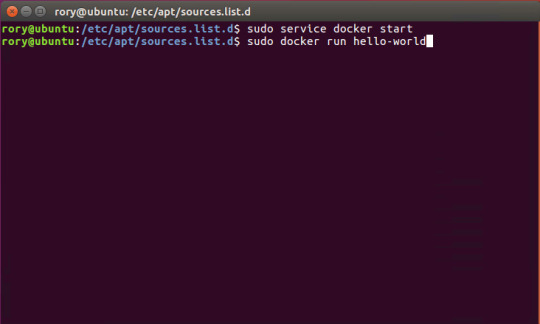
Installing Docker on Linux
Docker is available for various Linux distributions, including Ubuntu, Debian, Fedora, and CentOS. The steps below outline how to install Docker on Ubuntu, which is similar to other Linux distributions.
Step 1: Update System Packages
Before installing Docker, update the system package list to ensure the latest versions are available.
Step 2: Install Required Dependencies
Docker requires a few system dependencies to function properly. Install these before proceeding.
Step 3: Add the Docker Repository
Since Docker is not included in default package repositories, add the official Docker repository to get the latest stable version.
Step 4: Install Docker Engine
Once the repository is added, install Docker using the package manager of your Linux distribution.
Step 5: Start and Enable Docker
After installation, start the Docker service and enable it to run automatically when the system boots.
Step 6: Verify Installation
To check if Docker is installed successfully:
Open a terminal window.
Type Docker --version and press Enter. This should display the installed Docker version.
Post-Installation Steps
After installing Docker on Windows or Linux, consider the following steps for better usability:
Add Non-Root Users to Docker Group (Linux Only): By default, Docker requires root privileges. To allow a non-root user to run Docker, add the user to the Docker group.
Enable WSL Integration (Windows Only): If using Linux containers, enable WSL 2 for improved performance.
Check Docker Settings: Open Docker Desktop settings on Windows or check the configuration files on Linux to adjust resource allocation, network settings, and storage preferences.
Troubleshooting Common Issues
Windows
Docker Desktop Not Starting: Ensure that virtualization is enabled in the BIOS.
WSL 2 Not Installed: Download and install the latest WSL 2 kernel update from the Microsoft website.
Network Issues: Restart Docker Desktop or reset network settings from the application settings. Docker and Kubernetes Online Training
Linux
Permission Errors: If you see a permission denied error, ensure your user is added to the Docker group.
Service Not Running: Restart Docker with the command to enable it at startup.
Conclusion
Installing Docker on Windows and Linux is a simple process that allows developers to take advantage of containerization technology. Windows users can install Docker Desktop with an easy setup, while Linux users need to configure the system with the appropriate packages and repositories. After installation, verifying Docker’s status ensures that it runs smoothly. Following these steps, you can quickly set up Docker and start deploying containerized applications.
Trending Courses: ServiceNow, SAP Ariba, Site Reliability Engineering
Visualpath is the Best Software Online Training Institute in Hyderabad. Avail is complete worldwide. You will get the best course at an affordable cost. For More Information about Docker and Kubernetes Online Training
Contact Call/WhatsApp: +91-7032290546
Visit: https://www.visualpath.in/online-docker-and-kubernetes-training.html
#DockerandKubernetesTraining#DockerandKubernetesCourse#DockerandKubernetesTraininginHyderabad#DockerKubernetesOnlineCourse#DockerOnlineTraining#KubernetesOnlineTraining#DockerandKubernetesOnlineTraining#KubernetesCertificationTrainingCourse#DockerandKubernetesTraininginAmeerpet#KubernetesOnlineTraininginIndia#DockerandKubernetesTraininginBangalore#DockerandKubernetesTraininginChennai
0 notes
Text
Selenium Uncovered: Benefits and Limitations
Automation is a cornerstone of modern software development and testing, and Selenium has emerged as one of the most widely used tools for automating web applications. If you want to advance your career at the Selenium Course in Pune, you need to take a systematic approach and join up for a course that best suits your interests and will greatly expand your learning path. But what exactly makes it so popular, and where does it fall short? Let’s uncover the key benefits and limitations of Selenium to help you decide if it suits your needs.

Benefits of Selenium
1. Free and Open-Source
Selenium is completely free to use, making it an accessible option for developers and businesses. Its open-source nature also allows for community contributions and continuous improvement. For those looking to excel in Selenium, Selenium Online Course is highly suggested. Look for classes that align with your preferred programming language and learning approach.
2. Supports Multiple Programming Languages
With support for Java, Python, C#, Ruby, and JavaScript, Selenium provides the flexibility to work in your preferred language, reducing the need for additional training or switching languages.
3. Cross-Browser Compatibility
Selenium enables testing across various browsers like Chrome, Firefox, Safari, and Edge. This ensures your application performs reliably for users regardless of their browser choice.
4. Strong Community Support
As an open-source tool, Selenium benefits from an active and large community. Tutorials, forums, and resources are readily available to help solve issues or learn new techniques.
5. Integration Capabilities
Selenium integrates well with tools like TestNG, JUnit, Maven, Jenkins, and Docker. These integrations simplify setting up continuous integration and deployment workflows.
6. High Flexibility
From testing simple forms to dynamic, feature-rich web applications, Selenium’s adaptability allows you to create tailored test cases for diverse scenarios.
7. Parallel and Remote Testing
Using Selenium Grid, you can execute tests on multiple machines or browsers simultaneously, speeding up the testing process and making it scalable for larger projects.

Limitations of Selenium
1. Complex Learning Curve
Selenium requires a strong understanding of programming and web technologies such as HTML, CSS, and JavaScript, which can make it challenging for beginners.
2. Limited to Web Applications
Selenium is specifically designed for web-based testing. If your testing involves desktop or mobile apps, additional tools are necessary.
3. Lacks Built-In Reporting
Selenium doesn’t provide built-in reporting features. For detailed reports, you’ll need to integrate third-party libraries or tools.
4. Maintenance Overhead
Dynamic and frequently updated web applications can make test scripts prone to breakage, requiring regular updates and maintenance.
5. Browser-Specific Issues
While Selenium supports multiple browsers, inconsistencies between browsers can lead to test failures, requiring extra debugging and adjustments.
6. No Official Technical Support
Being open-source, Selenium lacks official technical support. While the community is helpful, it might not always provide timely assistance.
7. Performance Limitations
Selenium can be slower than some other automation tools, particularly when dealing with complex applications. It’s not ideal for performance testing.
Conclusion
Selenium offers significant benefits for web application testing, including cost-effectiveness, flexibility, and strong community support. However, its steep learning curve, limited scope, and maintenance challenges may make it less suitable for certain teams or projects.
If you’re focused on automating web applications and have a technically skilled team, Selenium can be a powerful tool. For those seeking an all-in-one solution or working with desktop and mobile apps, alternative tools might be a better fit.
Ultimately, the decision to use Selenium should depend on your project’s specific requirements, technical expertise, and available resources. With the right approach, Selenium can be an invaluable asset in your automation toolkit.
0 notes
Text
Linux Zero to Hero: Mastering the Open-Source Operating System
Linux, an open-source operating system, is the backbone of countless systems, from personal computers to enterprise servers and supercomputers. It has earned its reputation as a robust, versatile, and secure platform for developers, administrators, and tech enthusiasts. In this comprehensive guide, we explore the journey from being a Linux beginner to mastering its vast ecosystem.
Why Learn Linux?
1. Open-Source Freedom
Linux provides unparalleled flexibility, allowing users to customize and modify the system according to their needs. With its open-source nature, you have access to thousands of applications and tools free of charge.
2. Industry Relevance
Major companies, including Google, Amazon, and Facebook, rely on Linux for their servers and infrastructure. Learning Linux opens doors to lucrative career opportunities in IT and software development.
3. Secure and Reliable
Linux boasts a strong security model and is known for its stability. Its resistance to malware and viruses makes it the operating system of choice for critical applications.
Getting Started with Linux
Step 1: Understanding Linux Distributions
Linux comes in various distributions, each catering to specific needs. Popular distributions include:
Ubuntu: User-friendly, ideal for beginners.
Fedora: Known for cutting-edge technology and innovation.
Debian: Stable and versatile, preferred for servers.
CentOS: Enterprise-grade, often used in businesses.
Choosing the right distribution depends on your goals, whether it’s desktop use, development, or server management.
Step 2: Setting Up Your Linux Environment
You can use Linux in several ways:
Dual Boot: Install Linux alongside Windows or macOS.
Virtual Machines: Run Linux within your current OS using tools like VirtualBox.
Live USB: Try Linux without installation by booting from a USB drive.
Mastering Linux Basics
1. The Linux File System
Linux organizes data using a hierarchical file system. Key directories include:
/root: Home directory for the root user.
/etc: Configuration files for the system.
/home: User-specific data.
/var: Variable files, such as logs and databases.
2. Essential Linux Commands
Understanding basic commands is crucial for navigating and managing the Linux system. Examples include:
ls: Lists files and directories.
cd: Changes directories.
mkdir: Creates new directories.
rm: Deletes files or directories.
chmod: Changes file permissions.
3. User and Permission Management
Linux enforces strict user permissions to enhance security. The system categorizes users into three groups:
Owner
Group
Others
Permissions are represented as read (r), write (w), and execute (x). Adjusting permissions ensures secure access to files and directories.
Advanced Linux Skills
1. Shell Scripting
Shell scripting automates repetitive tasks and enhances efficiency. Using bash scripts, users can create programs to execute commands in sequence.
Example: A Simple Bash Script
bash
Copy code
#!/bin/bash
echo "Hello, World!"
2. System Administration
System administrators use Linux for tasks like:
Managing users and groups.
Monitoring system performance.
Configuring firewalls using tools like iptables.
Scheduling tasks with cron jobs.
3. Package Management
Each Linux distribution uses a package manager to install, update, and remove software:
APT (Ubuntu/Debian): sudo apt install package_name
YUM (CentOS/Fedora): sudo yum install package_name
Zypper (openSUSE): sudo zypper install package_name
Linux for Developers
Linux provides a robust environment for coding and development. Key features include:
Integrated Development Environments (IDEs): Tools like Eclipse, IntelliJ IDEA, and Visual Studio Code are supported.
Version Control Systems: Git integration makes Linux ideal for collaborative software development.
Containerization and Virtualization: Tools like Docker and Kubernetes thrive in Linux environments.
Troubleshooting and Debugging
Learning to troubleshoot is vital for any Linux user. Common methods include:
Viewing Logs: Logs in /var/log offer insights into system errors.
Using Debugging Tools: Commands like strace and gdb help debug applications.
Network Diagnostics: Tools like ping, traceroute, and netstat diagnose connectivity issues.
Linux Certifications
Earning a Linux certification validates your skills and enhances your career prospects. Notable certifications include:
CompTIA Linux+
Red Hat Certified Engineer (RHCE)
Linux Professional Institute Certification (LPIC)
Certified Kubernetes Administrator (CKA)
These certifications demonstrate proficiency in Linux administration, security, and deployment.
Tips for Success in Linux Mastery
Practice Regularly: Familiarity with commands and tools comes through consistent practice.
Join Communities: Engage with Linux forums, such as Stack Overflow and Reddit, to learn from experienced users.
Contribute to Open-Source Projects: Hands-on involvement in projects deepens your understanding of Linux and enhances your resume.
Stay Updated: Follow Linux news and updates to stay informed about advancements and changes.
Conclusion
Mastering Linux is a transformative journey that equips individuals and organizations with the tools to thrive in a technology-driven world. By following the steps outlined in this guide, you can progress from a Linux novice to a seasoned expert, ready to tackle real-world challenges and opportunities.
0 notes
Text
Theme Updates, Offline Upgrades Headline New Additions to Pop!_OS 19.10

Halloween came early this year with our latest release of Pop!_OS. Fill your treat bag with theme updates, Tensorman, easy upgrading, and more as we unwrap the details of Pop!_OS 19.10:
Theme Updates
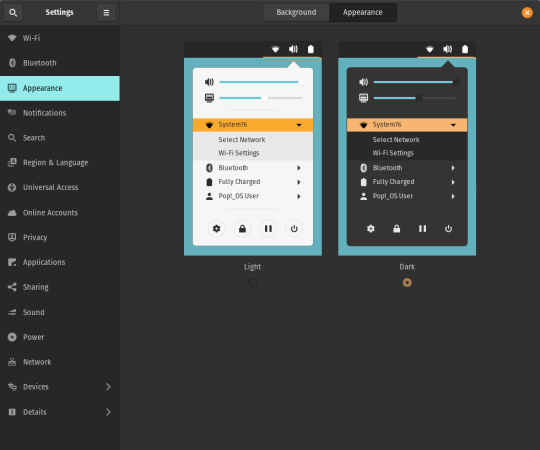
A new Dark Mode for Pop!_OS is available in the operating system’s Appearance Settings. Both the Light and Dark modes feature higher contrast colors using a neutral color palette that’s easy on the eyes.
The functionality of Dark Mode has been expanded to include the shell, providing a more consistently dark aesthetic across your desktop. If you’re using the User Themes extension to set the shell theme, disable it to use the new integrated Light and Dark mode switcher.
The default theme on Pop!_OS has been rebuilt based on Adwaita. Though users may only notice a slight difference in their widgets, the new OS theme provides significant measures to prevent application themes from experiencing UI breakage. This breakage manifests in the application as missing or misaligned text, broken widgets, and scaling errors, and should not occur with the new theme in place.
The updated theme includes a new set of modernized sound effects. Users will now hear a sound effect when plugging and unplugging a USB or charging cable. The sound effect for adjusting the volume has been removed.
Tensorman
Tensorman is a new tool that we’ve developed to serve as a toolchain manager for Tensorflow, using the official Docker builds of Tensorflow. For example, executing a python script inside of a Tensorflow Docker container with CUDA GPU and Python 3 support will now be as simple as running:
tensorman run --gpu python -- ./script.py
Tensorman allows users to define a default version of Tensorflow user-wide, project-wide, and per run. This will enable all releases of Pop!_OS to gain equal support for all versions of Tensorflow, including pre-releases, without needing to install Tensorflow or the CUDA SDK in the system. Likewise, new releases of Tensorflow upstream will be made immediately available to install with Tensorman.
Examples of how to use Tensorman are in the tool’s support page. Tensorman is now available on Pop!_OS 19.10, and will be coming to Pop!_OS 18.04 LTS soon.
To install Tensorman, enter this command into the Terminal:
sudo apt install tensorman
GNOME 3.34
In addition to theming improvements, the GNOME 3.34 release brings some new updates to the fold. From GNOME’s 3.34 Release Notes:
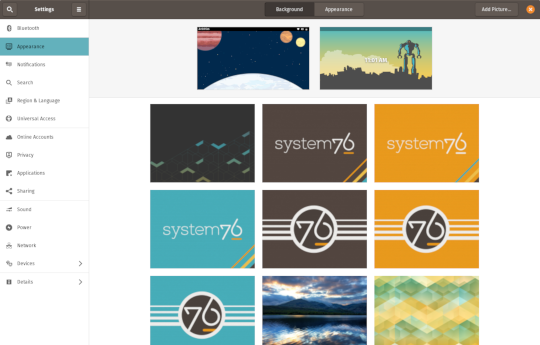
A redesigned Background panel landed in the Appearance settings. Now when you select a background, you will see a preview of it under the desktop panel and lock screen. Custom backgrounds can now be added via the Add Picture… button.
Performance improvements bring smoother animations and a more responsive desktop experience.
Icons in the application overview can be grouped together into folders. To do this, drag an icon on top of another to create a group. Removing all icons from a group will automatically remove the group, too. This makes organizing applications much easier and keeps the application overview clutter-free.
The visual style for the Activities overview was refined as well, including the search entry field, the login password field, and the border that highlights windows. All these changes give the GNOME desktop an improved overall experience.
Some animations in the Activities overview have been refactored, resulting in faster icon loading and caching.
The Terminal application now supports right-to-left and bi-directional languages.
The Files application now warns users when attempting to paste a file into a read-only folder.
Search settings for the Activities overview can now be reordered in the Settings application by dragging them in the settings list. The Night Light section has been moved to the Display panel.
New Upgrade Process

Offline upgrades are now live on Pop!_OS 19.04, bringing faster, more reliable upgrades. When an upgrade becomes available, it is downloaded to your computer. Then, when you decide to upgrade to the newest version of your OS, the upgrade will overwrite the current version of your software. However, this is not to be confused with an automatic update; your OS will remain on the current version until you yourself decide to upgrade.
To upgrade to 19.10 from a fully updated version of Pop!_OS 19.04, open the Settings application and scroll down on the sidebar menu to the Details tab. In the About panel of the Details tab, you will see a button to download the upgrade. Once the download is complete, hit the button again to upgrade your OS. This will be the standard method of upgrading between Pop!_OS releases going forward.
Alternatively, a notification will appear when your system is ready to upgrade. This notification appears on your next login on your fully updated version of Pop!_OS 19.10. Clicking it will take you to the About panel in the Settings application.
In early November, Pop!_OS 18.04 LTS users will be notified to update to Pop!_OS 19.10 or remain on 18.04 until the next LTS version is available.
New to Pop!_OS:
Visit the official Pop!_OS page to download Pop!_OS 19.10.
Upgrade Ubuntu to 19.10
See our support article on upgrading Ubuntu for information on how to upgrade Ubuntu 19.04 to 19.10.
17 notes
·
View notes
Text
Parity Wallet
The Parity Wallet is one of several well-liked remedies that were designed for you to serve as each a wallet and a software between the Ethereum software and your laptop or computer. Like MyEtherWallet, Parity is genuinely a browser and not some sort of budget. Parity even bills itself as an �Ethereum Browser� � a web browser is needed because Ethereum is really an extensive system. The idea guiding Parity is to provide the particular most effective connection between Ethereum and various technologies possible. Ethereum came to be as a decentralized data safe-keeping solution, but it is widespread since cryptocurrency because it will be encrypted and very safe. The great way to think of Ethereum is a new second, encrypted network in the internet. Parity is created like a entrance to that network together with an software between the web and even Ethereum. A FULL NODE WALLET Parity was designed since a full-node pocket book the fact that means you can carry out everything this. You will store Ethereum and ERC-20 up to date initial cryptocurrency solutions (ICOs). More importantly, you are able to send and receive bills, buy and sell Azure and ICO tokens, mine, invest in Ethereum plus add the wallet with a wide variety of programs. That makes Parity Ethereum management tool you can add to a number regarding internet browsers and run upon a number of operating systems. Presently, it works with Ubuntu, OS 10, Dockers and Home windows. One reason why users like the Parity Wallet is definitely that provides a dashboard that can be used to manage Ether on your own screen. It will perhaps purpose on desktops just where MyEtherWallet and Mist have got been extra. EASY TO BE ABLE TO USE Parity is pretty effortless if you abide by the instructions in the dash, which are fairly straightforward together with explanatory. If anyone look carefully you ought to see everything explained in order to anyone. This makes saving and managing Ethereum since easy as shopping with Amazon. Although it might take a good while to get your money to exhibit way up in Parity, users survey that it takes many time to be able to record dealings. Another favorite feature is the easy recovery bed sheet with a quick study (QR) code that an individual can scan with nearly any phone. That permits you regain your Parity account quick if that is lost or your own personal pc crashes. LOTS INVOLVING SUPPORT Several developers and even consumers like Parity mainly because the idea has a lot of assist. It is quite uncomplicated to contact and assist the firm responsible intended for the finances. The browser was the creation of the company named Parity Solutions. Based in Manchester and Munich, Parity�s aim is certainly to create a superfast networking that combines expert to see payments, networking, algorithms, cryptography, databases, and decentralized purposes. This provides a new more specialized operation in addition to a higher level connected with assistance than some connected with Parity�s challengers. Parity offers what it wants to phone the �world�s best plus lightest client� that may be included immediately into a net cell phone browser. That means it is a lot a great deal more than a wallet. You can store, receive and send Ethereum by means of Parity, yet you can likewise create or execute contracts and even design, deploy, plus any wide variety involving Ethereum-based applications. The best way it does that is to be able to work as the interface involving various networks. The assist on Parity includes device tests and review designed to make certain every performs. That also contains some associated with the most experienced cryptocurrency technical engineers around. HIGH AMOUNT OF KNOWLEDGE Parity Systems includes some of the people that helped develop Ethereum itself. Parity�s founder Doctor Gavin Solid wood, worked well together with Ethereum founder Vitalik Buterin when this individual first designed the blockchain system. Wood is actually wanting to develop a greater and much more comprehensive Ethereum software built to serve as the full-service payment network. Often the Parity Wallet is meant to become the cornerstone of that system. Ethereum Parity v2.3.4 can be to create next-generation Fin-Tech solutions which can be marketed for you to banks, retailers, off-set money, credit card companies, governing bodies, and other organizations. These remedies would certainly utilize the Ethereum blockchain to make market segments, retail systems, and economic products. THE FEATURES CONNECTED WITH PARITY Some Parity�s illustrates and selling things incorporate: Will work with The apple company McIntosh computers via the OSX operating technique. Will certainly work using the Linux-based Ubuntu operating system. Works together with an ecommerce applications software called Docker. Basic one-word online setup intended for Apple pc and Ubuntu, and perhaps Stainless and Android. PARITY FEATURES The most impressive matter about Parity is several of the very advanced features it provides. They look to possibly be years prior to other wallets and handbags and might supply a good more effective payment alternative. Competitors would be well-advised to help imitate some of Parity�s very-impressive new attributes. These are a little technological but if they will work as offered, those people features will make Parity of the best level of privacy wallets currently available. One least appreciated Parity attribute is often the Rust programming terminology which usually is low-level. That helps make Parity, simple and faster than other wallets and handbags, and even should reduce errors. Rust will allow the creation regarding complex smart contracts using JITEVM turbocharging and multi-level storage caching. Parity Systems claims that Rust guarantees safety with actor-based modality, unit testing, and expert review. That is made to create a better made and resilient process. More levels of durability are really created along with a standard, JSON-based company specs structure, native rate contracts plus modular design. Higher levels of security, privateness, and even anonymity are offered by means of Parity�s small impact. Acquiring a small footprint helps make Parity harder to detect and track on-line. A smaller footprint provides a bigger level involving cache management and generates a more compact storage footprint that is certainly less complicated to manage but harder for the bad guys to be able to discover. Even though the website fails to mention Android mobile phone or Chromium, the builders claim it truly is highly suitable with Linux-based operating systems. This kind of is achieved through 100% test conformant consensus conformant execution, standard devp2p community standard protocol, and full match ups with JSON-RPC-API. All the fact that should really make Parity specific simple to operate with one collection Apple pc and even Linux installation. That means one line installation on Chrome and even Android might be available for the reason that those Google solutions usually are Linux-based. Installation can furthermore be made with Docker photos. PARITY VS MYETHERWALLET Parity by far is made for the considerably more techie user who needs to get smart having the interior workings associated with ethereum wallets and handbags. There� Parity Wallet Download 2.4.0 for stuff like multisig legal papers, manual adjustment associated with GWEI (useful if a person are trying to find directly into a new highly reasonably competitive ICO) values, and more. However, Parity does not necessarily have the easiest-to-use user interface and, as things proceed, certainly not as user-friendly as MyEtherWallet. Power users will certainly almost certainly prefer Parity in excess of MyEther Wallet. Casual consumers who else just need a good private pocket to shop ERC20 tokens will most likely desire MyEtherWallet Is Parity with regard to You? All this creates Parity a great solution for severe Ethereum geeks and people that are trying to developing next-generation Ethereum solutions. Parity would end up being a great use for you if you want for you to create or maybe execute great contracts one example is. Persons together with organizations that want a internet browser that can help average people access and usage Ethereum would be well-served simply by Parity. That causes a great substitute for ecommerce companies and fiscal professionals. Parity may well certainly not be a good alternate for somebody who is definitely just searching for a good suggests of buying, stocking, sending and trading Ethereum. The big drawback to Parity that individuals can see is definitely that this will not look to be compatible together with any of the well-liked cryptocurrency hardware wallets. It appears to be as if no assist can be obtained for the TREZOR or any in the Journal products such as this Piccolo S. That may well make MyEtherWallet which will easily be installed on often the TREZOR and Piccolo T, some sort of better alternative. Why You Need More in comparison with Only one Cryptocurrency Wallet A good totally obvious solution for the particular person that will wants for you to store Ethereum will be to possess two or more wallets and handbags. A major advantage to Parity is that it is supposed to be compatible with pouches like the Mist together with MyEtherWallet. A person can use Parity regarding sophisticated Ethereum tasks like making money with smart contracts, as well as the additional wallet for storing altcoins or switching it to equipment wallets. One of typically the best strengths to Parity is that it is creators� acknowledge the need for several wallet. If an individual watch good news, you almost certainly know that every altcoin within the sun has been recently hacked. Using two or maybe more wallets can add more security and produce the idea harder for crooks to swipe your current coins. Parity�s recognition on this a weakness in addition to the need for diversity is a solid marketing point with regard to the items. It might likewise possibly be an indication that Parity Technologies is planning some other products in the future such as a Australian visa or MasterCard debit credit card or a mobile app that converts cryptocurrency for you to fiat currencies such while money. A smart strategy is to possess two or more wallets and handbags with your computer and much more in comparison with one hardware wallet. A good good mix of billfolds would have been a Parity, MyEtherWallet, a new standard commercial wallet like Coinbase, a trading remedy like CEX. IO, a TREZOR for travel, one other components wallet for storage space, including least wallet using a MasterCard or Australian visa payment selection. There may be now several wallets linked to MasterCard and Visa debit cards such as TenX. These a option would be some sort of superior option � as you can make use of the debit card in places like the grocery store and also to get dollars from ATMs if have be. A VERY INNOVATIVE BUDGET WITH A LARGE LEVEL OF TESTING You should definitely consider using Parity should you need an innovative wallet that provides a great deal of support. The Parity Technological innovation Team seems to offer a lot more support and a new a higher level00 seriousness than a few of it is competitors. Their best attribute is undertaking a lot of examining. There is certainly enough support to help create a merchandise honestly, that is stable and basically gets results. Unlike some other altcoin solution providers, Parity Technology tests its merchandise alone rather than dumping all of them out online for uninformed consumers to tests. A proven way Parity tries to sustain sturdiness and stability is definitely by trying to test and release new editions or updates every six weeks. An additional is through 100 % unit-testing which many cryptocurrency geeks know is definately not often the industry standard. Parity features even managed to conduct more than 1, 000 opinion checks in a great hard work to be sure its products really work. Individuals reviews contain static program code checking, and even obtaining more than one expert programmers review every single update in advance of it is revealed. In the event you need a wallet of which completely has to help work, Parity is intended for you. The testing should really provide a higher levels of resilience plus trustworthiness than you are possibly utilized to. HIGH LEVEL REGARDING TRANSPARENCY Additionally, Parity basically outlines its� testing techniques and procedures online. This actually goes out of the way to reveal this kind of attributes as block-processing rate, memory footprint, and trie benchmarks online. That indicates techies can actually for you to see if Parity�s promises are for real. Parity Wallet v2.3.4 delivers a far higher amount of transparency than will be usually seen through several crypto solution suppliers. It is a true start taken solution created using a dangerous of visibility and sincerity. Developers will certainly definitely appreciate the fact that although so will regular people that want something sufficient for the pros to be able to use. A person big advantages to Parity is the fact that the idea is a professional alternative.

PARITY IS A GOOD SOLUTION FOR ENTREPRENEURS When you need something of which developers might access in addition to play with, Parity is normally definitely for you. That would help it become some sort of fine solution for anyone that is trying to produce smart contracts, a good ICO, or an Ethereum-based web commerce market platform, or product. Somebody that expects to hire a team connected with engineers to help develop a good new Ethereum-solution would be incredibly well served by Parity. So would entrepreneurs looking to do business with large institutions such like big banks, governments, large firms, investment banking institutions, hedge funds, credit-card providers, and technology companies. Parity might be more likely to be able to offer the degree of documentation, safety, and visibility those companies require. That makes Parity a great choice of finances for those trying for you to create or even design following generation internet solutions. In case you own a organization or website and you want to add more Ethereum � Parity will be a great way to do the idea. This means Parity is certainly not necessarily a fantastic solution to get private individuals. It appears to be like some sort of business solution for professionals � that requires some level of technical skills to implement. In case you want to understand Ethereum and how to help produce Ethereum-based solutions, you should definitely get informed about Parity and learn to use it. Persons that will just want to make use of Ethereum as a repayment alternative, might be better served by way of a more consumer-friendly solution like MyEtherWallet. With luck ,, the Parity Technologies group will generate a simpler version of their wallet for use by this general public eventually. Their product is impressive and it also deserves to find the large advertise and market. Note that typically the split developers behind parity are putting their abilities in to developing a new crypto that aims to become the next big movement above ethereum � many might argue the next generation regarding blockchain technological innovation � using a internet of �blockchains� that aims to interface together with connect with different blockchains. This new cryptocurrency is termed Polkadot and goes survive Q4 2019. People the fact that want to see what a cryptocurrency wallet plus an Ethereum browser have to look such as must check out Parity. Parity Ethereum v2.3.5 might well come to be the yellow metal standard involving Ethereum-interface alternatives.
1 note
·
View note
Text
Mysql Server For Mac

Jul 27, 2020 Just like Windows, MySQL installer for Mac doesn't add MySQL executable to the PATH environment variable. Consequently, we have to execute MySQL by specifying the full path to it in the terminal. We are now ready to start the server. The first step is to download MySQL server. Go to the MySQL web site and select the version that matches your version of Mac OS. Select the DMG. Archive version. After the DMG file finishes downloading click on it to open.
Remove MySQL server on a Mac The other day I wanted to run some project via Docker Compose. Surprisingly, the MySQL service defined normally like this: crayon-5fc481694552/ didn’t start, because I apparently had MySQL server already running locally. Trust me, I tried everything from this StackOverflow post but any time I tried to kill the process (that I saw is running with ps. How to install MySQL server on Mac OS X cd /usr/local/mysql. Sudo bin/mysqlsecureinstallation. This command will ask for your computer password. While typing it no characters will. Set root password? Select Y and press Enter. After that enter a password for MySQL and press Enter.
Are you a web developer with a need for fast, secure, and limitless data storage?
Ever heard of WordPress, Joomla, or Drupal? Well, they are all database-driven web applications that use MySQL. If you’re aiming high for your website, then MySQL has the performance power to help you succeed.
It’s easier than you think to download and benefit from MySQL for Mac. If you’re ready to get started on advancing your database management system, then read on to learn how!
What is MySQL?
MySQL is considered the world’s most popular open source relational database management system. It is a way for you to manage the data stored on your computer.
Your Mac computer can already hold a lot of data. MySQL will help you manage it and can collaborate with a number of application programming interfaces (APIs). It is known for being the go-to database management system for popular websites such as Facebook, Google, Twitter, and Uber.
MySQL uses Structured Query Language (SQL), which the most common standardized language used to access databases.
If you are working on software or websites that require MySQL database, then you should probably download it to your computer!
Let’s get started!
Anyone Can Download MySQL for Mac
One benefit to using MySQL is it is an open source software. That means anyone can download it and modify the code as needed. The software is licensed under the GNU General Public License (GPL).
The nice thing about this is developers around the world are able to update the software and are continuously fixing bugs in it.
If you’re looking to embed MySQL software into commercial applications, then you can purchase a commercial license. This will prevent you from having to share source code or be subject to the GPL license.
MySQL for Mac is Fast
Using the MySQL server is easy on your Mac laptop or desktop. Plus it is reliable in its speed and security. This makes it ideal for accessing databases on the Internet.
It won’t slow down when running along with your other applications and web servers. In fact, you can adjust the settings to use the full memory, CPU power, and I/O capabilities. Some developers will dedicate an entire computer to MySQL for this exact purpose.
In other cases, you can use MySQL to work with multiple machines connected together through a network. It can handle all types of large projects!

Download MySQL for Free
Many web servers and websites are going to include a MySQL download as a service they provide. Mac OS X doesn’t ship with a copy of MySQL included, but it’s free to download. You can download it on your own.
Simply go to MySQL’s website and download the standard Mac OS installer package. Make sure you click on the latest version and you select the DMG archive version. This will include the server as well as command line utilities.
Steps to Download MySQL for Mac
After you click the Download button, you will be prompted to sign up for an Oracle Web Account. This is optional so you can skip it if you want.
The MySQL for mac download weighs about 70MB.
Next, go to your Downloads file and double-click on the DMG archive. You will then double-click on the .pkg file. Step by step instructions will be provided in the setup wizard.
You will need to read and agree to the license terms. Then continue until you reach the Install button.
Don’t Forget the Password!
Before you close down the setup wizard, make sure you write down the temporary password given. Don’t lose this! It cannot be recovered. Once you log in to MySQL using the temporary password, it will prompt you to create your own.
Double-click the MySQL.prefPane file to download the MySQL control panel. This will install your control panel into the System Preferences application.
Ready to open MySQL? Just go to System Preferences on your computer. There you will click on the Other section. You should see the MySQL icon. Click on Start MySQL and you’re ready to go!
Open MySQL
To open MySQL you will need to go to the MySQL Preference Pane, which was part of the installation. Click on Start. It’s that easy!

You can also configure MySQL to start automatically when you turn on your computer. Just use the MySQL Preference Pane to change your settings.
Is Your MySQL Running?
Here’s an easy way to check and make sure MySQL is running properly on your computer. Open the Activity Viewer by going to Applications and then Utilities. Click on All Processes in the popup menu. In the search bar, type in the phrase mysqld.
You should see a mysqld process showing that MySQL is running!
Get MySQL Workbench
Download Mysql Server For Mac
You’re going to need to download MySQL Workbench as a visual tool to allow you to create a server instance. The MySQL Workbench will help you in the design and development process to create ER models, forward and reverse engineering, as well as SQL queries.
It creates an easy to view and organize dashboard to help you manage users, query database health, and audit your MySQL environment with ease.
Once you download MySQL Workbench go to the Server Administration section and click on New Server Instance to get started. You’re going to need some developer knowledge to work in this tool.
Web Development Packages
You may be interested in using web development packages for your mac that are compatible with MySQL. MAMP/XAMPP give you the ability to create PHP pages using Apache and MySQL.
Mysql Server Client For Mac
These packages include Apache and MySQL within them. Which makes them another way to download MySQL to your Mac along with some other various utilities.
Want More Ways to Mac?
Downloading MySQL for Mac is just the beginning of expanding and growing your online business. If you’re starting to feel overwhelmed, then we’re here to help. We are passionate Mac users just like you.
Check out the many services we provide including hosting and domains. Or if you just need a helping hand, contact us!
Login
×
I manually installed the MySQL client on my MacBook Pro without homebrew. However, I also installed another MySQL server by homebrew. How could I remove the manual installed MySQL server? Thanks
Best Answer:Omni Remover is the #1 Mac App Uninstaller software that can remove MySQL from your Mac completely. Free Download


MySQL is an open-source relational database management system written in C and C++. The MySQL server software itself and the client libraries is available on multiple operation system including macOS. To completely uninstall MySQL OS X it is necessary to remove numerous files and folders and edit one file. So in this article, we’ll show you how to uninstall MySQL from your Mac with minimal effort.
Table of Content:
Part 1: How To Manually Uninstall MySQL on Mac
Uninstall applications on Mac is as easy as 1-2-3. You simply need to find the app you want to remove in Applications folder, drag and drop it to Trash and it's done. However, some stubborn programs may cause you extra trouble. Here are the step by steo tips on how to uninstall MySQL from your Mac manually.
Step 1: Open Finder on your Mac > Go to Applications > Drag MySQL.app To Trash.
How To Completely Uninstall MySQL on Mac
Step 2: After moving MySQL.app to Trash, you may have these MySQL related files left behind, like the data and files in database, log files, cached data, etc. So to get rid of these MySQL leftover junk files, you need to move further.
Step 3: Open a terminal window > Use mysqldump to backup your databases to text files > Stop the database server and enter: sudo rm /usr/local/mysql sudo rm -rf /usr/local/mysql* sudo rm -rf /Library/StartupItems/MySQLCOM sudo rm -rf /Library/PreferencePanes/My*
Step 4: Edit /etc/hostconfig and remove the line MYSQLCOM=-YES- sudo rm /usr/local/mysql rm -rf ~/Library/PreferencePanes/My* sudo rm -rf /Library/Receipts/mysql* sudo rm -rf /Library/Receipts/MySQL* sudo rm -rf /private/var/db/receipts/*mysql*
Important Note: The last three command lines are particularly important in regard of clean uninstall MySQL on your Mac. Because, as otherwise, you can't install an older version of MySQL even though you think that you've completely deleted the newer version!
Part 2: Common Problems of Uninstalling MySQL on Mac
Even you're a senior macOS user, it still has chance that you cannot clean and fully uninstall MySQL from your Mac. The common MySQL on Mac uninstalling problems are list below (Learn How To Completely Uninstall Programs on Mac).
MySQL Data / Files / Icon / Shortcuts / Contest Menu that are related to MySQL have been found in the later use of your Mac.
Manual removal of MySQL on Mac requires advanced knowledge about how macOS file system and how terminal works. Otherwise, any false operations, mistake deletions will bring troubles. For instance, other application (Safari) cannot open correctly, or even severer, your Mac may work abnormally.
To completely remove MySQL from your Mac you'll need a capable Mac App Uninstaller software like Omni Remover 2. It is the new Mac App Uninstaller software made to remove MySQL and other ill-behaved apps on macOS. Follow steps below to get rid of MySQL on your Mac in few clicks
Step 1: Download Omni Remover
Download and install Omni Remover on your Mac > Open Omni Remover.
How To Completely Uninstall MySQL on Mac Step 1
Step 2: Uninstall MySQL
In Omni Remover > App Uninstall > Click MySQL > Clean Uninstall.
How To Completely Uninstall MySQL on Mac Step 2
Step 3: Finish Uninstalling MySQL Mac
Then Omni Remover will start scanning all MySQL associated data/files > After it finished scanning, click Clean Uninstall to start uninstall MySQL from your Mac.
How To Completely Uninstall MySQL on Mac Step 3
It's just way easier with Omni Remover to uninstall MySQL from your Mac. Besides, Omni Remover can also scan your macOS, find and clean all unwanted app leftover junk files at one go. Free Download Now >
Omni Remover
Requirements: OS X 10.8+ , 13.1Mb free space Version 3.3.5 (January 31, 2020) / Support macOS Catalina Category: Mac Uninstaller
More iPhone/Mac Related Tips
Tags: Uninstall iTunes MacUninstall Office 2011 MacUninstall FirefoxUninstall Kaspersky MacUninstall MacKeeperUninstall Google Earth MacUninstall Steam MacUninstall Adobe Flash MacUninstall Citrix Receiver MacUninstall Spotify MacUninstall Dropbox MacUninstall Skype MacUninstall Teamviewer MacUninstall uTorrent MacUninstall Sophos Antivirus MacUninstall Norton MacUninstall Soundflower MacUninstall WinZip Mac
0 notes
Text
Mac Os X Lion Installer Download

This directory contains binaries for a base distribution and packages to run on Mac OS X (release 10.6 and above). Mac OS 8.6 to 9.2 (and Mac OS X 10.1) are no longer supported but you can find the last supported release of R for these systems (which is R 1.7.1) here. Releases for old Mac OS X systems (through Mac OS X 10.5) and PowerPC Macs can be found in the old directory.
Note: CRAN does not have Mac OS X systems and cannot check these binaries for viruses.Although we take precautions when assembling binaries, please use the normal precautions with downloaded executables.
How to install and use Docker on RHEL 7 or CentOS 7 (method 1) The procedure to install Docker is as follows: Open the terminal application or login to the remote box using ssh command: ssh user@remote-server-name; Type the following command to install Docker via yum provided by Red Hat: sudo yum install docker. To install docker in CentOS without getting a migraine, try this command and see the magic unfold on your terminal screen: sudo dnf install docker-ce -nobest You'll be prompted to import a GPG key, make sure the key matches to 060A 61C5 1B55 8A7F 742B 77AA C52F EB6B 621E 9F35 before entering 'y'. Docker install on centos.

Package binaries for R versions older than 3.2.0 are only available from the CRAN archive so users of such versions should adjust the CRAN mirror setting (https://cran-archive.r-project.org) accordingly.
This directory contains binaries for a base distribution and packages to run on Mac OS X (release 10.6 and above). Mac OS 8.6 to 9.2 (and Mac OS X 10.1) are no longer supported but you can find the last supported release of R for these systems (which is R 1.7.1) here. Mac OS X Lion 10.7.2 dmg for mac free. download full version. Mac OS X Lion 10.7.2 offline installer complete setup for mac OS with direct link. Description Mac OS X Lion 10.7.2 Dmg For Mac + Overview. Among exclusive mac OS x releases, mac OS x lion is a broadly used running system. Supplying stability, safety and better compatibility features.
Mac Os X Lion 10.7 Installer Download
Mac OS X Lion 10.7 is the eighth version of the Mac OS X series. This is completely a different version from Windows. Mac OS X Lion 10.7 ISO depends on the productivity which is suitable for Mac operating system X. This is the reason why Mac is one of the best and successful processors of 2011. This is mainly followed by the Mac of the year 2007. Mac OS X Lion (version 10.7) is the eighth major release of macOS, Apple's desktop and server operating system for Macintosh computers. A preview of Mac OS X 10.7 Lion was publicly shown at the 'Back to the Mac' Apple Special Event on October 20, 2010.
R 4.0.4 'Lost Library Book' released on 2021/02/15
Please check the SHA1 checksum of the downloaded image to ensure that it has not been tampered with or corrupted during the mirroring process. For example type openssl sha1 R-4.0.4.pkg in the Terminal application to print the SHA1 checksum for the R-4.0.4.pkg image. On Mac OS X 10.7 and later you can also validate the signature using pkgutil --check-signature R-4.0.4.pkg Download os mojave.
Mac Os X Mountain Lion Installation File .dmg Download
Latest release:
R-4.0.4.pkg (notarized and signed) SHA1-hash: 0b2b3bc846f6ebc72a8bc0b53e6e85d600d95deb (ca. 85MB)R 4.0.4 binary for macOS 10.13 (High Sierra) and higher, signed and notarized package. Contains R 4.0.4 framework, R.app GUI 1.74 in 64-bit for Intel Macs, Tcl/Tk 8.6.6 X11 libraries and Texinfo 6.7. The latter two components are optional and can be ommitted when choosing 'custom install', they are only needed if you want to use the tcltk R package or build package documentation from sources.
Note: the use of X11 (including tcltk) requires XQuartz to be installed since it is no longer part of OS X. Always re-install XQuartz when upgrading your macOS to a new major version. Also please do not install beta versions of XQuartz (even if offered).
This release supports Intel Macs, but it is also known to work using Rosetta2 on M1-based Macs. Native Apple silicon binary is expected for R 4.1.0 if support for Fortran sabilizes, for experimental builds and updates see mac.R-project.org.
Important: this release uses Xcode 12.4 and GNU Fortran 8.2. If you wish to compile R packages from sources, you will need to download GNU Fortran 8.2 - see the tools directory.
NEWS (for Mac GUI)News features and changes in the R.app Mac GUI Mac-GUI-1.74.tar.gz SHA1-hash: 2c791fd1fd2d8f90b0887c1f9541882200a6eab8Sources for the R.app GUI 1.74 for Mac OS X. This file is only needed if you want to join the development of the GUI, it is not intended for regular users. Read the INSTALL file for further instructions. Note: Previous R versions for El Capitan can be found in the el-capitan/base directory.
Binaries for legacy OS X systems:
R-3.6.3.nn.pkg (signed) SHA1-hash: c462c9b1f9b45d778f05b8d9aa25a9123b3557c4 (ca. 77MB)R 3.6.3 binary for OS X 10.11 (El Capitan) and higher, signed package. Contains R 3.6.3 framework, R.app GUI 1.70 in 64-bit for Intel Macs, Tcl/Tk 8.6.6 X11 libraries and Texinfo 5.2. The latter two components are optional and can be ommitted when choosing 'custom install', they are only needed if you want to use the tcltk R package or build package documentation from sources. R-3.3.3.pkg MD5-hash: 893ba010f303e666e19f86e4800f1fbf SHA1-hash: 5ae71b000b15805f95f38c08c45972d51ce3d027 (ca. 71MB)R 3.3.3 binary for Mac OS X 10.9 (Mavericks) and higher, signed package. Contains R 3.3.3 framework, R.app GUI 1.69 in 64-bit for Intel Macs, Tcl/Tk 8.6.0 X11 libraries and Texinfo 5.2. The latter two components are optional and can be ommitted when choosing 'custom install', it is only needed if you want to use the tcltk R package or build package documentation from sources.
Note: the use of X11 (including tcltk) requires XQuartz to be installed since it is no longer part of OS X. Always re-install XQuartz when upgrading your OS X to a new major version.
R-3.2.1-snowleopard.pkg MD5-hash: 58fe9d01314d9cb75ff80ccfb914fd65 SHA1-hash: be6e91db12bac22a324f0cb51c7efa9063ece0d0 (ca. 68MB)R 3.2.1 legacy binary for Mac OS X 10.6 (Snow Leopard) - 10.8 (Mountain Lion), signed package. Contains R 3.2.1 framework, R.app GUI 1.66 in 64-bit for Intel Macs. This package contains the R framework, 64-bit GUI (R.app), Tcl/Tk 8.6.0 X11 libraries and Texinfop 5.2. GNU Fortran is NOT included (needed if you want to compile packages from sources that contain FORTRAN code) please see the tools directory. NOTE: the binary support for OS X before Mavericks is being phased out, we do not expect further releases!
The new R.app Cocoa GUI has been written by Simon Urbanek and Stefano Iacus with contributions from many developers and translators world-wide, see 'About R' in the GUI.
Subdirectories:
toolsAdditional tools necessary for building R for Mac OS X: Universal GNU Fortran compiler for Mac OS X (see R for Mac tools page for details). baseBinaries of R builds for macOS 10.13 or higher (High Sierra)contribBinaries of package builds for macOS 10.13 or higher (High Sierra)el-capitanBinaries of package builds for OS X 10.11 or higher (El Capitan build)mavericksBinaries of package builds for Mac OS X 10.9 or higher (Mavericks build)oldPreviously released R versions for Mac OS X
You may also want to read the R FAQ and R for Mac OS X FAQ. For discussion of Mac-related topics and reporting Mac-specific bugs, please use the R-SIG-Mac mailing list.
Information, tools and most recent daily builds of the R GUI, R-patched and R-devel can be found at http://mac.R-project.org/. Please visit that page especially during beta stages to help us test the Mac OS X binaries before final release!
Package maintainers should visit CRAN check summary page to see whether their package is compatible with the current build of R for Mac OS X.
Binary libraries for dependencies not present here are available from http://mac.R-project.org/libs and corresponding sources at http://mac.R-project.org/src.
Last modified: 2021/02/15, by Simon Urbanek
Mac OS X Snow Leopard Free Download DMG 10.6.3 Clean Rip. It is final bootable OS X Snow Leopard Install DVD 10.6.3 DMG for Clean OS X Reinstall.
Mac OS X Snow Leopard Overview

Mac OS X Snow Leopard is the seventh release of the Mac OS X. This operating system was released on 28th of August 2009. Mac OS X Snow Leopard has many enhancements compared to the previous releases. The performance of Mac OS X has been enhanced greatly and there is a reduction in the memory footprints. The name Snow Leopard suggests greater improvements in the previous Leopard version. New programming framework like OpenCL has been created which has enabled the developers to use graphic cards in their applications. You can also Download Mac OS X Yosemite which is latest so far.
MAc OS X Snow Leopard has some new and some enhanced features which has expanded the technical capabilities of the operating system. iChat feature has been enhanced and now it supports greater resolution video chat. Finder the default file manager of Mac has been entirely rewritten in Cocoa API. Preview which is Mac’s application for displaying images and PDF files can now deduce the paragraph structure in PDF document. Mac OS X Mountain Lion is another great choice for advanced features.
Safari 4 now has built in crash system which can prevent the browser from crashing due to plugins. Some new wallpapers have also been included in this operating system two of them being of Snow Leopard’s. User interface has also been refined. AppleTalk, a suit for networking protocol is no longer supported by Mac OS X Snow Leopard. Also you can Download Mac OS X Mavericks which is great success.
On a conclusive note we can say that Mac OS X Snow Leopard is a very productive operating system which has great emphasis on efficiency and performance of Mac.
Features of Mac OS X Snow Leopard
Mac Os X Lion Installer Download Windows 7
Below are some noticeable features which you’ll experience after Mac OS X Snow Leopard free download.
Great emphasis on efficiency and performance of Mac.
New programming framework OpenCL introduced.
Expansion in technical capabilities of the operating system.
Enhanced iChat which support greater resolution video chat.
Finder has been entirely rewritten in Cocoa.
Preview can now deduce the paragraph structure of PDFs.
Built-in crash system for Safari 4.
New wallpapers included.
AppleTalk no longer supported.

Mac OS X Snow Leopard Technical Setup Details
Software Full Name: Mac OS X Snow Leopard Install DVD 10.6.3
Setup File Name: Mac_OS_X_Install_DVD_10.6.3.dmg
Full Setup Size: 6.4 GB
Setup Type: Clean Rip Official DMG
Compatibility Architecture: 32 Bit (x86) / 64 Bit (x64)
Latest Version Release Added On:
License: Official Reinstall DMG
Developers: Apple Mac OS
System Requirements For Mac OS X Snow Leopard
Before you start Mac OS X Snow Leopard free download, make sure your PC meets minimum system requirements.
Memory (RAM): 1GB of RAM required.
Hard Disk Space: 7GB of free space required.
Mac Os X Mountain Lion Installer Download
Mac OS X Snow Leopard Free Download
Click on below button to start Mac OS X Snow Leopard Free Download. This is complete offline installer and standalone setup for Mac OS X Snow Leopard.
More from my site
Mac Os X Lion Installer Usb Download
This Post was Last Updated On: September 10, 2017
0 notes
Text
Mac 0s 10.10

This content has been archived, and is no longer maintained by Indiana University. Information here may no longer be accurate, and links may no longer be available or reliable.
Mac Os 10.10.12
Mac Os 10.10.1
Mac 0s 10.10 Operating System
Mac Os 10.10.3
How to download old mac os x versions. The macOS Mojave 10.14.1 update improves the stability, compatibility and security of your Mac, and is recommended for all users. https://fmfox835.tumblr.com/post/655253393734074368/bootcamp-windows-xp-drivers. This update: Adds support for Group FaceTime video and audio calls, which support up to 32 participants simultaneously, are encrypted end-to-end for privacy, and can be initiated from a group Messages conversation, or joined at any time during an active call. Mac OS X Jaguar (version 10.2) is the third major release of macOS, Apple's desktop and server operating system.It superseded Mac OS X 10.1 and preceded Mac OS X Panther.The operating system was released on August 23, 2002 either for single-computer installations, and in a 'family pack,' which allowed five installations on separate computers in one household. Manually download docker image.
On this page:
Reinstalling Yosemite on a computer alreadyrunning it
Upgrading from previous versions to OS X 10.10 (Yosemite)
OS X 10.10 (Yosemite) is no longer available for purchase from theMac App Store. If you have a previous version of the operating system,and your computer meets the system requirementsfor OS X 10.11 (El Capitan), you can upgrade directly to thatversion instead; see ARCHIVED: Install or upgrade OS X 10.11 (El Capitan)
Mac Os 10.10.12
Reinstalling Yosemite on a computer already running it
To reinstall or recover Yosemite, you must have an active Internetconnection. If you are on campus at IU, UITS recommendsthe wired Ethernet network instead of wireless. However, if IUSecure is your only option, see Connect to an IU wireless network in macOS if booted from your Recovery HD
Reinstalling while keeping files, applications, and settings

Mac Os 10.10.1

Mac 0s 10.10 Operating System
Restart your computer, and immediately hold down command-r until the gray Apple logo appears.
If prompted, select your main language and then click the arrow.
Click Reinstall OS X, and then Continue. Follow the instructions on the screen, and then choose your hard disk. Click Install, and enter your Apple ID information if prompted.
When the installation is complete, select App Store.. from the Apple menu, and install any available updates.
Reinstalling while erasing everything on your computer
Mac Os 10.10.3
Restart your computer, and immediately hold down command-r until the gray Apple logo appears.
If you see a screen asking you to select your main language,choose it, and then click the arrow.
Click Disk Utility, and then Continue.
In Disk Utility:
Click your hard disk in the left column, and thenclick the Erase tab.
Next to 'Format:', make sure Mac OS Extended (Journaled)is selected. In the 'Name:' field, give your disk a name.
If you would like to securely erase your data, click SecurityOptions.., adjust the slider accordingly, and clickOK.
When you're ready, click Erase.., and thenErase again to erase your disk.
Once it's completed, quit Disk Utility.
Click Reinstall OS X, and then Continue:
Follow the instructions on the screen, and then choose your harddisk.
Click Install. If prompted, enter your Apple IDinformation.
Once the installation is complete, you'll beasked to enter basic information, and have the option to transfer datafrom another computer or backup.
From the Apple menu, select App Store, and then installany available updates.
0 notes
Text
Start Docker In Ubuntu

A Linux Dev Environment on Windows with WSL 2, Docker Desktop And the docker docs. Docker Desktop WSL 2 backend. Below is valid only for WSL1. It seems that docker cannot run inside WSL. What they propose is to connect the WSL to your docker desktop running in windows: Setting Up Docker for Windows and WSL. By removing /etc/docker you will loose all Images and data. You can check logs with. Journalctl -u docker.services. Systemctl daemon-reload && systemctl enable docker && systemctl start docker. This worked for me.
$ docker images REPOSITORY TAG ID ubuntu 12.10 b750fe78269d me/myapp latest 7b2431a8d968. Docker-compose start docker-compose stop. After installing the Nvidia Container Toolkit, you'll need to restart the Docker Daemon in order to let Docker use your Nvidia GPU: sudo systemctl restart docker Changing the docker-compose.yml Now that all the packages are in order, let's change the docker-compose.yml to let the Jellyfin container make use of the Nvidia GPU.
Complete Docker CLI
Container Management CLIs
Inspecting The Container
Interacting with Container
Image Management Commands
Image Transfer Comnands
Builder Main Commands
The Docker CLI
Manage images
docker build
Create an image from a Dockerfile.
docker run
Run a command in an image.
Manage containers
docker create
Example
Create a container from an image.
docker exec
Example
Run commands in a container.
docker start
Start/stop a container.
docker ps
Manage containers using ps/kill.
Images
docker images
Manages images.
docker rmi
Deletes images.
Also see
Getting Started(docker.io)
Inheritance
Variables
Initialization
Onbuild
Commands
Entrypoint
Configures a container that will run as an executable.
This will use shell processing to substitute shell variables, and will ignore any CMD or docker run command line arguments.
Metadata
See also
Basic example
Commands
Reference
Building
Ports
Commands
Environment variables
Dependencies
Other options
Advanced features
Labels
DNS servers
Devices
External links
Hosts
sevices
To view list of all the services runnning in swarm
To see all running services
to see all services logs
To scale services quickly across qualified node
clean up
To clean or prune unused (dangling) images
To remove all images which are not in use containers , add - a
To Purne your entire system
To leave swarm
To remove swarm ( deletes all volume data and database info)
To kill all running containers
Contributor -
Sangam biradar - Docker Community Leader
The Jellyfin project and its contributors offer a number of pre-built binary packages to assist in getting Jellyfin up and running quickly on multiple systems.
Container images
Docker
Windows (x86/x64)
Linux
Linux (generic amd64)
Debian
Ubuntu
Container images
Official container image: jellyfin/jellyfin.
LinuxServer.io image: linuxserver/jellyfin.
hotio image: hotio/jellyfin.
Jellyfin distributes official container images on Docker Hub for multiple architectures. These images are based on Debian and built directly from the Jellyfin source code.
Additionally the LinuxServer.io project and hotio distribute images based on Ubuntu and the official Jellyfin Ubuntu binary packages, see here and here to see their Dockerfile.
Note
For ARM hardware and RPi, it is recommended to use the LinuxServer.io or hotio image since hardware acceleration support is not yet available on the native image.
Docker
Docker allows you to run containers on Linux, Windows and MacOS.
The basic steps to create and run a Jellyfin container using Docker are as follows.
Follow the offical installation guide to install Docker.
Download the latest container image.
Create persistent storage for configuration and cache data.
Either create two persistent volumes:
Or create two directories on the host and use bind mounts:
Create and run a container in one of the following ways.
Note
The default network mode for Docker is bridge mode. Bridge mode will be used if host mode is omitted. Use host mode for networking in order to use DLNA or an HDHomeRun.
Using Docker command line interface:
Using host networking (--net=host) is optional but required in order to use DLNA or HDHomeRun.
Bind Mounts are needed to pass folders from the host OS to the container OS whereas volumes are maintained by Docker and can be considered easier to backup and control by external programs. For a simple setup, it's considered easier to use Bind Mounts instead of volumes. Replace jellyfin-config and jellyfin-cache with /path/to/config and /path/to/cache respectively if using bind mounts. Multiple media libraries can be bind mounted if needed:
Note
There is currently an issue with read-only mounts in Docker. If there are submounts within the main mount, the submounts are read-write capable.
Using Docker Compose:
Create a docker-compose.yml file with the following contents:
Then while in the same folder as the docker-compose.yml run:
To run the container in background add -d to the above command.
You can learn more about using Docker by reading the official Docker documentation.
Hardware Transcoding with Nvidia (Ubuntu)
You are able to use hardware encoding with Nvidia, but it requires some additional configuration. These steps require basic knowledge of Ubuntu but nothing too special.
Adding Package RepositoriesFirst off you'll need to add the Nvidia package repositories to your Ubuntu installation. This can be done by running the following commands:
Installing Nvidia container toolkitNext we'll need to install the Nvidia container toolkit. This can be done by running the following commands:
After installing the Nvidia Container Toolkit, you'll need to restart the Docker Daemon in order to let Docker use your Nvidia GPU:
Changing the docker-compose.ymlNow that all the packages are in order, let's change the docker-compose.yml to let the Jellyfin container make use of the Nvidia GPU.The following lines need to be added to the file:
Your completed docker-compose.yml file should look something like this:
Note
For Nvidia Hardware encoding the minimum version of docker-compose needs to be 2. However we recommend sticking with version 2.3 as it has proven to work with nvenc encoding.
Unraid Docker
An Unraid Docker template is available in the repository.
Open the unRaid GUI (at least unRaid 6.5) and click on the 'Docker' tab.
Add the following line under 'Template Repositories' and save the options.
Click 'Add Container' and select 'jellyfin'.
Adjust any required paths and save your changes.
Kubernetes
A community project to deploy Jellyfin on Kubernetes-based platforms exists at their repository. Any issues or feature requests related to deployment on Kubernetes-based platforms should be filed there.
Podman
Podman allows you to run containers as non-root. It's also the offically supported container solution on RHEL and CentOS.
Steps to run Jellyfin using Podman are almost identical to Docker steps:
Install Podman:
Download the latest container image:
Create persistent storage for configuration and cache data:
Either create two persistent volumes:
Or create two directories on the host and use bind mounts:
Create and run a Jellyfin container:
Note that Podman doesn't require root access and it's recommended to run the Jellyfin container as a separate non-root user for security.
If SELinux is enabled you need to use either --privileged or supply z volume option to allow Jellyfin to access the volumes.
Replace jellyfin-config and jellyfin-cache with /path/to/config and /path/to/cache respectively if using bind mounts.
To mount your media library read-only append ':ro' to the media volume:

To run as a systemd service see Running containers with Podman and shareable systemd services.
Cloudron
Cloudron is a complete solution for running apps on your server and keeping them up-to-date and secure. On your Cloudron you can install Jellyfin with a few clicks via the app library and updates are delivered automatically.
The source code for the package can be found here.Any issues or feature requests related to deployment on Cloudron should be filed there.
Windows (x86/x64)
Windows installers and builds in ZIP archive format are available here.
Warning
If you installed a version prior to 10.4.0 using a PowerShell script, you will need to manually remove the service using the command nssm remove Jellyfin and uninstall the server by remove all the files manually. Also one might need to move the data files to the correct location, or point the installer at the old location.
Warning
The 32-bit or x86 version is not recommended. ffmpeg and its video encoders generally perform better as a 64-bit executable due to the extra registers provided. This means that the 32-bit version of Jellyfin is deprecated.
Install using Installer (x64)
Install
Download the latest version.
Run the installer.
(Optional) When installing as a service, pick the service account type.
If everything was completed successfully, the Jellyfin service is now running.
Open your browser at http://localhost:8096 to finish setting up Jellyfin.
Update
Download the latest version.
Run the installer.
If everything was completed successfully, the Jellyfin service is now running as the new version.
Uninstall
Go to Add or remove programs in Windows.
Search for Jellyfin.
Click Uninstall.
Manual Installation (x86/x64)
Install
Download and extract the latest version.
Create a folder jellyfin at your preferred install location.
Copy the extracted folder into the jellyfin folder and rename it to system.
Create jellyfin.bat within your jellyfin folder containing:
To use the default library/data location at %localappdata%:
To use a custom library/data location (Path after the -d parameter):
To use a custom library/data location (Path after the -d parameter) and disable the auto-start of the webapp:
Run
Open your browser at http://<--Server-IP-->:8096 (if auto-start of webapp is disabled)
Update
Stop Jellyfin
Rename the Jellyfin system folder to system-bak
Download and extract the latest Jellyfin version
Copy the extracted folder into the jellyfin folder and rename it to system
Run jellyfin.bat to start the server again
Rollback
Stop Jellyfin.
Delete the system folder.
Rename system-bak to system.
Run jellyfin.bat to start the server again.
MacOS
MacOS Application packages and builds in TAR archive format are available here.
Install
Download the latest version.
Drag the .app package into the Applications folder.
Start the application.
Open your browser at http://127.0.0.1:8096.
Upgrade
Download the latest version.
Stop the currently running server either via the dashboard or using the application icon.
Drag the new .app package into the Applications folder and click yes to replace the files.
Start the application.
Open your browser at http://127.0.0.1:8096.
Uninstall
Start Docker In Ubuntu Virtualbox
Stop the currently running server either via the dashboard or using the application icon.
Move the .app package to the trash.
Deleting Configuation
This will delete all settings and user information. This applies for the .app package and the portable version.
Delete the folder ~/.config/jellyfin/
Delete the folder ~/.local/share/jellyfin/
Portable Version
Download the latest version
Extract it into the Applications folder
Open Terminal and type cd followed with a space then drag the jellyfin folder into the terminal.
Type ./jellyfin to run jellyfin.
Open your browser at http://localhost:8096
Closing the terminal window will end Jellyfin. Running Jellyfin in screen or tmux can prevent this from happening.
Upgrading the Portable Version
Download the latest version.
Stop the currently running server either via the dashboard or using CTRL+C in the terminal window.
Extract the latest version into Applications
Open Terminal and type cd followed with a space then drag the jellyfin folder into the terminal.
Type ./jellyfin to run jellyfin.
Open your browser at http://localhost:8096
Uninstalling the Portable Version
Stop the currently running server either via the dashboard or using CTRL+C in the terminal window.
Move /Application/jellyfin-version folder to the Trash. Replace version with the actual version number you are trying to delete.
Using FFmpeg with the Portable Version
The portable version doesn't come with FFmpeg by default, so to install FFmpeg you have three options.
use the package manager homebrew by typing brew install ffmpeg into your Terminal (here's how to install homebrew if you don't have it already
download the most recent static build from this link (compiled by a third party see this page for options and information), or
compile from source available from the official website
More detailed download options, documentation, and signatures can be found.
If using static build, extract it to the /Applications/ folder.
Navigate to the Playback tab in the Dashboard and set the path to FFmpeg under FFmpeg Path.
Linux
Linux (generic amd64)
Generic amd64 Linux builds in TAR archive format are available here.
Installation Process
Create a directory in /opt for jellyfin and its files, and enter that directory.
Download the latest generic Linux build from the release page. The generic Linux build ends with 'linux-amd64.tar.gz'. The rest of these instructions assume version 10.4.3 is being installed (i.e. jellyfin_10.4.3_linux-amd64.tar.gz). Download the generic build, then extract the archive:
Create a symbolic link to the Jellyfin 10.4.3 directory. This allows an upgrade by repeating the above steps and enabling it by simply re-creating the symbolic link to the new version.
Create four sub-directories for Jellyfin data.
If you are running Debian or a derivative, you can also download and install an ffmpeg release built specifically for Jellyfin. Be sure to download the latest release that matches your OS (4.2.1-5 for Debian Stretch assumed below).
If you run into any dependency errors, run this and it will install them and jellyfin-ffmpeg.
Due to the number of command line options that must be passed, it is easiest to create a small script to run Jellyfin.
Then paste the following commands and modify as needed.
Assuming you desire Jellyfin to run as a non-root user, chmod all files and directories to your normal login user and group. Also make the startup script above executable.
Finally you can run it. You will see lots of log information when run, this is normal. Setup is as usual in the web browser.
Portable DLL
Platform-agnostic .NET Core DLL builds in TAR archive format are available here. These builds use the binary jellyfin.dll and must be loaded with dotnet.
Arch Linux
Jellyfin can be found in the AUR as jellyfin, jellyfin-bin and jellyfin-git.
Fedora
Fedora builds in RPM package format are available here for now but an official Fedora repository is coming soon.
You will need to enable rpmfusion as ffmpeg is a dependency of the jellyfin server package
Note
You do not need to manually install ffmpeg, it will be installed by the jellyfin server package as a dependency
Install the jellyfin server
Install the jellyfin web interface
Enable jellyfin service with systemd
Open jellyfin service with firewalld
Note
This will open the following ports8096 TCP used by default for HTTP traffic, you can change this in the dashboard8920 TCP used by default for HTTPS traffic, you can change this in the dashboard1900 UDP used for service auto-discovery, this is not configurable7359 UDP used for auto-discovery, this is not configurable
Reboot your box
Go to localhost:8096 or ip-address-of-jellyfin-server:8096 to finish setup in the web UI
CentOS
CentOS/RHEL 7 builds in RPM package format are available here and an official CentOS/RHEL repository is planned for the future.
The default CentOS/RHEL repositories don't carry FFmpeg, which the RPM requires. You will need to add a third-party repository which carries FFmpeg, such as RPM Fusion's Free repository.
You can also build Jellyfin's version on your own. This includes gathering the dependencies and compiling and installing them. Instructions can be found at the FFmpeg wiki.
Start Docker In Ubuntu Lts
Debian
Repository
The Jellyfin team provides a Debian repository for installation on Debian Stretch/Buster. Supported architectures are amd64, arm64, and armhf.
Note

Microsoft does not provide a .NET for 32-bit x86 Linux systems, and hence Jellyfin is not supported on the i386 architecture.
Install HTTPS transport for APT as well as gnupg and lsb-release if you haven't already.
Import the GPG signing key (signed by the Jellyfin Team):
Add a repository configuration at /etc/apt/sources.list.d/jellyfin.list:
Note
Supported releases are stretch, buster, and bullseye.
Update APT repositories:
Install Jellyfin:
Manage the Jellyfin system service with your tool of choice:
Packages
Raw Debian packages, including old versions, are available here.
Note
The repository is the preferred way to obtain Jellyfin on Debian, as it contains several dependencies as well.
Download the desired jellyfin and jellyfin-ffmpeg.deb packages from the repository.
Install the downloaded .deb packages:
Use apt to install any missing dependencies:
Manage the Jellyfin system service with your tool of choice:
Ubuntu
Migrating to the new repository
Previous versions of Jellyfin included Ubuntu under the Debian repository. This has now been split out into its own repository to better handle the separate binary packages. If you encounter errors about the ubuntu release not being found and you previously configured an ubuntujellyfin.list file, please follow these steps.
Run Docker In Ubuntu 18.04
Remove the old /etc/apt/sources.list.d/jellyfin.list file:
Proceed with the following section as written.
Ubuntu Repository
The Jellyfin team provides an Ubuntu repository for installation on Ubuntu Xenial, Bionic, Cosmic, Disco, Eoan, and Focal. Supported architectures are amd64, arm64, and armhf. Only amd64 is supported on Ubuntu Xenial.
Note
Microsoft does not provide a .NET for 32-bit x86 Linux systems, and hence Jellyfin is not supported on the i386 architecture.
Install HTTPS transport for APT if you haven't already:
Enable the Universe repository to obtain all the FFMpeg dependencies:
Note
If the above command fails you will need to install the following package software-properties-common.This can be achieved with the following command sudo apt-get install software-properties-common
Import the GPG signing key (signed by the Jellyfin Team):
Add a repository configuration at /etc/apt/sources.list.d/jellyfin.list:
Note
Supported releases are xenial, bionic, cosmic, disco, eoan, and focal.
Update APT repositories:
Install Jellyfin:
Manage the Jellyfin system service with your tool of choice:
Ubuntu Packages
Raw Ubuntu packages, including old versions, are available here.
Note
The repository is the preferred way to install Jellyfin on Ubuntu, as it contains several dependencies as well.
Start Docker In Ubuntu 20.04
Enable the Universe repository to obtain all the FFMpeg dependencies, and update repositories:
Download the desired jellyfin and jellyfin-ffmpeg.deb packages from the repository.
Install the required dependencies:
Install the downloaded .deb packages:
Use apt to install any missing dependencies:
Manage the Jellyfin system service with your tool of choice:
Migrating native Debuntu install to docker
It's possible to map your local installation's files to the official docker image.
Note
You need to have exactly matching paths for your files inside the docker container! This means that if your media is stored at /media/raid/ this path needs to be accessible at /media/raid/ inside the docker container too - the configurations below do include examples.
To guarantee proper permissions, get the uid and gid of your local jellyfin user and jellyfin group by running the following command:
You need to replace the <uid>:<gid> placeholder below with the correct values.
Using docker
Using docker-compose
0 notes
Text
Docker Machine Xhyve

Elasticsearch will then only be accessible from the host machine itself. The Docker named volumes data01, data02, and data03 store the node data directories so the data persists across restarts. If they don’t already exist, docker-compose creates them when you bring up the cluster. Make sure Docker Engine is allotted at least 4GiB of memory. Docker Engine 1.12 introduced a new swarm mode for natively managing a cluster of Docker Engines called a swarm. Docker swarm mode implements Raft Consensus Algorithm and does not require using external key value store anymore, such as Consul or etcd. If you want to run a swarm cluster on a developer’s machine, there are several options.
« Install Elasticsearch with Windows MSI InstallerInstall Elasticsearch on macOS with Homebrew »
Elasticsearch is also available as Docker images.The images use centos:8 as the base image.
A list of all published Docker images and tags is available atwww.docker.elastic.co. The source filesare inGithub.
This package contains both free and subscription features.Start a 30-day trial to try out all of the features.
Obtaining Elasticsearch for Docker is as simple as issuing a docker pull commandagainst the Elastic Docker registry.
To start a single-node Elasticsearch cluster for development or testing, specifysingle-node discovery to bypass the bootstrap checks:
Starting a multi-node cluster with Docker Composeedit
To get a three-node Elasticsearch cluster up and running in Docker,you can use Docker Compose:
This sample docker-compose.yml file uses the ES_JAVA_OPTSenvironment variable to manually set the heap size to 512MB. We do not recommendusing ES_JAVA_OPTS in production. See Manually set the heap size.
This sample Docker Compose file brings up a three-node Elasticsearch cluster.Node es01 listens on localhost:9200 and es02 and es03 talk to es01 over a Docker network.
Please note that this configuration exposes port 9200 on all network interfaces, and given howDocker manipulates iptables on Linux, this means that your Elasticsearch cluster is publically accessible,potentially ignoring any firewall settings. If you don’t want to expose port 9200 and instead usea reverse proxy, replace 9200:9200 with 127.0.0.1:9200:9200 in the docker-compose.yml file.Elasticsearch will then only be accessible from the host machine itself.
The Docker named volumesdata01, data02, and data03 store the node data directories so the data persists across restarts.If they don’t already exist, docker-compose creates them when you bring up the cluster.
Make sure Docker Engine is allotted at least 4GiB of memory.In Docker Desktop, you configure resource usage on the Advanced tab in Preference (macOS)or Settings (Windows).
Docker Compose is not pre-installed with Docker on Linux.See docs.docker.com for installation instructions:Install Compose on Linux
Run docker-compose to bring up the cluster:
Submit a _cat/nodes request to see that the nodes are up and running:
Log messages go to the console and are handled by the configured Docker logging driver.By default you can access logs with docker logs. If you would prefer the Elasticsearchcontainer to write logs to disk, set the ES_LOG_STYLE environment variable to file.This causes Elasticsearch to use the same logging configuration as other Elasticsearch distribution formats.

To stop the cluster, run docker-compose down.The data in the Docker volumes is preserved and loadedwhen you restart the cluster with docker-compose up.To delete the data volumes when you bring down the cluster,specify the -v option: docker-compose down -v.
See Encrypting communications in an Elasticsearch Docker Container andRun the Elastic Stack in Docker with TLS enabled.
The following requirements and recommendations apply when running Elasticsearch in Docker in production.
The vm.max_map_count kernel setting must be set to at least 262144 for production use.
How you set vm.max_map_count depends on your platform:
Linux
The vm.max_map_count setting should be set permanently in /etc/sysctl.conf:
To apply the setting on a live system, run:
macOS with Docker for Mac
The vm.max_map_count setting must be set within the xhyve virtual machine:
From the command line, run:
Press enter and use`sysctl` to configure vm.max_map_count:
To exit the screen session, type Ctrl a d.
Windows and macOS with Docker Desktop
The vm.max_map_count setting must be set via docker-machine:
Windows with Docker Desktop WSL 2 backend
The vm.max_map_count setting must be set in the docker-desktop container:
Configuration files must be readable by the elasticsearch useredit
By default, Elasticsearch runs inside the container as user elasticsearch usinguid:gid 1000:0.
One exception is Openshift,which runs containers using an arbitrarily assigned user ID.Openshift presents persistent volumes with the gid set to 0, which works without any adjustments.
If you are bind-mounting a local directory or file, it must be readable by the elasticsearch user.In addition, this user must have write access to the config, data and log dirs(Elasticsearch needs write access to the config directory so that it can generate a keystore).A good strategy is to grant group access to gid 0 for the local directory.
For example, to prepare a local directory for storing data through a bind-mount:
You can also run an Elasticsearch container using both a custom UID and GID. Unless youbind-mount each of the config, data` and logs directories, you must passthe command line option --group-add 0 to docker run. This ensures that the userunder which Elasticsearch is running is also a member of the root (GID 0) group inside thecontainer.
As a last resort, you can force the container to mutate the ownership ofany bind-mounts used for the data and log dirs through theenvironment variable TAKE_FILE_OWNERSHIP. When you do this, they will be owned byuid:gid 1000:0, which provides the required read/write access to the Elasticsearch process.
Increased ulimits for nofile and nprocmust be available for the Elasticsearch containers.Verify the init systemfor the Docker daemon sets them to acceptable values.
To check the Docker daemon defaults for ulimits, run:
If needed, adjust them in the Daemon or override them per container.For example, when using docker run, set:
Swapping needs to be disabled for performance and node stability.For information about ways to do this, see Disable swapping.
If you opt for the bootstrap.memory_lock: true approach,you also need to define the memlock: true ulimit in theDocker Daemon,or explicitly set for the container as shown in the sample compose file.When using docker run, you can specify:
The image exposesTCP ports 9200 and 9300. For production clusters, randomizing thepublished ports with --publish-all is recommended,unless you are pinning one container per host.
By default, Elasticsearch automatically sizes JVM heap based on a nodes’sroles and the total memory available to the node’s container. Werecommend this default sizing for most production environments. If needed, youcan override default sizing by manually setting JVM heap size.
To manually set the heap size in production, bind mount a JVMoptions file under /usr/share/elasticsearch/config/jvm.options.d thatincludes your desired heap size settings.

For testing, you can also manually set the heap size using the ES_JAVA_OPTSenvironment variable. For example, to use 16GB, specify -eES_JAVA_OPTS='-Xms16g -Xmx16g' with docker run. The ES_JAVA_OPTS variableoverrides all other JVM options. The ES_JAVA_OPTS variable overrides all otherJVM options. We do not recommend using ES_JAVA_OPTS in production. Thedocker-compose.yml file above sets the heap size to 512MB.
Pin your deployments to a specific version of the Elasticsearch Docker image. Forexample docker.elastic.co/elasticsearch/elasticsearch:7.12.0.
You should use a volume bound on /usr/share/elasticsearch/data for the following reasons:
The data of your Elasticsearch node won’t be lost if the container is killed
Elasticsearch is I/O sensitive and the Docker storage driver is not ideal for fast I/O
It allows the use of advancedDocker volume plugins
If you are using the devicemapper storage driver, do not use the default loop-lvm mode.Configure docker-engine to usedirect-lvm.
Consider centralizing your logs by using a differentlogging driver. Alsonote that the default json-file logging driver is not ideally suited forproduction use.
When you run in Docker, the Elasticsearch configuration files are loaded from/usr/share/elasticsearch/config/.
To use custom configuration files, you bind-mount the filesover the configuration files in the image.
You can set individual Elasticsearch configuration parameters using Docker environment variables.The sample compose file and thesingle-node example use this method.
To use the contents of a file to set an environment variable, suffix the environmentvariable name with _FILE. This is useful for passing secrets such as passwords to Elasticsearchwithout specifying them directly.
For example, to set the Elasticsearch bootstrap password from a file, you can bind mount thefile and set the ELASTIC_PASSWORD_FILE environment variable to the mount location.If you mount the password file to /run/secrets/bootstrapPassword.txt, specify:
You can also override the default command for the image to pass Elasticsearch configurationparameters as command line options. For example:
While bind-mounting your configuration files is usually the preferred method in production,you can also create a custom Docker imagethat contains your configuration.
Create custom config files and bind-mount them over the corresponding files in the Docker image.For example, to bind-mount custom_elasticsearch.yml with docker run, specify:
The container runs Elasticsearch as user elasticsearch usinguid:gid 1000:0. Bind mounted host directories and files must be accessible by this user,and the data and log directories must be writable by this user.
By default, Elasticsearch will auto-generate a keystore file for secure settings. Thisfile is obfuscated but not encrypted. If you want to encrypt yoursecure settings with a password, you must use theelasticsearch-keystore utility to create a password-protected keystore andbind-mount it to the container as/usr/share/elasticsearch/config/elasticsearch.keystore. In order to providethe Docker container with the password at startup, set the Docker environmentvalue KEYSTORE_PASSWORD to the value of your password. For example, a dockerrun command might have the following options:
In some environments, it might make more sense to prepare a custom image that containsyour configuration. A Dockerfile to achieve this might be as simple as:
You could then build and run the image with:
Some plugins require additional security permissions.You must explicitly accept them either by:
Attaching a tty when you run the Docker image and allowing the permissions when prompted.
Inspecting the security permissions and accepting them (if appropriate) by adding the --batch flag to the plugin install command.
See Plugin managementfor more information.
You now have a test Elasticsearch environment set up. Before you startserious development or go into production with Elasticsearch, you must do some additionalsetup:
Learn how to configure Elasticsearch.
Configure important Elasticsearch settings.
Configure important system settings.
« Install Elasticsearch with Windows MSI InstallerInstall Elasticsearch on macOS with Homebrew »
Most Popular
-->
This section lists terms and definitions you should be familiar with before getting deeper into Docker. For further definitions, see the extensive glossary provided by Docker.
Container image: A package with all the dependencies and information needed to create a container. An image includes all the dependencies (such as frameworks) plus deployment and execution configuration to be used by a container runtime. Usually, an image derives from multiple base images that are layers stacked on top of each other to form the container's filesystem. An image is immutable once it has been created.
Dockerfile: A text file that contains instructions for building a Docker image. It's like a batch script, the first line states the base image to begin with and then follow the instructions to install required programs, copy files, and so on, until you get the working environment you need.
Brew Docker-machine-driver-xhyve
Build: The action of building a container image based on the information and context provided by its Dockerfile, plus additional files in the folder where the image is built. You can build images with the following Docker command:
Container: An instance of a Docker image. A container represents the execution of a single application, process, or service. It consists of the contents of a Docker image, an execution environment, and a standard set of instructions. When scaling a service, you create multiple instances of a container from the same image. Or a batch job can create multiple containers from the same image, passing different parameters to each instance.
Volumes: Offer a writable filesystem that the container can use. Since images are read-only but most programs need to write to the filesystem, volumes add a writable layer, on top of the container image, so the programs have access to a writable filesystem. The program doesn't know it's accessing a layered filesystem, it's just the filesystem as usual. Volumes live in the host system and are managed by Docker.
Tag: A mark or label you can apply to images so that different images or versions of the same image (depending on the version number or the target environment) can be identified.
Multi-stage Build: Is a feature, since Docker 17.05 or higher, that helps to reduce the size of the final images. In a few sentences, with multi-stage build you can use, for example, a large base image, containing the SDK, for compiling and publishing the application and then using the publishing folder with a small runtime-only base image, to produce a much smaller final image.
Docker Machine Xhyve Game
Repository (repo): A collection of related Docker images, labeled with a tag that indicates the image version. Some repos contain multiple variants of a specific image, such as an image containing SDKs (heavier), an image containing only runtimes (lighter), etc. Those variants can be marked with tags. A single repo can contain platform variants, such as a Linux image and a Windows image.
Registry: A service that provides access to repositories. The default registry for most public images is Docker Hub (owned by Docker as an organization). A registry usually contains repositories from multiple teams. Companies often have private registries to store and manage images they've created. Azure Container Registry is another example.
Multi-arch image: For multi-architecture, it's a feature that simplifies the selection of the appropriate image, according to the platform where Docker is running. For example, when a Dockerfile requests a base image mcr.microsoft.com/dotnet/sdk:5.0 from the registry, it actually gets 5.0-nanoserver-1909, 5.0-nanoserver-1809 or 5.0-buster-slim, depending on the operating system and version where Docker is running.
Docker Hub: A public registry to upload images and work with them. Docker Hub provides Docker image hosting, public or private registries, build triggers and web hooks, and integration with GitHub and Bitbucket.
Azure Container Registry: A public resource for working with Docker images and its components in Azure. This provides a registry that's close to your deployments in Azure and that gives you control over access, making it possible to use your Azure Active Directory groups and permissions.
Docker Trusted Registry (DTR): A Docker registry service (from Docker) that can be installed on-premises so it lives within the organization's datacenter and network. It's convenient for private images that should be managed within the enterprise. Docker Trusted Registry is included as part of the Docker Datacenter product. For more information, see Docker Trusted Registry (DTR).
Docker Community Edition (CE): Development tools for Windows and macOS for building, running, and testing containers locally. Docker CE for Windows provides development environments for both Linux and Windows Containers. The Linux Docker host on Windows is based on a Hyper-V virtual machine. The host for Windows Containers is directly based on Windows. Docker CE for Mac is based on the Apple Hypervisor framework and the xhyve hypervisor, which provides a Linux Docker host virtual machine on macOS X. Docker CE for Windows and for Mac replaces Docker Toolbox, which was based on Oracle VirtualBox.
Docker Enterprise Edition (EE): An enterprise-scale version of Docker tools for Linux and Windows development.
Compose: A command-line tool and YAML file format with metadata for defining and running multi-container applications. You define a single application based on multiple images with one or more .yml files that can override values depending on the environment. After you've created the definitions, you can deploy the whole multi-container application with a single command (docker-compose up) that creates a container per image on the Docker host.
Cluster: A collection of Docker hosts exposed as if it were a single virtual Docker host, so that the application can scale to multiple instances of the services spread across multiple hosts within the cluster. Docker clusters can be created with Kubernetes, Azure Service Fabric, Docker Swarm and Mesosphere DC/OS.
Docker Machine Xhyve Tool
Orchestrator: A tool that simplifies management of clusters and Docker hosts. Orchestrators enable you to manage their images, containers, and hosts through a command-line interface (CLI) or a graphical UI. You can manage container networking, configurations, load balancing, service discovery, high availability, Docker host configuration, and more. An orchestrator is responsible for running, distributing, scaling, and healing workloads across a collection of nodes. Typically, orchestrator products are the same products that provide cluster infrastructure, like Kubernetes and Azure Service Fabric, among other offerings in the market.
0 notes
Text
Parallels Download For Mac

Free Parallels Download For Mac
Parallels For Windows
Parallels Download Free
Download Parallels Desktop 2017 For Mac
Parallels Server 4.0 - Run multiple Mac, Windows, and Linux virtual servers. Download the latest versions of the best Mac apps at safe and trusted MacUpdate Download, install, or update Parallels Server for Mac from MacUpdate. 1-16 of 514 results for 'parallels for mac' Customers ultimately bought. Best Selling. Parallels Desktop 14 for Mac. By Parallels Software. $79.99 $ 79 99 Prime. 3.4 out of 5 stars 4. Mac Download. $99.99 $ 99 99. Parallels Desktop 11 for Mac Aug 19, 2015. By Parallels Software. Mac Key Card. $21.40 $ 21 40 Prime. FREE Shipping on eligible.
Download Parallels Desktop 2017 For Mac Latest Version – Parallels Desktop for Mac 2017 is the first remedy that offers Apple users the capability to run Windows, Linux or other operating system as well as their crucial applications at the same time as Mac OS X on any Intel-powered iMac, Mac Mini, MacBook or MacBook Pro. Unlike dual-boot solutions, where individuals should completely shut down Mac OS X and sustain a full OS start-up cycle to access an important application, Parallels Desktop computer for Mac 2017 equips customers with the capacity to run important Windows programs like Overview, Accessibility, Net Explorer and all various other applications without having to give up the functionality and also performance of their Mac OS X machine also for a couple of minutes.
Parallels for MAC free. download full version is an amazing that deals with simple user interface and easy to use. It relieved the advanced form after this brief timeframe and furthermore, that is new to work area virtualization pc programming for Mac PCs.
Parallels Desktop for Mac Pro Edition is the easiest and most powerful application to run Windows on Mac for developers, testers, and experienced power users. Specifically tailored for users who need the best performance and extended functionality for running non-Mac apps on Mac.
Parallels Desktop Features:
Parallels Desktop The easiest, fastest, as well as the majority of powerful option for running Windows on Mac without rebooting. The # 1 selection of Mac customers for over 8 years, with over 5 million copies offered.
Ready for OS X Yosemite Totally optimized and improved for OS X Yosemite! Currently use great functions like click to call with iPhone, send with iMessage, and more from Windows apps.
Switching from PC to Mac? We make it easy to get all your files, applications, internet browser book markings and also even more from your COMPUTER to your Mac. Just follow our Wizards.
Effective Efficiency Support for 16vCPUs and also 64 GB of RAM lets you run even one of the most demanding applications easily. We won’t slow you down.
Run any type of Windows Applications on Mac Usage Net Traveler, Windows Media Gamer, Accessibility as well as 100s of other applications not readily available on the Mac.
One click adjusting While we set up your Windows virtual equipment, we’ll immediately tune it wherefore you’ll utilize it for the most: productivity applications, style, development or video games.
It’s not just for Windows Support for running a wide variety of running systems including OS X Mavericks, Windows 8.1 & 7, Linux as well as Google Chrome means you can do almost anything on your Mac.
Mac coolness in Windows Applications Introduce Windows apps from the Dock, usage OS x gestures in Windows applications, as well as copy & paste and also drag & drop between Mac and also Windows.
Read :

Latest Version: Parallels Desktop 12.1.2.41525
Operating System : Windows XP / Windows XP 64 bit / Windows Vista / Windows Vista 64 bit / Windows 7 / Windows 7 64 bit / Windows 8 / Windows 8 64 bit / Windows 10 / Windows 10 64 bit / Mac
Download Parallels Desktop 2017 For Mac Latest Version
Supported versionsDonwloadParallels Desktop 2017 for Windows XP / Vista / Windows 7 (32/64 bit)DownloadParallels Desktop 2017 for Windows 8 / Windows 10 (32/64 bit)DownloadParallels Desktop 2017 for Max OSDownload
Read Also :
Posted in Mac OS by admin On March 13, 2016. 4 Comments
Parallels Desktop 11.1.3 Full + Crack Mac is the ultimate solution to run your favorite Windows apps on your Mac effortlessly. Parallels Desktop 11 latest version is an emulation program made specifically for Mac users. It is considered the best competitor to Vmware Fusion Pro and Vmware Workstation; that have very similar features to allow users to run different operating systems designed for windows to work on your Mac computer. When comparing system virtualization technologies of the fore-mentioned programs, we clearly notice that Parallels Desktop 11 is rated much higher than Vmware Fusion Pro 2015 and VirtualBox in various types of benchmarks due to better optimization. Split View is another great feature that is ideal for multitasking, as it makes it possible for users to run more than one application all at the same time, without having to switch windows. Parallels Desktop 11CrackMultilingual comes in many languages such as Portuguese, Italian, English, Russian, French, Spanish, Chinese.
Parallels Desktop 11 Full Crack Mac Activation Key Features:
– Ability to access thousands of Windows-only apps on your Macintosh – The program allows you to run any Windows program on your Mac, such as, Microsoft Office, Windows Xp, Windows 7, FreeBSD, PC Games, Windows 8, Windows Server, Linux, Solaris. – Full integration with some very popular tools such as Chef, Docker and Jenkins. – The best way to play Windows games on Mac without having to install standalone softwares such as Bootcamp. – Network performance has now been massively enhanced for faster connection and response time. – Possibility to absolutely do anything you want to do on and run Windows applications on a MacBook Pro.
Parallels Desktop 11 Full for Mac Instructions:
Free Parallels Download For Mac
1- First you will need to disconnect your internet connection
Parallels For Windows
3- Run the program then type anything in the box, then press continue
Parallels Download Free
iZotope Neutron Advanced 2 Full + Crack
iZotope Neutron Advanced 2 Full Crack Latest version
AnyTrans 6.3.6 Mac iOS Full
AnyTrans 6.3.6 Mac iOS Full version is an application
Waves Complete v9.6 2016 RTAS VST Mac OSX + Win
Waves Complete v9.6 2016 AAX RTAS VST VST3 Mac
0 notes
Photo

Babylon.js 4.0, Electron 5.0, and standing up for the ternary operator
#435 — May 3, 2019
Read on the Web
JavaScript Weekly

Babylon.js 4.0: The (Very) Powerful WebGL Graphics Engine — Such a significant release that they’ve released a 2 minute video trailer for it! With 4.0 Babylon has gone fully modular, so it’s more efficient than ever to distribute to end users. Want to play? Enjoy this editable live demo.
Microsoft
Visual Studio Code Previews Support for 'Remote Development' — The VS Code editor is getting an exciting new feature, the ability to work directly with remote workspaces (running either WSL, Docker containers, or physical machines or VMs over SSH).
VS Code Team
Using Competency Mapping to Unlock Skills in Your Org — Free, Online Talk - May 15th.
Big Nerd Ranch sponsor
Electron 5.0.0 Released — Just 3 months after 4.0, Electron 5, the popular system for building Node and Web technology based desktop apps, is here. It’s mostly a dependency bump release, but with Node 12 and Chromium 73 now under the hood, that’s no bad thing.
Electron.js Team
Editor.js: A Block-Styled Editor with JSON Output — Typical WYSIWYG editors output raw HTML markup but Editor.js keeps things organized into ‘blocks’ which are then returned in structured JSON which makes the content easier to sanitize or transform.
CodeX
Shimport 1.0: Use JavaScript Modules in All Browsers? — Allows you to use JS modules in all browsers, including dynamic import(). We first linked this when it was entirely experimental but it’s just had its 1.0 release, so have a play.
Rich Harris
Easy Automatic npm Publishes — npm and Node powerhouse Isaac Z. Schlueter says he hasn’t “manually typed npm publish in a while” and explains how he’s semi-automated his npm publishing process.
Isaac Z. Schlueter
💻 Jobs
JavaScript Developer at X-Team (Remote) — Join the most energizing community for developers. Work from anywhere with the world's leading brands.
X-Team
Senior JavaScript Developer - Kontist (Remote) — Join our team of full-stack JavaScript developers and shape the future of banking.
Kontist
Have You Tried Vettery? — Vettery specializes in tech roles and is completely free for job seekers. Create a profile to get started.
Vettery
📘 Tutorials and Opinions

In Defense of the Ternary Statement — Code similar to expression ? true_result : false_result is known as a ternary expression. Much maligned, is it possible to use them in JavaScript without getting into an unreadable mess?
Burke Holland
'I just shipped Promise.allSettled in Chrome 76' — Promise.allSettled is like Promise.all but doesn’t short-circuit if any supplied promise is rejected.
Sathya Gunasekaran on Twitter
New Features in Node 12 You Shouldn't Miss — Node 12 came out last week, and this post reflects on some of the new features.
Máté Huszáarik
▶ How Facebook is Building the New Facebook.com with React, GraphQL and Relay — The forthcoming redesign is fully powered by React and Relay and this 35 minute talk digs into the technicalities.
Facebook for Developers
Replace Tedious Coding with MongoDB Stitch and Public APIs
MongoDB sponsor
The Perfect Unit Test — You might recognize Jack’s name if you’ve been a long time subscriber as he used to write a lot of great posts. He’s back now with some basic tips on how to craft better unit tests.
Jack Franklin
Deeply Understanding async and await with Examples — One more for beginners, but it’s a perennial topic covered well.
Arfat Salman beginner
Array.push is 945x Faster Than Array.concat? — Also worth checking out the comments on this one.
Shi Ling
Why I Prefer React Over Vue Sebastian De Deyne
An Introduction to Vue.js Render Functions (with Examples) Charles Ouellet
5 Things You Didn’t Know About React DevTools Kristofer Selbekk
Serving Vue.js Apps on GitHub Pages Muhammad Usman
🔧 Code and Tools
Textblock: Set Continuously Responsive Typography — A JS library that adjusts the size, leading, line height, and other factors of text to make it ‘continuously responsive’.
Glyphic
sql.js: SQLite Compiled to JavaScript (and Webassembly) — Naturally experimental, 1.0 just dropped with Webassembly support and based upon the latest SQLite version (3.28.0). Want to play? Here’s a live demo.
Alon Zakai
Automate Your Code Reviews — Codacy flags errors in your code so you can fix them quickly, directly from your current workflow. Get started today.
Codacy sponsor
Relay 4.0.0 Released: A Framework for Building Data-Driven React Apps — “Simply declare your data requirements using GraphQL and let Relay figure out how and when to fetch your data.”
Facebook
jQuery-CSV: A jQuery CSV Parser Plugin — A jQuery plugin(!) you say? Yes, but this is a very well optimized, battle tested, and spec compliant CSV parser and its 1.0 release today “marks the first – and likely only – stable LTS release of this library” so.. congratulations are in order.
Evan Plaice
Glide: A Dependency-Free ES6 Slider and Carousel — A lightweight, flexible and fast straightforward slider. Demo here.
Jędrzej Chałubek
jQuery 3.4.1: A Bugfix Release — Bugs squashed include focus/blur triggering in IE, checking element attachment in iOS 10.0-10.2, and loading with AMD. 3.4.0 was released last month if you missed that.
Timmy Willison
DeepScan Makes Your JavaScript Better — Use this static analysis service to find problems in your JavaScript, TypeScript, React & Vue on GitHub. Try it free.
DeepScan sponsor
vue-qrcode-reader: Vue.js Components for Detecting and Decoding QR Codes Niklas Gruhn
Dotenv 8.0: Load Environment Variables From `.env` in Node Scott Motte
Ember Charts 2.0: An Easy to Use Charting Library for Ember.js Addepar
by via JavaScript Weekly http://bit.ly/2ZVwMXp
0 notes
Text
Using Enhanced Mode Ubuntu 18.04 for Hyper-V on Windows 10
I run Windows as my daily driver but I use WSL (Windows Subsystem for Linux) all day long but WSL is just the command-line and has some perf issues with heavy file system work. I use Docker for Windows which works amazingly and has it good perf but sometimes I want to test on a full Ubuntu Desktop.
ASIDE: No joke. My Linux/Ubuntu bona fides go back a while. Here's me installing Ubuntu 10.4 on Windows 7 over 8 years ago. Umuntu ngumuntu ngabantu!
To be frank, historically Ubuntu has sucked on Window's Hyper-V. If you wanted to get a higher (read: usable) resolution it would take a miracle. If you wanted shared clipboards or shared disk drives, well, again, miracle or a ton of manual set up. It's possible but it's not fun.
Why can't it be easy? Well, it is. I installed the Windows 10 "Fall Creators Update" - yes the name is stupid. It's Windows 10 "1809" - that's 2018 and the 9th month. Just type "Winver" from the Start menu. You may have "1803" from March. Go update.
Windows 10 includes Hyper-V Quick Create which has this suspiciously short list under "Select an operating system." Anytime a list has 1 or 2 items and some whitespace that means it will someday have n+1 list items.
Recently Ubuntu 18.04.1 LTS showed up in this list. You can quickly and easily create an Ubuntu VM from here and it's all handled, downloading, network switch, VM create, etc.
I dig it. So click create, start it up...get to the set up screen. Now, here, make sure you click "Require my password to login." What we want to do won't work with "Log in Automatically" and you don't want that anyway.
After you've created your VM and got it mostly setup, close the Hyper-V client window. Just X it out. The VM is still running of course.
Go over to Hyper-V Manager and right click on it and "Connect."
You'll see a resolution dialog...pick one! Go crazy! Do be aware that there are issues on 4k display but you can adjust within Ubuntu itself.
Now, BEFORE you click Connect, click "Show Options" and then "Local Resources." Under here, uncheck Smart Cards and Check "Drives."
Click OK and Connect...and you get this weird dialog! You're actually RDP'ing into Ubuntu! Rather than using the historical weird Hyper-V Client stuff to talk to Ubuntu and struggle with video cards and resolutions, here you are literally just Remote Desktoping into Ubuntu using integrated open source xrdp!
Login with your name and password (remember before when I said don't automatically login? This is why.)
What about Dynamic Resizing?
Here's an even better possible future. What we REALLY want (don't we, Dear Reader) is Dynamic Resolution and Resizing without Reconnection! Today you can just close and reconnect to change resolutions but I'd love to just resize the Ubuntu window like I do Windows 7/8/10 VM client windows.
The feature "Dynamic resolution update" was introduced in RDP 8.1. It enables to resize screen resolution on-the-fly.
Since we are using xrdp and that's open source over https://github.com/neutrinolabs/xrdp/ AND there's even a issue about this AND a lovely person has the code in their own branch and agreed to possibly upstream it maybe we can start using it and this great feature will just light up for folks who use Hyper-V Quick Create. Certainly we're talking weeks and months here (unless you want to help) but the lion's share of the work is done. I'm looking forward to resizing Ubuntu VMs dynamically.
What's in Enhanced Mode Today?
Back to today! You can read about how Linux VMs (Ubuntu or Arch) are set up in this GitHub repo https://github.com/Microsoft/linux-vm-tools You can set them up yourself with scripts, but the nice thing about Hyper-V Quick Create is that the work is done for us to make these "enhanced session" RDP-friendly VMs. No need to fear, you can just read the scripts yourself.
I can connect quickly and Enhanced Mode VMs give me:
a shared clipboard
the resolution of my choice on connect
fast painting/video/scrolling
automatic shared-drives
Smooth and automatic mouse capture
Fantastic.
What about installing Visual Studio Code? Of course. And also .NET Core.NET Core, natch.
This took like 10 min and 8 of it was waiting for Hyper-V Create to download Ubuntu. Try it out!
Sponsor: Check out the latest JetBrains Rider with built-in spell checking, enhanced debugger, Docker support, full C# 7.3 support, publishing to IIS and more advanced Unity support.
© 2018 Scott Hanselman. All rights reserved.


Using Enhanced Mode Ubuntu 18.04 for Hyper-V on Windows 10 published first on https://brightcirclepage.tumblr.com/
0 notes
Text
Using Enhanced Mode Ubuntu 18.04 for Hyper-V on Windows 10
I run Windows as my daily driver but I use WSL (Windows Subsystem for Linux) all day long but WSL is just the command-line and has some perf issues with heavy file system work. I use Docker for Windows which works amazingly and has it good perf but sometimes I want to test on a full Ubuntu Desktop.
ASIDE: No joke. My Linux/Ubuntu bona fides go back a while. Here's me installing Ubuntu 10.4 on Windows 7 over 8 years ago. Umuntu ngumuntu ngabantu!
To be frank, historically Ubuntu has sucked on Window's Hyper-V. If you wanted to get a higher (read: usable) resolution it would take a miracle. If you wanted shared clipboards or shared disk drives, well, again, miracle or a ton of manual set up. It's possible but it's not fun.
Why can't it be easy? Well, it is. I installed the Windows 10 "Fall Creators Update" - yes the name is stupid. It's Windows 10 "1809" - that's 2018 and the 9th month. Just type "Winver" from the Start menu. You may have "1803" from March. Go update.
Windows 10 includes Hyper-V Quick Create which has this suspiciously short list under "Select an operating system." Anytime a list has 1 or 2 items and some whitespace that means it will someday have n+1 list items.
Recently Ubuntu 18.04.1 LTS showed up in this list. You can quickly and easily create an Ubuntu VM from here and it's all handled, downloading, network switch, VM create, etc.
I dig it. So click create, start it up...get to the set up screen. Now, here, make sure you click "Require my password to login." What we want to do won't work with "Log in Automatically" and you don't want that anyway.
After you've created your VM and got it mostly setup, close the Hyper-V client window. Just X it out. The VM is still running of course.
Go over to Hyper-V Manager and right click on it and "Connect."
You'll see a resolution dialog...pick one! Go crazy! Do be aware that there are issues on 4k display but you can adjust within Ubuntu itself.
Now, BEFORE you click Connect, click "Show Options" and then "Local Resources." Under here, uncheck Smart Cards and Check "Drives."
Click OK and Connect...and you get this weird dialog! You're actually RDP'ing into Ubuntu! Rather than using the historical weird Hyper-V Client stuff to talk to Ubuntu and struggle with video cards and resolutions, here you are literally just Remote Desktoping into Ubuntu using integrated open source xrdp!
Login with your name and password (remember before when I said don't automatically login? This is why.)
What about Dynamic Resizing?
Here's an even better possible future. What we REALLY want (don't we, Dear Reader) is Dynamic Resolution and Resizing without Reconnection! Today you can just close and reconnect to change resolutions but I'd love to just resize the Ubuntu window like I do Windows 7/8/10 VM client windows.
The feature "Dynamic resolution update" was introduced in RDP 8.1. It enables to resize screen resolution on-the-fly.
Since we are using xrdp and that's open source over https://github.com/neutrinolabs/xrdp/ AND there's even a issue about this AND a lovely person has the code in their own branch and agreed to possibly upstream it maybe we can start using it and this great feature will just light up for folks who use Hyper-V Quick Create. Certainly we're talking weeks and months here (unless you want to help) but the lion's share of the work is done. I'm looking forward to resizing Ubuntu VMs dynamically.
What's in Enhanced Mode Today?
Back to today! You can read about how Linux VMs (Ubuntu or Arch) are set up in this GitHub repo https://github.com/Microsoft/linux-vm-tools You can set them up yourself with scripts, but the nice thing about Hyper-V Quick Create is that the work is done for us to make these "enhanced session" RDP-friendly VMs. No need to fear, you can just read the scripts yourself.
I can connect quickly and Enhanced Mode VMs give me:
a shared clipboard
the resolution of my choice on connect
fast painting/video/scrolling
automatic shared-drives
Smooth and automatic mouse capture
Fantastic.
What about installing Visual Studio Code? Of course. And also .NET Core.NET Core, natch.
This took like 10 min and 8 of it was waiting for Hyper-V Create to download Ubuntu. Try it out!
Sponsor: Check out the latest JetBrains Rider with built-in spell checking, enhanced debugger, Docker support, full C# 7.3 support, publishing to IIS and more advanced Unity support.
© 2018 Scott Hanselman. All rights reserved.


0 notes
Text
Best Pixel Art Tools to Create Stunning Pixel Artwork
Pixel art is a digital art created with the help of different software, where images are modified on the pixel level. Pixel art was generally used in creating video games in an 8-bit and 16-bit computer. Today’s video games are more realistic than old pixel video games, but many designers still prefer pixel art.
In this article, we are listing some stunning tools by which you can create fantastic pixel artwork.
GrafX2
GrafX2 is a 256-color program tool that comes with 60 resolutions. GrafX2 is inspired by Amigo Programs Deluxe paint and brilliance. GrafX2 has both standard and advanced tools. You can animate with multiple frames, and it can be saved as GIF.
You can also reorder the colors palette without making any changes in the picture. You can also play with gradients and easily create a screen mockup by assembling and copying tiles. You can also create extensive shortcuts and control everything with the keyboard.
GraftX2’s 2007 is a new updated version with some new features.
Pyxel Edit
Pyxel Edit is a pixel editor tool to make tilesets and animations easy. The Pyxel edit’s interface is very much similar to the Photoshop application. It has a lot of features for artists who want to work with tiles. It enables you to draw in one tile, and it gets updated instantly. The tile instances can be rotated as well.
You can export your animations as sprite sheets or GIFs. It can import images of tilesets and identify all unique tiles instantly. It enables you to modify and rearrange old sets as well.
Pyxel edit enables you to export your tilesets in XML, JSON, and plain text format.
Krita
Krita is a free painting program made by artists to create an economical art tool that everybody can access. Krita has a clean and easy to use interface. It has over 30 dockers, and they can be customized as per your workflow. It has different light color themes and a customizable layout.
They have a set of professional brushes to add more effects and brush stabilizers to smoothen the graphic. You can create comic panels and add text to your artwork because of its in-built vector tools. You can also create your brush sets and share your bundles with others.
Aseprite
Aseprite is an animated sprite editor and pixel art tool. You can organize your layers, tag frames, and animate with Aseprite. You can alter playback modes and see other frames for reference.
You can also choose various onion skin modes. You can also resize your palette and modify the color harmonies. It also offers other features like shading mode, pixel-perfect stroke, tiled mode, custom brushes, and RotSprite rotation.
You can save your artwork in animated GIF, sprite sheets, and PNG formats. You can also recover your sprite after a crash. Aseprite is compatible with Windows, macOS, Ubuntu, and you can get it for US$19.99.
GIMP
GIMP is one of the most popular tools in pixel art and photo editing because of its customizable options and plugins. GIMP can be a little difficult for beginners, but once you understand how to use it, you can create some stunning artworks.
You can do image manipulation and transform your images into unique art pieces. GIMP can be used for designing icons, graphical elements, and art for the user interface.
Piskel
Piskel tool is animated sprites and pixel art tool. Piskel allows you to see your animation in real-time and can adjust the frame delay. Piskel supports various export modes for your artwork like an animated GIF, PNG, zip file, and sprite sheets.
You can also make your gallery private and public as per your need. You can access Piskel on your desktop and as an offline application for free on Windows, OSX, and Linux.
GraphicsGale
GraphicsGale is an easy-to-use animated graphic editor to create stunning pixel artworks. It enables you to preview your animation in real-time. You can use multiple layers while drawing, and you can see your previous and next frames using onion skin.
You can create your art from scratch, or you can use Graphic Gale’s TWAIN imaging support to import images from your scanner and other devices. It supports multiple formats like .ico, .gif, .avi, and more.
You can also change the colors of palettes that can help you create your artwork more quickly and easily. You can download graphics gale for free and start creating stunning pixel artwork.
Pixilart
Pixilart is a free and easy-to-use pixel art tool. It enables you to create animations, icons, gaming sprites, and share it across all social networks.
Pixilart has advanced privacy features like blocking and reporting other users, no private chats. The content which is not socially acceptable will be removed. All drawings are screened before making it public.
Conclusion
No matter how realistic new age games look like, the charm of retro games does not fade. Retro-games are still prevalent in all generations. If you want to try your hands on creating some stunning pixel art, then the tools mentioned above will help you in many ways. Whether you are a beginner or an experienced designer, you can easily access these tools and create some stunning pixel art pieces.
Eva Winget is a Microsoft Office expert and has been working in the technical industry since 2006. As a technical expert, Eva has written technical blogs, manuals, white papers, and reviews for many websites such as office.com/setup.
SOURCE: Best Pixel Art Tools to Create Stunning Pixel Artwork
0 notes