#Dowel Fit Guide
Explore tagged Tumblr posts
Visit Tumblr Blog
Explore Tumblr blogs with no restrictions, modern design and the best experience.
Last Seen Tumblr Blogs


Fun Fact
After the announcement of the deal with Yahoo!, there were 170K signatures of unhappy Tumblr users petitioning to prevent the sale in 2013.
Text
How Kapila Steel’s Dowel Bar Standards Align with Global Construction Codes

Dowel bars have left a vital detail in civil engineering, mainly for pavements and urban slabs. These unassuming metal rods silently deliver the responsibility of transferring hundreds between adjoining slabs, minimizing joint deflection and stopping cracking. Their performance plays an instantaneous role in determining the energy, durability, and lifespan of a concrete structure. As construction standards tighten globally, so does the scrutiny over bar dowel satisfactory and compliance. This is where the role of reliable TMT bar manufacturers, like Kapila Steel, becomes critically important.
The moment any infrastructure project begins to scale, consistency in material strength and code alignment becomes non-negotiable. Dowel bars aren't just metal pieces—they’re precision-engineered elements that must meet exact tolerances. The early-stage selection of bar dowel products can influence the long-term success of pavements, industrial floors, and airport runways. In this scenario, engineers seek not just suppliers, but dependable allies.
Raising the Bar in Dowel Precision
Kapila Steel manufactures dowel bars with consistent diameter, length, and finish, ensuring seamless load transfer and preventing pavement distress. These bars are fabricated with exacting standards that reflect internationally recognized norms. Whether it's ASTM A615/A615M or BS 4449, Kapila’s production process mirrors the rigorous checks and balances that top global construction codes demand.
A Focus on Metallurgical Integrity
Material science lies at the heart of performance. Kapila Steel’s dowel bars are manufactured using advanced metallurgical techniques that ensure high tensile strength and ductility. Through controlled heat treatment and chemical balancing, the bars can endure cyclic loading, impact pressure, and even harsh weathering without fatigue.
Such attributes are crucial when aligning with Eurocode 2 or Indian IRC specifications. These standards emphasize not only physical dimensions but also fatigue resistance, corrosion tolerance, and load-sharing effectiveness. Kapila’s production plant adheres to these principles without compromise.
TMT Bar Manufacturers Who Think Globally, Deliver Locally
While the spotlight is on dowel bars, it’s important to understand that TMT bar manufacturers who get the details right here tend to apply the same ethos across all products. This is evident in how Kapila Steel handles their entire TMT lineup—built for resilience, earthquake resistance, and superior bonding with concrete. The global codes they follow for dowel bar production echo across their TMT bar solutions, creating a consistent reliability engineers can count on.
When Standards Meet Supply Chain Reliability
It's one thing to manufacture dowel bars that meet global standards. It's another to deliver them reliably, on time, and at scale. Kapila Steel operates with supply chain agility, enabling project managers to meet their construction timelines without compromising on material compliance.
The availability of bar dowel products, backed by thorough documentation and certificates of compliance, brings peace of mind to stakeholders who cannot afford risks in large-scale construction projects. It’s this harmony between engineering discipline and logistic efficiency that gives Kapila its industry edge.
A Smarter Choice for Builders and Engineers
In the end, aligning with global construction codes isn’t about ticking boxes—it’s about instilling confidence. Whether it's highway expansion, industrial floors, or mass housing projects, the quality of dowel bars can define the success or failure of the structure over time.
Kapila Steel stands as a quiet partner in this journey—through dowel bars that meet international standards and through a commitment to precision that’s visible in every delivery.
Conclusion
Global construction codes exist to ensure durability, safety, and structural integrity. Kapila Steel’s dowel bars don’t just comply—they contribute. Through manufacturing excellence, rigorous quality checks, and a mindset aligned with international engineering demands, Kapila Steel offers much more than metal rods. It delivers the foundation for lasting trust and construction that endures.
#Dowel Bar Specs#Global Codes Fit#Kapila Steel Bars#Bar Strength Test#Concrete Dowels#Code-Ready Steel#Global Bar Norms#Bar Quality Check#Steel Bar Grade#Kapila Bar Tech#Dowel Fit Guide#Bar Code Match#ISO Steel Bars#Bar Design Code#Durable Dowels#Code Safe Bars#Global Build Fit#Bar Spec Sheet#Dowel Compliance#Steel Code Align
0 notes
Text
Why Bar Dowels Are Gaining Popularity in Infrastructure Projects

Bar dowel technology is becoming a staple in modern construction sites across the country. Alongside binding wire and dowel bars, this trio has reshaped how engineers approach long-term strength, load transfer, and joint stability in concrete infrastructure.
What Exactly Is a Bar Dowel?
It’s a simple but powerful reinforcement component: a short steel rod inserted into concrete slabs to allow smooth load distribution across joints. When vehicles or heavy machinery pass over concrete surfaces, bar dowels absorb and transfer the weight evenly, preventing cracks or displacement.
Binding wire is used to keep these dowels precisely aligned during the pouring phase. Meanwhile, dowel bars complement bar dowels by managing thermal expansion and keeping slab sections from shifting under pressure.
The Shift from Traditional Methods
Older techniques relied heavily on expansion joints, which allowed motion but did little to boost structural continuity. This often led to cracked slabs, misaligned joints, and accelerated protection. The bar dowel system offers a smarter solution: movement flexibility and structural strength.
That’s why contractors and engineers working on highways, warehouses, airport runways, and parking structures are shifting toward bar dowel setups. They simply outperform outdated reinforcement methods.
Why This Matters in Infrastructure
Every slab in an infrastructure project is like a puzzle piece. If the pieces shift or fail to align, the entire system becomes vulnerable. Bar dowels provide a link among those slabs—making sure they function collectively as one stable unit. This now not only improves balance but also additionally extends the lifespan of the floor.
Dowel bars offer similar benefits, particularly in pavement applications. But bar dowels are often preferred in applications that involve repetitive loads or require greater resistance to joint faulting.
Installation is Quick, but the Benefits are Long-Term
One reason bar dowels are gaining ground is their ease of installation. They don’t require extensive rebar modification or special equipment. Once inserted and tied in place using binding wire, they’re ready for concrete pour.
This saves contractors both time and labor costs. Better yet, bar dowels reduce the need for long-term repairs, offering significant ROI over the lifecycle of the project.
Custom Options from Trusted Suppliers
As demand increases, manufacturers are responding by offering a wide range of bar dowel sizes, coatings (like epoxy for corrosion resistance), and material grades. Whether a project requires standard diameters or specific lengths, bar dowels are now readily available to match various engineering needs.
Top-quality manufacturers also provide dowel bars and binding wire to complement the system—ensuring optimal performance in all conditions, from coastal humidity to heavy-traffic zones.
Not Just Strong—Smart and Sustainable
Using bar dowels isn't just about performance. It’s also a sustainability move. Fewer joint failures mean fewer repairs. Less repair work means lower material consumption. And that makes bar dowels a smart choice for builders focused on long-term environmental and structural responsibility.
Where They're Used
Bar dowels are already making a difference in:
National highway expansion projects
Airport runway reinforcements
Industrial flooring installations
Railway platform developments
Multi-level parking structures
In each case, bar dowels, dowel bars, and binding wire play interconnected roles in creating surfaces that can endure decades of wear.
Choosing the Right System
The final decision often lies in performance versus cost. But with bar dowels, engineers get both. They offer enhanced load transfer, reduced maintenance, and support sustainable practices. When combined with high-quality dowel bars and reliable binding wire, the entire setup becomes a strong, adaptable foundation for any structure.
#Bar Dowels Use#Dowel Bars Info#Bar Dowels Rise#Dowel Steel Use#Infra Bar Dowels#Bar Dowels Trend#Bar Dowels Role#Dowel Tech 2025#Steel Bars Guide#Road Joint Bars#Bar Dowel Facts#Smooth Bar Use#Bar Dowel Types#Dowel Bars Fit#Pavement Dowels#Bridge Dowel Use#Rebar vs Dowels#Bar Dowels Now#Bar Dowel Boom#Bar Dowels Aid
0 notes
Text
How To Choose The Perfect Hardwood Dining Table For Your Home?
A hardwood dining table is more than just a piece of furniture; it is a central gathering place for family meals, celebrations, and intimate moments. Choosing the right one can be a rewarding yet thoughtful decision, as this piece of furniture will be an integral part of your home for many years.
In this guide, we’ll discuss key factors to consider when selecting the perfect dining table for your space, style, and needs.
1. Assess the Size and Space
The first step in choosing the perfect dining table is determining the size that fits your space. A table should not overwhelm the room but provide enough seating and space for movement.
Measure the area: Ensure enough room around the table for comfortable seating and movement. A good rule is to leave at least three feet of space on all sides.
Seating capacity: Consider how many people you typically dine with. If you frequently entertain, consider an extendable table to accommodate additional guests.
Choosing the right size ensures the table will blend seamlessly with your room while offering the necessary functionality.
2. Choose the Right Shape
The shape of your custom made hardwood dining table in Melbourne plays an important role in the overall ambience and functionality of the room. Different shapes can impact both the flow and feel of your dining area.
Rectangular tables are ideal for larger spaces and provide ample seating.
Round or oval tables work well in smaller or square rooms, offering a more intimate and inviting atmosphere.
Square tables offer a modern look and are best for small dining areas.
By selecting the appropriate shape, you ensure that your table suits your space while enhancing the overall dining experience.
3. Select the Right Material
The material used in a dining table is crucial to its appearance and durability. Wood, especially hardwood, is timeless due to its natural beauty and longevity.
Oak: A classic option that offers a traditional, durable look.
Walnut: Known for its rich, dark hues, perfect for a sophisticated look.
Maple: Lighter in colour, ideal for modern, minimalist spaces.
Each wood type has distinct characteristics that can impact the table's overall aesthetic, so select one that complements your style.

4. Evaluate Durability and Craftsmanship
A dining table is a long-term investment, so durability and craftsmanship are key. Look for solid construction that can withstand years of use.
Check the joints: Solid craftsmanship with strong joints, such as dovetail or dowel, ensures longevity.
Finish quality: A protective finish enhances the table’s resilience against spills, stains, and wear while bringing out the wood's natural beauty.
Paying attention to these details ensures your dining table remains a functional and beautiful centrepiece for years.
5. Consider Style and Design
Your table should complement your home’s overall design. Whether you prefer modern minimalism or rustic charm, there’s a table to fit your aesthetic.
Modern styles: Opt for clean lines and light finishes that add a contemporary feel to your dining room.
Rustic or farmhouse: Look for distressed finishes or tables with thicker legs and a more textured surface.
Traditional style: Choose ornate carvings and rich finishes for an elegant, timeless look.
The right design will enhance your space, creating a cohesive and welcoming environment.
6. Set a Budget
While a hardwood dining table can be a significant investment, it is important to set a realistic budget that aligns with your expectations. Hardwood tables are more durable than other materials and offer long-term value.
Compare prices: Research similar tables to ensure you're getting good value.
Include additional costs: Remember to account for delivery fees or professional assembly if needed.
Setting a clear budget will help you narrow your options without compromising quality.
7. Test the Table’s Comfort and Functionality
Before making your final decision, testing the table for comfort and functionality is important.
Check the height: Ensure the table is appropriate for your chairs. The standard height for dining tables is between 28 to 30 inches.
Test the seating space: Make sure there’s enough space around the table for comfortable dining and room for your plates, glasses, and serving dishes.
Ensuring the table is comfortable and practical will make dining experiences more enjoyable.
Conclusion: Finding the Perfect Dining Table
Choosing the perfect dining table requires careful thought and attention to detail. By considering the size, shape, material, and overall design, you can select a piece that will serve as the heart of your home and enhance your dining space.
With the right hardwood dining table, you’ll enjoy a functional, beautiful addition to your home that will last many years.
#hardwood dining table#custom made hardwood dining table in Melbourne#custom made hardwood dining table#custom made dining table
0 notes
Text
Comprehensive Guide to Furniture Joints: Enhancing Durability and Minimizing Furniture Repair Times
In the realm of furniture construction and restoration, a nuanced understanding of various furniture joints is imperative. These joints are fundamental to the structural integrity and durability of furniture, as well as influencing the frequency and complexity of furniture repairs. This guide delves into the most prevalent types of furniture joints, elucidating their benefits and roles in enhancing the longevity and stability of furniture pieces.
Dovetail Joints
Distinguished by their interlocking, wedge-like tenons, dovetail joints are synonymous with high-quality furniture. Their design offers superior tensile strength, obviating the need for metallic fasteners. Predominantly utilized in drawer construction, dovetails are celebrated in both traditional and modern cabinetry for their robustness and aesthetic appeal.
Mortise and Tenon Joints
Regarded as one of the most ancient and dependable woodworking joints, the mortise and tenon consists of a tenon, which is a protruding end of wood, fitting snugly into a mortise, a cavity cut into a corresponding wood piece. This joint is extensively employed in the construction of chairs, tables, and other furniture requiring a sturdy framework, ensuring durability through mechanical strength.
Butt Joint
The butt joint represents the most basic form of wood joinery, where the ends of two wood pieces are aligned and joined directly. Although relatively weak on its own, it is commonly reinforced with adhesives, screws, or nails. This joint is preferred in minimalist furniture designs and simple frame constructions, where straightforward aesthetics are paramount.
Lap Joints
In a lap joint, two wood pieces overlap either fully or partially. This configuration offers enhanced strength compared to butt joints and increases the surface area available for adhesive applications, which strengthens the bond. Lap joints are adaptable and are utilized across a variety of woodworking projects, from structural frames to decorative cabinetry.
Dowel Joints
Dowel joints employ small wooden pins (dowels) inserted into aligned holes across adjoining wood pieces. This type of joint conceals the connecting mechanism, providing a visually appealing finish. Dowel joints are favored for their strength and aesthetic cleanliness, often replacing visible nails or screws, and are instrumental in reducing furniture repairs time due to their stability.
Pocket Hole Joints
Pocket hole joints are formed by drilling an angled hole into one piece of wood and securing it to another with a screw. This technique is prized for its rapid assembly and the robust, secure connection it offers. Pocket hole joints are prevalent in do-it-yourself furniture projects and scenarios where the joint's visibility is not a concern.
Conclusion
A thorough comprehension of different furniture joints is crucial for anyone engaged in woodworking or furniture maintenance. Proper selection and application of these joints not only enhance the durability and functionality of furniture but also have significant implications for furniture repairs time. By choosing the appropriate joint, craftsmen ensure that their creations endure both functionally and aesthetically over time.
0 notes
Text
Injection Mold Checklist
Excellence in manufacturing depends on injection frisbee quality. Our injection Mold Checklist simplifies this procedure, walking you through the necessary stages to uphold high standards. This checklist is an essential tool for any injection molding expert, as it includes all the necessary steps to optimize injection molding solutions, reduce errors, and increase productivity from original design to final inspection.
Mold appearance and dimension
Is the kind of water connector correct? Is there sufficient clearance in the hole for the water connector? The hole's outside border must be consistent and chamfered.
Indicate the water lines with "IN," "OUT," and neatly and legibly number them. For instance, INT1, OUT1.
Pneumatic or oil connection numbers must begin with the prefix "O" or "G," for example, G IN1, O IN1.
The gas, oil, and water plugs' screw threads all match the Tooling datasheet.
Are the KO pattern and size up to par?
The Locating ring's diameter and fastening type comply with the Tooling specification.
The tooling datasheet's sprue bushing sphere radius must be met.
The total size of the mold must satisfy the customer's press (tie bar space), and the clamping technique must satisfy the customer's demand.
When installing a mold that requires installation instruction, the cavity or core plate should be etched with an arrow that reads "UP."
Each part must have a unique number. Moreover, the standard mold datum needs to be etched.
It is not permitted to make any of the components within the home.
Using the right steel is important, and the molding injection company must submit the steel certification.
All connection screw threads, including K.O. and eyebolt holes, must be precise.
Wear plates should employ oil grooves whose designs adhere to client specifications.
The shut-off pieces must fulfill customer requirements and have a disparity in hardness.
Does Slide Gib require a dowel pin?
Are side locks properly purchased and installed?
Cycle Installing a counter as per the mold design sketch.
Make a vent opening for the guide bush.
Is a dustproof sheet required?
Are the slides assembled and properly fit the molding injection company?
The PL vent needs to be planned and cut. Is it directly cut to the part location and appropriate for parting?
Clearance space should be designed and created in the region beyond the portion wall. There is no need to invest in a grinding machine.
Sprue bushing should be OK and should not break.
Ejection, Return, Pull system and Removing
Smoothly ejecting, No unique sound, no get stick.
Lifter surfaces must be polished, lubricant slots must be made, and heat or nitride treatment must be applied (depending on the client's needs).
A & B plate guide pins, guide bushings, and ejector plate guide pins must satisfy client requirements.
Uneven ejector pins need to be placed in the molding injection company.
The ejecting plate ought to fully retract.
A flat-surfaced space block must be utilized for the ejecting stroke.
A return spring must be a normal part; it cannot be split or polished.
Does the material for the lifter, wedge block, and gib match the requirements of the customer? It must be heat-treated or nitride-treated.
Install a restricted switch on a hydraulic cylinder or slide.
The lifter stroke or slide must be sufficient to satisfy the requirements.
Both the ejector pin and the ejector plate must have the ejector number stamped on them.
Return pin top surfaces must be level and free of welding; bottom surfaces cannot have pillows or welding. The required hole clearance is 0.07 mm.
Unless otherwise noted, there should be 0.05mm of space between the B plate and the ejector guide pin (Conform to the molding injection company design specification).
With a sufficient stroke, the runner stripper plate moves smoothly.
The steel dimensions must be examined, and a steel check report must be submitted.
Cooling System
Water line seals must be leak-free, and utilize Teflon sealing tape.
Is the flow appropriate for cooling? To determine this, a flow metre must be used and the flow value recorded.
Cooling manifold installation must be done accurately and by client specifications.
The water baffle needs to fit the molding injection company specifications
Cold Runner System
Sprue bushing inside surface must be polished to design specifications.
It is necessary to polish the runner channel to the drawing standard.
For multi-molding injection company, the short-shot has to be tesmolding injection company.
Hot Runner System
Specifying the desired kind and size of sockets and installing safety settings is necessary.
Is there mold protection equipment placed on the outside of the connection box? The wiring must match the shop's given design.
To prevent breakage, wires must be bundled and covered with a plate.
When both connector sizes are the same, they must be carefully marked to prevent incorrect assembly.
Wires that are visible outside of the mold surface are prohibited.
The transition slot that allows the wire to pass through the plate and manifold must be rounded to prevent damage.
Does a mold-insulating plate exist? If not, has the consumer given their approval?
Mold Packing
The steel type, certification, and heat treatment must satisfy the client's needs.
Safety locks (at least two pieces) ought to fulfill the design specification, and a rest hole must be created.
The CD's files are full?
Are there any particular requirements for the outside surface of mold?
Are all the spare components filled up? And it must be supplied with a thorough list.
Mold must be wrapped in a plastic membrane.
After marking the positioning direction, spread mold # with lacquer.
Everything on the packing list must be packed.
Conclusion
In conclusion, obtaining consistent quality and operational efficiency requires the use of an injection mold checklist. You may drastically lower mistakes, raise the caliber of your output, and increase productivity by using this thorough guidance. By putting this checklist into practice, you can revolutionize your cheap injection molding process and make sure every project surpasses customer expectations and industry standards.
#plastic injection mold design#injection molding solutions#best injection molding company#injection frisbee#injection molding maker
0 notes
Text
DIY: How to Make Your Own Silver Bangles at Home
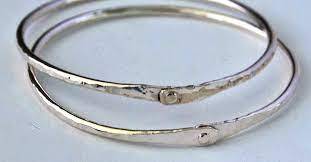
Silver bangles for women are timeless accessories that add a touch of elegance to any outfit. Whether you’re dressing up for a special occasion or adding a bit of shine to your everyday wear, silver bangles can elevate your style. But have you ever thought about making your own? Creating your own silver bangles at home can be a fun and rewarding experience. Here's a step-by-step guide to help you craft beautiful silver bangles for women right from the comfort of your home.
Materials You'll Need
Before you start, gather the following materials:
Silver wire (preferably 18-20 gauge)
Jewelry pliers (round-nose, flat-nose, and wire cutters)
Mandrel or cylindrical object (like a can or a dowel) to shape the bangle
Soldering kit (optional, for a more professional finish)
Hammer and bench block (for texturing)
Polishing cloth
Step-by-Step Instructions
1. Measure and Cut the Silver Wire
First, decide on the size of your bangle. Use a measuring tape to measure the circumference of your wrist and add about an inch for a comfortable fit. Cut the silver wire to the desired length using wire cutters.
2. Shape the Wire
Wrap the silver wire around your mandrel or cylindrical object to form a circular shape. Use your fingers and pliers to ensure the ends meet neatly.
3. Secure the Ends
If you have a soldering kit, use it to solder the ends of the wire together for a seamless finish. If you don’t have a soldering kit, you can use jewelry glue to secure the ends. Alternatively, you can create a hook and loop closure by forming a small loop on one end of the wire and a hook on the other end.
4. Hammer and Texture
Place the bangle on a bench block and gently hammer it to add texture. This step is optional but can add a unique, handmade touch to your silver bangle. Use a ball-peen hammer for a classic hammered look or experiment with different textures.
5. Polish the Bangle
Once your bangle is shaped and textured, use a polishing cloth to buff the surface. This will give your silver bangle a beautiful shine. Make sure to polish all surfaces, including the edges and any textured areas.
6. Add Personal Touches
Personalize your silver bangle by adding charms, beads, or engraving a special message. You can use jump rings to attach charms or beads. For engraving, use a metal stamping kit to add initials, dates, or designs.
Tips for Success
Practice Makes Perfect: If you're new to jewelry making, practice with less expensive wire before working with silver.
Safety First: Always work in a well-ventilated area and use safety equipment, especially when soldering.
Experiment: Don’t be afraid to try different techniques and designs. The more you experiment, the more unique your creations will be.
Conclusion
Creating your own silver bangles for women at home is not only a fun and creative hobby but also a way to design personalized jewelry that perfectly suits your style. With a few basic materials and tools, you can craft beautiful bangles that will be cherished for years to come. So why not give it a try and start making your own silver bangles today?
0 notes
Text
How to Find the Perfect Sofa for Your Living Room with WeDezine
Selecting the right sofa is a key element in designing a living room that is both functional and aesthetically pleasing. At WeDezine, Bangalore’s leading interior design firm, we understand that a sofa is more than just a piece of furniture; it’s a cornerstone of your living space. To help you make the best choice, we’ve put together a comprehensive guide on how to find the perfect sofa for your home.
1. Evaluate Your Living Space
Before diving into sofa options, take a close look at your living room’s dimensions and layout. Measure the area where the sofa will go to ensure it fits perfectly. Consider the flow of the room and how the sofa will interact with other pieces of furniture. Avoid choosing a sofa that overwhelms the space or seems too small for the room.
2. Define the Sofa’s Purpose
Understanding the primary use of your living room is crucial. Are you hosting large gatherings, spending time with family, or enjoying a peaceful retreat? For frequent entertainers, a spacious sectional or a sofa with generous seating might be ideal. For a more intimate setting, a plush, cozy sofa could be the perfect choice.
3. Match the Style
Your sofa should enhance the overall design of your living room. Whether you’re drawn to modern, minimalist designs or prefer a classic, traditional look, ensure your choice complements the existing décor. At WeDezine, we help you align your sofa with the current elements in your space, including coffee tables, rugs, and lighting.
4. Select the Right Fabric
Fabric selection impacts both style and durability. For families with pets or children, opt for durable and easy-to-clean fabrics like leather, microfiber, or performance materials. For a touch of elegance, consider luxurious options like velvet or linen. Choose a fabric that not only looks good but also fits your lifestyle needs.
5. Choose Colors and Patterns Wisely
The color and pattern of your sofa play a significant role in setting the tone of your living room. Neutral shades like beige, gray, or navy are versatile and can seamlessly integrate with other décor. For a more dynamic look, consider bold colors or patterns. Ensure that your choice complements the overall color scheme of your room.
6. Test for Comfort
No matter how stunning a sofa looks, comfort is key. Sit, lounge, and test the sofa’s cushions and back support. If you prefer a firmer seat, high-density foam cushions are ideal. For a softer touch, down-filled cushions are a great choice. Take your time to find the right level of comfort for you.
7. Prioritize Quality and Durability
Investing in a high-quality sofa means you’ll enjoy it for years to come. Look for sturdy frames made from hardwood like oak or maple, and avoid particleboard. Ensure joints are properly glued, dowelled, and screwed. Quality upholstery and strong stitching are also essential for durability.
8. Stick to Your Budget
While luxury options are tempting, it’s important to adhere to your budget. Set a price range and seek a balance between quality, style, and cost. Remember, a higher price doesn’t always equate to better quality. Do your research and compare different options to find the best value.
9. Explore Customization
If you can’t find the perfect sofa, consider customization. WeDezine offers bespoke furniture solutions that allow you to tailor the size, shape, fabric, and features of your sofa. Customization ensures that your sofa fits your space and meets your exact needs.
10. Plan for Delivery and Installation
Finally, think about the logistics of bringing your new sofa home. Measure doorways, staircases, and hallways to ensure a smooth delivery process. Check if the store provides delivery and installation services to make the process hassle-free.
Conclusion
Finding the perfect sofa involves a mix of practicality and personal taste. By following these expert tips, you’ll be on your way to selecting a sofa that enhances both the style and functionality of your living room. For personalized advice and a wide range of high-quality sofas, visit WeDezine, Bangalore’s top interior design experts. Let us help you create a living room that is stylish, comfortable, and uniquely yours.
0 notes
Text
Mistakes to Avoid While Installing Bar Dowels in TMT Steel

Bar dowel installation in TMT saria bar and TMT steel components requires precision and expertise. When creation initiatives fail in advance, mistaken dowel placement regularly emerges as a high offender. These seemingly small metal connectors play an extensive role in structural integrity, but their set up often suffers from preventable errors that compromise complete building systems.
Proper bar dowel placement creates essential load transfer points between concrete sections. When installed correctly in high-quality TMT steel, these connections allow for controlled movement while maintaining structural continuity. However, even experienced contractors make critical errors that undermine this fundamental construction element.
Common Installation Mistakes That Compromise Structural Integrity
Misalignment stands as perhaps the most frequent error during bar dowel installation. When dowels aren't perfectly parallel to the intended direction of movement, they create binding forces that prevent proper expansion and contraction. This misalignment strains the surrounding TMT saria bar framework and eventually leads to cracking as the structure attempts to move naturally.
Incorrect embedment depth presents another serious issue. Bar dowels must penetrate sufficiently into both connected elements to transfer loads effectively. Shallow placement in TMT steel connections fails to engage enough material for proper force distribution, while excessive penetration can restrict necessary movement and create stress concentration points.
Inadequate sleeve installation frequently undermines dowel performance. These sleeves allow one end of the bar dowel to move freely while the other remains fixed. When contractors install damaged sleeves or improperly seal them against concrete intrusion, the system loses its movement capability. Quality TMT saria bar connections demand meticulous sleeve preparation to ensure long-term performance.
Improper spacing between bar dowels creates uneven load distribution across joints. When dowels bunch too closely together, stress concentrates in small areas of the TMT steel framework rather than distributing evenly. Conversely, excessive spacing leaves sections unsupported, forcing individual dowels to carry more load than designed.
Material Selection and Preparation Issues
Using incompatible materials represents a surprisingly common mistake. Bar dowels must match the surrounding TMT steel in terms of strength and corrosion resistance. Mixing standard steel dowels with premium TMT saria bar can create galvanic reactions that accelerate corrosion and premature failure.
Inadequate corrosion protection frequently dooms installations before they even begin service. Bar dowels often bridge between interior and exterior environments with dramatically different exposure conditions. Without proper coating or material selection, these components can deteriorate rapidly, especially when used with high-quality TMT steel that would otherwise outlast standard components.
Failing to prepare bar ends properly introduces another vulnerability. Rough-cut or damaged ends create stress concentration points that can initiate cracks in surrounding concrete. Each bar dowel requires smooth, burr-free ends to perform as designed within TMT saria bar frameworks.
Installation Process Refinements
Rushing installation timing leads to numerous problems. Bar dowels placed too early may shift during subsequent construction activities, while installation too late often forces compromises in placement accuracy. The optimal installation window depends on specific project sequencing and TMT steel component assembly.
Neglecting proper vibration during concrete placement leaves voids around bar dowels. These empty spaces prevent full load transfer and expose dowels to moisture infiltration. Thorough vibration ensures complete encasement of dowels within the concrete matrix surrounding TMT saria bar elements.
Using improper tools during installation often results in damaged sleeves, misaligned dowels, or incorrect spacing. Purpose-designed installation templates and guides ensure accurate placement within TMT steel frameworks and maintain critical tolerances.
Bar dowel installation may seem straightforward, but attention to these details determines whether a structure will maintain integrity for decades or require premature repair. By avoiding these common mistakes, construction teams can ensure their TMT steel and TMT saria bar connections perform exactly as designed, delivering the durability and performance that modern construction demands.
#Bar Dowel Tips#TMT Bar Dowels#Dowel Bar Guide#Dowel Bar Errors#Steel Bar Joints#Rebar Dowel Mistakes#Bar Dowel Fixing#TMT Bar Tips#Rebar Installation#Bar Dowel Faults#Dowel Bar Fitting#TMT Bar Issues#Dowel Misalignment#Dowel Bar Rules#TMT Joint Guide#Rebar Connection#Concrete Dowels#Dowel Steel Bars#Bar Dowel Safety#Bar Dowel Basics
0 notes
Text
So, whether a land bridge or a canal, both are very feasible for this area of Thailand.... It would speed up, logistics and reduce the coughs related to shipping between india and china and the surrounding countries....
Now designing the land bridge that could handle commercial rail. That could stack containers double stack or triple stack.. You would need much taller bridges in tunnels or double and triple stack... He would also have to reinforce the strength of the foundation under the rails or train real line...
Can you stack shipping containers vertically?
Most containers are designed to be stacked horizontally or vertically. And, containers should always be stacked in the way they were designed.Jan 3, 2023
https://www.forkliftcertification.com › ...
Guide to Stacking Shipping Containers Safely
They allow vertical stacking by aligning and locking with the container below, creating a secure, interlocked bond.Sep 21, 2023
Reddit · r/trains
10+ comments · 4 years ago
Do you guys ever think triple stack container trains will ever be a thing?
I would think not, just because of height restrictions of tunnels and bridges. Also the wind aspect would be way worse for 3 stacks.
Missing: cargo four
Trainorders.com
https://www.trainorders.com › read
Double-Stack Question
Loading double stacks is typically done by loading all the bottom boxes on the track first, then following the packer down the track, one of the intermodal ...
Missing: cargo four freight
mobilemodularcontainers.com
https://www.mobilemodularcontainers.com › ...
Complete Guide to Stacking Shipping Containers
May 16, 2021 — Properly stacking shipping containers on the ground and on ships is critical to avoiding accidents, monetary losses, and OSHA penalties.
Missing: four freight
Reddit · r/trains
110+ comments · 6 months ago
A Triple Stack Container freight trial on Western Dedicated ...
My understanding is this is mostly due to older tunnels which don't have clearances for double stack + catenary. Notice that this rail corridor ...
UNECE Wiki
https://wiki.unece.org › display › 5 ...
5 Stacking on ground and terminal operation with freight containers
Aug 25, 2014 — On the ground, the freight container should be supported by the four bottom container fittings only. When stacking freight
How to stop train tracks from buckling?
To prevent buckling from happening, hydraulic machines called rail tensors are used to artificially stretch rails as they are newly placed.
https://www.ptv.vic.gov.au › footer
Heat changes everything: PTV track structure and maintenance
How can track buckling be prevented?
Ballast shoulders are important to control the tendency of track to buckle in a lateral direction. A ballast shoulder of 6 inches is adequate to prevent lateral movement on tangent track, and a shoulder of 12 inches is generally recommended for sharper curves.Jan 3, 2014
https://interfacejournal.com › archives
Preventing Track Buckles - Interface Journal
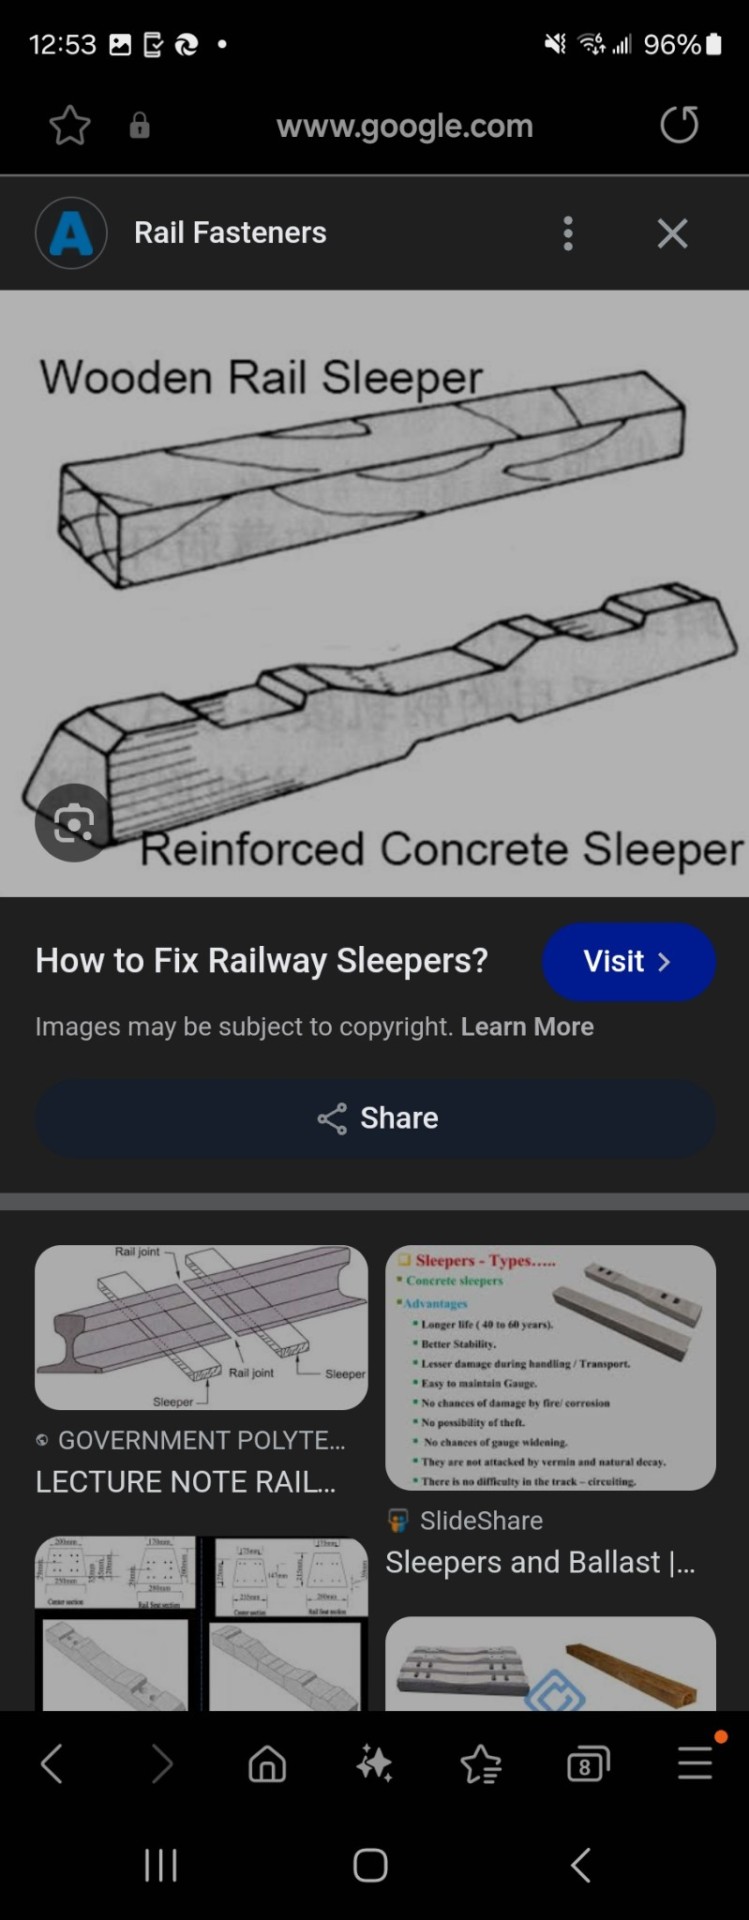
How to fix railway sleepers on top of each other?
When fixing railway sleepers together, use steel landscaping screws as they are strong, won't corrode if they come into contact with timber treatment, and are available up to 250mm in length. With a hexagonal head they can be put in place using a power drill.Dec 3, 2021
https://www.howarth-timber.co.uk › ...
How To Fit Railway Sleepers Together - Howarth Timber
https://pelicancontainers.com › stac...
Stacking Shipping Containers Safely for Efficient Storage
Now, one way to improve rail sleepers that are wooden is to make wood as strong as steel....
How do you reinforce sleepers?
Using timber dowel to peg through sleeper lengths is another effective way to join timber providing additional strength for a more traditional look. We recommend using dowel alongside timber screws for fixings to ensure the sleepers are really secure.
https://www.wickes.co.uk › sleeper-...
Working with sleeper techniques - Ideas & Advice | Wickes.co.uk
This talks about real sleepers, and this is where the steel rail track sits on and they call it a sleeper....
Railwaysleepers.com
https://www.railwaysleepers.com › s...
Seven ways of fastening railway sleepers together
Some people fasten railway sleepers together with bolts or Timberlok Screws. Others use steel angle brackets or steel flat connector plates. Some
https://www.google.com/search?client=ms-android-comcast-us-rvc3&sca_esv=44aafcd442c2ff9c&sca_upv=1&q=Ways+to+reinforce+train+rail+beds&source=lnms&fbs=AEQNm0COabAucIQdzGgOV6zyCH49114ne6VEuJbL5isfzp-vzH3haa7CPqgEUHwcUrktU3Kx3XZBiknUfd3ri4NmaiAkDUi2mptHpLfMS6Tw7Wym1dckgdQlbEd02W11fiQ_7_Cbd3WteytwLRJOjz7ndRGoG1JC9K7aBcqWVtcFui2vR228VrdmwggyR2dRsYEvYYEsNHTpUdl80DKcEOm8WvYs7RUQGQ&sa=X&ved=2ahUKEwicutGx4JaHAxVwpo4IHe8MBkIQ0pQJegQIFRAB&biw=345&bih=706&dpr=2.63
So you can use new concrete reinforced, sleepers or like I said, you can make wood like steel and use wooden sleepers that are equal to the strength of steel...
Now they say that you can make wood stronger than steel. May be able to make it stronger than some high strength, titanium alloys! They say there is a simple way of doing this....
Can wood be made stronger than steel?
Some varieties of wood, such as oak and maple, are renowned for their strength. But scientists say a simple and inexpensive new process can transform any type of wood into a material stronger than steel, and even some high-tech titanium alloys.Feb 7, 2018
https://www.scientificamerican.com › ...
Stronger Than Steel, Able to Stop a Speeding Bullet--It's Super ...
https://www.google.com/search?ie=UTF-8&client=ms-android-comcast-us-rvc3&source=android-browser&q=How+to+make+wood+stronger+than+steel
Now we solve the problem of the strength of the sleepers, which are usually wooden, making them as stronger stronger than steel...
Railway fasteners
http://www.railway-fasteners.com › ...
How To Build A Raised Bed With Railway Sleepers?
Oct 21, 2016 — Learn how to build a raised bed with railway sleepers, step by step including choose place,railway sleeper, oil, plant, etc.
stahlwerk-thueringen.com
https://www.stahlwerk-thueringen.com › ...PDF
GREEN STEEL - The Strong Partner of European Railways
The sleeper height can strongly influence the costs for existing tunnels, underpasses or overpasses: with concrete sleeper track, a sufficiently strong ...
11 pages·1 MB
YouTube · Weckenmann Anlagentechnik GmbH & Co. KG
4.5K+ views · 3 years ago
Production of concrete track sleepers
4:32
Track sleepers are manufactured using a circulation system. Thi
So you don't want water to build up the tracks? So you need to use something that is permeable, but still will support the Sleepers with a strong foundation... Now here they say crush rock. Maybe concrete reinforce pillar seawall style, maybe better...
What is the foundation for railway sleepers?
The railway sleepers will be joined together using rebar or metal spikes. Make sure the spikes you select are long enough to cut through the sleepers completely. Crushed stone or gravel: This will serve as the foundation for your wall. It aids in giving your sleepers stability and drainage.Feb 20, 2023
https://www.frank-key.co.uk › guides
How to Make a Garden Wall Out of R
https://www.google.com/search?ie=UTF-8&client=ms-android-comcast-us-rvc3&source=android-browser&q=Making+incredibly+strong+foundation+the+sleeper+of+a+train+rail
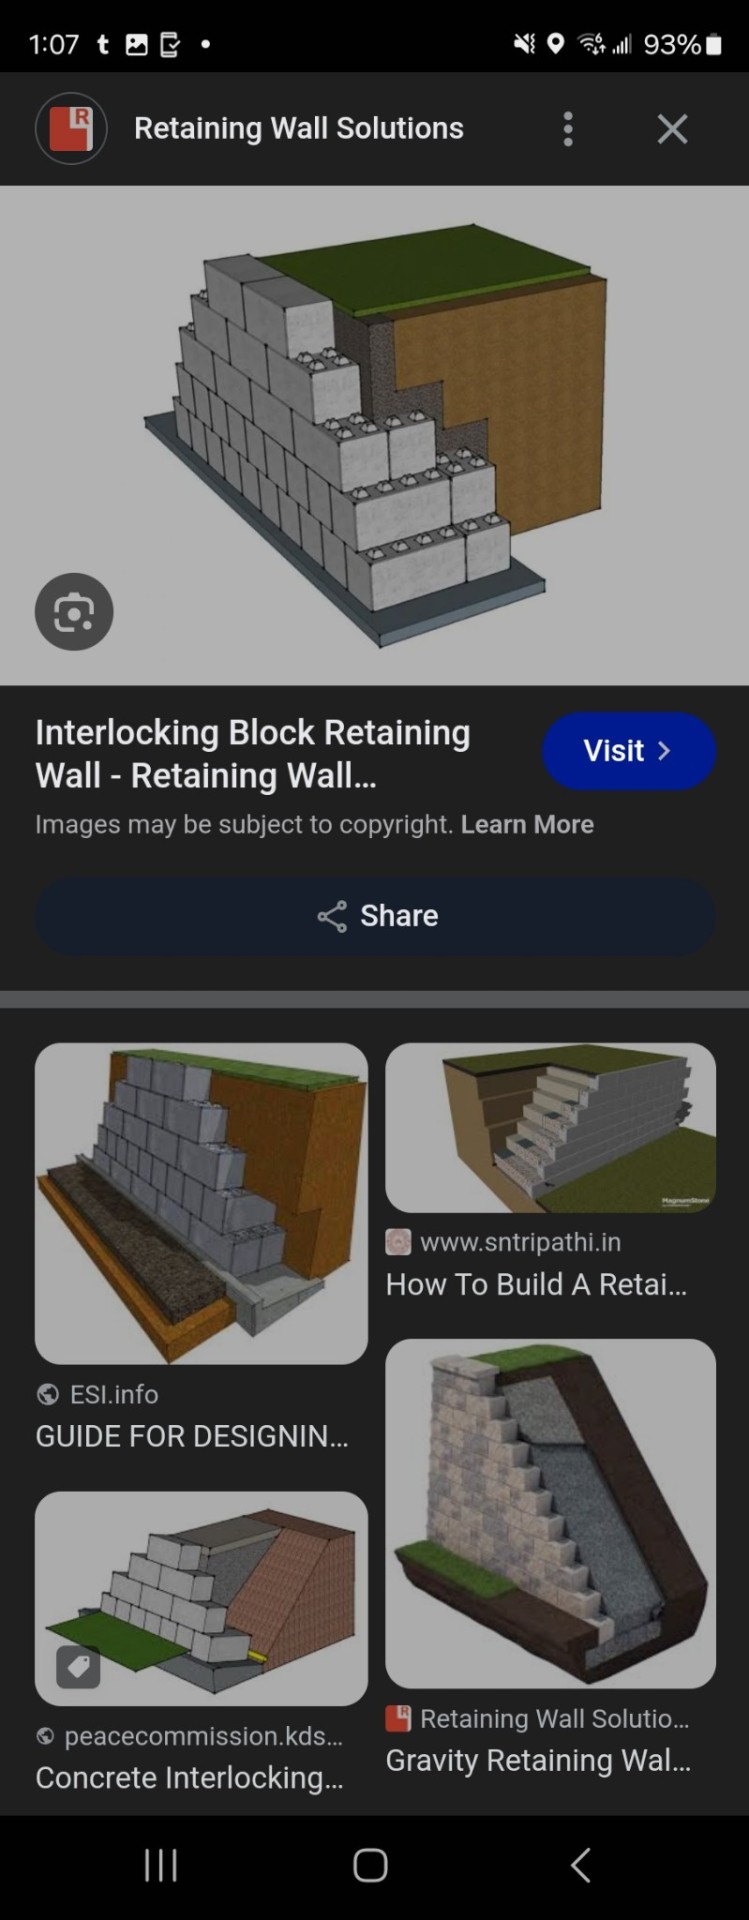
So to keep the foundation in place a railroad track. You can use interlocking blocking foundations they use for seawalls.... See image number seventeen and the link below
https://www.google.com/search?client=ms-android-comcast-us-rvc3&sca_esv=44aafcd442c2ff9c&sca_upv=1&q=Interlocking+seawall+blocks+that+are+stronger+than+steel&source=lnms&fbs=AEQNm0DvD4UMlvdpwktgGj2ZHhIXtktV_n5Sb1mPlHT0eDBk5ZCzEaSTALdseHaccpMmpY1sNVJHcM26nw7MBj24m0lHg9TQ-AaogfjQOxiwBVp1L2thxduebdDWTkmq8SoLI8KmUlu-AQtJVj7b-FXVsZ5vggYKfvStLy9qi_4JFWSyLjiEzxLJN-7wY8jvNNwjb0GnPh3taR_xIHxo7CfBClhMyaNL5w&sa=X&ved=2ahUKEwiIhr-645aHAxVeoI4IHUfvBVMQ0pQJegQIFhAB&biw=345&bih=706&dpr=2.63
Now, here is the world's strongest permeable foundation. And this can be used for the foundation. In between the seawalls, railroad tracks to lay the sleepers on top tolay the steel rails on top for the train... There is more on this. The world's strongest permeable foundations, the link.Below the true grid link...
https://youtu.be/OPg7zgxivB0?si=7oYV_aNtPF6_fPWw
https://www.google.com/search?ie=UTF-8&client=ms-android-comcast-us-rvc3&source=android-browser&q=The+world%27s+strongest+permeniable+foundation
https://www.google.com/search?ie=UTF-8&client=ms-android-comcast-us-rvc3&source=android-browser&q=The+world%27s+strongest+permeniable+foundation
For the bridges that are needed for the trains. Here we are five new technologies to make train bridges or bridges, stronger and faster...
midas Bridge
https://www.midasbridge.com › blog
Top 5 New Advanced Technologies for Bridge Design
Dec 29, 2020 — 2. Innovative new construction materials for bridges. With rapid development of new technologies and materials, there has been
Progressive Railroading
https://www.progressiverailroading.com › ...
Railroads tackle major bridge projects to replace worn-out ...
Railroads tackle major bridge projects to replace worn-out structures, speed up trains and improve access to rail service · Saving time, improving safety.
O Gauge Forum
https://ogrforum.ogaugerr.com › ar...
Are Rail Bridges Built Better Than Highway Bridges?
Aug 19, 2014 — Road bridges and rail bridges have a common foe, salt. Highway ... Design methods have changed from Allowable stress design to Load ...
Missing: faster | Show results with: faster
TeachEngineering
https://www.teachengineering.org › ...
Construction Technologies: Create the Strongest Bridge
Aug 21, 2018 — Create a design method. Observe quantitatively how bridges work under load and why engineers use different types of bridges for different places .
https://www.google.com/search?ie=UTF-8&client=ms-android-comcast-us-rvc3&source=android-browser&q=New+ways+to+make+train+bridges%2C+stronger+and+faster
So how to sure up the foundation under the new permeable pavers? And under the sea walls, that will hold the rail line in place....
Corrosion Technologies
https://www.corrosionx.com › pages
Soil Stabilization, Erosion and Dust Control
From reducing dust and erosion, to improving the weight bearing and other engineered characteristics of roadways, parking lots, quarries, mines and more – there ...
Federal Highway Administration (.gov)
https://highways.dot.gov › deployin...
Deploying Technology in Challenging Terrain | FHWA
Many FLH projects use mechanically stabilized earth (MSE) walls for road widening and new road construction. Typical MSE wall construction in
Novatr
https://www.novatr.com › blog › r...
Innovations That Will Transform Road Construction
Mar 27, 2023 — In this blog, find out some key innovations that will transform road construction.
On a side note here is new innovations. In fixing potholes, and this might be necessary to fixing holes in the foundation's.That make up different structures...
ConExpo Con/Agg
https://www.conexpoconagg.com › ...
5 Technologies Changing the Pothole Filling Industry
Apr 9, 2024 — To meet the needs of workers filling potholes, companies have been developing new technologies that decrease the time it takes to fill them.
So also, you should look into technology that is self. Healing infrastructure that if something gets broken, it can repair itself, keeping it strong and stable for a long time.
Architect Magazine
https://www.architectmagazine.com › ...
Infrastructure is Failing—But These Roadway Material ...
Researchers are developing new technologies for self-healing asphalt, pothole prediction, and more.
Missing: reinforce | Show results with: reinforce
BaseCore
https://www.basecore.co › soil-stab...
Soil Stabilization for Dirt Roads: New Techniques
Jun 22, 2022 — Eco-Friendly Soil Stabilization for Dirt Roads Reinforce the ground to withstand heavier vehicle traffic for longer, all while considering ...
PMGSY. Nic. in
https://pmgsy.nic.in › filesPDF
New Technology Initiatives in Rural Roads and Use of Marginal ...
Evolving environmentally optimized and climate resilient design for rural roads. Evolving pavement performance prediction models for determining rate of ...
52 pages·1 MB
Missing: reinforce | Show results with: reinforce
Yahoo
https://www.yahoo.com › tech › a...
Has the potential to transform how we perform road maintenance
Apr 23, 2024 — "This innovative technology has the potential to transform how we perform road maintenance and enhance the driver experience
https://www.google.com/search?ie=UTF-8&client=ms-android-comcast-us-rvc3&source=android-browser&q=New+technologies+to+reinforce+the+ground+under+roadways#ip=1
Here is also self healing technology... Technology that will correct its own problems...
Understanding Self-Healing in IT
In the realm of IT, this often incorporates machine learning (ML) algorithms and automation to predict, detect and respond to operational issues. Automation platforms with self-healing capabilities leverage AI to provide auto-remediation, optimizing systems and processes in real-time.Feb 14, 2024
https://www.advsyscon.com › blog
Self-Healing IT Operations: What To Know To Get Started
Red Hat
https://www.redhat.com › blog › ho...
How to implement a self-healing infrastructure
Nov 29, 2023 — Self-healing infrastructure leverages historical data-driven insights and automation to identify and resolve issues across hybrid cloud ...
Red Hat
https://www.redhat.com › resources
Accelerate your path to self-healing IT infrastructure
Apr 26, 2021 — Find out how organizations are using self-healing infrastructure to reduce costs, enhance security, and reduce the burden of compliance ...
Overview
Why now?
What is self-healing...
Evolving from DevOps to AIOps
ZIF.AI
https://zif.ai › building-a-self-heali...
Building a Self-Healing IT Infrastructure
Nov 22, 2023 — A self-healing IT infrastructure is critical for companies that deal with large volume of data on a daily basis.
https://www.google.com/search?ie=UTF-8&client=ms-android-comcast-us-rvc3&source=android-browser&q=New+technologies+in+self+healing+infrastructure
So getting into self healing materials...
National Institutes of Health (NIH) (.gov)
https://www.ncbi.nlm.nih.gov › pmc
Advances in Materials with Self-Healing Properties: A Brief Review
by R Dallaev · 2024 — In this review, we provide an overview of recent advances in materials with self-healing properties, encompassing polymers,
here's new innovations in civil engineering dealing with self healing materials....
MDPI
https://www.mdpi.com › ...
Recent Advances of Self-Healing Materials for Civil Engineering
by CY Liao · 2024 · Cited by 1 — Empowering materials with self-healing capabilities is an attractive approach for sustainable development.
https://www.google.com/search?ie=UTF-8&client=ms-android-comcast-us-rvc3&source=android-browser&q=New+insight+to+self+healing+material
To build it quickly, you'll need new innovations and earth moving technology...
Some of the new technology you can expect to see more of include:
Drones. Drones are quickly becoming more popular within the construction industry. ...
Data Collection Apps. Data collection projects are some of the most popular apps in the construction industry. ...
Building Information Modeling (BIM)
Jun 11, 2023
https://www.sitechsw.com › Blog
The Future of Earthmoving: Emerging Technology in ...
For Construction Pros
https://www.forconstructionpros.com › ...
Innovations Abound Among Earthmovers
Yet, the biggest buzz tended to center around those presented in the earthmoving sector. Here are some of the most significant new models featured at the show.
StartUs Insights
https://www.startus-insights.com › 5...
5 Top Excavation & Earthmoving Equipment Solutions
We analyzed 72 excavation & earthmoving equipment solutions. TRUVAC, Demine Robotics, Claw Manufacturing, V-Labs & BlueBanyan develop 5 top ...
gocodes.com
https://gocodes.com › new-technol...
7 Technology Innovations Impacting Construction Equipment
We'll give you an overview of new technology in construction equipment and discuss how these innovations are reshaping the industry.
https://www.google.com/search?ie=UTF-8&client=ms-android-comcast-us-rvc3&source=android-browser&q=New+innovations+in+earth+moving+technology
There is new technologies, an eco friendly infrastructure
In addition to energy efficiency, water management plays a crucial role in sustainable infrastructure development. Technologies like rainwater harvesting, greywater recycling, and permeable pavements are being incorporated into urban planning to mitigate the effects of water scarcity and urban flooding.Mar 1, 2024
https://www.linkedin.com › pulse
Advancements in Sustainable Infrastructure: Technologies ...
https://www.google.com/search?ie=UTF-8&client=ms-android-comcast-us-rvc3&source=android-browser&q=New+innovations+and+building+eco+friendly+infrastructure
Image number 18 and 19 and the information in link below our strategies in reducing cost related to building construction infrastructure....
How can construction costs be reduced?
Value Engineering
Reducing Square Footage. One way to dramatically reduce costs is to just reduce the square footage of the entire home. ...
Choosing a Stock Design. ...
Reducing Lineal Feet of Logs. ...
Opt for a Simple Roof System. ...
Use Drywall on Interior. ...
More Modest Kitchen. ...
Don't Take a Bath on Your Bath. ...
Avoid Change Orders.
https://www.nahb.org › log-homes
8 Strategies for Reducing Construction Costs | NAHB
National Association of Home Builders
https://www.nahb.org › log-homes
8 Strategies for Reducing Construction Costs
One way to dramatically reduce costs is to just reduce the square footage of the entire home. Think small and cozy to slash costs. Another smart strategy is to ...
Locusview
https://www.locusview.com › 4-su...
4 Surprising Ways to Reduce Construction Costs
Reduce Human Labor Costs of Construction Projects · Invest in Grid Modernization for Aging
https://www.google.com/search?ie=UTF-8&client=ms-android-comcast-us-rvc3&source=android-browser&q=Strategies+to+reduce+cost+of+building+new+infrastructure
Here is innovative ways of funding, financing, and delivering infrastructure projects....
State Resource Center: Innovative Infrastructure Funding, Financing and Delivery
Alternative Project Delivery Models.
Public Private Partnerships.
Long-term Asset Concessions and Asset Recycling.
Federal Loan, Loan Guarantee and Private Activity Bond Program.
Value Capture and Tax Increment Financing.
More items...•May 20, 2024
https://www.nga.org › projects › sta...
State Resource Center: Innovative Infrastructure Funding ...
https://www.google.com/search?ie=UTF-8&client=ms-android-comcast-us-rvc3&source=android-browser&q=Innovative+financing+ideas+to+finance+infrastructure+projects
So, whether it's a canal or a land bridge in Thailand connecting these 2 bodies of water. I think is a great idea and it should bring lots of economic prosperity to thailand.... 2 new deep sea ports with rail connecting them. Maybe a better idea, then a canal..... Definitely.Less land the move so it can be done quicker.... It also should be easier to maintain....
But I hope the future of thailand keeps on getting brighter!!!!!! :)
https://youtu.be/N21S-jo3CF0?si=Yuc9FVzzBfWU6ERo


0 notes
Text
The Ultimate Guide to Cabinet Connectors Hardware
Have you ever wondered what holds your kitchen cabinets together so securely? The answer lies in the often-overlooked heroes of cabinetry: cabinet connectors hardware. These small yet mighty components are essential for creating sturdy, functional, and aesthetically pleasing cabinets. Whether you're a DIY enthusiast or planning a professional installation, understanding cabinet connectors is crucial. In this comprehensive guide by InoxDecor, we'll delve deep into the world of cabinet connectors hardware, exploring everything from types and materials to installation and maintenance. Let's unlock the secrets behind those flawless cabinet finishes!

What are Cabinet Connectors?
Cabinet connectors are specialized hardware pieces designed to join and secure cabinet parts together. Think of them as the unsung heroes in the background, ensuring your cabinets remain robust and aligned. Without these connectors, your cabinets would lack stability and integrity.
Cabinet connectors come in various forms, including screws, dowels, and specialized fittings. They play a crucial role in modern cabinetry, offering solutions that cater to both functionality and aesthetics. By understanding their purpose, you can appreciate how essential they are in achieving that seamless look in your kitchen or bathroom cabinets.
Types of Cabinet Connectors
Cabinet connectors come in different shapes and sizes, each designed for specific applications. Here are some of the most common types:
1. Screws and Bolts
Screws and bolts are perhaps the most traditional and widely used cabinet connectors. They are easy to install and provide strong, reliable connections.
2. Dowels
Dowels are cylindrical rods, usually made of wood or metal, used to align and join two pieces of wood. They are hidden connectors that provide a clean, professional look.
3. Cam Lock Connectors
Cam lock connectors are popular in flat-pack furniture. They consist of a metal dowel and a cam lock, which, when turned, pulls the dowel into the lock, securing the pieces together.
4. Brackets and Corner Braces
These are used to reinforce the corners and edges of cabinets. They are visible connectors but provide excellent support and strength.
5. Hidden Fasteners
Hidden fasteners include specialized clips and clamps that hold cabinet parts together without being visible. They are perfect for achieving a sleek, minimalist look.
6. Knock-Down Fittings
Knock-down fittings are designed for easy assembly and disassembly, making them ideal for flat-pack furniture. They include components like cam locks, dowels, and screws.
Materials Used in Cabinet Connectors
Cabinet connectors are made from a variety of materials, each offering different benefits:
1. Steel
Steel connectors are strong and durable, making them ideal for heavy-duty applications. They provide excellent support and are resistant to corrosion.
2. Aluminum
Aluminum connectors are lightweight yet strong. They are often used in modern and contemporary cabinetry for their sleek appearance.
3. Plastic
Plastic connectors are inexpensive and easy to manufacture. They are commonly used in lightweight applications and flat-pack furniture.
4. Wood
Wooden connectors, such as dowels, offer a traditional look and are often used in high-end cabinetry. They provide a natural aesthetic and are easy to work with.
5. Zinc Alloy
Zinc alloy connectors offer a balance between strength and cost. They are resistant to corrosion and provide good durability.
Benefits of Using Cabinet Connectors
Using cabinet connectors comes with a multitude of benefits that go beyond just holding things together:
1. Enhanced Durability
Cabinet connectors provide strong and reliable joints, ensuring your cabinets withstand the test of time. They help distribute weight evenly and prevent sagging or warping.
2. Easy Assembly and Disassembly
Many connectors, especially those designed for flat-pack furniture, allow for easy assembly and disassembly. This is particularly useful for moving or reconfiguring your furniture.
3. Aesthetic Appeal
Hidden connectors and dowels help maintain a clean, seamless look, free from visible screws and nails. This enhances the overall aesthetic of your cabinetry.
4. Cost-Effective
Using the right connectors can save you money in the long run. They reduce the need for extensive woodworking skills and specialized tools, making the assembly process more straightforward and less labor-intensive.
5. Flexibility and Versatility
Cabinet connectors come in various types and materials, allowing for a high degree of flexibility in design and application. You can choose connectors that best suit your specific needs and preferences.
How to Choose the Right Cabinet Connectors
Selecting the right cabinet connectors for your project can be daunting, but considering a few key factors can simplify the process:
1. Type of Cabinet
Different types of cabinets may require different connectors. For instance, kitchen cabinets need strong, durable connectors, while lightweight connectors might suffice for display cabinets.
2. Material Compatibility
Ensure the connectors you choose are compatible with the materials of your cabinets. For example, wood cabinets pair well with wooden dowels, while metal connectors are better suited for metal or composite cabinets.
3. Load-Bearing Capacity
Consider the weight your cabinets will bear. Heavy-duty applications, such as kitchen cabinets, require connectors with high load-bearing capacities.
4. Aesthetic Considerations
If you prefer a seamless look, opt for hidden connectors or dowels. Visible connectors, like screws and brackets, might be acceptable for utility or garage cabinets where aesthetics are less of a concern.
5. Ease of Installation
If you're a DIY enthusiast, choose connectors that are easy to install with basic tools. Cam lock connectors, for instance, are user-friendly and don't require specialized skills.
6. Budget
While it's essential to choose high-quality connectors, consider your budget constraints. There are cost-effective options available that don't compromise on quality.
Installation Guide for Cabinet Connectors
Installing cabinet connectors might seem intimidating, but with the right tools and techniques, you can achieve professional results. Here's a step-by-step guide:
1. Gather Your Tools
You'll need a few basic tools: a drill, screwdriver, measuring tape, and the specific connectors for your project.
2. Prepare the Cabinet Pieces
Ensure all cabinet pieces are cut and ready for assembly. Check for any irregularities and sand down rough edges.
3. Mark and Drill Holes
Mark the locations for your connectors accurately. Use a drill to make pilot holes, ensuring they are straight and appropriately sized for your connectors.
4. Insert Connectors
Depending on the type of connector, insert screws, dowels, or other fasteners into the pre-drilled holes. For cam locks, insert the dowels and then the cams into their respective holes.
5. Assemble the Pieces
Carefully align the cabinet pieces and insert the connectors. Tighten screws or twist cam locks as needed to secure the joints.
6. Check for Alignment
Before final tightening, ensure all parts are correctly aligned. Adjust as necessary to achieve a seamless fit.
7. Final Tightening
Once everything is in place, give all connectors a final tightening. Be careful not to over-tighten, as this can damage the connectors or the cabinet material.
8. Inspect and Adjust
Inspect the assembled cabinet for any gaps or misalignments. Make any final adjustments to ensure everything is secure and looks good.
Maintenance Tips for Cabinet Connectors
Proper maintenance can extend the life of your cabinet connectors and keep your cabinets looking great. Here are some tips:
1. Regular Inspections
Periodically check your cabinet connectors for signs of wear or loosening. Tighten any loose connectors and replace any that are damaged.
2. Cleanliness
Keep your cabinets and connectors clean. Dust and debris can accumulate around connectors, leading to wear and corrosion.
3. Avoid Moisture
Moisture can cause connectors, especially metal ones, to rust or corrode. Ensure your cabinets are kept dry and address any water leaks promptly.
4. Lubrication
For connectors with moving parts, such as cam locks, occasional lubrication can keep them functioning smoothly.
5. Handle with Care
Avoid slamming cabinet doors or placing excessive weight on cabinet shelves, as this can strain the connectors and lead to damage.
Common Issues and Troubleshooting
Despite their durability, cabinet connectors can sometimes encounter issues. Here are some common problems and how to address them:
1. Loose Connectors
Loose connectors are often the result of repeated use or improper installation. Tighten loose screws or bolts, and ensure dowels and cam locks are securely in place.
2. Misalignment
Misaligned cabinets can occur if connectors are not installed correctly. Check for any loose connectors and adjust as necessary to realign the cabinet pieces.
3. Stripped Screws
Stripped screws are a common issue, especially with frequent adjustments. Use a screw extractor to remove stripped screws and replace them with new ones.
4. Broken Connectors
Over time, connectors can break or wear out. Replace broken connectors with new ones, ensuring they are the same type and size for a proper fit.
5. Corrosion
Corrosion is a problem for metal connectors, particularly in damp environments. Replace corroded connectors and take steps to reduce moisture exposure in the future.
Innovations in Cabinet Connectors
The world of cabinet connectors is continually evolving, with new innovations enhancing functionality and ease of use:
1. Tool-Free Connectors
Recent innovations have led to the development of tool-free connectors, which can be installed and adjusted without the need for tools. These are perfect for DIY enthusiasts.
2. Magnetic Connectors
Magnetic connectors use powerful magnets to hold cabinet pieces together. They provide a seamless look and are easy to adjust or reposition.
3. Adjustable Connectors
Adjustable connectors allow for fine-tuning of cabinet alignment even after installation. This is particularly useful for ensuring a perfect fit in custom cabinetry.
4. Eco-Friendly Materials
With a growing focus on sustainability, many manufacturers are developing connectors made from eco-friendly materials, such as recycled metals and biodegradable plastics.
5. Integrated Lighting
Some modern connectors come with integrated LED lighting, adding a functional and aesthetic element to your cabinets.
InoxDecor's Top Picks for Cabinet Connectors
At InoxDecor, we pride ourselves on offering high-quality cabinet connectors that cater to various needs. Here are some of our top picks:
1. InoxDecor Steel Cam Locks
Our steel cam locks provide robust connections ideal for kitchen and bathroom cabinets. They are easy to install and offer a clean, professional finish.
2. InoxDecor Wooden Dowels
For a traditional look, our wooden dowels are perfect. Made from high-quality wood, they offer excellent durability and a seamless appearance.
3. InoxDecor Hidden Fasteners
Our hidden fasteners are designed for those who prefer a minimalist aesthetic. They are easy to install and provide strong, invisible connections.
4. InoxDecor Magnetic Connectors
Our magnetic connectors are a modern solution, offering easy installation and adjustability. They are perfect for contemporary cabinetry designs.
5. InoxDecor Eco-Friendly Connectors
Made from recycled materials, our eco-friendly connectors are a sustainable choice without compromising on quality or durability.
Case Studies: Real-Life Applications
To illustrate the versatility and effectiveness of cabinet connectors, let's explore some real-life applications:
1. Residential Kitchen Renovation
In a recent kitchen renovation project, our steel cam locks were used to secure custom cabinets. The result was a sturdy, seamless installation that withstood daily use and looked stunning.
2. Office Storage Solutions
For an office storage solution, hidden fasteners were chosen to maintain a sleek, professional appearance. The connectors provided the necessary support without detracting from the modern design.
3. Retail Display Cabinets
In a retail environment, adjustable connectors were utilized to ensure perfect alignment and easy adjustments of display cabinets. This flexibility was crucial for frequently changing displays.
4. Eco-Friendly Tiny Home
In an eco-friendly tiny home project, our biodegradable plastic connectors were used. They provided the necessary durability while aligning with the project's sustainability goals.
5. DIY Home Office Setup
A DIY enthusiast used our magnetic connectors to create a home office setup. The connectors allowed for easy assembly and adjustments, resulting in a functional and aesthetically pleasing workspace.
DIY vs. Professional Installation
When it comes to installing cabinet connectors, you might wonder whether to go the DIY route or hire a professional. Both options have their pros and cons:
DIY Installation
Pros:
Cost-Effective: DIY installation can save you money on labor costs.
Satisfaction: Completing a project yourself can be highly rewarding.
Flexibility: You can work at your own pace and make adjustments as needed.
Cons:
Time-Consuming: DIY projects can take longer, especially if you're unfamiliar with the process.
Skill Level: Some connectors require specific skills or tools for proper installation.
Potential for Errors: Mistakes can lead to misaligned or unstable cabinets.
Professional Installation
Pros:
Expertise: Professionals have the skills and experience to ensure a flawless installation.
Efficiency: A professional can complete the project more quickly and efficiently.
Quality Assurance: Hiring a professional reduces the risk of errors and ensures high-quality results.
Cons:
Cost: Professional installation can be more expensive due to labor fees.
Less Personal Involvement: You might miss out on the satisfaction of completing the project yourself.
Ultimately, the choice between DIY and professional installation depends on your budget, skill level, and the complexity of the project.
Environmental Impact and Sustainability
As we become more conscious of our environmental impact, the sustainability of cabinet connectors is an important consideration. Here are some ways to ensure your connectors are eco-friendly:
1. Choose Sustainable Materials
Opt for connectors made from recycled or biodegradable materials. This reduces the environmental impact of manufacturing and disposal.
2. Consider Longevity
High-quality connectors that last longer reduce the need for replacements, minimizing waste.
3. Reduce Chemical Use
Some connectors require adhesives or coatings that contain harmful chemicals. Look for eco-friendly alternatives that use non-toxic materials.
4. Support Eco-Friendly Brands
Brands like InoxDecor are committed to sustainability. By choosing our eco-friendly connectors, you support practices that prioritize the environment.
5. Recycle and Reuse
When replacing or upgrading connectors, recycle the old ones if possible. Some materials can be repurposed or melted down and reused.
Conclusion
Cabinet connectors hardware might seem like a small detail, but they play a significant role in the durability, functionality, and aesthetics of your cabinets. From understanding the different types and materials to installation and maintenance, there's a lot to consider when choosing the right connectors for your project. At InoxDecor, we offer a wide range of high-quality cabinet connectors to suit various needs and preferences. Whether you're a DIY enthusiast or prefer professional installation, our connectors will help you achieve the perfect cabinet setup. So next time you admire your cabinets, remember the unsung heroes holding them together!
#InoxDecor#cabinet connectors hardware#cabinet fittings hardware#inox kitchen equipment#inox modular kitchens
0 notes
Text
Choosing the Perfect Seater Sofa for Your Home: A Comprehensive Guide
A seater sofa, whether it's a 2-seater, 3-seater, or a larger sectional, is often the centerpiece of your living space, offering comfort, style, and functionality. Finding the perfect seater sofa involves considering various factors such as size, style, material, and budget. This comprehensive guide will help you navigate these choices to find the perfect seater sofa for your home.
1. Assess Your Space
Measure Your Room Start by measuring the area where you plan to place the sofa. Consider the length, depth, and height of the sofa to ensure it fits comfortably without overwhelming the room. Leave enough space for movement around the sofa and other furniture.
Room Layout Think about how the sofa will fit into your overall room layout. It should complement other furniture pieces and not obstruct walkways. Using a floor plan or room planning app can help you visualize different layouts.
Consider Room Functionality Determine how the sofa will be used in the room. Is it for a formal living room, a cozy family room, or a multifunctional space? This will influence the style and type of sofa you choose.
2. Determine Your Needs
Usage Frequency Consider how often the sofa will be used. Is it for everyday use, occasional seating, or primarily for guests? This will influence the level of comfort and durability you need.
Seating Requirements Think about how many people you need to accommodate. A 2-seater sofa is perfect for smaller spaces or as additional seating, while a 3-seater or sectional is better for larger families or those who entertain frequently.
Comfort Needs Consider the comfort preferences of everyone who will use the sofa. Do you prefer a firm seat or something plush and cushy? Look for a sofa with the right level of support for your needs.
3. Choose the Right Style
Match Your Decor Your seater sofa should blend seamlessly with your existing decor. Whether your style is modern, traditional, or eclectic, there are options to suit every taste. Pay attention to the sofa’s lines, color, and detailing.
Timeless vs. Trendy Decide whether you want a timeless piece that will stay stylish for years or something trendy that might need updating sooner. Neutral colors and classic designs are safe bets for longevity.
Customizing Options Some manufacturers offer customization options, allowing you to choose fabrics, colors, and even the firmness of the cushions to suit your specific tastes and needs.
4. Select the Best Material
Fabric Options
Cotton and Linen: These natural fabrics are breathable and comfortable but may stain easily.
Microfiber: Durable and stain-resistant, making it ideal for families and pets.
Velvet: Luxurious and stylish, though it can be more challenging to maintain.
Leather: Durable and easy to clean, but can be expensive and may require conditioning.
Color and Pattern Consider how the color and pattern of the fabric will fit with your room’s color scheme. Darker colors and patterns can hide stains better, while lighter colors can make a room feel larger and more open.
Performance Fabrics Look for performance fabrics that are designed to be stain-resistant, durable, and easy to clean. These are ideal for high-traffic areas and homes with children or pets.
5. Evaluate Construction Quality
Frame The frame’s material affects the sofa’s durability. Kiln-dried hardwood frames are the most durable, while cheaper options like particleboard or plastic may not last as long.
Joinery Look for frames with joints that are glued, doweled, and screwed rather than stapled. This ensures better durability and stability.
Springs High-quality sofas typically have sinuous spring or eight-way hand-tied spring systems. These provide better support and comfort compared to cheaper alternatives.
Cushion Fill
Foam: Offers firm support and holds its shape well.
Feather and Down: Provides a plush, luxurious feel but requires regular fluffing.
Memory Foam: Conforms to the body for added comfort but can be more expensive.
Upholstery Check the quality of the upholstery fabric and ensure it’s tightly woven and has a good feel. The seams should be well-stitched and aligned properly.
6. Focus on Comfort
Seating Comfort Ensure the cushions are comfortable and supportive. Look for high-density foam cushions that retain their shape and provide good support. Consider the seat depth and backrest height to ensure they meet your comfort needs.
Lounging Comfort If you plan to use the sofa for lounging, look for features like deep seats, plush cushions, and high backrests. Reclining features or chaise attachments can add extra comfort for lounging.
Armrest Design The design of the armrests can affect comfort. Wide, padded armrests are great for leaning against, while narrower, more rigid armrests may be more stylish but less comfortable.
7. Test Before You Buy
In-Store Testing If possible, visit a showroom to test the seater sofa. Sit on it to assess seating comfort, and ensure the cushions provide adequate support and comfort.
Online Reviews If purchasing online, read customer reviews to get insights into the sofa’s comfort, durability, and overall quality. Pay attention to any recurring issues mentioned by reviewers.
Return Policies Check the store’s return policy to ensure you can return the sofa if it doesn’t meet your expectations. Some stores offer trial periods where you can test the sofa at home.
8. Budget Wisely
Set a Budget Determine how much you’re willing to spend on a seater sofa. Prices can vary widely based on brand, material, and features.
Value for Money Don’t just go for the cheapest option. Consider the sofa’s durability, comfort, and style. Investing in a high-quality piece can save you money in the long run.
Sales and Discounts Look out for sales, discounts, and clearance events. You might find a high-quality sofa at a reduced price, especially during holiday sales or end-of-season clearances.
9. Check Delivery and Assembly
Measure Access Points Ensure that the sofa can fit through doorways, hallways, and any other tight spaces during delivery. Measure these areas before making a purchase.
Delivery Options Understand the store’s delivery policies, including costs and return options. Some stores offer free delivery and setup, which can save you hassle and money.
Assembly Requirements Some sofas require assembly. Check if the store offers assembly services or if you need to do it yourself. Ensure you have the necessary tools and help if required.
10. Consider Additional Features
Storage Some seater sofas come with built-in storage solutions, such as under-seat compartments or side pockets. These can be great for storing blankets, pillows, and other small items.
Reclining Features If you love to lounge, consider a sofa with reclining features. These can add a level of comfort, but ensure they don’t compromise the sofa’s overall style and fit in your room.
Sofa Beds If you need extra sleeping space for guests, look for a sofa that converts into a bed. This can be a practical solution for small apartments or guest rooms.
11. Sustainability
Eco-Friendly Materials If sustainability is important to you, look for sofas made from eco-friendly materials like certified wood, organic fabrics, and non-toxic finishes.
Ethical Brands Research brands that prioritize ethical manufacturing practices. Supporting these companies can make a positive impact on the environment and workers’ welfare.
Conclusion
Choosing the perfect seater sofa for your home involves balancing comfort, style, durability, and budget. By assessing your space, determining your needs, and carefully evaluating the various options available, you can find a sofa that meets both your seating and lounging requirements. Remember to test the sofa before purchasing, read customer reviews, and consider additional features that could enhance your living experience. With these tips and tricks, you’re well on your way to finding a seater sofa that will be a cherished part of your home for years to come.
0 notes
Text
Do You Make These Simple Mistakes While Choosing a Sofa Set?
Choosing the perfect sofa set for your home is an important decision that influences both the aesthetic and functional aspects of your living space. Yet, many make common mistakes that can lead to dissatisfaction and regret. In this comprehensive guide, we will highlight these mistakes and provide practical tips to ensure you make the best choice for your needs.

1. Overlooking the Room Size and Layout
Understanding Space and Proportions
One of the most critical mistakes is not considering the size of your room and the layout. A sofa that looks fantastic in a showroom can appear overwhelming or insignificant in your home if the proportions are wrong. Measure your space accurately and consider the sofa’s placement. Use blueprint tools or apps to visualize how the sofa will fit into your room.
Traffic Flow and Accessibility
Ensure the sofa does not obstruct pathways or make the room feel cramped. Proper traffic flow is crucial for functionality and comfort. Arrange your sofa in a way that enhances accessibility and complements other furniture pieces.
2. Ignoring the Sofa’s Functionality
Purpose and Usage
Think about how you will use the sofa. Is it for a formal living room, a family lounge, or a space for entertaining guests? Each use case demands different features. For instance, a family room sofa might require durable, stain-resistant fabric, while a formal setting may prioritize aesthetic appeal over functionality.
Additional Features
Consider sofas with multi-functional features like recliners, storage compartments, or convertible designs. These features can significantly enhance your living space’s utility and comfort.
3. Disregarding Comfort and Support
Cushion Firmness and Fillings
Comfort should never be compromised. Pay attention to the cushion firmness and fillings. High-resilience foam, memory foam, or down-filled cushions each offer different levels of comfort and support. Sit on the sofa to test it before making a decision.
Back Support
Good back support is essential for prolonged use. Look for sofas with well-designed lumbar support. Ergonomic designs can prevent back pain and enhance overall comfort.
4. Choosing Style Over Substance
Material and Fabric Choices
While the sofa’s style is important, choosing a material that matches your lifestyle is crucial. Leather, microfiber, cotton, and linen each have their pros and cons. Leather is durable and easy to clean, while fabric options offer a wider range of colours and patterns. Consider the maintenance requirements and longevity of the material.
Colour and Pattern Coordination
Select colours and patterns that complement your existing decor. Neutral tones are versatile, while bold colours or patterns can make a statement. However, remember that trendy designs might not age well. Opt for styles that you will appreciate for years to come.
5. Neglecting the Quality of Construction
Frame Construction
The sofa’s frame is the backbone of its durability. Look for hardwood frames, such as oak, maple, or teak, which provide longevity and strength. Avoid frames made from particleboard or plastic.
Joinery Techniques
Quality sofas use superior joinery techniques like dowel joints, corner blocks, and metal screws. These methods offer better stability compared to staples or glue alone.
6. Failing to Set a Budget
Balancing Quality and Cost
Set a realistic budget that balances quality and affordability. While it might be tempting to go for the cheapest option, investing in a higher-quality sofa can save money in the long run due to its durability and better construction.
Financing Options
Explore financing options if available. Many furniture stores offer payment plans that can make higher-end sofas more accessible without straining your finances.
FAQs
Q1: How do I determine the right sofa size for my living room?
A1: Measure your living room dimensions accurately, including doorways and other furniture. Use these measurements to determine the maximum sofa dimensions that will fit comfortably in your space. Consider the scale and proportion of the sofa relative to the room size.
Q2: What are the best materials for a family-friendly sofa?
A2: For a family-friendly sofa, consider durable and easy-to-clean materials such as leather, microfiber, or performance fabrics. These materials can withstand wear and tear, resist stains, and are easier to maintain.
Q3: How can I ensure the sofa I choose will be comfortable?
A3: Test the sofa in person by sitting on it to assess cushion firmness and back support. Consider cushion-filling materials such as high-resilience foam or down. Ergonomic designs and adequate lumbar support are crucial for comfort.
Q4: What should I look for in a sofa warranty?
A4: Look for warranties that cover the frame, springs, and cushions. A good warranty should last several years and provide comprehensive coverage. Additionally, review the return policy to ensure you can return or exchange the sofa if it doesn’t meet your expectations.
By avoiding these common mistakes, you can choose a sofa set that not only enhances the beauty of your living space but also provides comfort and durability for years to come.
If you want to read more information about Furniture Castle, just visit
Website | Facebook | Medium
1 note
·
View note
Text
Cake Toppers
Top Off Your Cake with Style: All About Cake Toppers 🎂✨
A cake isn't just a dessert; it's a centerpiece of celebration and joy. One way to elevate its charm and make it truly memorable is by adding a cake topper. Whether you're celebrating a birthday, wedding, anniversary, or any special occasion, the perfect cake topper can transform your cake into a work of art. Let's explore the delightful world of cake toppers and how they add that extra special touch to your festivities.
A Brief History of Cake Toppers
Cake toppers have been adorning cakes for over a century. Initially popularized in the 1920s, wedding cake toppers featured miniature bride and groom figures. Since then, they have evolved to include a wide range of designs, themes, and materials, making them a versatile addition to cakes for all occasions.
Types of Cake Toppers
Personalized Toppers: Customized with names, initials, or special messages, these toppers add a personal touch that makes your cake uniquely yours.
Figurine Toppers: Miniature characters, animals, or themed figures that can reflect the interests and personality of the celebrant.
Floral Toppers: Real or artificial flowers that bring a natural, elegant touch to any cake, perfect for weddings and sophisticated events.
Themed Toppers: Perfect for children's parties or themed events, these toppers can range from superheroes to unicorns, matching the overall theme of the celebration.
Acrylic and Wooden Toppers: These modern, stylish options can be cut into intricate designs and are often reusable, making them a sustainable choice.
Edible Toppers: Made from sugar, fondant, or chocolate, these toppers are not only beautiful but also delicious!
How to Choose the Perfect Cake Topper
Match the Occasion: Choose a topper that fits the theme and tone of your celebration. For a wedding, go for elegant and romantic designs, while a birthday might call for something more fun and playful.
Consider the Cake Size: Ensure the topper is proportionate to your cake. A large topper on a small cake can overwhelm it, while a tiny topper on a big cake might get lost.
Personalization: Adding names, dates, or special messages can make the topper a cherished keepsake long after the cake is gone.
Material and Durability: Consider whether you want a one-time-use topper or something that can be kept as a memento. Acrylic and wooden toppers are great for lasting memories.
DIY Cake Toppers
For those who love a personal touch, creating your own cake topper can be a fun and rewarding project. Use materials like paper, glitter, wire, and fabric to craft something unique. There are plenty of tutorials online to guide you through the process, making it easy to tailor the topper to your exact needs.
Placing Your Cake Topper
Ensure your cake is stable and level before placing the topper.
Insert the topper gently into the cake, ensuring it’s secure but not damaging the structure.
For heavier toppers, consider using support straws or dowels inside the cake for added stability.
Conclusion
Cake toppers are the crowning glory of any cake, adding personality, style, and a touch of magic to your celebrations. Whether you opt for something classic, whimsical, or personalized, the right cake topper can turn a delicious dessert into a cherished memory. So, next time you're planning a celebration, don't forget to top off your cake with a topper that truly reflects the spirit of the occasion. 🎉🍰
0 notes
Text
Ananka
Q1) How do you ensure the proper alignment of holes before inserting hex bolts?
Ans) Ensuring the proper alignment of holes before inserting hex bolts is crucial to maintain the integrity of the assembly and facilitate the fastening process. Here's a step-by-step guide on how to achieve proper hole alignment:
1. Preparation: Gather all the necessary tools, materials, and fasteners before you begin. This may include hex bolts, nuts, washers, a wrench or socket set, and any other equipment needed for the specific application.
2. Visual Inspection: Before inserting any bolts, visually inspect the components that need to be fastened. Check for any misalignments, obstructions, or irregularities that could hinder the alignment process. Identify the holes where the hex bolts will be inserted.
3. Clear Debris: Ensure that the holes are clean and free from any debris, dirt, or obstructions. Use a brush, compressed air, or other suitable methods to clear out any material that could interfere with proper alignment.
4. Trial Fit: Before fully tightening any bolts, perform a trial fit by inserting the hex bolts without tightening them. This allows you to assess how well the holes align and make any necessary adjustments before final fastening.
5. Alignment Tools: In cases where precise alignment is critical, consider using alignment tools such as dowel pins, alignment pins, or jigs. These tools can help guide the proper alignment of the holes.
6. Clamping or Holding: If the components are large or heavy, use clamps or other holding devices to secure them in the desired position before inserting the hex bolts. This prevents movement during the fastening process.
7. Slow and Even Insertion: Begin inserting the hex bolts into the aligned holes. Start threading the bolts by hand to ensure they are properly aligned with the threads. Slowly turn the bolt clockwise while applying gentle pressure.
8. Finger-Tightening: Once the bolt is threaded properly, use your fingers to tighten it a few turns. This helps ensure that the bolt is securely engaged with the threads and prevents cross-threading.
9. Check Alignment: After inserting a few bolts, double-check the alignment of all the holes. If you notice any misalignments, back out the bolts and make necessary adjustments before proceeding.
10. Alternating Tightening: Once you are confident in the alignment, use a wrench or socket set to gradually tighten the hex bolts in an alternating pattern. This prevents one side from getting tightened more than the other, which could lead to misalignment.
11. Final Torque: Tighten the hex bolts to the specified torque level recommended for your application. Be sure to follow the manufacturer's guidelines to avoid over-tightening or under-tightening.
12. Inspection: After tightening all the bolts, perform a final visual inspection to ensure that the components are properly aligned and securely fastened.
By following these steps and paying careful attention to the alignment of holes before inserting hex bolts, you can ensure a secure and properly aligned assembly that maintains its structural integrity.
CS fasteners
Q2) How do you ensure proper alignment when threading multiple hex nuts onto bolts?
Ans) Ensuring proper alignment when threading multiple hex nuts onto bolts is paramount to prevent cross-threading, guarantee secure fastening, and uphold assembly integrity. Here's a comprehensive guide to ensure accurate alignment during this process:
1. Preparation: Gather all essential tools and materials, including hex nuts, bolts, washers (if used), and an appropriate wrench or socket set.
2. Clean Threads: Ensure that both the bolt and nut threads are clean, devoid of debris, rust, or any impediments that might hinder smooth threading.
3. Visual Inspection: Examine bolt and nut threads for visible damage or irregularities. Any compromised threads could lead to alignment and threading difficulties.
4. Align the First Nut: Begin by aligning the first hex nut with the bolt. Hold the nut and match it with the bolt's threads. Gradually thread the nut onto the bolt by turning it clockwise using your fingers.
5. Hand-Tighten the First Nut: Hand-thread the initial hex nut onto the bolt until it is snug against the surface. At this stage, avoid fully tightening; leave room for subsequent nuts.
6. Align Subsequent Nuts: For each following hex nut, align it with the bolt's threads and cautiously thread it onto the bolt using your hands. Steer clear of cross-threading, which may damage threads and compromise assembly integrity.
7. Utilize a Wrench or Socket: Once all nuts are aligned and manually threaded, employ a wrench or socket set to tighten them further. Start with the first nut, then proceed sequentially.
8. Alternate Tightening: To ensure uniform pressure and prevent misalignment, alternate between tightening the nuts. For instance, with three nuts, partially tighten the first, move to the second, then the third, and finally return to the first for full tightening. Repeat this cycle until all nuts are securely fastened.
9. Optimal Torque: While using multiple nuts on a bolt, ensure each nut is tightened to the specified torque level. Utilize a torque wrench to achieve the correct tightness without over-tightening.
10. Visual Inspection: Post complete tightening, perform a final visual inspection to confirm proper alignment and uniform seating of the nuts on the bolt threads.
11. Consistent Spacing: If application demands uniform spacing between nuts, employ a measuring tool to verify equal distances between each nut.
12. Anti-Rotation Measures: In scenarios prone to vibration-induced loosening, consider using locking nuts, self-locking nuts, or thread-locking compounds to prevent unintentional loosening.
By adhering to these steps and exercising patience and precision throughout the threading process, you can ensure accurate alignment and secure fastening when threading multiple hex nuts onto bolts. Proper alignment and threading are pivotal in maintaining assembly integrity and performance.
SS Fasteners Suppliers
Q3) What is the impact of using different washer materials on corrosion resistance?
Ans) Using different washer materials can have a significant impact on corrosion resistance in an assembly. The choice of washer material should be carefully considered to ensure compatibility with the other components and to prevent galvanic corrosion, which occurs when dissimilar metals come into contact in the presence of an electrolyte (such as moisture). Here's how different washer materials can impact corrosion resistance:
1. Similar Materials: If the washer material is similar or compatible with the materials of the joined components and the fastener, the risk of galvanic corrosion is reduced. For example, using stainless steel washers with stainless steel fasteners and components of similar or compatible alloys can help maintain good corrosion resistance.
2. Galvanic Compatibility: When using different washer materials, particularly in contact with dissimilar metals, it's important to consider the galvanic compatibility between the metals. Some metals are more prone to galvanic corrosion than others, depending on their position in the Galvanic Series. A less noble metal (anodic) in contact with a more noble metal (cathodic) can lead to accelerated corrosion of the anodic metal.
3. Insulating Washers: In some cases, using insulating or non-metallic washers, such as nylon or plastic, between dissimilar metals can help prevent galvanic corrosion by interrupting the electrical contact between the metals. However, these insulating materials may not provide the same load distribution or strength as metallic washers.
4. Avoid Direct Contact: If using different washer materials is necessary, consider using a barrier material, such as a gasket or insulating tape, to prevent direct contact between dissimilar metals and minimize the risk of galvanic corrosion.
5. Corrosion-Resistant Washers: Some washer materials, like stainless steel or corrosion-resistant alloys, are specifically chosen for their ability to resist corrosion even in harsh environments. These materials can contribute to the overall corrosion resistance of the assembly.
6. Corrosion Potential: Be aware of the corrosion potential of the washer material in the specific environment where the assembly will be used. For example, in highly corrosive environments, using washers made of materials with high corrosion resistance is essential
7. Environmental Conditions: Consider the exposure of the assembly to moisture, humidity, chemicals, and other corrosive agents. The choice of washer material should be appropriate for the anticipated environmental conditions.
8. Coating Compatibility: If washers have coatings, such as zinc or other protective coatings, ensure that the coating is compatible with the other materials in the assembly. Some coatings can react with certain materials and affect corrosion resistance.
In summary, the impact of using different washer materials on corrosion resistance depends on factors such as the specific materials being used, their compatibility, and the environmental conditions. To ensure optimal corrosion resistance, it's advisable to consult with experts, consider galvanic compatibility, and select washer materials that are suitable for the application's requirements and potential exposure to corrosive elements.
Stainless Steel Bolt and Nut Manufacturers in India
Q4) How do you ensure proper alignment when threading multiple nuts onto stud bolts?
Ans) Ensuring proper alignment when threading multiple nuts onto stud bolts is pivotal to thwart cross-threading, misalignment, and challenges during tightening. Below are steps you can adhere to for assuring accurate alignment:
1. Examine the Threads: Before initiating, scrutinize the threads of both the stud bolts and nuts. Confirm they are devoid of debris, grime, or damage that could obstruct seamless threading.
2. Choose Consistent Nut Sizes: Opt for nuts of identical size and thread pitch as the stud bolts. Discrepancies in sizes may lead to misalignment and threading difficulties.
3. Hand-Thread: Commence by manually threading the initial nut onto the stud bolt. Ensure it rotates smoothly. If you encounter resistance or a misaligned sensation, halt and realign.
4. Alignment Indicator: Reflect on marking one facet of the stud bolt with temporary ink or paint prior to threading the nuts. This indicator aids in gauging nut alignment as you thread them.
5. Alternate Threading: When threading multiple nuts onto a stud bolt, alternate between nuts. Thread one nut a few turns, then move to the next, and so forth. This practice equitably distributes the load and aligns the nuts symmetrically.
6. Visual Alignment: While threading each nut, visually verify alignment with the preceding nut and the stud bolt. Nuts should stand perpendicular to the bolt axis without tilting.
7. Detect Resistance: Be attentive to resistance as you thread each nut. Any heightened resistance or abrupt shift in sensation warrants an immediate halt, as it might signal cross-threading or misalignment.
8. Gentle Hand-Tightening: Hand-tighten each nut delicately until they sit flush against the surface. Employ a wrench or socket when necessary, avoiding over-tightening to prevent thread damage.
9. Revisit Alignment Marker: Once all nuts are manually tightened, revisit the alignment marker created earlier. Nuts should align with the mark, signifying even threading.
10. Final Tightening: Utilize a wrench or socket to uniformly tighten the nuts. Alternate between nuts in a crisscross pattern to ensure uniform tightening, forestalling lopsided tension.
11. Visual Evaluation: Post-tightening, visually assess nut alignment. They should exhibit uniform spacing and alignment with the stud bolt.
12. Inspect for Binding: After tightening, assess for any binding or resistance while turning the nuts. Difficulties encountered could denote misalignment or cross-threading.
By adhering to these steps, you can secure proper alignment when threading multiple nuts onto stud bolts. This approach circumvents threading dilemmas, secures even load distribution, and safeguards the assembly's integrity.
ASME Fastener Standards
0 notes
Text
Innovating Efficiency: Essential Equipment for Door Manufacturing
Door manufacturing is a precise and intricate process that requires specialized equipment to ensure efficiency, accuracy, and quality in production. From initial material preparation to the finishing touches, the right tools and machinery play a crucial role in streamlining operations and delivering high-quality doors. Here’s a comprehensive guide to the essential equipment used in door manufacturing:
Panel Saws: Panel saws are fundamental in cutting large sheets of materials, such as wood, metal, or composite panels, to the required sizes for door components. These saws offer precision cutting and are capable of handling various materials used in door production.
Edge Banding Machines: Edge banding machines apply thin strips of material, such as PVC or wood veneer, to the edges of door components. This equipment ensures a clean, finished appearance and adds durability to the edges of the door.
CNC Routers: CNC routers are versatile machines used for intricate cutting, shaping, and detailing of door components. They can carve out designs, create grooves for hinges or locks, and achieve precise cuts, contributing to the customization and quality of the doors.
Press Machines: Press machines are crucial for joining and bonding door components together. They apply pressure and heat, utilizing adhesives or glues, to create strong and durable bonds between materials, such as laminates or veneers.
Door Assembly Tables: These specialized workbenches are designed with fixtures and clamps to hold door components in place during assembly. They provide a stable platform for workers to assemble door frames, panels, and other parts accurately.
Dowel Insertion Machines: Dowel insertion machines automate the process of inserting dowels or pins into door components for alignment and reinforcement. This equipment ensures precise and consistent placement of dowels, enhancing the structural integrity of the door.
Spray Booths and Finishers: Spray booths and finishers are used for applying paints, stains, or finishes to the doors. These booths provide a controlled environment for even application, ensuring a uniform finish and protecting the doors from environmental elements.
Door Lamination Press: Lamination presses are used to laminate different materials onto door surfaces. They apply heat and pressure to bond decorative laminates or veneers onto the door, adding aesthetic appeal and durability.
Milling Machines: Milling machines are utilized for precision cutting and shaping of door components, such as hinges or lock slots. They ensure accuracy in creating necessary fittings and openings in doors.
Hinge Boring Machines: Hinge boring machines are designed specifically to drill precise holes for hinges in doors. These machines ensure uniformity in hinge placement, facilitating smooth door operation.
Dust Collection Systems: Dust collection systems are essential for maintaining a clean and safe working environment. They remove dust and debris generated during the manufacturing process, ensuring worker safety and machinery efficiency.
Quality Inspection Tools: Equipment for quality control, such as measuring devices, calipers, and gauges, are indispensable in ensuring that manufactured doors meet specified standards for size, dimensions, and quality.
For More Info:-
RUVO Door Machines
Door manufacturing equipment
Customizable door machines
Door assembly line automation
0 notes
Text

Back in April the NFL Draft was held over three days.
2023 is the Titans first draft of the Ran Carthon era.
Below is the 2023 Draft class written by Ronan Briscoe....
Peter Skoronski first round pick, a tackle/guard out of Northwestern, arrives in Nashville from Park Ridge, Illinois. He's the grandson of Bob Skoronski, a tackle on Vince Lombardi's Packers teams that won five NFL championships and each of the first two Super Bowls. He started every game of his college career, and was a First-Team All-American in 2022. He was widely viewed as one of the top two tackles in the class, though he may wind up finding a career as a guard.
Will Levis second round pick, QB out of Madison, Connecticut (as well as Newton, Massachusetts and Middletown, Connecticut) who finished his career at Kentucky after appearing in 14 games across two seasons for Penn State. He totaled 5,232 passing yards, 43 touchdowns and 23 interceptions during his time in Lexington. During this time, he helped spark a nice period for Kentucky football and head coach Mark Stoops.
Tyjae Spears third round pick, a running back out of Tulane by way of Ponchatoula, Louisiana, was one of the most dangerous players in the entire country with a football in his hands last season. In four years with Tulane, Spears totaled 2,940 rushing yards and 31 touchdowns. 1,581 of those yards and 19 of those touchdowns came in 2022. He won the American Athletic Conference Offensive Player of the Year award as well. He arrives in the NFL with some well-documented potential issues with his knee, but don't worry too much about him.
Josh Whyle was the Titans' pick in the fifth round. He's a native of Cincinnati who stayed home for college and helped guide the Bearcats to the College Football Playoff in 2021. He's the kind of tight end who uses his size in blocking while also being dangerous as a pass catcher. Whyle totaled 88 catches for 1,062 yards and 15 touchdowns during his four seasons at Cincinnati.
Jaelyn Duncan sixth round pick an offensive tackle from Maryland. The New Carrollton, Maryland native spent five years as a Terrapin, and the only one of those he wasn't the starting left tackle was his redshirt year. He's a big, and very athletic tackle who should fit right into the roster Ran Carthon wants to build.
Colton Dowell seventh round pick wide receiver at Tennessee-Martin. Dowell didn't just have an incredibly successful career, picking up four consecutive All-OVC honors. He didn't just rack up 177 catches for 2,796 yards and 19 touchdowns in 47 college games. He left the Skyhawks as their all time statistical leader in receiving yards.
Below are the undrafted free agents who were signed after the draft.
DT Shakel Brown (Troy)
Brown (6-4, 299) played in 13 games as key backup on Troy's top-rated defense in 2022 … Started five games in his career … Recorded 32 tackles, six tackles for loss and four sacks.
WR Jacob Copeland (Maryland)
Copeland (6-0, 202) appeared in 12 games in 2022 … Led the team by averaging 14.5 yards per reception ... Caught 26 passes for 376 yards, and hauled in a pair of touchdowns.
WR Tre'Shaun Harrison (Oregon State)
Harrison (6-1, 191) led Oregon State with 52 receptions for 604 yards … Scored four touchdowns … Ended his OSU career with 90 catches for 1,147 yards and eight touchdowns.
S Matt Jackson (Eastern Kentucky)
Jackson (6-2, 215) started 10 games in 2022 and led the team with 87 tackles ... Also registered 7.5 tackles for loss, 2.0 sacks, two fumble recoveries, and one forced fumble ... From Nashville, played at Hillsboro High.
CB Steven Jones (Appalachian State)
Jones (5-10, 185) tied for the Sun Belt lead in the regular season with 15 passes defended in 2022 … Also totaled 45 tackles, 4.5 tackles for loss and one sack on the season.
S Tyreque Jones (Boise State)
Jones (6-2, 205) started all 12 games in 2022. … Registered 34 tackles, including 4.5 for-loss, three pass breakups and an interception… Converted to nickelback in 2022.
CB Anthony Kendall (Baldwin Wallace)
Kendall (5-10, 180) averaged 5.4 tackles per game, three interceptions, four tackles for loss and 12 pass breakups at Division III Baldwin Wallace in 2022.
RB Charles McClelland (Cincinnati)
McClelland (5-11, 200) appeared in 13 games and started the final 12 in 2022 … Led the Bearcats in rushing and all-purpose yards… Tallied 849 rushing yards and seven touchdowns on 146 attempts…Added 14 receptions for 116 yards… Rushed for more than 100 yards three different times.
DE TK McClendon (Eastern Kentucky)
McClendon (6-5, 300) started all 12 games in 2022 and led Eastern Kentucky with 11.5 tackles for loss and 6.0 sacks ... added 58 tackles, two pass breakups, one forced fumble, and one fumble recovery.
OLB Caleb Murphy (Ferris State)
Murphy (6-4, 245) tallied 40 sacks and 60.5 tackles for a loss in his two seasons at Ferris State, including 25.5 in 2022 when he helped lead the Bulldogs to their second consecutive D-II national title.
T John Ojukwu (Boise State)
Ojukwu (6-6, 315) was selected All-Mountain West First Team in 2022 after being the only Bronco to start all 14 games on offense. … Was also All-Mountain West first team in 2021 after starting all 12 games at left tackle.
LB Otis Reese (Mississippi)
Reese (6-3, 225) started 11 games for the Rebels in 2022 ... Finished second on the team with 84 total tackles, with 8 coming for a loss ... Added 3 sacks ... Came up with 1 fumble recovery and hauled in 1 interception on the season.
OLB Thomas Rush (Minnesota)
Rush (6-3, 250) started all 13 games in 2022 and made 34 tackles (20 solo) … Had 2.5 tackles for loss and 1.5 sacks while also breaking up two passes and forced one fumble.
K Trey Wolff (Texas Tech)
Wolff (6-4, 210) finished his career by connecting on 42-of-52 career field goal attempts and 107-of-110 PATs … Totaled 233 points overall over 45 career games as a Red Raider … Ended his career ranked fifth all-time in program history for successful field goals (42) and PATs (107) … one of eight kickers in program history to nail 40 or more field goals in a career.
0 notes