#Easy Guide For D-Link Extender Setup Wizard
Explore tagged Tumblr posts
Visit Tumblr Blog
Explore Tumblr blogs with no restrictions, modern design and the best experience.
Last Seen Tumblr Blogs


Fun Fact
1,644 Tumblr posts in 1 second.
Text
How to Accomplish the D-Link WiFi Repeater Setup?

What are the Multiple Ways to Perform D-Link WiFi Repeater Setup?
A D-Link WiFi Repeater Setup is an essential device when you want to extend your home networks' WIFI signal to areas with weak or no connectivity. Whether you're in a large house or have dead zones in certain parts of your home, a Wi-Fi extender can ensure smooth internet access across your space. While it’s easy to get started, performing the D-Link WiFi Repeater Setup involves a few steps, and there are multiple methods you can use. This guide will walk you through the web interface setup, the app setup, and using the WPS button for a hassle-free installation.
Pre-setup Requirements:
Before proceeding with any of the setup methods, ensure you have the following essentials:
Active Internet Connection: You must have an active internet connection from your router to extend the Wi-Fi network.
Correct Web/IP Address: Ensure you know the correct IP address or URL (dlinkap.local) for accessing the extender’s web interface.
Admin Credentials: You’ll need the default admin login credentials (usually mentioned in the product manual or on the device label).
D-Link WiFi App: Make sure you have the D-Link WiFi app downloaded and installed on your smartphone for the app setup method.
Computer/Smartphone: Depending on your preferred setup method, you’ll need either a computer or a smartphone.
Now, let’s look at the different ways to configure your D-Link WiFi Range Extender.
D-Link WiFi Repeater Setup Using the Web Interface:
This is one of the most common and straightforward methods of setting up your D-Link WiFi Range Extender. Follow these steps:
Power on the Extender: Connect your D-Link extender to a power outlet and ensure it’s powered on.
Connect to the Extender's Network: On your computer or smartphone, go to the WIFI settings and connect to the network broadcasted by the extender. It might be labeled something like “D-Link_Extender” or similar.
Open a Web Browser: Launch any web browser (Google Chrome, Firefox, Safari, etc.), and in the browser's address bar, type dlinkap.local and hit enter. This will take you to the login page of your D-Link WiFi Extender.
Login with Admin Credentials: Enter the admin username and password. The default credentials are usually “admin” for both fields (unless changed). You can find the details on the label of the extender or in the user manual.
Smart Setup Wizard: After logging in, you’ll be directed to the smart setup wizard. Follow the on-screen prompts to configure your extender.
Wi-Fi Setup: Navigate to the Wi-Fi Setup section. Here, you can modify your extenders' Network Name (SSID) and Password to match your primary router’s settings. It's recommended to use a unique SSID and a strong password.
Advanced Settings: Optionally, go to the Advanced Settings section, where you can configure Parental Controls, AP Mode, Bridge Mode, or Guest Networks based on your needs.
Save Settings: After making the necessary changes, click Save Settings to apply them. Your D-Link WiFi Extender is now configured.
Completion: Once the settings are saved, your extender should be ready to use, and your Wi-Fi coverage will be extended throughout your home.
D-Link WiFi Repeater Setup Using the App:
If you prefer using your smartphone, you can easily set up your D-Link extender using the official D-Link WiFi app. Here’s how:
Download the App: First, download the latest version of the D-Link WiFi app from the App Store (for iPhone) or Google Play Store (for Android).
Connect to the Extender’s Network: Connect your smartphone to the D-Link extender’s Wi-Fi network.
Launch the App: Open the D-Link WiFi app on your phone. If you don’t already have an account, you will need to create one. Once your account is ready, log in with your credentials.
Access the Home Dashboard: After logging in, you will be directed to the home dashboard of your extender. Here, you can manage all settings related to your Wi-Fi extender.
Wi-Fi Setup: Go to Settings > Extended Wi-Fi. You can change the SSID and password here, as well as other security settings.
Save Changes: After entering the new network name and password, click Save to apply the changes. You can also modify additional settings such as Guest Network and Internet Settings if needed.
Completion: After saving the settings, your extender will be configured, and your extended Wi-Fi network will be active.
D-Link WiFi Repeater Setup Using the WPS Button:

For those who prefer a quick and simple setup without involving any browser or app, the WPS method is the best option. Here’s how to perform the setup using the WPS button:
Power On the Extender: Plug the D-Link extender into a power outlet and make sure it’s powered on.
Place the Extender Near the Router: Position your extender close to the router for the initial setup.
Locate the WPS Button: Find the WPS (Wi-Fi Protected Setup) button on both your router and your D-Link extender.
Activate WPS: Press and hold the WPS button on your router for about 3 seconds. After that, press and hold the WPS button on your extender for about 3 seconds.
Wait for Connection: The LED lights on your extender will start blinking green, indicating that the devices are successfully communicating and pairing.
Release the Button: Once the connection is established, the LED light will become solid, indicating that the setup is complete.
Completion: Your D-Link WiFi Extender is now successfully connected to the router, and your extended Wi-Fi network is up and running.
Final Words The D-Link WiFi Repeater Setup can be performed in multiple ways, depending on what’s more convenient for you. Whether you prefer the traditional web interface, the app, or the simple WPS method, all these methods allow you to extend your Wi-Fi signal easily. Make sure you walk through the setup process step-by-step and choose the method that suits you best. By following the instructions carefully, you’ll have your Wi-Fi extended in no time, improving coverage throughout your home.
1 note
·
View note
Text
D-Link DAP-1320 Wireless Range Extender Setup. A Complete Guide Here!
The D-Link DAP-1320 Wireless Range Extender setup is a straightforward process that boosts your Wi-Fi coverage. Plug the extender into a power outlet within your existing network's range, connect to its network using the provided credentials, and access the setup wizard through a web browser. Follow the on-screen instructions to select your network and enter the password. The extender will then amplify your Wi-Fi signal, eliminating dead zones and extending coverage to previously weak areas of your home or office. It's an easy solution for improving your wireless network's reach and performance.
0 notes
Text
Get The Easy Guide For D-Link Extender Setup Wizard l dlink extender.local
So, if you are new to the world of dlink wifi extender, we will help you install it no time. You need to get access to the dlink extender.local setup wizard which is the web-based interface that allows a user to make the configuration to the device. You can reach out to our technicians if you want to set up your device in very less time.
#dlink extender.local#dlink extender setup#dlink extender login#dlink extender#D-Link Extender Setup Wizard#Easy Guide For D-Link Extender Setup Wizard#http://dlinkextender.local#http://dlink extender.local
1 note
·
View note
Text
With the D-link dap x1870 extender, you can eliminate internet dead zones and broaden your network’s coverage throughout your home or office. With the rise in the amount of time, we spend online, whether for personal or professional reasons. If we want to stay connected, we need a single mesh wifi network. If you don’t know how to use the D-Link AX1870 Mesh WiFi Dlinkap.local, this article is for you. To learn how to configure your Dlink x1870 extender, continue reading this guide.
The DAP-X1870 Extender can set up manually using http://dlinkap.local
Use the dlink extender to connect your computer or smartphone to the network.
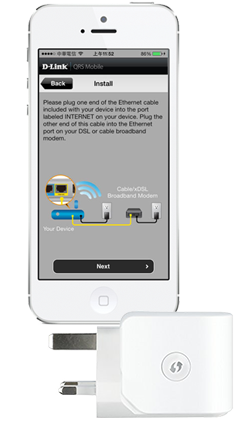
Use an ethernet cable to connect your d’link dap x1870 extender to your computer.
Enter http://dlinkap.local into your browser’s address bar to begin the setup.
• You will be redirected to a login page after typing in the setup web address into your browser’s address bar.
• Enter the login information that you’ve written down in the space provided. These are the router’s primary login and password credentials. These credentials can be found in the user guide or on the bottom of the main router.
• You will be taken to a setup page when you click on login. “Next” is the next step.
• Select “manual” from the drop-down menu of connection methods on this page.
Choose your router’s wireless network from the drop-down list. Click on “select.”
You will now be asked to enter your wifi password and then click “next” on this page.
A notification will appear on your screen when your d-link dap x1870 is in sync with your main router.
In the next step, you’ll need to enter the dual-band passwords and SSIDs into the appropriate fields. Click “next” after that.
Then a summary of your setup will be shown to you on the page you’ve just been taken to.
Once you’ve completed your setup, click “save”
Changing some of the router’s default security settings is an additional step you can take to help keep your wifi and network secure.
Your admin login credentials need to update. To ensure that no one can get into your network and reset it.
Use http://dlinkap.local to access your account. To begin using the wizard, simply click on this weblink.
Click on “management” once you’ve arrived at the setup page.
Admin will appear in a drop-down menu.
Change the admin password to something else if you’d like. However, keep in mind that you must pick a password that can’t be easily deciphered.
Then, click “save” to finish.
You can rest assured that your DAP-X1870 will restart and be configured in accordance with the settings you’ve previously made.
With the dlink wifi app, quickly set up D-Link AX1870 mesh WiFi
In order to complete your setup in the quickest possible time, use the dlink app. Once you’ve followed the instructions, you’ll be done in a matter of minutes. Accessibility is another benefit of having the App. Using your dlink wifi account, you can quickly change all of your wifi settings. The following are the quick and easy steps to Setup D-Link DAP X1870 Dlinkap.local Mesh WiFi with the App:
To begin, connect your x1870 extender to an electrical outlet. Be patient until the light turns solid.
After that, connect your smartphone to the extender’s WiFi network. On the bottom of the extender or in the user’s manual, you’ll find the connection credentials.
To get started, open the dlink app and follow the on-screen instructions.
Select the operating mode of your dlnik device, and then select your device from the list that displayed. •
If you see a list of wifi networks, select the SSID you want to connect to. Then enter your passkey and hit “connect” after you’ve chosen the correct one.
Next, you’ll be able to customize your device’s SSID and password. Select “YES” to continue.
As a result, you’ll have to change the default password to something more comfortable for you to use. Tap “Next” when you’re done with that.
When you’re done, the app will show you a summary of all your settings.
Then, if you’re still not sure, tap “save.”
The message “whole-home mesh wifi created” will appear on a new page.
Click on the “Done” button.
NOTE: You’ll be notified of possible locations for your dlink extender setup device via a suggestion notification. You’ll be able to quickly connect to other devices with this.
DAP-X1870 DAP-X1870 AX1800 Mesh Wi-Fi 6 Range Extender • Dual-band AX1800 (574 Mbps + 1200 Mbps) • Industry-standard mesh Wi-Fi • Gigabit Ethernet connector allowing wired mesh backhaul • Latest industry-standard 128-bit wireless encryption • LED signal strength indicators
Reasons for DAP-X1870 setup problems
Any time you try to Setup D-Link DAP X1870 Dlinkap.local a device, you’re likely to run into technical difficulties. Just fix the problem at its source before moving forward with your setup, and everything else will fall into place naturally. The following few of the most common:
Slow or unreliable internet
Older version of the browser
WiFi router firmware that is out of date
Errors or weak connections in ethernet wires
There was a problem logging in. Incorrect SSIDs and Passwords also included in this category.
The Process of Troubleshooting your setup
Here some fast fixes for any Setup D-Link DAP X1870 issues you may run into.
In the event that you’re unable to access the setup URL, please verify your internet connection. Alternatively, an older browser may to blame.
Ethernet cable connections should checked.
Restarting your gadgets may be an option.
Contact our professional specialists if you’re still having trouble after trying any of these basic fixes. They’ll be able to provide you with any information you need about "Setup D-Link DAP X1870 Dlinkap.local".
In relation to this item
Firstly, Increase WiFi 6 coverage for all of your security cameras, smart doorbells, laptops, mobile phones, tablets, game consoles, and other devices.
Secondly, Next-Gen AX1800 Dual-Band Speeds with 4-streams and up to 574 Mbps (2.4GHz) plus 1201 Mbps (5GHz)
Add WiFi connectivity to a wired device by connecting to the Gigabit Ethernet port
Supports SmartConnect, MU-MIMO, OFDMA, ATF, 80 MHz
Easy setup, management, and auto firmware updates
And the last is, Locate the best spot for placement w/ D-Link Wi-Fi App
#dlinkap.local#dlinkrouter local#d link router local#d'link login#d'link wifi extender#mydlink login#login for d link router#d link router login#log into dlink router#http dlinkrouter local#d link default password#d link wifi extender set up
0 notes
Text
D-LINK WIRELESS RANGE EXTENDER N300 DAP-1320 CONFIGURATION
About D-LINK:
The D-link n300 DAP-1320, Wireless Range Extender N300 is a compact plug-in repeater that lets you continue actual wireless channels. You can place it everywhere in your house to enhance the range of your wireless network. Tiny yet powerful, it supports Wireless N speeds of up to 300 Mbps in a device that fits appropriately in the palm of your hand. In case, you are trying to setting up your dlink wifi router to its factory default setting, you these procedure.
About D-LINK N300 DAP-1320 Setup:
Connectivity
• Wireless 802.11n for high-speed wireless
• Wireless 802.11g/b backward agreeable
• The wireless speed of up to 300 Mbps1
Security
• WPA2/WPA wireless encryption to keep your wireless connection stable
Easy to Use
• The one-piece wall-plug design is compact, portable, and does not require additional power cables
• Built-in Setup Wizard and QRS Mobile app for mobile devices guide you through the installation
Configuration process:
1. Click Launch Wireless Setup Wizard to begin the D-link n300 DAP-1320 Setup Wizard.
2. Click Next to start the Setup Wizard.
3. Select WPS as the configuration method only if your wireless device supports Wi-Fi Protected Setup (WPS).
4. Click Next to continue.
5. Press and hold the WPS button on your wireless router or access point until the light starts flickering green and then free. Please allow up to three minutes for the WPS process to finish.
6. Select Manual as the configuration method to set up your network manually.
7. Click Next to continue.
8. A list of wireless networks in your range will be listed. Select your wireless network and click Connect to continue.
9. Enter the Wi-Fi Password for the router you are using to connect and click next.
10. You can decide to change the Wi-Fi Network Name (SSID), and the password for the D-link n300 DAP-1320 setup or you can enter the information found in your configuration card.
11. Click Next to continue to finish the setup process.
Conclusion:
You can use One-touch configuration by forcing the WPS push-button on the DAP-1320 and on the router or AP you want to extend. You can also directly plug the DAP-1320 in, connect to it wirelessly with a PC or mobile device, and follow the steps in the built-in Setup Wizard to configure the DAP-1320.
0 notes
Text
10 Wireless Security Cameras Under $100
Home security cameras come in a variety of styles and price ranges. You can find models made to withstand harsh outdoor conditions, and those intended to blend in with your home’s interior. Some communicate with the cloud; others right to your smartphone or record footage to an SD card. You can buy white cameras or black, and ones that swivel in all directions to catch all the action as it unfolds. So whatever your home security plans, here are 10 great surveillance cameras to consider—and they are all less than $100. Each of these 10 cameras is loaded with cool features; we’ll focus on some of the most innovative.
YI Dome Camera
It’s good to focus a surveillance camera on a particular area; it’s also good to be able to pan and tilt it so that you can see a broader view. The app that controls the Yi Dome Camera lets you “bookmark” as many as 8 favorite positions, which you can get to by just tapping a button on your smartphone. Or, you can engage the Auto-Cruise feature to survey the area 360 degrees horizontally. The camera will also track moving objects and record the footage to an SD card and/or the Cloud.
1080p high definition
Night vision
Two-way audio (intercom mode)
Works with iOS and Android devices
$74.99
Zmodo Smart Wireless Security Cameras- 4 Pack
Remote access to a surveillance camera is handy way to monitor your home while you’re gone, but who wants to keep a constant vigil from your smartphone? The cameras that make up the Zmodo 4-pack will send an alert to your phone when it detects motion, so you’re only viewing your house when you really need to. When your house is dark, the camera automatically fires up its built-in infrared lights to provide a clear view of the nighttime action—up to 80 feet.
IP connectivity
Works with iOS and Android devices
720p
IR night vision
$99.99
Vimtag VT-361 Super HD Security Camera
Often, the hardest part about technology in your home is not figuring out how to use it, but understanding how to set it up. Vimtag has simplified the processes of installing a security camera by putting a QR code on its VT-361 surveillance camera. You just scan the code with your smartphone and the camera sets up in four easy steps. If you’re a bit leery of storing recorded footage of your home in the Cloud, this camera records only to an internal SD card.
Remote pan and tilt
Motion detection snapshots
Two-way audio
Night vision
$69.95
UOKOO 360-Degree Fisheye Panoramic Network Wireless Camera
Resembling a large light bulb, the Uokoo 360-degree Fisheye Wireless Camera combines and interesting aesthetic with some solid surveillance features. It captures a 360-degree view in HD quality, notifies your smartphone when it detects motion, and can see 16 feet in complete darkness. And although this camera communicates via Wi-Fi, there’s no need to lose sight of your home if you’re somewhere with weak or non-existent Wi-Fi service; you can access the camera via a 4G network.
Stores footage on SD card
Works with iOS and Android devices
Two-way audio
$84.99
Votecom Wi-Fi Hidden Camera Detector
When you don’t want your security camera to look like a security camera, Votecom disguises it as a smoke detector. The mini 1080p camera will push notifications to your smartphone when it detects motion, however, you can adjust its motion detection sensitivity to 7 different levels, and create a schedule to receive alerts—like only when you are at work—to avoid unnecessary interruptions. You can also change the recording resolution to save space on the 64GB SD card (not included).
1080p high definition
Can be mounted to the wall or ceiling
Works with iOS and Android devices
$89.99
Zmodo Pivot All-in-One Smart Hub
Its main job is visually monitoring your home, but the Zmodo Pivot can also function as a Bluetooth speaker and provides temperature and humidity readings. As a bonus, it comes with two door/window sensors to alert you when something is open. The camera will pivot toward the triggered sensor and capture video of the area. To prevent getting an alert every time a cat walks by the camera, you can customize which areas on your live view will trigger a motion detection alert.
1080p high definition
16GB of built in storage
Two-way audio
Can add other Zmodo accessories
$99.88
Kodak CFH-V15 – HD Security Camera
A built-in Wi-Fi extender ensures that the Kodak CFH-V15 camera maintains contact with you and your smartphone. You can store your high-definition video clips from the past 24 hours on the cloud for free. Anything more will cost extra, but includes a smart detection feature to reduce false alarms. The camera can be panned (350-degrees) and tilted (105-degrees) remotely.
5-minute Setup Wizard
Night vision up to 10 meters
Two-way audio
$87.90
D-Link DCS-5222L Camera
If you have a large area to monitor, the 10x digital zoom feature of the D-Link DCS-5222L will come in handy. A built-in SD card slot supports 32GB recording of video based on motion detection, schedules, or continuously. The camera’s built-in PIR sensor sends automation push alerts to your smartphone, as well.
340-degree pan, 120-degree tilt
720 resolution
Night vision
Two-way audio
$91.22
Belkin NetCam
Why keep your surveillance camera all by itself when it can work with other smart home devices? The Belkin NetCam works with Belkin WeMo products including a light switch and motion sensor. When the camera notices motion, for example, it can trigger on a light. A special night vision filter ensures clear nighttime viewing.
Wide-angle lens
Email alerts when movement is detected
Two-way audio
$92.99
iSmartAlarm Spot HD Video Camera
Security cameras are intended to help protect your home, so it makes sense that they would pair up nicely with home security systems. The iSmartAlarm Spot camera does just that, working either as a standalone Wi-Fi camera or part of a more comprehensive iSmartAlarm security system. The Spot not only watches for trouble—it also listens. Able to identify the siren of a smoke alarm and carbon monoxide alarm, it can push a notification of the event to your phone.
Free cloud video storage
Two-way audio
Voice-guided setup
$99.99
The post 10 Wireless Security Cameras Under $100 appeared first on Electronic House.
from Data Wire Solutions News Feed http://ift.tt/2mndoOT
0 notes