#Edited using Affinity Photo 2.5
Explore tagged Tumblr posts
Visit Tumblr Blog
Explore Tumblr blogs with no restrictions, modern design and the best experience.
Last Seen Tumblr Blogs


Fun Fact
Tumblr posted its first advertisements in May 2012 and subsequently earned $13M in revenue.
Text

Nikon D610; 1/1250; F/4.5; ISO 100; 105mm; 11x1 Panorama
03/09/2024
#Nikon D610#1/1250#F/4.5#ISO 100#105mm#Panorama#11x1 Panorama#03/09/2024#Edited in RawTherapee#Edited using Affinity Photo 2.5#Eastbourne Pier#sea#cloudy sky#photography#art
9 notes
·
View notes
Text
Adobe flash cs6 download for pc

+ Massive image support (100+ Megapixels) + Super smooth pan and zoom at 60fps. Watch your edits render in real time and dive into the huge toolset, tailored to the demands of a professional workflow. The raw power under the hood of Affinity Photo will leave you amazed at how quickly you can work. Take your images one step further by choosing a photo effect or applying a photo filter. No time to tinker with tools? Simply click Auto Enhance, move the slider, and watch your photos come to life. If you’re on Canva Pro, use the background remover tool to quickly erase or replace the backdrop. How to change the default download folder (or picking a specific folder for each download) on your computerCreate instant mockups with the Smartmockups tool. Create online creative graphics in minutes by using Picsart’s easy-to-use FREE photo editing tools. Set the thickness and pencil shadow by using the slider according to the sketch effect you want for the image. Upload your favorite image by clicking on the Upload Image button. Just follow these three easy steps below, and use your sketched photo anywhere. Try Photo Editor Learn More Photo Editor Video Editor All Popular Photo Effects Photo Editor Background Changer Collage Maker Template Editor Background Remover Sketch Effect Text Editor YouTube Banner Maker Sticker Maker Photo Effects Add Stickers To Photos Using this AI photo to sketch tool is really easy. Try top photo editing tools to transform simple images into something truly incredible. This free PC program is developed for Windows XP/Vista/7/8 environment, 32-bit version. The most popular versions of the software 2.6 and 2.5. We cannot confirm if there is a freeload of this software available. Downloading PhotoTools Free 2.6.3 from the developer's website was possible when we last checked. Faststone is an image viewing and management software that helps you organize, edit, rename, and add text and watermark to your images. Best for varied photo management and editing options ($19.95 one-time payment). B-3 02000 digiKam is an open-source tool, hence entirely free to use. Design on the go from any deviceThe Complete Photo Tool Kit - Digital Photo Editor 4 products- in one. Share Share it instantly to your favorite platform or save it for later. Customize Take it further with stickers, graphics, frames, and more. Edit Edit your look with filters, effects, adjustments and more. Crop Crop your photo to the size you want. StudioLine Photo Basic 4 is the free version of StudioLine's photo editing and management software, providing a media viewer, and editing tools for basics like cropping. > What can it do? * View complete photo information * Batch/single delete location information of photos * Bulk/single deletion of irrelevant information for photos * Batch/single share photos without metadata > Features: * Secure A completely offline local tool that. Download Photo.Helper and enjoy it on your iPhone, iPad and iPod touch.
1 note
·
View note
Text
Alternatives for Adobe Acrobat, Photoshop and more
I remember when Adobe made the switch. In 2013, not long after I purchased the Adobe Creative Suite CS6 program, Adobe terminated the desktop versions of its software and launched Creative Cloud, offering subscription-based access only to its suite of products.
It's easy to understand why some users have been unhappy with Adobe's subscription model. A large corporation has the budget to shoulder monthly fees, but small businesses and home users may balk, especially for programs used only occasionally.
I love Adobe products, and I’ve used them since Photoshop version 2.5. I’ve also purchased Freehand and PageMaker, and the Macromedia products. They’re the best, hands-down. But a subset of users have largely left their beloved Adobe software behind for a variety of clones, shareware, and open-source products.
I actually use them all—Adobe and the alternatives—because each program has unique features I can pick and choose for my projects. The following programs are the best options we’ve found to replace Acrobat, Photoshop, Illustrator, and InDesign. We also talk to experts about why software subscriptions are on the rise.
Adobe Acrobat alternatives
See PC World’s ongoing reviews of PDF editor programs for the best third-party Acrobat programs.
Adobe Photoshop alternatives
All three of the programs listed below provide effective photo-editing tools, from sizing, cropping, and retouching to noise reduction, color correction, and more. Affinity and Paint Shop Pro have a few more features than GIMP does, and all three have fewer than Photoshop. The filters and special effects are what distinguish them from one another and from Photoshop.
1. GIMP (free open-source)
GIMP (GNU Image Manipulation Program) offers 130-plus amazing filters and special effects. See Alvin Alexander’s blog for all the cool stuff GIMP can do. I especially like the Borders Sparkles, Reflections, and Gradient Flare effects; and the Whirl and Pinch features. I also appreciate that GIMP works on multiple platforms, uses minimal system resources, and is super-easy to use.
2. PaintShop Pro ($79.99, or $99.99 for the pro version)
I love Paintshop Pro. I’ve used it since version 5 and have continued to upgrade through the current versions. It provides hundreds of excellent features such as Capture, which is much better than Photoshop’s Snipping Tool. The Film effects are spectacular, the new SmartClone feature is amazing, and the Refine Brush, which finely details selections around difficult outlines such as hair and animal fur is superb. But my all-time favorite feature is the Picture Tubes, similar to Photoshop’s custom brushes, but in full 16-bit color.
3. Affinity Photo ($49.99)
Affinity Photo stands somewhere between PaintShop Pro and Photoshop in features and special effects. Its highlight features include custom brush nibs called Nozzle tips, which modify the shape and size of your lines as you draw them. Symmetry mode creates amazing kaleidoscopes, and the best Dispersion effect I have ever seen. You can even record and save actions as macros. Even if you own both PaintShop and Photoshop, this little gem is more than worth the ticket.
Adobe Illustrator alternatives
Photo editing software can now do almost anything that illustration programs can do. Some users prefer the illustrator drawing tools over the photo drawing tools, but that’s just a matter of personal preference. For alternatives, check these out.
1. Apache OpenOffice Draw (free open-source)
The interface is intuitive (if a bit outdated), and the product packs a punch. OpenOffice Draw’s highlight features include Styles, Glue Points, and Picture Gallery for stock images and clipart. It also offers advanced rendering, lighting and texture effects, an efficient 3D controller for creating shapes, plus all the standard editing and manipulation tools.
0 notes
Text
Thinking Outside the Dieline: Package Design for Businesses
In a perfect world, you’d like to hire a freelance or full-time graphic designer to handle your package design. But perhaps you don’t have the time to vet and onboard a designer, or perhaps, the budget is an issue. This article will serve as a startup guide to package design if you don’t have the ability or capacity to hire a professional graphic designer.
You can expect to understand the best software to use for package design, and some basic best practices for creating a quality finished good. In addition to this the article covers some tips for staying on brand, and creative digital mockups of your package.
Software Choices for Package Design
Software in the design world is a big deal. Programs offered by Adobe (the Creative Cloud), are powerful and loaded with features not typically available on other software options. But what programs are best for package design?
You may think that Photoshop is the best for this. You may also be drawn to it because it’s the cheapest single software plan offered by Adobe. Unfortunately, Photoshop is not an ideal software for things like logo design and package design. If you aren’t going to hire a designer, you need to at least put your best foot forward when it comes to software.
The ideal choice for package design software is Adobe illustrator, with Affinity Designer being in second place (first place if you are on an extreme budget, as Affinity is not a monthly subscription). Both of those software options are vector-based and can export to the same file formats (.ai .pdf .eps .svg).
Photoshop isn’t a great option for final package design because it is raster based, so the graphics can’t be scaled larger than their original size.
Vector, Raster and Resolution
I’ve just thrown around a few key words that may have you scratching your head. I’m going to go over how vector, raster and resolution work. Once you understand that, it will make more sense as to why I said Photoshop doesn’t work for package design.
Vector-based artwork is very powerful in the fact that it can be scaled infinitely without getting pixelated or losing quality. This is because vector artwork relies on key points called anchor points. It fills in colors based on the location of these key points. What that means is if you have 2 points 10 inches apart, and you have the fill color as black, it will fill everywhere between those two points with black. If you then move one of the points 10 feet away from the other point, it will still fill the distance between the two points with black without losing any quality.
Raster-based artwork (Photoshop is a raster based program. You can’t create vector artwork in Photoshop) uses little dots called pixels to fill an area with your image. Let’s imagine you have a 1 inch by 1 inch image. Inside of that image there are 100 of these tiny pixels. In a 1 inch (squared) space, you have 100 of those pixels, all crammed in and nice and small. So small that you can’t see where one pixel ends and another begins. But what happens if we Take that same image and make in 10 inches. Now those pixels have to stretch to 10 times their size to fill the area you specified. This creates the grainy or low-resolution image.

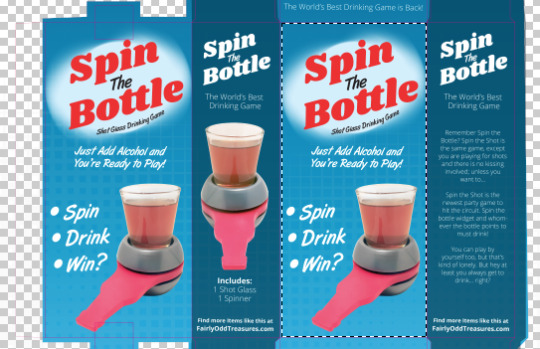
Resolution is locked, in a manner of speaking. The ideal resolution is 300 DPI (dots per inch, or PPI for pixels per inch. This is the same thing). Notice how on the right, the image is grainy, and pixelated? I took that half of the photo and blew it up to illustrate the effect of scaling an object beyond 300 DPI. The further you go beyond that point, the worse, and more apparent the issue becomes.
If you take an image that is 5 inches by 5 inches and 300 DPI, you can use it on your package artwork at 5 inch size without worrying about image quality. However, if you stretch that image to 10 inches (double it in size), that same 300 DPI image now becomes 150 DPI. The DPI measurement is just telling you how many pixels or dots are stuffed into a square inch. In the same example, shrinking that 5 inch image down to 2.5 inches (half the size) would make the image 600 DPI. This DPI will always be tied to the image and resolution can’t be added to a photo or image.
So What is Photoshop Good For?
Nothing! Just kidding. Like I said earlier, all Adobe programs are loaded with high end features, and Photoshop is no exception. Photoshop is great for creating raster-based images to use on your package design.
You should be using photoshop to edit photos for the use on your package design file. Some examples of this are color correction, removing the backgrounds and adding special effects.
Understanding Your Dieline, and Bleed Area
So you have illustrator and you have the dieline from your packaging supplier (the vendor printing your boxes or packages). Let’s open that up in Illustrator and see how that looks, and go over some basics.
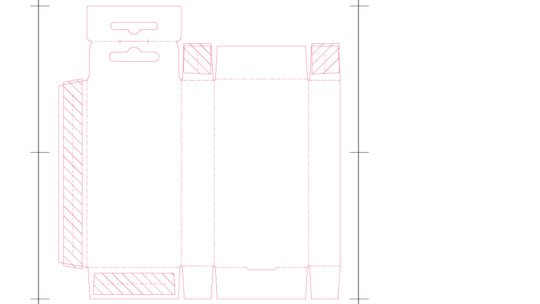
The pink lines represent where the machine will cut the stock into the flat shape of the box. In this example above, the dashed pink lines are clearly folds, however, most dielines use cyan (light blue) colored fold lines. The crossed areas are locations for glue.
If you are having a hard time visualizing how the final product will look, you can make a personal sample of it relatively easily. First, print out two copies. Write a number or letter for each panel. On the second copy, do the same thing with the same letters in the same location.
Next, actually fold one up and tape or glue it together. This will tell you what panels on the dieline go where on the finished box. Also take note of the orientation your markers take. Some of them may now display upside down, so your artwork will need to be upside down in those areas to appear right side up. For example, the top-left-most panel in the dieline above would be an area where the artwork should be upside down.
The next thing to account for is the bleed. The bleed is extra area where designers put color to correct for the printer being slightly misaligned. For this reason, try to keep important information 0.125 inches away from the side of the dieline. To put bleeds on a dieline like this, simply extend any colors or images that touch the dieline beyond the pink line by another 0.125 inches.
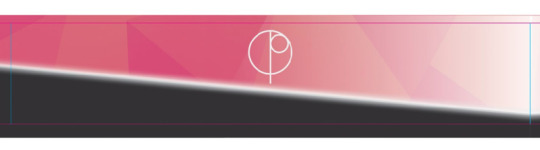
In the image above, notice how the dark gray and pink texture goes slightly beyond the dieline. This is what it will look like if you’ve designed for your bleed area properly.
Understanding Illustrator’s Tools
The best thing you can do to understand Illustrator’s tools better is to practice. You can also look at online tutorials or more inspiration and understanding of how the software works. You should be well versed in the following tools & features before taking on a serious package design project for yourself:
● Layers ● Swatches / Color Selection ● Pen Tool ● Fill vs Stroke ● Character / Paragraph ● Clipping Masks ● Links
This only scratches the surface, but taking the time to learn about those tools and panels will give you a good jumping off point.
Color Spaces & Printing
When you get your dieline from the printer, you should also find out how they like their files. Also find out if they do spot colors. You will need this information when designing your packaging.
Typically, there are a few options available to you:
1 Color 2 Color 3 Color CMYK CMYK + Spot Colors
One, 2 and 3 color are for when you are only working with that many single Pantone colors. Any use of CYMK color mixing or an image, would require CMYK Printing. CMYK represents the 4 colors of ink that go into printers. All colors that come out of the printer are a mix of cyan, magenta, yellow, and black.
Pantone colors are a special mix of inks to create a specific color. These print separate from CMYK. If your logo has PMS 265C, you would want to load that into your artwork’s swatches panel.
In some cases you will use Pantone colors as well as CMYK printing to create big multi-color jobs (could be CMYK plus 3 or 4 Pantone colors for 7 or 8 total colors). This sounds exciting, but keep the cost in mind. The more colors you’re printing, the higher the cost.
Staying on Brand When Designing Your Own Packaging
Once you have your design software down, it’s time to look at the fundamentals. Staying on brand being the most important. This is especially true if you already have a few products on the market.
The best, and easiest way to do this is take a previously created package design form your brand, and copy the elements (logo, writing, textures etc.) over to your new dieline. Then, place the pasted elements to the same areas where they were previously, and finally resize and retype the new copy to match your new product.
You likely won’t reuse the same imagery, but try to pay attention to the target audience and overall feel of the images between products. Do they feel like the same brand?
If you don’t have previously designed packages: You’re not off the hook. It just means your job got harder. What you create now needs to set the bar for future designs. Try to emulate the look and feel of your logo, and convey the message of your mission statement through your package.
To ensure quality, create 3 different looks for your design. Then take it around to your team and get good feedback. Then, take a VERY hard look yourself and make sure you’re happy with the design. Work that was done by an ameteur usually looks like that. It’s your job to push yourself beyond your limits when designing your own packaging artwork. Go through at least 2 or three rounds of this. You will eventually get to a point where your package looks professional and ready for the market.
Creating Digital Mock-ups
Now that you have your package designed. I’ll show you how to create a digital mockup in photoshop.
Step 1: Save your design as a PDF, and open that PDF in Photoshop. Step 2: Create a new Document (so you should have 2 windows open. Your design and a blank document). Step 3: In your opened PDF, take the selection tool and select one panel of your box.
Step 4: Copy that panel over to your blank document. Next, use the distort tool (Edit menu > Transform > Distort). This will let you alter the perspective of your layer.
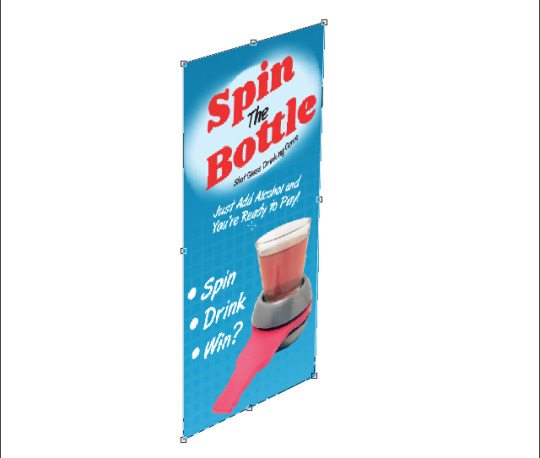
Step 5: Repeat steps 3 and 4 for each panel until no more panels would be visible in an actual photo.
Perspective tip: Typically vertical lines should stay perfectly straight. Your box can look deformed if you have leaning vertical lines.
Ultimately, choosing to do package design yourself over hiring a professional designer is your call. I recommend hiring a professional designer to help give your brand an amazing head start, and generally speaking their work will be higher quality than what a non-designer could produce. Just like how a sales manager would be a lot better at acquiring new store opportunities than a designer.
from Survis Posts https://survis.com/posts/thinking-outside-the-dieline-package-design-for-businesses from Survis https://survisinc.tumblr.com/post/174405735241
0 notes