#How to paint in sgraffito method
Explore tagged Tumblr posts
Visit Tumblr Blog
Explore Tumblr blogs with no restrictions, modern design and the best experience.
Last Seen Tumblr Blogs


Fun Fact
Kazakhstan’s Minister of Communications and Informatics has blocked the Tumblr site because it contained 60 sites of terrorism, extremism, and pornography in 2015.
Text
🎨 10 Timeless Art Techniques Every Beginner Should Try

Whether you're just picking up a brush or introducing your child to the world of creativity, exploring foundational techniques can open a lifetime of joyful expression. Here are 10 time-tested art methods that every beginner, no matter their age, should try.
Sketching: The Foundation of All Visual Art
Before color comes from. Sketching teaches control, proportion, and perspective. Start with basic shapes, move to still objects, and try shading for depth. All you need? A pencil, eraser, and a curious eye.
Watercolor Washes
There’s magic in watching colors bloom on wet paper. Watercolor washes introduce softness, flow, and emotion. This technique is perfect for skies, emotions, or abstract explorations.
Acrylic Painting Basics
Acrylics dry fast and offer bold colors — perfect for experimenting. Try painting simple objects or color blocks. You'll learn layering and brush control quickly.
Color Theory in Practice
Color theory helps you understand how to evoke moods. Try making a color wheel with paints or paper. Mix colors and see how they interact. It’s part science, part magic!
Collage Creation
Layering textures and images helps children and adults tell visual stories. Use magazines, scrap paper, and glue. Collage opens up a world where mistakes don’t exist — only happy accidents.
Still Life Drawing
Draw what’s in front of you — fruit, a teacup, a plant. It builds patience, observation, and the ability to translate 3D into 2D. Still life is a classic for a reason.
Oil Pastels & Blending
Bold, rich, and tactile — oil pastels are a joy to use. Layer colors, then smudge with your fingers or tools to blend. Try sgraffito: scratching through one color to reveal another underneath.
Printmaking with Everyday Objects
No fancy tools needed! Use potatoes, leaves, or cardboard to stamp patterns. It’s perfect for kids learning about repetition, shape, and symmetry.
Ink & Line Drawing
Pen and ink allow for crisp, expressive linework. Try drawing using only dots (stippling) or continuous lines. The practice builds hand control and creative confidence.
Mixed Media Play
Why choose one medium when you can blend them? Add watercolor to a collage, use pen over acrylic — mixed media encourages imagination and joyful exploration.
🌟 Final Thoughts
Trying these techniques is like learning different languages of art. Each one teaches something new, deepening your skill and your joy. Whether you're a child, a parent, or a curious creative, these timeless methods are the perfect place to begin.
🎨 Ready to explore hands-on creativity in a nurturing environment?
At Art For Heart, we offer personalized, inspiring art lessons for kids designed to build confidence, joy, and lifelong creative skills.
👉 Discover more about our art lessons for kids, where every child is guided to turn their imagination into something beautiful.
#art schools in san diego#art clasess for kids in san diego#art clasess for kids#art lessons for kids#art lessons for kids in san diego
0 notes
Text
Painting Course: A Comprehensive Guide to Mastering the Art of Painting
Introduction to Painting Course
Painting is a timeless form of artistic expression that allows individuals to convey emotions, ideas, and stories through colors, textures, and brushstrokes. Whether you're a beginner or an experienced artist looking to refine your skills, enrolling in a painting course can provide structured learning, expert guidance, and creative inspiration.
This guide explores the benefits of taking a painting course, the different types available, essential techniques, and how to choose the right program for your artistic journey.
Why Enroll in a Painting Course?
Taking a painting course offers numerous advantages, including:
1. Structured Learning
A well-designed painting course provides a step-by-step curriculum, ensuring that students build foundational skills before advancing to complex techniques.
2. Professional Guidance
Experienced instructors offer personalized feedback, helping students correct mistakes and improve their artistic abilities.
3. Exposure to Different Styles
From classical realism to abstract expressionism, a painting course introduces students to various artistic styles, broadening their creative horizons.
4. Access to Quality Materials & Tools
Many courses provide high-quality materials, allowing students to experiment with professional-grade paints, brushes, and canvases.
5. Community & Collaboration
Joining a painting course connects artists with like-minded individuals, fostering creativity through group discussions and collaborative projects.
Types of Painting Courses Available
Depending on your interests and skill level, you can choose from several types of painting courses:
1. Beginner Painting Courses
These courses focus on fundamental skills such as color mixing, brush techniques, and basic composition. Ideal for those new to painting.
2. Intermediate & Advanced Painting Courses
Designed for artists with some experience, these programs delve into advanced techniques like glazing, impasto, and dynamic compositions.
3. Oil Painting Courses
Oil paints are versatile and rich in texture. A specialized oil painting course teaches blending, layering, and drying techniques unique to this medium.
4. Watercolor Painting Courses
Watercolors require precision and control. A watercolor painting course covers washes, gradients, and transparency effects.
5. Acrylic Painting Courses
Acrylics dry quickly and are highly adaptable. An acrylic painting course explores texture building, layering, and mixed-media applications.
6. Digital Painting Courses
For those interested in modern art forms, a digital painting course teaches techniques using software like Adobe Photoshop and Procreate.
7. Landscape & Portrait Painting Courses
Specialized courses focus on capturing nature or human expressions, teaching perspective, shading, and anatomical accuracy.
Essential Techniques Taught in a Painting Course
A high-quality painting course covers key techniques to enhance artistic proficiency:
1. Color Theory & Mixing
Understanding primary, secondary, and tertiary colors, as well as warm and cool tones, is crucial for creating harmonious artworks.
2. Brushwork & Strokes
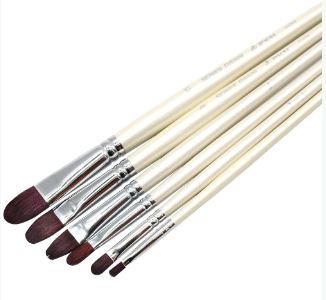
Different brushes produce varying effects—learning how to use flat, round, and fan brushes enhances control and creativity.
3. Composition & Perspective
A strong composition guides the viewer’s eye. Courses teach the rule of thirds, focal points, and depth techniques.
4. Light & Shadow
Mastering chiaroscuro (light and shadow) adds realism and dimension to paintings.
5. Texture & Layering
Techniques like dry brushing, sgraffito, and impasto help create tactile surfaces in artwork.
6. Drying & Varnishing
Proper drying methods and varnish application ensure the longevity of oil and acrylic paintings.
How to Choose the Right Painting Course
Selecting the best painting course depends on several factors:
1. Skill Level
Choose a course that matches your experience—beginner, intermediate, or advanced.
2. Medium Preference
Decide whether you want to focus on oils, watercolors, acrylics, or digital painting.
3. Instructor Expertise
Research the instructor’s background, artistic style, and teaching approach.
4. Course Format
Options include in-person classes, online courses, or hybrid programs.
5. Duration & Schedule
Short workshops are great for quick learning, while long-term courses provide in-depth training.
6. Reviews & Testimonials
Check student feedback to gauge the course’s effectiveness and instructor quality.
Top Platforms Offering Painting Courses
Several reputable platforms provide excellent painting courses:
Udemy – Affordable courses on various painting styles.
Coursera – University-level art programs.
Skillshare – Creative classes for all levels.
Domestika – Specialized courses by professional artists.
Local Art Schools – Hands-on training with experienced mentors.
Conclusion
A painting course is an invaluable resource for anyone looking to develop their artistic skills. Whether you prefer traditional mediums like oil and watercolor or modern digital painting, structured learning can accelerate your growth as an artist. By selecting the right course, practicing consistently, and embracing creativity, you can unlock your full potential in the world of painting.
Start your artistic journey today by enrolling in a painting course that aligns with your goals and passions!
1 note
·
View note
Text
Week 10: Revival
Hey everyone, welcome back to the blog! This week was largely academic, in preparation for next semester and the part-time positions I plan to hold alongside my academic responsibilities as a student. I also went to Copenhagen and reunited with my roommates from last semester whom I love to death! As usual, the blog is divided into sections by topic, feel free to skip over ones that don’t interest you.
Anyways, here’s a fun fact to start off the blog: The Prague metro stations were built in the Cold War period with the potential function as nuclear safe zones; i.e. a space for rebuilding hospitals and other important institutions below ground. Náměstí Míru (Peace Square) is home to the deepest station!
Architecture Tour - Revivalism
This week’s architecture tour was all about the Revivalist movement - using aesthetic styles that reflect a previous architectural era, while also incorporating modern material and technology. We explored the building we take classes in: Villa Gröbovka. The Neo-Renaissance residence took inspiration from Italian architecture, featuring marble, symmetry, Florentian motifs, and detailed ceilings. The original owner, Mr. Gröbe, actually threw in a communist symbol on the second floor ceiling, because why not mix politics and art? My professor said it was because the Renaissance was a humanist period in which everyone was included in reforms, including peasants. The building reflects classic characteristics of a Renaissance palace: a gallery in front of the building, rectangular shape and symmetric layout of windows, and a big balcony.
The Villa is also surrounded by beautiful gardens, which used to be aristocratic, but now serve as a public park. Gardens in the Renaissance period were often built as part of the residence, and include a mixture of tree types - an attempt at returning to the garden of Eden. Finally, there's a grotto, which resembles a cave with a fantastical twist. It features many secret passageways, a beautiful fountain, and mythical sculptures. Kids love to play here!
School
This week at school we had our challenge project mid-point presentation in front of our client. We presented our analysis of their current SEO strategy based on the data they acquired through Google Analytics, and then recommended some changes to make to improve their site architecture and domain authority. It went well, but we didn’t receive much feedback because the client representative is not a super technical person, so she didn’t understand a lot of the specifics we delved into. That relieved some of the pressure on our team when we were presenting because it didn’t need to be perfect. We also had two database exams, which were long and boring, but at least we got them over with. Our teacher lets us use ChatGPT to help us design our database and even write/debug code, so that makes it much easier.
Mug Painting
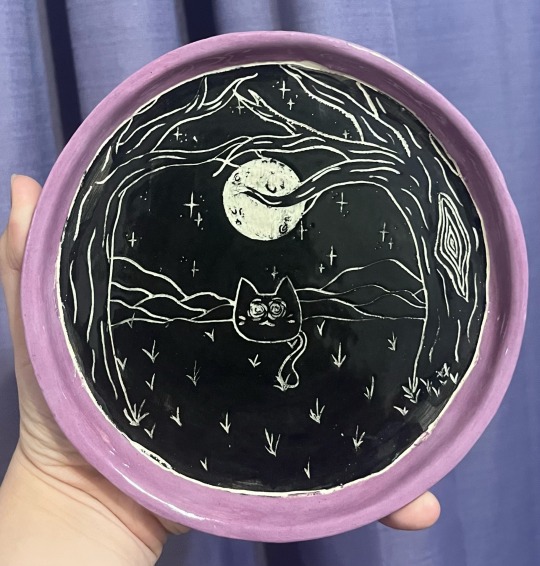
This week’s IFSA excursion was hidden in the back of a local souvenir store - a little workshop where we could paint our own mugs! We got a bit of instruction on how to paint using the "enamel" technique, which, when met with heat, dries quickly and can be scratched off to reveal the layer underneath. It’s mistake friendly, because the enamel washes off with water, even when dried, until it’s actually put into the kiln. When fired, the enamel turns into a permanent layer. This artistic technique is called “sgraffito”, a term that comes from the Italian word meaning “scratched.” The idea is that multiple layers of plaster or glaze are applied, and the top layer is methodically scratched through to reveal the contrasting layer beneath. I painted a white and black marble overcoat onto my mug, and then carved intricate flowers into the sides. It actually turned out really nicely!

Prepping for next semester
It came time to start preparing my roles for next semester at UofM. I need to have at least one job during the semester to be able to afford life, and it is the dreaded time to start applying for roles for next semester. In the Fall, I worked as an IA for EECS 376 and a CSE Peer Advisor, both roles I thoroughly enjoyed and was fulfilled with. Unfortunately, because I went abroad, I couldn't continue either of these roles and have to reapply for both of them for next semester. The IA application process is always super competitive, so I have no idea if I’ll get my same position but I really hope so because I loved teaching 376. My friends can attest to me being really unhappy to have to re-apply, because returning IAs typically just have to fill out a form and are guaranteed their position back. Not in this case, I guess. Anyways, I went ahead and re-recorded my application video, a 5 minute lesson on any course-related content, and am hoping to get an interview or call back over the summer. Fingers crossed! The application for Peer Advising opens this summer, but I stayed in contact with the staff throughout the semester and they promised to keep an eye out for my application. That job was truly a nice break in the day, and the CSE advising staff is absolutely incredible, so I hope to return to that position too.
I am also super involved with the Society of Women Engineers at UofM, particularly in outreach, so I applied for an officer position for next year. I served as the SWIndia Director last year which was probably the most fulfilling experience I’ve ever had. However, I wasn’t able to hold one this year because I was not in AA this semester, so I’m excited to be back in a leadership position. The turnaround for these interviews was quick, and I’m excited to announce that I’ll be serving as the Elementary Outreach Officer for the 24-25 academic year! Super exciting and important stuff :)
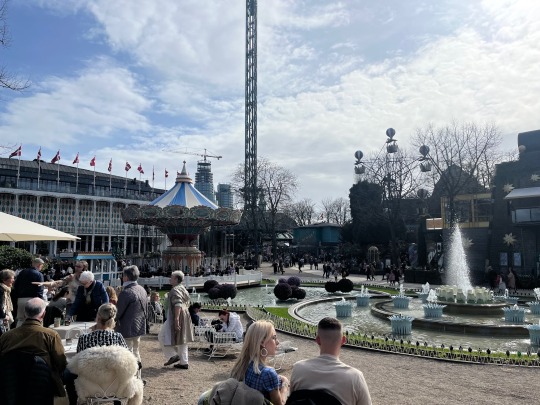
Copenhagen
This weekend I went to Copenhagen to visit my roommates from last semester! It was so refreshing to spend time with them and we really enjoyed the weekend. I really got lucky with the friends I’ve made in college and have surrounded myself with good people. They also happen to be fun and silly and passionate and driven and supportive and I truly believe they make me a better person just by hanging out with them. So yeah, refreshing company. That isn’t to say I haven’t made these types of connections with people in Prague, because I have and I love them so much, but our program is a very niche community that we spend most, if not all, of our time with. Our community is made up almost entirely of Michigan CS kids.
We spent most of the day Saturday at the Tivoli Gardens, one of the oldest operating amusement parks in the world, located in the city center. It was opening weekend, so even Alex and Maya who are studying in Cope haven’t been yet, making it an exciting new experience for all of us! The park isn’t grimy like any of the amusement parks you would think of in the US, but rather a perfectly manicured garden that just happens to host contemporary rides and entertainment. Overall, a great way to spend the day, especially if you like wild rides and fairs! Plus we got blessed with great weather and lots of sunshine, something atypical for Copenhagen they said!
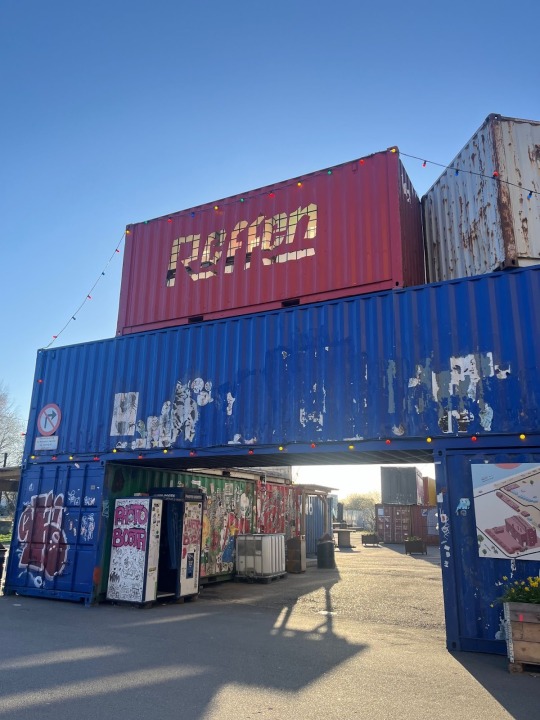
We went out both nights, and the city was surprisingly super lively and very accommodating to students. There’s this one bar that turns into a cafe in the morning (with great prices!) that serves free water and 24/7 bathrooms which is nice, there’s nothing in Prague like it. The only downside is that the whole place smells like beer pretty consistently. Sunday afternoon we stopped by Reffen, a street food market in an old shipyard which was probably the highlight of the trip. It just opened for the season and had literally every cuisine I could imagine. It was popping with skaters, musicians, and just a ton of young people waiting for the sunset. Great vibes.
Overall I loved Copenhagen, but found it to be chilly, cloudy, and ridiculously expensive (more than London and Paris!) so I probably wouldn’t come back and definitely wouldn’t study here if you’re ballin’ on a budget or struggling with seasonal depression. I am very glad I got to spend time with my friends though, and I even got to try the infamous cardamom bun! Possibly an unpopular opinion, but I still think that cinnamon rolls are much better.
Now for some ins and outs:
Ins:
April weather: This week seems to have brought sunshine and warmth throughout Europe which is exciting!! Yay for Spring!
Brunch plates: Cope is known for yummy brunch plates where you select 5-6 small menu items for your customizable spread. They’re super versatile, very filling, and really tasty. Highly recommend going to one of the many restaurants that offer them
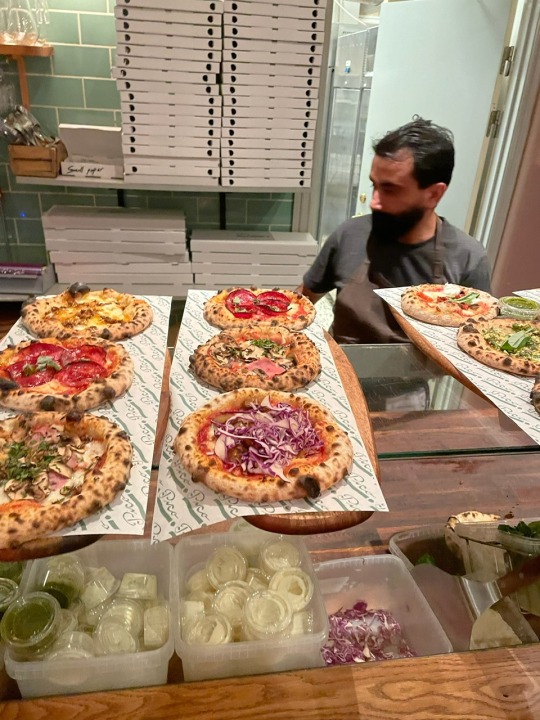
Pico’s Pizza: Another Copenhagen food rec… this pizza place serves tiny personal pizzas. Each order comes with 3 pizzas you choose from a seasonal menu with all the classics and some more creative options. I swear these pizzas are sooo good and so tiny and cute. Plus they’re known for their allergy friendly gluten free/vegan options, they cost the same price and are of amazingly high quality.
Outs:
Copenhagen prices: The same pastry that would’ve cost me $1, maybe $2 at an expensive coffee shop, in Prague, cost me $5 in Cope. We spent our money wisely and didn’t have to pay for a hotel since we slept at Maya’s place, but still racked up a decent amount of spending.
Re-applying for last semester’s IA positions after going abroad: All of the EECS IAs had this problem, not just me, where our jobs got taken away after taking a semester abroad. Typically returning IAs don’t have to reapply, especially if they were highly regarded on staff, but that wasn’t the case for anyone I talked to here. Our applications aren’t even getting set apart from the other 500+ students that apply, so pray for us…
That’s it for this week’s blog, catch me later! (You know where to find me :) )
Na shle,
Reese Liebman
Computer Science and Engineering
Institute for Study Abroad (IFSA) CS Tech Career Accelerator in Prague, Czechia
0 notes
Text
Art Tip #4 - Painting Techniques
Understanding some basic painting techniques will help you experiment with various styles and create your own unique artistic voice if you're wanting to improve your painting capabilities.
If you're interested in learning more about how to interpret art, check out our videos on where to start for tips on where to look for inferences. ✨
PART 1: Palette Knife
youtube
You might mistakenly believe that a palette knife is just useful for blending paint on the palette; however, this tool can also be utilized to add some distinctive effects to your work that a brush would find challenging to achieve. Just load a small bit of paint onto the edge of the palette knife, and dab the edge of the knife onto the canvas. Simply make sure the paint is applied evenly on the knife's edge. You must also constantly reload your palette knife between strokes because you typically only gets one line every stroke.
PART 2: Pouring Technique
youtube
Pouring is a basic but effective technique that works best with acrylic paint. This method includes pouring paint directly onto a surface and tilting the canvas at various angles to activate the paint and move it around. Acrylic paint must be rendered liquid and pourable with the addition of a Pouring Medium and other components as necessary in order to do the acrylic pouring. With the use of this technique, the colors can naturally meld together to produce colorful, one-of-a-kind artwork that reflects the interactions between colors.
PART 3: Dabbing Technique
youtube
Dabbing Technique involves dabbing paint onto a surface using a stiff bristle brush, paper towel or sponge. Applying the paint fast and gently is recommended. A piece gains movement and texture via dabbing. For example, you may construct treetops that seem to be moving in the wind using the dabbing technique. For inspiration, take a look at some examples of Claude Monet’s work.
PART 4: Sgraffito Technique
youtube
Sgraffito painting technique allows artists to add more colors to underpainting layers once it is completely dried. In order to reveal what is beneath a layer of paint, this includes scratching. Artists can successfully scratch off the superficial layer to reveal distinctive patterns or shapes by covering a previous surface with another layer. It is possible to use any object that will allow you to scratch a line into the paint.
That would be our stop! There's a lot more techniques, so explore more!
~ Now pack your art supplies and start creating! Safe travels🚍🎨
-Post by Bacarro
#Art#traditional art#Painting#Painting Techniques#YouTube#palette knife technique tutorial#dabbing painting technique#How to paint in sgraffito method#How to paint in pouring technique#Traditional Art method#art terminal ph#art tips#art tutorial#art guide#art reference#illustration#art#Painting tutorial#painting guide#painting tips#How to Paint in splattering technique
4 notes
·
View notes
Note
Mwahaha i have QUESTIONS
First of all, what's the best seating arrangement? On a couch, at a table, in bed, in a shallow hole in the park?
What's your go-to outfit if you're just doodling? Mine is high-waisted pants and something tucked in
What's your favorite wh ship?
Which jack stauber song/video creeps you out the most (Lima bean man)
Would you rather be able to only drink water, or no plain water ever again?
What do you think the worst job is?
If you're about to get up and an animal rests its head on your foot, are you legally obligated to stay there until they are ready to leave?
What's your favorite medium?
By myself? In MY SPOT on the couch. With friends? In a vaguely menacing circle or half circle. The council has decided death to be far too merciful a punishment. TO THE BABY SHARK WITH FART REVERB CHAMBER YOU GO.
Confused by the question. If you’re asking what I, myself, am wearing while doodling, probably pajamas tbh. If you’re asking what sort of outfit I like to draw characters in, usually just their canon outfit tbh. But I’m an absolute sucker for RIDICULOUS and FABULOUS blazers and coats for my original characters. ✨✨✨
Good ol’ canon FranklyDear. They’re just so cute together!!
I wouldn’t say any of them really creepy me out, so I’ll just share my two favorites, which are The Pumpkin Song (mention of a cat + mecore fr) and Hamantha (she’s just impossible to ignore).
No plain water ever again. If I’m really craving WATER, I’ll just drink water with a liiiittle bit of lemon juice or smthn in it to make it *technically* not “just plain water”.
The worst job? For me, personally, definitely a hooker. I’m asexual- I think that speaks for itself. I also just don’t really like touching people in general yk?
I pet that critter until it’s so happy it starts headbutting my hand. I’m gonna pick it up and carry it with me to wherever I need to go. (Unless it’s outside, in which case I will make that critter the BEST, MOST COMFORTABLE little spot to snuggle EVER and I will cuddle them when I return from The Outside.)
Clay! I’m mostly a sculpture artist and clay is super great to work with because of how easy it is to shape. I’m a bit pickey with my clay though- I don’t really like air dry clays or baking clays because of how weirdly rubbery they are. You can’t make slip (equal parts clay and water-basically clay glue) with them and if you’re building a Thing in pieces, it is an absolute NIGHTMARE to try to attach them securely. Low-fire cone 05-06 white clay and mid-high-fire cone 5-6 speckled buff clay bodies are my favorites to work with because of how soft they are- they make really good slip and it’s easy to build in pieces because they attach super easily with just a little bit of scoring, slipping, and pulling. I can get a ton of detail in firing clays that air dry and baking clays just won’t allow. I also generally prefer the look of glaze to paints on my art. I like creating utilitarian items from clay too, so I need glazed stoneware to make them food safe. Like this cool sgraffito plate I made last year!
There’s also a ton of amazing decorating techniques that are possible with firing clays, but not air dry or baking clays. One of my favorites is definitely raku, which is where you fire a piece to bisque, then apply raku glaze (special glaze) and fire that. BUT here’s the important part that makes it raku- you have to fire it at an insanely high temperature (750°C) VERY QUICKLY and take it out of the kiln while it’s red-hot. Then you stick it straight into a metal container of some sort with flammable material in the bottom (shredded newspaper, dried leaves, etc.) and let it catch fire. Then you put the lid on the metal container and let it burn until it runs out of air. Now you can either let it sit in there for a while to cool or you can remove it to let it cool- it doesn’t particularly matter. Firing with this method makes the most INSANE glaze patterns and it’s also so gorgeous omg- Here have some examples:
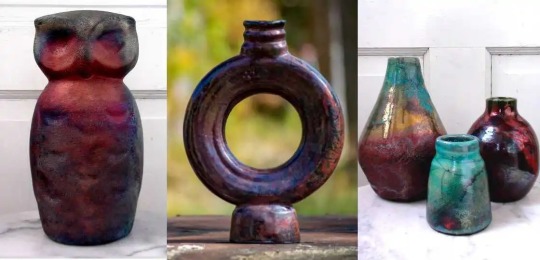
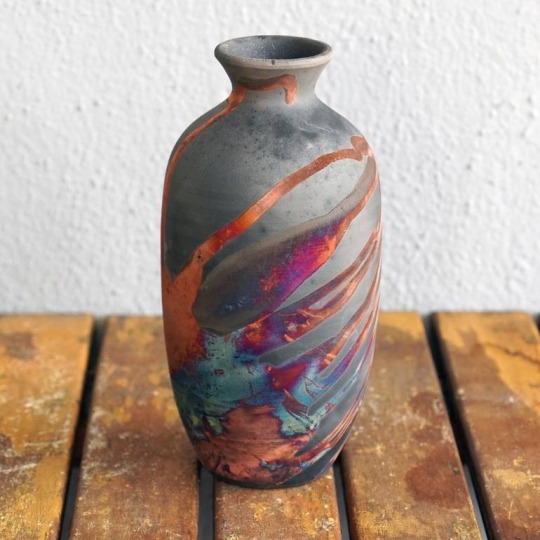
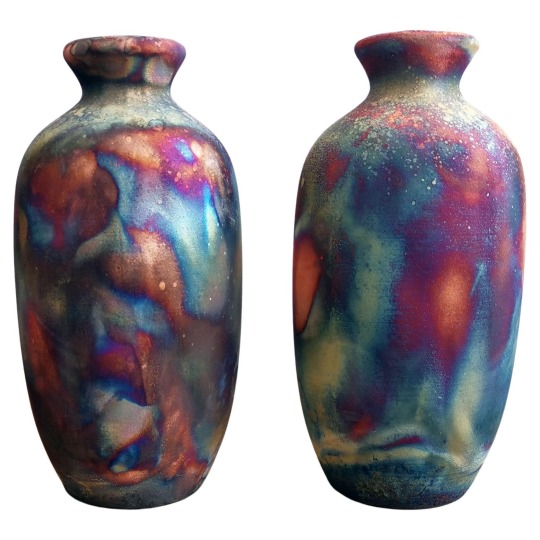
It’s really pretty and super fun to do because it’s not often that you get to set your art on fire and have it turn gay. I’ve done exactly one raku firing and it was one of the absolute best things I’ve ever done. SO fun.
Anyway that was quite the ceramics rant there… 👀
13 notes
·
View notes
Text
Week 5
Link #1: How to Create a Painting With Shading : Painting Techniques
~You want to make sure you have at least one dark color and one light color. Okok, so I’ll be including a little picture of what I did, but I’ll be using Emerald Green as the light color and Ultramarine as the dark color :) ~Now mix them together to get your medium tone. Oh. I mean, it comes out as a pretty teal owo. You’ll see in a bit, dw. ~Dip your brush in the water and just dip into your middle tone and paint a circle on your paper or canvas. I hope y’all know that I don’t expect you to do this with me. I mean, I wouldn’t mind if you tried this out LOL. Whatever floats your boat y’know. Besides, who doesn’t love painting circles, am I right?- But seriously, circles do be pretty hard to make legit circles. Like, I think I’ve only managed to get one even close to being an actual circle, and that wasn’t even that close. ~It’s completely okay to have some variation, thicker paint around the edges and then kind of wash you paint in the center of the sphere (for now it’s a circle, but that’s besides the point) ~You don’t have to completely rinse your brush out. It's okay to leave a little bit of that color on because it’ll create a smooth transition. I actually didn’t think of that to be completely honest with you. I tend to always wash my brush completely before I even go into the next color. I- well the more you know, the better you can be c: ~Grab a little bit of that light color and you’re gonna add some highlights in the upper left or right corner of your sphere (whichever one you prefer I suppose, I tend to always have the light coming from the left) ~Even though we’re using acrylic, the paint should be staying fairly wet and just kinda blend that lighter color in with the darker color. So like, wait. I just kinda went braindead for half a second, I’m like- Acrylic paint isn’t wet, that’s only water colors. And- I’m just sitting here now dumbfounded because when you think about it- Water color isn’t wet- But acrylic paint is- it’s- yes- look I have no idea where I was going with this bit LOL. But here it is-(Intense brush strokes) LOL ~Create as smooth of a transition as possible between the upper and lower part of your sphere. I cannot tell you guys how good this looks tbh, and we’re only maybe halfway done LOL ~Dip the brush back in the water (What if I wanted to dunk it though-) and go for your dark color and basically you’re just going to do the opposite of what you did with the light color, meaning that you’ll be in the opposite, bottom corner (Don’t mind the fact that I just said the bottom corner for a sphere- I’m intelligent, yes.) ~Really try to blend it in with the paint that’s already down there. ~You should be doing light brush strokes, you don’t need to push too much paint down onto the page. See, the thing is. I have a pretty heavy hand when it comes to anything really, so I would say this was the most challenging thing for me, so far that is one of the main struggles for me. ~Now rinse your brush out and leave a little bit of paint on the brush and this is going to be used for the shadow, which is just gonna be a washy shape surrounding the bottom of the sphere and that’ll create a plane for your object (sphere) to be on. I never actually thought of it like that- Usually I thought of the shadow as, well, a shadow lol. But I guess when you add the shadow it does give it a little place to sit. Almost like a dog sitting on a mat or something.
My little video painting a sphere :)
(This video was well done, I would like to say that the sphere doesn’t really look all that much like a sphere BUT it does show enough to help with one’s shading, which was the whole point of that video)
Link #2: Beginners Guide to Highlighting and Shading
(So, since this is a website not a video. I’m going to only write down what I didn’t know already, that way it doesn’t take years to get through all of this kk? I did include the link^ so y’all can check it out yourself as well :) ) ~Most beginners use black for all their shadows. In reality, shadows are rarely a true black. Okay, it’s not like I didn’t know this before. But I once made the mistake of trying to make every single shadow black. I can feel the pain, it’s okay. I just learnt this at the beginning of this class to be honest with y’all LOL. ~To find the right shadow color for your object, add tiny amounts of black or the cool complementary color to the original color of your subject. So basically, what the first link said as well. You have the light color, and the dark color. But to get that dark color you need your medium tone, so kinda backwards in a sense-ish. ~Blend out the edges to make sure you don’t have a harsh line. Use various mixes of your shadow color to gradually lighten your shading and blend it into the surrounding area. I meannnn, I think I’m pretty good at not having harsh lines for the most part. I would say that the edges are usually always a bit harsh, but other than that I think the shading part is pretty well blended. ~You can also use a glaze to add shading. (Yo, okay so I have zero idea what a glaze is when it comes to painting- I-) ~Shadows are not always dark. To be fair, I think most of the beginners (including myself) start off thinking shadows are always dark. That they’re more prominent than the object itself. I think that’s what’s stopped me a lot of the times with my earlier paintings that I did a while ago. ~It is important to study your scene or reference photo before planning out your painting I 100% agree, study the scene, the object, everything. Analyze the reference you want to paint before you actually dive right in. That goes with any art actually, not just painting. ~It is tempting to add pure white paint where the light source hits your subject. (I can relate, don’t worry) However, as with shadows, highlights are rarely pure white. ~Use a soft brush with a light touch for highlights. They should be subtle and the edges well blended into the surrounding color. Oh goodness, again I’ll have to work on my heavy hand, but other than that I would say I’m doing pretty good about this. ~Gradually build up the highlight rather than having a blob of light colored paint. Uh, oOpS ._.
Link #3: 7 Must-Know Painting Techniques For Artists
1. Under painting
~Create an underpainting in burnt umber or a mix or burnt sienna and phthalo blues to establish shadows and values. I never actually thought about doing this tbh. I usually start with a white canvas and go from there, y’know? Maybe if I try this I’ll see some big improvements, who knows :) ~Work paint up from thin to thick, especially when using slow-drying paints. It’s impossible to work on top of heavy, wet paint. (I agree, like- There’s been times that I’ll legit just try and paint over the first coat maybe 15 minutes after I paint it on. I’m like, nahhh it’ll be fine to paint on, what’s the worse that can happen. Well- I ruined the painting lesson learned though) In the same way, work up to highlights, adding the brightest, and usually heavier, paint at the end. 2. Blocking in
~A filbert is a good general brush for blocking in form and paint. It has a dual nature, combing aspects of flat and round brushes so it can cover detail as well as larger areas.
These would be the type of paint brush that they’re talking about. They’re a mix of flat brushes and round brushes. I maybe have like- 2 of these in all between 3 art kits to be honest. I may have to start investing in more of them, who knows.
3. Building up texture
~Almost anything can be used to add texture to your paint. (I honestly never knew that people added things to their paint to create texture) There are already made texture media available, but I have seen items such as egg shells and sand used to add interest to a painting. Oh? Bro, who would’ve thought about adding eggshells to your paint, like I honestly never thought about adding anything actually. I just paint with what I got, y’know. But maybe I’ll try this soon™ ~Use an old toothbrush to spatter your image with paint. This can be remarkably effective at suggesting noise and grain. Well, that’s new. I really didn’t think about using anything else for a painting besides paint brushes. oOpS
4. Dry brushing
~This method tends to work best when applying light paint over dark areas/dried paint and is useful for depicting rock and grass texture. So, I’ma be completely honest with you guys. I used to paint without water, and like- I was so ignorant about most of the things that I know now. I would only use water to wash my paint brush afterwards, but now. Water has become so helpful in my paintings oml, it’s amazing what a little bit of water can do for your painting.
5. Sgraffito
~Removing paint can be just as important as applying it. I- I only ever removed paint when it was in the wrong spot.- I didn’t know that removing paint from anywhere can help, especially when you want to expose the underpainting.
6. Glazing
~Glazing is the process of laying a coat of transparent paint over a dry part of the painting, and it’s used for intensifying shadows and modulating colour. Well, now I know what glazing is LOL.
7. Painting with mediums
~Mediums are fluids that can be added to paint to modulate its consistency, drying time and texture. Again, I honestly never knew that. I’m so inexperienced with painting items and ways it’s not even funny man. ~In the case of acrylics, you get different mediums that make the paint matte or gloss.
Link 4: Acrylic Painting Techniques
1. Dry Brush
~You want to aim for seeing your brushstrokes in the paint. I don’t tend to like seeing my brushstrokes within my painting to be honest, but if it works it works, kinda thing.
2. Sgraffito/combing
~Involves painting a layer or two of paint and then etching into it to create a design and reveal what’s underneath. Again, I really don’t tend to do this either. Considering I just learnt it LOL but I wouldn’t have thought about removing paint or etching anything within the paint.
3. Wet-in-wet
~You can do wet-in-wet with acrylic just like you can with watercolor so go ahead and lay down some water on your paper and then you can just drop in the acrylic paint. My thinking- If you want a watercolor effect, why not just use watercolors? Big brain time LOL
4. Overlay/glazing
~Start by laying down a darker color on your paper and then letting it dry. (Yes, we need to let this dry for several minutes. So while you’re waiting, pop in some popcorn, watch it pop, eat some and then you can go back to painting :) ) ~What you’re going to do now is overlay or glaze a lighter wash over top so water down your paint just a little bit. Y’know, this technique might actually come in handy with my next painting ngl. But we won’t talk about that until the time comes owo
5. Impasto
~You’re going to use a palette knife instead of a brush so this is a really nice way to achieve a lot of different texture within the paint. So, I only ever use palette knives before for backgrounds. To get that kind of color dye/blending feel y’know- I can’t think of the word right off hand but- TYE DYE yes tye dye feel, hush- :(
6. Modeling Paste
Before we even learn anything, like- I never knew that you could use modeling paste for painting?!?!?! Like- I only ever used modeling paste when I was fixing a clay sculpture or something of the sort, y’know?- The more you know ~A great way to add texture into your artwork. So you can use a palette knife to scoop it out and then apply it onto your paper. You could also use a paintbrush to softly apply it to your paper. (My brain man, this is all so new for me- I-) Note you can also mix it directly with the paint color if you want to. Let the modeling paste dry and then you can paint over top of it. Waittt, you could use this to make the texture of mountains owo and rock beds, bro- I feel so inspired by this one ngl.
7. Stencil/Stamp
So the girl in the video was pretty basic with it, you just use it as a stencil should be used and of course washing it afterwards.
8. Sponge
~With a sponge, similar process as you would use with watercolor. You’re just using the sponge to apply paint instead of a brush. (Big brain, she knows) You can go back in after you let the first layer dry a bit and add like a second or third layer of paint. Y’know, time for a funny-ish story. So back in elementary school, we did this sponge painting, we could only use the sponge. And I’m like, I wonder what a pufferfish would be like with a sponge. So- I painted the sponge right, then I took some bottled glue, put the glue on the back of the sponge and glued it to the paper. LOL My art teacher found it funny, but had me remake the painting and explained that it had to be painted with the sponge, not made out of the sponge. So yeah-
9. Drips/Splatters
~To achieve drips, mix some water into your acrylic paint and you’re just gonna kind of angle your paper and guide the drips down. (So like, this would be kinda effective when you want the feel of a waterfall? Yes, no, maybe so?) ~For splatters, it’s better to use a flat bristle brush. Load it up with paint and you can actually just kind of flick the bristles and really control your splatters.
10. Gel Medium
~Gel medium is used to thicken your paint and also actually make it a little bit more adhesive. So you can mix it directly with your color and it’ll lighten it just a little bit. So, when using this don’t expect the exact color, okay got it.
11. Scumbling
~You can scumble with paint just like you can with colored pencils. So use your brush in a circular motion but keep it controlled. Well, that’s new. Now I know what it’s called at least LOL. I honestly never knew what that technique was called until now, but I remember always coloring with colored pencils like that just because my mum did--
12. Masking
~You can mask with masking tape of course or you can also use rubber cement. Rubber. Cement. I- Howcanonemakecementrubber- I might actually have to search up what it looks like, I’ve never heard of anything called rubber cement. ~If your paint bleeds through, just go back through and patch it up with some paint.
13. Mediums: Gloss or Matte
She really just explained what she was doing for this one.
14. Soft edge vs. hard edge
~Soft edge and hard edge are just two paint terms for how the paint is laid down and the quality of it. Who knew, I actually didn’t realize that how you lay down the paint affects how soft or hard the edge is.
So, I’m sorry for this being a bit late. But I feel like I learnt a lot with this one :)
0 notes
Text
Technical problems
I have been trying with clay few times now and I can say is still tricky to get the right stuff ( meaning same piece with same consistency and glaze) I have done few tiles now but the final phase: glazing my last tiles didn't work as I think they were too wet when I poured the glaze. So same method only one different step ( didn't wait long enough to be dried before applying the glaze) they came out pale and almost greyish, you could also peal the glaze out of them. Clay has its own life and you need to understand it if you want an specific vessel to look in a certain way. How much you handle the clay before moulding and how much glaze you pour or paint it also affects how it is coming out. Did not help that a whole set of tiles were lost, so I'm short few (about 12 of them) I enjoyed the sgraffito technique in terracotta, it was fun carving and printing designs on them. The more I work with clay the more I get suck into it. There is endless practice and learning
0 notes
Photo
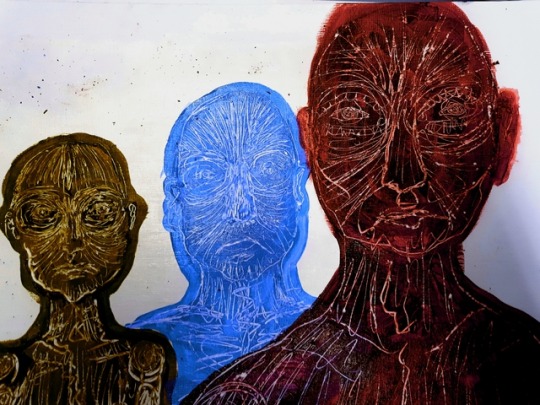
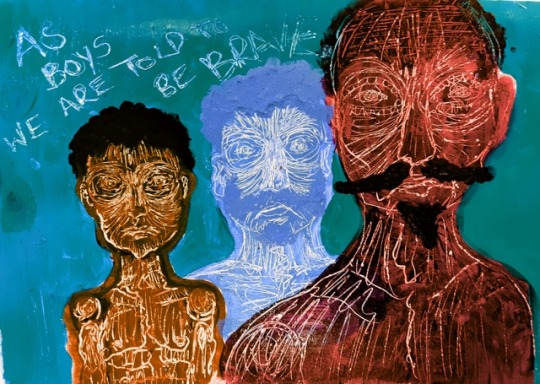
Masculine painting
After reading ‘The descent of Man’ by Grayson Perry, I decided to paint a response to the book. This painting is about the stereotypes boys have to put up with, and how this can impact their mental health. The painting is titled ‘As boy we are told to be brave’ referencing to a quote in Perry’s book. I chose to use the method of sgraffito into acrylic for this composition, to scrape away layers of paint to convey the revealing of the males true self and feelings, acting against societies ideals and expectations of the ‘ideal’ man.
0 notes