#How to run mac on windows 10 virtualbox
Explore tagged Tumblr posts
Visit Tumblr Blog
Explore Tumblr blogs with no restrictions, modern design and the best experience.
Last Seen Tumblr Blogs


Fun Fact
Tumblr has been providing a Korean-language service since 2013.
Text
How To Install VOCALOID 1 On a Modern Computer
Full tutorial is under the cut, but the basic steps for this process are:
Enable virtualization on your computer.
Install VirtualBox.
Use VirtualBox to create a Windows XP virtual machine.
Transfer the VOCALOID files into the XP virtual machine.
Install the VOCALOID program on the XP virtual machine.
You don't need to have a ton of space or RAM for this, it'll work on a garbage computer (like mine). It works on all common operating systems too (Windows, Mac, or Linux).
Step 1: Enabling Virtualiztion
This is the only step that varies based on which operating system you're using.
I'm covering the instructions for Windows 10 in this post (because that's what I use). If you don't use Windows 10, you'll have to look up a dedicated tutorial for enabling virtualization on whichever operating system you use.
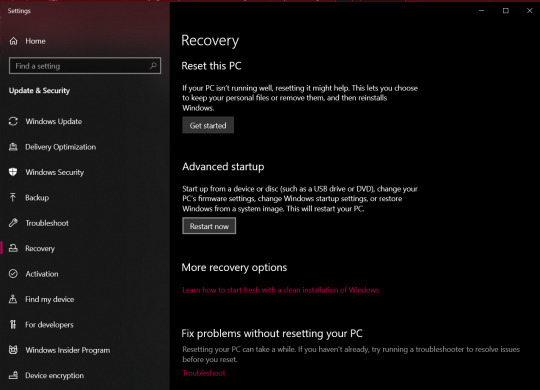
Locate "Advanced startup" in the regular system settings. Either use the start menu search bar to get there quickly, or click through "Settings" > "Update & Security" > "Recovery".
From there, hit "Restart now"
After the restart, you'll be brought to a screen asking you to choose an option.
Select "Troubleshoot" > "Advanced options" > "UEFI Firmware Settings"
You'll then be prompted to restart to change the UEFI Firmware Settings. Hit restart, and you'll be sent to your computer's BIOS.
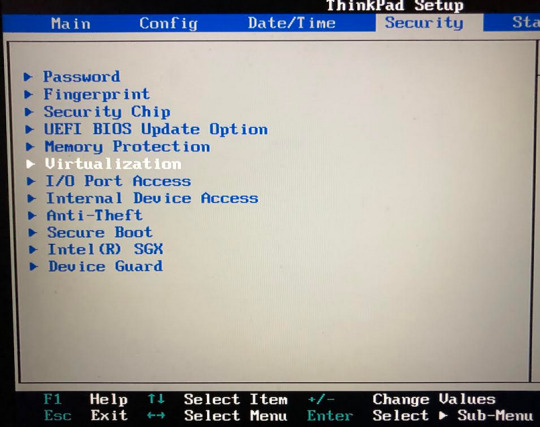
The specific menu will vary depending on what brand of physical computer you're using (Lenovo, Dell, Toshiba, etc). I'm providing the visual aide for a Lenovo here, but you can look up a visual guide to the BIOS for whatever brand computer you use.
Head over to the "Security" tab to find the virtualization setting.
Once you enter the virtualization settings, switch both the options here to "Enabled".
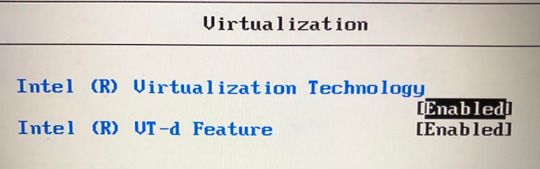
Then you just need to save and exit by hitting F10, and your computer will restart normally.
You can see whether or not virtualization has been enabled by going into "Task Manager". Get to "Task Manager" by right-clicking the task bar, or search it up through the start menu.
Once you're in "Task Manager", click over to the "Performance" tab, and it will say "Virtualization: Enabled" or "Virtualization: Disabled."

End of Windows 10 specific instructions here, everything after this will apply to all operating systems.
Step 2: Install VirtualBox
VirtualBox can be downloaded from here (on virtualbox.org). Just pick the right package for your operating system.
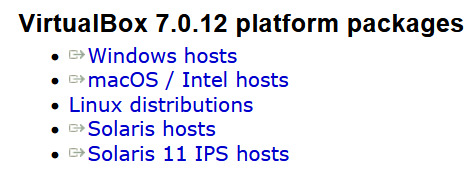
Once the EXE file is downloaded, run it to go through the VirtualBox installation process.
Step 3: Create a Windows XP Virtual Machine
First, you need to get an ISO of Windows XP. (Digital equivalent of an installation disk basically). I acquired my copy through Internet Archive here.
Just hit "ISO IMAGE" under "DOWNLOAD OPTIONS". Don't worry if it's downloading super slowly, that's normal on Internet Archive.
Open VirtualBox, and select the "New" option to create a virtual machine.
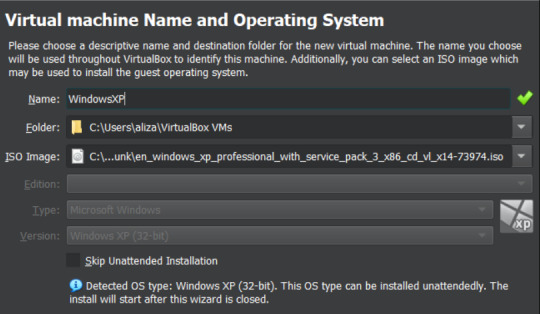
From there, go under the "ISO Image" tab and find your XP ISO. VirtualBox will be able to detect that you picked Windows XP.
"Skip Unattended Install" will be unchecked by default. I recommend keeping it unchecked so you don't have to go through the XP installation process manually.
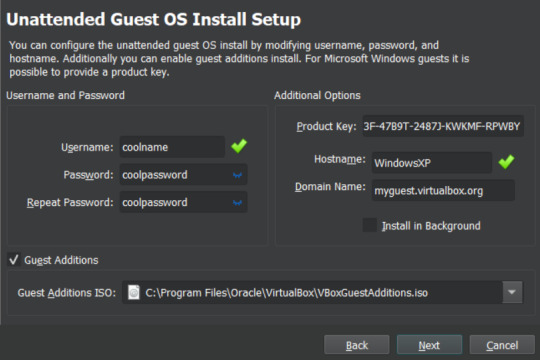
The Internet Archive page provides this working product key you can copy-paste: MRX3F-47B9T-2487J-KWKMF-RPWBY
"Guest Additions" will be unchecked by default, but I recommend checking it. This is a surprise tool that will help us later 😉
(You could still install Guest Additions later, but checking the box here is less work).
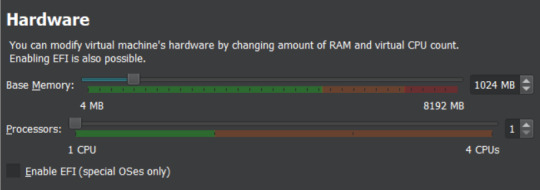
512 MB of RAM is the minimum you can away with for VOCALOID, but a full 1 GB (1000 MB) is recommended for better performance.
No need to adjust CPU count.
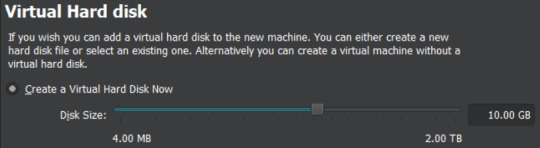
Choose "Create a Virtual Hard Disk Now".
Now you get to pick how much storage space the virtual machine will have. VOCALOID files aren't very big, so they don't require too much space.
I'm not sure about the true minimum size required for this, so I recommend just leaving it at the default of 10 GB. It's unlikely that you'll actually fill/use all of that space, it's just the maximum that the virtual machine will be hypothetically capable of holding. XP with V1 installed took up less than 4GB for me, but it won't let you install the program without extra space available.
There's an easy way to add more storage later if you accidentally make it too small in this step (info at the end of this post).
Make sure all of the settings you chose are correct.
The summary should say "Skip Unattended Install: false", "Product Key: true", "Install Guest Additions: true".

Now VirtualBox will create the machine and install XP on its own. Just leave the window open and don't interact with it until it's finished.
It'll be left on the Windows XP desktop once installation is complete.
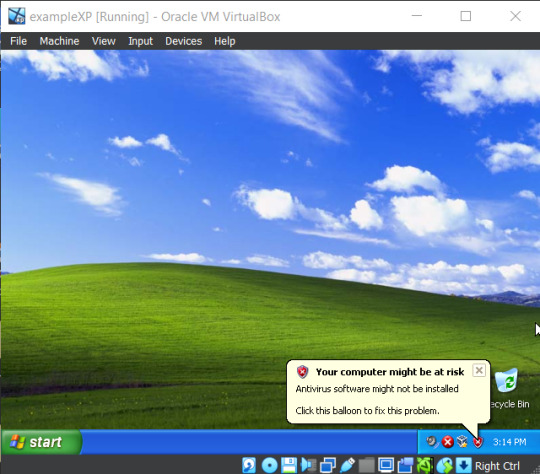
Before doing anything else in XP, I recommend changing the screen resolution so it isn't a ridiculously tiny window you need to squint at.
View > Virtual Screen > Resize to whatever looks best on your screen.
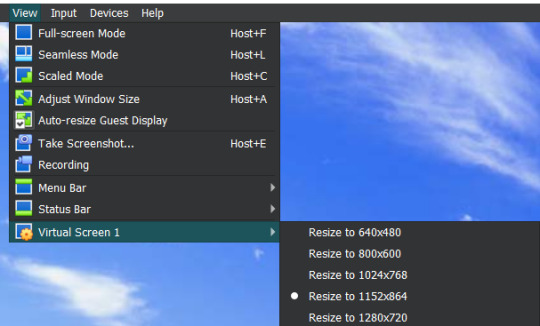
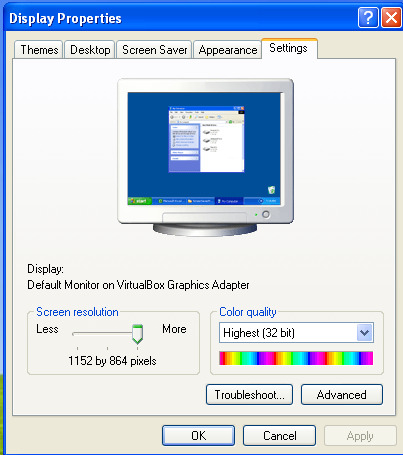
Alternatively, you can right click the XP desktop and select "Properties", then go to the "Settings" tab. Increase the screen resolution and hit "Apply" to see how it looks. You'll get a popup asking if you want to keep those changes or not.
Step 4: Transfer VOCALOID Files Into XP
I acquired a usable copy of VOCALOID from Internet Archive here. That folder includes everything you need to install and activate any V1 voicebank without an official activation code.
(I unfortunately have yet to find a similar resource for VOCALOID 2. For info on using V2 voicebanks, check the end of this post.)
Before returning to VirtualBox, go to the location you saved the VOCALOID folder too, and right-click the folder.
Select "Properties", then copy the location information.
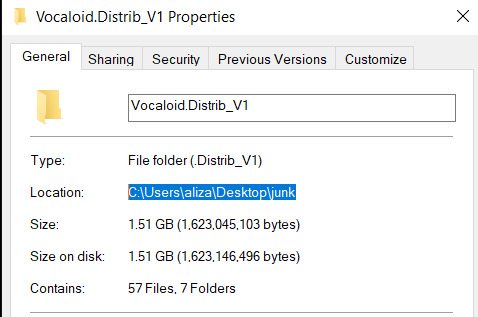
There's a really fast way to transfer small files in and out of the virtual machine (see the end of this post for an explanation on that), but the VOCALOID folder is too big for that, so you need to turn it into a VISO (virtual ISO) instead.
To make a VISO, open VirtualBox, and select the "Tools" icon.
Move to the "Optical disks" tab, then select the "Create" icon.

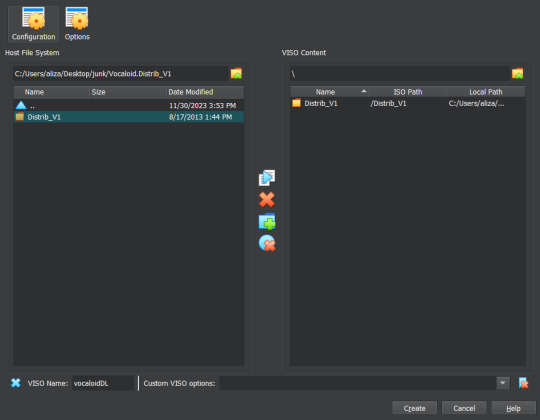
Now you can paste the location information text you copied into the textbox on the upper left side.
Alternatively, you can hit the folder icon and manually sift through your computer files to reach the VOCALOID folder, but that's annoying.
Make sure the folder is selected (just click on it), the hit the paper icon in the middle to "Add Item(s) to VISO".
Then hit the "Configuration" icon in the upper left to make a textbox appear in the bottom left. Enter a VISO name there.
Make sure the VOCALOID folder has actually appeared under "Viso Content" on the right, then you can hit "Create"
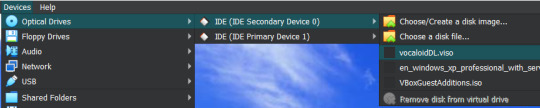
Now go back into XP to insert the VISO into the virtual disk drive.
"Devices > "Optical Drives" > whatever pops up there > "Remove disk from virtual drive" if something is currently in there > The VISO you made should appear as an option.
XP will ask what you want to do with the disk, choose "Open folder to view files".
Then drag the VOCALOID folder onto the XP desktop. It should start copying files over.
You can remove the VISO from the virtual disk drive once everything is copied over.
Step 5: Install VOCALOID In XP
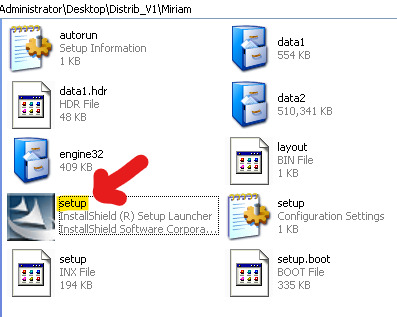
Open up "Distrib_V1", then go into the folder for whichever voicebank you want to install first. (The others can easily be added later.)
Now run the setup EXE within that folder. Windows XP doesn't show all file extensions by default, so the setup EXE file won't actually be labeled as such.
When the installer asks about "Setup Type", choose "Complete".
When it asks if you want to "Activate VOCALOID", select No. Don't say Yes.
Once it's installed, open up the "Vocaloid v1.1.2 Update & Patch" folder that's inside "Distrib_V1".
Run "setup". You'll be prompted to restart XP afterwards, agree to it.
After the restart, right-click the desktop icon for VOCALOID, and select "Properties".
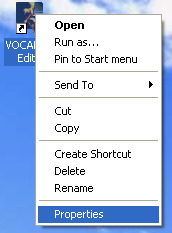
Hit "Find Target", and you be brought to the location the editor was saved to.

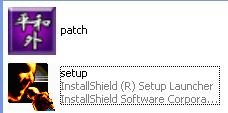
Open up the "Vocaloid v1.1.2 Update & Patch" again, then drag and drop "patch" into the folder containing VOCALOID.
Run "patch", hit the very obvious patch button, and then you'll be able to use VOCALOID 1 🎉
To add another voicebank, follow the same steps you went through to install the first one, but choose "Custom" for "Setup Type".
Deselect every component that doesn't have the specific vocaloid's name in it. (You don't really need to select the "SKIN" either if you don't want it, that's just an aesthetic option for the UI).
You won't need to run the updater and patch files again for each voicebank, unless you accidentally reinstalled the Editor.

Additional Info:
"How Do I Transfer Files Without Making a VISO?"
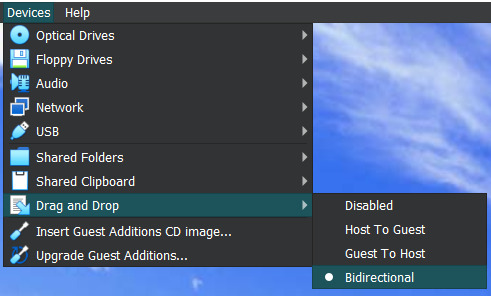
With Guest Additions installed (yes we're finally using it), you can use the super easy drag-and-drop file transfer method for most individual files. It just doesn't like transferring large folders. I recommend this method for sending instrumentals into XP and retrieving completed song files from XP.
Enable it through "Devices" > "Drag and Drop" > "Bidirectional" or select the specific direction you currently need to send things in.
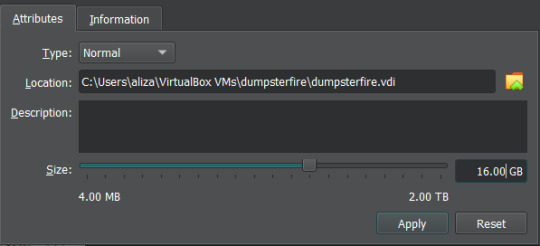
"I Didn't Give My Virtual Machine Enough Storage, How Do I Retroactively Increase It?"
In VirtualBox, hit the keyboard shortcut Ctrl+D to access the "Virtual Media Manager".
Alternatively, you can find it by clicking through "File" > "Tools" > "Virtual Media Manager"
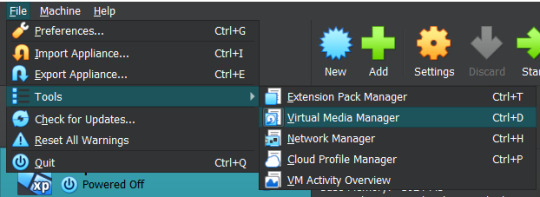
Select [whatever name you picked].vdi, and just adjust the size slider at the bottom.
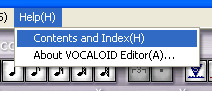
"How Do I Actually Use VOCALOID Now That I've Downloaded It?"
The manual that comes with program is actually very informative!!! You should read it!!! It's available under the "Help" tab within the program.
The only video tutorial I found for V1 is this one by Zero G.
One drawback of V1 compared to newer Vocaloid programs is that the piano keys aren't fully labeled, so you need to actually know what order notes go in. There are lots of music crash courses on Youtube which can help you in that department.
"How Can I Get a Working V2 Voicebank?"
If you just want to use a V2 voicebank and don't care about using the V2 software specifically, this site offers a cracked V4 download and compatible versions of the V2 voicebanks ("legacy" versions that have been converted to V3 voicebanks, so they work on V3 or V4).
. . .
If you want to have an awful time, you could install V2 in the virtual machine in almost the same way you install V1. However, I haven't found a reliable way to bypass the activation process for V2, so you'll be stuck with the 14 day trial period (unless you torrent Pocaloid2 instead). You can just reinstall the voicebank in a fresh virtual machine if you want to continue using it after the 14 days are up though.
Download your preferred voicebank(s) from Internet Archive. This user (haru0l) has uploaded all of the V2s (non-legacy). If the one you want isn't already in ISO form, turn it into a VISO.
You unfortunately won't be able to install Rin/Len Act2, Miku Append, or Rin/Len Append if you don't have their originals installed and properly activated (can't be using the 14 day trial).
Installing a Japanese voicebank will give you a bunch of unreadable symbols in the UI, and not all of the English voicebanks on Internet Archive are bundled with the V2 software (for some reason), so you just need to run the English updater to fix that. English V2 update available on Internet Archive here.
(There is another method where you just delete/move/rename every Vocaloid file that says JPN or Japanese in the name, but that doesnt completely translate the UI and still has some unreadable garbage).
If you're installing one of the less ancient voicebanks first, you might not be able to run the updater. It will say you already have an up to date version of the software (I had this problem with Piko). You can avoid that by simply installing an older voicebank first.
Make sure you choose the "Custom" setup for additional voicebanks, same as with V1.
"I Have Another Question OP Didn't Anticipate"
Feel free to send an ask with any questions! There's a chance that I won't know the answer either, but I'll try my best.
Also, please let me know if the links on this post ever stop working so I can replace them.
#idk how to tag this#vocaloid#windows xp#tutorial#weird how they just completely ditched the original synthesis engine and switched to a different system btwn v1 and v2#v1 voicebanks cant be accurately replicated in other versions of vocaloid because of that#v1 meiko my beloved <3#also internet archive my beloved <3 <3
6 notes
·
View notes
Text
How to run mac on windows 10 virtualbox

#How to run mac on windows 10 virtualbox full version
#How to run mac on windows 10 virtualbox windows 10
#How to run mac on windows 10 virtualbox pro
#How to run mac on windows 10 virtualbox software
#How to run mac on windows 10 virtualbox Pc
This means, for example, you can't check your Apple Mail at the same time as you're using Windows. The biggest disadvantage of using Boot Camp over virtualization is that you can't access your primary operating system at the same time. Instead, it lets you boot your Mac into another operating system at startup, either a separate version of macOS or copy of Windows 8, Windows 8.1, or Windows 10.
#How to run mac on windows 10 virtualbox software
Built into macOS, the software isn't run on virtualization technology. If you rather not use a third-party solution, consider Apple's Boot Camp. Who's this for: Open-source software is preferred by many computer users and for those folks, VirtualBox is a great choice. It's available for Mac, Windows, Linux, and Solaris too. VirtualBox is available to download online. Otherwise, pay for a copy of Parallels 15 or VMware Fusion 11.5. If you're an IT professional or someone with the time to play around with open-source software, by all means, consider VirtualBox. Unfortunately, because it's open-source, VirtualBox doesn't provide technical support, although there's an active user forum.īut again, it's important to circle back around to VirtualBox's interface, which isn't nearly as slick or easy to use as the others. Another advantage: Oracle has released VirtualBox as open-source, which offers more flexibility to end-users than the other solutions. Perhaps the most important reason to consider VirtualBox is that it's free, at least for personal or educational use. Despite this, there are some important differences between it and Parallels 15 and VMware Fusion 11.5 that might make it a better solution, depending on your situation. Unfortunately, Oracle's VirtualBox is the least polished virtualization title on this list. When using software, I expect a polished experienced. If you're familiar with VMWare products, Fusion is probably the one for you. Who's this for: VMWare's Fusion 11.5 is nearly as good as Parallels 15.
#How to run mac on windows 10 virtualbox pro
If you're familiar with other VMWare products, including Workstation Pro for Windows, Fusion is probably the path for you, although check out both products if you can.įusion 11.5 is available for download from the VMWare website. The VMWare Fusion interface doesn't look nearly as nice as the one offered by Parallels, but it's close. All versions come with a 14-day free trial. A professional version is also available for IT environments.
#How to run mac on windows 10 virtualbox full version
It also supports Touch Bar on a MacPro Pro.įusion 11.5 is available at the same price points as Parallels, $80 for a full version and $50 for an update. Beginning with Fusion 11, support was added for Apple's Metal graphics system. With Fusion's unity mode, you can run Windows-based applications on your computer as if they were Mac apps.
#How to run mac on windows 10 virtualbox windows 10
In this case, you can use Fusion with Windows 10 (or another operating system) through a window on your Mac desktop or in full-screen mode. Like Parallels, Fusion lets you create a virtual machine through software that can run separately from your macOS installation. Created by Dell Computer's VMWare, the latest version of Fusion (11.5), has been designed to take advantage of macOS Catalina tools, including Sidecar and Dark Mode. Parallel's closest virtualization competitor, Fusion, is another great choice for consumers. Grab a copy if you're looking for a solution that just works. Who's this for: Parallel offers a no-nonsense approach to virtualizaiton. New versions of Parallels typically arrive around the time Apple releases a new version of macOS, usually in the fall. Once a new version gets released, you can download it from the Parallels website. The professional version does include free upgrades. The former doesn't include free updates to future versions of Parallels Desktop, but also has no expiration date. The home version is $80 or $50 for an upgrade, while the professional version is $100 per year. Parallels Desktop 15 is the company's flagship consumer product and is available through a free trial, regardless of the version you choose. It also works with macOS Mojave 10.14, macOS High Sierra 10.13, and macOS Sierra 10.12. Noted Windows apps you can run on your Mac include Autodesk 3ds Max 2020, Lumion, ArcGIS Pro, and more.īeyond this, Parallels Desktop 15 is also fully compatible and optimized for macOS Catalina, which means it supports Apple's Sidecar.
#How to run mac on windows 10 virtualbox Pc
To date, nearly 1,600 PC games require DirectX 11, which means you can now experience all of them on your Mac through Parallels virtualization.
2 notes
·
View notes
Text
Download Ox S 10.11

Mac Ox S
Download Mac Os X 10.11
Os X 10.11 Update Download
Uc Browser Setup Exe
Jan 05, 2021 OS X 10.11 Download. OS X 10.11 Download is the twelfth major release to the Macintosh operating system which is namely, the El Capitan download. This is the 10.11 version to the MacOS and it is the last member of the OS X family. Apple has added new features, improvements, and bug fixes to this version of MacOS.
Hello, I tried downloading a previous version of creative cloud as the new version doesn't work on my OS X EL CAPITAN 10.11.6 mac but it doesn't work. The creative cloud window opens but I don't see any application in it just a blue circle and then it disappears from my computer; perhaps it's not.
7/10 (266 votes) - Download macOS El Capitan Mac Free. The twelfth version of Mac OS X appeared in 2015. MacOS El Capitan is the successor to Yosemite with improvements to its functions and graphical performance. MacOS is the current name of the former OS X, previously known as Mac OS X.
Looking to Download Mac OS EL Capitan DMG 10.11 Latest Version? Mac OS El Capitan is your twelfth major release of Mac OS X, now that now named as Mac OS X, the latest version is 10.11 for both Apple Inc, background. Mac OS X El Capitan is one of the most well-known running systems, such as Macintosh computers. It is a successor to Mac OS Yosemite and forms on performance. More following in northern California, the last version and latest edition of Mac OS X El Capitan premiered under the title of OS X was declared by macOS Sierra. The first beta Mac OS X El Capitan was released to developers within WWDC year 2015. Over time, Mac decided to release new upgrades to the general public.
Os X 10 11 free download - Apple Mac OS X Mavericks, Apple Mac OS X Snow Leopard, R for Mac OS X, and many more programs.
You can also read:
How To Install Mac OS X EL Capitan On VirtualBox On Windows: Easy Steps How To Install Mac OS X EL Capitan On VMware On Windows PC: Easy Steps How To Install VMware Tools On Mac OS X EL Capitan: 12 Easy Step Guide
Download Mac OS EL Capitan DMG 10.11 Latest Version
Mac is your shot Moderate Access Control or Mac understand as a Mac Address. It was called a Physical speech and Hardware Address because Mac consists of a robust security system that understands one can get Mac’s system. Hence, the speeches are usually assigned from the hardware maker, and the ID’s are burnt into the Firmware of the network access.
Mac OS is the computer operating system for Apple computers, and the popular latest edition of this operating system is Mac OS X. OS X has a contemporary design and added new features to the operating system. Also, It runs exceptional Software compared to the previous version of Mac.
Download Mac OS El Capitan DMG: Links below
Mac Ox S
MAC OS_X_El_Capitan DMG by techrechard (MediaFire)– Checked on 27th September, 2021
The DMG file is around 5.67 GB, so you will need a good internet connection to download the macOS El Capitan DMG file. So, here is a tool that you can use to speed up the download process. Internet Download Manager tool that will help you enhance your downloading speed. You can download the full version here.
IDM 6.27 Build 2 Registered (32bit + 64bit Patch) (Techrechard.com) – This file is password-protected, and the password is www.techrechard.com. You can extract this file using WinRAR download free and support: WinRAR (win-rar.com).
The Best way to Install macOS X El Capitan on VMware on Windows
Requirements:
Download Mac Os X 10.11
MacBook Pro, MacBook Air, Mac Mini, iMac, Mac Guru, Xserve
At least 1GB RAM
6 GB of Disk Space
At least AMD supported
Mac old variant necessitated 2 GB RAM
If you want to install the latest version programmers of Mac OS on VMware, then that is too easy. You may download the VMware Workstation Pro publicly and install this.
Suppose You’d like to set up Mac OS X El Capitan on VMware Workstation as a guest machine. Or you wish to test an older variant of Mac OS, which means you need to download Unlocker master. Because the Unlocker master lets you demonstrate the working system such as Mac OS.
Install macOS El Capitan on VirtualBox
So if you own macOS El Capitan on your pc, you could even install that on your Macintosh computer or VirtualBox on Windows. Thus, I recommend you to use Workstation Pro and VirtualBox. These two tools consist of complex tools to install or examine different operating systems on it, such as Windows, macOS Mojave, macOS High Sierra, or any others you desire.
To install Mac OS Capitan on VirtualBox, you want to the full fill your requirements.

Download Newest version of virtual-box Download mac OS EL Capitan Latest version (Google Drive-7 Parts) Codes for VirtualBox

Os X 10.11 Update Download
Conclusion: Download Mac OS EL Capitan DMG
Uc Browser Setup Exe
That’s all about How to Download Mac OS EL Capitan DMG. Thus, I hope that you have gotten something out of this. Additionally, I will write a post about the installation of this on VMware Workstation and VirtualBox.
1 note
·
View note
Text
El Capitan Mac Os Bootable Usb

It was 2009 when Apple last released a new operating system on physical media. Things have proceeded remarkably smoothly since version 10.7 switched to download-only installers, but there are still good reasons to want an old, reliable USB stick. For instance, if you find yourself doing multiple installs, a USB drive may be faster than multiple downloads (especially if you use a USB 3.0 drive). Or maybe you need a recovery disk for older Macs that don't support the Internet Recovery feature. Whatever the reason, you're in luck, because it's not hard to make one.
El Capitan Mac Os Bootable Usb Drive
As with last year, there are two ways to get it done. There's the super easy way with the graphical user interface and the only slightly less easy way that requires some light Terminal use. Here's what you need to get started.
Bootable USB Stick - macOS X El Capitan 10.11 - Full OS Install, Reinstall, Recovery and Upgrade SANDISK USB FLASH DRIVE 2.0/3.1 - 16GB - 5 years warranty Latest certificate (expires These USBs are NOT produced by Apple.
How to Create a Bootable USB with macOS Installer OS X El Capitan Create bootable USB drive with Mac Disk Utility Now that you have the installation files ready on your Mac, you can move them to your USB drive for future use. To install macOS on an external hard drive: 1. Connect the USB to your MacBook 3. Part 4: Boot Mac from macOS USB Drive for Installation. Now remove the USB drive and insert it into the Mac computer. To boot from the disk, you need to hold down the option key when you hear the boot chime. This will take you to the Startup Disk Manager, where you should be able to see the USB drive.

To install El Capitan, make sure the USB drive is inserted into the computer, then restart the computer while holding the Option (alt) key on your keyboard. Wait until the Startup Manager pops up, then select the 'OS X Base System' volume. Alternatively, you can just hold down the C key while starting up to boot directly into the USB drive. Now Create bootable USB for Mac OS El Capitan on Windows. Now it is the time to create a bootable USB installer using TransMac, To install Mac OS El Capitan on VirtualBox on Windows 10 you need a Bootable USB here you will learn the steps of creating a bootable USB installer for Mac OS El Capitan on Windows.
A Mac that you have administrator access to, duh. We've created El Capitan USB stick from both Yosemite and El Capitan, but your experience with other versions may vary.
An 8GB or larger USB flash drive or an 8GB or larger partition on some other kind of external drive. For newer Macs, use a USB 3.0 drive—it makes things significantly faster.
The OS X 10.11 El Capitan installer from the Mac App Store in your Applications folder. The installer will delete itself when you install the operating system, but it can be re-downloaded if necessary.
If you want a GUI, you need the latest version of Diskmaker X app. Version 5 is the one with official El Capitan support.
Diskmaker X is free to download, but the creator accepts donations if you want to support his efforts.
The easy way
Once you've obtained all of the necessary materials, connect the USB drive to your Mac and run the Diskmaker X app. The app will offer to make installers for OS X 10.9, 10.10, and 10.11, and it should run on OS X versions all the way back to 10.7—support for 10.6 was dropped in the most recent release.
Advertisement
Diskmaker X has actually been around since the days of OS X 10.7 (it was previously known as Lion Diskmaker), and it's still the easiest GUI-based way to go without intimidating newbies. If you're comfortable with the command line, it's still possible to create a disk manually using a Terminal command, which we'll cover momentarily.
Select OS X 10.11 in Diskmaker X, and the app should automatically find the copy you've downloaded to your Applications folder. It will then ask you where you want to copy the files—click 'An 8GB USB thumb drive' if you have a single drive to use or 'Another kind of disk' to use a partition on a larger drive or some other kind of external drive. Choose your disk (or partition) from the list that appears, verify that you'd like to have the disk (or partition) erased, and then wait for the files to copy over. The process is outlined in screenshots above.
The only slightly less-easy way
If you don't want to use Diskmaker X, Apple has actually included a terminal command that can create an install disk for you. Assuming that you have the OS X El Capitan installer in your Applications folder and you have a Mac OS X Extended (Journaled)-formatted USB drive named 'Untitled' mounted on the system, you can create an El Capitan install drive by typing the following command into the Terminal.
sudo /Applications/Install OS X El Capitan.app/Contents/Resources/createinstallmedia --volume /Volumes/Untitled --applicationpath /Applications/Install OS X El Capitan.app --nointeraction
Install Mac Os On Usb
The command will erase the disk and copy the install files over. Give it some time, and your volume will soon be loaded up with not just the OS X installer but also an external recovery partition that may come in handy if your hard drive dies and you're away from an Internet connection.
Whichever method you use, you should be able to boot from your new USB drive either by changing the default Startup Disk in System Preferences or by holding down the Option key at boot and selecting the drive. Once booted, you'll be able to install or upgrade El Capitan as you normally would.
Summary
How to make a bootable USB drive on Linux Mint (19.3) to allow you to install Mac OS X El Capitan on a MacBook with broken or corrupted recovery mode.
Background
I was recently given a 2011 MacBook Pro that had been “well-loved” and was therefore a mess of missing applications, ghost files and generally slow-as-hell. Since there wasn’t much worth saving I wiped it and initiated recovery mode in order to re-install OS X (El Capitan).
Having recently fixed a busted MacBook Air I had learned a bit about Recovery Mode (hold Command+R whilst pushing the Power button and release a few seconds after the machine wakes up). I tried that with this machine, and upon hitting “Reinstall MacOS X” was greeted with a prompt telling me it would take -2,148,456,222 days and 8 hours (an uncaught buffer overflow, me thinks). After about 30 seconds, a window pops up saying “Can’t download the additional components needed to install Mac OS X” and the installation gives up. The detailed error log says “Chunk validation failed, retrying” about 1000 times and eventually gives up altogether.
Further investigation suggests this may be something to do with security certificates having expired and hence the machine not being able to download the necessary files from Apple’s servers, but it seems the error can appear for all sorts of reasons. I also tried Internet Recovery (Command+Option+R) but that gave exactly the same error (and would also only have installed OS X Mountain Lion).
I then turned to attempting to make a bootable USB stick of OS X El Capitan from an image downloaded from Apple. I use Linux Mint on my main laptop and that was all I had available. Apple seem to assume everybody has a spare MacBook from which to create a bootable USB so they provide absolutely no documentation to help with this. I also couldn’t find a single guide online that worked from start to finish, so here I summarise what needs to be done.

Steps
As usual, this is all at your own risk 🙂
First you need to go to Apple’s OS Download Page and (step 4) get ahold of “InstallMacOSX.dmg” for El-Capitan. It’s a 6GB file so it might take a ‘lil while. You will also need to find a USB drive with at least 8GB capacity, and make sure it’s blank. The format doesn’t matter, because this procedure will format it correctly.
(In total you will need to use about 15-18GB of disk space by the time you’ve done all the extracting necessary, which shouldn’t be a problem for most computers but it was a challenge for my laptop with it’s 128GB SSD and dual boot Windows/Linux!)
Then you need to get a program called ‘dmg2img’
You can then extract the DMG
Now double click the .img file to mount it. In there is a InstallMaxOSX.pkg file. This requires a utility called “xar” to extract, which can be installed with these instructions (from https://www.oueta.com/linux/extract-pkg-and-mpkg-files-with-xar-on-linux/)

Then build and install with
Now you can extract the .pkg file. It will extract to the current working directory
Create Bootable Usb For Mac Os X El Capitan
Now, within the extracted files you will find something called InstallESD.dmg. This actually contains all the interesting boot files, but it isn’t a pristine image, so we can’t just burn it to a USB. Thankfully, a script exists to convert this DMG to a bootable usb, and it’s available here. It takes the DMG and writes everything directly to the USB in the right place.
El Capitan Macos Bootable Usb
ONE CAVEAT: When I ran this script on my InstallESD.dmg, it crashed because it didn’t recognise the checksum. I think this is because Apple updates the dmg’s anytime there is a security update for El Capitan so the checksum list isn’t updated. All I did was delete the checksum check from the script above. Essentially, just open the script and delete this section
Mac Os X El Capitan Dmg Bootable Usb
Once I had done this, I ran the script with my USB connected (/dev/sdb for me, but CHECK YOURSELF with fdisk or similar) and after quite a while it finished copying.
I plugged the USB into the MacBook, and opened the startup menu by holding down Option whilst pushing the power button. This gave me the choice of booting from EFI, or choosing a WiFi network. Click on the EFI, and then follow the prompts to install OS X from the USB drive!
When you’re done, you may need to use Parted or a similar utility to re-format your USB as a normal drive again.
1 note
·
View note
Text
Virtualbox 5.2 For Windows 7 32 Bit

Virtualbox 5.2 For Windows 7 32 Bit Download
Download Virtualbox For Windows 10
Virtualbox 5.2 For Windows 7 32 Bit Free
Oracle VM VirtualBox Base Packages - 6.1.26. Freely available for Windows, Mac OS X, Linux and Solaris x86 platforms under GPLv2: Platform. Windows Installer. Solaris 10 5/08 and later or Solaris 11. First, create a new virtual computer on VirtualBox. Select Windows Server 2016 (64-bit) in the operating system selection window in the steps for creating a VM. After preparing the MS Server 2019 virtual machine, run the virtual machine by clicking the Start button. Configure the language, time settings, and keyboard layout for MS Server 2019. Virtualbox 32 Bit - downyup. VirtualBox for Windows 7 - original software that allows you to experiment with operating systems. Creates a virtual machine, allows you to set iron parameters within certain limits. The advantage is the modular architecture and the presence of internal logic. Suitable for users with an average level of skills.
Run Android on your PC
VirtualBox How To
The following are instructions on how to run Android-x86 inside VirtualBox. Note: For optimal performance, make sure you have enabled either VT-x or AMD-V in your host operating system's BIOS. Android-x86 versions tested against Virtualbox versions.
Date TestedVirtualboxHost OSAndroid-x86Result??2.2.4Windows XP??Good??3.0.2Fedora 11??GoodNov. 2 20175.2.0Windows 106.0-r3 32/64 bitGood
Downloading
Download an ISO of Android-x86 from here.
Caution
If you are using Android-x86 for debugging purposes, some binaries (gdb for example) are built for 32-bit architectures and will not support debugging 64-bit binaries such as the Android app host. Download a 32-bit distribution instead.
Create a new VM
If you have not already created a VirtualBox virtual machine for Android-x86 yet, do so as follows:
Click the 'New' button, and name your new virtual machine however you like. Set Type to Linux, and Version to Linux 2.6 / 3.x / 4.x. Note that you should choose the appropriate bit type for the version of Android-x86 that you downloaded.
Specify how much RAM will be allocated to your virtual machine when you run it. Android doesn't specify a bare-minimum requirement for memory, just keep in mind what apps you plan on running. 2GB (2048MB) is a good place to start, and you can change this later if you need to.
Create a new Hard disk image which will act as your machine's storage. The recommended starting size of 8GB is enough. Click through the rest of the options for creating your Hard disk.
Your virtual machine has now been created. It still needs to be initially installed at this point.
Settings
Tested on VirtualBox 64-bit for Windows, version 5.2.0. Android-x86 version 6.0-r3, both 32-bit and 64-bit. Select your machine, then click the Settings button and refer to the below recommended configuration to make sure your settings match.
(System)Recommended: Processor(s) should be set above 1 if you have more than one virtual processor in your host system. Failure to do so means every single app (like Google Chrome) might crush if you try to use it.
(Display):
Optional: Video Memory may be increased beyond the minimum selected automatically. The affects of this are unknown.
Mandatory: Unless guest additions are installed(1), change the default VMSVGA to VBoxVGA.
Optional: Enable 3D Acceleration may be checked. The Linux Guest Additions must (VirtualBox v6.1+) / may (VirtualBox v6.0 and below) need to be installed(2)(1) to get any benefit from this.
Failure to do so means you won't even be able to launch Android-X86 in the first place.(3)
(Storage) Find the first 'Empty' item (this should have an icon of a CD). In the Attributes, click on the CD icon with a small down arrow, and pick 'Choose Optical Virtual Disk File...'. Specify the Android-x86 ISO that you downloaded.
(Audio) Intel HD Audio seems to be natively supported in Android-x86.
(Network) By default, your installation of Android-x86 will be able to automatically connect to the internet. If not, you can try to enable WiFi in Settings/Network & Internet, and connect to showing VirtWifi. If you do not want to connect to the internet in VirtualBox, uncheck Enable Network Adapter under the Adapter 1 tab.
Install
Click the green Start arrow to power-on your virtual machine. You'll be presented with a list of options. Use the arrow keys to pick which one you want, then press Enter once the one you want is selected.
If you don't want to install Android-x86 yet and just want to test it, pick one of the Live CD options (except for Debug mode).
Pick the Installation option if you want your system to be installed to the virtual hard drive.
If you want to use higher resolution, you can edit the boot option by pressing TAB, change vga=788 (800x600) to vga=791 (1024x768) or vga=794 (1280x1024), and press Enter. You can also use vga=ask to see all available modes. But please note Android will only work under 16-bit mode.
Partition
When you are prompted to Choose a partition:
If you upgrade Android-x86 from a previous version, just select the existing partition. Agree to overwrite it when prompted.
If this is a new VM, choose to Create/Modify partitions. Use Bootable but not GPT! This will cause the GRUB installation to fail later.
You may partition your disk however you see fit. If you just want a simple installation, create one partition taking up the entire disk and format it as ext4.
Continue through the installation. You should install GRUB when it prompts you to. You may also leave /system as read and write when prompted. Once the installation is complete, force close/shut down the virtual machine and remove the ISO from the virtual CD drive. Finaly, start Android-x86. If it's a new machine, once loaded you can perform the Android setup to begin using your machine.
Advanced
Custom partitions, SDCard
When booting Android-x86, you may specify which partitions represent the data and sdcard. On the boot menu, select an entry you would like to boot from, press TAB, then add the following as it suits your needs: DATA=sda1 SDCARD=sda2 Press Enter to boot. These options specify user data (your setting, your uploaded applications, ...) go into /dev/sda1, and data saved in sdcard go into /dev/sda2. If you build the ISO from source, you can add these options to bootable/newinstaller/boot/isolinux/isolinux.cfg. Here is a note from David when using fdisk:
Create a new virtual machine with a hard disk.
Launch the Live ISO in Debug mode (I used android-x86-2.2-generic.iso) to get the commend prompt.
'fdisk /dev/sda', then type:
'n' (new partition)
'p' (primary partition)
'1' (1st partition)
'1' (first cylinder)
'xx' (choose the last cylinder, leaving room for a 2nd partition)
'w' (write the partition)
Repeat #3, but call it partition 2, and use the remaining cylinders.
'mdev -s'
'mke2fs -j -L DATA /dev/sda1'
'mke2fs -j -L SDCARD /dev/sda2'
Reboot ('reboot -f')
At the boot menu, choose VESA, then hit TAB and type so that the end of the line reads: 'DATA=sda1 SDCARD=sda2'. (Only need for the generic target images, for VM target images, this is not needed)
After booting (and of course disabling mouse integration via the machine menu), the SD card is read as unformatted, but you can format it by going to Settings > SD card & phone settings > Format SD Card, then Mount SD card.
The SD card should now work!
Note: for the step 7, if you want to format to vfat only, then you can do : Also remember the partition type has to be fat32 (b or c). By using vfat, the step 10 is not needed. DevTools application has a MediaScanner which (re)indexes your SD card for cases where you manually copied media over. This ensures that you see new images and/or music in the apps without having to reboot. If you downloaded it from within android, the application asks the relevant service to index new files.
Playing music
This section describes two ways to upload music files into Android running on a vbox so you can play them by the Music app. Of course, you can save the files to the virtual disk mounted at /sdcard, as described above.
Upload files by adb
Adb is Android Debug Bridge, a tool to debug Android system. If you compile from source, it is located in out/host/linux-x86/bin/adb. Otherwise you can get it from Android SDK. Suppose the network of your vbox is OK, you can upload a file from your host by
ADBHOST=<ip of vbox> out/host/linux-x86/bin/adb push <a music file> /sdcard
You need to know the ip of your vbox. You can get it by Alt-F1 and netcfg. You may also need to reboot Android to see the uploaded files. Of course in this way you have to mount /sdcard to a virtual disk partion. For complex network settings of the VirtualBox VM, you should refer to Debug How To on how to connect adb to the VM.

Upload files by wget
You can also upload files by wget in the debug mode. In the debug mode shell, before entering Android,
# cd /android/sdcard # netcfg eth0 dhcp # wget <url of a music file>
Then type exit to enter Android.
Debug with adb
This section describes the way to debug Android with adb via network.
Virtualbox 5.2 For Windows 7 32 Bit Download
If we want to debug with adb via network, we should ensure the ip of vbox can be accessed by host machine. So we should change the Network Adapter type of vbox to Bridged Adapter. After starting the android-x86, we should follow the above Settings/(Network) section to ensure the network of android-x86 is enabled, and enable USB debugging in Settings/System/Developer Options. Then we can get the device ip from Settings/System/About tablet/IP address. For example, if we see the ip address is 192.168.0.116, then we can use following command to connect android-x86 in vbox from host machine.
Then you can use adb command to debug android-x86 such as get log, and dump system information.
References
Download Virtualbox For Windows 10
Virtualbox 5.2 For Windows 7 32 Bit Free
^ ab VirtualBox currently has no Guest Additions for Android.
^ VirtualBox v6.1.0 states: 'old style 3D support (with VBoxVGA) has been completely removed'
^ VirtualBox states: 'Note that you must install the Guest Additions on the guest VM to specify the VBoxSVGA or VMSVGA graphics controller.'
1 note
·
View note
Text
El Capitan Bootable Usb Dmg

Today i am showing how to make a boot able usb drive for mac using a dmg file 8gb usb drive and the disk utility that comes with mac os x. Because since el capitan the disk utility of macos was different if you running el capitan and want to create bootable u sb for macos sierra you can use yosemite disk utility for el capitan just google it. Now using a Windows tool called Transmac (15 day trial) to create a bootable El Capitan USB from the dmg file downloaded from Apple. Will post again with result / subsequent actions / results. Probably the copy of OS X 10.8 I got from a 3rd-party site and used to update 10.6 was dodgy.
Create Bootable Usb Dmg Windows. To install macOS High Sierra restart computer hold the Option (ALT) key and select Installation USB drive from the menu. Microsoft Office 2011 V14 0.0 Dmg Free Download. Ff14 Lb Does More Dmg If Youre Gear Is Better.
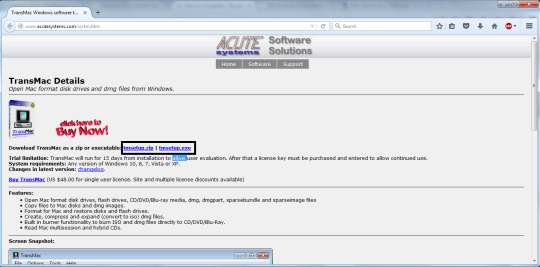
In this article, I will show you How to create Bootable USB for Mac OS El Capitan on Windows using Transmac. Therefore, you can create bootable USB for your Mac using Transmac on windows 10/7/8/8.1 here you will learn the easiest method of creating bootable USB. As you know that Mac OS EL Capitan is the newest version among Mac. In here just follow my steps to create a bootable USB installer for your Mac. is the twelfth major of the Mac operating system. Therefore, it has outstanding features that the previous version of Mac doesn’t have that. It is better now that we should create a bootable USB installer drive to install Mac OS.
You all have the information about “Transmac” software about its function that how it works, or how to download “TransMac” and how to install that on your Windows PC? However, you need the following requirements to create a great bootable USB installer for Mac OS El Capitan.
Why we use TransMac to Create bootable USB for mac os el Capitan?
TransMac is a simple application to open hard drives disk, Flash drives, CD/DVD high-density floppy disk on Windows 10/7/8/8.1 or lower version of other Windows. to use this application you just need to insert the drive you need, and one of the great function is this that it will automatically read the drives, TransMac is a great tool that you can access the Mac file on Windows operating system using TransMac.
TransMac Features
You are allowed to use the TransMac for 15 days trial, and after that, if you want to use that more then 15 days then you need to purchase that. All the features are the same for Mac.
The system requirements are you need Windows 10/7/8/8.1 or Windows Vista and XP.
The users can buy TransMac for $59.00 with the license.
Apple files system (APFS) are only supported.
Open Mac APFS/HFS/HFS+ format disk drives, flash drives, CD/DVD/Blu-ray media, HD floppies, dmg, dmg part, sparse bundle, and sparseimage files.
Copy files to Mac and image file
Format HFS to Mac
Save and restore image files to disk and USB flash.
Create, compress image files for Mac
Burn your ISO file and dmg file directly to CD/DVD Blu-ray.
View the partition layout
Now Create bootable USB for Mac OS El Capitan on Windows
Now it is the time to create a bootable USB installer using TransMac, To install Mac OS El Capitan on VirtualBox on Windows 10 you need a Bootable USB here you will learn the steps of creating a bootable USB installer for Mac OS El Capitan on Windows.
Step #1. Before going to create a bootable USB for Mac OS El Capitan you need to download TransMac. Therefore, you can download TransMac from the given link. After that, you are download TransMac now install that on your computer, the installation process is too much easy everyone can install that on their PC/Computer with a simple procedure. Just click on the setup file and with some click, the installation will finish. After that, Launch TransMac when TransMac is launched you will see the list of Flash drives or local disk. Then Right-click on that flash you want to create bootable USB for Mac OS El Capitan then select Restore with Disk Image.
Restore with the Disk image
Step #2. Now a warning message will pop-up after you select Restore with Disk Image, and in this step, select Yes.
Step #3. After that, you clicked on yes now a dialogue box will come just click on that and browse for VMDK file and select the file and click Open.
select Mac OS EL Capitan VMDK file
Step #4. After that, you clicked on Open in here your file will be ready to copy on USB drive click on “OK”.
Copying your File VMDK file to USB
Step #5. After that, you clicked OK now in this step, your Mac OS EL Capitan VMDK file will copy to your USB drive. Have patience and wait for some minutes that should copy your file.
Copying Mac OS EL Capitan File to USB
Conclusion
That’s all about it,Now you are totally done with creating the USB drive. Therefore, if you faced any problem regarding this you can comment on below comment box and share your ideas. Furthermore, we will discuss that and don’t forget to subscribe our website with your email address and have a notification about our latest post.
Jun 11, 2015 How to Make Bootable USB drive with.DMG for Tiger, Leopard, Lion, Mountain Lion, Mavericks OS X. Can I make a bootable dvd usb drive with.dmg file. Make Bootable USB. Jul 20, 2011 So if you create a bootable Lion-installer drive using the current version of the Lion installer—which, as of 2/10/2012, installs OS X 10.7.3—that drive will work with all current Lion-capable. Mar 03, 2018 Bootable USB Installers for OS X Mavericks, Yosemite, El Capitan, and Sierra First, review this introductory article: Create a bootable installer for macOS. Second, see this How To outline for creating a bootable El Capitan installer. Dec 14, 2019 How to Install macOS Catalina/ Mojave? Plug your bootable USB drive and restart your machine. Hold ALT+R keys during starting your mac computer. (Before Apple logo appears) Select your bootable USB on the screen and follow on screen instructions.
Are you trying to make a bootable installer? Do you have the El Capitan installer downloaded from the App Store? You cannot make a bootable DVD but you can make a bootable flash drive.
Create Bootable Usb Dmg Windows
Bootable USB Installers for OS X Mavericks, Yosemite, El Capitan, and Sierra
First, review this introductory article: Create a bootable installer for macOS. Second, see this How To outline for creating a bootable El Capitan installer. Simply replace the Terminal command with the one from the preceding article by copying it into the Terminal window. You will need an 8GB or larger USB flash drive that has been partitioned and formatted for use with OS X.
Drive Partition and Format
Open Disk Utility in the Utilities' folder.
After Disk Utility loads select the drive (out-dented entry with the mfg.'s ID and size) from the side list.
Click on the Erase tab in the Disk Utility toolbar. Name the drive, 'MyVolume'. <---- IMPORTANT!
In the drop down panel set the partition scheme to GUID. Set the Format type to Mac OS Extended (Journaled.)
Click on the Apply button and wait for the Done button to activate. When it does click on it.
Quit Disk Utility.
Create Bootable Usb Using Dmg File Windows 7
Create Installer
Open the Terminal in the Utilities' folder. Choose the appropriate command line (in red) depending upon what OS X installer you want. Paste that entire command line from below at the Terminal's prompt:
Command for macOS High Sierra:
sudo /Applications/Install macOS High Sierra.app/Contents/Resources/createinstallmedia --volume /Volumes/MyVolume --applicationpath /Applications/Install macOS High Sierra.app
Command for macOS Sierra:
sudo /Applications/Install macOS Sierra.app/Contents/Resources/createinstallmedia --volume /Volumes/MyVolume --applicationpath /Applications/Install macOS Sierra.app
Command for El Capitan:
sudo /Applications/Install OS X El Capitan.app/Contents/Resources/createinstallmedia --volume /Volumes/MyVolume --applicationpath /Applications/Install OS X El Capitan.app
Command for Yosemite:
sudo /Applications/Install OS X Yosemite.app/Contents/Resources/createinstallmedia --volume /Volumes/MyVolume --applicationpath /Applications/Install OS X Yosemite.app
Command for Mavericks:
sudo /Applications/Install OS X Mavericks.app/Contents/Resources/createinstallmedia --volume /Volumes/MyVolume --applicationpath /Applications/Install OS X Mavericks.app
Mac Os El Capitan Bootable Usb Dmg
Press RETURN. You will be asked for your admin password. It will not echo to the Terminal window. Then press RETURN again. Wait for the return of the Terminal prompt signifying the process has completed. It takes quite some time to finish. Be patient.
Mar 3, 2018 7:47 PM
If your Mac suddenly refuses to boot up properly, you might need bootable macOS install USB to make repairs. But how do you create such a disk if all you're left with is a Windows 10 computer? Fortunately, there's a great tool that you can use for free to create bootable macOS media on a USB drive in a Windows 10 environment. This article shows you how to download a macOS DMG file, format a USB drive using a GUID Partition Table, burn the DMG to the drive and boot your Mac from the USB. All the steps except the last one are done on a Windows 10 machine.
Part 1: Download macOS or Mac OS X DMG File
The first step is to get the DMG disk image file for the version of macOS that you want. You can get a copy of the latest macOS version from Apple download portal or App Store here. There are also several other direct download sites that offer various versions of Mac OS X in DMG format rather than the standard APP format that runs on Mac. Since you're working in a Windows environment, you need the DMG rather than the APP file.
Part 2: Format USB Drive to GPT
Mostly, the USB drive was formmated to FAT32 in default when being shipped out from the factory. However, FAT32 can be only used for installing OS with legacy BISO, which doesn't work for macOS. So the next step is to format your USB drive in the GPT partition style in order to burn installation files to the desired USB drive. You can do this in Command Prompt as admin. In elevated Command Prompt (Ctrl+Shift+Enter), input the following series of commands followed by Enter after each line: Diskpart List disk Select Disk X (X stands for the USB drive name that appears after the previous command) Clean Convert GPT Create partition primary
Part 3: Create Bootable macOS USB from Windows 10
You have now formatted the partition of USB drive. It's time to download TransMac for Windows. Although this is a premium software, you can use the initial free trial period to create a bootable macOS USB drive on Windows 10. After installing the application, follow the sequence of steps shown below:
Step 1: Right-click the icon and select Run as Administrator from the contextual menu. Choose Run when prompted.
Step 2: Insert your formatted USB drive, and you will be able to see it in the TransMac software on the left panel.
El Capitan Bootable Usb Dmg Download
Step 3: Right-click the USB and select Restore with Disk Image in the contextual menu. Click Yes in the warning popup.
Step 4: You will see a window that says Restore Disk Image to Drive. Here, select your DMG file in the dropdown menu and click OK.
Dmg To Bootable Usb Mac
Depending on the system configuration, this can take anywhere from a few minutes to a couple of hours. Once the progress bar is at 100%, a bootable USB is ready.
Os X El Capitan 10.11.0 Bootable Usb (dmg File)
Part 4: Boot macOS Install USB on Mac
Now remove the USB drive and insert it into the Mac computer. To boot from the disk, you need to hold down the option key when you hear the boot chime. This will take you to the Startup Disk Manager, where you should be able to see the USB drive. It might have a different name, but as long as it is bootable, you'll be able to see it there. Once you select it, the computer will boot from the disk and the macOS installation will begin.
Create El Capitan Bootable Usb From Install Macos.dmg
Conclusion:
Create Bootable Usb Using Dmg File Windows 10
The whole process might look a bit complicated if this is your first time, but just follow the instructions in this article and you should be fine. That being said, you need to be careful when downloading the DMG file and formatting your USB drive. If you don't do these two steps correctly, the output drive from the TransMac software won't be bootable, which means you can't install macOS using it, and you may need to do the whole thing over again.
Comments are closed.
1 note
·
View note
Text
Create Dmg Installer For Mac

Create Dmg Installer Mac Os X
Create Dmg Installer For Mac Os
Create Dmg Installer For Mac Catalina
Nov 07, 2019 Now create a computer account for macOS Catalina. For three-times click Continue; Now select the Dark mode, Light mode or Auto mode for macOS Catalina. Wait a while till the desktop should be ready when it gets ready. Enjoy using macOS Catalina 10.15 for the first time in your PC-Hackintosh. Create Dmg Installer For Mac Download Bottom Line. Jun 23, 2020 How to Install and Open.dmg Files on a Mac. Software installation with Mac OS X is very different than in the Windows world. On a Windows PC you run an installer, tick off a few checkboxes, and wait for the progress meter to reach completion. Dec 10, 2018 If you want to use a DMG file in Windows to mount a version of Mac OS X, then Method 1 will work. However, most of the time, you'll need a DMG to install an OS version on a Mac computer. In those cases, if all you have to work with is a Windows PC, DMGGeeker is the perfect application. Are you looking for a direct download link for MacOS High Sierra ISO installer or dmg file for your Mac or Windows computer or virtual machine then you are at the right place. VirtualBox, Vmware. Dec 28, 2019 How to Make a DMG File on a Mac. One way to store or group files on a Mac is to create a Disk Image.
A DMG disk image file is Apple's container format for capturing entire drives or disks, similar to ISO for other platforms like Windows. It consists of data blocks that represent a physical disc. If you're on a Windows machine, you're limited in what you can do with DMG files. That's why you need third-party utilities to create a bootable DVD from DMG on Windows. This article explains two different methods to burn DMG files to amake bootable macOS installation DVD in Windows.
Method 1: How to Create Bootable DVD from DMG (Command Prompt)
This approach utilizes a tool called DMG2IMG, which converts DMG file into ISO, the universally more compatible archive format. This ISO file is then burned using a command line execution in Command Prompt. You don't really need any experience with disk images or command line work, but it will certainly help should something go wrong. If you're not comfortable with any of this, you can skip to Method 2, which showcases a powerful but user-friendly tool that does it all for you. But first, let's see how the Command Prompt method of creating a bootable DVD from DMG works.
Note: The older version of DMG2IMG is called DMG2ISO. Although the download is available in the link provided in Step 1 below, it is recommended that you use DMG2IMG instead. The utility has the ability to convert DMG into both ISO and IMG, based on your needs.
Step 1. Install DMG2IMG on a Windows PC after downloading the zipped win32 binary from this website. Unzip the file and run the .exe to install the program. You can also download DMG2ISO, but DMG2IMG is the recommended software to use.

Step 2. Open Command Prompt on your PC and execute the following command to convert your DMG into ISO. Be sure to change the file names as appropriate, and include the whole file path from the main directory: dmg2img.exe c:downloadsexample.dmg c:downloadsexampleconverted.iso
Step 3. Now that your ISO file is ready, you can use the Windows ISO burning utility or a free application like FreeISOBurner to create a bootable DVD.
This DVD can be used to install macOS in virtual Windows environments with tools like Virtualbox. You can't use ISO files to install software in Mac, so if this is intended for a computer running Mac OS X or macOS, you will need to convert it back to DMG before you can install the program in question. If you're not confident that you can carry out the steps properly, then continue to Method 2.
Method 2: How to Make a Bootable DVD for Mac on Windows (DMGGeeker)
Conversion processes aren't always accurate and success rate is low for the first method. Many DVD are not able to be used to install macOS due to boot errors. Although DMG2IMG is a great tool, you may find that your resulting ISO file is corrupted and therefore useless. That means doing it all over again. Instead, you can try using DMGGeeker, which allows you to directly burn DMG to a DVD in Windows without having to convert the file. Such a disk can be used to boot a Mac computer.
DMGGeeker is an emerging star in the world of disk image file management software. It allows you to edit, add files to, delete content from, rename and do a lot more with DMG files on Windows without any conversion necessary. If you've been searching for the ideal DMG handling tool for Windows, your search has just ended. Let's see how the process works for creating a bootable media from DMG in Windows. It works with all recent versions of Windows.
Step 1Prepare for Installation
You can download it from the official site here. And then install DMGGeeker on a Windows PC.
Step 2Open DMGGeeker in Windows
Launch the application and click on the 'Burn' option. You'll see the other tools available for DMG files.
Step 3Create Bootable USB from macOS Install Image
Click 'Load DMG' to import your DMG file into the program. Insert a blank DVD and click Burn against the DVD option to write the DMG to the disk.
In three simple steps, your bootable DVD is ready. You won't find that many tools that are so easy to operate. DMGGeeker also has one of the highest burn success rates in its class, which means no wasted DVDs and no wasted time.
Summary
Create Dmg Installer Mac Os X
How to choose the rignt tool depends on what the purpose is. If you want to use a DMG file in Windows to mount a version of Mac OS X, then Method 1 will work. However, most of the time, you'll need a DMG to install an OS version on a Mac computer. In those cases, if all you have to work with is a Windows PC, DMGGeeker is the perfect application. It's simple enough for a novice yet robust enough for a professional, it contains all the tools you need to manage DMG files, and it's a life-saver if you only have a Windows PC to work with.
Create Dmg Installer For Mac Os
Dec 10, 2018 16:32:11 / Posted by Candie Kates to Mac Solution
Create Dmg Installer For Mac Catalina
Related Articles & Tips
1 note
·
View note
Text
Mac Os Catalina Disk Image Download

In this article, I’ve listed the download links for downloading the macOS Catalina ISO image. macOS Catalina was released in Worldwide Developer Conference (WWDC19). The latest version of this OS is macOS Catalina 10.15.5 (19F101). Apple has released there new OS, macOS Big Sur on WWDC20. If you want to try and test macOS Big Sur, follow how to install macOS Big Sur on VMware or how to install macOS Big Sur on VirtualBox guides.
Download macOS Catalina 10.15- If the user currently has macOS Catalina’s predecessor macOS Mojave running on their Mac, they can proceed to the System Preferences which can be found under their Apple Menu and update their OS version directly. If they do not possess this macOS, they can download macOS Catalina from the App Store.
MacOS Big Sur elevates the most advanced desktop operating system in the world to a new level of power and beauty. Experience Mac to the fullest with a refined new design. Enjoy the biggest Safari update ever. Discover new features for Maps and Messages. And get even more transparency around your privacy. DMG stands for disk image. MacOS Catalina is the first Mac operating system that does not support 32-bit applications. Here is El Capitan download link. Download Macos Catalina Vmware And Virtualbox Image Download Macos Catalina Vmware and Virtualbox Image. With that said, if you want to install macOS Catalina at a certain point, whether developing some apps or catch up with everything, you’ll definitely want the macOS Catalina VMware or even VirtualBox image. This image is pretty different.
Apple has announced Apple Podcast, TV, and Music app on macOS Catalina operating system. The Dark Mode, which is another most wanted feature that thousands of Mac users were waiting for, was released in the earlier version of Mac OS “Mojave 10.14”. Now it’s also available in macOS Catalina 10.15. There were many other features that you can read on Apple.com.

If you want to install macOS Catalina using VMDK image, you can Download macOS Catalina VMDK for VMWare & VirtualBox.
Download macOS Catalina ISO Image
Download macOS Catalina 10.15.5 (19F101)Latest
Download macOS Catalina 10.15 (19A4871)Beta
Related: Install macOS Catalina on VMware -Windows
Mac Os Catalina Disk Image Download Iso
Warning: All the content of this site is copyright protected. If anything from this website is copied somewhere, the website link must be mentioned. Otherwise, the targeted website who copied the content will be reported to corresponding copyright law or at least some search engines like Google, Bing. This ISO image is created only for testing & educational purposes, so the miss-use of the image is not tolerated and it’s not our responsibility.
Mac Os Catalina Disk Image Download
Related: Install macOS Catalina on VirtualBox -Windows
Mac Os Catalina Disk Image Download Windows 10
Conclusion
Mac Os Catalina Disk Image Download Free
After reading this piece of information, you should have downloaded macOS Catalina ISO Image. The ISO file which is linked for download in this post is up to date and currently the latest version of macOS Catalina. If you’ve any suggestions or any topics that you want us to cover in the next article, please let us know in the comment section below this post.
1 note
·
View note
Text
Ygopro 2 Download Mac

YGOPRO 2 - Beta - Download - posted in Announcements: Yu-Gi-Oh! The Dawn of a New Era - YGOPRO 2 Download Link: Version: 1.0.1.1029 Beta Frequently Asked Questions: What is YGOPRO 2? YGOPRO 2 is a new Yu-Gi-Oh! Game with a modern interface, it looks like this. Can I play this game on Mac and Linux? The game is currently not supported on Mac. Mac app store malware. Download Yu-Gi-Oh! Duel Links on PC (Windows 10, 8.1, 8, 7, XP computer) or MAC APK for Free. Duel Links is a real-time trading card game that allows you to challenge other Duelists on a global arena. Yugioh Pro 2 Download Mac Iso. We offer multiple single player opponents for you to duel. Bembo font download free mac. YGOPRO The Dawn of a New Era Mac OS X Edition has been released, it can be downloaded here: Download YGOPro.The Mac edition comes with an all new launcher! For anyone new to our website, YGOPro The Dawn of a New Era (TDOANE) is an automatic, free to play Yu-Gi-Oh! Online game, which gives players access to all released cards while continually adding new cards as soon as they are announced. Mac Icons Download Free. These elegant Mac icon set is downloadable and comes in different formats such as PNG, ICO and more. These designs can be edited in Photoshop or Illustrator, and you can make as many changes as you want. If you love to have more elegance with a change in icons, this is the best option. YGOPRO 2 YGOPRO 2 is a new Yu Gi Oh game with a modern interface it looks like this Can I play this game on Mac and Linux The game is currently not supported on Mac or Linux systems once this. D Jan 2019 Easy Safe and absolutely Free to download tutorial Download WinRAR Here https YGOPRO 2 Download Tutorial 2019 Alvaroy Yu Gi Oh How to Download.
Ygopro 2 Download Discord
Ygopro 2 Download Mac
Ygopro Percy Download 2020
Ygopro Free Download Windows 10
Ygopro Percy Download
Ygopro 2 Download Windows 10
Project Ignis : EDOPro
The Project Ignis team, formerly the team behind YGOPro Percy, is happy to present you with EDOPro, an evolution of the YGOPro system, supporting all major desktop platforms (Windows, Mac, Linux), with a plethora of new features and bug fixes.
Ygopro 2 Download Discord
Feature of Project Ignis : EDOPro
– Rush Duel Mode – Speed Duel Mode – Master Rule April 2020 – Single Mode (Ai Duel) – Puzzle Mode – LAN Mode – 10.000+ Card – Test Hand on Deck edit
Main menu :
Deck Edit :
Duel Mode (Vs AI):

Support me on patreon : https://www.patreon.com/join/ygoprocombo
Visit my Youtube Channel : YgoPro Combo
Hey everyone, I know it's been a common issue for mac players being unable to play the game for whatever reason, and while I may not know all the details I wanted to share my workaround for the time being. Following all the steps below should allow you to run the game client and have it working as intended. (Without having to download any programs you have to pay $$$ for, instead spend that money on donations for the server now that you can play it!)
I'm sorry this guide is so long, but I've tested it and know it works 100%.
Edit: Before we get started I just wanted to add that I did a bit of research and supposedly there's an easier solution. There's a program called 'Wine' that's used to run windows programs on Mac and Linux, however I don't know if the program is free or if it even works. You can try and download it but I have no clue if it'll work or not.
Step 1:
Fairly simple, you'll need to download a VM (Virtual Machine) of your choice, my personal favorite is VirtualBox. The download link can be found here. https://www.virtualb.../wiki/Downloads
If you're on a Mac operating system, then you'll want to click the download link titled 'OS X hosts'
Step 2:
Download and install the VirtualBox (Or another VM) software onto your computer, unfortunately I can't show a step by step guide using the OS X download but fingers crossed it looks something like the Windows download version, as shown below.
Make sure you download the full version of the VM client and continue.
Make sure when you're prompted to make a start menu shortcut, make one, it'll save us a lot of time.
Step 3:
Now that you have a VM downloaded, you'll want to download a Windows ISO file so that your VM can run. Honestly I'd prefer a Windows 7 ISO, but on this guide I'll show you how to get a Windows 10 ISO running, since It's available for free in Microsoft's website.
Make sure you follow this next link: https://www.microsof...nload/windows10
On the link you'll be sent to a page with a download link shown here:
Click the link and download the Windows Media Creation Tool file, and open it. Once you've done that you'll be prompted to read the license terms, just click accept.
HERE'S THE IMPORTANT PART:
Ygopro 2 Download Mac
Now that you've downloaded the MediaCreationTool for Windows (10) You need to click the circle I have below, and click 'Next'.
You'll then be prompted to the next page, I recommend using the recommended options. If you need to change something about it, such as the language or the 64/32-bit settings, then do so. However please make sure you install the normal 'Windows 10' version.
Make sure you then download Windows 10 media as an ISO file, shown below.
Download and save Windows.iso onto your DESKTOP for easy access, this makes the guide easier for both of us.
Step 4:
I'm not sure why I'm putting the steps so loosely onto the guide, forgive me, but now that you have both Windows.iso and a VM, you can finally run Windows (10) on your Mac.
Open up Oracle VM VirtualBox, and Click 'New' and we'll start to create our Windows VM, this might get a little tricky so follow closely.
After you click 'New' you'll be shown this pop-up window, just fill out the name with anything you want, just make sure the type is 'Microsoft Windows' and the version is Windows 10 (64-bit or 32-bit depending on your OS).
For the next few images, you'll want to follow the exact settings I have, you can add more GB and memory to your VM to make it run faster (which to run YGO TDOANE you might need more memory) but if you make the settings any lower than what I have you'll more than likely not have enough room to download Windows.iso, so be sure to clear up space on your computer if you don't have it.
Here are the settings I have for each section:
Memory Size: 3000 MB
Hard Disk: Select 'Create a virtual hard disk now' and make sure it is 32.00 GB
Hard disk file type: VDI


Storage: Dynamically Allocated
File location: Anywhere you want, 32.00 GB
-
Alright! Now that you've completed creating the actual VM, you'll want to double click it on your VM list to power it on.
Once powered on you'll be prompted with another pop-up window. You'll want to click the circle labeled 'Create a virtual hard disk now' and click 'Create'.
Once opened, it'll ask you to select a start-up disk, this is when you'll want to click the small folder with a green '^' arrow on it. Once you do that it'll open your file menu where you'll search for your 'Windows.iso' file. If you've followed my instructions it should be on your desktop, if not look for it and select it, and press 'Open'.
Here's where it can get really tricky. Now that you've successfully mounted the Window.iso file and started the VM, it'll begin to run, and as you're now using a completely new Windows OS, you'll need to install it for the first time. Choose the settings you want and click 'Next' and then 'Install'
The next step is a little annoying, You'll be shown a window where you have to put in a product key, simply click 'I don't have a product key' and continue.
Now that you've done that, you'll be given a window with different selections as to which version of Windows you want to install, just install Windows 10 Pro for this guide.
Accept the license terms and when prompted pick the custom installation (advanced) option. You'll then be asked to install this into a drive, which there should only be one, and obviously, click that one and press 'Next'
Installing Windows 10 Pro will take a while, for me it took around 20 minutes, so make sure that when you're done using your VM client you NEVER delete the VM file, unless you're done using the VM completely and want to uninstall it. Once successfully installed the VM will need to restart, however we're going to be exiting out of the VM, so click the X at the top right and select 'Power off the machine' option when prompted.
We can't continue until we get rid of the Windows.iso from our VM, this is because if we don't we'll be stuck in an endless loop of booting up into the installation section of Windows 10. To remove the Windows.iso file all we need to do is right click our VM on the main page, and click 'Settings'. Gonna show you where to right click below:
Once your settings are opened you'll want to proceed to the 'Storage' tab, there you'll see two files, one named 'whatever you named your VM'.vdi and 'Windows.iso'. Just right click Windows.iso and delete it. Close your Settings window and now you're ready to boot up Windows 10 without any problems!
Step 5:
Now here's the easy part. You'll load up Windows 10 and after a short wait you'll see this screen below:
Follow the basic installation guide all the way through and you should have Windows 10 successfully running on your Virtual Machine!
Ygopro Percy Download 2020
Step 6:
Now that we're finally on Windows 10 in our VM (Hopefully the setup and account creation didn't take too long for you) we can begin to get onto YGO TDOANE!
Ygopro Free Download Windows 10
Simply, just open your browser (The only browser you should have right now is Internet Explorer, and for that I'm sorry), and click the link here: https://drive.google...mxBeHcwTjA/edit This link is the mirror download for the Windows version of the TDOANE client. If you can't copy/paste this link simply just Google 'YGO TDOANE download', click the first link, and subsequently download either of the Windows mirrors on the page.
Ygopro Percy Download
Follow the installation for TDOANE as you normally would and you should now be able to run and play the game without any issues. Here's a screenshot of me in the client using VM:
Thank you for taking your time to read this guide, and I apologize if there's actually a far easier method to do this, or if the mac problem has already been fixed.
P.S. If the game is running too slow on the VM then you need to increase the amount of memory you have on the VM, you can do so from the 'Settings' section, the same area we deleted the 'Windows.iso' file.
Ygopro 2 Download Windows 10
1 note
·
View note
Text
Install Oracle Virtualbox On Mac

How to run Mac OS X on VirtualBox0

Download the latest version of Oracle VirtualBox for OS X hosts. Go to your Downloads folder and double click on the VirtualBox disk image file (dmg) you just downloaded.
Oracle VM VirtualBox Extension Pack. Free for personal, educational or evaluation use under the terms of the VirtualBox Personal Use and Evaluation License on Windows, Mac.
Install Linux(Ubuntu) on Oracle VirtualBox. Mayank Kumar Chaudhari. Which usually works much better on linux than on Windows or Mac, but you don’t want to leave your preferred os — may be windows or Mac OS or you want to experiment with a new software without risking the host OS.
Currently MacOS X is available to download for everyone, and with it you will obtain a mass of advantages and bonuses, like incredible Aqua interface and unforgettable style and traditions of classical MacOS X design. However, at the moment all the enthusiasts are capable to install and run MacOS X on VirtualBox VM instance, but you’ve got to know, that you will encounter some obstacles and thorns on your way. The main reason is different hardware architecture, PC has a lot of special options and peculiarities comparing to MacOS X platform, and during installation of MacOS in VirtualBox you will tackle with them all. Also no one guarantees that everything would work fine on your VirtualBox instance, without any problems and barriers, so be ready for unexpected surprises and moments.
The first thing what you should do prior to setting up, is to download the virtual hard disk image with the stored copy of Mac OS X (in this build 10.11 ElCaptain version is installed), so everything that you need is to get the installed copy of HDD, import it into VirtualBox and start using it as if you installed it yourself.
In this article I’m going to tell you how to run Mac OS X on VirtualBox, how to customize it and how to transform the virtual instance into functional representation easily.

The first thing what you should do prior to setting up, is to download the virtual hard disk image with the stored copy of Mac OS X (in this build 10.11 ElCaptain version is installed), so everything that you need is to get the installed copy of HDD, import it into VirtualBox and start using it as if you installed it yourself.
The copy:

https://drive.google.com/drive/folders/0B7cXiM2mdMukRW85U0xxM2FCRFU
So, download the file from the source link and extract the archive to the reliable destination.

Now I will describe the hardware requirements for the MacOS X installation on VirtualBox.
Requirements for the personal computer:
Install Oracle Vm On Mac
OS: Windows 10/8/7 (64-bit)
CPU: Intel
RAM: 3072 MB (minimal)

BIOS: Virtualization Enable (VT-x)
The next step, which you should perform, is to install VirtualBox.
Further create new VM instance. Here come the parameters:
Name: OSX ElCapitan Final
Type: MacOSX
Version: MacOSX 10.11 ElCapitan (64-bit)
Image: OSX ElCapitan Retail.vmdk
When the form with RAM memory definition appears during VirtualBox setting up, set the RAM size to 4 GB (minimum 2.56 GB).
Next step is related to virtual machine configuration. Set up the following settings for exact reproduction of hardware platform and correct VM operation:
CPU: 2 CPU and Enable PAE/NX
Install Macos Catalina On Oracle Virtualbox
System: Disable Floppy, Enable EFI, Chipset is IHC9 or PIIX3.
Can't Install Virtualbox On Mac
On this iteration the algorithm “How to install Mac OS X on VirtualBox?” is approaching to its conclusion. Using the predefined instruction, you will easily be able to install and run MacOSX 10.11 ElCapitan on your Windows PC platform and VirtualBox appropriately and use it with full comfort and coziness. As far as this instruction is quite detailed and circumstantial, you will not feel any discomfort or confusion while addressing to it. Also we checked the links given in the beginning of the article, and may guarantee that they are all correct and working. Thus, they will serve you well and successfully.
1 note
·
View note
Text
Okay so I’m using rpgmaker 2003, on a windows 10 operating system on a virtual machine called virtualbox but it runs as slow as piss and is absolutely unusable (fixed the file sharing problem though by linking it to a file on my Mac) but I have no idea how to fix the awful lag that comes with the slow speed. Heellppp
2 notes
·
View notes
Text
So, I've got VirtualBox, a virtual machine program, on my computer, as I've been mentioning a lot lately. I primarily installed it because I just switched from Windows 10 to Ubuntu Linux; as such, the main virtual machine on it is running Windows 10, so I can continue to use programs that don't work on Linux (primarily MMD and the Office suite; I've abandoned a lot of the programs I used to use on Windows in favor of Linux alternatives, but MMD doesn't really HAVE alternatives (in that way, it's kinda less of a 3D graphics program and more of a game) and the Office suite is kinda necessary for certain bits of schoolwork).
However, at the moment, I'm installing a second virtual machine that's running a different version of Linux- Fedora. Why? Is it because I'm second-guessing Ubuntu and considering a different Linux distro? Not really, I've been perfectly happy with Ubuntu so far. Rather, it's because I'm taking a Linux class in school right now, and Fedora is the version of Linux that this class is working with. So, I'm installing Fedora so I can do my homework.
Anyways, in setting up this Fedora VM, I remembered what options VirtualBox gives me. When I first tell it to create a new VM, it gives me options for what OS it's gonna be running. The options? Microsoft Windows, Linux, Solaris, BSD, IBM OS/2, Mac OS X, and Other. Then, of course, the second question is what version of that OS it's gonna be using (Oh, Windows? Is it gonna be 3.1, XP, 7, 10? Oh, Linux? Is it gonna be 2.2? Ubuntu? Fedora? openSUSE?).
In any case, I find it amusing that those are my main options. I've never heard of Solaris or BSD, and the only reason I've heard of OS/2 is because I've been watching a lot of videos about computing technology from the 80's lately. And yet, apparently there are more people trying to run OS/2 VMs than DOS ones. I mean, I guess it's not really THAT surprising- I mean, who the hell would WANT to run a VM of DOS? If you want a DOS experience on a modern computer, why not just use the Windows command line? And if you want a FULL DOS experience, why not just use a vintage computer?- just, I've known about the existence of DOS since... basically the first time I ever started looking into the history of old PCs AT ALL, but I only know OS/2 due to... basically online documentaries. I mean, to be fair, those documentaries also talked about how OS/2 is apparently still in surprisingly large use in things like cash registers and ATMs, and there are still a lot of OS/2 enthusiasts, but I don't see cash registers or ATMs needing virtual machines to run, and I don't see OS/2 enthusiasts installing it on a VM- if anything, they'd have OS/2 as their host and install Windows or Linux on a VM.
As much as I'm making fun of the idea, simply knowing that VirtualBox can virtualize OS/2 does make me kinda wanna download an ISO of OS/2 and run a VM of it, just to see what it's like if nothing else.
1 note
·
View note
Text
Kodi 17.3 download for windows 10 64 bit

KODI 17.3 DOWNLOAD FOR WINDOWS 10 64 BIT HOW TO
KODI 17.3 DOWNLOAD FOR WINDOWS 10 64 BIT MAC OS
KODI 17.3 DOWNLOAD FOR WINDOWS 10 64 BIT APK
KODI 17.3 DOWNLOAD FOR WINDOWS 10 64 BIT INSTALL
KODI 17.3 DOWNLOAD FOR WINDOWS 10 64 BIT 64 BIT
KODI 17.3 DOWNLOAD FOR WINDOWS 10 64 BIT 64 BIT
With this tool, you can easily create on Windows your own autorun file to open Kodi and enjoy all the functions and features of one of the best media centers out there. Kodi Film Songs freeload Kodi 64-bit Download Download Kodi On Iphone 10 Download Mashup For Kodi 2015 Mobdro For Kodi 17.6 Download Exodus Wont Download Kodi 17 Download Kodi 17.1 In Windows Kodi Download Italiano Windows 10 Kodi Download For 64 Bit Download Kodi 17.
Cualquier HTPC x86 (64 bits) with Intel, AMD or NVIDIA GPU.
KODI 17.3 DOWNLOAD FOR WINDOWS 10 64 BIT INSTALL
This app is one of the most popular Video apps worldwide Install Kodi latest full setup on your PC/laptop Safe and Secure. This is the list of devices that LibreELEC is compatible with: Kodi 18 64 Bit Download And Install Kodi 18 64 Bit Download Will Start Jump to: Key Features of Kodi Media Player Download and Install Kodi 18.2 on Windows 10 Whats New on Kodi 18. Kodi app for Windows 10 Download Kodi for Windows 10/8/7 64-bit/32-bit. With this tool you can download from Malavida, you yourself can create a USB stick or an SD card with the version of the operating system that you need depending on your device. Make the most of an operating system focused on multimedia playbackįor the development of this operating system, its creators took into account the possibility to use it on embedded devices of the likes of Raspberry Pi and its subsequent versions 2 and 3. Follow the prompts as you would with any other software installation. In any case, the best thing you can do is download the image and burn it onto a LIVE CD, DVD or USB device.LibreELEC is an operating system based on OpenELEC, the Linux distribution that in turn is based on Kodi and is aimed at playing multimedia contents without consuming too many resources, by running it straight from a flash memory unit. Use the following commands in your Linux/Ubuntu terminal to install Kodi 18.3. That means that, although it's not the most recommendable method, you can run it using a virtual machine of the likes of VirtualBox. The installation file, that offers us 32 and 64-bit versions, comes along in ISO format.
At least 8 GB of free space on your hard drive.
ATI, NVIDIA or Intel video card with OPENGL 2.0 support.
KODI 17.3 DOWNLOAD FOR WINDOWS 10 64 BIT MAC OS
XBMC is a cross-platform and open source software (GPL) available for Linux, Mac OS X, Windows and the Xbox game-console. Its graphical user interface (GUI) allows the user to easily browse and view videos, photos, podcasts, and music from a harddrive, optical disc, local network, and the internet using only a few buttons. Kodi (64-bit) is a media player jukebox and entertainment hub for all your digital media. It should instead have been named 'Kodi for Windows 64-bit is almost here', or 'Kodi for Windows 64-bit alpha builds available for testing' or something like that. That's the reason why it's a great way of turning an old computer into a device to watch movies downloaded from the Internet or on a CD or DVD on our computer screen or TV set. It uses a 10-foot user interface designed to be a media player for the living-room, using a remote control as the primary input device. (, 15:38) RockerC Wrote: So comes down to a bad choice of title for that news-post IMHO. This distribution is really a Linux version fully focused on running Kodi and all its features, aiming all its resources at running the app and not at other unnecessary functions.Īll your computer's resources will be focused on playing multimedia files.
KODI 17.3 DOWNLOAD FOR WINDOWS 10 64 BIT APK
Kodi, previously known as XBMC, is one of the best multimedia centers that we can download to different platforms (also for iOS and in APK format for Android), that offers us a wide range of options and possibilities to play multimedia files. Focused on the Kodi application, it intends to offer us a method to turn our computer into a media center without any further complications. Ubuntu is one of the easiest-to-use distros that has brought this operating system closer to many users, and this Kodibuntu is based on the latter. Easily turn your computer into a media center
KODI 17.3 DOWNLOAD FOR WINDOWS 10 64 BIT HOW TO
any suggestions on how to install 64 bit ver 17. The Steps are very simple and easy to follow to get kodi on Windows 10. Download and install Kodi for Windows 10/8/7 with the help of this article. if I install the 64 bit it installs ver 18 and works but I want to install ver 17.5. How to Install Kodi on Windows 8.1 Now, if you are using Windows 8.1 on your device, you can install Kodi using anyone of the three methods: Download the software from Kodi’s official website. That's obviously possible thanks to its open-source nature that allows any particular user or company to carry out its own developments. When i install the (x86) version when i start kodi o get a message windows stop working. Kodi (formerly known as XBMC) is an award-winning free and open source (GPL) software media player and entertainment hub that can be installed on Linux, OSX, Windows. One of the greatest advantages of Linux regarding Windows or macOS is the possibility to develop distributions focused on a specific use of our PC. A new version Kodi 17.6 freeload on.
0 notes
Text
Os x vmware image torrent

#Os x vmware image torrent how to#
#Os x vmware image torrent mac os x#
#Os x vmware image torrent archive#
#Os x vmware image torrent code#
It includes fixes for USB 3.0 support, mouse and keyboard support, and other useful VirtualBox patches.ĭownload: VirtualBox Extension Pack for Windows (Free)
#Os x vmware image torrent how to#
For instance, right-click, then select 7-Zip > Extract to “macOS Catalina.” How to Create a macOS Catalina Virtual Machine with VirtualBoxīefore creating the macOS virtual machine, you need to install the VirtualBox Extension Pack.
#Os x vmware image torrent archive#
If that is the case, please leave a comment, and I’ll fix them as soon as possible.Īfter the virtual image finishes downloading, right-click, and extract the file using your favorite archive tool. Please note that these links may stop working from time to time. You can then download the macOS Catalina virtual image from there. If the Google Drive reaches its download limit, right-click the file and select Copy to create a copy in your own Google Drive. Use the following links to download macOS Catalina for both VirtualBox and VMware.
#Os x vmware image torrent code#
You can find the tutorial and the code snippet in the section below.įurthermore, you will find links to several AMD macOS Catalina, Mojave, and High Sierra virtual machine tutorials, at the end of the article. The process to launch the macOS Catalina virtual machine is the same as the Intel version but uses a slightly different code snippet. There is, however, the code snippet that anyone using an AMD system requires to boot a macOS Catalina using VMware on AMD hardware. Unfortunately, I do not have access to any AMD hardware, so I cannot provide a tutorial. This tutorial will focus on installing macOS Catalina in a virtual machine running on Intel hardware, using either VirtualBox or VMware Player. You can find the download links for macOS Catalina in the next section.
Download the latest version of VMware Player.
Download the latest version of VirtualBox.
Not sure which to use? Learn more about the differences between VirtualBox and VMware. The tutorial details how to create macOS virtual machines using both Oracle VirtualBox Manager (VirtualBox) and VMware Workstation Player (VMware Player). What Files Do You Need to Create a macOS Virtual Machine on Windows 10?īefore delving into the “how-to,” you need to download and install the essential tools. There is another VMWare Sierra guide on this site, but with AMD system a modified VMWare image is required to even. I’m making this guide for those who don’t have access to a Mac and need macOS to either try out for a bit or create a macOS boot loader installer for a AMD hackintosh build. This guide will show you the steps to install Sierra on a AMD Ryzen PC using a VMWare Virtual Machine. My laptop model is Acer Aspire 5738 having Intel core 2 duo T6400 processor.
#Os x vmware image torrent mac os x#
To run Mac OS X you need a host on which VMware Workstation supports Intel VT-x or AMD-V. So, here’s how you install macOS in a virtual machine on Windows, making a virtual Hackintosh that lets you run Apple apps from your Windows machine. What better way to do that than from the safe confines of your existing operating system with a virtual machine? This way, you can run macOS on Windows, which is perfect when you want to use Mac-only apps on Windows.
Links: VMware Player: Mac OS X Yosemite AMD Image (Download all three and extract as one): Music I used: Song: Sk.
Let’s Download MacOS High Sierra Image File for Virtualbox & VMware, however, the current Apple OS is MacOS Catalina 10.15 that announced and released in 2019, besides that, macOS Mojave 10.14 is also the greatest operating system having tons of feature But still, MacOS High Sierra 10.13.6 is in high demand and legions of people are installing MacOS High Sierra on Macbook, Mac Mini.
r/AMD is community run and does not represent AMD in any capacity unless specified.
Welcome to /r/AMD - the subreddit for all things AMD come talk about Ryzen, Threadripper, EPYC, Navi, the next-gen consoles, news, rumours, show-off your build and more.
It has its quirks and annoyances, but which operating system doesn’t? Even if you’re beholden to Microsoft and Windows 10, you can still shop around.
0 notes
Text
Parallels desktop 14 mac

#Parallels desktop 14 mac for mac#
#Parallels desktop 14 mac mac os x#
#Parallels desktop 14 mac mac os#
and update Official amd pc drivers are not compatible with mac versions of.
#Parallels desktop 14 mac for mac#
The primary focus of this year’s Parallels Desktop for Mac release is on enhanced storage. The popular cross-platform solution that lets you run Windows 10 on your Mac features support for Apple’s upcoming macOS Mojave update and includes storage and performance enhancements, and more. Parallels Desktop 14 is available now.įollow the Money: This is how digital cash is changing the way we save, shop and work.ĬNET Magazine: Check out a sample of the stories in CNET's newsstand edition. AMD Apple Boot Camp Graphics Driver 14 They are Apple modified versions in. Parallels Desktop for Mac 14 has been unveiled. You can get it for $80 as a 12-month subscription license, though. Parallels Desktop 14 will charge $100 for a perpetual license instead of the previous $80.
#Parallels desktop 14 mac mac os#
are speed-related Parallels Desktop 15 for Mac is fully compatible with macOS 10. Parallels Desktop 14 Key Features: Install and run our favorite Mac OS and windows functions at the same time without troubleshooting or rebooting. Parallels Desktop 14 is priced at US99.99 for a perpetual license, or 79.99 as an annual subscription.
#Parallels desktop 14 mac mac os x#
Parallels is also preparing for Apple's upcoming Mojave update, though the company is still testing features that will be released when Mojave hits Macs. Fix VirtualBox Errors While Installing Mac OS X 20: Unable to install. Parallels Desktop is available now for Parallels Desktop subscribers as a free update. Parallels added a tweak that lets you use the MacBook's pressure sensitive trackpad with your finger, though that won't be as precise as drawing with a pen.ĤK cameras are now supported. And if you don't have a pressure sensitive drawing tablet, fret not. Other enhancements include pressure sensitivity in apps like PowerPoint and Photoshop. Let us know if you have any questions about the latest update of Parallels Desktop 14.1 of Mac in the comments below. Resolves an issue with the Japanese characters hardly visible on the Download Windows screen. Parallels said the 14th version comes with speed improvements that enable it to almost instantly load at a click, with new OpenGL updates that let it run apps such as 3D modeling tool SketchUp without a hitch and with a feature that promises to free up to 20GB of virtual machine storage space. Resolves an issue with Parallels Transporter Agent crashing periodically on a remote computer because of conflicts with OpenGL. The updated software, released Tuesday, lets you run Microsoft Windows as a virtual machine on your Macbook or Mac and sports features that lets you seamlessly copy and paste information back and forth between Windows and MacOS. Parallels Desktop Business Edition 14 macOS freeload includes all the necessary files to run perfectly on your system, uploaded program contains all. If you like using Windows on your Mac, then Parallels Desktop 14 for Mac may fit your needs.
0 notes
Text
Network drivers on mac with windows 10 not working

#NETWORK DRIVERS ON MAC WITH WINDOWS 10 NOT WORKING HOW TO#
#NETWORK DRIVERS ON MAC WITH WINDOWS 10 NOT WORKING DRIVERS#
#NETWORK DRIVERS ON MAC WITH WINDOWS 10 NOT WORKING UPDATE#
Then you can restart your computer and check if the problem has been solved. Step 5: Click Next and follow the onscreen instructions to finish the operation. Nov 27, Windows Vista Driver Updates freeload To find the latest driver, including Windows 10 drivers. The only driver not installed in the audio one which is.
#NETWORK DRIVERS ON MAC WITH WINDOWS 10 NOT WORKING HOW TO#
Then click Run as administrator and check Apply repairs automatically. 44 thoughts on How to install Windows XP SP3 on Mac OSX Mountain Lion and get drivers, too. Step 4: In the pop-up window, click Advanced to view more options. You need to click Network Adapter from the list. Then Windows will list all the troubleshooters available on the PC. Step 3: In the left side, click View all. My friend put his Wi-Fi network card and still could not detect network adapter. Cable is good, using on another desktop and my laptop. How to set up virtualbox and Windows 10 on Mac. Could not detect network adapter when using ethernet cable. Got this working on an amd 3950 using - VBoxManage modifyvm Big Sur -cpu-profile Intel Xeon X5482 3. Step 2: Select View by: Large icons from the upper right corner in the window. I have i5 11600k lga 1200, win 10 pro圆4, msi geforce gt1030/corsair vengeance lpx 16gb ddr4 2133/wd black sn750 nvme.2 500gb. Then input control panel and press Enter to access Control Panel. The only thing in Device Manager that shows having no driver is the. On Windows 8.1, the speakers had their own entry. In Device Manager, the speakers don't even show up as a device. Afterwards, the internal speakers would not work. Once finished, it will tell you what the flash drives problem is. This Mac previously had Windows 8.1 and was fine. It may take some time to complete the scan. Open the Tools tab and click Check now'¦. Go to My Computer and right-click on the flash drive. Step 2: In the pop-up window, double-click Network adapters to extend it. Way 1: Scan Flash Drive to Find the Issue. Step 1: Right-click Start and choose Device Manager. You can fix the issue by updating your Broadcom 802.11n Network Adapter driver on Windows 10. Step 1: Press Win + R to invoke Run window. Corrupted or outdated device driver could be a reason for Broadcom 802.11n Network Adapter not working. Solution 1: Run Network Adapter TroubleshooterĪ simple way to solve Broadcom 802.11n Network Adapter not working is to run Network Adapter troubleshooter, a built-in collection to troubleshoot some common problems. You can try the following fixes to solve the problem.
#NETWORK DRIVERS ON MAC WITH WINDOWS 10 NOT WORKING DRIVERS#
When they check the properties of this adapter, they find that the device status shows “ This device cannot start. Details: The drivers they include for the Sentinel HL were working fine on my old Windows Cant install Sentinel HL driver on. Some Broadcom 802.11n Network Adapter users report that they have trouble in connecting to the internet.
Solution 3: Fix Corrupted Registry entries.
#NETWORK DRIVERS ON MAC WITH WINDOWS 10 NOT WORKING UPDATE#
Solution 2: Update Your Network Adapter Driver.
Solution 1: Run Network Adapter Troubleshooter.
0 notes