#Internal Tube Cutter
Explore tagged Tumblr posts
Visit Tumblr Blog
Explore Tumblr blogs with no restrictions, modern design and the best experience.
Last Seen Tumblr Blogs


Fun Fact
Tumblr was the first site to host the blog for President Barack Obama in 2011.
Text
i've been doing some work on the barn stall, which used to be frequented by horses when we had them, because i've been thinking about getting sheep
and it's good to have a secure place for the sheep to overnight if you don't have a livestock guardian dog
our land is relatively secure against large predators with the perimeter fence, but a determined coyote could still find a weak spot to dig under the fence or a big cat (puma / mountain lion / cougar) could just hop over the fence, thus no keeping the sheep out at night
so the stall of the barn

(currently in use for winter storage of summer outside furniture) has two big window spaces (to the left here, and on the wall to the right - covered by a big rolling door that blocks off the middle part of the barn that's behind the stall)
and of course the large doorway which has no door
the horses were self-secure; very little will mess with a horse; they came and went and rarely slept in the barn stall
the first part of this semi-renovation was to strengthen the bottom of the internal walls because the wood had somewhat rotted, likely because of being peed on by the horses

some of the base boards needed replacement and i slapped some plywood on at the bottom to cover gaps, and set up a strong threshold across the entry, since everything passing through (man or beast) will undoubtedly step on it, and it will also protect the base of the gates and keep the dirt & bedding in
next was to protect the window

i chose this 4"×4" pattern panel since nothing that can fit through it is likely to bother sheep or lambs
the panel is 8' wide and 3' high, which was almost perfect for the window
almost

so i took a piece of the panel that i had clipped off (using 18" bolt cutters - makes a crude but sufficient cut easily) from the corner, trimmed it to fit, and tack welded it on
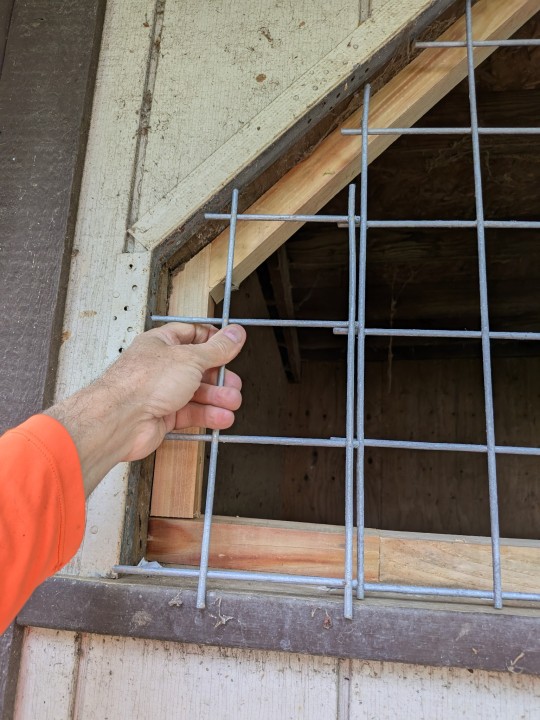

turned out good methinks

obviously i need to redo that fence on the left side too...
i'll do a similar panel for the window space on the right but that'll be after i dump a bit of dirt through the window using the tractor to replace what the horses displaced over many years
and i'll build a pair of custom gates to fit the doorway exactly, using 1¼" square tubing on the perimeter and this metal panel in the middle
#country life#barn repair#sheep to be#i got dizzy from a very brief hit of smoke from welding that galvanized#very strange didn't happen when i welded up the goose coop
2 notes
·
View notes
Text
Best Laser Cutters & Engravers

Laser cutters, also sometimes called laser engravers, come in all shapes and sizes, allowing you to safely work with a variety of materials, from oak to iron-on transfers. You can get one of the best low power laser cutters for as little as. Low-wattage lasers are cheaper and perfect for engraving images and cutting thin materials. Higher wattage machines are more expensive and can cut through thicker material in one pass. To help you choose, we’ve tested several models and listed the best laser cutters. Where the laser cutting process needs to start anywhere other than the edge of the material, a piercing process is used, whereby a high power pulsed laser makes a hole in the material - laser cutter.
Lasers are tested using both the supplied samples as well as popular project blanks, such as basswood sheets and bamboo cutting boards. We completed several test projects to evaluate how the laser performs while engraving text and images, whether it can cut acrylic or etch something more difficult like stone or metal. Our deflection units are used in applications where a focused laser beam needs to be directed onto a workpiece. The possible applications of such laser processing can hardly be fully enumerated. In cooperation with our customers, our department is constantly developing products for new applications. Typical applications for our deflection units include, for example - Tube laser.
Laser cutting uses a high-power laser which is directed through optics and computer numerical control (CNC) to direct the beam or material. Typically, the process uses a motion control system to follow a CNC or G-code of the pattern that is to be cut onto the material. The focused laser beam burns, melts, vaporises or is blown away by a jet of gas to leave a high-quality surface finished edge. The laser beam is created by the stimulation of lasing materials through electrical discharges or lamps inside a closed container. The lasing material is amplified by being reflected internally via a partial mirror until its energy is enough for it to escape as a stream of coherent monochromatic light. This light is focused at the work area by mirrors or fibre optics that direct the beam through a lens which intensifies it. For more information, please visit our site https://impactmachinery.com.au/
0 notes
Text
The importance of the profession of a sanitary technician
The profession of a sanitary technician is one of the most important jobs in the construction sector, as individuals and institutions rely on it to ensure the availability of clean water and the safe disposal of wastewater. The importance of this profession lies in the following points:
Ensuring the health of the population: By providing sound sewage systems, the sanitary technician prevents the spread of diseases resulting from water pollution. Preserving water resources: Contributes to the installation of water-saving systems and detecting leaks that may lead to water waste. Supporting infrastructure: The sanitary technician plays a major role in the construction and maintenance of residential, commercial and industrial buildings. Reducing material damage: Helps detect and repair leaks early, reducing the possibility of damage to buildings. Achieving safety standards: The sanitary technician works according to health and engineering standards to ensure the safety of facilities and users. Tasks of the sanitary technician The sanitary technician undertakes many basic tasks in plumbing and sanitation, including:
Installing plumbing and water systems Installing pipes and tubes for cold and hot water. Connecting water tanks to distribution systems inside the building. Installing pumps to ensure proper water flow.
Installing and maintaining sewage systems Establishing domestic and industrial sewage networks. Installing drainage pipes and ensuring efficient drainage of wastewater. Repairing blockages or leaks in sewers.
Detecting and repairing water leaks Using advanced technologies to detect water leaks without the need to break walls. Replacing damaged pipes and repairing faults to ensure no water is wasted.
Installing sanitary ware Installing sinks, toilets, bathtubs, and showers in bathrooms. Installing water tanks and central heating systems. Installing water purification devices and ensuring they work efficiently.
Repairing and maintaining plumbing systems Performing periodic maintenance of water and sewage systems. Cleaning sewage networks from deposits and impurities that may lead to blockage. Replacing damaged parts in faucets and pipes to avoid leaks.
Adhering to health and engineering standards Ensuring that installation and maintenance operations comply with approved building and plumbing standards. Using high-quality materials to ensure the sustainability of sanitary networks for long periods.
Tools used in the work of the sanitary technician The sanitary technician relies on a set of basic tools that help him accomplish his work efficiently, including:
تسليك مجاري الرقعي الكويت
تسليك مجاري الجهراء
Wrenches: such as the pipe wrench and adjustable wrenches to adjust and loosen connections. Leak detection devices: used to detect invisible leaks without the need to break walls. Pipe Cutters: used to cut metal and plastic pipes accurately. Pipe welding machine: used to connect plastic and PVC pipes in a safe manner. Drain cleaning equipment: such as water pressure machines and manual wiring tools. Pressure and tilt gauges: to ensure the correct flow of water and no leaks occur. Drilling and crushing equipment: in case of need to replace internal pipes or extend new networks. How to choose a professional sanitary technician? When looking for a professional plumber, some factors must be taken into account to ensure reliable and high-quality service:
Experience and competence: The technician must have practical experience in the field of plumbing and drainage. Certifications and licenses: It is best to deal with a plumber certified by the competent authorities. Use of modern equipment: It is preferable to choose a technician who uses advanced technologies to detect leaks and repair faults. Commitment to deadlines: The technician must be committed to the specified time to complete the work. Service warranty: It is best to choose a technician who provides a warranty on the services he provides. Challenges faced by the plumber Despite the importance of this profession, the plumber faces many challenges, such as:
Working in difficult conditions: He may have to work in narrow spaces or underground. Exposure to health risks: Such as exposure to contaminated water or harmful chemicals.
0 notes
Video
youtube
National Diet Building|Origami Architecture|paper art|kirigami|國會議事��
Paper Size : A4 . 200gsm This is a demonstration of how to cut and fold make a pop up card. Interested people can download the pattern to make their own pop-up cards. 這是示範如何做3D彈出卡片,有興趣的人可以下載圖案自行製作彈出卡片. 影片為切割及摺疊紙張過程.免費提供下載模板圖使用! 模板僅提供個人使用,不得使用於商業用途 ! The template is provided for personal use only and not be used for commercial ! The template download is FREE at https://drive.google.com/file/d/1yzWjc3H0mH2yOGxCkKAt8fBCt_gBirxl/view?usp=drive_link #paper art Many people think that paper is something that is outdated.. After all, now you can just send a sticker in social networks. It is simple and fast, does not require any costs or time. However, the more so, a hand-made postcard will surprise the recipient and will let him know that you really tried to make something pleasant. #pop up card Pop-up-postcards are postcards with three-dimensional elements that are unfold when you open a postcard. The art of pop-up is a wonderful opportunity to create something completely unique and unique from plain paper Unique artistic traits and hand-made value. #art It is quite simple to make the card, for this you will need: colored paper, cardboard, scheme, cutter, glue, scissors, pencil, ruler, printer and computer. You can make such crafts with your child, developing his imagination and drawing skills. 許多人認為紙張已經過時了。畢竟,現在你可以在社交網絡中發送貼紙了。 它簡單快捷,不需要任何費用或時間。 然而,更多的是,手工製作的明信片會給收件人帶來驚喜,讓他知道你真的想要做一些令人愉快的事情。 彈出式明信片是明信片,具有三維元素,當您打開明信片時會展開。 彈出式藝術是一個絕佳的機會,可以用普通紙創造出獨特而獨特的東西獨特的藝術特質和手工製作的價值。 製作卡片非常簡單,為此您需要:彩色紙,紙板,方案,刀具,膠水,剪刀,鉛筆,尺子,打印機和計算機。 您可以與您的孩子一起製作這樣的工藝品,發展他的想像力和繪畫技巧。 If you like this video please subscribe me subscribe 訂閱https://www.youtube.com/channel/UCxdQbCE1S2blAp7760QehQQ?sub_confirmation=1 如果您喜歡影片,請按訂閱,訂閱是免費的.它會讓您會收到影片更新通知.謝謝您! The National Diet Building (国会議事堂, Kokkai-gijidō) is the building where both houses of the National Diet of Japan meet. It is located at Nagatachō 1-chome 7–1, Chiyoda, Tokyo. Sessions of the House of Representatives take place in the south wing and sessions of the House of Councillors in the north wing. The Diet Building was completed in 1936 and is constructed entirely of Japanese materials, with the exception of the stained glass, door locks, and pneumatic tube system. History The construction of the building for the old Diet of Japan began in 1920; however, plans for the building date back to the late 1880s. The Diet met in temporary structures for the first fifty years of its existence because there was no agreement over what form its building should take. Early designs German architects Wilhelm Böckmann and Hermann Ende were invited to Tokyo in 1886 and 1887, respectively. They created two plans for a Diet building. Böckmann's initial plan was a masonry structure with a dome and flanking wings, similar to other legislatures of the era, which would form the core of a large "government ring" south of the Imperial Palace. However, at the time there was public resistance in Japan to Foreign Minister Inoue Kaoru's internationalist policies, and so the architects submitted a more "Japanese" design as well, substituting traditional Japanese architectural features for many parts of the building. Ende and Böckmann's Diet Building was never built, but their other "government ring" designs were used for the Tokyo District Court and Ministry of Justice buildings. In 1898, Prime Minister Itō Hirobumi interviewed American Ralph Adams Cram, who proposed a more "Oriental" design for the building, featuring tiled roofs and a large enclosure of walls and gates. The Itō government fell as Cram was en route to the United States, and the project was dropped. First building, second building, and fires at both With an internal deadline approaching, the government enlisted Ende and Böckmann associate Adolph Stegmueller and Japanese architect Yoshii Shigenori to design a temporary structure. The building, a two-story, European-style wooden structure, opened in November 1890 on a site in Hibiya. An electrical fire burned down the first building in January 1891, only two months later. Another Ende and Böckmann associate, Oscar Tietze, joined Yoshii to design its replacement. The second building was larger than the first, but followed a similar design: it housed the Diet until 1925 when another fire destroyed the building. 國會(日語:国会/こっかい kokkai)是日本的最高立法機關暨最高權力機構,前身為1890年依《明治憲法》成立的帝國議會,現今依《日本國憲法》第41、42條設置,實施兩院制,由相當於下議院的眾議院、以及相當於上議院的參議院構成。今眾議院議員設465席、參議院議員設248席,選民則為18歲以上的日本國民[1]。 由於日本實施內閣制,國會議員可兼任內閣閣員,內閣總理大臣(首相)亦由國會從國會議員中推選。今日本國會的主要政黨為自由民主黨、立憲民主黨、公明黨、日本共產黨、日本維新會、國民民主黨等,而最大黨為自由民主黨。 blogger https://jrchiang.blogspot.com/ Pixnet http://jrchiang2006.pixnet.net instagram https://www.instagram.com/jrchiang_ig/ facebook https://www.facebook.com/profile.php?id=100000032068067 Tumblr https://www.tumblr.com/blog/jrchiangm twitter https://twitter.com/jrchiang2006 pinterest https://www.pinterest.com/jrchiang2006/
0 notes
Text
What is planetary Gear Motors?

Planetary Geared Motors efficiently handles the speed and optimises the torque. They can be used in wide industrial applications ranging from steel plants to material handling equipments.
Components of Planetary Geared Motors
Motor speed reducers can be categorised in the following ways depending on how they are internally configured:
Planetary Speed Reducers
Stages of planetary gear motors are grouped, and each one has the following layout:
Sun Gear (Central Gear)
The sun gear in a planetary gearbox rotates the neighbouring planetary gears, which are mounted on a carrier to prevent slippage while in use. The planetary gears rotate the ring gear while the sun gear is powered. The sun gear is the main gear. It rotates on a bigger axis and is greater in size.
Multiple Planet Gears
The epicyclic gear typically consists of two gears, one of which meshes with the sun gear and the other with the planetary ring gear. These are used to lower speed. They are utilised to boost torque and slow down motors. Planetary gears' primary and essential job is to adjust the rotational speed or torque between the input and output shafts while transmitting torque.
Planet Carrier
The planet gear is held by the planet carrier, which rotates in the opposite direction of the planet gear. Typically, it offers support to allow two gears to roll without slippage by connecting their centres. A planet carrier that meshes with the sun can carry up to three gears.
Ring Gear (Outer Gear)
Numerous planet gears that are utilised to drive the outer ring, shaft, or spindle share the load from the sun gear. The ring gear provides a reverse direction by rotating in the same direction as the sun gear.
Advantages Of Planetary Gear Motors
Increased Repeatability
Its faster radial and axial loads are more dependable and robust, reducing gear misalignment. Additionally, flawless repeatability is provided by consistent transmission and reduced vibrations under various loads.
Perfect Accuracy
The movement's accuracy and dependability are improved by the rotation's maximum angular stability.
Efficient Durability
Because there is greater surface contact, the noise intensity is lower. Jumping is almost negligible, and rolling is much smoother. Owing to its torsional rigidity and improved rolling, it is more durable. Your bearings assist in minimising the losses that would result from the shaft rubbing against the box directly, improving this characteristic. As a result, the gear operates more smoothly and with more efficiency.
High Degrees of Effectiveness
Planetary reducers are more effective and minimise losses during operation due to their internal design and architecture. In actuality, these driving systems are the most efficient ones available today.
Improved Torque Transmission
The mechanism can transmit and endure more torque when there are more teeth in connection. Things also performs it in a more consistent way.
Maximum Adaptability
Its gearbox, which is cylindrical and can be mounted practically anywhere, houses the mechanism.
Disadvantages of Planetary Gear Motors
A planetary gear system will generally cost more than a traditional gearbox.
Planetary gear design and production are challenging and highly complex.
It would be difficult to figure out a planetary gear system's efficiency
It is challenging because the gear system demands exact gearing.
Some planetary gearing configurations operate noisier than others.
The driving component and the driven component must coincide to avoid any additional gearing.
Applications of Planetary Gear Motors
It is utilised in packing equipment for industrially reproducible goods.
They are utilised in cutter head drives, coil tubing injectors, and pumps.
It can be used in drives like wheel drives, track drives, conveyor drives, slew drives, hoist drives, and winch drives, among others.
These gears are frequently employed in robotics to increase torque.
It is utilised in printing presses to lower the rollers' speed.
Regulations For Planetary Gearboxes
When a manufacturer lists the operating time of your gears or the maximum torque they can withstand, keep in mind that each manufacturer establishes its own standards. Nevertheless, these parameters are governed by a few rules.
ISO 6636 for gears.
DIN ISO 281: Contains all the guidelines necessary to calculate bearings correctly.
ISO 9409: Part II discusses how the output shafts of these geared motors are designed in accordance with various requirements.
#planetarygearmotors#planetarygearmotorsmanufacture#planetarygearmotorssuppliers#kavitsuransmissions#kavitsu
0 notes
Note
Hello! Sorry if this is an out of the blue question, but I recently found your post that you made these adorable forearm crutches for your teddy bear. I know you posted that a good while ago, but do you remember how you made them? I’d love to do something similar for my bears and I think the ones you made look so good! ❤️
(I hope you have a good day!)
hey!
(Link to post with forearm crutches for stuffed animal)
The way I made it was I built the internal structure of the crutch and then sewed fabric to fit on top of it (you could also probably glue if preferred.) I got wooden dowels to act as the main core of the crutch that were like...a half inch wide, probably, and I was able to cut it to the right size with a box cutter. I cut out cardboard rectangles in the right size for the cuff. For the tip, i cut out a cardboard circle and then like, a flattened out cone shape. I glued the cone to the cardboard circle to make the tip as like a cutoff cone. I filled the tips with some weighted poly-pellets to make it easier for them to stand up on their own but you can probably skip that step. I glued some stuffing on top of the cardboard and the wooden dowel to make it a little smoother, and then cut rectangles of fabric in the right size to cover the crutch, the cuffs, and the tips. I sewed another tube for like the bottom handle part of the crutch and filled it with stuffing. I sewed a dot of velcro onto the cuff and then also on the right place on the stuffed animal arm so that it could attach and stand up on its own.
lmk if you have any other questions or if that makes sense, i'm having a hard time trying to figure out how to describe some of that with words!
0 notes
Text
Simple Tube Bender Tools: Beginner's Kit
Are you just starting your journey into tube bending? Whether you're a hobbyist or a novice fabricator, having the right tools can make all the difference in achieving successful bends. In this guide, we'll introduce you to a beginner-friendly kit of tube bender tools that will help you get started on your bending projects with ease.
Tube Bender Tooling Essentials for Beginners
Tube Cutter: A good-quality tube cutter is the foundation of any bending project. It allows you to precisely cut tubes to the desired length, ensuring clean and accurate bends. Look for a cutter with a sharp cutting wheel and a sturdy construction for optimal performance.
Bending Machine: While there are various types of bending machines available, a manual tube bender is an excellent choice for beginners. These compact and affordable machines are easy to operate and can handle a wide range of tube sizes. Choose a model with adjustable dies for added versatility.
Bend Die Set: A basic bend die set is essential for shaping tubes to the desired angle and radius. Opt for a set that includes a variety of die sizes to accommodate different bending requirements. Look for durable materials like hardened steel for long-lasting performance.
Mandrel Kit: For smoother and more uniform bends, consider investing in a mandrel kit. Mandrels provide internal support to the tube during bending, preventing deformation and reducing the risk of wrinkles. Look for a kit that includes mandrels in various sizes to suit different tube diameters.
Deburring Tool: After cutting tubes, sharp edges and burrs may form, which can affect the quality of bends. A deburring tool helps remove these imperfections, ensuring smooth and clean bends. Choose a tool with a comfortable grip and replaceable blades for ease of use and maintenance.
Measuring Tools: Accurate measurements are crucial for achieving precise bends. Invest in a quality tape measure, calipers, or a combination square to ensure your bends are spot-on every time. These tools will help you achieve professional results and minimize wastage of materials.
Conclusion
Embarking on your tube bending journey is an exciting adventure, and having the right tools at your disposal can make the experience enjoyable and rewarding. With a beginner's kit of tube bender tools, you'll have everything you need to tackle your bending projects with confidence and ease.
#tube bender#pines tube bender#tubebendertooling#tube bender tooling#equipment#machine#pipe and tube bender#tubebendercontroller
0 notes
Text
Guide to Appliance Repair for Home Appliance Users

Understanding how to diagnose and fix common issues with your home appliances is an invaluable skill. Not only can you save money on Appliance Repair in Surrey, but you can also extend the life of your appliances and prevent small problems from becoming larger ones. This guide walks through the most common appliance malfunctions and the tools you'll need for repairs and provides step-by-step instructions for tackling issues like leaks, noisy appliances, and power failures. Don't worry if you haven't fixed anything before — let's start with the basics and build up to more complex repairs.
Importance of Basic Appliance Repair Skills
Being knowledgeable about basic appliance repairs empowers you in several ways:
Saves money on service calls and new appliances
Teaches valuable problem-solving and handiness skills
Allows more control over the comfort and functionality of your living space
Encourages a "waste not, want not" attitude towards our resources
Common Appliance Issues to Look Out For
Before you learn appliance repair, you need to recognize when they are malfunctioning. Common signs include strange sounds, leaks, and electrical issues. Every appliance user should know to identify potential problems and act swiftly.
Leaks and Water Issues
Leaks are often due to worn hoses, clogged lines, or damaged seals. Immediate action is necessary to avoid water damage.
Strange Noises
Clanking, rattling, or grinding noises can signify mechanical problems, such as worn bearings, motor issues, or loose components.
Electrical Malfunctions
If your appliance fails to power on or experiences intermittent power loss, there may be a fault in the power cord, outlet, or internal electrical system.
Tools Needed for Appliance Repair
You'll need a basic set of tools to address most appliance issues adequately. Here are the tools that you should have in your kit:
Essential Tools:
Screwdrivers (Phillips and flathead)
Adjustable Wrench
Multimeter (for electrical testing)
Pliers
Putty Knife (for prying open appliance parts)
Flashlight
Optional Tools:
Tubing Cutter
Nut Driver Set
Appliance-Specific Wrenches or Sockets
Appliance Lifts or Movers (for heavy appliances)
Step-by-Step Repair Guide
When you've spotted an issue with your appliance, follow these steps to diagnose and appliance repair it safely and effectively.
Safety First
Your safety is paramount. Always unplug the device or turn off the circuit breaker before beginning repairs. If working on gas appliances, turn off the gas supply to the unit.
Troubleshooting the Issue
The first step is to troubleshoot the problem. This might involve taking a closer look, running a diagnostic cycle, or observing the appliance to identify the malfunction.
Disassembling the Appliance
Carefully disassemble the appliance, starting with the outer panels and working to the interior components. Keep track of screws & parts by using small containers or labels.
Part Replacement or Repair
Once you locate the defective part, assess whether it can be repaired or if you need to replace it. Follow the manufacturer's instructions or service manual.
Reassembling and Testing
After completing the appliance repair, reassemble the appliance in the reverse order of how it was disassembled. Test the appliance to ensure that it is functioning properly.
Specific Appliance Repairs
Each type of appliance has different components and appliance repair tactics. Let's delve into the details of handling the most common home appliances.
Refrigerator Repairs
Leaks from Your Fridge: Often, this is from a blocked or frozen defrost drain. Empty the freezer, remove it with ice, and flush it with hot water.
Not Cooling Properly: Check the condenser coils for dust and clean them. If that doesn't help, the condenser fan or compressor might need to be fixed.
Noisy Refrigerator: This could be a problem with the evaporator fan, the condenser fan, or the motor. Inspect and replace the affected component.
Washing Machine Repairs
Leaks: Inspect the hoses and water pump for leaks or blockages.
No Water Filling the Drum: Check the inlet valve for obstructions or damage.
Drum Not Spinning: This might be due to a broken or worn belt. Replace the belt or the motor if necessary.
Oven and Stove Repairs
Gas Smell: If you detect a gas smell, turn off the gas to the appliance and contact your gas company immediately.
Not Heating Properly: The element might need to be fixed if you have an electric oven. Gas ovens might have issues with the igniter or thermostat.
Inconsistent Temperature: This is often a problem with the temperature sensor or the oven's calibration.
Preventive Maintenance Tips
The best way to avoid major appliance repairs is through regular maintenance. Here are some general practices for prolonging the life of your appliances:
Always read and follow the manufacturer's instructions for proper use and care.
Keep appliances clean and free of dust, lint, and debris.
Check for leaks and unusual sounds regularly.
Perform scheduled maintenance tasks such as changing filters or inspecting hoses.
Conclusion: Embrace DIY Repairs
Basic appliance repair is well within the capabilities of most home appliance users. By following the steps in this guide, you can become more self-sufficient and extend the life of your valuable appliances. Remember to be patient, take your time, and always prioritize safety. Your appliances will thank you with years of trouble-free service. If an appliance repair Surrey job seems beyond your comfort level, feel free to call in a professional. It's better to have the job done than risk further damage.
0 notes
Text
The Value of One Finger

I worked in a small print shop when I was in my early twenties. Ed, the foreman, was a nice man but very nervous even at the best of times. If anything went wrong he became a complete wreck. One day we found him in the stock room banging his head against the wall after a customer had complained.
We had a book to deliver on a Friday afternoon. It was not well designed and the spine was much too thick from the binding method that was used. My job that morning was to trim all the books to size. Since the spine was so thick I had trouble fitting more than one book at a time in the cutter. Unless I could trim more than one book at a shot there was no way I would get them all done in time for delivery.
I came up with a clever way to fit three books in the cutter. My method required me to put my hand over and behind the hydraulics and push the spines down. That gave me the chance to bring down the hydraulic clamp that held everything in place to keep the books flat. Then I could safely trigger the heavy steel guillotine blade to cut the books. A steel panel covered the hydraulics so I couldn't see how close my fingers came to the clamp as it came down. The hydraulic clamp used about 600 pounds of pressure to hold everything perfectly still for the cutter blade.
I was working along quite happily and the books were getting trimmed much faster than expected. I felt a sharp pain in my left index finger and pulled it out of the cutter just in time to see a small drop of blood ooze out from the corner of the finger nail. I felt a bit queasy and sat down for a minute.
One of the bindery workers yelled out that I had been hurt. Ed came running over as fast as he could. By the time he reached me I felt much better and had a look at the tiny drop of blood on the edge of my finger. I wiped it off as Ed checked me over and he started to go into panic mode. He yelled for someone to call an ambulance. I insisted that I was fine and it was only one drop of blood.
Cooler heads stopped the call for an ambulance. We managed to talk Ed down from an ambulance to a taxi to take me to the hospital. Ed insisted that I needed emergency medical attention and I should take the rest of the day off. How could I resist that offer?
I sat in Vancouver General Hospital's emergency room for about an hour before a nurse came to talk to me. I had been watching the parade of cases as they came in. I felt a bit embarrassed by my lack of symptoms. One man with a stab wound to his thigh was covered in blood from the waist down. A stretcher carrying a drug overdose case rolled past me. A drunk with his hair matted with blood was trying to explain who he was to the admitting nurse. A few crying children and moaning adults waited more or less patiently for some attention.
A nurse walked briskly up to me and asked me what was wrong. I explained how the corner of my finger became slightly crushed. I added that I was only there at the insistence of my employer. A second drop of blood had obligingly squeezed out in the time since I left work. The nurse said "I'll get you a doctor".
Another hour later a young intern came by to see me. I repeated the story of my grave injury and showed him the drop of dried blood still on the edge of my finger nail. The doctor said "I'll get you a nurse".
A while later a nurse showed up with a square cardboard box and a strange device that looked like a small tube of chicken wire. She pulled the end of a roll of gauze from the box, threaded it through the chicken wire thing and began to expertly wind the gauze back and forth over my finger. She kept this up until my finger had so much gauze on it that it was the size of a light bulb.
The nurse stood up and admired her work briefly before telling me I was free to go. I walked out of the emergency room trying to hide the gauze bulb and headed home. As I passed a garbage can I dropped the light bulb of gauze into it.
When I got back to work on Monday Ed asked if I was OK and told me he had opened a case with the Workers Compensation Board. He told me I was owed some consideration for my injury. I expected to get a reply from a faceless bureaucrat explaining that they don't compensate you for losing 2 drops of blood.
A few months later, after the WCB had carefully considered the facts of my case, I got a cheque in the mail. It was accompanied by a short letter explaining that they had calculated the degree of suffering I endured and the cheque was a reflection of their assessment. The amount was $1.59. I think the amount was about right.
0 notes
Text
CNC Pipe Cutter

Our many years of experience along with their vision to place a strong stand in the industry by manufacturing machines with high quality, precision and accuracy makes them a reliable manufacturer to purchase from. The features and specifications of each CNC pipe-cutting machine will depend on the manufacturer. The most important function of the main drive is to ensure the accuracy of the pipe cutting process - pipe profile machine.
Profile benders are capable of bending a variety of profiles, including tubes, bars, and other shapes. These machines are widely used in the production of architectural elements, furniture, and various metal structures. This foundation remains aligned for years of production and is important to ensure the machine accuracy. The frame supports the main drive with chuck, cutting trolley with touch screen and pipe support. The rails on the frame allow longitudinal movement of the cutting trolley and pipe support. The quality of their machinery and equipment has been aptly certified with their acquisition certificate, the international standard for quality assurance. They also pay high attention to high standards by adjusting the cost, productivity and accuracy of their machinery according to their customer needs - Tube laser.
The machine scans the material first by laser, to compensate for material deformations and misalignment. Due to the intelligence of the machine, it is possible to achieve a minimum usage of consumables and high cutting speeds without compromising on quality. The Pipe cutting machine has a unique headstock design. The adjustable three-jaw chuck allows pipe to easily be aligned and centered for cutting. The thermal cutting emissions are exhausted through the chuck and headstock to an industrial-grade fume extraction system. This unique design maximizes productivity and maintains a clean and safe work environment.
Together we design, build, install, and maintain systems to provide the convenience and control of a one-stop source. This CNC is there for a high-value CNC Pipe cutter, savings in fitting welding and full penetration at two site. The greatest worry in fabrication is the complexity of the design, poor production flow management, too much waste of the material, loss of control over operational expense and lack of highly skilled welders. There is an increasing demand for tough regulations on the welded structure. For more information, please visit our site https://impactmachinery.com.au/
0 notes
Text
The 4 Most Common Types of Precision CNC Machining
CNC machining is a catch-all term for a wide range of machining applications. The term “CNC” stands for Computer Numerical Controlled and refers to the machine’s programmable feature, which allows the machine to perform many functions with little human intervention. CNC machining is the process of creating a component with a CNC-controlled machine. A lot of CNC Manufacturers in India excel in providing you with these machines. The term refers to a group of subtractive manufacturing processes that involve removing material from a stock workpiece or bar to create a finished component part.

The 4 most common types of Precision CNC Machining are as follows:
CNC Lathes and Turning Machine:
During machining, CNC lathes and turning machines rotate materials. These machines use linear cutting tools to remove material around the revolving bar stock’s circle until the required diameter is reached. Internal and external components such as drilled holes and threads can be produced by a CNC lathe or a CNC turning machine. Screws, bolts, shafts, and poppets are examples of CNC machined components. Precision Components manufacturers may assist you with a CNC lathe and turning machine. A CNC lathe or a CNC turning machine can produce internal and external components such as drilled holes and threads.
2. CNC Milling Machines:
CNC milling machines are distinguished by their ability to rotate cutting tools while remaining stationary with the material workpiece/block. They can make a variety of shapes, such as face-milled features (shallow, flat surfaces and cavities in the workpiece) and peripheral-milled features (deep cavities such as slots and threads). CNC milling machine components are typically square or rectangular in shape and have a variety of features.
3. CNC Laser Machines:
CNC laser machines use a pointed router with a highly focused laser beam to cut, slice, or engrave materials precisely. The laser heats the material, causing it to melt or vaporize and leaving a cut in it. The material is typically in sheet form, and the laser beam moves back and forth across the material to create a precise cut. CNC laser engravers are frequently used to mark machined components. It can be difficult, for example, to machine a logo and company name into a CNC-turned or CNC-milled component.
4. CNC Plasma Cutting Machine:
CNC plasma cutters are also used to slice materials. They do it, however, with a computer-controlled high-powered plasma torch. Plasma torches operate similarly to hand-held gas welding torches but reach temperatures of 50,000°F. To form a cut, the plasma torch melts through the material. Precision CNC machining is used in the manufacturing industry to create CNC-machined components. Depending on the environment, material, lead time, volume, budget, and features, there is usually an optimal way to provide the desired output.
Supreme Metal Works is considered amongst the best steel components manufacturers. We are recognized as one of the renowned CNC Turned Component Manufacturers in Mumbai, India. Our diverse services include tube fitting which also happens to be our primary expertise. Quality and Customer satisfaction are what we assure you at Supreme Metal Works.
You can reach us on suprememetal.in

#cnc machined components manufacturer#manufacturers of tube fittings in india#ferrule fittings manufacturer in india#cnc machined components manufacturer in india
0 notes
Text
Large Diameter HDPE Solid Wall Pipe Extrusion Machine
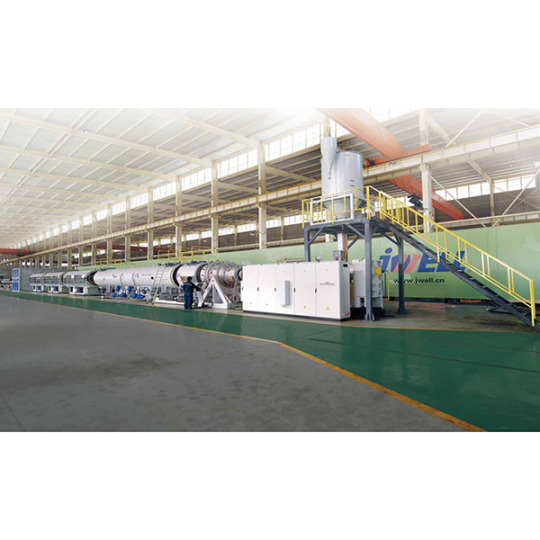
The performance and advantages of our equipment Extruder is JWS-H series High efficiency, high output single screw extruder. The special screw barrel structure design ensures ideal melt uniformity at lower solution temperatures.Designed for large-diameter pipe extrusion, the spiral distribution structure mold is equipped with an in-mold suction pipe internal cooling system. Combined with a special low-sag material, it can produce ultra-thick-walled, large-diameter pipes.Hydraulic opening and closing two-stage vacuum tank, computerized centralized control and coordination of multiple crawler tractors, chipless cutter and all units, a high degree of automation. The optional wire rope tractor can make the initial operation of the large-caliber tube more convenient. Polyolefin Pipe Die Head PO die head is designed by JWELL Machinery Co.,ltd for high speed & high output pipe extrusion,which can produce pipe diameter from 16mm to 3000mm, adapting spiral design to make even material arrangement, low head melt temperature, low pressure consumption, reduction of innerstress as well shinning pipe surface. Modularity structure to cause easily disassemble and material change. Main technical specification Model Pipe diameter Extruder Capacity JWPEG-800 Φ400-800mm JWS-H120/38 1100-1300kg/h JWPEG-1000 Φ500-1000mm JWS-H120/38 1100-1300kg/h JWPEG-1200 Φ630-1200mm JWS-H90/38+90/38 1800-2000kg/h JWPEG-1600 Φ1000-1600mm JWS-HH90/38+120/38 2000-2200kg/h JWPEG-2500 Φ1400-2500mm JWS-H120/38+150/38 2200-2500kg/h Product image display Read the full article
#HDPEMarinePipeExtrusionMachine#HighSpeedExtrusionMachineforHDPEWaterPipe/GasPipe#LargeDiameterHDPESolidWallPipeExtrusionMachine#NewCorrugatedPipeExtrusionMachineforVentilationSystem#PEHeatInsulationPipeExtrusionMachine#PE/PPDoubleWallCorrugatedPipeExtrusionMachine#PipeExtrusionMachine#PPR/PERT/PEXCool&HotWaterPipeExtrusionMachine#PVCDualPipeExtrusionMachine#SiliconCorePipeExtrusionMachine#Three-layerPVCSolidWallPipeCo-extrusionExtrusionMachine#UPVC/CPVCPipeExtrusionMachine
0 notes
Video
youtube
The basic structure of the National Diet Building|Origami Architecture|p...
Paper Size : A4 . 120gsm This is a demonstration of how to cut and fold make a pop up card. Interested people can download the pattern to make their own pop-up cards. 這是示範如何做3D彈出卡片,有興趣的人可以下載圖案自行製作彈出卡片. 影片為切割及摺疊紙張過程.免費提供下載模板圖使用! 模板僅提供個人使用,不得使用於商業用途 ! The template is provided for personal use only and not be used for commercial ! The template download is FREE at https://drive.google.com/file/d/1ez9qrqwidnnnGC_v_UnvTh7gvXf9QP2c/view?usp=drive_link #paper art Many people think that paper is something that is outdated.. After all, now you can just send a sticker in social networks. It is simple and fast, does not require any costs or time. However, the more so, a hand-made postcard will surprise the recipient and will let him know that you really tried to make something pleasant. #pop up card Pop-up-postcards are postcards with three-dimensional elements that are unfold when you open a postcard. The art of pop-up is a wonderful opportunity to create something completely unique and unique from plain paper Unique artistic traits and hand-made value. #art It is quite simple to make the card, for this you will need: colored paper, cardboard, scheme, cutter, glue, scissors, pencil, ruler, printer and computer. You can make such crafts with your child, developing his imagination and drawing skills. 許多人認為紙張已經過時了。畢竟,現在你可以在社交網絡中發送貼紙了。 它簡單快捷,不需要任何費用或時間。 然而,更多的是,手工製作的明信片會給收件人帶來驚喜,讓他知道你真的想要做一些令人愉快的事情。 彈出式明信片是明信片,具有三維元素,當您打開明信片時會展開。 彈出式藝術是一個絕佳的機會,可以用普通紙創造出獨特而獨特的東西獨特的藝術特質和手工製作的價值。 製作卡片非常簡單,為此您需要:彩色紙,紙板,方案,刀具,膠水,剪刀,鉛筆,尺子,打印機和計算機。 您可以與您的孩子一起製作這樣的工藝品,發展他的想像力和繪畫技巧。 If you like this video please subscribe me subscribe 訂閱https://www.youtube.com/channel/UCxdQbCE1S2blAp7760QehQQ?sub_confirmation=1 如果您喜歡影片,請按訂閱,訂閱是免費的.它會讓您會收到影片更新通知.謝謝您! The National Diet Building (国会議事堂, Kokkai-gijidō) is the building where both houses of the National Diet of Japan meet. It is located at Nagatachō 1-chome 7–1, Chiyoda, Tokyo. Sessions of the House of Representatives take place in the south wing and sessions of the House of Councillors in the north wing. The Diet Building was completed in 1936 and is constructed entirely of Japanese materials, with the exception of the stained glass, door locks, and pneumatic tube system. History The construction of the building for the old Diet of Japan began in 1920; however, plans for the building date back to the late 1880s. The Diet met in temporary structures for the first fifty years of its existence because there was no agreement over what form its building should take. Early designs German architects Wilhelm Böckmann and Hermann Ende were invited to Tokyo in 1886 and 1887, respectively. They created two plans for a Diet building. Böckmann's initial plan was a masonry structure with a dome and flanking wings, similar to other legislatures of the era, which would form the core of a large "government ring" south of the Imperial Palace. However, at the time there was public resistance in Japan to Foreign Minister Inoue Kaoru's internationalist policies, and so the architects submitted a more "Japanese" design as well, substituting traditional Japanese architectural features for many parts of the building. Ende and Böckmann's Diet Building was never built, but their other "government ring" designs were used for the Tokyo District Court and Ministry of Justice buildings. In 1898, Prime Minister Itō Hirobumi interviewed American Ralph Adams Cram, who proposed a more "Oriental" design for the building, featuring tiled roofs and a large enclosure of walls and gates. The Itō government fell as Cram was en route to the United States, and the project was dropped. First building, second building, and fires at both With an internal deadline approaching, the government enlisted Ende and Böckmann associate Adolph Stegmueller and Japanese architect Yoshii Shigenori to design a temporary structure. The building, a two-story, European-style wooden structure, opened in November 1890 on a site in Hibiya. An electrical fire burned down the first building in January 1891, only two months later. Another Ende and Böckmann associate, Oscar Tietze, joined Yoshii to design its replacement. The second building was larger than the first, but followed a similar design: it housed the Diet until 1925 when another fire destroyed the building. 國會(日語:国会/こっかい kokkai)是日本的最高立法機關暨最高權力機構,前身為1890年依《明治憲法》成立的帝國議會,現今依《日本國憲法》第41、42條設置,實施兩院制,由相當於下議院的眾議院、以及相當於上議院的參議院構成。今眾議院議員設465席、參議院議員設248席,選民則為18歲以上的日本國民[1]。 由於日本實施內閣制,國會議員可兼任內閣閣員,內閣總理大臣(首相)亦由國會從國會議員中推選。今日本國會的主要政黨為自由民主黨、立憲民主黨、公明黨、日本共產黨、日本維新會、國民民主黨等,而最大黨為自由民主黨。 blogger https://jrchiang.blogspot.com/ Pixnet http://jrchiang2006.pixnet.net instagram https://www.instagram.com/jrchiang_ig/ facebook https://www.facebook.com/profile.php?id=100000032068067 Tumblr https://www.tumblr.com/blog/jrchiangm twitter https://twitter.com/jrchiang2006 pinterest https://www.pinterest.com/jrchiang2006/
0 notes
Text
How to fix the jackhammer noise of the toilet

The jackhammer noise coming from your toilet is not caused by the toilet, but by the water pipes. It occurs when water slams against the pipes when the toilet valve is closed. Since water is incompressible, the vibrations are transmitted through the pipes to the wall or through the filling valve to the toilet. This phenomenon is called water hammer and can damage the pipes if nothing is done about it. The solution is to install a water hammer damper. It has an internal piston that absorbs the excess water pressure, stopping the shaking. Install a tee in the supply line just before the shutoff valve. You will probably need to cut out a piece of drywall to access the pipe. In this case, use a drywall saw to cut out a large rectangle that extends to the studs on both sides. This will give you plenty of room to work and make it easy to replace. Turn off the water line and open the shut-off valve to relieve the water pressure. Cut the pipe about an inch before the elbow protruding from the wall with a pipe cutter or, if the pipe runs next to a stud, with a hacksaw. Drain the water and then deburr the pipe with a file. Insert a 1.2-cm threaded copper tee into the pipe where you cut it. The outlet should be parallel to the wall or slightly backwards. Coat the pipe and the inlets of the tee with solder flux, slide it onto the pipes, and solder it with lead-free solder. Place a heat shield between the tube and the stud to protect the stud while you heat the joint with a torch. Wrap tape around the threads of a water hammer protector that resembles a short 1.2 cm pipe with a cap, and screw the protector into the tee with a wrench. Plug in the toilet, turn on the valve and flush a few times to make sure the water hammer is no longer heard. If it does, replace the drywall, patch it and paint it.
Call the Emergency Plumber in Luton. We are your right contact partner. Call us whenever you want, 01582323084.
0 notes
Text
भारत में एक सफल प्लंबिंग बिजनेस (plumbing business) चलाने के लिए 7 स्मार्ट टिप्स
प्लंबिंग बिजनेस (plumbing business) उन सभी बिजनेस में से एक है जिसकी आम आदमी को हर जगह ज़रूरत रहती है । बिना प्लंबिंग के कोई घर या ऑफिस चल ही नहीं सकता क्योंकि ये बिजनेस सीधे पानी से जुड़ा है और ऐसा कोई नहीं जिसको इसकी ज़रूरत न हो । चाहे वो फीटिंग हो, लीकेज, ब्लॉकेज, टंकी या कुछ और, एक बेहतर प्लंबिंग सर्विस की ज़रूरत सबको रहती है क्योंकि इस बिज़नेस में क्वालिटी वर्क की सबसे ज़्यादा डिमांड है और अगर आपकी सर्विस को पसंद किया जाता है तो आप भारत में एक सफल बिजनेस बना सकते हैं ।
नोएडा में प्लंबिग सर्विस Plumbing service in noida
नोएडा क्षेत्र जितनी तेजी से बस रहा है, वहां उतनी ही तेजी से plumbing service की ज़रूरत पड़ रही है । फ्लेट हो, ऑफिस हो या फिर घर, नोएडा में plumbing business एक सफल बिजनेस का रूप ले चुका है । यहाँ पहले से काफी ज़्यादा plumber service मौजूद है, उसके बावजूद यहां plumbing service demand लगातार बढ़ रही है । आप भी अगर plumbing business को एक सफल बिजनेस बनाना चाहते हैं तो हम नीचे प्लंबिंग बिजनेस (plumbing business) को सफल बनाने वाले 7 स्मार्ट टिप्स आपको बता रहे हैं, आप इन्हें फॉलो कीजिए -
इनवेस्टमेंट यानी निवेश करना
किसी भी बिजनेस को बढ़ाने के लिए इनवेस्टमेंट एक ज़रूरी पहलू है । Plumbing service को सफल बनाने के लिए आपके पास एक बेहतर पूंजी निवेश करने के लिए होनी ज़रूरी है । आपको ये निवेश सोच-समझकर करना है और हां, ये उम्मीद न करें कि पहले ही महीने से आपको नतीजे दिखाई देने लगेंगे । आप सबसे पहले नए प्लंबिंग औज़ार (plumbing equipment) और लगने वाली बाकी लागत के लिे लोन भी ले सकते हैं ।
बिजनेस प्लान
Plumbing business एक ऐसा बिजनेस है जिसमें नल, टैंक, पाइपलाइन, ट्यूब या फिर किसी दूसरे टूल की मदद से पानी के लिए फीटिंग, लीकेज, ब्लॉकेज फिक्स किया जाता है, इसके लिए एक बिजनेस प्लान बनाने की ज़रूरत पड़ती है । अगर आंकड़ों की मानें तो noida plumbing services में 16% की बढ़त देखी गई है । एक बिजनेस प्लान आपको बिजनेस में लगने वाले खर्चे, समय और निकलने वाले नतीजों की जानकारी दने के लिए ज़रूरी है ।
अपनी स्किल चुनें
Plumbing service business तभी सफल हो सकता है जब आप इस काम के माहिर हों क्योंकि इस क्षेत्र में आप जितना बेहतर करेंगे आपके पास उतने कस्टमर आएंगे और जिसके पास जितना बड़ा कस्टमर होता है, वो बिजनेस उतना ही सफल होता है । अगर आप plumbing repair expert हैं, तो numberdekho app आपको प्रमोट करने का काम करता है ।
ऑफिस सेट-अप
एक सफल Plumbing business में ऑफिस की जगह बहुत बड़ी भूमिका निभाती है । आपके अपना ऑफिस एक ऐसी जगह पर जमाना होगा जहाँ से आप आसानी से ज़्यादा से ज़्यादा लोगों तक पहुंच सकें । ऑफिस का साइज़ इतना हो कि वहाँ plumbing tools रखने के लिए ठीक-ठाक जगह हो ताकि आपको कस्टमर की समस्या को दूर करने के लिए किसी दूसरे उपकरण की ज़रूरत न हो, मतलब ये कि आपके पास plumbing service के लिए एक्स्ट्रा उपकरण होने चाहिए । हालांकि अब numberdekho App ने आपको ऑनलाइन प्लेटफॉर्म देकर सेट-अप कर दिया है ।
ज़रूरी औज़ार
अगर आप plumbing business में एक्टिव हैं तो आपके पास ये plumbing tools होने ज़रूरी हैं -
Tubing Cutter (ट्यूब कटर)
Hacksaw ( हॉकशॉ)
Hole saw kit ( होल शॉ किट )
Pipe and tube benders ( पाइप और ट्यूब बैंडर )
Mole grips ( मोल ग्रिप्स )
Plumber’s torch ( प्लंबर टॉर्च )
Thread sealing tape ( थ्रैड सीलिंग टेप )
Pliers ( पाइलर्स )
Press fitting systems ( प्रैस फीटिंग सिस्टम )
Flashlight ( फ्लैश लाइट )
A bucket ( एक थैला )
Ratcheting pipe threader set ( रैचइटिंग पाइप थ्रैडर सेट )
Plumber Wrenches ( प्लंबर व्रैंच )
Pipe wrench ( पाइप व्रैंच )
Adjustable wrench ( एडजस्टेबल व्रैंच )
Basin wrench ( बेसिन व्रैंच )
Faucet key ( फुकैट कि )
Torque wrench ( टॉर्क व्रैंच )
Internal pipe wrench ( इंटरनल पाइप व्रैंच )
Plumber Drain Cleaning Tools ( प्लंबर ड्रैन क्लिीनिंग टूल्स )
Plungers Hand auger ( प्लंगर हैंड ऑगर )
Snake machine ( स्नैक मशीन )
Drain inspection camera ( ड्रेन इन्पेकशन कैमरा )
Hydro jetting machines ( हाइड्रो जेटिंग मशीन )
Plumbing Safety Tools ( प्लंबिंग सेफ्टी टूल )
Gloves ( ग्लोव्स )
Goggles ( चश्मे )
Heat shields or pads ( हीट शील्ड या पैड )
मार्केटिंग
Plumbing business में दूसरे बिजनेस की तरह ही मार्केटिंग फैक्टर बहुत अहमियत रखता है । क्योंकि प्लंबिंग बिजनेस में दी जाने वाली सेवाएं भी कस्टमर तक तभी पहुंचेंगी जब मार्कटिंग मज़बूत होगी, Numberdekho App आपके लिए एक मार्केटिंग रणनीति की तरह काम करता है । इस ऐप में अपना बिजनेस रजिस्टर करते ही आप plumbing business में ऑटोमेटिक एक्टिव हो जाते हैं और आ जाते हैं भारत के सबसे बड़े सर्विस/रिपेयर कस्टमर नेटवर्क के साथ ।
खर्चों को कंट्रोल करें
क्यूंकि आपने अभी-अभी एक स्टार्ट-अप के तौर पर अपना plumbing business शुरू किया है तो इस बात का ध्यान रखें कि आपके बिजनेस में लगने वाली लागत आपके जेब खर्चों पर हावी न हो जाए । आपको शुरूआत से अंत तक इस बात का ध्यान रखना होगा ताकि आप किसी भी नुकसान से बच सकें । जब आप numberdekho App पर अपने बिजनेस की रजिस्टर कर देते हैं तो आप अपने चार्ज अपने बजट के हिसाब से दर्ज कर सकते हैं ।
अगर आप प्लंबिंग बिजनेस को कुछ ही समय में सफल बनाकर एक बड़ा बिजनेस बनाना चाहते हैं तो आज ही भारत के सबसे उत्तम सर्विस प्रोवाइडर ऐप numberdekho पर अपने बिसनेस और खुद को लिस्ट करें ।

0 notes