#Linux SDR
Explore tagged Tumblr posts
Visit Tumblr Blog
Explore Tumblr blogs with no restrictions, modern design and the best experience.
Last Seen Tumblr Blogs


Fun Fact
There are dozens of funny blogs to kill time on Tumblr.
Text
back to da grind after resting my shoulder 🙏 ziggy voice i hope joining this crew full of muscular handsome bounty hunters doesn't awaken anything in me

#i thought it was funny the rest of the sdr crew makes a bi flag what does it all mean .........#his shirt is a linux joke but its not funny dw about it.#wip tag#art tag
60 notes
·
View notes
Text

Skywave Linux v5.3 is available for download! It is a self-contained live Linux operating for shortwave listening. Connect easily and stream from internet based SDR sites. The picture is from a nice night enjoying CBC Radio 1, picked up on a receiver in Newfoundland, Canada.
Get the iso image, burn it to a USB stick, boot the system and have fun. Shut down and unplug the USB, your PC never knew it was running a live Linux system…
#skywave linux#linux software defined radio#Python SDR apps#Debian Sid with DWM#internet sdrs#KiwiSDR#WebSDR
8 notes
·
View notes
Text

Skywave Linux v5.3 is available for download! It is a self-contained live Linux iso for shortwave listening on internet based SDR sites. The picture is from a nice night enjoying CBC Radio 1, picked up on a receiver in Newfoundland, Canada
Get the iso image, burn it to a USB stick, boot the system and have fun. Shut down and unplug the USB, your PC never knew it was running a live Linux system...
0 notes
Text
Everybody should learn how to use sdr radios, it's cheap, easy fun and weirdly useful. Ive built a program that can monitor when my neighbors cars enter and leave the parking lot using the rtl_sdr_433 package and it wasn't even super difficult.
1 note
·
View note
Text
the other linux adventure last weekend was trying to get sdr++ to start on boot. i've never interacted directly with systemd stuff before and my impression so far is "way too complicated for regular users to touch".
like, to try to run a service on boot with systemd it was making a script that runs the server, testing that it works in userland, seting up the script as a service, configuring the service, and it still didn't work because my server threw some uninitialized variable error that never occurs in userland. i tried two or three times with no success, varying which states were in the "wanted" and/or "before" and "after" fields, no luck.
starting it up with cron was adding one line to a crontab and it Just Werked
3 notes
·
View notes
Link
0 notes
Text
DragonOS
Dodane do bazy: DragonOS. DragonOS to oparta na Lubuntu specjalistyczna dystrybucja Linux, która koncentruje się na radiu zdefiniowanym programowo (SDR). https://linuxiarze.pl/distro-dragonos/

0 notes
Text
لماذا Jellyfin أصبح الخيار الأول لعشاق الوسائط بدلاً من Plex

مع تزايد شعبية منصات إدارة الوسائط، يبحث المستخدمون عن حلول توفر لهم المرونة والتحكم الكامل في محتواهم دون تكاليف إضافية. Jellyfin يبرز كواحد من أفضل البدائل مفتوحة المصدر، متفوقًا على منصات مثل Plex في عدة جوانب. من خلال هذا المقال، سنستعرض الأسباب التي تجعل Jellyfin الخيار الأمثل لعشاق الوسائط، مع التركيز على ميزاته الفريدة وسهولة استخدامه.
هناك المزيد في الحياة من Plex عندما يتعلق الأمر ببث الوسائط. Jellyfin هو بديل لخادم الوسائط مفتوح المصدر والذي يكون موجودًا دائمًا عندما أحتاج إليه.
1. Jellyfin مجاني
في حين أن كل من Plex و Jellyfin مجانيان للتنزيل، إلا أن الأخير فقط يقدم جميع ميزاته مجانًا تمامًا. هذه نقطة بيع كبيرة لأي تطبيق أو خدمة، مع العلم أن ما تراه هو ما تحصل عليه. Jellyfin ليس لديه أي تكاليف خفية أو متطلبات مميزة. Plex لديه Plex Pass، اشتراك شهري بقيمة 4.99 دولار (مع خطط سنوية بقيمة 39.99 دولارًا وخطط مدى الحياة بقيمة 119.99 دولارًا أيضًا). على الرغم من أن البث الأساسي مجاني، فإن Plex Pass ضروري للاستفادة من العديد من الميزات التي قد تتوقع الحصول عليها مجانًا. يجدر فهم حدود الخطة المجانية قبل بذل الجهد لإعداد خادم واستيراد الوسائط وفهرسة كل شيء.
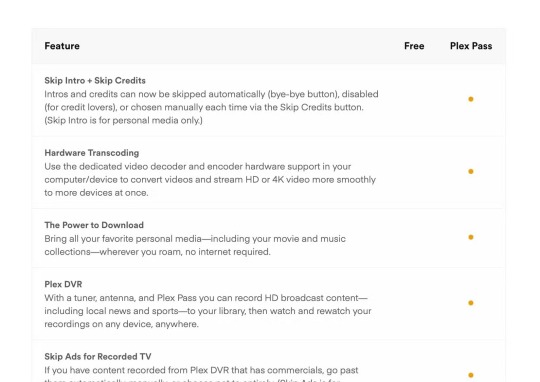
على سبيل المثال، إذا كنت تريد مشاهدة المحتوى من خادم Plex الخاص بك عبر تطبيق Plex لجهاز iPhone أو iPad، فستحتاج إلى Plex Pass. وعلى النقيض من ذلك، فإن تطبيق Jellyfin لتلك المنصات مجاني ولكنه أكثر تعقيدًا بعض الشيء (ستحتاج إلى كتابة عنوان الخادم يدويًا). إذا كنت تريد استخدام خادم Plex الخاص بك كجهاز DVR، فستحتاج إلى Plex Pass. تقدم Jellyfin هذه الميزة مجانًا، وهو ما قد يحدث فرقًا عندما يتعين عليك بالفعل دفع ثمن موالف لتشغيل الميزة. يعد تنزيل الوسائط محليًا ميزة أخرى من ميزات Plex Pass المجانية داخل Jellyfin. كما يضع Plex بعض الميزات الرائعة خلف جدار الدفع، مثل القدرة على تخطي المقدمات (التي يجب أن تعمل في Jellyfin، لكنها غير متسقة في تجربتي)، ودعم كلمات الأغاني عند بث الموسيقى. كما قد تكون خمنت، فإن هذا السعر المتميز يأتي مع طبقة من التلميع قد تشعر أنها مفقودة في Jellyfin. بالنسبة لي، هذا جيد. سأختار الخيار المجاني، مع كل عيوبه.
2. لست بحاجة إلى دفع ثمن تحويل الترميز بالأجهزة
إن أهم ميزة في Plex تتطلب Plex Pass هي تحويل الترميز بالأجهزة. إذا كنت تريد استخدام وحدة معالجة الرسوميات لتحويل الوسائط بسرعة من خادم Plex الخاص بك إلى تنسيق يمكن لجهاز آخر تشغيله، مثل التلفزيون الذكي، فستحتاج إلى دفع الرسوم. إذا كنت لا تريد الدفع، يتم استخدام تحويل الترميز بالبرمجيات بدلاً من ذلك. وهذا يجبر وحدة المعالجة المركزية على تحويل ترميز الفيديو، وهي عملية أقل كفاءة بكثير. سيؤدي تحويل ملف فيديو ضخم عبر Plex في البرنامج إلى إبطاء خادمك. من الأفضل أن تأمل ألا تستخدمه لأي شيء آخر، وأن وحدة المعالجة المركزية قادرة على التعامل مع الحمل.

من ناحية أخرى، يدعم Jellyfin الترميز المادي بشكل أصلي لتقنيات Intel وNVIDIA وAMD وApple. ويمكنه أيضًا استخدام واجهة برمجة تطبيقات تسريع الفيديو في Linux ووحدات معالجة الفيديو المستندة إلى Rockchip ARM. ويعمل هذا لكل من الترميز وفك التشفير عبر مجموعة jellyfin-ffmpeg المعدلة من المكتبات المخصصة. يمكن أن يعمل تسريع الأجهزة على تحسين الأداء في جميع المجالات (خاصة عند تقديم تدفقات فيديو متعددة) ولكنه ينطبق أيضًا على ميزات مثل تعيين نغمة HDR إلى SDR وحرق الترجمة. هل أنت مهتم بمعرفة المزيد؟ اطلع على دليل تسريع الأجهزة Jellyfin الذي يتضمن نصائح وتعليمات الإعداد (عند الضرورة) وتعليمات للتحقق من أن دعم الترميز المادي يعمل بشكل صحيح.
3. Plex قد يشعرك بالفوضى
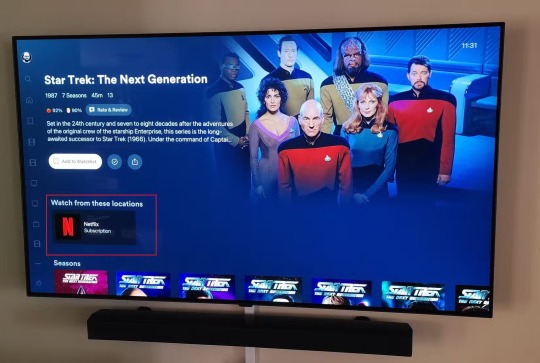
إذا كنت تريد مركز وسائط يقوم بكل شيء، من تقديم الوسائط الشخصية الخاصة بك إلى خدمات البث المتميزة والمحتوى المجاني من جميع أنحاء الويب، فإن Plex هو خيار جيد. شخصيًا، هذا ليس ما أتمنى الحصول عليه من تطبيق خادم الوسائط. لا يعرض لي تطبيق Jellyfin سوى الوسائط التي أضفتها وفهرستها بنفسي، وهذا كل ما يهمني. يدمج تطبيق Plex الآن تأجير الأفلام وخدمات البث مثل Netflix وPrime Video وDisney+ وMax وHulu. يحتوي جهاز التلفزيون الذكي الخاص بي على تطبيقات لكل هذه الخدمات، وأنا أحاول دائمًا تقليل اعتمادي على خدمات البث على أي حال.
بالإضافة إلى ذلك، أستخدم تطبيقًا مجانيًا آخر يسمى Stremio لتلبية احتياجاتي من البث المباشر. وفي حين أن Plex يحتوي على بعض من أفضل أدوات اكتشاف الوسائط في هذا المجال، فإن Stremio يقوم بعمل جيد أيضًا. فهو يُظهر لي ما هو جديد وشائع، من الأشياء التي تُعرض حاليًا في دور السينما إلى ��لمحتوى المتميز وحتى الأشياء المجانية. إحدى نقاط البيع التي يقدمها Plex هي مجموعة مختارة من قنوات البث التلفزيوني المباشر المجانية وفهرس يضم 50000 فيلم وبرنامج تلفزيوني. يحتوي تلفزيون LG الخاص بي أيضًا على قنوات مجانية، ولم ألمسها أبدًا. لا يوجد نقص في الأشياء التي يمكن مشاهدتها أو بثها هنا؛ أشعر دائمًا أنني متأخر عن عرض أو فيلم. حتى سرعة التشغيل 4x لن تساعد في مسح تراكم YouTube الخاص بي. بالنسبة لي، تعاني واجهة Plex نتيجة لكل هذه الأشياء الإضافية التي لا أحتاج إليها. عندما أقوم بتشغيل Jellyfin، يكون ذلك لأنني لدي استخدام محدد للغاية في الاعتبار: أشاهد شيئًا معينًا قمت بحفظه محليًا لسبب ما. من المنعش ألا تواجه شاشة أخرى "ما الذي أشاهده؟" وتشعر بالشلل بسبب الاختيار.
4. لا أشعر بالقيود بواسطة Jellyfin
ربما خمنت الآن أن Plex هو المنتج الأكثر نضجًا وثراءً بالميزات. يبدو Jellyfin أكثر بساطة وفائدة بالمقارنة. يتوفر Plex بإصدارات أكثر، وتطبيقات عملاء أكثر لأجهزة التلفزيون الذكية وصناديق البث، ويتمتع بدعم أفضل بشكل عام. على الرغم من هذا، لا أتقيد بعيوب Jellyfin. بالتأكيد، هناك عدد أقل من إصدارات Jellyfin المتاحة، لكنني راضٍ عن إصدار Mac. يحتوي Jellyfin أيضًا على سلاح سري في جعبته: حاوية Docker. يتيح لك هذا تشغيل Jellyfin على أي شيء يدعم Docker، وهو نظام حاويات لتشغيل التطبيقات داخل بيئة افتراضية جزئيًا. إذا كنت تريد تشغيل Jellyfin على بعض توزيعات Linux الغامضة، أو كنت تريد تشغيل Jellyfin على Synology NAS الخاص بك ولكنك تجد أنه لا يوجد إصدار أصلي، فيمكنك استخدام Docker للقيام بذلك بدلاً من ذلك.
لا أواجه أي مشكلات أيضًا مع تطبيقات العميل. يمكنني مشاهدة الأشياء على جهاز LG CX الخاص بي باستخدام عميل Jellyfin webOS الأصلي، وهو أمر رائع. ولكن بالنسبة للتلفزيون الأقدم كثيرًا في غرفة النوم، لا يوجد تطبيق. لحسن الحظ، ي��مل خادم UPnP الخاص بـ Jellyfin بشكل رائع. أنا راضٍ تمامًا عن استخدام النهج "القديم" المتمثل في التنقل عبر قائمة بسيطة للوصول إلى محتوى البث عبر دعم التلفزيون المدمج لبث DLNA. لا أحصل على الصور الجميلة أو أوصاف IMDb، لكن لا يزال بإمكاني مشاهدة الأفلام والبرامج التلفزيونية. من الجدير بالذكر أن Plex يدعم أيضًا UPnP.
5. Jellyfin موجود عندما أحتاج إليه
الحقيقة أنني لا أشاهد الكثير من المحتوى عبر Jellyfin هذه الأيام، لكنه موجود دائمًا يعمل بصمت في الخلفية عندما أحتاج إليه، وأجد القليل من الوقت الفارغ الذي أشغله بألعاب الفيديو أو بث المحتوى. وعلى نفس المنوال، فقد مرت سنوات منذ أن فكرت في استخدام Plex. لدي خادم وسائط جاهز للاستخدام دائمًا، مع ميزات أكثر من تلك التي أستخدمها على الإطلاق، ولا أدفع أي شيء مقابل ذلك. إنه الاستخدام المثالي. من ناحية أخرى، يبدو Plex موجهًا نحو مستخدمي خوادم الوسائط الأكثر تمييزًا. في الوقت الحالي، هذا ليس أنا. إذا كنت تبحث عن طريقة لبث الأفلام والبرامج التلفزيونية محليًا في حزمة بسيطة، فأنا أحثك على البدء باستخدام Jellyfin. إذا كنت تبحث عن متجر شامل لاستهلاك الوسائط، فإن Plex Pass مقابل 4.99 دولارًا هو منافس جدير بالاهتمام. Jellyfin يقدم تجربة فريدة ومتكاملة لعشاق الوسائط، بدءًا من كونه مفتوح المصدر ومرورًا بسهولة تخصيصه وعدم وجود قيود على الميزات. إذا كنت تبحث عن بديل فعّال واقتصادي لإدارة مكتبة الوسائط الخاصة بك، فإن Jellyfin يستحق التجربة. مع تطوره المستمر، من المتوقع أن يزداد انتشاره كخيار رئيسي في عالم إدارة المحتوى الرقمي. Read the full article
0 notes
Text
Digital Radio Spy
Digital Radio Spy: The Ultimate Guide to Staying Tuned In

What is Digital Radio Spying?
Using specialized hardware and software to record and decode signals from digital radio transmissions is known as “digital radio espionage.” Digital radio uses complicated encoding systems that call for more advanced equipment, in contrast to traditional radio, where the signal is frequently analog and reasonably simple to decode with a basic receiver.
This hobby or practice is widely used by:
Amateur radio enthusiasts: who enjoy exploring and listening to different frequencies.
Security researchers: testing wireless systems for vulnerabilities.
Aviation fans: listening to air traffic control (ATC) communications.
News agencies: to monitor emergency services and breaking events.
The Evolution of Radio Technology
Before we dive into the tools of digital radio spying, let’s take a brief look at how radio technology has evolved:
AM/FM Radio: Amplitude modulation (AM) and frequency modulation (FM) were the main ways to transmit audio signals over the airways for many years. These technologies have long been a part of radios found in homes, cars, and portable electronics.
Digital Radio: Digital radio emerged as a result of technological advancements, providing improved sound quality, increased content availability, and data transmission capabilities (such as text, photos, and more).
SDR (Software-Defined Radio): This is the application of digital radio espionage. SDR offers greater flexibility and usefulness by using software to tune into frequencies and decode digital signals rather than relying on conventional hardware receivers.
How Does Digital Radio Spy Work?
SDR technology is the foundation of digital radio espionage. You attach a software platform to hardware intended for capturing radio signals in place of a physical radio receiver. After then, the software can be configured to detect a large spectrum of frequencies, interpret the signal, and display it in a format that is useful.
Here’s a basic breakdown of the setup:
SDR Hardware: You may record radio waves with this gadget, which you can link to your phone, tablet, or computer. RTL-SDR dongles, HackRF, or more sophisticated SDR receivers for experts are common choices.
SDR Software: You’ll need software to decode and interpret the signals. Some of the most popular programs for digital radio spying include:
SDR (SDRSharp): A highly popular software for Windows that supports RTL-SDR and other SDR hardware.
Gqrx: A widely-used SDR application for Linux and macOS.
CubicSDR: Cross-platform SDR software with a simple and intuitive interface.
Antennas: A single SDR device is insufficient. To pick up the precise frequencies you want, you’ll need the right kind of antenna. Different antennas can be needed depending on if you’re interested in UHF, VHF, or other bands.
Decoders: Decoders are required in order to decode digital signals, which can include encrypted data, digital voice, or digital television signals. Tools like DSD+ can aid in decoding digital voice, but other applications may be necessary for more specialized forms.
Popular Uses of Digital Radio Spying
Digital radio spying serves multiple purposes, depending on the type of signal being captured. Here are some of the most common uses:
1. Monitoring Air Traffic Control (ATC)
Digital radio eavesdropping is a tool used by aviation enthusiasts to listen in on pilot-to-air traffic controller interactions. Even while this is quite lawful in many regions of the world, it’s crucial to confirm your local laws.
2. Tracking Maritime Communications
SDR can be used to intercept and decode signals from ships and marine communications, including emergency broadcasts, in a manner similar to ATC monitoring.
3. Decoding Weather Satellites
One exciting application is decoding messages from weather satellites. You can directly obtain photos and meteorological information from satellites orbiting the Earth by intercepting these transmissions.
4. Amateur Radio Listening
A lot of digital radio spies also listen in on amateur radio broadcasters on different frequencies. Listening to global HAM radio enthusiasts is possible with SDR.
5. Emergency Services Monitoring
Emergency services continue to use analog or digital transmissions in some areas. In the event that these messages are not encrypted, digital radio spies could be able to hear them. However, it is prohibited in many jurisdictions to listen to encrypted emergency services.
Ethical Considerations
While there are many interesting potential for digital radio espionage, it’s crucial to keep in mind that there are important ethical and legal considerations. Understanding the laws governing radio interception in your nation is crucial. It may occasionally be unlawful to listen to specific frequencies, such as those utilized by the military, police enforcement, or encrypted services.
Ethical digital radio spying means respecting these boundaries:
Do not intercept encrypted signals unless authorized.
Avoid using the information gathered for illegal purposes.
Respect privacy laws and regulations, especially when dealing with personal or sensitive data.
The Legal Landscape of Digital Radio Spying
The legalities surrounding digital radio spying vary by country. Here are some general guidelines:
In the United States, Radio transmissions are governed by the FCC, and it is illegal to intercept some messages without authorization, particularly those that are encrypted. It is, however, usually acceptable to tune in to open, unencrypted broadcasts such as amateur radio or ATC.
In the United Kingdom, Ofcom oversees radio communications, and it is illegal to listen to any broadcast that you are not authorized to hear, including emergency services, private business communications, and encrypted transmissions.
In Australia, the Australian Communications and Media Authority (ACMA) regulates radio communications, and similar rules apply. However, amateur radio and weather satellites are typically open to interception.
Before starting any digital radio spying activities, always research the specific legalities in your country to ensure you’re complying with the law.
Getting Started with Digital Radio Spy
If you’re eager to dive into the world of digital radio spying, here’s a basic list of things you’ll need to get started:
An SDR Receiver: The most accessible and budget-friendly option is an RTL-SDR dongle. For more advanced users, devices like the HackRF or Airspy offer higher performance.
Software: Download SDR# or CubicSDR to get started. These programs allow you to tune into frequencies and decode signals.
Antennas: Depending on your focus, you may need different types of antennas for UHF, VHF, or HF bands.
Decoding Software: If you’re capturing digital signals, you’ll likely need additional software like DSD+ to decode digital voice or satellite data.
Patience and Experimentation: Digital radio spying involves a bit of trial and error. Start by exploring publicly available frequencies, and gradually work your way toward more complex signals.
Future Trends in Digital Radio Spy
The future of digital radio spying looks promising as technology continues to advance. We can expect:
Improved SDR hardware: With higher sensitivity and greater frequency range, future devices will allow for even more in-depth signal analysis.
More decoding tools: As digital radio formats evolve, so will the tools designed to decode them, making it easier for enthusiasts to capture and interpret signals.
Integration with AI: Artificial intelligence could play a role in analyzing and interpreting large volumes of intercepted data, automating some of the more complex aspects of digital radio spying.
Conclusion
Digital radio spying is both an engaging pastime and an effective tool for experts, researchers, and enthusiasts. You may access a world of secret signals using SDR technology, including air traffic control communications and weather satellite signals. But it’s crucial that you approach this activity knowing what the ethical and legal requirements are in your area.
Article Source :- https://medium.com/@EuspyshopUK/digital-radio-spy-0e904d55ff92
0 notes
Text
RDS Data Extraction with RFtap and Wireshark
RDS (Radio Data System) is a communication protocol standard used for embedding small amounts of digital information in traditional FM radio broadcasts. It enables radio stations to transmit data such as station identification, program information, and traffic updates.
To capture and decode RDS data, one method involves using a Software Defined Radio (SDR) along with GNU Radio and RFtap. GNU Radio provides a framework for creating software radios, while RFtap acts as a bridge between GNU Radio and conventional network monitoring and packet analysis tools like Wireshark.

Unfortunately, as of the time of writing, RFtap is no longer being maintained and does not work with the latest version of GNU Radio (version 3.10.10). This post offers guidelines for rebuild and using RFtap with the new GNU Radio release.
This post assumes that the reader has access to DVB-T dongles based on the Realtek RTL2832U and a PC running Ubuntu or Debian Linux. For this, I used an RTL dongle with Rafael Micro R820T tuner and Ubuntu 24.04 LTS release.
As the first step install the following GNU Radio build dependencies into the OS:
sudo apt-get install cmake libboost-all-dev \ liblog4cpp5-dev qtcreator qtbase5-dev \ qt5-qmake python3-cheetah python3-numpy \ python3-pygtk python3-gi python3-gi-cairo \ gir1.2-gtk-4.0
sudo apt install git g++ libgmp-dev swig \ python3-mako python3-sphinx python3-lxml \ doxygen libfftw3-dev libsdl1.2-dev \ libgsl-dev libqwt-qt5-dev libqt5opengl5-dev \ python3-pyqt5 liblog4cpp5-dev libzmq3-dev \ python3-yaml python3-click \ python3-click-plugins python3-zmq python3-scipy \ libcodec2-dev libgsm1-dev libusb-1.0-0 \ libusb-1.0-0-dev libudev-dev \ python3-setuptools
sudo apt install pybind11-dev python3-matplotlib \ libsndfile1-dev libsoapysdr-dev soapysdr-tools \ python3-pygccxml python3-pyqtgraph
sudo apt install libiio-dev libad9361-dev \ libspdlog-dev python3-packaging python3-jsonschema \ python3-qtpy
sudo apt remove swig
Next, clone and build Volk (Vector-Optimized Library of Kernels)
mkdir ~/rf cd rf git clone --recursive https://github.com/gnuradio/volk.git cd volk mkdir build cd build cmake -DCMAKE_BUILD_TYPE=Release -DPYTHON_EXECUTABLE=/usr/bin/python3 ../ make sudo make install sudo ldconfig
After installing the Volk library, we can proceed to build GNU Radio.
cd ~/rf wget https://github.com/gnuradio/gnuradio/archive/refs/tags/v3.10.10.0.tar.gz tar -xvf ./v3.10.10.0.tar.gz cd gnuradio-3.10.10.0 mkdir build cd build cmake -DCMAKE_BUILD_TYPE=Release -DPYTHON_EXECUTABLE=/usr/bin/python3 ../ make -j8 make test sudo make install sudo ldconfig

Now GNU Radio is installed with all necessary components. To enable RTL SDR support, we must build and install Osmocom RTL SDR libraries and SDR components.
cd ~/rf git clone https://gitea.osmocom.org/sdr/rtl-sdr.git cd rtl-sdr mkdir build cd build cmake ../ -DINSTALL_UDEV_RULES=ON make sudo make install sudo ldconfig
cd ~/rf git clone https://gitea.osmocom.org/sdr/gr-osmosdr cd gr-osmosdr mkdir build cd build cmake ../ make sudo make install sudo ldconfig
Before plugging in the RTL-SDR dongle, we need to prevent the kernel modules for the RTL-SDR USB device from being loaded into the kernel and taking ownership of the device. To do this, simply navigate to the /etc/modprobe.d directory and create a file called rtl-sdr-blacklist.conf with the following content:
# This system has librtlsdr0 installed in order to # use digital video broadcast receivers as generic # software defined radios. blacklist dvb_usb_rtl28xxu blacklist e4000 blacklist rtl2832 blacklist rtl2830 blacklist rtl2838
Next, you should clone and build the FM RDS/TMC transceiver module for GNU Radio.
cd ~/rf wget https://github.com/bastibl/gr-rds/archive/refs/tags/v3.10.tar.gz tar -xvf ./gr-rds\ -v3.10.tar.gz cd gr-rds-3.10 mkdir build cd build cmake .. make sudo make install sudo ldconfig
For the next steps, we need to have Wireshark and RFTap. Wireshark can be installed using a package manager.
sudo apt-get install wireshark
To run Wireshark without requiring root user permissions, use the following set of commands:
sudo dpkg-reconfigure wireshark-common sudo usermod -a -G wireshark $USER newgrp wireshark
A message may be prompted in the first step above and proceed by selecting the "Yes" option.
Now restart the OS and continue with the RFTap installation.
The official RFTap repository is no longer being maintained and is not compatible with newer versions of GNU Radio. For this step, please use the RFTap fork available in my GitHub repository. This version has been successfully tested with GNU Radio 3.10.10 and Wireshark 4.2.2.
cd ~/rf git clone https://github.com/dilshan/gr-rftap.git cd gr-rftap mkdir build cd build cmake .. make sudo make install sudo ldconfig
Now get the modifier version of rds_rx_rftap.grc from the above repository.

The Wireshark Dissector file for RDS data is also available in the repository. Copy it to the ~/.config/wireshark/plugins directory. Create the directories if they do not exist.
Launch Wireshark and monitor the loopback (lo) adapter. Start GNU Radio and execute the rds_rx.grc file, which was downloaded in the above step.
youtube
If all the steps are performed correctly, the RDS data should appear in the packet list pane as UDP messages. The dissected messages can be observed through the packet bytes pane.
0 notes
Text
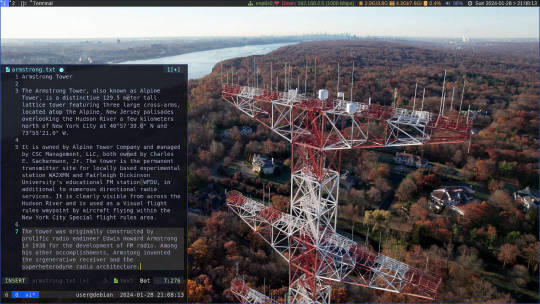
Skywave Linux v5 is Now on Debian Sid!
Enjoy shortwave radio and overseas broadcasts, no matter where you are. Skywave Linux brings the signals to you. Broadcasting, amateur radio, maritime, and military signals are available at your fingertips.
Skywave Linux is a free and live computing environment you boot from a flash drive on your PC. Start it up, pick a radio server somewhere in the world, and tune in some stations.
Skywave Linux brings you the signals, whether or not you have a big outdoor antenna or can afford an expensive communications receiver. Hundreds and hundreds of volunteer operated radio servers are on the internet, which let you tune the airwaves and pick up broadcasts in excellent locations and on high performance equipment.
If you are into FT-8, PSK-31, JT-65, or other digimodes, you can decode the signals in Skywave Linux. It also has tools for decoding weather satellites, ACARS, and ADS-B signals.
Not only is Skywave Linux a prime system for software defined radio, but also for programming and coding. It has the Neovim editor and support for several programming languages: Python, Lua, Go, and Javascript. It is a great system for Web developers.
Debian Sid is now the base operating system which Skywave Linux builds upon. It is debloated, tuned, and tweaked for speed, so that you get the best possible computing performance. It works nicely on old laptops; it is super fast on a multi core, high spec PC.
For shortwave listening, weather satellite decoding, or airband monitoring, Skywave Linux is the system you want!

4 notes
·
View notes
Text
SDRアプリケーション
調べてみたところ代表的なアプリケーションがいくつかあったのでインストールしてみました。OSはUbuntu 22.04 LTSです。 その前にRTL-SDR.COM受信機がLinuxから認識できるようにドライバーをインストールします。このページに書かれた方法でやれば上手くできると思います。 ドライバーのインストールが終わったらRTL-SDR.COM受信機をUSBポートに挿して認識されることを確認します。 Realtek Semiconductor Corp. RTL2838 DVB-T の部分が受信機です。 以下、Linuxで使用できる代表的なSDRアプリケーションです。 CubicSDR Gqrx SDR++ 一通り電波を受信できることを確認したのみで詳細を比較するところまで今日はできませんでした。 このRTL-SDR.COMの受信機は使用していると結構な熱を持ちます。

View On WordPress
0 notes
Text
Catbird Linux 1.6 Released!
Catbird Linux is the OS you can use daily if you're a content creator, web scraper, or market watcher. This new version has an upgraded kernel 6.0.11, freshened apps, and upgraded Python support for MySQL and DuckDB.

1 note
·
View note
Text
PythonとbladeRFでSDR
ソフトウェア無線のプログラミング、皆さんはどんな言語を使っていますか?私達はMATLAB/Simulinkを使ったり、時にはC言語を使ったりしていますが、PythonもSDRとの相性は良いと思います。今回はPythonでSDRにトライしてみました。

WindowsでもPythonは使えますが、ハマってしまうといやなので、今回は最初からLinux環境を用意しました。WindowsにVirtualBoxをインストールして環境構築するところからスタートします。
1 VirtualBoxのインストール
仮想環境はVirtualBoxを選びました。もちろん、VMWareでも問題ありません。

https://www.virtualbox.org/
インストール時の注意点としては①UEFI/BIOSでハードウェア仮想化(Intel VTなど)を有効にすることと、②Windowsの仮想化機構”Hyper-V”を無効化することです。”Hyper-V”はVirtualBoxと競合するのでオフにします。
参考:
https://www.atmarkit.co.jp/ait/articles/1806/25/news026.html
VirtualBoxのインストールそのものは簡単なので省略します。ただしVirtualBoxはUSB3.0がデフォルトで入っていないので、別途有効化しておきます。メモリサイズは2GBもあればいいでしょう。ストレージは10GB程度でしょうか。必要に応じて増減させてください。
参考:
http://ultra-genma.hateblo.jp/entry/2018/04/08/210259
2 Linuxのインストール
今回インストールするのはUbuntu16.04です。もっと新しいバージョンでも動作するかもしれませんが、私が動作させた環境はこのバージョンです。こちらも特に注意すべき点はありません。

参考:
https://qiita.com/ykawakami/items/4bae371932110b2e25e3
3 PothosSDRのインストール
Ubuntuが起動したら、いよいよSDR環境のインストールです。PothosSDR(とSoapySDR)をインストールすると、様々なSDRデバイスをPython(とGo言語)で操作できるようになります。オープンソースなのでソースからビルドする方法もありますが、Ubuntuはapt-getコマンドでインスト―ルするのが楽です。

参考:
https://github.com/pothosware/PothosCore/wiki/Ubuntu
4 bladeRFを繋いでみる
インストールが成功したかどうかは、”SoapySDRUtil --info”コマンドで確認できます。bladeRFを接続した状態で上記コマンドを打つと、接続したbladeRFのシリアルナンバー等の情報が表示されます。

もしうまく動かない時は、bladeRFがVirtualBoxに接続されているかどうか確認します。

5 サンプルプログラムの動作実験
GitHubからサンプルプログラムをダウンロードして動かしてみます。適当なフォルダにGitから下記リポジトリをcloneしてください。
git clone https://github.com/pothosware/SoapySDR.git

VMにgitがインストールされていない場合は先にaptコマンドでインストールします。
% sudo apt install git
サンプルプログラムのフォルダに移動して周波数=1GHz、サンプリングレート=1MHzで起動します。

スペアナがある場合はbladeRFのTx端子をスペアナに繋いで信号が出ていることを確認してみると良いでしょう。
さあこれであなたも、Pythonを使って自由にSDRプログラミングできる環境を手に入れました。
参考:
https://github.com/pothosware/SoapySDR/blob/master/python/apps/SimpleSiggen.py
0 notes