#Macbook pro M2
Explore tagged Tumblr posts
Visit Tumblr Blog
Explore Tumblr blogs with no restrictions, modern design and the best experience.
Last Seen Tumblr Blogs


Fun Fact
Tumblr Inc. is funded by 13 investors.
Text

Discover why the M2 chip outshines its predecessor, the M1. Here, we cover CPU performance, GPU Performance, and Memory and explore five compelling reasons why choosing the M2 chip for your device delivers a superior computing experience.
#macbook#macbook air#macbook pro#m1#m2#auckland#macbook repair services auckland#apple device#apple device repair store auckland#smashed it#smashed it auckland#iphone#laptop
4 notes
·
View notes
Text


My new Macbook Air in Starlight ✨
#arrived on Monday after a long week of being laptop-less#initially I wanted to stretch my current macbook pro 2017 out until next year when the M3 is estimated to come out but sadly during#my trip to mexico my laptop's keyboard sustained water damage and stop working - even though the screen and mouse are okay#I didn't find the option to spend half the amount of a new laptop to repair it wise when I was going to replace it in 6-8 months anyway#so finally bit the bullet and got the m2 macbook air in starlight with 16gb ram and 512 storage#personal#electronics
6 notes
·
View notes
Text
شاحن ماك بوك برو | الأفضل بالمقارنة مع البدائل الأخرى

شاحن ماك بوك برو: هو أحد أهم الملحقات لأي مستخدم من مستخدمي أجهزة ابل المحمولة. بالتأكيد، فإن مع التطور المستمر في تقنيات الشحن، أصبح البحث عن الشاحن الأمثل الذي يجمع بين: السرعة، الكفاءة، التوافق، والقيمة، أمرًا بالغ الأهمية.
لذلك، فإنني في هذا المقال، سوف استعرض معك عزيزي القار��، شاحن ماك بوك برو، ونقارنه ببدائل أخرى في السوق، مع التركيز على أهمية الحصول على شاحن ماك بوك برو أصلي، وذو كفاءة منقطعة النظير. دعنا نتعرف الأن على كافة هذه التفاصيل.
لماذا يعد شاحن ماك بوك برو بقوة 118 واط الخيار الأمثل؟
عند الحديث عن شاحن ماك بوك برو، فإن القوة والكفاءة تأتيان في المقدمة. لأن الشاحن الذي نقدمه بقوة 118 واط، يوفر تجربة شحن فائقة السرعة لجهازك من أجهزة ماك بوك.
وهذه القدرة العالية تضمن أن جهازك الماك بوك برو أو حتى الماك بوك اير، يستعيد طاقته بسرعة، مما يجعلك تعود إلى عملك أو ترفيهك في أقصر وقت ممكن.
لذلك، فإن هذا الشاحن هو الحل الأمثل لكل من يبحث عن شاحن ماك بوك تايب سي يواكب أحدث التقنيات. وبالتالي، دعني أوجز لك يا عزيزي أهم مميزات شاحن ماك بوك برو:
#شاحن#ماك بوك#ماك بوك برو#شاحن ماك بوك برو#MacBook Pro#شاحن ماك بوك#شاحن لاك بوك برو 20١٢#شاحن لاك بوك برو 2011#شاحن لاك بوك برو ٢٠١١#شاحن ماك بوك برو 2018#تصليح شاحن لاك بوك برو#شاحن لاك بوك برو مستعمل#شاحن ماك بوك برو ماي شغال#شان ماك بوك برو#ماك بوك برو ١٦#ماك بوك برو ١٣#ماك بوك برو 14#ماك بوك برو m1#ماك بوك برو m2#اصلاح شاحن ماك بوك#ماك بوك برو 2017#ماك بوك اير 14#ابلاك بوك برو 2017#فتح صندوق ماك بوك m1#شاحن ماك#مشاكل ماك بوك
0 notes
Text
M2 MacBook Pro on Rent
Get the M2 MacBook Pro on Rent at the best rates with PerDayRent. Experience lightning-fast performance, stunning Retina display, and powerful battery life for your work or creative projects. Perfect for freelancers, professionals, and students. Rent hassle-free with flexible plans and quick delivery. Upgrade your productivity today with PerDayRent—your trusted rental partner. Book now and enjoy a seamless performance!
0 notes
Text
So it turns out I didn't even need to buy a DAC/Amplifier for my MacBook Air M2. The headphone jack supports lossless listening and playing through high-impedance headphones. i just needed to change the MIDI settings to match the frequency of the tracks I have - which I don't ever go no lower than MP3 320kbps. And yeah, now my music collection sounds bloody incredible through my HD 600's.
I'm a happy music enthusiast now (Girl4Music, isn't my IM name for no reason, you know) I really only needed the DAC/Amplifier for my iPhone 15 Pro Max. Good thing too because this IFI DAC/Amp is tiny and I wouldn't listen through these headphones in public anyway because they leak sound like I don't know what. Sennheiser open back wired headphones are only ever meant for private listening. Unless I can figure out how to work this DAC thing on my iPhone, I guess I'm sticking with listening through my Bluetooth earphones - which unfortunately doesn't/won't ever support lossless listening.
I'm guessing anyway. I don't know if Apple will eventually invent its own audio codec that will support its Apple Music lossless feature through Bluetooth. I know that at the moment it doesn't with any of its headphone/earphone products. Including the high end ones. Not that I would ever use Apple's products for audio listening/playing 🤣
#sennheiser#hd 600#high-impedance headphones#high res sound quality#macbook air m2#once settings have been changed#ifi go link dac and amplifier#iPhone 15 pro max#not an audiophile#just a music enthusiast
0 notes
Text
Apple expected to launch new MacBook Air, iPad Air and iPad Pro models this spring
According to Mark Gurman at Bloomberg, Apple poised to launch new models of the iPad Air, iPad Pro, and MacBook Air in the spring of this year, even as soon as March or April. Once these devices launched, the focus is expected to shift to Apple’s annual developers conference, WWDC, which takes place in June. MacBook Air Gurman has indicated that Apple intends to launch several MacBook Airs…

View On WordPress
0 notes
Text
Apple MacBook Pro 16" M2 1 To SSD 32 Go RAM Puce Apple M2 PRO CPU 12 cœurs GPU 19 cœurs Gris sidéral
Profitez d'une offre exceptionnelle chez Fnac : -15% sur le dernier MacBook Pro avec la puce M2 Pro ou M2 Max! Ne manquez pas cette chance unique de vous équiper avec la technologie de pointe d'Apple à un prix réduit.

Apple MacBook Pro 16" M2 1 To SSD 32 Go RAM Puce Apple M2 PRO CPU 12 cœurs GPU 19 cœurs Gris sidéral - LaRevueGeek.com
#MacBook Pro#M2 Pro#M2 Max#Fnac#-15%#Performance#Autonomie#Liquid Retina XDR#macOS Ventura#Innovation
0 notes
Text
Just found out the macstore isnt giving me money for my old macbook, FOUL
#i wanted to upfrade to one of those m2 ones#but they are sooo expensive#and they wont take my 2015 macbook pro for cashback#boooooo
0 notes
Text


Neural Filters Tutorial for Gifmakers by @antoniosvivaldi
Hi everyone! In light of my blog’s 10th birthday, I’m delighted to reveal my highly anticipated gifmaking tutorial using Neural Filters - a very powerful collection of filters that really broadened my scope in gifmaking over the past 12 months.
Before I get into this tutorial, I want to thank @laurabenanti, @maines , @cobbbvanth, and @cal-kestis for their unconditional support over the course of my journey of investigating the Neural Filters & their valuable inputs on the rendering performance!
In this tutorial, I will outline what the Photoshop Neural Filters do and how I use them in my workflow - multiple examples will be provided for better clarity. Finally, I will talk about some known performance issues with the filters & some feasible workarounds.
Tutorial Structure:
Meet the Neural Filters: What they are and what they do
Why I use Neural Filters? How I use Neural Filters in my giffing workflow
Getting started: The giffing workflow in a nutshell and installing the Neural Filters
Applying Neural Filters onto your gif: Making use of the Neural Filters settings; with multiple examples
Testing your system: recommended if you’re using Neural Filters for the first time
Rendering performance: Common Neural Filters performance issues & workarounds
For quick reference, here are the examples that I will show in this tutorial:
Example 1: Image Enhancement | improving the image quality of gifs prepared from highly compressed video files
Example 2: Facial Enhancement | enhancing an individual's facial features
Example 3: Colour Manipulation | colourising B&W gifs for a colourful gifset
Example 4: Artistic effects | transforming landscapes & adding artistic effects onto your gifs
Example 5: Putting it all together | my usual giffing workflow using Neural Filters
What you need & need to know:
Software: Photoshop 2021 or later (recommended: 2023 or later)*
Hardware: 8GB of RAM; having a supported GPU is highly recommended*
Difficulty: Advanced (requires a lot of patience); knowledge in gifmaking and using video timeline assumed
Key concepts: Smart Layer / Smart Filters
Benchmarking your system: Neural Filters test files**
Supplementary materials: Tutorial Resources / Detailed findings on rendering gifs with Neural Filters + known issues***
*I primarily gif on an M2 Max MacBook Pro that's running Photoshop 2024, but I also have experiences gifmaking on few other Mac models from 2012 ~ 2023.
**Using Neural Filters can be resource intensive, so it’s helpful to run the test files yourself. I’ll outline some known performance issues with Neural Filters and workarounds later in the tutorial.
***This supplementary page contains additional Neural Filters benchmark tests and instructions, as well as more information on the rendering performance (for Apple Silicon-based devices) when subject to heavy Neural Filters gifmaking workflows
Tutorial under the cut. Like / Reblog this post if you find this tutorial helpful. Linking this post as an inspo link will also be greatly appreciated!
1. Meet the Neural Filters!
Neural Filters are powered by Adobe's machine learning engine known as Adobe Sensei. It is a non-destructive method to help streamline workflows that would've been difficult and/or tedious to do manually.
Here are the Neural Filters available in Photoshop 2024:


Skin Smoothing: Removes blemishes on the skin
Smart Portrait: This a cloud-based filter that allows you to change the mood, facial age, hair, etc using the sliders+
Makeup Transfer: Applies the makeup (from a reference image) to the eyes & mouth area of your image
Landscape Mixer: Transforms the landscape of your image (e.g. seasons & time of the day, etc), based on the landscape features of a reference image
Style Transfer: Applies artistic styles e.g. texturings (from a reference image) onto your image
Harmonisation: Applies the colour balance of your image based on the lighting of the background image+
Colour Transfer: Applies the colour scheme (of a reference image) onto your image
Colourise: Adds colours onto a B&W image
Super Zoom: Zoom / crop an image without losing resolution+
Depth Blur: Blurs the background of the image
JPEG Artefacts Removal: Removes artefacts caused by JPEG compression
Photo Restoration: Enhances image quality & facial details
+These three filters aren't used in my giffing workflow. The cloud-based nature of Smart Portrait leads to disjointed looking frames. For Harmonisation, applying this on a gif causes Neural Filter timeout error. Finally, Super Zoom does not currently support output as a Smart Filter
If you're running Photoshop 2021 or earlier version of Photoshop 2022, you will see a smaller selection of Neural Filters:


Things to be aware of:
You can apply up to six Neural Filters at the same time
Filters where you can use your own reference images: Makeup Transfer (portraits only), Landscape Mixer, Style Transfer (not available in Photoshop 2021), and Colour Transfer
Later iterations of Photoshop 2023 & newer: The first three default presets for Landscape Mixer and Colour Transfer are currently broken.
2. Why I use Neural Filters?
Here are my four main Neural Filters use cases in my gifmaking process. In each use case I'll list out the filters that I use:

Enhancing Image Quality:
Common wisdom is to find the highest quality video to gif from for a media release & avoid YouTube whenever possible. However for smaller / niche media (e.g. new & upcoming musical artists), prepping gifs from highly compressed YouTube videos is inevitable.
So how do I get around with this? I have found Neural Filters pretty handy when it comes to both correcting issues from video compression & enhancing details in gifs prepared from these highly compressed video files.
Filters used: JPEG Artefacts Removal / Photo Restoration
Facial Enhancement:
When I prepare gifs from highly compressed videos, something I like to do is to enhance the facial features. This is again useful when I make gifsets from compressed videos & want to fill up my final panel with a close-up shot.
Filters used: Skin Smoothing / Makeup Transfer / Photo Restoration (Facial Enhancement slider)
Colour Manipulation:
Neural Filters is a powerful way to do advanced colour manipulation - whether I want to quickly transform the colour scheme of a gif or transform a B&W clip into something colourful.
Filters used: Colourise / Colour Transfer
Artistic Effects:
This is one of my favourite things to do with Neural Filters! I enjoy using the filters to create artistic effects by feeding textures that I've downloaded as reference images. I also enjoy using these filters to transform the overall the atmosphere of my composite gifs. The gifsets where I've leveraged Neural Filters for artistic effects could be found under this tag on usergif.
Filters used: Landscape Mixer / Style Transfer / Depth Blur
How I use Neural Filters over different stages of my gifmaking workflow:
I want to outline how I use different Neural Filters throughout my gifmaking process. This can be roughly divided into two stages:
Stage I: Enhancement and/or Colourising | Takes place early in my gifmaking process. I process a large amount of component gifs by applying Neural Filters for enhancement purposes and adding some base colourings.++
Stage II: Artistic Effects & more Colour Manipulation | Takes place when I'm assembling my component gifs in the big PSD / PSB composition file that will be my final gif panel.
I will walk through this in more detail later in the tutorial.
++I personally like to keep the size of the component gifs in their original resolution (a mixture of 1080p & 4K), to get best possible results from the Neural Filters and have more flexibility later on in my workflow. I resize & sharpen these gifs after they're placed into my final PSD composition files in Tumblr dimensions.
3. Getting started
The essence is to output Neural Filters as a Smart Filter on the smart object when working with the Video Timeline interface. Your workflow will contain the following steps:
Prepare your gif
In the frame animation interface, set the frame delay to 0.03s and convert your gif to the Video Timeline
In the Video Timeline interface, go to Filter > Neural Filters and output to a Smart Filter
Flatten or render your gif (either approach is fine). To flatten your gif, play the "flatten" action from the gif prep action pack. To render your gif as a .mov file, go to File > Export > Render Video & use the following settings.

Setting up:
o.) To get started, prepare your gifs the usual way - whether you screencap or clip videos. You should see your prepared gif in the frame animation interface as follows:

Note: As mentioned earlier, I keep the gifs in their original resolution right now because working with a larger dimension document allows more flexibility later on in my workflow. I have also found that I get higher quality results working with more pixels. I eventually do my final sharpening & resizing when I fit all of my component gifs to a main PSD composition file (that's of Tumblr dimension).
i.) To use Smart Filters, convert your gif to a Smart Video Layer.
As an aside, I like to work with everything in 0.03s until I finish everything (then correct the frame delay to 0.05s when I upload my panels onto Tumblr).
For convenience, I use my own action pack to first set the frame delay to 0.03s (highlighted in yellow) and then convert to timeline (highlighted in red) to access the Video Timeline interface. To play an action, press the play button highlighted in green.

Once you've converted this gif to a Smart Video Layer, you'll see the Video Timeline interface as follows:

ii.) Select your gif (now as a Smart Layer) and go to Filter > Neural Filters

Installing Neural Filters:
Install the individual Neural Filters that you want to use. If the filter isn't installed, it will show a cloud symbol (highlighted in yellow). If the filter is already installed, it will show a toggle button (highlighted in green)

When you toggle this button, the Neural Filters preview window will look like this (where the toggle button next to the filter that you use turns blue)

4. Using Neural Filters
Once you have installed the Neural Filters that you want to use in your gif, you can toggle on a filter and play around with the sliders until you're satisfied. Here I'll walkthrough multiple concrete examples of how I use Neural Filters in my giffing process.
Example 1: Image enhancement | sample gifset
This is my typical Stage I Neural Filters gifmaking workflow. When giffing older or more niche media releases, my main concern is the video compression that leads to a lot of artefacts in the screencapped / video clipped gifs.
To fix the artefacts from compression, I go to Filter > Neural Filters, and toggle JPEG Artefacts Removal filter. Then I choose the strength of the filter (boxed in green), output this as a Smart Filter (boxed in yellow), and press OK (boxed in red).
Note: The filter has to be fully processed before you could press the OK button!

After applying the Neural Filters, you'll see "Neural Filters" under the Smart Filters property of the smart layer

Flatten / render your gif
Example 2: Facial enhancement | sample gifset
This is my routine use case during my Stage I Neural Filters gifmaking workflow. For musical artists (e.g. Maisie Peters), YouTube is often the only place where I'm able to find some videos to prepare gifs from. However even the highest resolution video available on YouTube is highly compressed.
Go to Filter > Neural Filters and toggle on Photo Restoration. If Photoshop recognises faces in the image, there will be a "Facial Enhancement" slider under the filter settings.

Play around with the Photo Enhancement & Facial Enhancement sliders. You can also expand the "Adjustment" menu make additional adjustments e.g. remove noises and reducing different types of artefacts.

Once you're happy with the results, press OK and then flatten / render your gif.
Example 3: Colour Manipulation | sample gifset
Want to make a colourful gifset but the source video is in B&W? This is where Colourise from Neural Filters comes in handy! This same colourising approach is also very helpful for colouring poor-lit scenes as detailed in this tutorial.
Here's a B&W gif that we want to colourise:

Highly recommended: add some adjustment layers onto the B&W gif to improve the contrast & depth. This will give you higher quality results when you colourise your gif.
Go to Filter > Neural Filters and toggle on Colourise.

Make sure "Auto colour image" is enabled.
Play around with further adjustments e.g. colour balance, until you're satisfied then press OK.
Important: When you colourise a gif, you need to double check that the resulting skin tone is accurate to real life. I personally go to Google Images and search up photoshoots of the individual / character that I'm giffing for quick reference.
Add additional adjustment layers until you're happy with the colouring of the skin tone.

Once you're happy with the additional adjustments, flatten / render your gif. And voila!

Note: For Colour Manipulation, I use Colourise in my Stage I workflow and Colour Transfer in my Stage II workflow to do other types of colour manipulations (e.g. transforming the colour scheme of the component gifs)
Example 4: Artistic Effects | sample gifset
This is where I use Neural Filters for the bulk of my Stage II workflow: the most enjoyable stage in my editing process!
Normally I would be working with my big composition files with multiple component gifs inside it. To begin the fun, drag a component gif (in PSD file) to the main PSD composition file.
Resize this gif in the composition file until you're happy with the placement

Duplicate this gif. Sharpen the bottom layer (highlighted in yellow), and then select the top layer (highlighted in green) & go to Filter > Neural Filters

I like to use Style Transfer and Landscape Mixer to create artistic effects from Neural Filters. In this particular example, I've chosen Landscape Mixer
Select a preset or feed a custom image to the filter (here I chose a texture that I've on my computer)

Play around with the different sliders e.g. time of the day / seasons
Important: uncheck "Harmonise Subject" & "Preserve Subject" - these two settings are known to cause performance issues when you render a multiframe smart object (e.g. for a gif)

Once you're happy with the artistic effect, press OK
To ensure you preserve the actual subject you want to gif (bc Preserve Subject is unchecked), add a layer mask onto the top layer (with Neural Filters) and mask out the facial region. You might need to play around with the Layer Mask Position keyframes or Rotoscope your subject in the process.
After you're happy with the masking, flatten / render this composition file and voila!

Example 5: Putting it all together | sample gifset
Let's recap on the Neural Filters gifmaking workflow and where Stage I and Stage II fit in my gifmaking process:
i. Preparing & enhancing the component gifs
Prepare all component gifs and convert them to smart layers
Stage I: Add base colourings & apply Photo Restoration / JPEG Artefacts Removal to enhance the gif's image quality
Flatten all of these component gifs and convert them back to Smart Video Layers (this process can take a lot of time)
Some of these enhanced gifs will be Rotoscoped so this is done before adding the gifs to the big PSD composition file
ii. Setting up the big PSD composition file
Make a separate PSD composition file (Ctrl / Cmmd + N) that's of Tumblr dimension (e.g. 540px in width)
Drag all of the component gifs used into this PSD composition file
Enable Video Timeline and trim the work area
In the composition file, resize / move the component gifs until you're happy with the placement & sharpen these gifs if you haven't already done so
Duplicate the layers that you want to use Neural Filters on
iii. Working with Neural Filters in the PSD composition file
Stage II: Neural Filters to create artistic effects / more colour manipulations!
Mask the smart layers with Neural Filters to both preserve the subject and avoid colouring issues from the filters
Flatten / render the PSD composition file: the more component gifs in your composition file, the longer the exporting will take. (I prefer to render the composition file into a .mov clip to prevent overriding a file that I've spent effort putting together.)
Note: In some of my layout gifsets (where I've heavily used Neural Filters in Stage II), the rendering time for the panel took more than 20 minutes. This is one of the rare instances where I was maxing out my computer's memory.
Useful things to take note of:
Important: If you're using Neural Filters for Colour Manipulation or Artistic Effects, you need to take a lot of care ensuring that the skin tone of nonwhite characters / individuals is accurately coloured
Use the Facial Enhancement slider from Photo Restoration in moderation, if you max out the slider value you risk oversharpening your gif later on in your gifmaking workflow
You will get higher quality results from Neural Filters by working with larger image dimensions: This gives Neural Filters more pixels to work with. You also get better quality results by feeding higher resolution reference images to the Neural Filters.
Makeup Transfer is more stable when the person / character has minimal motion in your gif
You might get unexpected results from Landscape Mixer if you feed a reference image that don't feature a distinctive landscape. This is not always a bad thing: for instance, I have used this texture as a reference image for Landscape Mixer, to create the shimmery effects as seen in this gifset
5. Testing your system
If this is the first time you're applying Neural Filters directly onto a gif, it will be helpful to test out your system yourself. This will help:
Gauge the expected rendering time that you'll need to wait for your gif to export, given specific Neural Filters that you've used
Identify potential performance issues when you render the gif: this is important and will determine whether you will need to fully playback your gif before flattening / rendering the file.
Understand how your system's resources are being utilised: Inputs from Windows PC users & Mac users alike are welcome!
About the Neural Filters test files:
Contains six distinct files, each using different Neural Filters
Two sizes of test files: one copy in full HD (1080p) and another copy downsized to 540px
One folder containing the flattened / rendered test files
How to use the Neural Filters test files:
What you need:
Photoshop 2022 or newer (recommended: 2023 or later)
Install the following Neural Filters: Landscape Mixer / Style Transfer / Colour Transfer / Colourise / Photo Restoration / Depth Blur
Recommended for some Apple Silicon-based MacBook Pro models: Enable High Power Mode
How to use the test files:
For optimal performance, close all background apps
Open a test file
Flatten the test file into frames (load this action pack & play the “flatten” action)
Take note of the time it takes until you’re directed to the frame animation interface
Compare the rendered frames to the expected results in this folder: check that all of the frames look the same. If they don't, you will need to fully playback the test file in full before flattening the file.†
Re-run the test file without the Neural Filters and take note of how long it takes before you're directed to the frame animation interface
Recommended: Take note of how your system is utilised during the rendering process (more info here for MacOS users)
†This is a performance issue known as flickering that I will discuss in the next section. If you come across this, you'll have to playback a gif where you've used Neural Filters (on the video timeline) in full, prior to flattening / rendering it.
Factors that could affect the rendering performance / time (more info):
The number of frames, dimension, and colour bit depth of your gif
If you use Neural Filters with facial recognition features, the rendering time will be affected by the number of characters / individuals in your gif
Most resource intensive filters (powered by largest machine learning models): Landscape Mixer / Photo Restoration (with Facial Enhancement) / and JPEG Artefacts Removal
Least resource intensive filters (smallest machine learning models): Colour Transfer / Colourise
The number of Neural Filters that you apply at once / The number of component gifs with Neural Filters in your PSD file
Your system: system memory, the GPU, and the architecture of the system's CPU+++
+++ Rendering a gif with Neural Filters demands a lot of system memory & GPU horsepower. Rendering will be faster & more reliable on newer computers, as these systems have CPU & GPU with more modern instruction sets that are geared towards machine learning-based tasks.
Additionally, the unified memory architecture of Apple Silicon M-series chips are found to be quite efficient at processing Neural Filters.
6. Performance issues & workarounds
Common Performance issues:
I will discuss several common issues related to rendering or exporting a multi-frame smart object (e.g. your composite gif) that uses Neural Filters below. This is commonly caused by insufficient system memory and/or the GPU.
Flickering frames: in the flattened / rendered file, Neural Filters aren't applied to some of the frames+-+
Scrambled frames: the frames in the flattened / rendered file isn't in order
Neural Filters exceeded the timeout limit error: this is normally a software related issue
Long export / rendering time: long rendering time is expected in heavy workflows
Laggy Photoshop / system interface: having to wait quite a long time to preview the next frame on the timeline
Issues with Landscape Mixer: Using the filter gives ill-defined defined results (Common in older systems)--
Workarounds:
Workarounds that could reduce unreliable rendering performance & long rendering time:
Close other apps running in the background
Work with smaller colour bit depth (i.e. 8-bit rather than 16-bit)
Downsize your gif before converting to the video timeline-+-
Try to keep the number of frames as low as possible
Avoid stacking multiple Neural Filters at once. Try applying & rendering the filters that you want one by one
Specific workarounds for specific issues:
How to resolve flickering frames: If you come across flickering, you will need to playback your gif on the video timeline in full to find the frames where the filter isn't applied. You will need to select all of the frames to allow Photoshop to reprocess these, before you render your gif.+-+
What to do if you come across Neural Filters timeout error? This is caused by several incompatible Neural Filters e.g. Harmonisation (both the filter itself and as a setting in Landscape Mixer), Scratch Reduction in Photo Restoration, and trying to stack multiple Neural Filters with facial recognition features.
If the timeout error is caused by stacking multiple filters, a feasible workaround is to apply the Neural Filters that you want to use one by one over multiple rendering sessions, rather all of them in one go.
+-+This is a very common issue for Apple Silicon-based Macs. Flickering happens when a gif with Neural Filters is rendered without being previously played back in the timeline.
This issue is likely related to the memory bandwidth & the GPU cores of the chips, because not all Apple Silicon-based Macs exhibit this behaviour (i.e. devices equipped with Max / Ultra M-series chips are mostly unaffected).
-- As mentioned in the supplementary page, Landscape Mixer requires a lot of GPU horsepower to be fully rendered. For older systems (pre-2017 builds), there are no workarounds other than to avoid using this filter.
-+- For smaller dimensions, the size of the machine learning models powering the filters play an outsized role in the rendering time (i.e. marginal reduction in rendering time when downsizing 1080p file to Tumblr dimensions). If you use filters powered by larger models e.g. Landscape Mixer and Photo Restoration, you will need to be very patient when exporting your gif.
7. More useful resources on using Neural Filters
Creating animations with Neural Filters effects | Max Novak
Using Neural Filters to colour correct by @edteachs
I hope this is helpful! If you have any questions or need any help related to the tutorial, feel free to send me an ask 💖
#photoshop tutorial#gif tutorial#dearindies#usernik#useryoshi#usershreyu#userisaiah#userroza#userrobin#userraffa#usercats#userriel#useralien#userjoeys#usertj#alielook#swearphil#*#my resources#my tutorials
548 notes
·
View notes
Note
Since some people might want a Mac, I'll offer a Mac equivalent of your laptop guide from the perspective of a Mac/Linux person.
Even the cheapest Macs cost more than Windows laptops, but part of that is Apple not making anything for the low end of the tech spectrum. There is no equivalent Mac to an Intel i3 with 4 gigabytes of RAM. This makes it a lot easier to find the laptop you need.
That said, it is possible to buy the wrong Mac for you, and the wrong Mac for you is the 13-inch MacBook Pro with the Touch Bar. Get literally anything else. If it has an M2 chip in it, it's the most recent model and will serve you well for several years. Any new MacBook Air is a good pick.
(You could wait for new Macs with M3, but I wouldn't bother. If you are reading these guides the M3 isn't going to do anything you need done that a M2 couldn't.)
Macs now have integrated storage and memory, so you should be aware that whatever internal storage and RAM you get, you'll be stuck with. But if you would be willing to get a 256 gig SSD in a Windows laptop, the Mac laptop with 256 gigs of storage will be just as good, and if you'd be willing to get 8 gigs of RAM in a Windows laptop the Mac will perform slightly better with the same amount of memory.
Buy a small external hard drive and hook it up so Time Machine can make daily backups of your laptop. Turn on iCloud Drive so your documents are available anywhere you can use a web browser. And get AppleCare because it will almost certainly be a waste of money but wooooooow will you be glad it's there if you need it.
I get that you are trying to help and I am not trying to be mean to you specifically, but people shouldn't buy apple computers. That's why I didn't provide specs for them. Apple is a company that is absolutely terrible to its customers and its customers deserve better than what apple is willing to offer.
Apple charges $800 to upgrade the onboard storage from a 256GB SSD to a 2TB SSD.
A 2TB SSD costs between $75-100.
I maintain that any company that would charge you more than half the cost of a new device to install a $100 part on day one is a company making the wrong computer for you.
The point of being willing to tolerate a 256GB SSD or 8GB RAM in a Windows laptop is that you're deferring some of the cost to save money at the time of purchase so that you can spend a little bit in three years instead of having to replace the entire computer. Because, you see, many people cannot afford to pay $1000 for a computer and need to buy a computer that costs $650 and will add $200 worth of hardware at a later date.
My minimum specs recommendations for a mac would be to configure one with the max possible RAM and SSD, look at the cost, and choose to go buy three i7 windows laptops with the same storage and RAM for less than the sticker price of the macs.
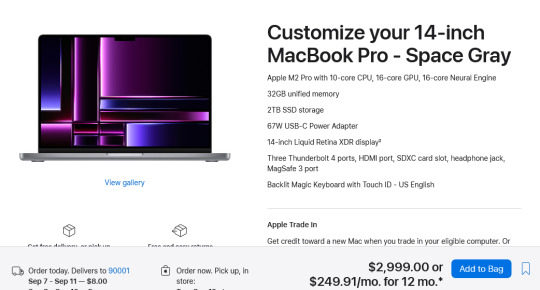
So let's say you want to get a 14" Macbook pro with the lowest-level processor. That's $2000. Now let's bump that from 16GB RAM and a 512GB SSD to 32GB and 2TB. That gets you to $3000. (The SSD is $200 less than on the lower model, and they'll let you put in an 8TB SSD for $1800 on this model; that's not available on the 13" because apple's product development team is entirely staffed by assholes who think you deserve a shitty computer if you can't afford to pay the cost of two 1991 Jeep Cherokee Laredos for a single laptop).
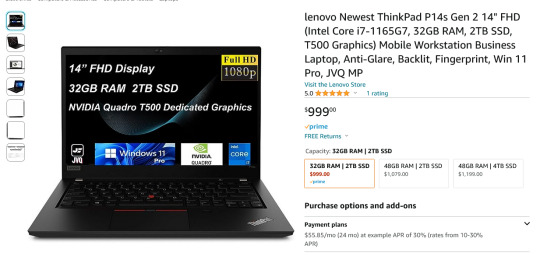
For $3000 you can get 3 Lenovo Workstation laptops with i7 processors, 32GB RAM, and a 2TB SSD.
And look, for just $200 more I could go up to 48GB RAM and get a 4TB SSD - it costs $600 to upgrade the 14" mac from a 2TB SSD to a 4TB SSD so you could still get three laptops with more ram and the same amount of storage for the cost of one macbook.
I get that some people need to use Final Cut and Logic Pro, but hoo boy they sure are charging you through the nose to use products that have become industry standard. The words "capture" and "monopoly" come to mind even though they don't quite apply here.
"Hostile" does, though, especially since Mac users end up locked into the ecosystem through software and cloud services and become uncertain how to leave it behind if they ever decide that a computer should cost less than a month's rent on a shitty studio apartment in LA.
There's a very good reason I didn't give mac advice and that's because my mac advice is "DON'T."
#sorry i swear i know you're being nice#i am incapable of being nice when talking about apple#i was a total apple fangirl until the unibody#which is the domino that started all the other companies pulling shit like soldered RAM#they said 'fuck you - users shouldn't service their own computers' and I say 'fuck apple - users shouldn't use macs'#and that has been my stance on the matter since 2012#which was the last time i bought a macbook because i knew i'd never buy a computer that would fight me to change my own battery
475 notes
·
View notes
Text
Y'ever just think... wow... that's too many computers?
I have seven, not including my tablets.
Five of them are laptops.
Two of those laptops are Macs -- my current Mac laptop (an M2 Macbook Air) which I use every day, and my old laptop (a late-2011 13" MacBook Pro) which after some upgrades (and the removal of its spicy pillow battery years ago) currently runs as a backup server, print server, and network drive.
Then there are the three HP laptops.
One of them I technically don't own, as it's my work machine. It's just running Windows 10 -- nothing special -- and it works. Then I have my two fuckaround machines -- a 15 year old 17" 'desktop replacement' that originally ran Vista but currently runs Linux Mint (and we used for years as the registration computer at No Brand Con). Then I have a 14" laptop that's "current" (in the sense that you can buy it right now for less than $200 at Walmart) that I got for free -- which dual boots into Linux Mint and Windows 11.
And then there are the non-laptops -- my M1 Mac Mini (my primary production workstation for art and podcasts) and my non-laptop fuckaround machine -- a Raspberry Pi 400 running Raspberry Pi OS.
And I was realizing today... is that too many? That might be too many.
29 notes
·
View notes
Text
プロフィール
初めまして。アムリアです。色んな創作がしたい未熟者。
来歴
2015年 吹奏楽部入部。フルート希望だったがオーディションでホルンへ。
↪️実は同期は自分も含めて皆ホルン以外を希望していた。経験者だからとF、B♭、ダブルを全部中学のうちにやった。自前は古いダブル。
2018年 中学三年で昭和楽器デュオコンで銅賞。(相方はTb)
↪️ 音域が一緒すぎて楽譜なかったのでTbデュオ譜面を移調した。
2018年 埼玉県立松伏高等学校音楽科ホルン専攻入学。
2020年 適応障害から不登校になり単位不足で高校転校。通信制へ。
2021年 尚美ミュージックカレッジ 音響・映像・照明学科入学。
同年12月 6月に新型コロナウイルスに羅漢。後遺症と精神疾患の再発で中退。この時期に適応障害が双極性障害になり、発達障害が発覚。
2022〜2024年 生き方を模索。一番足掻く。
2025年 自立支援事業所をきっかけに本格的に小説以外の創作の練習を開始。3月末アレルギー性の喘息を発症。
本人の概要
アカウントの名前の「アリウム」は花の名前。花言葉は「不屈の心」。
これだけは絶対に折れないという願いを込めてつけた。他の趣味アカウントもほとんど花の名前が由来。
小学生から音楽に触れ続け、ついでにあちこちのヒーローを男女問わずに履修。結果的には一番昭和ライダーにどハマりしたオタク。知らないヒーローの方が恐らく少ない。世代2005〜2015年あたり
大体見てなくても名前は全部知ってることが多い。ロボ系は普通。エヴァは好き。
最推しを1人に絞れない人。
小6から授業は板書だけしていつも小説を書いている生活。
もう10年近いが、二次創作しか完成したことがない。一次はやったことはある。心理描写と本編に沿った追加の独自設定が強み。
文字数増えがち、筆爆速。
寄り道でアイドルを通ったおかげで聴いているジャンルはJ-POPとK-POP、J-POPはHIPHOP以外は大体好きなら聞く。アニソンも好き。逆に言葉の意味がすぐ分かりずらいことから洋楽はあんまり得意じゃないけど、好きな曲もある。最近はインストもやっと好きになってきた。ただ、ピアノやオーケストラしかストレスなく聞けない。
これがきっかけで軽くなら韓国語読み書き可能。
ボカロ中毒。マイナーな曲ばかり好きになるのでカラオケに無くて悲しい思いをしがち。機種はJOYSOUND一択。まねきねこヘビーユーザー。最大6時間一人で居座ったことがある。カラオケ中毒でもある。基本一人で来てずーーっと歌ってる。一緒に行ってくれる人募集中。
専門で作曲に触れたことから制作を志すものの、難しすぎて���念。歌詞だけは書ける。詩的でストーリーがはっきりしているのが特徴。2025年に再開。
イラストは元々苦手意識があったが、脳内のイメージをちゃんと形にしたいと少しずつ始める。将来MVを作れるようになりたい。
楽器演奏はホルンがメインだが、ピアノも少しやってた。家にはトランペットとアコギ、エレキがある。でも元から爪が長いせいでギター系は練習しずらい。楽譜はリズム読みが壊滅的。読み方知りたい。
発達障害と精神疾患があるうえ、体もあちこちボロボロだが案外元気。
別に同情とか配慮とかしてほしくて書いてるんじゃなくて「こうなってもここまで来れる」って思って欲しいから。
座右の銘は「諦めなければなんとかなる」「善は急げ」。
死ぬほどせっかち。
この人生の苦しみに意味があったと思えるように、自分の作品で誰かが「あと少しだけ生きてみよう」と思える作品を作りたくて覚悟を決めた。
コミュ力に割り振るはずのステータスを創作に全振りしたかのようなスペック。なるたけ誠実でありたいけどまだ難しい。
好きなアーティスト(敬称略、順不同)
A.B.C-Z
Ado
DECO*27
DIVELA
doriko
(G)I-DLE
HIMEHINA
Juice=Juice
n-buna
Neru
PENTAGON
P丸様。
VERIVERY
ZOCX
*Luna
アンジュルム
うぴ子
すいそうぐらし
とあ
トラボルタ
バルーン
ファントムシータ
ワルキューレ
中島美嘉
中川翔子
大原櫻子
嵐
米津玄師
など。その他多数。これなら知ってるって人も多い。
環境設定
使用PC…MacBook Air 13.6インチ M2 16GB 250GB
DAWソフト…Studio One7 Pro
オーディオインターフェイス…PreSonus STUDIO24c
MIDIキーボード…M-AUDIO KEYSTATIONMINI32 MK3
マイク…audiotechnica AT2020
スピーカー…CREATIVE Pebble Pro
イラストソフト…Clip Studio Pro
使用タブ…One by WACOM CTL-672
編集ソフト…wonder share Filmora12
���章エディタ…Word
好きなものをやってたいだけなのでこの自己紹介で「ん?」って思った人はフォロー非推奨。ただ、基本精神疾患等の話はしません。
話すジャンルは全部垢分けしてあるので気になった人はご連絡ください。
2 notes
·
View notes
Note
Hi! I really want to play this game but the file won't open. I have a 2022 Macbook pro with an M2 chip. Is this a game that will only work on old intel Macbooks? Thanks!
A new mac build has been uploaded to our Itch.io page! Please let me know if you run into any issues.
#replies#mac build#FYI I have NOT tested this extensively#it's working but may look funky..#but it's been like 8 years so.
12 notes
·
View notes
Text


Apple MacBook Pro 14“ (19 Core M2 Pro, 16GB RAM, 1TB SSD)Space Gray Laptop
Excellent Condition, work perfectly
AppleCare+ Expires JULY 1,2026
It comes with the original Apple 96W power supply and color-matching MagSafe power cable shown in the pictures.
$1,015
3 notes
·
View notes
Note
what computer do you have??
I have 5 computers I’ve collected over the years
1 MacBook Air
1 MacBook Pro
1 MacBook Pro with a m2 chip
1 iMac
1 gaming PC it’s ASUS F15
4 notes
·
View notes