#OilBasedInk
Explore tagged Tumblr posts
Visit Tumblr Blog
Explore Tumblr blogs with no restrictions, modern design and the best experience.
Last Seen Tumblr Blogs


Fun Fact
The total number of visits Tumblr.com received during January 2021 is 327 million.
Text
Discover the Best Rubber Stamp Refill Ink for Your Custom Stamps
Rubber stamps are an excellent tool for adding a personal touch to documents, stationery, and artwork. Whether you're using a custom stamp for business or personal purposes, maintaining its quality is essential for consistent, crisp impressions. One of the key factors in preserving the longevity of your rubber stamps is choosing the right refill ink.
When it comes to refill ink for your custom stamps, selecting the best option can make a huge difference in how well your stamps perform. Here are some factors to consider when choosing the ideal rubber stamp refill ink for your custom creations.
Type of Ink
There are several types of ink available, each offering unique benefits:
Water-based ink: This is ideal for general use, providing a smooth impression with a quick dry time. It's perfect for most paper-based surfaces and doesn't bleed through, making it suitable for everyday stamping needs.
Oil-based ink: This ink is more durable and smudge-resistant, making it an excellent option for use on glossy or coated surfaces. It takes a little longer to dry but provides a long-lasting, vibrant impression.
Pigment-based ink: Known for its rich, bold color, pigment ink is perfect for achieving vibrant, long-lasting prints. It’s also water-resistant, making it great for archival purposes and outdoor use.
Compatibility with Your Stamp
Ensure that the ink you select is compatible with your specific stamp. Some stamps require a specific type of ink, such as self-inking stamps, which need a special type of ink that works with their built-in ink pad. Always double-check the manufacturer’s recommendations for the best ink to use with your stamp.
Color Variety
When it comes to custom stamps, color can play a significant role in making your impressions stand out. Choose from a variety of colors to match your branding, artwork, or personal preferences. Vibrant colors like red, blue, and green can add flair, while classic black or navy offers a more professional look.
Drying Time and Smudge Resistance
Consider how fast the ink dries, especially if you're working with multiple impressions or need your work to be smudge-free. Pigment-based and oil-based inks tend to take longer to dry but provide smudge-resistant results. If speed is crucial, water-based inks may be your best bet.
Environmentally Friendly Options
If you're environmentally conscious, look for eco-friendly ink options. Some brands offer non-toxic, biodegradable, and soy-based inks that are safer for the environment without compromising performance.
Conclusion
Choosing the best rubber stamp refill ink is crucial to ensure that your custom stamps continue to provide clear, consistent impressions. By considering the type of ink, compatibility, color variety, drying time, and eco-friendliness, you can make an informed decision to keep your stamping projects looking their best. Whether you’re using stamps for business branding, artistic projects, or personal use, investing in the right refill ink will elevate the quality and longevity of your custom stamps.
#RubberStampRefillInk#CustomStamps#StampInk#BestInkForStamps#StampingEssentials#WaterBasedInk#OilBasedInk#PigmentInk#EcoFriendlyInk#StampingSupplies#InkForCustomStamps#RubberStampCare
0 notes
Text
Printmaking - Carborundum

So, carborundum. Above you can see my smaller print made with carborundum powder and gesso on a metal plate and printed via press using oil based printing ink.
I did not have any specific idea when I started but then it started to move towards waves. I used a bit too much sand/powder so it turned too dark and flat and I did not get lighter areas back or they vanished during inking. I should have tried the powder mixed in gesso, now I just dropped it on top of the painted gesso and it was hard to sprinkle very light layers and even if you did, the loose powder from other parts likely got where it shouldn’t.
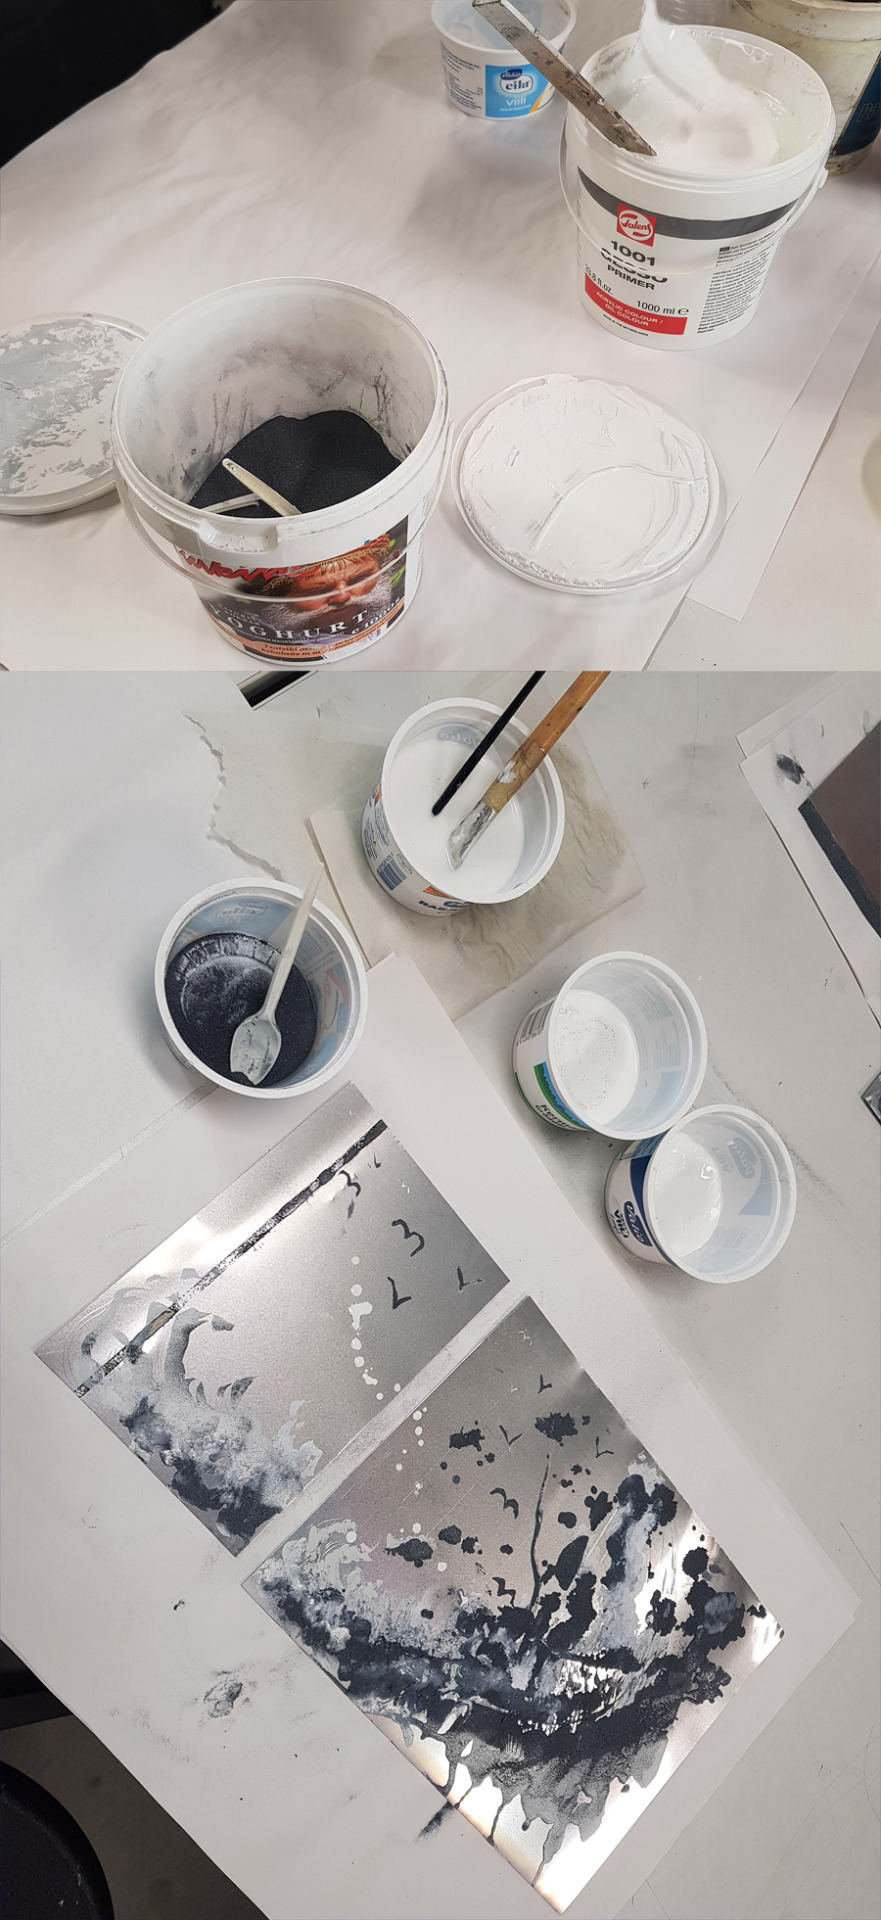
I did not have images on the inking phase, it is a very messy phase (same as in dry point) so quite impossible to take our camera while working. Even though it was messy I managed to do all prints using just one pair of gloves. I was trying not to be too wasteful with the materials.
The bigger print:

I also used some dry point in the plates (the small lines).
I like, again, the plate more than the print itself, but this was anyway just a practice with not much thought in the design either. I could have worked on the plate more, if we had more time, but since this was practice this will suffice. (I wouldn’t have redone carborundum, but made more dry point etching to get some details back and maybe even trying to clean some of the sand off, and when printing clean the plate better).
The plates after printing:

(paper: Hahnemühle watercolor paper cut to pieces)
2 notes
·
View notes
Photo

From the Archives: Portrait of HG Wells 2002, Over the years I did a series of monotype portraits of literary figures for an illustration portfolio. Not a great deal came out of it. #monotype #printmaking #contemporarymonotype #artonpaper #ink #oilbasedink #press #painterlyprint #archives #tombennettart #printmaker #art #sciencefictionwriter #hgwells (at Brooklyn, New York) https://www.instagram.com/p/Btzfz-ZBw1t/?utm_source=ig_tumblr_share&igshid=du1pk784xwfz
#monotype#printmaking#contemporarymonotype#artonpaper#ink#oilbasedink#press#painterlyprint#archives#tombennettart#printmaker#art#sciencefictionwriter#hgwells
1 note
·
View note
Photo

My version of an image I saw recently with people holding up the planet and the words “What You Allow Will Continue.” I believe the image I was looking at was a sculpture . This here is a #reductionlinocut on #ricepaper using #oilbasedink . This was an edition of 11 and 9 have been mailed today to the Patreon subscribers . To get cool stuff in the mail pledge support on the Graohic Non-Violence Patreon (at Los Angeles, California) https://www.instagram.com/p/CgN3K81LekQ/?igshid=NGJjMDIxMWI=
0 notes
Photo
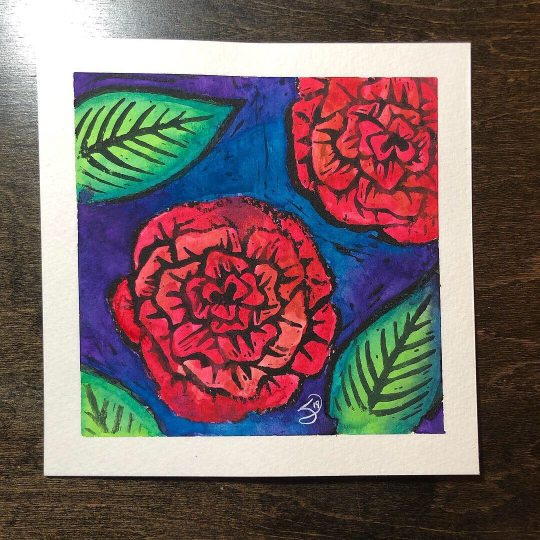
Linocut stamps are some of my favorite projects to do! #linocut #linocutprint #linocutting #linostamps #flowerart #roseartwork #watercolorart #watercolorandink #speedballoilbasedinks #oilbasedink #epicsamanthajane (at Fort Wayne, Indiana) https://www.instagram.com/p/CClv63OhCL1/?igshid=lju29ocr82t3
#linocut#linocutprint#linocutting#linostamps#flowerart#roseartwork#watercolorart#watercolorandink#speedballoilbasedinks#oilbasedink#epicsamanthajane
0 notes
Video
Listing of the day is Great Oak. A limited edition lino print using 4 colours of Caligo safe wash oil based inks and printed at the Sona Beam Studio in Sowerby Bridge. Available through the shop links in bio. . . . . . . #etsy #artfinder #art #artwork #artistsoninstagram #linoprint #get_imprinted #linoldruck #trees #tree #magic #linocut #linoleum #caligo #oils #oilbasedinks #cranfield #listed #new #printmaker #printmaking #yorkshireprintmaker #yorkshireartist #landscape #green #printmakersuk #pagan #magicaltrees
#artwork#artfinder#landscape#etsy#artistsoninstagram#linoprint#oilbasedinks#trees#yorkshireprintmaker#linocut#cranfield#linoleum#new#magicaltrees#printmaking#get_imprinted#pagan#linoldruck#listed#green#tree#oils#caligo#yorkshireartist#magic#printmakersuk#art#printmaker
1 note
·
View note
Text
Inilah Sebabnya kenapa Sablon Plastisol lebih Mahal
Anda tahu tidak kaos yang menggunakan Sablon Plastisol? Tinta plastisol itu jenis tinta berbasis minyak (oil based ink). Berbeda dengan tinta rubber, foam, superwhite atau discharge yang berbasis air.
Rata-rata tinta berbasis minyak digunakan konsumen untuk disablon pada t-shirt dan sweater. Tujuannya agar desain memiliki efek yang bermacam-macam, misalnya efek timbul, high-dens, glossy, doff, aspalt, amazing dan lain sebagainya.
Tinta ini sudah tidak diragukan lagi untuk kualitas daya tahan yang sangat tinggi (dengan proses dan finishing yang pas)- dengan perawatan yang baik akan menghasilkan sablon kaos jakarta yg lebih tahan dan awet sekitar 2 tahun.
Selain itu, tipe finishingnya juga berbeda dengan sablon tinta berbasis air. Tinta plastisol harus melewati finishing dengan proses curing, yaitu dipanaskan dengan suhu lebih dari 180℃. Karena jika finishing sablon kaos jakarta tidak sempurna maka tinta akan retak dan luntur. Kualitas hasil akhir juga dipengaruhi oleh merk tinta.

Nah, kami menggunakan tinta bermerk Wilflex yang diimport dari USA. Kami menggunakan tinta tersebut karena setelah melakukan uji coba dengan berbagai macam tinta lain, tinta merk ini menghasilkan produk sablon kaos jakarta akhir yang memuaskan. Meskipun harga dasarnya memang lumayan mahal.
Kami juga pernah mencoba sample sablon dengan tinta lain, hasil akhirnya sangat tidak baik karena beberapa di antara tinta seperti membentuk bubble ketika di-curing, hal semacam ini kemungkinan disebabkan oleh tinta sablon kaos jakarta yang telah tercampur dengan air.
Untuk itulah kenapa harga tinta plastisol sedikit lebih mahal dibandingkan dengan harga tinta yang lain. So, kalau kalian menghadapi vendor kaos dan sablon yang menwarkan pembuatan sablon plastisol dengan harga miring, “pastikan kalau merk tinta apa yang mereka pakai dan tipe finishing seperti apa yang gunakan?” begitu juga ketika mereka menawarkan dengan harga yang tinggi yaa.

Tujuannya untuk memastikan kualitas dan harga apakah sebanding dan sesuai dengan yang Anda harapkan. Kira-kira begitu info yang kami share kali ini, semoga bisa bermanfaat buat kalian. Kalau teman-teman ingin berkonsultasi atau ingin tanya perihal jenis tinta dan vendor sablon kaos jakarta hubungi saja supplier terdekat di lokasi Anda.
#sablonkaosjakarta#sablonkaosmurah#sablonplastisol#tintaplastisol#tintaWilflex#tintaberbasisminyak#oilbasedink
0 notes
Photo

#inktable # brayers #VictoryInk #oilbasedink
1 note
·
View note
Photo

I LOVE the art of block printing and I'm getting back into it! This time I'm printing on paper instead of fabric and I'm experimenting with oil-based inks instead of water-based. This print is now available in my Etsy shop: DivineNYCo. Each print is an original & individually handprinted on heavyweight paper in a bold red. #linocutprint #Etsy #AmazonHandmade #blockprinting #hearts #valentinesday #oilbasedink #love #red
0 notes
Photo

Kika Karadi, Untitled (OPM No.6) #oilbasedink #art #painting #blackandwhite #kikakaradi #monautre @kikakaradi @jonathanviner_ @thejournalinc
0 notes
Text
Printmaking - Etching

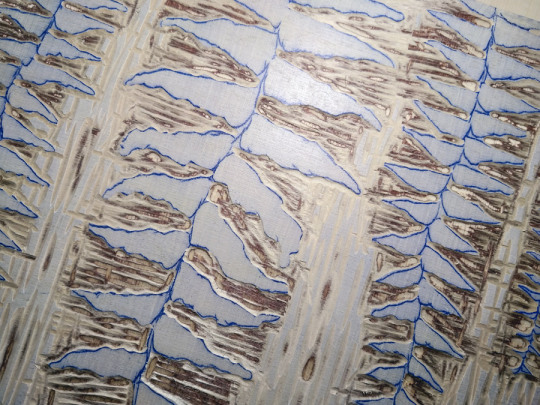
The last print making course day and last technique. An etching using dried plants. This was quite fun and rewarding. All the details on everyone’s pieces was amazing.
The above pink version was my last (third) print so I perfected the printing, at least compared to the earlier runs. I cleaned the plate the best I have ever done, also compared to earlier dry point or carborundum pieces. I fixed after first run some places with dry point, which however turned a tad too deep so for the last piece I tried cleaning more of the ink off from those spots. I am quite happy with the print, even though the design is not that perfect and the plants could have been more interesting and/or larger pieces.
Making of:
(the prepared plate with plants, plate after ‘printing’ the plants and masking, plate dipped to acid, and clean etched plate)

When inking the plate it was quite hard to see is there enough or any ink left, but once printed, wow, all the details of the plants, there it is. This was quite fun and hey, I like plants and nature so perfect theme.
The first (black & white) and second (green) prints:


And a close up on the pink print:
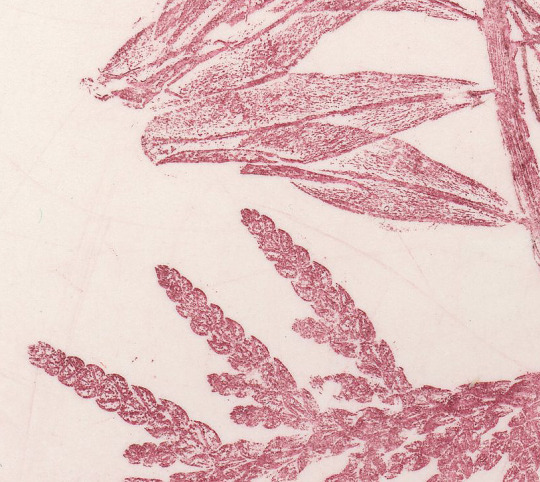
(paper: Hahnemühle watercolor paper cut to pieces)
1 note
·
View note
Photo

Summer Attraction 4, monotype image 12" x 18" #monotype #printmaking #monotypeprint #contemporaryprintmaking #contemporarymonotype #arr #painterlyprint #shark #capecod #greatwhiteshark #sealife #expressionistart #oilbasedink #turpentine https://www.instagram.com/p/B1VKCAfHEYo/?igshid=6oov3ju155bs
#monotype#printmaking#monotypeprint#contemporaryprintmaking#contemporarymonotype#arr#painterlyprint#shark#capecod#greatwhiteshark#sealife#expressionistart#oilbasedink#turpentine
0 notes
Text
Printmaking - Woodblock printing (Fern, part 2 of 2)
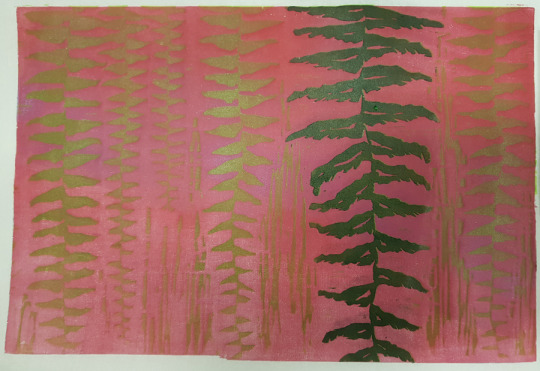
It is finished!
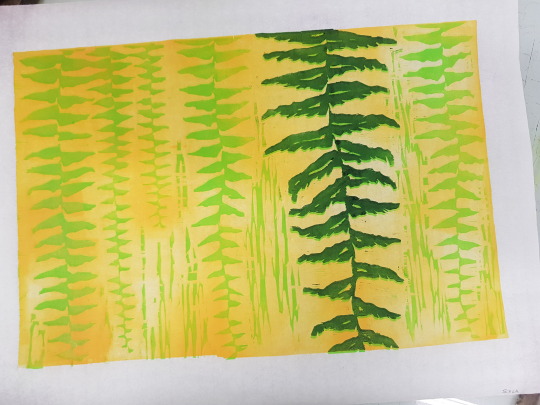
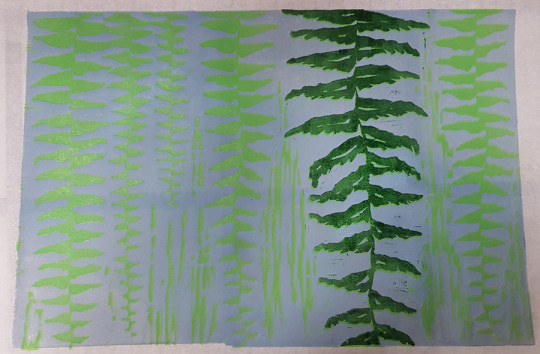
I decided to use just light green in first print and then in second reprint covering just the biggest fern in sap green mixed with my lighter mix. The light green did not pop much out of the different backgrounds, but in the red background it seems almost metallic shiny.
In total I made three prints with the prepared red, yellow and light blue backgrounds and printing was done in two steps using one block.
WIP (making of images prior to printing the block, work in progress and materials and tools):
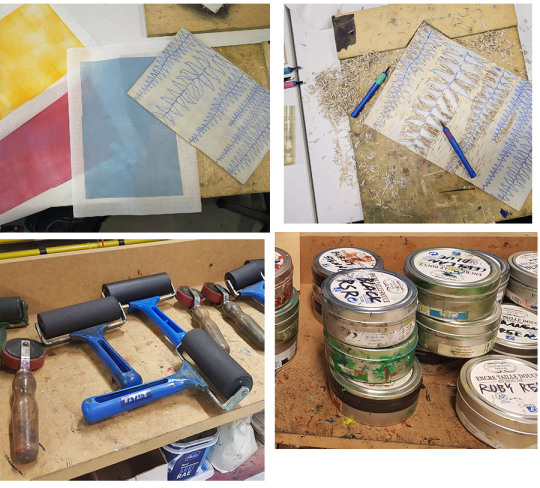
WIP (the glorious printing day, oil based etching ink prepared, rolled to the block and pressed):
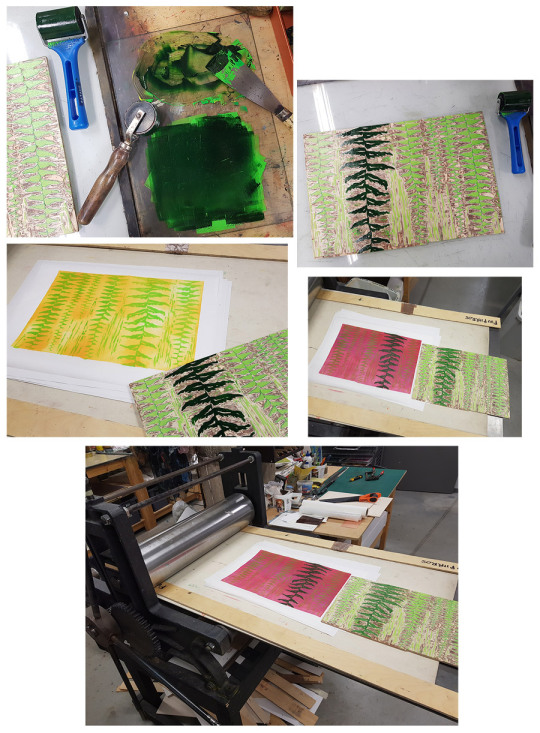
I think I will reuse the block at home using water based materials, in the japanese woodblock printing method, mokuhanga (or what ever I manage to do :D). I have some goodies on the way home to start printing. That in mind I also started a new block and I will then make multiple blocks for the printing. Lets see what happens.
(I also have few water color plant pictures to post, but I think I will still slightly work on the other so it is not yet finished. I will post both at the same time so need to wait a bit. Have to take proper picture of them also, considering scanning also to get quality images.)
(paper: Japanese paper paper cut to pieces)
(part 1 post: https://shoilaartstudies.tumblr.com/post/187904899845/printmaking-woodblock-printing-fern-part-1-of )
#woodblock print#woodcut#woodblock#puupiirros#printmaking#artassignment#graphicart#woodworking#woodcarving#oilbasedink
1 note
·
View note
Text
Printmaking - Screen printing

My screen printing, mainly just the technical part of it and no design that is. (not my designs, printed by me)
Unfortunately I did not make it to the first day session and even though I prepared a sketch, I could not continue the next day with the design so that it would have been printed. Thus the print everyone made, including me, is lacking my design.
There was used one huge screen to collect all the designs and the colors for printing were also decided to the entire piece for everyone in the group. The end result of the weekend being thus mainly a practice to get hang of the technique by printing to your own paper everyone’s design (no print of just your design with colors you wanted). This was I suppose due to the fact of lacking space/equipment/time (?), but anyway everyone got to print something and learn the basics.
Example on one first day sketches of other group member designs and screen preparations with line images transfer to screen:

And on the next day printing of colors (test print in image) and starting to print the black lines:

So, the first image in the post was my final print after the color and black layers. It turned out nice color wise as I was the first one (colors not yet muddied). Quality was not perfect but quite ok. It was a nice practice, even though my design was lacking from the print.
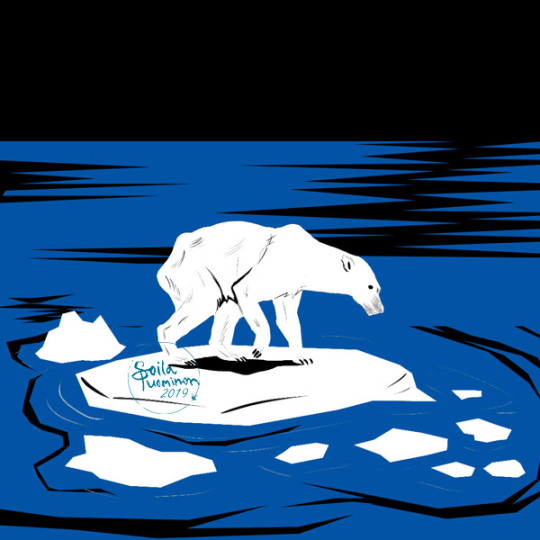
The topic for the image was none other than global warming, so I had prepared a heartbreaking emaciated polar bear on small remainders of ice. I was not sure what the technique was going to be so I prepared the black & white sketch and an inverted version also.
My design:


And now after doing the screen printing I also drafted a version with the added color how I probably then would have printed the image (as end result was not after all just b&w):
0 notes
Text
Printmaking - Woodblock printing (Fern, part 1 of 2)
The graphic art / print making course started off with woodblock printing (puupiirros), one type of relief printing. First of all, I have not done any kind of graphic art prints since school times, so all is pretty much new and to be learned. I also faced a bit of terminology pondering while doing this post, but woodblock or block printing seems to be the correct in this case. I think. (other similar/related options were wood engraving and woodcut).
This is still a work in progress, but since the next session is, what.. in the end of next month, I wanted to post a part one on what is to come.
So we had some basic Finnish plywood (vaneri) to which I drew my design of fern after preparing the wood with gesso. Gesso ensures I can see clearly where I have carved and where not. First I sketched some fern to my sketchbook and then modified the design to transparent paper choosing which frond design to use, skip or reuse. Then I copied the design to the wood using tracing paper. I should have turned my sketch to get tracing as mirror image but forgot, or chose not to, do not recall why I did not do it, thus final print will be mirrored then from original design.
Before starting off the carving process, I also made three Japanese papers ready with a background color. The wood block was fully covered in paint and then color was printed to the paper using press.

Once the papers were ready and set to dry, I started off with the carving. I roughly estimated I perhaps can get the shapes carved out within the ~3hour session, but uhm, I used some time with phone and drinking coffee. So now I still have to carve out the last frond and as expected, need to clean the edges and add some details.
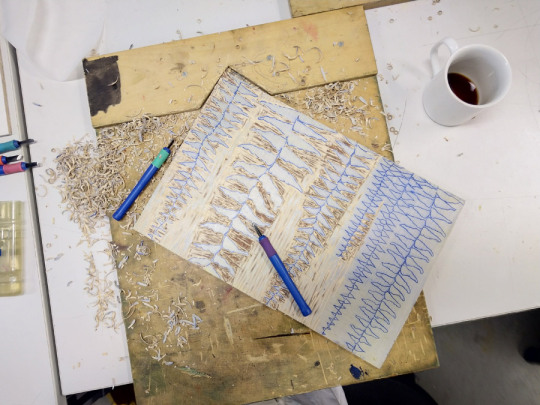
As soon as I get tools to continue at home (which hopefully are not crappy ones), I will finish up the carving and then in the next lesson I can finish up with the printing. I also have some color thinking to do before that...
(paper: Japanese paper cut to pieces)
edit.
part 2 post here: https://shoilaartstudies.tumblr.com/post/188607767265/printmaking-woodblock-printing-fern-part-2-of
0 notes