#PMX editor
Explore tagged Tumblr posts
Visit Tumblr Blog
Explore Tumblr blogs with no restrictions, modern design and the best experience.
Last Seen Tumblr Blogs


Fun Fact
The average Tumblr user visits about 67 pages every month.
Note
Any chance you can do a tutorial or give advice on how to use the open plugin for things like open jackets etc ? Whenever I search for something it just seems to bring up skirt plugin in and not anything about the open plugin
anon... there's no such thing as open plugin.... what you're looking for really is the skirt plugin..... BUT FRET NOT, I SHALL GIVE A SIMPLE EXPLANATION ON HOW TO USE IT FOR OPEN JACKETS!
this will require some knowledge on operating the plugin AND making physics adjustments! (this will not cover adjusting the rigid bodies parameters and joints values)

1) select the parts of the vertex mesh you want to rig with the skirt plugin. i highly recommend enabling the wireframe or weight mode too so you can see better when placing the weight anchors later on

2) load the skirt plugin, and do your usual thing with it. (you can always apply the changes with [Initialize] even if you have already placed your weight anchors!)

3) head to [Advanced] tab, in [Face Setting], change from [Close Face] to [Open Face], after that apply the changes to start placing the weight anchors.

4) what you'll see after that is something like this (the weight anchors are all in straight line instead of 3d form if you get what i mean). you'll have 5 columns of the weight anchors.

5) when placing the weight anchors, despite choosing [Open-Face], you still need to think like 3d. so you'll have 1st and 5th columns being in the front, 2nd and 4th columns being in the sides, while the 3rd column being in the back.

you can arrange them like a star shape (you don't need to worry about the rotations, just moving the weight anchors is enough)

6) apply the arrangement and you should get sth like this!

also if you're a fool like me and somehow refuses to replace the broken plugin that comes together with Inochi-PM's eng PMXE, you can simply resize the horizontal joints with [Object Editor]


and if the rigid bodies also come out the same, just do the same thing too.


don't forget to make sure everything's properly connected!


8) and that's pretty much it! you still need to do your usual physics adjustments ofc, but that's how you can use the skirt plugin to rig meshes that aren't fully cylindrical!

22 notes
·
View notes
Text

i tried to make a ball bounce but it doubled over in pain instead
28 notes
·
View notes
Text
[Blender to MMD] A MW idiot's journey PT2
Hi there, everyone! On the previous post I narrated a bit of my journey trying to import the Mouthwashing characters to MMD by using Blender.
Well, I had to put a pause to that first because I don't know what I'm doing wrong that the rest of the characters had the same black model glitch as Jimmy did. The thing is, I don't remember how I even fixed it the previous time, I just pressed buttons and options until I got it right so... I'll have to figure that out that later as well.

In the meantime, some of you may be aware that at the beginning of the month I commissioned someone to make a model of my boy, Derek. Because horrible fictional characters deserve to be together. Well, after a month... the commission wasn't what I expected. Not to mention I couldn't even open the file on Blender, it crashed my whole computer (Basically, some compatiblity issues due to the version of our Blender programs) and the only way to use it again was re-starting it from the power switch button. (No biggie, we talked it out and we're in good terms)
So I went and grabbed a Daisuke model and begin to play with the vertices, the textures and we're somewhere...
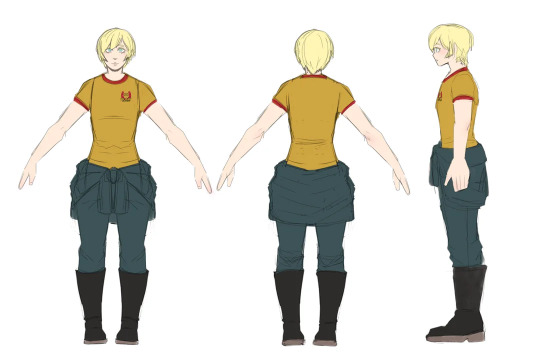
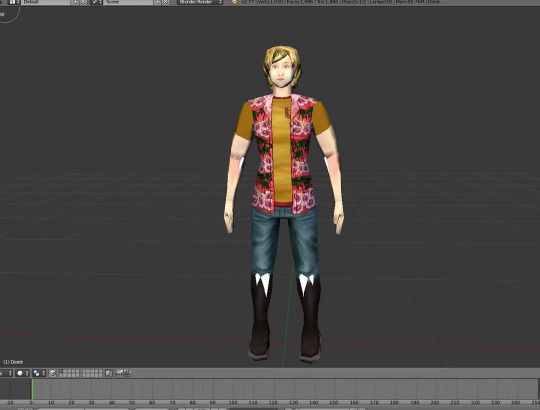
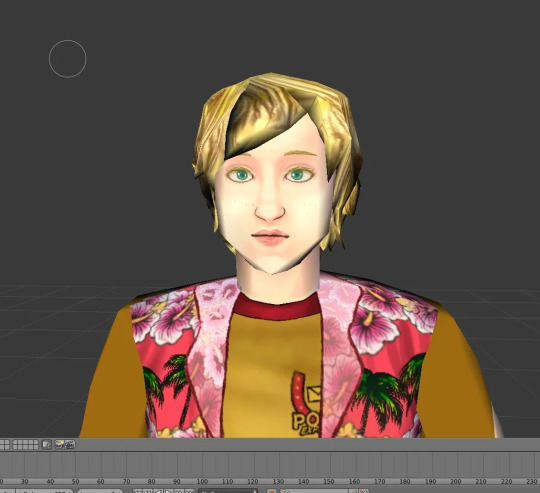
I can't believe I've managed this much in just two days The hair is going to be the worst, I still have to do the texture and you can tell I fucked up the vertices, not sure how I'll make, attach and incorporate the sleeves of the jumpsuit on his waist, besides making sure it gets attached to the model and isn't just floating once exported to MMD.
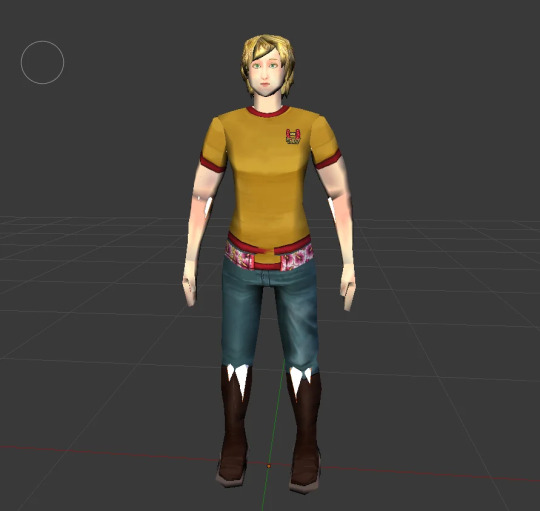

Still a long way ahead of me, besides me adding some strokes to calculate where the mapping translates so I won't draw in vain lol. But I'm a stubborn girl, I have plenty of time to work on this while I do some art commissions. I'm still a bit sad, as I originally wanted to render something silly/fun for Valentine's Day, but I guess it'll have to wait~
I'm not planning to do model commissions, as I'm pretty amateurish at this as you can tell, and by no means I would like people to feel disappointed like I felt lol.
Anyway, have a nice day!
#Mouthwashing#MW#Long yap#MMD#MikuMikuDance#Blender#PMX Editor#Jimmy Mouthwashing#Just a girl narrating her adventures#original character#mouthwashing oc#oc x canon#jimerek
9 notes
·
View notes
Text
Making a spinning morph (MMD/PMXe)
So earlier this month I posted a showcase of my newest stage (link) and one of its functions was that you could make the armillary sphere spin with just a morph. I'll try my best to explain here how to make a morph like this yourself! ( ˶ᵔ ᵕ ᵔ˶ )
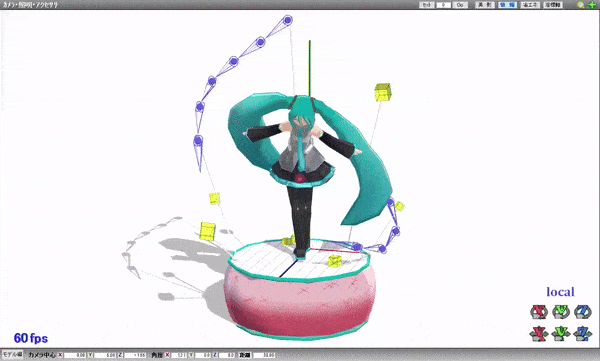
Model by Etheluu
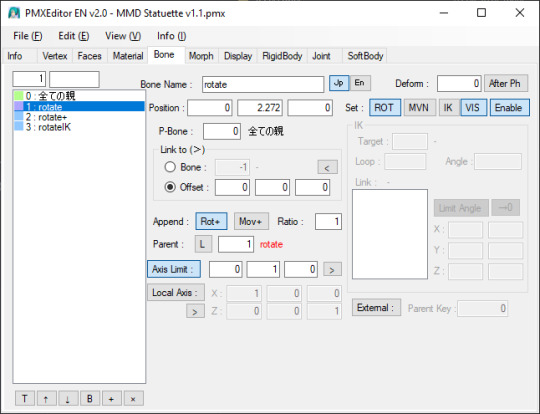
To start of, add one bone and rig the parts that you want to spin to the said bone.
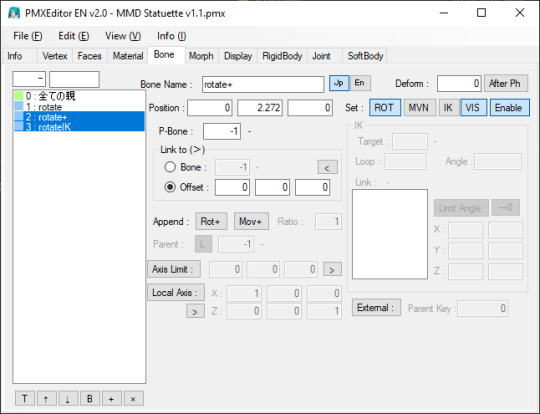
In the 'Bone' section, select the bone that you made (you can name it whatever you want, I named it 'rotate') and click CRTL+D twice to duplicate it twice.
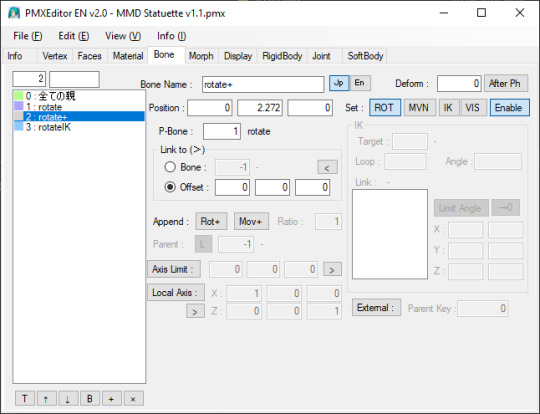
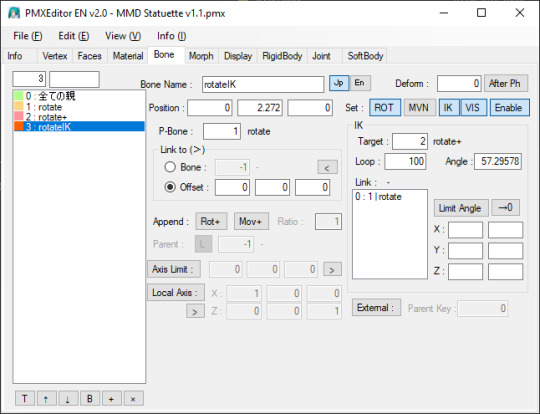
Name those two bones as well, they shouldn't share all the same name! One bone will be the actual IK bone ('rotateIK') and one will be just a target bone for the IK bone ('rotate+').
Now into the each of the bones' settings:
For 'rotate' bone:
assign the parent bone (P-Bone) to the main bone (or a bone that the rotating bone should be attached to)
set 'Append' to 'Rot+', where parent is the 'rotate' bone (yes, the bone must refer to itself! in PMX info it will show up as an error but it will work either way)
turn on 'Axis Limit' and type in '1' in a box that refers to the axis that the bone should be rotating on (X, Y or Z)
For 'rotate+' bone:
assign the parent bone (P-Bone) to the 'rotate' bone
turn off the visibility for this bone (not neccessary for it to work)
For 'rotateIK' bone:
assign the parent bone (P-Bone) to the 'rotate' bone
turn on the 'IK' setting
in IK section, in the 'Target' box, type in the number of the 'rotate+' bone
in IK section, in the 'Loop' box, type in '100'
ik IK section, in the 'Link' box, add the 'rotate' bone (you can do it by right-clicking on the 'rotate' bone on the left side and select 'Copy Index (X)' option from the menu and then right-clicking on the 'Link' box and selecting 'Copy From Index (V)' option)
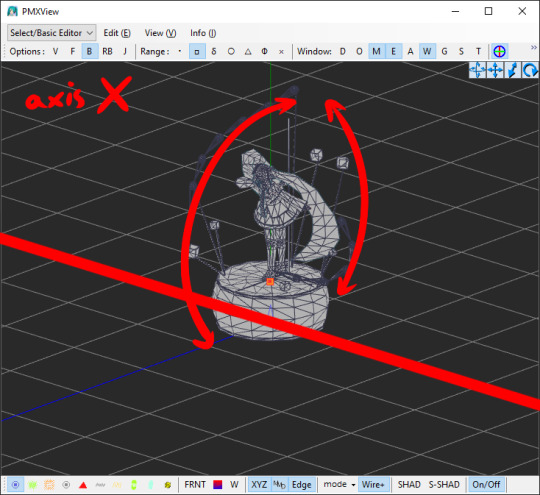
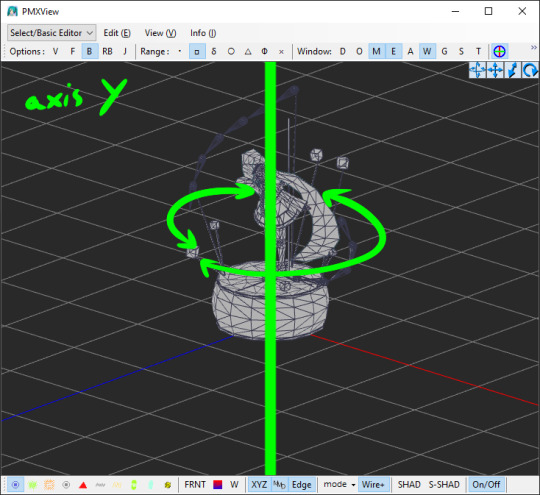
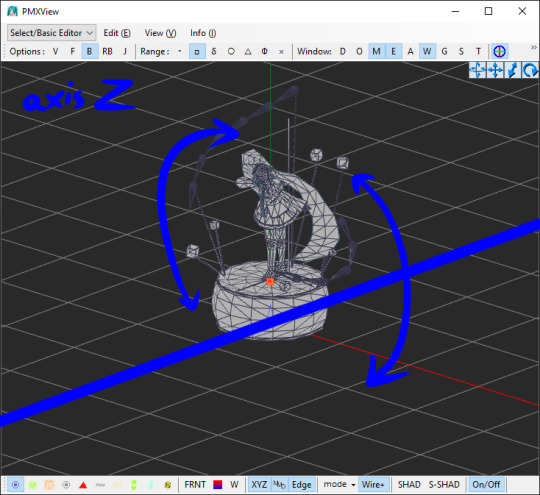
Now, you must move the IK bone ('rotateIK') along the same axis that the whole thing will be rotating along. Example: if you want the materials to rotate by the Y axis, move the IK bone ('rotateIK') by the Y axis.
An infographic(?) if you want to see the direction of the rotation of the axisses in PMXE:
Switching to the 'Morph' tab, add a new morph. Right-click on the area on the left -> New (N) -> Bone (B). Name it however you want.
Don't mind the other morphs on the screenshot, those are just pre-existing morphs I made and are irrevelant.
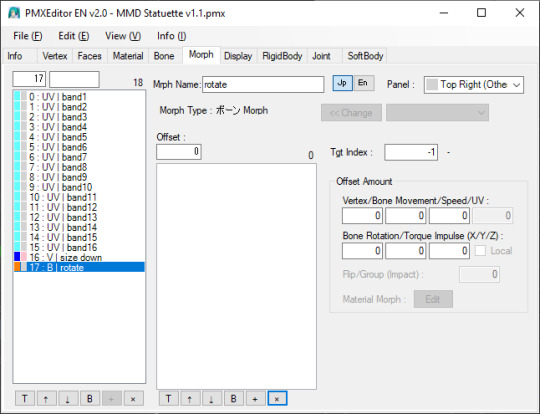
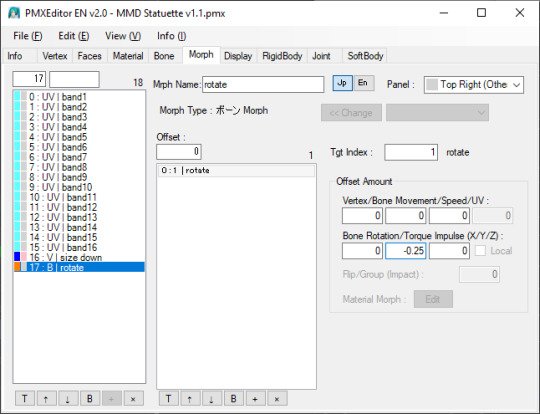
Add the bone that you rigged the materials to ('rotate'). You can do it with the same method as earlier with the IK settings ("Copy Index (X)" and "Paste From Index (X)").
In the 'Offset Amount' section and under 'Bone Rotation/Torque Impulse (X/Y/Z)' text, enter a number from 0 to 1/-1. This determines the speed at which the bone will rotate at:
0 = not moving at all
1 = moving quickly
-1 = moving quickly but in the opposite direction
Theoretically, you can enter higher number but it might result in the bone moving way too fast so I would just simply not recommend doing that.
And here you go! You've made a morph that makes a bone rotate on its own ദ്ദി(˵ •̀ ᴗ - ˵ ) ✧
Remember that this will work only in MMD itself and not in PMX Editor!! If you try to test it in PMXE, don't be alarmed! This does not work in the PMX Editor (for some unknown to me reason) but if you test it in MMD then everything will be alright!
9 notes
·
View notes
Text
Behold, space baby Most randomly spawned OC, idk if i ever make something with em again learned some stuff while working on them - good enough i guess probably my best attempt at a character' preview, too

#my oc stuff#oc reference#oc design#3D model#3D art#mikumikudance#mmd#pmx editor#zodiac signs#space aesthetic#alien oc#alien design
2 notes
·
View notes
Text

i may have gone crazy but at least this taught me a few things about blender (i still have no idea why his bone were not exported in the pmx model, it had them in blender but not in mmd.... not even on pmx editor so ig it's my fault lol)
he has some expressions, but because the bones were not exported, I CAN'T TEST THEM T______T. and i'm really a beginner on blender so idk how to visualize them. if i ever suceed to export the model with its bones, it should work tho. I followed a tutorial to retrieve them and uhhhhh well it should work. maybe.
I'm going to restart the WHOOOLe thing since the beginin, maybe it will work better lol
here are screenshots of my failures because idk i find them fnny


YOU + lawrence's true form

idk how to close windows

juke cube


NO EYES T_T
that's all when the model will be ready i'll make a new post BYEEEEEEE
#subway surfers#subway surfer#grand juke#lawrence#winter wonderland#mmd#blender#pmx editor#plz help me lol
2 notes
·
View notes
Text
I might have gone insane an made a sherry model for MMD
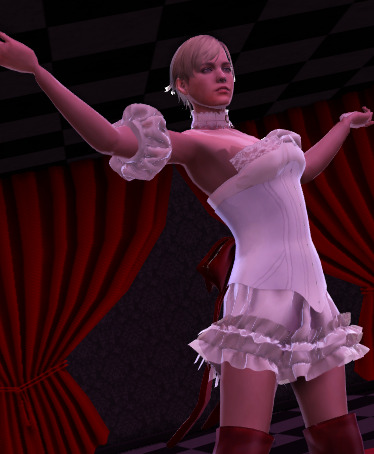

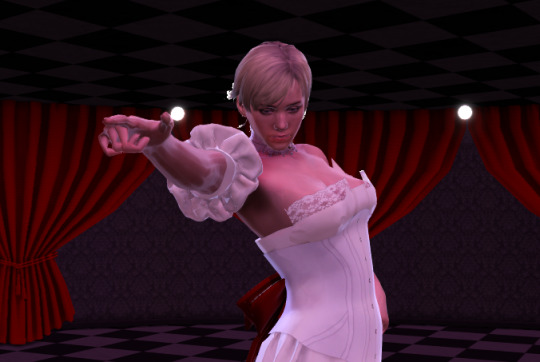
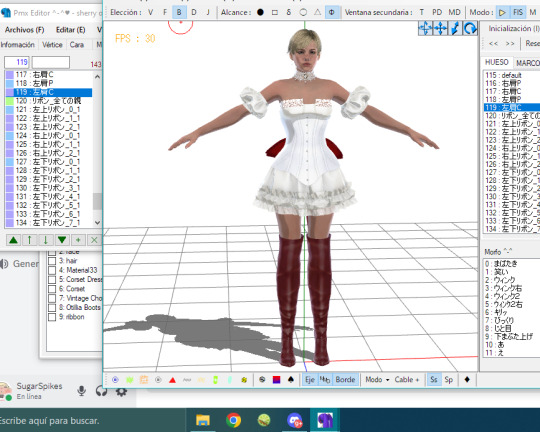
There are still some vertexes i gotta clean and rig properly but it looks good so far!
Give me fit prompts for sherry! (Just sherry for now, it's the only model I've rigged so far)
Maybe cat sherry? Princess? Casual?
#re6 sherry#sherry birkin#mmdmikumikudance#mmd#pmx#pmx editor#mmd model#rebhfun#resident evil sherry#resident evil 6#resident evil
19 notes
·
View notes
Text
things i wish i knew when starting out using mmd and general 3d modeling:
blender isn't as scary as u think. trust me. u dont need like 95% of the shit you see on screen
to touch up weight painting, use blender. it's far better than whatever the fuck pmxeditor has
experiment!! like, seriously. start out small (like with accessories and something as simple as for example a halo)
make your own textures when you can!!
use the goddamn transfer data modifier instead of the weight copy plugin I BEG YOU that legit changed me
use batch suffix / prefix adder tools (well, websites) and the batch name changer!! that will save you a lot of time when making multi-armed model edits. trust me.
most importantly, have fun!! really, if it's just a hobby, make it fun.
2 notes
·
View notes
Text

btw if you apply 'Average Normals - Near' on your VRoid model's mouth parts in PMX Editor (especially if it's cell shaded or has 2D look), you'll get this very nice looking outline around the mouth and on the tongue, but specifically on the edges of the teeth 😊
it's not mandatory to do so ofc, but it does give a pop up look on the teeth (would look much better w/o toon but that's just my preference!) also this can be easily done by just merging vertices with Blender/Metasequioa/any 3D modeling software you use, but this is mainly for MMD users who's only familiar with PMX Editor! (or any lazy bum like me HAHA)
anyway to do this, just go to this option as shown here:

it'll prompt you to enter your value; the default value is fine, but i prefer to use 0.000000001 for smoother look after that you're p much done!

if you wanna go extra, you can use Edge Scale tool (accessible from Vertex option) to manually adjust the outline value w/o needing to separate your mouth mesh to different materials 😄
26 notes
·
View notes
Text
They should rename pmx editor to pmo editor because it pmo
0 notes
Text
[Blender to MMD] A MW idiot's journey
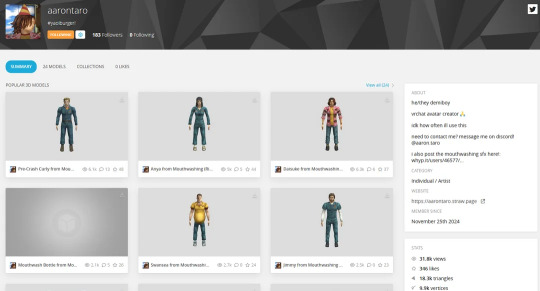
Hi everyone! I'm sharing part of my journey to turn the Mouthwashing characters into MMD models (Of course! Others have done this already, but I'm doing it from scratch 'cause I later want to import my bastard son too (I've commissioned his model from PinterHex_Studio) and well, a girl's gotta know her way around stuff.
So first of all! I first got the Mouthwashing characters from Aarontaro's Sketchfab page. He is behind several of the amazing versions that you've probably seen around in VRChat videos!
Then I went outta my way and got Blender (But I don't like animating there so I of course I wanted to go to MMD to feel like my cringy self from when I was 12), I got the version 2.77 for Windows64. Then I got the MMD Tools by sugiany (I apologize if I got the credits wrong). After fighting for a while trying to install it since I was doing this late at night, I began to test out the whole import, export, convertion thing.
In Blender everything worked just fine, I imported him, added him his textures and all (Tho I realized waaaaay later that I wasn't putting him the Textures but putting him Material) so when I first managed to import his model in PMX Editor (Ver. 0.2.2.2) he looked like this, he didn't even look like the typical white glitch in PMX Editor
""Ok, finally managed to export his fbx ass to pmx but Jimmy, I get I draw you dark skinned but this is ridiculous why are your textures not showing?!"" (Mf really embraced being a dead pixel)

(Black?! My son is black!? joke because I had to laugh it off instead of getting mad)
So, I went back to Blender where I found out the thing about Material =/= texture. (Yeah of course, someone who knows about this would probably have figured that out faster, but I'm not, I'm just a common girl doing girly things).
Once solved the texture problem, now he looks fine in PMX Editor but badly in MMD. Need to figure out how to solve the Vertex issue.

The solution was particulary simple, it was just going to Edit in PMX Editor then click on "Vertex Morph Normalize" option.
See, Jimmy? Unlike you, I'm slowly fixing it. Now we have to make sure your Bones aren't as fucked up (I mean I can still pose him and animate him if I feel like it, but I want it to be more comfortable) which I'll do later since I have work to do

Mf thinks he can make my life miserable. I love how pissed off he looks, he can't get away with shit lmao
Anyway! I hope you had as much fun as I did while revisiting this whole fiasco, I swear it looks simple in this post, but I've been literally doing this for several hours and got mad in the middle of the night too, the things I do because I want to do silly animations and cringe shit besides some rancid argentinian tiktoks with these characters lmao.
#Mouthwashing#MW#Long yap#MMD#MikuMikuDance#Blender#PMX Editor#Jimmy Mouthwashing#Just a girl narrating her adventures
9 notes
·
View notes
Text
MMD model making tip:
If you want your model to have pants or stockings, unless you want your model to have baggy pants or a specific pants shape (bell bottoms, cuffed jeans, etc), it's much easier to simply retexture the existing leg material rather than adding someone else's stocking or tight fitting pants model part to your model. You won't have to worry about the legs clipping through the pants when using motions, and you also don't have to manually fit the pants to the model's leg shape!
You can either edit the texture of the whole body using your preferred image editing software and retexture just the leg part of the texture, or you can separate the legs from the main body material and edit them separately.
I recommend the second method, as it'll make editing the textures simpler. You don't have to worry about the pants part of the texture spilling (for lack of better wording) onto the rest of the body, as the pants have their own texture. It's also better for when you're making renders of the model, you can give the pants a different shader from the main body, useful for when you want to apply a cloth/fabric shader to the pants but not the skin.
I see SO MANY models with stocking and pants related clipping issues which could easily be fixed by simply retexturing the legs rather than fitting pants or stockings to a model. I'm guilty of this, and after learning this life hack making models wearing pants or stockings is much simpler!
This method is also useful for things like gloves and some shirts, assuming you don't plan on having any 3D added details to the gloves.
If you want your model to have baggy pants or cuffs on the legs then this method won't help as much, but for tight fitting pants and socks such as stockings it'll make things much simpler!
Will update with images when I get my computer back from being repaired!
#mmd#mikumikudance#3d modeling#3d modeling tips#mmd tips#mmd tutorial#mikumikudance tutorial#3d modeling tutorial#pmx#pmx editor#pmxe#pmx editor tips#pmx editor tutorial
1 note
·
View note
Text


Her hair is going to be the death of me
Putting this here so I do not forget to continue this tomorrow
#s#skye's musings#skye's wips#solaria#cosmic wonders#cosmic wonders solaria#...just occurred to me i forgot her skirt button#something *else* to fix tomorrow orz#I'll be adding the bracelets later in PMX Editor because I can't accurately get the beads there in VRoid
201 notes
·
View notes
Text

Yatta I'm watching your stream, why you trying not to laugh
64 notes
·
View notes
Text
i should learn blender but it's soooo scary
#bobtalk#kids these days only know blockbench pmx editor mmd. whadda hell#ive always been ass at picking up new skills because my attention span is such shit LOL
2 notes
·
View notes
Note


I'm hoping it's at least mostly accurate to how you envision it! :D
Is it okay if I show you the 3D model I made of Sana's Leviathan spear..? Thought I should probably ask beforehand ^^;
Go for it :O
#also⹁ fun fact! I made the 3D model and did the UV mapping entirely in PMX Editor.#which is part of why it's a bit low-poly⹁ but it still turned out better than expected.#very open to advice on how to make it more accurate :]
248 notes
·
View notes