#Raspberry Pi for Learning Initiative
Explore tagged Tumblr posts
Visit Tumblr Blog
Explore Tumblr blogs with no restrictions, modern design and the best experience.
Last Seen Tumblr Blogs


Fun Fact
1,644 Tumblr posts in 1 second.
Text
YI Cam Remote Access: Your Guide to Self-Hosted Surveillance

Want to have complete control over your YI Cam and go beyond its default cloud? For more privacy and customization, many users prefer YI Cam Remote Access, rather than using the manufacturer's cloud. Therefore, this post explores how to accomplish this sophisticated configuration, assisting you in navigating the frequently challenging process of self-hosting your camera's feed. Walk through this post to learn more details!
Understanding the YI Cam Remote Access
Generally, you need to install a custom firewall on your device if you want to access the YI camera remotely and connect it to your server. Additionally, it allows leveraging the benefits of the RTSP (real-time streaming protocol) streaming as well as FTP access. Moreover, it eliminates the need for third-party platforms and for configuring cameras to the self-hosted servers.
However, it acts as a “Network Remote Controller,” especially for the multimedia servers. It allows users to control media playback remotely. But it does not deliver audio or video streams continuously; instead, it communicates with the servers streaming the multimedia content. Hence, for the YI Cam Remote Access, users must connect their security cameras to the server through RTSP.
How to Connect Camera To Server for YI Remote Access?
Moreover, enabling the YI Cam Remote Access opens up several possibilities and advanced functionalities. So, let’s begin with the essential steps to Connect Camera To Server for managing and monitoring your YI camera remotely.
Initially, confirm your YI Cam supports the RTSP or streaming compatibility, as some models may require custom firmware.
Subsequently, set up your chosen server device, such as a computer, NAS, or Raspberry Pi, with a suitable operating system.
Next, install essential software like Blue Iris, MotionEye, FFmpeg, or Home Assistant to manage the video feed.
Finally, configure secure remote access using methods such as port forwarding, VPN, or Dynamic DNS for external viewing.
Now, you can view, configure, and control your YI camera remotely.
Bottom Line
In conclusion, YI Cam Remote Access empowers you with full control over your camera's feed through self-hosting, prioritizing privacy & customization. Additionally, this advanced setup typically requires RTSP compatibility, a dedicated server, and management software. With secure remote access methods such as VPN or port forwarding, you can ensure seamless monitoring from anywhere.
#YICameraSetup#YICamRemoteAccess#SelfHostedCamera#IPCameraSetup#RemoteCameraAccess#YICamOnServer#RTSPStream#ONVIFCamera#YICamRTSP
2 notes
·
View notes
Text
Hopefully by March, we will be living in London, near to a lovely queer community. But we also find myself during this current social isolation we suffer, exiled from our tools, we miss taking on projects. This needs to change. Unfortunately said tools are currently packed up, awaiting out move.
So, after we have migrated from this dreary town, we will setup our little "lab" again and intend to work on various projects, including:
- A Raspberry Pi Compute Module 4 powered Linux phone with 4G connectivity (initially)
- A Steampunk meets Atompunk desk, based on a nuclear reactor console
- Setting up Home Assistant powered smart tech in the new home, from lights to temperature control, etc
Have any ideas? Let me know! My specialism is Python, though I'm always up for learning something new. Challenges inspire me.
2 notes
·
View notes
Text
Fic Titles W/ Beverages Masterlist
Bacon McDouble with a Pepsi (ao3) - orphan_account
Summary: in a world in which the first words your soulmate says to you are inscribed upon your wrist, dan finds a mcdonald’s order on his arm
Bags Under My Eyes And Coffee In My Hands - andystanberg
Summary: Phil works at a 24/7 Starbucks and Dan just can’t get any sleep.
Been Thinking About You a Latte (ao3) - Full_Moon_Lover
Summary: You’re the cute and quiet customer that frequents the coffee shop where I’m a barista and also where my rival barista works and we’re both fighting for your attention in increasingly creative and inconspicuous ways (making foam art, writing cheesy pick-up lines on your napkin etc. etc.)
Cafe Latte (ao3) - auroraphilealis (peachrayne)
Summary: Phil’s always been that awkward boy who never quite belonged, and when he runs off to University, that doesn’t really change; he’s still that weird boy who continuously finds himself being bullied, even as the barista behind the counter. Until Dan comes along
Cake and Coffee (ao3) - swagityswag
Summary: Phil was the kind of person to get bored often, Dan and his little coffee shop helps.
Coffee At Midnight (ao3) - waveydnp
Summary: A recent trauma has lead Phil to embrace a ‘try new things’ approach to his life. One of those new things is learning how to swim, and Dan is the lifeguard who’s going to teach him.
Coffee Shops and Cute Baristas - amazignphil
Summary: Coffee Shop AU with a blushy Phil and fanboy Dan.
Diet Soda Society - phanlight
Summary: dan is a lonely philosophy teacher who just needs to vent his thoughts, but not everyone understands.
Don’t Cry Over Spilt Milk (ao3) - philsdrill
Summary: Phil comes back from the doctors after finding out he’s lactose intolerant, which is hard for him to come to terms with.
Driving in the Espresso Lane (ao3) - soft_lester
Summary: Phil accidentally had too much caffeine, so he and Dan stay up playing Mario Kart.
green tea and cherry blossoms (ao3) - CapriciousCrab
Summary: Japan is lovely in the spring...
Hippo Milk Is Actually Pink (ao3) - deletable_bird
Summary: In Which Dan Is Drunk, Phil Is Also Drunk, They Hook Up, And Things Just Kind Of Go From There.
hot chocolate and marshmallows (ao3) - lilyxxxooo
Summary: A package arrives for them and Dan doesn’t know how to help. (based off Cornelia’s story of the mince pies Mrs. Lester made)
Hot Chocolate Can't Keep Me As Warm As You Do (ao3) - rainbowliguori (frickyeahfezco)
Summary: A Dan and Phil snow day leads to a heartfelt love confession. Excessive fluff.
I Like You a Latte (ao3) - orphan_account
Summary: Coffee Shop AU based off a tumblr post that I will link at the end bc spoliers.
lemonade sweet (ao3) - watergator (orphan_account)
Summary: dan and phil are moving out
Make Me Espresso Many Feelings (ao3) - orphan_account
Summary: Dan doesn’t like being a barista. The pay’s bad, the work’s boring and his co-workers acts like the proverbial devil sometimes. The only good thing about it is the really cute hipster that comes by sometimes.
Midnight Milkshakes (ao3) - thelandofphan
Summary: “Well, this is a different first date,” Dan initiated as they began to follow the sodden pathway ahead, “I turned up late, looking like a tramp then we ditched the original plan and now I’ve stolen your beanie when we’ve only just met. Sorry.” He concluded, sucking his lip nervously, peering towards Phil.
milkshakes and window art (ao3) - orphan_account
Summary: dan works at a diner and there's one boy who always is at the diner who he can't get his mind off
Morning Tea (for you) (ao3) - FangirlOfMany57
Summary: A simple act of love can surpass the big things out there - it could be as simple as Tea.
Pineapple Juice (ao3) - Emejig16
Summary: Phil teaches Dan how to give a blowjob.
Raspberry Vodka (ao3) - dansleftboob
Summary: Teen!Phan try raspberry vodka and anal sex for the first time.
Share A Coke - nebulous-frog
Summary: Dan and Phil wouldn’t necessarily go so far as to say that Coca-Cola brought them together, but they couldn’t deny the significant part it played in their first meeting…
Shut Up & Drink Your Diet Soda (ao3) - lightweeds
Summary: Dan misses Phil, and ends up at his party.
Spearmint & Espresso (ao3) - blossomsphan
Summary: Scents (and cuddles) can be healing
Tea Leaves (ao3) - lowlights (orphan_account)
Summary: Dan and Phil have always been the best of friends. Recently, however, Dan's started to develop feelings for the other boy.
to coffee or not to coffee (ao3) - danhoweiis
Summary: dan doesn’t like coffee, phil works in a coffee shop. cue some awful attempts at flirting and some first dates
vodka kisses (ao3) - orphan_account
Summary: "Danny, you know what we should do?" Phil asked almost shamelessly, and Dan swore that sentence broke the intimacy but he held in a laugh. "It won't be the first time, so there's nothing to be scared of."
#phanfictioncatalogue#phanfiction#phanfic#phan#masterlists#drinks#drinks masterlist#fictitles#fictitles masterlist#food
5 notes
·
View notes
Text
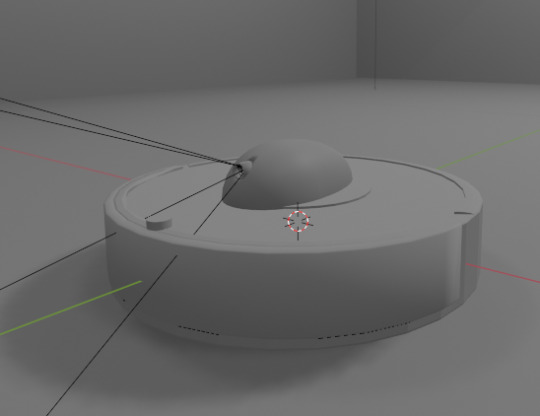
Applied AI - Integrating AI With a Roomba
AKA. What have I been doing for the past month and a half
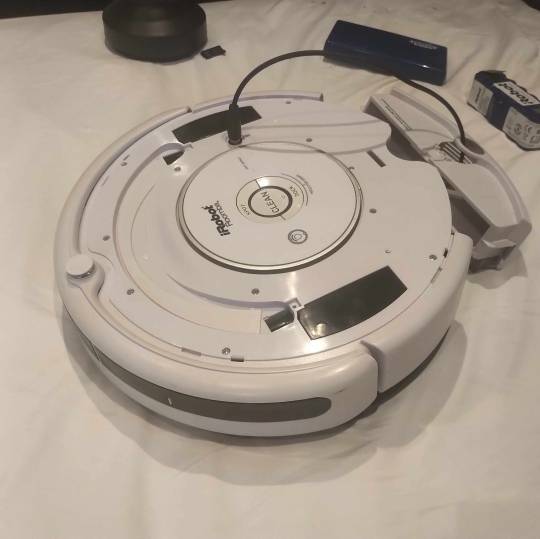
Everyone loves Roombas. Cats. People. Cat-people. There have been a number of Roomba hacks posted online over the years, but an often overlooked point is how very easy it is to use Roombas for cheap applied robotics projects.
Continuing on from a project done for academic purposes, today's showcase is a work in progress for a real-world application of Speech-to-text, actionable, transformer based AI models. MARVINA (Multimodal Artificial Robotics Verification Intelligence Network Application) is being applied, in this case, to this Roomba, modified with a Raspberry Pi 3B, a 1080p camera, and a combined mic and speaker system.

The hardware specifics have been a fun challenge over the past couple of months, especially relating to the construction of the 3D mounts for the camera and audio input/output system.
Roomba models are particularly well suited to tinkering - the serial connector allows the interface of external hardware - with iRobot (the provider company) having a full manual for commands that can be sent to the Roomba itself. It can even play entire songs! (Highly recommend)
Scope:
Current:
The aim of this project is to, initially, replicate the verbal command system which powers the current virtual environment based system.

This has been achieved with the custom MARVINA AI system, which is interfaced with both the Pocket Sphinx Speech-To-Text (SpeechRecognition · PyPI) and Piper-TTS Text-To-Speech (GitHub - rhasspy/piper: A fast, local neural text to speech system) AI systems. This gives the AI the ability to do one of 8 commands, give verbal output, and use a limited-training version of the emotional-empathy system.
This has mostly been achieved. Now that I know it's functional I can now justify spending money on a better microphone/speaker system so I don't have to shout at the poor thing!
The latency time for the Raspberry PI 3B for each output is a very spritely 75ms! This allows for plenty of time between the current AI input "framerate" of 500ms.
Future - Software:
Subsequent testing will imbue the Roomba with a greater sense of abstracted "emotion" - the AI having a ground set of emotional state variables which decide how it, and the interacting person, are "feeling" at any given point in time.
This, ideally, is to give the AI system a sense of motivation. The AI is essentially being given separate drives for social connection, curiosity and other emotional states. The programming will be designed to optimise for those, while the emotional model will regulate this on a seperate, biologically based, system of under and over stimulation.
In other words, a motivational system that incentivises only up to a point.
The current system does have a system implemented, but this only has very limited testing data. One of the key parts of this project's success will be to generatively create a training data set which will allow for high-quality interactions.

The future of MARVINA-R will be relating to expanding the abstracted equivalent of "Theory-of-Mind". - In other words, having MARVINA-R "imagine" a future which could exist in order to consider it's choices, and what actions it wishes to take.
This system is based, in part, upon the Dyna-lang model created by Lin et al. 2023 at UC Berkley ([2308.01399] Learning to Model the World with Language (arxiv.org)) but with a key difference - MARVINA-R will be running with two neural networks - one based on short-term memory and the second based on long-term memory. Decisions will be made based on which is most appropriate, and on how similar the current input data is to the generated world-model of each model.
Once at rest, MARVINA-R will effectively "sleep", essentially keeping the most important memories, and consolidating them into the long-term network if they lead to better outcomes.
This will allow the system to be tailored beyond its current limitations - where it can be designed to be motivated by multiple emotional "pulls" for its attention.
This does, however, also increase the number of AI outputs required per action (by a magnitude of about 10 to 100) so this will need to be carefully considered in terms of the software and hardware requirements.
Results So Far:
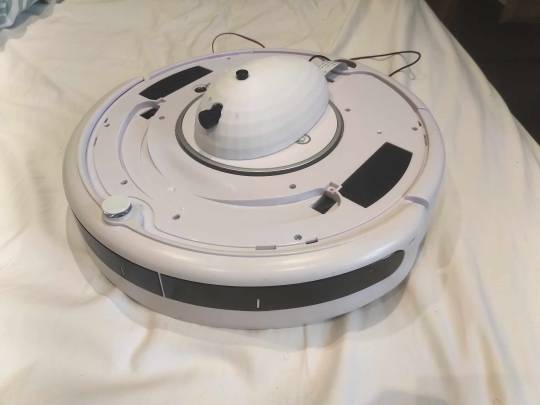
Here is the current prototyping setup for MARVINA-R. As of a couple of weeks ago, I was able to run the entire RaspberryPi and applied hardware setup and successfully interface with the robot with the components disconnected.
I'll upload a video of the final stage of initial testing in the near future - it's great fun!
The main issues really do come down to hardware limitations. The microphone is a cheap ~$6 thing from Amazon and requires you to shout at the poor robot to get it to do anything! The second limitation currently comes from outputting the text-to-speech, which does have a time lag from speaking to output of around 4 seconds. Not terrible, but also can be improved.
To my mind, the proof of concept has been created - this is possible. Now I can justify further time, and investment, for better parts and for more software engineering!
#robot#robotics#roomba#roomba hack#ai#artificial intelligence#machine learning#applied hardware#ai research#ai development#cybernetics#neural networks#neural network#raspberry pi#open source
8 notes
·
View notes
Text
Setting up a Raspberry Pi is always an adventure, and our latest project has been no exception! We've been diving deep into the world of network configuration, and after a bit of head-scratching (and a few "aha!" moments), we've made some significant progress in understanding how to get our Pi to share its internet connection.
Initially, like many, we fell into a common trap. Our goal was to share the internet connection from our Raspberry Pi, and our first thought was to assign a static IP address to wlan0 – the wireless interface. The logic seemed sound: wlan0 is how the Pi connects to the internet (via a hotspot, in our case), so surely that's where the magic needed to happen, right?
Not quite!
After some experimentation and a healthy dose of troubleshooting, we realized a crucial distinction. While wlan0 receives the internet connection, it's not the ideal interface for sharing it in the way we envisioned. Think of it this way: wlan0 is like the person receiving a package at the door. They've got the package, but they're not the ones distributing it to everyone else in the house.
This led us to eth0 – the trusty wired Ethernet port. And that's where the real breakthrough happened! We had a lightbulb moment: eth0 is perfectly suited for sharing the connection.
Here's why eth0 is our new best friend for internet sharing:
* Dedicated Connection: eth0 allows for a direct, dedicated connection to another device, like a router or even another computer. This is ideal for creating a stable and reliable shared network.
* Logical Separation: By using eth0 to share, we can keep the wlan0 interface focused on its primary job: connecting to the internet. This simplifies the network topology and makes it easier to manage.
* Foundation for a Robust Setup: With eth0 as our sharing interface, we can now configure it to act as a DHCP server, enable IP forwarding, and set up Network Address Translation (NAT). These are the essential ingredients for turning our Raspberry Pi into a powerful internet gateway.
So, what's the plan moving forward?
Our focus has now shifted to configuring eth0. We'll be looking at:
* Assigning a static IP address to eth0: This will be the gateway for any devices connected to it.
* Enabling IP forwarding: This is the key to telling the Pi to route traffic between our wlan0 internet source and our eth0 shared network.
* Setting up a DHCP server (like dnsmasq) on eth0: This will allow devices connected to eth0 to automatically get an IP address from our Pi.
* Configuring iptables for NAT: This crucial step will ensure that devices on our eth0 network can access the internet through our wlan0 connection.
This project has been a fantastic learning experience, highlighting the importance of understanding the fundamental roles of different network interfaces. We're excited to get eth0 fully configured and unlock the full potential of our Raspberry Pi as an internet sharing hub.
Stay tuned for more updates as we continue to build out this network!
- I used ai for this post.
0 notes
Text
How to Setup Robotics Lab in School – A Complete Guide to Establishing a Robotics Lab
In today’s technology-driven world, robotics education acts as an important asset in equipping students with 21st-century Robotics & AI skills such as critical thinking, problem-solving, and creativity. Robotics lab offers a dedicated space for students to engage in hands-on learning, exploring engineering, machine learning, and artificial intelligence (AI). By providing a well-structured Robotics & AI lab, schools generate our young learner’s interest in the field of STEM (Science, Technology, Engineering, and Mathematics), and make them ready for future careers in further Robotics & AI embedded technology. This will guide our learners in a direct approach to setting up a Robotics lab, and also ensure that students gain maximum educational benefits from this modern learning environment.
Defining Objectives and Goals
At the foundational stage of setting up Robotics & AI labs in schools, it is essential to clearly define the lab’s objectives and purpose. This helps schools determine whether the focus will be on basic robotics education, competition-driven learning, or innovation through patent-worthy projects. The primary goals include introducing our young learners to Robotics and AI, upgrading with programming and engineering skills, and preparing students for national and international tech. Competitions, and encourage them to become future innovators by learning the combination of innovative projects that combine balanced learning. These objectives will guide schools in planning the necessary resources such as designed curriculum and selecting appropriate equipment while learning the concept in Robotics & AI labs.
Securing Budget and Funding
Setting up robotics labs in schools involves a significant financial investment, and schools must plan their budgets accordingly. Several funding options are available in the authority, including school budget administration, government permits, corporate partnerships and sponsorship, and community fundraising initiatives. STEM education companies collaborate with the government for support with the education part and the material requirements according to the school for opening robotics & AI Labs in the school. At the same time, STEM education companies also offer sponsorship under several projects, provide teachers training programs by the STEM education companies, and Atal tinkering Labs handled by the robotics lab. CSR approach and alumni contributions can also give financial assistance.
Selecting the Right Space
Whenever a lab is established in a school, it is essential to carefully select a suitable space. Choosing the right location for the Robotics and AI lab is crucial to ensuring a practical, engaging, and productive learning environment. The lab should be spacious enough to have workstations, practical testing areas, robotics kits, and tool storage. It must also have proper ventilation, lighting, electrical connection, and internet connectivity. A well-setup layout with designated areas for programming, assembly, and testing enhances productivity and safety.
Procuring Robotics Kits and Equipment
Robotics Lab Selecting the right robotics kits and equipment is fundamental for creating an effective robotics lab. The selection of kits should be based on the learners’ age groups and their initial skill levels. For beginners, kits such as mechanical construction kits and block-based power screw kits are ideal. In terms of coding, platforms like Scratch and Code Blocks provide a built-in introduction to robotics and programming. Intermediate classes from 6th to 8th can benefit from Arduino, Raspberry Pi, and other robotics kits, which provide hands-on experience in coding and electronics technology. Students at the senior level can explore AI-powered coding platforms like AI Connect, Drone technology, and IoT-based machine learning projects. With all of this, the Robotics & AI lab will support various robotics innovations going to happen in the future.
Developing a Robotics Curriculum
A well-organized robotics curriculum ensures progressive growth in learning and development of new advanced skills. Schools should design the curriculum in such a way that it will cover all concepts from beginner to advanced levels, hands-on projects, and advanced robotics applications. In the beginner level from class 3rd to 5th class, learners will focus on basic robotics, easy-to-understand programming concepts, and understandable mechanical design. Then at the intermediate level for 6th to 8th class learners should focus on microcontrollers, robotics, and Machine learning robot programming. Later on at the advanced level, it should include AI, machine learning, IoT embedded, and participation in robotics competitions which motivates the students to do more innovation in the future.
Hiring Skilled Educators and Mentors
After setting up the lab, the most crucial person is the one who will run it – the ideal role model and mentor. This individual will guide our future learners towards a bright future, equipped with up-to-date knowledge in advanced technology and artificial intelligence. Our STEM companies provide STEM-certified educators, who are the best mentors to help students grasp the concepts of robotics and AI in an engaging and enjoyable way. They are essential for guiding students in this specific direction of gaining knowledge in robotics and AI. As per our advice, schools should recruit STEM-certified educators with expertise in all directions where they should be experts in their fields of Science, Technology, Engineering & Mathematics.
Robotics Lab in School Following that, it is important to establish collaborations with university researchers, industry professionals, and robotics organizations to provide students with valuable insights, real-world exposure, and expert mentorship. If some schools want to train their teachers for this subject, then our STEM education companies provide teachers training programs and organize workshops for the teachers to ensure that instructors remain updated with the latest technology in robotics technology. This also encourages students to a learning approach, where senior students can also mentor in the class and it also enhances engagement and knowledge-sharing skills.
Implementing Safety Measures
In the Robotics & AI lab, we need to ensure that we have proper safety for the students in the robotics lab. It is essential to establish clear guidelines on the Circular Board for handling electronic components and computer systems provided in the lab. Additionally, students must be trained in basic first aid procedures to ensure they are prepared to respond effectively in case of any mishap, emphasizing the importance of safety and preparedness in a lab environment. The essential safety measures include protective gear such as gloves and safety goggles, building fire safety protocols, and training students for first aid. These properly structured lab sessions with instructor supervision help to maintain a safe environment in the lab.
Conclusion
In conclusion, establishing Robotics & AI labs in schools marks a progressive leap in advancing STEM education and preparing students for a tech-driven future. A well-designed and thoughtfully planned lab—with clear objectives, suitable equipment, expert mentorship, and a structured curriculum for all grades—creates an engaging, future-ready learning environment. Getting educated about Robotics & AI education develops technical skills and also enhances creativity, teamwork, and critical thinking approach toward the problem and its solution. By continuously approaching & upgrading resources such as curriculum and student participation in the competition, schools can work hard to motivate the upcoming generation of young innovators and engineers who are ready to lead the vision of future innovators.
0 notes
Text
Big Screen Fun: The Ultimate Guide to Connecting Your Raspberry Pi to a Projector in 2025 In 2025, the humble Raspberry Pi continues to punch above its weight, offering incredible versatility at an affordable price. Whether you're building a home theater, running a presentation, creating a digital art installation, or indulging in retro gaming, connecting your Raspberry Pi to a projector is an excellent way to bring your ideas to life on the big screen. With a variety of Raspberry Pi models on the market — including the powerful Raspberry Pi 5, the compact Pi Zero 2 W, and the reliable Pi 4 — understanding their video output capabilities is the first step toward a smooth setup. This comprehensive guide will walk you through how to connect a Raspberry Pi to a projector in 2025, covering everything from cable choices to resolution tweaks and troubleshooting. Understanding Raspberry Pi Video Output Before connecting to a projector, it’s essential to know your Pi’s video output ports: Raspberry Pi ModelVideo OutputNotesPi 52× Micro-HDMISupports up to 4K @ 60HzPi 42× Micro-HDMISupports dual displaysPi 3, 2, B+Full-size HDMI1080p @ 60HzPi Zero / Zero 2 WMini-HDMI1080p capableAll ModelsComposite via GPIO or AV jackFor analog displays Key points: HDMI is the preferred output for modern projectors. Micro-HDMI and Mini-HDMI require adapter cables to convert to full-size HDMI. Supported resolutions range from 480p to 4K, depending on model and projector compatibility. Make sure you have the correct video cable or HDMI adapter for your specific Raspberry Pi model and projector. Connecting Your Raspberry Pi to a Projector: Step-by-Step Guide 1. Physical Connection Step 1: Identify Ports On your Raspberry Pi, locate the correct video output: Pi 4/5: Micro-HDMI (use Micro-HDMI to HDMI cable) Pi 3: Full-size HDMI Pi Zero: Mini-HDMI (use Mini-HDMI to HDMI cable) On your projector, find the HDMI or VGA input port. Most modern projectors have HDMI; older ones may only support VGA. Step 2: Choose the Right Cable HDMI to HDMI: Best option for digital projectors. Micro-HDMI to HDMI: Required for Pi 4/5. HDMI to VGA: Requires active adapter (with power via USB). Step 3: Connect While Powered Off Turn off both the Raspberry Pi and the projector. Connect the video cable securely between the two devices. 2. Powering On Power on the projector first to allow it to initialize. Then power on the Raspberry Pi by plugging in the power supply. 3. Select the Correct Projector Input Use the projector's remote or onboard controls to choose the correct input source: Common options include: HDMI1, HDMI2, VGA, or AV. Wait a few seconds — the Pi should auto-detect the projector and display the desktop or boot screen. 4. Raspberry Pi Display Configuration (if needed) In most cases, the Pi will auto-adjust the output to match the projector’s resolution. If you experience black screens, resolution mismatches, or cropped images, manual configuration is required. Option 1: Using raspi-config Open a terminal: bashCopyEditsudo raspi-config Navigate to: Display Options > Resolution Choose a compatible resolution (e.g., 1920×1080, 1280×720) Finish and reboot. Option 2: Manually Edit config.txt Open the configuration file: bashCopyEditsudo nano /boot/config.txt Add or edit the following lines: iniCopyEdithdmi_force_hotplug=1 hdmi_group=2 # 2 = DMT (for monitors/projectors) hdmi_mode=82 # 82 = 1080p @ 60Hz Other useful options: iniCopyEdithdmi_drive=2 # Enables HDMI audio disable_overscan=1 # Removes black borders Save and reboot: bashCopyEditsudo reboot For a full list of hdmi_mode values, refer to the Raspberry Pi video documentation. 5. Adjust Projector Settings Use the projector’s focus ring, keystone correction, and zoom features to align and sharpen the image. For digital projectors, this may also be handled via the settings menu.
Common Issues and Troubleshooting 1. No Signal Check that cables are firmly connected. Verify that both devices are powered on. Confirm the projector input source is correct. Try a different HDMI cable or port. Force HDMI detection using hdmi_force_hotplug=1. 2. Incorrect Resolution or Aspect Ratio Use raspi-config or edit config.txt to manually select resolution. Adjust the aspect ratio settings on the projector (e.g., 16:9 or Auto). 3. Flickering or Distorted Image Use a high-quality HDMI cable. Ensure the Raspberry Pi has a 5V/3A power supply. Avoid long HDMI cables (keep under 6 ft if possible). 4. No Sound via HDMI Enable HDMI audio in the config: iniCopyEdithdmi_drive=2 Set audio output to HDMI via: bashCopyEditsudo raspi-config Navigate to Advanced Options > Audio > HDMI. Check if the projector has internal speakers or external audio support. 5. Projector Doesn’t Detect Pi Reboot both devices. Confirm hdmi_force_hotplug=1 is set. Check if the cable or adapter is faulty. Optimizing Your Raspberry Pi for Projector Use 1. Choose the Right Pi Model Raspberry Pi 5/4: Ideal for 4K video, gaming, or media centers. Raspberry Pi Zero 2 W: Great for lightweight slideshow or digital signage. Older Models: Suitable for presentations or basic playback. 2. Use a Stable Power Supply An underpowered Pi can cause display flickering or boot failures. 3. Install Useful Software VLC or Kodi for media playback. LibreOffice Impress for presentations. RetroPie for classic games. 4. Use Wireless Peripherals A Bluetooth or RF keyboard/mouse setup makes controlling the Pi from a distance easier. 5. Manage Cables Use Velcro ties or cable organizers to reduce clutter and prevent accidental disconnections. Conclusion Connecting your Raspberry Pi to a projector in 2025 is easier than ever, thanks to improved video output capabilities, software support, and plug-and-play compatibility. Whether you're using it for education, entertainment, or creative expression, this setup opens up a world of big-screen possibilities at a low cost. With the right cable, basic configuration, and a few tweaks, your Raspberry Pi can deliver stunning visuals through any compatible projector. So power up your Pi, plug in your projector, and explore the vast potential of your DIY home cinema, digital dashboard, or interactive presentation system. Ready to level up your Raspberry Pi experience? Try it with Kodi, set up RetroPie, or even build a wireless media streamer — the only limit is your imagination!
0 notes
Text
Introducing the Artificial Intelligence Lab for Schools in Dubai by Clevered

In an era dominated by rapid technological advancements, education must evolve to equip students with the skills and mindsets necessary for the future. The United Arab Emirates, particularly Dubai, has always been at the forefront of embracing innovation in education. Now, taking a transformative step forward, Clevered—a leading education innovation platform—is proud to launch the Artificial Intelligence (AI) Coding Lab for Schools across Dubai. This groundbreaking initiative is designed to introduce school students to the world of Artificial Intelligence, Machine Learning, and Data Science in a practical, engaging, and future-ready manner.
Why AI in Schools? The UAE’s Vision for Future-Ready Learning
The UAE government has consistently demonstrated its commitment to nurturing a tech-savvy generation. From appointing the world’s first Minister of State for Artificial Intelligence to integrating AI into national strategies, the emphasis on future technologies is evident.
By introducing AI at the school level, Dubai aims to:
Foster early exposure to emerging technologies
Promote computational and analytical thinking
Bridge the gap between classroom learning and real-world applications
Prepare students for careers that don’t yet exist
Clevered’s AI Coding Lab initiative aligns seamlessly with the UAE’s Artificial Intelligence Strategy 2031, ensuring students aren’t just consumers of technology—but its creators.
What is the AI Coding Lab by Clevered?
The AI Coding Lab is a cutting-edge, hands-on learning environment designed for school students aged 10 to 18. It integrates Artificial Intelligence, Python programming, Robotics, Machine Learning, and Data Analytics into a dynamic, age-appropriate curriculum. Unlike traditional computer labs, this lab encourages creativity, experimentation, and critical thinking.
Each lab is equipped with:
High-performance computers optimized for AI applications
Interactive smart boards and AR/VR capabilities
AI development kits (including Raspberry Pi, Arduino, and sensors)
Coding software and tools (Scratch, Python, TensorFlow Lite for kids)
Curriculum Highlights: Learning with Purpose
Clevered has developed a proprietary, project-based curriculum tailored to different age groups. The curriculum is co-designed with global AI experts and aligned with international frameworks such as ISTE (International Society for Technology in Education) and UNESCO's AI education guidelines.
Modules Include:
Introduction to AI & Ethics: Understanding how AI impacts society and the importance of responsible AI.
Python for Beginners: Learning coding basics and syntax through games and interactive challenges.
Machine Learning Projects: Creating models that recognize images, text, and patterns using supervised learning techniques.
AI in Daily Life: Exploring how AI powers voice assistants, recommendation engines, and self-driving technology.
Data Science for Kids: Learning how to clean, visualize, and draw insights from real datasets.
Robotics with AI: Programming robots to react to human voice, gestures, and environmental stimuli.
Each module concludes with a hands-on project such as building a chatbot, designing a traffic prediction model, or creating an AI-powered recycling robot.
Empowering Educators: Training & Certification
At the heart of any successful educational initiative is the educator. Clevered supports schools not just with infrastructure, but with comprehensive teacher training programs. Teachers are trained in AI pedagogy, classroom integration techniques, and continuous assessment tools.
Upon completion, educators receive:
Certified AI Educator Credentials
Ongoing professional development
Access to a global educator community
Resources for classroom implementation
Clevered also organizes AI Bootcamps and Hackathons to foster cross-school collaboration and healthy competition.
How Schools Benefit: More Than Just a Lab
The AI Coding Lab offers far-reaching benefits that extend beyond the lab walls.
1. Academic Excellence
Integrating AI projects into core subjects enhances STEM education and improves student engagement and performance.
2. Future Skills Development
Students gain foundational skills in programming, data literacy, critical thinking, and design thinking—skills identified as essential for future jobs by the World Economic Forum.
3. School Differentiation
Schools that adopt the AI Lab gain a competitive edge in attracting tech-forward families and meeting KHDA innovation standards.
4. Industry Collaboration
Clevered partners with leading technology companies, enabling students to work on real-world AI problems and internships in the future.
5. Innovation Showcases
Annual AI exhibitions and showcase days provide students with a platform to demonstrate their projects to parents, educators, and tech leaders in Dubai.
Student Success Stories: Empowering Young Innovators
In pilot programs conducted across select schools in Dubai, the results have been transformative:
Sarah, 13, created an AI-based chatbot to assist visually impaired users in navigating websites using voice commands.
Omar, 16, developed a basic fraud detection model for online transactions during a school project.
Ayesha, 14, won second place in a regional AI Hackathon using Clevered’s lab tools to create a smart attendance system using facial recognition.
These success stories reflect the real-world relevance and empowerment offered by the AI Coding Lab.
Making AI Accessible to All
Clevered believes in inclusivity and accessibility. The AI Labs are designed to be modular and scalable, allowing schools of all sizes and budgets to implement them without compromising quality. From compact setups for small classrooms to full-fledged innovation hubs, the lab solutions are customizable.
Additionally, Clevered offers AI Learning Kits for students to continue experimenting at home, ensuring learning doesn’t stop at the school gate.
Join the Movement: AI for Every School in Dubai
Dubai is not just embracing the future—it's leading it. The AI Coding Lab by Clevered is more than an educational tool; it’s a catalyst for systemic transformation in how students learn, think, and innovate.
If your school shares this vision, now is the time to act.
Partner with Clevered and bring the power of Artificial Intelligence into your classrooms.
Contact Us Today
Website: www.clevered.com
Email: [email protected]
Phone: + 973 36805659
Social Media: @CleveredAI | #AIinSchoolsUAE | #CleveredLabsDubai
Empower your students. Future-proof your curriculum. Let’s build tomorrow, today—with Clevered’s AI Lab for Schools.
#artificial intelligence internship#artificial intelligence lab#Artificial Intelligence Lab for schools
0 notes
Text
Robotics & Coding: Shaping the Future of STEM Education

In a world increasingly driven by technology, Robotics & Coding have emerged as powerful tools in transforming education—especially in the realm of STEM (Science, Technology, Engineering, and Mathematics). As industries evolve and automation becomes the norm, it’s essential that students are equipped with the skills necessary to thrive in the future workforce. Integrating Robotics & Coding into the classroom not only enhances technical literacy but also fosters critical thinking, creativity, and problem-solving abilities among students.
What Are Robotics & Coding?
Robotics involves designing, building, and programming machines that can perform specific tasks—often mimicking human actions. Coding, or computer programming, is the process of writing instructions that a computer or robot can follow. When combined, Robotics & Coding allow students to bring machines to life by writing programs that control how they move, respond to stimuli, and interact with their environment.
From simple robots built with LEGO kits to advanced AI-driven machines, Robotics & Coding are making technology tangible and accessible to learners of all ages.
Why Are Robotics & Coding Important in STEM Education?
1. Hands-On Learning Unlike traditional learning methods, Robotics & Coding engage students through hands-on activities. Building a robot or writing code provides immediate feedback and encourages experimentation, which helps reinforce core STEM concepts in physics, mathematics, and computer science.
2. Problem-Solving and Logical Thinking Programming robots teaches students how to approach problems methodically. They learn to troubleshoot code, analyze errors, and refine their logic—skills that are critical in both academic and real-world settings.
3. Boosts Creativity and Innovation With Robotics & Coding, the possibilities are limitless. Whether designing a robot to clean a room or writing a program for a sensor-controlled drone, students are encouraged to think outside the box and innovate solutions to everyday problems.
4. Encourages Collaboration and Teamwork Most robotics projects are completed in teams, which builds communication and collaboration skills. Students learn to divide tasks, share ideas, and work toward a common goal—key traits in modern STEM careers.
5. Prepares Students for Future Careers Robotics & Coding are no longer niche skills; they are now essential for a wide range of careers in engineering, computer science, automation, AI, and even healthcare. Introducing these skills early ensures students are career-ready for a tech-driven world.
Robotics & Coding in the Classroom
Across the globe, schools are incorporating robotics kits, coding platforms, and competitions to engage students. Platforms like Arduino, Raspberry Pi, Scratch, and Python are being introduced to children as young as seven or eight. These tools make programming accessible and fun, while simultaneously teaching core STEM concepts.
Moreover, government initiatives and educational policies in many countries now prioritize STEM curriculum enhancement through Robotics & Coding, recognizing their role in preparing a future-ready generation.
Conclusion
Robotics & Coding are not just educational trends—they are the foundation of tomorrow's innovation. By embedding these skills into STEM education, we empower students to become inventors, thinkers, and leaders in a tech-centric world. As the lines between hardware and software continue to blur, the demand for skilled minds will only grow. The future is automated, and it starts with Robotics & Coding.
0 notes
Text
Top 5 Electrical Engineering Projects for University Students
Electrical engineering is a dynamic field that offers students numerous opportunities to apply theoretical knowledge in practical scenarios. For those pursuing Electrical Engineering Courses Sri Lanka, working on hands-on projects is essential to developing problem-solving skills and technical expertise. Here are five exciting project ideas for university students to explore.
1. Automation System for Smart Homes
Smart home automation is a great project option with the growth of IoT technologies. With this system, consumers can use voice commands or a smartphone to operate household equipment. An effective automation system can be built using wireless modules like Wi-Fi and Bluetooth, as well as components like Arduino and Raspberry Pi.
2. Station for Charging Powered by Renewable Energy
A solar or wind-powered charging station is an important initiative as the globe moves towards sustainable energy. This entails creating a system that harvests renewable energy and transforms it into electrical power that can be used to charge electronics. It can be a great tool to investigate ideas like power management, battery storage, and solar panel efficiency.
3. Automated Street Lighting System
This concept automates street lighting in an effort to save electricity. Students can design a system that turns street lights on and off in response to changes in the surrounding light levels by utilising microcontrollers and light-dependent resistors (LDRs). This project is eco-friendly and useful at the same time.
4. Transmission of Power Wirelessly
In electrical engineering, wireless energy transfer is an intriguing idea. One project on this subject entails creating a system that uses resonant inductive coupling to wirelessly transfer electricity over small distances. Applications such as electric vehicle and mobile device wireless charging depend on this technology.
5. Battery Management System (BMS) for Electric Vehicles
A project concentrating on battery management systems is extremely pertinent given the rising demand for electric cars (EVs). By keeping an eye on variables including voltage, temperature, and charge cycles, a BMS guarantees the security and effectiveness of EV batteries. This initiative will shed light on power electronics and energy storage.
Taking part in these electrical engineering projects will improve job possibilities and practical skills. Practical experience is crucial whether you're working on power systems, automation, or renewable energy. NSBM offers a first-rate learning environment with up-to-date materials and knowledgeable supervision for students looking for high-quality education and prospects in this profession.
0 notes
Text
How to Set Up an Affordable STEM Lab in Amravati?
Setting up a STEM lab in Amravati is a game-changer for schools looking to provide hands-on, future-ready education. However, many schools hesitate due to budget constraints. The good news is that creating a STEM lab solution in Amravati doesn’t have to be expensive. With the right planning, resource allocation, and smart investments, schools can develop a cost-effective STEM lab program in Amravati that enhances student learning and aligns with modern education trends.
A well-equipped STEM lab in Amravati enables students to explore science, technology, engineering, and mathematics through interactive and practical experiences. By integrating STEM education into the curriculum, schools can foster problem-solving skills, creativity, and critical thinking among students. Moreover, a STEM lab solution in Amravati prepares young minds for future careers in technology-driven fields. The demand for STEM professionals is growing rapidly, making it crucial for schools to introduce students to these fields early on. While some institutions may worry about the costs, the reality is that an effective STEM lab can be set up within budget-friendly parameters. This guide will walk you through essential steps to establish an affordable STEM lab program in Amravati that benefits both students and educators. Book your first free consultation!
Identify Your STEM Lab Goals and Requirements
Before setting up a STEM lab solution in Amravati, schools must define their objectives. Are you focusing on robotics, coding, electronics, or engineering concepts? Understanding the curriculum needs will help in selecting the right tools and resources while keeping costs in check. Contact us now!
Start Small and Scale Gradually
A common misconception is that a STEM lab program in Amravati requires high-end equipment and a massive budget. Instead, schools can start small by integrating basic kits and tools like Arduino, Raspberry Pi, and affordable 3D printers. Over time, as interest and funding grow, more advanced equipment can be added.
Utilize Open-Source and Low-Cost Resources
One of the best ways to keep costs low is by leveraging open-source software and low-cost STEM kits. Many online platforms offer free coding programs, robotics simulations, and engineering design tools that can enhance the learning experience without additional expenses.
Seek Government and Private Funding Options
Many organizations and government initiatives support STEM education by offering grants and funding. Schools looking to set up a STEM lab in Amravati should explore options such as CSR funding from corporations, state education grants, and nonprofit partnerships to reduce financial burdens.
Optimize the Existing Infrastructure
Instead of building a new facility, schools can repurpose existing classrooms or libraries into a STEM lab solution in Amravati. This helps save costs on infrastructure while ensuring students have a dedicated space for hands-on learning.
Encourage Community and Industry Collaborations
Collaborating with local industries, universities, and STEM organizations can provide access to mentorship, guest lectures, and even shared equipment. These partnerships not only reduce setup costs but also enhance real-world exposure for students.
Invest in Multi-Purpose Equipment
To maximize budget efficiency, invest in multi-purpose STEM tools that cater to various learning activities. For example, a 3D printer can be used for engineering prototypes, biology models, and even art projects, making it a versatile addition to your STEM lab program in Amravati.
Train Teachers for Effective STEM Education
A well-equipped STEM lab is only effective if educators are trained to use it. Schools must provide professional development opportunities for teachers to ensure they can deliver engaging and interactive lessons using STEM tools. Book your first free consultation!
Involve Students in the STEM Lab Setup Process
Engaging students in the creation and development of the STEM lab in Amravati fosters a sense of ownership and creativity. Allowing students to participate in selecting tools, designing projects, and even assembling kits can make learning more immersive and cost-effective.
Monitor, Evaluate, and Upgrade Regularly
Once your STEM lab solution in Amravati is operational, it’s crucial to assess its effectiveness. Gather feedback from students and teachers, track progress, and upgrade resources periodically to ensure the lab continues to meet educational goals.
Get Started with a STEM Lab in Amravati Today!
An affordable STEM lab program in Amravati is within reach for every school. With careful planning, strategic resource allocation, and community collaboration, schools can provide students with a future-ready education without breaking the budget. Investing in a STEM lab solution in Amravati is not just about equipping a classroom with tools; it’s about transforming the way students learn and engage with real-world challenges. Schools that integrate STEM learning can ensure their students are prepared for the demands of the modern workforce, equipped with critical thinking, problem-solving, and technical skills.
Moreover, implementing a STEM lab program in Amravati can help schools meet educational guidelines, enhance student participation, and improve academic outcomes. If your school is ready to take the next step towards innovation and interactive learning, contact us today! and bring a STEM lab to your students.
0 notes
Text
Chatgpt computer communication design
Designing a computer circuit where two computers communicate with each other and "teach themselves" using an Arduino board involves a combination of hardware setup and software programming. Here’s a general guide to get you started:
1. Basic Concept
Two Computers (PCs or Microcontrollers): These are the two devices that will communicate and learn from each other. Each will run a program for self-learning.
Arduino Board: The Arduino will facilitate the communication between the two computers and control the process. It could also be part of the system performing calculations or simulations.
Communication Protocol: The two computers will need to communicate with each other. For simplicity, we can use serial communication (UART) or I2C with the Arduino acting as the intermediary.
2. Hardware Components
Arduino Board (e.g., Arduino Uno, Nano, or Mega)
Two Computers (PCs or other microcontrollers, like Raspberry Pi or other Arduino boards)
Communication Module: If you are using something like a Raspberry Pi or another microcontroller, you might need USB-to-Serial adapters or Bluetooth/Wi-Fi modules (e.g., ESP8266/ESP32, HC-05).
Power Supply: Proper power sources for the Arduino and computers.
Cables: USB, serial cables, or jumper wires for communication.
3. Circuit Design
Here is a high-level overview of the connections between the Arduino and the two computers.
Arduino and PC1 (Computer 1):
Connect the Arduino to PC1 via USB or UART communication pins (TX/RX pins if using serial).
Arduino and PC2 (Computer 2):
If you are using a second microcontroller (like another Arduino or a Raspberry Pi), connect them to the Arduino board using a communication protocol (e.g., I2C or UART).
The two computers could either communicate directly over a network (like Ethernet or Wi-Fi) or through serial communication.
For this example, let’s assume you are using UART for communication between the Arduino and both computers. You can use the TX/RX pins on the Arduino and connect them to the USB-to-Serial adapters connected to each computer.
4. Software Design
The software should allow the computers to "teach themselves," which likely means implementing some form of machine learning or pattern recognition. For simplicity, let’s outline how you could set up communication, with the learning part handled on the computers.
Arduino Code: The Arduino will act as the middleman for the communication. It will receive data from one computer, send it to the other, and also handle basic processing or simulation. It can be programmed to send responses or instructions back to the computers.
// Simple Arduino code for UART communication void setup() { Serial.begin(9600); // Start the serial communication at 9600 baud } void loop() { if (Serial.available()) { char incomingByte = Serial.read(); // Read incoming byte Serial.print("Received: "); Serial.println(incomingByte); // Send back the received byte } }
Computer 1 and Computer 2 Code: Each computer should run a program that will send data to the Arduino and receive responses. This could be a simple Python script or C++ program for serial communication.
Example Python Script: Here’s a basic Python script that can run on each computer. This script will send data to the Arduino and read the response back.import serial import time # Open serial port (make sure to change COM port for your system) ser = serial.Serial('COM3', 9600) # Change COM port as needed time.sleep(2) # Wait for the serial connection to initialize # Send data to Arduino ser.write(b'Hello Arduino!\n') # Read response while True: if ser.in_waiting > 0: response = ser.readline().decode('utf-8').strip() print(f"Arduino says: {response}") break ser.close()
This Python script could run on Computer 1, while a similar script runs on Computer 2. Both will send messages to the Arduino and receive feedback.
5. Self-Learning Simulation
To simulate the "self-teaching" aspect, each computer can use machine learning algorithms. You could start with something simple like linear regression or a decision tree. The computers could send random data points to each other and exchange feedback on whether the predictions made by each other are correct.
Computer 1 could generate a random dataset and send it to Computer 2.
Computer 2 processes the data, makes predictions, and sends the feedback back.
Computer 1 uses this feedback to adjust its learning algorithm (e.g., adjust weights in a simple linear regression model).
Example of a Simple Learning Process: Each computer could adjust its internal model based on the received feedback, similar to how a neural network or other machine learning models learn. The Arduino could be involved in simple processing tasks or sending acknowledgment signals when certain thresholds are reached (e.g., "success" or "failure").
6. Scaling Up
If you want to scale up the project to involve more complex learning or higher levels of interaction, you could use a more advanced platform such as a Raspberry Pi or ESP32/ESP8266 for networking and faster processing, where each computer uses a machine learning library (like TensorFlow Lite or scikit-learn).
7. Final Setup
Computer 1 and Computer 2 run machine learning algorithms that adjust based on feedback.
Arduino manages data flow between the computers and possibly performs basic learning tasks like adjusting variables or sending commands.
The entire system simulates a network where two computers are learning from each other.
This is a high-level overview, and there are many ways to implement it depending on the complexity of the communication and learning algorithm you want to achieve. Would you like to dive deeper into any specific area or need more detailed code for the project?
Creating two PCs from scratch using Arduino boards is an interesting challenge, but it's important to note that a full-fledged personal computer involves much more complexity than an Arduino is capable of. However, you can certainly simulate basic "PC-like" behavior using Arduino boards, where each "PC" would be a microcontroller (Arduino) with some level of functionality, communication, and processing.
High-Level Concept
Each Arduino board would act as a basic computing unit (like a simplified "PC"), running simple programs, processing input, and communicating with each other. While these "PCs" won't have the advanced features of a real computer (like an OS, GUI, or complex processing power), they can serve as learning devices or communication nodes in a network.
To make two PCs communicate with each other using an Arduino board, the Arduino acts as an intermediary. The Arduino will handle the communication between the two PCs, either via a serial connection (UART), I2C, or wireless communication (e.g., Bluetooth/Wi-Fi). Below is a guide on how to set up such a system:
1. Hardware Setup
Here, I'll describe a setup where two PCs communicate via an Arduino board using serial communication (UART). The Arduino will act as a mediator, forwarding messages between the two computers.
Components Needed:
Arduino board (e.g., Arduino Uno, Nano, Mega)
2 PCs (PC1 and PC2)
USB-to-Serial adapters (if using UART)
Jumper wires (if using direct communication between Arduino and PC)
Connections:
PC1 <-> Arduino: The first PC will communicate with the Arduino using its USB port (acting as a serial port).
PC2 <-> Arduino: The second PC will communicate via another USB-to-Serial adapter or possibly the second USB port of the Arduino (if the Arduino model supports multiple serial connections, e.g., Mega).
In simpler terms:
Arduino will be connected via USB to PC1.
PC2 will be connected to Arduino's serial pins (TX/RX) or using a USB-to-Serial adapter.
2. Arduino Code
The Arduino will need to read from one serial port (PC1) and forward the data to another serial port (PC2) and vice versa. The following is a simple Arduino sketch for this task.// Arduino code for mediating between two PCs void setup() { // Start serial communication with both computers Serial.begin(9600); // For communication with PC1 Serial1.begin(9600); // For communication with PC2 (if using Arduino Mega or another board with multiple serial ports) } void loop() { // Check if data is available from PC1 (connected to Serial) if (Serial.available() > 0) { char dataFromPC1 = Serial.read(); // Read data from PC1 Serial1.write(dataFromPC1); // Send data to PC2 (connected to Serial1) } // Check if data is available from PC2 (connected to Serial1) if (Serial1.available() > 0) { char dataFromPC2 = Serial1.read(); // Read data from PC2 Serial.write(dataFromPC2); // Send data to PC1 (connected to Serial) } }
Explanation of the Code:
Serial.begin(9600): Initializes communication with PC1.
Serial1.begin(9600): Initializes communication with PC2. (Note: Only available on boards with multiple UARTs like Arduino Mega, if using an Arduino Uno, you’ll need a USB-to-Serial adapter for PC2).
Serial.read(): Reads data from one serial port.
Serial.write(): Sends data to the other serial port.
3. Software on the PCs
On each of the two PCs, you will run a program that communicates with the Arduino via a serial connection. You can use Python to interface with the Arduino. Here’s a simple Python example that reads data from the Arduino and sends data back.
Python Code for PC1:
import serial import time # Connect to Arduino via serial port (Adjust the port name as needed) ser = serial.Serial('COM3', 9600) # Replace 'COM3' with your Arduino's port time.sleep(2) # Wait for the serial connection to establish # Send data to Arduino (which will forward to PC2) ser.write(b'Hello from PC1!\n') # Read data from Arduino (which is coming from PC2) while True: if ser.in_waiting > 0: response = ser.readline().decode('utf-8').strip() print(f"Received from PC2: {response}") break ser.close()
Python Code for PC2:
import serial import time # Connect to Arduino via serial port (Adjust the port name as needed) ser = serial.Serial('COM4', 9600) # Replace 'COM4' with your Arduino's port time.sleep(2) # Wait for the serial connection to establish # Read data from Arduino (which is coming from PC1) while True: if ser.in_waiting > 0: message = ser.readline().decode('utf-8').strip() print(f"Received from PC1: {message}") # Send data back to Arduino (which will forward to PC1) ser.write(b'Hello from PC2!\n') break ser.close()
4. Explanation of the PC Software:
Python serial library: Used to open a serial connection to the Arduino.
ser.write(): Sends data from PC1 or PC2 to the Arduino.
ser.readline(): Reads incoming data from the Arduino, which is forwarded from the other PC.
Time Delays: time.sleep(2) ensures that the serial connection is established before communication begins.
5. Communication Flow
PC1 sends a message (e.g., "Hello from PC1") to the Arduino.
The Arduino forwards the message to PC2.
PC2 receives the message, processes it, and sends a response back to the Arduino (e.g., "Hello from PC2").
The Arduino forwards the message back to PC1.
6. Adjusting for More Complex Setups
If you are using an Arduino Uno (which has only one serial port), you’ll need an additional USB-to-Serial adapter to handle communication with both PCs. Alternatively, you can use an Arduino Mega, which has multiple serial ports (like Serial, Serial1, Serial2, etc.).
For the Arduino Mega, you can use Serial for PC1 and Serial1 for PC2, as shown in the code above.
For PC2, you might need a USB-to-Serial adapter if you're not using an Arduino Mega.
7. Next Steps
To make the setup more advanced, you can:
Add error handling and retry mechanisms for more robust communication.
Implement data processing algorithms to simulate machine learning (e.g., a simple model for each PC that "learns" from the data it receives).
Use wireless communication like Bluetooth or Wi-Fi if you don't want to rely on USB connections.
Would you like to explore how to expand this further or add more complexity to the system? Let me know!
Here’s how you might approach creating two Arduino-based "PCs" from scratch:
1. Basic Requirements and Constraints
You’re working with Arduino boards, which are microcontrollers with limited processing power, memory, and storage compared to a real PC. The Arduino can run basic programs, perform calculations, and communicate with other devices, but it cannot run complex software like a PC.
To simulate PCs, you'll need:
Arduino microcontroller boards (e.g., Arduino Uno, Nano, Mega, etc.)
Inputs/outputs (e.g., buttons, LEDs, displays)
Communication method between the two Arduinos (e.g., UART serial, I2C, or even wireless)
Storage (limited, but can use EEPROM or SD card modules)
Basic display (e.g., an LCD or LED screen for output)
2. Building the Two "PCs" with Arduino
Each Arduino board will act as one "PC." Here’s how you can conceptualize the setup:
Arduino 1 (PC1): Will handle user input and perform computations.
Arduino 2 (PC2): Will also handle user input and perform computations. It will communicate with PC1 to share or exchange data.
The communication between the two PCs can be done using serial communication (UART) or I2C.
3. Basic Hardware Setup for Each PC
Each "PC" could have:
Buttons or switches to simulate input (e.g., user input or commands).
LCD or 7-segment display for output (or use an LED to indicate activity).
Communication interface to talk to the other PC (e.g., UART or I2C).
SD card or EEPROM to simulate storage.
Components Needed:
2 Arduino boards (e.g., Arduino Uno or Nano)
1 LCD display (16x2 or 20x4 for basic text output)
2 push buttons (to simulate input)
2 LEDs (to indicate some activity or status)
2 USB-to-Serial adapters (if using UART communication between PCs)
1 I2C or UART communication method
1 SD card module (optional for storage simulation)
4. Software Design for the "PCs"
Each Arduino PC will need a program to read inputs, perform some basic computation, and send/receive data to/from the other PC. Here’s a simple breakdown of the software for each Arduino:
Arduino PC1 (PC1 Sketch)
This sketch allows PC1 to process input (button presses), perform simple calculations, and send/receive data from PC2.#include <Wire.h> // For I2C communication (if using I2C) #include <LiquidCrystal_I2C.h> // For LCD display // Initialize the LCD (change pin numbers according to your setup) LiquidCrystal_I2C lcd(0x27, 16, 2); // Input and output pins int buttonPin = 7; // Pin for button input int ledPin = 13; // Pin for LED output void setup() { // Start communication Wire.begin(); // Start I2C communication if using I2C lcd.begin(16, 2); pinMode(buttonPin, INPUT); pinMode(ledPin, OUTPUT); lcd.print("PC1: Ready"); delay(2000); // Wait for 2 seconds } void loop() { int buttonState = digitalRead(buttonPin); // Read button state if (buttonState == HIGH) { // If button is pressed digitalWrite(ledPin, HIGH); // Turn on LED lcd.clear(); lcd.print("Button Pressed"); // Send data to PC2 (via I2C or serial) Wire.beginTransmission(8); // 8 is the I2C address of PC2 Wire.write("PC1: Button Pressed"); Wire.endTransmission(); } else { digitalWrite(ledPin, LOW); // Turn off LED } delay(100); // Small delay to avoid bouncing }
Arduino PC2 (PC2 Sketch)
This sketch for PC2 will receive data from PC1 and display it on the LCD, simulating output.#include <Wire.h> // For I2C communication (if using I2C) #include <LiquidCrystal_I2C.h> // For LCD display LiquidCrystal_I2C lcd(0x27, 16, 2); // LCD setup void setup() { Wire.begin(8); // Set PC2's I2C address to 8 Wire.onReceive(receiveEvent); // Define the event handler for receiving data lcd.begin(16, 2); // Start the LCD display lcd.print("PC2: Ready"); } void loop() { // Main loop does nothing, waiting for incoming data } void receiveEvent(int bytes) { String message = ""; // Initialize an empty string for the message while (Wire.available()) { message += (char)Wire.read(); // Read each byte and convert to character } // Display the received message on LCD lcd.clear(); lcd.print("PC2: "); lcd.print(message); // Print received message on LCD }
5. How They Communicate:
I2C Communication: In this setup, PC1 sends a message to PC2 using I2C. This allows you to connect the two Arduinos with just two wires (SDA, SCL) and share data.
Serial Communication (UART): Alternatively, if you're using UART (Serial) communication, PC1 sends data to PC2 via the Arduino’s TX/RX pins and vice versa.
6. Adding Storage (Optional)
To simulate storage, you can attach an SD card module to the Arduino. The Arduino can read/write simple text files or store computational results on the SD card.
Example of using an SD card module on PC1:#include <SPI.h> #include <SD.h> File myFile; void setup() { Serial.begin(9600); if (!SD.begin(4)) { Serial.println("SD card initialization failed!"); return; } myFile = SD.open("log.txt", FILE_WRITE); if (myFile) { myFile.println("PC1: Data Log"); myFile.close(); } else { Serial.println("Error opening log.txt"); } } void loop() { // Example of logging data continuously myFile = SD.open("log.txt", FILE_WRITE); if (myFile) { myFile.println("New Data Recorded"); myFile.close(); } delay(1000); // Wait for 1 second }
7. Expanding the "PCs"
You can add more features to each Arduino "PC," such as:
User input: Keyboard or mouse emulation.
Network Communication: Use Wi-Fi or Ethernet modules (like ESP8266 or Ethernet shield) to allow the two PCs to communicate over a network.
Processing: Implement simple algorithms or calculations on each Arduino to make them more like basic computers.
8. Limitations
Remember that an Arduino board is not a real PC, and it has significant limitations:
Limited processing power and memory.
No operating system or advanced software.
Minimal input/output capabilities.
But it is still a great way to learn about the basics of computer-like behavior, communication, and microcontroller programming.
Conclusion
While building a full-fledged PC using Arduino isn’t feasible, you can create two basic "PC-like" systems by using Arduino boards to simulate basic functionality such as processing, input/output, communication, and storage. This setup is a great way to learn about how computers work at a fundamental level, as well as how data is shared and processed between multiple devices.
Would you like to explore any specific part of the project further or need help with something else?
0 notes
Text
Cost-Effective Ways to Set Up a Robotics Lab in Schools

Introduction
Robotics education is becoming an essential part of modern learning, providing students with hands-on experience in science, technology, engineering, and mathematics (STEM). However, setting up a robotics lab in schools can be costly. This guide explores cost-effective ways to establish a high-quality Robotics Lab setup in school while optimizing resources and budget.
1. Define Objectives and Budget
Before setting up a robotics lab, schools should clearly define their objectives. Are they introducing basic robotics concepts, programming, or advanced AI? Based on these goals, schools can set a realistic budget. Partnering with Robotics lab for schools providers can also help in estimating costs and choosing the right equipment.
2. Leverage Grants and Funding Opportunities
Schools can explore government grants, corporate sponsorships, and crowdfunding platforms to secure financial assistance. Many organizations support STEM education and provide funds for schools to build robotics labs.
3. Start Small and Expand Gradually
Instead of investing in high-end robotics kits initially, schools can start with affordable kits such as LEGO Mindstorms, Arduino, or Raspberry Pi. These provide students with a strong foundation without straining the budget.
4. Utilize Open-Source Software and Free Resources
There are many open-source platforms available that reduce software costs. Programs like Scratch, Tinkercad, and Python allow students to learn coding and robotics at no additional expense. This approach ensures that schools get the best value when setting up a Robotic lab for kids.
5. Partner with Local Institutions and Experts
Collaborating with universities, tech companies, and local robotics clubs can help schools gain access to shared resources and expertise. Industry experts can conduct workshops and mentorship programs, reducing the need for expensive in-house training.
6. Repurpose Existing Infrastructure
Instead of constructing a new space, schools can repurpose existing computer labs or classrooms into a robotics lab. By reusing furniture, computers, and projectors, institutions can save significantly on setup costs.
7. Encourage Community Involvement
Involving parents, alumni, and local businesses can bring additional funding and resources. Organizing fundraising events, donation drives, and sponsorship programs can support the growth of the robotics lab.
8. Invest in Multi-Use Robotics Kits
Instead of purchasing specialized equipment for different projects, investing in multi-use robotics kits that support a range of activities will maximize efficiency and cost-effectiveness.
Conclusion
Creating a Robotics Lab setup in school does not have to be an expensive venture. By leveraging strategic partnerships, open-source tools, and careful planning, schools can offer high-quality robotics education within a budget. A well-structured robotics lab will equip students with the essential skills needed for the future while making learning interactive and fun.
0 notes
Text

Top Benefits of an Embedded Systems Course in India for Beginners
Embedded systems are everywhere—from smartphones to home appliances we use daily. They are intended for specific tasks and are the heart of a wide range of devices. Technological advancements have triggered a rapidly increasing demand for competent experts in embedded systems. This exciting field is the right opportunity for beginners to make their mark in it. An embedded systems course in India is the right decision, which would be a game changer. The courses are highly inclusive of both hardware and software components, which gives students the ability to design, develop, and troubleshoot embedded systems.
1. Basic Knowledge of Embedded Systems
An embedded systems course for freshmen in India gives a person foundational principles in embedded systems, an important base for any career in this discipline. Such courses cover, inter alia, topics that include microcontroller architecture, embedded C programming, hardware design, real-time operating systems, and communication protocols. A beginner is initiated to the interaction between an embedded system and its environment, including hardware and software, through the execution of specific functions. This base knowledge empowers students to learn about the fundamental elements that come with the designing of embedded systems, which marks the very first step toward success in the industry.
2. Hands-On Practical Experience
The best way to get to know embedded systems is through practical experience, and this course in India regarding an embedded system ensures beginners get hands-on exposure with real-world projects. Most of the courses allow working with microcontroller-based systems, sensors, and other related devices. Beginners will also get a chance to program hardware and troubleshoot issues in real time. This would be done using industry-standard tools and platforms like Arduino, Raspberry Pi, and ARM-based microcontrollers. This will ensure the development of practical skills necessary for working in the design of embedded systems. This is why these courses are highly valuable for beginners who emphasize practical learning.
3. Industry-Relevant Skills
One of the major reasons for joining an embedded systems course in India is that it provides students with the skills that are most in demand by the industry. Embedded systems are vital in a large number of industries, such as consumer electronics, automotive, telecommunications, healthcare, and industrial automation. The embedded systems course equips beginners with the skills necessary to meet the needs of these rapidly changing sectors. Students learn modern tools, programming languages, as well as design techniques, putting them ahead in a fast-paced job market. As the Internet of Things (IoT) as well as Artificial Intelligence evolves, embedded systems knowledge remains increasingly vital, and even an embedded systems course taught in India can help pupils remain abreast of everything.
4. High demand for jobs and career scope
The embedded systems industry has grown rapidly, and there has been a growing demand for professionals with this skill. As more industries adopt automation and connected devices, this trend is becoming more palpable. An embedded systems course in India opens the gates for beginners to enter a field in high demand. Graduates can work on a wide range of responsibilities, including embedded software development, hardware design, system architecture, and testing. Additionally, smart devices, wearables, and connected cars have led to new opportunities in embedded systems for job seekers in almost every industry. When adequately trained, fresh candidates can quickly move into the lucrative field, thus allowing great career growth.
5. Availability of Good Coaches and Training Centers
India has several well-known institutes and training centers offering specific courses in the subject of embedded systems. Starting from the Indian Institutes of Technology, IITs, and even specialized training centers, one never faces a lack of quality education. Courses on embedded systems in India are generally taught by seasoned instructors who bring practical knowledge from industry to the class. The instructors can further guide the students through such complex concepts and provide very valuable insights into the present trends in embedded systems. Students also get the benefit of modern labs and resources, where they can go deep into the concepts of embedded systems and thus gain a competitive edge in the job market.
6. Cost-Effective Education
Compared to countries like the US and Europe, the cost of pursuing an embedded systems course in India is relatively affordable. This makes India an attractive destination for both domestic and international students. With the growing trend of online courses, many institutions provide flexible learning options that help beginners access quality content at lower costs. Either through full-time programs, part-time options, or online platforms, students can pursue an embedded systems course without breaking the bank. This cost-effectiveness, along with world-class education, makes India an excellent choice for pursuing a career in embedded systems.
7. Exposure to Real-World Projects and Internships
An added advantage of an embedded systems course in India is exposure to real-world projects and internships. Several institutes engage with leading companies for students to be able to gain internships, work on live projects, and acquire hands-on experience. This is the real-life exposure needed by beginners to help them learn and apply skills acquired to a professional level. It enhances one's problem-solving skills. There are better chances to get employment after the training is complete. Students learning about designing and developing embedded systems also get some experience through internships conducted by industry professionals.
8. Networking and Career Support
An embedded systems course in India would open up a vast network of peers, industry experts, and professionals. Networking is an essential constituent of any career, and most students who enroll in such courses have access to career fairs, workshops, and seminars where they can get in touch with employers. Most institutes have also offered job placement facilities and helped students secure positions within the leading companies. Building a strong professional network during the course can lead to collaborations, internships, and full-time job opportunities in the embedded systems industry.
Technos COE: A Leader in Embedded Systems Training
An excellent example of an institution offering high-quality embedded systems courses in India is Technos COE (Center of Excellence). Technos COE is known for providing hands-on training in various fields of electronics and embedded systems. The institute offers a structured curriculum designed for beginners, with a focus on practical experience and real-world projects. Technos COE collaborates with industry leaders to ensure that its courses remain aligned with current technological trends, making it a top choice for those looking to build a career in embedded systems. Technos COE supports students by using industry ties and state-of-the-art facilities to train with experts for proficiency in gaining the competencies that succeed in today's dynamic landscape of embedded systems.
Conclusion
A course on Embedded Systems from India serves beginners as a great avenue by providing access to valuable industry insights and practical knowledge essential for beginning professionals in this profession. Due to its highly growing requirement, becoming one of its professionals opens ways to thousands of amazing avenues in various fields of operation. These courses make sure that beginners are equipped with the right knowledge, hands-on training, and exposure to real-world projects so that they can succeed in the field of embedded systems. Specialized programs, such as those offered by Technos COE, further enhance the learning experience by preparing students for the challenges of the modern tech industry.
0 notes
Text
[ad_1] Students at Oakridge International School Bengaluru are making a strong impact through challenging CAS projects. Here's a list of projects by the IBDP learners that raise awareness and bring solutions to real world problems:VRScience: Sarthak GroverThrough the Google Cardboard API and the Unity Game Engine, VRScience has been made an affordable product, giving widespread access to VR, an often-pricey feature. The application displays 3D models of various scientific topics (e.g. Plant Cell, Human Skeleton, etc.) that are tailored to the school curriculum. Sarthak is invited to the "Guru Awards 2024, 18th Education Conference" hosted by the "Brain World" group to present his product pitch to principals, school directors and educators from all over India.Members of Project ActivateFinanceForAll: Vivaan ShethThe objective of FinanceForAll is to make financial education accessible to children and youth from marginalized and less privileged sectors. Oakridge students have reached over 1200 children from government schools and colleges and conducted over 30 sessions. They developed a curriculum for financial literacy and are now expanding to 3 states. The project also got recognition from UNICEF. Project OREO: Aanya, Advitiya, Pranav, Misha, Ranitha & SunidhiThis ongoing project focuses on sustainability and waste management solutions in school. The initiative includes cleanest classroom awards, reducing waste, and upcycling solutions.Activate: Shreyas, Advitiya, Anuragini, and DamianThe initiative focusses on building air-purifying sachets to improve air quality, which can be used in schools and communities. The students use charcoal and breathable cotton layer to trap airborne toxins. Over 60 sachets created will be donated and used in school buses.NEXGEN: Bhavya and SamudrikaThe recent NAE-UNICEF Summit inspired this project, NexGen, focusing on "Empowering adolescents and youth with the skills they need to thrive and take positive action". The students aim to work with underprivileged children in government schools around Bangalore, providing essential skills and enriching their educational experiences.Metanoia: Dongjun, Avani, Aanya and AnishkaThe initiative focuses on empowering children in a childrens home to learn in a fun and interactive way. The teaching focused on science, art and sports, and it was to give the children an opportunity to explore the subjects in a more interactive way that was not previously introduced to them by their schools. It was over a period of a month and a half.Suvriddhi OS: Raviish, Riya, Joviana, Nidhi, and TanviThe project involves creating Raspberry Pi computer systems for government PU college students. They raised funds during Self-awareness week to purchase parts for these systems. They mentored students from MYP 5 and DP1 to help assemble these. The computers were donated to a PU college where they not only went to set up the systems but also conducted an orientation class on coding as the college did not have a computer teacher.About Oakridge InternationalAs a Nord Anglia Education School, Oakridge International School, Bengaluru is part of the world's leading premium school organisations. It is an IB continuum school that is committed to providing quality education and holistic development opportunities to its students and their families. For more information, visit: www.oakridge.in/bengaluruFor admissions, write to [email protected] [ad_2] Source link
0 notes