#ReturnData
Explore tagged Tumblr posts
Visit Tumblr Blog
Explore Tumblr blogs with no restrictions, modern design and the best experience.
Last Seen Tumblr Blogs


Fun Fact
Premium Tumblr themes are available from anywhere between $9 to $49.
Text
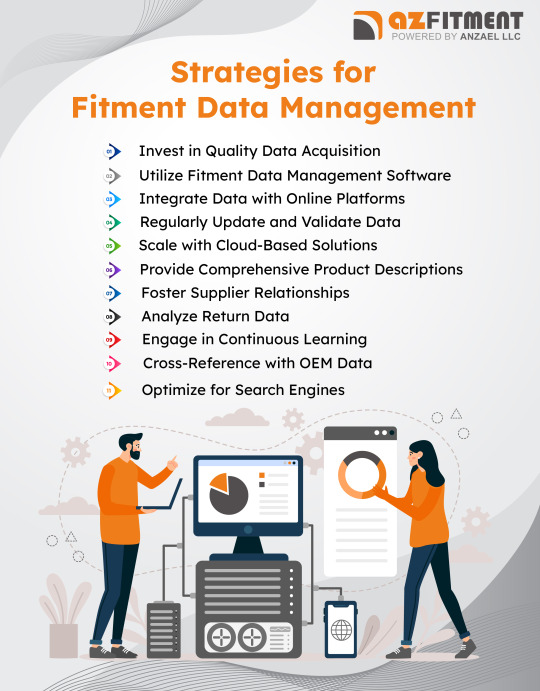
Strategies for Fitment Data Management :
💡 Invest in Quality Data Acquisition 🛠️ Use Fitment Data Management Software 🌐 Integrate with Online Platforms 🔄 Regularly Update & Validate Data ☁️ Scale with Cloud Solutions 📄 Provide Detailed Product Descriptions 🤝 Build Strong Supplier Relationships 📊 Analyze Return Data 📚 Embrace Continuous Learning 🔍 Cross-Reference with OEM Data 🚀 Optimize for Search Engines
#FitmentData#DataManagement#eCommerce#ProductManagement#TechSolutions#CloudSolutions#SupplierRelations#DataOptimization#ContinuousLearning#OEMData#SearchEngineOptimization#ReturnData
1 note
·
View note
Photo

The Return on Investment of Training: A Complete Guide
61% of training leaders aren’t measuring the return on investment of their training programs. We wanted to know why, and more importantly, how we could help.
Visit Here:- https://www.hqpubs.net/the-return-on-investment-of-training-a-complete-guide-2/
#roi #investmnet #training #program #returndata
0 notes
Text
Master Geolocation for Free with IP Geolocation API
Understanding where your users are, can mean the difference between making a sale, attracting a new member, getting a push on social media, building a solid user experience, or bombing completely.
Because where a person is, affects their schedule, their culture, their currency, their whole outlook on the world.
Sure, you might not be able to translate your entire site into their preferred language—who knows, maybe you can—but if they don’t speak the same language as you, you can at least acknowledge it. And okay, perhaps you can only accept payments in US dollars, but wouldn’t it be nice to let them know approximately how much you’re charging in Yen, or Dongs, or Euros. How about shipping costs, do you ship to Africa? And then there’s GDPR, wouldn’t it be great to be legally compliant in the EU without having to be compliant globally? You can even use an IP address’ longitude and latitude to identify the nearest real world store, if your company has more than one location.
You can do all of this and much much more with geolocation. Geolocation ties the web to the real world by taking an IP address, finding it in a huge database that identifies IP address locations, and then returning key details like country, currency, and continent.
The downside with geolocation is that it’s often expensive to implement, charging for the number of queries submitted to the database, making it beyond the budget of many small businesses.
The IP Geolocation API is different. Cutting down on the number of features, and the amount of data returned, means that you can get the same accurate location data, in a simple to use package, for free.
The Geolocation API returns data as a JSON object, and includes tons of information you can use to tailor your site.
Getting Started with IP Geolocation API
You can connect to the IP Geolocation API in any number of coding languages, the most common is JavaScript. However, because we want to customize the contents of the page, we don’t want to rely on a front-end technology. Instead we’re going to write the page before it gets to the user, with PHP.
The first thing you want to do is create a new file, name it “country.php” and save it to your dev environment, or open up your ftp client and upload it to a PHP enabled web space. Next we can edit the file’s code.
Open the PHP file:
<?php
Then we need to create a function to grab the location of the IP address we supply:
function grabIpInfo($ip) { }
Don’t worry if you’re not used to writing functions in PHP, all will become clear. (In simple terms, when we repeat that function’s name, passing an IP address to it, the code inside the brackets will run.)
Inside those brackets, we’re going to use PHP’s built-in cURL to get the data from the API:
$curl = curl_init();
This code initiates the cURL session. Next we need to set the options on the cURL session. The first is very important, it’s the URL to load, which will be http://bit.ly/2FgtJAa and on the end we have to append the actual IP address we want to look up (remember we’re passing this into the function, so we just need to use the $ip parameter):
curl_setopt($curl, CURLOPT_URL, "https://api.ipgeolocationapi.com/geolocate/" . $ip);
The next option tells cURL to return the data as a string, rather than just outputting it to the page:
curl_setopt($curl, CURLOPT_RETURNTRANSFER, TRUE);
Next we execute the cURL session, saving the data to a new variable that we can return from the function:
$returnData = curl_exec($curl);
Now we close the cURL session:
curl_close($curl);
Lastly we return the data from the function:
return $returnData;
Remember all of that code was inside the curly brackets of the function. Now, we can call the function as often as we like and access the data, from outside the function:
$ipInfo = grabIpInfo("91.213.103.0");
Our $ipInfo variable now has a ton of great data returned about that IP address. If you’d like to see it, you just output the variable using PHP’s echo:
echo $ipInfo;
Finally, don’t forget to close the PHP:
?>
Now you can run your file in a browser, you’ll see something like this:
{"continent":"Europe","address_format":"\n\n \n","alpha2":"DE","alpha3":"DEU","country_code":"49","international_prefix":"00","ioc":"GER","gec":"GM","name":"Germany","national_destination_code_lengths":[2,3,4,5],"national_number_lengths":[6,7,8,9,10,11],"national_prefix":"0","number":"276","region":"Europe","subregion":"Western Europe","world_region":"EMEA","un_locode":"DE","nationality":"German","eu_member":true,"eea_member":true,"vat_rates":{"standard":19,"reduced":[7],"super_reduced":null,"parking":null},"postal_code":true,"unofficial_names":["Germany","Deutschland","Allemagne","Alemania","ドイツ","Duitsland"],"languages_official":["de"],"languages_spoken":["de"],"geo":{"latitude":51.165691,"latitude_dec":"51.20246505737305","longitude":10.451526,"longitude_dec":"10.382203102111816","max_latitude":55.0815,"max_longitude":15.0418962,"min_latitude":47.2701115,"min_longitude":5.8663425,"bounds":{"northeast":{"lat":55.0815,"lng":15.0418962},"southwest":{"lat":47.2701115,"lng":5.8663425}}},"currency_code":"EUR","start_of_week":"monday"}
It’s incredible that we can grab all of that data so easily, but it’s not actually all that useful. We need to be able to pick out parts of that code.
Go back and delete the line of code that begins with “echo”, and replace it with the following:
$ipJsonInfo = json_decode($ipInfo);
That line converts the JSON string into an object we can access.
Next echo the part of the data you want to. In this case, the name property gives us the country name:
echo $ipJsonInfo->name;
Run your file again, and you’ll see the country name “Germany” in your browser.
That’s cool, but there’s one more thing we need to do before this code is really useful, and that’s find the IP address dynamically, so that we’re looking up the country name of whomever is accessing the page. IP Geolocation API will do that for you if you access it with JavaScript (you simply omit the IP address altogether). Unfortunately, we’re using PHP, but fortunately, PHP gives us a really simple way to access the current user’s IP address, $_SERVER[“REMOTE_ADDR”].
Replace the IP address in the function call with the dynamic version:
$ipInfo = grabIpInfo($_SERVER["REMOTE_ADDR"]);
When you now run the code you’ll get your own country output to the browser. (If you don’t see anything, you’re probably testing locally so you don’t have a detectable IP address, upload to your webspace to see the file working correctly.)
Here’s the full code:
<?php function grabIpInfo($ip) { $curl = curl_init(); curl_setopt($curl, CURLOPT_URL, "https://api.ipgeolocationapi.com/geolocate/" . $ip); curl_setopt($curl, CURLOPT_RETURNTRANSFER, TRUE); $returnData = curl_exec($curl); curl_close($curl); return $returnData; } $ipInfo = grabIpInfo($_SERVER["REMOTE_ADDR"]); $ipJsonInfo = json_decode($ipInfo); echo $ipJsonInfo->name; ?>
Simple Geolocation
As you can see, accessing geolocation data with the IP Geolocation API is incredibly fast and simple. And being able to access this kind of data for free is an incredible resource for any developer.
IP Geolocation API’s data is all run from the MaxMind database—one of the most trusted sources—which means you’re getting reliable, and accurate data, from a premium provider, at zero cost.
IP Geolocation API is the perfect place to start experimenting with geolocation. Once you get started, it will become an essential part of every user experience you design.
[– Featured image via DepositPhotos –]
[– This is a sponsored post on behalf of IP Geolocation API –]
Add Realistic Chalk and Sketch Lettering Effects with Sketch’it – only $5!
Source from Webdesigner Depot http://bit.ly/2KX6nmY from Blogger http://bit.ly/2IUxqwo
0 notes
Text
How to Create a Slack Bot without using PoshBot.
If you run Windows 7 or Windows Server 2008 in your environment, PoshBot is not something you can use. This is a chat bot which connects to Slack’s API and retrieves the latest messages.
#Declare object of the Channel $MyBot = [PSCustomObject]@{ LastMessage = [decimal] 0 Channel = ‘A212’ #This needs to be set Token = 'token-1’ #This needs to be set Count = '10’ TempTimestamp = [decimal] 0 MyUserName = [string] “MyBot” MessageChannel = 'W11’ Trigger = ’@’ }
#Creates an array which contains the different channels you have. You can copy $MyBot for each channel.
$BotConfig = @() $BotConfig += $MyBot
#This is a bad name for this method, however, it gets the latest message’s timestamp.
Function GetTimeStamps ($COnfigData,$messages) { foreach ($item in $messages.messages) { if ($item.ts -gt $configdata.lastmessage) { if ($item.ts -gt $configdata.temptimestamp) { $configdata.temptimestamp = $item.ts } } } return $configdata }
Function GetMessage ($info) { $url = “https://slack.com/api/groups.history?token=” + $info.token + “&channel=” + $info.channel + “&pretty=1count=10” $data = Invoke-WebRequest $url -SessionVariable temp #Convert the data to an object $returnData = $data.Content | convertfrom-json return $returnData
} function NewActionMessage { [CmdletBinding()] param( [Parameter(Mandatory=$true)] [PSCustomObject]$Object, [Parameter(Mandatory=$true)] [PSCustomObject]$Message )
if ($object.trigger -like $message.message.substring(0,1) -and $message.message.substring(1) -like “help*”) { SendMessage -token $Object.Token -channel $Object.MessageChannel -opt_username $Object.MyUserName -messagecontent “Welcome to help” }
}
#This loop will run forever. do { #Loop through all your channels declared earlier. foreach ($Config in $BotConfig) { #Get all messages for the channel. $apimessages = GetMessage($Config) #Store the timestamp for the newest message $c = GetTimeStamps $Config $apimessages $Config.TempTimestamp = $c.TempTimestamp #if the latest message is not set, set it to the last message, therefore nothing will happen on start-up. if ($Config.LastMessage -lt 0.01) { $Config.LastMessage = $c.TempTimestamp } #Loop through all messages foreach ($i in $apimessages.messages) { $text = $I.text $user = $i.user $ts = $i.ts #If the timestamp of the messages pulled from the Slack API are newer than the last message the Bot saw when it last ran if ($ts -gt $Config.LastMessage -and $user -notlike $Config.MyUserName -and $user -ne $null -and $user -ne “”) { #Create an object with the message, user. $TempObject = [PSCustomObject]@{ Message = $text User = $user } $r = NewActionMessage -Object $Config -Message $TempObject } } #Set the newest message from this API call to the last message received. $Config.LastMessage = $c.TempTimestamp Start-Sleep 30 }
} while ($true)
The limitations of this chat bot are that on first run it will not do anything.
@Help is the only command which works
This chat bot calls makes many calls and needs to be created as a scheduled task.
0 notes
Text
Reply To: Experimental – Offline Excel Portfolio Builder
FYI: A friend of mine looked at the offline Excel Portfolio Builder spreadsheet in a lot of detail and he found a small error in the calculation for CAGR. The error is due to how the time difference from End to Start is calculated. A Named range called “DatesDuration” is used to calculate the time difference. The spreadsheet uses a fixed amount of time to count the number of rows of data, which gives trading days, but the formula needs to use calendar days. Currently the spreadsheet is adjusting the time by adding 5 * 100, there are approximately 100 days/year that are non trading, and this adds 5 years of this. But since there are more than 5 years of historical data, it causes CAGR to be overstated. One should use the difference between the start and end date, and let it change every time the data is updated. Here’s a fix for the calculation: Unhide the sheet named “Control” Unprotect it In cell B4 you will see the name “DatesDuration” . Need to change C4. In cell C4, put in the following formula. =MAX(ReturnData!A:A)- (MIN(ReturnData!A:A)-1) https://goo.gl/JQetX5 #Investing #Trading
0 notes
Text
Adding UWP features to your existing PC software
With last summer’s release of the Windows 10 Anniversary Update and the announcement of the Windows Store supporting apps built with the Desktop Bridge technology, we want to share more details and sample code on how to further enhance and extend your PC software on Windows 10. In addition to Windows Store distribution and modern deployment technology, the Desktop Bridge enables you to use exciting Universal Windows Platform (UWP) features and capabilities that were previously unavailable to existing PC software. In this blog post, we will share four examples of adding such features, with full source code available on GitHub. The corresponding apps are also available in the Windows Store, so you can start exploring them on Windows 10 PCs without a development environment. We have picked a different desktop application technology for each of the samples to further emphasize that the Desktop Bridge is applicable to all PC software. The samples are calling into Windows 10 UWP APIs using the techniques that we explained in another blog post last week.
Adding a UWP XAML user experience
In our first example, we are extending a Visual Basic 6 application to use the UWP XAML Map control to visualize the location information of a database application. The sample also uses UWP APIs to pop up toast notifications.
Links to source code and app download:
Windows Store app linked here; GitHub code linked here
AppxManifest.xml
To understand how the UWP and Desktop Bridge tooling enables this scenario, let’s look at the relevant lines in the AppxManifest.xml file for the solution. The entry point here is the VB6 application that we have converted using the Desktop Bridge. Now we can add a UWP component (implemented in MapUI.exe) to the package, which provides the XAML UI. To facilitate the activation of the modern component from the existing application, we define a protocol extension in the manifest. Furthermore, note that we need to declare two capabilities: (a) ‘runFullTrust’ to keep the VB6 code running at the same level of trust as before the Desktop Bridge conversion and (b) ‘internetClient’ for the Map control to download map data from the internet.
<Applications> <Application Id="VB6App" Executable="VB6App.exe" EntryPoint="Windows.FullTrustApplication"> <uap:VisualElements ... /> <Extensions> <uap:Extension Category="windows.protocol" Executable="MapUI.exe" EntryPoint=" MapUI.App"> <uap:Protocol Name="desktopbridgemapsample" /> </uap:Extension> </Extensions> </Application> </Applications> <Capabilities> <rescap:Capability Name="runFullTrust" /> <Capability Name="internetClient" /> </Capabilities>
Code Snippets
To protocol-activate the UWP view from the VB6 application, we invoke the LaunchUriAsync UWP API by wrapping it into a VB6-callable interop function (‘LaunchMap’) and pass in the latitude and longitude as parameters:
Private Declare Function LaunchMap Lib "UWPWrappers.dll" _ (ByVal lat As Double, ByVal lon As Double) As Boolean Private Sub EiffelTower_Click() LaunchMap 48.858222, 2.2945 End Sub
And this is the underlying C++ code for the LaunchMap() API in UWPWrappers.dll, which is wrapping the calls into the actual LaunchUriAsync UWP API:
DllExport bool __stdcall LaunchMap(double lat, double lon) { try { // // format the URI to match the defined protocol: // http://desktopbridgemapsamplelocation?lat={latitude}&?lon={longitude} // String ^str = ref new String(L"http://desktopbridgemapsample"); Uri ^uri = ref new Uri( str + L"location?lat=" + lat.ToString() + L"&?lon=" + lon.ToString()); // now launch the UWP component Launcher::LaunchUriAsync(uri); } catch (Exception^ ex) { return false; } return true; }
This now triggers the OnActivated event in the UWP component. The component is written in C++, but could done in any programming language that supports the UWP. Here we check if we got activated for the right protocol. If so, we will perform the actual activation and load the map page passing on the value set that includes the latitude and longitude information.
void App::OnActivated(Windows::ApplicationModel::Activation::IActivatedEventArgs^ e) { if (e->Kind == ActivationKind::Protocol) { ProtocolActivatedEventArgs^ protocolArgs = (ProtocolActivatedEventArgs^)e; Uri ^uri = protocolArgs->Uri; if (uri->SchemeName == "desktopbridgemapsample") { Frame ^rootFrame = ref new Frame(); Window::Current->Content = rootFrame; rootFrame->Navigate(TypeName(MainPage::typeid), uri->Query); Window::Current->Activate(); } } }
Additional remarks
In the UWPWrappers.dll you will also find another UWP API wrapper function (CreateToast) which is used for firing off toast notifications from the VB6 app.
Note that in many scenarios, you will need the main app and the added UWP component to communicate with each other back and forth. This sample doesn’t demonstrate the communication workflow, but you can refer to this sample on GitHub that shows how an AppServiceConnection can be used for two-way communication between two components within an app package.
Exposing an UWP App Service
In the second example, we are extending a WinForms data application that exposes an App Service to provide other apps controlled access to its database, even if the WinForms app is not running.
Links to source code and app download:
Windows Store app linked here; GitHub code linked here
AppxManifest.xml
The entry point here is the Windows Forms application, that we have packaged using the Desktop Bridge. Now we can add a UWP component (implemented in a Windows Runtime component called ‘MyAppService.dll’) to the package, which provides the App Service implementation. This component gets activated out-of-proc to the main application process, so we also need to declare a package-level extension to explain to the system how the class will get activated.
<Applications> <Application Id="WinformWithAppService" Executable="WinformWithAppService.exe" EntryPoint="Windows.FullTrustApplication"> <uap:VisualElements ...> <Extensions> <uap:Extension Category="windows.appService" EntryPoint="MyAppService.AppServiceTask"> <uap:AppService Name="com.microsoft.samples.winforms" /> </uap:Extension> </Extensions> </Application> <Applications> <Capabilities> <rescap:Capability Name="runFullTrust" /> </Capabilities> <Extensions> <Extension Category="windows.activatableClass.inProcessServer"> <InProcessServer> <Path>MyAppService.dll</Path> <ActivatableClass ActivatableClassId="MyAppService.AppServiceTask" ThreadingModel="both" /> </InProcessServer> </Extension> </Extensions>
Code Snippet
In the App Service implementation, we will want to validate and handle requests from other applications that request access to our database:
public sealed class AppServiceTask : IBackgroundTask { private BackgroundTaskDeferral backgroundTaskDeferral; public void Run(IBackgroundTaskInstance taskInstance) { this.backgroundTaskDeferral = taskInstance.GetDeferral(); taskInstance.Canceled += OnTaskCanceled; var details = taskInstance.TriggerDetails as AppServiceTriggerDetails; details.AppServiceConnection.RequestReceived += OnRequestReceived; } private async void OnRequestReceived(AppServiceConnection sender, AppServiceRequestReceivedEventArgs args) { var messageDeferral = args.GetDeferral(); ValueSet message = args.Request.Message; string id = message["ID"] as string; ValueSet returnData = DataBase.GetData(id); await args.Request.SendResponseAsync(returnData); messageDeferral.Complete(); } private void OnTaskCanceled(IBackgroundTaskInstance sender, BackgroundTaskCancellationReason reason) { if (this.backgroundTaskDeferral != null) { this.backgroundTaskDeferral.Complete(); } } }
And here is example code for a client application that consumes the App Service:
private async void button_Click(object sender, RoutedEventArgs e) { AppServiceConnection dataService = new AppServiceConnection(); dataService.AppServiceName = "com.microsoft.samples.winforms"; dataService.PackageFamilyName = "Microsoft.SDKSamples.WinformWithAppService"; var status = await dataService.OpenAsync(); if (status == AppServiceConnectionStatus.Success) { string id = int.Parse(textBox.Text); var message = new ValueSet(); message.Add("ID", id); AppServiceResponse response = await dataService.SendMessageAsync(message); string result = ""; if (response.Status == AppServiceResponseStatus.Success) { if (response.Message["Status"] as string == "OK") { DisplayResult(response.Message["Result"]); } } } }
Making your PC software a share target
In this example, we are extending a WPF picture viewer to become a share target. This way users can easily share pictures from Microsoft Edge, the Photos app and other applications with our application. Sharing pictures is just one of many scenarios that can be enabled by making your app a sharing target. Several other data formats are supported as well. See the Windows Dev Center documentation page for a complete list and more details.
Links to source code and app download:
Windows Store app linked here; GitHub code linked here
AppxManifest.xml
The structure of our manifest looks very similar to the XAML example earlier in this post. In fact, our sharing UI is also XAML. The only difference here is that we are declaring the ‘windows.shareTarget’ extension instead of protocol activation, to let the system know we want to activate if the user is sharing the specified data type and selects our app as the sharing target.
<Applications> <Application Id="PhotoStore" Executable="Win32PhotoStore.exe" EntryPoint="Windows.FullTrustApplication"> <uap:VisualElements ... /> <Extensions> <uap:Extension Category="windows.shareTarget" Executable="ShareTarget.exe" EntryPoint="ShareTarget.App"> <uap:ShareTarget> <uap:SupportedFileTypes> <uap:SupportsAnyFileType /> </uap:SupportedFileTypes> <uap:DataFormat>Bitmap</uap:DataFormat> </uap:ShareTarget> </uap:Extension> </Extensions> </Application> </Applications> <Capabilities> <rescap:Capability Name="runFullTrust" /> </Capabilities>
Code Snippet
When the user selects our application as the sharing target, the OnNavigatedTo event fires in the UWP component and we get access to the shared data. Now we can, for example, save it in our local app storage or process it in other ways that are appropriate for the given app context.
protected override async void OnNavigatedTo(NavigationEventArgs e) { this.shareOperation = (ShareOperation)e.Parameter; if (this.shareOperation.Data.Contains(StandardDataFormats.StorageItems)) { this.sharedStorageItems = await this.shareOperation.Data.GetStorageItemsAsync(); foreach (StorageFile item in this.sharedStorageItems) { ProcessSharedFile(item); } } }
Adding a UWP background task
In this example, we are extending an MFC application to receive raw push notifications from a server application, regardless whether the client software is running or not. If the application is running, it will receive the notification event and process the payload within the application process. If the application is not running, a background task will be triggered to handle the payload, for example to save to disk, notify the user with a toast notification, update the Live Tile, etc.
Links to source code and app download:
Windows Store app linked here; GitHub code linked here
AppxManifest.xml
The structure of the manifest should look mostly familiar by now. In addition to the main MFC application, we are declaring a background task type “pushNotification”. One special thing to note here is that because the background task is implemented using managed code, we need to declare ‘CLRHost.dll’ as the inProcessServer, as we will need this platform component to handle the activation for us here.
<Applications> <Application Id="MFCSampleIDE" Executable="MFCSampleIDE.exe" EntryPoint="Windows.FullTrustApplication"> <uap:VisualElements ...> <Extensions> <Extension Category="windows.backgroundTasks" EntryPoint="BackgroundTasks.PushNotificationTask"> <BackgroundTasks> <Task Type="pushNotification" /> </BackgroundTasks> </Extension> </Extensions> </Application> </Applications> <Capabilities> <Capability Name="internetClient" /> <rescap:Capability Name="runFullTrust" /> </Capabilities> <Extensions> <Extension Category="windows.activatableClass.inProcessServer"> <InProcessServer> <Path>PushNotificationBackgroundTask.dll</Path> <ActivatableClass ActivatableClassId="PushNotificationBackgroundTask.MyTask" ThreadingModel="both" /> </InProcessServer> </Extension> </Extensions>
Code Snippet
With the following code, we are subscribing to get notified via an event (in-proc) and background task (out-of-proc) whenever the server application sends a raw push notification to our application instance.
// Hook up push notification foreground event task<PushNotificationChannel^>( PushNotificationChannelManager::CreatePushNotificationChannelForApplicationAsync()) .then([](PushNotificationChannel ^channel) { channel->PushNotificationReceived += ref new TypedEventHandler<PushNotificationChannel^, PushNotificationReceivedEventArgs ^> (&OnPushNotificationReceived); }); // Register push notification background trigger BackgroundTaskBuilder ^builder = ref new BackgroundTaskBuilder(); builder->Name = "pushTask"; builder->TaskEntryPoint = "PushNotificationBackgroundTask.MyTask"; builder->SetTrigger(ref new PushNotificationTrigger()); builder->Register();
Additional remark
Note how this last sample keeps the legacy code separate from the Windows 10 enhancements, which are all implemented in UWPFeatures.dll. This DLL is being loaded dynamically when running on Windows 10 to light up those features. On earlier versions of the operation system, such as Windows 7, the same application EXE can still be deployed as before as all enhancements are cleanly separated from the existing code base.
Conclusion
With UWP and Windows 10, applications can take advantage of several exciting new features to increase their user engagement. With the Desktop Bridge platform and tooling enhancements, existing PC software can now be part of the UWP ecosystem and take advantage of the same set of new platform features and operating system capabilities.
For more information on the Desktop Bridge, please visit the Windows Dev Center.
Ready to submit your app to the Windows Store? Let us know!
from DIYS http://ift.tt/2jX84Ad
0 notes
Text
Reply To: Experimental – Offline Excel Portfolio Builder
ICYMI: A friend of mine looked at the offline Excel Portfolio Builder spreadsheet in a lot of detail and he found a small error in the calculation for CAGR. The error is due to how the time difference from End to Start is calculated. A Named range called “DatesDuration” is used to calculate the time difference. The spreadsheet uses a fixed amount of time to count the number of rows of data, which gives trading days, but the formula needs to use calendar days. Currently the spreadsheet is adjusting the time by adding 5 * 100, there are approximately 100 days/year that are non trading, and this adds 5 years of this. But since there are more than 5 years of historical data, it causes CAGR to be overstated. One should use the difference between the start and end date, and let it change every time the data is updated. Here’s a fix for the calculation: Unhide the sheet named “Control” Unprotect it In cell B4 you will see the name “DatesDuration” . Need to change C4. In cell C4, put in the following formula. =MAX(ReturnData!A:A)- (MIN(ReturnData!A:A)-1) https://goo.gl/kG7yfc #Investing #Trading
0 notes
Text
Reply To: Experimental – Offline Excel Portfolio Builder
A friend of mine looked at the offline Excel Portfolio Builder spreadsheet in a lot of detail and he found a small error in the calculation for CAGR. The error is due to how the time difference from End to Start is calculated. A Named range called “DatesDuration” is used to calculate the time difference. The spreadsheet uses a fixed amount of time to count the number of rows of data, which gives trading days, but the formula needs to use calendar days. Currently the spreadsheet is adjusting the time by adding 5 * 100, there are approximately 100 days/year that are non trading, and this adds 5 years of this. But since there are more than 5 years of historical data, it causes CAGR to be overstated. One should use the difference between the start and end date, and let it change every time the data is updated. Here’s a fix for the calculation: Unhide the sheet named “Control” Unprotect it In cell B4 you will see the name “DatesDuration” . Need to change C4. In cell C4, put in the following formula. =MAX(ReturnData!A:A)- (MIN(ReturnData!A:A)-1) https://goo.gl/QQKc1D #Investing #Trading
0 notes