#SafetyProtection
Explore tagged Tumblr posts
Visit Tumblr Blog
Explore Tumblr blogs with no restrictions, modern design and the best experience.
Last Seen Tumblr Blogs


Fun Fact
Tumblr Inc. is funded by 13 investors.
Text

♦️ 【ONCCY Installation Case】
⚡ ONCCY MCCB Photovoltaic DC Molded Case Circuit Breaker is engineered for photovoltaic (PV) energy storage systems, delivering dual overload and short-circuit protection to ensure efficient and stable operation of battery systems and PV modules.
⚡ Its UV-resistant polycarbonate enclosure with IP66 protection withstands harsh outdoor conditions.
⚡ Rated for 500VDC and 250A maximum current, it features high breaking capacity, reliable insulation, and supports frequent operations and electrical isolation. The optimized arc-extinguishing system rapidly interrupts fault currents, protecting equipment and personnel.
⚡ A modular design streamlines maintenance, boosting operational reliability and energy efficiency in PV DC systems.
🌐 Official Website: www.onccy.com
📧 Engineer Support: [email protected]
📱 WhatsApp: +86 17301617015
#SolarEnergy#DCCircuitBreaker#EnergyStorage#PVSystem#OverloadProtection#ShortCircuitProtection#IP66#UVResistant#HighVoltageDC#ModularDesign#SafetyProtection#RenewableEnergy
0 notes
Text
50% OFF: Self Cleaning Litter Box for Cats 2 Pack Cat Litter, Nafcefi Automatic Cat Litter Box Self Cleaning Extra Large, Robot Litter Box Self Cleaning App Control/Odor Removal/Safety Protection Litter Box
https://amzn.to/4f8UgOi

#SelfCleaningLitterBox#AutomaticLitterBox#CatLitterBox#Nafcefi#RobotLitterBox#ExtraLargeLitterBox#AppControlledLitterBox#OdorControl#CatCare#PetTech#LitterBoxForCats#CatLovers#SmartLitterBox#SafetyProtection#PetProducts
0 notes
Text
Jump-Start Your Car: The Complete Guide to Using Jumper Cables Safely
https://autorepairlebanontn.com/?p=4029 Jump-Start Your Car: The Complete Guide to Using Jumper Cables Safely Ever found yourself stranded with a dead battery? We’ve all been there, and it’s never convenient. That’s why knowing how to use jumper cables properly isn’t just useful—it’s essential for any driver. With jumper cables and a willing helper, you can get back on the road in minutes rather than waiting hours for professional assistance. But using them incorrectly can damage your vehicle’s electrical system or even cause serious safety hazards. We’ll guide you through the proper technique to jump-start your car safely and effectively. In this comprehensive guide, we’ll cover everything from identifying your battery terminals to the step-by-step process of connecting cables in the correct order. Let’s turn that frustrating situation into a quick fix you can handle confidently anytime, anywhere. Table of Contents Toggle What Are Jumper Cables and Why You Need ThemSafety Precautions Before Jump-Starting a CarGeneral SafetyProtective Gear and PositioningBattery Safety ConcernsStep-by-Step Guide to Jump-Starting a CarPreparing Both VehiclesConnecting the Jumper Cables in the Correct OrderStarting the Dead BatteryRemoving the Jumper Cables SafelyCommon Mistakes to Avoid When Using Jumper CablesConnecting Cables in the Wrong OrderLetting Cable Clamps Touch Each OtherIgnoring Battery ConditionPositioning Cables Near Moving PartsDisconnecting Cables in the Wrong OrderChoosing the Right Jumper Cables for Your VehicleCable Gauge and LengthClamp Quality and FeaturesMaintaining Your Jumper Cables for LongevityChoose the Right CablesStore ProperlyInspect RegularlyFollow InstructionsAlternatives to Traditional Jumper CablesPortable Jump Starters (Battery Packs)Jump Starters with Air CompressorsSolar-Powered Jump StartersProfessional Roadside AssistanceConclusionFrequently Asked QuestionsWhat are jumper cables and why do I need them?How do I identify the positive and negative terminals on a car battery?What’s the correct order for connecting jumper cables?How long should I wait after connecting jumper cables before starting the dead car?Can I damage my car’s electronics when jump-starting?What safety precautions should I take when jump-starting a car?What should I do if my car won’t start even after a jump-start?Are portable jump starters better than traditional jumper cables?How do I properly maintain my jumper cables?Can I jump-start a car in the rain? What Are Jumper Cables and Why You Need Them Jumper cables are heavy-duty insulated electrical cables with alligator clips on each end that connect the batteries of two vehicles to transfer power from a working battery to a dead one. These essential automotive tools typically range from 10-20 feet in length and are made with copper wire wrapped in insulating rubber or plastic. Quality jumper cables feature color-coded clamps (red for positive and black for negative) and thick gauges (4-6 gauge for most passenger vehicles) to handle the electrical current safely. Every driver should keep jumper cables in their vehicle as part of a basic emergency kit. Battery failures occur unexpectedly due to various factors including cold weather, leaving lights on, or simply an aging battery reaching the end of its lifespan. Having jumper cables readily available eliminates waiting hours for roadside assistance or paying $50-$100 for a service call. During winter months, when battery failures are 40% more common, these cables become particularly valuable. Cars with dead batteries display several telltale signs: the engine won’t start, dashboard lights may be dim or non-existent, and you’ll often hear a clicking sound when turning the key. The immediate availability of jumper cables transforms this stressful situation into a manageable 10-minute fix. Many drivers have found themselves stranded in parking lots, at work, or even at home with a car that won’t start—situations where jumper cables provide immediate relief rather than prolonged inconvenience. Safety Precautions Before Jump-Starting a Car Jump-starting a car requires careful attention to safety protocols. Following these precautions helps prevent electrical damage, battery explosions, and personal injury when using jumper cables. General Safety Always ensure both vehicles are turned off and in park or neutral gear before beginning the jump-start process. Position the vehicles close to each other without allowing them to touch, leaving just enough space for the jumper cables to reach between batteries. Keep the red and black clamps separated when not connected to prevent short circuits that can create dangerous sparks and potentially damage the electrical systems of both cars. Protective Gear and Positioning Wearing appropriate protective equipment increases your safety during jump-starting operations. Put on insulated gloves and safety glasses to shield yourself from potential electrical shocks, battery acid, or unexpected sparks that may occur during the connection process. Stand in a stable position away from moving engine components like fans and belts that could cause injury if the vehicle suddenly starts. Your body positioning matters—never lean directly over the battery when making connections as batteries can emit hydrogen gas that’s flammable when exposed to sparks. Battery Safety Concerns Inspect the battery thoroughly before attempting a jump-start to avoid dangerous situations. Don’t proceed if you notice a cracked case, leaking fluid, or any visible damage to the battery, as these conditions significantly increase the risk of explosion or further damage. Check for corrosion around the terminals, which appears as a white or greenish powder, and ensure the battery isn’t frozen, particularly in cold weather conditions. Batteries contain sulfuric acid that can cause severe burns, so avoid touching your face or eyes after handling battery components without washing your hands first. Step-by-Step Guide to Jump-Starting a Car Jump-starting a car with a dead battery requires following exact steps in the correct order to ensure safety and effectiveness. This guide breaks down the process into four simple stages that anyone can follow when faced with a battery emergency. Preparing Both Vehicles Position the working vehicle close enough to the dead car so the jumper cables can reach between both batteries. Both cars should be parked with their engines off, all lights turned off, and accessories unplugged. Make sure the vehicles aren’t touching each other as this creates a safety hazard. Raise the hoods on both cars to access the batteries and identify them clearly before proceeding with any connections. Connecting the Jumper Cables in the Correct Order The connection sequence matters significantly for safety when using jumper cables. Start by attaching the red (positive) clamp to the positive terminal (+) of the dead battery, which is typically marked with a plus sign and connected to a red wire. Next, connect the other end of the red clamp to the positive terminal on the working battery. Attach one black (negative) clamp to the negative terminal (-) of the working battery. Finally, connect the remaining black clamp to an unpainted metal surface on the engine block of the car with the dead battery, away from the battery itself to prevent potential sparks near battery gases. Starting the Dead Battery Turn on the engine of the working vehicle and let it run for 1-2 minutes to deliver initial charge to the dead battery. This waiting period helps ensure sufficient power transfers between vehicles. Attempt to start the car with the dead battery after this brief charging period. If the engine doesn’t start on the first try, allow the working car to run for a few additional minutes before making another attempt. Most vehicles will start after this additional charging time if the battery is merely discharged rather than damaged. Removing the Jumper Cables Safely Disconnect the jumper cables in precisely the reverse order of installation once both engines are running. Remove the black (negative) clamp from the unpainted metal surface on the previously dead car first. Take off the black clamp from the negative terminal of the working battery next. Disconnect the red (positive) clamp from the positive terminal of the good battery third. Remove the final red clamp from the previously dead battery last. Let both vehicles continue running for several minutes after successful jump-starting to allow the recharged battery to build up adequate power through its alternator. Common Mistakes to Avoid When Using Jumper Cables Even with proper instructions, many drivers make critical errors when jump-starting vehicles. These mistakes can damage your car’s electrical system or create dangerous situations. Let’s examine the most common pitfalls to avoid during this emergency procedure. Connecting Cables in the Wrong Order The connection sequence matters significantly when jump-starting a vehicle. Always attach the red (positive) cables first, connecting to both batteries’ positive terminals. Next, connect the black (negative) cable to the working battery’s negative terminal. Finally, attach the remaining black clamp to an unpainted metal surface on the dead car’s engine block—not directly to its negative terminal. Reversing this order creates dangerous electrical arcs that can damage sensitive electronic components. Letting Cable Clamps Touch Each Other Jumper cables carry substantial electrical current, making contact between the metal clamps potentially hazardous. Keep the clamps separated while connecting them to prevent short circuits that could damage both vehicles’ electrical systems or create sparks near potentially explosive battery gases. Handle one clamp at a time and ensure they don’t touch each other or any metal surfaces except their designated connection points. Ignoring Battery Condition Attempting to jump-start a visibly damaged battery is extremely dangerous. Never use jumper cables on batteries that are cracked, leaking fluid, or show signs of physical damage. These compromised batteries can rupture or explode when electrical current flows through them. Always inspect both batteries thoroughly before proceeding with a jump-start to prevent serious injuries and additional vehicle damage. Positioning Cables Near Moving Parts Engine compartments contain many moving components like fans and belts that can catch loose cables. Position your jumper cables carefully to keep them away from all moving parts, particularly engine fans which may activate automatically during the jump-starting process. Trapped cables can damage expensive engine components or cause personal injury when they become entangled with rotating parts. Disconnecting Cables in the Wrong Order The disconnection process requires the same attention as the connection procedure. Remove jumper cables in the exact reverse order of how you connected them: first the negative clamp from the ground connection on the dead car, then the negative clamp from the donor battery, followed by the positive connections. Improper disconnection sequence can create voltage spikes that damage vehicle electronics or cause sparks near battery gases. Choosing the Right Jumper Cables for Your Vehicle Selecting appropriate jumper cables is essential for effective and safe jump-starting. Quality jumper cables make a important difference in performance and safety, with even basic cables being better than none at all. Cable Gauge and Length Cable gauge directly impacts the effectiveness of your jumper cables. Lower gauge numbers indicate thicker cables that deliver more power efficiently – experts recommend using 4 to 6 gauge cables for optimal performance. These thicker cables handle the high electrical current needed to start a vehicle without overheating or creating resistance. The ideal length for jumper cables is at least 20 feet (6 meters). This extended reach ensures you’ll have enough cable to connect batteries between two vehicles that can’t be positioned directly next to each other. Shorter cables might limit your options during an emergency, forcing awkward or unsafe vehicle positioning. Clamp Quality and Features Heavy, durable clamps are crucial components of reliable jumper cables. Spring-loaded clamps provide the necessary tension to create a secure connection with battery terminals, preventing accidental disconnection during the jump-starting process. This secure grip ensures consistent power transfer between vehicles. Color-coded clamps eliminate confusion during stressful situations. Red clamps should always indicate positive (+) terminals while black clamps designate negative (-) terminals. These clear markings help prevent potentially dangerous incorrect connections that could damage vehicle electronics or cause sparks. Look for cables with thick insulation around the clamps and wires to provide additional protection against short circuits. Maintaining Your Jumper Cables for Longevity Proper maintenance of your jumper cables ensures they’ll be ready when you need them most. Taking care of these essential tools requires minimal effort but provides important benefits in terms of reliability and safety. Choose the Right Cables Heavy-duty jumper cables withstand frequent use and harsh conditions better than lighter alternatives. We recommend selecting cables that are 4 to 6 gauge and at least 20 feet long for optimal performance and durability. Thicker cables allow for better current flow while minimizing resistance, and robust clamps create secure connections that won’t slip during use. Store Properly Correct storage extends the lifespan of your jumper cables significantly. Keep your cables in a dry, cool place away from direct sunlight and moisture to prevent corrosion and damage to the insulation. Many drivers store their cables in a dedicated bag or container in the trunk, protecting them from exposure to automotive fluids or mechanical damage. Inspect Regularly Monthly cable inspections help identify potential problems before they become serious issues. Check for signs of wear such as frayed wires, loose connections, or corrosion on the clamps during your routine vehicle maintenance. Cables with damaged insulation or corroded clamps should be replaced immediately, as they present both safety hazards and reliability concerns. Follow Instructions Manufacturer guidelines provide exact information relevant to your particular set of jumper cables. Always refer to the instruction card or label included with your cables to ensure you’re connecting them correctly each time. These instructions often contain model-exact safety precautions that help prevent damage to vehicle electrical systems during jump-starting procedures. Alternatives to Traditional Jumper Cables Traditional jumper cables aren’t the only solution when your battery dies. Several modern alternatives offer convenience and additional features that might better suit your needs. Portable Jump Starters (Battery Packs) Portable jump starters eliminate the need for a second vehicle during emergencies. These compact devices contain built-in batteries powerful enough to start a car independently. Most models come with integrated jumper clamps that connect directly to your battery terminals. The versatility of these units extends beyond jump-starting—they often include USB ports to charge phones, tablets, and laptops during roadside emergencies. Jump Starters with Air Compressors Combination units featuring both jump-starting capability and air compressors provide dual functionality in emergencies. These all-in-one devices can revive a dead battery and inflate tires with low pressure. Their versatility makes them excellent additions to any vehicle emergency kit, addressing multiple roadside problems with a single tool. Solar-Powered Jump Starters Solar-powered jump starters offer a sustainable solution for outdoor enthusiasts and those traveling in remote areas. These innovative devices harness solar energy through integrated panels to charge their internal batteries. Off-grid travelers appreciate the independence these units provide when traditional power sources aren’t available, making them ideal for camping trips and extended journeys away from civilization. Professional Roadside Assistance Services like AAA provide expert help for drivers uncomfortable using jumper cables or jump starters. Professional technicians arrive equipped with specialized equipment to safely jump-start your vehicle. This option proves particularly valuable during extreme weather conditions or when dealing with modern vehicles that have sensitive electronic systems requiring specialized knowledge. Conclusion Mastering the use of jumper cables is an essential skill for every driver. By following the proper steps and safety precautions we’ve outlined you’ll be prepared to handle dead battery situations with confidence. Remember that quality cables paired with correct technique make all the difference between a quick fix and potential damage. Whether you stick with traditional jumper cables or opt for modern alternatives like portable jump starters the key is being prepared. Keep your chosen solution well-maintained and easily accessible in your vehicle. This simple preparation can save you time money and stress when you least expect it. With these skills under your belt you’ll never need to fear a dead battery again! Frequently Asked Questions What are jumper cables and why do I need them? Jumper cables are heavy-duty insulated wires with alligator clips that connect two vehicle batteries to transfer power. They’re essential for every driver because battery failures can happen unpredictably due to factors like cold weather or aging batteries. Having jumper cables in your emergency kit allows you to jump-start your car without waiting for professional help, potentially saving time and money when you encounter a dead battery situation. How do I identify the positive and negative terminals on a car battery? Battery terminals are clearly marked: the positive terminal has a “+” symbol and is usually red, while the negative terminal has a “-” symbol and is typically black. Many jumper cables are color-coded (red for positive, black for negative) to help you make the correct connections. Always verify the terminals before connecting jumper cables to prevent electrical system damage or safety hazards. What’s the correct order for connecting jumper cables? Connect in this exact order: 1) Red clamp to dead battery’s positive terminal, 2) Other red clamp to working battery’s positive terminal, 3) Black clamp to working battery’s negative terminal, 4) Other black clamp to an unpainted metal surface on the dead car’s engine block (not the negative terminal). This sequence prevents sparks near the battery where hydrogen gas might be present. How long should I wait after connecting jumper cables before starting the dead car? After connecting the cables correctly, run the working vehicle for about 2-5 minutes to provide initial charge to the dead battery. This allows enough power transfer for starting the dead vehicle. For severely discharged batteries, you might need to wait up to 5 minutes before attempting to start the dead car. Don’t rev the engine excessively during this charging period. Can I damage my car’s electronics when jump-starting? Yes, improper jump-starting can damage sensitive electronics. Risks include connecting cables in the wrong order, letting clamps touch each other, or creating power surges when disconnecting while engines are running. Modern vehicles with complex computer systems are particularly vulnerable. To protect your electronics, always follow the correct connection sequence and remove cables in the reverse order after both vehicles are turned off. What safety precautions should I take when jump-starting a car? Turn off both vehicles before connecting cables. Wear protective gear including insulated gloves and safety glasses to protect against electrical shocks and battery acid. Inspect batteries for cracks or leaks before proceeding. Ensure vehicles aren’t touching each other. Keep jumper cables away from moving engine parts. Never lean over the battery when making connections, as batteries can emit explosive hydrogen gas. What should I do if my car won’t start even after a jump-start? If your car doesn’t start after multiple jump-start attempts, your issue might be more than a dead battery. Check for corrosion on battery terminals and clean if necessary. Your battery might be too old and need replacement, or you could have problems with the alternator, starter motor, or fuel system. In this case, it’s best to call professional roadside assistance for diagnosis and service. Are portable jump starters better than traditional jumper cables? Portable jump starters offer significant advantages over traditional jumper cables: they don’t require a second vehicle, are compact and easy to store, and often include additional features like USB ports for charging devices or built-in flashlights. However, they require periodic recharging to maintain their power, while jumper cables are always ready to use as long as you have access to another vehicle. How do I properly maintain my jumper cables? Store jumper cables in a dry, cool place, preferably coiled in their original packaging or a storage bag. Inspect them regularly for cracks in the insulation, loose connections, or corrosion on the clamps. Clean any corrosion with a wire brush and baking soda solution. Replace cables that show signs of wear or damage. Quality cables can last for years with proper care and storage. Can I jump-start a car in the rain? Yes, you can jump-start a car in the rain, but extra caution is necessary. Stand on a dry surface if possible and wear insulated rubber gloves. Make sure the cable connections are secure and not in standing water. Be particularly careful not to touch the metal parts of the clamps when they’re connected to prevent electrical shock. The risk comes from water conducting electricity, not from damage to the battery or vehicle. https://autorepairlebanontn.com/?p=4029 Absolute Auto Repair
0 notes
Text
Permanent flame retardant polyester canvas fabric - the ultimate protection for tents and bags!
Whether you are an outdoor adventure enthusiast or a travel expert who needs durable bags, our permanent flame retardant polyester canvas fabric is your ideal choice!
Ultra-high flame retardancy:through strict safety tests, it will extinguish itself when it encounters fire to protect your safety.
Super durable :tear-resistant, wear-resistant, and not afraid of bad weather.
Lightweight and waterproof : safer to use outdoors and easier to carry bags.
Applicable to: camping tents, mountaineering bags, travel bags, military equipment, etc. Safe and reliable, full performance!
#Flameretardantfabric #Outdoorequipment #Tentmaterial #Luggagefabric #Permanentflameretardant #Polyestercanvas #Safetyprotection #Outdooradventure #Travelessential #Durablematerial #Fireprooffabric #Campingequipment #Industrialfabric #Highperformancetextile #begoodtex
Follow us to get more information about high-performance fabrics! www.begoodtex.com

#flame retardant market#begoodtex#begoodtexflameretardant#flame retardant products#inherent flame retardant fabrics#flame retardant#camping tents#tents#canvas
0 notes
Text
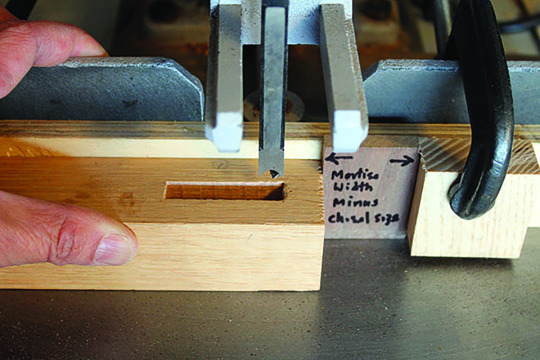
Tenoning Jig for Table Saw: Enhance Precision and Efficiency!

A tenoning jig for a table saw ensures precise and accurate cutting of tenons in woodworking projects. It is a valuable tool for woodworkers. Woodworkers often use tenoning jigs to create strong and secure joints in furniture and other wooden projects. By guiding the workpiece through the saw blade at a precise angle and depth, tenoning jigs help achieve clean and professional results. This efficient tool minimizes the risk of mistakes and ensures consistent and accurate tenons for seamless joinery. With adjustable features and a sturdy design, tenoning jigs are essential accessories for any woodworking shop aiming for precision and efficiency.
Benefits Of Using A Tenoning Jig
Discover the advantages of using a tenoning jig with your table saw. From improved accuracy to enhanced safety, this tool can revolutionize your woodworking projects.Improved AccuracyEnsure precise and consistent cuts every time. The tenoning jig allows for repeatable joinery with minimal margin of error.Enhanced SafetyProtect yourself from accidents and injuries by using a tenoning jig to securely hold your workpiece in place during cutting.

Credit: www.tailoredforest.com
Key Features Of A Tenoning Jig
Tenoning jigs are essential accessories for table saws that ensure precise and efficient tenon cutting. Understanding the key features of a tenoning jig is crucial for woodworkers looking to enhance their joinery capabilities. Let's delve into the key components that make a tenoning jig a valuable tool in any workshop.Adjustable StopsAdjustable stops allow for precise control over the length and depth of tenons, ensuring consistency in your joinery projects.Built-in ClampsBuilt-in clamps secure the workpiece in place, providing stability and safety during cutting operations.
Setting Up The Tenoning Jig
Setting up the tenoning jig is crucial for ensuring precise and accurate cuts on your table saw. Proper setup is essential for achieving clean and professional-looking tenons. In this article, we will walk you through the process of setting up your tenoning jig step by step. Pay close attention to the following steps to ensure optimal performance from your tenoning jig. Choosing The Right Blade Before setting up your tenoning jig, it's important to ensure that you are using the right blade for the job. Select a blade suitable for cutting tenons, such as a dado blade or a specialized tenoning blade. A sharp and appropriately sized blade will ensure clean cuts and smooth tenon shoulders. Aligning The Jig With The Saw Blade To achieve accurate and precise cuts, it's crucial to align the tenoning jig with the saw blade. Ensure that the jig is parallel to the miter gauge slots on the table saw. Use a square to check the alignment and make any necessary adjustments to ensure that the jig is perfectly parallel to the saw blade.

Credit: www.finewoodworking.com
Mastering The Tenoning Technique
Learn the art of perfect tenoning with a specialized jig for your table saw. Achieve precise, professional results every time with our step-by-step guide to mastering the tenoning technique. Elevate your woodworking projects with this essential tool and technique combination. If you're a woodworking enthusiast or a professional carpenter, mastering the tenoning technique is essential to achieving precise and sturdy joinery. The tenoning jig for table saws is a valuable tool in this process, allowing you to create strong and reliable tenons with ease. In this article, we will walk you through the process of mastering the tenoning technique, from making initial cuts to fine-tuning the fit.Making Initial CutsBefore delving into the intricacies of the tenoning technique, you need to start by making the initial cuts on your workpiece. This is where the tenoning jig comes into play. With a tenoning jig firmly attached to your table saw, you can ensure accurate and repeatable cuts each time. Here's a step-by-step guide to making your initial cuts: - Begin by setting the blade height to the desired depth of your tenon. This will depend on the thickness of your workpiece and the specific requirements of your project. - Position your workpiece against the tenoning jig, aligning it precisely with the cutting line. - Secure the workpiece in place using clamps or hold-downs, ensuring it doesn't move during the cutting process. - With all safety precautions taken, turn on the table saw and slowly feed the workpiece into the blade, guiding it along the jig's fence. - Continue pushing the workpiece until the initial cut is complete, and you have achieved the desired length of the tenon. By following these steps, you will have successfully made the initial cuts for your tenon, setting the stage for the next crucial step in the tenoning technique – fine-tuning the fit.Fine-tuning The FitWhen it comes to creating strong and precise tenon joints, achieving the perfect fit is paramount. Fine-tuning the fit involves carefully shaving off excess material to ensure a seamless match between the tenon and its corresponding mortise. Here are the steps to fine-tuning the fit: - Start by testing the fit of your tenon in the mortise. It should slide in snugly without requiring excessive force. - If the tenon is too tight, make minor adjustments by removing thin shavings with a chisel or a shoulder plane. - Conversely, if the tenon is too loose, you can use veneer or thin shims to achieve a tighter fit. - Continue testing and making adjustments until you are satisfied with the fit. Remember that a well-fitted tenon should remain sturdy and not wobble within the mortise. By following these steps, you will be able to fine-tune the fit of your tenon, resulting in a strong and seamless joint. Mastering the tenoning technique takes practice and patience, but with the right tools and methodology, you can achieve professional-level joinery in your woodworking projects. https://www.youtube.com/watch?v=OFUNt3yxZm0
Maintenance And Safety Tips
When it comes to using a tenoning jig for a table saw, it is crucial to prioritize maintenance and safety. By following regular inspection protocols and adhering to safe operating practices, you can ensure a smooth and secure woodworking experience. Let's dive into some important points:Regular InspectionPerforming regular inspections of your tenoning jig is essential for its optimal functionality and longevity. Here are some areas that you should pay close attention to: - Check the alignment of the jig components, especially the sliding mechanism and fence. - Inspect the bolts, nuts, and screws for any signs of loosening or wear. - Ensure the miter gauge bar is in proper alignment and free from debris. - Inspect the clamps and locking mechanisms for any defects or damage. By conducting these inspections regularly, you can catch any potential issues before they become safety hazards or affect the performance of your tenoning jig.Safe Operating PracticesUsing a tenoning jig safely should be your top priority. Here are some safe operating practices that you should follow: - Always wear appropriate personal protective equipment, including safety glasses and ear protection. - Ensure that the table saw is powered off and unplugged before attaching or removing the tenoning jig. - Follow the manufacturer's instructions for setting up and adjusting the jig. - Make sure the workpiece is securely clamped and held against the jig to prevent kickback. - Never reach over the spinning blade or use your hands to hold the stock during operation. - Maintain a clear workspace, free from clutter or distractions. - Keep your hands and fingers away from the cutting area at all times. - If you notice any abnormalities or unusual sounds during operation, stop immediately and investigate the issue. Following these safe operating practices will greatly reduce the risk of accidents or injuries while using a tenoning jig for your table saw.
Credit: woodworkersinstitute.com
Frequently Asked Questions On Tenoning Jig For Table Saw
What Is A Tenoning Jig And How Does It Work? A Tenoning Jig is a woodworking tool used with a table saw to create precise and strong tenon joints. It works by guiding the workpiece through the blade while ensuring a straight and accurate cut, resulting in tight-fitting joints for furniture and other woodworking projects. Why Should I Use A Tenoning Jig Instead Of Other Methods? Using a Tenoning Jig offers several advantages over other methods. It provides precise and repeatable cuts, ensuring a perfect fit for tenon joints. It also enhances safety by keeping your hands away from the blade, reducing the risk of accidents. Additionally, it saves time and effort by streamlining the tenon-making process. Can I Build My Own Tenoning Jig Or Should I Buy One? While it is possible to build your own Tenoning Jig, buying a dedicated one offers numerous benefits. Professionally made Tenoning Jigs are designed with precision and accuracy in mind, ensuring consistent results. Additionally, they often come with adjustable features, allowing you to customize the jig for different tenon sizes and angles. Investing in a quality Tenoning Jig will save you time and frustration in the long run.
Conclusion
A tenoning jig for your table saw is an invaluable tool for improving woodworking precision and safety. Its simple design and ease of use make it a must-have for woodworkers of all skill levels. By incorporating this versatile jig into your projects, you can achieve accurate and professional-looking tenons with ease. Embrace the benefits of this essential woodworking accessory today! Read the full article
0 notes
Text

【Winter Essential】Keep Warm and Cozy with our Smart Electric Blanket! ❄️❤️
The cold winter has arrived, and are you shivering in your bed? Don't worry! We have a smart electric blanket designed to create a warm and comfortable sleeping environment for you! 🔥💤
This electric blanket features advanced smart technology that automatically adjusts the temperature according to your needs, ensuring comfort without overheating. Whether you prefer a moderate or cozy warmth, you can adjust it according to your preference. 🌡️
Moreover, this electric blanket also prioritizes safety, equipped with overheating protection to ensure worry-free usage. It is also highly energy-efficient, bringing you more energy-saving benefits for your home. 🔌💰
Not only that, but this smart electric blanket also offers a soft and comfortable material, providing a cozy sleep experience all night long. It is also lightweight and portable, making it convenient to use at home or take along during your travels, ensuring warmth anytime, anywhere. 🛏️✈️
Grab this smart electric blanket now and make your winter warmer and more comfortable! Click on the purchase link to get this essential product for the season! ❄️❤️
#SmartElectricBlanket #WinterEssential #WarmandCozy #SleepingAid #SafetyProtection #EnergyEfficient #SoftandComfortable #LightweightandPortable #WinterMustHave #ShoppingFrenzy
0 notes
Text
Buy Covid 19 Protection Products Online | Optica
In our endeavor to contain and restrict the widespread of the COVID-19, we have compiled all necessary products being used to protect the humans and the medical fraternity in this special ‘COVID – 19 Products Category’. COVID-19, as we all know by now is a novel Coronavirus with new strain that has not been previously identified in humans. Find below the list of products being manufactured by Optica.

For Details 📞 - +91-9886654729 📧- [email protected] Visit - https://www.opticsindia.com/covid-19-products/
1 note
·
View note
Text
1 PAIR-STANLEY PERSONAL PROTECTION SAFETY EYEWEAR ANTI-SCRATCH RST-61035 Click Now https://ebay.to/2Mq0hbO
0 notes
Photo

Portwest GlowTex Triple Technology uses the latest innovation in light emitting technology to ensure the wearer achieves the highest level of protection in high visibility apparel. .. .. #Portwest #hivis #safety #safetyworkwear #safetyprotection #PPE #innovation #workwear #style #workwearstyle #highvis @RepostIt_app (en Igualada)
#innovation#workwearstyle#portwest#ppe#safety#safetyworkwear#style#highvis#workwear#hivis#safetyprotection
0 notes
Text
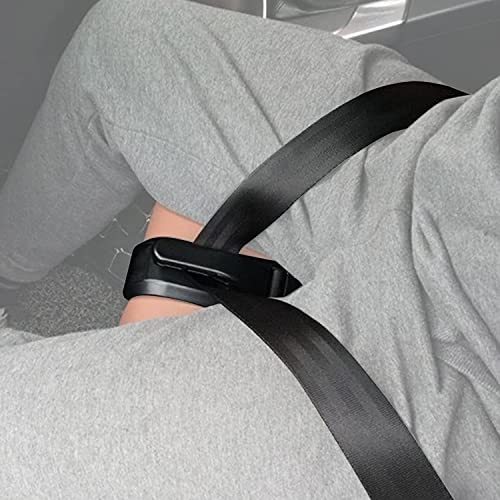
Pregnancy Bump Strap, Prevent Compression of The Abdomen, Comfort & Freedom for Pregnant Moms Belly, Protect Unborn Baby, a Must-Have for Expectant Mothers
Pregnancy Bump Strap, Prevent Compression of The Abdomen, Comfort & Freedom for Pregnant Moms Belly, Protect Unborn Baby, a Must-Have for Expectant Mothers
Price: (as of – Details) Pregnancy Bump Strap, Prevent Compression of The Abdomen, Comfort & Freedom for Pregnant Moms Belly, Protect Unborn Baby, a Must-Have for Expectant Mothers More ComfortableMore SafetyProtect Unborn BabyGift idea for Pregnancy Mother
View On WordPress
0 notes
Text
🤔 Prevent Accidental Contact and Ensure Safe Operation of Power Systems? 🔊 ONCCYEAS80 Door Lock is Here to Protect!
✨ Worried about the safety hazards caused by accidental contact with electric meters and cabinets?
🔌 The ONCCYEAS80 door lock is specifically designed for power system safety, providing you with comprehensive protection!
⚡ Robust Performance, Stable and Reliable:
With an insulation voltage of up to 800V, working voltage of 690V, and a maximum current of 125A, it easily meets various power demands, ensuring stable system operation.
🪄 Internally crafted with highly conductive nickel-phosphorus copper material, it offers excellent conductivity, durability, and extended service life, saving you both money and hassle!
🔒 Safety Door Lock Design, Eliminating Misoperation:
The door lock design effectively prevents unauthorized personnel from operating the isolation switch, avoiding potential safety risks caused by mishandling.
😃 Want to learn more about the product or get a customized solution? Contact us now for professional service!
Get more: www.onccy.com, [email protected],WhatsApp:+86 17301617015

0 notes
Text
Paragon Backup and Recovery Pro Rus Keygen
Paragon Backup and Recovery Pro Rus Keygen
Paragon Backup and Recovery Pro Rus 202017.10.12 Cracked Working 100% Crack Find more information about the app cloned files at https://developer.apple.com/.Stable OperationFail-safe operability across compatible hardware and software systems for both general-purpose and specialized applications.Data SafetyProtection of data integrity and prevention of accidental data corruption and possible…

View On WordPress
0 notes
Text
Permanent flame retardant polyester canvas fabric - the ultimate protection for tents and bags!
Whether you are an outdoor adventure enthusiast or a travel expert who needs durable bags, our permanent flame retardant polyester canvas fabric is your ideal choice!
Ultra-high flame retardancy:through strict safety tests, it will extinguish itself when it encounters fire to protect your safety.
Super durable :tear-resistant, wear-resistant, and not afraid of bad weather.
Lightweight and waterproof : safer to use outdoors and easier to carry bags.
Applicable to: camping tents, mountaineering bags, travel bags, military equipment, etc. Safe and reliable, full performance!
#Flameretardantfabric #Outdoorequipment #Tentmaterial #Luggagefabric #Permanentflameretardant #Polyestercanvas #Safetyprotection #Outdooradventure #Travelessential #Durablematerial #Fireprooffabric #Campingequipment #Industrialfabric #Highperformancetextile #begoodtex
Follow us to get more information about high-performance fabrics! www.begoodtex.com

#flame retardant market#begoodtex#begoodtexflameretardant#flame retardant products#inherent flame retardant fabrics#flame retardant#canvas#camping tents
0 notes
Text
Four swivel casters make moving from one area to another abreeze
After pulling out our microscope and taking a closer look, the SEM 2125S Strip-Cut Shredderhas proved to be a worthy machine. It's a fairly versatile machine witha not-too-crazy price tag either (but remember you can often get abetter deal if you call or email :-) Overall we'd recommend surge protection thismachine but I suggest that you take a look at the specs yourself.
Security
This is the second lowest level of security available rated at a 2.This strip-cut shredder is a tad better than a level 1 machine but nota whole lot. If you are really concerned about the information on yourdocuments then we highly recommend that you start looking at some ofthe cross-cut machines. The one benefit of the strip-cut machine isthat you can shred faster and more pages per pass. Just make sure thatyou are choosing the right security level for your needs.
Shredable Material
The SEM 2125S Strip-Cut Shreddercan shred Paper, Paper Clips, Staples. If you need to be able to shredsomething else then we recommend that you look at a larger machineand/or look for something with a little bit lower security (the higherthe security the less likelihood that the machine shreds somethingother than paper).
Continuous Motor
This shredder is not rated for continuous use. That simply meansthat you will have to shut the machine down after a certain period oftime to let it cool off. Now don't let this scare you away because mostpeople will never reach that point unless they just sit down and startshredding and shredding and shredding. If you plan on doing all yourshredding at one sitting then it is highly recommended that you get amachine with a continuous duty motor, otherwise you're just fine.
Bin Size
The SEM 2125S Strip-Cut Shredderhas a 20 gallon bin. We're happy with this size because it will giveyou a bit more time between emptying your bin. Although the size maymake it difficult to fit this shredder in a tight space, it's alwaysworth it in the long run to get a bigger bin size and move your officearound a bit.
Throat Size
We love the 10.25 inch throat on this shredder because you can putin odd sized paper and it leaves plenty of breathing room when it comesto regular sized paper. Some of the smaller machines will crumple thepaper and eventually jam because the throat opening is just not largeenough.
Auto Oiler
With an Optional Auto-Oiler available on this machine we highlyrecommend that you get it pre-installed. The machine is pre-wired toaccept an oiler so all the manufacturer has to do is hook it upproperly and you'll never have to worry about messy oil again.Automatically oiling your machine takes the guess-work out ofmaintenance and will most likely increase the life of your machine.
Warranty
The 3 Years Parts / 90 Days Labor / 6 Years on Cutting Heads on theSEM 2125S Strip-Cut Shredder is one of the best in the industry so restassured that you are covered. Just make sure that you oil your machineand avoid inserting any foreign object in the cutting heads and you'llbe just fine
Price
The MSRP is $1,187.49 but you can find it for much less online ifyou look around. Don't let the price deter you until you do a littlebit of comparison shopping first.
About the Manufacturer
SEM is the only shredder and data destruction manufacturer with adirect sales force to meet the needs of USA and Worldwide customers.They are trained in all aspects of shredder, disintegrator and othersecurity product applications. They are backed by the industry's mostresponsive Customer Service and Sales Support personnel. So next timeyou need a shredder or a complete destruction solution, consider thepeople as well as the machine.
Manufacturer Jargon
The Model 2125S is STRIP CUT Shredder an ideal for medium dutyapplications. Designed with safety in mind, it features a SPS ( SafetyProtection System), an exclusive electronically controlled safety flapin the feed opening. When the machine is shredding, the flap closes forsafety. It also features a new multi-function control element (switch)which has integrated optical signals and is color coated forconvenience. Four swivel casters make moving from one area to another abreeze.
I hope that our break-down here has helped you make your decision on the SEM 2125S Strip-Cut Shredder.We are always available to answer more specific questions that youmight have, so don't hesitate to give us a call. As always, rememberthat the manufacturer stated specs do not always match up to thereal-world performance that you get from the machine so keep this inmind when deciding on what to buy.
0 notes
Text
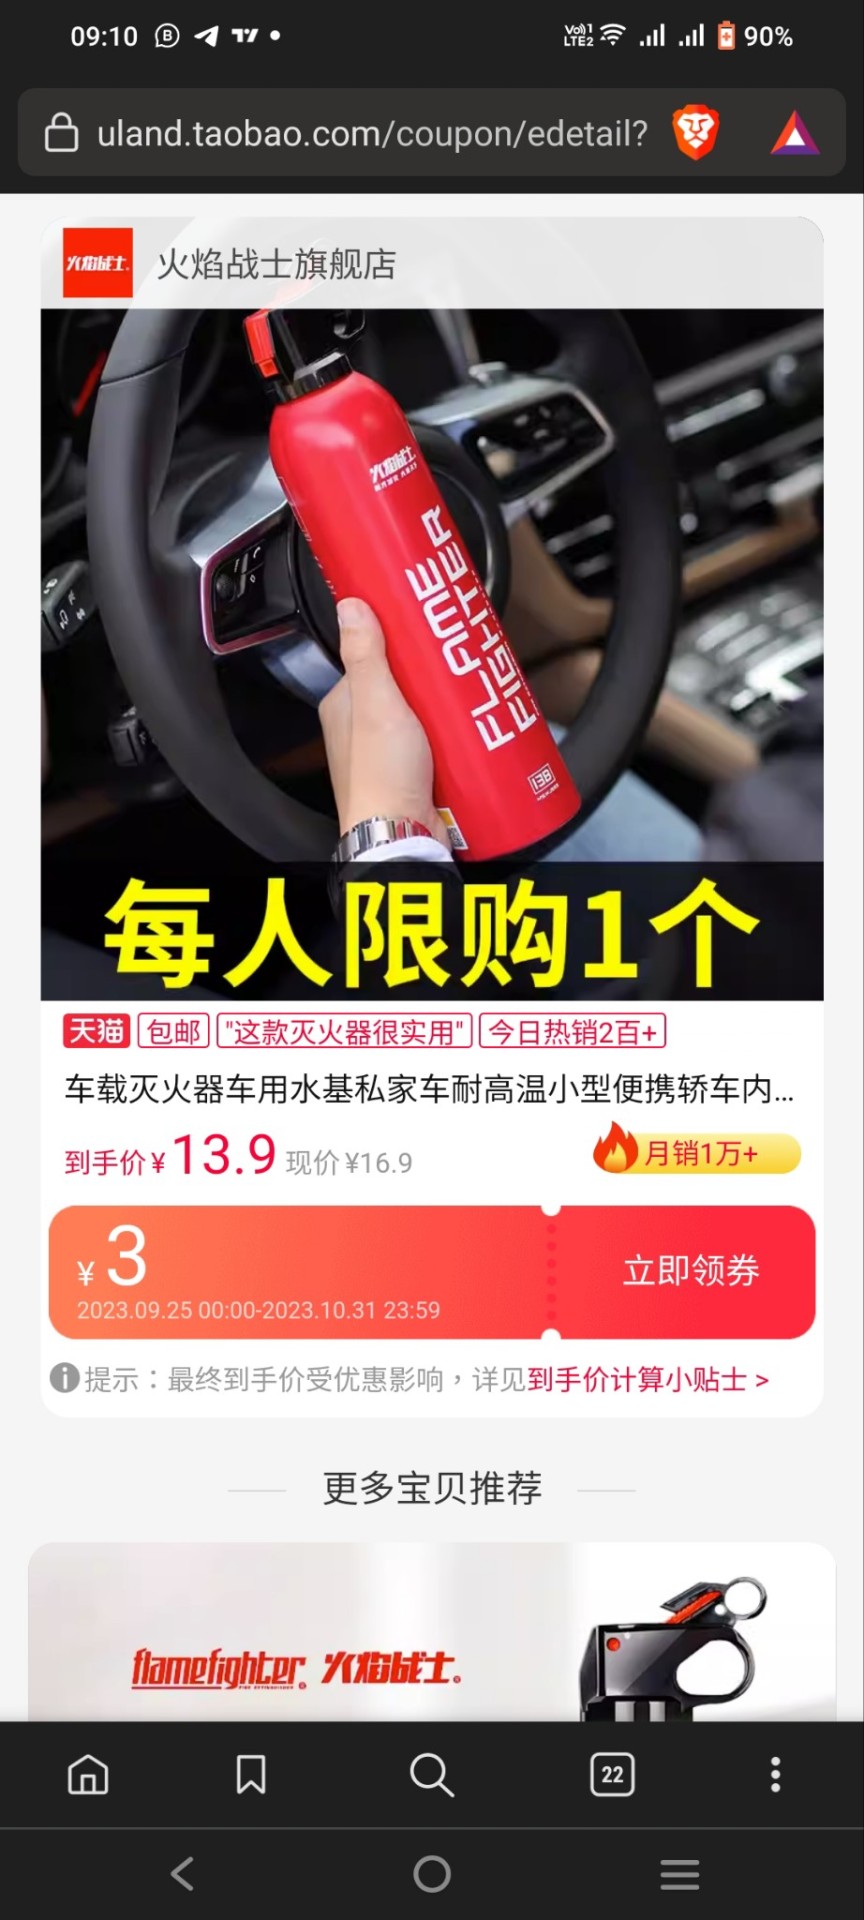
🔥 Exclusively on Taobao! Introducing the Car Water-Based Fire Extinguisher, designed to protect you and your vehicle! 🚗💦
Are you concerned about the risk of fire in your car? We've got you covered with our innovative product - the Car Water-Based Fire Extinguisher, giving you confidence in handling fire emergencies.
This fire extinguisher utilizes an eco-friendly water-based extinguishing agent that is non-toxic and harmless, ensuring no damage to you or your vehicle. It quickly and effectively puts out fires, containing them in the shortest time possible to safeguard your safety.
The Car Water-Based Fire Extinguisher is compact, lightweight, and easy to carry, making it convenient for use. Simply press gently to release the extinguishing agent, swiftly extinguishing the fire and providing added protection for your vehicle and passengers.
Don't hesitate any longer! Purchase the Car Water-Based Fire Extinguisher on Taobao now and give your car an extra layer of safety! 🔥🚗💦
#Taobao #CarWaterBasedFireExtinguisher #SafetyProtection #EcoFriendlyExtinguishingAgent #CompactAndPortable #EmergencyFireExtinguishing #ProtectYourVehicle #PeaceOfMindOnTheRoad
0 notes
Photo

Wiley X Safety Frames available on The Eyelation Safety Benefits Management Platform™ Learn more at https://eyelation.com
#WileyX #safetyframes #safetyeyewear #product #productthursday #glasses #eyeprotection #safetyprogram #rxeyewear #rxsafetyeyewearprogram #platform #safety #safetyprotection #eyelation
0 notes