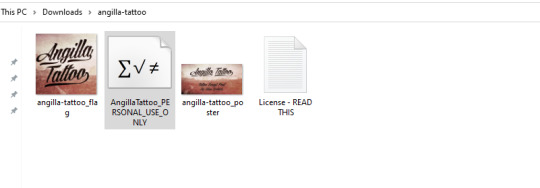
#Screen Capture Software For Windows
Explore tagged Tumblr posts
Visit Tumblr Blog
Explore Tumblr blogs with no restrictions, modern design and the best experience.
Last Seen Tumblr Blogs


Fun Fact
Tumblr’s reach among the 26-to-35-year-olds in the US is 11%.
Text
AnyMP4 Screen Recorder
AnyMP4 Screen Recorder is the top HD screen recording software for Windows PCs, allowing you to capture various screen activities. It enables high-quality video recording with multiple audio sources, including system sounds, microphone input, or both, along with the ability to record webcam footage and take screenshots. Enjoy! This convenient desktop screen recording application offers an…
#AnyMP4#audio recording#gameplay capture#HD recording#instructional videos#online tutorials#screen capture#screen recorder#video editing#video meetings#webcam recording#Windows software
0 notes
Note
What is the appeal of vintage computers to you? Is it the vintage video games or is it the programs? If so, what kind of programs do you like to run on them?
Fair warning, we're talking about a subject I've been passionate about for most of my life, so this will take a minute. The answer ties into how I discovered the hobby, so we'll start with a few highlights:
I played old video games starting when I was 9 or 10.
I became fascinated with older icons buried within Windows.
Tried to play my first video game (War Eagles) again at age 11, learned about the hardware and software requirements being way different than anything I had available (a Pentium III-era Celeron running Windows ME)
I was given a Commodore 1541 by a family friend at age ~12.
Watched a documentary about the history of computers that filled in the gaps between vague mentions of ENIAC and punch cards, and DOS/Windows machines (age 13).
Read through OLD-COMPUTERS.COM for the entire summer immediately after that.
Got my first Commodore 64 at age 14.
I mostly fell into the hobby because I wanted to play old video games, but ended up not finding a ton of stuff that I really wanted to play. Instead, the process of using the machines, trying the operating system, appreciating the aesthetic, the functional design choices of the user experience became the greater experience. Oh, and fixing them.
Then I started installing operating systems on some DOS machines, or playing with odd peripherals, and customizing hardware to my needs. Oh, and programming! Mostly in BASIC on 8-bit hardware, but tinkering with what each computer could do is just so fascinating to me. I'm in control, and there isn't much of anything between what I write and the hardware carrying it out (especially on pre-Windows machines)! No obfuscation layers, run-times, .dlls, etc. Regardless of the system, BASIC is always a first choice for me. Nova, Ohio Scientific, Commodore, etc. I usually try to see what I can do with the available BASIC dialect and hardware. I also tend to find a game or two to try, especially modern homebrew Commodore games because that community is always creating something new. PC stuff I focus more on pre-made software of the era.
Just to name a few examples from a variety of systems: Tetris, terminal emulators, Command & Conquer titles, screen savers, War Eagles, Continuum, video capture software, Atomic Bomberman, demos, LEGO Island, Bejeweled clones, Commander Keen 1-3, lunar lander, Galaxian, sinewave displays, 2048, Pacman, mandelbrot sets, war dialers, paint -- I could keep going.
Changing gears, I find it funny how often elders outside of the vintage computing community would talk about the era I'm interested in (60s-early 90s). [spoken with Mr. Regular's old man voice]: "Well, computers used to be big as a room! And we used punch cards, and COBOL!" I didn't know what any of that meant, and when pressed for technical detail they couldn't tell you anything substantial. Nobody conveyed any specifics beyond "that's what we used!"
I noticed that gaps remained in how that history was presented to me, even when university-level computer science and history professors were engaged on the subject. I had to go find it on my own. History is written by the victors, yeah? When was the last time a mainstream documentary or period piece focused on someone other than an Apple or Microsoft employee? Well, in this case, you can sidestep all that and see it for yourself if you know where to look.
Experiencing the history first hand to really convey how computers got from point A to B all the way down to Z is enlightening. What's cool is that unlike so many other fields of history, it's near enough in time that we can engage with people who were there, or better yet, made it happen! Why do you think I like going to vintage computer festivals?
We can see the missteps, the dead-ends, the clunkiness, the forgotten gems and lost paradigms, hopefully with context of why it happened. For the things we can't find more information on, when or documentation and perspectives are limited, sometimes we have to resort to digital archeology, and reverse engineering practices to save data, fix machines, and learn how they work. The greater arc of computer history fascinates me, and I intend to learn about it by fixing and using the computers that exemplify it best, and sharing that passion with others who might enjoy it.
275 notes
·
View notes
Note
May I ask what scanners / equipment / software you're using in the utena art book project? I'm an artist and half the reason I rarely do traditional art is because I'm never happy with the artwork after it's scanned in. But the level of detail even in the blacks of Utena's uniform were all captured so beautifully! And even the very light colors are showing up so well! I'd love to know how you manage!
You know what's really fun? This used to be something you put in your site information section, the software and tools used! Not something that's as normal anymore, but let's give it a go, sorry it's long because I don't know what's new information and what's not! Herein: VANNA'S 'THIS IS AS SPECIFIC AS MY BREAK IS LONG' GUIDE/AIMLESS UNEDITED RAMBLE ABOUT SCANNING IMAGES
Scanning: Modern scanners, by and large, are shit for this. The audience for scanning has narrowed to business and work from home applications that favor text OCR, speed, and efficiency over archiving and scanning of photos and other such visual media. It makes sense--there was a time when scanning your family photographs and such was a popular expected use of a scanner, but these days, the presumption is anything like that is already digital--what would you need the scanner to do that for? The scanner I used for this project is the same one I have been using for *checks notes* a decade now. I use an Epson Perfection V500. Because it is explicitly intended to be a photo scanner, it does threebthings that at this point, you will pay a niche user premium for in a scanner: extremely high DPI (dots per inch), extremely wide color range, and true lossless raws (BMP/TIFF.) I scan low quality print media at 600dpi, high quality print media at 1200 dpi, and this artbook I scanned at 2400 dpi. This is obscene and results in files that are entire GB in size, but for my purposes and my approach, the largest, clearest, rawest copy of whatever I'm scanning is my goal. I don't rely on the scanner to do any post-processing. (At these sizes, the post-processing capacity of the scanner is rendered moot, anyway.) I will replace this scanner when it breaks by buying another identical one if I can find it. I have dropped, disassembled to clean, and abused this thing for a decade and I can't believe it still tolerates my shit. The trade off? Only a couple of my computers will run the ancient capture software right. LMAO. I spent a good week investigating scanners because of the insane Newtype project on my backburner, and the quality available to me now in a scanner is so depleted without spending over a thousand on one, that I'd probably just spin up a computer with Windows 7 on it just to use this one. That's how much of a difference the decade has made in what scanners do and why. (Enshittification attacks! Yes, there are multiple consumer computer products that have actually declined in quality over the last decade.)
Post-processing: Photoshop. Sorry. I have been using Photoshop for literally decades now, it's the demon I know. While CSP is absolutely probably the better piece of software for most uses (art,) Photoshop is...well it's in the name. In all likelihood though, CSP can do all these things, and is a better product to give money to. I just don't know how. NOTENOTENOTE: Anywhere I discuss descreening and print moire I am specifically talking about how to clean up *printed media.* If you are scanning your own painting, this will not be a problem, but everything else about this advice will stand! The first thing you do with a 2400 dpi scan of Utena and Anthy hugging? Well, you open it in Photoshop, which you may or may not have paid for. Then you use a third party developer's plug-in to Descreen the image. I use Sattva. Now this may or may not be what you want in archiving!!! If fidelity to the original scan is the point, you may pass on this part--you are trying to preserve the print screen, moire, half-tones, and other ways print media tricks the eye. If you're me, this tool helps translate the raw scan of the printed dots on the page into the smooth color image you see in person. From there, the vast majority of your efforts will boil down to the following Photoshop tools: Levels/Curves, Color Balance, and Selective Color. Dust and Scratches, Median, Blur, and Remove Noise will also be close friends of the printed page to digital format archiver. Once you're happy with the broad strokes, you can start cropping and sizing it down to something reasonable. If you are dealing with lots of images with the same needs, like when I've scanned doujinshi pages, you can often streamline a lot of this using Photoshop Actions.
My blacks and whites are coming out so vivid this time because I do all color post-processing in Photoshop after the fact, after a descreen tool has been used to translate the dot matrix colors to solids they're intended to portray--in my experience trying to color correct for dark and light colors is a hot mess until that process is done, because Photoshop sees the full range of the dots on the image and the colors they comprise, instead of actually blending them into their intended shades. I don't correct the levels until I've descreened to some extent.
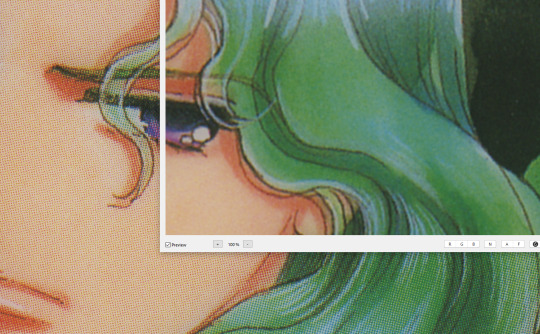
As you can see, the print pattern contains the information of the original painting, but if you try to correct the blacks and whites, you'll get a janky mess. *Then* you change the Levels:
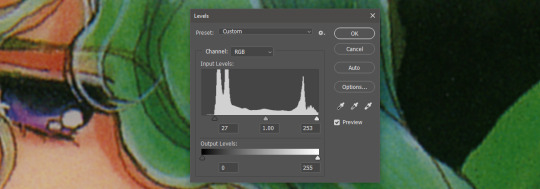
If you've ever edited audio, then dealing with photo Levels and Curves will be familiar to you! A well cut and cleaned piece of audio will not cut off the highs and lows, but also will make sure it uses the full range available to it. Modern scanners are trying to do this all for you, so they blow out the colors and increase the brightness and contrast significantly, because solid blacks and solid whites are often the entire thing you're aiming for--document scanning, basically. This is like when audio is made so loud details at the high and low get cut off. Boo.
What I get instead is as much detail as possible, but also at a volume that needs correcting:

Cutting off the unused color ranges (in this case it's all dark), you get the best chance of capturing the original black and white range:
In some cases, I edit beyond this--for doujinshi scans, I aim for solid blacks and whites, because I need the file sizes to be normal and can't spend gigs of space on dust. For accuracy though, this is where I'd generally stop.
For scanning artwork, the major factor here that may be fucking up your game? Yep. The scanner. Modern scanners are like cheap microphones that blow out the audio, when what you want is the ancient microphone that captures your cat farting in the next room over. While you can compensate A LOT in Photoshop and bring out blacks and whites that scanners fuck up, at the end of the day, what's probably stopping you up is that you want to use your scanner for something scanners are no longer designed to do well. If you aren't crazy like me and likely to get a vintage scanner for this purpose, keep in mind that what you are looking for is specifically *a photo scanner.* These are the ones designed to capture the most range, and at the highest DPI. It will be a flatbed. Don't waste your time with anything else.
Hot tip: if you aren't scanning often, look into your local library or photo processing store. They will have access to modern scanners that specialize in the same priorities I've listed here, and many will scan to your specifications (high dpi, lossless.)
Ahem. I hope that helps, and or was interesting to someone!!!
#utena#image archiving#scanning#archiving#revolutionary girl utena#digitizing#photo scanner#art scanning
244 notes
·
View notes
Text
Fuck Google Gemini
If you have Gmail, you probably got a welcome to Gemini email today-ish (Feb 19, 2025). If, like me, you want nothing to do with gen AI garbage software, you can turn Gemini off. However, as it is an opt out, rather than an opt in, I will never trust that Google won't just turn it back on again. This move shows that they are very much pro gen AI, which means they are pro theft of intellectual property as well as pro fuck-over-the-environment.
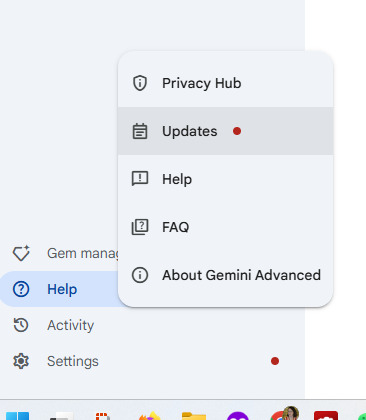
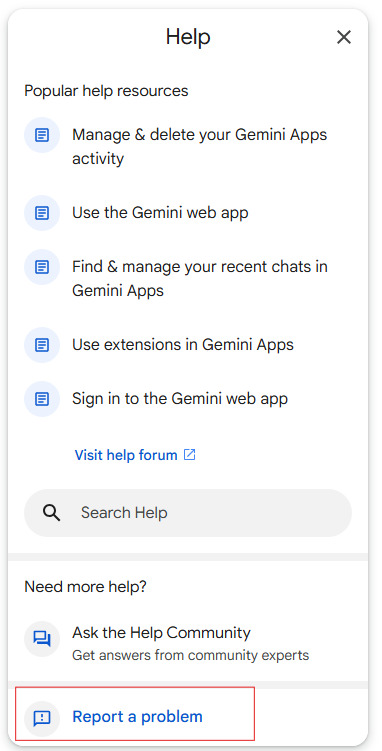
You can send Google feedback on how you feel about this. 1. Open the Gemini extension and go to Help in the left sidebar (it's the question mark, if it's compressed). 2. Click Help in the pop up menu. 3. Click Report a Problem in the little pop up window over on the right. 4. Share your feedback.
This is inspiring me to escalate my removal of all content from Google products and pursue different email options. Yay for motivation, I guess. [Screen capture showing icon and path to Help. Followed by a screen capture showing where you'll get the feedback dialog box.]
#Fuck Google#Generative AI is unethical#Fuck Gemini#Turn Off Gemini#Send Google your feedback#Opt out is a crappy model#not writing#Google is evil
30 notes
·
View notes
Text
How to record videos with Sims 2 in-game camera (HD, no UI, no lag, no file format issues)
I originally planned to include this information in the behind-the-scenes video about Bring Me To Life that I'm currently working on, but it's overly technical and not that interesting. It still might be useful to some people (mostly machinima creators), so I decided to make a separate post about it.
There are two ways to record videos in The Sims 2:
Using screen recording software
This is the most common and probably the easiest way. You just need a program like OBS that will capture whatever happens on your screen exactly as it happened. If this method works for you, it's perfectly fine. No need to follow this guide then.
Using the in-game video capture tool
This way involves capturing videos directly in the game by clicking the video camera icon or pressing V on your keyboard. This method is perfect for machinima creators. It automatically hides the UI, but more importantly, the video will always be perfectly smooth, regardless of the actual performance of your game, i.e. even if it runs like a literal slide show, any videos you capture this way will look perfectly fine.
Okay, so if this method is so great, why do we need a tutorial for it? Well, as is usually the case with this game, the feature works fine, it's just a little bit outdated.
To fix it, we need to do 3 simple* things.
*If you're a Sims 2 player, you're probably used to this kind of stuff anyway
Step 1: Installing a modern codec
In the Camera settings, the game lets you choose if you want the videos to be compressed. I highly recommend choosing that option, as uncompressed videos take up way too much storage space.
The codec that the game uses to handle compression is outdated and most video editing programs will not be able to edit such files. To fix this problem, we need to download and install x264vfw, which is a free an open source codec.
Once installed, open the Configure x264vfw app. No need to change anything there (unless you want to test different settings of course), except for this one small thing:
In the Debug section, go to Log level and change it to None. Otherwise the codec will display a pop-up window each time you record in the game, which is pretty annoying.

Step 2: Making the game use the codec
Locate the VideoCapture.ini file in the installation folder with your latest expansion pack. I have Ultimate Collection, so for me the path looks like this:
D:\Program Files (x86)\Origin Games\The Sims 2 Ultimate Collection\Fun with Pets\SP9\TSData\Res\UserData\Config
Back up your file and open the original version with Notepad. You can either replace the whole thing with my settings, or just update the highlighted parts.
While you're at it, make sure to update the LargeSettings value to 1920x1080 so that the videos are captured in HD (no need to worry about it if you're copying the whole thing):
[Config] PreferredCodec=x264vfw Folder is relative to Res/Userdata Folder=Movies FilenameBase=movie NoFillFrames=0 AudioStereoOutput=0 AudioRateDivisor=4 GlobalSettings = reset, vbr:1, fps:10, keyinterval:30, mode:1, datarate:0 SmallSettings = size: 128x128 MediumSettings = size: 320x240 LargeSettings = size: 1920x1080 LowQualitySettings = minq: 6, maxq: 16, mode:0 MediumQualitySettings = minq: 4, maxq: 10, fps:15, mode:0 HighQualitySettings = minq: 2, maxq: 8, fps: 30, keyinterval: 60 SmallLowSettings = datarate: 75 SmallMediumSettings = datarate: 150 SmallHighSettings = datarate: 300 MediumLowSettings = datarate: 150 MediumMediumSettings = datarate: 300 MediumHighSettings = datarate: 600 LargeLowSettings = datarate: 300 LargeMediumSettings = datarate: 600 LargeHighSettings = datarate: 1200 AllowAntialiasing=0 # some drivers have issues with capture when AA is enabled [Codecs] 0=VP61 # On2 VP6.1 1=VP62 # On2 VP6.2 2=VP60 # On2 VP6.0 3=x264vfw # x264vfw
Save your file.
When in game, go to Camera Options and make sure Video Capture Size is set to Large and Video Quality is set to High.
Also, you might want to change the Maximum Video Recording Time to something higher than 60 seconds.

Credit for this solution goes to this person who left the following comment under this video
Step 3: Changing the file format from avi to mp4
Before doing this step, test if everything works correctly when you try to capture videos in the game. The videos will go to the Movies folder in your Documents folder for TS2.
Try to import the videos into your editing software. If it doesn't work, e.g. the program does not recognize the file or the file appears to be corrupted, you'll need to change the file format from avi to mp4.
I personally use VLC media player for that, as it's free and open-source.
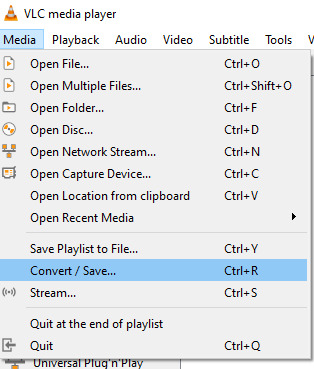
Go to Media > Convert / Save...
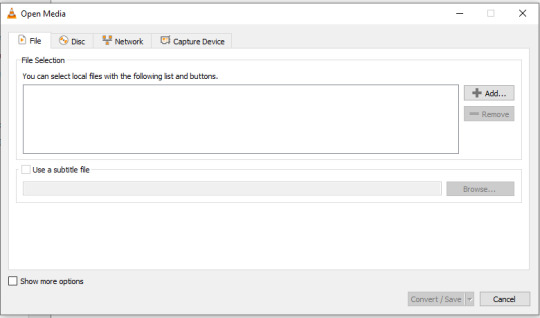
Drag your files into the File Selection section or select them by clicking the + Add button.
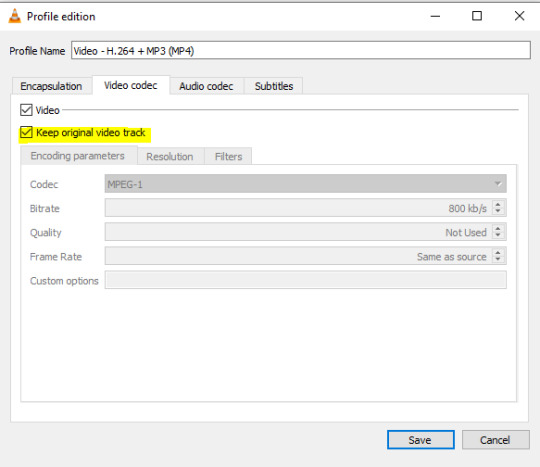
Select the Video - H.264 + MP3 (MP4) profile and click the wrench icon to edit its settings.

In the Video tab, make sure to check the box next to Keep original video track. Go to the Audio tab and check the analogous box.
Save and in the next window specify the destination folder and click Start. VLC will go through each of the files you added.
IMPORTANT:
While Steps 1 and 2 only need to be done once, Step 3 needs to be done for every new video you record (unless, your video editing software doesn't struggle opening the avi files). The good news is, this step is really fast, no more than a second per a single video. This is because we're keeping the original video track intact. The only thing that is changed is the container. That's why this change is fast and does not affect video quality in any way. Ideally, this step wouldn't be needed if we figured out a way to force the game to use mp4 when saving those videos, but I'm not sure if this is possible.
Like I said, outside of machinima creation, it probably makes more sense to just record your screen with OBS. Especially if you want to capture videos in 4K, which I don't think would be possible with this method. But it works for me and as it took me a while to figure it all out, I just wanted to share all the info in a single post!
#sims 2 machinima#ts2#sims2#sims 2 tutorial#ts2 tutorial#sims 2 guide#ts2 guide#my stuff#ts2 simblr#machinima#ts2 machinima
12 notes
·
View notes
Text
Making Baldur’s Gate 3 GIFS Tutorial
TOOLS USED:
Nvidia or alternate game video recording software
PotPlayer
GIMP (Optional)
Adobe Photoshop
PART 1: Recording
I personally use the Nvidia recording software that came with my computer to capture videos of the game, but there are plenty of video recording options out there. I know OBS Studio is a popular one, for example. Whatever your choice may be, here are three important tips for when capturing video:
Use the least amount of compression settings your recording software can output, and I recommend at least 30FPS, though 60 is better
Press F10 to hide the Baldur’s Gate 3 UI and capture the entire screen
Give about three seconds worth of video before and after the section you want to record, as safety buffers, if you can
PART 2: Frame Extraction
Open the video you’ve recorded in PotPlayer in window mode (not full screen), and pause a little bit before where you want to start your GIF. Press Ctrl + G to open up the Consecutive Image Capturer window, and drag it to the side of the video player. These are the settings I recommend in general:
HOWEVER, I suggest playing around with the “Every # frame” option to your own liking. I have a pretty high framerate for this video I’m using, so 5 is fit for me, but if you have a lower framerate, you may want a lower number, like 2.
With your settings in place, click “Start” and unpause the video. Pause the video again after you’ve captured all the frames you want, then click “Stop”. If you’re making a gifset, I recommend then storing each set of frames in a single folder at a time.
PART 3: Resizing
I personally use GIMP to resize/crop the images because I find it easier, then export the image as a PSD for the next steps in Photoshop. But you can use Photoshop for this step too, if you’re more comfortable with that.
The number of frames you can get away with in a single GIF for Tumblr depends on the aspect ratio you plan on saving it as—for example, 270x200 obviously can handle more frames than 540x300 while still fitting within Tumblr’s size limit.
PART 4: Sharpening
In Photoshop, use the Filter > Sharpen > Smart Sharpen tool on each layer. The settings are your choice, but I usually use 200 for the Amount and 0.5 for the Radius.
PART 5: Animation
If you don’t yet have the timeline set up in Photoshop, click on Windows > Timeline to bring it up. Then from the arrow, choose “Create Frame Animation” and click on the button to do so. This will insert the first frame into your timeline. Click on “Make Frames from Layers” in the timeline options menu to add them all.
Click on frame 1, then hold down Shift and click on the last frame to select them all. Then click on the drop-down arrow from the last frame and set the delay between each frame changing. I usually use 0.1 seconds.
Change the “Once” option to “Forever” to make the GIF repeat itself ongoing.
PART 6: Editing/Colouring
Click on frame 1. Then click on the top layer, while still keeping frame 1 visible.
You can use a variety of tools in Photoshop to editing the colours, brightness, contrast, etc. of the gif. Make sure the filters are the top layers to apply them to all the frames. If you test out your gif and see that the filters are not applied to all the frames, toggle the visible option on them off and on again.
I’m not going to go into detail of how to edit your GIF here, because each one is different. But I will say the tools I most typically use are Brightness/Contrast and Curves.
PART 7: Export
Click on File > Save for Web. These are the settings I like to use:
Congratulations, you’ve made a GIF!
150 notes
·
View notes
Text
How I Make Gifs!
I've gotten multiple asks in my inbox about the method I use to make these animal crossing gifs:
So I figured it was about I time I answer these asks in the form of a separate post using gifs and screenshots to help explain things! I will warn that this will be an EXTREMELY LONG explanation, but I want to give as much details as I can under the cut. I'm going to use Queenie as my example!
The first thing I do is go to Photopia on Harv's island, a place where you can take photos using any of the villagers in the game and all the items you've collected. I use the Custom Designs app on the nook phone to download different colored wallpapers and floors. The colors that I use depends heavily on the villagers. I've used different backgrounds to make these gifs: green, blue, magenta, and (very rarely) black. For Queenie's colors, it was best to use green! I usually place the villagers towards the back of the wall while I stand in the center of the room. From there, I take out the phone's camera and start recording different reactions.


To record these I use my capture card, the Elgato HD60 S, and the capture software that you can download from Elgato's website. Any capture card and recording application will work.
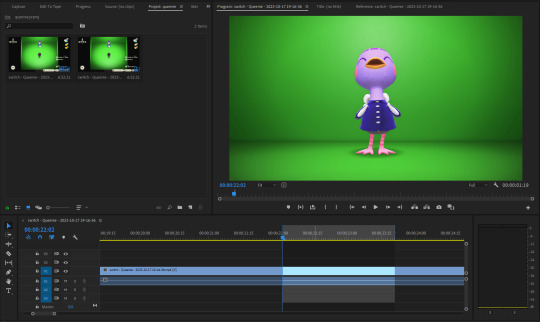
I use three adobe apps to make these gifs: Premiere Pro, After Effects, and Photoshop. I know not everyone has access to these, but I was able to obtain these with the help of some friends. I won't go into details, but I will leave you with this image as a friendly reminder:
Premiere Pro - Here is where I drag all of my videos down onto the timeline and begin the editing process!
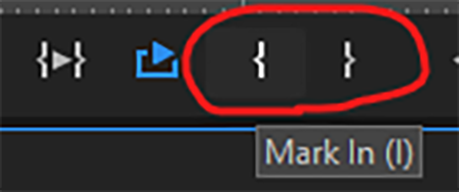
I try to find the best looping points for each reaction. I mark those points using the "Mark In" and "Mark Out" buttons located at the bottom of the preview window. The "Mark In" sets the starting position for the villager reaction and the "Mark Out" sets the ending point, creating a bracket for that specific reaction.
After marking these points, I use the "Play Video In and Out" button and then I make sure to click on the "Loop Playback."
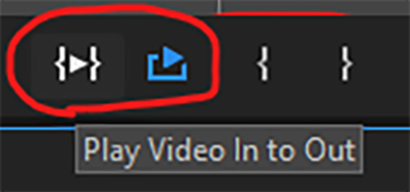
This will not only play the parts of the timeline that I've marked, but it'll loop that exact bracket.
From there, I go to File > Export > Media (or ctrl+m on keyboard). This will bring up the export settings window. I turn the "Source Range" tab to "Sequence In/Out," so it only exports the spots I've marked with the "Mark In" and "Mark Out" buttons.

I then go to the source tab at the top and select the cropping tool.
I make sure to click the box under the "Match Source" button to remove the check mark, and then click the chain icon next to height and width settings to put a slash through the symbol. This allows me to freely crop the video and adjust the height and width of the output, so I can make a perfect green screen box around the villager

I then export this video and move on to the next reaction. I have folders for each gif set that I make. They usually look like this for all the villagers I've completed sets for:
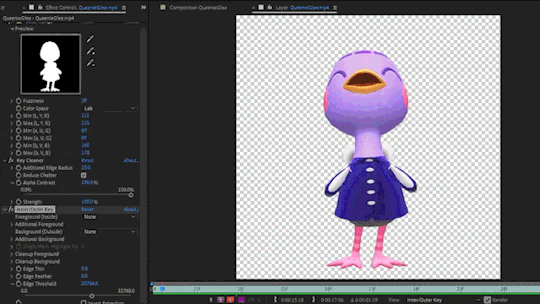
After Effects - Here's where I open all of the reaction files. I go to the effects panel and open the keying tab.
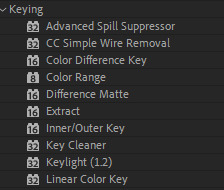
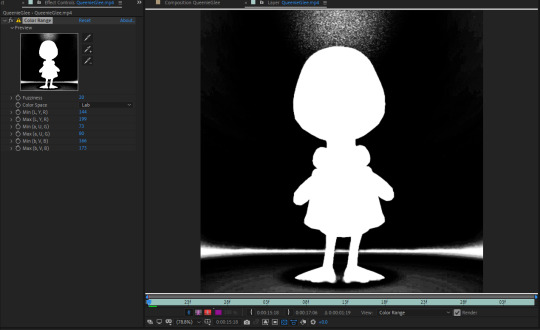
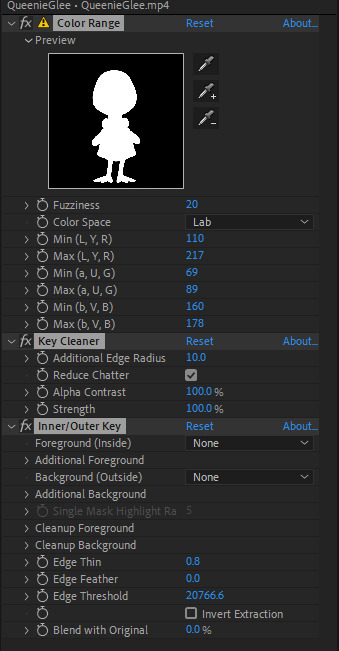
This is where the magic happens! There are three keying effects that I use: Color Range, Key Cleaner, and Inner/Outer Key.
First Effect : Color Range - Starting the keying process, I use dropper tool on any part of the green that's behind the villager. This will only remove some of the background elements because how unevenly colored the green is, due to the lighting of the game.
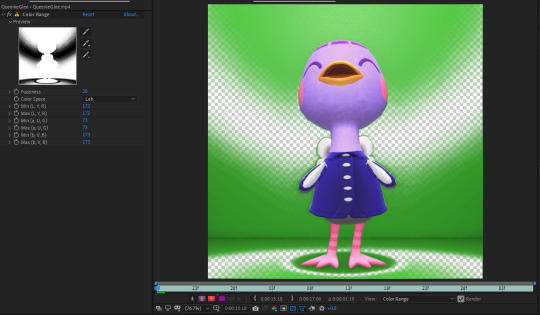
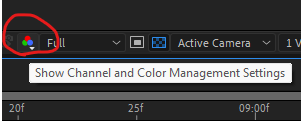
I then use the dropper with a "+" icon on the rest of the background. What helps me is clicking the "Show Channel and Color Management Settings" button at the bottom of the preview window and switching to the "Alpha" view. The alpha channel deals with the transparency of an object and switching to this view allows me to see every bit of the wallpaper and floor that remains. This is where I can apply that dropper+ tool to get rid of them. It doesn't have to be perfect, because the other keying effects that'll be used will help get rid of the loose pixels of green that may still be present.
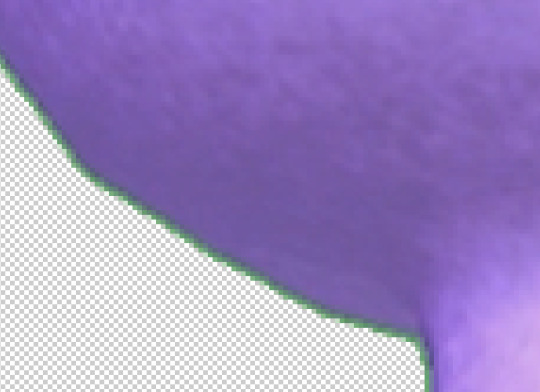
From here, the only adjustment that I sometimes use under this effect is the "Fuzziness" tool. Some villagers will have various color patterns that'll get keyed along with the background. Bringing down the fuzziness helps bring some of those colors back. This does run the risk of bringing some the background pixels back into the video, but that can easily be erased. I usually don't need to adjust the fuzziness. Again, it all largely depends on the colors of the villagers. After all of this is done, I now have a transparent background, but now there's a green outline around the villager:
Luckily, the next effect will help with that!
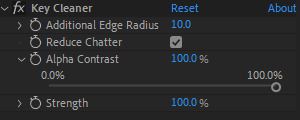
Second Effect: Key Cleaner - This plugin helps clean up the alpha channel around the edges of the villager. The only thing I do here is select the box labeled "Reduce Chatter" and turn the "Alpha Contrast" all the way to 100%.
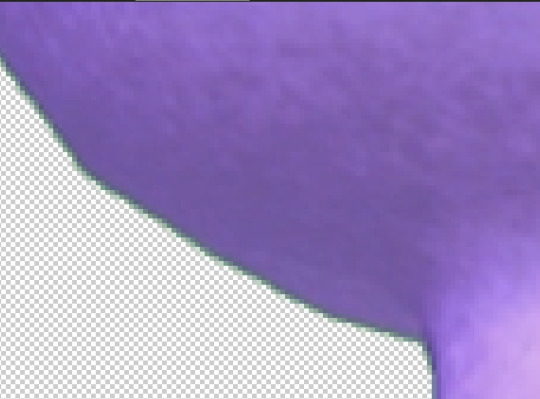
This helps erase most of the outline and makes the edges a little sharper, but there's still a tiny bit of green that surrounds the villager.
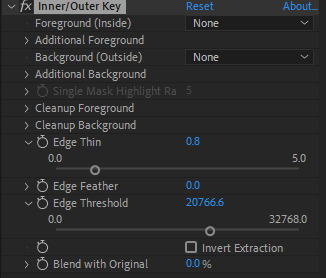
Third Plugin: Inner/Outer Key - I will admit that I don't utilize the entirety of this effect's capabilities. I only adjust the "Edge Thin" and "Edge Threshold" sliders, which should shave off the rest of the green outline.
Using these tools, I've now completed the keying process and I have a nice, crisp villager reaction with a completely transparent background!
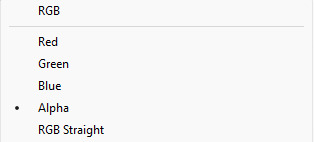
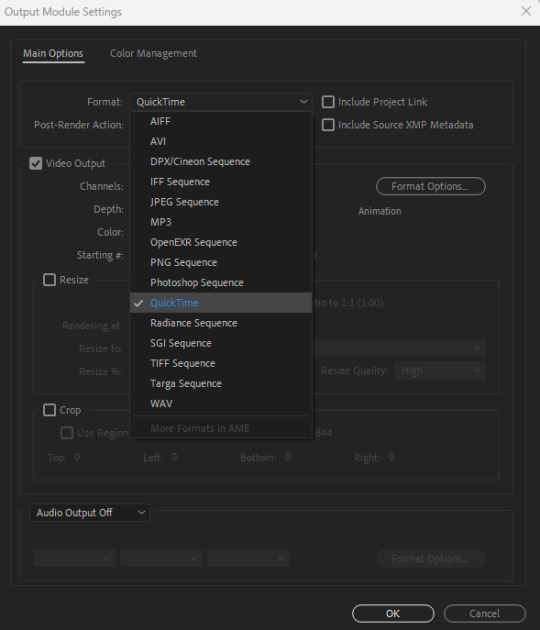
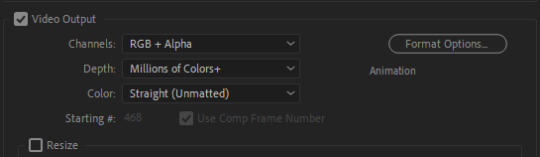
Next I go to File > Export > Add to Render Queue (or ctrl+m on keyboard). I bring up the output settings by clicking on the "Output Module." I then change the format to QuickTime, which will render the reaction as a ".mov" file. I then change the channel to "RGB + Alpha" to render the object (which is the villager) and the transparent background.
Once this is done, I hit the render button and the reaction has been exported! After doing all of this with the first video file, I highlight all of the effects that I've applied from the effects panel by clicking on the names:
I then hit ctrl+c on my keyboard, open the next reaction into the timeline, and then hit ctrl+v. This copies all the effects applied to the first reaction and pastes them to the next video. I repeat this process for each file so I don't have to redo the entire keying process for all of the reactions. After they're all rendered, I can move onto the final adobe step.
Photoshop - This is where I open all of the QuickTime files that I've exported from After Effects.
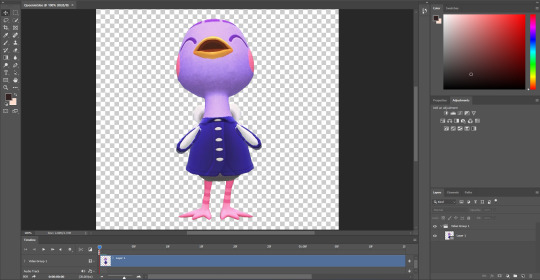
From here, I can apply any adjustments to the villager, whether it be adjusting the brightness, messing around with the hues and saturation, increasing the speed, etc. The main thing I do here is decrease the size. These files are usually huge so I have to adjust the size so I don't risk putting groups of extremely large gifs on peoples' dash. I go to Image > Image Size (or Alt+Ctrl+I on keyboard) and change the width and height to five inches. Of course, any size you choose will work. Five is just perfect for me because it's not too small to ruin the quality of the gif.

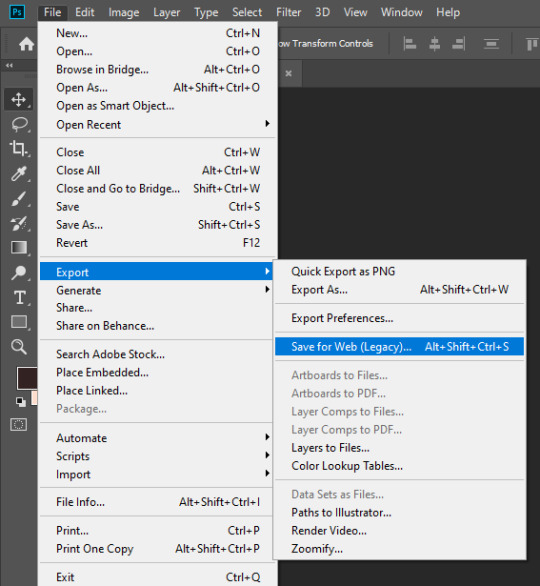
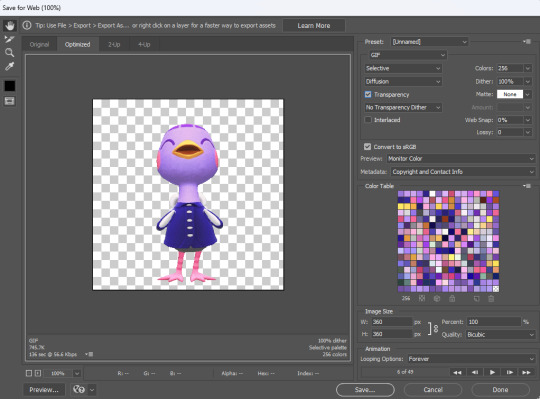
After this is done, I got to File > Export > Save for Web (or Alt+Shift+Ctrl+S on keyboard). This is where I can preview the gif.
I go to looping options on the bottom right and change it to "Forever," otherwise the gif won't loop. I then turn the matte to "None" so the gif doesn't export with an outline around it. I also make sure that the transparency box is checked. This is what my window looks like before I hit the save button:
Once I hit save, that's it! Queenie has been exported as a gif. You can see that gif at the top of this post.
If you've made it this far, thank you for reading all of that! I know some parts of this could've been just a simple summary, but I really wanted to show all the details of how I use every application in this gif making process. I will say that I'm no expert at adobe. This is just a method that I pieced together after experimenting with different combinations of keying effects and I managed to make it all work. I apologize if this process seems messy to advanced users out there and I welcome any tips if they help make things easier!
108 notes
·
View notes
Text
no sound, just imagine frantic sketching noises
my first experiment with art timelapse! ^^
software: photoshop for drawing, obs studio for screen capture, windows movie maker for editing speed (x64) + end zoom
🐍⚕️🐉
#nic art#sketch#art timelapse#naruto#naruto fanart#kabuto yakushi#sage mode#trying to avoid moving the canvas too much#amateur trash but i'm glad i tried this#we all have to start somewhere so why not#it can only get better
9 notes
·
View notes
Note
Can you GIF Axel's wave in episode 5 season 2 at Jesse? I just have no idea how to sorry😭
yeah sure

and a step by step of how i gif things under the cut
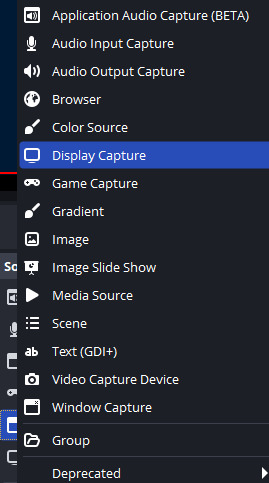
Have a screen recording software, like OBS. On OBS, a Display Capture should work just fine. Or you can use the game capture or window capture, depending on where you're getting the recording from. I used a display capture for this one.
2. Either find the moment on Youtube or go into the game yourself. If its a mandatory part of every playthrough like a major story moment or axel's wave here, you'll probably find it easily. If it's a more obscure moment, I'd open the game myself. I used a youtube video to find axel's wave because I played through episode 5 for a couple minutes and decided it was taking too long FSDKFHD
3. Record that bit! (And familiarize yourself with where the file ends up on your computer. On OBS it should show a message of where the recording was saved at the bottom after you stop the recording)
4. Drop it into an editing software that can output gifs.
I sometimes use Clipchamp because it's free and works in browser, but it's a little limited because you can't do custom video sizes and you can do keyframe animation to move across the screen during the gif or anything. But it works for anything quick.
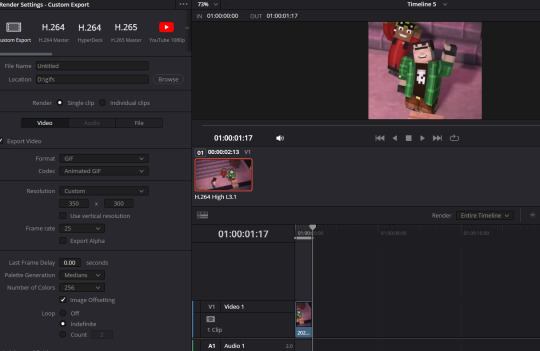
Most of the time nowadays, I use Davinci Resolve. It's free and it's beefy. Takes a beefy pc too. But it's good. I used Davinci Resolve to gif this gif in particular.
#asks#minecraft story mode#so sorry if this isnt the part you meant fddfsds i can gif the right part if you specify more
9 notes
·
View notes
Text
kantab's proof of concept impl
my main concern was potential latency because this goes through like 3 layers (native > websocket > browser)
this is running pretty sweet at 60fps (mouse position obtained each 10ms)
cpu usage is negligible, latency is negligible
this proof of concept is an astounding success
kantab? yeah, kantab (簡単 [kantan] (easy) + tablet)
many vtubers use a software called spud tablet and arm. the software's purpose is to show a hand that aligns to mouse movement and its images are customizable
it works well, i've used it, it's fun. however it has a few working quirks i am not very happy with
it's basically a game app (made using SDL) so for it to be active the window has to be MAXIMIZED and open at all times, so, in the background behind all active windows or just running like that in your screen while you tell obs to only capture the window for the art program
the background is not transparent, you chroma key it to get it to be transparent in obs
no Windows Ink support (windows ink does not update mouse position, and spud requires mouse movement to work its magic)
not crossplatform
kantab is my response to these issues; basically what spud tablet does but with a degree of customizability i want to add beyond just the images, potential windows ink support (aided by opentabletdriver, which would allow one to use it in modern programs and also browsers) and since it's made in .net core, potentially cross platform too
this is also technically overengineered? idk i like trying things out
5 notes
·
View notes
Text
Resolution Independence, Zoom, Fractional Scaling, Retina Displays, High-DPI: A Minefield
I already explained how CPU dispatch is a minefield: It doesn't cause intermittent bugs. It often doesn't even cause crashes. Badly implemented CPU dispatch means you build something on your machine that runs on your machine, but doesn't perform the dispatch correctly, so it crashes on somebody else's machine, or something build on a worse machine still runs fine on a better machine, but not as well as it could. Some of the bugs only manifest with a different combination of compiler, build system, ABI, and microarchitecture. CPU dispatch is a minefield because it's easy to get wrong in non-obvious ways.
I recently played an old game on Windows 11, with a high-DPI 2560x1600 (WQXGA) monitor. Text was too small to read comfortably read, and the manufacturer had set the zoom level to 150% by default. When I launched the game, it started in fullscreen mode, at 2560x1660, which Windows somehow managed to zoom up to 3840x2400. The window was centered, with all the UI elements hidden behind the edges of the screen. When I switched from fullscreen to windowed, the window still covered the whole desktop and the task bar. I quit the game and switched to another. That game let me choose the resolution before launch. At first I tried 2560x1660, but nothing worked right. Then I started it again, at 1920x1080. It didn't look quite right, and I couldn't understand what was going on. Windows has scaled the game up to 2880x1620, which looked almost correct. At this point I realised what was happening, and I set the zoom to 100%. Both games displayed normally.
The first game was an old pixel art platformer from the early 2000s, with software rendering. The second is a strategy game built with OpenGL around 2015, with high-resolution textures based on vector art, and with a UI that works equally well on an iPad and on a PC.
It was hard to read things on that monitor, so I set the font scaling to 150%, but somehow that made things harder to read. Some applications did not honour the font size defaults, and others did, and still others had tiny UI elements with big letters that were spilling out.
Next, I tried to run a game on Ubuntu, with Sway (based on wayland) as the desktop environment. It's a different machine, a 15.6 inch 1920x1080 laptop with an external 1920x1080 23 inch monitor attached. I zoomed the internal display of the laptop by 150% in order to have windows appear equally sized on both monitors.
What is happening on Windows 11 seems to be that even OpenGL games that don't think in terms of pixels, but in terms of floating point coordinates that go from -1 to +1 in both the x and y dimension, (so 0.1 screen units are different sizes in different dimensions) are treated the same as software rendering games that give a buffer of software-rendered pixels to the operating system/graphics environment. Making an already resolution-independent window bigger feels pointless.
What I would want to happen by default, especially in the case of the software-rendered game, is for the operating system to just tell my game that the desktop is not sized 2560x1600, but 1706x1066 (or just 1600x1000), and to then scale that window up. If the window is scaled up, mouse position coordinates should be automatically scaled down from real pixels to software pixels, unless the mouse cursor is captured: If I am playing a DOOM clone or any first-person game, I do not want relative mouse sensitivity to decrease when I am playing on a 4K monitor or when I am maximising the window (if playing in windowed mode). If I have a retina/zoomed display attached, and a standard definition/unzoomed display, and there is a window overlapping both screens, then only the part of a window that is on the zoomed display should be zoomed in.
What I would want to happen with a "resolution-independent" game is this: The game queries the size of the monitor with a special resolution-independent query function. There is no way to "just make it backward compatible". This is a new thing and needs new API. The query returns
Size of all desktops in hardware pixels
Size of all screens in real-world centimetres
Preferred standard text size in pt/cm (real world) or pixels
Zoom factor (in percent) of all desktops
Which screens are touch or multi-touch screens
Is dark mode enabled?
Which desktop is "currently active"
The "preferred" desktop to open the window
This information would allow an application to create a window that is the appropriate size, and scale all text and UI elements to the appropriate size. We can't assume that a certain size in pixels is big enough for the user to comfortably hit a button.
Even this information might not be enough. What should be the behaviour if a windowed OpenGL application is dragged between a 4K monitor at 200% zoom, and a 640x480 CRT? Should the OS scale the window down the same way it currently scales windows up when they aren't "retina aware"?
I don't really know. All I do know is that Windows, Mac OS, and different wayland compositors all handle high-DPI zoom/retina differently, in a way that breaks sometimes, in some environments. But it looks fine if you don't have scaling set. There are ways to tell the windowing system "I know what I am doing" if you want to disable scaling, but these are easy to abuse. There's a cargo cult of just setting "NSHighResolutionCapable" or "HIGHDPIAWARE" without understanding why and why not. Win32 provides all the information you need, with a very complex API. Wayland has a very different approach. SDL is aware of the issue.
I really hope SDL3 will make this work. If you get this wrong, you'll only realise when somebody on a different operating system with a different monitor tries to get your game to fit on the screen by fiddling with the registry, and it goes from not fitting on the monitor to text being too small read.
8 notes
·
View notes
Text
gif making tutorial for the inimitable @snowysobsessions
disclaimer: this is exactly how i do it, but im basically just winging it tbh. there may be other methods that are quicker and/or look way better. this is just the way to which i have become accustomed. i am not a fancy ass gif maker who does colouring and sharpening or uses photoshop whatever, those folks are the real pros. i just like to get the job done :) if you wanna make really fancy gifs other tutorials may be more appropriate. ok lets get into it under the cut!
step 1:
select your source. for the purposes of this tutorial im going to stay on-brand and use this video of weird al on 30 rock (aka the original Milf Weird Al).
youtube
step 2:
either download the video (i dont have a good recommendation for a website for that unfortunately, they all seem virus-ridden these days) or screen-record the part of the video you want to turn into a gif. for me, thats the part with al in it.
my computer runs windows something - 11 maybe? and it comes with screen recording software built in that saves into a folder called "captures" in the video folder, which can be activated with the keyboard shortcut Windows Key + Alt + R. most phones also have screen recording functions, you could record it on your phone and transfer it to your computer? (for the record the website i use works on mobile too, but its very slow and annoying so i much prefer to use my laptop.)
step 3:
use video editing software of your choice to cut the clip down to just the part you want giffed. i use microsoft clipchamp because thats whats on my computer. it can also be used to crop away any black bars around any video clip, which is useful, because a properly cropped gif will probably be better quality. export the clip in as high quality as possible.
tip: try to keep the gif 3 seconds or under. this keeps the filesize down. tumblr gif size limit is 10MB, but i keep all my gifs 5MB or below because otherwise the loading time/storage burden is painful, and like i said, im not making fancy ones here, i dont mind them being a bit lower quality.
here is my clip. i saved it muted because its filesize is smaller that way.
step 4:
go to https://ezgif.com/video-to-gif which looks like this.
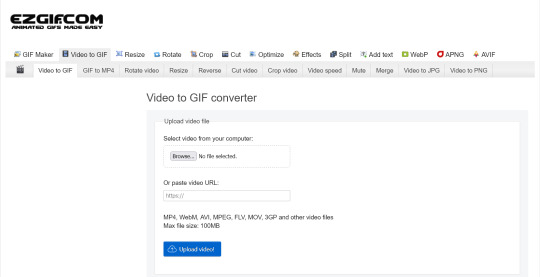
note that ezgif has tools for cutting, cropping and resizing videos if you dont have access to any video editing tool. its quicker if you do it in advance, though, i find.
upload your video and you will see this type of screen appear.
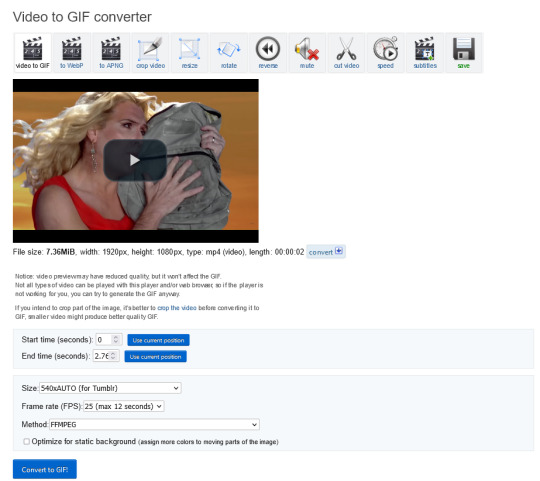
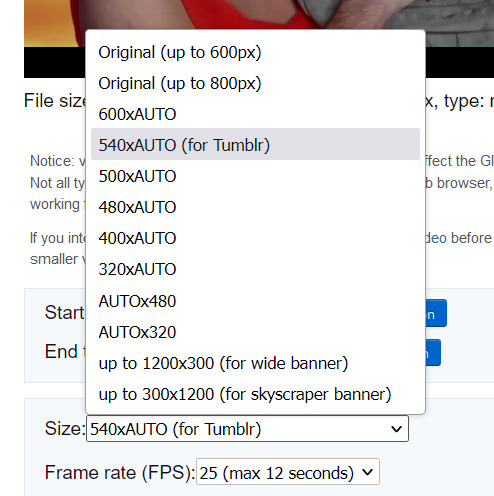
if youre uploading it to tumblr, the 540xAUTO size option is the one i go for by default, but it also has the following size options.
smaller size = smaller filesize, and you want the filesize as small as possible within reason. i sometimes make a gif smaller in dimensions if i'm really struggling to get the filesize below 5MB.
next is the frame rate: i set it to 25 because thats closest to the oriignal frame rate of most recorded video, but in order to make savings on filesize, it can be selected to 20FPS or 12FPS. i wouldnt recommend lower than that unless you want it to look weird and choppy, in which case, go ahead, and i wouldn't recommend higher unless you literally need the animation to be smooth as silk - for making it slowmo, for example.
i don't mess with the "method" drop down bc idk what it means.
the "Optimise for static background" tickbox is useful for if someone is doing something on a totally still background, because it reduces filesize by not animating every single bit of background in every frame. it could be helpful here as our background is not moving at all, just our heroine Alfina. i'm going to tick it.
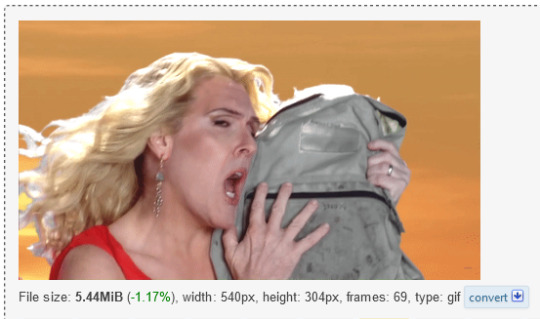
now you can click "Convert to GIF". you should see something like this - itll be animated of course, this is just a screenshot.
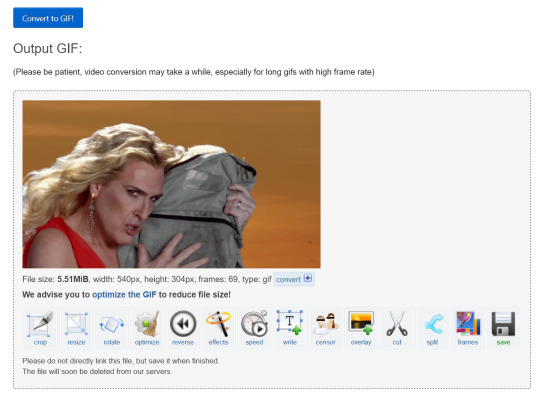
our gif looks crispy fresh (and has 69 frames - NICE), but its filesize is 5.51MB which is more than id like it to be, but first we're gonna look at Effects, so I'm not going to click the "Optimise" option yet.
step 5:
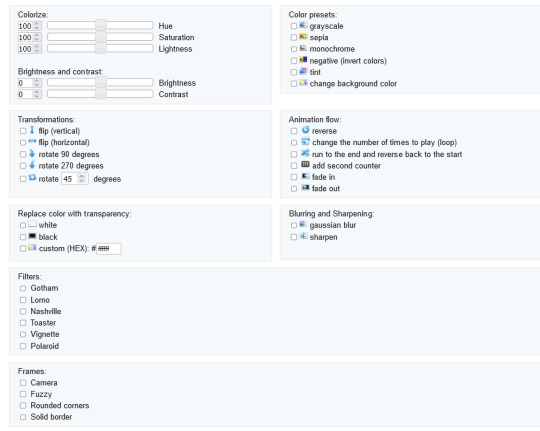
clicking effects will provide the following options
if the video was sort of dark and hard to see, for example if it was live footage, it can be helpful to increase the brightness. changing the brightness and contrast makes our gif look like this, and makes it pop a little more.
you can keep playing with the settings and clicking "Apply selected" until it looks about right to you, or not add any effects at all - it's up to you. I hit the back button in my browser to go back to the gif before i added the effects, then I went to Optimise.
step 6:
the Optimise screen is like this
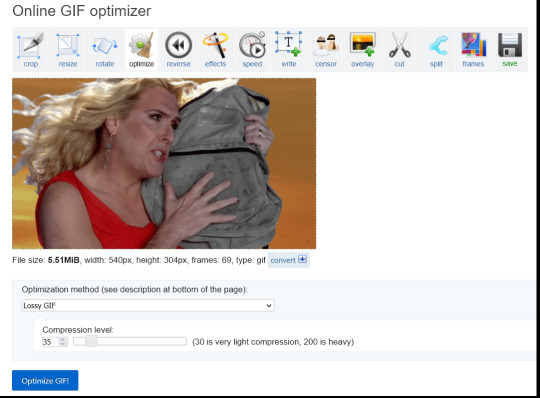
i tend to stick with the Lossy GIf optimization method. I put the compression level down to 30, and press Optimise GIF and see what happens.
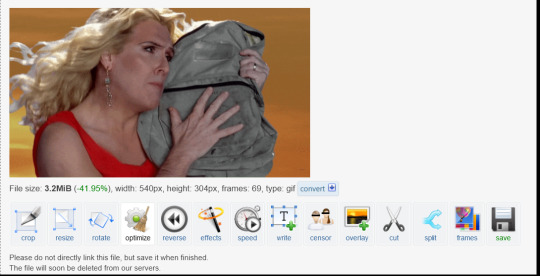
as you can see, the filesize has been reduced by 41.95% to 3.2MB without a super noticeable drop in quality.
if you set the compression level to 200, this is what it looks like
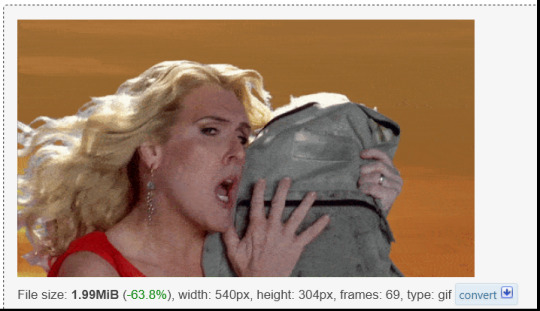
much more pixely, and not much further reduced in size, so i stick to the lower end of the compression scale.
this is our finished gif! isnt she beautiful. i just right-clicked and hit save on it on the webpage after generating - on mobile, i guess you'd long-press on it to download it.

hope that helps!!! lmk if you need help with any other aspect like changing speed or overlays or anything but honestly it's pretty intuitive once you know how to do these bits.
17 notes
·
View notes
Text
Bookbinding for Beginners by a Beginner Part 3
*braces self on a door frame* Right there's a lot of information I still need to cover so lets get into it.
I don't recall if I told everyone to set up the document to be booklet type or not but here's how to do that (I'm not re-reading what I wrote my brain stopped working at some point)
But Layout Tab, Page Layout, hit the little arrow pointing towards the document:
I have the sheets per booklet set to 32, but this site is helpful for helping you get the exact number of signatures (a portion of the fic you are printing it is one section of the book, whereas a text block is the whole thing together)
That's if you want to print through the program you're type facing (the text within the pages all of the formatting and indents and everything we started covering in part 2 is type facing). I have totally done printing through the word processor but there is a different option that I will cover later down this post.
For now I'm going to try and remember all of the extra stuff I need to cover. A lot of this is trial an error and fiddling, farting, and sometimes sobbing your way through this.
OH! Right if the fic you're type facing has a fake email. Like.... I don't know "[email protected]" Word will sensor it automatically when you paste it onto the document. The only work around I have is to have the OG link to the fic you're working on, and try your best to locate the email copy it, and find it within the text of the document using the headers to skip to the chapter in question and scan for the brackets with [Email redacted] or some such, it's usually blue text with "[ ]" going on.
I can't truly think of anything else at this time pertaining to my tips and tricks for Word. There is more I may know but my mind is fizzling out I may circle back to this but I think I'll move on towards downloading and uploading fonts to use in your bookbinding adventures and some Canva stuff.
DaFont and 1001 Free Fonts work
Dafont:

1001:

I'll be using these two Fonts as my examples cause... well I actually quite like them.
Hit "Download"
This will pop up on your screen hit "OK"
Go to your Downloads or where you put your downloads,
Right click on the file in question and hit "Extract All"
Hit Extract.
Click on the folder post extraction. The file type you're looking for is "Open Type Font File" Right Click, "Install" or "Install for all Users" works as well and the font will be available to anyone that has a User key for the computer you're on.
Sometimes the file will look like this:
The Greyed out one? That's the type file.
There will be a pop up that says "Installing Font" give it a few seconds and it will disappear.
You will now be able to open up your word processor and go to the font section and be able to find your newly downloaded font
Enjoy your new found power in getting fancy pants fonts on your word documents!
Now... Canva...
You can download it for free like I said. I have it on my phone and on my computer as a software application:
So I don't accidentally doxx myself this is all you really need to see- you can do much much more than bookcovers, I've done bookmarks, and logos and a few other things.
but for our purposes we'll open up a document and make a few pages:
At the very tippy top that I did not show there's "create Design" I usually hit either "Bookcover" or "ebook cover".
There will be a document with some template examples and you can scroll and see if you like any of those. OR You can just go down to "Elements" and start playing and toying around with that.
You can also grab screen captures of decorative lines to replace the "***" on your document.
How to do this- in elements there should be a search bar type in "decorative lines" and you can refine it "Decorative Rainbow" "brush stroke" "ornate" then open up the application on your computer that allows for screen shots Snip and Sketch for Windows, I don't know for Mac. Sorry.
Select something you like and when it appears on the document click outside of it.
open up your screen grab and grab the line in question

Here's my example.
Now in your word document feel free to go into the Pages tab of the Navigation bar and find whatever the author has used to break up the text. Highlight, right click, hit "search" There will be a pop up on the right hand of word hit the tab that says "Search this document/file" you can see how many times "***" or the equivalent has been used. I would suggest opening this link and reading all of the other tips and tricks since they break it down better than I ever could.
Edit as of November 18th 2023: But the root gist of it all is to highlight the "***" or equivalent divider on the document. Right click, "Search" there will be a prompt that opens on the right hand side of Word hit the "In this Document" and it will bring up every instance of what you have highlighted.
Have the image you intend to replace "***" with right click "Copy". Back in Word, hit "Replace" there will be a box that pops up with "Replace with" Type: ^C . What this does is take the image you've just copied and will override the highlighted "***" Hit "Replace all". You may have to scrub through the document to center it properly but thankfully it's easier to find especially with the Navigation Bar on the "Pages" tab open.
End Edit
Though you can just scroll and find the breaks highlight and drag and drop the image to break up the text if you so choose. Do what works for you.
Now you can also do the same thing with decorative chapter headers, just choose or fiddle and make something that works for the fic in question. Remember when I made you do all of those "Next Page" breaks for the fic? Well on the top of that page with the chapter, double click the header insert an image and "warp image" to "Behind text" and you are free to resize and move the image around.
Just so you know whatever is next to the image will repeat with this example it's the author's name, it will appear no matter the page number odd or even. I don't know the work around and it doesn't bother me much at the end of the day. At this point I'm just trying to pull all of the tips and tricks I've learned over time out of my ass to help people out.
Back to Canva. You can make your Covers if you'd like in this and you can do decorative cover pages. Just go to the page that you want the title page on, insert an image, and warp image to "In front of text" You will be free to stretch and fill the page as much as you please. I do the same thing with my logo placement for the logo page.
Now... if you're still with me... Congratulations I'm not sure I'm still with me or not.
So I'll move on to the "OK I like how this all looks and I've saved everything I've done"
GREAT you can calculate the right number of signatures and print from here OR you can take a few extra steps.
Hit File, Export, hit Create PDF/XPS. I hope you have at least a free Acrobat or PDF reader. Wait. Don't panic if it looks like the processor is freezing up on you. there should be a pop up of a PDF after that minor heart attack.
Now. With your new PDF you're going to go to Bookbinder JS
Upload the pdf file you've created and I'll walk you through the steps.
Letter 612 x 792 is your standard 8.5 x 11 paper.
Printer type- Duplex I hope you have a duplex printer. You'll need it or else you will be manually flipping the pages to make this book bind.
Folio- That is just 8.5 x 11 paper folded in half to make 8.5 x 5.5 booklets. Keep these numbers in mind.
Signature format- there you can select "Perfect bound" AKA Paperback. Or Standard signature. Here I select 20 page signatures. Keep in mind that there will be four pages per one sheet of paper.
Preview output ALWAYS preview output because it will tell you how many signatures will be with the upload. For example:

What this means: Total pages of the file uploaded, since the fic I'm type facing is 300+k words I divided the chapters up.
so you know what a 100+k word fic looks like printed folded and the air compressed (I will cover this as well) Keep this in mind this was Celestial Navigation now add similarly stacked pages atop of what's here. 100+k fics it's wisest and best to split this in half. Keep in mind your wrists. 500-600 pages is comfortable holding. You can get to around 800 pages but if it's 900+ pages I would think about dividing the document up.

After you are happy with the number of everything. Hit "Generate Output" wait for the popup for the save file to appear and hit "Save" this will be in a zip file as well. Head over to your Downloads and hit extract, open up the file and some terminology that will help with this:

Aggregate book means "the whole damn thing" Signature 0 is the first signature.
To spare the wrath and protest of my printer- I print one signature at a time and fold it since I don't have to worry about getting the page numbers to line up.
Take however much time you please. Next post. Folding signatures, pressing signatures, stitching, gluing end bands and ribbons.
aka- welcome to the world little fic. We hope you enjoy your stay. You're going to be a real book soon.
If I wasn't running out of steam I would cover Quartos. But if you wanted to print a smaller fic know this- increase the text size through out the whole document, these things are SMALL. 4.5x5.5 all said and done. I would go to TikTok and Youtube and look up "Quarto Book bind" if you want to see the smallest, cutest most pain in your ass book you've ever wanted to try and make.
I've done those as experiments as well... they can be fun but my god I'm bad at mathing at times.
#bookbinding for beginners by a beginner#book binding#DIY#so you really want to get into bookbinding?#have I scared you yet?
8 notes
·
View notes
Text
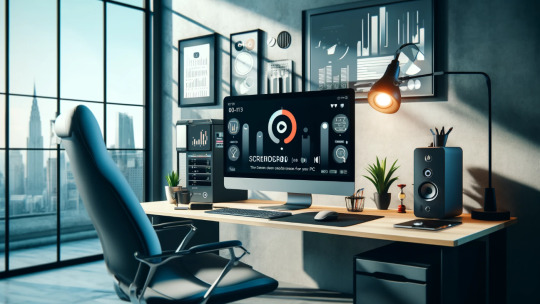
The Best Screen Recorders with Audio for Your PC
Recording your screen along with audio can be a game-changer for creating tutorials, recording gameplay, or conducting online classes. Having the right screen recorder that captures both video and audio seamlessly is essential for producing high-quality content. Let’s explore some of the best options available, highlighting ScreenRec for its efficiency and ease of use, along with other noteworthy tools.
What Makes a Great Screen Recorder with Audio?
When selecting a screen recorder with audio capabilities, consider the following:
Ease of Use: The tool should be intuitive and user-friendly.
Video and Audio Quality: High-definition video and clear audio without lag or desynchronization.
Editing Features: Tools for basic to advanced editing of your recordings.
Sharing Options: Easy and secure sharing capabilities.
Cost: Evaluate the balance between features offered and affordability.
Top Screen Recorders with Audio for PC
ScreenRec: ScreenRec stands out for its simplicity and powerful features. It allows you to capture high-quality video and audio effortlessly. One of its best features is instant sharing through a secure cloud link, which is perfect for quick communication and collaboration. ScreenRec is free, with unlimited recording time once you create a free account, making it a budget-friendly choice. Its user-friendly interface ensures that even non-tech-savvy users can start recording with ease. Additionally, ScreenRec encrypts all recordings, ensuring that your data remains secure.
OBS Studio: Open Broadcaster Software (OBS) Studio is a free and open-source screen recording tool known for its extensive features and customizability. It's particularly popular among gamers and live streamers for its ability to handle multiple sources and live stream directly to platforms like Twitch and YouTube. OBS Studio supports high-quality video and audio recording but comes with a steeper learning curve due to its vast array of features.
Camtasia: Camtasia is a premium screen recording tool that offers a comprehensive suite of editing features, such as annotations, transitions, and effects. It's perfect for creating polished, professional videos. Camtasia supports both screen and audio recording, making it a great choice for producing detailed tutorials and marketing videos. Despite its higher price tag, its advanced capabilities make it a worthwhile investment for those who need detailed editing options.
Bandicam: Bandicam is favored for its ability to record high-quality video, particularly for gameplay. It supports high FPS recording and includes features like real-time drawing and webcam overlay. Bandicam also supports audio recording, capturing both system sound and microphone input. It’s ideal for users who prioritize video quality and detailed recording options.
ShareX: ShareX is a free, open-source screen recorder that offers various capture methods, including full screen, window, and region. It also provides a range of editing and sharing tools. ShareX supports audio recording, though setting it up might require some additional steps compared to more user-friendly tools like ScreenRec. ShareX is suitable for users who appreciate customization and don’t mind a bit of a learning curve.
Why ScreenRec Stands Out
ScreenRec excels in providing a seamless recording experience with minimal setup. Its user-friendly interface ensures that even those who aren't tech-savvy can start recording with ease. The instant sharing feature, combined with secure cloud storage, ensures that your recordings are always accessible and easy to distribute. For users needing a reliable, no-cost solution that doesn’t compromise on features, ScreenRec is an excellent choice.
Final Thoughts
Choosing the right screen recorder with audio capabilities depends on your specific needs. If you’re looking for a simple, effective, and free tool, ScreenRec is highly recommended. For more advanced features and professional editing, Camtasia and Bandicam are excellent options. OBS Studio and ShareX provide powerful features for free, though they come with a learning curve. Regardless of your choice, having a reliable screen recorder will enhance your productivity and communication.
5 notes
·
View notes
Text
Win Mobile and PC Monitoring Software: A Comprehensive Guide
In an era where digital devices are an integral part of our daily lives, monitoring and managing their usage have become essential. Whether you're a concerned parent, a business owner, or an individual looking to ensure the security of your devices and data, Win Mobile and PC monitoring software can be a valuable tool in your arsenal. In this article, we will explore the world of monitoring software for Windows-based computers and mobile devices, highlighting their features, benefits, and considerations.
Understanding Win Mobile and PC Monitoring Software
Win Mobile and PC monitoring software, often referred to as computer or mobile monitoring software, is a category of software designed to track and record activities on Windows-based computers and mobile devices. These tools serve various purposes, from parental control and employee monitoring to security and data protection. Let's delve into their key features and applications.
Key Features
Activity Logging: Monitoring software records a wide range of activities, including keystrokes, web browsing history, application usage, and file transfers. This comprehensive logging helps users gain insights into what happens on the monitored device.
Screen Recording: Some advanced monitoring tools can capture screenshots or record the screen in real-time, allowing you to see exactly what the user is doing on their device.
Remote Access: Many monitoring programs offer remote access capabilities, enabling users to view the monitored device's screen or perform certain actions from a remote location. This can be particularly useful for troubleshooting or parental guidance.
Alerts and Notifications: Monitoring software can be configured to send alerts and notifications when specific keywords are detected in messages or when certain actions are taken, helping users stay informed in real-time.
GPS Tracking: Mobile monitoring solutions often include GPS tracking features, allowing you to track the physical location of a mobile device in real-time.
Applications
Parental Control: Parents can use monitoring software to keep an eye on their children's online activities, ensuring they are safe and responsible online. It helps in preventing exposure to inappropriate content and managing screen time.
Employee Monitoring: Businesses can use monitoring software to increase employee productivity, monitor workstation usage, and protect sensitive company data from insider threats.
Security: Monitoring software can act as a security tool by identifying and preventing unauthorized access, potentially saving sensitive data from theft or loss.
Data Recovery: In case of device theft or data loss, monitoring software can help track the device's location or recover important files and data.
Considerations and Ethics
While Win Mobile and PC monitoring software offer significant advantages, there are ethical and legal considerations to keep in mind:
Legal Compliance: Ensure that your use of monitoring software complies with local and international laws. Unauthorized monitoring can result in legal consequences.
Privacy: Respect the privacy of individuals being monitored, especially in a personal or workplace context. Transparent communication is key.
Consent: In many cases, obtaining consent from the individuals being monitored is essential and legally required.
Conclusion
Win Mobile and PC monitoring software can be a powerful ally in ensuring the safety, productivity, and security of your digital devices and data. However, it's crucial to use such software responsibly, ethically, and in compliance with applicable laws and regulations. Whether you're a parent, an employer, or an individual concerned about your own digital security, choosing the right monitoring software and using it judiciously can make a significant difference in your digital world.
Ready to take control of your digital world and ensure the security and productivity of your devices? Don't wait any longer; it's time to explore the benefits of Win Mobile and PC monitoring software. Here's your call to action:
Choose the Right Software: Begin by researching and selecting the monitoring software that best suits your needs. Look for reputable options with the features you require.
Download and Install: Download the chosen software from a trusted source and follow the installation instructions carefully.
Configure and Customize: Take the time to configure the software to your preferences. Customize alert settings, access permissions, and monitoring parameters to align with your objectives.
Educate Yourself: Familiarize yourself with the software's features and capabilities. Understand how to use it effectively for your specific purposes.
Respect Privacy and Consent: If you're monitoring others, always ensure you have proper consent, and respect privacy laws and ethical guidelines.
Stay Informed: Keep yourself informed about updates and improvements to the software. Regularly check for updates to benefit from the latest security enhancements and features.
Seek Support: If you encounter any issues or have questions, don't hesitate to reach out to the software's support team or community for assistance.
Monitor Responsibly: Use the software responsibly and ethically, whether it's for parental control, employee monitoring, or security purposes. Balancing security with privacy is essential.
Now, take the first step towards a safer and more controlled digital environment. Download your chosen Win Mobile and PC monitoring software today and experience the peace of mind and productivity benefits it can offer. Your digital world is in your hands—make the most of it with monitoring software.
2 notes
·
View notes
Note
hi!! if you don't mind me asking what do you use to capture your bg3 gifs??
hi ! sorry for a bit of a late reply as i was out all day. but it's totally chill i'm happy to answer any questions about this sort of stuff !
so i actually use the built in windows capture controlled by the xbox game bar. i also have dabbled w/ the screen recording software that comes w/ my nvidia graphics card but i think the xgb is easier to use for me personally. there are muuuuch better programs out there but this is what works for me.

heres a lil screenie of what it looks like u can see my various recordings from pics to videos and is just fairly simple & i control it with hotkeys on my laptop. if you're curious about the video quality here's a wee clip below to showcase---
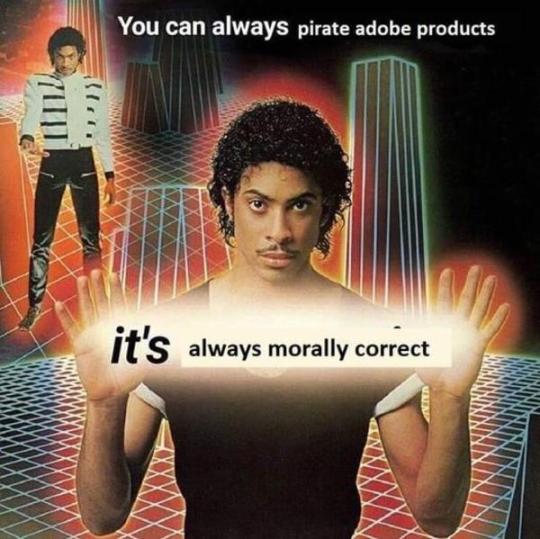
as far as what software i use to make gifs im actually running on a bootleg pocket cs5 kfsdjha unless someone wants to pay for my adobe i'll be using cracked versions of it until i die.
anyways i hope this all helps ! lemme kno if u have any more questions c:
2 notes
·
View notes