#Smart Home Setup Tips
Explore tagged Tumblr posts
Visit Tumblr Blog
Explore Tumblr blogs with no restrictions, modern design and the best experience.
Last Seen Tumblr Blogs


Fun Fact
1,644 Tumblr posts in 1 second.
Text
🏠 Best Smart Home Devices to Upgrade Your Space in 2025
Welcome to the future—where your home responds to your voice, saves energy automatically, and keeps you secure 24/7. Smart home devices have become more affordable and intuitive, making it easier than ever to upgrade your space without breaking the bank. In this post, we’ll cover the best smart home gadgets of 2025 that will transform your house into a modern, connected space. 🗣️ 1. Echo Dot…
#Affordable Smart Home Tech#Alexa Compatible Devices#Best Smart Gadgets#Echo Dot 5th Gen#Govee Light Strips#Home Automation Ideas#news#Ring Video Doorbell#Smart Home Accessories#Smart Home Devices 2025#Smart Home Setup Tips#Smart Living 2025#Smart Tech for Beginners#technology#TP-Link Smart Plug#Voice-Controlled Devices
0 notes
Text
youtube
Upgrade Your Setup: Cool Tech Accessories & Smart Gadgets
Looking to upgrade your setup? Check out these cool tech accessories and smart gadgets that will take your computer game to the next level. From sleek keyboards to handy gadgets, these accessories will make your workspace more efficient and stylish!
#computeraccessories#smartgadgets#smartdevice#smart home gadgets#office gadgets#tech tips#productivity gadgets#tech setup#technology trends#smart devices#latest gadgets#budget tech#tech haul#Youtube
0 notes
Text
Getting Started with Smart Home Automation
Hello everyone! I’m excited to dive into the world of smart home automation. Recently, I’ve been exploring the brand SwitchBot and their innovative solutions. I’ve heard great things about their universal remote capabilities, which can control multiple devices in your home with ease.
I’m particularly interested in how I can streamline my daily routines using this technology. I’ve read that SwitchBot’s universal remote allows you to manage various devices, like lights, fans, and even appliances, all from one central hub. It sounds super convenient!
For someone just starting out, what are some tips on setting up the SwitchBot universal remote? I want to ensure I maximize its potential to make my home smarter and more efficient. Any advice on the best devices to pair with it would be greatly appreciated. Thank you for your help!
#SwitchBot#daily routines#setup tips#smart devices#universal remote#smart home automation#home efficiency#device control
0 notes
Text
TV Mounting Guide with Easy Steps for Wall Installation

TV mounting is a great way to optimize your living space at the same time as enjoying a sleek, modern setup. Mounting your TV on the wall now not only improves your viewing experience but also provides an easy aesthetic to your home. In this guide, we’ll cover the benefits, tools, gear, and steps for proper TV mounting on the wall.
Why Mount Your TV on the Wall?
TV mounting offers several benefits that can transform your living area:
1. Space-Saving
Mounting your TV on the wall eliminates the need for heavy furniture such as TV stands. It frees the valuable floor space and creates a more organized room.
2. Better Viewing Angles
By mounting your TV on the wall at the eye level, you will enjoy more comfortable viewing and avoid neck stress with awkward angles.
3. Clean, Modern Look
The TV mounting provides a smooth, minimal appearance, in which hidden cables create a well-organized, clutter-free space.
4. Safety
For homes with young children or pets, enhancing your TV on the wall, ensuring that it stays safely in place, stops accidents from topping the TV.
Choosing the right wall mount
The first step of TV mounting is to choose the right wall mount for your TV. The most common types here are:
1. Fixed Wall Mounts
Ideal for a simple, low-profile look, fixed mounts keep the TV flat against the wall with no adjustment features.
2. Tilting Wall Mounts
If you need a slight angle adjustment, tilting mounts allow you to tilt the TV up or down, perfect for reducing glare.
3. Full-Motion Wall Mounts
You can tilt, swivel, and extend the TV away from the wall with these mounts. They work well in spaces with lots of seating.
Tools You’ll Need
Get these supplies before you begin mounting your TV on the wall:
TV Wall Mount: Check that it fits the Vesa pattern and size of your TV.
Drill bits and a Power drill: Are used to create holes in walls.
Stud Finder: To find the studs for secure mounting.
Level: To keep the TV straight.
Screwdriver: To attach the mount and arms.
Tape Measure & Pencil: For accurate measurements and marking.
Cable management: To conceal cables for a neat appearance.
Step-by-step guide to mount your TV on the wall
Use these procedures to mount your TV correctly on the wall:
Step 1: Find out the appropriate location
To find studs behind the wall, use a stud finder. These provide the necessary support for your TV. Mark the stud positions and decide on the best height for your TV, ideally at eye level when seated.
Step 2: Take measurements and make notes Points of Drilling
To ensure that your TV will be level and centered, measure and mark the wall mount locations. Use the layer to make sure everything is level.
Step 3: Drill holes
Using the marks you made as a guide, drill pilot holes into the studs. The screws in the mount should be the same size as these holes.
Step 4: Fasten the mounting bracket
Using pilot holes, screw the growing bracket in the wall. Verify the level and security of the bracket.
Step 5: Connect TV to mounting arms
Attach the wall mount's arms to your TV's back. This should be attached to the mounting holes on the Vesa.
Step 6: Mount the TV
Carefully lift the TV with a friend's assistance, then hang it from the mounting bracket. If needed, fasten it with extra screws.
Step 7:Keep the Cables Hidden
For a clean look, conceal cables behind the wall using cable management systems like raceways or in-wall kits.
Advice for an Effective TV Mounting
Measure Twice, Drill Once: To prevent errors, be extra cautious when taking measurements.
Help: Two people can mount your TV on the wall. Accuracy and protection are assured if you have help.
Verify for Obstructions: Before drilling, make sure there are not any wires or pipes in the back of the wall.
Expert Assistance: If you are no longer sure a way to mount your TV, reflect on consideration on getting professional assistance.
Advantages of Expert TV Mounting
If you are not comfortable mounting your TV yourself, hiring a professional installer is probably your best choice.
Professional Installation: Experts make certain the TV is hooked up competently and firmly.
Time-Saving: Experts finish tasks fast and effectively.
Cable Management: To give your cables a polished appearance, many installers can assist with organizing them.
Concluding remarks
Mounting your TV on the wall is a quick and simple way to improve your home theater system. With the right tools and a little preparation, you may have a smooth, modern TV display that enhances your living space with a sleek and elegant look. Whether you choose to do it yourself or hire a professional, TV mounting will help you to build a more aesthetically pleasing and organized house.
#Professional TV Installation#tv wall mounting#Safety Tips for TV Mounting#Smart Home Setup#TV Installation
0 notes
Text
Essential Steps to Get Your Home Ready for a New AC System

A new air conditioning installation is a significant investment that can improve your home's comfort and energy efficiency. Proper preparation ensures a smooth process and maximizes the performance of your new system. Whether you're replacing an outdated unit or installing an air conditioner for the first time, following essential steps can help you get your home ready for the upgrade.
Assess Your Home’s Cooling Needs
Before scheduling an air conditioning installation, it’s important to evaluate your home’s specific cooling requirements. Factors such as the size of your home, insulation quality, number of occupants, and local climate all play a role in determining the right AC unit. Consulting with a professional HVAC technician can help you choose an appropriately sized system that will efficiently cool your space without excessive energy consumption.
Choose the Right Air Conditioning System
Selecting the best AC system for your home is crucial for long-term comfort and efficiency. There are several types of air conditioning units available, including:
Central Air Conditioners: Ideal for whole-home cooling, these systems use ductwork to distribute conditioned air evenly.
Ductless Mini-Splits: A great option for homes without ductwork, providing zoned cooling for different areas.
Window or Portable Units: Suitable for smaller spaces or supplemental cooling but not ideal for whole-home use.
Each type of air conditioner has its advantages, and an experienced HVAC technician can guide you in choosing the best system based on your home's layout and cooling needs.
Inspect and Prepare Your Ductwork
If your new air conditioning installation involves a central air system, it’s essential to ensure your ductwork is in good condition. Leaky or dirty ducts can reduce efficiency and cause uneven cooling. Have a professional inspect and seal any leaks before the installation process begins to maximize airflow and system performance.
Clear the Installation Area
To facilitate a hassle-free air conditioning installation, clear the area where the indoor and outdoor units will be placed. Remove any furniture, decor, or obstacles that might obstruct the installation process. For the outdoor unit, ensure the surrounding area is free from debris, plants, and other obstructions to allow for proper airflow and system efficiency.
Ensure Proper Electrical Setup
A new AC system may require electrical upgrades to handle the power load efficiently. Check with your HVAC technician or electrician to confirm that your home’s electrical panel and wiring meet the necessary requirements. This step prevents issues such as system malfunctions or power failures due to inadequate electrical capacity.
Improve Home Insulation and Sealing
To maximize the efficiency of your air conditioning installation, evaluate your home’s insulation and sealing. Proper insulation helps maintain consistent indoor temperatures and reduces the workload on your AC unit. Sealing gaps around windows, doors, and vents prevents cool air from escaping and minimizes energy waste, leading to lower utility bills.
Consider Smart Thermostat Integration
Upgrading to a smart thermostat can enhance the performance of your new AC system by providing precise temperature control and energy savings. Many modern air conditioning installations include compatibility with smart thermostats, allowing you to program cooling schedules, monitor energy usage, and adjust settings remotely.
Plan for Routine Maintenance
Once your air conditioning installation is complete, regular maintenance is key to ensuring longevity and optimal performance. Schedule periodic inspections, clean or replace filters, and check refrigerant levels to keep your system running efficiently. A well-maintained AC unit reduces the risk of breakdowns and extends its lifespan, providing reliable cooling for years to come.
Final Thoughts on Preparing for Air Conditioning Installation
Proper preparation is crucial for a successful air conditioning installation. By assessing your cooling needs, selecting the right system, preparing your home, and optimizing insulation, you can ensure maximum efficiency and comfort. Consulting with a qualified HVAC professional will help streamline the process and guarantee a seamless installation. Investing time in preparation will not only improve your AC’s performance but also enhance your home’s overall energy efficiency and indoor comfort.
#AC Installation#Air Conditioning Installation#HVAC Installation#Central AC Installation#Ductless AC Installation#Home Cooling System#Energy-Efficient AC#New AC Unit#Residential AC Installation#Professional AC Installation#HVAC System Setup#Air Conditioner Replacement#Cooling System Installation#Best AC for Home#Smart Thermostat Installation#HVAC Ductwork#Ventilation System#Airflow Optimization#Home Comfort Solutions#AC Efficiency Tips#Climate Control#Indoor Air Quality#Heat Pump Installation#Air Conditioning Services#Cooling System Upgrade.
0 notes
Text
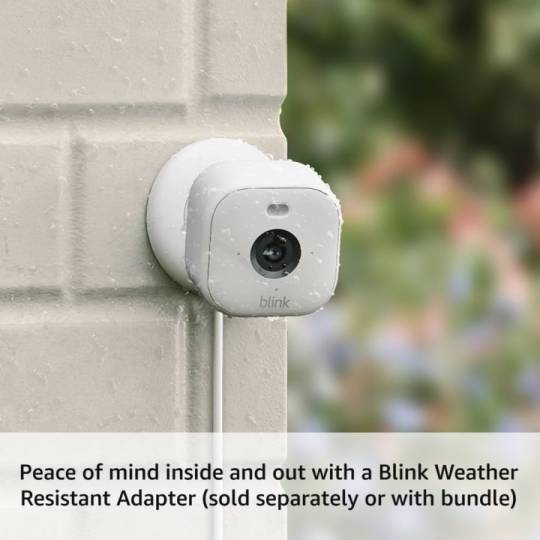
Easy instructions: External Blink 4, Blink Mini 2, and Ring Floodlight Cam Wired Plus
Introduction
Would you be interested in the right smart security camera? With so many options, it can take time to decide. Don't worry—we've got you covered! Here's a straightforward comparison of three excellent choices: the Blink Outdoor 4, the Blink Mini 2, and the Ring Floodlight Cam Wired Plus. Let's break it down so you can pick the one that works best for you.
1. Blink Outdoor 4 [Newest Model]

Checkout this product from here
The Blink Outdoor Four is notable and bendy. It's constructed for indoor and outdoor use and requires no wires, so installation is smooth.
What's Great About It?
· Clear Video Anytime: With 1080p HD in the day and infrared nighttime imaginative and prescient, you'll get sharp views regardless of the time.
· Talk & Listen: Use the Blink app to speak with site visitors or scare off intruders. Intelligent Motion Alerts: It uses more advantageous movement detection to alert you quickly.
· Battery That Lasts: It runs on AA lithium batteries for up to 2 years!
· Store Your Videos: Save clips to the cloud (subscription wished) or locally with the blanketed module.
·Works with Alexa: Control it with your voice or see live perspectives on Alexa devices.
Best For:
Anyone who wishes a dependable, long-lasting wireless digicam for outside or indoor use.
2. Blink Mini 2: Plug-in Security Camera
Checkout this product from here
The Blink Mini 2 is small, affordable, and ideal for indoor safety. It plugs in, so you won't have to worry about batteries.
What's Great About It?
HD Video with Night Vision: See, even in the dark, thanks to its built-in highlight. Covers More Space: The vast view area allows you to see more.
Motion Alerts: Get real-time notifications to your phone while it detects movement.
Quick Setup: Plug it in, set it up, and you're ready to go.
Extra Features: Pair it with a Blink Video Doorbell to apply it as a doorbell chime.
Storage Options: Like the Outdoor Four, you can keep films in the cloud or regionally.
Best For:
People who want an easy and financially pleasant way to screen the internals of their homes.
3. Ring Floodlight Cam Wired Plus

Checkout this product from here
The Ring Floodlight Cam is all about outdoor severe protection. It's a powerhouse with floodlights, a siren, and pinnacle-notch video first-rate.
What's Great About It?
Sharp Video: 1080p HD video with colouration at night, imaginative and prescient, lets you see the whole lot without a doubt, day or night.
Bright Floodlights: Lights come on whilst movement is detected, preserving your private home adequately lit.
Customizable Alerts: Set movement zones to recognize the regions that most matter to you.
Built-in Siren: A loud 105dB siren provides more safety.
No Batteries Needed: It's hardwired, so it's usually powered and equipped to go.
Alexa compatible: You can get notifications, see live pictures, and even communicate with site visitors about using Alexa gadgets.
Best For:
Homeowners who need advanced outdoor security with practical lighting fixtures and delivered features.
Final thoughts
Choose the Blink Outdoor 4 if you want a rugged, easy-to-use wireless camera for indoor and outdoor use.
If you want an affordable, straightforward indoor camera with solid features, choose the Blink Mini 2.
Choose the Ring Floodlight Cam Wired Plus if you want a top-notch outdoor security system with floodlights, sirens, and constant power.
No matter your choice, these cameras will help keep your home safe and give you peace of mind!
#Home Security Cameras#Smart Camera Setup#Blink 4 Instructions#Blink Mini 2 Guide#Ring Floodlight Cam Setup#Wired Camera Installation#Security Camera Tips#Easy Camera Installation#Home Surveillance Guide#Smart Home Devices
0 notes
Text
How to Write Burns in Your Novel (The Art of Verbal Warfare)

She flicks her fan open, eyes glinting like a cat who just cornered a mouse. “Oh dear, I would agree with you, but then we’d both be wrong.”
His mouth opens. Closes. He stares. The room erupts into laughter.
That’s the power of a good burn.
Burns are often used in fiction to showcase a character’s wit, dominance in a conversation, or to add humor and tension to dialogue.
Writing burns in your novel isn’t just about throwing insults. It’s about timing, wit, and the perfect choice of words.
So, how do you write one that stings just right?
Here are some proven tips.
1. Know Your Character’s Intelligence Level
Not everyone is a master of sarcasm or wit. A sharp-tongued noblewoman will deliver a different burn than a street-smart rogue. Make sure the insult matches their voice.
For Example:
The Aristocrat: "Darling, your ideas are as refreshing as yesterday’s tea—lukewarm and entirely unnecessary."
The Rogue: "You talk a lot for someone who can’t back it up. Must be exhausting."
2. Less Is More
The best burns are quick and punchy. Don’t let your character ramble—one well-placed line is all it takes.
Example:
Bad: "You know, I always thought you were incompetent, but now I see you’ve made a full-time job of it.
"Better: "Incompetence suits you."
3. Context Is Everything
A burn needs the right setup. Delivered at the wrong moment, it falls flat.
You can think of burns like landmines—placed strategically, they do the most damage.
For Example:
Casual Setting: A friend teasing another: "You have something on your chin. No, the other one."
Tense Scene: An enemy smirking: "You’re so predictable I wrote your comeback for you."
4. Use Irony and Double Meanings
The best burns don’t just insult—they make the victim realize they walked into it.
Example:"I’d explain it to you, but I left my crayons at home."
"Your secrets are safe with me. I never even listen when you tell them."
5. Let the Reaction Speak for Itself
Sometimes, the power of a burn isn’t just in the words—it’s in the stunned silence that follows. Let your character drop the insult and walk away, leaving the recipient (and the reader) reeling.
For Example:
-She raises an eyebrow. “Bless your heart.” And sips her tea.
-He leans in, grins. “That’s cute. You think you matter.”
Burn delivered. Scene set. Let the verbal carnage begin.
#WritingTips #Burns #CharacterDevelopment
11 notes
·
View notes
Text

7 Geothermal HVAC Mistakes Homeowners Regret (And How You Can Avoid Them)
If you’ve invested in or are thinking about investing in a geothermal HVAC system, you’re already on the right path. It’s one of the smartest ways to cut down on energy bills, boost your home’s comfort, and lower your environmental impact, especially here in the Tri-State area.
But here’s something we’ve seen too often: even the best geothermal systems can underperform or become a money pit when they’re not installed or maintained correctly.
Homeowners unknowingly make small mistakes like skipping soil testing or hiring a contractor who’s not geothermal-certified and those decisions can lead to years of frustration and unnecessary expenses.
We’ve put together a simple, no-fluff guide that breaks down the 7 most common geothermal mistakes, based on real issues we see in homes across NY, NJ, and CT. It’s designed to help you avoid the stress and protect your investment from day one.
In the guide, you'll learn:
Why your soil type matters more than you think
How choosing the wrong system size can wreck efficiency
The danger of skipping regular maintenance
What makes insulation just as important as the system itself
Which rebates and incentives most people miss
And why expecting fast payback can lead to early disappointment
Bottom line? Geothermal is a long-term win if you do it right from the start.
👉 Read the full guide here 👉 Get in touch for a free quote
💬 Let’s Talk Geothermal!
Whether you're planning a new installation or want to make the most of your current system, we're here to help you save energy, avoid costly mistakes, and make a smart, sustainable choice for your home or business.
📞 Call Us Toll-Free: 877.ALL.4.GEO Direct: (+1) 845-240-1827
📧 Email Us [email protected]
#GeothermalHVAC#Geothermal HVAC Mistakes#Geothermal Heating and Cooling#GeothermalEnergy#geothermal energy New York
4 notes
·
View notes
Text
Electrician Tips: Fixing Common Lighting Mistakes
Common Lighting Installation Mistakes and How to Fix Them
Lighting plays a crucial role in any home or business, not just for visibility, but also for aesthetics and functionality. However, many people—whether DIY enthusiasts or even some professionals—can make mistakes during lighting installation that lead to poor results, safety hazards, or inefficient energy use. In this article, we’ll explore the most common lighting installation mistakes and provide practical tips on how to fix them, ensuring your space is well-lit, safe, and stylish.

1. Wrong Type of Lighting for the Room
One of the most frequent issues is choosing the wrong type of lighting for a particular space. For example, using a bright overhead light in a bedroom may feel too harsh, while dim lighting in a kitchen can make it difficult to prepare food safely.
How to Fix It: Layer your lighting. Combine ambient (general), task (focused), and accent (decorative) lighting to create a balanced and flexible setup. In a living room, for instance, overhead lighting can be paired with floor lamps and wall sconces to improve functionality and ambiance.
2. Overlooking Light Placement
Poor placement can make even the best lighting fixtures ineffective. Lights that are too high, too low, or placed unevenly can result in dark spots or overly bright areas that strain the eyes.
How to Fix It: Consider the function of the space and adjust your lighting placement accordingly. For example, in the kitchen, ensure task lights are positioned over work surfaces like counters and the sink. In bathrooms, place lights on either side of the mirror rather than overhead to avoid casting shadows on your face.
3. Using the Wrong Bulbs
A common mistake is using bulbs with the wrong wattage, color temperature, or brightness level. This not only affects the room’s mood but can also damage fixtures or increase energy consumption.
How to Fix It: Match the bulb specifications to the fixture and the intended use. For reading areas, opt for brighter, daylight-balanced bulbs (around 4000K–5000K). For bedrooms, softer, warmer bulbs (around 2700K) create a more relaxing atmosphere. Always check the recommended wattage before installing a bulb.
4. Ignoring Dimmers and Smart Controls
Many homeowners forget to install dimmer switches or smart lighting controls, limiting flexibility in how a room is used and how energy is consumed.
How to Fix It: Install dimmer switches or smart bulbs that can be adjusted via app or voice command. These systems not only save energy but also allow you to control lighting levels throughout the day and night, adapting to your activities.
5. Poor Wiring or Overloading Circuits
DIY installations often skip important steps like checking circuit loads or using appropriate wiring, which can lead to circuit breakers tripping—or worse, electrical fires.
How to Fix It: If you're unsure, hire a licensed electrician. They can assess your home's electrical capacity and ensure proper installation. For those in Kent, an Electrician in Sevenoaks or an Electrician in Tunbridge Wells can provide expert local support, helping you avoid these potentially dangerous pitfalls.
6. Lack of Planning for Future Upgrades
Installing lighting without considering future updates or changes in layout can result in expensive and disruptive revisions later on.
How to Fix It: Plan ahead. Think about potential renovations, new furniture arrangements, or evolving technology. Opt for modular lighting systems or easily upgradable fixtures. Leaving extra wiring or conduit space can also make future changes simpler.
7. Skipping the Use of Junction Boxes
Some DIY installers connect wires outside of a junction box, which is a serious safety hazard and a violation of electrical codes.
How to Fix It: Always use a junction box when connecting wires. This helps contain sparks or heat and prevents fires. If you’re unsure about how to properly use one, consult a qualified electrician. It’s not worth risking your safety for a shortcut.
8. Inconsistent Fixture Styles
While not a technical mistake, mismatched lighting fixtures can disrupt the visual flow of a room. A mix of modern, industrial, and vintage fixtures can create a chaotic look if not done intentionally.
How to Fix It: Choose fixtures that complement each other. You don’t need them to match exactly, but they should share similar materials, finishes, or design elements to maintain a cohesive aesthetic.
Conclusion
Lighting installation isn’t just about screwing in a bulb—it’s about design, safety, and efficiency. By understanding common mistakes and knowing how to correct them, you can greatly enhance the comfort and usability of your space. For more complex tasks or large projects, consulting a professional is the smartest move. Whether you need an Electrician Sevenoaks or an Electrician Tunbridge Wells, working with a trusted expert ensures your lighting is both beautiful and safe.
#business#electrician#electricity#real estate#services#electrician in tunbridge wells#electrician tunbridge wells#electrician in sevenoaks#electrician sevenoaks#LightingInstallation#homeupgrade#electrical#InteriorLighting#DIYLightingFixes#smart home#ElectricianTips#architecturallighting#SevenoaksElectrician#TunbridgeWellsElectrician
2 notes
·
View notes
Text
Podcasting Setup Guide: Microphones, Interfaces, and Room Tips
Launching a home podcast studio is easier than ever—but sounding professional from the start takes more than just hitting “record.” Whether you're building your first setup or refining your current one, this guide covers the essential gear and room tips you’ll need to capture clean, flexible audio without overcomplicating the process.

Recording in progress: A compact podcasting studio with pro-level gear and smart acoustic treatment.
A Quick Look Back: How Podcasting Gear Evolved
In the early 2000s, podcasting was largely reserved for tech enthusiasts with access to radio studios or complex gear. Today, with streamlined digital tools and compact interfaces, it’s possible to achieve broadcast-quality audio from a bedroom or travel rig. The evolution of microphones for podcasting and portable interfaces has reshaped how creators work, making high-quality content more accessible than ever.
Know Your Format First
Before investing in equipment, clarify your format:
Solo commentary
Co-hosted discussions
In-person or remote interviews
Your format determines mic count, interface requirements, and even room setup. Planning avoids wasted purchases and technical limitations down the line.
Microphones: Choose the Right Tool for Your Voice
The microphone is the foundation of any podcast setup. It captures everything, so picking the right one helps control your sound.
Common Mic Types:
Dynamic Microphones: Ideal for untreated rooms. Great at rejecting background noise—perfect for hobbyists and small spaces.
Condenser Microphones: Capture rich detail, but are sensitive to room reflections. Best for quiet, acoustically treated environments.
Quick Tips:
Use a pop filter to soften plosives.
A shock mount reduces desk vibrations.
Stay 4–8 inches from the mic for clarity and focus.
Audio Interfaces: Clean Signal, Zero Hassle
An audio interface converts your mic signal into a digital file for your computer. It’s a critical part of any recording podcast at-home workflow.
What to Look For:
Two XLR inputs for dual mic setups
Phantom power (for condenser mics)
Zero-latency monitoring
Quiet preamps with clean gain
If you're planning to expand or need tactile controls, a compact mixer/interface hybrid can simplify routing.
Working with knowledgeable staff at a reputable pro audio shop ensures your interface, mics, and cables all work seamlessly together.
Recording Remote Guests
Remote interviews are common but present quality challenges.
Options to Consider:
Video call apps: Easy, but often low fidelity
Double-end recording: Each guest records locally and sends you their file
Multitrack platforms: Record remote guests in full resolution on separate tracks—ideal for post-editing
Room Sound: Treat the Space, Not Just the Gear
Even the best mic will sound poor in a bad room. Reverb, echo, and hum can distort speech clarity.

Thoughtful room setup—like foam panels, curtains, and carpets—can dramatically improve recording quality without a full studio build.
Simple Fixes:
Avoid reflective rooms with high ceilings or bare walls
Add carpets, bookshelves, and curtains to absorb sound
Place foam or DIY panels behind and beside the mic for better isolation
You don’t need a professional vocal booth—just thoughtful adjustments.
Recording Workflow: Keep It Simple
Consistency and preparation make recording smoother.
Workflow Tips:
Set input levels to peak around -12 to -6 dB
Record each mic to a separate track
Monitor with headphones to catch issues live
Save multiple copies during the session
Separating dialogue, music, and effects gives you more flexibility in editing.
Monitoring: Hear What You Capture
Closed-back headphones block room noise and prevent mic bleed, where audio leaks back into the mic and causes echo.
Avoid wireless earbuds, which introduce latency and compression, making editing more difficult.
Post-Production Polish
Editing is where your raw voice becomes a polished show.
Essential Steps:
Trim long pauses or repeated phrases
Use EQ to enhance clarity
Apply compression to even out levels
Add intro/outro music for identity
Normalize your final mix to -16 LUFS, the loudness standard for podcast streaming platforms.
Recommended Starter Setup
A basic, budget-friendly setup for most beginner podcasters:
One or two reliable dynamic microphones
A two-channel USB audio interface
XLR cables and pop filters
Closed-back headphones
Modest room treatment (curtains, rugs, or panels)
Exploring in-stock options at a trusted pro audio shop lets you see how these components work together before you invest.
Final Thoughts: Smart Setup, Pro Sound
Podcasting is expanding—mobile kits, video podcasts, and remote-friendly tools are reshaping how creators share ideas. But the fundamentals haven’t changed. Prioritize clean capture, control over your environment, and a streamlined workflow, and you'll deliver audio that competes with the pros.
Whether you're starting your first show or fine-tuning your tenth episode, a clear setup and solid gear make all the difference. Learn, experiment, and evolve—your audience will hear the difference.
#dj#pro audio gear#pro audio equipment#pro audio#dj gears#professional audio shop#podcasting#podcast#podcasting tips#pro audio store#dj controller#dj equipments#the microphones
3 notes
·
View notes
Text
Your Next Trip Just Got Better with Himmaleh's Outdoor Gear

Planning an outdoor adventure? Then you already know how important it is to have reliable gear. The difference between a trip you’ll remember for the right reasons and one you’d rather forget often comes down to the equipment you pack. That’s where Himmaleh comes in — offering well-designed, practical gear for campers, hikers, and trekkers alike.
In this blog, let’s walk through essential items like the Camping Tent by Himmaleh, trusted Camping Equipment, rugged Waterproof Trekking Shoes by Himmaleh, and the all-around value of the Best Outdoor Equipment by Himmaleh.
What Makes Himmaleh Stand Out in Outdoor Gear?
When you’re outdoors, conditions are unpredictable. That’s why having gear that holds up in heat, cold, rain, and wind is key. Himmaleh delivers just that — gear that’s been tested in real outdoor conditions.
Here’s what sets them apart:
Built for Indian terrain and weather
Functional design that makes camping simpler
Easy-to-carry items for treks and travel
Get Camping-Ready with the Right Equipment
Every successful camping trip starts with the right tools. Whether it’s your first trip or your fiftieth, you’ll need dependable Camping Equipment to cook, sleep, and stay safe.
Top Picks in the Lineup
Cookware sets: Compact and multi-functional
Utility lights: Bright, long-lasting, and rechargeable
Carry kits: Lightweight storage solutions for food and gear
Pitch-Perfect Shelter: Camping Tent by Himmaleh
A tent can make or break your camping experience. The Camping Tent by Himmaleh is crafted to handle the elements, whether you’re camping in the forest, by a river, or up a hill.
Why Campers Prefer It
Fast setup: Spend less time figuring it out, more time enjoying
Weather resistance: Keeps you dry even in heavy rain
Roomy inside: Enough space to stretch, sleep, and store
Trek Smart with Waterproof Trekking Shoes by Himmaleh
Footwear isn’t just a fashion choice in the wild — it’s a safety essential. The Waterproof Trekking Shoes by Himmaleh offer traction, comfort, and protection from wet conditions.
Why These Shoes Rock
Water can’t get in, but your feet still breathe
Non-slip soles grip rocky or muddy terrain
Padded interiors let you walk for hours without blisters
Why the Best Outdoor Equipment by Himmaleh is Worth It

From sleeping mats to portable tools, the collection of Best Outdoor Equipment by Himmaleh is curated for adventurers who want quality and convenience. Everything is designed to be light in your bag but heavy in usefulness.
Tips for Making the Most of Your Himmaleh Gear
Break in your shoes before you head out
Practice pitching your tent at home
Pack smart: use compartments to organize your Camping Equipment
How to Clean and Store Your Gear
Taking care of your outdoor gear means it lasts longer.
Dry your Camping Tent by Himmaleh after every use
Clean the mud off your Waterproof Trekking Shoes by Himmaleh after each hike
Store Camping Equipment in a cool, dry place away from moisture
Why First-Timers Love Himmaleh
If you're new to camping or trekking, Himmaleh makes it easy. The gear isn’t complicated, it’s built to perform, and it won’t weigh you down. That’s everything a beginner wants.
Ready to Upgrade Your Next Outdoor Trip?
Nature offers the experience. Himmaleh provides the tools to enjoy it safely and comfortably. Whether you need shoes that hold up in harsh terrain, a tent that protects against storms, or cooking kits that make life easier in the wild — the answer is simple.
Go with Himmaleh. You’ll notice the difference on your very first trip.
Conclusion
Adventuring without the right gear is like hiking without a map — frustrating and risky. But with thoughtfully designed products like the Camping Tent by Himmaleh, durable Camping Equipment, trusted Waterproof Trekking Shoes by Himmaleh, and a solid collection of Best Outdoor Equipment by Himmaleh, your trip becomes a lot more fun and stress-free.
So pack your essentials, tie those trekking shoes, pitch your tent, and take on the wild — with Himmaleh by your side.
FAQs
1. What is the best way to carry camping equipment? Use modular storage kits or lightweight backpacks from Himmaleh that are easy to organize and carry.
2. How waterproof are the Waterproof Trekking Shoes by Himmaleh? They’re made to resist heavy rain and shallow water, perfect for trekking in wet regions.
3. Can the Camping Tent by Himmaleh handle windy weather? Yes, it’s designed with durable pegs and wind-resistant fabric to stay secure.
4. Where can I buy Himmaleh gear? Directly from the official Himmaleh website.
5. Is this equipment suitable for kids or families? Yes, Himmaleh offers a range of gear suitable for family camping trips too.
2 notes
·
View notes
Text
Add Bold Elegance: 10 Stylish Black Side Tables for Every Room

When it comes to adding style, functionality, and a touch of drama to your home, few pieces are as versatile as a black side table. Sleek, bold, and timeless, a black side table can effortlessly enhance your interior while serving as a practical addition to your space.
Whether you're styling your living room, bedroom, or hallway, the right black side table can elevate your décor. In this guide, we'll explore 10 stylish black side table ideas that blend aesthetics with functionality. Plus, we'll share expert tips on pairing your table with a chic round coffee table or a sophisticated chest of drawers for a cohesive and elegant look.
Why Choose a Black Side Table?
A black side table isn’t just a piece of furniture — it’s a statement. Here’s why adding one to your home is a smart choice:
✅ Timeless Appeal: Black blends seamlessly with most color schemes, adding elegance without overpowering the room.
✅ Versatile Design: From modern to industrial, a black side table complements various styles.
✅ Practicality: These tables offer storage, display space, or a spot for lighting and décor.
✅ Perfect Pairing: A round coffee table or a chest of drawers can enhance the bold elegance of a black side table.
1. Sleek Black Metal Side Table for Minimalist Charm
A simple yet striking black side table with a metal frame and slim legs embodies minimalism. Its lightweight design makes it easy to move, while the sleek finish creates a clean, modern look.
✨ Best For: Small living rooms, bedrooms, or reading nooks. ✨ Pair With: A contemporary round coffee table for a streamlined setup.
Pro Tip: Add a minimalist lamp or a decorative vase for a balanced design.
2. Black Side Table with Glass Top for Sophistication
For a refined touch, consider a black side table featuring a tempered glass top. This combination blends elegance with practicality, perfect for modern interiors.
✨ Best For: Living rooms, home offices, or guest bedrooms. ✨ Pair With: A dark wood chest of drawers for added warmth and depth.
Pro Tip: Use mirrored accents or metallic décor to enhance the table’s reflective surface.
3. Black Side Table with Gold Accents for Luxury
A black side table featuring gold legs or detailing creates a luxurious, high-end look. This design is ideal for glamorous interiors or homes embracing a bold aesthetic.
✨ Best For: Elegant living rooms, hallways, or master bedrooms. ✨ Pair With: A statement round coffee table featuring gold elements to maintain a cohesive theme.
Pro Tip: Add a scented candle or metallic tray for an elevated finish.
4. Compact Black Side Table with Storage Drawers
If you need both style and functionality, a black side table with built-in drawers offers ample storage. Perfect for bedrooms or entryways, this design keeps clutter tucked away while maintaining a sleek appearance.
✨ Best For: Bedrooms, home offices, or hallway spaces. ✨ Pair With: A matching chest of drawers for additional storage solutions.
Pro Tip: Use decorative baskets inside the drawers for organized storage.
5. Round Black Side Table for Soft Elegance
A round black side table brings soft edges and fluid design to your space. Its curved shape is perfect for creating a welcoming and cozy vibe.
✨ Best For: Small seating areas, cozy corners, or bedrooms. ✨ Pair With: A stylish round coffee table to complement the table’s shape.
Pro Tip: Add a small potted plant or ceramic sculpture to enhance the aesthetic.
6. Black Side Table with Open Shelving for Display
For those who love displaying books, candles, or decorative pieces, a black side table with open shelving provides the perfect platform.
✨ Best For: Living rooms, study corners, or beside reading chairs. ✨ Pair With: A tall chest of drawers for extra storage.
Pro Tip: Use decorative trays to keep displayed items organized and stylish.
7. Industrial-Style Black Side Table for Edgy Vibes
An industrial black side table featuring metal frames, distressed wood, or concrete tops adds a raw yet modern touch to your space.
✨ Best For: Lofts, urban apartments, or industrial-inspired interiors. ✨ Pair With: A metal-framed round coffee table for a cohesive look.
Pro Tip: Add vintage-inspired décor like iron candle holders or exposed bulb lamps for a striking effect.
8. Black Side Table with Marble Top for Luxe Appeal
If you're drawn to upscale interiors, a black side table with a marble top offers the perfect blend of sophistication and durability.
✨ Best For: Elegant living rooms, formal spaces, or upscale bedrooms. ✨ Pair With: A round coffee table featuring a marble finish for a luxurious vibe.
Pro Tip: Pair this with velvet cushions or metallic accents to enhance the luxury theme.
9. Folding Black Side Table for Flexibility
For multi-purpose spaces, a foldable black side table offers flexibility without sacrificing style.
✨ Best For: Outdoor patios, compact apartments, or homes with limited space. ✨ Pair With: A compact chest of drawers to maximize space.
Pro Tip: Use the foldable table as a serving station or plant stand when not in use.
10. Black Side Table with Geometric Design for Modern Artistry
If you love artistic interiors, opt for a black side table with a bold, geometric frame. These statement pieces combine functionality with eye-catching design.
✨ Best For: Contemporary homes, creative workspaces, or eclectic interiors. ✨ Pair With: A round coffee table with unique shapes or metal accents.
Pro Tip: Keep the surrounding décor minimal to let the table shine as the focal point.
Styling Tips for a Cohesive Look
To create a well-balanced and stylish space, consider these tips:
✅ Mix Textures: Combine metal, wood, and glass for depth and visual interest. ✅ Add Greenery: Plants soften bold colors like black, adding vibrancy. ✅ Play with Contrast: A black side table contrasts beautifully against light walls or vibrant décor. ✅ Incorporate Lighting: Table lamps or lanterns enhance the ambiance. ✅ Group Accessories: Use trays to organize candles, books, and small décor items.
Conclusion
A black side table is more than just a furniture piece — it's a powerful design element that brings bold elegance to any room. Whether you prefer minimalist designs, luxurious accents, or multifunctional options, there’s a black side table that fits your style.
Pair your table with a sophisticated round coffee table for a modern vibe or complement it with a practical chest of drawers for added storage and structure. By blending these elements, you can create a stylish and functional living space that reflects your personality.
FAQs
1. Are black side tables suitable for small spaces?
Absolutely! A black side table with slim legs, glass tops, or compact designs can maximize style without overwhelming small rooms.
2. How do I keep my black side table looking clean?
Use a soft cloth for dusting and avoid abrasive cleaners. For painted surfaces, a damp cloth with mild soap works best.
3. Can a black side table match lighter-colored furniture?
Yes! A black side table contrasts beautifully with light furniture and walls, creating a striking visual balance.
4. What’s the best way to style a black side table?
Combine textures like marble, metal, or wood, and add decorative elements like candles, plants, or books to personalize the look.
5. Can I use a black side table outdoors?
If designed with weather-resistant materials like metal or treated wood, a black side table can be a great addition to patios and balconies.
#HandmadeFurniture#UAEHomes#VintageFurniture#ModernHome#Furniture#FurnitureDesign#HomeDecorIdeas#HomeStyling#InteriorDesign#DecorTips#HomeDecor#FurnitureTrends#HomeStyle#LuxuryHomeDecor
3 notes
·
View notes
Text
Soundbar Setup Tips: Maximize Your Home Audio Performance
Soundbars have revolutionized the manner people enjoy audio in their houses, supplying a handy and incredible answer for reinforcing the sound of televisions and other gadgets. Compact, elegant, and relatively smooth to installation, soundbars have become an vital a part of modern-day home leisure systems. This article delves into the various elements of soundbars, consisting of their features, advantages, kinds, and suggestions for deciding on the right one in your desires.
High-quality soundbar with subwoofer
The Evolution of Soundbars
Televisions have gone through a good sized transformation over the last few decades, turning into slimmer and more visually attractive. However, this layout evolution has frequently come at the cost of audio best, as thinner TVs lack the distance for robust built-in audio system. Enter the soundbar – a sleek, standalone audio tool designed to cope with this obstacle by using turning in advanced sound high-quality.
The first soundbars emerged inside the overdue Nineties and early 2000s, typically as a response to the developing reputation of flat-screen TVs. These early models presented a easy way to beautify TV audio with out requiring a complex surround sound machine. Over time, soundbars have developed to encompass superior functions like wireless connectivity, integrated voice assistants, and Dolby Atmos assist, making them a versatile audio answer for diverse desires.
Key Features of Soundbars
Modern soundbars come packed with functions that cater to one of a kind choices and budgets. Some of the maximum remarkable capabilities include:
Sound Quality: Soundbars are designed to supply rich, immersive audio with enhanced readability and intensity. Many fashions consist of multiple drivers and subwoofers to create a balanced sound profile.
Compact Design: Unlike conventional domestic theater systems, soundbars are compact and may be without difficulty set up on a wall or positioned on a TV stand without occupying a lot space.
Connectivity Options: Soundbars usually offer numerous connectivity alternatives, such as HDMI ARC, optical enter, Bluetooth, and Wi-Fi, allowing seamless integration with TVs, smartphones, and other devices.
Virtual Surround Sound: Some soundbars use advanced audio processing technology to simulate surround sound, supplying an immersive enjoy without the need for multiple audio system.
Smart Features: Many soundbars come equipped with smart capabilities like voice control, app-primarily based controls, and compatibility with clever domestic ecosystems.
Customization: High-end soundbars frequently consist of EQ settings and presets that allow customers to tailor the sound to their alternatives or particular content material.
Types of Soundbars
Soundbars are available in numerous configurations to match unique desires and setups. Here are the principle sorts:
All-in-One Soundbars: These fashions encompass integrated subwoofers and drivers, making them a compact, standalone answer for higher audio.
Soundbars with External Subwoofers: These soundbars include a separate subwoofer unit, handing over enhanced bass overall performance. The subwoofers are frequently wireless, allowing bendy placement in the room.
Soundbar Systems with Surround Speakers: For a true surround sound enjoy, some soundbars encompass extra satellite audio system. These systems are ideal for home theater lovers.
Dolby Atmos Soundbars: Designed for a premium audio revel in, these soundbars guide Dolby Atmos technology, which creates a 3-dimensional soundstage with the aid of adding top to the audio.
Compact Soundbars: These are smaller soundbars designed for compact areas or secondary TVs. While they may lack superior features, they nevertheless provide giant audio improvements over integrated TV audio system.
Benefits of Soundbars
The recognition of soundbars stems from the numerous blessings they provide:
Enhanced Audio Quality: Soundbars significantly improve the audio experience as compared to traditional TV audio system, making talk clearer and sound outcomes more impactful.
Space-Saving Design: Their slender and streamlined layout makes soundbars a realistic desire for modern-day dwelling spaces, where area is probably constrained.
Ease of Installation: Setting up a soundbar is typically trustworthy, frequently requiring only a single cable connection or wi-fi pairing.
Affordability: While high-cease models may be expensive, there are many price range-pleasant options that offer awesome performance.
Versatility: Soundbars can be used for extra than simply TV audio; they are remarkable for streaming track, gaming, and even arms-free calls, depending at the model.
Factors to Consider When Choosing a Soundbar
Selecting the right soundbar involves thinking about several elements to make certain it meets your desires and preferences:
Audio Quality: Pay attention to the soundbar's specs, which include the wide variety of channels, wattage, and frequency range. Listening to a demo, if feasible, also can assist.
Room Size and Layout: Choose a soundbar that fits the dimensions of your room. For larger rooms, don't forget fashions with outside subwoofers or additional speakers.
Compatibility: Ensure the soundbar is like minded along with your TV and different gadgets. Look for features like HDMI ARC or eARC for seamless integration.
Connectivity Options: Consider your selected connection technique, whether it's Bluetooth, Wi-Fi, or bodily cables.
Features and Functionality: Determine which functions are most critical to you, consisting of digital surround sound, voice assistants, or Dolby Atmos aid.
Budget: Set a budget and examine models inside your rate range. While top rate soundbars provide superior functions, there are tremendous mid-variety and budget alternatives available.
Setting Up Your Soundbar
Setting up a soundbar is usually quick and easy. Here are a few popular steps to follow:
Position the Soundbar: Place the soundbar without delay underneath or above your TV for most beneficial audio alignment. If mounting it on a wall, make sure it is at ear level.
Connect to Your TV: Use the preferred connection technique, inclusive of HDMI ARC, optical cable, or Bluetooth. Follow the manufacturer’s instructions for setup.
Adjust Settings: Access the soundbar’s settings to customise the audio profile. Experiment with presets or EQ adjustments to find the satisfactory sound in your space.
Test the Audio: Play distinctive styles of content to ensure the soundbar can provide steady overall performance across films, track, and TV indicates.

Maintenance and Troubleshooting
To preserve your soundbar acting optimally, observe these renovation guidelines:
Keep it Clean: Dust the soundbar regularly to prevent dust buildup, that may affect sound first-rate.
Update Firmware: Check for firmware updates from the producer to make sure your soundbar has the today's capabilities and fixes.
Check Connections: Periodically investigate cables and connections to make certain they're stable and functioning properly.
Troubleshoot Issues: If you enjoy problems like audio lag or connectivity troubles, seek advice from the person guide or searching for support from the manufacturer.
2 notes
·
View notes
Text
Touchless Foam Dispenser – Automatic, Hygienic & Refillable for Mess-Free Hand Washing
In an age where hygiene and convenience go hand-in-hand, upgrading your soap dispenser isn’t just a luxury—it’s a smart health decision. Whether you’re redesigning your bathroom or modernizing your kitchen, an automatic foam soap dispenser can completely transform your daily routine.
At Nav Emporium, we believe that wellness starts with clean hands. Our top-rated GermFree Touchless Soap Dispenser combines functionality with modern design, making it the ideal touchless foam dispenser for any home or workspace.
Why a Touchless Foam Dispenser is the Future of Hygiene
Unlike traditional pump bottles, a foam dispenser automatic unit uses smart sensor technology to eliminate physical contact. This reduces the spread of germs and provides a cleaner, mess-free experience.
Top Benefits:
✅ Touchless Convenience: Just wave your hand—no button pressing.
✅ Economical Use: Foamed soap means less product wasted.
✅ Kid-Friendly: Encourages children to wash hands properly.
✅ Modern Aesthetic: A sleek design that fits into any decor.
Whether you need a foam handwash dispenser for your master bath, guest restroom, or kitchen, this is one upgrade you’ll wish you had sooner.
Comparing Dispensers: Soap Dispenser vs Foam Dispenser
Understanding the difference between the two is key to making the right purchase.
Feature
Foam Dispenser
Liquid Soap Dispenser
Texture
Pre-foamed, light
Thick liquid
Use
Dispenses soap + air mix
Dispenses only soap
Efficiency
High (uses less soap)
Moderate
Experience
Luxurious, soft lather
Heavier, more residue
Best For
Daily family use
Heavy-duty or industrial use
The automatic foam soap dispenser for bathroom offers more value, especially for families or households concerned with reducing product waste.
Product Highlight: Germ Free Touchless Soap Dispenser
Meet your new hygiene essential: the GermFree Touchless Foam Dispenser. Designed to be functional, efficient, and elegant, it ticks all the right boxes.
Product Features:
Advanced Infrared Sensor: Instant, contact-free activation
USB Rechargeable Battery: Long-lasting power, eco-friendly charging
Refillable Tank: Compatible with all foaming hand soaps or diluted liquids
Water-Resistant Casing: Perfect for wet spaces like bathrooms
Modern Design: Complements marble countertops or wooden vanities alike
Looking for an automatic foam soap dispenser for home that looks great and performs even better? This is it.
How to Refill and Use
You can use any foaming soap or dilute regular liquid soap with water in a 1:4 ratio. Here’s a quick setup guide:
Charge: Connect the USB cable and fully charge the unit.
Dilute: Mix one part soap to four parts water for non-foaming soaps.
Refill: Unscrew the base, pour in the solution, and reattach.
Test: Place your hand near the sensor to ensure the unit dispenses correctly.
That’s it! Your automatic foam soap dispenser touchless is now ready to use.
Smart Placement Ideas for Every Room
Wondering where to use it?
🛁 Bathroom Sink: Replace traditional pump bottles for a clutter-free look.
🍽️ Kitchen Counter: Keep hands clean during food prep.
🏢 Office Pantry: Promote hygiene in shared spaces.
🚪 Entryway: Place near the door for instant sanitizing.
Searching for an automatic foam soap dispenser nearby? Order online at Nav Emporium and enjoy fast delivery.

Real Customer Experiences
See what users say in their touchless foaming soap dispenser reviews:
“★★★★★ My kids actually enjoy washing their hands now. The foam feels nice, and there’s no soap mess.” – Ritu M.
“★★★★★ I've installed one in my kitchen and another in the bathroom. They look great and work perfectly!” – Karan J.
“★★★★★ Really easy to charge and refill. Plus, it uses so little soap that I’m saving money too.” – Ayesha D.
These testimonials make it clear—this is more than just a foam dispenser. It's a lifestyle upgrade.
Tips to Maintain Your Touchless Foam Dispenser
To extend the life of your foam dispenser automatic:
🧼 Weekly Cleaning: Wipe the nozzle with a cloth to prevent buildup.
💧 Check Soap Quality: Only use foaming soap or proper dilution.
🔋 Monitor Battery: Recharge monthly depending on usage.
🛢️ Store Properly: Avoid placing in direct sunlight or under dripping water.
Proper maintenance ensures your automatic foam handwash dispenser continues to perform efficiently every time.

Ideal Gift for Every Occasion
Need a practical, thoughtful gift idea? The GermFree Touchless Dispenser is perfect for:
🎁 Housewarmings 🎁 Holiday Gift Sets 🎁 Baby Showers 🎁 Wedding Registries 🎁 Corporate Gifting
It’s more than a gadget—it’s a wellness essential that shows you care.
Where to Shop More Hygiene Essentials
Want more smart solutions? Explore:
🔗 New Arrivals
🔗 Best Sellers
From innovative kitchen tools to luxury bathroom accessories, Nav Emporium brings curated quality right to your doorstep.
Eco-Conscious and Economical
By choosing a refillable foam dispenser, you’re making a sustainable choice:
♻️ Reduces plastic bottle waste
💧 Uses less soap per wash
⚡ USB charging eliminates disposable batteries
Sustainability meets sophistication in every unit.
Final Thoughts
If you’re still using outdated soap pumps that spill, drip, and harbor bacteria—it’s time to upgrade. The GermFree Touchless Soap Dispenser isn’t just functional. It’s intuitive, hygienic, and visually sleek.
Whether you want to create a spa-like bathroom, a cleaner kitchen, or simply reduce daily mess, a touchless foam dispenser is a worthy investment. And with fast delivery from Nav Emporium, cleanliness is just a click away.
1 note
·
View note
Text
Why Air Conditioner Installation Austin TX is More Important Than Ever

When summer temperatures in Austin soar well into the 90s and beyond, there’s nothing more important than a reliable and efficient air conditioning system. Whether you're building a new home, replacing an outdated unit, or upgrading to a more energy-efficient system, AC installation in Austin, TX is a smart investment that will keep you cool and comfortable all year round.
But where do you start? With so many options available, choosing the right air conditioner—and the right installer—can feel overwhelming. This guide will walk you through everything you need to know about air conditioning installation in Austin, TX, from selecting the best unit for your home to understanding the installation process.
The climate in Austin is hot, humid, and unforgiving. During peak summer months, a malfunctioning or inefficient AC can lead to discomfort, higher energy bills, and even health risks. That’s why timely and professional AC installation in Austin, TX is more than just a convenience—it’s a necessity.
When you install a modern air conditioning system, you benefit from:
Lower energy bills thanks to improved efficiency
Better indoor air quality
Quiet, consistent performance
Advanced smart features and thermostat integration
Choosing the Right System
Not all air conditioning units are created equal. The best system for your home depends on several factors, including your square footage, insulation, budget, and energy efficiency goals. In Austin, the most common systems include:
Central Air Conditioning: Best for larger homes and consistent whole-house cooling.
Ductless Mini-Splits: Ideal for smaller homes, apartments, or additions where ductwork isn't practical.
Heat Pumps: A two-in-one solution offering both heating and cooling, great for Austin’s moderate winters.
A professional installer will conduct a load calculation to determine the optimal size and capacity for your system—an essential step that ensures peak performance and efficiency.
What to Expect During Installation
Hiring a licensed professional for your Air Conditioner Installation in Austin, TX ensures a smooth and hassle-free experience. The typical process includes:
Pre-Installation Assessment: A thorough inspection to assess your home’s layout, insulation, and existing ductwork.
Unit Selection & Placement: Recommendations tailored to your needs and preferences.
Installation Day: Setup, connection to the ductwork and electrical system, and a full system test.
Post-Installation Guidance: Walkthrough of system operation, thermostat settings, and maintenance tips.
Professional technicians will also ensure your new unit complies with local codes and environmental regulations.
Don’t Sweat It—Call the Pros
When it comes to AC installation in Austin, TX, you want a trusted partner who understands the unique climate and your comfort needs. Look for HVAC companies with solid reviews, proper licensing, and a strong track record in the community.
The right team will help you choose the perfect unit, install it correctly the first time, and offer ongoing support to keep your system running smoothly for years to come.
Final Thoughts
Don’t let the Texas heat take a toll on your comfort and wallet. Whether you’re upgrading or installing a brand-new system, professional air conditioning installation in Austin, TX will ensure your home stays cool, energy-efficient, and ready for whatever the weather brings.
Ready to take the next step? Contact a trusted HVAC provider today for expert Air Conditioner Installation in Austin, TX and get the cool relief you deserve.
#AC Installation Austin TX#Air Conditioner Installation Austin TX#Air Conditioning Installation Austin TX#AC Installation
1 note
·
View note
Text
Exploring IPC2128SB-ADF28KMC-I0's Power as the Top 8MP HD Tribrid Security Camera

Exploring IPC2128SB-ADF28KMC-I0's Power as the Top 8MP HD Tribrid Security Camera
Are you trying to find a security camera that does more than just record video? Imagine a camera that actively discourages intruders with smart lighting and auditory alerts in addition to taking incredibly clear pictures. Introducing the IPC2128SB-ADF28KMC-I0, an 8MP HD TriGuard fixed bullet network camera that will revolutionize your security setup. This cutting-edge camera provides the capabilities you need to keep your property safe and secure, whether you're protecting your house or securing a company.
The IPC2128SB-ADF28KMC-I0: Why Choose It?
Traditional cameras might not be sufficient to safeguard your property in the modern world, when security is of utmost importance. The IPC2128SB-ADF28KMC-I0 is distinguished by its unique TriGuard technology, which provides proactive deterrent in addition to surveillance. However, what really sets this camera apart? Let's examine its salient characteristics.
Important characteristics of the IPC2128SB-ADF28KMC-I0
HD Resolution of 8MP The IPC2128SB-ADF28KMC-I0's 8-megapixel resolution is its main feature; it produces incredibly clear photographs that let you catch every detail. The superb definition of the camera guarantees that you won't miss anything crucial, whether you're keeping an eye on a wide area or concentrating on a particular access point.
Technology TriGuard By integrating three essential features—video surveillance, intelligent lighting, and auditory warnings—the TriGuard feature distinguishes this camera. A strong deterrent against crime, the camera's intelligent lights can illuminate the area when motion is detected, and the sound alerts can frighten away would-be invaders.
3. Perceptive Motion Recognition With the camera's sophisticated motion detection features, you can wave goodbye to false warnings. In order to differentiate between human motion and other motion types, the IPC2128SB-ADF28KMC-I0 employs sophisticated algorithms, guaranteeing that you are only notified of genuine risks. 4. The ability to see at night Security doesn’t stop when the sun goes down. With enhanced night vision, this camera can capture clear images even in complete darkness, making it ideal for around-the-clock surveillance. 5. Weatherproof Design Built to withstand harsh weather conditions, the IPC2128SB-ADF28KMC-I0 is IP67-rated, ensuring it remains operational in rain, snow, or extreme heat. This durability makes it perfect for outdoor use, providing reliable security no matter the environment.
Real-World Applications: Where the IPC2128SB-ADF28KMC-I0 Shines
The versatility of the IPC2128SB-ADF28KMC-I0 makes it suitable for a wide range of security applications:
Residential Security: Protect your home and family with a camera that not only monitors but also deters intruders before they can cause harm.
Business Surveillance: Keep an eye on your business premises, ensuring that every corner is covered, day or night.
Public Spaces: Ideal for monitoring parking lots, parks, and other public areas where safety is a concern.

How to Get the Most Out of Your IPC2128SB-ADF28KMC-I0
To maximize the effectiveness of your IPC2128SB-ADF28KMC-I0, consider the following tips:
Optimal Placement: Install the camera in areas where it can monitor entry points or high-traffic areas for maximum coverage.
Regular Maintenance: Keep the camera lens clean and check its functionality periodically to ensure it’s always ready to perform.
Integrate with Other Security Systems: Combine the IPC2128SB-ADF28KMC-I0 with other security measures, such as alarms or additional cameras, for a comprehensive security solution.
In conclusion, use the IPC2128SB-ADF28KMC-I0 to invest in advanced security. You shouldn't have to make any concessions when it comes to property protection. The IPC2128SB-ADF28KMC-I0 is a great option for anyone who takes security seriously since it provides the ideal balance of HD video, clever deterrence, and sturdy build. Are you prepared to improve your security system? To learn more about the IPC2128SB-ADF28KMC-I0 and to place your order right now, go to CCTVInstaller.ai. Invest in the greatest safety for your house or place of business right away to avoid it being too late! Do you have any queries or require guidance on the optimal security configuration? Let's start a discourse by leaving a comment below!
1 note
·
View note