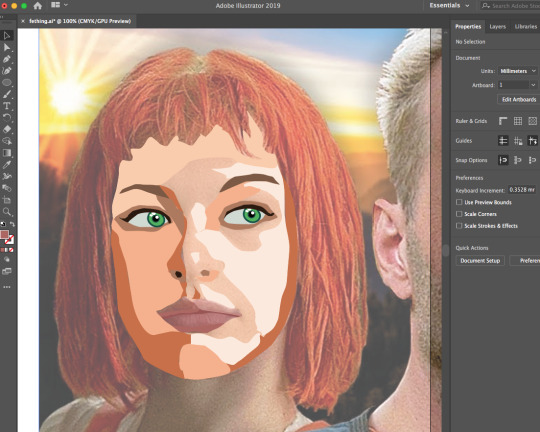
#Text with Gradient Shading in PDF
Explore tagged Tumblr posts
Visit Tumblr Blog
Explore Tumblr blogs with no restrictions, modern design and the best experience.
Last Seen Tumblr Blogs


Fun Fact
In 2020, 27% of US Tumblr users had an annual household income of over $100,000.
Text
Quarkxpress Mac Download
Download QuarkXPress for Mac - Comes with a plethora of layout designing tools, automated workflows and typographic instruments in order to improve your overall editing experience. QuarkXPress is considered to be the current standard in creating and presenting all manner of document. Magazines, newspapers, catalogues, calendars, books, reports, manuals and brochures can all be created with this fabulous tool, however the ingenuity and creativity must ultimately come from you.
You can Download QuarkXPress for free
QuarkXPress Key
QuarkXPress is the leading graphic design and page layout software for creative professionals. It’s used by hundreds of thousands of users around the world who value quality and performance in their daily production of print and digital products. QuarkXPress is the new version that raises the bar for design and productivity. With non-destructive graphics and image editing directly within your layout, you no longer have to choose between efficiency and output quality. Create responsive HTML5 Publications as well as “unlimited”* single iOS apps and more.
Initially the application was “created” for Mac, but literally after the release, the engineers of the company offered a version for Windows. The program is the basis of all modern typesetting, although at the moment and lags behind in functionality from AdobeInDesign, and even from AdobeIllustrator and CorelDraw, and these editors vector graphics.
Manufacturers have announced the program multi-language support. At the moment, the newest version of the program is QuarkXPress 2020, which included a lot of innovative features. Let’s take a closer look at them.
With QuarkXPress, the user can professionally create, layout and edit documents of any complexity in WYSIWYG mode. Aware that powerful players, such as Adobe, with more functional and simple tools have appeared on the layout market, Quark engineers have tried in the 2016 release to catch up with the competition. In the new version, the user will be able to:
convert objects or pages from other programs, such as pasting InDesign objects as their own;
export objects to HTML5;
convert Quark’s own files to PDF, Illustrator and EPS files;
and get a new user interface, improved and simplified.
Many small improvements have also been made that are visible along the way. Thus, if you are a novice newspaper or magazine layout designer, I can recommend this program to you. You can download QuarkXPress 2020 by clicking on the link below.
Quarkxpress Versions
Features:
Introducing new graphics and image editing capabilities
Enhancing and extending text and typography features
“Wish list” features requested by our users
Continued digital publishing innovation
Retaining the perpetual lifetime license model
Quarkxpress 2018 Mac Download
Images and Vectors
Nondestructive image editing (adjustments and filters)
Transparency blend modes
New shape tools
More multicolor gradients
Gradients for frames
Item format painter
Typography and Text
Text stroking
Text shading
Column spanning/splitting
Nonbreaking text attribute
Merge text boxes
Automatic line between columns
Proportional leading
Additional smart quotes
Smart text linking
Word import enhanced
Footnotes enhanced
Digital Publishing
“Unlimited”* iOS single apps
Adaptive layout conversion
Automatic tableofcontent
Responsive HTML5 Publications
(multi device output)
General
Adaptive layout conversion
Convert to Native Objects
Mac and Win UI enhancements
Cursor key can control increments/decrements
List most recent fonts
Find/Change enhanced
Cross References enhanced
Builtin cache cleaner
XTensions Manager enhanced
Also recommended to you CyberLink PowerDVD Ultra
Screenshots:
Password for archiv: kolompc.com
License: ShareWare
Requirements: Win 7/8.1/10
Download QuarkXPress 2020 16.3.4 – (1,5 Gb)
Requirements: MacOS X 10.9 or later 64-bit
Download QuarkXPress 2020 16.3.2 MacOS – (1 Gb)
Download QuarkXPress 2018 for Mac free standalone setup. The QuarkXPress 2018 for Mac is a popular designing software that helps users to create and publish rich, compelling materials for print, the Web, e-readers, tablets, and other digital media without any coding and programming.
QuarkXPress is the Best leading desktop publishing software. Create layout designs. Publish printed books, brochures, digital magazines, flyers and interactive online documents. Mac: macOS® 10.13.6 (High Sierra), macOS® 10.14.6 (Mojave) and macOS® 10.15.1 (Catalina) Windows: 8.1 and 10 (64bit only, with latest updates) Products. QuarkXPress 9.2.1 (2012) (Mac OS X only) – Fix 'missing icons' bug caused by Lion 10.7.3 QuarkXPress 9.2.1.1 (2012) – Added support for exporting to the Retina iPad QuarkXPress 9.3 (2012) – Export eBooks directly to Amazon Kindle format, plus other minor fixes including EPS and PDF color management.
QuarkXPress 6.0 will, at long last, comply with the Carbon application programming interfaces of Mac OS X, according to an eWeek article.It's a move that should make many Mac users in the.
QuarkXPress 10.1.1 Multilingual (Mac OS X) 615 MB Creative expression requires the right tools and when it comes to professional results, details matter. QuarkXPress 10 has been redesigned from the inside out to deliver stunning graphics, virtuoso productivity features and a.
Quarkxpress 4
Quarkxpress Free Download Mac Os X
QuarkXPress 2018 for Mac Review
QuarkXPress 2018 for Mac is an easiest to use tool specially used for creating and publishing stunning content. This QuarkXPress 2018 enables users to create multi-page or multi-component designs for print or web/mobile and interactive/video. It has sophisticated typography and shape tools plus basic but non-destructive image editing. With the help of these tools, users can create print and digital layouts including text, images, and interactivity such as animation and video. A large list of editing tools is available in it that allows users to change colors and gradients, add text, create layers and add images for any publishing content.
There are many additional design tools that allow users to fully customize the project. In addition, it provides full control over the layout of the application so users can create custom page sizes, utilize zoom and scale the images. As it covers various types of publishing content, logo designers, cover makers, banners creators and book publishers can fulfill their needs. In short, if you want to take your publishing projects to the next level, bag the QuarkXPress 2018 for Mac without wasting any time. You can also Download QuarkXPress 2017 for Mac Free.
Features of QuarkXPress 2018 for Mac
Provides numerous design tools for creating stunning content
Multiple options to export and make impressive presentations
Great for books, pamphlets, ads, posters, and anything text-heavy
Offers interface that is quite straightforward for a design tool
Offers different frames for each side of a box
Digital-to-Print Conversion (Digital First Workflow)
Technical Details for QuarkXPress 2018 for Mac
File Name: QuarkXPress-2018.zip
File Size: 601 MB
Developers: Quark
System Requirements for QuarkXPress 2018 for Mac
Operating System: Mac OS X 10.10.5 or later
2 GB free HDD
2 GB RAM
Intel Multi-Core Processor
Download QuarkXPress 2018 for Mac Free
Click on the button given below to download QuarkXPress 2018 DMG for Mac free. It is a complete offline setup of QuarkXPress 2018 DMG for Mac with the direct download link.
QuarkXPress 2019 dmg for mac free download full version. Complete setup QuarkXPress 2019 15.1 offline installer for mac OS with direct link.

Quarkxpress Gratuit Pour Mac Os X
Description QuarkXPress 2019 For Mac + Overview
QuarkXPress 2019 for mac is that the most versatile software for print and digital style. it’s specially developed for the users like freelance designers, graphic ninjas, digital artists, photographers, print providers, agencies, marketers and publishers to produce advertising, brochures, magazines, books, catalogs, newspapers, flip books, mobile apps, and more. This QuarkXPress 2019 for mac graphic style software that offers digital artists a certain management over text, images, shapes, color, and opacity for achieving their desired style.
With its unique and powerful tools, users will produce print and digital layouts as well as text, pictures and interactivity like animation and video. an outsize list of editing tools is available in it that allows users to vary colors and gradients, add text, produce layers and add pictures for any publication content. There are several extra style tools that enable users to completely customize the project. additionally, it provides full management over the layout of the applying therefore users will produce custom page sizes, utilize zoom and scale the photographs. You can download Waves Central V11 DMG Mac.
QuarkXPress 2019 Features Full Version for Mac OS X
Some interesting features of QuarkXPress 2019 v15.1 listed below that you experienced after download dmg of QuarkXPress 2019 for mac.
Great for books, pamphlets, ads, posters, and anything text-heavy
Could be used for designing and exporting responsive Web Pages
Can create vector shapes and illustrations
Perfect program for dealing all types of print and digital design
QuarkXPress 2019 Dmg Setup Details
Product: QuarkXpress_2019_QXP_mac.rar
Size of App: 770 MB
Dmg Version: 2019 15.1
Setup Extension: zip
Tools for dmg needed: Zip Extractor
Developers: Quark Inc
System Requirements of QuarkXPress 2019 15.1 for Mac OS X
Quarkxpress 9 Free Download For Mac Os X
Must read listed system requirement for your Apple mac book before download this app.
Quarkxpress 11 For Mac Os X
Operating System: OS X 10.10 or later
Ram (Memory): 2 GB Minimum required for this dmg.
Disk Space: 1.4 GB free space needed for this app.
System Processor: Intel Core 2 Duo or later (Core i3, Core i5).
Quarkxpress 10 Mac Download
Download Free QuarkXPress 2019 Mac Dmg

Click on the button below to start downloading QuarkXPress 2019 for mac OS X. We are here to provide to clean and fast download for QuarkXPress 2019. This link is resume able within 24 hours. Keep visiting themacgo the world of dmgs.
1 note
·
View note
Text
Add Text with Gradient Shading & Manipulate Table inside PDF Document using .NET
What's New in this Release?
Aspose team is very excited to announce the new version of Aspose.PDF for .NET 18.7. This new release has been rolled out with quite excited features and enhancements. In text editing scenarios, applying gradient shading or pattern colorspace to the text is now available in latest release of the API. Aspose.Pdf.Color Class has further been enhanced by introducing new property of PatternColorSpace, which can be used to specify shading colors for the text. An example demonstrating the usage of mentioned feature can be checked at following link in API documentation. Earlier it was achievable to add table inside PDF document as well as extract it using TableAbsorber Class. However, new features have been added to the API in order to remove as well as replace existing tables with new ones. Existing TableAbsorber Class has further been enhanced by introducing new methods. Existing TextFragmentAbsober Class has further been enhanced by adding new method i.e. RemoveAllText(). Users can remove text from particular page as well as from whole PDF document using this method. In particular scenarios where text removal from PDF is an important requirement, this new method works quite efficiently and fast. Since functionality to generate Tagged PDF documents has been under development, completed features have also been included in this release of the API. such as Validation for Tagged of Real Content has been implemented, Implemented validation for Artifacts, Implemented Recognition of Natural Language, Added Support of Graphics Operators in Content Sequence Classes, Validation of Graphics has been added, added Support for images in tagged content, bounding box for images has been added and image attributes are supported for tagged PDF. Along with the above mentioned features, 25 fixes have also been incorporated in this release, such as Worked to improve heading formatting inside PDF document, Improved functionality of TextFragmentAbsorber Class, Text replacement operations have further been improved, Inter-File Format conversions have been improved further for compliance tests, Image rendering inside PDF has been improved, text rendering inside tables has been improved, PDF to image conversions has been further improved and enhanced and many more. The list of important new and improved features are given below
Remove all text from PDF file
Feature Request to Replace a Table using PdfContentEditor (as we have ReplaceText method)
PDF/UA: Validate Tagged of Real Content
PDF/UA: Validate Artifacts
PDF/UA: Recognize Natural Language
PDF/UA: Support Graphics Operators in Content Sequence Classes
PDF/UA: Validate Graphics
PDF/UA:Add support images in tagged content
PDF/UA:Add bounding box for images
PDF/UA:Add suporting image attributes
XML to PDF - the type Cell does not exists
Implement using of Shading Colors for text editing scenarios
Implement Radial (Type 3) Shadings
Headings are missing in the output document.
Incorrect retrieval of the rectangle coordinate LLX
TextFragmentAbsorber does not replace flatten form text
Text replace issue: long text is not being break to next line
PDF to PDF/A_2a (A_2b) - Resultant file is not compliant
PDF to PDF/A-1b - the output PDF does not pass compliance test
Document is not PDF/A-3A compatible after conversion (CMYK used but output intent is not CMYK)
PDF to PDFA3b: compliance failure due to LZW compression and CYMK colorTurquoise image generated from PDF
The repeating column header has been overwritten when generating PDF output.
Some repeating columns are missing.
The text in the repeating column is cut off.
The conversion to PDFA_2A produces a XREF table with subsections
PDF to PDFA1b: compliance verification issue - Integer value out of range(too high)
PDF to PDF/A-1b - Output does not pass the compliance test
PDF to PDF/A - missing text
Multi byte characters not displayed in PDF
PDF to PDF/A-1b problem
PDF to PDFA2b/PDFA3b: Converting PDF, generated from Aspose.Cells, to PDFA2b and PDFA3b fails the compliance
PDF to JPG - the square boxes are created in place of Chinese characters
PDF to DOC - Page number is missing
PDF to PDFA1b: stamp loses its transparency
Text is not being extracted correctly.
Getting Garbage Characters after setting Font property 'IsEmbedded=true'
Searching/replacing of text with character spacing is not supported
Other most recent bug fixes are also included in this release.
Newly added documentation pages and articles
Some new tips and articles have now been added into Aspose.PDF for .NET documentation that may guide users riefly how to use Aspose.PDF for performing different tasks like the followings.
Apply Gradient Shading to the Text
Remove Multiple Tables from PDF document
Overview: Aspose.Pdf for .NET
Aspose.Pdf is a .Net Pdf component for the creation and manipulation of Pdf documents without using Adobe Acrobat. Create PDF by API, XML templates & XSL-FO files. It supports form field creation, PDF compression options, table creation & manipulation, graph objects, extensive hyperlink functionality, extexnded security controls, custom font handling, add or remove bookmarks; TOC; attachments & annotations; import or export PDF form data and many more. Also convert HTML, XSL-FO and MS WORD to PDF.
More about Aspose.Pdf for .NET
Homepage of Aspose.Pdf for .NET C#
Download Aspose.Pdf for .NET
Read online documentation of Aspose.Pdf for .NET
Online Demo for Aspose.Pdf for .NET
#Text with Gradient Shading in PDF#Manipulate Table inside PDF#Remove Text from PDF#add Text to PDF#improved pdf heading formatting#.NET PDF APIs#PDF to image conversions
0 notes
Link
For just $3.00 This tutorial will show you the basics of using the right angle weave in order to make 3D shapes from beads. It is written at the beginner level so little to no beading experience would be needed. Learn to make this lovely pendant in a plethora of shades an hues. I will send you a 12-page PDF filled with digital illustrations and text descriptions to help you! The file size is a little larger than 1.5MB. I will email it to your PayPal address within 48 hours of received payment (but it will not always take that long, just as a formality, in case I can't get to the computer for some reason) I also have another version of the tutorial that is in high-def photographs instead of the illustrations. If you would prefer this format, please let me know in the "Messages to seller" section of your transaction. Feeling a little adventurous and finished with the basics? Try out my tutorial for a crystal cube: This is only my second tutorial, so feel free to contact me with any feedback and suggestions as to what I can to to improve it! Thank you so much! On the serious note: You MAY NOT take this tutorial, in part or whole, and re-sell it as your own. You MAY, however, sell whatever you make from this tutorial as you see fit. And, you MAY ALSO use this tutorial to assist you with teaching classes, as long as you give credit to the author. Thank you so much for your understanding and happy beading!! -Odin
1 note
·
View note
Text
Assignment 2.2
Hi-fi prototyping
Introduction
For this assignment, we were to use the lo-fi wireframe and its functionalities as the foundation to the final hi-fi prototype for the Tripp3r application. In this version, color, images and other non-functional details should be added to make it look like a finished product.
The design
For the hi-fi design, I copied the lo-fi design and added colors, images, and some extra screens to make it completer and more functional as a public transport application. I added a map to the landmarks page, so users would know how to get to certain landmarks. I also changed the 2 download pages from the “saved trips” section to full screens, one as a loading screen when the app is downloading a trip as PDF, and one for when this process is completed.
The company wanted their values to be reflected by a set of colors they have chosen to represent them: green for the environment, blue for customer satisfaction and orange for courage and progressiveness. These colors are the main design component in my hi-fi prototype. In the logo they have delivered, the orange has more of a yellow hue, so this is the exact shade that I used in the final prototype.
In the loading page, I wanted to incorporate all colors, but distinguish it from the rest of the application a bit. This is why I chose to make it a faded gradient as opposed to the solid colors on the other screens.
All top navigation bars including the menu button and the menu look and function the same on every page. The most important functionality in the app is the planning of trips, so I chose to make all backgrounds related to this blue (plan a trip and saved trips). In order to distinguish the other functionalities, I gave the different background colors. So the maps and weather pages are yellow, and the landmarks pages are green.
The first two images below are of the full prototype, and the focused screens are the ones that received direct feedback during the testing.


Testing protocol
Materials:
computer
wifi (as these tests will probably conducted online)
Introduction:
Thank you for agreeing to test this hi-fi prototype. All data related to this test will only be used for this BTP assignment, and only shared with the relevant teachers. This test consists of looking at a few screenshots of the prototype, and then giving your opinion on them.
Tasks:
For each screen, please choose one or two of the following words that you think fit with the screen, and give a short explanation for why you chose these words. Words can be repeated as many times as you need them, and feel free to use negative ones in combination with positive ones if needed.
Appealing Boring Busy Comprehensive Efficient Incomprehensible Inconsistent Intuitive Satisfying Confusing Consistent Frustrating Organized Overwhelming Unattractive Understandable Usable
Feedback and iterations
Most of the negative words (5 out of 8 words) were connected to the home screen, the most frequent one being ‘inconsistent’. In the explanations, users were dissatisfied about the borders, as they were not around every component, which made the screen less satisfying to look at. This has been altered in the iteration.
There were also comments about the bulkiness of the white input spaces, which I have also changed a bit to look cleaner.

Another screen with some negative feedback (3 out of 6 words) was the ‘weather’ screen. According to testers, even though it is organized and understandable, the text was a bit repetitive. One tester also said they missed some information, such as the temperature. This is why I removed the repetitive text, and replaced it with a few icons with more information about the weather; the temperature and wind direction and strength.

0 notes
Text
Illustrator vs Photoshop 10 Reasons Illustrator Is Better Than Photoshop.
Illustrator vs Photoshop
Adobe Illustrator and Adobe Photoshop are both graphic design software developed by Adobe Systems.
Illustrator is primarily vector-based, meaning it uses mathematical equations to create graphics that can be resized without losing quality. It is best for creating logos, illustrations, and graphics with clean lines and geometric shapes.
On the other hand, Photoshop is raster-based, meaning it uses pixels to create images. It is better suited for photo editing, image manipulation, and creating detailed graphics with many colours, textures, and shading.
In summary, Illustrator is best for vector graphics, while Photoshop is better for raster graphics. Both have strengths and weaknesses and can complement each other in a graphic design workflow.
10 Reasons Illustrator Is Better Than Photoshop
Illustrator and Photoshop are two of the most widely used graphic design software, and each has unique features and advantages. Here are 10 reasons why Illustrator is better than Photoshop:
Vector Graphics: Illustrator is specifically designed for creating vector graphics, while Photoshop is primarily used for raster images. Vector graphics are resolution-independent and can be scaled to any size without losing quality, making Illustrator ideal for creating logos, illustrations, and graphics that need to be resized.

Cleaner User Interface: Illustrator has a cleaner user interface, making navigating and finding the tools you need easier.
Precision: Illustrator's vector-based tools allow more precise control over shapes and lines, making creating clean and crisp graphics easier.
Customizable Workspace: Illustrator allows you to customize your workspace, making it easier to access the tools you use.
Gradients and Transparency: Illustrator offers powerful gradient and transparency tools, making creating smooth, blended effects easier.
Global Edits: Illustrator's Global Edit feature allows you to make changes to multiple instances of an object simultaneously, saving time and reducing the risk of mistakes.
Versatile File Formats: Illustrator supports various file formats, including SVG, PDF, and AI, making it easier to share and collaborate on projects.
Collaboration: Illustrator offers a variety of collaboration tools, making it easier to work with other designers and stakeholders on a project.
Advanced Typography: Illustrator offers advanced typography tools, making it easier to create professional-looking text-based graphics.
Consistent Design: Illustrator's vector-based tools and precision control allow you to maintain consistent design elements throughout a project, helping to reinforce your brand and maintain a professional look and feel.
Ultimately, Illustrator is a powerful and versatile graphic design tool that offers a range of advantages over Photoshop. Whether you're creating logos, illustrations, or text-based graphics, Illustrator is an excellent choice for professional designers.
#illustrators on tumblr#illustration#artwork#drawing#artistsontumblr#original art#illustrations#photoshop#adobe photoshop#graphicdesign#adobe#procreate#illustrator
0 notes
Text
Gravit designer gratuit

#Gravit designer gratuit for free#
#Gravit designer gratuit mac os x#
#Gravit designer gratuit software#
#Gravit designer gratuit Pc#
It's a program that requires a certain learning period, so downloading an Affinity tutorial is never a bad idea. It supports the simultaneous design of different projects and the layout of menus and tools can be arranged freely. You can create a fully customizable workspace in favor of productivity. In fact, flexibility and adaptability are the strong points of this software. Here you'll find all the tools you need to work on vector design: from pens to color gradient functions, all the latter presented on different menus that adapt to the user's workflow. Professional CMYK, LAB, RGB and greyscale color models.Ī graphical design tool with excellent features.Compatibility with PDF, PSD, SVG, AI, Freehand and EPS.Make use of brushed and objects regardless of the size of the image.Move objects in the correct Z direction.Making the most of state-of-the-art technology optimized for 64-bit PCs, it's capable of taking advantage of every single piece of your computer's hardware to carry out actions such as the following: It's now available for Windows after being highly acclaimed on Mac. Affinity Designer is a versatile tool that allows us to work in this field of graphical creation with different purposes: advertising, art, web. It does not store any personal data.There's no need to spend too much many on downloading a vector design program that offers professional results. The cookie is set by the GDPR Cookie Consent plugin and is used to store whether or not the user has consented to the use of cookies. The cookie is used to store the user consent for the cookies in the category "Performance". This cookie is set by GDPR Cookie Consent plugin. The cookie is used to store the user consent for the cookies in the category "Other. The cookies are used to store the user consent for the cookies in the category "Necessary". The cookie is set by GDPR cookie consent to record the user consent for the cookies in the category "Functional". The cookie is used to store the user consent for the cookies in the category "Analytics". These cookies ensure basic functionalities and security features of the website, anonymously. Required cookies are absolutely essential for the website to function properly. are all available.įor more information, visit the Official website by Gravit Designer. Using slices and various assets, export high quality PDFs, SVGs and images.Īdvanced layouts, import of Sketch and EPS files, design templates, transformations, and more. Text A sophisticated hand-crafted text engine with text on path, web fonts, styles and more. With shared styles, you can combine many fills/borders, effects, and blending modes. Grids, anchors, and auto-layouts are all powerful tools for creating pixel-perfect screen designs. With non-destructive booleans, a knife tool, and path graphics, this vector was made for vector. To organize your information, use powerful pages with masks, real layers and symbols. These are some of the most effective tools to unleash your creativity.įrom design to export, unparalleled accuracy in any unit (Pixels, MM, CM, etc.). are some of the tools available.Įnjoy a simple and user-friendly user interface according to your preferences. Pen, bezigon, freehand, shading, knife, pointer, underselection, laser, layer, slice, and shapes like line, polygon, triangle, ellipse, rectangle, etc. You can create vectors and path graphs using non-destructive booleans.
#Gravit designer gratuit Pc#
Gravit designer for PC includes everything you need to create complex animations, screen designs, presentations, high quality icons, prototyping and more.
#Gravit designer gratuit for free#
Gravit designer is available for freeload.
#Gravit designer gratuit software#
The software has a simple and user-friendly interface that can be customized to meet the needs of any user.
#Gravit designer gratuit mac os x#
Gravit designer is a design program free vector that works on Windows, Mac OS X and Linux.
0 notes
Text
9 REASONS WHY LABEL PROOFS MATTER

PDF LABEL PROOF VS. PHYSICAL LABEL PROOF
The method of emailing PDF files for approval of a label proof has been adopted by printers for decades. This method will show how art appears on a monitor, is universally accepted, and works great in many circumstances including re-prints or minor text revisions. Your printer should have systems in place to measure and track color and color consistency from run to run. However, there are limitations to proofing print jobs with digital PDF files.
Proof Label Color Output
The most common mistake seen in the print industry is art files that are built in the wrong format for the print method. RGB (red, green blue) files work for websites, online advertising, and essentially anything that will be viewed through a screen or monitor. An RGB file will not create the same output on physical print (even if printed using RGB colors). This is because the RGB format deals with the mixing of different colors of light, whereas the standard print format, CMYK (cyan, yellow, magenta, black), deals with the mixing of inks or toners. Converting from an RGB file to a CMYK file is not always a 1-to-1 swap. If the color does not convert well for printing in CMYK, the result could be a color that is washed out or even an unexpected shade. This is where press proofs come in! A physical press proof is a small run of your labels that is used to show the print color and quality that you can expect from an order.
1. Label Design Elements and Layers
It’s not unheard of for design elements to show up perfectly clear on-screen, yet not translate well to print. This could be due to many factors, including but not limited to RBG file format. Here is a small list of additional considerations:
Color contrast that is too high or too low; too subtle or not subtle enough
White ink layers are incorrect or missing (especially important when printing on silver or clear labels material)
Corner radius – square-cornered elements might not look great on round-cornered labels
Label fit to the actual container (a physical proof can be cut out and tested)
Gradient – too low contrast or shows hard lines
Print-to-print registration
Background too dark or too light
Missing elements due to missing fonts, i.e., barcodes and QR Codes
(Download this checklist to help you proof your next label proof)
2. Testing
With a press proof in hand, scanning barcodes and QR codes will provide definitive results. UPC codes and barcodes that do not scan properly can cause problems with retailers, leading to additional fees, or fines, but more importantly, can cost that premium shelf space you worked so hard to acquire.
3. Proof Label Orientation on Roll
One often overlooked specification of label printing is the direction the label comes off the roll; also known as the unwind direction {link to unwind direction chart}. This is particularly important for automatic label applications. Let’s just say life is so much easier when the unwind direction is correct. Everything just moves along as it should.
4. Final Chance to Proofread

The meaning “press-ready” implies that the files have previously been reviewed and are approved for the printing process. Press-ready files are not manipulated by the printer unless the request is made for specific changes. The reason your press-ready art file is proofed is to ensure your art file translates properly on our end. Take this time to check over your label with a fine-tooth comb. Customers have been known to catch these “opportunities”:
Misspelled words
Missing fonts
Incorrect barcode
Missing barcode
Compare Alternate Materials
Art files are generally created on a white background with specifications to print on silver or clear material. The best attempt at simulating different backgrounds does not compare to the real thing. A physical proof will displace doubt and give you full confidence that your labels are exactly how you had imagined!
7. Removes Risk
Quality is a valid concern. Especially when using a new vendor or printing a new label. A physical proof will give you the confidence to know the labels you are waiting for are exactly what you expect them to be. Nothing removes risk like knowledge and confidence.
8. Save Money
A great print provider will stand behind their work when they make a mistake. However, when a digital PDF file is proofed and approved, or the mistake is in the provided art file, the chances of having to pay for a second print run are high. This is being said through experience and the deepest concern for all customers; It is true to your benefit to review a physical press proof.
9. Time-Saving
“There is never enough time to do it right, but there is always enough time to do it over.” ~ John W. Bergman
0 notes
Text
Adjustments in Photoshop
Hue Adjustment


Vibrance Adjustment


Saturation Adjustment


Contrast and Brightness Adjustment


What are adjustments?
Adjustments are changes that are made to an image to enhance or correct it. Adjustments are things such as making the image brighter, changing the shade of a colour, or just making all the colours stand out more What is the difference between adjustments and adjustment layers?
An Adjustment Layer can be used in Photoshop to make changes to an image without altering the original image itself. Layers can be deleted to remove certain adjustments that have been made What is the Brightness/Contrast tool use for?
Brightness controls are used to adjust the tone of light and shadow in an image, making the image appear brighter or darker as needed
Contrast controls are used to increase or decrease the distinction between light and dark areas What is the Hue & Saturation tool used for?
Hue controls are used to change the colours in your image.
Saturation controls are used to increase the intensity of the colours in your image What is the Vibrance tool used for?
Vibrance controls are used to increase the intensity of muted colours in your image, without adjusting the intensity of colours that are already well saturated in the image. When exporting your files for PRINT, what ppi should you use and why is that so important?
300 PPI is used for images that are being exported for printing as it will decrease pixilation and blurriness in the final printed product When exporting for the Web what is a good pixel size to use and why?
72 PPI is used for images that are being exported for the web as this helps keep file sizes smaller What colour space should you use when uploading an image to the web?
Srgb as this is the standard used on displays and ensures that the colours on your image look the same no matter which display is used to view it. JPEG
Joint Photographic Experts Group. This is a lossy compression file format the most common type used on the web as the amount of image compression can be adjusted. A more compressed image will be smaller in size but will also be reduced in quality PNG
Portable Network Graphics. This is a lossless compression file format. It was developed as an improved replacement for GIF files. GIF
Graphics Interchange Format. This is a lossless compression file format more commonly used for animations and simple colour graphics. it’s pallet limitations means it’s not suitable for photographs or images with a gradient. TIFF
Tag Image File Format. This is an uncompressed file format that is popular with photographers and they offer more in post processing. The files sizes are often rather large. PSD
Photoshop Document. This is a file type used in Adobe Photoshop. It supports multiple layers while editing and a wide variety of editing options. PDF
Portable Document Format. A file type created by Adobe for display of text and image documents across a variety of platforms. RAW
Raw Image File. These are unprocessed files from the camera and need to be processed before they can be used. Raw files are basically “digital negatives”. Images taken from the camera in Raw format can offer more in post processing of the image. DNG
Digital Negative. This is a raw file format created by Adobe.
0 notes
Text
Corel Draw 11 Mac Free Download Full Version

Corel Draw Download For Pc
Corel Draw Free Download For Windows 10
Coreldraw 11 For Mac free. download full Version
Corel Draw 13 Free Download
Download Your Free CorelDRAW Trial. Get full access to all of the premium features and content in CorelDRAW Graphics Suite 2020, including; An extensive collection of applications for drawing, illustration, page layout, photo editing, web graphics and more; The popular Corel Font Manager™ to explore and organize fonts for your projects.
In the latest version, Corel Draw x7 Live Sketch is also added. This application runs on all types of windows such as window 7, window 8, window 8.1, window 10, XP, and Vista. This software supports several unique languages. Many interactive bars are added to Corel Draw x7. Corel Draw x7 has an innovative vector modeling tool.
CorelDRAW Graphics Suite 2020 v22.1.1.523 Patch & Serial Number Free Download. Break down creative barriers with CorelDRAW Graphics Suite 2020 v22.1.1.523 Crack, the graphic design software of your choice for professional vector illustration, layout, photo editing, and more.Work faster with one-click image enhancements powered by machine learning and experience AI-assisted Power Trace, taking.
October 10, 2020
CorelDRAW 22.1.1.523 Crack + Keygen Full Torrent 2020 Free Download
CorelDraw Crack is a very good amazing graphics designing software for professional designers and newbies. It empowers your creativity and makes you think like professionals. Millions of professionals, small business owners, and design enthusiasts use this program for graphic design. It is only because this software provides everything you need for vector illustration, layout, photo editing, and designing.
The crack for CorelDraw 2020 Graphics Suite full version encourages your confidence and quickly generates magnificent results with a lot of premium tools. The app has a lot of advanced integration features and impact tools for all types of projects. By using this application, you can design what’s on your mind. Further, this software does not need any training to work with it.
After a very short time, you’ll be able to think and work as professionals. Generally, CorelDraw 2020 new Activation Code keeps you the most productive. It is due to its industry-leading file format compatibility and faster processing. Furthermore, it integrates with cutting-edge design technology and state-of-the-art tools to enrich your creative journey.
CorelDRAW 2020 Serial Key full. free download Latest
CorelDraw Crack also provides added toolsets and enhanced flexibility. Most importantly, the port is appropriately scalable with high-DPI support, so if you’ve got a 4K display or a Surface Publication. The interface also includes the much-improved signature and pen service. CorelDraw Serial Key a range of shortcuts that make sense, which Adobe hasn’t bothered to incorporate a secure method to accomplish in apps like Illustrator. Decide on another item below or continue below is a perfect illustration of the.
CorelDRAW Graphics Suite 2020 Download is available and straightforward, is that its GUI. It is also able to export in formats like Illustrator, AutoCAD, GPG, PDF, CPT, and many others, offering great support for vector images. Another thing I like is that the app allows you to pay for the functionality you are using to build only. CorelDRAW Graphics Suite 2020 Serial Number provides many new features. It can manage text appearance and create unique looks from a single font. It supports an original inertia method to build design features such as 3D depth, a new CorelDRAW bitmap effect lentil, and Corel PHOTO-PAINT to combine vector and bitmap artifacts into an existing template and new non-destructive effects in Corel PHOTO-PAINT. It supports OpenType variable fonts.
CorelDraw 22.1.0.523 Keygen + Torrent 100% Working
Furthermore, CorelDraw 2020 Keygen Mac allows you to access its worldwide features and applications. It offers you outstanding, high-caliber tools to design effectively. In addition, it offers you customizable shortcuts and automatic alignment and straightens for smart work. Also, its fastest processing ability keeps you productive all the time. Further, it offers impressive, innovative features such as the Symmetry drawing mode, Block Shadow tool, and more. By using this CorelDraw Torrent 2020, you can produce something that will make a lasting impression on the audience.
Also, you can create distinctive logos, sign, web and social media graphics, billboards, and much more. It provides you full flexibility due to advanced color-management tools. Additionally, the latest version of CorelDRAW full Graphics Suite Cracked is fully updated and enhanced tools that give you an advanced experience of the advanced tilt, benefits of editing, orientation, and rotation of your graphic with full control.
You can utilize a lot of text fonts in various styles with attractive displaying effects. The new workspace with the Touch function makes it more simple to work with this application. You can adjust the graphics drawing window size at any time. More, the CorelDraw 22.1.0.523 Free Full crack with a modified user interface enables all users to utilize the software with maximum easy to use facilities. The whole controlling penal is very clear and ready to use for all your graphical projects.
In addition, Corel Draw X7 Crack is designed with the most powerful filling engine of all time, giving you full control over gradient fills, bitmap fills, and vector files. In addition, it can create elliptical and rectangular gradient fills, tilt control fills individual color transparency, fills repetitive object fills, and more.
Corel Draw Download For Pc
To find the perfect font for any project, you can easily view fonts and advanced character tools. Before applying fonts to your design, the new “Font Paradise” lets you see and try different fonts. Redraw Insert Character docker also automatically displays all characters, symbols, and glyphs associated with fonts, making them easier to find and enter than before.
It also provides new special effects, including four new tools that are sensitive to liquid pressure (smudge, pulling, repelling and rotating) and new camera effects such as blurry bokeh, shadow, sepia, and extension). In Corel PHOTO-PAINTTM X7, you can create unique images.
It supports various RAW files that offer several ways to enrich your images for more than 300 types of cameras. Make sure all page elements are exactly where you want them to be when using the enhanced layout features. A new guide for aligning helps you place objects quickly. The new “Contour Position” option allows you to choose whether the framework is inside, outside, or inside and outside the object.
CorelDRAW Graphics Suite 2020 Crack Full Version Features
Jump in CorelDRAW Graphics Suite 2021 For Pc Whether you’re a first-time consumer or an experienced clothier, CorelDraw photographs suite 2020 Full Crack makes it easy to get started out. Research the fundamentals, see what’s new with a Startup tour, or transition to the suite with a special walkthrough designed just for Adobe users. Be effective right away with a workspace that matches your workflow desires, and benefit from fantastic content and versatile in-product getting to know.
Craft CorelDRAW Graphics Suite 2020 Activation Key Make the most of your design abilities with the intuitive, excessive-caliber capabilities of this image design software program. Quickly discover fonts for any challenge with the font search and filtering function. Save precious layout time with the new live sketch device that allows you to seize any original idea on a pen-enabled tool the moment creativity moves. Paintings quicker with the brand-new node enhancing, and refine your photographs with the restoration clone device in CorelDRAW Graphics Suite 2020 Full Version
Personalize CorelDRAW Graphics 2020 Suite Registration Key Since right at home with all of your favorite equipment! Adapt your layout space to your needs with the custom icon size, laptop, and window border shade. Explore and prepare fonts for your projects with the assist of the popular Corel font supervisor 2020. Make bigger your series of creative gear and content by means of downloading free and top-class apps, plugins, extensions, font packs, and extra, without delay from in the programs.
Pleasure CorelDRAW Graphics Suite 2021 License key supply expert-nice output so one can make an enduring impression across any medium: from one-of-a-kind emblems and signs to striking advertising materials, web, and social media pics, billboards, and greater. With its industry-leading report format compatibility and advanced shade-control gear, CorelDRAW graphics suite 2020 Free Download offers the flexibility and coloration accuracy you want for all types of tasks. Find out a colorful and provoking network of CorelDRAW users to undoubtedly impact your innovative adventure.
CorelDRAW Graphics Suite More Features:
Many new features are updated in the latest version, which follows as;
This software is very small and can be downloaded and used easily.
Corel Draw x7 supports a variety of special effects including Smear, Attract, Twirl, and others.
This application supports high resolution which means you can create HD designs.
There are also picture paintings so you can easily paint and edit images with this feature.
This software has a new document style.
It also supports difficult scripts.
CorelDRAW Graphics Suite X7 is a complete professional solution for all graphic designs.
It supports almost all types of formats.
Many new powerful tools are present in this latest release, so everything looks
natural that you really want to show off.
This is a sophisticated application and has many new features for editing images.
This software has a QR generator that you can use easily for professional web
design.
If you want to make a natural chart, you can use different tools and settings for
your work.
In this software, you have full control over vector and font pattern files.
QR code maker to create and add QR codes.
This software manages your content and does instant searches on Flicker and Fostoria.
Corel Draw x7 comes with all new tools.
The interface is easy to use and direct.
In the latest version, Corel Draw x7 Live Sketch is also added.
This application runs on all types of windows such as window 7, window 8,
window 8.1, window 10, XP, and Vista.
This software supports several unique languages.
Many interactive bars are added to Corel Draw x7.
Corel Draw x7 has an innovative vector modeling tool.
With this application, users can control their files and transparency.
This application is compatible with all commonly-used formats.
This software works quickly.
It has an exclusive font preview.
Corel Draw x7 supports RAW camera documents.
Corel Draw x7 has all the applications you need for design.
Using this application you can design easily and with confidence.
In addition, this software has Adobe color association units.
Minimum System Requirements:
Before installing and cracking Corel Draw X7 for free and using keygen, here are the minimum system requirements for using the full version of Corel Draw X7.
Windows 10/8 / 8.1 / 7 (32-bit or 64-bit)
Intel Core 2 Duo or AMD Athlon 64
2 GB of RAM
1 GB hard disk space (for installation)
Mouse, tablet, or multitouch screen
1024 x 768 screen resolution (768 x 1024 on a Tablet PC)
DVD drive (if physical copy)
Microsoft® Internet Explorer® 8 or higher
Internet connection required for certain features.
What’s New in CorelDraw 22.1.0.523 (X9)?
A bundle of latest tools updates and many new graphics editing abilities.
Performance issues caused by Windows 10 Fall Creator Update are no more present in this release.
This version provides you more and enhanced stability.
Also, it contains an improved and magnificent Font Manager.
Some new and intuitive tools are also part of this release.
How To Install & Register CorelDRAW Graphics Suite 2020 v22.1.1.523 Crack Keys [Latest]
How To Crack CorelDRAW Graphics Suite 2020 v22.1.1.523 License Key [Latest].
After the Download Extract the zip file using WinRAR or WinZip.
After the Extract, the zip file Installs the Program As Normal.
After Install Don’t Run the Software.
Please Always Read the Readme File.
Please, Copy & Paste Crack File in the c/program files.
After Install Run the Software.
You are Done it. Now Enjoy the Full Version.
Please share it. Sharing is Always Caring!
CorelDRAW 22.1.0.523 Crack + Keygen Full Torrent 2020 Free Download From links are given below!
Download Now
CorelDRAW Graphics Suite X7 v22.1.0.517 with Serial Number Full Version & Keygen
CorelDRAW Graphics Suite x7 2020 allows you to use the program without having to buy the serial numbers or codes. All you need to do is get it from here. You can use Keygen to easily activate the full version. This program is full of varied tools that work together to create a compelling image. Internet creation, website architecture, image editing, image creation, image enhancement, and visual effects customization are the main features of Corel Draw X7. Website architecture services have no other platform specialized for it like Corel Draw X7.
Get outstanding productivity with the key new features of this versatile graphical design program named CorelDRAW Graphics Suite x7 Crack. Industry-standard PDF / X-4 support and enhanced content navigation experience help you optimize workflow. Moreover, with the new CorelDRAW.app, you can access your work wherever you are. Create original illustrations, signs, and logos for print and the web. Create your way with a variety of professional document styles, layouts, and vector tools. Furthermore, you can also take advantage of new non-destructive editing features when you apply effects to vector and bitmap objects. Customize your interface, tools, templates, and more to make it your own.
CorelDRAW Graphics Suite, included in Windows and Mac solutions, allows you to work more productively and creatively. New web applications complement your graphical workflow, allowing you to access CorelDRAW files stored in the cloud, add annotations and theme elements, or get started with new projects on any device. Also, the innovative tools it brings makes it possible for you to increase creativity and achieve exceptional results.
Screenshots:
CorelDRAW Graphics Suite Keygen has all the tools you need to create and print designs for the fashion industry, whether you’re a professional or not, such as screen printing, embroidery, direct printing on clothes, and clothing. CorelDRAW Graphics Suite Serial Key has the tools to create anything, from creative professionals in advertising and publishing to small businesses, creating internal marketing material, from pending brand identity to attractive sales tools.
CorelDRAW Graphics Suite X7 Key Features:
This software is very small and can be downloaded and used easily.
Corel Draw x7 supports a variety of special effects including Smear, Attract, Twirl, and others.
This application supports high resolution which means you can create HD designs.
There are also picture paintings so you can easily paint and edit images with this feature.
This software has a new document style.
It also supports difficult scripts.
CorelDRAW Graphics Suite X7 is a complete professional solution for all graphic designs.
It supports almost all types of formats.
Many new powerful tools are present in this latest release, so everything looks
natural that you really want to show off.
This is a sophisticated application and has many new features for editing images.
This software has a QR generator that you can use easily for professional web
design.
If you want to make a natural chart, you can use different tools and settings for
your work.
In this software, you have full control over vector and font pattern files.
QR code maker to create and add QR codes.
This software manages your content and does instant searches on Flicker and Fostoria.
Corel Draw x7 comes with all new tools.
The interface is easy to use and direct.
In the latest version, Corel Draw x7 Live Sketch is also added.
This application runs on all types of windows such as window 7, window 8,
window 8.1, window 10, XP, and Vista.
This software supports several unique languages.
Many interactive bars are added to Corel Draw x7.
Corel Draw x7 has an innovative vector modeling tool.
With this application, users can control their files and transparency.
This application is compatible with all commonly-used formats.
This software works quickly.
It has an exclusive font preview.
Corel Draw x7 supports RAW camera documents.
Corel Draw x7 has all the applications you need for design.
Using this application you can design easily and with confidence.
In addition, this software has Adobe color association units.
What’s new in CorelDRAW Graphics Suite X7?
Corel Draw Graphics Suite x7 supports higher resolutions and multiple resolutions.
In this latest version, easily seen fonts are present.
Many sophisticated character tools are present in this latest version.
This program supports advanced workspaces.
Corel Draw x7 works faster and more efficiently.
This software was published in the word press.
The interface is easy to use and direct.
This software supports complex scripts.
New document styles are present in this latest version.
This software supports several unique languages.
Corel Draw x7 also supports several advanced characters.
This software works quickly and easily.
It supports new fonts and photo editing.
Corel Draw x7 supports all types of windows.
This supports a fully customizable workspace.
You can control files and transparency.
Corel Draw x7 supports the accurate design and drawing tools.
Corel Draw Graphics Suite x7 Activation Code:
LO9M8-KIN7U-J6BHY-5VTG4-RFC3E
DXM9L-OK8I7-UJN6B-HY5GT-V4RFC

3EDXO-LM8KI-N7UJ6-BHY5G-TV4FR
C3DMO-9L8KI-N7UJ6-BHY5G-TV4RF
C3EDX-ML9O8-KI7UJ-N6HYB-5GTV4
Corel Draw Free Download For Windows 10
Corel Draw Graphics Suite x7 Serial Number:
LOM9K-8INJ7-UBH6Y-VG5TC-F4RDX
Download mac os mojave torrent. 3ML9O-KI8NJ-U7BHY-6GTV5-RFCDX
ML9OK-8INJ7-UHY6B-G5TVF-4CRD3
XEM9O-LK8IN-JU7HY-6BGVT-FCRDX
E3SML-9OK8I-J7UN6-HYB5G-TV4FR
Corel Draw Graphics Suite x7 Keygen:
DJS39W-SDJKSI-DJKSIW9 Call of duty black ops 1 mac download.
Coreldraw 11 For Mac free. download full Version
DFKDIEJ-DFJKD-DFJKD9E
System Requirements:
Before installing and cracking Corel Draw X7 for free and using keygen, here are the minimum system requirements for using the full version of Corel Draw X7.
Windows 10/8 / 8.1 / 7 (32-bit or 64-bit)
Intel Core 2 Duo or AMD Athlon 64
2 GB of RAM
1 GB hard disk space (for installation)
Mouse, tablet or multitouch screen
1024 x 768 screen resolution (768 x 1024 on a Tablet PC)
DVD drive (if physical copy)
Microsoft® Internet Explorer® 8 or higher
Internet connection required for certain features.
How To Install CorelDRAW Graphics Suite X7 Crack?
If you want to download this software, follow these steps;
Search for a reliable link and download Corel Draw x7 keygen.
Click on the download link.
You may need to extract it to the archive using 7zip.
Then install the software settings on your PC system.
Wait for the settings to be installed on your PC system.
If you provide a password, simply click on the password URL. The password will
be displayed to you here.
Copy the password and paste it into the extraction tool.
You can now easily extract these files.
Then enter the activation key for activation of this software.
This process will take several minutes.
Follow these steps carefully and your activation process will be successful.
You can easily install this tool.
All ready! You can enjoy this program.
Corel Draw 13 Free Download
Download Link is Given Below…
0 notes
Text
Magazine Processes and Research
I will be analysing ten covers of the film magazine Little White Lies.
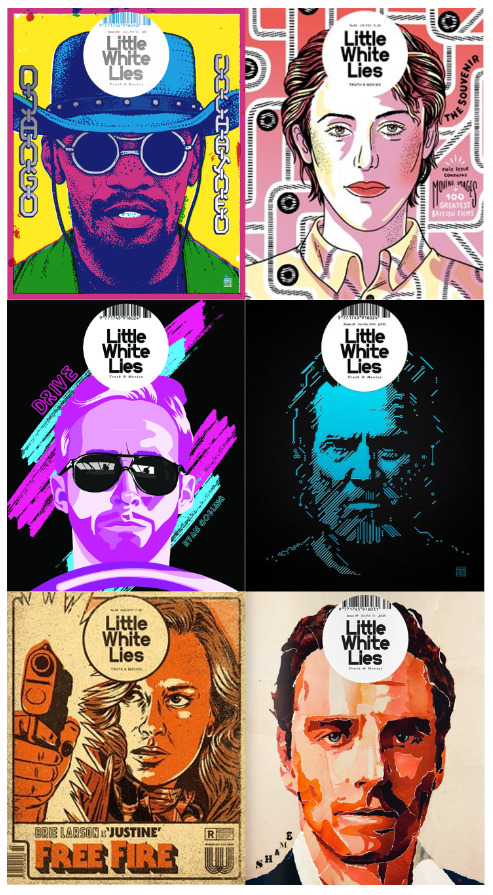
I really like all of these processes and they all inspire me to a degree. The top two are really cool looking and look achievable, with the outlined cartoony style of the top right cover with shading down the middle of the face and excellently chosen highlights in the hair. I think the colour palette of the top left one is just fantastic and it works so well. Both of these points apply to the bottom left cover which I think is just fantastic, the way all of the colours work so well together but none of them are straight-up white. and the figure blends into the background too. The middle right art is absolutely excellent, using only two colours, but it looks like the most difficult to recreate, with its intricate patterns making up the face. The bottom right has an effective effect with it, the outline-less “painted” texture look, could be achievable in a digital style. And, finally, the middle left design is just beautiful with its colour palette, outline-less design and smooth, bold shapes.
In summary, I’d attempt to find a middle ground style between and inspired by the top two covers, as well as an attempt at utilising the middle left cover and attempting to digitally paint like the bottom right one.
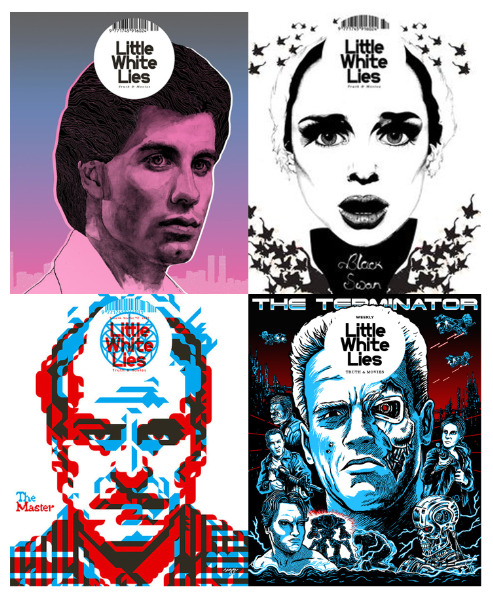
These four covers are also great to look at. I really love the gradient and all-pink tone of the face in the top-left one, the uniformity is stellar. The technique of the greyscale face with pink layered on top, as well as the detailed shading contrasting with the flat colour shirt and the pink and white outlines around the face, really brings the picture out as an effective piece. I don’t really like the top right one as it looks odd and poorly drawn to me, but I do like how only the essential facial features are really shaded here, and everything else is near enough left to be pure white. It presents itself as an interesting effect. The bottom left design is akin to the middle-left cover of the previous lot - very impressive and aesthetically pleasing, but would be difficult to replicate. I do like the simple colour palette though. And, of course, the Terminator cover is just impressive. I would be amazed to see myself pulling something like this off, but I think it’s beyond doable. So I will take inspiration from appropriate pieces and use it to make pieces of my own.
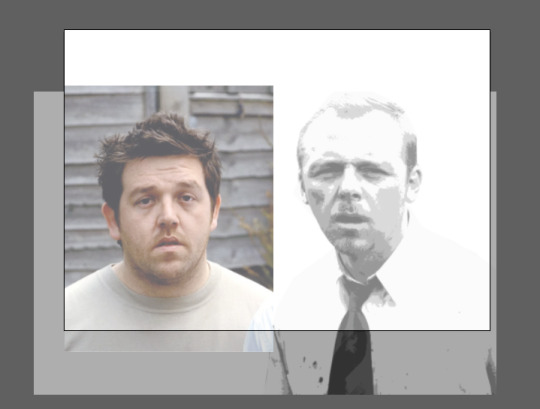
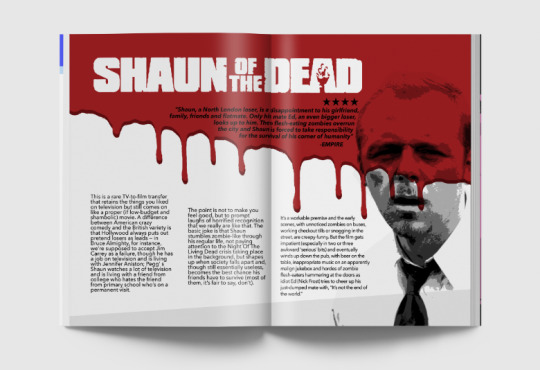
I sourced images of the protagonists of Shaun of the Dead, including the experiment I attempted with Shaun earlier. As I had tried a process with Shaun before, I thought I should try something with Ed first. So, in Adobe Illustrator I used the pen tool to outline all of the facial features I could, and the head itself. I thought it looked rather odd on top of the original image, but I had faith that it may look good once everything was filled in. Afterwards, I attempted Shaun, but I thought it had gone so horrendously badly that I needn’t attempt it, Ed alone would be enough.
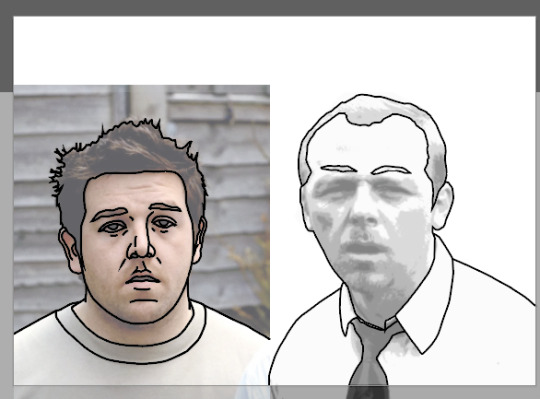
I then isolated the outline layer and began filling in all of the colour, choosing cartoony block colours for the skin, shirt, and hair. I thought it was starting to look good.
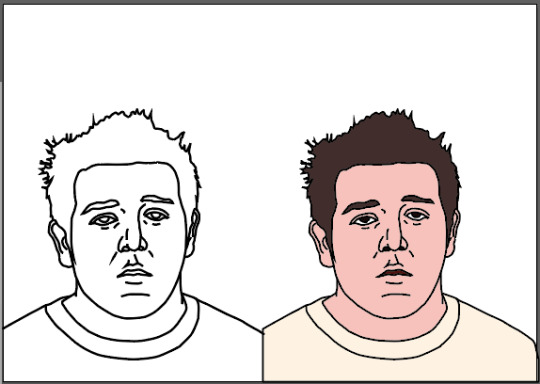
Although the process was meant to comprise original work, I took it into Photoshop and decided to try elevating the piece by layering a transparent copy of the original on top (with the background removed). I think the subtlety of it helped to add some shading and not make it look too strange. To make the hair look less flat, I used the magic wand tool to select the highlights from the original shot, and I then filled them with a lighter brown.
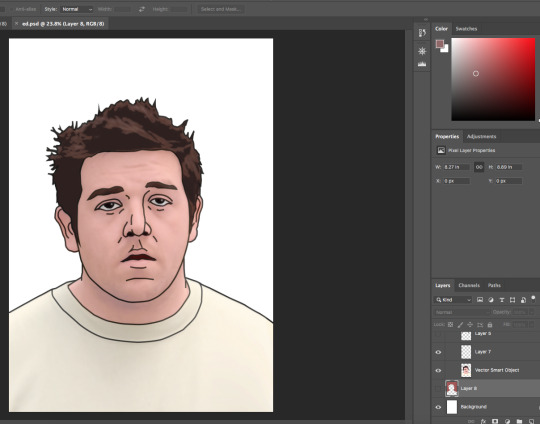
I added a temporary background that I thought looked better than the block white previously, and I also added a stroke around all of him, and made it transparent. I left it here for that day, with no plan for what to do with this.

Once I returned with a clearer idea of what to do with my magazine, I decided that this Little White Lies-based work was ideal to use for a front cover, as everything else I had was intended for the inside, as opposed to this. So, I decided to make the background more interesting to prepare myself for adding on the logo.

I used the polygonal lasso tool and just went nuts, drawing and adding random shapes to make this strange edge outline. I overlaid it onto my design and I could see that I had work to do.
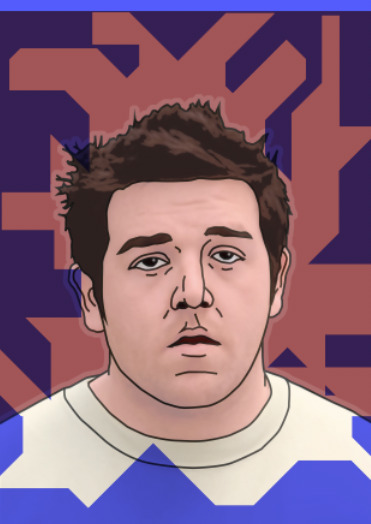
The one shape seemed basic, so I duplicated it and mirrored it on both axes. I added overlay effects and played around with them until I got something interesting.
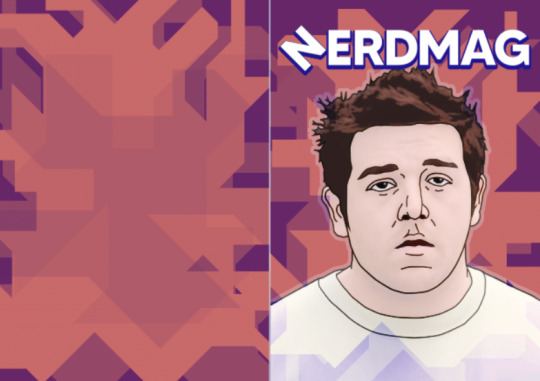
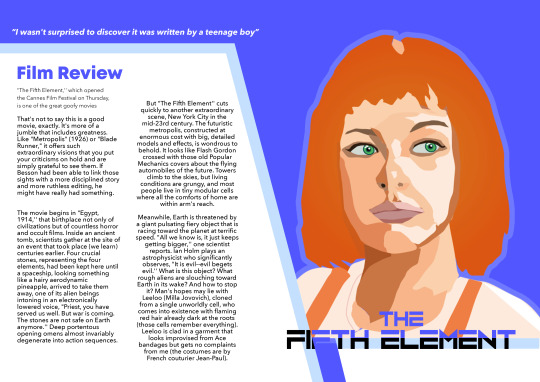
Then, I felt that it was time to add the logo. I added the Nerdmag logo above Ed’s head, and added a duplicate layer of it below to make it stand out from the background.

However, I felt that the cover was much too exposed and bright, and the text was rather illegible and blended in. I decided to try giving the blue text layer a stroke and I was very pleased with the result, as it gave it a bubble/bevel effect.
With the background/shape overlays, I experimented further, finding a saturation level that I was happy with, but the colours seemed rather ugly, particularly the diarrhoea brown at the bottom.

After adjusting the colours I ended up with this lovely purple and peach combo. I tried changing the text outline colour as well, but the blue seemed to just work best. I was very pleased with this look and adopted it as the font cover of my magazine.

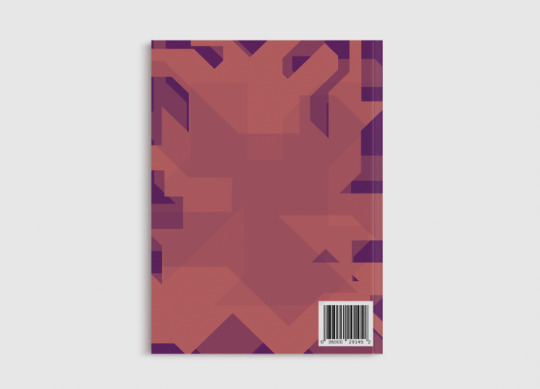
For the back cover, I altered the shapes in the background and zoomed it in a bit more, as well as adding some shapes in the middle to make it more interesting than the blank peach-coloured area.
I added a fake barcode in the corner to help sell the illusion of the back cover. and after this I considered it finished.

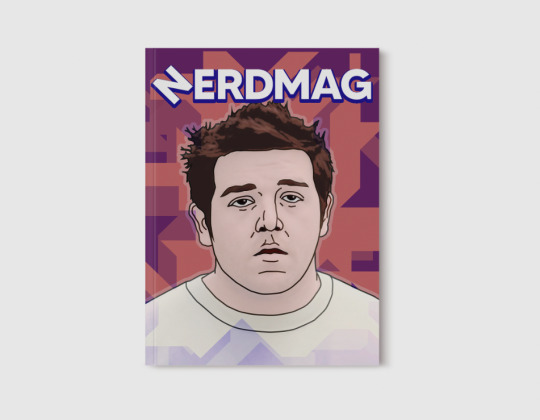
For my Fifth Element page spread, I could not keep my previous design because it was my unaltered screen print before printing, so I had to make a new outcome. I found myself most inspired by the middle left piece in the first lot of Little White Lies covers, so I decided to remake Leeloo’s face with blocks of shading. I sourced an image of three of the film’s characters and isolated her face in Illustrator.
I worked my way around the face, trying hard to adapt and keep faithful to the facial features so that she does not look weird. I did not try as hard on the hair though.
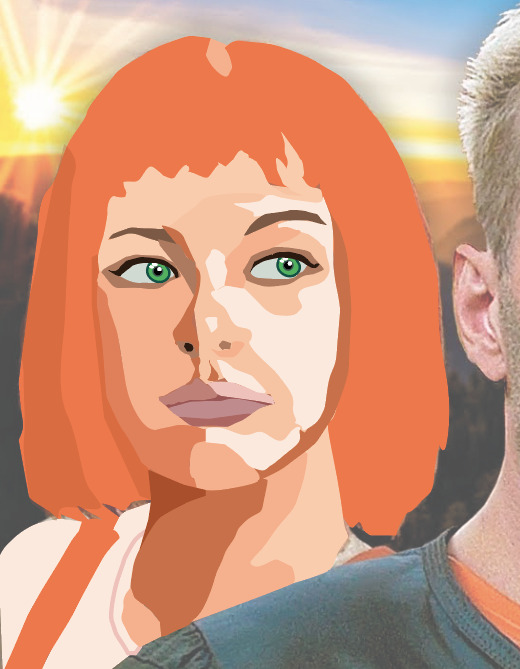
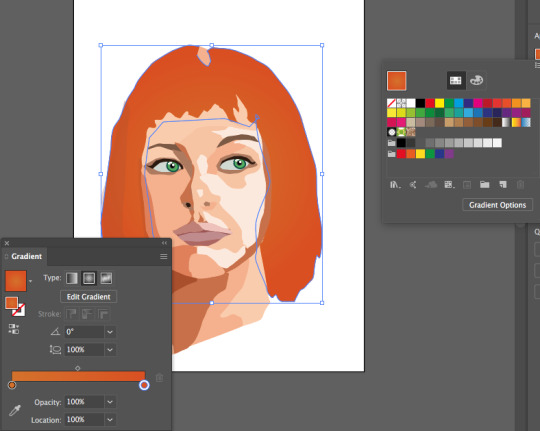
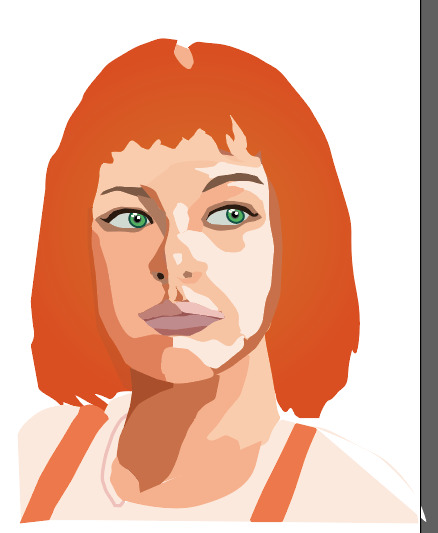
To make the hair look less plain, I added a gradient over the top of it, which I was really happy with. It certainly seemed to give the hair depth. Once I felt done with the design, after I finished the shoulders as well, I exported the image as an asset with a transparent background.
I replaced the screen print design with this design and I decided to replicate the Ed effect by doing a transparent stroke around Leeloo. I also altered the text overlay to make it blue instead of grey, to make it cool-looking but still legible.

After this, I started adapting the text boxes to contain actual reviews and meaningful content. I sourced a review of The Fifth Element, and swapped out the text boxes, then exported the final page spread.
I replaced my Shaun of the Dead screen print asset with my experiment of Shaun. I used an overlay to blend him into the background, and I rearranged the text to better match this, also swapping out the contents for more meaningful text, a review.

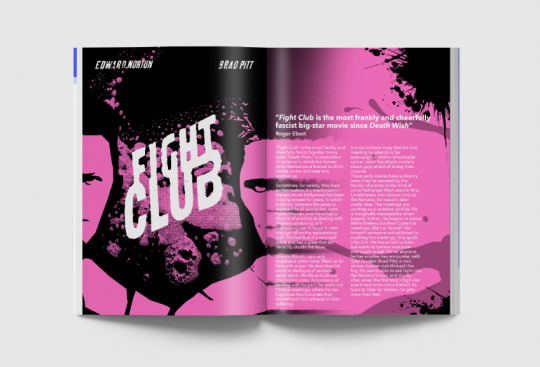
And as I had not used my Fight Club screen print, I could use it as a page for this magazine after all. Once again, I adapted it to swap out the contents with a review, not needing to change much of the text positioning this time round.

After all of the pages were exported, I imported them into InDesign and exported the final PDF.
I additionally rendered mock-ups of the exports, very pleased with the final designs, and how they looked this way.
0 notes
Link
These days, Google has acquired a lot of the market share, and people are used to having Google at their fingertips. And in this rage, users have forgotten about Firefox Mozilla’s existence. Like Google Chrome, Firefox Mozilla also has plug-ins and add-ons that you can use to your advantage as a designer. And when we talk about graphic designing and graphic designers, many interesting and useful Firefox add-on are out there that you may not know about.
In this blog, we are going to take a look at such add-ons that help you when you are a graphic designer with all of your graphic designing projects. They are as follows:
1. TinEye:

TinEye is a Firefox add-on that is smarter than Google’s image search. It is a reverse image search engine, which means it takes an image for input and offers related photos. And TinEye is a widely used reverse image search engine so far. Photographers and people from the creative domain use this tool extensively. Moreover, photographers can also see if someone has stolen, edited, or reused their images. TinEye is easy to use. You just have to upload an image or a URL of that image goes into search query as input.
The TinEye add-on for Firefox is available for use for free. You just have to create an account with its website. And you can use the tool for free. The free version of it allows you to run around 150 searches in a week.
2. Stylus:

There are some days when you start designing a website, and you don’t seem to agree with its aesthetics and appearance. Web developers and designers generally rely upon the CSS, also known as Cascaded Style Sheet, for the appearance of their website. In such a scenario, Stylus can help you sort out your issues. Stylus lets you apply new CSS to the sites that don’t appear very impressive in their appearance. If you are someone with a strong technical background, you can design your CSS from scratch. But to the people who are not from a technical background, those people can download the customized themes from online websites. You can also download the CSS and customize the CSS according to your requirements. This can let you have a collection of CSS themes that are personalized that you can modify from time to time to keep it fresh.
Stylus lets you install various themes while supporting the themes from online repositories. Moreover, you can also install the styles from .user.css or .user.styl link sources. With Stylus, you don’t have to worry about losing your customized themes. It provides you with backup management that does not let you lose track of your CSS. Also, your themes update intuitively, which you can configure according to your requirements. The UI of Stylus is customizable. It has different themes, optional layout customization, icon and badge color combinations, and many other tweaks. Stylus provides you with two code validators that are optional with the rules that his user can configure.
3. EPUB Reader:

It gets downright annoying when you want to read an ebook, but it is not available in the PDF file format. Instead, it is available in EPUB format. Many of us are used to reading ebooks in PDF file format. And when we see the file format of the ebook is EPUB, we entirely lose out on the idea of reading that ebook. Hence, for readers like us, Firefox provides a plug-in called EPUBReader plug-in. There are millions of ebooks that are available for free on the Internet. But if you don’t have the right device to read it, it is all futile.
But if you use Firefox and are a voracious reader, you can always install EPUB Reader add-on in the browser. You just have to find the EPUB file online. Once you click that file, Firefox downloads it, processes it and renders it on your screen like a PDF file. The best part of using this add-on is, you can also read the EPUB files that you have downloaded previously on your device.
4. Measure-it:

It is always challenging to find the right width or height when you are dealing with the web page design. And specifically, if you are working for responsive web design, then the process has to be immaculate and accurate. But that does not imply that you have to have exact dimensions when it comes to images. Hence, it is still convenient to have a scale to measure the height and width of the images in terms of pixels. Such a tool is available with a Firefox add-on called Measure-it. With Measure-it, you can draw a scale on a web page to check the elements’ width and height on the web page. These measurements are in terms of pixels. Hence, with this tool, you can create perfect mockups and wireframes with the precision at the pixel level.
5. iMacro:

With web design and graphic design, specific tasks are always repeated. To establish certain tasks, you have to keep on repeating particular actions. In such a case, you can use the Firefox add-on called iMacro. With iMacro, you can accomplish the repetitive tasks with just a click of the mouse button. You can record an action in iMacro, and you can fill the form fields, carry out text extraction, download files, and do so much more. There are numerous possibilities. People use iMacro for their professional and personal task accomplishment and save a lot of time, energy, and resources.
Web developers can use iMacro for website regression testing, performance analysis, monitoring various web transactions. Moreover, you can combine iMacro with tools involving web development and testing. Macros in iMacro are stored in the form of text that supports password-based encryption. You can save macros either as a separate external file or in the form of bookmarks. Hence, you can play the recorded macros in the browser, and you can finish other tasks while macro assists you in your regular responsibilities.
6. Fireshot:

When working with websites, you often have to click screenshots to depict specific things during their documentation. And when you have to click a long screenshot, it is difficult to click the screenshot with your usual methods. Hence, there is an add-on with Firefox Mozilla that lets you click the long shot of the website. This Firefox add-on is called Fireshot. You can click the picture of an entire web page or capture the selected area of the web page. Fireshot is a versatile tool when it comes to capturing screenshots.
Fireshot lets you click the screenshot of the selected area or the entire webpage. Once you capture the screenshot, you can work with the captured image as a regular image. You can print the copy, edit it, and share it with others.
7. ColorZilla:

With graphic designers and color enthusiasts, Colorzilla is the most widely used tool. You get options like Advanced Eyedropper, Color Picker, Zoom in and Zoom out, Palette Browser, Web page DOM Colors, Gradient generator, and so much more one tool. The eyedropper and color picker functions are similar to the ones that you find in the desktop-based graphic design and painting applications. With this tool, you can pick up a color and save it in your palette so that you can use it repeatedly in the future.
Another advanced feature of ColorZilla is Web Page DOM Analyser. It analyses the colors and shades on the web page and creates a palette of color chips. This way, you can experiment with different colors while using the colors on the website.
8. Dark Reader:

Graphic designers and web designers often read a lot to enhance and sharpen their skills. And sometimes, some designers regularly read until late night and end up losing their sleep. This happens because the lights emitted by the devices, often make us insomniac. These lights trick the human brain into thinking that it is still day, and hence the sleep betrays us. To avoid such situations, developers developed the Firefox add-on called Dark Reader.
Dark Reader is a tool that lets you invert the colors of the website and darkens the appearance of the webpages so that you can read at night without losing sleep. With this tool, you can modify brightness, contrast, sepia filter, dark mode, fonts, and ignore list. The best part is that it doesn’t feature advertisements and doesn’t store any user’s data, making it safer and private for use.
9. Palette Creator:

In some situations, you require an exact same color, yet you are unable to find it in your palette. Moreover, with different color combinations, you are unable to achieve that same color. Hence, this Firefox add-on was developed for color enthusiasts that are very specific about the color selection. You can pick up the color you want from an image, and you get the same color for use in your project.
Once you right-click the image, you get the Palette Creator option, and you can choose the number of colors you want in your palette. Therefore, you can use this palette extensively to pick up the colors you want, and then create and save the palette.
10. SEO Quake:

SEO Quake is self-explanatory. You can improve the performance metrics of your web pages using the Firefox add-on SEO Quake. With SEO Quake, you can analyze all the significant metrics quickly, analyze SERP thoroughly, and export the CSV file format results. You can estimate the impact of the keywords along with setting parameters for search queries. It also lets you conduct the SEO audit of your web pages individually while checking the compatibility issues for a mobile phone.
SEO Quake consists of multiple tools that you can explore and use to your advantage. To explore core metric analysis, you can use the SEO bar that shows up at the top of the browser window, which you can customize.
11. Font Finder:

The Firefox add-on Font Finder came into existence for the designers, web developers, and typographers. It lets you find the font information of any component of a web page. Moreover, you can copy that information to the clipboard and access it whenever you require it. With this tool, you can analyze the fonts on the page, any font information can be pinned to the clipboard, and you can adjust the font’s options inline. The font options include color, size, and the family of the font.
You can access the options by right-clicking on the page and selecting the “inspect element” option. Font Finder lets you see the information like font color, background color, font family, size of the font, line height, and vertical alignment. You can also see the details like letter and word spacing, the weight of the typeface, font style, and it’s variant.
12. HTML Validator:

We all know how difficult it can get when we have to write pages of codes and find the error while executing the HTML code. With stretches of codes, it gets tedious to see how the error propagated and its origin. To avoid such situations, there is an add-on called HTML Validator can be used. When you install and use this Firefox add-on, it displays the number of errors in the status bar in the form of an icon. This Firefox add-on can analyze and validate the HTML code sent from the server or the one in the memory. You can find the details of the error when you look at the source code of the page. Hence, with this tool, you can forget about the HTML code errors and use this tool to see if any error has propagated into the web page.
Conclusion:
We saw some of the best Firefox add-ons that can help the designers with their projects by saving time, money, and energy. As these add-ons are widely available, you can easily download, install, and start working with them. Some of the Firefox add-ons are updated regularly, and developers make sure they are available for use across not only Firefox Mozilla browsers but also others. Initially, the add-ons were browser-specific. But now, with the concept of browser compatibility kicking in, the add-ons can be used across all the basic browsers. Hence, this blog comes handy when you want to understand the Firefox add-ons and download them for free. The best part of this blog is, every Firefox add-on that we have listed here is available for free. You can start working with them instantly.
0 notes
Photo


Draft
I’ve always wanted to create an infographic but never had the occasion to.
One problem I faced was having too many colors in the infographic. Whilst I made my background a dark blue and had 4 main swatches to use, I had also added the colors of the gay pride flag and different shades of blue/green for the map. These colors were picked for their ability to contrast the blue background. However, it also resulted in too much color, which is tiring to look at and lacks a focus. Hence, I decided to try to use more white in my text and graphics.
Graphics
All the graphics are made using illustrator vectors. For some of the harder vectors such as the maps, I used image trace and a pen tool to draw over a Google image.


I also wanted to add little details to some of the vectors to make the infographic more appealing. For example, I added a shadow to the speech bubble vectors. The shadow was made using a duplicate of the speech bubble graphic, stretched using the shear tool and Fill set to Multiply.

Typography
I chose to use several fonts from the Futura family (Namely Futura Hv BT and Futura Bk BT). I chose this font because it is san-serif, which makes it look cleaner and easier to read on the computer. I also played around with capitalised characters, bold and italics to make the text look more appealing. A combination of blue and white allowed me to keep the text interesting and highlight certain words. In addition, I liked the way text looks when they align, which prompted me to vary the sizes of the text so that they fit a specific shape I wanted (eg. a rectangle).

Some parts of my text required me to change the tracking, kerning and leading of the characters. Due to the different sizes of text, I had to adjust the leading to keep the spacing between (top and bottom) lines consistent. For the word “LAW” in my infographic, I felt the “L” was too close to the “A” and adjusted the kerning accordingly.

Design Elements
I took balance into consideration by making sure each segment feels evenly weighted visually. For example, I chose to tilt both the male and female icons to not only save space, but to create a symmetric graphic, as well as to emphasize the contrasting binary between the two sexes. I also played around with the colors in the circle, and opted for the version that had less yellow because it lacked contrast with the pink female icon.

I ran into more trouble with color contrast when I tried to use the pride flag colors to represent the different letters of LGBT. Zooming out made it difficult to make out the icons due to the colors. Hence, to ensure my icons are visible, I switched some to solid colors instead.

In my Pink Dot graph, I used pink dots to represent the number of attendees as it corresponds to the name of the event, “Pink Dot”. I also liked how the repetition of circles looked. In 2016, the turnout exceeded the max capacity of the venue, which I depicted by using a gradient to fade the last circle.

I chose to work with a variety of shapes to create distinct vectors, as well as a variety of ways to present them; bar graph, pie charts, map, lists. This was a way to test my design skills – both the presentation of information and the ability to execute it.
Critique
One critique I had was that the original colours I used in the bar graph were redundant as they do not add any meaning; in fact, it may confuse viewers who try to search for meaning in the use of the different colors. This particular critique made me rethink the way I was using colors, and I switched some of the colors up so that Yellow was mostly associated with support for homosexuality, Red for opposition of homosexuality and Purple for neutral.
This led me to try out different colors for the bar graphs. First, I tried alternating shades of red, but it felt like too much red color in one area. Hence, I chose to do a red-to-yellow gradient, which also represents the most opposed to most supportive categories in the bar graph. In order to achieve a gradient across all the bars, I made the bars a compound path.

Another critique I noted was the use of icons to represent different age groups. I found this one particularly challenging as the age group 15-24 year olds did not have a distinctive feature. Originally, I had used an icon carrying a backpack, but it seemed too child-like. I was reluctant to make them students as it may be misinterpreted as level of education rather than age group. In the end, I settled for a person with a sling bag and a tie.

Lastly, one classmate mentioned that the hearts I originally used to represent “no laws that discriminate against homosexuality” was misleading as not all the countries in the infographic were actually gay-friendly. Hence, I changed them into green circles to symbolize “OK”, which could hopefully evoke a more neutral interpretation.
More Improvements
One area I feel like I can improve on would be spacing. Because there is so much information I want to present, the infographic feels a bit cluttered. I did not want to reduce the size of segments because I was afraid that smaller text becomes illegible after a certain size. Perhaps I should have used a focal point such as a hero image to draw the audience’s view and smoothly guide them through the segments.
Another thing I want to work on is colour. I think I might have chosen too many colors for the color palette of this infographic, such that the vibrant colours are fighting for attention at some points. I am interested in learning to use less colors, and to also play with gradients a bit more.
Lastly, I notice a weird thing that the PDF file does: The graph about Religion has lines going across it to demarcate the percentages. Maybe the lines are too fine, because it seems to glitch and flash in and out of visibility when I zoom in:

Workspace


0 notes
Text
知っておくと役立つ!CSSの疑似要素:beforeと:afterを使用したUI要素を実装するテクニックのまとめ
CSSの疑似要素は非常に便利です。疑似要素:beforeと:afterを使用したUI要素を実装する便利なテクニックを紹介します。
Webページやスマホアプリで使えるUI要素をはじめ、クリック・タップ可能領域を広げたり、:afterと:beforeのどちらを使うべきかなど、知っておくと役立つ疑似要素のテクニックです。
Uncommon Use Cases For Pseudo Elements by Ahmad Shadeed
下記は各ポイントを意訳したものです。 ※当ブログでの翻訳記事は、��サイト様にライセンスを得て翻訳しています。
疑似要素で、親子のホバーエフェクト
疑似要素はその親要素に属しているため、それを利用したテクニックがいくつかあります。分かりやすい例を使用して説明します。
子をホバーすると、親にエフェクトが適用される
見出し(Section Title)があり、その左に小さな円があります。見出しにカーソルを合わせると、この小さな円は大きくなります。 これは、下記のCSSで実現できます。
.section-title:before {
content: "";
width: 20px;
height: 20px;
background: blue;
/* Other styles */
}
.section-title:hover:before {
transform: scale(1.2);
}
CSSは簡単で分かりやすいと思います。 では、このコンセプトをより有用な使用例に拡張してみます。
一覧のリスト
私のWebサイトには、プロジェクトの一覧があります。プロジェクトごとにサムネイルを追加したかったのですが、最優先事項ではありませんでした。より重要だったのは、リンク自体です。このエフェクトはEthan Marcotteで、初めて見ました。
デフォルト時
上記のモックアップ画像は、私が適用したかったアイデアを示しています。本文のリンクには、それに対応する要素があります。
子要素のリンクをホバーすると、親要素にエフェクトを適用
HTMLは、下記の通りです。
<section class="hero">
<p>Hello, my name is Ahmad. I’m a UX Designer and Front End Developer that enjoys the intersection between design and code. I write on <a href="http://bit.ly/2P5yuAU" class="link-1">ishadeed.com</a> and <a href="http://bit.ly/380D1x3" class="link-2">a11ymatters.com</a> on CSS, UX Design and Web Accessibility.</p>
</section>
ヒーローにpaddingを追加
疑似要素のためにスペースを確保したいので、paddingを追加します。
paddingを追加して、スペースを確保
疑似要素を絶対配置にする
絶対配置にするには、どの親が相対的な親であるかを定義する必要があります。この場合は、ヒーローセクションに追加する必要があります。
下記のアニメーションGIFで、.heroからposition: relativeを削除すると疑似要素にどのような影響を与えるかに確認してください。
position: relativeを削除すると疑似要素にどのような影響を与えるか
擬似要素を追加
最後にホバーエフェクトとともに、擬似要素を追加します。
1
2
3
4
5
6
7
8
9
10
11
12
13
14
15
16
17
18
19
20
21
22
23
24
25
26
.link-1 {
color: #854FBB;
}
@media (min-width: 700px) {
.link-1:after {
content: "";
position: absolute;
right: 0;
top: 20px;
width: 150px;
height: 100px;
background: currentColor;
opacity: 0.85;
transition: 0.3s ease-out;
}
.link-1:hover {
text-decoration: underline;
}
.link-1:hover:after {
transform: scale(1.2);
opacity: 1;
}
}
これで、子要素のリンクをホバーすると、それに対応した要素にエフェクトが適用されます。
完成したデモ
実装のポイント
疑似要素のbackgroundプロパティにcurrentColorを定義していることに注目してください。このキーワードは常に、親のカラーを継承します。そのため、リンクのカラーを変更しても問題ありません。
リンクと同じカラーを常に継承する
実際のデモは、下記ページでご覧ください。
もし興味があれば、私のWebサイトにも実際に使用しているので、チェックしてください。ここで紹介したテクニックを使用しています。
ishadeed.com
疑似要素で、クリック可能領域のサイズを広くする
疑似要素をリンクに追加することで、クリック可能な領域が広くなります。これは非常に便利なテクニックで、ユーザーエクスペリエンスを向上します。
クリック可能領域のサイズを広くする
さらに、カードコンポーネントのクリック可能領域を広くするためにも使用できます。記事のタイトルや画像などのコンテンツは疑似要素の上にあるため、テキストの選択や画像の保存には影響しません。
カードのクリック可能領域のサイズを広くする
この実装方法については、以前詳しく解説した記事をご覧ください。
Enhancing The Clickable Area Size 日本語訳: クリック・タップ可能な領域のサイズを広くする実装方法のまとめ
疑似要素を使用したオーバーレイ
背景画像を持つ要素があり、そのデザインに描画モードがカラーに設定されたグラデーションのオーバーレイがあるとします。その場合、疑似要素で実装できます!
疑似要素を使用したオーバーレイ
CSSは、下記の通りです。
.hero {
position: relative;
height: 300px;
background: url("image.jpg") center/cover;
}
.hero:after {
content: "";
position: absolute;
left: 0;
top: 0;
width: 100%;
height: 100%;
background-image: linear-gradient(180deg, #851717 0%, #30328C 100%);
mix-blend-mode: color;
}
実際のデモは、下記ページでご覧ください。
疑似要素で、シャドウエフェクト
「Wrapped Shadows」の名称が正しいかどうか分かりませんが、私はそう認識しています。このエフェクトを実現するために、少し歪んだシャドウを作成していました、繊細なエフェクトです。 聞いてください! 疑似要素を使用するとこれも簡単に実装できます。
少し歪んだシャドウ「Wrapped Shadows」
このエフェクトの実装方法を解説します。
Step 1: 要素を作成
まずは、div要素で矩形のスタイルを定義します。
.elem {
position: relative;
display: flex;
align-items: center;
max-width: 400px;
background: #fff;
padding: 2rem 1rem;
font-size: 1.5rem;
margin: 2rem auto;
text-align: center;
box-sizing: border-box;
}
中央に配置された矩形が実装されました。
中央に配置された矩形
Step 2: 疑似要素を加える
次に、widthが50%の:beforeと:afterを加えます。 ※説明のために、それぞれ異なる背景色をつけました。
1
2
3
4
5
6
7
8
9
10
11
12
13
14
15
16
17
18
.elem:before,
.elem:after {
content: "";
position: absolute;
top: 2px;
width: 50%;
height: 100%;
}
.elem:before {
left: 0;
background: grey;
}
.elem:after {
right: 0;
background: #000;
}
:beforeがグレー、:afterがブラック
疑似要素にtransform: skew(x)を加え、xは2度です。1つをマイナスにすることで、目的のエフェクトが得られます。
.elem:before {
transform: skew(-2deg);
}
.elem:after {
transform: skew(2deg);
}
角度をつける
擬似要素にz-index: -1を加え、親の背後に移動します。
疑似要素を背後に移動
最後に仕上げです。
filter: blurを加える。
opacityを下げる。
透明から黒へのグラデーションを加える(親の上部中央にある擬似要素のエッジを非表示にするため)。
最終のコード
最終のコードは、下記の通りです。
1
2
3
4
5
6
7
8
9
10
11
12
13
14
15
16
17
18
19
20
21
22
23
24
25
26
27
28
29
30
31
32
33
34
35
.elem {
position: relative;
display: flex;
align-items: center;
max-width: 400px;
background: #fff;
padding: 2rem 1rem;
font-size: 1.5rem;
margin: 2rem auto;
text-align: center;
box-sizing: border-box;
}
.elem:before,
.elem:after {
content: "";
position: absolute;
top: 3px;
width: 50%;
height: 100%;
z-index: -1;
background: linear-gradient(to bottom, transparent, #000);
filter: blur(3px);
opacity: 0.3;
}
.elem:before {
left: 0;
transform: skewY(-2deg);
}
.elem:after {
right: 0;
transform: skewY(2deg);
}
疑似要素の:beforeと:afterにskewYに入れ替えると、また違ったシャドウを実装できます。
skewYに入れ替えたエフェクト
実際のデモは、下記ページでご覧ください。
:afterと:beforeのどちらを使うべきか
私は最近Twitterの議論で、:afterではなく:beforeを使用する方が良いということを学びました。どうしてでしょう?
なぜなら、:afterを使用した場合は��似要素が他のネストされた要素と重ならないようにz-indexを他のネストされた要素に追加する必要があるかもしれないからです。
実際の例を見てましょう。 サムネイルとタイトルで構成されたシンプルなカードです。テキストの下にはグラデーションオーバーレイがあり、サムネイルの画像が明るすぎる場合でもテキストが見やすくなります。
サムネイルとタイトルで構成されたシンプルなカード
HTMLは非常にシンプルです。
<article class="card">
<img src="article.jpg" alt="">
<h2>Title here</h2>
</article>
タイトルの下にオーバーレイを追加するには、疑似要素を使用する必要があります。:afterと:beforeのどちらを使用しますか? 両方の例を見てましょう。
:afterを使用した場合
:afterを使用した場合は、タイトルは下記のように擬似要素オーバーレイの下に表示されます。
タイトルがオーバーレイの下に表示されてしまう
これを解決するには、タイトルにz-indexを加えます。簡単で迅速な解決策ですが、それは正しい方法ではありません。
.card-title {
/*Other styles*/
z-index: 1;
}
:beforeを使用した場合
:beforeを使用した場合は、デフォルトで機能します。タイトルにz-indexを加える必要はありません。これが機能する理由は、:beforeを使用すると他の兄弟要素の上には表示されませんが、:afterだと表示されてしまうからです。
実際のデモは、下記ページでご覧ください。
ファイル拡張子を元にリンクのスタイル設定
このテクニックは例えば、PDFファイルへのリンクがある場合はPDFアイコンを表示して、ユーザーに分かりやすくすることができます。 さっそく、その実装方法を見てましょう。
<p><a href="example.pdf">Download PDF</a></p>
<p><a href="example.doc">Download Doc</a></p>
a[href$=".pdf"]:before {
content: "";
display: inline-block;
vertical-align: middle;
margin-right: 8px;
width: 18px;
height: 18px;
background: url(https://s3-us-west-2.amazonaws.com/s.cdpn.io/182774/np_pdf_377198_000000.svg) center/20px no-repeat;
padding: 3px;
}
これで、.pdfへのリンクにはPDFアイコンを、.docへのリンクにはDOCアイコンを表示します。
ファイル拡張子を元にリンクのスタイル設定
実際のデモは、下記ページでご覧ください。
疑似要素で、区切り線
「or」の両側にラインを引いた区切り線です、これは疑似要素とFlexboxを使用して簡単に実装できます。
疑似要素で、区切り線
実装は非常にシンプルです。
1
2
3
4
5
6
7
8
9
10
11
12
13
14
15
16
17
18
19
p {
display: flex;
align-items: center;
}
p:before, p:after {
content: "";
height: 2px;
background: #c5c5c5;
flex-grow: 1;
}
p:before {
margin-right: 10px;
}
p:after {
margin-left: 10px;
}
実際のデモは、下記ページでご覧ください。
アップデート
この実装方法より、よい方法があります。Scott ZirkelのTwitterで指摘され、<hr>を使用する方がよいことが分かりました。実際のコードは、下記のデモをご覧ください。
終わりに
これで終了です。コメントや提案があれば、@shadeed9に送ってください。
0 notes
Text
Low Cost Color Copies Print near My Place for Denver CO
How to Choose Colors for Color Printing Materials?
At times, it can be tough to make a solid impression on potential customers with direct mail marketing pieces. Most of the sales letters, postcards and marketing brochures that are obtained are either instantly thrown away or scanned briefly. Color can make your text and graphics outstanding. You have to consider with care all the colors that you may use for your preferred paper, graphics, and text, so as to be even more successful in bringing more attention to the products that you print. Here is how you can choose the best Low-Cost Color Copies Print near My Place for Denver CO options.
Emphasize Text with color
For making the text more apparent, color is a very powerful tool – even more than making use of italic or bold colors. Typically, the smaller the texts that you can use over your printed products, the less vivid your colors are. When you use a colored font, you can make your text more easily readable just at a glance. Make sure that while using color as your text background, try using lighter color shades which can make it very convenient to read. When you design, keep in mind that the colors observed on a PC screen would be generally darker as compared to printed materials.
Make Use of Accent Colors
With an accent color, information can be conveyed easily and quickly. This can let your audience connect every dot in your messages. It is best to use accent shades for coupon codes, headings and other details that would be used by your recipients to get in touch with you, as well as other specific brand names or products, and any important benefits that you would like to stress in every message. Red tones happen to be among the most popular accents, given that the ink is frequently more effectual and cheaper in grabbing attention. As many people will scan all your printed materials only briefly, the use of an accent color by the Low-Cost Color Copies Print near My Place for Denver CO agencies can let you convey vital details to your customers.
Make use of brand logo colors
Your logo happens to be among the most vital aspects of your business. Thus, it has to be every piece of marketing. Develop a consistent branding message with the use of colors from your brand logo on every piece that is printed. In case you are yet to design your brand logo, make use of colors which may be used in your postcards and brochures in headings and highlight the specifics in your text. The use of same colors on your text and logo can save printing expenses for you, as you would use less inks.
Choose your paper with care
Typically, there are two varied forms of postcard paper or brochure – coated and uncoated. Based on whether or not you use coating, the colors of your choice could appear dramatically varied. Another alternative related to paper choices and coating is the use of a special form of coating that offers an illusion of texture. While ensuring a very smooth and flawless finish.
The paper color of your choice can also have a major impact on the finished item. As ink does not have opacity, the use of varied ink shades with various paper color shades can help you to get an unexpected and new color palette.
What Should You Check Before Color Copy Printing File Submission?
Before you upload, ensure that you have these requirements for your color copies printing file.
Spot UV: An extra mask or file has to be created in order to install a spot UV. The mask needs to be white and black with the space to be UV in 100% black without any gradient. The remaining, not having spot YV, needs to be in white color. Send the grey scale file or mask to your printer with your CYMK file. It can be very interesting to use Spot UV and may detect printing as a premium marketing and sales piece literature in readers’ perception.
Fonts: It is not necessary to use fonts with PDF files of high-resolution, which is more preferable. In case there is no embedding of fonts, make sure that you submit all your fonts with the file. You should place fonts in own folder.
Resolution: Ensure that every image is 300 dpi or even more, so as to get the most detailed pictures. If there is something less, you can get inferior quality. On your monitor, 72 dpi may appear acceptable. However, on printed products. 72 dpi means that the image quality will be poor.
youtube
Flatten Files
In case you work in any design software, such as Photoshop, which makes use of layers, make sure that the file is flattened before it is submitted for printing.
CMYK: Every color copies file needs to be of process color or CMYK. Avoid using any color system such as lab or RGB, as these does not truly showcase what would be printed.
Bleed: In case you need any printed piece of yours to print to the paper edge – or bleed on it – you have to ensure that one-eighth of an additional image is obtained all around.
Crop Marks: These are very vital on every printing job, so that the color copies printer has an exact understanding of how the job should be cut – particularly in case you are making use of Spot UV. These can offer the exact positioning that you are placing a request for.
Trim Area
Keep every important image, text and border a minimum of a quarter of an inch away from the trim edge. You can get Low Cost Color Copies Print near My Place for Denver CO template free of cost on lots of printing websites online.
Rich Black
Any black background needs to have the percentages 100-K, 40-Y, 40-M and 60-C. So that a rich black color can be obtained. When you view on your monitor. You can find the black colors appearing similar although these will appear significantly varied when printed. You should keep every type just all-black (0-C, 0-M, 0-Y, 100-K). The font sizes have to be below 28 pt in order to be easily legible.
Low Cost Color Copies Print near My Place for Denver CO
The post Low Cost Color Copies Print near My Place for Denver CO appeared first on Cheap Printing Deals.
Low Cost Color Copies Print near My Place for Denver CO posted first on https://www.55printing.com
0 notes
Text
Staying Connected And Learning From Each Other
About The Author
Juggling between three languages on a daily basis, Iris is known for her love of linguistics, arts, web design and typography, as well as her goldmine of … More about Iris …
A month is a long time to stay on top of things. Here you’ll find an overview of everything we’ve been working on and have also enjoyed reading over the past month. Of course, you can always find us on Twitter, Facebook and LinkedIn, and also stay updated with our RSS feed as well as our Smashing Newsletter (sent out every second week with all sorts of goodies!).
Digital space obviously has its challenges, but it also provides incredible opportunities for us to connect and learn in ways we just wouldn’t be able to do otherwise. The situation with COVID-19 has challenged us to consider ways in which we could offer a similar SmashingConf experience and access to experts just as in an in-person workshop — without needing to leave your desk.
With insightful takeaways, exercises, access to slides, recordings and friendly Q&As, it has been such an incredible experience already! We’ve had literally people from all over the world collaborating together on group exercises — something we’d never be able to achieve with an in-person event.
We’re looking forward to connecting with Brad Frost, Joe Leech, Miriam Suzanne and many others. Try spotting them, but don’t get too distratced by the Mouse!
And we’re just getting started! We already have a schedule of online workshops ready for you so you can start marking your calendars and join us anytime you like. What better way is there to boost your skills online and learn practical, actionable insights from experts in the industry — live!
Do you like what you see, but are worried about getting some time off from work? Well, you surely didn’t think we would leave your hanging? We know how difficult it can sometimes be, and so we’ve prepared a neat lil’ Convince-Your-Boss template to help you out. Good luck!
Ready For The Next Smashing Book?
That’s right! Paul Boag’s Click! Encourage Clicks Without Shady Tricks is currently in its final production stage and the pre-release starts on May 5. This practical guide has 11 chapters full of advice that can help you start improving your conversion rate in just a matter of simple steps. You can subscribe for a pre-order discount and be one of the first to get your hands on the book. Stay tuned!
Live UX Review With The Author
Next week, we’ll be hosting a Smashing TV webinar with Paul Boag who’ll be reviewing your websites and sharing some techniques you can use to improve conversion rates — without having to resort to any shady tricks. Tell me more →
As for the previous book, printed copies of The Ethical Design Handbook have made their way around the world, and we got to see some happy responses and thoughtful reviews. If you’d also like a copy, you can download a free PDF excerpt (5 MB) to get a first impression of the book — we’re sure you won’t be disappointed!
Also, in case you missed it, there is a Smashing Podcast episode featuring two of the authors of the book: Trine Falbe and Martin Michael Frederiksen. They discuss what it means for a design to be ethical, and how we can make improvements in our own projects.
Drew has also interviewed Laura Kalbag, Eduardo Bouças, Stéphanie Walter, and many more. You can subscribe and tune in anytime with any of your favorite apps!
Trending Topics On SmashingMag
We publish a new article every day on various topics that are current in the web industry. Here are some that our readers seemed to enjoy the most and have recommended further:
“Best Practices With React Hooks” by Adeneye David Abiodun This article covers the rules of React Hooks and how to effectively start using them in your projects. Please note that in order to follow this article in detail, you will need to know how to use React Hooks.
“Inspired Design Decisions With Herb Lubalin” by Andy Clarke How can we combine elements to develop powerful headers and calls to action? How do we use pre-formatted HTML text, and the text element in SVG for precise control over type? How can we optimise SVGs and make SVG text accessible? In this article, we’ll explore just that.
“Baking Structured Data Into The Design Process” by Frederick O’Brien Retrofitting search engine optimization only gets you so far. As metadata gets smarter, it’s more important than ever to build it into the design process from the start.
“How To Make Life Easier When Using Git” by Shane Hudson You don’t need to know your trees from your dangling blobs. If you use Git every day and feel like it’s a juggling act, then here are some tricks and tips to help make your life a bit easier.
Best Picks From Our Newsletter
We’ll be honest: Every second week, we struggle with keeping the Smashing Newsletter issues at a moderate length — there are just so many talented folks out there working on brilliant projects! Kudos to everyone involved!
Interested in sponsoring? Feel free to check out our partnership options and get in touch with the team anytime — they’ll be sure to get back to you right away.
Tips For Leading A Remote Team
Leading a remote design team can feel a bit daunting, especially if it’s your first time. Luckily, other people out there have found themselves in the same situation before and developed strategies to keep the team productive and effective, no matter where everyone might be located. Mark Boulton is one of them.
In light of recent events when many teams need to switch to remote work, Mark summarized some simple but useful approaches that have helped him leading remote teams for years. From continuing your team’s rituals to dealing with expectations on availability and coaching people through the ups and downs that working remotely brings along, Mark’s tips aren’t hard to adopt but they can make a real difference. (cm)
Getting To Grips With CSS Viewport Units
CSS Viewport units provide us with a way to size things in a fluid and dynamic way, without the need for JavaScript. If you haven’t gotten around to dive deeper into the topic yet, Ahmad Shadeed wrote a useful guide to CSS Viewport units.
Starting with a general overview of the viewport units vw, vh, vmin, and vmax, the guide covers how viewport units differ from percentages and explores practical use cases for viewport units and how to implement them in your projects. Just the push you might have needed to make the switch. (cm)
A Better File Uploader For The Web
Building a better file uploader for the web. That was the idea behind the JavaScript image uploader Uppload. Created by Anand Chowdhary, the image uploader is open-source and can be used with any file uploading backend. And with more than 30 plugins, it’s highly customizable, too.
Users can drag and drop their files to upload them or import from a camera, URL, or social media and a several other services (there’s even an option to take and upload a screenshot just by entering a URL). During the uploading process, users can apply effects to the images and adjust filters like brightness, contrast, and saturation. If that’s overkill for your project, you can select only what you need and treeshake the rest, of course. Uppload supports browsers down to IE10. Handy! (cm)
Open-Source Flip Counter Plugin
Do you want to count down to an event, visualize a fundraising campaign, or show a clock or sales counter? Then Rik Schennink’s Flip Counter might be for you. The plugin is open-source, mobile-friendly, easy to set up, and it gets by without any dependencies.
Apart from its ease of use and flexibility, Flip shines with the beautifully smooth animation that is used to flip the numbers on the cards. Depending on your use case, there are several presets that you can use as a starting point to build your flip counter. The visual style can be customized with CSS. A lovely little detail. (cm)
How To Write Good Email Code
Maybe you’ve been in that situation before where you had to code an HTML email but struggled with email code best practices. To help you master the challenge, Mark Robbins set up a library for good email code. You can simply copy and paste the code and use it in your emails or you can learn more about the theory behind it.
Priority lies in making sure the code is semantic, functional, accessible, and meeting user expectations, as Mark points out. Consistency between email clients and pixel perfect design are important, too, but always secondary. One for the bookmarks. (cm)
A Complete Solution For Tooltips, Popovers, And Dropdowns
If you’re looking for a quick and easy solution for tooltips, popovers, dropdowns, and menus, you might want to take a look at Tippy.js. The library provides the logic and styling involved in all types of elements that pop out from the flow of your document and get overlaid on top of the UI.
Tippy.js is optimized to prevent flipping and overflow, it’s WAI-Aria compliant, works in all modern browsers, and, so the promise, it even delivers high performance on low-end devices. You can style the elements with custom CSS and TypeScript is supported out of the box, too. Handy! (cm)
Open-Source Tool To Make Animated Product Mockups
What do you do when you’re missing a tool for a specific purpose? You build it yourself. That’s what Alyssa X did when she was looking for a tool to make animated GIFs and videos to showcase a product. Her take on the subject: Animockup.
With Animockup, you can showcase your product in action within a device mockup. Just drag some screen footage into the browser-based tool, and Animockup automatically places it into your desired mockup. You can add text, images, and adjust the styling, and choose from a selection of presets to optimize your mockup for sharing on Twitter, Dribble, Instagram and the like. A useful little helper. (cm)
Create CSS Color Gradients With Ease
Hand-picking colors to make a color gradient requires design experience and a good understanding of color harmony. If you need a gradient for a background or for UI elements but don’t feel confident enough to tackle the task yourself (or if you’re in a hurry), the color gradient generator which the folks at My Brand New Logo have created has got your back.
Powered by color gradient algorithms, the generator creates well-balanced gradients based on a color you select. There are four different styles of gradients that go from subtle to a mother-of-pearl effect and an intense, deep color gradient. You can adjust the gradient with sliders and, once you’re happy with the result, copy-paste the generated CSS code to use it in your project. Nice! (cm)
Collaborative Diagrams
Pen and paper are often hard to beat when you want to visualize an idea with a quick diagram. If you’re looking for a digital alternative that is just as straightforward and easy to use as your analog tools, you might want to check out Excalidraw.
Excalidraw is a virtual whiteboard that you can draw on. You can choose from a set of shapes, connect them with arrows or lines, add text, and color. There are some other styling options, too, but the tool is kept rather simple so that you can focus on what’s really important: visualizing your idea. A great feature that comes in especially handy now that a lot of teams work remotely: You can share a live-collaboration session with your team members or your clients. Export and save options are included, too, of course. (cm)
Mastering BEM Naming Conventions
BEM makes your code scalable and reusable, prevents it from becoming messy, and facilitates teamwork. However, even experienced CSS developers struggle with the naming conventions sometimes. To prevent you from getting lost in the BEM cosmos, the folks at 9elements put together the BEM Cheat Sheet with naming suggestions for some of the most common web components: breadcrumb navigation, buttons, cards, lists, tabs, form checkboxes, sidebars, and more.
If you want to dive in even deeper into the BEM methodology, Luke Whitehouse shares tips to tackle an ever-present issue in BEM: grandchildren, i.e. elements that are tied to another element, rather than to the block itself. Luke explores three different approaches to master the challenge: flattening the grandchildren and treating them as if they have no relation with their parent element, by creating new blocks, and by extending the BEM naming convention. A good read. (cm)
A Preserve For Classic Games
Do you feel nostalgic when you think of the video games you played back in the 80s and 90s? Well, why not take a little trip back to those days when games were just as much fun without the fancy effects they shine with today?
ClassicReload preserves more than 6,000 old retro games and abandoned OD/interfaces that you can play right in your browser. You can search for your favorite or browse the games by name, year, genre, and platform to discover something new. No matter if it’s The Oregon Trail, Prince of Persia, or Dangerous Dave you’ve been longing for for so long, if you’ve got a sweet spot for games, the site will keep you entertained for quite a while. (cm)
Managing HTML DOM And jQuery Alternatives
How do you manage HTML DOM with vanilla JavaScript only? Phuoc Nguyen collected 100 native DOM scripting snippets along with explanations on how to use them. The snippets are labeled by difficulty and range from basic (e.g. detecting if an element is focused) to more intermediate tasks like exporting a table to CSV and, finally, advanced use cases like creating a range slider.
Speaking of going vanilla: If you’re using jQuery in your projects, it might be a good idea to check if you actually need the additional dependency or if a few lines of utility code could do the trick. “You might not need jQuery” lists useful alternative code snippets that help you forgo jQuery. (cm)
Overly Descriptive Color Palettes
Have you ever considered combining snail-paced soft pink with unsealed mahogany and lousy watermelon as a color scheme for your next project? Well, what might sound a bit weird at first, is the concept behind colors.lol, a color inspiration site with “overly descriptive color palettes”, as its creator Adam Fuhrer describes it.
Created as a fun way to discover interesting color combinations, the palettes are hand-selected from the Twitter bot @colorschemez. The feed randomly generates color combinations and matches each color with an adjective from a list of over 20,000 words. Hiding behind the unusual names are of course real hex color values that you can use right away — #FDB0C0, #4A0100, and #FD4659 in the case of snail-paced soft pink and its fellas, for example. A fun take on color. (cm)
Flexible Repeating SVG Masks
Sometimes it’s a small idea, a little detail in a project that you tinker with and that you can’t let go off until you come up with a tailor-made solution to make it happen. Nothing that seems like a big deal at first glance, but that requires you to think outside the box. In Tyler Gaw’s case, this little detail was a flexible header with a little squiggle at the bottom instead of a straight line. The twist: to make the component future-proof, Tyler wanted to use a seamless, horizontal repeating pattern that he could color with CSS in any color he liked.
To get the job done, Tyler settled on flexible repeating SVG masks. SVG provides the shape, CSS handles the color, and mask-image does the heavy lifting by hiding anything in the underlying div that doesn’t intersect with the shape. A clever approach that can be used as the base for some fun experiments. (cm)
As a token of appreciation, Vitaly Friedman released his very own “Smart Interface Design Checklists”, a PDF deck with 150+ questions to ask when designing and building anything from hamburgers to carousels and tables. Subscribe to the newsletter below and get it in your inbox right away!
(cm, vf, ra, il)
Website Design & SEO Delray Beach by DBL07.co
Delray Beach SEO
source http://www.scpie.org/staying-connected-and-learning-from-each-other/ source https://scpie1.blogspot.com/2020/04/staying-connected-and-learning-from.html
1 note
·
View note
Text
Staying Connected And Learning From Each Other
About The Author
Juggling between three languages on a daily basis, Iris is known for her love of linguistics, arts, web design and typography, as well as her goldmine of … More about Iris …
A month is a long time to stay on top of things. Here you’ll find an overview of everything we’ve been working on and have also enjoyed reading over the past month. Of course, you can always find us on Twitter, Facebook and LinkedIn, and also stay updated with our RSS feed as well as our Smashing Newsletter (sent out every second week with all sorts of goodies!).
Digital space obviously has its challenges, but it also provides incredible opportunities for us to connect and learn in ways we just wouldn’t be able to do otherwise. The situation with COVID-19 has challenged us to consider ways in which we could offer a similar SmashingConf experience and access to experts just as in an in-person workshop — without needing to leave your desk.
With insightful takeaways, exercises, access to slides, recordings and friendly Q&As, it has been such an incredible experience already! We’ve had literally people from all over the world collaborating together on group exercises — something we’d never be able to achieve with an in-person event.
We’re looking forward to connecting with Brad Frost, Joe Leech, Miriam Suzanne and many others. Try spotting them, but don’t get too distratced by the Mouse!
And we’re just getting started! We already have a schedule of online workshops ready for you so you can start marking your calendars and join us anytime you like. What better way is there to boost your skills online and learn practical, actionable insights from experts in the industry — live!
Do you like what you see, but are worried about getting some time off from work? Well, you surely didn’t think we would leave your hanging? We know how difficult it can sometimes be, and so we’ve prepared a neat lil’ Convince-Your-Boss template to help you out. Good luck!
Ready For The Next Smashing Book?
That’s right! Paul Boag’s Click! Encourage Clicks Without Shady Tricks is currently in its final production stage and the pre-release starts on May 5. This practical guide has 11 chapters full of advice that can help you start improving your conversion rate in just a matter of simple steps. You can subscribe for a pre-order discount and be one of the first to get your hands on the book. Stay tuned!
Live UX Review With The Author
Next week, we’ll be hosting a Smashing TV webinar with Paul Boag who’ll be reviewing your websites and sharing some techniques you can use to improve conversion rates — without having to resort to any shady tricks. Tell me more →
As for the previous book, printed copies of The Ethical Design Handbook have made their way around the world, and we got to see some happy responses and thoughtful reviews. If you’d also like a copy, you can download a free PDF excerpt (5 MB) to get a first impression of the book — we’re sure you won’t be disappointed!
Also, in case you missed it, there is a Smashing Podcast episode featuring two of the authors of the book: Trine Falbe and Martin Michael Frederiksen. They discuss what it means for a design to be ethical, and how we can make improvements in our own projects.
Drew has also interviewed Laura Kalbag, Eduardo Bouças, Stéphanie Walter, and many more. You can subscribe and tune in anytime with any of your favorite apps!
Trending Topics On SmashingMag
We publish a new article every day on various topics that are current in the web industry. Here are some that our readers seemed to enjoy the most and have recommended further:
“Best Practices With React Hooks” by Adeneye David Abiodun This article covers the rules of React Hooks and how to effectively start using them in your projects. Please note that in order to follow this article in detail, you will need to know how to use React Hooks.
“Inspired Design Decisions With Herb Lubalin” by Andy Clarke How can we combine elements to develop powerful headers and calls to action? How do we use pre-formatted HTML text, and the text element in SVG for precise control over type? How can we optimise SVGs and make SVG text accessible? In this article, we’ll explore just that.
“Baking Structured Data Into The Design Process” by Frederick O’Brien Retrofitting search engine optimization only gets you so far. As metadata gets smarter, it’s more important than ever to build it into the design process from the start.
“How To Make Life Easier When Using Git” by Shane Hudson You don’t need to know your trees from your dangling blobs. If you use Git every day and feel like it’s a juggling act, then here are some tricks and tips to help make your life a bit easier.
Best Picks From Our Newsletter
We’ll be honest: Every second week, we struggle with keeping the Smashing Newsletter issues at a moderate length — there are just so many talented folks out there working on brilliant projects! Kudos to everyone involved!
Interested in sponsoring? Feel free to check out our partnership options and get in touch with the team anytime — they’ll be sure to get back to you right away.
Tips For Leading A Remote Team
Leading a remote design team can feel a bit daunting, especially if it’s your first time. Luckily, other people out there have found themselves in the same situation before and developed strategies to keep the team productive and effective, no matter where everyone might be located. Mark Boulton is one of them.
In light of recent events when many teams need to switch to remote work, Mark summarized some simple but useful approaches that have helped him leading remote teams for years. From continuing your team’s rituals to dealing with expectations on availability and coaching people through the ups and downs that working remotely brings along, Mark’s tips aren’t hard to adopt but they can make a real difference. (cm)
Getting To Grips With CSS Viewport Units
CSS Viewport units provide us with a way to size things in a fluid and dynamic way, without the need for JavaScript. If you haven’t gotten around to dive deeper into the topic yet, Ahmad Shadeed wrote a useful guide to CSS Viewport units.
Starting with a general overview of the viewport units vw, vh, vmin, and vmax, the guide covers how viewport units differ from percentages and explores practical use cases for viewport units and how to implement them in your projects. Just the push you might have needed to make the switch. (cm)
A Better File Uploader For The Web
Building a better file uploader for the web. That was the idea behind the JavaScript image uploader Uppload. Created by Anand Chowdhary, the image uploader is open-source and can be used with any file uploading backend. And with more than 30 plugins, it’s highly customizable, too.
Users can drag and drop their files to upload them or import from a camera, URL, or social media and a several other services (there’s even an option to take and upload a screenshot just by entering a URL). During the uploading process, users can apply effects to the images and adjust filters like brightness, contrast, and saturation. If that’s overkill for your project, you can select only what you need and treeshake the rest, of course. Uppload supports browsers down to IE10. Handy! (cm)
Open-Source Flip Counter Plugin
Do you want to count down to an event, visualize a fundraising campaign, or show a clock or sales counter? Then Rik Schennink’s Flip Counter might be for you. The plugin is open-source, mobile-friendly, easy to set up, and it gets by without any dependencies.
Apart from its ease of use and flexibility, Flip shines with the beautifully smooth animation that is used to flip the numbers on the cards. Depending on your use case, there are several presets that you can use as a starting point to build your flip counter. The visual style can be customized with CSS. A lovely little detail. (cm)
How To Write Good Email Code
Maybe you’ve been in that situation before where you had to code an HTML email but struggled with email code best practices. To help you master the challenge, Mark Robbins set up a library for good email code. You can simply copy and paste the code and use it in your emails or you can learn more about the theory behind it.
Priority lies in making sure the code is semantic, functional, accessible, and meeting user expectations, as Mark points out. Consistency between email clients and pixel perfect design are important, too, but always secondary. One for the bookmarks. (cm)
A Complete Solution For Tooltips, Popovers, And Dropdowns
If you’re looking for a quick and easy solution for tooltips, popovers, dropdowns, and menus, you might want to take a look at Tippy.js. The library provides the logic and styling involved in all types of elements that pop out from the flow of your document and get overlaid on top of the UI.
Tippy.js is optimized to prevent flipping and overflow, it’s WAI-Aria compliant, works in all modern browsers, and, so the promise, it even delivers high performance on low-end devices. You can style the elements with custom CSS and TypeScript is supported out of the box, too. Handy! (cm)
Open-Source Tool To Make Animated Product Mockups
What do you do when you’re missing a tool for a specific purpose? You build it yourself. That’s what Alyssa X did when she was looking for a tool to make animated GIFs and videos to showcase a product. Her take on the subject: Animockup.
With Animockup, you can showcase your product in action within a device mockup. Just drag some screen footage into the browser-based tool, and Animockup automatically places it into your desired mockup. You can add text, images, and adjust the styling, and choose from a selection of presets to optimize your mockup for sharing on Twitter, Dribble, Instagram and the like. A useful little helper. (cm)
Create CSS Color Gradients With Ease
Hand-picking colors to make a color gradient requires design experience and a good understanding of color harmony. If you need a gradient for a background or for UI elements but don’t feel confident enough to tackle the task yourself (or if you’re in a hurry), the color gradient generator which the folks at My Brand New Logo have created has got your back.
Powered by color gradient algorithms, the generator creates well-balanced gradients based on a color you select. There are four different styles of gradients that go from subtle to a mother-of-pearl effect and an intense, deep color gradient. You can adjust the gradient with sliders and, once you’re happy with the result, copy-paste the generated CSS code to use it in your project. Nice! (cm)
Collaborative Diagrams
Pen and paper are often hard to beat when you want to visualize an idea with a quick diagram. If you’re looking for a digital alternative that is just as straightforward and easy to use as your analog tools, you might want to check out Excalidraw.
Excalidraw is a virtual whiteboard that you can draw on. You can choose from a set of shapes, connect them with arrows or lines, add text, and color. There are some other styling options, too, but the tool is kept rather simple so that you can focus on what’s really important: visualizing your idea. A great feature that comes in especially handy now that a lot of teams work remotely: You can share a live-collaboration session with your team members or your clients. Export and save options are included, too, of course. (cm)
Mastering BEM Naming Conventions
BEM makes your code scalable and reusable, prevents it from becoming messy, and facilitates teamwork. However, even experienced CSS developers struggle with the naming conventions sometimes. To prevent you from getting lost in the BEM cosmos, the folks at 9elements put together the BEM Cheat Sheet with naming suggestions for some of the most common web components: breadcrumb navigation, buttons, cards, lists, tabs, form checkboxes, sidebars, and more.
If you want to dive in even deeper into the BEM methodology, Luke Whitehouse shares tips to tackle an ever-present issue in BEM: grandchildren, i.e. elements that are tied to another element, rather than to the block itself. Luke explores three different approaches to master the challenge: flattening the grandchildren and treating them as if they have no relation with their parent element, by creating new blocks, and by extending the BEM naming convention. A good read. (cm)
A Preserve For Classic Games
Do you feel nostalgic when you think of the video games you played back in the 80s and 90s? Well, why not take a little trip back to those days when games were just as much fun without the fancy effects they shine with today?
ClassicReload preserves more than 6,000 old retro games and abandoned OD/interfaces that you can play right in your browser. You can search for your favorite or browse the games by name, year, genre, and platform to discover something new. No matter if it’s The Oregon Trail, Prince of Persia, or Dangerous Dave you’ve been longing for for so long, if you’ve got a sweet spot for games, the site will keep you entertained for quite a while. (cm)
Managing HTML DOM And jQuery Alternatives
How do you manage HTML DOM with vanilla JavaScript only? Phuoc Nguyen collected 100 native DOM scripting snippets along with explanations on how to use them. The snippets are labeled by difficulty and range from basic (e.g. detecting if an element is focused) to more intermediate tasks like exporting a table to CSV and, finally, advanced use cases like creating a range slider.
Speaking of going vanilla: If you’re using jQuery in your projects, it might be a good idea to check if you actually need the additional dependency or if a few lines of utility code could do the trick. “You might not need jQuery” lists useful alternative code snippets that help you forgo jQuery. (cm)
Overly Descriptive Color Palettes
Have you ever considered combining snail-paced soft pink with unsealed mahogany and lousy watermelon as a color scheme for your next project? Well, what might sound a bit weird at first, is the concept behind colors.lol, a color inspiration site with “overly descriptive color palettes”, as its creator Adam Fuhrer describes it.
Created as a fun way to discover interesting color combinations, the palettes are hand-selected from the Twitter bot @colorschemez. The feed randomly generates color combinations and matches each color with an adjective from a list of over 20,000 words. Hiding behind the unusual names are of course real hex color values that you can use right away — #FDB0C0, #4A0100, and #FD4659 in the case of snail-paced soft pink and its fellas, for example. A fun take on color. (cm)
Flexible Repeating SVG Masks
Sometimes it’s a small idea, a little detail in a project that you tinker with and that you can’t let go off until you come up with a tailor-made solution to make it happen. Nothing that seems like a big deal at first glance, but that requires you to think outside the box. In Tyler Gaw’s case, this little detail was a flexible header with a little squiggle at the bottom instead of a straight line. The twist: to make the component future-proof, Tyler wanted to use a seamless, horizontal repeating pattern that he could color with CSS in any color he liked.
To get the job done, Tyler settled on flexible repeating SVG masks. SVG provides the shape, CSS handles the color, and mask-image does the heavy lifting by hiding anything in the underlying div that doesn’t intersect with the shape. A clever approach that can be used as the base for some fun experiments. (cm)
As a token of appreciation, Vitaly Friedman released his very own “Smart Interface Design Checklists”, a PDF deck with 150+ questions to ask when designing and building anything from hamburgers to carousels and tables. Subscribe to the newsletter below and get it in your inbox right away!
(cm, vf, ra, il)
Website Design & SEO Delray Beach by DBL07.co
Delray Beach SEO
source http://www.scpie.org/staying-connected-and-learning-from-each-other/ source https://scpie.tumblr.com/post/615709373558390784
0 notes