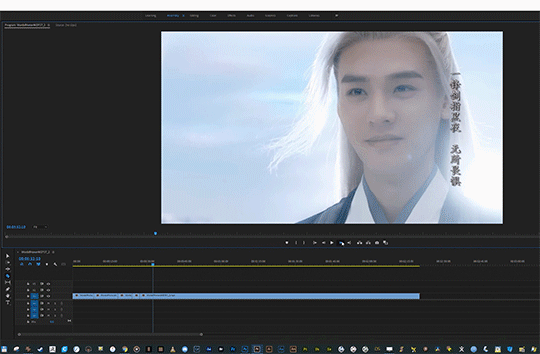
#There's still a lot of stuff about animation and the functions of adobe animate that I'd like to know more about yknow?
Explore tagged Tumblr posts
Visit Tumblr Blog
Explore Tumblr blogs with no restrictions, modern design and the best experience.
Last Seen Tumblr Blogs


Fun Fact
Post activity is at the highest at 4:00 pm EDT; notes peak at 10:00 pm EDT.
Note
Hello! Do you have a Fanfiction or story planned for your Springdad AU?
Also have a nice day :D
I'm planning to work on... something, but it won't be in the fanfiction format since I'm not very experienced with the English language
(clears throat)
(CLEARS THROAT HARDER)

have a nice day as well :]
#I wanted to work on a smaller project like this one before moving on to bigger ones such as Behind The Codes#There's still a lot of stuff about animation and the functions of adobe animate that I'd like to know more about yknow?#not sure about this though#since I already am busy w life in general and other projects as well#springdad au#fnaf#my art
1K notes
·
View notes
Text
📣 clip studio paint is having a 60% off sale from now until june 23rd 11:59pm pst (deadline is actually june 24 1am pst but whatever)
that means perpetual v4.0 is $23.40 and ex is $180.60. updates from 3.0->4.0 is pro->pro 17.49 and ex->ex 50.39
question and answer segment ⬇
is clip studio paint good i do not like adobe so i use this instead of photoshop. i like it and i like drawing in it
whats the difference between pro and ex ex doesn't have the 24 frames animation limit that pro has and it also has a lot more comic page and comic printing features. if you dont do multi-page comics or animation just get pro
should i buy now? i think if you wait until november or december for their last sale of the year you can get 5.0 also. so if you dont really need it now you could just wait i guess
is upgrading to csp 4.0 worth it compared to the csp version im using right now??? look at the features comparison list here and see if there is anything that strikes your fancy. features that i cared for off the top of my head: 2.0 added liquify across multiple layers, align/distribute tools, and proper word wrap for text. 3.0 added better mesh transformation controls, made timelapse more efficient, and webp import/export support (lol). 4.0 added better snapping and you can now select multiple brushes at once in the menu to move or delete them (HUGE)
how do i upgrade to 4.0 from 2.0. or 1.0 youd have to upgrade twice, once up to 3.0 and then again to 4.0, so honestly id just buy a new license. you should buy a new license if you have 1.0 regardless so you can continue to have access to 1.0 imo cuz thats the only one that doesnt have the online checks
aw does it still have the online checks yes but its not every day. its like, either every 3 days or 14 days, something like that. they changed it from being every 24 hours after everyone got mad when 2.0 came out
im a time traveller from the future. the 4.1 feature update in october or whatever added something lifechanging incredible why cant i use it! perpetual license only gives you up to 4.0 features. which includes 4.0 and 3.2, 3.1, 3.0 etc etc. you dont get 4.1 or 4.2 stuff. you have to wait for 5.0 perpetual for those. if youre impatient you can pay 11 dollars for an update pass that lasts 1 year and is functionally the same as a 1 year subscription. the update pass is only available if u have perpetual license and never goes on sale so its always 11 dollars which is coincidentally about the same price as an on-sale 1 year sub.
i use ipad tablet or android phone perpetual license is only for desktops. mobile devices can only have subscription. 1 year sub is on sale for $10.79 though (its usually $27)
#pivstuff#clip studio paint#i miss the more esoteric shit i could do in photoshop but eh. c'est la vie
6 notes
·
View notes
Text
For artist who use Adobe photoshop.
A really good alterative for me is Clip Studio paint. I did actually use to use photoshop, especially in high school and collage and I will say Clip is better and has some similar functions.
Such as a big stock of brushes, some for free and some on sale. As well as you can customize and make your own brushes. It also has the famous Gaussian blur, air brush and effects like fish eye.
On top of that it can open .PSDs and save in .PSD so you don't have to worry about changing your files.
It also has some other goodies, like 3D models to help you figure out a pose or help with perspective.
Also yes you can animate on Clip too, there is even a comic/manga setting for anyone who makes them.
On top of that as far as I know there are two ways of getting this program. Mine is the pay once and you own it, the other is to sub and get all the updates and other side stuff. I'm personally happy with the one time one, as it still does the job and you still get a lot for your money.
8 notes
·
View notes
Note
What equipment and programs do you use to make your art? Your about says you're self taught, what helped you learn? And does anything specific give you inspiration for your current style or what you'd like to achieve in the future? I really like your art❤️
ahh!! hey, thank you so much!! <3 that's so kind of you to say!!
easy questions first: for digital art i use a wacom intuos tablet and paint tool sai, which is the only setup i've ever used. i've been trying to get into clip studio paint but something about it just doesn't stick with me. i think i need more practice.
for comic panels and lettering i use adobe indesign, and export as png to before putting them in sai.
everything else under the cut so this post isn't miles long
i've been drawing ever since i was a kid, but until middle school i mostly just drew animals or little notebook paper comics about animals. i grew up on a farm so there were lots around, and drawing from life is something i think really helped. like, there's a difference between knowing what a cat looks like and being able to pick one up and see how its bones and muscles fit together, being able to watch it change how it moves around depending on what it's doing, whether it's catching a mouse or playing with another cat or curled up asleep, and being able to break down that anatomy and movement into simple shapes. i'm a pretty visually oriented person so knowing how a thing functions or fits together as simple shapes helps me visualize it in my head and imagine how it would look in different poses or from different angles.
around middle school i moved onto drawing people, again from life while sitting in a cafe or at a park. actually being able to get what's in my head down onto paper in a way that satisfies me is something that i think just took practice. only recently (like, late last/this year) have i been consistently satisfied with the way i draw things.
sorry if that sounds weird or clinical--this is the first time i've been asked to explain how i learned to draw and this is the best way i can think to say it.
honestly, finding my own style has been looking at what i like about other artists' styles and trying to figure out how they achieved that. i did a lot of redraws of other peoples' art as a kid. for me, trying to replicate something makes me really think about why i like the way it looks. i try to lean towards a semi-realistic style--i don't like drawing super realistic all the time, i love cartoons and think they have a lot of character--but i also don't want to lose the underlying anatomy or structure because it helps my brain make sense of stuff. so i try to find the middle of the road, where things are simplified but still structured, if that makes sense.
brief tangent... that's why i draw pokémon the way i do. they're not on model, they're how i imagine they would look if they were real animals, based on the sort of animals they're... uh, based on. so like for this piece, because camerupt is a cow/camel hybrid, i looked at a bunch of pictures of cows laying on their sides, what their hooves and skulls looked like from certain angles, etc. and then i could draw what i wanted.
as for improvements, i need to get better at backgrounds and realistic coloring/lighting. color theory is one of those things that i understand... well, in theory, but when it comes to practice and paying attention to it when i color, i need work. and because i've mostly drawn animals and people my whole life--organic stuff--i find buildings and backgrounds difficult, so i tend to avoid them. and i need to not do that.
#thank you for the ask!! this one really made me think#let me know if you'd like me to clarify anything... i tend to get longwinded and distract myself with tangents.#so idk how clear this is? i really look like the charlie conspiracy board meme trying to explain anything to anybody#bc like there's CONTEXT alright#like i deleted a tangent about how much i love hiromu arakawa and fullmetal alchemist and it was a huge inspiration and#like damn dude that amount of granular detail was not asked for lmao#autumn.ask#autumn.personal
15 notes
·
View notes
Text
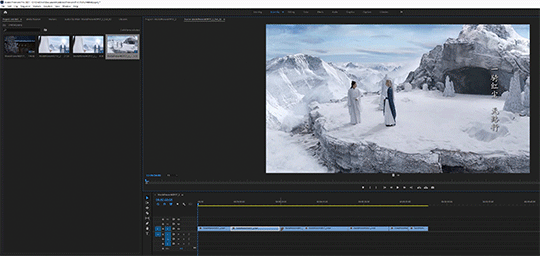
Tutorial: Batch Creating Animated Gifs in Adobe Premiere
I figured out how to make gifs with Adobe Premiere and the results, surprisingly, do not suck ass.
Here’s a gif from photoshop. No effects or lighting etc, just resized to 540 width and exported with Selective Color & Diffusion chosen for export settings.

Here’s the same clip done with Premiere + Media Encoder, bypassing Photoshop entirely. I used the Animated Gif preset when exporting, and only changed the size.

They look pretty much the same to me, which is not something I’ve found from experiments in previous years. Edit after multiple additional experiments: the quality is not predictable. Premiere offers no options for dither or optimization of your gifs, so based on lighting, how strong your highlights are, etc, you can get results that have a lot of artifacts; dark indoor scenes with brightly lit actors seem especially bad. I’m finding about half of my gifs look good, and half have annoying white dots in them.
But this is all so fast that it’s worth doing anyway; worst case I’ve done my lighting mods in premiere, which is fast, and just have to export half of the mp4′s from photoshop for proper diffusion.
Why Use Cruel, Unfriendly Premiere?
Premiere has a steep learning curve, but it is full of good features. Good-quality batch GIF exporting is basically the holy grail of gif-related features, at least when your hobby is making giant shitposts full of gifs.

You also can use Premiere to apply the same lighting effects and whatnot to a series of clips. That’s a bit more advanced than this here tutorial, however. This here tutorial will show you everything you need to click in order to clip and export gifs from Premiere, without learning anything else about it.
Version
This tutorial is for Adobe Premiere 2021, Version 15.1.0, released around April 2021 and Media Encoder 2021, also version 15.1.0. It should be the same or similar for any newer versions, but older versions may not have these functions. Or they might have them but produce terrible gifs.
The Illustrated Steps Are Behind A Cut Because I’m Not An Asshole
The Steps
Note: These gifs are generally cropped to the relevant part of the workspace only, so you can see what I’m clicking.
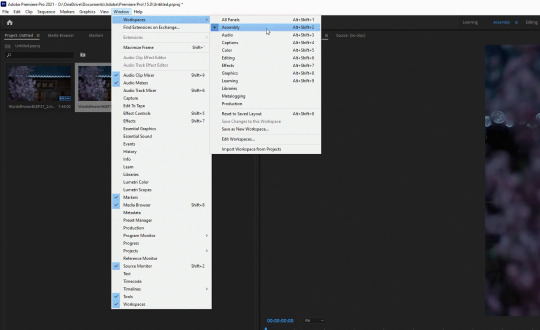
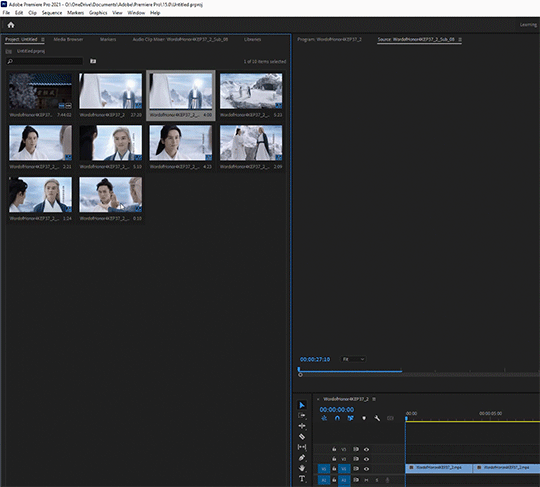
1. Open a new file in Adobe Premiere and save it to somewhere sensible, not the stupid location that Premiere thinks you want to save files in. You’ll probably never open this file again once you’re done exporting, but you should still save it in case the power goes out while you’re clipping.

2. Switch to the Assembly workspace.
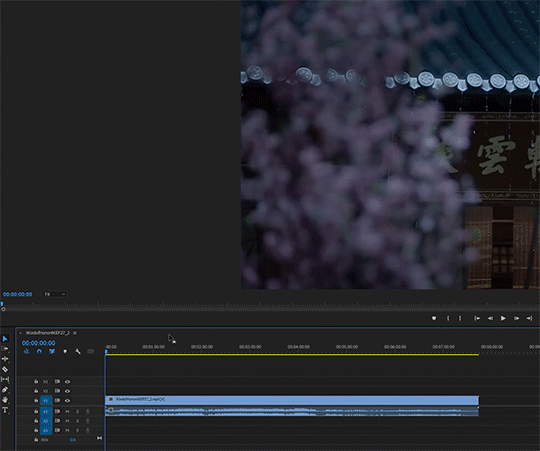
3. Right-click in in the media area and choose import media, or just drag an MP4 in from your file browser.

4. Drag the media to the timeline.

5. Unlink the audio and delete it, since it’s not needed for giffing.
5. Pick up the razor (Keyboard shortcut C) and get cutting. Go to the frame AFTER the break point, then cut on the line. You can use the right and left cursor keys to move between frames one at a time, if you don’t want to use the mouse to click like I’m doing here.
Use the bar at the bottom of the timeline to adjust its scale while you work. This only affects the visual interaction with the timeline, not the clip timing.

6. After you’ve snipped stuff, pick up your pointer (Keyboard shortcut V) to select individual clips. Delete the clips you don’t want by selecting them and clicking the delete key.
7. If you don’t like gaps, choose “close gap” from the Sequence menu.

For individual gaps (or clips) you can right click on a gap and choose “ripple delete” which deletes the gap and moves the next clip into place.

You don’t strictly need to know how to close gaps in order to make gifs, but if you want to combine two into one, this is useful.
The Magical Command
In order for it to export your clips correctly as single files, instead of as one big file, here’s the trick:
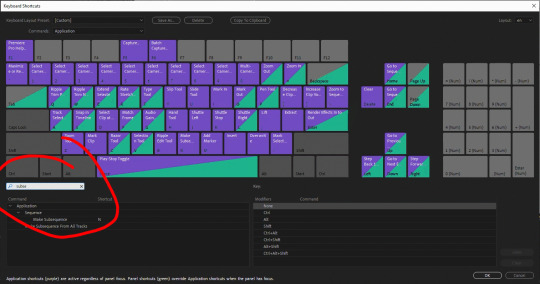
8. Use the “Make Subsequence” command. You have to do this individually for each clip that you want to batch export. Select the clip, right-click, and choose “make Subsequence.” (Note: earlier versions call this “nested sequence”)
You can also combine two clips into one by selecting them together and making them a subsequence.
9. To speed things up, define a hotkey for this command.
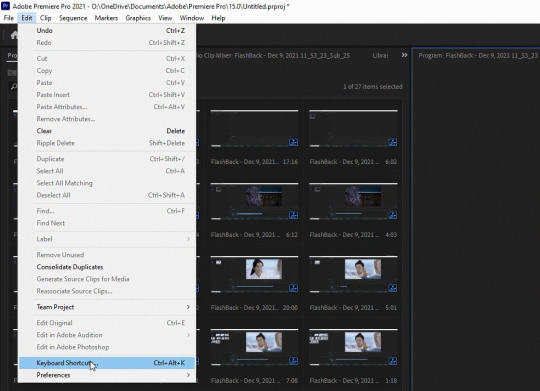
Here’s how fast it goes when you have a hotkey.
Export
10. When you’re done making subsequences, select all of the subsequences in the media area. That means all of the items in the media area except the first item (which is the original video file) and the second item (which is the entire timeline). Right-click and choose “Export Media.”
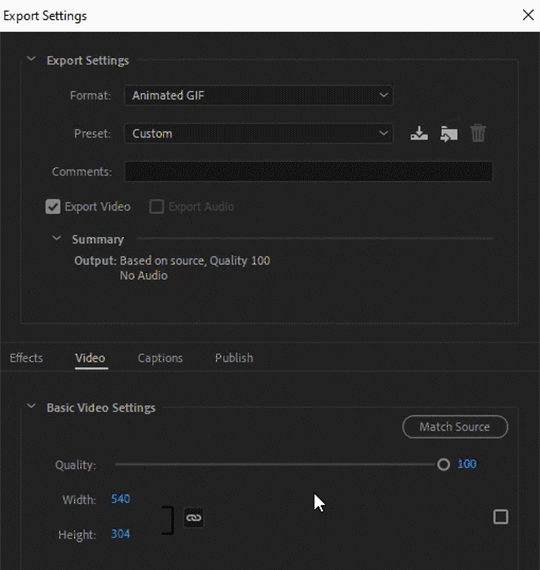
11. In the Export dialog, choose the “Animated Gifs” format - but don’t take the original resolution, because that will be huge. Set it to whatever you want it to be. Tumblr compression currently (in 2021) likes things to be 540 pixels wide. You can tweak a lot of other settings if you’re feeling adventurous.

12. Once you have your settings the way you want them for exporting, before you do anything else, save an export preset with these tweaks that you can use next time. Note: The preset will save the height as well as the width, so you can only use it unaltered if the next project has the same aspect ratio.
13. Click “Queue” to send everything to Media Encoder for baking. Always use “queue” instead of direct export, even if you’re only exporting one clip. (With multiple clips, queue is the only option).
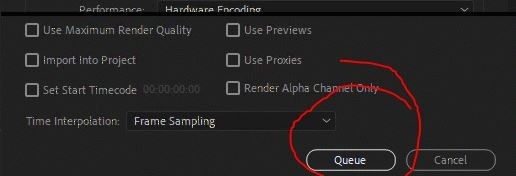
Premiere seems to forget my export settings if I export directly from Premiere, but if I choose “queue” it hands everything off cleanly to Media Encoder.
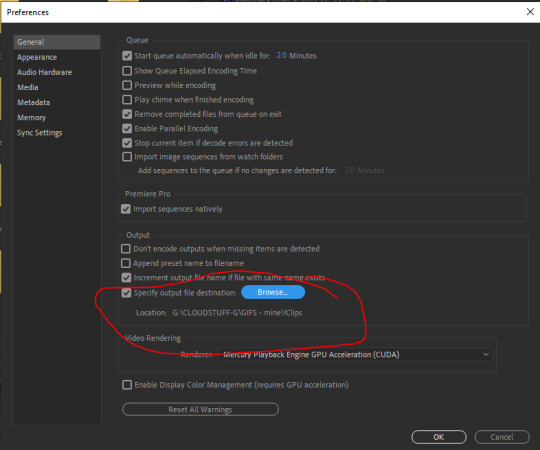
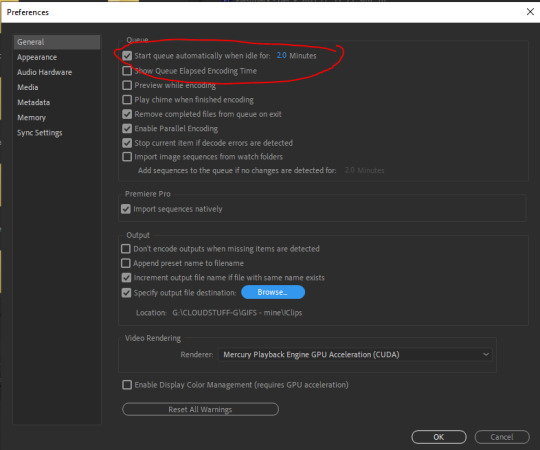
14. Hop over to Media Encoder (it will autolaunch when you click Queue). You can change the export location of the files here by right-clicking the file names in the queue. Even better, you can tell Media Encoder to always export things to the same folder, so that Premiere’s save location doesn’t affect it. Go to Edit menu --> Preferences to set this up.
15. Once the queue is loaded up in Media Explorer, click the green “play” icon to export the clips.
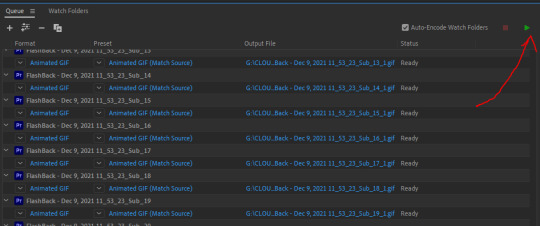
You can also set ME preferences to automatically run the queue after x minutes if you, like me, frequently forget to click “play” after queuing things.
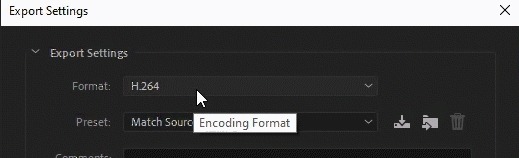
16. While the queue is running, go back to Premiere and do another export; this time use the H.264 encoding preset to export (via the M.E. queue) a set of full-size MP4′s.
This way if any of your gifs look bad, you can use the MP4′s in photoshop to make better ones, or just store them for later adventures.
And that’s it! Happy giffing!
Bonus: Look at these dorks


61 notes
·
View notes
Text
GIF Tutorial for Beginners
People keep asking me to teach them how to make gifs and I end up writing them long confusing messages, so I figured maybe it’s time to just write up an actual clean tutorial instead! This is supposed to be for total beginners! (Or people who want to switch to a new process that I’ve curated and streamlined over 8 years of making gifs.) I’ll try to keep this as barebones as possible, and won’t include all the advanced stuff I usually add. I hope it’s easy enough to follow, and I’ll include some links at the end for more stuff. I really do think it’s better to make a few simple gifs before doing more complicated stuff though, just to get used to it!
There will be three sections in this tutorial: #1 Basics - How to make a gif in PS at all #2 Sharpen - How to use sharpen/denoise filters in an easy way #3 Colouring - Just a few very basic adjustment layers
What you need:
A video (most common formats should work, although .mkv doesn’t always)
Photoshop (I use PS CC 2018 - this one because I'm morally opposed to Adobe’s subscription model - but versions aren’t super different from each other)
In the end, you should hopefully be able to make something like this:
This is gonna be so long. Sorry. You can make a gif with just part #1! The rest is just to make it look better.
#1 Basics
If any of the tools/functions aren’t where they should be for you, your best bet is googling it, you might need to change something in your preferences!
Make sure to save your PS file... often. PS has a tendency to crash, especially on laptops.
First, you need to get the video file. I recommend a shorter video, a few minutes long, if it’s longer you might want to cut it into shorter parts beforehand. This is just because PS’s video import tool sucks.
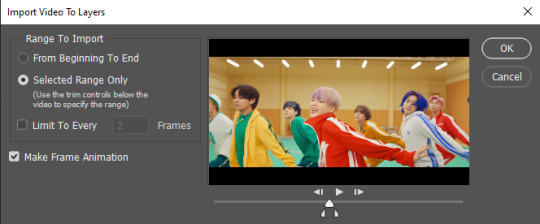
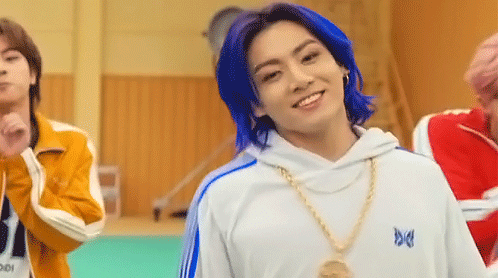
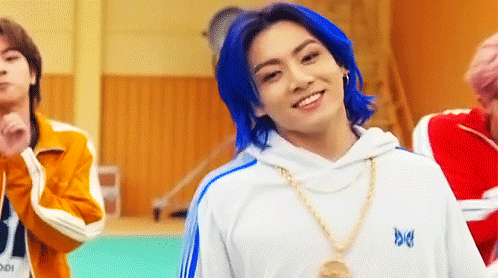
I chose the Butter MV, specifically Jungkook’s body roll at 1:24 because that’s what I want to look at for the duration of this tutorial. No further questions, thanks.
1. Open PS, go to File > Import > Video Frames to Layers

2. In the little pop-up, choose the part of the video that you want to gif. This will import every frame of the video into PS as a layer, so it has to be a relatively short part, or it’ll take ages (and gifs can’t be that big anyway). Now you can also see why it’s almost impossible to select the correct part if the video is too long.
The little controls at the bottom are for trimming, the one in the middle just for the preview. Make sure “Make Frame Animation” is selected! Then click OK.
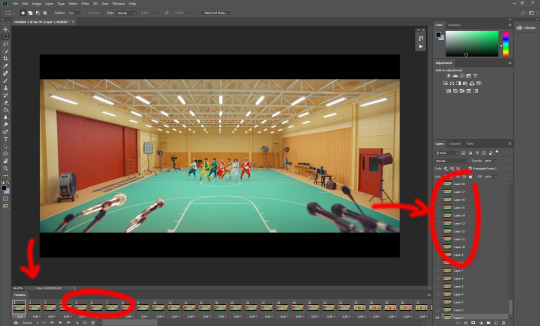
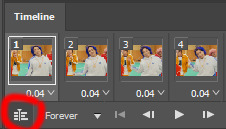
3. Now you have your layers, and you have a frame animation! On the right are your layers, that’s where we’ll apply the colouring etc. later on. On the bottom, that’s your timeline or frame animation - that’s what the gif will be in the end! So if you delete frames, the layers will still be there, but they won’t show up in the gif. If you click on a frame, you can see the little eye checkmark on the layer that’s currently visible.
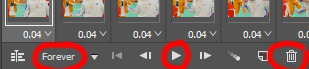
4. The timeline controls at the bottom that are relevant right now: set to “forever” so the gif will loop, you can play the animation with the play button, and you can delete the selected frame(s). The number on each frame is the speed of the gif, depending on the video I usually set it to 0.05 or 0.06 (photoshop lies to you when you play the animation, the only way to test this is to open the finished gif, preferably on tumblr or wherever you want to upload it).
5. As you can see, the animation starts a bit before the actual part that I want, so go ahead and delete all the frames in the animation that you don’t want! You can delete the corresponding layers too if you want, to make the PS file smaller, but it has no influence on the gif. (Hold Shift to select multiple frames as usual)
6. Next, we’re gonna crop the gif however we want! You can do this with the crop tool in the left sidebar, but with gifs like this where there’s a lot of moving parts, I sometimes just use the selection tool in the left sidebar, like so:
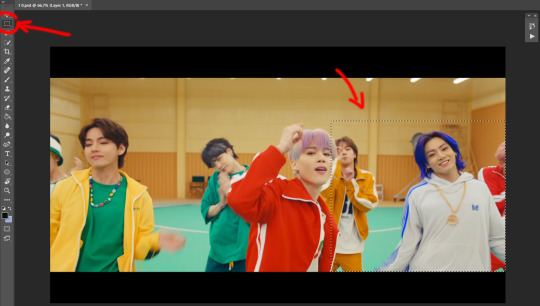
When you click on different frames, the selection stays, and you can check to make sure Jungkook doesn’t suddenly go out of frame if you crop it like that!
At this point, make sure the selection/crop isn’t smaller than you want the gif to be! For tumblr, what matters is the width (in pixels) of gifs. In the end, the width dimensions on tumblr should be 540px (1 gif per row), 268px (2 gifs per row), or 177/178px (3 gifs per row). Anything else will lead to very shitty resizing!
For this gif I’m going full sized, meaning 540px wide, so I made sure my selection isn’t smaller than that.
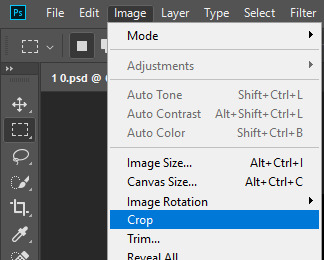
Then just go to Image > Crop, and it’s done!
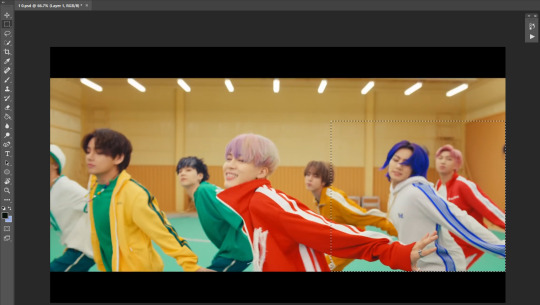
7. Check to see if this is what you want, then resize: go to Image > Image Size to resize the picture. Make sure the little “link” between Width and Height is active (to keep the same aspect ratio), then set the width to 540px or whatever you chose. I always set the resample option to Bicubic.
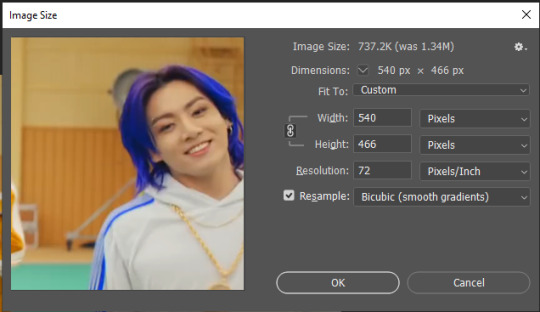
Once that’s done, set the zoom to 100% right above the timeline, to see what it really looks like.
Almost done! A little note about the sizing: width is the important part for tumblr, but if you want to make a whole gif set (especially with more than 1 gif per row!!!) make sure to make all the gifs the same height, otherwise they won’t line up and tumblr will do whatever it wants.
I ended up making mine 540 x 400 and ended up with this:
8. Time to save the gif!! Go to File > Export > Save for Web (OR just use the shortcut Ctrl + Shift + Alt + S) (or whatever it is on Mac).
In the pop-up, you can change things about the gif, but most things should already be the way you want it (Image size, Looping option forever). Selective should be the default, just like the rest.
You can choose between Pattern and Diffusion, some gif makers swear on one or the other, I go back and forth.
On the bottom left, you can see the size of your gif. Keep an eye on that! I believe Tumblr allows every single gif to be up to 10mb, but I try to keep mine under 5mb or close to it, because I think tumblr adds compression if it gets closer to 10mb?? Anyway back in my day you couldn’t upload anything over 1mb. You’ll never know our struggles.
Then just save it, and that’s it, you made a gif! Well done!! Here’s the end result:
:)
#2 Sharpen
There are countless ways out there to make gifs as smooth and clean as possible! Here I’ll show you the easiest way, but it also provides a good basis for other methods. The main difficulty is that you you need to sharpen the layers, but you don’t want to 100 layers one by one. So what we’re gonna do is convert the layers into a Smart Object, which functions as one layer!
1. Convert the frame animation timeline to a video timeline with the little button right underneath on the left:
It should look like this, and I’m sorry but I can’t explain this one because I’m not an expert here, but you can just ignore it:
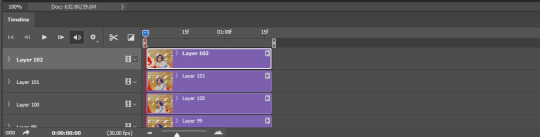
2. Select all layers: Select > All Layers, or just manually.
Then right click on the layers > Convert to Smart Object. Now there’s only one layer left, but don’t worry, the frames are still there!

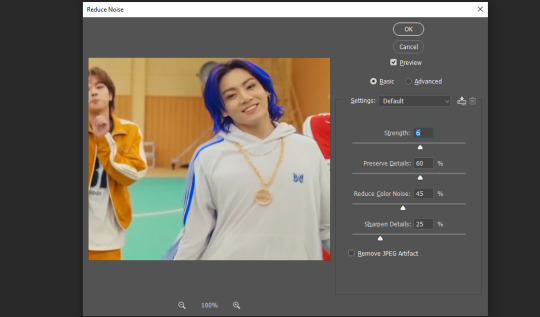
3. De-noise! It reduces noise, takes away some of that grain. More necessary in some videos. It also makes it less sharp, so I do this one first. Filter > Noise > Reduce Noise

My default settings are, Strength: 6, Preserve Details: 60, Reduce Color Noise: 45, Sharpen Details: 25, Remove JPEG Artifact: No. But you can play around, especially with the strength, and see how the little preview looks. Don’t apply too much of it! Or it will look weirdly smooth with no details in the end.
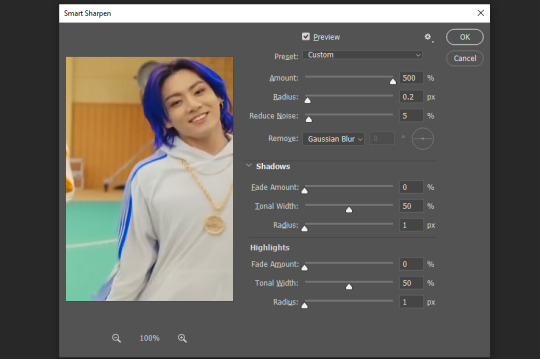
4. File > Sharpen > Smart Sharpen.
Settings: I usually have mine at Amount: 500, Reduce Noise: 5, and Radius at either 0.2 or 0.3, depending on the video. I’ll actually do 0.3 here, because I find it a bit blurry otherwise. If you sharpen more, it can quickly get grainy.
The difference isn’t huge, but here’s a little before and after denoise & sharpen:
5. Technically you can just save it as a gif (save for web) as shown above now, or you can convert it back to a frame animation, which I’d recommend especially if you use certain other sharpening methods (I’ll show you how to convert it back at the end of the colouring part), but for now, let’s go straight to the next part:
#3 Colouring
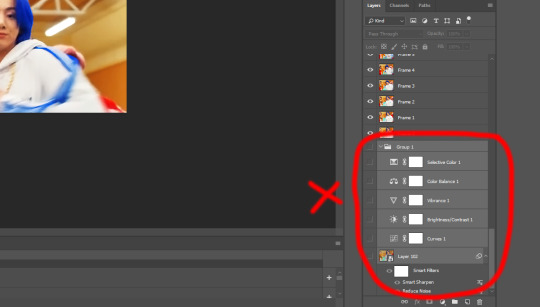
Now, you CAN do this part right after part #1, still in frame animation, without a smart object. I prefer it like this because sometimes PS acts weird, but if you want to skip the smart object stuff: select all frames, and add the adjustment layers at the very top, above all the other layers. (It only affects selected frames; and it only affects the layers under it.)
The adjustment layers should be above the layer tray, and these are the ones we’ll use today: Brightness/Contrast, Curves, Vibrance, Color Balance, Selective Color.
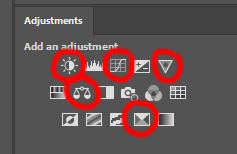
All of these are optional! You can do one, or all, or any combination. This is just the very most basic for me to get a gif to a point that I like. I’d recommend sticking to these for a start, but once you get the hang of it, definitely feel free to play around! It’s fun! Every gif maker has different preferences here, too, so there’s tutorials for everything.
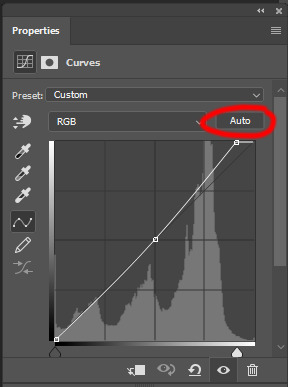
1. Curves: Just click Auto, tbh. You can play around, but Auto works fine for me as a start, just to brighten or darken some parts as a base.
2. Brightness/Contrast: Usually videos are a bit dark, and contrast can help to make it seem sharper AND cut down on gif size, so I usually just up both of them a bit (but not too much! Or it’ll look cheap). Here I put them at B: 19, C: 23

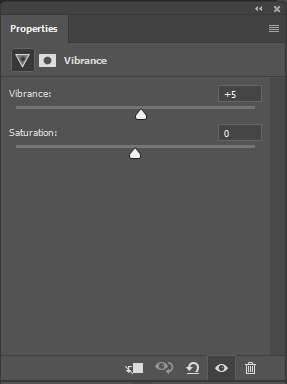
3. Vibrance: I love very vibrant and colourful gifs, so I usually up the vibrance (and sometimes the saturation). This one is already very vibrant, so I only put +5, but if you try to colour, say, a very moody tv show, this can help wonders, especially if you want to work with the colours more later.
If you prefer less vibrant gifs, you can also lower the values here!
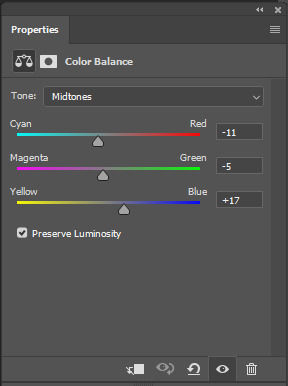
4. Color Balance: getting a bit more complicated now. Often, videos will have a slight yellow or green or blue tint, and this is where you can correct that. This video is a bit yellow, so I added +17 Blue. It was still too warm, so i added -11 Cyan as well. This neutralized the yellow tint, but I wanted some of the reddish tone back, so I added -5 Magenta. I usually do a similar process like that, depending on the tone.
Instead of Midtones, you can also do this for Shadows and Highlights individually.

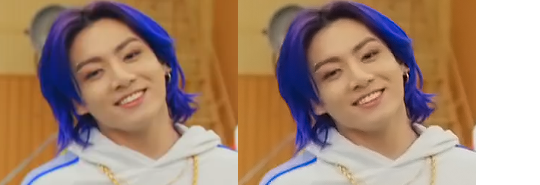
5. Selective Color: now this is the most complicated, but also the most fun to play around in my opinion! Be careful here, if you do something too extreme it’ll look like shit or make the gif super grainy. I some rough goals in mind here: make the blue hair as blue as possible, make their skin tone a bit less pale, and enhance the black and white (which I always do).
You choose a colour at the top, and then add or subtract cyan/magenta/yellow/black values for that colour.
Skin tone: yellow and red. For this gif, I just added black to both, making them darker. Sometimes, if you change one or both those colours for a different part of the gif (for example, if I wanted to make the background less yellow, I’d subtract yellow from the yellows - but then I’d add yellow to the reds, to make the skin tone natural again.)
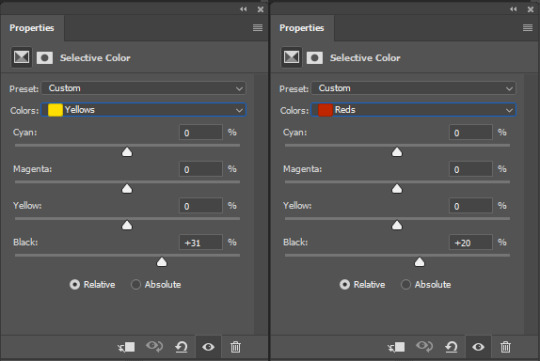

Blue hair: Just ramp up the cyan for the blues. Be careful with putting anything to +100, but here it’s already so bright that it should be fine. His roots are more purple, so I changed the magentas by adding cyan and black, and subtracting magenta and yellow. It’s not super clean, but fine for our purposes.
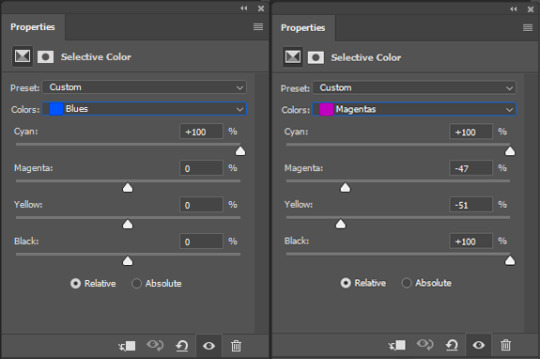
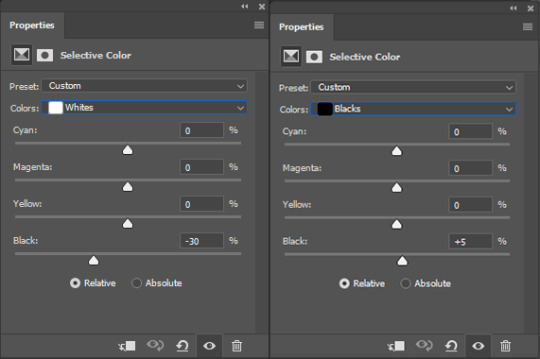
Black/white: depending on the gif, I often either add or subtract black to the whites. Adding makes the highlights less blinding, a bit darker, and flatter (I like to do that if one side of the face is bright white in the sunlight, for example). Subtracting creates contrast, makes it brighter, can wash it out. It can also lessen the gif size, and here it’s mostly just the tracksuit instead of important details, so I subtracted black. For the blacks, I almost always just add a bit of black, to make it more intense. Just like adding contrast, this can make the gif seem sharper and less grainy.

And done!
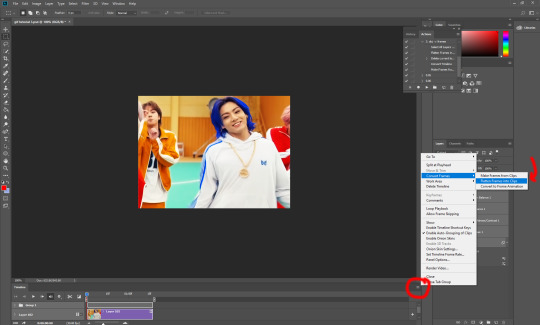
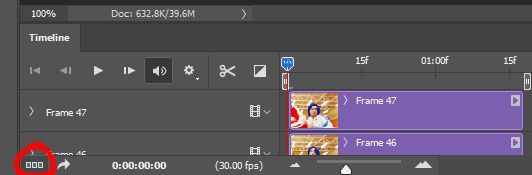
6. You could just save it as gif now, but as I said, I prefer to convert it back to frame animation timeline first, if only because I like to let it play through before I save it, and it works better for me there than in the video timeline.
Select all frames, then click the little menu on the top right of the video timeline > Convert Frames > Flatten Frames into Clips
7. When you scroll down to the bottom of the layers now, the old smart object + adjustment layers should be at the bottom, under all the new layers. Delete the old ones, we don’t need them anymore.
8. Convert the timeline back to frame animation, by clicking the little button at the bottom left of the video timeline:
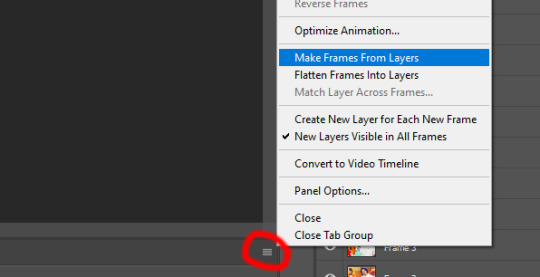
9. Click on the menu top right of the timeline again > Make Frames from Layers
10. Now, just some potential cleaning left to do. Sometimes, there’s a doubled or empty frame or layer at the beginning or end, just delete those as necessary. The timing of the frames is probably off, too, just select all frames and set the delay time to 0.05 (or whatever).
Now your done! Save as gif, and you should get this:
I included some bonus links and tips after this but tumblr ate that whole part so I guess it’s going into a separate post. (Here is is)
Anyway, I tried to make this as easy to follow as possible for beginners, but feel free to send me an ask for clarification anytime. Hope this helps, now go make gifs and have fun!!
#photoshop#tutorial#gif tutorial#ps tutorial#btsgif#*#*tutorial#this took so much longer than i expected i'm not giffing for at least a week now
245 notes
·
View notes
Note
What do you use to edits gifs? I really wanna get into this kinda thing but I dunno what program or website people tend to use
I'm old fashioned, so I mostly use Adobe CC 2017 or Adobe CS6 (if i need to do an old effect / function which isn't avaliable in newer versions) There are some online editors, but I do not find them suitable from tumblr format. Like, i’m sure they are fine if you just want make gifs / use gifs for other sites But for the most part all of the internet moved pasted GIF format cause it’s dated and it’s heavy - which is bad for mobiles and stuff. BUT ANYWAY Also - it's always morally correct to pirate adobe products, just saying
Then there's two options (taken from HERE):

I use the second option because it's easier, the newer version of photoshop always have this feature and because it's great for video games.
You can look at first option, but honestly, unless you're giffing animation / animes / some HD films from BLU-ray, I found the first method to be too much time consuming (in my opinion.)
Here are links to some tutorials that will help and teach u about gif sizes as well (some are with images!):
♥ // ♥ // ♥
I can't explain all of the stuff, but things you need to consider when it comes to quality of GIFs:
a) getting footage; while clips from youtube is an easy way of founding a needed stuff (or if, let's say, a console game you can't capture) - but there's the catch, youtube eats all the quality of video because of compression. even 1080p clips do look bad on BIG gifs - EXAMPLE OF MINE (made during time when bayo1 didn’t had PC port) - and most of the footage either has watermark or SUBTITLES (which are pain in the ass when you want to put subtitles yourself - you cut like 45% of the bottom and it’s not great) ideally - you want to capture stuff yourself, even more ideally - capture stuff with OBS or bandicam which do not compress your footage and the output image is great, NVIDIA capture feature is an okay option, but it has a bit of compression - but honestly, not the worst option, it’s definetly a more safe option for your hard drive capacity i reached that point, when i started giffing specific scenes of bayo2 - i freaking emulated the game, terribly, but did so cause youtube just doesn’t provided what i wanted like, you can use capture device, but i ain’t spending money on that unless i’ll be a streamer or idk content creator (but forget about that)
b) coloring is your bread and butter; for the most part, even not that great of quality gif can be saved by coloring / adjusting brightness / levels and all of that. as an easy example, THIS SET, was taken from basic 1080p footage, but because i softed colors, almost all video compression is gone cause when you loo at something LIKE THIS SET, man, this was not a great time for coloring it looks bad
or an example like THIS SET, that trailer is DO DATED that there’s just no HD version of it and you can see pixels, it’s bad in original game and looks even worse compressed that even coloring didn’t do much while starting, you can always use PSDs / colorings created by people - I suggest going into searching on tumblr in general or CHECKING THIS (it’s outdated, but some stuff is still avaliable) or even just do basic adjustement it’s fine. but eventually, you’ll just starting creating and doing it yourself, because it’s just simply easier. c) tumblr compression / limiting; this site changed a lot, not only gifs automatically converts to gifvs (it’s like a video of your gif, again, done for mobile) and unless you have extension that gets rid of that, nothing u can do about it
but currently all you need to know is that: at the moment tumblr limit of giz size is 8MB, if you got past that - the gif is not gonna work. (and it loads badly, it was bad even before, but tumblr is a mess if saying it easy)
Honestly and that’s all I can say. it’s gonna be rough at the start, but eventually and quite quick you get the hand of it, you even might find a more suitable way for you to gif or color stuff or sharpen your gifs (that’s another whole story) If you look back at my old stuff from freaking 2013 from my main blog - enjoy the ride (82 pages!!) - it wasn’t looking great and it took some time for sure to start making progress and be better at that or even just for this blog in particular - half the less pages than on main - but i still chagned a lot in my “style” of editing and colorings
But most importantly - just have with it, it’s not the most enjoyable ride, considering this site history, but I still find it a enjoyable hobby :)
12 notes
·
View notes
Note
Hi can I ask what programs you use? I would love to use something thats not as pricey
hi !! for art or gfx? if its art ive sold my soul to clip studio paint. i think its normally around 50usd to buy a pro license, but i got it on sale so it ended up being 20usd.
if you want something free i tried autodesk's sketchbook between making the switch from firealpaca to csp. it has a really great interface, v high quality, good brushes, etc. iunno why autodesk made it free but it certainly (to my knowledge?) didnt downgrade the quality. i still have some wips where the sketches were made in sketchbook hah. i rly.. need to go thru that folder more.
im saying all this as a mac user, so if you have windows, while i think all these should work? on windows too?? another one ive heard tons about and recently had a chance to try myself is paint tool sai. its another more complex drawing program like csp except. for windows. i rly love the brush options sai gives you, esp for custom ones. always trying to emulate them in csp but theres jus something not there, never adds up well. sai has like a month long trial version thats free, off the top of my head iunno how much it is but its NOT expensive at all. maybe around the same as csp.
(i jus realized sai 2 recently released this year so all info i know is for og sai. sai 2 might be more costly)
sai i think is also what ppl use as a low-grade gfx editor. supports animation?? should at least??? but ye there is a lot to do there.
if you like ps but dont wanna pay for it photopea is a browser emulator of ps. kinda weird to work in a browser + does require internet but it does function exactly the same. can open up an existing project. can export things. jus. thru google. magic.
i used gimp for the longest time to edit stuff. its still lurking around here somewhere. the bad thing abt gimp is the more you add to it the longer it takes to read thru everything and load. i had a tonnn of assets installed so it always took a small eternity to even want to start up. past that i still think its a good program. if you want something thats smaller but functions better try seahorse!! that might be dated actually lmao. does anyone still own seahorse.
tbh my computer doesnt support the latest cc updates at all lmao so all my adobe software i have is ripped 2019 cc stuff. if you like an adobe program n wanna use it do yourself a favor and download an older version. better/free/less time-consuming/easier to deal with. if its not a cc version you dont even have to rip it. jus download that bitch n start it up. (if it is cc you gotta key it so you can use it after trial period, but its not that hard, jus an extra step rly)
thats all i got haha hope that helped some. if anyone wants to add on go for it.
#ask#absolutely 1000% thought this ask was gonna be an adobe voucher SO GLAD it wasnt ty anon#was mentally prepared to read this and feel my soul rip in half#actually i shoulda added but since i have an ipad for school this semester#ive downloaded procreate for drawing and its so much fun!!#its like 10 bucks but if its on your acct you can reinstall on any device you want#meaning when schools over n i get a new ipad next year i can download it again for freeeeeee
2 notes
·
View notes
Note
What was your first impression of the roleplay community on Tumblr? And what’s your impression of it now?
Mun’s Asks: RP Edition
1.) What was your first impression of the roleplay community on Tumblr? And what’s your impression of it now?
[OOF STRAP IN INTREPID]
I’ve been on this hellsite since the beginning but I really only started RPing here after a few years. Probably in 2012 or 2013? I can’t remember exactly when but I remember being very intimidated by the idea of RP on this platform in particular. There is a bit of a steep learning curve in terms of etiquette here that is even steeper when you factor in the near requirement for tumblr-literacy. Like you basically need xkit to RP and you need to understand what kinds of asks get eaten and when/how cuts work and what behaviors do and don’t cause notifications and how ask posts work and how the block/blacklist features do and dont work and what tags tumblr will and wont index etc etc. When you’re a tumblr old head it’s easy to forget newcomers don’t immediately know things like that. It’s part of the reason why I tend to be very basic in my approach compared to what is popular at the moment. I was one of those fabled newcomers at one point.
I don’t really think that tumblr RPC is any better or worse now than it was back then, just different. A lot of what’s popular now was a thing back then, but now it’s more commonplace in a much smaller population of RPers. I wouldn’t say that the RPC has many new problems as much as I would say the old problems have intensified.
When I started out I was in a fandom that was very cliquey and made me feel like shit a lot and those spaces probably still exist on tumblr but the difference is I know what my boundaries are and what behaviors I will and wont tolerate on my dash. Overall the RPC is much better at talking about things like that than it used to be imo. That same fandom I just shit on was also a lot of fun and taught me that it was okay to not take RP too seriously and not be too worried about if it looks pretty enough or was fancy enough. I’m really grateful for people who would RP with me back then even though I unknowingly broke a lot of tumblr RPC’s unwritten rules.
That’s why it’s very important to me as a seasoned RPer to be as approachable a blog as I can possibly be. In this the lords year of 2020 I still feel myself being set in my ways and avoiding trends that are ultimately harmless, but there is an extent to which I have to participate in order to be courteous to others so I do my best to be open minded about Neo RPC Trends. I end up being of two minds just about everything that’s popular right now.
Take for example reblog karma / I AM NOT A MEME SOURCE type rules. I think that’s shits dumb, you guys can reblog anything you want from me, in fact reblogging it from me heightens the chances of me sending you one whether you sent me one or not. I’m not gonna get mad at you for using the website as it is intended by the devs to be used, but also if somebody else’s rules say it bugs them to have memes rbed from them, then I think their feelings are more important than my opinion on the matter. People are more important to me than policies in cases like these, so of course I’ll reblog the meme from the source instead of you or w/e.
But at the same time, that idea about feelings also includes the feelings of people who are new to RP and maybe don’t even know the etiquette well enough to know they’re messing up. There’s a lot to get mad about in the current state of tumblr RP but even when I agree that I want this particular tedium done, I don’t really agree with the idea that I should make it a rule that forces other people to stay away from me. Yes I dont want to be ponging an ask post back and forth. Yes I want our posts cut. But also, I wont get mad if you rb an ask instead of putting it in a new post. I’ll just put in a new post myself. I wont get mad if you dont cut a post, I’ll just cut it myself. It’s not hard to do.
Take also graphics, banners, and all manner of fancy formatting. RPC has really really leaned into that a lot more than back in 2013. On the one hand, I think that’s great. People are so creative. Their stuff looks so pretty, and I really like the work people put in. I don’t think it’s a bad thing necessarily, but on the other hand it does heighten that already steep barrier for entry imo, especially in circles that require it and judge based upon it. For me it’s more important to avoid looking like that’s an expectation of mine. Like, I can do that stuff. I do sometimes, actually. I make icons in batches of hundreds, I take commissions for RP graphics, don’t tell anybody. I’m a freelance illustrator and I know my way around the adobe creative suite-- I CAN make these things and I do for other people, but I can’t be called to do it for myself in most cases. When I see a blog with very nice graphics I immediately assume they don’t care to interact with me. In fact I still tend to unfairly think this even when they’ve shown me otherwise. If we don’t have a long term rapport and you’re a blog with nice graphics and I reply to your posts, what you’re seeing is a neurotic prey animal that is afraid of you signaling alarm. For whatever reason I tend to interpret very fancy looking blogs as confident and happy in their own existing bubbles with no particular interest in newcomers. I know that’s not always a fair assumption to make--it’s a problem with me that I need to work on--but also I know other people deal with similar feelings. That’s why I don’t feel particularly called to make much beyond the most basic of graphics most of the time and I’m highly avoidant of anybody who seems like graphics are a requirement for interactions with them. Not everybody has photoshop. Not everybody is skilled at that sort of thing. I don’t want people to think that I will judge their style based on what my own style looks like, so I don’t invest much in it. Again, there’s nothing wrong with graphics, but it’s more important to me than anything else that I am approachable and I make other people on the dash as comfortable as I can. I’m glad that it seems like a requirement for cohesive graphics has waned over the last few years.
But, yea. I’d say this duality--the “this is cool but also I have reasons I feel I shouldn’t participate”--is how I feel about pretty much everything that’s big right now. And like don’t even get me started on the anxiety RPC has around things like soft blocking and mutuals and multiples and “quality”. These things in particular aren’t that new, but a lot of Neo RPC etiquette and trends surrounding those types of anxieties represent a whole quagmire that I try to avoid as much as I can, often to a fault, and lately I’ve realized that in my blanket avoidance I am actually missing out on some things I really should consider doing. My icons could do with some light color retouching. I do want to get my tags together eventually. Permanent starter calls, interests checkers, banners to make asks more easily rebloggable-- these things are functional and can be fun and make RP easier and help people feel emboldened to approach. Like, there are a lot of newish things that are actually cool and I should maybe consider trying them out, but being an oldster has really made me slow to adapt.
So yeah, idk if that was clear at all lol. Take these many, many unnecessary words to say that again, I don’t necessarily think that the current RPC is better or worse in an objective sense, but I do think a lot of the anxieties and trends that were starting in the old RPC have really caught fire now in a way that makes them hard to abstain from even if you want to. Since the RPC is so much smaller now than it was in 2013, you really do have to play ball on these things more than you used to have to in order to find partners. There is a lot of etiquette and anxiety that goes unspoken in the RPC and so I often avoid fairly harmless RPC trends as a means of mitigating that anxiety and clarifying the unspoken as much as I can. Tumblr already has a barrier for entry by being a broken website that hates its rp users, I don’t need to pile on any extra factors to make that barrier to entry look any taller.
#[ooc]#[Munday]#posts an opinion and waits for the hard blocks to roll in#not that I said anything more controversial than ''I'm down for whatever''#but u kno#long post#pawnshopsouls#[Asks]
6 notes
·
View notes
Text
my new Symphogear Vines thing is partially just because it’s fun, partially because i always intended to do something kinda similar with Neptunia and i never really got around to it and that’s kinda a bummer, partially because i want to be creating more......
and also largely to teach myself better video editing. i’ve got basic video editing skills from all my MMD work, but just basic stuff.
namely, the things i often used for MMD?
joining clips
removing audio from a file
layering partially transparent videos and images on top of others
transitions
and that was kinda it.
but now, this new Symphogear Vines project is also teaching me keyframe animation and cropping, and i’m probably gonna have to subtitle my liveblog clips myself too since the episodes i’ve got are soft-subbed.
it also helps that i’ve finally, FINALLY found a video editor that i’m satisfied with: Shotcut.
for reference, my Video Editing Adventure:
in spring of 2016, i started getting into MMD; because of various glitches i had with MMD, i couldn’t make proper videos with just MMD, i needed to do some post-production on them, too. so i experimented with video editors.
and i couldn’t find a single good one for free. there were incredibly complicated and unintuitive open source programs, programs that weren’t as free as advertised, and programs that just flat-out didn’t really work.
but then, in summer of 2016, i graduated from high school. i got a LOT of money as graduation presents (about $600, which is still the most money i’ve ever had at once), and i also finally got my own bank account (or rather credit union account because fuck banks) and debit card so i could make my own purchases.
my very first purchase? Adobe Premiere Elements, which cost about $100. and i was satisfied at first. it was intuitive, and it wasn’t free at all so i didn’t have to worry about features getting blocked off, and it functioned fine. the output it gave me was perfect.
however, i’d eventually come to regret the purchase. while all that was true, i wouldn’t say it worked great. it took for-fucking-ever to start up (i had to open the program, then wait a long amount of time for it to load, then click a button, then wait even longer for it to load), and while that was bad enough, what made it worse was how much it just fucking LOVED to crash (particularly when i opened the transitions menu). and also, it just fucking cost $100 and constantly tried to convince me to buy Photoshop and also subscribe to Adobe’s asset service or whatever.
and then, when i switched to Linux a little over a year ago, i basically lost access to Adobe Premiere. so i decided to wade back into what i could find for free....
...and suddenly had a lot more options to explore?
now, i didn’t immediately find anything i was truly satisfied with. but i found things i was as satisfied with as Premiere pretty quickly.
but i wasn’t really doing any real intense video editing for most of 2019, so i didn’t get much chance to really explore.
but now, i’ve done some more exploring with this sort of thing, and, yeah: Shotcut. i could have sworn i tried it last year and had some sort of problem with it, but i’m not finding any issues now. wondering if it was something that wasn’t that big a deal in the first place, or if it was just an inferior version of Shotcut, or what. but i like it. it’s fast, stable, powerful, and intuitive.
1 note
·
View note
Note
Hey I like your art a ton and I was wondering just how long you have been drawing and working to improve as an artist.
Oh my gosh haha thank you so much for liking my art!
I have been drawing for the longest time, I think ever since kindergarten, well at least the artistic dedication!
I used to draw my when i was in middle school, starting from fourth grade i have been drawing more and more frequently until fifth grade in which I was drawing on a daily base, back then I would also be sitting and making animations on flash, which unfortunately I dont have backups of
but from middle school, up to high school 2012, my art never improved, it was just all the same all the time, I was back then on ritalin and I decided to start my first pony blog, while updating my blog, I couldnt consider yet Tumblr being part of the effective social websites that I go on as nobody was following me and I had no one to intreact with back, tumblr would be the thing i would check once every few days, it was nothing to me but a mere another google plus, until i was sponsored by catfood-mcfly back when he was running the Herpy Derpy blog, and thats where I got recognized and I was determined to continue my activity on tumblr as an ask blog, and I have gotten to become more interactive with people, being inspired by the many of the art I have been seeing from following other people, I would adopt and experiment with what I saw mostly shines through their art, and 2012 was the year I have made the biggest change in my art throughout the months, whitin 6-8 months I have improved by a ton! tumblr was a very resourceful to the evolution of my art! and I also made so many friends and I have as well learned to become a better person! I am a better person of who I used to be in the past, and i am still improving! there are still a lot of things I need to work about myself as a person!
Also stepping out of drawing in flash and starting doing my stuff in sai was revolutionary to my art, flash back then wasnt recognized fully as an animators program by macromedia and neither by adobe, as they saw it an all purpose program for making goptimized ames and ads, only until all browsers and webpages grew out of flash and flash officially was blocked by all browsers since you could have implanted malicious codes into flash files, only then flash recognized as an art and animation tool for creators.
So moving to sai allowed me to build sketches and bodies easily and paint and yadda yadda and it was all great and helped boosting my art upwards
Flash limited my improvement as I wasnt drawing sketches on flash since you couldnt just lower the opacity of the layer you drew the sketch on, you would have to go through several actions to achieve that, but you would be lowering the opacity of your selected drawing and not the layer, I couldnt also paint on flash and flash ever since the stone age had those horrible vector tools that SUCKED DICK unless you do stretching and smoothing and fixing, in my opinion at least, they did improve the vector system a bit BUT IT STILL SUCKS, i prefer bitmap brushes more, which why I prefer Toon Boom harmony as a program for animators.
If you have been back in the days, you could have watched me go through a several phases! like drawing like atryl, raikissu’s shading and coloring styles, florecentmoo’s shading techniques and eye pupil style, and I uhh.. dont remember the rest, but theres have been a lot of artists out there whom I adopted artistic traits like:
theflyingtacoz, kittentoots(drunk fluttershy), w300, Santi, belaboy, dr idiot, inzergue (big impact on my current style), David (the guy who now works on mighty magiswords along with kyle), fungasm, colorlesscupcake (known as caek now), ahappypichu (a pretty powerful current impact on how i paint my art today), uhh, also “pinkie in private” which, to this day, drawing the way the draw the cheek for their characters, and some other artists I that I couldnt come up in my mind but I did adapt a trait or two from.
My current big inspirations are artists who work on OK KO and as fake as it might sound, my own fiance! yes!! they have been an inspiration for me for quite a while even back at 2012, but to how I viewed it, I never really dared to adopt anything from them because I was so out of their league, and my art was still shaping and i already had ideas that I wouldnt think would work if i mixed some of their’s, but now that my art have been developed and has a solid state of how it looks, they inspire me so much!!
Drawing ponies was probably the best practice I have ever had that thanks to that I have pushed so far in the art that I do, ponies are so simplified!! and easy to draw! it allowed me to produce more and that means that it allowed me to experience differently with each time!
It helped me improve with a lot of stuff like gesture, facial and painting and other other minor stuff! drawing ponies was such a booster seat for me!
But unfortunately, from drawing ponies alot you wont learn how to draw humans, which understanding muscle, action line, figure and bones is so crucial for drawing, anything really! understanding how the body works is extremely fundamental and its there for you to know how to manipulate the drawings your making, of any specie, its not there to just teach you how to draw the anatomy of the human body, that will only serve as a plus.
I have learned a lot from ponies but how bodies work and draw clothes lmafo, to this day I cant draw clothes for days
in 2014 I ordered a really good book and I have polished my anatomy and human drawing skills, I yet dont know some stuff because i stopped practicing because of varios reason like relationship, access and physical health.
In the begging of the year I acquired a cintiq and it been nothing but dreadful to me, but im using it because i spent.. so much money on it.. and i have been so concerned about bringing it to my home country as well.. but it has the adventage of a screen so...
its just, I dont have a low enough desktop or high enough chair to draw on it, its always above my shoulder no matter the angle and it puts so much weight on my shoulders, the thing is heavy too so its not something you could lean on your legs while you draw, neither it is portable, it made work much more harder and difficult and I wasnt drawing as frequesnt because my time wasnt so so enjoyable, my 2015 as well become a dreadful year to me and I was feeling guilty and shitty everyday, and it was my fault because it was all my doing and i let myself feel that way, and I had barely the stamina to work on my art ever over the year, I also lost my passion and motivation to draw and basically it dragged also to 2016, I drew a few commissions but I didnt produce much art neither, then I flew over the united states and I didnt have acess to drawing for 4 months as i was away from my equipment, my fiance had the equipment, but that means that I would have to use their computer for all the dedicated hours I use to work on my art and they would have nothing but a mere phone to entertain themselves, also our time togehter was really precious and every minute counted, so we rathered having fun other than doing work work work
2017 came and I still had the sense of drawing lost in me, I would draw whenever i would have a piece of paper available to me since I find fun in that, since im comfortable and cozy and i dont have to concentrate the entirety of my body weight on my hand and arm as i draw, but I would never draw on the cintiq unless its a miracle or if had a crazy comic idea in mind that i had and MUST HAD executed, i almost didnt draw anything in 2017, and neither in this year but the ok ko drawing i have recently created, but I found a new comfortable focus and its doing 3d, I am using my mouse to do everything and i dont have to feel my horrible chair scraping againt my butt like sandpaper, and I dont to feel like my shoulders are about to give up, I did try Tam’s 13hd and it was so much more comfortable and nice to draw on as i could put it on the bed or on my legs, but I cant afford another expensive piece of equipment, especially not in this generation of technology, wacom fucking sucks but no other brand is willing to be their competitive because tablet is not the purchase the average person would make.
Another reason why I have been so held on drawing and using the cintiq, which was probably the most major thing was it’s total, hot flaming shitty garbage diarrhea poopy stank abysmal horrible disgusting nasty dumbass smelly drivers which made every chance i had to draw a miss because i would battle myself from 30 minutes to over a hour fixing my tablet to draw a single thing, and its been like that every time i would turn my cintiq on! the situation was severe and everytime i would find a solution, it would be later suppressed, it was so harsh that i had a few months in which nothing I would do would make the drivers function, i was basically tabletless, so many, and a lot of opportunities for me to create a piece of drawing was flushed in the toilet with the rest, and so it was a deeper burden on my passion, determination and motivation to draw.
But yeah, now im doing 3d and it feels like a fresh hobby to me since I felt that im not going anywhere in and with my art (even though I yet have to learn how to draw bodies better, let alone drawing limbs, feet and CLOTHES!!)
and now the future has yet to be revealed!
1 note
·
View note
Text
15 Best CSS Libraries for 2019

Hey kids, you ready for me to tell you all about this newfangled thing called Bootstrap? Well get un-ready, ‘cause I’d never do that to you. It’s not that Bootstrap isn’t great, it’s just that if you work in web design, and you’ve been paying any attention at all, you already know about it.
And if you don’t… well… welcome to the industry! We have some articles you may want to check out.
For everyone else, I went searching for the new(ish), the exciting, and perhaps even the fun. God bless GitHub’s advanced search functionality, because I found CSS libraries that do all kinds of stuff. Even if you don’t end up using them, you can absolutely learn from them. Have a look:
CSS Wand
CSS Wand is one of the simpler and smaller libraries on this list; it’s really just a handful of simple, pure CSS-based animations that you can copy-paste into your site, and customize at will. If you need to make your buttons, inputs, or loading animations feel fancy, you could try these out.

Water.css
Yeah, that’s Water.css, as in “just add water”. It’s a set of default styles that, while it falls short of being a full CSS framework, can get you started if you don’t feeling bothering to come up with your own type or form styles. It weighs in at less than 2kb, and uses no classes. That’s my kind of starter framework, to be honest.

Raisin CSS
Raisin CSS describes itself as a utility CSS library, which means (you guessed it) a whole lot of classes. They’ve got pre-built modules for CSS Grid, FlexBox, breakpoints, the Display property, overflow, positioning, and more. I’d personally use a library like this if I was going to be use JS to alter the appearance of a lot of different elements on the fly.

Atomize
Atomize takes things a little further than Raisin CSS, creating something more like a full framework based on Atomic CSS, and the theory of separation of concerns. It aims to be style-neutral, let you define your own breakpoints, and you can use it with NPM, or just download the source for use with any other dev pipeline.

Sassyfication
Sassyfication has a couple of things going for it, starting with its name. It just makes me want to snap my fingers in a “Z” shape, and tell people they just can’t handle me. It also has a collection of commonly-used variables and mixins for SASS. Think of the previously-mentioned utility libraries, but for SASS.
Man, I love SASS, but I still miss LESS. Anybody else miss LESS?

Spectrum CSS
It should be no surprise that Adobe has its own design system, or “design language” as they sometimes call it. Well, it’s called Spectrum, and Spectrum CSS is what you might use to make your site look a lot like an Adobe project. Or, you know, you could just see how they do things, for fun.

Box-shadows.css
Okay… just how much do you love drop-shadows, and the box-shadow property? Probably not as much as the people who made Box-shadows.css, a whole library dedicated to one thing: rounded corners.
I’m kidding. I think you can guess what this does. If you need more shadows in your life and your UI, look no further.

Flix Carousel
Flix Carousel is, as the name suggests, a carousel based on Netflix’s preview carousels. It’s pure CSS, which I love, and seems to work pretty well. The only hiccup is that the preview on the repository page isn’t working. For a visual example, you’ll have to head to the author’s portfolio.

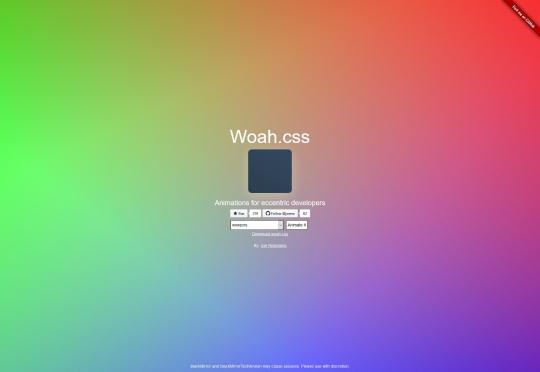
Woah.css
Woah.css is billed as a CSS Animation Library for eccentric web developers, and it lives up to that promise. The animated elements remind me a lot of the old video transitions on TV in the ‘90s, and the video transitions in every “consumer-grade” video editor. It’s cheesy as heck, and a lot of fun to play with.
Animation Library
It’s called “Animation Library”, and the animations are about as sedate as the name. This is not a bad thing, as a corporate site probably doesn’t need or want ‘90s video transitions for their animated buttons. It’s pure CSS, so just add the classes you want, and go from there.

Wipe.css
Wipe.css is basically a brand new CSS reset, based on libraries like sanitize.css and normalize.css. It doesn’t reinvent the wheel, nor should it. It has sensible defaults that make a lot of sense to me, and I might well be using it myself in the near-ish future.

Denali CSS Library
Denali CSS Library is another one based on a design system, specifically the (you guessed it) Denali design system. It features a sleek, modern, and highly sans-serif sort of look that’s perfect for business sites. It’s also got some fairly detailed documentation to get you started.

nova-skeletons
nova-skeletons is an interesting one in that it should definitely never be used for production. It’s basically used to create grey blocks for dummy content in prototypes, as seen in this screenshot. Now dummy content is never completely ideal, but for very early prototypes, this might actually be better than Lorem Ipsum.

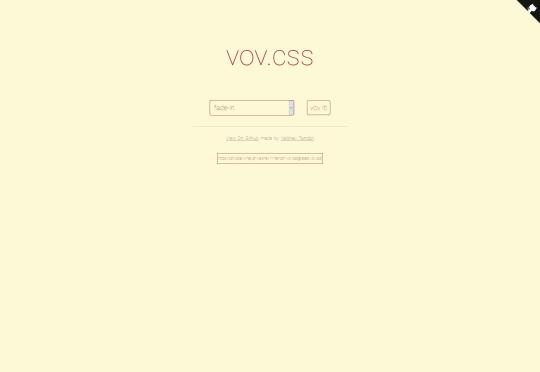
vov.css
vov.css is a lovely set of pure CSS animations that covers basically every (basic) animation you might want. Just add a class and go. One thing I do like is that they include an extra set of classes for adding delay to the animation.
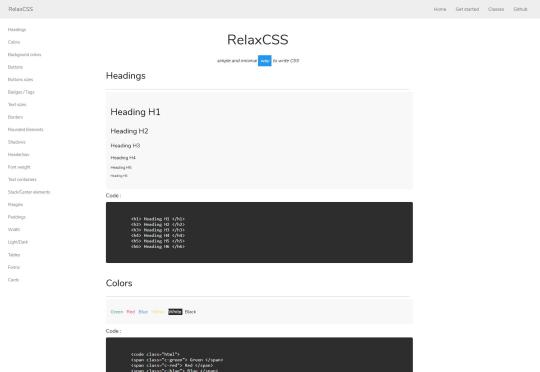
relaxCSS
relaxCSS is a full (but small) framework that styles most of the things you might want in a basic web page or app, with extra components for navigation, tags, and things like that. It also features a dark theme. What I like most is that there’s no layout framework, so you can just add these styles into a site with a Grid or Flexbox layout and get on with your day.
Featured image via DepositPhotos.
Source from Webdesigner Depot https://ift.tt/2nXcfDL from Blogger https://ift.tt/2pI2klR
0 notes
Link
After Effects CC 2020: Complete Course from Novice to Expert
After Effects CC 2020: Complete Course from Novice to Expert
Create stunning Motion Graphics, VFX Visual Effects & VFX Compositing with hands-on tutorials & 50+ practice projects.
What you'll learn
After Effects CC 2020: Complete Course from Novice to Expert
How to use all of After Effects CC - in a dynamic, hands-on approach.
Work with the latest Responsive Design Techniques
Create Motion Graphics to enhance your videos using a step by step, easy-to-use method.
Boost your creativity by completing 50+ Practice Activities and projects from simple to complex.
Practice compositing techniques to achieve stunning video effects.
Master Visual Time Effects on Videos and Motion Graphics.
How to use specialized visual effects such as Motion Tracking, Camera Tracking, Chromakeying, Rotoscoping, Stabilizing and many more…
Work in 3D space with Cameras, Lights and Shadows and practice your new skills with 3D Motion Graphics Projects.
How to Import and animate Illustrator Vector Graphics.
Create advanced Type Animation in 2D & 3D – cool stuff only in After Effects.
And much more for you to become an expert in Motion Graphics, Visual Effects, and Compositing
Requirements
No Prior Knowledge of After Effects, Visual Effects or Motion Graphics Required
A working copy of After Effects CC 2020 or CC 2019
All project files are available in After Effects CC 2020, CC 2019 and CC 2018
Backward compatibility up to After Effects CC 2013 for all projects
Also download: Adobe Photoshop CC 2020
Description
The Most Comprehensive, Bestselling and Highest Rated After Effects Complete Course with over 440+ Lectures and 31+ hrs of Video.
Updated to include with the latest Motion Graphics and Visual Effects Techniques.
New Sections added periodically to give you the BESTSELLING and HIGHEST RATED COMPLETE Adobe After Effects Course. The Ultimate Learning Experience with Hands-On Practice Activities and Their Tutorials to cement and expand your learning.
After Effects CC: The Complete After Effects CC Course from Beginner to Advanced.
Top Up-Voted Review:
Adama Sy - This is the most satisfying video course I ever purchased. It's not only about After Effects, but it's also the knowledge and the will to share the knowledge and everything he knows that makes this course so interesting and important to anyone willing to understand After Effects in all areas. Thank you Louay, You are a great teacher and I recommend to anyone all your courses.
Ernst Pierre - I don't want to start like others saying this is the best course in AE available here on Udemy, I think it's even better than that, this course is hmm! ... I cannot find any words. The content is great, the lecturer is awesome, the TIME TO RESPOND from the instructor is unbelievable, it's like he is just here waiting for your questions to reply (last time he replied me in 5 minutes).
Folks, if you can afford it, don't have a second thought just pay for this course because you won't only learn how to create great motion - animation, you will also learn the mechanism behind it and how to play around to boost your creativity. Furthermore, besides learning AE, Louay will also inspire you to be a better learner. On a whole, if you want to see how awesome you can just take this course and after only a few lectures you will be amazed to see how amazing you are and can be...
Sir! Man... you are just something else.
Restructured, Repackaged to give you an Ultimate Learning Experience.
Motion Graphics and Visual Effects are becoming increasingly valuable and important in any video created. Learning how to create these animations using Adobe After Effects has become essential. Talents to create these kinds of animations and effects are more and more in demand. It is also an easy way to earn money as a freelancer or resell your packaged animations on hundreds of sites on the web.
Learn and Master Motion Graphics and Visual Effects in After Effects in this Comprehensive Course:
Understand the concepts behind Animation Techniques
Learn how to Design, Animate, and Sequence complete Motion Graphics Projects
Work with all the transformations basic and beyond
Learn easy, yet powerful, techniques to create the most complex animations
Create Stunning Visual Effects using Build in Effects (no expensive third-party plugins)
Apply specialized effects such as Rotoscoping, Chromakeying, Camera Tracking and many more
Mastering After Effects
Learning the fundamentals and beyond of Motion Graphics and Visual Effects using Adobe After Effects is a very powerful tool at your fingertips.
You will go through creating useful and practical animations and learn how to use simple and complex animation techniques. This is not the type of ‘Tips and Tricks’ here and their course. This Course is a serious learning experience where you get to actually create serious animations and genuinely learn how to use After Effects and become a top-notch animator and a visual effects artist.
Viry Juárez Lozada - It's a very complete course. The instructor answers all the questions in every lesson and explains everything in detail. If you are a beginner in After Effects it's perfect for you, Louay begins with the very basics and covers a lot of the software. The practices are very helpful to understand the lessons and to get you used to AE.
Contents and Overview
You will start with a fast track to get familiar with After Effects and Create a Crash Animation. You will then learn all about the essential transformations using practical animations and useful examples. You will build Projects and Videos from scratch and practically learn more about numerous features and functions of After Effects.
You will go through projects where you will learn how to create animation sequences and package a whole video.
Essential manipulation of the many methods in After Effects is covered with emphasis on practical use and not just an overview of methods.
Most importantly throughout the course, the spirit of compositing, putting together Visual Effects and Motion Graphics are thoroughly covered. This experience is invaluable for you to master Visual Effects in After Effects.
Here some of the techniques you will Learn:
The latest Responsive Design Techniques (CC 2020)
Create your First Motion Graphics Video
How to Design and Animate a full AE Project
Spatial and Temporal Interpolation and Motion Path Animation
Reveal Techniques using Track Mattes and Masks
Important Techniques to Help You Create even better animation
Essential 3D Animation Techniques
Advanced 3D with Cameras, Lights and Shadows
3D Camera Orbit Null
Complex, Compound and Bezier Shapes
Per Character Text Animation and how to use text presets
How to use the Puppet Tools in CC 2018 and CC 2019/20
How to Use Expressions
Animation Presets - Using, Editing, Creating and Saving Presets
How to Composite with Masks and Effects
Motion Graphics Time Games
Videos Time Games
Motion Tracking
Camera Tracking
Green Screen Chromakeying
Rotoscoping
Importing and Animating Vector Graphics from Adobe Illustrator
Best Exports for YouTube, Vimeo, and Facebook
Motion Graphics Visual Effects
Color Correction & Color Grading
How to use the all New Scripts to Animate Mask points
Using the Essential Graphics Templates
.... and so much more interesting and useful updates you will discover within the course
Most Importantly this course offers you the chance to understand, practice and develop your skills as a Visual Effects and Motion Graphics Artist.
Inger Wold - I have learned so much. I have already sold and made several videos. But this is still just the beginning, and the course made me able to find even more cool stuff. Still learning
Abdulrazek Fawzy Abdulrazek - It's the Best Course In After Effects I have ever seen. Accurate + Fast + Smooth + Knowledgeable = Expert Instructor. Louay Makes you enjoy every bit he shows. Really if you want to Knock the real world of AE, come to Louay.
See you inside the course
Louay
Who this course is for:
Beginners in After Effects who want to start Learning Compositing, Visual Effects, and Motion Graphics
Intermediate After Effects Users who want to polish their skills and learn more techniques to create better videos
YouTube Publisher looking to add Motion Graphics, Titles, Lower Thirds and VFX to their Videos
Video Editors looking to implement Visual Effects and Motion Graphics in their videos
Motion graphics artists and graphic designers
After Effects CC 2020: Complete Course from Novice to Expert
Created by Louay Zambarakji
Last updated 2/2020
English
English [Auto-generated]
Size: 17.05 GB
DOWNLOAD COURSE
Content From: https://ift.tt/33K0O1w
0 notes
Text
Ranking the 34 best ways to make money with YouTube
$500 million. That’s how much YouTube darling and beauty blogger Michelle Phan is worth. (1)
For some perspective, that’s more than 3 times the net worth of Hollywood sweetheart Jennifer Lawrence. (2)
You’re probably here because you’d rather stack that paper using a mediocre webcam from the comfort of your own home than go to thousands of auditions in hopes of maybe scoring a role…and then even if it’s the lead in the Hunger Games, you still won’t make as much money as a girl who sits at home putting makeup on in front of her mediocre webcam.
That’s the internet, folks. The earning potential is infinite.
Be sure to check out the best ways to make money fast, the best ways to save money, and the best online business ideas.
34. Track analytics
Trying to make money online without tracking analytics is like practicing 3 point shots and then closing your eyes every time before the basket reaches the hoop.
YouTube Insight is a great analytics tool, and websites like Social Blade will track and deliver your YouTube analytics, helping you figure out how to decipher them. (3) (4)
33. Get a mentor
If you’re trying to make it to Michelle Phan status, you should start with talking to people who have already done it. There are tons of communities out there dedicated to social media marketing and blogging, and even some that are dedicated specifically to YouTube.
YTalk is probably the biggest one, and it’s a great place to ask questions about YouTube and get tips from the pros. (5)
32. YouTube partner
The most obvious way to make money is to join YouTube’s partner program. To qualify, you need at least 10,000 lifetime views on your channel. (6)
Your content does have to be advertiser-friendly (no violent content, graphic language, overly political content, sexual jokes, etc), which might limit a lot of people.
But if your content passes their guidelines, you can make money in several ways:
Ads – Display, overlay, and video ads.
Channel memberships – You can offer special perks to your viewers in exchange for a set monthly payment.
Merch shelf – Sell your own branded merchandise on your YouTube account. See #12 for more information.
Super chats – Your viewers can pay to have their comments pinned to the top of a live stream or chat stream for a set period of time.
YouTube Premium Revenue – You earn a portion of the subscription fee for each YouTube premium subscriber that watches your videos.
Try to use all these for the most earnings.
31. Manage YouTube accounts
Know your way around a YouTube channel, but don’t want to start your own? You can manage other people’s YouTube accounts for pay. You’ll basically do everything you’d do if it were your own channel without having to come up with a channel idea.
In fact, you could strike out as a freelance YouTube account manager if you find managing several different YouTube accounts fun.
30. Animated videos
Childhood in 2017 mostly means zoning out in front of your mom’s cell phone while YouTube shuffles from one bizarre, poorly rendered animated video to the next. Kids YouTube has over 8 million weekly users, and kids don’t really care about quality, so it’s a good place to churn out crap content for easy money. (7)
The channel is full of these easy to make, auto-generated animated videos and songs that use SEO-packed titles. GTA V is the software most use, and the videos made with it generate views in the millions. (8)
29. Speaking engagements
Beginning public speakers can rake in $500 for one engagement, and once you’ve got some experience and a name built up, $5,000 or even $15,000 checks are not uncommon. (9)
You can sell yourself as a public speaker even before you’ve got followers in the 6-figures. Even 5 or 10k is social proof that people like hearing what you have to say. Put together a media kit with your best videos and your analytics, then pitch it to relevant event directors.
28. Software tutorials
Use a screencast software like Screencast-o-Matic to record your computer screen, and give tutorials of the latest, most popular software programs. (10) Terry White posts Adobe Creative Cloud tutorial videos on YouTube and has almost half a million subscribers. (11)
If you’d rather not compete with the hundreds of Photoshop and InDesign tutorials, pick more niche but still widely used software. Personally, I’d go with something B2B like SalesForce.
27. Tech reviews
People like to watch products in action before buying, so if you’re a techie and you’re good at explaining complicated things simply, you should start a video reviewing new pieces of technology.
As with anything, niching down will make you the most money. Computer stuff, video game consoles, photography gadgets, smartphones, etc. Put affiliate links for the products you review and you’re set.
26. Fitness videos
Fitness videos are big on YouTube because people like seeing exercises in action. That said, the competition is fierce, so you need a convincing “fitness motivation” type of story to connect with viewers.
If your channel is a hit, you can use it as a launchpad for your own personal training business. Write some workout and/or diet programs and sell ’em to your viewers.
25. Music-related videos
With YouTube, you can make musician-level money without being a famous musician a few ways.
One way would be to make YouTube video lessons on a musical instrument, probably the guitar. Marty Schwartz, a popular YouTube guitar instructor, makes multiple six figures a year thanks to his YouTube guitar lessons and online courses. (12)
Your other music-related niche option is song covers. There are YouTubers making tons of money by reimagining a song in a different genre (like making a heavy metal version of a pop song), doing acoustic covers, etc. If you’re skilled in a certain genre or are great at a weird instrument, you can carve out your own cover video niche.
Lastly, you could just make your own music. That method might be more difficult than just covering popular songs, though.
24. ASMR Videos
ASMR (Autonomous Sensory Meridian Response) is a nice-feeling tingly sensation in your scalp as a result of hearing certain sounds and seeing certain actions, usually of a calming nature. (13) On YouTube, so-called “ASMRtists” rake in tons of money by brushing the camera, tapping on objects, crinkling tinfoil, and doing “roleplay” videos (no, not like that).
This niche is poised for growth. Only recently has this phenomenon caught the attention of researchers and gone mainstream, so there’s plenty of time to get in on the ASMR ground floor.
Yes, you’ll most definitely feel weird talking to and brushing your camera, but it’s an easy way to make money on YouTube.
23. B2B videos
If it were me, I’d head straight for the businesses with my target audience. B2B is where the money is at, and having businesses as a client base opens up the door for you to sell consulting services to a built-in audience.
Make videos with business-focused software tutorials, business consulting, or accounting advice, for example. Offer value upfront, but hold a little back so you can upsell.
22. Info products
Base your channel around teaching others some skill you have to. Provide value upfront with free YouTube videos and grow your subscriber base into the thousands.
Then, just like you’d do with a blog, create an info product to sell to your audience and generate passive income. A video course is a good idea since you’re already on YouTube.
Hey, you could also make a “how to grow your YouTube channel” type course once you hit it big on YouTube.
21. Use YouTube to bring leads to your business
A lot of businesses use blogs to build a loyal customer base, but you could do the exact same with YouTube.
You could make videos providing helpful information, showing off your product or service, demonstrating your expertise in your field, having customers give testimonials about your product or service, maybe even host a live stream for a product launch or a webinar.
20. Premium content
Reel them into your channel with videos so baller they’ll pay for more. You’ve really got to be on your A game for this one because people are used to free content, but premium options are one of the most easily scalable ways to monetize an online platform.
You can sell on-demand videos on websites like Yondo, and you don’t even have to share revenue. (14)
19. Keyword research
If you’re good enough with metadata, you can figure out exactly which keywords are going to be the most lucrative and least saturated.
To get started, YouTube’s Creator Playbook explains how to create and interpret your own metadata. (15) Optimize your videos for search accordingly and watch the ad money come in while you sleep.
18. Sell subscriptions
It’s free to subscribe to a YouTube channel. But if you build a dedicated fanbase there first, you can start moving some of your content over to Viddler, a video platform in which users pay to subscribe to their favorite channels. (16)
This works best for YouTubers with consistent, regular content such as comedy sketches, web series, or talk shows.
17. Book deal
Are you really an internet celeb if you don’t have a book deal? Everyone goes this route eventually, and for good reason – although not necessarily just money.
According to publishing agency Macgregor Literary, the average first book deal pays an advance of around $5,000 to $15,000. If you have a huge following already, though, it could pay $50,000 or more. (17)
16. Beauty blogger
Michelle Phan, the bonafide queen of YouTube, makes $17.1 million per year off her beauty and skincare videos. (18)
It’s a market with low start-up costs and huge payoffs for the right personality (aka face). It’s easy to combine YouTube and Instagram for multiple income streams here. But it’s also saturated and competitive. My advice: find a niche. Yes, a niche within the niche of beauty.
15. Fan funding
Youtube has a fan funding function that basically lets you make a tip jar for your videos. Make it rain. (19)
Patreon is a great platform too. Fans can subscribe to you for a monthly fee ($1, $5, $10), and in return, they receive exclusive content. (20) But you have to already have a loyal following for this route to work.
14. Consulting
Consultants make bank. You can easily top 100 grand a year doing this. (21)
The hard part is getting to the point where people trust you enough to drop 5-figures for your advice. For that, you need to grow a solid following and offer proof that you can help them do the same. Something you can do by making YouTube videos with value-packed free content for your viewers.
13. Sponsorships
In the age of social media, when something becomes popular, there’s a 95% chance that influencer marketing is secretly the reason. At 5 to 10 cents per view, even a small-timer can bring in $500 for a video. It’s good money for minimal work.
How do you find a sponsor? There are online marketplaces for it. Check out Grapevine Logic, Famebit, and Channel Pages. (22) (23) (24)
12. Brand swag
Not great for a main stream of income, but easy side money if you get a fanbase. Start up an e-commerce shop, hire some freelancers on Fiverr to draw up some designs, find a dropshipper to print and ship your shirts. (25) Voila, let the orders roll in and never even touch the product.
YouTube actually has a partnership with Teespring that lets you create your own branded shirts on Teespring and advertise them directly on your YouTube video descriptions if you have at least 10,000 subscribers. (26) Pick your price, set up the shelf, and watch your subscribers buy your branded clothing.
11. Video gamer
Remember that kid in high school who wanted to be a professional video gamer for a living? You laughed at him then, but now, he might be getting rich on YouTube.
Millions of people will sit on YouTube and watch you play Minecraft for hours. Proof: Skydoesminecraft nets $1.7 million a year through YouTube, and he’s not even the biggest out there. (27) Stampy Longhead makes around $6 million/year. (28) PewDiePie has somehow managed to make $15 million in a year and still regularly pulls nearly a mil a month on average. (29)
Not every video has to be of you gaming if you’re really into the expanded universe of a video game. There are tons of Star Wars and Halo YouTubers, for example, who get hundreds of thousands of views on videos simply discussing the lore and background story stuff in the Star Wars and/or Halo universes.
10. Comedy skits
This is another popular genre, and it’s fun. BarelyPolitical, a variety show on YouTube filmed out of an office building, makes about $1.4 million/year. The hit TV show Broad City actually started as a YouTube web series that eventually landed a Comedy Central deal.
Although after you factor in costs, like paying all cast members, (they have around 12), set, costumes, etc, the total payoff seems lower. (30)
9. Affiliate marketing
Affiliate marketing is another one of those monetization methods that’s probably not going to get you rich but is an incredibly easy side hustle. Click Bank pays out commissions of anywhere from 1-75%, and Amazon’s popular affiliate program pays out 10% commission. (31) (32)
You can find even higher commissions as an affiliate for certain courses or info products.
Place your affiliate links in your video descriptions, pin a top comment with your most lucrative video-relevant affiliate links, and put them on your channel page too.
8. Toys
Remember what I mentioned about Kids YouTube being a literal gold mine?
From toy collectors to people playing with toys, a lot of the most wealthy YouTubers have accounts that revolve around toys.
Combine the fact that 8 million users get on Kids YouTube per week with lucrative toy company contracts, and you’ve got people like Blucollection netting $12.7 million/year. (33)
7. Brand partnerships
Think sponsored content, but instead of getting paid big money for one video, you’re getting paid big money every time you make a video. Just to name drop.
Jenna Marbles, YouTube’s darling, nets $4.6 million/year. A lot of that is for her massive subscriber list, but it’s also because of brand partnerships with Xfinity and Sirius-XM radio.
6. Cooking
The guys from EpicMealTime make around $3.1 Million per year. (34) To eat fast food.
The trick with food and cooking channels, though, is you’ve got to make it unique. EpicMealTime invented fast food lasagna – about as unique as it gets. And they have a clear target audience: stoner bros.
Narrow into a niche that isn’t overdone and you could be looking at all kinds of sponsorships, book deals, and even TV deals.
5. Start a blog
Pairing vlogging and blogging is a natural progression. These are two income streams with huge flexibility and earning potential. Monetize them both, funnel traffic between them, and you can double your money.
4. Crowdfund a project
Got an idea you’re sure would net you good money but don’t have the start-up cash? YouTube is a great crowdfunding platform.
Create a relevant channel and build out a decent following. For example, you want to build an app in the online dating space… start an online dating advice channel. Once you’ve got a following, shoot a baller viral video that explains your crowdfunding campaign and links to a Kickstarter page. This video can double as the intro video on your Kickstarter too. (35)
3. Travel web series
“Get paid to travel the world!” You’re probably sick of seeing this plastered all over the web, right?
Travel is a seriously saturated market. But, it’s also filled with mediocre content and people who quit in the first year.
If you can push through and build a name for yourself in the travel space, it has some of the best perks of any niche. All-inclusives in the Caribbean, first class tours of the south of France… all free AND you get paid to do it, as long as you vlog it. With locations that stunning, it shouldn’t be hard to make a solid video.
2. License your content
If you’re creating viral videos, chances are media outlets, TV news, and online conglomerates are going to want a piece of that viral action. You can actually license out your video to them for a fee on websites like Jukin Media. (36)
How do you go viral? There’s no guaranteed formula, but there is a formula. It needs to be short and attention-grabbing. It has to do something completely original. It should be either hilarious, shocking, or insanely useful. Finally, videos don’t catch fire in a vacuum. Promote.
1. Lead generation for local businesses
Getting rich and famous off YouTube sounds easy enough…laptop + webcam + charismatic personality. But for every YouTube celeb you can name, there are thousands upon thousands of equally charismatic and talented YouTubers who never made it past 1,000 views.
I’d rather not leave my success up to chance or a fickle fanbase. I push this one a lot, but that’s because offering SEO and lead generation services to local businesses is the most consistent way to make good, scalable income online.
In a nutshell: you learn SEO (yes, there is a formula), you pick a niche and a location (selling limo service in Springfield, Illinois is a lot easier than competing with millions and millions of YouTube creators), you capture leads. Once you turn around and go to an actual limo service business with those leads, you’ll see what I mean about consistent and scalable cash. Companies will pay an arm and a leg for a fresh stack of leads.
via https://mlmcompanies.org/make-money-with-youtube/
0 notes
Text
James Paterson, Digital Frontiers
Developer, programmer, artist, designer. Mad scientist?
Call James Paterson what you want, but one thing’s for sure: his creativity knows no boundaries. Paterson started using Flash in early 1997, and made a career out of pushing the medium and his creations into new, exciting, and evocative territories.
He’s been a part of the web’s past and present, and will undoubtedly be a part of the digital future that’s yet to come, although it’ll happen without one of his favorite tools: Flash. In the very near future, the platform and web plugin will no longer be supported by Adobe. Like others who used Flash, Paterson has lamented the coming of the end. “I think because I grew up with it as my primary set of creative tools it was really a part of me. I had spent well over 10 years perfecting my craft with it, and had a setup that was like an extension of my mind and body. It took years to relearn everything and port as much of my world as possible to JavaScript.”
James Paterson, photo by Jonathan Chang.
Paterson’s studio, where the magic happens.
But he’s a realist too.
“Ultimately the switch to JavaScript was good and healthy… it’s a much broader medium and allowed me to take my craft to all sorts of new places.” And there’s no turning back, all for the better. Paterson has broken into new digital territories, pushing the boundaries of augmented reality (AR) with #normanvr and other digital platforms. He took time out of his busy schedule to answer some questions about AR, developer tools, the web, Flash, and a (possible) future for Flash.
VR (virtual reality) sculpting has become a major focus for Paterson. “It’s sort of a natural progression of my drawing process, popped into 3D, thanks to the hands-on-ness of VR.”
Q. Who were the Flash artists, designers, and developers you admired during the early days of Flash, and why?
In the very early days there wasn’t much going on that I could find made using Flash. There were some ultra-early Shockwave/Director sites, notably Antirom (Tomato Interactive) and Noodlebox (Danny Brown) which caught my attention in the late 90s. Then when Flash started to pick up in 1998-99 I saw a little piece of open source by praystation (Joshua Davis) that revealed how to create a “frame loop” where code could run across time. That was my very first introduction to code as a kind of living breathing thing. I’ve been thankful to Josh for that kickstart into code ever since. Some other characters from the early Flash days who influenced me hugely were Amit Pitaru, Yugo Nakamura & Erik Natzke.
Q. How would you describe what you called code as a living breathing thing and that frame loop that Joshua Davis made?
Up until that point I had only used very contained “actions” to perform a bit of control over my animations. Things like clicking buttons to stop, play and jump around through animations. The “frame loop” that I saw in Josh’s open-source showed some code sitting on frame 1, then an action on frame 2 saying “go back and play frame 1 again!” This was the first time I saw a game loop/tick/enter-frame in action and it blew my mind. Learning to code can be intimidating, and baby-stepping my way in as Flash slowly progressed to become a more full-powered development tool gave me a very comfortable on-ramp. Seeing Josh’s frame loop was where something shifted in my mind from being about simple actions triggered by discrete user events like mouse clicks, to being a fluid dynamic system that was constantly shifting and changing over time.
Q. As Flash became more and more popular, you’d see Flash used for expressive, experimental, and artistic purposes. Plenty of sites would also use Flash with the entire site needing the Flash plugin, or it would just have Flash components such as menus or images or animations. Where would you put yourself on that spectrum of Flash artwork versus Flash functional work, and why?
I primarily used flash as a personal art medium. Specifically, my area of interest was bringing drawings to life through a combination of animation and code. I would draw endlessly in my sketchbook, then pick my favorite drawings to expand into living, breathing pieces of interactive work using animation and code. This eventually matured into building custom creative tools (something I did a lot in collaboration with Amit Pitaru) and also getting into more game-like territory. The further I went down this path the more I had to study programming and take it seriously. I was continuously outgrowing my technical ability and having to pause (sometimes for years at a time) to learn more before I could continue.
The more comfortable I got with the medium and programming in general, the more I would take on contracts doing “functional” jobs as you put it. Basically I would spend as long as humanly possible making my own work, then when I was sufficiently broke I would take on commercial gigs doing more practical stuff with the skills I had developed in my personal endeavors. These commercial projects could sometimes be challenging and satisfying, but were usually just a way for me to pay the bills so I could get back to the main event: making weird personal work.
Chalk on chalkboard, from a wall in Paterson’s studio. “They are a combination of stream of consciousness/automatic drawing (a process I call psychic vomit) and plans/code for whatever I’m working on.”
A mural by Paterson in the parking lot of B-Reel Los Angeles.
Q. When you first heard about Flash being phased out, what was your reaction?
Flash was phased out slowly over a number of years, and while I could feel it happening I was still very much invested in it as a creative tool. The final blow was dealt by Steve Jobs in 2010, in his open letter Thoughts on Flash. My reaction was split down the middle. On one side, I agreed with Jobs about how inappropriate Flash was for making websites. I didn’t like Flash sites any more than the next person and was happy that they would be going the way of the Dodo.
But on the other hand, that was not what I used Flash for. For me it was my primary art tool. So with my own creative process, my reaction was one of deep sadness and loss. I had invested well over a decade developing workflows in Flash that were perfectly suited to me. I creatively grew up alongside Flash, so much so that it felt like a part of me. Once I read that letter by Jobs I knew it was totally over, and in some ways if felt like someone had come into my beloved studio, full of all my most intimate creative tools and processes, and burned the place down.
I know that sounds dramatic, but it really did feel that way at the time. I had to completely reinvent myself technically and creatively over the following half-decade, porting as much of my process to JavaScript as possible. This was a huge growth experience for me, facing that loss and then rebuilding.
Q. Are you still developing for Flash, in any way, be it with Adobe Animate CC or something else?
I occasionally animate using Adobe Animate, then drive those animations with JavaScript, but it is somewhat rare these days. It’s still a great animation tool, but I’ve moved on to other places and broadened my horizons in terms of tools and workflows.
Q. From curators I’ve spoken with, you’ve begun to work in AR and VR spaces. How are those platforms allowing you to push your visions and experiments further, and in what ways did Flash prepare you for the spaces you’re working in today?
AR and VR have been a fascinating to me ever since reading Neuromancer by William Gibson and other cyberpunk stuff as a kid. When it finally matured enough to really work, with Vive and Rift, I jumped right in. One of the main projects I’ve done in this area was to take my favorite parts of animating in Flash and create my own open source VR animation tool from scratch, called Norman. This was an incredible experience and such a fun way to carry some of the old school flash frame-by-frame lineage forward into the present. I used JavaScript to code Norman, and it runs on the web (WebVR) for Oculus Rift.
View this post on Instagram
Gonna miss you Gord #gorddownieforever
A post shared by James Paterson (@presstube) on Oct 18, 2017 at 1:05pm PDT
Q. At what point did you leave Halfempty, and when you decided to do so, what did working independently enable you to do that you had not done before?
I started Presstube in 1999 as a way to just get a fresh start after working on Halfempty for the previous few years. I had a wonderful experience working on Halfempty with Marty Spellerberg in 1997–98. He was the first person to turn me on to Flash actually! But in 1999 it felt like the right thing to do to break away and do my own thing. Halfempty was more of a magazine curating the work of many different people, and I just wanted to descend into my own creative rabbit hole.
vimeo
Q. What did getting published mean to you, especially being in such great company in the book New Masters of Flash?
It was a huge honor to be invited to contribute alongside all the amazing people in that book. Also just getting to share my process with others was a thrill.
Drawings by James Paterson
Q. What (possible) future do you see for Flash after 2020, when Adobe will end support of the plugin, and how would you want to be involved with Flash when it’s outmoded?
I’m not sure that Flash has any future to be honest, except to be remembered as a platform which acted as a catalyst for a sort of Cambrian explosion of creativity at the dawn of the internet. I will continue to draw on it to inform my workflows moving into the future, and try to rebuild my favorite old school Flash workflows from scratch.
Q. When the final nail goes into the coffin, how will you remember Flash?
Flash was at the heart of an open and switched on creative community in the early days of the web. It introduced a lot of non-technical creative people to the art of programming, and did so in an accidentally perfect gradual manner. It was the source of much frustration for users when it was used to build entire websites or aggressive banner ads, but for a small group of early creative technologists it was a profoundly inspiring and mind expanding technology. Thank you, Macromedia and Adobe, for that glorious ugly duckling of a creative platform!
Keep track of what James Paterson is up to on his Instagram.
Inspired by James Paterson and want to make contact with thousands of other creatives just like you? Attend HOW Design Live and you’ll be among the best and brightest in the industry. Register now!
Edited from a series of electronic interviews.
The post James Paterson, Digital Frontiers appeared first on HOW Design.
James Paterson, Digital Frontiers syndicated post
0 notes
Text
Desktop vs. mobile app design: how to optimize your user experience
The mobile wave hit hard. As early as 2014, internet usage for mobile apps eclipsed usage for desktop (in the U.S.), and not long after in 2016, total internet browsing on mobile surpassed that on desktop (worldwide). This wave changed the game of digital design.
How can you create a great experience for desktop and mobile app users alike? It’s a challenge.
Today, website owners and designers are still scrambling to catch up. The desktop design strategies they’d spent the last ten years perfecting have now become a secondary skill, and the power has shifted to those who understand mobile.
For entrepreneurs and designers alike, survival now depends on understanding the differences between desktop vs. mobile app design and how to make the best of both. In this article we walk you through some best practices so you can create the ultimate user experience.
Desktop vs. mobile app design: the big differences —
Screen size
Desktop = large
This means a lot more than the opportunity to add more stuff. Screen size affects all aspects of design, especially navigation.
Desktop apps can support fixed navigation bars, while mobile are generally limited to pull-out menus. This is quite effective for discoverability, since users may find new sections they didn’t previously know about. For example, did you know eBay sells motors and other car parts? If you use their mobile app, you’d have to go out of your way to learn that.
Mobile = small
Mobile apps must conserve screen space everywhere they can, so you must be aware of which elements are important enough to show. Two interesting trends arose from this obstacle: minimalism and the hamburger menu. Both were so successful, they seeped into desktop design as well, where they’re stylistic choices rather than necessities.
Interaction
Desktop = cursors
Desktop apps can make full use of cursor interactivity: things like hover text or cursor-triggered animations. This allows desktop apps to feature entire screens full of pictures, with descriptive text only appearing on hover.
Don’t scoff at gesture controls; Tinder built an empire upon them. Via the Loop
Mobile = gestures
You can’t hover or rollover on mobile apps, but you have an infinite slate of gestures literally at your fingertips. Swiping, shaking, or good ol’ fashioned poking bring a whole new set of opportunities to apps (and they make them more fun). Can you imagine how boring Tinder would be if you had to click?
Organizing content
Desktop = columns
Any content on desktop can appear in a traditional multi-column format—just like print content in newspapers and magazines. This offers a lot of flexibility for designing layouts and positioning text, images and UI elements.
The Spotify desktop, mobile, and tablet apps. Via Spotify
Mobile = scrolling
Once content reaches a certain length, mobile apps need to use long scrolling. And that’s not a bad thing! Mobile users actually prefer continuous scrolling, and this technique conserves screen space while making interaction more fun with gestures. Like minimalism and the hamburger menu, long scrolling is another mobile design trend that has transferred over to desktop because of its popularity.
Mobile = portrait and landscape
Unlike desktop screens, mobile apps can switch between portrait and landscape views at will. For designers and website owners, this is a blessing and a curse. Two screen orientations allow for more functionality and better user personalization, but it can often require twice as much design work.
Functionality
Desktop = big tasks
Judging by the results of a Gallup Panel survey, user prefer desktop apps for longer, more involved tasks. One reason: mobile screens limit the number of functions available at once. That’s one reason why Adobe opted for a hybrid Photoshop Mix app instead of porting all of Photoshop to mobile.
But more to the point, it’s about the mentality. Mobile works for short spurts and quick tasks that come up in the moment (think price comparisons or proving your friend wrong about who plays the Hound in GoT). When longer tasks come up, users would rather find a seat and settle in to desktop apps with more functions, more content, and more special features.
Mobile = experimental
What mobile lacks in functionality, it makes up for with ingenuity. Right now, mobile design is at the forefront of technology and offers tons of exclusive features that desktop just can’t do.
While the accelerometer was intended for more practical functions like determining when users switch orientations, Snapchat found a more creative use for it. Via Gizmodo.
Here’s just a few examples:
Virtual reality
Augmented reality
Multiple cameras
Accelerometers and gyro sensors
Mobile contact lists
Magnetic sensors
It’s not always new tech either. Sometimes apps can use existing tech in new ways. For example, Snapchat makes use of your phone’s accelerometer to know when you’re driving, and switches to a bitmoji car.
Best practices for desktop vs. mobile app design —
What does this all mean in practical terms? What should you do differently for each medium? Let’s look at the specific design tips to help you optimize the designs of each.
Go mobile-first
If you’re creating an app that’s for both desktop and mobile, start with the mobile version first. It’s easier to add elements as you increase the screen size than it is to remove elements as you shrink the screen size. Going desktop-first tends to involve more backtracking.
Prioritize elements
Mobile screens only have room for the most significant parts of your design. You need to know what they are. List out all your design elements, and prioritize them from most to least important. This helps later when you decide which elements get the best screen locations and which hide in hamburger menus. PS: this is just as helpful for desktop design.
Skype’s desktop app has left-sided navigation, while the mobile app is entirely vertical. Via Skype.
Work with columns
As we mentioned, desktop apps allow for multi-column formats, which enables options like a left- or right-sided navigation menu, sidebars for widgets and ads and room for card structures. That won’t fly on mobile devices, though where a single, centralized column is best. Organize your app content vertically (with ads on the bottom). Put images above or below text but rarely next to it.
Use mobile’s benefits
We know you don’t want to hear “more work,” but there’s a difference between designing for mobile and simply making a desktop app for a mobile device. Use all the fun stuff you can do with mobile, including inventive gesture controls and special sensors. These don’t just improve the usability of mobile apps, they’ll also make them more fun and stand out.
Don’t forget mentality
One of the greatest discrepancies between mobile and desktop is the user’s state of mind. Tasks on mobile apps should be fast and instantly comprehensible at a glance. Imagine someone trying to use your app while running late to catch a flight. It must support quick sporadic glances and be usable amid distractions. Keep complex tasks in desktop land.
Make your apps allies —
We might make it sound like desktop and mobile are bitter rivals, but the truth is, most of the time users use both devices, even for different areas of the same task.
Custom web and app design by Mike Barnes.
Take online shopping, for example. The common ritual is to browse products on a mobile device (where the user can get comfortable or check on the move), and then make the actual purchase on a desktop (where the keyboard makes it easier to fill in forms).
With that in mind, stay updated on the best design tactics for both. It’s not about creating the best desktop experience. Or the best mobile experience. It’s about creating the best experience, period. To do that, optimize both desktop and mobile to account for all factors.
Looking for a desktop or mobile app design?
Let our creative designer community create a clickable or swipe-able design just for you!
Yes please!
The post Desktop vs. mobile app design: how to optimize your user experience appeared first on 99designs.
via 99designs https://99designs.co.uk/blog/web-digital-en-gb/desktop-vs-mobile-app-design/
0 notes