#Top Excel Tutorials Online
Explore tagged Tumblr posts
Visit Tumblr Blog
Explore Tumblr blogs with no restrictions, modern design and the best experience.
Last Seen Tumblr Blogs


Fun Fact
Tumblr posted its first advertisements in May 2012 and subsequently earned $13M in revenue.
Text
EV Prime Spares – Quality That Drives the EV Future
Electric vehicles aren’t just a trend—they’re the future of mobility. And every powerful ride needs reliable components to keep it running smoothly. That’s where EV Prime Spares comes in. We are your trusted partner for supplying high-performance, top-quality EV spare parts across India.

With our roots in New Delhi and our commitment rooted in excellence, EV Prime Spares is dedicated to supporting the rapid rise of electric mobility through quality products, fair pricing, and unmatched service.
Who We Are
EV Prime Spares is a wholesaler and trader of premium electric vehicle spare parts. From e-bikes to electric scooters and conversion kits, we supply everything needed to keep EVs moving efficiently. Our tagline says it all — “Prime Quality for Prime Customers.” We believe that our customers deserve nothing less than the best, whether they’re running a repair shop, launching an EV startup, or managing a fleet.
Our Core Offerings
We specialize in spare parts for:
Electric Bicycles (E-Bikes)
Electric Scooters
EV Conversion Kits for Two-Wheelers
Accessories and Components for Customization
No matter what part you're looking for, you’ll find high-quality, tested, and performance-ready products at EV Prime Spares.
E-Bike Components
Motors, PAS sensors, and display meters
Smart controllers for better battery and speed management
High-efficiency throttle systems
Electric Scooter Spares
Hub motors, wheels, and brakes
Charging systems and battery cases
Handlebars, digital meters, and indicators
EV Conversion Kits
Full kits to convert conventional vehicles into EVs
Includes motor, controller, switchgear, wiring harness, and basic accessories
Accessories & Add-Ons
Side mirrors, headlamps, tail lights, horns, and more
All products are sourced from reputed manufacturers and are inspected for durability, performance, and safety.
Why EV Prime Spares?
You have options. So why do businesses choose EV Prime Spares again and again?
✔️ Top-Grade Products We don’t compromise. Every part we sell is performance-tested and reliable.
✔️ Bulk Supply, Wholesale Pricing Looking for competitive pricing? Our wholesale rates are perfect for resellers and workshops.
✔️ Wide Range Under One Roof No need to hop from supplier to supplier — we have everything you need.
✔️ Fast Dispatch from New Delhi We understand urgency. That’s why we keep our warehouse stocked for prompt dispatch.
✔️ Knowledgeable Support Team Not sure which product fits your EV model? Our experts are here to guide you.
Our Customers
EV Prime Spares serves a wide range of customers:
Retailers & Dealers: Bulk supplies at wholesale prices to stock up your inventory.
EV Mechanics & Workshops: Original parts for repairs, servicing, and upgrades.
Fleet Operators: Consistent availability to keep your fleet running without delays.
Startups & Innovators: Need spare parts for your prototype or small production batch? Count on us.
Whether you're just starting out or scaling up, we’re here to supply your needs — no minimum order required.
Our Role in the EV Revolution
At EV Prime Spares, we’re more than a supplier — we’re active participants in India’s EV revolution. By making reliable spare parts accessible and affordable, we support the larger mission of reducing carbon emissions and building a sustainable transportation future.
We’re proud to be helping small garages, big brands, and visionary startups drive the change, one component at a time.
Growing With the Industry
The EV space is moving fast — and so are we. EV Prime Spares is constantly expanding its product line, partnerships, and capabilities. Here's what's coming:
Dedicated online store for faster, easier orders
New categories like EV rickshaw and cargo three-wheeler spares
Installation guides and video tutorials
Partnerships with top domestic and international brands
Let’s Build the Future Together
Whether you're upgrading your repair shop, assembling EVs, or launching your own brand, EV Prime Spares is the reliable backbone you need. Our name stands for trust, quality, and service.
Electric vehicles are here to stay — and we’re here to make sure they run at their best.
2 notes
·
View notes
Note
Hiya!! I am taking a coding course at a University. While it's excellent for learning how to use a lot of complicated concepts in programming, we don't really get to do any projects or create anything yet. I was wondering how to get into that. Are there any resources you might recommend?
Hiya!! 💞
Goodie, you want to build your own projects! That's so good, I love project building! Now, it depends what you're coding (the languages + specific area) e.g. are you learning HTML/CSS/JavaScript (Website building) or is it like Python/Java/C# idk but you get what I'm asking for here, the projects you want to learn and build depends on what you're learning in the first place! But I will give some general advice!

🎥 YouTube
I love YouTube so much, there are thousands of videos on that site for any programming language to building pretty much anything! What I did when I started off was the simple search of "[The coding language] beginner project" and then I get to see what I can build. Now if you get stuck on a snippet of code, Google it and there are sites that will explain it for you. Now, don't fall for tutorial hell where you're watching tutorial after tutorial videos but watching them will give you a good foundation!
🔍 Google
Similar to what I said for the YouTube way, you can Google the same question and it will give you a bunch of project ideas, how to even do them and all you can do also is add more on top, what I mean is don't just watch or read about a project idea, see how you can twist it your own style e.g. recently I watched a React.js tutorial on how to make a to-do app! My twist was I styled it different by adding a frog theme. So the tutorial was my foundation and I just added on top of that to further exercise my skills!
🌐 GitHub
Have a hub for all your projects! After creating your projects, you don't just want it sitting on your computer, you can put it online! I use GitHub - it's a place where you can store all your projects, have a save history so you can go back on old code, even share the static webpages you make (using HTML/CSS/JavaScript) with other people online! The Site | How to use GitHub | Check out my GitHub for reference
📚 Online Courses
Many online platforms offer project-based courses. Websites like Udemy, Coursera, Codecademy and FreeCodeCamp can guide you through creating practical projects step by step. I use Udemy for learning and there are courses that are like "Build 9 web development projects blah blah blah" they're actually really good! BUT you do have to pay for them but if you can't find a good project on YouTube to follow or you can visualise or understand the articles online on how to build one, I suggest getting a course because someone teaches you how to make the project. Udemy is fairly cheap during their sales, going down from £59.99 to £10.99!
🤗 Collaboration
Reach out to classmates to build together, someone is bound to have an idea for something! Collaborative projects not only expand your skill set but also let you learn from others. Great skill to have! You can even collab on GitHub projects - which I am doing right now with people I've met through Tumblr (checkout our project)!
Remember, Rome wasn't built in a day! Start with small projects, gradually challenging yourself with larger ones. The journey of creating is just as exciting as the finished project itself. Happy coding! 😎🙌🏾💻💗
43 notes
·
View notes
Text
5 Reasons Why Learning Chess Online is Perfect for Busy Minds

In today’s fast-paced world, it can be challenging to find time for hobbies or activities that require focus and concentration. Chess, a game that requires strategic thinking and mental agility, is often seen as a pastime for those with plenty of free time. However, with the rise of online chess learning, busy individuals now have the opportunity to sharpen their minds and improve their chess skills without sacrificing their hectic schedules. Whether you’re an experienced player or a beginner, learning chess online offers flexibility, convenience, and a personalized experience that fits into even the busiest of routines. In this blog, we’ll explore the top 5 reasons why learning chess online is perfect for busy minds.
Flexible Chess Learning: Fit Chess into Your Busy Schedule
Why Learn Chess Online: Flexibility is Key
One of the primary benefits of online chess classes is the flexibility they offer. Traditional chess lessons often require students to follow a strict schedule, which can be difficult to maintain if you have a demanding job, family commitments, or other responsibilities. On the other hand, online chess platforms allow you to learn at your own pace, whenever and wherever it suits you.
With online chess for busy people, you have the freedom to choose when to play and study. You can fit in a quick 15-minute lesson during your lunch break, or spend an hour learning new strategies after work. This flexibility allows you to progress in your chess skills without feeling overwhelmed by the demands of a busy life.
Time-Saving Chess Classes
Another advantage of learning chess online is the ability to save time. Time-saving chess classes are designed to be efficient, providing you with concise lessons that maximize learning in minimal time. This way, you don’t have to spend hours commuting to a chess club or classroom – all you need is a device with internet access, and you’re good to go. Whether you’re at home, in a café, or during your commute, online chess lessons can easily fit into your day.
Chess Learning for Busy Minds: Mental Stimulation on Your Terms
Benefits of Online Chess Classes: Engage Your Mind Anytime
Chess learning for busy minds is an ideal way to keep your brain sharp and engaged. Many people struggle to find time for intellectual stimulation outside of their work, and learning chess online provides a way to challenge your mind in a focused and structured manner. The beauty of online chess for busy people is that you can fit it into your schedule without pressure.
Studies show that chess helps improve cognitive abilities such as problem-solving, pattern recognition, and strategic thinking. These skills transfer well to other areas of life, making chess an excellent tool for personal development. By learning chess online, you’re not only improving your game but also exercising your brain and enhancing your mental agility.
Play Chess Online for Beginners: A Perfect Starting Point
If you’re new to chess and have a packed schedule, playing chess online for beginners is an ideal way to get started. Many online chess platforms offer step-by-step tutorials and beginner-friendly lessons, allowing you to gradually build your skills without feeling overwhelmed. You can start with simple puzzles and strategies, then move on to more complex tactics as your understanding of the game deepens. The flexible chess learning process ensures that you can progress at your own pace, no matter how busy your life may be.
Access to the Best Online Chess Programs
Online Chess Coaching Advantages: Learn from the Best
When you choose to learn chess online, you gain access to top-tier chess coaches and resources that might not be available in your local area. Best online chess programs offer coaching from grandmasters, chess masters, and other highly skilled players. This access allows you to learn from the best, no matter where you live.
Moreover, online chess coaching advantages extend beyond just having access to expert teachers. Online programs often include interactive features, such as personalized feedback, video tutorials, and real-time analysis of your games. These resources are designed to give you a comprehensive understanding of chess while accommodating your busy lifestyle.
Why Choose Online Chess: Expert Guidance at Your Fingertips
One of the key reasons why online chess is such a great option for busy people is the availability of expert guidance right at your fingertips. With online chess coaching, you can get personalized lessons that cater to your skill level and learning goals. Whether you’re looking to improve your opening game, master endgames, or develop advanced tactics, online chess programs provide tailored content to help you succeed.
Continue Reading: https://chesstrainer.com/5-reasons-why-learning-chess-online-is-perfect-for-busy-minds/
#Learning chess online#Benefits of online chess classes#Why learn chess online#Online chess for busy people#Online chess benefits#Online chess lessons#Chess learning for busy minds#Online chess platforms#Flexible chess learning#Best online chess programs#Why choose online chess#Busy schedule chess learning#Play chess online for beginners#Online chess coaching advantages#Time-saving chess classes
2 notes
·
View notes
Text
Tips for my transfemme siblings <3
I've been transitioning for the past 4 years and in that time I've picked up a lot of tips and tricks that I didn't see many other people talking about. So, let me pass along a little bit of the wisdom that's helped me pass to the rest of you all. This is going to be a long post, so brace yourself :)
DISCLAIMER: These are things that I have found personal success with. All people are different, and not all advice is going to be perfect for everyone. Also important to note, this advice is coming from a white person who is ABSOLUTELY not makeup expert. I have specifically made notes below where my advice and recommendations may not be the best / most accurate for people of color. With that said, much of the advice should still be applicable to most people - POC or not.
A lot of the transfemme makeup tutorials I found early on were based in drag. I didn't like the sheer amount of products that were being pushed as *necessary* and had heavy looking final results. Over the past few years I've found a more minimal (and affordable) routine that gives passing results. My daily makeup routine only consists of four products: Concealer, Translucent setting power, blush, and eyeliner. Let's go through each of those.
TOOLS - You're going to want to get a set of brushes. You can find affordable sets online or in stores. I got a set of E.L.F. brushes and they've held up excellently the past 4 years. - Don't buy beauty blenders. Beauty blenders aren't going to be the best tool for us because of our skin texture. Skin that grows facial hair is more textures than skin that doesn't. Applying makeup to textured skin with a beauty blender won't look as good for as long. - The rest of the supplies I use will be listed in their respective sections. You really don't need a ton of tools or supplies, especially as a beginner. Stone rollers, face masks, serums, scrubs.... They're nice extras if you can afford them, but they're not essentials
CONCEALER - I use R.E.M. Beauty Sweetener concealer ($24). It comes in a small pot and will require a brush for application. This concealer comes in a wide array of colors (60, to be specific), provides high coverage, and doesn't look cake-y. - Cream concealer has worked better for me compared to liquid concealers. You get more control on the amount you're using and it should last you a good few months. REMEMBER, a little goes a long way! You don't need to lay it on super heavy. - I apply this just over the areas where I have facial hair shadow. Stipple the concealer on freshly shaven skin and blend those edges out until there's no visible edge. - Using a brush is crucial for trans femmes, especially when going over facial hair shadow. As I said above, the skin that grows facial hair is rougher and more textured, using a brush to stipple on the makeup will get it into the pores. - The concealer I've recommended is great because it can be built up in multiple layers if needed. R.E.M. Beauty is also cruelty free and vegan, if those factors are important to you.
SETTING POWER - I use a L'oreal Hydra Perfecte loose setting powder. Unfortunately, this product has been discontinued. - A great affordable / drug store option is E.L.F.'s High Definition Powder. It's only $6, comes in a sheer option for light skin tones and "soft luminescence" for some darker skin tones. - I don't know what kinds of setting powders will work best on dark skin tones. Light setting powders like this can (I think) leave an ashy finish on darker skins. - I prefer using loose powder, but that's mostly because just what I have experience with. They tend to have a more sheer and transparent finish compared to pressed powders. - Tap out a small amount into the lid of your powder and press it into your skin lightly instead of spreading it across your face. - You will want to use a setting powder on top of every layer of liquid or cream makeup. This will set the makeup and prevent it from smudging as easily and mixing with another liquid / cream product. (if you're applying a second layer of concealer, like I mentioned above, powder in between layers). - Setting powder, in addition to keeping makeup from mixing and spreading, gives the skin a matte finish. This will help hide the textured portions of your skin. - If you want a dewy finish you can add a setting spray at the very end. This will give your skin a little bit of shine without drawing attention to your textured sections.
BLUSH - I use Revolution Beauty Blusher Reloaded ($6). This one pan has lasted me four years and has approximately ten years left. (Seriously, I use this almost every day and the pan hardly looks used). - Blush is a very important step because it brings color and warmth back to your face. - There are two main methods I use when I apply blush: Dramatic and Classic - Dramatic: Place blush from cheek to cheer and across the nose. - Classic: Place blush on the apples of you cheeks (the part that rises up when you smile) - If you apply the blush too heavily just go over it with your bare powder brush. This will reduce the color and blend the edges. - I've found that you can get away with a heavier blush if you're going with the dramatic method (hence the name). Classic blush looks best when it's applied fairly subtly. However, it's still possible to go too heavy with the dramatic style.
EYELINER - The ONLY eyeliner I use is the NYX Epic Ink Liner ($10). - There are three main kinds of eyeliner: Pencils, Pots, and Liquids. - Pencils: Like the name suggests, they're basically really really soft pencils. These are great if you want to blend out and get a smokey look, but aren't great for crisp bold lines. - Pots: This style of eyeliner comes in a pot and requires a specific brush to apply. If you buy a set of brushes, you should be set. This kind of eyeliner is more versatile, able to be blended into a smokey eyeliner AND able to give crisp lines. However, I've found that it's got a steeper learning curve. - Liquid: This style is the best way to get clean lines and sharp wings. Liquid liners usually come in a bottle with a nail polish looking brush, which definitely also have a learning curve. But, that's where my favorite eyeliner comes in! - The Epic Ink Liner is essentially a brush pen. With a pencil form factor and an always sharp brush tip, you will get easy to control lines with just a little bit of practice. - This is my everyday method of applying eyeliner: 1) Start in the outer corner of your eye and extend the angle your lower lid makes. (You can make this wing as big as you'd like, but I would suggest beginners start with a relatively smaller wing (1cm or shorter). Repeat on the other eye. 2) Place the tip of the brush at the peak of that line and draw over in a straight line until you hit your lashes. Close your eyes slightly so the crease of your eye doesn't effect this line. Repeat on the other eye. 3) Move to the inner corner of your eye and apply an even line along the rest of the eyelid. Take a moment to soften the transition between this line and the straight line from the previous step. Repeat with the other eye. 4) Fill in any empty spaces - By doing each step on both eyes before moving on to the next step will help your eyeliner to look more symmetrical. Plus, if the angles aren't matching, it's much easier to remove one line rather than an entirely finish eye. - One additional step you can add is extending the line in the inner corner of your eye just a little bit. Follow the curve you made and don't go down too far. - NOTE: This is my method for non hooded eyes. Because hooded eyes are an entirely different shape, I don't know the best method to add eyeliner.
HIGHLIGHTER - I use Colorpop Super Shock Cheek highlighter ($9). As the name suggests, this is a SUPER highlighter. - I don't wear highlighter every day. It's a fun addition, but I don't find it necessary for days I'm just running errands or going grocery shopping. I reserve it for concerts, dates, or any other event where I want to look extra cute. - The main places to add highlighter are the top edge of your cheek bones, the inner corner of your eyes, the outer edge right below your eyebrows, and down the bridge of your nose and onto the tip. - Since this isn't going on any skin that grows facial hair, you don't need to use a brush. I use my ring finger to apply the highlighter, wipe off the excess, then gently blend the edges with my ring finger again - Blending your highlighter doesn't need to be taken that seriously. Just softening the edges is enough 99% of the time. If you think you applied the highlighter too heavily you can take your powder brush and hit those spots and little. Just like with the blush, this should tone down the pop a bit
FOUNDATION - I don't use foundation anymore. I prefer a minimal face of makeup, letting the natural variations in color and imperfections show. However, wanting a smooth and consistent color all over your face is perfectly valid, too <3 - If you are going to use foundation, you will want to apply concealer first. The concealer is going to do the heavy lifting for hiding your facial hair shadow. - When choosing a concealer to put underneath foundation, many people will say to pick a color that's a shade lighter than your skin. That advice is aimed towards people who primarily conceal their under eye bags, and the lighter color helps the eyes look more awake. If you're getting just one concealer, pick the closest match to your skin tone. - I highly recommend choosing a powder foundation. Powder products, as I said before, give the face a matte finish that hides the textured skin better. Unfortunately, powder foundations are less common and typically more expensive ($30+) - If you already have liquid foundation and don't want to waste it, apply it like you did with the concealer: take a small amount and dab it into the skin with a brush. - The order I would apply this makeup in is: Concealer -> Setting Powder -> Powder Foundation // Concealer -> Setting Powder -> Liquid / Cream Foundation -> Setting Powder. Not everyone agrees on which should come first, concealer or foundation, but I found that concealer first looked better, especially with powder foundations.
COLOR CORRECTOR - You might notice that no matter how high coverage your concealer or foundation are, there's still some noticeable discoloration over your facial hair shadow. This is down to color theory: your shadow is producing a different undertone than non shadowed skin. To cancel that out you need to cover it with its complementary color. There are generally 3 different tones that shadow comes in. - Brown tones: typically found in light to medium tan skin tones. This is covered by pink and salmon tones. The deeper your skin tone, the darker you'll want to go. - Blue/green tones: Typically found in olive skin tones. This is covered by peach and orange tones. Again, the deeper your skin tone, the darker you'll want to go. - Blue/grey tones: Typically found on dark skin tones. This is covered by orange tones. Medium dark skin will want a lighter orange, darker tones will want a more true orange. - DO NOT APPLY COLOR CORRECTOR HEAVILY!!! The heavier you apply the color corrector the more concealer / foundation you'll have to apply to cover it up. You only need the smallest amount to counteract the undertones that will show through your concealer / foundation. - Color corrector is also used to hide other skin tone variations like under eye bags or acne. Under eye bags are usually blue, so use a peachy CC on them. Acne is canceled out by green. - I have seen so many tutorials that recommend using lipstick as your color corrector. Don't do this. Lipstick is generally going to be more oily and prone to melting / smudging. Specially formulated color correctors will stay put much better.
MISC. OTHER PRODUCTS - Primers - A primer can be a good addition to your routine, but they're not strictly necessary for everyone. Primers can be used to give your full face of makeup a better initial layer to stick to, and there are some designed to fill in your pores (something you may want if your shadowed areas are more textured than you'd like after after concealer (and foundation if you use it). I'd say skip it on your first trip to the makeup aisle, but pick it up later on if you'd like. - Eye shadow - Eye shadow can be really fun! It adds extra color to your face and can really accentuate your eye color. It can be a fun addition to tie in with accent colors in your outfit. I just personally don't like the time and effort needed to get good looking eye shadow most days. And, because I don't do it much, I'm not that great with it. Luckily, it is absolutely not needed for an every day look. - Lipstick - I'm an anxious lip biter, so lipsticks don't always last very long on me. I do, however, LOVE one specific lipstick: Maybelline's Super Stay Matte Liquid Lipstick ($11). Once this bad boy dries you're going to have that color on all day. I like the look of matte lipsticks, but if you want a glossy finish you can add a lip gloss once it dries. This liquid lipstick is pretty east to apply, just try to keep a steady hand and work your way to the outer edges of your lips. Letting it air dry will take a little longer, but ends up looking better removing the excess with a napkin (no paper bits will get stuck to your lips). Just be prepared to scrub this off your lips at the end of the day. -NOTE: I don't like recommending people buy from Maybelline since they aren't cruelty free. This is the only product of theirs that I haven't been able to find a suitable alternative that works even a fraction as well. Luckily, one tube of lipstick lasts a long time, and since it stays on so well you won't have to be reapplying multiple times a day -Contour - Contour can be your friend, or it can be your worst enemy. This is one of the more difficult products to apply if you're going for a natural look. Most times that I've personally tried contouring it ends up way too dark. Subtlety is your best friend with contour. I would also suggest sticking to a powder contour pallet to start, liquid contours are much tougher.
SKIN CARE -Okay I am the WORST person to talk about skin care, I neglect doing it so often. With that said... - Don't buy in to beauty youtubers and their 12 step skincare routines. They're super expensive, have so many overlapping products, and I have never met a single person who has the time or commitment to stick to that intense of a routine daily. - Bare minimum: Get makeup remover wipes and take your makeup off every night. Since we are specifically trying to fill our pores we NEED to make sure we take the makeup off. Clogged pores lead to acne outbreaks and ingrown hairs. Eye makeup, if left on, can lead to developing styes, which are painful, annoying, and can grow into a serious issue if not dealt with. Cheap walmart branded wipes will do the job, but they aren't the best. I really like Neutrogena's makeup remover wipes ($5). - If you do develop a stye you'll want to give it a hot compress once or twice a day. Soak a towel or wash cloth, wring it mostly out, pop it in the microwave for 20-30 seconds, and apply to the affected eye. This is opening that pore and letting it breathe. After a few days - a week it should be fixed. DO NOT TRY TO POP A STYE!!!! Styes are clogged pored that have developed an infection, if the puss from the infection gets out it can cause more styes. - If you want a better routine than just makeup wipes, here's my 3 step process (that I don't do nearly as often as I should): Simple Foaming Cleanser (now discontinued :( ) to remove your makeup -> CeraVe Hydrating Facial Cleanser ($15) to clean your face once the makeup is off -> Simple Replenishing Rich Moisturizer ($7) to keep the skin hydrated and soft. There is a bit of overlap here, and if you're on a tight budget I would just go for the CeraVe cleanser. - If you're a lazy bitch like I am, just use makeup wipes at the end of the day and keep your face wash in the shower and do that whenever you shower.
Shaving -If you want the closest possible shave or all day smoothness, you won't find a better answer than a 5 blade razor (or a straight razor but those have a steeper learning curve). DON'T DRY SHAVE WITH THIS KIND OF RAZOR!!! You've got to have something lubricating the skin or else you're going to end up with razor burn and irritated skin. Putting makeup on top of razor burn hurts and isn't good for the healing process - I don't like the time and hassle that a standard razor requires, so I shave every day with the Philips One Blade (~$40). This gives an incredibly smooth shave that lasts almost all day (at least with the rate my facial hair grows). The head replacements are a bit on the pricey side (a 3 pack is usually on sale for ~$30), but one head will last you around 3 months. The face will wear down and show an image when it's time to replace it, but I find you can typically get a good shave out of it for a while after. - They make a variant of the razor with a stronger motor that's designed for body hair, but I've have great results with the standard one. If you have thicker / coarser body hair the upgraded motor model might be the one you want to go for (it should work perfectly fine on facial hair, too). - They have also recently released special heads for "intimate" areas but that's another thing I think you can probably pass on. I just snap on the #1 guard and shave my pubic area down. It's not a perfectly smooth shave (and I don't recommend using the bare razor head on your pubic region unless you're EXTREMELY careful and/or don't mind the occasional small cut), but I find that it's more than good enough for me. That length actually bypasses the itchy phase of your pubes growing back in after a day or two (for me, at least)). And... I think that's everything! Those are all the makeup and beauty related products and processes that I can think of. Again, I'd like to reiterate that this is all stuff that has worked for me specifically, and it's information I ended up learning the hard way. I spent several months walking around with orange tinted skin so you don't have to. If you have any questions about anything please feel free to ask in the replies or you can DM me. And, if you have any extra tips that I didn't mention, or if you have tips for darker skin tones / hooded eyes / other non-white features, please add them! Our POC siblings deserve love and support too!
#LGBT#transgender#trans femme#trans feminine#makeup#make up#Lgbtq#lgbtqia#queer#trans support#trans woman#trans women#pride month#gay pride#queer pride#This turned out to be a lot longer than I expected it to#I just hope it can find its way to the people who need it
5 notes
·
View notes
Text
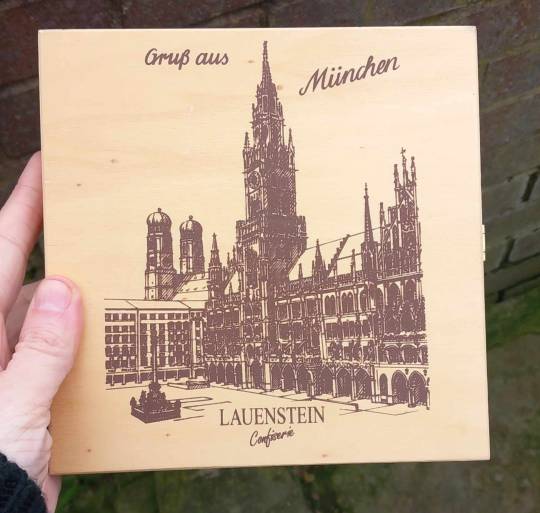
You ever get the feeling that sometimes the universe thinks the time is right for a specific project?
Earlier this week, heavily inspired both by @rattusrattus3 and their collage box youtube tutorial, and the gorgeous corvid boxes posted by @korva-the-raven, I decided to make something similar myself. THE DAY AFTER that decision was made I found this wooden chocolate box in a charity shop for £1.99. It could not be more perfect for purpose.


I had been thinking the collage part would be difficult as I "don't really keep interesting bits of paper." As it turns out, the hell I don't.
That same evening I found this stash in my old art folder. I thought all I had in there were a couple of greetings cards.

Of particular use were the William Blake and Exploring the Gothic art exhibition guides. These are both really high quality prints and contain some gorgeous artwork. Thankfully I have a paper guillotine so I could cut out the pictures really neatly.

This is what I ended up with. I could make several boxes just from these!

Korva's boxes have individual compartments made out of matchboxes which are also decorated. I don't have any matchboxes, but then I recalled that I know how to make an origami box - I had a friend in school who was Japanese and her mother taught me. So, what if I was able to find some nice paper and make small boxes to go inside? Again, the universe provided...

These are from a pad of scrapbooking paper, 24 double sided sheets, 30x30cm (12x12 inches) for £4. Very thick and high quality and excellent for making sturdy boxes that are fit for this purpose. I didn't love all of it but these designs are beautiful, and I will have more than enough for this project and tons left for the future 😁
I thought to save it looking too "busy" I would just use one plain colour and one floral. Since the internal boxes need to be quite small I thought a smaller print would work best, and paired that with a plain purple. I used the guillotine again to cut the paper into squares that were the right size (after a trial run with some cartridge paper to make sure they would fit) and...
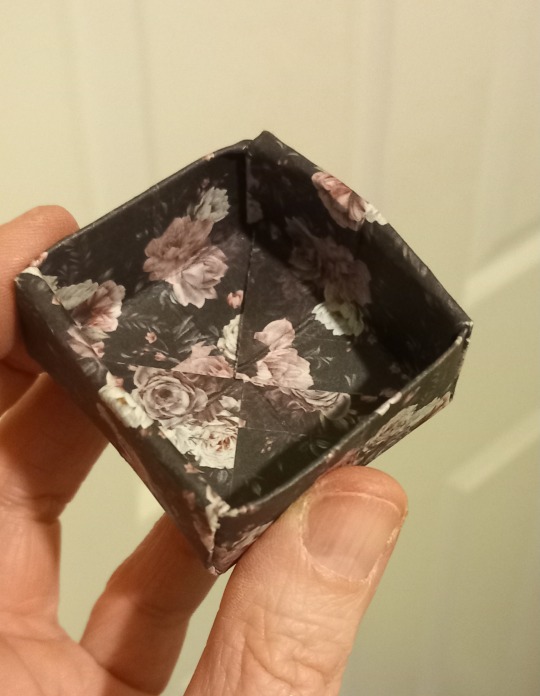

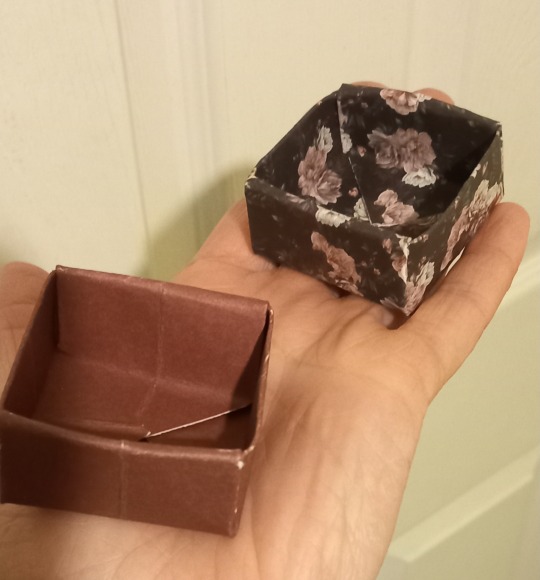

This box is super easy to do, probably why I still remember how to make it after being taught at the age of 5! Here's a tutorial.
Meanwhile the outer box got a couple of coats of black acrylic paint.
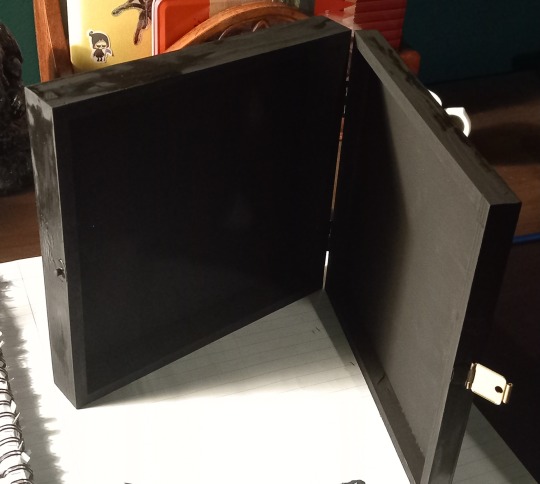
Then it was time to decide how to arrange my collage pieces. I quickly came up with this for the inside (Edgar Allan Poe themed, the large picture is an illustration to "The Raven" which is super appropriate for a corvid box, and the small one in the top right has lines from the poem "Lenore"). I'm still unsure about whether I will also do the base as its going to be covered most of the time anyway. I may just line it with more of the floral paper.

The outside was harder, but I've gone with some anatomical drawings, plus a couple of space-fillers which look pretty.

The edges are a little narrow so I'm not going to collage those for now, but I might see if any of the charms from my shiny things box would look good glued onto the sides instead.
Unfortunately I can't finish it just yet, as the only thing I haven't been able to get is modge podge - every shop I went into said "we used to have that but don't stock it anymore". So I ordered some online and I should have it within a few days.
Then all I'll need to do is decide how I want to fill it, I have lots of items to choose from 😁
Huge thanks to those who inspired this, it has been a project that I've absolutely loved, and I'm going to be on the lookout for more nice boxes so I can make another, I still have plenty of supplies!
#diy craft#collage#Collage box#goth diy#goth aesthetic#corvidcore#crowcore#crow aesthetic#gothic art#edgar allan poe#andreas vesalius#anatomical drawing#gothic#goth#crafting#crafts#craftblr#Goth crafting#paper art#paper craft#papercraft#paper collage#thrifting finds#thrift finds#thrifted#charity shop finds#charity shops#origami#arts and crafts#decoupage
7 notes
·
View notes
Text
Title: “Top-Selling Musical Instruments for Beginners: A Guide to Choosing the Right Instrument”
If you’re just starting your musical journey or helping someone get into music, choosing the right instrument is crucial. With the convenience of e-commerce, it’s easier than ever to explore a variety of musical instruments online and find one that fits your style, budget, and skill level. This guide will highlight some of the top-selling musical instruments for beginners, each offering a unique sound and learning experience.
1. Acoustic Guitar: The Go-To Instrument for Beginners
The acoustic guitar remains one of the most popular and accessible instruments for beginners. Its versatility and relatively low cost make it ideal for anyone wanting to explore genres like rock, pop, country, and folk music.
Why it’s great for beginners:
• Ease of learning: Many online tutorials and courses make learning guitar simpler.
• Versatile sound: Acoustic guitars are suitable for various music genres.
• Affordability: Many budget-friendly guitars offer excellent quality for beginners.
Popular beginner models:
• Yamaha FG800: Known for its rich sound and durability, perfect for beginners.
• Fender FA-115: A budget-friendly option with excellent tone and build quality.
• Epiphone DR-100: A reliable beginner’s guitar with a solid reputation.
Price Range: ₹5,000 – ₹15,000
Follow hkmstore.in For best price and quality instruments
2 notes
·
View notes
Text

Finding the Best E-Commerce Website Builder for Your Business
Choosing the right e-commerce website builder is crucial for creating a successful online store. With numerous options available, selecting the best platform can significantly impact your business’s growth and efficiency. Here’s a guide to help you find the best e-commerce website builder that suits your needs.
1. Ease of Use
The best e-commerce website builders should offer an intuitive interface that simplifies the process of setting up and managing your store. Look for platforms with user-friendly drag-and-drop editors and customizable templates. These features make it easier to create a professional-looking website without requiring advanced technical skills.
2. Essential Features
Evaluate the core features each builder offers. Key functionalities include product management, secure payment processing, inventory tracking, and shipping options. Advanced features such as SEO tools, marketing integrations, and analytics capabilities can further enhance your online store’s performance.
3. Design Flexibility
A visually appealing and unique online store helps attract and retain customers. Choose a builder that provides a range of customizable templates and design options. This allows you to tailor your site’s appearance to align with your brand’s identity and create a memorable shopping experience.
4. Scalability
As your business grows, your e-commerce platform should be able to scale with you. Opt for a builder that offers flexible plans and additional features to accommodate increased traffic, a larger product range, and expanded functionalities. Scalability ensures your website remains effective and efficient as your business evolves.
5. Support and Resources
Reliable customer support and comprehensive resources are essential for troubleshooting and ongoing management. Select a builder that provides responsive support through various channels, such as live chat, email, or phone. Additionally, access to tutorials, guides, and community forums can be valuable for resolving issues and learning best practices.
Top Recommendations
Shopify: Known for its ease of use and robust feature set, Shopify is ideal for businesses of all sizes. It offers a wide range of customizable templates, integrated payment options, and excellent customer support.
WooCommerce: Perfect for those familiar with WordPress, WooCommerce provides extensive customization and flexibility. It’s suitable for businesses with specific needs and technical capabilities.
BigCommerce: Renowned for its scalability, BigCommerce is a great choice for growing businesses. It offers built-in features for SEO, multi-channel selling, and advanced analytics.
Wix: Wix combines simplicity with design flexibility. Its drag-and-drop editor and diverse templates make creating a visually appealing online store easy.
Squarespace: With its elegant design templates and user-friendly interface, Squarespace is perfect for businesses seeking a stylish and functional online store with minimal effort.
READ MORE >>>>
2 notes
·
View notes
Text
Get the Right Guitar of Your Choice with Yamaha
In this blog, you will learn about the types of guitars, and with the help of the guide you can choose the right guitar for yourself based on your choice, preferences, and needs. Let us look at the types of guitars Yamaha has to offer;
Acoustic Guitar
The acoustic guitar is a popular choice for beginners due to its simplicity and portability. It produces sound through the resonance of its hollow body, without the need for amplification. Yamaha's FG800 is an excellent option for beginners in the acoustic guitar category. It offers a solid spruce top for enhanced sound projection and comfortable playability, making it a great choice for fast learning.

Electric Guitar
Electric guitars are favored by those looking to play rock, blues, jazz, or other genres that require amplified sound. They have a solid body and require an amplifier to produce sound. Yamaha's Pacifica 112V is a fantastic choice for beginners in the electric guitar realm. It provides versatility with its combination of single-coil and humbucker pickups, allowing for a wide range of tones. Its comfortable neck profile and reliable tuning stability make it a guitar that beginners can quickly learn and grow with.

Bass Guitar
Bass guitars are responsible for providing the rhythmic foundation in a band, and they are particularly suitable for those with an affinity for low-frequency sounds. The Yamaha TRBX174 is an ideal choice for beginners in the bass guitar category. It offers solid build quality, balanced tone, and comfortable playability, making it easier for beginners to grasp the fundamentals of bass playing.

Classical Guitar
Classical guitars feature nylon strings and are commonly used in classical, flamenco, and fingerstyle genres. They have a distinct sound and a wider neck, which can be beneficial for finger placement. Yamaha's C40 is a fantastic option for beginners interested in classical guitar. It offers solid construction, excellent tone, and affordability, making it a great instrument for fast and efficient learning.

The learning period required for each type of Guitar
The time required to learn the guitar varies from person to person and depends on factors such as dedication, practice routine, and prior musical experience. Generally, it takes consistent practice over several months to become proficient in playing simple songs and basic chords. As you progress, the complexity of songs and techniques will increase, requiring more time and practice to master. Becoming a truly accomplished guitarist can take years of dedication and continuous learning.
To learn the guitar efficiently, it is essential to establish a regular practice routine. Dedicate a specific amount of time each day to practice, focusing on various aspects such as chord progressions, scales, finger exercises, and playing songs. Utilize online resources, instructional books, and tutorials to guide your learning process. It can also be beneficial to seek guidance from a qualified guitar teacher who can provide personalized instruction and feedback.
While the idea of learning the guitar quickly may be appealing, it's essential to remember that the learning process is unique to each individual. Yamaha offers a range of high-quality guitars suitable for beginners in different categories. Whether you choose an acoustic, electric, bass, or classical guitar, Yamaha has options that provide excellent playability, sound, and affordability.
Visit Yamaha's official website or reach out to a local music store to find the perfect Yamaha guitar that matches your musical aspirations. Remember, no matter which guitar you choose, consistent practice, dedication, and a love for music are the keys to unlocking your potential as a guitarist. So, grab your chosen Yamaha guitar, embrace the joy of learning, and let the music begin!
#Yamaha Semi-Acoustic Guitar#Best Electric Guitar Brands#Buy Electric Guitar Online#Electric Classical Guitar#Electric Guitar Online India#Yamaha Electric Guitar Price
2 notes
·
View notes
Note
hello! i saw your ad while lurking around tumblr and just wanted to know more about your group and how it works! I’ve never written on a forum before, so I’m a little unsure of how it works
Hi! :D thank you for your interest in Runey Season!
i'd be happy to explain how forum RP works :] or at least how it works for us! Let me put this under a readmore since I'd like to make it a full walkthrough on how the forum works from start to finish with picture examples.
STEP 1: SETUP.
This involves signing up with us by reserving a character you're interested in through sending an ask to the blog here! (For existing members looking to multimuse, I also accept DMs on the forum & Discord messages from people in the Optional Server.)
Once a character is reserved, then you make an account on the forum.


That's through the "Register" button on the top bar!
This requires:
An email address
A password
A name (this will be your character's name!)
A birthday (preferably, your character's birthday so that it shows up on our event calendar!)
It also asks for a username! Plenty of members just use their character name, some (our Kyle, Arthur, Felicity, & Lynette) used their tumblr URLs, some people think something up (ex. princesspoint for Frey, clumsymaidenofmusic for Lily)... It doesn't matter what you put! The username is pretty much solely used for tagging purposes.
Once you're signed up, I'll get a notification that we have a new member pending approval! Once I see who it is, I'll approve you for posting right away; this is just in place to prevent botting, since I've seen forums with open member / posting freedom get overrun by bots. </3
STEP 2: SETUP AGAIN (ON THE FORUM THIS TIME)
Once your account is approved & you're allowed into your account, you'll have access to your profile! This is accessible from the button second to the right on the top bar.


The "Edit Profile" menu has several tab options, with the most important ones being "Avatar," "Personal," & "Privacy." (Some of the tabs shown below are likely unavailable to non-me members, as this is an admin account.)
The "Avatar" tab lets you change your profile picture! As you can see, Admin Wooly's is currently the piece I drew for the group's opening last year. For this, you can upload a picture directly to use!

The "Personal" tab includes options for changing your Display Name, Mini Icon (selectable from one of our many custom emojis), latest status, location, & signature, amongst a few others. The Signature includes a sidebar for inserting one of our many custom emojis, otherwise it uses BBCode, which we have a tutorial thread for!
The "Privacy" tab is for changing, well, privacy settings! Things like permanently setting your status to "Invisible" so that no one other than the admin account can see whenever you're online, hiding your email from everyone, etc.
Once you're done setting things up, we recommend making a post on the "OOC Chat" board to introduce yourself to everyone, but it's not required at all!
STEP 3: ACTUALLY GETTING INTO RPING
So you've set up your account, fixed up your profile, optionally introduced yourself, and you'd like to dive into things. Where do you begin?
First and foremost, forum RP is... I think I would best describe it as relatively similar to Tumblr RP, if you know anything about that. If not, it's no worries! We have plenty of members who were new to this kind of structuring. (Admin's only RP experience is Twitter and a small smidge of Discord, for example. And we have several members who've never RPed at all, let alone on a forum!) What I mean by this comparison is just that it tends to offer the same kind of customisation that Tumblr does regarding lengthy posting limits & formatting capabilities. Except we get signatures. Which is an excellent bonus.
Okay, diving in to how to navigate the forum...
When interacting with others, you're welcome to post your own threads in the Open RP board or reply to any other threads posted there using either the Create Thread button or the Quick Reply / Reply functions, depending on whether you'd like to join a thread or create a new one!

You can also post in the Plotting board if you'd like to run something by others before you post it, or if you want to reach out to plan out a closed thread with someone.

(For an example of this, here's that AMNESIA thread by Frey.)

As the pictures show with those little icons that say "New!" on them, each board will notify you if there's been any new postings in it since the last time you viewed it, in case you ever want to check anything out!
We also have the Recently Updated Threads sidebar on the home page. This applies to any threads, so it'll list ones that may not be generally accessible (ex. anything in the Questions & Suggestions board isn't available to anyone not logged in, as we have the Discord link available there, & occasionally my admin-only test threads will pop up), but it's a generally very handy resource for seeing what just got updated if you're looking for a response! Or a thread you might be interested in jumping into!

When you do want to post something, we have two options for doing so: the "Quick Reply" function for replying to existing threads, & the full Create-a-Post window, which can be used both for creating threads & for replying to existing ones.
The "Quick Reply" option is found at the bottom of an existing thread page; it types things out quickly using raw BBCode formatting view!

As shown here, there are a handful of different font face & size options, colour changes, bold, italics, underlines, strikethroughs, sub/superscript, alignment, grids, lists, link & image insertions... etc.
The :) face button is for our emojis, of which we have plenty! I update our custom emoji + sticker list often. The gradient-styled button next to it is for colour smear, which is our plugin for adding text gradients. This button does NOT work in Quick Reply, for some reason...? The little shushing icon at the end is the Spoiler button, for hiding text!
Clicking the "Reply" button on the right side of the Quick Reply bar takes you to the full Create Post window, which offers options for both raw BBCode & Preview windows.

(The Colour Smear button DOES work here.) This post window can be used to check how the BBCode formatting applied to your text will look, & is available both for replies and for creating new threads!
On that note, the "Create Thread" button that takes you to this post window is available at the far right of a board bar!


When making a new thread, we currently have two available formatting labels for the Open RP board: Forum-style & In Person. These can be added by clicking the gear on the top right of the Create Thread bar next to the "Add Attachment" button, going to Labels, & selecting one of the two!


(The scales under the "Subject" listing are actually a working button, btw! That's the title formatting button; you can change the styling & colour of your thread title using it.)
"Forum-style" is for any interactions conducted as if they're online interactions On A Forum, using the forum setting! I think the fun of these kinds of RP mediums is being able to take advantage of them and how they are in full, even if it doesn't make a lot of sense within canon, so it's an option. A good example of this would be Pia's Bathhouse Survey thread!

"In person" is for any interaction that would be conducted through face-to-face interaction. These are most commonly written out in paragraph style, but any writing formatting is accepted (para, action brackets, dialogue-based, asterisks....) & no one cares about matching length, so there are no pressures regarding writing super long or detailed replies.
We've also discussed the idea of adding a third option (Shortform), but I haven't implemented it yet because I'm still trying to explore my options for providing a shortform writing option for quicker in-person interactions first, especially for future event plans.
For the Closed RP board, as those are plotted out interactions and those tend to lean in-person, we at this time have no labels to apply there! Though thinking on it... a planned-out longterm forum-style interaction would be very funny and I would love to see it happen.
Basically: anything goes regarding writing style, & we have options for in-person interactions and interactions that make use of the forum setting!

I hope that explanation is an in-depth enough walkthrough of Runey Season & how forum RP operates for us! Please feel free to let me know if I've left anything uncovered that you're still curious about; I'd be happy to update this. And I hope it's not too long to keep up with! I like being able to provide picture examples, so they really padded things out;;;
#i hope it's alright with you that i post this publicly! i normally answer asks that involve proper full responses privately#but i figured this could be a helpful guide for anyone else potentially interested but unsure about forum RP.#inquiries#postings#IVE BEEN CHIPPING AWAY AT THIS FOR A FEW DAYS BTW SRY IT TOOK SO LONG. thank u for ur patience regarding a response.#admin has been unfortunately very busy & stressed with work but really wanted to answer this properly & in full!!!#im not apologising for the i7 plugging though. fun fact doug's va is on the song i mentioned in the quick reply pic
2 notes
·
View notes
Note
how do i get better at arting
Well, like basically every other artist will tell you, practice more!
Although, a lot of people don't really say what that means or HOW to practice, so there are a few things I can suggest regarding that.
1.) One important thing is to realize where your deficiencies are or what you're trying to improve. If it's several things, narrow them down a bit. If you don't do this, it can make things much more overwhelming and make the task seem a lot more daunting, which makes you less likely to want to do anything with it, or leave you with a feeling that you just CAN'T improve because it's too much. Start small. What do you want to improve? Anatomy? Shading? Coloring? Hair? Something else? Once you have that narrowed down, look up some tutorials on how to improve on it! You can refine the tutorial search from "How do I get better at art" to more specific terms like "how do I shade better?", which will often yield more helpful results! Most digital drawing software also has online tutorials for how to use it and its tools, so I also recommend checking those out if you're a digital artist! (Even MS Paint has tutorials online for stuff, so you don't even need anything fancy!)
2.) Use references! I promise it's not cheating; even professional artists use references! And this doesn't apply to just "oh use this image of [character] to learn how to draw them", either. Use references for things like poses, hands, and even backgrounds! Use Google (or another preferred search engine) to look up bases or even stock images to use for pose references. This site here is EXCELLENT for hand refs! I use it a lot! And if you can't find a good hand or pose reference, the thing I do then is take a picture of myself in the pose/angle I need to use as a reference instead. I definitely recommend doing that if you need better references or refs at precise angles. For backgrounds, use photos! Want to draw a waterfall? Look up images of waterfalls to use! A forest? Look up forest pics instead!
3.) Remember that it's a slow process! You probably won't see a ton of improvement overnight, but that's okay! Don't beat yourself up about it if you're not seeing much improvement at first. It can be real easy to fall into a mindset of thinking that you're a failure or that you'll never improve because of how long it can take before you start seeing noticeable results, but just remember: no artist got as good as they are overnight. It took me several years to get to where I'm at, skill-wise. Just keep working at it and remember to love yourself. :)
Those are some things that come to mind, off the top of my head, but yeah.
2 notes
·
View notes
Text
Top 10 Best Study Resources
Struggling to find the best study resources? Look no further! Whether you’re prepping for exams or just want to expand your knowledge, these top 10 study resources are here to help you succeed.

1. Khan Academy
Specialty: Offers a wide range of subjects with video tutorials. Popularity: Used by 80% of students globally. Khan Academy provides free, high-quality education on various topics from math to history.
2. Coursera
Specialty: University-led courses across diverse subjects. Popularity: Engages 75% of learners globally. Take courses from top universities and gain certifications that can boost your career.
3. Quizlet
Specialty: Digital flashcards and study games. Popularity: Utilized by 70% of students globally. Create and use flashcards, quizzes, and games to make studying fun and effective.
4. Duolingo
Specialty: Gamified language learning. Popularity: Used by 65% of language learners. Learn new languages through interactive exercises that make the process enjoyable.
5. YouTube
Specialty: Educational channels and tutorials. Popularity: 85% of internet users watch educational content on YouTube. Find tutorials, lectures, and more on almost any topic imaginable.
6. edX
Specialty: University courses from around the world. Popularity: Preferred by 60% of online learners. Access high-quality courses and even earn degrees from reputable institutions.
7. Anki
Specialty: Spaced repetition flashcards. Popularity: Favored by 55% of learners. Optimize your study sessions with flashcards designed for long-term retention.
8. Google Scholar
Specialty: Academic articles and journals. Popularity: Trusted by 75% of researchers and students. Find scholarly articles and stay updated with the latest research in your field.
9. Wolfram Alpha
Specialty: Computational knowledge engine. Popularity: Used by 50% of students and professionals. Solve complex problems and perform computations with ease.
10. Grammarly
Specialty: Writing assistant for grammar and style. Popularity: 70% of writers and professionals rely on it. Improve your writing with real-time grammar and style suggestions.
Want more details on these amazing study tools? Check out my full blog post for an in-depth look at each resource and how they can help you excel in your studies. Click here to read the full post!
Join the Conversation!
What study resources do you use? Share your thoughts and experiences in the comments below. Let's help each other achieve academic success!--> https://examtips42.wordpress.com
3 notes
·
View notes
Text
The Best Screen Recorders with Audio for Your PC
Recording your screen along with audio can be a game-changer for creating tutorials, recording gameplay, or conducting online classes. Having the right screen recorder that captures both video and audio seamlessly is essential for producing high-quality content. Let’s explore some of the best options available, highlighting ScreenRec for its efficiency and ease of use, along with other noteworthy tools.

What Makes a Great Screen Recorder with Audio?
When selecting a screen recorder with audio capabilities, consider the following:
Ease of Use: The tool should be intuitive and user-friendly.
Video and Audio Quality: High-definition video and clear audio without lag or desynchronization.
Editing Features: Tools for basic to advanced editing of your recordings.
Sharing Options: Easy and secure sharing capabilities.
Cost: Evaluate the balance between features offered and affordability.
Top Screen Recorders with Audio for PC
ScreenRec: ScreenRec stands out for its simplicity and powerful features. It allows you to capture high-quality video and audio effortlessly. One of its best features is instant sharing through a secure cloud link, which is perfect for quick communication and collaboration. ScreenRec is free, with unlimited recording time once you create a free account, making it a budget-friendly choice. Its user-friendly interface ensures that even non-tech-savvy users can start recording with ease. Additionally, ScreenRec encrypts all recordings, ensuring that your data remains secure.
OBS Studio: Open Broadcaster Software (OBS) Studio is a free and open-source screen recording tool known for its extensive features and customizability. It's particularly popular among gamers and live streamers for its ability to handle multiple sources and live stream directly to platforms like Twitch and YouTube. OBS Studio supports high-quality video and audio recording but comes with a steeper learning curve due to its vast array of features.
Camtasia: Camtasia is a premium screen recording tool that offers a comprehensive suite of editing features, such as annotations, transitions, and effects. It's perfect for creating polished, professional videos. Camtasia supports both screen and audio recording, making it a great choice for producing detailed tutorials and marketing videos. Despite its higher price tag, its advanced capabilities make it a worthwhile investment for those who need detailed editing options.
Bandicam: Bandicam is favored for its ability to record high-quality video, particularly for gameplay. It supports high FPS recording and includes features like real-time drawing and webcam overlay. Bandicam also supports audio recording, capturing both system sound and microphone input. It’s ideal for users who prioritize video quality and detailed recording options.
ShareX: ShareX is a free, open-source screen recorder that offers various capture methods, including full screen, window, and region. It also provides a range of editing and sharing tools. ShareX supports audio recording, though setting it up might require some additional steps compared to more user-friendly tools like ScreenRec. ShareX is suitable for users who appreciate customization and don’t mind a bit of a learning curve.
Why ScreenRec Stands Out
ScreenRec excels in providing a seamless recording experience with minimal setup. Its user-friendly interface ensures that even those who aren't tech-savvy can start recording with ease. The instant sharing feature, combined with secure cloud storage, ensures that your recordings are always accessible and easy to distribute. For users needing a reliable, no-cost solution that doesn’t compromise on features, ScreenRec is an excellent choice.
Final Thoughts
Choosing the right screen recorder with audio capabilities depends on your specific needs. If you’re looking for a simple, effective, and free tool, ScreenRec is highly recommended. For more advanced features and professional editing, Camtasia and Bandicam are excellent options. OBS Studio and ShareX provide powerful features for free, though they come with a learning curve. Regardless of your choice, having a reliable screen recorder will enhance your productivity and communication.
5 notes
·
View notes
Text

The Ultimate Guide to Cost-Effective Property Maintenance in Dubai
Welcome to the comprehensive guide to cost-effective property maintenance in Dubai. Whether you're a long-standing homeowner or a fresh face in our bustling city, staying on top of property upkeep is essential. In this guide, we'll explore top-tier strategies and insights tailored specifically for property maintenance in Dubai.
Understanding Needs: Before diving into maintenance strategies, assess your property's unique needs. Identify areas that require immediate attention and prioritize tasks accordingly. This proactive approach not only saves time but also prevents potential costly repairs down the line.
Choosing the Right Service Provider: When it comes to property maintenance in Dubai, partnering with the right service provider is key. Look for companies with a track record of excellence, responsive support, and competitive pricing. Customer reviews and testimonials can also offer valuable insights into their service quality.
Efficient Appliances and Fixtures: Investing in energy-efficient appliances and fixtures is a smart way to cut down on maintenance costs in Dubai. Opt for products with high energy ratings, as they not only reduce utility bills but also require less frequent repairs and replacements.
Regular Inspections and Maintenance Checks: Regular inspections and maintenance checks are the backbone of cost-effective property management in Dubai. Schedule routine visits from professionals to assess your property's condition, identify potential issues early on, and perform preventive maintenance tasks.
Budget-Friendly Tips: Not all maintenance tasks require professional assistance. Embrace budget-friendly tips to tackle minor repairs and upkeep tasks around your property. From fixing leaky faucets to repainting walls, a little DIY effort can go a long way in saving costs.
Identifying DIY-Friendly Tasks: Begin by identifying maintenance tasks that you can comfortably handle on your own. Simple tasks such as replacing light fixtures, cleaning gutters, or caulking windows are excellent starting points for DIY enthusiasts.
Maintenance Schedules: Create a maintenance schedule for tasks based on seasonal needs and the condition of your property. Regularly inspecting and maintaining areas like plumbing fixtures, HVAC systems, and outdoor spaces can prevent major issues and costly repairs.
Equipping Your Toolbox: Invest in a basic toolkit with essential tools like a hammer, screwdriver set, pliers, measuring tape, and a utility knife. Having these tools readily available can empower you to tackle various maintenance projects around your property.
Educational Resources: Leverage online tutorials, guides, and instructional videos to enhance your DIY skills. Platforms like YouTube and websites offer step-by-step guides for a wide range of home maintenance tasks, making it easier for you to execute projects efficiently.
Safety First: Prioritize safety when engaging in maintenance. Always wear appropriate safety gear such as gloves, goggles, and masks when handling tools or working on projects that involve chemicals or dust. Familiarize yourself with safety protocols to prevent accidents or injuries.
Community Support: Engage with local communities or forums to exchange tips, seek advice, and share experiences with fellow DIY enthusiasts. Networking with others who have similar interests can provide valuable insights and support for your DIY endeavors.
Mastering cost-effective property maintenance in Dubai is all about proactive planning, smart investments, and regular upkeep. By following the expert tips and tricks outlined in this guide, you can ensure that your property remains in top-notch condition without breaking the bank. Here's to hassle-free maintenance and a thriving property in the dynamic city of Dubai!
#AllCleaningServices#PlumbingSolutions#CarpentryExperts#ElectricalServices#ProfessionalPainting#RemodelingSpecialists#FlooringInstallation#FurnitureAssembly#UAEPropertyMaintenance#ReliableMaintenanceServices#CostEffectiveSolutions#SkilledTechnicians#QualityAssurance#CustomerSatisfaction#FlexibleServiceOptions#ExperiencedTeam#EfficientRepairs#PromptService
2 notes
·
View notes
Text
Defects, this is probably going to be the only time ever that I post something bummer like this, but I feel as though I can't keep it bottled up anymore. Only read if you're not easy to make sad.
I miss having a future, Defects. I really do. The moment I got seizures, my entire life flipped from almost being complete into stepping into an amazing phase of my life, having completed college and using the skills I was insanely (and rightfully) confident and sharp in. Fuck, I was amazing.
Then boom. Stress-enduced seizures. Trapped inside due to covid lockdown too. Family and College - two insane stressors, now dangerous for me. I lost so much from that.
I had to move out early and never got to finish the degree I spent *two years of my life* working toward.
Even if I pick it up now, I'm pretty sure most of my credits have expired. I'm fucked, and I owe student loans now, too, on top of barely making enough money to live, so I get to just be more terrified and hopeless every second watching the interest keep piling up. And I can't get a job that pays well because of a STUPID PIECE OF FUCKING PAPER.
I WAS EXCELLENT AND WOULD HAVE BEEN GREAT AT IT BUT NOONE GIVES A RATS ASS WITHOUT THE PAPER.
Now here I am, living on my own in IT because it was an easy fallback that was supposed to be temporary.
I don't like this, Defects.
You, Defects, as well as my loved ones online are... Well, the only things that I look forward to each day.
I keep trying to get better. To dig myself out of this pit. I started hormones finally - and I am so happy about it, so I guess I have a third thing since it's helping me feel a little more, well, girl.
But I sure as fuck don't quite resemble one beyond the cute eyeliner and hair. I wear a purse recently, which helps. But I feel like a fake.
I can't escape facial hair. No matter how much I shave, it's so fucking thick and grows so fast that even if I got it completely smooth, it'd just regrow and be visible in maybe a couple hours at most.
I want to program again, Defects. I want to make games. I want to have a future and go back to my original goals. I want to make games and make people happy.
I want some of it back. Any of it back.
It fucking hurts.
I can't even get myself to program. No matter what I do, I can't get myself to just... Do it. I will install the editor and go through all the setup and... Be overwhelmed. Overwhelmed by the new ui, by having to relearn so much. By NOT BEING ABLE TO DO THE ONE THING I SPENT MY LIFE LEARNING. It really is a use it or lose it skill I guess. And I have not been using it Defects.
It's almost like a fear of acceptance too, I think. Deep down inside, I know I still have some of it left. I bet I can relearn, even if I will fucking suck. Even if I will never get it back fully.
I want that so much. Please. I don't know how to start. I don't know what to do. I touch the editor and try to do stuff and it won't fucking compile. I can't get the header dependencies right.
I can't remember how to do anything. I got so SO fucking proud of myself for making A FUNCTION THAT CHOOSES A RANDOM NUMBER IN A RANGE AND PULLS A VALUE FROM A LIST OF STRINGS AND PRINTS IT TO HELP ME CHOOSE WHAT TO STREAM WHEN I AM UNSURE. IT TOOK ME SO LONG AND IT IS FUCKING HUMILIATING.
IT SHOULD TAKE ME LIKE 5 MINUTES MAX NOT 30. NOT AN HOUR. NOT. Fucking. Ugh.
And then I couldn't get myself to program again. I thought I broke free from it. I really did. I forced myself to do it but why do I return to being unable to do it?
Is it because I don't have an objective? A goal? I like making things for people. I want to help and make them happy.
I don't really have a use for making things for myself. Maybe that is why. Making stupid useless tutorial projects.. feels both demoralizing and useless. A waste of time, DESPITE that it will help me gain something back.
I don't know what to do.
Sorry for you having to read all that.
Maybe one day we will program again.
It's why I did the game design document with Duckolium. Maybe if I stream it, I can force myself to program. Well, more like *be* forced to.
This is my last hope.
I hope it works.
- Buffer
2 notes
·
View notes
Text
How Avatrade Can Help You Maximize Your Trading Profits
Top Benefits of AvaTrade: A Reliable Trading Platform
AvaTrade, established in 2006, has grown into a trusted online broker with a global presence. As a regulated broker, AvaTrade offers a secure and reliable trading environment, making it a preferred choice for both beginners and experienced traders. This article explores the top benefits of AvaTrade and how it can enhance your trading experience.
Top Benefits of AvaTrade
One of the top benefits of AvaTrade is its extensive range of trading instruments. Traders can access over 1,000 assets, including forex pairs, stocks, commodities, cryptocurrencies, and indices. This diverse selection allows traders to build a well-rounded portfolio and take advantage of various market opportunities. AvaTrade also provides competitive spreads starting from 0.9 pips and leverages up to 1:400, offering favorable trading conditions for all types of traders.
Another significant advantage of AvaTrade is its commitment to regulation and security. AvaTrade is regulated by multiple financial authorities worldwide, including the Central Bank of Ireland, the Australian Securities and Investments Commission (ASIC), and the Financial Services Authority (FSA) in Japan. These regulations ensure that AvaTrade adheres to strict standards of transparency and security, protecting traders' funds and personal information. Additionally, AvaTrade offers negative balance protection, preventing traders from losing more than their initial deposit, and segregates client funds to enhance security.
What Are the Top Benefits of AvaTrade?
When considering what are the top benefits of AvaTrade, it is essential to highlight its user-friendly trading platforms. AvaTrade offers a range of platforms to suit different trading styles and preferences. The MetaTrader 4 (MT4) and MetaTrader 5 (MT5) platforms are renowned for their advanced trading tools, customizable charts, and automated trading capabilities. AvaTradeGO, the mobile app, provides traders with the flexibility to trade on the go with real-time market data and intuitive interface. Furthermore, AvaTrade’s proprietary platforms, AvaTrade WebTrader and AvaOptions, offer unique features tailored to enhance the trading experience.
Another notable benefit of AvaTrade is its comprehensive educational resources. AvaTrade is dedicated to helping traders improve their skills and knowledge through a variety of educational materials, including video tutorials, eBooks, webinars, and market analysis. These resources are designed to cater to traders of all levels, from beginners looking to learn the basics to experienced traders seeking advanced strategies. AvaTrade also offers a demo account, allowing traders to practice their strategies with virtual funds before committing real money.
Enhance Your Trading Experience with AvaTrade
AvaTrade's exceptional customer support is another key benefit that enhances the trading experience. AvaTrade provides multilingual customer service 24/5 through various channels, including live chat, email, and phone. This ensures that traders can receive timely assistance and resolve any issues promptly. The broker’s dedication to customer satisfaction is evident in its high ratings and positive reviews from traders worldwide.
In summary, the top benefits of AvaTrade include its diverse range of trading instruments, strong regulatory framework, user-friendly trading platforms, comprehensive educational resources, and excellent customer support. These features make AvaTrade a reliable and attractive option for traders looking to navigate the financial markets with confidence. Whether you are a novice or an experienced trader, AvaTrade provides the tools and support needed to succeed in your trading journey.
For more information on AvaTrade and to start trading, visit the AvaTrade website
1 note
·
View note
Text
Reseller Royalty Crown Yourself with the Best in Reseller Hosting
Unveiling Excellence in Reseller Hosting Solutions
At L3WebHosting.com, we redefine the reseller hosting experience, offering unparalleled services that go beyond conventional standards. Our commitment to excellence sets us apart, allowing you to crown yourself with the best in reseller hosting. Discover why partnering with us ensures reseller royalty in the dynamic digital landscape.
Tailored Reseller Packages
L3WebHosting.com prides itself on tailoring reseller hosting packages to meet diverse needs. Our comprehensive packages empower resellers with the flexibility to customize hosting solutions for their clients. From bandwidth to storage, we provide the building blocks for resellers to create unique and scalable hosting experiences.
Cutting-Edge Technology for Optimal Performance
In the fast-paced online world, performance is non-negotiable. Our reseller hosting solutions leverage cutting-edge technology, ensuring optimal website speed and reliability. With state-of-the-art servers and advanced infrastructure, your clients' websites will thrive, enhancing user experience and satisfaction.
Unmatched Customer Support
24/7 Dedicated Support
We understand that your success is our success. That's why our dedicated support team is available 24/7 to assist you and your clients. Whether it's technical troubleshooting or general inquiries, our experts are ready to provide prompt and efficient solutions.
Comprehensive Knowledge Base
Empower yourself with our extensive knowledge base. We offer a wealth of resources, including tutorials, guides, and FAQs, equipping you with the knowledge to navigate and optimize your reseller hosting experience. Our commitment to transparency ensures you are always in control.
Robust Security Measures
Fortifying Your Digital Kingdom
Security is paramount in the online realm. At L3WebHosting.com, we prioritize the safeguarding of your digital assets. Our reseller hosting solutions come with robust security measures, including firewalls, malware detection, and regular security audits. Rest easy knowing your clients' data is shielded against cyber threats.
Seamless Integration and White Label Solutions
Your Brand, Your Identity
We understand the importance of brand identity. Our reseller hosting solutions offer seamless integration and white label options, allowing you to establish and promote your brand effortlessly. Provide hosting services under your label while we handle the technical intricacies behind the scenes.
Cost-Efficiency for Maximum Profitability
Unlocking Profit Potential
Our reseller hosting packages are not only feature-rich but also cost-efficient. Maximize your profitability with competitive pricing and flexible billing options. We believe in empowering resellers to achieve financial success while delivering top-notch hosting services.
Conclusion: Elevate Your Reseller Hosting Experience with L3WebHosting.com
In the competitive landscape of reseller hosting, L3WebHosting.com stands as a beacon of excellence. Our commitment to tailored solutions, cutting-edge technology, unmatched support, robust security, seamless integration, and cost-efficiency makes us the optimal choice for those aspiring for reseller royalty.
If you are ready to elevate your reseller hosting experience and crown yourself with success, partner with L3WebHosting.com today.
2 notes
·
View notes