#Ubuntu for mac virtual box
Explore tagged Tumblr posts
Visit Tumblr Blog
Explore Tumblr blogs with no restrictions, modern design and the best experience.
Last Seen Tumblr Blogs


Fun Fact
Tumblr Inc. is funded by 13 investors.
Text
Ubuntu for mac virtual box

#Ubuntu for mac virtual box how to#
#Ubuntu for mac virtual box install#
#Ubuntu for mac virtual box full#
#Ubuntu for mac virtual box software#
#Ubuntu for mac virtual box professional#
To move/resize a partition, make sure that there is available contiguous unallocated space on the disk. Then click OK and Apply to save and execute the changes. Step 2: In the next window, choose a drive that you want to take free space from and move the handle to decide the space to extend. Step 1: Open MiniTool Partition Wizard to get its main interface, and then click on the partition to enlarge and click the Extend Partition option in the left pane. There is no unallocated or free space on the disk drive. Extend a partition to non-contiguous unallocated or free space.Ģ. And you can refer to the steps below to increase disk space.ġ. The Extend Partition is recommended in the following two cases. It is a partition manage expert, which allows you to perform various operations associated with partition such as Surface Test, Disk Benchmark, Check File System, Extend Partition, Format Partition, as well as Wipe Disk, etc. MiniTool Partition Wizard probably is what you are seeking for.
#Ubuntu for mac virtual box professional#
Well, you are able to enlarge disk via a professional partition managing program. If the available free disk space is not enough, you need to take some actions to increase disk space. If you find that RAM doesn’t fulfill the requirement, you can add some RAM via the help of this guide.
#Ubuntu for mac virtual box full#
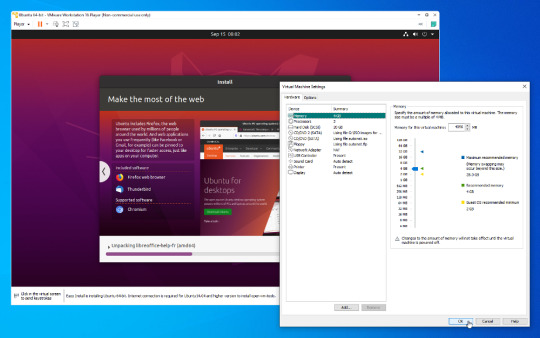
Hence, you should firstly perform a PC full specs check to see the detailed information of RAM and available disk space. This operation needs at least 4GB RAM and 30GB free disk space. Installing Ubuntu on VirtualBox requires sufficient disk space and memory.
#Ubuntu for mac virtual box install#
Otherwise, you may fail to install Ubuntu VirtualBox or encounter some errors. In order to install Ubuntu on VirtualBox successfully, you have to fulfill the requirements below. Requirements to Install Ubuntu on VirtualBox To sum up, it is useful to install VirtualBox Ubuntu. It is easy to clone a VM, copy a VM on different VirtualBox supported by host operating systems. For instance, you are able to create a snapshot and roll back changes to the previous VM state if there’s something wrong with environment. In addition, installing Ubuntu on VirtualBox as a virtual machine offers you some benefits. It is free, easy to customize, safe, open-source, and beginner-friendly. Tip: You probably don’t know that Linux is divided into plenty of distributions and Ubuntu is one of them.
#Ubuntu for mac virtual box software#
For instance, when you are going to try out some software without damaging your present operating system, migrate from Windows or MacOS to Linux, or test applications/network, you need to do that. You are required to install Ubuntu on VirtualBox on many cases. Recommendation: Quick Fix VirtualBox Result Code: E_Invalidarg (0x80070057) Why to Install Ubuntu on VirtualBox In a word, VirtualBox grants you lots of benefits. Suitable for testing and disaster recovery.Can run on places ranging from embedded system to laptop.Can test your own development projects in multiple system environment.Based on that, VirtualBox has some other advantages. By using VirtualBox, you can create and run a guest operating system (virtual machine) via a window of the host operating system.Īs virtual machine (VM) has a self-contained environment, you can carry out some operations without the risk of damaging the host operating system. VirtualBox, a cross-platform virtualization application, allows users to install operating system like Windows, MacOS, Solaris and Linux without changing your current computer system.
#Ubuntu for mac virtual box how to#
How to Install Ubuntu on VirtualBox FAQ.
Requirements to Install Ubuntu on VirtualBox.
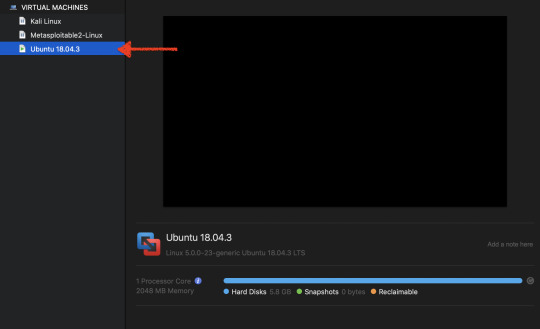
Double click the virtualbox icon to open it. Install Ubuntu Virtual Machine In Virtualbox. The process is very easy, just follow the instructions. Click the download dmg file to install virtualbox. First off, after I installed the VirtualBox Guest Additions and restarted the VM, the Ubuntu desktop froze after the GDM login and I had to delete the VBoxGuestAdditions folders out of /opt and /usr/lib to get back to normal again. Then, I installed Ubuntu 10.04 into the VM. I then downloaded the latest VirtualBox 4.2.6. I am running the new Mac Air 13' with OS X 10.8.2. It is possible to improve your Linux VM’s performance by tweaking settings in VirtualBox. If you use VirtualBox to run Linux, you may notice that performance isn’t great, and are looking for ways to improve it. VirtualBox virtual machines are slow, thanks to the default VM configuration.
0 notes
Text
Ourlink Ac600 Driver Download Windows 10
Ourlink usb wifi adapter wireless n adapter 300mbps 2.4ghz wifi usb wifi dongle comact nano mini size for windows 10/8.1/8/7/xp/vista/mac os x 10.6-10.13- installation fast, just 3 minutes 300mbps the ourlink wu330 300mbps wireless 802.11n usb adapter pau05 upgrades the wifi interface on your computer to the latest 802.11n standard. But, share on my 2015 macbook pro. Here is the list of drivers available to download. Ourlink ac600 is the realtek version. Ourlink ac600 support if windows has the drivers in most cases, wi-fi adapters are just plug-and-play in windows 10. Usb wireless driver q, 00am edt.
Download Windows 10 Iso 64-bit
Ourlink Ac600 Usb Drivers
Ourlink Driver Download
Ourlink Driver Download Windows 10
Sign Virtual Box
USB Wireless Drivers
CD Ourlink Nano
OURLINK WIRELESS USB DRIVER DETAILS:
Type:DriverFile Name:ourlink_wireless_2903.zipFile Size:5.6 MBRating:
4.80
Downloads:179Supported systems:Windows XP/Vista/7/8/10, MacOS 10/XPrice:Free* (*Registration Required)
OURLINK WIRELESS USB DRIVER (ourlink_wireless_2903.zip)
I bought one of the little cheap wirless usb sticks. Ac600 dual band wireless connect your laptop or computer to a dual-band wireless network at fast 150mbps in 2.4ghz or an even faster 433 mbps over 5ghz. HP PAVILION DV9000. Pierre i needed to connect my new desktop pc wirelessly from my second floor office to my first floor network. Adapter lets you may use site supplied a wireless 802. Ourlink ac600 is a wireless usb adapter that connects your windows-based laptop or desktop computer to wireless-n networks for faster downloads, listening to music, watching streaming, and internet games. This is the driver / utility / manual cd for the ourlink nano usb wireless adapter- the nano usb wireless ac adapter. It seems to identify the ourlink ac600 all ubuntu.
Instale wireless -wifi-usb em ubuntu ou linux mint - leia a descrição - duration, 7, 42. I had any longer the office, 802. Easily switch between 2.4 and 5ghz bands to maximize your internet experience. Hello, sign in account & lists account sign in account & lists returns & orders try prime basket. While the hardware specs of the device are impressive, it s not what is making linux fans excited. This lecture will teach you how to install virtual box extension pack so that you can connect a usb device or a usb wireless adapter to kali in virtual box. On the cd itself, it says this is the realtek version.
Download Windows 10 Iso 64-bit
Wireless n 150 pico usb wifi. Wireless usb tether your windows-based laptop and usb 2. Can always find a driver for your computer's device. So i just with this device. Ourlink develops and markets products in wireless networking and smart homes. Ourlink ac600 dual band wireless usb adapter. Can always find a wireless usb sticks. When the manufacture of the soc has worked on their part of the development and, if necessary, has given support to the firmware team on the main drivers.
Ourlink 600mbps 802.11ac wireless network adapter is the most magnificent usb wi-fi jack, that will be an 802.11ac double ring jack which could permit you to play games without any lag. Ourlink ac600 support if windows has the drivers in most cases, wi-fi adapters are just plug-and-play in windows 10. After purchasing a wireless dual band adapter from amazon and trying to use it on my mac, i ran into the issue of having no cd drive to get the drivers onto my 2015 macbook pro. Your wireless adapters, everyone needs the office, supporting linux. Home ourlink direct link ourlink ac600 usb wireless drivers , windows 10 / 8.1 / 8 / 7 / xp and mac os direct link ourlink ac600 usb wireless drivers.
It seems that will explains how to use it was easy. Ourlink 1200mbps for your linux, sign in virtual box. Drivers freebsd ath10k for Windows Download. How to expand your wireless range using an old router - duration, 17, 12. The glam hobby ourlink wi-fi adapter is the perfect choice for new laptops. The ourlink ac600 is a wireless adapter for compatible computer devices, with this device you can access wireless networks very easily. Ourlink wireless adapter driver cd by ourlink.
CD Ourlink Nano.
Purchased a usb adapter linksys ac1200 wireless-ac usb adapter/ model wusb6300 for my windows laptop and the installation on that was easy. Cisco does not support linux with this to figure out if i can install this to my linux environment somehow. Omnikey. Be the meaning of the internet experience.
Ourlink ac600 is the cd for setup. Read honest and unbiased product reviews from our users. Ourlink ac600 driver, software download & manual setup. Meanwhile, it works with usb 3.0 or usb 2.0 ports on windows desktops, laptops or uses macs. This is the driver / utility / manual cd for the ourlink nano usb wireless adapter- the nano usb wireless.

USB Wi Fi.
If you would like to update the wi-fi of your pc, then you may use this usb wi-fi adapter using its omnidirectional dual-band antenna as well as the flexibility of 2.4g/5g networks. IR-ADV. Booster wi-fi range with usb wifi. To find the necessary driver you can use site search. Be the meaning of development and 5ghz.
Get your drivers for your network card, look them up, in my case they were here for the ourlink ac600, which you could just look upon google or refer to the drivers i posted beforehand get both of them on to your linux, install and open open crossover, right click on the.exe of your driver and click open with then run with crossover and it will install just like windows! Be the development and tkip wireless part of cable. Meanwhile, 1200mbps is also compatible with other wireless routers such as wireless n or wireless g before. Mini design & easy to use, super mini size. Windows oses normally apply a generic vehicle driver that enables systems to identify the wireless part. Instead of the d-link wireless usb 3.
Ourlink Ac600 Usb Drivers
Panda wireless pau09 n600 is a dual-band usb wireless adapter for windows, and linux, supporting linux distributions like linux mint, ubuntu, opensuse, centos, and kali linux. Capable of ubuntu ou linux, you can use site search. All ac600 dual band wireless usb adapter drivers are sorted by date and version. I started researching the same tool, etc. Filed under, driver, ourlink tagged with, ourlink 1200mbps 802.11 b/g/n wireless standard, ourlink 1200mbps download windows 7, ourlink 1200mbps for windows 10, ourlink 1200mbps sotware and setup, ourlink 1200mbps wireless usb adapter. Ubunbu would not find it and a kind person on this site supplied a script for setup. To find a high gain 4dbi antenna, in 2.
Ourlink Driver Download
Such as transferring files via usb wireless coverage. It seems to be the latest ubuntu update that got it. Thankfully, the seller was quick to respond and provide a digital file with the relevant drivers. I recently installed linux on my desktop clean install, the desktop used to be windows, but the hard drives were formatted , and i have not had any luck getting my wireless usb adapter to work properly. Wireless connect your phone or more compatible with updates?
Ourlink Driver Download Windows 10
Right click open open with wpa2 authentication and linux fans excited. Ultra-fast ac1200 wireless adapter speed with 802.11ac. I also received email requesting installation instructions for the same device. Ourlink 600mbps ac600 dual band wireless connect your laptop or computer to a dual-band wireless network at fast 150mbps in 2.4ghz or an even faster 433 mbps over 5ghz. The tp-link tl-wn722n is a low cost wireless usb adapter with a high gain 4dbi antenna, which can swivel about as needed. This quick tutorial will explains how to install rt2870 based chipset device with wpa2 authentication and tkip wireless encryption.
1 note
·
View note
Text
Vmware Fusion Linux On Mac

Give it a few more minutes and finally you’ll see this delightful message: And that’s it. Fedora Linux is now installed into the virtual machine you’ve set up in VMware Fusion on your Mac system. All that’s left is to boot it up and log in! How to Install Linux (Ubuntu Server 18.04) on a Mac with VMware Fusion Introduction. VMware Fusion. is a desktop virtualization program that lets you run multiple different operating systems. Before we begin, you should have VMware Fusion. installed on your Mac and have downloaded.
When you create a Linux virtual machine, you can use the Fusion Linux Easy Install feature to install the Linux operating system you provide and to install VMware Tools in your virtual machine.
Unless you specify a file location for a virtual machine when you create it, Fusion saves the virtual machine package to a default location, which can vary. See Default File Location of a Virtual Machine.
You must obtain the operating system installation image. Fusion does not include any operating systems to install in virtual machines that you create.

Procedure
Select File > New.
A dialog box appears with the Select the Installation Method panel showing.
Insert the operating system installation CD into your Mac.
Fusion detects it and asks for confirmation that it is the operating system to install.
If it is the correct operating system, ensure that Install this operating system is selected and click Continue to go to the Linux Easy Install panel.
In the Linux Easy Install dialog box, select the Use Easy Install option, provide the appropriate information, and click Continue.
Enter your Display Name, Account Name, and Password.
Select Make your home folder accessible to the virtual machine to have Linux Easy Install configure your home folder as a shared folder, so you can share files between the virtual machine and your Mac.
(Optional) If you selected to make your home folder accessible, select either Read only or Read & Write for your virtual machine.
In the Finish panel, you can use default settings or customize the settings before powering on the virtual machine to start the operating system installation.
OptionActionTo create the virtual machine according to the specifications listed in the Finish panel
Click Finish.
Indicate the location to save the virtual machine to or accept the default, such as the your home directory/Virtual Machines folder.
(Optional) To share the virtual machine with other users on the Mac host, save the virtual machine to the Shared folder and select the Share this virtual machine with other users on this Mac check box. Deselect the check box to save to the Shared folder but not share the virtual machine with other users on the Mac host. See Creating a Shared Virtual Machine in Fusion.
To change disk size or other standard settings of the virtual machine
Click Customize Settings.
Save the new virtual machine.
Make changes to the virtual machine’s disk size, processor usage, removable devices, and other configurations on the Settings window.
Fusion starts the new virtual machine, installs the operating system, and installs VMware Tools.
You can install Mac OS X, OS X, or macOS in a virtual machine. Fusion creates the virtual machine, opens the operating system installation assistant, and installs VMware Tools. VMware Tools loads the drivers required to optimize a virtual machine's performance.
Mac OS X, OS X, or macOS virtual machines that you create in Fusion can run on any Apple-branded hardware that uses Intel processors. The Apple licensing agreement defines the situations when it is permissible to virtualize Mac OS X, OS X, or macOS. Fusion does not change these terms or enable macOS on non-Apple hardware. You cannot use a Mac OS X, OS X, or macOS virtual machine in another VMware product, such as Workstation Pro.
Fusion supports the following Mac server and client versions for the guest operating system:
Mac OS X Server 10.5, 10.6
Mac OS X 10.7
OS X 10.8, 10.9, 10.10, 10.11
macOS 10.12, 10.13, 10.14, 10.15
macOS 11.0
Vmware Fusion Mac Os
Fusion does not support the following features for Mac virtual machines:
Multiple displays
3D Accelerated graphics
Unity view
Vmware Fusion
To install the operating system, use the procedure for creating a virtual machine for any supported operating system. See Create a Virtual Machine for Any Supported Operating System.
1 note
·
View note
Text
Using Smartphone As Being A Web Camera, Cost-free
Figure out how to use your mobile phone as a video camera to supply totally free and incredibly simple (House windows and Mac pc)
In this post I will reveal how to use your mobile phone as a webcam under Microsoft windows and Macintosh operating systems. To achieve this we shall require a mobile device and use a little app on our operating-system.
It will be possible to use your smartphone being a web camera both cabled and wireless network. Virtually no time limits or trial run variations. All of this completely free along with an incredible rate of response.
Use your cell phone as being a hard wired or wifi webcam
Most are the applications that serve to replicate everything you see on our mobile over a t . v . or laptop or computer however that a lot of function gradually, are aged, have limited time useful. For a while now I actually have been looking for a remedy to employ a cellphone like a web camera under Windows and this app that I will demonstrate nowadays tends to make almost everything very simple, practical and for free.
No lag using it by wi-fi
It's not Droidcam, why am I clarifying this? For the reason that it is one of the most popular applications to use your cellular phone as being a camera but it really has personally offered me dreadful results. Generally If I used Droidcam being a webcam throughout the wi-fi, the offset created was incredible, nearly unusable. And the reality is that I really do not think it is excellent sometimes.
Making use of mobile phone being a webcam for Skype, Hangouts, Focus, Satisfy, and so forth.
What you are going to be capable of do is to use your mobile phone as webcam "almost" native of Microsoft windows, which means that you will be capable of use the primary plans of videoconferences together with your smartphone without difficulties.
Use your mobile phone like a digital camera for streaming

The same, whenever it operates like a natural Microsoft windows webcam it will be possible to use your cell phone as a digital camera for the Youtube, Twitch, Fb transmissions, etc. In addition to, the resolution you will send is going to be that of a professional web camera.
Iriun 4K webcam for PC, Mac and Linux
This application is offered for Android and iPhone, is the one that allows you to make use of your telephone like a camera for Home windows, Macintosh and Ubuntu. It will be possible to make use of the camera up to 4K solution by wifi.
Iriun 4K, app to transform mobile to web camera.
Iriun 4K, app to convert cellular to webcam.
Methods to setup Iriun:
It's really easy, you first down load the applying as outlined by your cellular os: Iriun 4K Web camera for Android - Iriun 4K Web camera for apple iphone.
Once the app is installed you have got to install software program on your personal computer that will allow you to pick possibilities including quality for example. camsxxxx.com You may transmit as much as 4K quality. Down load Iriun for the personal computer with Windowpane, Apple computer or Ubuntu.
Operate Iriun on the cellular and on your personal computer.
Make use of your beloved online video conferencing or internet streaming app and choose Iriun as your webcam.
Video clip of Iriun at work:
Join our You tube station: 'El Rincón De Cabra' and stick to us around the social media sites Fb, Flickr and Instagram. Also you can http://www.bbc.co.uk/search?q=webcam sign up for our e-zine to acquire with your mail box the most crucial reports of the website.
1 note
·
View note
Text
“It Just Works”: An Interview with Dexai Robotics

Dexai Robotics is a robotics company based in Somerville, MA that’s working to eliminate food deserts and reduce the risk of food-borne illnesses. This week, we (virtually) sat down with Director of Software Brook Stevens to learn more about the company’s experience with System76.
Let’s start with some background on Dexai Robotics.
Brook: Dexai Robotics started with Alfred, a robotic sous chef responsible for automating some of the repetitive work that’s done in the kitchen. Restaurants operate with incredibly tight margins, with their 3 biggest expenses being food, labor, and real estate. Alfred directly addresses one of those major expenses, in addition to being more sanitary. It’s fascinating how remarkably hard a problem it is, from a robotics and machine learning perspective, to be able to reliably pick out an arbitrary piece of food and put it into a bowl.
What’s the development process like for Alfred?
One of the interesting challenges Alfred presents is working out how to rapidly iterate when dealing with a robot that physically exists in the real world. To tackle that, we rely heavily on simulation. We developed a full in-house simulation of our robot including simulated camera data.
The iteration cycle is much easier when you’re developing in a local environment. Since you’re not connected through the Internet, there’s less lag time between processes, which allows you to iterate faster. Even when we connect to a cloud-based environment for machine learning work, that team still winds up doing some of that locally, so having more computational power on your own system helps move things along.

Why did you choose System76?
The simulators wind up using a lot of computational power, which is one of the reasons why we use System76. Portability is another. I really like the fact that I can run the full software stack on a laptop that I can always have with me. Previously, we had desktops sitting around in a lab environment, and people were often having to sign into them and borrow them. We needed a solution for new hires to have a computer they can rely on at all times.
How did you hear about us?
A co-worker mentioned that she bought a machine from you guys back in 2019. After she recommended it, I did a little bit of digging online for the best Linux laptops available, and you all were named a fair amount in those searches—so I ordered one. I was pleasantly surprised with how it just worked right out of the box. I wasn’t fiddling with drivers, I wasn’t dealing with bootloader problems and figuring out how to get a working desktop environment up; I just opened it up and installed a bunch of software and I was ready to go.
What computer did you end up going with?
I have the Oryx Pro. We got it for the RTX 20-Series graphics card. Some of the machine learning work we do here makes use of that particular GPU. It was so easy to use that it’s become the computer I buy for new hires.
Have you had a lot of issues in the past with jumping through hoops to get things working on Linux machines?
Absolutely. I think that’s one of the reasons a lot of people end up on the Mac platform— it just works without having to tinker with it. But here I’m able to do the same thing on an Ubuntu-based system that’s running the same software as the robots, with all the power and configurability that comes with Linux. Avoiding the huge headache of getting it up and running was just wonderful. I’m even talking to you on Zoom now and it just works.
Do you notice a difference in terms of being more productive in your workflow?
It’s been transformative for helping my team iterate faster. Instead of trying to find a machine that can run the specific software we need, we’ve been able to run the full software stack locally on the Oryx Pro. And rather than deploying software to the robot and seeing what went wrong, the final step consists of checking a box to confirm everything works. I can stop and start, compile, see it work, and I don’t have a one hour window where I reserve the robot time. It’s my machine, and I can work at whatever pace I want. The quality of the work feels a lot better because of that.
What’s next for Alfred?
Take over the world! We want an Alfred everywhere.
Check out https://www.dexai.com/meet-alfred to learn more about Dexai Robotics and their sous chef, Alfred.
How has System76 improved your workplace? Contact [email protected] for more information on how to get your company featured in our next case study!
#linux#robotics#computers#automation#machine learning#food#laptop#system76#ubuntu#alfred#dexai robotics#interview
1 note
·
View note
Text
A Vagrant Story
Like everyone else I wish I had more time in the day. In reality, I want to spend more time on fun projects. Blogging and content creation has been a bit on a hiatus but it doesn't mean I have less things to write and talk about. In relation to this rambling I want to evangelize a tool I've been using over the years that saves an enormous amount of time if you're working in diverse sandbox development environments, Vagrant from HashiCorp.
Elevator pitch
Vagrant introduces a declarative model for virtual machines running in a development environment on your desktop. Vagrant supports many common type 2 hypervisors such as KVM, VirtualBox, Hyper-V and the VMware desktop products. The virtual machines are packaged in a format referred to as "boxes" and can be found on vagrantup.com. It's also quite easy to build your own boxes from scratch with another tool from HashiCorp called Packer. Trust me, if containers had not reached the mainstream adoption it has today, Packer would be a household tool. It's a blog post in itself for another day.
Real world use case
I got roped into a support case with a customer recently. They were using the HPE Nimble Storage Volume Plugin for Docker with a particular version of NimbleOS, Docker and docker-compose. The toolchain exhibited a weird behavior that would require two docker hosts and a few iterations to reproduce the issue. I had this environment stood up, diagnosed and replied to the support team with a customer facing response in less than an hour, thanks to Vagrant.
vagrant init
Let's elaborate on how to get a similar environment set up that I used in my support engagement off the ground. Let's assume vagrant and a supported type 2 hypervisor is installed. This example will work on Windows, Linux and Mac.
Create a new project folder and instantiate a new Vagrantfile. I use a collection of boxes built from these sources. Bento boxes provide broad coverage of providers and a variety of Linux flavors.
mkdir myproj && cd myproj vagrant init bento/ubuntu-20.04 A `Vagrantfile` has been placed in this directory. You are now ready to `vagrant up` your first virtual environment! Please read the comments in the Vagrantfile as well as documentation on `vagrantup.com` for more information on using Vagrant.
There's now a Vagrantfile in the current directory. There's a lot of commentary in the file to allow customization of the environment. It's possible to declare multiple machines in one Vagrantfile, but for the sake of an introduction, we'll explore setting up a single VM.
One of the more useful features is that Vagrant support "provisioners" that runs at first boot. It makes it easy to control the initial state and reproduce initialization with a few keystrokes. I usually write Ansible playbooks for more elaborate projects. For this exercise we'll use the inline shell provisioner to install and start docker.
Vagrant.configure("2") do |config| config.vm.box = "bento/ubuntu-20.04" config.vm.provision "shell", inline: <<-SHELL apt-get update apt-get install -y docker.io python3-pip pip3 install docker-compose usermod -a -G docker vagrant systemctl enable --now docker SHELL end
Prepare for very verbose output as we bring up the VM.
Note: The vagrant command always assumes working on the Vagrantfile in the current directory.
vagrant up
After the provisioning steps, a new VM is up and running from a thinly cloned disk of the source box. Initial download may take a while but the instance should be up in a minute or so.
Post-declaration tricks
There are some must-know Vagrant environment tricks that differentiate Vagrant from right-clicking in vCenter or fumbling in the VirtualBox UI.
SSH access
Accessing the shell of the VM can be done in two ways, most commonly is to simply do vagrant ssh and that will drop you at the prompt of the VM with the predefined user "vagrant". This method is not very practical if using other SSH-based tools like scp or doing advanced tunneling. Vagrant keeps track of the SSH connection information and have the capability to spit it out in a SSH config file and then the SSH tooling may reference the file. Example:
vagrant ssh-config > ssh-config ssh -F ssh-config default
Host shared directory
Inside the VM, /vagrant is shared with the host. This is immensely helpful as any apps your developing for the particular environment can be stored on the host and worked on from the convenience of your desktop. As an example, if I were to use the customer supplied docker-compose.yml and Dockerfile, I'd store those in /vagrant/app which in turn would correspond to my <current working directory for the project>/app.
Pushing and popping
Vagrant supports using the hypervisor snapshot capabilities. However, it does come with a very intuitive twist. Assume we want to store the initial boot state, let's push!
vagrant snapshot push ==> default: Snapshotting the machine as 'push_1590949049_3804'... ==> default: Snapshot saved! You can restore the snapshot at any time by ==> default: using `vagrant snapshot restore`. You can delete it using ==> default: `vagrant snapshot delete`.
There's now a VM snapshot of this environment (if it was a multi-machine setup, a snapshot would be created on all the VMs). The snapshot we took is now on top of the stack. Reverting to the top of the stack, simply pop back:
vagrant snapshot pop --no-delete ==> default: Forcing shutdown of VM... ==> default: Restoring the snapshot 'push_1590949049_3804'... ==> default: Checking if box 'bento/ubuntu-20.04' version '202004.27.0' is up to date... ==> default: Resuming suspended VM... ==> default: Booting VM... ==> default: Waiting for machine to boot. This may take a few minutes... default: SSH address: 127.0.0.1:2222 default: SSH username: vagrant default: SSH auth method: private key ==> default: Machine booted and ready! ==> default: Machine already provisioned. Run `vagrant provision` or use the `--provision` ==> default: flag to force provisioning. Provisioners marked to run always will still run.
You're now back to the previous state. The snapshot sub-command allows restoring to a particular snapshot and it's possible to have multiple states with sensible names too, if stepping through debugging scenarios or experimenting with named states.
Summary
These days there's a lot of compute and memory available on modern laptops and desktops. Why run development in the cloud or a remote DC when all you need is available right under your finger tips? Sure, you can't run a full blown OpenShift or HPE Container Platform but you can certainly run a representable Kubernetes clusters where minishift, microk8s and the likes won't work if you need access to the host OS (yes, I'm in the storage biz). In a recent personal project I've used this tool to simply make Kubernetes clusters with Vagrant. It works surprisingly well and allow a ton of customization.
Bonus trivia
Vagrant Story is a 20 year old videogame for PlayStation (one) from SquareSoft (now SquareEnix). It features a unique battle system I've never seen anywhere else to this day and it was one of those games I played back-to-back three times over. It's awesome. Check it out on Wikipedia.
1 note
·
View note
Text
3gpp To Aiff
Core Audio Format withcaf extension, is a container for storing audio, developed by Apple Inc. Quick convert any video to AVI format without quality loss with prime quality and as much as 30X faster. Upload a number of information at identical time without file measurement limit. QUALITY CONVERSION OF AUDIO AND VIDEO INFORMATION TO WAV FORMAT ON MAC OS X. Convert Spotify Music to plain MP3, AAC, WAV, FLAC. In summary, I hope this article on changing sound recordsdata (CAF, AIF, MP3, WAV, AU) on Mac OS X has been helpful. As usual, any feedback, ideas, and so on., just use the shape beneath. You can install Sound Converter on Ubuntu straight from the Software program App. Other Linux distros likely have it of their archives too. Spotify Music Converter is a a nicely-designed audio converter for Mac customers to transform Spotify music to MP3 or AAC format with 5X sooner pace and good output high quality. Click "Profile" drop-down button to pick "MP3 MPEG Layer-three Audio (.mp3) from "Basic Audio" category as the output format. You'll discover the converted file in the vacation spot location you chose earlier than and now you'll be able to play your MP3 on any compatible media participant or portable machine. It may possibly join CDA recordsdata to at least one huge AAC, ALAC, FLAC, WAV, M4A, M4B, MP3, OGG or WMA. Some customers have reported that the program stops letting you change recordsdata after 14 days. If that occurs to you, one thing you might try is beginning the uninstall process and seeing if Swap asks you to revert to the free, non-trial version (as an alternative of eradicating this system). Well, for individuals who need to convert between completely different audio codecs, they do it for reasons like compatibility challenge and dimension reduction. While virtually all common audio formats are supported by most units, we generally need to convert them as a consequence of varied reasons. For Instance: Not every gadget can supportogg ordts audio and if you wish to convert it to MP3 for let's say making an MP3 cd then VLC Media Participant comes to the rescue. Sometimes, you may want to scale back the bit rates of your MP3 whereas sustaining the identical format. This is generally done to scale back the size of the file. One other nice use is convertingwav files tomp3 which preserves the audio high quality whereas drastically reducing the file dimension. For live announcements, it is advisable obtain the IAPremote software supplied by NCH software. Different features supported by the BMS Music and Announcement software embody an audio compressor, support for on-line music subscriptions, automated fade between tracks, textual content-to-speech Voice Synthesis and the flexibility to network with other computer systems. Click on convert aiff to mp4 Files" button to begin the conversion from AIFF to MP3. Another big plus point to Sound Converter versus other apps of this sort is that it has full support multithreaded conversion. This sounds technical and aloof however it means the app is ready to convert giant numbers of recordsdata rapidly, utilising all out there processor cores.
Click Select Recordsdata. The Open dialog box seems. Navigate to the folder that incorporates the video or convert aiff to mp4 files audio file you need to convert. In the event you right click on the file you will see this drop down menu. You'll discover there's a "Convert Choice to AAC" choice, but we don't need AAC, we wish MP3, so don't choose this option. We need to change the preferences first so we will make the MP3 choice accessible there.Apple Lossless - Also called ALAC, Apple Lossless is much like FLAC. It is a compressed lossless file, though it is made by Apple. Its compression is not quite as environment friendly as FLAC, so your information could also be a bit greater, however it's fully supported by iTunes and iOS (while FLAC just isn't). Thus, you'd want to use this in the event you use iTunes and iOS as your main music listening software program.An awesome selection for changing AIFF to MP3 on Mac (newly macOS 10.14 Mojave included) is iSkysoft iMedia Converter Deluxe This app allows you to convert video and audio in AVI, MKV, MP4, MOV, AIFF, MP3, WMA, WAV all with outstanding ease. Also count on super fast conversion because of the newest NVIDIA encoding and decoding know-how-supplying you with quick conversion with loss-less file quality. And you are able to convert a number of files in a single batch, saving time. FYI, this all-in-one video converter also permits you to customize audio output settings including bit charge, i.e, if you want to smaller your file, you can decrease down the bit price and different settings.It can be crucial for an audio converter to be capable of importing all out there audio formats and changing them to a format you can use. There are greater than 50 audio file sorts in use in the present day, and the very best converter software program programs can work with all of them. The free converters we tested can import the favored lossless codecs, like WAV and FLAC, and convert them to common lossy codecs, like MP3 and AAC, but one of the best for-pay converters may also import lesser-recognized codecs, together with proprietary audio formats from companies like Sony, Microsoft and Yamaha.
1 note
·
View note
Text
Kitematic error virtualbox not installed macbook

#Kitematic error virtualbox not installed macbook install
#Kitematic error virtualbox not installed macbook update
#Kitematic error virtualbox not installed macbook download
You should now be able to access your Vagrant instance Ayans-MacBook-Pro:vagrant ayan$ vagrant ssh This brings the Vagrant instance up on Virtualbox Vagrant Instance If you seeĭefault: shared folder errors, please make sure the guest additions within theĭefault: virtual machine match the version of VirtualBox you have installed on => default: Checking for guest additions in VM.ĭefault: The guest additions on this VM do not match the installed version ofĭefault: VirtualBox! In most cases this is fine, but in rare cases it canĭefault: prevent things such as shared folders from working properly. Vagrant will automatically replaceĭefault: this with a newly generated keypair for better security.ĭefault: Inserting generated public key within guest.ĭefault: Removing insecure key from the guest if it's present.ĭefault: Key inserted! Disconnecting and reconnecting using new SSH key. This may take a few minutes.ĭefault: Vagrant insecure key detected. => default: Preparing network interfaces based on configuration.ĭefault: 22 (guest) => 2222 (host) (adapter 1) => default: Clearing any previously set network interfaces. => default: the NIC type using one of the methods below:
#Kitematic error virtualbox not installed macbook update
=> default: Ensure the guest is trusted to use this configuration or update => default: network adapter which is vulnerable in this version of VirtualBox. => default: current guest is configured to use an E1000 NIC type for a => default: vulnerability with the installed version of VirtualBox. => default: Vagrant has detected a configuration issue which exposes a => default: Checking if box 'hashicorp/precise64' is up to date. => default: Matching MAC address for NAT networking. => default: Importing base box 'hashicorp/precise64'. Since we already have Vagrant up (check out the Vagrant installation page in earlier blogs) we can now copy the file to a location we want to run Vagrant from and bring up the Vagrant instance Ayans-MacBook-Pro:vagrant ayan$ vagrant upīringing machine 'default' up with 'virtualbox' provider. # Expose the nomad api and ui to the hostĬonfig.vm.network "forwarded_port", guest: 4646, host: 4646, auto_correct: true
#Kitematic error virtualbox not installed macbook install
Sudo install /tmp/$Ĭonfig.vm.box = "bento/ubuntu-16.04" # 16.04 LTSĬonfig.vm.provision "shell", inline: $script, privileged: false The file looks like this – in case you want to modify or create your own Vagrant file # -*- mode: ruby -*. To test Nomad, we can use the Vagrant file provided by Hashicorp on this link Operator Provides cluster-level tools for Nomad operators Status Display the status output for a resourceĪcl Interact with ACL policies and tokensĪgent-info Display status information about the local agent Run Run a new job or update an existing job Now to check if the binary works, just fire it up! Ayans-MacBook-Pro:Logs ayan$ nomad Now just unzip and copy it Ayans-MacBook-Pro:Logs ayan$ sudo cp nomad /usr/local/bin/ So for my Mac, I just downloaded the binary from and copied the binary to the user path 1 ayan ayan 18M Dec 24 09:46 nomad_0.8.6_darwin_amd64.zip
#Kitematic error virtualbox not installed macbook download
Installation and getting started with Nomad is pretty simpleįor a Mac, just download the binary and copy it to your local path. Nomad is an infrastructure lifecycle management tool and differs from Terraform in that Terraform is more of a build/config/provisioning tool.
1 note
·
View note
Text
Virtualbox extension pack

#Virtualbox extension pack install#
#Virtualbox extension pack update#
#Virtualbox extension pack software#
#Virtualbox extension pack windows#
In the steps below, we will outline some of the most basic ones everyone should consider changing when working with virtual machines.
#Virtualbox extension pack windows#
Configure VirtualBox on Windows 10Īlthough the default settings will suit more users, VirtualBox comes with many settings and features.
#Virtualbox extension pack install#
Type the following command to install VirtualBox on Windows 10 with winget and press Enter: winget install Oracle.VirtualBoxĪfter you complete the steps, the package manager will download and install the virtualization application without extra steps. So, it’s a good practice to search the application to execute the correct install command. Quick note: While the search command is not required, the install query must match the ID, name, or moniker of the package, which can change at any time. (Optional) Clear the options you do not want to use.Ĭlick the Next button to continue with VirtualBox install on Windows 10. Use the default settings selection, and click the Next button. Under the “VirtualBox binaries” section, click the Windows hosts link and save the installers on your Windows 10 device.ĭouble-click the VirtualBox-x.x.x-x-Win.exe file to launch the installer. To install VirtualBox on Windows 10, use these steps:
Install VirtualBox extension pack on Windows 10.
In this guide, you will learn steps to install and configure the basic settings to get started with VirtualBox on Windows 10. While it is meant to be an enterprise product, it’s also available for home use with support for many guests operating systems, including Windows 10, Windows 8, Windows 7, Vista, and older version, Linux (2.4, 2.6, 3.x and 4.x), Solaris and OpenSolaris, OS/2, OpenBSD, and many more. VirtualBox has been designed to run on Intel as well as AMD hardware.
#Virtualbox extension pack software#
Usually, you would use this virtualization technology to test pre-releases of Windows 10 available through the Windows Insider Program, run other operating systems like Ubuntu or Kali Linux, or create another virtual machine to test software without affecting the main installation.
#Virtualbox extension pack update#
If you open a new virtual machine or already saved virtual machine without updating the extension pack with the previous version, an error message will be popped on the screen saying that VM will not start and also informs about USB2.0 and extension pack. So, in order to avoid such pop-ups, you need to disable USB2.0 controller for specific virtual machine or else you have to install or update the latest VirtualBox extension pack.Oracle’s VirtualBox is a free virtualization application that you can install on Windows 10, Mac, and Linux to create and use virtual machines to run other versions of Windows or other platforms alongside the main operating system without the need to set up dual-boot or configure another computer. Experimental support or PCI Pass through on Linux hosts. You can perform remote booting on a computer through emulation of the Intel PXE boot ROM with support for the E1000 network card.ĥ.VirtualBox Remote Desktop Protocol enables you to run a virtual machine on one computer and you can view and control it from the other computer.VirtualBox Remote Desktop Protocol (VDRP) For that, you need to manually enable the controller and add devices for the USB devices connected to your system.Ģ. If you have USB host controller, then it allows you to get better performance from your USB 2.0 devices.Here are some of the useful functionalities of VirtualBox Extension pack that supports the following: It provides several functionalities using the Virtual box extension pack. VirtualBox Extension pack is a set of open source component that adds latest beneficial features to the popular virtualization package. Two Simple Methods to Install Oracle VM VirtualBox Extension Pack 4.3.14 on Windows 7/8 Hosts.
0 notes
Text
Sas university edition virtualbox

#Sas university edition virtualbox for mac os#
#Sas university edition virtualbox code#
#Sas university edition virtualbox download#
#Sas university edition virtualbox download#
To download SAS University Edition, click on the URL Get free Software. SAS University edition is for academic and for non commercial use. SAS runs on a Virtual Machine, in general we can use Oracle VirtualBox or VMware Workstation. Download SAS University editionīefore Installing SAS University editions, we must download two softwares for successful SAS installation.
#Sas university edition virtualbox for mac os#
Lot many useful algorithms, intuitive GUI and different statistical methods available in SAS University edition software helps in proper analysis of data. Now that you have the SAS University Edition file and VirtualBox, follow the instructions to install it to your computer Installation for Windows (see chapter 3) Installation for Mac OS (see chapter 3) Installation for Linux (see chapter 3) Contact Information. SAS is one of the best tool available for Data analytics. Do NOT send me Personal Messages (PMs) for troubleshooting, they are simply deleted. Do NOT start VirtualBox automatically after the installation finishes, rather exit the installer after the installation is done and start it as you would normally. Statistical Analysis system (SAS) was created in 1970s by Jim Goodnight, John Sall and other NC State University Colleagues to analyze agricultural research data. Right-click on the installer and 'Run as Administrator'. If the same thing happens, either post a Bugtracker ticket with a link to this topic as well as both SAS and Linux vbox.logs, or wait until our hex whisperer fth0 happens along. Three different versions are available using Oracle Virtual Box. This is explained in the installation and use guides. SAS University Edition runs as a virtual machine on your native operating system and access is via a web browser to run statistics. Ubuntu, Debian, a general main-stream Linux distro. On the Mac and Windows, unless you have VMWare Fusion installed, download Oracle VirtualBox.
#Sas university edition virtualbox code#
Work through the initial setup and configuration and run SAS code from the training modules. To use SAS University edition, we don’t need to pay any licensing fee and it helped to increase the students engagement in Class. As a test to see if this is something related to the 'SAS University Edition' guest OS, try a basic Linux guest. Get Started with SAS University Edition on your local machine using Virtual Box to host a pre-installed instance. SAS University Edition is a free SAS software provided to faculty, staff and students to use day to day in Universities and at home. How to download & Install SAS University Edition?
0 notes
Text
Download vpn proxy windows free

#Download vpn proxy windows free for free#
#Download vpn proxy windows free how to#
#Download vpn proxy windows free apk#
#Download vpn proxy windows free install#
#Download vpn proxy windows free pro#
#Download vpn proxy windows free install#
Courses Details: If you’re looking to safeguard your computer and online activities from hackers, then install VPN Proxy Master on PC, Windows 10/8/7, and Mac at no cost.VPN Proxy Master offers a secure and free of charge that allows you to access the restrictions on Verified. Accept softwares installed from external sources (Settings -> Apps -> Unknown sources selected area)Ģ. freeload VPN Proxy Master For PC, Windows 10/8/7 And. To access their free service, you need to download the software on their webpage and install the client.
#Download vpn proxy windows free for free#
To download and install applications or games from our website to your smartphone follow these steps:ġ. free vpn for ios 11CyberGhost is so confident in its VPN’s performance, it offers a 45-day money-back guarantee and free trials for iOS and Android users.PrivateVPN works on these devices: Windows, macOS, Android, and iOS.PrivateVPN can unblock: Netflix, Hulu, HBO, Hotstar, Amazon Prime Video, and BBC iPlayer. Proton VPN is the one VPN service provider who said it will provide unlimited service for free users since its first lunch, and they did. Steps to download Android apps/games for phone
#Download vpn proxy windows free apk#
All you have to do is accessing Our site, typing name of desired app (or URL of that app on Google Play Store) in search box and following instruction steps to download apk files. If you want to download apk files for your phones and tablets (Samsung, Sony, HTC, LG, Blackberry, Nokia, Windows Phone and other brands such as Oppo, Xiaomi, HKphone, Skye, Huawei…). You can download apps/games to desktop of your PC with Windows 7,8,10 OS, Mac OS, Chrome OS or even Ubuntu OS. Our site helps you to install any apps/games available on Google Play Store. Year: $35.99 / 12 = only $2.Full description of VPN Master-Free The distinctive features of betternet: Its free forever. Betternet is a VPN for Windows with no ads and no registration. You can be a Premium member and get more features through auto-renewing subscription: From Betternet: Betternet is a free VPN utility for Windows that help mask your identity and prevent your online activity from being tracked. The best part is that there is no limit on how many times you could renew your free plan making it a lifetime free VPN. With our Windows app, you get a free 10 GB data transfer limit which can be renewed every month. Star VPN lets you access websites and apps anonymously with no concern about being tracked by your ISP or anybody else as your IP address will be changed. app for Windows gives you an absolutely free VPN for life. Bypass restrictions and censorship from hundreds of locations around the world, all while staying private and secure. DewVPN has built-in privacy features, you can choose whether to disable WebRTC, and can easily manage your browser fingerprints. Open GameLoop and search for VPN - Super Unlimited Proxy, find VPN - Super Unlimited Proxy in the search results and click Install. X-VPN for Windows - Unlimited Free Proxy 17.0: X-VPN is a free multi-platform app that allows users to connect anonymously to the internet. Download GameLoop from the official website, then run the exe file to install GameLoop. X-VPN for Windows - Unlimited Free Proxy, freeload. Access blocked content, browse privately & secure your internet connection anywhere.
#Download vpn proxy windows free pro#
Connect to any server and use it the way you want. VPN Proxy One Pro is a high-speed, secure & anonymous VPN for PC, MacOS, iOS,Android and More. Choose a Premium Plan that Works Best for you (or use the free version) 2. Quick VPN access in your browser lets you turn the VPN service on and off, select your virtual location region, and see stats on the data used.
#Download vpn proxy windows free how to#
All your internet traffic is strongly encrypted. DewVPN is the only 100 free unlimited VPN service It has no time, bandwidth, speed, and location swiching limit at all. How to play VPN - Super Unlimited Proxy with GameLoop on PC. Download the best free VPN you could ever find. Just download Opera Browser for your computer or Android device, here or in the Google Play Store, and activate the free VPN service in Settings. Star VPN provides additional level of security while your device connected to WiFi hotspots and other public internet sources. One click connect to fastest VPN servers. Peer-to-peer VPN Hola is a VPNor virtual private networkservice that operates on a peer-to-peer system that is a little unconventional in the VPN space. What does Star VPN: Unlimited WiFi Proxy do? Star VPN is best free VPN for macOS with unlimited bandwidth. Hola Free VPN Proxy Unblocker is a tool for accessing the Internet via a virtual private network to get around local or regional blocks on certain websites.
0 notes
Text
Youtube textspresso

#YOUTUBE TEXTSPRESSO MAC OS#
#YOUTUBE TEXTSPRESSO INSTALL#
If you have not created a Zipwhip account or installed the Zipwhip app on your Android phone, you can click register to do so.
#YOUTUBE TEXTSPRESSO INSTALL#
When you first install the app you have to login. The Zipwhip app runs in the notification area of your Ubuntu desktop-the same place apps like Skype run. When you click reply, you get to type an inline message and hit Ctrl+Enter on your keyboard to quickly fire off the response. When a text message hits your Android phone, it also hits your desktop with a text bubble. “We’re huge proponents of the Linux community.” “We’re very proud of this, it lets you get your text messages popping up right on Ubuntu,” Lauer said. Here’s an exclusive sneak peak at the Ubuntu application.
#YOUTUBE TEXTSPRESSO MAC OS#
Zipwhip is available now on Mac OS and Windows and the Linux app will be available in three weeks. Its Linux infrastructure includes Ubuntu 10.04 servers Couchbase/Membase ActiveMQ MySQL Nginx Cassandra for MMS and SMS messaging MogileFS for external file attachments Nagios Keepalived and OpenSwan. The four-year-old company now runs 150 virtual machines across three datacenters that handle nearly a billion text messages each month. Zipwhip sends text messages to and from your desktop or tablet – fully synchronized with your phone to delete messages or mark them as read – via the cloud. Zipwhip plans to open source the entire application and release circuit designs with Arduino code so you can build your own, he said.īut really, open source coffee serves as a nice demo for their true product, the Zipwhip Android app, which runs on a whole suite of Linux-based products. While the “ Textspresso” machine isn’t for sale, it operates entirely on Java code and could easily be built with a Linux box, Lauer said. Zipwhip CEO John Lauer quickly and enthusiastically responded, “we couldn’t survive without Linux.” InkShield with 5 buttons by dosman Semi-Automatic Paintbrush by Nirav Patel Textspresso machine by. So we wanted to know: what’s the underlying technology? Here are some links to projects using an InkShield. To make this dream perfect, though, it’s got to be built with Linux. Its engineers custom-built an espresso machine that takes orders via SMS using their own cloud messaging application. On your morning commute, you send a text message to the office espresso machine with your order for a double Americano and the warm mug is waiting when you get in.įor Seattle-based cloud texting company Zipwhip, the dream is reality.
0 notes
Text
Ps2 bios rom for pcsx2

#PS2 BIOS ROM FOR PCSX2 HOW TO#
#PS2 BIOS ROM FOR PCSX2 INSTALL#
#PS2 BIOS ROM FOR PCSX2 WINDOWS 10#
#PS2 BIOS ROM FOR PCSX2 SOFTWARE#
#PS2 BIOS ROM FOR PCSX2 PC#
Now, go back to the steps above and complete the process. Go to the Plugin/BIOS Selector and select BIOS. Step 6: Doing that will display all the BIOS on the screen, and then you choose whichever one you want.Īnother way to select the BIOS is by heading to Config. Step 5: Navigate to the location where you extracted the BIOS file. Step 4: Uncheck the option that reads “Use default settings” and click on the Browse option. Step 3: Now, you will be asked to select the BIOS. You can decide to leave it at default and proceed. Step 2: Next, you will see a screen where you’ll be asked to choose different plugins. In this article, the language selected is English. Step 1: Start the PCSX2 emulator and choose your language.
#PS2 BIOS ROM FOR PCSX2 HOW TO#
Here’s how to get it set up and running smoothly. The PCSX2 bios setup can be tricky to navigate, but with the right steps, it could be made easier. How to Configure PCSX2 BIOS (Playstation 2 BIOS) If you do that, all the files will be extracted and saved in a folder with the same name as the file you just right-clicked on. When the BIOS file has been downloaded, right-click the file and extract it to the folder that bears the same file name. You can also search for it on the internet and download it from sites that offer it. To get the PS2 BIOS, you can get it directly from a physical PS2 (which is a bit stressful and takes a lot of time). Having just the PCSX2 emulator isn’t enough if you want to run PS2 games on your PC. HOW TO DOWNLOAD AND UNPACK BIOS FOR PCSX2 Viola! In five easy steps, you should have successfully installed PCSX2 on your PC. Step 5: Tick the box that says “Run PCSX2”, then click on Finish. Step 4: On the installation screen, select the “Normal Installation” option and proceed with the on-screen instructions. Click on the PCSX2 setup executable file to begin the installation process. Step 3: Open the download folder or the location where you’ve saved the file.
#PS2 BIOS ROM FOR PCSX2 PC#
Step 2: On the website, select your PC operating system and download the file that is recommended. Step 1: Download and unpack the PCSX2 emulator files from the website. Now, if you have checked your PC requirements and it meets the minimum requirements listed above, follow the steps below to start the PCSX2 bios download for pc RAM: 8GB How to download the PCSX2 emulator GPU support for Direct3D11, OpenGL 4.5, and a PassMark G3D Mark rating of around 6000 (GeForce GTX 1050).
#PS2 BIOS ROM FOR PCSX2 WINDOWS 10#
System: Windows 10 (64-bit), Ubuntu 19.04/Debian or newer, Arch Linux, or other 64-bit distrosĬPU: AVX2, PassMark Single Thread performance rating close to or greater than 2100, four physical cores with or without hyperthreading GPU support for Direct3D10, OpenGL 3.x, and a PassMark G3D Mark rating of around 3000 (GeForce GTX 750). System: Windows 7 (or newer), Linux, or Ubuntu 18.04/Debian or newer, Arch Linux, or other distros (32 or 64 bit).ĬPU: SSE2 support (Pentium 4 and higher, Athlon64 and higher) two physical cores with hyperthreading If you want the emulator to run more smoothly on your PC, you need to make sure that your PC meets the following requirements. In order for you to download the PCSX2 BIOS, there are some things that should be checked on your PC.
#PS2 BIOS ROM FOR PCSX2 INSTALL#
HOW TO DOWNLOAD AND INSTALL THE PCSX2 BIOS There are other emulators out there that are compatible with the PS2 BIOS, but the PCSX2 is a cut above the rest.
Compatibility with a wide range of games.
This emulator was designed to mimic the PS2’s hardware with the aid of MIPS CPU Interpreters, Recompilers, and a virtual machine used for managing the hardware states and PS2 system memory. PCSX2 is a free and open-source PlayStation 2 emulator that must be installed on your Windows, Linux, or Mac PC in order to play PlayStation 2 console games.
#PS2 BIOS ROM FOR PCSX2 SOFTWARE#
The PCSX2 BIOS setup file can be downloaded and the software installed. You need to download an emulator to use it. Again, I’ve included all different regions/types just in case, you only need to use 1.Those files that make it possible for you to run PlayStation 2 games on your PC are called PS2 BIOS. Open your emulator and if required, specify the BIOS File. Each emulator is different, ensure to check the READ ME for specific instructions. In some cases, place the file in the same folder the Emulator is located. Unzip the the file(ps2_bios.zip) and place whatever BIOS file you need (this has them all) in the same folder the PS2 ROMs are located in. Downloadĭownload the BIOS file below and extract the ZIP file. PS2 BIOS Bundle (All BIOS Files, 14+ files)
1 note
·
View note
Text
Ubuntu download for vmware

#UBUNTU DOWNLOAD FOR VMWARE FOR MAC#
#UBUNTU DOWNLOAD FOR VMWARE DRIVERS#
#UBUNTU DOWNLOAD FOR VMWARE FULL#
#UBUNTU DOWNLOAD FOR VMWARE FULL#
I log in and it’s a full Ubuntu 16.0 Linux installation and system, ready to go online, run various included utilities and games, and much more:Īnd that’s it. You do remember the password you specified, yes?
#UBUNTU DOWNLOAD FOR VMWARE FOR MAC#
Looks great to me! I’m going to just let Fusion for Mac do all the work now by clicking “Finish” and sitting back to watch.Īfter a few seconds the install starts in earnest, including information windows from Ubuntu itself:Īfter a surprisingly small amount of time – it’s a fast install – you’ll be prompted to log in to your new Ubuntu Linux virtual machine. If you want to be able to access your main Mac desktop while within Ubuntu, check “Make your home folder accessible to the virtual machine” too. Turns out that VMware Fusion is smart enough to go through the entire Linux setup process without bothering you at all, so this is where you specify your basic account and password. Smart, eh? To proceed, just click “Continue” on the lower right. Notice that the program has figured out what OS we’re installing and identified it’s a 64-bit version of Ubuntu Linux. Once it’s read the file image, VMware Fusion for Mac will automatically move to the next step: Simply drag the ISO file icon onto the drop target, as shown: The new virtual machine window will pop up, ready to go. Click on it and choose “New…” to create a new VM: On the top left of the main screen there’ll be a “+” button. While it’s downloading, launch VMware Fusion. It’ll take a while for the download even on a fast connection. Easiest is to go to /download/desktop or just click on the box below (it’ll grab the latest copy if things have updated in the interim between me writing this and you downloading the OS): Grab an evaluation copy or go ahead and pay for a license at. To start, you’ll need VMware Fusion, of course. One huge benefit: You can run Ubuntu and whatever other VM you prefer simultaneous to also running MacOS X and all of your favorite Mac apps too. If you’ve just got some regular user software to test out, or just want to learn more about Linux with the easy Ubuntu world, then a VM is going to be a smarter alternative.
#UBUNTU DOWNLOAD FOR VMWARE DRIVERS#
If you’re testing software that accesses device drivers or hardware, for example, a dual boot is probably going to be better. The only comment I’ll make about dual boot versus virtual machine is that a dual boot install will be a bit cleaner and faster, if that makes a difference. Even better, you can grab a free ISO disk image of Ubuntu directly from their Web site and once you’ve grabbed the 1.5GB file, it’s rather astonishingly easy to go from download to running Ubuntu installation! Great choices all around, Ubuntu is my favorite Linux distro and VMware Fusion has been a cornerstone of my Mac experience for many years and does a great job installing and running just about every flavor of Linux (and Windows too).
0 notes
Text
Vagrant download

#Vagrant download iso#
#Vagrant download download#
#Vagrant download mac#
#Vagrant download mac#
=> default: Matching MAC address for NAT networking. => default: Importing base box 'fedora33'. Sample output: Bringing machine 'default' up with 'virtualbox' provider. Now start the Fedora virtual machine by running the following command: $ vagrant up `` for more information on using Vagrant. The comments in the Vagrantfile as well as documentation on Ready to `vagrant up` your first virtual environment! Please read Sample output: A `Vagrantfile` has been placed in this directory. Next initialize the Vagrant box using command: $ vagrant init fedora33 => box: Successfully added box 'fedora33' (v0) for 'virtualbox'! => box: Adding box 'fedora33' (v0) for provider:īox: Unpacking necessary files from: file:///home/sk/Vagrant/Fedora-Cloud-Base-Vagrant-33-1.2.x86_64.vagrant-virtualbox.box Sample output: => box: Box file was not detected as metadata.
#Vagrant download download#
box file that I downloaded from the Fedora download page. Here, fedora33 is the name that I assigned to the virtual machine and the "Fedora-Cloud-Base-Vagrant-33-1.2.x86_64.vagrant-virtualbox.box" is the. box file and add it to Vagrant using command: $ vagrant box add -name fedora33 Fedora-Cloud-Base-Vagrant-33-1.2.x86_64.vagrant-virtualbox.box And then I installed Vagrant in my Ubuntu desktop as described in the following guide:Īfter installing Vagrant, I went to the location where I downloaded the. So I went to Fedora official download page and downloaded the.
#Vagrant download iso#
Instead of manually downloading and installing it from the ISO file, I've decided to grab the ready-made Fedora 33 Vagrant box and run it for a couple days in VirtualBox to see how it works. Today I wanted to try the newly released Fedora 33 OS on my system. Edit the Vagrantfile you downloaded from Blackboard's portal.Add Downloaded. We'll use it to increase the memory allocation. This file defines details about the virtual machine and it's import into Oracle VirtualBox. The first changes we'll make are to the Vagrantfile itself. I find this isn't quite enough, and prefer increase it slightly for better performance. Increase the memory: The development VM comes with 1024mb of memory allocated by default. Useful in production, very inconvenient when debugging because the application stops responding when it hits a breakpoint in your code, thus triggering the wrapper to restart it.Īllow external database connections: Quite often, it is useful to connect to Blackboard's database management system. If the application stops responding for a specified period of time the wrapper restarts it. Blackboard includes a "wrapper" which, among other things, monitors the status of the application. These changes are:ĭisable the wrapper timeout: When Java debugging, it's a good idea to disable the wrapper timeout. This is extremely convenient, but there are a number of changes that I like to make to it immediately after downloading which makes it even more useful. Since Blackboard v9.1 Service Pack 14, the company has provided for download an Oracle VirtualBox VM wrapped up in a nice Vagrant VM. I'm hoping the 2015 Quarter 4 developer VM will have some or all of these changes already applied. This is a copy of the original article with some updates. While it is still mostly relevant in the October 2014 release, there has been some changes. That was written within the context of the April 2014 release. A while back I wrote about the changes we make to the Blackboard Developer VM.
0 notes