#Vograce did a stellar job with the charms
Explore tagged Tumblr posts
Visit Tumblr Blog
Explore Tumblr blogs with no restrictions, modern design and the best experience.
Last Seen Tumblr Blogs


Fun Fact
There were a total of 171.5 billion posts on Tumblr in 2019.
Text
I’ve had a few questions regarding how I made custom shaker charms so here’s a basic guide. For starters, I used Vograce for my production. (There are a myriad of other custom product websites, but I only have experience with this one so that’ll be what I detail here.)
What I learned from my first shaker charm purchase:
Before you start drawing, make sure your canvas color profile is in CMYK. (If you don’t know how, I recommend Googling color profile settings for whichever drawing app you use.) In Procreate, once you create a canvas, you cannot alter its color profile. Guess who had to create an entirely new canvas and move over every. layer. for. every. trio. frame. layer. And then recolor everything. CMYK does not have as vibrant a range of colors as the typical color profile. Your designs may look slightly off-color.
Speaking of canvases, the recommended resolution for Vograce charms is at LEAST 1000x1000 pixels. I did 1360x1360 for all mine. Leave a decent portion of rim around the images as every piece of the shaker charm will have a 2mm border. Your design may be cut off if you do not leave sufficient room for the border. (For my 1300x1300 canvas, I added +30 pixels to each side before saving anything as PNGs just in case.)
Artworks Needed:
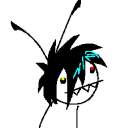
Layers/Frames: When designing shakers, you will design a front, middle, and back frame to your charm. The front layer will include a transparent section (where you see your charm inside.) The middle layer will ALWAYS have a hollow area, but does not have to be the same as layer 1. (Can have a larger/smaller hollow area depending on what you want to make.) The background can either be solid and provide an image behind where the charms shake around or have a transparent area. For Vos’ charm, the background is solid and details the cage backdrop; Romeo’s frames on the other hand, are all see-though (reflecting an actual blender.) Something to note, thick edges around hollow areas are preferred. Vograce has a short video detailing these frames. To make things as clear as possible, it’s important you add “Layer 1/2/3” to the name of the frame. (See image below)
Charm Pieces: You can have up to six charms that shake around in your keychain. These can all be different designs or the same charm duplicated multiple times. On average, the more pieces you add, the smaller they have to be to all fit and still have room to shake around.
Save each frame and charm as a separate PNG. Here’s a little peek at what made up Vos’ charm: (apologies for the messiness; it’s late here rn-)

I cannot stress enough how important a mock-up design is. These are essentially previews that show your manufacturer exactly what you want the finished product to look like. This includes a view of all the layers together, what sizes you want each charm to be, and I would recommend it be animated if possible:

Once you have your layers and charm pieces saved, it’s time to buy your shaker! In order to submit multiple images at once, you’ll want a Zip File. The way I turn my files into Zips is by saving all PNGs into a Google Drive folder (above) and then downloading the folder to my computer. (This will automatically turn it to a Zip file.) Then when you click to submit images, click the downloaded Zip File and it will link all the needed PNGs!
The minimum number of a single keychain/shaker charm order you can buy at once is 3. (You cannot just buy 1 or 2 of a design using Vograce.) If you buy more than 5 of a product at a time, Vograce will send you a proofing email you need to confirm before they start making your charms. This email is basically their way of saying “Hey, here’s what we have for your design pieces. Does everything look alright?” If yes, you can confirm the proofing and they will begin manufacturing your order. If something is wrong/ needs something tweaked, simply reply to the email with your concerns/suggestions. Some important things to keep in mind when looking at the proofing for shaker charms is the dimensions and borderlines of everything, how big the charms look in comparison to the inside of the hollow area, etc. The first time I bought stickers I forgot to check for the proofing email. DON’T FORGET TO CHECK FOR THE EMAIL. It usually comes within 2-5 days after the order.
The proofing for Vos’ keychain looked like this. It’s color-coded with the layers above for reference. ^

Things I wish I knew beforehand:
You can add an “X” on the mock-up to mark where you want the hole for the chain. Otherwise, it is assumed the chain will attach to the middle of the top.
Be sure to give your charms lots of room to shake around. I probably should have made the Sammy charms a larger area-
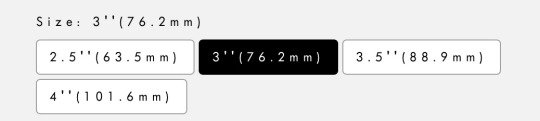
When choosing a charm’s size, the length will be the longest side. For the cage charm below, this was its height (3in tall.) For the map, this was its width (2.5in wide.) For whatever reason, I thought size always referred to height. It does not-

4. Somehow the map flipped, but idk how to explain that so I won’t. I am currently asking Vograce about it though- (it doesn’t really affect my design so I don’t mind)
There’s probably a LOT I forgot, but this is essentially everything I needed when I was designing my charms. Feel free to ask a Q if something sounds confusing- I hope this helped ^^
@woofmochi @planetsofmarz *places this in your hands*
#overall i was incredibly happy with my order#Vograce did a stellar job with the charms#i hope y’all don’t make a lot of the same mistakes i did#bermuda ramblings
12 notes
·
View notes