#WiFi Extender Setup
Explore tagged Tumblr posts
Visit Tumblr Blog
Explore Tumblr blogs with no restrictions, modern design and the best experience.
Last Seen Tumblr Blogs


Fun Fact
1,644 Tumblr posts in 1 second.
Text

Quick Guide for Joowin WiFi extender setup.
For an easy Joowin WiFi extender setup, open the web browser and type 192.168.10.1 IP address in the browser bar. Now, enter the login details and you will reach the smart home dashboard. Here, visit the Basic or Advanced settings to configure the device accordingly. To know the detailed information, get in touch with us!
0 notes
Text
Setek WiFi Extender Password Not Working
0 notes
Text
#wifi repeater setup#wifi.wavlink.com extender setup#wifi.wavlink.com repeater setup#setup tutorial#wavlink wifi repeater setup#wavlink ac600 setup#wavlink n300 wifi repeater setup#wavlink router setup#how to setup wavlink n300 wifi router#wavlink extender setup#wavlink n300 wifi range extender setup#wifi.wavlink.com#wifi.wavlink setup#wifi.wavlink.com login#wifi extender setup#wavlink setup#how to setup wifi extender#wifi range extender setup
0 notes
Text
Steps to Resolve Orange Light on WiFi Extender
When your Belkin wifi extender orange light turns on and remains constant or blinks, it typically implies that the setup was unsuccessful or that the connection was poor. Interference from other wireless signals is a common cause of the Belkin range extender blinking orange issue. Try moving the extender or altering the router's channel. A clean connection can be restored by restarting the computer or returning it to factory settings. Additionally, confirm that the extender has the most recent firmware installed. By taking these actions, the device's performance can be much enhanced, and the persistent orange signal can be removed.
#belkin setup#belkin range extender blinking orange#belkin wifi extender orange light#belkin range extender orange light#Belkin Extender Not Working
1 note
·
View note
Text
"Effortless Connectivity: Expert-Backed Guide for Seamless Netgear Plug-In WiFi Extender Setup!"
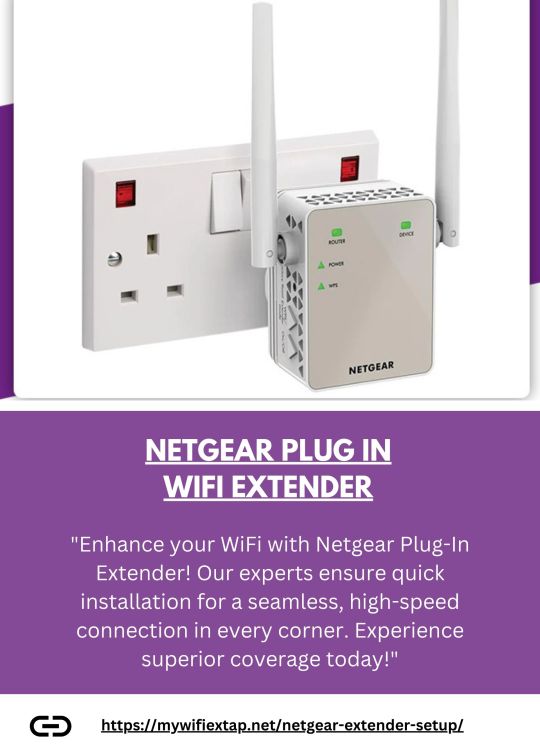
"Transform your WiFi experience effortlessly with the Netgear Plug-In WiFi Extender. Our expert-guided setup ensures seamless installation in minutes. Just plug it in, follow the intuitive steps provided by our experts, and enjoy extended WiFi coverage throughout your home. Say goodbye to dead zones and hello to a stronger, more reliable connection. Elevate your network with Netgear, where setup simplicity meets powerful performance."
2 notes
·
View notes
Text
Access Your Network Easily with Go.macard.online
Struggling to reach your extender’s settings page? Simply go to Go.macard.online in your browser after connecting to its Wi‑Fi network. This login gateway lets you configure SSID, password, and security settings quickly and easily. Perfect for expanding coverage without hassle—need more guidance regarding the same? Connect us with a single text!
0 notes
Text
Quick Tips to Access Your Repeater Settings
On a connected device, go to http tplinkrepeater net to access your extender settings. After that, access the dashboard by entering your tplinkrepeater login information. This is where you can update the firmware, control security, and set up the extended network. Check your connection or switch to a different browser if the login screen doesn't show up. For a seamless setup, always connect straight to the extender's Wi-Fi. By following these easy steps, you can make sure your device operates well and provides wider, more robust coverage throughout your area.
#tplinkrepeater#tplinkrepeater.net#Tp link repeater login#tp link setup#http //tplinkrepeater.net app#tplinkrepeater net#http tplinkrepeater net#tp link range extender setup#tp-link wifi extender setup
0 notes
Text
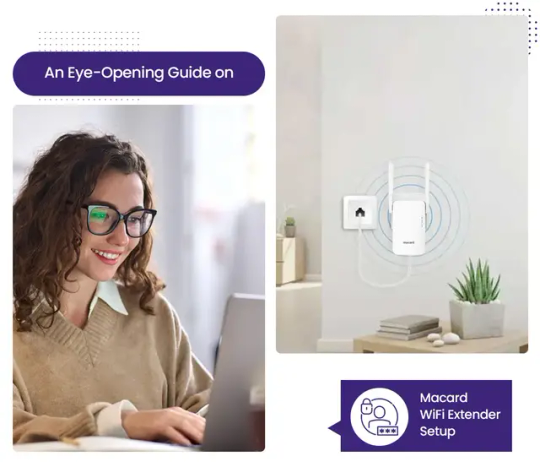
Macard WiFi Extender Setup Guide: Boost Your Signal Easily
To initiate the Macard wifi extender setup, plug the extender into an available power outlet. Connect your smartphone or computer to the extender's temporary Wi-Fi network. Open a web browser and enter go.macard.online or the default IP address. Follow the setup wizard to connect the extender to your existing home Wi-Fi. Expand your Macard Wi-Fi network.

0 notes
Text

Wavlink Range Extender Setup
The first thing you have to do is to connect the extender into the wall socket within the vicinity of the host router. So that, you can connect both extender & router without any cable in a hassle-free manner.There are two methods of setting up your Wavlink WiFi range extender: WPS method and web-based interface method. Let’s learn both the methods.
0 notes
Text
How to Set Up a D-Link WiFi Range Extender?

To begin the D-Link WiFi Range Extender Setup, plug the device into a power outlet. Use the WPS method by pressing the WPS button on your router, then on the extender. Alternatively, connect to the extender’s network, go to the setup portal, and follow the instructions to link it manually. To know alternative setup methods, connect with us!
1 note
·
View note
Text
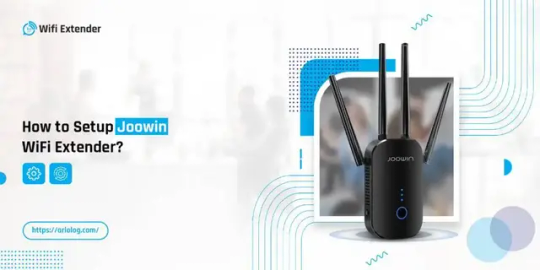
How to Setup Joowin WiFi Extender?
For the Joowin WiFi Extender Setup, log into the “192.168.10.1” IP address using the default login details. After that, visit the admin setup page, follow the on-screen instructions, and complete the setup process. If you are unable to set up your Joowin WiFi Extender, connect with our team for further guidance.
0 notes
Text
mywifiext.net login
Are you struggling to extend your Wi-Fi reach and conquer those dead zones? Well, fret no more, weary traveler! Your journey to seamless connectivity begins with mywifiext.net login. This hidden portal holds the key to unlocking the true potential of your NETGEAR WiFi extender.
But where do you even begin? Don't worry, we've got you covered. This handy guide will equip you with all the knowledge you need to navigate the mywifiext.net login process like a pro.
Step into the portal:
Open your favorite web browser on your laptop or PC. Type in the magic address: mywifiext.net or mywifiext.local. This is your gateway to the extender's inner sanctum. Press enter and brace yourself! You'll be greeted by the mywifiext.net login screen. Now comes the moment of truth:
Enter your username. This is usually the default username printed on a sticker on the extender itself. If not, it's often admin. Password, please! This is also printed on the sticker. If you changed it, enter your custom password instead.
0 notes
Text
Having Trouble Linking Zmodo Camera to Your Extender?

To Connect Zmodo Camera to WiFi Extender, ensure your extender is plugged in within your camera’s range. Next, install the Zmodo app on your smartphone, launch it and tap on ‘Add Device’, then tap on ‘WiFi’. Now, follow the on-screen instructions to finish. Need detailed instruction? Reach out to our tech team waiting to assist you!
1 note
·
View note
Text
Easy Solutions to Extend Your Home WiFi Coverage
Do you wish to eliminate all dead zones within your home network? Start the setup process now with the Belkin WiFi Extender, which is going to efficiently increase the range of your wireless network. Our detailed guide ensures you seamlessly conduct Belkin Extender Setup for a reliable and stable connection you can count on whilst working, streaming, or gaming from any corner; this is how it works: the Belkin Range Extender Setup provides enhanced signal strength and an improved Internet experience. Leave buffering behind and welcome seamless browsing - a well-configured extender allows you to do that.
#belkin.range#Belkin Range Extender Setup#Belkin WiFi Range Extender Setup#Belkin Wireless Extender Setup#Belkin Setup#http://belkin.range setup#http //belkin.range#belkin.setup
1 note
·
View note
Text
Macard WiFi Extender Setup Made Simple – No App Needed
Initiate your Macard WiFi Extender Setup to expand your home's wireless reach. Simply plug the extender into a power outlet situated between your router and the desired Wi-Fi dead zone. Connect your computer or smartphone to the extender's default network. Open a web browser and visit go.macard.online to access the intuitive setup wizard. Enhance your Wi-Fi signal.
0 notes
Text

Start with a reliable TP-Link wifi extender setup if you're having trouble with poor WiFi coverage. By extending your current signal, this procedure can assist in removing dead zones. To get quick TP Link setup instructions, plug your device close to the router and then use your browser. To connect it to your network, go to the setup page and follow the instructions. You can relocate the device to a more convenient spot after it has been configured. For best results, make sure the placement is within range of your primary signal.
#tp link setup#tplinkrepeater#Tp link repeater login#tp-link wifi extender setup#tp link wifi extender setup#tp-link extender setup through mobile
0 notes