#Wire ring connector
Explore tagged Tumblr posts
Visit Tumblr Blog
Explore Tumblr blogs with no restrictions, modern design and the best experience.
Last Seen Tumblr Blogs


Fun Fact
130K people were victims of a chain letter scam that affected Tumblr in May 2011.
Note
hiii i bought a bracelet recently as a gift but unfortunately it doesn't fit the wearer :(( do you mind sharing what gold little connector pieces you use between the beads so i can extend it myself? i saw in the previous ask you answered that you offer free size changes but unfortunately since i ordered to Canada it's a bit expensive to ship things back to the US - tysm for the help, it's very beautiful and i can't wait for my spouse to be able to wear it!! 🤍
Hello! I'm so sorry to hear that. I always try to add measurements and sizes on each of the listings, but I know sometimes it's hard to predict with gifts! :-(
Each bead is strung through a wire (usually 20-22 gauge); both ends are then looped using needle nose pliers and linked to the other beads. The little round hoops that connect the clasps to the bracelet are called 'jump rings'.
The easiest way for you to extend it would probably be to buy some cheap eye-pins, add a bead you like onto it, and add it somewhere into the bracelet. Alternatively, you could replace the clasp with a lobster clasp and chain to make it adjustable.
Best of luck and let me know if there's anything more I can do for you!
9 notes
·
View notes
Text
Made a cool embroidered pendant thing for my wretched mother
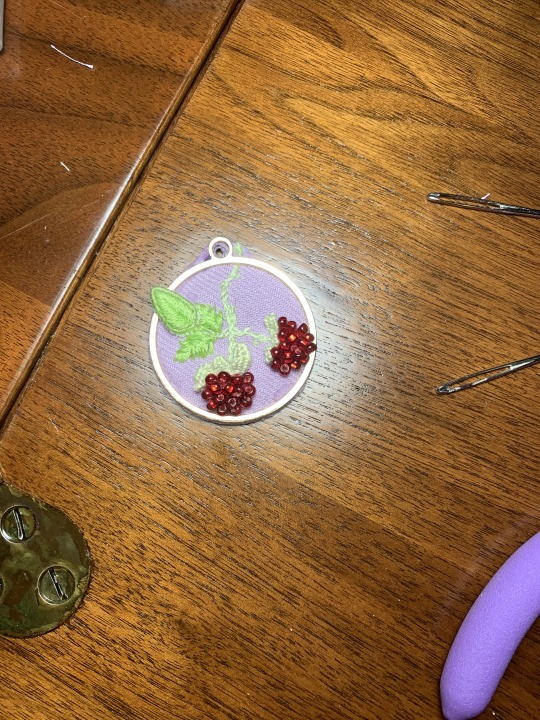
Seed beads, embroidery floss, fabric scrap and matching sewing thread, hidden stock card circle in the back, bit of wire, two connectors(? Spacers? I forgot what they’re called. Got them in the jewelry-rings and charms aisle at Michaels) and superglue
It’s about 1.5” diameter (the needles are my Big yarn/tapestry needles lol)


{Director’s Commentary under Read More}
Raspberries was chain stitch outline/fill, then just some straight stitches along the chain outline with beads added, some French knots in the middle for height, then adding beads in the middle by putting the needle through the French knots
Leaflets are woven picot. One berry I did the leaflets After stitching the berry and beads, the other I did leaflets Before berry and beads. Each has their charm, I think
(Sloppy) stem stitch for the vine. Should have done more than two strands… Smaller leaves are raised herringbone stitch. The big leaf is fishbone stitch done as wire work/stumpwork. Probably should’ve used stabilizer to help me plan the placement and spacing a little better but ¯\_(ツ)_/¯
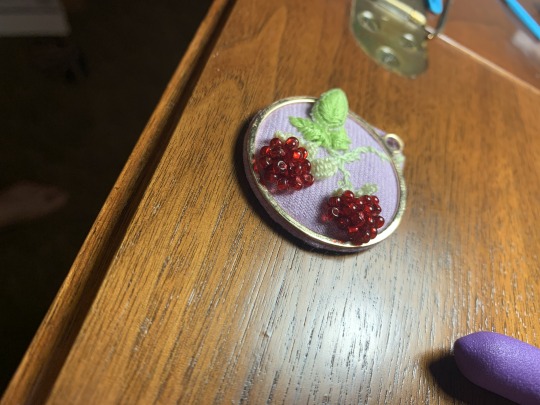
Didn’t really think far enough ahead for how to secure it to the hoop things… in my head I was going to gather the fabric behind like when you finish off in an embroidery hoop. But then I realized that wouldn’t get the popover effect I wanted. I ended up using Two hoops, one gathered in the back as planned (despite minor struggles with the “ring” on top)
I didn’t want to use hot glue bc it’d Ooze over and make gaps, so I went with superglue. I was too nervous/not thinking ahead to put the glue on the bottom and Then press the top hoop into place bc I was worried I wouldn’t get the placement right and it’d get stuck crooked. Instead I just held the pieces together and ran the glue along the outside letting it seep under the top hoop (and too far in some places, as you can see lol). I didn’t spill any superglue or get any on my fingers this time too >:3
I rreeaaaaally should’ve made the hole in the fabric for the connection ring spot Before gluing things together, bc dried-superglued-fabric doesn’t want to move much! Tried my best to buttonhole stitch it open regardless (round-needle nose pliers are great for opening up the fabric)
Also didn’t think far enough ahead on tidying up the back… I cut out a small circle of card stock or something like it that I grabbed from the recycling bag lol. I put that on the back and sewed a circle of matching fabric over it kind of like needle turn appliqué style but Hard Mode bc of some of the dried glue…
You can kinda see a bit of the pink fabric marker ink from where I marked the backing piece but ¯\_(ツ)_/¯

I like how that all made for a neat flat back side and pushed some of the excess fabric forward like padding to make the front a bit curved
#embroidery#long post#real pepper crafting hours#now I just need to remember to mail it to her fhdjfnfh
10 notes
·
View notes
Text
How do I solve the BS4 headlight problem in the Royal Enfield bullet?
Here's a comprehensive guide to solving the BS4 headlight issues in your Royal Enfield Bullet, combining technical fixes and practical solutions:
Diagnosis & Solutions Upgrade to LED/Halogen Hybrid Bulbs
The stock 35W halogen bulbs in BS4 Bullets often provide insufficient illumination. Consider:
Philips X-tremeVision 55W Halogen (direct fit, 150% brighter)
LED Conversion Kits like those from TradeChina.com with 6000K color temperature for better road coverage
Caution: Ensure LED conversions include anti-flicker resistors to prevent CAN bus errors Voltage Regulation Check
BS4 models suffer from unstable alternator output (5.5-14.5V fluctuations):
Test voltage at headlight connector using multimeter
Install voltage stabilizer (e.g., Roots VST-300) if readings exceed 14.2V
Replace corroded bullet connectors with waterproof Deutsch DT connectors Beam Alignment Adjustment
Misaligned beams cause poor illumination and glare:
Park 25ft from wall on level ground
Use 8mm hex key to adjust vertical screws on headlight nacelle
Ideal pattern: Cutoff line at 2.1" below headlight center height Housing & Reflector Maintenance
Cloudy reflectors reduce output by 40%:
Remove headlight assembly (4x 10mm bolts)
Polish reflector with 3M Headlight Restoration Kit
Apply UV-resistant clear coat to prevent yellowing Enhanced Cooling Mods
Bullet's sealed housing causes bulb overheating:
Drill 4x 5mm ventilation holes in lower housing
Install silicone-insulated wiring (reduces resistance heat)
Add heat sink kits for LED conversions
Preventive Measures Apply dielectric grease to all electrical contacts
Install TOPBIRD metal headlight ring (₹359) for vibration protection
Carry spare H4 bulbs in waterproof case under seat
Perform monthly voltage checks during chain lubrication
When to Consider Full Replacement If issues persist, upgrade to: Royal Enfield Classic 650 Twin Headlight Assembly (direct fit with modified brackets)
H4 Projector Retrofit Kit (with halo DRLs) - requires 12V relay harness
Cost breakdown: Solution Estimated Cost (₹) Labor Time LED Conversion 1,800-3,500 45 mins Voltage Stabilizer 1,200 30 mins Full Projector Retrofit 8,500 3 hrs
For persistent electrical gremlins, consult authorized service centers to check ECU lighting circuit outputs . Most BS4 headlight issues stem from voltage irregularities rather than component failures.

#led lights#car lights#led car light#youtube#led auto light#led headlights#led light#led headlight bulbs#ledlighting#young artist#car culture#cars#race cars#classic cars#car#cartoon#suv#porsche#truck#supercar#automobile#carlos sainz#headlight bulb#headlamps#build a headmate#headlamp#headlight#aftermarket new lamp#lamp#car lamp
5 notes
·
View notes
Text
Documenting my Scummy Xbox 360 Restoration
Jesus H Christ restoring this Xbox 360 was a pain in the ass. Got it off of Ebay with no guarantee of condition, I was just excited it powered on. Then the issues started rolling in...
First, the disc tray wouldn't open. I cracked the console open, cleaned a disgusting amount of tobacco and dust out of it, then greased the gears in the drive. That helped it open for a bit.
Then the console was overheating, even on the menu. So, I tore it apart again and replaced the thermal paste. That got it working, so I went to bed.
When I woke up, it was both overheating again and the disc drive was stuck. And this is where things got scummy...
So, for starters, neither of the 2 controllers that came in the bundle were working great. One wouldn't power on, the other one disconnected constantly. Stretching out the battery connectors fixed the disconnecting one, but the dead one was too coroded to make a connection. So... I tore the battery holder open, cut an old VGA cable, removed some of the grounded outer weave, and made a little rats nest of wire connecting the battery terminals. On the plus side, it totally works now! On the other side, taking the battery pack out makes it fall apart. So that's scummy fix #1.
Scummy fix #2 was in the DVD drive. The tray getting stuck is caused by the belt slipping and not overpowering the magnet on the top shell. I said to myself, "what is a drive belt if not a rubber band?" So I grabbed a tiny, bare elastic hair tie and replaced the belt with that. Drive opens great now! And if that "belt" breaks, I have 100 other hair ties to replace it with lol (I will buy a real belt if/when this fails, I promise).
So at this point everything worked, but the console was still overheating and shutting off on the menu doing nothing. I figured out that only one of the two 80mm fans were running. I took the fan out and hooked it up to a 9V battery, and both fans spun properly, so the fan header on the motherboard for one of the fans was bad. Most people fix this by splicing into the DVD drive's power, but then the fans would run at max speed all the time and I'd have to solder. So instead, I did scummy fix #3: I took some more ground shielding from the VGA cable, twisted it into two short "cables", and bridged the functional fan's power and ground pins into the nonfunctional fan's pins. After a quick test with the 9V battery again, I shoved the fan assembly back into the 360 and both fans powered on like a charm. One hour of playing Halo 3 later, and the console was still going strong!
The worst part is all of this effort I put in over the last two days ultimately means nothing. This is a Xenon 360, so it WILL red ring one day, that's completely unavoidable. But, when that time comes, buying a Jasper isn't that expensive or hard to do.
TL;DR I should not be trusted to restore consoles, but how scummy can my fixes honestly be if they totally work?
#watching bringus studios has filled me with misplaced confidence#also I used a defective stick of sodimm RAM I had lying around to spread the thermal paste#because it was handy and why not?#what is a dead stick of RAM if not a paste spreader?#one of these days I'll buy a glitch chip
4 notes
·
View notes
Photo
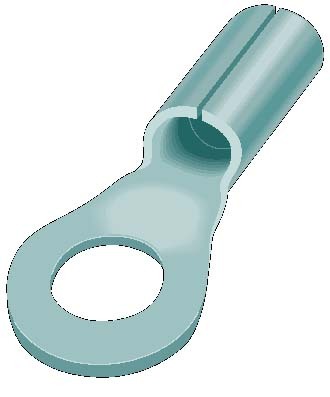
WIRECON2.BMF: A ring type wire connector. The stripped end of an insulated wire fits into the clamp, which is crimped tight around the wire. Then the O ring is fastened to a terminal connection. Anderson, I won’t go into any more details here. Have Cindy or one of your other associates locate a copy of the Anarchists Cookbook. Everything you need to know to get started is in there. - GB
3 notes
·
View notes
Text
My Headcanons on Mega Man’s Robot Masters- Part 1
Cutman:
Is an absolute pun master. To the point where some like MetalMan get annoyed by it.
He is a surprisingly good hairstylist for the others!
He sometimes mocks his enemies for the fun of it.
ElecMan:
He can shred a guitar like there’s no tomorrow.
He can use himself as a connector in case a wire’s broken.
His brothers often use him as a charger- sometimes.
IceMan:
He has his own custom sled he made himself for him and his brothers to toboggan on.
Some of his toys are penguin themed- especially the plushies!
He’s also a fan of building snowmen.
FireMan:
He has a country accent and doesn’t hesitate to raise his voice.
He can form a ring of fire against enemies like how a cowboy catches bandits with a lasso.
He can handle huge amounts of Carolina reaper chili con carne.
BombMan:
He has quite the explosive temper, but he can keep his under control.
He can easily know which bombs are the safest and most deadly.
He is resistant to explosions- any of them!!
Gutsman:
He HATES it when people talk about his butt without consent.
Most of the time, he does the heavy lifting for his siblings- Figuratively and Literally.
He also likes little animals- especially the smallest ones.
19 notes
·
View notes
Note
Can you describe your electric chair roleplay experience in detail? If you could do it again what uniform would you wear that you haven't worn yet?
I have two electric chair experiences. The first was the most intense, and I will base this answer on that experience.
I had expressed my interest in a death row scenario during role play. Because the gang at Hampton is well aware of my interest in "old school" prison (1930s to 1950s), they set up a classic roleplay based on the Nebraska execution of Charles Starkweather. I should also note that I had no idea this was going to happen.
When I arrived at Hampton, I was met at my car by several uniformed officers. They ordered me out of my car and immediately arrested me. It was unique and my first clue of what was coming because I was restrained in handcuffs, connector, and leg irons. There was an officer on either side of me and one in front. On arrival at the booking room, I was welcomed to death row. That was my second clue of what was coming.
I went through the usual intake process, stripped, searched, deloused, showered and issued a blue chambray shirt, button fly denim prison dungarees, brown prison boots and a denim yard coat. I also got standard white underwear and everything was stenciled with my prison number.
I was taken immediately to the solitary cell and locked down. There were other role players in the cellblock, and they were instructed to not talk to me at all. I was isolated throughout the incarceration. I was fed in my cell, taken to the yard alone and basically isolated for 48 hours.
On my last day, I was visited by my lawyer and a minister. I was given a short haircut (I wish now I had been shaved bald, but they knew I had a work conference coming up) and I was given a shower. They issued me a brand new blue chambray shirt and denim pants. I was given no underwear. The left leg of the pants was cut to the knee to allow for the leg electrode.
They took me back to my cell and gave me an amazing roast beef dinner. At 7pm they came for me.! All the guards were wearing ties and were very formal. They chained me hand and foot and buttoned the collar of my shirt before I was walked to the "chair".
The chair was located in the Hampton Court room. An American flag and state flag were in the corners and the chair was in the center of the room. A heavy, black cord laid from the back of the chair and out of the room. When I saw that, I started to freak out a little bit more (I will admit to being pretty damned scared all weekend).
I was placed in the chair and strapped in. Wide leather straps at my chest, biceps, wrists, waist, thighs and ankles. Mycprison boots were removed and canvas jail shoes put on my feet. A wet sponge was put on my leg above the ankle and a wire bolted to it.
Then came my head. A leather apparatus was strapped to my head. A wet sponge inside it dripped salt water down my face and I could taste it. I felt the wire for the head apparatus drag over my legs. Once the head electrode was attached, my head was strapped to the chair. I was given an opportunity to speak. I said nothing. At that point, I was blindfolded.
Unknown to me, there was a strong thunderstorm approaching Hampton and they wanted me to hear thunder cracking while blindfolded. I heard a phone ring. I was actually relieved and assumed it was " the Governor" calling. I heard yes Sir. Thank you. Then a guard came over and said I had a temporary reprieve while the Governor reviewed my case. Actually, they were waiting for exactly 8 pm (so I would hear the town clock chiming) and for the thunderstorm to hit.
I sat blindfolded for several minutes and then over the ever increasing claps of thunder, I heard the phone ring. I jumped at the sound of the phone and then excitedly waited for my assumed reprieve! The guard answered yes and I understand.
The next thing I heard was the guards boots on the floor coming toward me. He whispered in my ear that "the Governor called." Then he said, "the Governor say, Goodbye!"
Wait! What!? Fuck! Fuck! I struggled against the straps. (The reality was they were waiting for the chimes to start and on more clap of thunder) I heard the rumble of thunder and the chimes started. Cone, two, three, fuck me, four, five, ok guys enough is enough, six, seven, FUCK! eight!!!!
A felt a vibration on my head, leg and chest, a jab in my gut and a sudden flash of light in my face! ( They had put cell phones on vibrate and simultaneously touched them to my wrists, head and leg. One had grabbed me in the stomach and they had flipped up the blindfold and fired a flashlight in my face. As lame as that sounds, it worked. The adrenalin dump in my body was enormous!
Everybody stood back and asked if I was OK. I was fine. It took all of us about 30 minutes to recover and unstrap me. I spent the night in general population recalling the experience. I was exhausted.
Let me be very clear that a death row / execution scenario at Hampton is a very rare, by invitation experience. It is exhausting and emotionally draining on both the inmate and guards. It can be YEARS between death row scenarios. We are also not death row proponents. I am personally opposed to the death penalty. The experience was intense and I "enjoyed" it as a fantasy only. I am still uncertain about my feelings on roleplaying death row.
In final answer to your question, I would be interested in execution scene in authentic stripes and in Texas or Arkansas whites.

Electric chair execution

Charles Starkweather in prison denims

Arkansas death row whites

Texas death row whites

Classic prison stripes
34 notes
·
View notes
Note
“ this place isn't like it used to be. ” (perhaps in my undercover / 'dave the dayshift guard at the fnaf 2 location' era)

The dim glow of neon lights flickered against the scuffed plexiglass of the old arcade machine. Jeremy's knees press into the rough patches of neon colors, his hands curling around swirls of electric blue, scattered stars & neon geometry. A screwdriver clutched in between two rows of teeth, his hands weak from spending long, exhaustive hours tinkering with circuit boards & soldering wires. A paycheck is a paycheck, & lord knows the government never stops a-knockin. [ Not for me & not for no Lord fearin yuppie, his mother's words ring warmly in his ears. ] & Carefully, Jeremy works open the metal door, earning a groan against the hinges in response. Reaching into the cabinet, he traces a loose wire with his thumb, trailing it to a faulty connector that had partially shifted out of place. With ease, Jeremy rigs it back into place until a satisfying click rings out against its metal confines. After a final once over, he clasps his hands in relief.
The machine buzzed back to life, & Jeremy's mouth split into a proud smile. Then a voice, low & rough like gravel popping under a rubber burned tire. Jeremy jerked, his heart stuttering over a few beats. There, at the far end of the arcade room stood an man. A new-ish hire [ ? ] he thinks. Jeremy can't exactly recall. It isn't like he exactly sees the many of his coworkers around, his head mostly ducked into the nearest faulty machine the place has to offer him. Jeremy clears his throat [ . . . ]
“ right, yeah. totally. ” The amused sound that he forces from behind his teeth isn't exactly a laugh. Maybe some sort of sigh. A moment stretches on, quiet swallowing the whir & buzz of servos Jeremy shifts his weight, awkwardly. “ Sorry, there somethin' i could help ya with, Mister ? ”

#i hope this works fine and well :)!!#Writings : JEREMY F.#In Character : JEREMY F.#Answered. : MECHBITTEN.
1 note
·
View note
Text
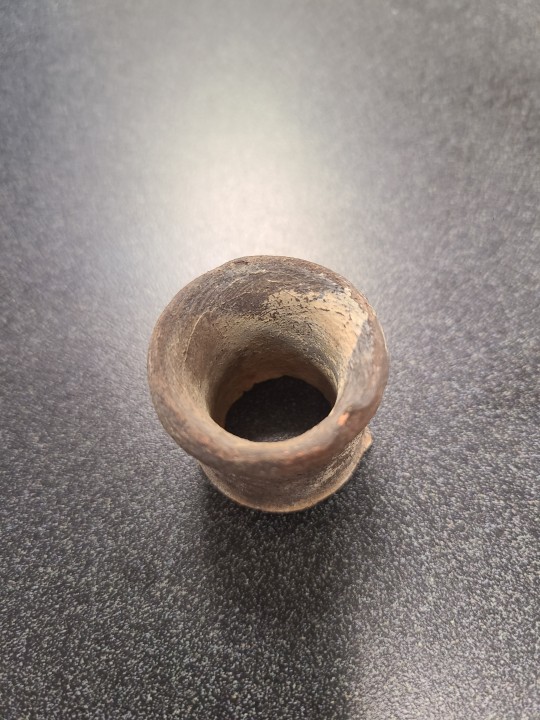
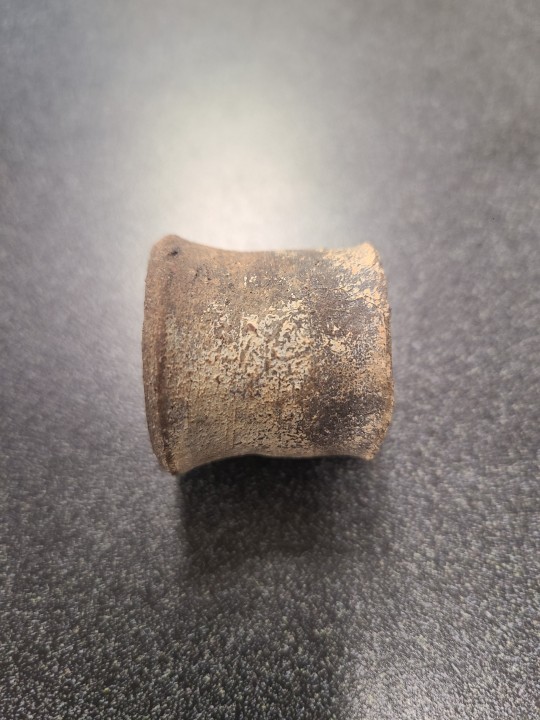
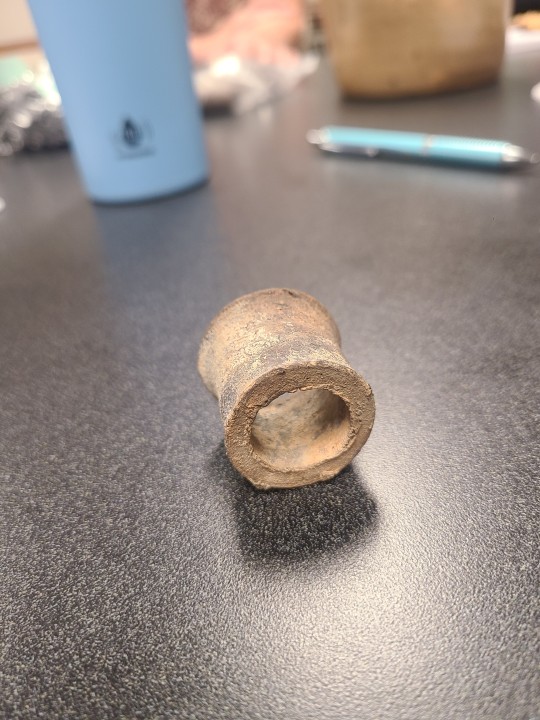
Hello archaeologists of Tumblr! I'm currently doing my first field school, and the dig we're working on is a historic stoneware pottery workshop from the 1800s in northwest Arkansas. I got permission from my site director to share and reach out about these odd little pieces we've been finding there.
They are little stoneware cylindrical rings varying about 2-3cm in size, with a finished rim on one end, while the other end is roughly but deliberately cut in some way. The way this cut is done varies by piece, from wire cutting done before firing, to saw cutting after firing, to a sort of twisting snap. We're not sure what exactly they are! It doesn't make much sense for them to be miscellaneous discard because there are DOZENS of them scattered across the site. Some are in the groundhog-style kiln we are excavating, some are scattered around the kiln and in other areas. A bunch of them were found near the firebox.
The other professionals on site are kind of stumped as to what they could be. Apparently there isn't anything like it in their background research. They've entertained a few theories, including kiln furniture (though they're too delicately made compared to the other kiln furniture we've seen), spouts meant to be put in gourds, connectors for pipes, and even little sapling pots (there was a big apple industry in the area at the time). We haven't found any in-situ to definitively tell what they are for. There's just LOTS of them lol
Any ideas would be appreciated! Might be a fun little community exercise
#archaeology#historical archaeology#archaeologist#19th century stoneware#pottery#I dunno what else to tag this tbh
14 notes
·
View notes
Text
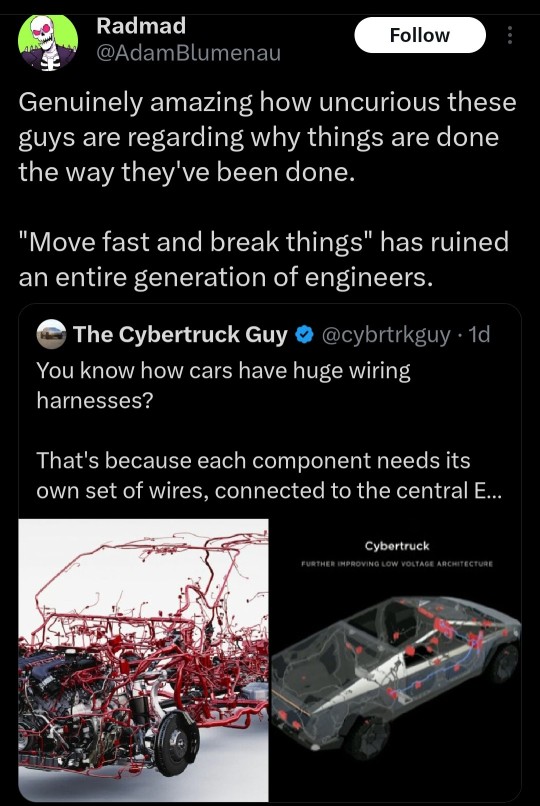
"Move Fast, Break Things" is great for use-cases where the cost of each iteration is very low, and where the consequences of Breaking Things™ in an iteration are very low; like, y'know, software projects still feeling out the problem space. 's fine there!
Not so good when an iteration takes months or years to complete, and thousands of combined hours of labour, and significant material outlay, and tooling costs, and where the consequences are shit like "raining burning and/or toxic debris on people's houses/into protected wetlands", or "losing steering/drive while travelling at speed", or...
Also, as someone who currently LARPs as a heavy-duty mechanic, seeing people considering one giant combined power & networking ring (doing everything on the vehicle) as a good thing just makes me groan.
Like, the vehicles I work with regularly have something like 4 or 5 different CANbus networks, alongside running physically switched power to stuff like the lights. Does it lead to a larger and heavier wiring loom than if everything was connected to the same 4 power and networking lines? Sure! Does it mean SHIT WILL STILL WORK when one of those networks DIES? Absolutely, yes!
Just about every vehicle I work on, over 2 or 3 years old, has a network fault somewhere of some variety; ranging from an intermitted missed message (from ... shit, I dunno, a wire wobbled somewhere or there was some electrical noise from something or whatever.) to, uh... some subsystem's electrical design team not realising that condensation is a thing that exists and thus not using a waterproof connector where the wiring comes into the top of the lane-departure warning system's camera unit, so after the truck's gone through a coupla years of British weather, the connector has filled up with water that condensed on the inside of the cab and ran down the wiring, and it's all a horrible green and crusty mess that doesn't work any more! (See: Every DAF LF with LDW/ACC in the last 6 or so years.)
But the thing is, even with the lane-departure warning system having utterly shit itself, even to the point that it's so dead that it pulls the CAN network down... that doesn't affect the brakes (other than the brake ECU can't talk to the automatic-emergency-braking system that uses the lane-departure camera, so you lose that feature), it doesn't affect the engine, it doesn't affect the lights. Because it's on a separate network.
Even when you have the utterly hilarious failure mode of a sensor unit on the engine CANbus network going stone dead and pulling the network down with it, yeah the engine will go into limp mode and you'll lose all the instruments; but your brakes still work, your power-steering still works, and you can still drive the vehicle to a point of safety. It just means that once you turn the engine off, you won't be able to start it again (until you disconnect the dead sensor, anyway.)
What happens when a component dies and pulls the network low, when everything's on the same network? Because parts are gonna fail. That's a guarantee. No matter the manufacturer, no matter who designed it, no matter how well-built it was, eventually something's gonna fail. And it's always at the worst possible time.
And, it being Tesla, you just know it's gonna be some shit like the headlight got wet so now you're stuck in the middle of the highway in a vehicle with no lights, that refuses to move.


42K notes
·
View notes
Text
Why Choose a Crimp Terminal Kit? A Complete Guide for DIYers and Professionals

Understanding Crimp Terminal Kits
A crimp terminal kit is an essential toolkit for professionals and hobbyists working with electrical systems, electronic assemblies, and hardware projects. These kits contain a variety of crimp connectors designed to ensure strong, reliable, and safe wire connections. Whether you're repairing cables in a laptop or wiring microcontrollers in a new build, a crimp terminal kit simplifies your work by providing all necessary terminals and tools in one convenient package.
What Makes a Crimp Terminal Kit So Valuable?
Crimp terminal kits are ideal for managing diverse wiring needs, offering everything from ring terminals to spade and butt connectors. These kits are especially useful in environments where durable and vibration-resistant connections are required, such as in controllers, microprocessors, and even industrial contactors. With everything organized in one kit, you reduce downtime, boost productivity, and improve safety on the job.
Key Components in a Typical Crimp Terminal Kit
A high-quality crimp terminal kit usually includes:
A range of terminals including ring, fork, spade, butt, and bullet types
Color-coded insulation for easy wire size identification
Heat-shrink or vinyl insulation for added protection
A crimping tool with interchangeable jaws or multi-functional features

Features That Make These Kits Essential
When it comes to selecting a crimp terminal kit, several standout features enhance its usability:
Pre-insulated terminals compatible with various wire gauges
Durable crimping tool designed for long-term use
Organised compartments that simplify selection and storage
Easy compatibility with standard cables, thermal wires, and LED leads
Ready-to-use design, suitable for on-site repairs and installations
Advantages of Using a Crimp Terminal Kit
Switching from soldering to crimping offers multiple benefits. Here’s why crimp terminal kits are a smart investment:
Speeds up wiring tasks by eliminating the need for heat or solder
Reduces the risk of overheating delicate sensors or capacitors
Provides a consistent connection quality for repeat jobs
Ensures safer terminations by reducing loose wire hazards
Enhances professionalism in electronics and automotive projects
Where Can You Use Crimp Terminal Kits?
Crimp terminal kits have versatile applications across various domains. Here are some key areas where they prove invaluable:
Electronics: Ideal for connecting LEDs, capacitors, microcontrollers, and sensors in circuit boards
Automotive repairs: Reliable connections for lights, switches, and fuses
Home improvement: Installing lighting fixtures, sockets, and safety alarms
Industrial equipment: Wiring machines, contactors, and control systems
Laptop repair: Rewiring broken cables, fan connections, and power jacks
DIY projects: Creating custom electronics, robotics, or smart home setups
Tips for Using Crimp Terminals Properly
To ensure optimal performance and long-term reliability of your crimped connections:
Strip the correct amount of insulation from the wire
Match the wire gauge to the correct terminal size
Use the appropriate crimping tool for the terminal type
Test the strength of the connection before installation
Add thermal pads or protective sleeves when working in high-heat zones

Crimping vs. Soldering: Which Is Better?
Although soldering has its place in electronics, crimping offers faster, cleaner, and more vibration-resistant connections. Crimp terminals are easier to handle, especially when you're working in tight spaces like electrical panels, under dashboards, or inside laptop housings. Moreover, crimped joints are widely accepted in professional industries because of their consistent quality and reduced need for post-installation inspection.
Choosing the Right Kit for Your Needs
When selecting a crimp terminal kit, it's essential to consider the following:
Connector variety: Does the kit include connectors for your specific projects involving controllers or sensors?
Wire range compatibility: Can it handle standard sizes used in electronics and thermal setups?
Tool durability: Is the crimping tool ergonomic and suited for repeated use with cables and grips?
Kit size: Does it include enough pieces for large projects without constant repurchasing?
Final Thoughts: Why Every Workshop Needs a Crimp Terminal Kit
In summary, a crimp terminal kit is a smart, convenient, and safety-driven investment for anyone working with electronics, wiring, or repairs. It enhances workflow, provides secure and long-lasting connections, and supports a broad range of applications, whether you're fixing microcontrollers, setting up switches, or managing sensors in an industrial setting. With benefits that span across tools, cables, oils, connectors, and more, there's no reason to delay adding one to your workspace.
0 notes
Text
Price: [price_with_discount] (as of [price_update_date] - Details) [ad_1] Mevigo DIY Shoe Rack Shelves Plastic Portable and Folding double Dekar Shoe RackIntroduction: A stylish design shoe rack adds a touch of style to entryway or bedroom. It is great and practical in use for home and office. We strongly recommend this Portable shoe Rack which is perfect for organizing shoes, Classic designed, highly functional and collapsible for easy transportation. Really an ideal way to organize your shoes and more. shoe rack for home, shoe rack, shoe rack for home plastic, plastic shoe rack, shoe rack with door, shoe cabinet, plastic shoe rack for home, plastic shelf rack, shoe racks, shoe rack for home with cover, wooden shoe rack for home, shoes rack for home, shoe stand for home, shoe cabinet for home, shoe organiser, shoe box, shoe boxes storage, shoes rack, shoe rack for home metal, shoe stand, shoe organiser space saver, chappal stand for home, branded shoe rack, This plastic modular shelving shoe storage cabinet is an economic but elegant piece for daily use, top rectangular blocks stores your sneakers, high heels and sandals, bottom storage cubes store your boots. Better yet, you can also use it as a storage cabinet to keep your folding clothes, books, CDS and art supplies. Consists of durable ABS connector and high-quality PP panel, this shoe rack features in eco-friendly material, excellent stability and easy maintenance. A lightweight design is convenient for transportation. A practical and attractive shoe rack for the entrance, hallway or small rooms! Features:Provide ample storage for shoes, umbrellas, and accessories. Stylish for your entryway or bedroom and goes well with any piece of your furniture. waterproof, rustproof and easy to clean. Specifications:- Color: Multi - Material: ABS connectors, Soft PP Plastic Panel and Rust-proof Metal Frame - Assembly Required: Yes 【Storage Aplenty】This versatile plastic shoe rack organizer, able to accommodate up to 30 pairs of shoes, doubles as storage for bags and toys. Its space-saving side hooks offer a handy spot to hang hats or keys 【Robust and Secure】This high-quality shoe rack is Crafted with premium connectors, durable plastic panels, and strong steel wire, each cube of this shoe storage shelf holds up to 10 kg. 【Easy Assembly and Disassembly】The shoe rack for home includes a wooden mallet makes assembling this shoe rack quick and easy. This organizer can also be quickly disassembled to store or transport, letting you easily rearrange this around your home 【Adaptable and Versatile】This cube storage rack is portable and can be personalized according to your needs. It can also be split into 2 or 3 separate rows, or separate small shelf units to organize shoes, or belongings in your wardrobe, bathroom, or any other desired space 【EASY TO CLEAN】 : The PP plastic panels are very durable and can be cleaned with water directly. 【MULTIPURPOSE】 : It can be used to store multiple things like shoes, boots, books, clothes, toys and much more 【STRONG STORAGE ABILITY】: 10lbs load-bearing for each cube, this shoe rack can hold shoes from athletic shoes, high heels, or work boots to meet your long-term storage needs; dust-proof PP Plastic Doors with metal ring design for easy opening and closing. [ad_2]
0 notes
Text
Types of Electrical Wire Connectors: Choosing the Right Connection for the Job
When working with electrical systems, one of the most crucial components for safety and functionality is the electrical wire connector. These small but vital devices are used to join electrical conductors securely, ensuring a stable flow of current while preventing loose connections, shorts, or electrical fires. At ECS Electrical Cable Supply Ltd, we offer a comprehensive selection of electrical wire connectors types, each designed to meet specific application requirements in residential, commercial, and industrial settings.
There are several types of electrical wire connectors, each suited to different wiring tasks and environments. One of the most commonly used is the twist-on wire connector, often referred to as a wire nut. These are conical plastic caps with internal metal threads that twist over the ends of stripped wires. As they’re twisted, the metal threads draw the wires tightly together, creating a secure mechanical and electrical connection. They’re ideal for general-purpose wiring in lighting, outlets, and switches.
Another widely used connector is the butt splice connector. This cylindrical connector joins two wires end-to-end. The stripped ends of the wires are inserted into each end of the connector, then crimped using a special tool to create a firm connection. Butt splices are commonly used in automotive, marine, and appliance wiring, especially where a direct, inline connection is needed.
For terminal-based applications, ring and spade connectors are essential. Ring connectors have a closed circular end that fits securely over a stud or screw, providing a solid and reliable contact. Spade connectors have a forked end, making them easier to install or remove without completely removing the terminal screw. These connectors are popular in panel wiring, circuit protection systems, and control cabinets.
In environments requiring quick and tool-free connections, push-in connectors (also known as lever connectors or spring connectors) are gaining popularity. These allow electricians to insert stripped wires into the connector where a metal clamp automatically secures them. These connectors are ideal for tight spaces, renovation work, or installations that may require future disconnection or adjustment.
For environments with moisture, chemicals, or extreme temperatures, waterproof and heat-shrink connectors are essential. These connectors have insulation that seals tightly around the wire once heated, protecting the joint from the elements. They’re ideal for outdoor wiring, marine applications, or any environment where durability and weather resistance are critical.
Insulation displacement connectors (IDCs) are another specialty type, allowing a wire to be connected without stripping the insulation. Common in telecommunications and low-voltage systems, IDCs are quick to install and often used in pre-assembled wire harnesses.
At ECS Electrical Cable Supply Ltd, we understand that selecting the right connector depends on wire type, voltage, current, environment, and connection permanence. Our team can help guide you to the best option, ensuring your wiring job is safe, code-compliant, and long-lasting.
In summary, there are many electrical wire connectors types, each tailored to specific tasks and conditions. From everyday installations to complex industrial systems, ECS Electrical Cable Supply Ltd is your reliable source for high-quality connectors and expert support—ensuring every connection is a safe one.
0 notes
Text
Why Copper Jump Rings Deserve a Spot in Your Jewelry Box

While silver and gold often dominate the jewelry landscape, there's a growing appreciation for the rich, earthy appeal of copper. And in the world of jewelry components, copper jump rings are emerging as a versatile and beautiful option, offering a unique aesthetic and a touch of rustic charm that can elevate a wide range of designs.
Jump rings, as we know, are the fundamental connectors in jewelry making – the unassuming loops that link components, secure clasps, and bring a piece to life. When crafted from copper, these essential findings introduce a distinctive warmth and character that sets them apart from their silver and gold counterparts.
Why Copper? Embracing the Elemental Beauty
The allure of copper jump rings lies in several compelling characteristics:
Rich, Warm Hue: Copper boasts a beautiful, inviting reddish-brown color that adds a natural, organic feel to jewelry. This warmth complements earth tones, vibrant blues, and deep greens, creating stunning visual contrasts.
Aesthetic Versatility: Copper jump rings are incredibly versatile. They can be incorporated into bohemian, tribal, steampunk, and even minimalist designs for a unique twist. They pair wonderfully with natural stones, wood beads, leather, and even other metals for mixed-metal looks.
Natural Patina: One of copper's most fascinating qualities is its ability to develop a natural patina over time. This process, where the metal slowly oxidizes, creates a range of beautiful greens, blues, and browns, adding depth and character to the jewelry. Many artists intentionally accelerate this process to achieve specific aged or antique looks.
Malleability and Workability: Copper is a relatively soft and malleable metal, making it easy to work with. This can be an advantage for jewelers who prefer to manipulate jump rings by hand, though a good pair of pliers is still recommended for secure closure.
Affordability: Compared to precious metals like silver and gold, copper is significantly more affordable. This allows artists to experiment with larger designs, create more intricate pieces, or simply keep their material costs down without sacrificing aesthetic quality.
Historical Significance: Copper has been used in adornment for thousands of years, giving it a timeless and almost primal appeal. Incorporating copper into your designs can connect them to this rich history.
Applications and Design Considerations
Copper jump rings are perfect for a multitude of jewelry applications:
Bohemian and Earthy Designs: Their natural color is ideal for pieces featuring gemstones like turquoise, jasper, and unakite, or with elements like leather cord and wooden beads.
Steampunk and Industrial Jewelry: The aged look of patinated copper is a perfect fit for the mechanical and retro-futuristic aesthetic of steampunk.
Mixed Metal Designs: Combining copper jump rings with silver or brass components can create striking contrasts and add visual interest.
Wire Wrapping and Chainmaille: Copper wire is popular for these techniques, and copper jump rings serve as a natural extension for completing such pieces.
Charms and Pendants: Use copper jump rings to attach copper charms or to introduce a warm accent to pendants made from other materials.
Caring for Copper Jump Rings and Jewelry
While the patina is often desired, copper can also darken over time, or even leave a green mark on the skin for some individuals. To manage this:
Sealing: Many artists apply a clear protective coating or wax to finished copper jewelry to slow down patination and prevent skin discoloration.
Cleaning: Copper can be cleaned with mild soap and water, or specialized copper cleaners to restore its original shine.
In conclusion, copper jump rings are far more than just functional connectors; they are a design element in themselves. Their warm glow, unique patination process, and versatility make them an invaluable addition to any jeweler's toolkit. By embracing the elemental beauty of copper, you can infuse your creations with a distinctive character and a touch of organic elegance that truly stands out.
0 notes
Text
How Aerospace Connectors Enhance Safety, Efficiency, and Innovation in Modern Aviation
Aerospace connectors are essential to the performance and integration of many modern aircraft systems, including powered assemblies, electrical networks, and onboard data interfaces. As these components are often expected to function reliably under extreme conditions like vibration, pressure shifts, and temperature fluctuations, their design plays a direct role in supporting overall system dependability. In this blog, we will delve into how aerospace connectors contribute to enhanced safety, improved operational efficiency, and ongoing innovation across the aviation industry.
How Do Aerospace Connector Designs Contribute to Aircraft Safety?
Maintaining safety in aerospace operations requires that various critical systems, such as flight controls, communication links, and power networks, function consistently and without interruption. Since connectors serve as key interfaces within many of these systems, their designs need to account for a wide range of potential physical and operational stressors. To support reliability in such conditions, numerous aerospace connectors incorporate advanced features aimed at mitigating failure risks and upholding performance under pressure, including:
Secure Locking Mechanisms: Many connectors feature mechanical latches that are designed to resist loosening when exposed to vibration or high-G maneuvers.
Environmental Sealing: O-rings and gaskets are commonly used in connector assemblies to help prevent contaminants like moisture, dust, or chemicals from reaching internal contacts.
Redundant Circuit Support: Some connector configurations include dual-path layouts that are intended to maintain functionality in the event of a system failure.
EMI Shielding: Specialized connector housings are often employed to reduce electromagnetic interference that could disrupt avionics or navigation systems.
Fire-Resistant Materials: High-temperature polymers and flame-rated metals are incorporated into many aerospace connector designs to help preserve structural integrity in the event of fire or extreme heat exposure.
In What Ways Do Connectors Improve Efficiency in Modern Aircraft?
For many aerospace programs, improving operational efficiency is a central focus during both manufacturing and maintenance activities. Connectors can support this objective in several ways, including enabling streamlined integration, reducing manual workload, and allowing for more modular system architectures. Common efficiency-oriented design features include:
Lightweight Shells: Lightweight aluminum or composite connector housings are often used to reduce overall aircraft mass.
Reduced Service Time: Specialized latch mechanisms are designed to simplify connector disengagement, which can minimize technician workload during routine servicing.
Simplified Cable Harnessing: Plug-and-play wiring setups built around standardized connectors can support faster system installation and may streamline future maintenance or upgrade activities.
Built-In Diagnostics: Some connectors with integrated sensors or test ports can assist technicians in identifying faults more quickly and accurately.
Low-Resistance Contacts: Low-resistance terminals are commonly incorporated into aerospace connectors to reduce the risk of power loss and heat buildup in high-current applications.
How Are Connectors Enabling a Wide Range of Next-Generation Aerospace Technologies?
As aerospace platforms evolve to incorporate more digital, autonomous, and electrified technologies, connector designs are similarly adapting to support emerging system requirements. This shift has prompted the development of advanced features aimed at enhancing compatibility, scalability, and signal integrity across a wide range of applications. Examples of connector capabilities coming with emerging innovations include:
Support for High-Frequency Signals: Some aerospace connectors are designed to accommodate fiber optics or RF signal transmission, helping enable faster and more reliable data exchange.
Compact Form Factors: Miniaturized connector footprints can be used to conserve space in dense avionics bays, supporting more efficient system layouts.
Composite-Compatible Interfaces: Certain connector models are engineered to attach securely to non-metallic structures like carbon fiber.
Electric Propulsion Integration: Many connectors are developed specifically to meet the various electrical and thermal demands of battery packs and electric propulsion systems.
Flexible Upgradability: Innovative connector geometries may support easier integration of emerging technologies across a myriad of next-generation aircraft platforms.
What Should You Look for When Selecting a Distributor for Aerospace Connectors?
When evaluating potential suppliers for aerospace connectors, procurement specialists should consider a range of factors that influence sourcing success, such as:
Inventory Transparency: Reputable distributors typically offer clear visibility into expected lead times and part availability to help buyers make well-informed sourcing decisions.
Technical Support Access: Leading distributors provide customers with access to knowledgeable experts who can assist with part selection and compatibility questions.
Performance Track Record: A track record of consistent fulfillment, quality assurance, and issue resolution is often regarded as a key indicator of distributor reliability.
Explore Our Vast Selection of Aerospace Connectors Today
If you are seeking competitive procurement solutions on dependable aerospace products that are sourced from a network of reputable companies we trust, look no further than Just Connectors and our ever-expanding inventory. With our market intelligence and purchasing power, we are in a position to bring customers timely fulfillment options on countless high-caliber items. Keeping our various dedications and capabilities in mind, get in touch with a team member at your earliest convenience to see why so many professionals rely on us for the connectors they require.
0 notes
Text
Dielectric Safety Harness & Lanyard: Ensuring Electrical Safety at Height
What is a Dielectric Safety Harness & Lanyard?
A dielectric safety harness & lanyard is a fall arrest system engineered with non-conductive materials to protect workers from electrical currents. Unlike traditional harnesses, dielectric variants are made with specially treated webbing, connectors, and D-rings that minimize the risk of electrical conduction. The primary goal is to provide a safe anchoring and fall-arrest solution in high-voltage environments.
Key Features of Dielectric Safety Harness & Lanyard
Non-Conductive Materials These harnesses are constructed from high-strength, flame-resistant polyester or other non-metallic fibers. Buckles and D-rings are often made from dielectric plastic or coated composite materials to avoid electric conductivity.
Corrosion and Arc Flash Resistance The materials used resist corrosion from chemicals, oils, and UV radiation. Many models also meet standards for arc flash resistance, offering an additional layer of protection in volatile electrical environments.
Shock Absorbing Lanyards Dielectric lanyards come with built-in shock absorbers to reduce the impact force during a fall, which helps protect the spine and internal organs.
Adjustable and Ergonomic Design Adjustable shoulder, chest, and leg straps ensure a snug fit for various body types, offering comfort without compromising safety.
Compliance with Safety Standards Quality dielectric harnesses comply with international safety standards such as ANSI Z359, OSHA 1910.269, and EN 361 for fall protection and electrical safety.
Importance of Dielectric Safety Harness & Lanyard
1. Prevention of Electrocution
The non-conductive properties of dielectric equipment significantly reduce the risk of electric shock when working near live wires or high-voltage installations.
2. Enhanced Fall Protection
These harnesses not only insulate the wearer from electrical currents but also provide secure fall arrest systems, which is crucial in high-risk environments.
3. Increased Worker Confidence and Productivity
When workers feel safe, they perform better. Providing the right safety gear fosters a culture of confidence and responsibility.
4. Regulatory Compliance
Using dielectric harnesses helps organizations meet safety regulations, avoiding legal penalties and ensuring smooth operational processes.
0 notes