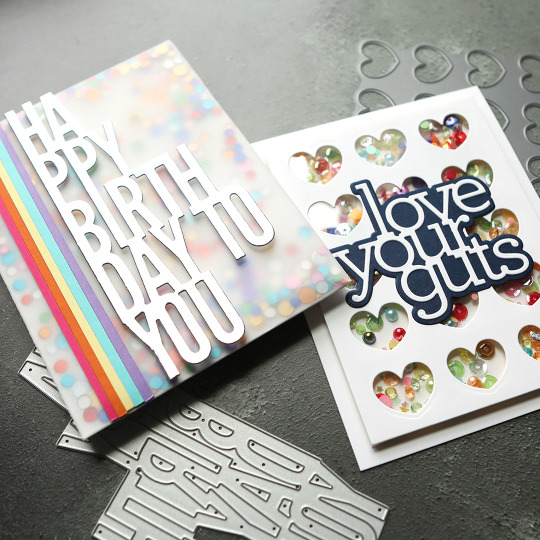
#also experimenting with bolding the whole gradient text
Explore tagged Tumblr posts
Visit Tumblr Blog
Explore Tumblr blogs with no restrictions, modern design and the best experience.
Last Seen Tumblr Blogs


Fun Fact
Kazakhstan’s Minister of Communications and Informatics has blocked the Tumblr site because it contained 60 sites of terrorism, extremism, and pornography in 2015.
Text


I know where you are.
INSIDE NO. 9 | S2E4 "Cold Comfort"
#in9#inside no 9#inside no. 9#in9 frames#cold comfort#steve pemberton#reece shearsmith#after mulberry it only made sense to come to this ep! (one of my top 5 faves ever!!)#although i immediately found out this was MUCH harder to get frames for loll#so maybe it's no surprise the 2nd half is all from the last 5mins#haven't officially rewatched but i will never tire of staring at george's cam during the 1st chloe call tbh#also experimenting with bolding the whole gradient text#(looked back at some of my old frames posts and saw there's a few where i forgot to bold the in9 title??)#(so it's like if i bold the whole thing then i won't forget!!)#vagueeyes.pdf
37 notes
·
View notes
Text
Abbotsford Canucks 2025 AHL Champions White T-Shirt

Link Product: https://inspirdg.com/product/abbotsford-canucks-2025-ahl-champions-white-t-shirt/
Abbotsford Canucks 2025 AHL Champions White T-Shirt: A Bold Celebration of Triumph and Legacy
A Moment in Time, Etched in Fabric
Few moments in sports are as electrifying and unforgettable as winning a championship. And the Abbotsford Canucks 2025 AHL Champions White T-Shirt captures that energy with breathtaking precision and elegance. More than just an article of clothing, this shirt stands as a tribute to the grit, determination, and heart that carried the Canucks to the pinnacle of the American Hockey League.
With a design rooted in both history and modern flair, this tee is made for fans who want to celebrate their team’s monumental victory in style. It speaks to the collective roar of a city, the unwavering belief of fans, and the unyielding will of players who refused to quit.
Front Design: A Bold Declaration of Victory
At the forefront of the design is the massive, unapologetically powerful word: “CHAMPIONS.” Bold lettering is filled with a textured steel gradient that mirrors the resilience shown on the ice. Arched above it is a commemorative line that reads: “MAJOR HISTORY IN ABBOTSFORD”—a clear signal that this isn’t just any win. This is a defining moment in the team’s history.
Below the title, the year “2025” is split in striking symmetry across the team’s name, anchoring the whole composition. It’s a balanced and intentional visual layout, evoking a feeling of confidence and permanence. This is a shirt that doesn't whisper victory—it shouts it with pride.
The signature Nike logo on the upper left corner gives it a professional polish, validating it as part of the elite class of official championship apparel.
Back Design: A Legacy Carved in Ice
Turn the shirt around and you're greeted by a celebration of not just a season, but a legacy. The AHL Champions 2025 text circles the Abbotsford Canucks crest in a roundel format—visually reminiscent of medals, championship badges, and timeless emblems of greatness. Within the circle lies a stunning hockey graphic: a stick, a puck, and motion lines creating a feeling of intensity and action—just like the 2025 playoffs themselves.
Everything about this back design reinforces a central idea: the Abbotsford Canucks aren’t just winners; they’re warriors. The swirling icy motifs and sharp font choices elevate the design from simple fan gear to wearable art.
Color Palette: Pure White, Bold Spirit
What makes this shirt instantly stand apart is its pure white base—a daring and brilliant choice. White in sportswear often signifies excellence, clarity, and legacy. It allows the bold blues, greens, and blacks of the graphics to explode with clarity, drawing the eye directly to the message of victory.
This color also serves a practical function: it reflects heat, making it perfect for outdoor celebrations, summer hockey camps, or casual daily wear. The contrast between the white fabric and the sharp typography turns every inch of this shirt into a statement.
Comfort and Construction: Made for the True Fan
Beyond the visuals, this shirt excels in terms of craftsmanship. Constructed with high-performance fabric—a breathable and lightweight blend of cotton and polyester—it’s built for comfort whether you’re at a playoff party, repping the team at the gym, or reliving the win with friends.
The shirt features reinforced stitching for durability, and its athletic cut provides a modern, flattering fit for all body types. Designed to be worn with pride and ease, it complements both fanwear collections and casual streetwear wardrobes.
Symbol of Team, Community, and Belief
The Abbotsford Canucks’ 2025 Calder Cup Championship run was more than just hockey. It was a story of a small market rising to greatness. It was about belief—in each other, in the fans, in the journey. This t-shirt distills that entire experience into something tangible.
Wearing it means more than celebrating a game. It means you stood by a team that rose to the occasion, that silenced doubters, and that claimed their place among the elite. It’s a symbol of the Abbotsford community’s heart, and of every loyal supporter who cheered from the stands or their living rooms.
Why This Shirt Belongs in Every Collection
Whether you are a diehard Canucks fan or simply appreciate the artistry of championship design, the Abbotsford Canucks 2025 AHL Champions White T-Shirt is an instant essential. It balances aesthetic impact, emotional storytelling, and versatile functionality with impressive grace.
Own it not just as a keepsake of a season, but as a part of something larger—a reminder that perseverance leads to greatness, and that hockey is more than a sport… it’s a brotherhood, a fight, and a celebration.
0 notes
Photo
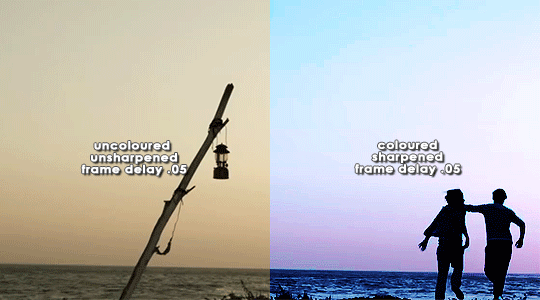


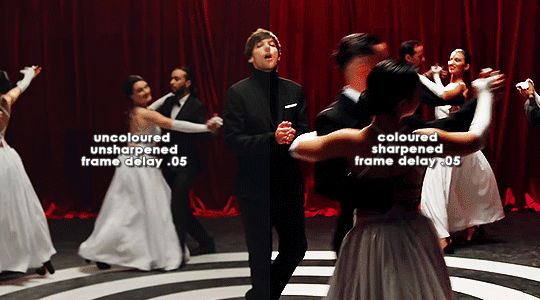
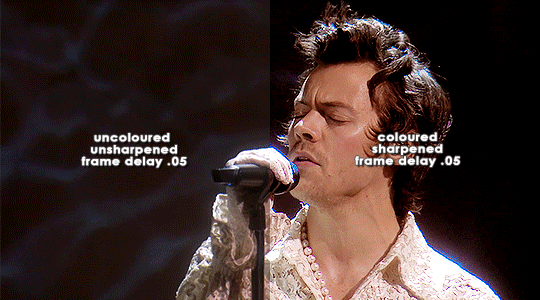
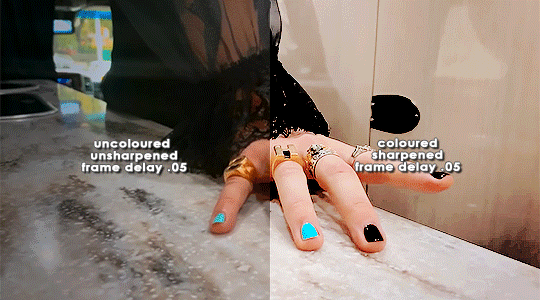
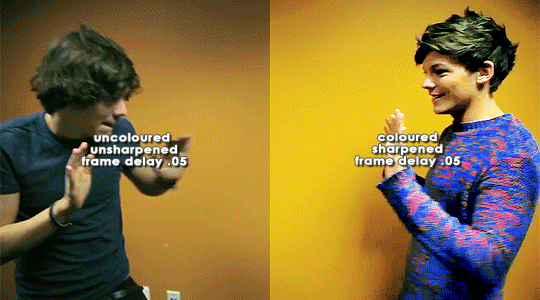
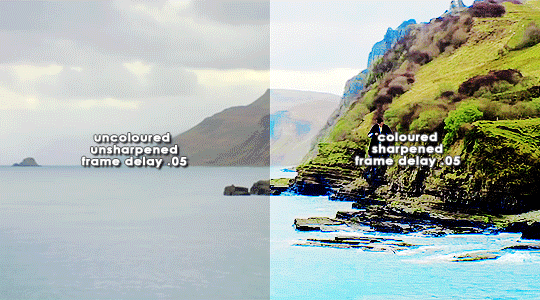
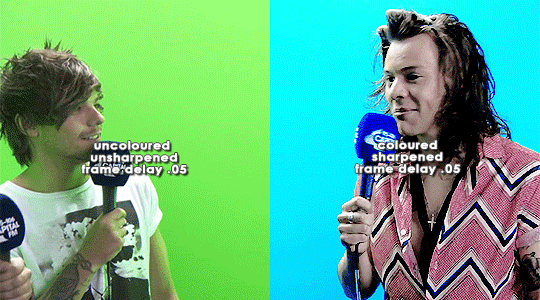
ORIGINAL → EDITED
gif making process
thank you so so much to the lovely and talented @pridesobright and @supportivehusbands for tagging me :’) reading about your processes was so interesting!!
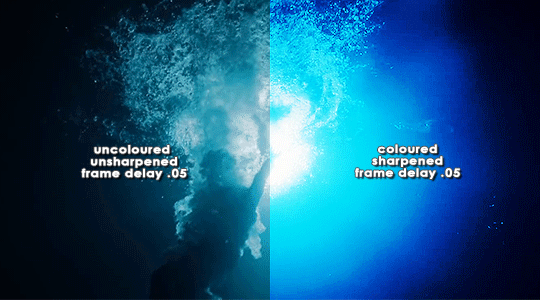
LEFT: cropped, resized (height 300px; width 540px), unedited, unsharpened, frame delay set to 0.05
RIGHT: cropped, resized (height 300px; width 540px), edited, sharpened, frame delay set to 0.05
ideally, 1080p is what i’d use for everything, but sometimes you just have to settle for what you can get (and if you’re cursed…………. you have to battle with less than 480p……….. im looking at you, miss ‘now kiss me you fool’ footage). for this post, i made gifs from ten separate videos to illustrate how even though your source materials are wildly different from each other, the resulting gifs can still be stylistically similar. this is why it’s so upsetting to see people steal gifs like it’s nothing. we put so much thought and care and time into our posts and i can’t even put into words how discouraging it is to see people act like crediting gif makers is a hardship.
i have a note filled with ideas for lyric sets, parallels, etc etc that i work from, but sometimes i’ll just sit down and pick a random video and play around with whatever idea i have in the moment. (that’s how this set came to be!)
after i’ve imported the footage to photoshop (i use cc 2019, although i first started out using cs5 and it’ll always have a soft spot in my heart), removed any redundant frames, and cropped it, i’ll resize it (to 540px more often than not), and set the frame delay to 0.05. when all that’s done, i can colour.
i colour every gifset from scratch — i’ve never had much success with using the same psd on other gifs. it totally works for gifs from the same source, but when you’re using like six different videos for the one gifset, you have to take much more care in making them all correspond to the aesthetic you��re planning for the post. i tend to choose a dominant theme or colour to work from, like blue, green, magenta, pastels, rainbow, etc.
i usually begin with curves and levels until im happy with the brightness. then i’ll move on to either selective colour or colour balance or vibrance, depending on the original colours of the footage. i almost always skew my gifs towards blues and cyans and magentas rather than yellows and greens (i lean more towards coolness or neutrals rather than warmth). and im just really fond of blue, which is apparent if you’ve ever seen anything i’ve made lmao especially if louis’ eyes are involved. this is definitely where i spend the most time messing around with different settings (like increasing cyans and blues and blacks in general / increasing cyans in whites if i want the sky to look more blue / decreasing the blacks in whites for contrast / decreasing the cyans in reds to make them really red / decreasing the yellows across the board, but most definitely in blues and cyans / decreasing magentas in greens if i want Very Bright greens). sometimes i lose my mind a little and i end up with like twelve selective colour layers and im like This Is Fine . skdjfskjf anyways, when everything looks as vibrant and colourful as i want it, i’ll go back to curves or levels or add a contrast layer to make everything look stronger. i also might go back to selective colour or vibrance with incremental changes at the end, just as a final touch. [tl;dr: curves > levels > colour balance > vibrance > selective colour > contrast > go back for any little amendments] for black and white gifs, i’ll start with a gradient map and then continue with curves, levels, etc. after all that’s done, i’ll convert to video timeline > select all layers > filter for smart objects > either sharpen with this action or use these smart sharpen settings > add text if the post calls for it (if it’s a concept/lyric gifset, i like to play around with the settings — although century gothic is my favourite font for this — and if it’s a captioned gifset my standard is arial bold italic / drop shadow to 140 degrees / grey stroke / adjust font pt according to the size of the gif) > export > save for web. et voilà!! one gif down, probably nine to go sdkfksjdfhsjdf
the double edged sword of making gifs for one direction fandom is the sheer volume of footage available to you: on the one hand, you have a whole decade’s worth of moments to gif (and that’s incredible!!!), and on the other, it’s so difficult and time consuming to colour all of these separate moments in a cohesive way that hopefully expresses your own unique creative style. so sometimes it’s frankly impossible to make certain things look the way you want them to. maybe you can’t find high quality footage (the absolute BANES of my existence are the rtl footage where they reacted to themselves playing football at boston common and the louis is loud……loud……….and……..loud footage where you can see harry’s face close up. it’s a TRAVESTY that they don’t exist in 1080p and i WILL scream it from the rooftops), or the moments you want to gif simply refuse to look good next to each other because they’re so wildly dissimilar in hue that no matter what you do, they look strange and disjointed when juxtaposed (in those moments i do tend to either give up or choose to make them black and white). but honestly? the obstacles i’ve come across while making gifs for this fandom have been amazing learning opportunities for me. i’ve grown into and experimented with my style way more than i ever did anywhere else, and i continue to feel inspired by this fandom every day, so thank you to every single creator for your ingenuity and hard work!! 💖💖💖💖
i think y’all have been tagged or done this already, so im just going to tag everyone i admire to say you’re legends and i love your content very much a lot!! @caparius @sunflowrsix @jimmytfallon @stylex @tmlnsn @cuddlerlouis @2tiedships2 @moonshinelouis @ltpolari @itsastorm @finelinee @ltwalls2020 @half-lightl @fallenwalls @tomlinsun @louisbravado @tattooedlovers@lordtomlinson @livehabit @halosboat @thepeacering @alinok
#photoshop#gif tutorial#kinda idk ?? sfkjhskdfjdfg#gif making process tag#the first gif is almost jarring to look at . like sometimes i forget how aggressively i remove warmth from the wmyb video dskfjhdkfjhdjgf#one direction: yellow/warmth. me: NOT IN MY HOUSE#anyways sorry this was so long i just got so excited kskdjfhskhdf#i love making gifs!!! even when i fucking despise it!!!#**#*#creations
93 notes
·
View notes
Text
Retro Blend Typography - Process
Creating on Illustrator
Before incorporating colours, textures etc. I created 6 variations of the typography in Illustrator, with which I chose my favourite and edited it in Photoshop.

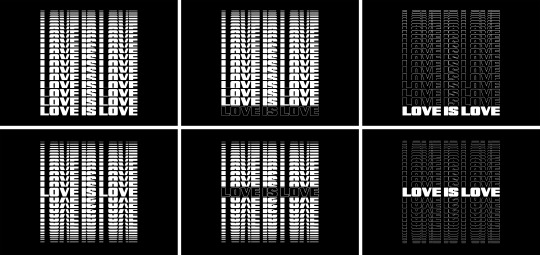
To begin with I downloaded a short and bold font from dafont.com, which I used to type out 'love is love' in the colour white. I then drew a black square over the text and sent it behind, any black bordering the words is how much space there will be between each duplicate. So I adjusted this until I was happy and set the text to the centre of the shape, to do this I aligned the glyph bound to 'point text' and then grouped the two objects together.
With this I duplicated and placed it directly underneath the other, then by selecting both I used 'object > blend > make' which blended them together through duplications. I then went into the blend options where I could set my own number of specified steps, of which I went with 19 because it didn't look too much nor too little. There needs to be a lot but not to the point where you can only see thin lines, and as you can see each duplicate of my blend displays just less than half of the letters.

Next I took the anchor point tool and used it to drag the centre path straight up, shortening the words so much until the blending out effect was created. To finalise it I filled an artboard with a black background and placed the object in the middle, because of the same black background the text really looks like its fading in.

I adjusted this outcome by duplicating it, clicking on the bottom word with the 'direct selection tool' and swapping the empty stroke and white fill. Although for the third outcome I repeated the process for the rest of the duplicates, but this time selecting the top of the text and filling in the bottom type only. To do this I selected the bottom word, copied and pasted it, swapped the fill and stroke again and placed it over the top.
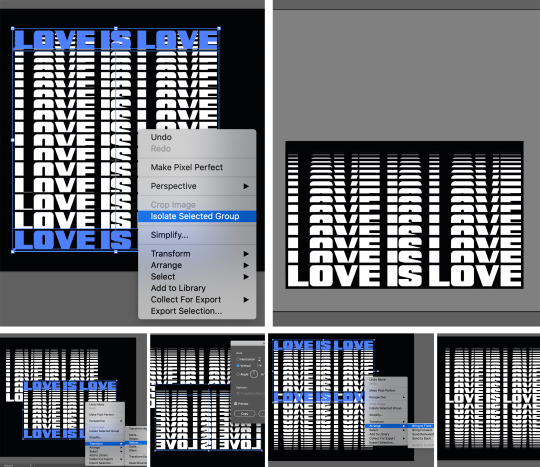
I also created three other versions with the main text in the centre of the group, so the words fade out on both sides rather than just one. First I isolated the selected group which allowed me to squish down the whole square, shortening the blend to about half way. Next I duplicated the edited selection and reflected it horizontally, with this I arranged it behind the upright version and aligned it together.
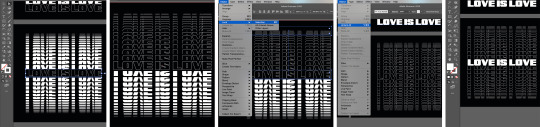
I then repeated the same process of swapping the main text's stroke and fill, however to create the opposite I had to go through a longer process. To begin with I selected the top of the type with the 'direct selection tool', and changed its fill to transparent and the stroke to white. This only effected the top selection because they're separate objects, however to click on the top of the other section is near impossible because the other layer is covering it. Therefore I locked the top selection which allowed me to select the text, once everything was strokes only I unlocked the object and repeated the final step of adding the filled type.
Editing on Photoshop
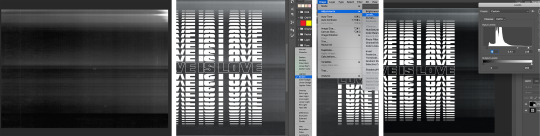
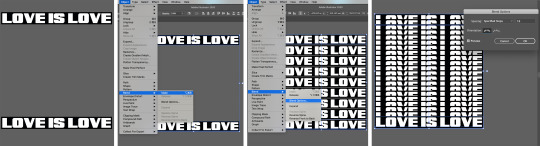
I chose this version because there's a lot of filled text that I could experiment with, and I think there's a perfect balance in the typography and colour ratio. To begin with I downloaded a photocopy texture to overlay the whole piece, blended using screen which allows the white to show through and subtly affects the black. However it lessened the contrast as it lightened the entire canvas, therefore I adjusted the layer with 'levels' where I darkened the black but kept the effect clearly.

Next I repeated the same process but inverting the layer and adjusting it lighter, I then blended this in with 'multiply' so the white text also had a bit of a texture, colour and character. I thought this really pulled it together and was happy to leave it as this, however I had another plan to involve some brighter colours.
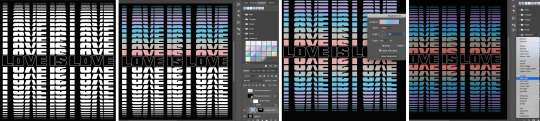
To fill the white text I selected it with the magic wand tool, but only the top half. With the paint bucket tool I selected an iridescent colour, using the one closest to a rainbow, which automatically filled the selection. To fill the other side I wanted the colours to spread from the centre, so for the bottom fill I set the angle to -90 which flipped it upside down. Finally I duplicated the gradient layer and selected the 'soft light' blending option, this made the colours vibrant and bold but also lowered the brightness and softened this contrast.
2 notes
·
View notes
Text
Web Design Trends 2020 – Top 12 You Need to Follow
Can’t believe it, but it is true. The web has turned 31 years old now! And we have seen varieties of websites surfacing on it (coming & going) – from bland HTML ones to flash media websites to AI-centric automated websites (the chatbots one?). We have come a really long way. Transitioning websites according to the latest web design trends has become a lifeblood for every digital business (literally everyone). Because these new web design trends each year are created or approved by your internet users or more specifically, your would-be customers only. And in this fiercely competitive market, you can’t fail to dissatisfy your “future customers”, would you? Just like previous years, this year too, we have some mind-blowing web design trends 2020 prowling around, making a huge impact on the website’s growth in terms of customer engagement, brand value & revenue creation.
12 Amazing Web Design Trends 2020 You Shouldn’t Skip
It may sound weird but – “Website design is like a joke, if you have to explain it harder, it won’t make any sense”. Similar to a joke, your websites need to be effortless at the first look, self-explanatory in the second scroll, and convincing to explore & take a further step (like your joke would, to make them laugh) at the third look.
Without much waiting, let’s get into the 12 amazing web design trends 2020. They are effortless to follow, self-explanatory to look at, and convincing for visitors to enter the sales funnel.
1. Bold & Vibrant Colors Are In… More Than Ever
This year, we are seeing bold, bright, flashy colors taking the forward leap. The full bold colored websites with undertones of contrasting and less vibrant colors around the edges of images & texts will be big this year. The designers today are focusing on creating a web design that creates an equal experience for everyone. A color scheme with little contrast of a different color that people even with special abilities can feel and enjoy.

2. Web Design Trends 2020 Make Chatbots More Obvious & Much Powerful
This year, chatbots will be mainstream and much more efficient at reaching visitors’ quey (all thanks to evolving AI & machine learning). The chatbots will be much more customized than ever. Also, they will appear as if there are real business reps behind the screen. Moreover, they will be in more loud & popping colors. They will reach faster & better at users’ silly to crucial queries with a personable face (maybe of business rep, cartoon character, or some mascot for the brand).

Chatbots are of different types, the ones with choice based questions, the humorous ones, etc. Additionally, you can choose to script the chatbots per your brand’s conviction & image in the market by partnering with any professional company for web design.
3. Motion UI – Graphics Will Not Be Just Still
Motion UI is another soaring trend, from which websites can’t keep hands-off. The graphics with slight to full swing animation can add a volume to your simple & static website. This year, websites will be all about winning the users’ hearts with animated graphics at the micro-interactions of the website.

Mobile UI can be added in a mobile screen picture as a moving mobile screen, or on a clothing eCommerce website, where the model gives a 360 turn in product pictures to give buyers an interactive & appealing look. You can experiment with Motion UI anywhere on the website from top to bottom. However, animation should be approachable and should be neither too fast nor too slow – to make sense to website visitors.
4. Web Design Trends 2020 in Color Palettes
Every year, there is a new color that dominates the web design trends. According to Web Design Company experts, yellow was the main color for 2018 trends, blue for 2019 trends, and this year, it is said to be the cool & breezy color “mint”.

Apart from just mint or any particular colored websites, we are seeing designers taking the websites to a whole new level with gradients – that has hues of a different color. It is best for businesses that can’t point fingers at just one solid color scheme. The gradient fluid will give more depth to the viewers in the first look.
Another color trend will be based on your brand theme, type, and target customers’ behavior or thinking pattern.

Like:
For information & other backgrounds – Colors like soft grey, teal or blue will be a great match to make the content part more readable for users.
For CTAs and buttons – Colors as warm and flashy like red, green, orange will be much triggering to click on those buttons.
If you are unsure of what color scheme to follow, your company for web design can help to find the best color palette to splash over your website type.
5. Fonts in Web Design Trends 2020 Are Bold and Edgy
San-serif and serif font are the two popular fonts. They will see a continued use this year too with outlined or more dark colors to make them stand out. The bold and broad fonts in landing page headings or subsection headings will steal the users’ attention in a thunder.
The fonts in the website’s banner or header will either have solid colors or some still or moving illustrations to make a lively connection with the visitors. The fonts will stand out on the surface of either light grey or other soft colors or extra edge pop-up colors.

Also, note. You have to decide the typeface & font type based on your brand’s notion, the company’s overall goal, and your audience’s behavior pattern.
Ask your web design company to choose a font and typeface that’s easy for readers to read as readability also counts big in the enhanced UX. Avoid adding complex and cursive fonts as it might confuse the readers and compel them to move out from the site instantly.
6. Minimalism Still Looks Full
Minimalism is a classic and never-getting-old design concept. A minimalistic design means fewer web elements, content, as well as more white spaces, and limited typography. Consequently, it gives the user room to think and explore the website much better.

This year too, the trend of minimalistic design is shifting from previous trends and despite being less, it will be more to the visitors.
You have to pull in minimalism with a lot of care. Make sure the design is understandable and has basic things that a user expects over your website. Keep the images, animation, content limited but in a way that readers are still able to connect the dots to satiate their queries & fall into the sales funnel.
7. Videos Are Dominating in Web Design Trends 2020
Videos are the timeless & most classic thing to add to modern web design trends. Try having a combination of text, visuals, and audio-video content. It creates a balance and caters equally to both the “patient” and “on-the-go” readers.

Readers who don’t have much time & are looking for information on the instant, for them, videos portraying the brand message, animation, or small collage of photos can create a long impact on their choice to stay and explore that website.
A general user loves a website that can showcase its content or offer – in other than just a boring wall of text. Companies today are exploring video-based content and are integrating such videos over their interfaces to serve on-the-go aesthetics.
You can add videos about anything, like product description, use, tutorial, step by step guide, social messages, and brand story. Likewise, you can even integrate your Youtube videos to look like a very well-established brand.
8. More Interactive Micro-interactions Are in Focus
Micro-interactions are the small actions or interactions throughout the website that grab the eyeballs of readers. Additionally, they attract visitors to different sections or elements of the website. Think of the red icons displaying the number of friend requests on Facebook. Or, remember a beep sound on refreshing the Twitter page. All these small icons before any text are all sorts of purposefully-done micro-interactions.
This trend is clamoring this year too. Actually, it is the best way to transfer the information or message to the audience with a more appealing UI. You can decide any type of micro-interaction at different sections of your website. Yet, you have to ensure they are creative, not overdone, gives a subtle overall UI look.
9. Increased Attention to UX and UI – Hand in Hand Web Design Trends 2020
The modern web design trends are showing support to UX (website functionality) and UI (website’s creative interface), congruently. This year, websites with smooth functionality along with impeccable UI are in more limelight. The web design company is focusing on creating a website that gives glitch-free and completely smooth user experience, with:
Less cluttering elements – more of white space for breathing
Navigable, easy to read and SEO-optimized content
The fast loading speed of the website
Balance of rich multimedia as visuals, infographics, videos, 3d illustrations & more

And to keep the user experience in great momentum, designers are focussing on creating more edgy and intuitive interfaces to maximize the UX of visitors with:
Transcribing the videos
Adding caption of the image
Making voice-supportive interfaces
Having balanced UX motion & other animations
Easy to skim content framework
Removing cluttering elements or features that are not necessary
Mobile responsive interface (more than 50% of internet traffic comes from mobile devices)
10. Web Design Trends 2020 Include Illustrations Tailored to Tell a Brand Story & Beliefs
Modern websites have a range of multimedia from visuals to illustrations to stock photos to icons. They appear on the website not just to bring more colors or visual appeal to readers. In fact, they are used for a much bigger purpose.
And that bigger purpose is to weave an exceptional brand identity. So, you can achieve it by telling a brand story, beliefs, use cases, or thought- process from the core level.

If you see NPO websites, you will notice how such websites are surfaced on top of positive deeds & optimism, such websites’ pictures deliver an out loud message (about helping the marginalized communities) for visitors.
You can have a splash of real photographs or have vector collections. Additionally, you can try street-art inspired graphics, icons, or illustrations that truly encapsulate your brand’s identity and visions. Ask your web design company to weave you some high-quality images or visuals. The latter should correlate with your brand and have a purpose to convey to the readers.
11. Large Elements Are “In” in Web Design Trends 2020
This year’s theme is all about going for bold, big, and users’ screen size elements to deliver a fuller look. This year, the contact forms for businesses too will have a broad appearance.
The contact forms are for picking a product inquiry, signing up for a service, service analysis, and much more. Users generally ditch the contact forms due to their limited size. This year, we will see websites going for full-length lead forms. They will be visible enough for users to fill in, without ditching them in one-go.
To make the forms appear less tedious or boring, you can add micro-interactions around as. For instance, try showing procedures to fill the form, some additional words to inspire people to fill up, if it is a lengthy form, divide that into different sections & give interactive scrolling buttons at the bottom.
12. Luminous, Fluorescent 3D Artworks Are Calling in For Great Attention
3D images and artwork have been there around the block for quite a long now. But this year, we are seeing the luminous, fluorescent, or neon-colored 3D visuals taking an edge more than ever.
The neon colors visuals or illustrations in the 3D effect on top of the minimal and basic template are grabbing the users’ attention much widely.
3D artworks are more prime this year to give the website more intense interaction with users and neon colors to give that lively & energetic look to the website layout. Together they combine to give an edge or personality to any UI.
P.S. While going for this trend, ask your company for web design to use the collection of neon colors in cohesion & moderation and scatter them around the overall UI. Too many concentrated neons can create a dizzy or noisy look. Surface these artworks on primary & subtle colors like white, grey, or light blue to make that artwork highlighted promptly.
Final Takeaway on 12 Modern Web Design Trends 2020
Each year new design trends come and go. If you fail to follow them, your scope for winning impactful brand identity and sales may be long gone with that obsolete trend too. Netizens love exploring a website that steps out from its comfort axis and has something spontaneous to offer (according to changing trends). They longer like a website that was made long years back and hasn’t changed anything to participate more actively in its audiences’ concerns & beliefs.
We just chalked 12 amazing web design trends 2020 that your website too needs to address – to be counted as a genuine and evolving brand – that your target audience expects you to be.
Are you determined not to put your audience’s interest down? Follow the above and many other stunning web design latest practices. Also, you can also for the help of a professional web designing company.
1 note
·
View note
Text
After several bad, terrible, not-so-good dates...Jade Dawson was in need of a real connection. She pulled out a chair and texted her date she had just arrived. She then heard an Android notification followed by a voice asking her name. When she looked up, she saw a pair of kind, dark eyes looking down at her. He’s so cute, she said to herself as she stood to graciously hug him.
Bryan Spence took the seat next to her and tucked his chair ever so slightly in her direction. The table arrangement was set up in a diamond shape as opposed to a square, which created both a comfortable and intimate experience. It was from this distance she could size him up. He was on the taller, slender side with a full beard that covered his youthful features. It made him look five to seven years older than his twenty-two years. His facial hair had a hint of auburn that had a slight gradient to chestnut brown to the top of his head. His muscle tone indicated he was a regular at the gym, but he also spoke with a slight inflection in tone that didn’t match his persona. He was sort of a juxtaposition in terms of masculinity and it set Jade ablaze. She always fancied the odd ones.
The lone man behind the bar tended to them immediately after Bryan sat. He introduced himself and dropped off the menus while listing the specials for the day. They looked over the items and talked about the days events at work. The conversation between them flowed organically. It was as if they had always known each other; not just messaging back and forth for a few weeks. The exchange was so delightful, like the vibrancy between a second round of drinks. She was able to make him laugh even though she wasn’t normally funny. He made her day by quoting her favorite animated show. The tension between them began to swell to palpable levels.
So when he asked her back to his place to smoke a bowl, her answer was an emphatic yes. She excused herself to the restroom after he slipped his card into the bill’s tray. While glancing at the mirror, she finger combed her blue black curly tresses and adjusted her gold septum piercing. She reached into her purse and touched up her burgundy lipstick that flattered her skin color. It was a lovely shade of mocha that reflected her mixed heritage and made it difficult to pinpoint her nationality. Jade knew all too well she got her untameable hair from her Afro-Latina mom and her high cheekbones from her European-Native American dad. She checked for any food in her teeth and smirked at her reflection. Just a bit of steady fun, she thought.
As it turned out, his place wasn’t far from the restaurant. He mentioned that he wanted to see more of the city since moving from Washington D.C. six months prior. He moved in with his best friend after she told him he had a room for rent.
��What? Just like that? You up and move?” she asked taken back by his bold decision to move.
“I knew that there wasn’t anything for me back home...career wise...and I wanted to move somewhere warmer. I was over the harsh winters.” His laugh had a beautiful innocence to it, like the first time a butterfly flaps its wings. It made Jade’s body tingle, all the way from the roots of her newly dyed hair to the tips of her painted toes. She felt entranced by his casual demeanor. He didn’t walk and boast in the overconfidence a lot of men his own age. His confidence was quiet and subtle that matched his intelligence. He had a natural sweet disposition that was the result of growing up with a single mother and older sister. Jade, the reformed maneater, was very intrigued by this breed of male. She imagined her lawful evil self filing her nails into a point so she could rip the flesh from his back when he penetrated her.
When they got to his apartment, they sat on his couch and she watched him pinch off the fluffy ground up grassy-diesel smelling herb and drop it into a long glass pipe. He passed the blue and black piece to her first. The combination of THC and alcohol coursed through her system with an oceanic rhythm. It collided with her hormones that have been slightly deprived. Her past two dates resulted it some of the worst sex she ever had. So to her delight, she studied him leaning in to touch his lips to hers. His kiss was sensual yet commanding. He knew how to please a woman and it was obvious he wanted to show her. He touched her with finesse. First starting underneath her jawline caressing her neck and cheek then slowly moving his way down to her shoulder. She pressed her chest in his direction encouraging him to touch her more. His fingers traced her bra strap, then cupped her breast. Bryan’s squeeze resulted her nipple to harden in the center of his palm. He squeezed again causing her to moan into his mouth.
Jade’s head was swimming with desire. Her skin was flushed and heated. So when he stopped for a second, she felt her whole body urge him to keep going. Without saying a word, he took her hand and walked to his bedroom. He closed the door behind her and continued kissing her with an innate, sexual passion. He was both romantic and carnal. He lifted her dress and lied her down on his bed. The touch of his bare hand against her belly, moving downwards, made her blood boil. Her clit was already swollen. The sheer contact sent shockwaves throughout her core that almost a blinding light came over her. He pressed firmly down on her button and then used the juices that flowed out of her to rub her clit more, resulting her to convulse sportatically. The tension in her whole body tightened and contracted, pushing her closer to the edge. His kisses had become more aggressive and his eyes changed from a docile male to an eager animal tamer.
After her second orgasm, she briefly felt weightless in his arms. She kissed him deeply enjoying the feel of his tongue moving to the same rhythm as hers. She rolled him over on his back and enjoyed watching his eyes scan her entire body. She met his gaze as she pinched the straps to her bra feeling the cool air against her flushed skin. She knelt before him only wearing a teal thong that illuminated against her skin color. She straddled him confidently and rubbed against his groin. He has far too many clothes on, she thought. Time to get rid of these. She took off his shirt and laughed to herself when she saw Robin from Teen Titans tattooed on his chest. It looked slightly faded and done by an amateur. But the pecs below it were tight and newly swolled from the gym. She kissed down his body and unbuttoned his pants. Button down fly ugh, she thought smugly. The worst type of jean fasteners.
She pulled down the atrocious pants and out swung a beautifully sculpted erect cock tucked away below his boxers. The peak had a small wet spot where his erection pushed firmly against. She slowly stripped down the last of his clothing to reveal his long, meaty dick. She devoured him, sliding all of him down her throat. The saliva began to pool inside her hungry mouth, letting some of the excess drip out the corners. She would pucker her lips and lick his shaft while still having him all in her mouth, testing the different pressures. He mostly laid still except for the few times he’d clench the sheets below him or when he pulsed inside her mouth the deeper she went. He groaned happily. He tapered wider down which made her insides quake. She was tempted to get on him and ride him to a filthy orgasm but she found herself enjoying sucking his long velvety flesh. He firmed up harder the longer she went. It was time.
She straddled him but she wasn’t really sure why. She was horny, yes. She was definitely going to get dick by the end of this night. But she wasn’t the type to get on top, especially for the first time. It was almost instinctual and strangely enough, she found herself wanting, needing to subdue the sweet, caring boy that paid for dinner and looked so charming before the kiss. She wanted to make him bend and yield to her will. Ride him and let him know how good her pussy is so he finds himself needing it again.
She gripped onto his erection and slid down. He filled Jade just to the point of her brink. Just enough to make her gasp when he twitched an inch harder. Damn, he felt so good to ride. Like a different kind of good. Almost as if their bodies fit seamlessly together. She felt like she was close again. She smashed her sex rapidity against his. Once she felt like she had peaked, she arched her back and let out a satisfied moan. Even though she had stopped, he was the one thrusting up inside her. She could feel him quiver and pulse one big time inside her rapture, and her hungry pussy lips engulfing his essence. His orgasm was intense and lingered between them. He was the type of man who only had a good time when his partner was enjoying herself to the fullest. Watching her, hearing her, feeling her...only then did he feel he was allowed to savor the moment. The succubus within her felt like she could finally break free. She only gave her new subject a short break until she kissed him deeply urging him to rise up.
The second time he was on top and plunged deep inside. He’d kiss her in the most gentle yet raveging of ways. He would mimic her tongue movements. He was a gentle man with a fierce sense of sexual prowess. While most people closed their eyes during sex, his eyes remained fixated on his lover’s face. His eyes were intense, frightening at times...as if he were looking deep inside his lover’s soul and joining her there.
She couldn’t look away though. As much as she felt as if she should, like a deep shutter ripping through her body, she held his gaze. It was like looking straight into the sun and at any moment she would go blind. The heat from his stare coursed through her. His mouth agape, enjoying the sensation. Suddenly she felt her pleasure start to rise. She closed her eyes and rode the intense wave. It was as if she was being lifted off the ground. Higher and higher she rose feeling her skin tingle. Waves of intense pleasure began to lift her. She didn’t feel like she was connected to this earth any longer; she had reached the exosphere and was soaring through the cosmos. Suddenly he hit it just right causing her to dig her shoulder blades into the bed and screamed her orgasm. Then she drifted off feeling like she was just launched into space and landed in the stars.
It had been years since Jade had been so sexually synced with someone. She liked looking at him because it stripped her of her vulnerability and she enjoyed that feeling with him. She didn’t even realize how exhausting it was having to keep her guard constantly up until she met him. He disarmed her.
She took him an impressive three times that first night. For the last time, she gladly got on top again. I could get used to this, she thought. He was an easy stallion to ride. He filled her swollen cunt just to the point where it pinched the back of her vaginal walls. She clung on tightly in response. She felt her whole body shudder the harder and faster she rode him. Driving her sex down with intent, feeling the rush and eventual release of yet another orgasm. The last one took practically everything out of her, and she collapsed on his chest.
There was no way of knowing that after this first night together, she would leave a piece of her heart behind. It was so unlike her. But as he stood waited outside with her until her rideshare showed up, basking in their afterglow, he looked freightingly attractive. Then he gave her a long kiss goodnight. Not just a simple “I’ll never see you again” kind of kiss. No. This was a “I can’t bloody wait to do this again with you” kind of kiss.
She caught her breath and inhaled his just a little longer. The exchange lit a fire inside her. Ignited something that hadn’t been stirred in a while. She smiled and waved goodnight to the man who she later dreamed about before drifting off to sleep.
1 note
·
View note
Text
Cheers, love! The time manipulating speedster frontwoman of Blizzard Entertainment’s Overwatch has arrived in the first wave of Hasbro’s new six inch line of action figures, and now she’s blinking into the Allspark Studio!
Overwatch Ultimates Tracer
To tell you the truth, I couldn’t tell you the last time I played Overwatch. While I was really big into the game when it launched, I think I can comfortably say my time with it is over. However, I think it speaks volumes about Blizzard Entertainment’s skill with crafting fun, enjoyable characters that I still found myself extremely intrigued by the proposition of Hasbro starting a new line of six inch action figures based off of the game. Though Max Factory over in Japan has already put out a handful of similarly scaled Overwatch action figures as part of their Figma line, the pricey nature of those figures for a game I’m no longer super passionate about gave me pause.
While my tastes in non-converting action figures do typically skew more towards the Figmas and Figuarts of the world, I was still very much interested in seeing what Hasbro could do with the license. Despite my reservations based on past experiences with Marvel Legends and Star Wars Black Series, I’m very happy to report Tracer has been an extremely pleasant surprise for me!
#gallery-0-19 { margin: auto; } #gallery-0-19 .gallery-item { float: left; margin-top: 10px; text-align: center; width: 33%; } #gallery-0-19 img { border: 2px solid #cfcfcf; } #gallery-0-19 .gallery-caption { margin-left: 0; } /* see gallery_shortcode() in wp-includes/media.php */
To give a small peak behind the curtain, I didn’t know I’d be writing a review of this figure when I purchased it. What this unfortunately means is that I didn’t know to save the packaging for photography. While I can’t illustrate this for you, I will assure you that the Overwatch Ultimates line has extremely striking packaging! A clean, white box with a matte finish features very bold strips of color on the sides, plus some very nice illustrations of the character on the front.
What’s a little less cool in the case of Tracer, however, is that once you open her up, there is a whole lot of empty space in that tray she comes packaged in. She’s part of the same single packed, $20 range of Ultimates figures that also include bulkier characters like Lucio and Reaper, who I presume fill out those trays a bit more, so it’s not necessarily her fault that she and her accessories are on the smaller side. Still, I’d be lying if I said I wasn’t a bit shocked when I saw just how much empty space was in her box.
Speaking of accessories, with Tracer you get her two submachine gun pistols, effect parts that give the effect of shooting them, two alternate right hands, and the time bomb she uses for her in-game ultimate. That last one is a bit sneaky, as it comes attached to her back in-package rather than laid out in the tray, so be on the look out!
#gallery-0-20 { margin: auto; } #gallery-0-20 .gallery-item { float: left; margin-top: 10px; text-align: center; width: 50%; } #gallery-0-20 img { border: 2px solid #cfcfcf; } #gallery-0-20 .gallery-caption { margin-left: 0; } /* see gallery_shortcode() in wp-includes/media.php */
The submachine guns are very nicely detailed for their small size, as is the time bomb for that matter. While they are easy enough to fit into Tracer’s default, gun-hold-y hands, the actual grip she has on them can feel just a bit loose. Not so loose that you can’t trust that she’ll be able to hold onto them if she’s posed on your shelf, but there’s a good chance they’ll slip out or at least turn sideways if you’re changing her poses while they’re in her hands. The effect parts are similarly reliably able to stay plugged in while Tracer holds a pose, but anything more than slight jostling is likely to knock them off. By looking inside them, it seems clear that there’s very much an intended top and bottom that the muzzle flashes are supposed to plug onto the guns, but it’s a bit difficult to tell what that way is and, in my experience, they feel the same whether they’re upside down or rightside up.
For her handswaps, Tracer has an open palmed waving hand and a little two finger salute hand, both of which are for her right hand. The hands all plug in nice and solidly and feature a wrist joint. It is kind of a shame that she doesn’t feature any alternate left hands and, as far as I can tell, I don’t believe her left hand is even removable. While the included two hands are nice, it’s a slight shame that she didn’t come with at least an open palmed left hand as well.
#gallery-0-21 { margin: auto; } #gallery-0-21 .gallery-item { float: left; margin-top: 10px; text-align: center; width: 50%; } #gallery-0-21 img { border: 2px solid #cfcfcf; } #gallery-0-21 .gallery-caption { margin-left: 0; } /* see gallery_shortcode() in wp-includes/media.php */
When it comes to her detailing and paint work, Hasbro did a good job of picking out all of the most important notes of her character design, making sure they got the attention they needed. Her shoulders feature nice and clear tampographs of the British flag on the right and a flight patch from her piloting days on her left. Her eyes are very nice and crisply painted on beneath her (non-removable) clear yellow goggles as well as some amazingly cleanly applied pink paint on her lips. The timey-wimey, sci-fi glow of her chronal accelerator harness is picked out in an eye catching electric blue, though unfortunately only on her chest. The back part features no such blue paint, though it is still picked out in a nice, bright white and silver. Tracer’s tights feature an amazing yellow-to-orange gradient, along with another tampograph of her own name that she has written on her left thigh for some reason and grey mesh running down the sides her thigh and calf. The gradient really is something to see, though, and helps give the figure a premium feel.
Unfortunately, there are noticeable amount of smaller details, like the belts that run under her arms and fasteners/buckles that are molded but unpainted. Her unpainted gauntlets also seem a little under-detailed compared to the in-game model. A very slight blackwash or even just a bit of panel lining would’ve really helped them pop a little more, I feel. Some paint, like the aforementioned electric blue, is a bit messily applied on my copy, though it’s only really noticeable on close inspection. There is one very egregious paint flaw on my copy though, as underneath her time bomb there is a gigantic splotch of white paint on her brown jacket. While this is thankfully hidden just by virtue of being on her back and almost being completely covered up by the bomb, it’s still not an insignificant paint error.
#gallery-0-22 { margin: auto; } #gallery-0-22 .gallery-item { float: left; margin-top: 10px; text-align: center; width: 33%; } #gallery-0-22 img { border: 2px solid #cfcfcf; } #gallery-0-22 .gallery-caption { margin-left: 0; } /* see gallery_shortcode() in wp-includes/media.php */
When it comes to articulation, I found Tracer to be better than expected, but still very limited in some ways. Chief among those limitations was, out of the box, my Tracer’s top right knee joint was completely stuck. Stuck in such a way that I feared trying to use force on it would cause it to break. Thankfully though, I was able to remedy this by sticking her in a plastic bag and then dipping her legs in hot water for a minute or two, which loosened her knee up good. With that fixed, Tracer’s legs are remarkably posable! She’s able to assume the kind of nimble poses you’d want her to be able to pull off. In addition to thigh swivels, her knees can bend just as far back as a human knee can without looking too freaky, and her legs can spread for almost full Van Damme level splits. While her legs can move forward decently high, she lacks pretty much any sort of backwards leg movement.
Unfortunately, as you move further up, Tracer’s articulation starts to get less impressive. While she does have an ab crunch and a balljointed upper body, her bulky gauntlets mean she has practically no elbows articulation beyond pointing down or sitting at a near 90 degree angle, though they can swivel right or left. Additionally, while her shoulders can move back and forth just fine, they have next to no outward or inward movement. While not nearly as limited as her arms, the high collar of her bomber jacket does slightly get in the way of her otherwise quite good head articulation.
#gallery-0-23 { margin: auto; } #gallery-0-23 .gallery-item { float: left; margin-top: 10px; text-align: center; width: 33%; } #gallery-0-23 img { border: 2px solid #cfcfcf; } #gallery-0-23 .gallery-caption { margin-left: 0; } /* see gallery_shortcode() in wp-includes/media.php */
All in all, despite my not particularly high opinions of Hasbro’s previous 6″ scale offerings and some stumblings with her, I’ve ended up being rather taken by Tracer. Giving her a once over after taking her from the box, I wasn’t too sure, but as time went on (and bad knee joints were fixed) I found myself warming up to her more and more. Honestly I think she might be the best experience I’ve had with any of Hasbro’s six inch figures. From what I can tell, they’re really stepping up their game for Ultimates, and I’m excited to see what they can do with it from here. If you’re willing to perhaps risk some slightly spotty QC, I think you’ll really find a lot to love with Tracer.
#gallery-0-24 { margin: auto; } #gallery-0-24 .gallery-item { float: left; margin-top: 10px; text-align: center; width: 25%; } #gallery-0-24 img { border: 2px solid #cfcfcf; } #gallery-0-24 .gallery-caption { margin-left: 0; } /* see gallery_shortcode() in wp-includes/media.php */
Overwatch Ultimates Tracer Gallery and Review! Cheers, love! The time manipulating speedster frontwoman of Blizzard Entertainment's Overwatch has arrived in the first wave of Hasbro's new six inch line of action figures, and now she's blinking into the Allspark Studio!
1 note
·
View note
Text
The Best CSS Tricks to Make Your Designs Stand Out
Have you ever seen an incredible web design and wondered how the designer got it to look so good? Let me tell you, they had to use a lot of tricks. Sure, they probably knew a whole bunch of things that you don’t know yet. But by looking at their finished project, you might guess that they used some cool CSS tricks that you didn’t know about. In this article I’m going to share 20 of my favorite CSS tricks that are guaranteed to make your designs stand out!
Introduction
There are a lot of CSS tricks that can help your designs stand out. In this article, we’ll take a look at some of the best ones.
One CSS trick that can really make your designs pop is to use background gradients. Gradients can add a lot of depth and interest to your design, and they’re relatively easy to implement. There are a number of online tools that you can use to generate CSS code for gradients, such as ColorZilla’s CSS Gradient Generator.
Another great CSS trick is to use shadows and highlights. By adding shadows and highlights to elements, you can create a sense of depth and dimension. This can really make your designs stand out, especially if you use contrasting colors.
CSS animations are another great way to make your designs stand out. By adding animations to elements, you can create an eye-catching and interactive experience for your users. There are a number of online tools that you can use to generate CSS code for animations, such as the Web Animations API.
Overall, there are a lot of great CSS tricks that you can use to make your designs stand out. These are just a few of the best ones.
Creating Text
One of the most important aspects of any design is the text. The text is what conveys the message of the design, so it is important to make sure it is legible and easy to read. There are a few CSS tricks that can help with this.
First, using a larger font size can make a big difference. If the text is too small, it will be difficult to read and people will likely just move on. Second, using a different color for the text can also help make it stand out. A bright color will grab attention and make the text easier to read. Finally, using bold or italicized text can also help make the message of the design more clear.
By using these CSS tricks, you can help make sure your designs are easy to read and understand. This will help you communicate your message more effectively and make your designs more successful overall.
Shapes
There are a few different ways to create shapes using CSS. One way is to use the border property. By setting the border-width to a different value on each side, you can create a trapezoid or triangle shape. You can also use the border property to create a circle shape by setting the border-radius to 50%.
Another way to create shapes is by using the clip-path property. This property allows you to specify a path that the element will be clipped to. This can be used to create any kind of custom shape.
Finally, you can use gradients to create shapes. By using a linear gradient, you can create rectangular or triangular shapes. You can also use radial gradients to create circles or ellipses.
All of these techniques can be used to create unique and eye-catching designs that will make your website stand out from the rest.
Positioning Elements
One of the best ways to make your design stand out is to use CSS to position elements in interesting and unique ways. By positioning elements in creative ways, you can add visual interest and make your design more eye-catching.
There are a few different CSS properties that can be used for positioning elements. The position property can be used to specify the position of an element relative to its normal position. The top, right, bottom, and left properties can be used to specify the distance of an element from its normal position. The z-index property can be used to specify the stacking order of elements.
When positioning elements, it is important to keep in mind the size of the element and the size of the screen. You don’t want to position an element so that it is off-screen or too small to be seen. Positioning elements can be a great way to add visual interest to your design, but it is important to use these techniques sparingly so that your design doesn’t become too cluttered or busy.
Applying Backgrounds to an Element
You can add background colors, images, or patterns to any element on your website using CSS. This can help to make your designs more unique and eye-catching.
To add a background color to an element, you can use the “background-color” property. For example, if you want to add a yellow background to a paragraph, you would use the following CSS:
p { background-color: yellow; }
You can also add background images to elements using the “background-image” property. For example, if you want to add a picture of a beach as the background for a div element, you would use the following CSS:
div { background-image: url(“beach.jpg”); }
Adding patterns as backgrounds is also possible using CSS. Patterns are small images that are tiled across the background of an element. You can create your own patterns, or use ones that already exist. For example, if you want to add a pattern of stars to an element, you would use the following CSS:
element { background-image: url(“stars.png”); }
Typography
There are a few CSS tricks that can really make your designs stand out. One of them is typography. By carefully choosing the right fonts and font sizes, you can create a look that is both unique and eye-catching.
Another way to make your designs stand out is to use CSS3 features like shadows and gradients. These can add depth and dimension to your design, making it more visually interesting.
Finally, don’t be afraid to experiment with color. Using bold or unusual colors can really make your design pop. Just be sure to use colors that complement each other well.
By using these CSS tricks, you can create designs that are truly unique and eye-catching.
Art Direction
When it comes to making your designs stand out, art direction is key. By carefully choosing the colors, fonts, and images you use, you can create a unique and eye-catching design. Pay attention to the overall feel of your design, and make sure everything works together to create a cohesive look.
Use Creative Coding
One way to really make your designs stand out is to use creative coding. This involves using code to create custom effects and animations. With creative coding, the sky’s the limit in terms of what you can create. If you want your designs to really wow people, try adding some custom code.
Think Outside the Box
When it comes to design, it’s important to think outside the box. Don’t be afraid to experiment with new ideas and concepts. Push the boundaries of what’s possible, and you may just come up with something truly unique. Thinking outside the box is essential for any designer who wants their work to stand out from the rest.
Gradients and Patterns: You can use gradients and patterns to add interest and depth to your designs. Gradients can be used to create a sense of movement, while patterns can be used to add texture and interest.
Text Effects: There are a variety of text effects that you can use to make your designs stand out. You can use shadows, highlights, and even 3D effects to add depth and dimension to your text.
Background Images: Adding a background image to your design can really make it pop. A well-chosen background image can add interest and drama to your design.
Borders: Borders can be used to frame your design and add visual interest. You can use different border styles, thicknesses, and colors to create a unique look for your design.
Colors: Carefully choosing the right colors for your design is one of the best ways to make it stand out. You can use contrasting colors, complementary colors, or even a monochromatic color scheme to give your design a unique look.
Drawing Shapes with CSS3
One of the great things about CSS3 is that it allows you to create complex shapes with very little code. In this article, we’ll show you some of the best CSS tricks for creating amazing shapes.
One of the simplest ways to create a shape is to use the border property. By setting the border-width to a different value on each side, you can create a simple triangle or square.
You can also use the border property to create more complex shapes. By setting the border-radius to 50%, you can create a circle or oval. And by adding a background-color, you can fill in the shape with color.
If you want to create a more complex shape, you can use the clip-path property. This property allows you to specify any arbitrary shape and have it clipped to an element.
There are many resources online where you can find ready-made clip-path shapes that you can use in your designs. Or, if you’re feeling creative, you can even create your own custom shapes with a tool like Illustrator.
Once you’ve created your shape, you can add it to any element on your page using the clip-path property.
Arrow Animation
The arrow animation is a great way to make your designs stand out. It is a simple CSS trick that can have a big impact on the look of your site. To create an arrow animation, all you need is a few lines of CSS code.
First, you need to create a div element with the class name “arrow.” Then, you need to add the following CSS code to the arrow class:
position: relative; width: 0; height: 0; border-left: 20px solid transparent; border-right: 20px solid transparent; border-bottom: 20px solid #fff;
This CSS code will create a white arrow that is 20 pixels wide and 20 pixels tall. The arrow will be pointing down.
Next, you need to add the following CSS code to the arrow class:
animation: arrow 1s infinite;
This CSS code will cause the arrow to animate infinitely. The animation will last for 1 second.
Finally, you need to add the following CSS code to the arrow class:
@keyframes arrow { 0% { transform: translateY(0); }
50% { transform: translateY(-100px); }
100% { transform: translateY(0); } }
The CSS code above is creating a keyframe animation for the arrow. The 50% keyframe adds the arrow to the page, and then at 100%, it removes the arrow from the page. This creates an infinite loop that continually adds and removes the arrow from the page. This infinite loop allows you to create infinitely looping animations on any web page!
Conclusion
There are a ton of different CSS tricks you can use to make your designs stand out from the rest. In this article, we’ve compiled some of our favorites. From using negative space to add visual interest, to adding animations and transitions to make your site more interactive, there’s sure to be a trick here that you’ll love. So go ahead and give them a try! Your users will be glad you did.
#The Best CSS Tricks to Make Your Designs Stand Out#web design#website development india#top mobile application development company#best website designing company in india#best application development company in india#graphic design#web development companies india
0 notes
Text
Vellum
Receive The Latest Inspiration and Advice. Unsubscribe Anytime. Email Address Join. Provide a valid email address. For Professionals. Vellum is a translucent material produced from the skin, often split, of a young animal. The skin is washed with water and lime (Calcium hydroxide), but not together. It is then soaked in lime for several days to soften and remove the hair. Once clear, the two sides of the skin are distinct: the side facing inside the animal and the hair side.
There is finally a free wallpaper app on iOS that’s absolutely beautiful. No insane subscription. Just hundreds of perfect images, unique curated collections, and a new wallpaper drop every day. This is the only wallpaper app you’ll ever need.
*Android coming soon
We've sorted through thousands of images to find the very best wallpapers. Beauty is something we're pretty passionate about.
You can create a blurred background easily from our wallpapers with our custom blur tool. The aesthetic of a matching gradient for your home screen is a welcomed addition. Zen attained.
Each day you open Vellum, you'll be treated to a new free Daily Wallpaper. Missed a day? Not a problem! Premium Users* have access to the last four weeks of the Daily Wallpaper. No expensive subscriptions in Vellum. *Requires a one time in-app purchase.
4K 4k cinematography 4K video 32 float adobe Apple bracketing canon cinema5D cinematography digital cinema digital photography DJI drone fstoppers.com fujifilm gear hdr hdr discounts hdr expose HDR expose 2 hdr express hdr software high dynamic range iphone mirrorless camera new nik nikon panasonic petapixel photo gear photogear photography. Welcome to HR Xpress! HR Xpress provides you with tools & information to manage your RR Donnelley work life. https://extraload977.tumblr.com/post/657340910438416384/hdr-express. Hdr Express LLC is a Texas Domestic Limited-Liability Company (Llc) filed On June 23, 2020. The company's filing status is listed as In Existence and its File Number is. The Registered Agent on file for this company is Alain Sivilla Perez and is located. HDR Express is a Shareware software in the category Miscellaneous developed by Less Stress Instructional Services. The latest version of HDR Express is 3.1.1.12800, released on. It was initially added to our database on. HDR Express runs on the following operating systems: Windows. The download file has a size of 11.1MB.
Do you like your devices to have a familiar theme? In a few simple steps, you’ll have a matching wallpaper on your watch and iPhone.
From Google Docs to Scrivener to our very own Reedsy Book Editor, there are countless tools out there for writers to create, edit, and ultimately format and export their books to publish. Vellum is another one that you probably recognize, though you might not be completely familiar with its mechanics. That’s why we wanted to comprehensively review the latest Vellum software! In this post we'll evaluate key features, overall pros and cons, and how to know if it’s the right software for you.
First off, let’s cover what Vellum is, as well as the different packages and pricing available.
What is Vellum?
Vellum is a book creation tool for Mac that allows you to professionally format books for publication. The Vellum software is free to download and use, but you’ll need to purchase a package to actually export your files to publish.
The Vellum package options are:
1. Vellum Ebooks — allows you to create and export unlimited ebooks. 💰Cost: $199.99 Space falcon reloaded movie.
2. Vellum Press — allows you to create and export unlimited ebooks and paperbacks. 💰Cost: $249.99
If you purchase Vellum Ebooks first, you can upgrade to Vellum Press for an additional $99.99. However, the mathematically-minded user will realize that this is $50 more than you’d pay for Vellum Press alone. So if there’s even a chance that you’ll end up printing your books, you might want to invest in Vellum Press outright.
These prices might seem pretty steep for publishing software, but keep in mind that you’re not just going to be using Vellum as a replacement for Microsoft Word. Indeed, its primary function is formatting, not writing, and its features allow for fairly sophisticated book design. Its strengths include great import and export abilities, style templates, and a multi-platform previewing tool — all of which we’ll cover below.
Did you know? The material “vellum” is parchment made from stretched calfskin, used by writers for centuries in lieu of paper. Though it’s much rarer nowadays, vellum is still used for certain religious and archival purposes, such as printing scrolls of the Torah and the British Acts of Parliament.
Key features of Vellum 2.5.3
📥 Import capabilities
Though just about every book formatting tool allows you to import other documents, Vellum’s import capabilities are quite impressive. You can only import Word .docx files (which makes sense, given that this software is only available for Mac), but the conversion is instantaneous and pretty seamless. Your entire book appears in the app right away, with chapter breaks inserted automatically, as long as you’ve denoted them with headings in the original document.
You can then edit directly in the app, though your bold, italics, and other basic formatting will carry over. Finally, you can do special formatting, such as ornamental breaks (which you can customize yourself!).
The only hiccup we found with Vellum’s importer was that it occasionally messes up the spacing in the first chapter. However, this can be fixed in-app by simply deleting the extra spaces. Some users have also reported chapters being clumped together or out of order. To fix this, just select the configuration icon next to the heading and then choose “Convert To.”
If you’d like to test out the importer (or any of the following features) yourself, you can do so using the sample documents provided on the Vellum Tutorial page.
📖 Book Styles
If any one feature makes Vellum worth its hefty price tag, it’s Book Styles. Once you’ve arranged your chapters to your heart’s content, you can navigate to this panel (under “Styles” on the left) to tailor just about every other aspect of your formatting and interior design. Start by selecting the overall aesthetic of your book under the main Book Style heading (with stylishly named options such as “Meridian,” “Artisanal,” and “Oxford”). Then go on to customize just about everything else!
For example, remember how we said you can cherry-pick those ornamental line breaks between sections? Vellum provides no less than seven built-in designs, plus the option to upload your own image to use as the “ornament.” The Book Style panel also supplies multiple options for chapter titles and first paragraphs (including various fonts and drop caps), as well as block quotes, verses, and even images.
Past versions of the Vellum software have struggled to incorporate images into the text, but the newest version has more or less cracked the formula. There’s still no viable option for a full spread of custom-placed images (as you might see with photos in the middle of a biography, for example), but you can easily insert in-line images, or a single image that takes up a whole page.
As you switch back and forth among the different styles, Vellum will also display each option in an e-reader preview on the right, so you can get a sneak peek at the final product. Speaking of which, those previews aren’t just for experimenting with Book Styles…
👀 Preview mode
Another helpful feature of Vellum is its Preview mode. Most formatting tools have a preview mode of sorts, but Vellum’s is particularly thorough. It allows you to see how your book layout will look on a wide variety of e-readers: Kindle Fire and Paperwhite, Apple iPad and iPhone, Nook SimpleTouch, Kobo Glo, and Android tablet. Simply click on the tablet icon in the toolbar to select your mode of choice.
You can also preview how your pages would appear in a print book. Vellum definitely shines here, as it has both Draft mode (for looking at the overall text) and Proof mode (for scrutinizing the layout and design). The only downside is that Proof mode can be a bit slow to run. So if you’re using Vellum to preview a print book, you should probably save the “Proof” preview until your very last once-over.
📤 Export capabilities
Finally, we have Vellum’s export capabilities, which match its trusty import capabilities: the app exports smoothly and true to preview. As long as you’ve checked over your book on every kind of e-reader, you should have no trouble. Naturally, it also exports in various file types for ebooks, and different trim sizes for print books.
However, it’s easy to forget that you won’t be able to export files from Vellum without paying for a full package — and you don’t want to frustrate yourself by designing the perfect book, only to realize you don’t actually have the budget for it. So be honest with yourself about what you’re willing (and able) to spend, and weigh your formatting options carefully before you begin this process. Luckily, our next section should help you with that!
Overall pros and cons of Vellum
What Is Vellum
👍 Pros
Vellum Envelopes
Various professional, aesthetically pleasing formatting options with Book Styles.
Can include links to external sources and your other books.
Preview function helps clearly envision the final product, whether it’s an ebook or print book.
No limit to the number of books you can export after you’ve purchased a package — great for authors self-publishing long series, and even has built-in box set capabilities.
👎 Cons
Vellum Software
Much more expensive to use than comparable book formatting tools, such as Apple Pages (free), Kindle Create (free), the Reedsy Book Editor (free), and Scrivener ($45).
Not available for PC — though you can still use Vellum on a PC, if you’re willing to pay for access to a “virtual” Mac.
Doesn’t lend itself well to substantial textual edits. For example, if you write a new sentence to replace an old one, but then want to undo the typing (Ctrl+Z), Vellum will undo each individual letter rather than the whole sentence at once. (This is why, though it can be used as a word processor, we recommend waiting to import your book into Vellum until you have a final draft.)
Vellum Software
The bottom line
Vellum software is a solid investment if you’re planning on self-publishing multiple books, especially if you’ve been dissatisfied with other DIY formatting options in the past. However, if this is only your first book, and/or you’re not sure whether you’ll go the self-publishing or traditional publishing route, it’s best to hold off for now — especially if you’re on a budget, since $199.99 (at minimum) is nothing to sneeze at.
In the meantime, why not check out some free book formatting tools, just to get a feel for the process? (We hear that RBE is pretty cool.) Or if you’re on the hunt for premium writing apps, but don’t quite have Vellum-deep pockets, there are many great pieces of novel writing software that are less taxing on the wallet. Don’t be afraid to try out lots of different options: that’s the only way to find out what’s right for you!
Have you used Vellum to format your books? If so, tell us about it in the comments — and if not, leave a question for someone who has!
0 notes
Text
Latest 12 Ultra Modern UI/UX Design Trends to Influence in 2021

Users use the website every day in their normal life, and show additional creativity to get their attention to businesses. Entrepreneurs focus on visual appeal and usability of their web solutions so that users stay there.
In addition, they monitor the latest UI trends to stay in the game. Let us now explore in detail the leading UI / UX design trends of 2021 and see how popular brands implement them successfully.
1. Skeuomorphism
Skeuomorphism UI stands proudly amid the latest UI trends and is not going to lose ground. Everyday people come in various advertisements. They watch discount advertisements and receive constant notifications. In addition, consumers interact with various interfaces that are overwhelmed with information. To avoid such overload, Mobile App Designers are always finding new ways to simplify graphic elements which keep limiting the number of colors and make different proportions and composition.
Nowadays, the functionality of the elements plays a paramount role. It is important to properly highlight the best qualities of a product and use it to convey the right feelings to customers. Components that designers use for decorative purposes are only used irrelevantly.
2. Go Bright & Bold, Colorful Background
The trend with various styles of using gradients was popular in the past and remains a relevant UI trend to date. Now the gradients are getting lighter, but at the same time, they look a lot more complex. The thing is that earlier, designers used about 2-3 colors in linear colors. Now the number of colors can be increased to 10. In addition, an overlay can be used.
Such gradients cause a temperamental outbreak because they are so colorful. This is why designers of many well-known companies like Stripe or MyMind enjoy using them.
3. Uninterrupted UX
You should not complicate interfaces in 2021 and force users to take additional action. Try to reduce the number of elements and areas that customers should fill. Uninterrupted registration and signing became one of the latest UX trends. For example, when entering their market account, users can enter their phone number. They no longer need to remember another password.
Thus, Apple followed this recent UX trend and created a custom button that helps avoid additional registration steps. By clicking the button, you choose whether or not you want a website to see your email. One moment and you are already logged in.
4. Especial & Incoherent Illustration Animation
Illustration user interfaces remain at the top of the trend like they did last year. However, they are less common than before. Earlier, web designers followed minimalism when pictures arrived. In this way, they tried to make web pages less overloaded and more sensible for users.
Nowadays designers mostly experiment with unusual angles, proportions and story. They are using muted pastel colors, bright or vice versa. The parables are getting bigotry and creating a bigger commotion than ever before. We suggest that SVG format should be used for pictures. The quality of images in PNG, GIF and JPEG formats is deteriorating as screen resolution increases. This is not a problem with SVG because the vector format can be extended and there is no loss in quality
5. Crayon Color
Since today is the day of minimalism and simple web design, designers use crayon colors in their works. In this way, they highlight the lightness and humility of the design. Such colors fit very well into various concepts. They set the right tone and environment for various websites, for example, e-commerce platforms etc.
6. Voice User Interface (VUI)
The widespread adoption of UX / UI design in conjunction with the voice user interface has again resulted in one of the UX trends. It has been clear for a long time that design does not have to be visual to work properly. The voice interface is an internal interface. It is more with context and data synthesis than with actual design. Nevertheless, designers are trying to keep pace with the latest user experience trends and provide users with more and more frequent voice interfaces.
For example, today we can see dozens of apps where you can translate a word or sentence into another language. It works in the following way. You click a button, then the device will start recording your voice and will start translating your speech into the language you want. In this way, you can communicate easily with people who do not know your language.
7 .Glass Morphism
According to research last year neomorphism was widely used in web design practices. It represents a combination of two general approaches to building user-interfaces. They are called skeuomorphism and flat design. These UI trends are quite different from each other and are often considered to be the exact opposite.
In 2021, web designers got a new passion, called glass morphism. This trend comes from the blur effect or the so-called blurred background. When people see such an element, it is as if they are looking through the glass.
8 .Enlightenment
Enlightenment is a brief introduction to the product that helps you find information in an application. Also, its key functions make it easy to understand. Whatever it is, onboarding became a major UX trend that should not be overlooked. An opinion exists that onboarding is a sign of poor design. They say that if you need to explain how a product works, then there is something serious with its design or description. Furthermore, you can see your users through these screens and force them to take unnecessary action.
In fact, modern onboarding comprises the most important screens of mobile applications. Due to them, users get better information about this app. We recommend that you keep it simple. Pay attention to the text, make it short and easy to read. Use beautiful high-resolution images and photos. You need to use all this information to explain the value of your product and to create interesting content.
9 .Symbols
Symbols make the job easier as an efficient tool for visual communication of customers. The simple minimalist icon is considered a powerful UX trend. It is about their ability to convey meaning in less space than all words. For this reason, many businesses place special emphasis on icons. For example, in 2020, big companies such as Apple and Sketch have complied with the latest user experience trends and thought to redesign all their system symbols. We recommend choosing icons from the same family. Their size and dimensions should be the same. This type of consistency will show your level of skill and emphasize the integrity of your website
10 . Mobile First Perspective
Today, about half of search queries come from mobile devices. People use their smartphones to find cafes for dinner or to book movie tickets, browse travel marketplaces to book holiday trips, and so on. These days, web designers are trying to make the design of your website or the desktop version of the app look good. For this reason, the mobile-first approach became an important UX trend. Web designers see this as a great way to improve customer interaction.
At Winklix, we develop a PWA application for each project. We convert websites into convenient cross-platform applications. Users can download them right from the website page on their device's home screen. Find a minute to learn more about PWA for insurance startups that have recently been added to our case studies.
11. Huge Typography
Every designer considers it necessary to choose the right font for the website, product or application. Customers often associate a particular font with a larger brand. Nobody would have used Roboto if it hadn't been for Google. Internet giants had taken the responsibility of creating this front and tried to show it to the whole world. People prefer scanning more than reading on the Internet. In such a situation, they get information that is important to them. For this reason, experimentation with fonts became one of the notable UI design trends. Today web designers use complex typography. They try to uncover the most important information and convey it to the customers.
These days we can often see websites that are completely built on typography. They look very fresh and entertaining. Speaking of fonts in general, their combination is an important part of design for any web solution. Understand the UI guidelines created for the online collaboration marketplace by the Winklix team of Mobile App Designing Company.
12. Virtual Reality
The world is not standing still. The 3D design field is evolving rapidly. However, the main drawbacks of this technique went nowhere. The more complex the 3D graphic, the more weight it puts on users' computers.
In 2021, 3D elements will become even more popular due to the high demand for AR and VR technologies. For example, in a new update from Apple, MacOS Big Sur, many icons were changed. The designers added elements of three-dimensional graphics to some of them.
Wrap up
In 2021, design trends are a mix of Skeuomorphism, Uninterrupted UX, Crayon Colors, Huge Typography, and Virtual Reality. To be successful in creating a unique and attractive user interface, try to select and combine multiple trends. If you are looking for a UI / UX design agency to implement all your needs and requirements, then hire UI designers from Winklix. Our team will be happy to create a custom software product for your business according to best industry practices.
At Winklix, we strongly believe that the main goal of UI / UX design is to help users achieve their goals. For this purpose, we track the latest UI and UX trends when building our products, be it a multi-vendor vehicle marketplace or a housing search website.
If you are looking for a UI / UX design agency to implement all your needs and requirements, then hire Mobile App UI / UX Designer from Winklix. Our team will be happy to create a custom software product for your business according to best industry practices. Contact us to get a free quote and turn your idea into a reality. In addition, you can check out our web application portfolio where we share our expertise in programming and design.
0 notes
Text
Web Design Trends to Rule in 2021
Website design trends in 2021 are going to be more creative to spark interest and engagement and provide a great user experience. Considering the online market for website design Dubai -the competition has already compelled web designers to raise the bar for web designing by any web development company in Dubai with cutting-edge styles and brand memorability.

Since 2003, Indglobal as a top web development company UAE has been designing websites for online businesses and has a varied portfolio of clients, from family-owned businesses to large corporations. We provide a range of digital optimization services which help you to reap the return on investment on your online platform.
Here are few of the top web design and user interface trends that any web design company in Dubai will recommend for 2021.
Online Email Template Builder
With Postcards you can custom emails templates faster without any coding skills! Considering website design UAE, this will be an useful trend.
Dark Mode5
Dark mode offers the ability to toggle between light and dark color schemes for your design. It can be regarded as a combination of deeper, darker colors that are able to create the same visual feel as light mode simultaneously maintaining readability and functionality.
Create Websites with Our professional Online Builders
Experimental Typefaces
Experimental typefaces are gaining immense popularity in website and mobile app projects in delivering fonts online. These typefaces range from amazing elaborate pieces of artwork, and could be a single color of style, animated including full- or abbreviated character sets.
Designs Without as Many Faces
This trend can be considered to be a direct result of the coronavirus pandemic worldwide – with designs featuring fewer people and faces.
Designers are checking for ways to use the existing inventories of images with people not gathering in groups and with mask-wearing, to establish appropriate imagery.
Text as Homepage “Art”
With multiple options for typography, considering the oversized and experimental trends if you wish to build a great website design in Dubai as many designers are preferring text as the main “art” for designs, like filled and outline pairs in the example from Known Themes.
Blur & Noise (Grain)
Blur and noise are going to be the beloved comebacks for 2021. All we remember is how they make website design feel sophisticated and refined but also they have left an excellent impression for mobile applications and all other sorts of interfaces and artworks.
Circles
Circes might emerge as the most popular geometric shape of 2021. because of the implied meanings of circles like wholeness, perfection, infinity, motion. They can really bring a visual focus to a specific area of the design.
3D Illustrations
Designers are currently trying to implement everything in 3D, including illustrations and animations to scenes created along with objects and images.
The examples here stress on illustrated styles. Illustrations can take on 3D effects and this trend has the ability to result in something with a more realistic feel.
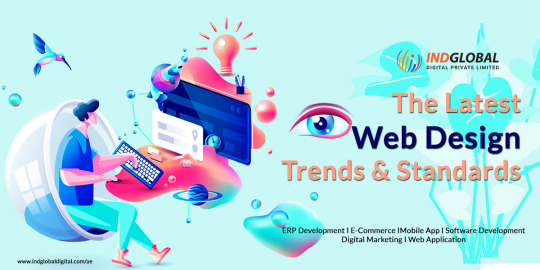
Black and White Illustrations
Other types of illustrations such as black and white drawing styles. also remain popular. The nice thing about these illustrations is that they seem real and can match” almost any design aesthetic as well.
Collage Art
Sometimes the most impactful website image happens to be a collection of multiple images. More designers are opting for collages these days as the main artwork on pages.
Images can be placed creating a layered collage look throughout the design in their own “containers”.
Images can be combined and merged to create a unified piece of art but actually that’s a collection of pieces.
Colorful Backgrounds
On the other end of the spectrum from dark mode is the use of colorful backgrounds for design projects. Bright color can be seen as a reflection of the world right now and also as a desire for better, brighter times in a pandemic era.
Colorful backgrounds come in two forms such as gradients and blurs and both of them allow you to check with color combinations from amazing bright hues to more softer rainbow-style palettes.
Big, Bold Typography
Typography is another big trend heading into 2021.
“The bigger the letters are, the more impactful they will be”- this trend is all over the map from thick sans serifs to thin serifs and scripts and slabs.
Cool Mouse/Cursor Icons or Actions
This is also a trend that mouse and cursor states can change into interesting things as you click, scroll or hover.
Impero uses a bright yellow circle which floats around the screen with the cursor. It makes other objects animate or move as it approaches and encourages clicks over and again.
Micro Animations and interactions in Web Design
The use of micro-interactions from any tiny buttons, call-to-actions, text hovering, cursors, pop-up illustrations is a common trend that is subtle but intriguing, 2021 is expected to witness a greater emphasis on the micro-animated interactions
The Parallax effect
The parallax effect is a trending element used by several web designers. Parallax is the optical illusion which occurs when objects that are near to the viewer seem to move faster than those objects which are farther away.
Minimalism in Web Design
The idea of simplicity and to offer a streamlined user experience is becoming popular. With customers flooding online, the web design trend of ‘minimalism’ is going to be a favorite for many people.
Pantone’s Illuminating and Ultimate Gray
It is hard to mention trends of the year without the pair as noted by Pantone as colors of the year. Illuminating (yellow) and Ultimate Gray along with the yin and yang of design that works with a more muted neutral.
Conclusion
These website designs and UI trends for 2021 do not work in isolation. They are the best when developed and designed as part of a brilliant design scheme as provided by our proficient developers at IndGlobal Digital - the best website designing company in Dubai. The versatility of these design trends make them highly usable, layer able and perfect to be implemented in your upcoming projects.
We would be happy to know your predictions about the future of web design UAE in the comments section below.
Email your query to [email protected] and we will get in touch with you.
0 notes
Text
Social Media Posts
An important part of any internet shopping brand is a digital presence. I wanted to create a page that was not only informative of what the brand is like, but also one that is full of artwork and designs relating to the brand. In the past I’ve seen brands create one larger image by splitting an image into 3 and posting them separately. When looking at the Instagram page as a whole, it would look like one larger design. This is an effect I want to experiment with within my own brand.
Below you can see a design that I created for my drink brand. I previously created another logo for cases in which my plain text one would not work. This logo is essentially a collage, and I use it as a design asset in a lot of my designs. I wanted to feature this on my social media so I decided to make an edit. I placed the design on a square artboard with an ink in water texture in the background. My aim was to make a design where the colour within it really stood out, which would only work if the majority of the image was in black and white. This meant that the ink and water texture had to be black and white to not interfere with this. I also added a white border to the design which I filled with black text as you can see below.
There is also a clipping mask within this design. You can see in the design that the fossil on the top of the collage is going over the white border. To achieve this, I placed the collage layer above the one of the white border and the text. To apply the clipping mask to this layer, I selected the icon that looks like a camera in the layers panel. I then held CTRL and clicked the thumbnail of the white border to put a selection on it. Finally, I clicked the clipping mask of the collage in the layers panel and brushed over the right and bottom parts of that went onto the border. This would hide them view perfectly before the border starts which gives the effect of the border going over it.
In order to colour parts of the design and to make it look integrated, I first needed to draw where I would want the colour. You can see that I have already completed this for the lips, but for the purposes of this post I will show how I did the nails. The colour of the nails was drawn using the Pen Tool with a bright blue set as the fill. I zoomed in close to this accurately so all of the nails would be completely covered.

To make the colour of the nails appear to be actually on the hand, I used the Multiply Blending Mode. As you can see below, the colour of the nails has slightly changed due to the colour blending with the original colour below. But the end result is one where the colour looks like it is actually part of the image instead of just being placed over the top.

This is the final result of this social media post. I am very happy with it and I think I have succeeded in making the colour appear bold and like it was part of the original image. Although it’s fairly obvious it’s not because of the style of the design, I think that it still does when you look at the way the colour has been applied.

This is another post I did for my social media. I wanted one to let people know that the drinks are available for sale, but I wanted it to be done in an aesthetically pleasing way. I decided to use a colourful textured background to achieve this, but with the use of Blending Modes I was able to merge the design into the text. I did this by typing ‘Lurcher’ in white into the centre of the background, but it was important to make sure this was done on a black background. This is because the Blending Mode Difference, which was the one I used, will invert the texture when it is above white. Because I want it to be easy to differentiate the text and the texture, the text had to remain in white.
After reviewing the design, I decided that the colours of the original texture didn’t link enough to my brand image. After doing the previous social media post, I had the idea of using pink and blue again. But in this case, I wanted to apply it to the entire image. This was an easy process with the use of the Gradient Tool, in which I picked a linear gradient and a pink to blue colour scheme. This layer was put above the texture and the Blending Mode set to Hue. As you can see below, it blends well into the texture and I don’t think it’s at all apparent that a gradient has been applied, which is the main aim when applying colours to an existing image.
The purpose of this post was to boldly display the words “Available Now” and I feel like this has achieved that. But it has not been done in a way that is boring to look at, or in a way that your eyes would just skip past it. I think this will not only be functional for these reasons, but also fit in well to my social media page.

For this post I wanted to stay true to the concept of a post featuring lots of black and white, but with splashes of colour to emphasise key elements and add depth to the design. The post you see below is one I made from a screen grab out of my advert. The particular scene this was taken from is my favourite shot of the advert, therefore I wanted to implement it into my social media. I did this by getting a screen grab and applying the Black & White adjustment layer from the layers panel in Photoshop. This turned the entire image into black and white, but it also produces a clipping mask layer with the adjustment layer. By selecting this and beginning to paint with a black brush, you can see the original colour begin to come through. This is what I did, but I made sure to not be too precise with it. Because of the static-like nature of this image, I thought it made sense to allow for some bleed of colour and I think this was a good decision after seeing the final result.

After assessing my previous social media posts, I decided that the first one I did was going to look a little out of place. This was an easy fix however, as I used the same technique as I did in my ‘Available Now’ post. The only difference is that the Blending Mode for the gradient was Hard Light and that it was clipping masked to avoid applying colour to the square border.

Following creating the previous three posts, I wanted to make some posts that were a bit more on the side of product promotion than aesthetic branding. This was a simple process as I had already created the mockups I used in the post you can see below. I spaced them out evenly and began to make some simple shapes across the background of the image. I took some influence for these combination of shapes from a camera viewfinder.
Like I had done before, I wanted to space this post out over three. To do this, I made three square artboards in Illustrator and placed them next to each other. When my design was laid over all three, I could just export all of the artboards as separate JPEGs. They were now ready to be posted on the Instagram page.

This is a screenshot of the Instagram page that I created. Here you can see what all of the designs look like posted on the page. The final sum of posts was twelve, but this was composed from five individual designs.
0 notes
Text
Poster 3


So for the first poster ive ended up using an free stock image form google which I took into illustrator to manipulate it into a traced image with the effect of “black and white logo” as shown above.


So my next steps and focus was to make the dice white which was done through selecting colour range and picking just the outline and removing the background out the equation and leaving just the outlines on one separate layer to keep everything floating about the way it should be.

The next thing that ive used was some previous work form an on sight task “mono-printing & Dry point printing”.

2 dry point prints form one of the on sight tasks that was set and used for this poster, which this photo got thrown into photoshop to then get manipulated to the way where the poker chips have its kind of spotlight and highlights and its shades with getting rid of the background leaving just the outline and at last inverted the colour of the outline to white from black.

Which ended up being the Casino chips/poker chips and this was work that was done using the dry point printing method that vie took a photo of the work and then manipulated it in photoshop to neaten the edges up to make it slightly sketched but also neatened up type sketch.
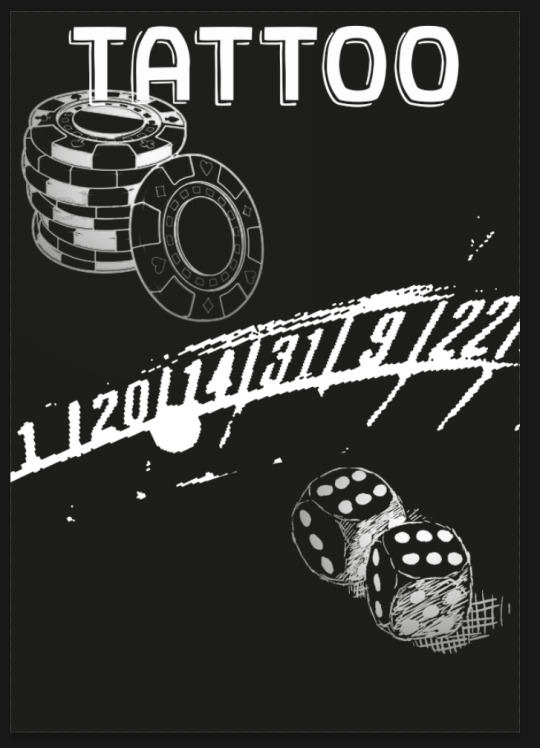

Also as for adding in the basic and the names/ text for the poster to present this design as a tattoo studio poster and to give its giveaway that its a tattoo studio which the imagery is the theme and the text to give it away but also the dice and the sketched poker chips. Where I've also went online and to be more specific to dafont to get the font called Gothic Ax Hand which ive to manipulate it in my own way but the font being form a gothic theme or another words set of font styles.

After being pleased with the font ive decided to get some kind of simple pattern to use inside the font to give the font more of its own character and its own unique look than some kind of simple bold one the idea was to get rid of the background/white space between the pattern and then blend it within the text.


These where the tools and also the brushes that I've used to create either the top grainy texture on the font. Starting with the gradient tool onto a larger b ut more soft brush with a larger scale to get the nice fade away.


The progress of the font transforming.The first thing that ive ended up doing after the pattern was without the white bits was to put it into the text then blend it and also scale it to the size that fits perfectly to my preferences and also add texture into the font just to give it more of a characteristics.


After i was as close to the finish ive decided to play around with another layer on top of the whole outcome to then dissolve the layer or other type of ‘FX’ change to the layer that was effective in its way and that caught my attention. Which ive ended up experimenting with all the ‘FX’ features and these where the two that stood out the most or actually worked as not all that ive experimented with didn't give me a response.

This was the one that really stood out along the side of the screenshot above but the reason why I appreciate the last one more than the green gold tint as of the nice lighter finish offs where the focus points of the imagery isn't solid its fades round the edges as of the manipulation made earlier.

My last step was to add the logo somewhere suitable on the page and then blend it in so the letter A curves around the poker chip.
0 notes
Photo


Poster Research:
Looking at ways I might want to present my quote posters:
Ocasio-Cortez’s campaign posters - really liked how dynamic and vibrant this one was - very different to normal political posters - aiming at the right audience- younger? love the boldness of the type - could I have a similar style? headshot of person with quote behind them? colourful - encourage people to come to my gallery?
Reebok - love the hand rendered look of the writing - what look ive been doing with the linos - could I put a hand rendered looking quote style on top of a photo? also love the angles and varied sizes of text - pointing you to the most important info.
Cannes Lions - really like the boxed out section - draws eyes in - could I do something similar for where my quote goes?
Women's Fund: Words masks - again, the hand rendered looking type - love how the shape and colour of it symbolise a mask - about not being able to speak out. like the idea of having the text in a certain shape - I could put my quote, hand-rendered font style in a speech bubble shape? or shape of logo?
University of Lodz - I loved the use of colour and shapes - the shape in the middle, allowing only that shape to be a photo section, allows for space around the outside to be used for text - this is a useful technique, I could do something similar, but with my logo shapes! I also loved the overlaying of type and imagery - the text overhangs the photo - more dynamic and interesting to look at - it means your eyes aren't only drawn to the photo, centred in the middle, but to the wider poster!
I’mpossible - could I use the shape of my logo and put the quote within it? on top of a photo of a person? bringing cohesiveness and allowing for a clear read of the quote? love this posters play on words with ‘I’mpossible’ - could Incorporate my p‘art’icipate into my quote posters? - help put scheme across even more?
Blurred boxes - quite like the idea of a collage effect - could I blur out the bits where I want to put the quote? I could have a loose colouring to the blurred section - referring to my logo colours. the blurred bit on the photo would help with readability of the quote! while still allowing for a lot of the photo to come through! I love the monochrome look to this - it makes the contrast in the blurriness even more significant - as I want to stick to my logo colour scheme, this may impact a blurry technique? if I do this, I will have to experiment with it!
Golden Melody - I love the multiple layered images - making these separate sections into a whole piece. could I do something like this? multiple people’s faces and experiences shown in one poster? to help symbolise how this gallery is for the whole community? I love how its got a mix of black/white and coloured photos - allows for chosen areas to stick out more - advancing your eyes to the right bits!
Nalanda - I really liked the calmness of these posters - simple and effective. the consistent sloping shape running through all three makes them cohesive. the slope shape also allows for writing to be easily seen over top of the image - could I do this with my logo shapes? make three quote posters? all with one of the different shapes on? together make a whole logo/piece?
Publicidade & Propaganda - PUC MINAS - I really liked the colour opacity ombre to these posters - they're both cohesive with one another and allow the white writing on top to be more pronounced against the photo background! could I mess around with a gradient - instead of block colours - in my quote poster designs?
Overall, this was very useful - I looked at posters that I thought could help determine how I wanted to portray photography with quotes/type. From looking at these, I now want to create rough ideas, inspired some of the techniques seen here - like blocking out bits of the photo for writing to go over, or the use of hand rendered font in dynamic compositions! I think, with reference to some of these compositions, I now have somewhere to take my quote poster concept!
0 notes
Text
Belt Drawing Experiment
For my belt section, I was thinking of some different imagery I could do for it showing the order of belts in a fun way without it looking boring or just being 6 lines of colour. With the belt order I added in a way of showing the judo belts by having showing them as the belts spread out on the page. I like how it looks but I am worried the colours are too bold and could distract the reader, however, I need to show the belt colour and order with imagery somehow.
For the black belt I did a similar thing by having it across the spread and adding in my name in Japanese from my own belt. I think it is a clean way to show the belts but I want to try taking images of my own belts and putting them in to show the textures and how they have been worn down. Also, some of my belts have the mon stripes on them and that would be good to show how they look. I think this could work well as it gives it more of a lively and some addition of colour. I don't want to interfere too much with the colour palette but this is going to have to be done on some spreads like this. For the order of belts I have added a gradient feather effect to not make the whole strip of colour as bold for the reader, I really like how this looks because the gradient it subtle. I don't want the strips to be too thick either because this will make it too bold too. I like the effect the black belt gives and the content on that page is about Dan Grades and me getting my black belt. The smooth line just helps to give more to the page, it it slightly thick but it still works and I find it doesn't distract the reader from the text.

Judo belt order with gradient feather effect

Judo belt order with no effect

Black belt with my name in Japanese from my own belt across the spreads
0 notes
Text
Web design trends to watch out for in 2020
If you used Facebook or pretty much most other social media a decade or half a decade ago, you remember how flat and boring their designs were. Websites were made with more practicality and efficiency in mind, as opposed to a blend of aesthetical and smart design. And if we looked at them again, chances are, they won’t be particularly pleasant to look at.

Unless you’re new to the industry of web design, you want to get all the updates on the latest and greatest design, so that your work matches the modern standards we’ve all come to expect. Sure, not everything is about following trends, but when we’re talking about aesthetics, it’s easy to get lost in the large variety of styles that people use for their websites.
So, we decided to highlight a few web designs we think are going to be big this year, so you have some idea of what you’ll be working with, or perhaps are working with right now.
1. A Little Darkness Never Hurt
We’ve reached a point of technological convenience, where you can use your electronics pretty much anywhere, one of the most famous places to use it on the bed, especially at night.
You’re sitting there in the darkness staring at the screen and the last thing you want is to be blinded by all these bright vibrant colors that make your retinas melt in their sockets. Which is why so many social media websites as well as tons of browsers allow you to turn on “Dark Mode”.
This is as practical as it is stylish, but there are many people out there who choose to have Dark Mode on all the time, even when there’s light around. It’s just so much more soothing to the eyes and less piercing. Sure, you could just turn down the brightness, but this may just make things hard to see.
Tip: Dark mode works best with minimalistic design since the entire point of it is to make it easier for your eyes to see the screen. By using minimalist design, you’re also making it simple for your eyes to track different areas of the page, making it even more pleasant to navigate.
2. Keeping Things Simple
An old design turned on its head with some zany colors that pop out, minimalist design has made a giant comeback in recent years and has won over many web pages with its simplistic practicality. This is where they say “less is more”.
Minimalism can mean many things in design, from a simpler font, to overall structure of the web page. Also, avoid being too wordy, as most individuals need very quick and immediate information, as opposed to paragraphs of text. Also, utilizing images and descriptions as a minimalist form of labeling can make your web page more accessible to people who don’t speak the language.
The minimalist design is not only pleasant to the eyes and considered to be stylish, but it also exists to improve users’ attention span and allow them to take in more of the web page without getting tired. Many people lose focus when there’s too much movement on the screen, so a minimalist design allows for better visual flow through each individual page.
Tip: Minimalism is a great style to use for web pages designed to give quick bursts of information, like a Q&A or FAQ page.
3. Keeping Things Even More Simple
Nothing beats the simple bliss of a basic, yet effective black and white style. This is a classic and it’s very hard to get it wrong, since it’s pretty much everywhere; in most books you read, this Word document I’m writing in, most documents in fact.
Tip: Use several shades of grey with the black and white to give the overall design more depth.
4. Vibrant Colors, Vibrant Life
We love that glow. We love that shine. Combine it together and you get these beautiful, strong colors, which take the overall aesthetic to a whole new level.
One of the best parts of this style, is that it looks futuristic and almost cyberpunk, with a lot of great designs which resemble a high-tech atmosphere and environment.
Tip: Neon colors are very vibrant, but sometimes too vibrant. Combine them with more somber colors, so they don’t get too tiring.
5. Getting Back to the Roots
When we talk about design, we talk about its roots in the craft of hand-drawn designs and illustrations. You can take the concept of style and design back to its roots with hand-drawn elements.
They may be a little cartoonish and look sloppy (on purpose, of course) but for many people, this is a very organic style, as it fits perfectly with their project. It brings more humanity and a little bit of personality to web pages. Sure: saying something is full of “soul” is a bit kitsch nowadays, you can’t look at hand-drawn design without giving yourself a little smirk.
Tip: Make sure you don’t force this style on people. Oftentimes, it can be quite distracting to see hand-drawn designs in every single corner of your website and could possibly be tiring for the eyes to take it all in. Be a little more conservative with this style.
6. Clean and to the Point
Some things need to be direct and to the point. This is exactly why so many web pages use Bold typography. A good UX design needs to communicate its message as clearly as possible. Hence why this design exists. Some people don’t need complicated designs and patterns. They need something formal, to the point and direct.
And nothing says this more than a simple bold typographic style that gets right down to business. You may find it boring, but then that means it’s not a web page meant for you.
Tip: Large letters and big blocks are easy to work with when it comes to building a website for the desktop, but it may cause problems on smaller screens, like phones and tablets. Be careful with how you design it so it’s easy to translate onto a mobile browser.
7. A Whole New Dimension
3D web designs have taken a backseat to flatter and more plain minimalism, but by no means is 3D obsolete. When used in the right areas, 3D elements can create a more dynamic UX. 3D allows for greater detail in designs, is super engaging and can catch a user’s gaze for longer.
This mostly comes from the depth of the shapes and patterns that catches the interest of the user, as they are interested in experiencing your website from different angles and perspectives.
Tip: 3D overload can cause longer load times on your website. Make sure that the webpages are optimized enough to handle such a high load.
8. Key is in the Detail
Speaking of depth, you can have a 3D experience on your website without the heavy load of actual 3D design, by cleverly using shadows, layers, and other floating elements to give users the illusion of 3D.
Despite the fact that this kind of style is clearly not 3D and only a façade, users will still appreciate the attention to detail, the light playfulness, as well as the practicality that comes with this style.
Tip: Shaders, layers and floating objects can be hard to work with, since wrong placements can cause your web design to look more noobie than old-school. You’ll need to play around with different kinds of shadows and layers before making the final design.
9. Some Satisfying Motion
You can keep things to a minimal, or you can go nuts with your animations. While many web designers are deciding to let animations take a back seat to practicality and better web page load times, animation is still one a favorite tool for many UX developers and is a very versatile tool.
Let’s be honest: we all love to play around with the different animations on the web page and see the little details the developers hid around.
Long story short: we find happiness in the little places, and when they move around, then we’re even more happy.
Tip: Much like 3D, fully animated web pages can also be very performance intensive. Be careful that you don’t overcrowd your page with animations and then find that it takes several minutes for them to load.
10. Old School Turned New School
Gradients are super old fashioned, but also really heartwarming. If you’ve ever had the opportunity to use the late 90s to early 2000s internet, you remember how wholesome it was to see all those out of place gradients and weird color placement.
You can take that style, modernize it, and make it sleek and smart. Gradients are still a great tool in design, so don’t be afraid of them. They’re a great way to add more color and style to your pages.
Tip: Do not use them randomly. Consider very carefully how you use them, so that they don’t look out of place or cluttered.
11. Videos Make Things Easier
Sure a decade or two ago, putting videos on your website could’ve completely destroyed your websites’ performance, as they are so demanding. But nowadays, everyone has some very powerful devices, capable of opening web page videos very quickly and without any hiccups.
There is basically no reason not to use videos in your design unless you are specifically instructed not to, as they’re a great way to communicate information without lengthy paragraphs that very few visitors will bother to read.
Imagine if instead of all these written descriptions there were videos that narrated and demonstrated all these design tips… You know, that’s not a bad idea at all.
Tip: Videos can still be somewhat demanding, so be careful with their amount, length and quality. You still have a lot of room to work with, but don’t overdo it.
To sum up
2020 is a year of big design diversity. Not only are some old-school designs and styles making some pretty big comebacks, but recently developed ones are also holding their own in recent trends. This means picking one out of the lot won’t mean regretting it after a couple years, when that particular design goes out of style.
If you’re a UX developer, just think about these following design ideas and see which ones best fit your project:
Dark mode A Little Darkness Never Hurt
Minimalism Keeping Thing Simple
Black & white Keeping Things Even More Simple
Luminous color schemes Vibrant Colors, Vibrant Life
Hand-drawn elements Getting Back to the Roots
Bold typography Clean and to the Point
3D elements A Whole New Dimension
Shadows, layers, and floating elements Key is in the Detail
User-triggered animation Some Satisfying Motion
Multi-colored gradients Old School Turned New School
Videos or text-only heroes Videos Make Things Easier
It’s looking like a promising year, so keep your eyes open to catch any new style or design that crosses your path. You never know where good ideas come from, so always remember to look all around you.
0 notes