#and then learn a ton about audio recording and mixing and editing and producing and and and
Explore tagged Tumblr posts
Visit Tumblr Blog
Explore Tumblr blogs with no restrictions, modern design and the best experience.
Last Seen Tumblr Blogs


Fun Fact
When “GIF” was named word of the year in 2012, Oxford Dictionaries U.S.A. credited Tumblr for pushing the word.
Text
completely unfair that to listen to the podcast that exists in my brain i have to write it first
#shh kat#and then learn a ton about audio recording and mixing and editing and producing and and and
0 notes
Text
What’s the Best DAW (Digital Audio Workstation) for Music Production?
As a music producer, I get this question all the time: What’s the best DAW for music production? And honestly, there isn’t a single right answer. The best DAW is the one that fits your workflow, genre, and budget. But I’ve spent years experimenting with different DAWs, so here’s my breakdown of some of the best options out there.

1. Ableton Live – Best for Electronic Music & Live Performance
If you’re into electronic music, hip-hop, or anything beat-driven, Ableton Live is an absolute beast. The Session View lets you experiment with loops and ideas in a non-linear way, making it perfect for live performances and spontaneous creativity.
Why I Love It:
✅ Intuitive loop-based workflow ✅ Great for live performance & DJing ✅ Tons of built-in instruments & effects
Who Should Use It? EDM producers, DJs, and beatmakers.
2. FL Studio – Best for Beginners & Beatmakers
I started my production journey with FL Studio, and I know a lot of producers who swear by it. The piano roll is hands-down the best in the game, and it’s super beginner-friendly.
Why I Love It:
✅ Easy-to-use interface ✅ Drag-and-drop workflow ✅ Amazing stock plugins & synths (hello, Sytrus and Harmor!)
Who Should Use It? Beginners, trap/hip-hop producers, and anyone who loves an intuitive interface.
3. Logic Pro X – Best for Mac Users & Songwriters
If you’re a Mac user and into recording live instruments, Logic Pro X is a no-brainer. It has a clean interface, powerful stock plugins, and is widely used by professionals in pop, rock, and film scoring.
Why I Love It:
✅ Huge collection of virtual instruments ✅ Great for recording live instruments ✅ Seamless integration with macOS & iOS
Who Should Use It? Mac users, singer-songwriters, and film composers.
4. Pro Tools – Best for Professional Studios & Engineers
Pro Tools is the industry standard for professional recording studios. If you plan to work in high-end studios or do serious audio engineering, you’ll want to learn this DAW.
Why I Love It:
✅ Industry-standard recording & editing tools ✅ Perfect for multi-track recording ✅ Rock-solid stability
Who Should Use It? Professional sound engineers, mixing & mastering pros.
5. Studio One – Best for All-in-One Workflow
Studio One is a rising star in the DAW world. It offers a super smooth workflow, great mixing features, and one of the best drag-and-drop interfaces I’ve seen.
Why I Love It:
✅ Fast, modern interface ✅ Built-in mastering suite ✅ Great for both recording & electronic music
Who Should Use It? Anyone looking for a powerful, easy-to-learn DAW.
Final Thoughts: Which DAW is Best for You?
At the end of the day, the best DAW is the one that feels right for you. My advice? Try a few demos, see what clicks, and stick with the one that boosts your creativity.
If you’re looking for a DAW, FL Studio and Ableton Live are great for electronic music, while Logic Pro and Pro Tools shine for recording and mixing.
What DAW do you use? Let’s talk about it in the comments!
To buy musical instruments and gear, visit Iktaraa.
1 note
·
View note
Text
If you want to create a fiction podcast, but think you don’t have the means, check this out.
Let me tell you how I occupied myself for about 10 weeks during quarantine. I spent almost every waking hour writing and producing a fiction podcast.

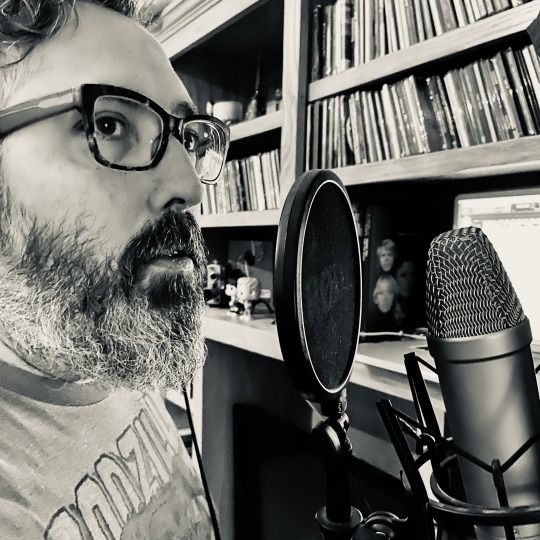
The original idea for the story included a bunch of characters, but because of the quarantine and the fact that I don’t have the funds to go around hiring a bunch of voice actors, I reworked the story to include just a few characters. And though I’m no actor, I filled the main role just out of necessity. See? Here I am acting and shit...
The emotion! The pathos!
Of course, that was before I learned that I should really be recording in a more soundproof place, so I moved into here...
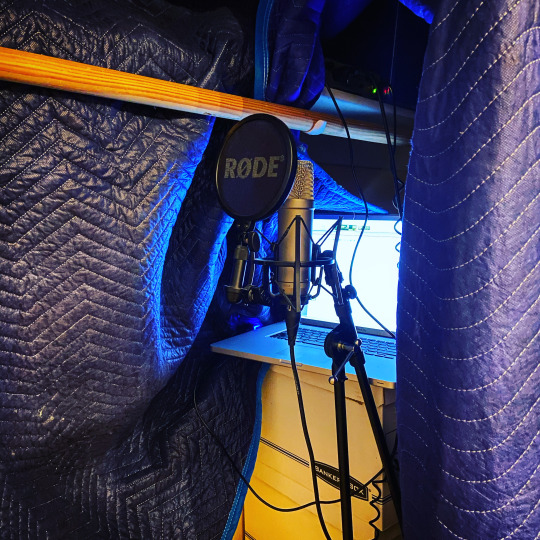
A closet. Not even enough room to turn around. Claustrophobia, party of one.
To fill out the cast, I asked two of my old college buddies (who had their own recording equipment) and my wife. I gave them each their episode scripts and, in the case of my friends, they recorded their parts in their own home and sent me a few takes of each scene.
I don’t have a photo of any of them recording, but... uh... here’s a shot of my wife standing proudly next to a puzzle she worked really hard to complete...

Oh, and as for the microphone, we already had a nice one, but any microphone will do in a pinch. Hell, I know some people even use the mic on their earbuds to record. Sure, it’s not ideal, but it works.
Then, having almost no knowledge of how to work the software, I edited it, did sound design and mixed it. I used Pro Tools, but there are a ton of free options for recording and mixing a podcast, like Audacity. And some podcast hosting companies, like Anchor, even offer that stuff for free. Easy-peasy, lemon squeezy.
Anyway, my wife knew how to use Pro Tools, so she showed me the basics. And my friend Tyler does audio for a living, so whenever I got stuck on something, he would walk me through the fix. You can’t swing a stick without hitting someone who knows something about recording, especially now when every-fucking-body has a podcast. So, ask around if you don’t know the technical stuff.
I should also note I got nearly all of the sound effects from freesound.org, which is a fantastic resource for this sort of thing. It’s a pretty massive searchable library of totally free effects generated by pro and amateur users. And the site has royalty-free music options, too, but I spent about $20 at melodyloops.com for main theme music I thought perfectly captured the mood of my story.
I also used royalty-free images to generate some promotional graphics both for the series and individual episodes. Graphics like this one...
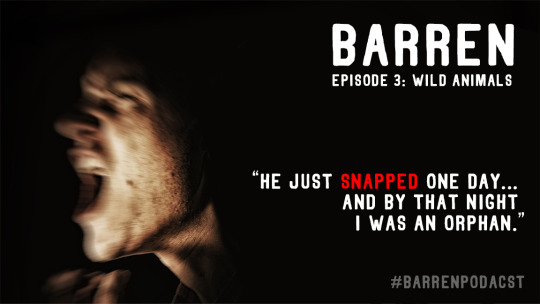
...and this one...

I used Photoshop to make them, but there are free online photo editors that have the same functionality. Pixlr is a good one.
When the audio files were ready, I looked around at where to put them. Now, there are a shit-ton of sites and services that will host your files and populate your podcast to all of the major platforms. So, see what works best for you. I used the aforementioned Anchor because it's super easy to use and — you guessed it — free.
Then, once the whole thing was rockin’ and rollin’, I started putting the word out any way I could and a few of those efforts were successful...
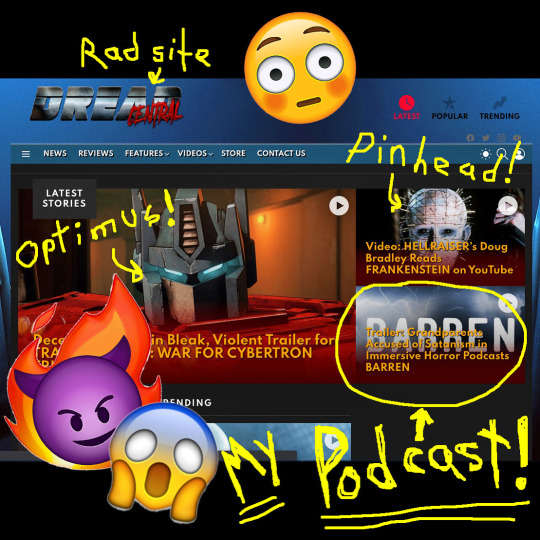
Now, this post is about how to make a podcast, not how to be successful at it. But, I’ll say this about self-promotion: Just tweeting shit out doesn’t do anything. You have to research where people who might listen to your podcast go online, what lingo they use, etc. I mean, it’s basically Marketing 101, but a lot of people think posting shit on social media is magic. It’s not.
So, yeah, I tweeted stuff, but I also wrote up a press release and emailed it out to a bunch of websites and reporters. And I made a video trailer using royalty-free stock footage and free video editing software.
youtube
So, my final tally to make and publish a 6-episode immersive fiction podcast was exactly $20. (And that was for the theme music.) And I was able to do this because I didn’t let a lack of funds or lack of technical know-how stop me. And because — and this is key — I wasn’t afraid to ask for help. If not for my wife and my friends... I won’t say I wouldn’t have been able to do it, but it definitely would have sucked ass.
Okay? Now you know you can quite literally make a podcast for free. So, go do it.
And lastly, if you dig crime and/or horror fiction, maybe check out my podcast Barren. And if you like it, leave a review.
If you don’t like it, fuck off.
19 notes
·
View notes
Text
Clarus Victoria Bundle Download For Mac

Incredible music. In the key of easy.
Clarus Victoria Bundle Download For Macbook Pro
Clarus Victoria Bundle Download For Mac Os
Clarus Victoria Bundle Download For Mac Download

GarageBand is a fully equipped music creation studio right inside your Mac — with a complete sound library that includes instruments, presets for guitar and voice, and an incredible selection of session drummers and percussionists. With Touch Bar features for MacBook Pro and an intuitive, modern design, it’s easy to learn, play, record, create, and share your hits worldwide. Now you’re ready to make music like a pro.
Both the bundles price and the% off were getting very high and it was becoming hard to balance, at this time the bundle is now just under 97% off up from 95% when I first released it, I was trying to keep it closer to 95% by occasionally adding some payed maps to the bundle but over the months the bundles overall price increased to about $45. Free Victorian fonts (.ttf &.otf). Victorian available in Windows and Mac OS X version. TrueType and OpenType fonts. Search from a wide range of typography fonts. Plug-ins and licenses for PC (Windows) or Mac (OS X) are not compatible with Android or iOS versions and vice versa. No AAX (Pro Tools) plug-ins available for the BusTools v3 and TrackEssentials v3 bundles. AAX plug-ins require Pro Tools 11 (64 bit) and up.
Start making professional‑sounding music right away. Plug in your guitar or mic and choose from a jaw‑dropping array of realistic amps and effects. You can even create astonishingly human‑sounding drum tracks and become inspired by thousands of loops from popular genres like EDM, Hip Hop, Indie, and more.
More sounds, more inspiration. Plug in your USB keyboard and dive into the completely inspiring and expanded Sound Library, featuring electronic‑based music styles like EDM and Hip Hop. The built‑in set of instruments and loops gives you plenty of creative freedom.
The Touch Bar takes center stage. The Touch Bar on MacBook Pro puts a range of instruments at your fingertips. Use Performance view to turn the Touch Bar into drum pads or a one-octave keyboard for playing and recording.
Plug it in. Tear it up. Plug in your guitar and choose from a van-load of amps, cabinets, and stompboxes.
Design your dream bass rig. Customize your bass tone just the way you want it. Mix and match vintage or modern amps and speaker cabinets. You can even choose and position different microphones to create your signature sound.
Drumroll please. GarageBand features Drummer, a virtual session drummer that takes your direction and plays along with your song. Choose from 28 drummers and three percussionists in six genres.
Shape your sound. Quickly and easily. Whenever you’re using a software instrument, amp, or effect, Smart Controls appear with the perfect set of knobs, buttons, and sliders. So you can shape your sound quickly with onscreen controls or by using the Touch Bar on MacBook Pro.
Look, Mom — no wires. You can wirelessly control GarageBand right from your iPad with the Logic Remote app. Play any software instrument, shape your sound with Smart Controls, and even hit Stop, Start, and Record from across the room.
Jam with drummers of every style.
Drummer, the virtual session player created using the industry’s top session drummers and recording engineers, features 28 beat‑making drummers and three percussionists. From EDM, Dubstep, and Hip Hop to Latin, Metal, and Blues, whatever beat your song needs, there’s an incredible selection of musicians to play it.
Each drummer has a signature kit that lets you produce a variety of groove and fill combinations. Use the intuitive controls to enable and disable individual sounds while you create a beat with kick, snare, cymbals, and all the cowbell you want. If you need a little inspiration, Drummer Loops gives you a diverse collection of prerecorded acoustic and electronic loops that can be easily customized and added to your song.
Powerful synths with shape‑shifting controls.
Get creative with 100 EDM- and Hip Hop–inspired synth sounds. Every synth features the Transform Pad Smart Control, so you can morph and tweak sounds to your liking.
Learn to play
Welcome to the school of rock. And blues. And classical.
Get started with a great collection of built‑in lessons for piano and guitar. Or learn some Multi‑Platinum hits from the actual artists who recorded them. You can even get instant feedback on your playing to help hone your skills.
Take your skills to the next level. From any level. Choose from 40 different genre‑based lessons, including classical, blues, rock, and pop. Video demos and animated instruments keep things fun and easy to follow.
Teachers with advanced degrees in hit‑making. Learn your favorite songs on guitar or piano with a little help from the original recording artists themselves. Who better to show you how it’s done?
Instant feedback. Play along with any lesson, and GarageBand will listen in real time and tell you how you’re doing, note for note. Track your progress, beat your best scores, and improve your skills.
Tons of helpful recording and editing features make GarageBand as powerful as it is easy to use. Edit your performances right down to the note and decibel. Fix rhythm issues with a click. Finesse your sound with audio effect plug‑ins. And finish your track like a pro, with effects such as compression and visual EQ.

Go from start to finish. And then some. Create and mix up to 255 audio tracks. Easily name and reorder your song sections to find the best structure. Then polish it off with all the essentials, including reverb, visual EQ, volume levels, and stereo panning.
Take your best take. Record as many takes as you like. You can even loop a section and play several passes in a row. GarageBand saves them all in a multi‑take region, so it’s easy to pick the winners.

Your timing is perfect. Even when it isn’t. Played a few notes out of time? Simply use Flex Time to drag them into place. You can also select one track as your Groove Track and make the others fall in line for a super‑tight rhythm.
Polish your performance. Capture your changes in real time by adjusting any of your software instruments’ Smart Controls while recording a performance. You can also fine‑tune your music later in the Piano Roll Editor.
Touch Bar. A whole track at your fingertips. The Touch Bar on MacBook Pro lets you quickly move around a project by dragging your finger across a visual overview of the track.
Wherever you are, iCloud makes it easy to work on a GarageBand song. You can add tracks to your GarageBand for Mac song using your iPhone or iPad when you’re on the road. Or when inspiration strikes, you can start sketching a new song idea on your iOS device, then import it to your Mac to take it even further.
GarageBand for iOS
Play, record, arrange, and mix — wherever you go.

Clarus Victoria Bundle Download For Macbook Pro
GarageBand for Mac
Your personal music creation studio.
Clarus Victoria Bundle Download For Mac Os
Logic Remote
Clarus Victoria Bundle Download For Mac Download
A companion app for Logic Pro.
1 note
·
View note
Text
Wave MP3 Cutter Joiner Free In English On CCM
If you might want to carry out audio or music modifying like extracting your favorite tune from a large audio file maybe in your mp3 participant ; minimize or be part of components of an mp3 file to create a musical file for your cellphone; lower out undesired commercials from your recordings; or even to separate an enormous audio file to multiple tracks with none loss of sound quality attributable to decompressing and recording. Once you select the MP3 file you want to lower, the MP3 Cutter tab displays a waveform graph of your selected file. You can select the starting and ending points as per your want. Nevertheless, the audio plugin doesn't present any zooming option in its waveform graph to take a more in-depth take a look at the chopping factors. Obtain the free picture enhancing software program InPixio to create beautiful photos — with 1 click on!" Built for these new to picture modifying, the checklist of options is brief however beneficial for easy enhancing needs. With Free Easy MP3 Joiner, you could quick merge, combine and be a part of a number of music MP3 recordsdata into a much bigger MP3 file in a break up second with out recompressing and with out high quality loss. As quickly as the audio information are added for merging, click the File" button and mp3joiner.org select the Merge" possibility from the drop-down itemizing to begin merging the information.

Copy and save audio tag from the supply information to the destination ones. MP3 Joiner is able to writing ID3v1, ID3v2 and APE MP3 tag. Organize and tidy up your type sheets with this free on-line CSS editor with syntax highlighting and plenty of useful code cleansing options. Load the demo text and take a look at the model cleansing choices. MP3 Chopper is the perfect MP3 Cutter App for Apple iOS devices that embody iPhones and iPad. You should utilize this app in your Apple cell system to make ringtones by editing and chopping mp3 recordsdata.

X2X Free Video Audio Merger is a superb tool within the occasion that a number of totally different recordsdata should be seamlessly joined together. Lots of the processes contained within this package deal are computerized; saving the user a substantial amount of time. As soon as the information are imported and the time stamps are chosen, the system does the rest. Additionally it is capable of assist batch conversions within the occasion that multiple files need to be created. As it is compatible with most media codecs, there ought to be few points with reference to codecs.
Finally, go to File> Export Clip> as an MP3 and save your audio file. BeFunky is one other on-line photo editor that is really easy to work with. You too can edit the metadata and the album art of the audio information that are edited with Simple MP3 Cutter Joiner Editor. If you happen to only need to lower your MP3 information and have little necessities to the audio editing, you'll be able to go for these free MP3 cutters aforementioned. Otherwise, if the fundamental audio splitting can't meet your needs, you may turn to a paid MP3 cutter akin to Joyoshare Media Cutter.Good free audio enhancing software program will allow you to to supply superior music. Modern audio editors can cut, trim, merge music, apply filters and effects, record sounds, mix music samples, change voice, normalize volume, make ringtones, mute silence and tons of different cool tips. In case you need to convert a track into one other format, you should use Freemake Audio Converter , which is free MP3 changing software. However for extra superior features test top audio editors that we record here.Like mp3DirectCut, Mp3Splt can work on an audio file without having to decompress it first, resulting in a quick workflow and no impact to audio quality. This app is way easy though: you just pick a begin and end time, then export that selection as a separate audio file. It counts with a really enticing interface, which makes its use so simple as counting from 1 to 5. You can cut and merge MP3 information in few steps.MP3 Cutter Joiner Free is an aspirational program for music lovers particularly one who likes to create his own music and want some cutting, enhancing, joining, and so forth. With this free MP3 cutter + joiner one-stop solution software program, it is convenient to join collectively multiple audio files into one single file and reduce large audio files into smaller items.This software is likely to attraction to people, therefore, who have movies they need to share with family and friends or who wish to post edited videos on to social media platforms that assist video content material, akin to YouTube. Free Video Cutter Joiner works effectively, the makers declare, with virtually every many file format that video is produced in.Stellar is among the most cost-effective conversion packages we examined. It has a straightforward-to-use interface and batch converts and exports in a lot of the widespread codecs, like MP3, WAV, ACC and FLAC. If you wish to see the detailed operation about the way to combine songs with this audio joiner, you can go to Audio Joiner website to verify it. The funny factor about it's that Visual Audio Splitter & Joiner has absolutely no impact on quality. Please go to the "How It Works" section to learn concerning the internal mechanics of the MP3 splitter.
1 note
·
View note
Text
Music Cutting Program For Mac

Best Music Cutting Program
Music Editing Software
Music Cutting Programs For Mac Free
Free Music Cutting Program
Music Cutting Program For M4a Files
The following is a list of Macintosh software—notable computer applications for current macOS systems. For software designed for the classic Mac OS, see List of old Macintosh software. This list is incomplete; you can help by expanding it.
Looking for the best Mac music-production software? We compare the best alternatives to Apple's free music-making app GarageBand. The editing features are complex and powerful, giving you.
Logic Pro X turns your Mac into a professional recording studio able to handle even the most demanding projects. Capture your compositions and performances — from tracking a live band to a solo software-instrument session — and flow them into your songs.
Top 9 Video Trimming and Cutting Software on Mac and Windows #1: Filmora Video Editor Filmora Video Editor for Windows (or Filmora Video Editor for Mac ) is a well-known video trimmer, cutter and joiner.
Good free audio editing software will help you to produce awesome music. Modern audio editors can cut, trim, merge music, apply filters and effects, record sounds, mix music samples, change voice, normalize volume, make ringtones, mute silence and tons of other cool tricks. If you need to convert a track into another format, you can use Freemake Audio Converter, which is free MP3 converting software. But for more advanced features check top audio editors that we list here.
Shotcut is a multi-track editing software like any other serious software, and you can readily rearrange the workspace to suit your editing needs. Shotcut supports a wide variety of file types for both input and output, including 4K video.
SEE ALSO: Best Websites to Download Free MP3
SEE ALSO: Top 5 Best Download Audio Tools
Audacity
Audacity is the first on the list. Originated in 2000, Audacity is a pioneer of free sound editing freeware. The download is available for Windows, Mac, and Linux. What is Audacity? It is a powerful music editor that lets you perform all the necessary operations with audio files: record music, mix audio samples, cut and trim tracks, merge several MP3s, apply effects, mute parts of a song, and much more! Audacity has an impressive list of supported audio formats including M4A, M4R, WAV, MP3, AAC, AIFF, FLAC, MP2, MP3, OGG & others. For the exotic music file extensions, use Freemake Audio Converter and encode them into MP3s, WAVs or WMAs for further use in Audacity.
The program records sounds from microphones or mixers, streams audio and records multiple channels in the same row. The most required features of this freeware are cutting, mixing large number of tracks, changing the sound properties: pitch, tempo and altering the effects of the track. There are also some advanced effects available like adding echo or reversing. Let’s learn how to use Audacity!
How to Use Audacity
Audacity is intuitive in use. Even if you’re a newbie in multimedia production, you’ll learn how to edit audio in Audacity fast. Follow 3 key steps:
Download and launch Audacity;
Import an original audio track via drag and drop;
On the wavepad form with your track, click the Selection Tool;
Set selection marks and apply any of the options listed in the Edit menu to the audio part;
When you’re done with the audio editing, go to File > Save Project to keep your changes;
The last step is to export your project into a new music file. Go to File > Export audio > Format choose a file extension and hit the Save button.
Summary: The Audacity’s interface is modest. It may be considered as a drawback, but for the program which is absolutely free, you can pay no attention to the button styles. Well, Audacity is suitable and convenient for all the standard operations you may need.
SEE ALSO: 12 Effective Free and Paid Ways of Compressing Any Audio File [TEST RESULTS]

Live 9
Live 9 is an advanced digital music workstation for DJs. Unlike Audacity, Ableton Live 9 enables professional musicians to broadcast live music sessions in night clubs and to perform real-time concerts. Live 9 is available for download on Windows and Mac.
It has a flexible interface and carries out almost any option you can imagine. Even background rhymes and chords are available for adding. So you can feel as a real music director and create your own masterpiece of live sounds. With Ableton Live 9 audio station software, you can record, mix, add effects, sync tracks, and much more. The cool perk of the Ableton software is the ability to work and produce MIDI files that every musician loves. Another advantage is a lengthy set of extra packs for musicians with various loops, samples, drum and instrumental mixes, rhythms, noises and melodies.
How to Use Ableton Live 9
Ableton Live 9 takes time to get used to. So you need to spend time on YouTube watching Live 9 tutorials. Be ready for it! Here’s a video guide for beginners:
Download and start Ableton Live 9;
Create a new live set via File> New Live Set;
Download music samples to your PC and add them via Categories > Add Folder;
Drag and drop desired music files (for example, from Instruments category) into the main window;
Drag and drop samples into the Impulse drum machine;
Tweak the sample’s settings like volume or frequency, if necessary;
Preview your music creation and go to File> Live Set as, name your project and click the Save button;
To save your project as an audio track or MIDI, jump to File> Export audio or File> Export MIDI clip.
Summary: If you are a musician or DJ, or just learning it, Ableton Live 9 is a right choice for you. The software is excessive for simple audio trimming or ringtone making. Live 9 audio editor is not completely free; a 30-day trial is accessible without paying. But is it’s enough and you’ll manage to dive into the world of sounds, you won’t find anything better.
WaveShop
WaveShop is a free and lightweight audio editor for Windows OS. As a typical open source tool, WaveShop can’t boast of beautiful interface. It’s plain, but comprehensible for amateurs. The editing freeware has one feature: you can edit the only fragment of a file without affecting the whole track. It seems to be a helpful option for music mixes or creation of DJ samples.
Then, you can reorder some audio blocks to patch a song cover. Moreover, as a usual audio editor, WaveShop can cut, trim, merge MP3s, add audio transitions, normalize, amplify, reverse, fade audio, etc.
How to Use WaveShop
Let’s learn how to cut music in WaveShop. Follow simple steps:
Download and launch WaveShop;
Add an original song via File > Open;
Look at the wavepad and hit the Pause button;
Choose a part of the track with your mouse cursor;
Right click on the selected part and hit the Cut option;
When you’re done, go to File > Save as to save your project;
Later you can export the edited file via File > Export option.
Summary: WaveShop is a pure open source product. If your mission is to make some technical alterations, go for this editor.
Wavosaur
Wavosaur fulfills all the simple missions like cutting, pasting, editing, pitch shifting and processing sounds. It supports VST effects plugin, working with multiple files at once, changing volume and voice, even muting the audio flows, fading in and out. Unfortunately, Wavosour audio editor is only suitable for Windows and it doesn’t have software installer. So, basically, you have to download an archive and use file compression software to unpack it.
Best Music Cutting Program
Installation of Wavosaur isn’t a piece of cake. The interface is plain and not user-friendly at all as you need to puzzle your brain about the meaning of the buttons and icons.
How to use Wavosaur
Music Editing Software
To facilitate software installation, watch Wavosaur video tutorial and follow all steps:
Download and unzip Wavosaur audio editor as shown in the video;
Add an audio file by clicking the file folder button;
Use the selection tool and your mouse cursor;
Apply a desired action (for instance, hit the Scissors button to cut file);
When you are ready, click the Save button.
Summary: Well, those who have time to learn the program’s insights will be quite satisfied with this version. The software is donation-based. So if you enjoy Wavosaur features, please support the developers.
MEF Music Editor
MEFmedia Music Editor is Windows freeware which looks stylish and works fine. It is claimed to be so easy to use that even a tyro of sound editing won’t get lost in it. The most common features like recording, cutting, copying, pasting, deleting and CD burning are inside. So, if you want to record the altered media file on the portable CD, this audio editor is right for you. The free software workflow is similar to Wavosaur. You can add file or a CD disk, go to the wavepad form and apply a sound effect or filter.
Summary: MEF Music Editor is good for advanced, but non-professional users. There are all popular features of an audio editor.
And now, what will be your choice?
Comments
comments
Recommended Video Software for Windows and Mac
Media Player Classic Home Cinema
Like VLC, Media Player Classic Home Cinema is a free, open-source app. In some cases, it may play a file that VLC cannot, or play it more smoothly. People who play a lot of locally stored media usually have both apps installed, to cover as many bases as possible. Like VLC, Media Player Classic Home Cinema can't play feature-film Blu-ray discs.
Music Cutting Programs For Mac Free
Adobe Premiere
With good video editing software, there's minimal processing time when you add video and audio clips that you want to put together. It has a preview window that quickly lets you check your progress without bogging down your computer. What you see in the preview is more or less the same as what you see in the final video file. When it comes time to convert your project into a file, the editor can take full advantage of your computer's potential processing speed to render the end product quickly and without errors. Ideally, the rendering function has presets for quality and file size that are optimized for things like uploading to YouTube or Facebook, and the ability to create your own presets. And you want an editor that's updated a few times a year to fix bugs and add new features.
Adobe Premiere Elements ticks all of these boxes, and for a reasonable price. If you have more money to burn, Premiere Pro, Avid, and Sony Vegas Pro are also good, but you may require training to get the most out of their more advanced features.
Free Music Cutting Program
VLC Media Player
Music Cutting Program For M4a Files
VLC is one of the most popular video players around -- and for good reason: It's not just high-quality, it's also completely free. There are no ads, and you don't need to give the company an email address. You just download and install it, then play your video file. It relies on donations to fund development. However, VLC won't play feature-film Blu-ray discs by default, due to legal issues.
0 notes
Text
Music Production: Everything You Need to Get Started
Music Production: Everything You Need to Get Started: via LANDR Blog
Music production is the process behind every track in your library.
It covers every phase in the creation of a song from writing to the final master.
But music production is a practice that can form the basis of your creative workflow as a musician.
It’s never been easier or more accessible to start producing music.
But there’s so much to learn that getting started with music production can feel intimidating.
In this article I’ll go through everything you need to know to understand the basics of music production and get started as a music production.
What does a music producer do?
Music production equipment
Producing music in a DAW
Songwriting and composition
Sound design
Samples, plugins and MIDI
Sound recording
Mixing music
Mastering
What is music production?
Music production is the process of developing, creating and refining recorded music for public presentation. Music production can refer to the entire lifecycle of a piece of music—from songwriting and composition to recording and sound design to mixing and mastering.
Despite the broad definition, every workflow in modern music production has one thing in common—digital tools.
Thanks to today’s technology, music production is more accessible than ever before.
For the lowest price in history any musician can set up a home studio and get started producing music.
Here’s all the basic information you need to start producing music.
What does a music producer do?
A music producer can have several different roles depending on the genre of music and the type of workflow.
In the traditional recording process, a music producer acts in a similar way to the director of a film.
They create a vision for the material and advise the musicians artistically on how to realize it.
During a recording session the producer acts as a coordinator and provides organizational help. They also offer creative input and notes on the musicians’ delivery and the technical choices made by the engineer.
But the term producer has come to mean a wider range of duties in other genres.
In R&B and hip-hop, the term producer most often refers to the person who created the beat the artists are singing or rapping over.
In EDM the words producer and artist are often used interchangeably, with most artists producing their own material.
Today more and more artists are opting to self-produce, even within traditional genres like rock, indie or singer-songwriter.
No matter which combination of these roles describes you best, if you’re using a DAW to create or record—you’re a music producer.
With the basics out of the way, let’s get into the pillars of music production you need to know to get started.
The 11 Best Music Production Books You Need to Read in 2020
Back to top ⟰
1. Music production software and equipment
To produce music you’ll need a few main pieces of equipment.
Don’t worry—music production setups can vary a lot. You don’t need tons of expensive gear to get started as a producer.
But you will need a handful of key pieces. I’m talking about equipment like a computer, DAW and something to listen to your sounds.
I could list everything individually, but if you want the best advice for building a music production setup with any budget, go check out our Home Studio Guide.
Once you’ve got the basics of home studio, there’s some other production tools you can add, depending on what suits your workflow.
Many producers create entire tracks using only their DAW—but just as many others prefer the tactile experience and hands-on control of hardware.
Synths, drum machines, grooveboxes and effects pedals are fun and inspiring equipment to add to your setup.
Home Studio Guide: How to Build a Home Recording Studio
The 10 Best Grooveboxes for Hands-on Music Production
The 10 Best Drum Machines on the Market Today
The 10 Best Ableton Controllers Available Today
Back to top ⟰
2. Producing music in a DAW
Your DAW is the digital home for your music production.
In a traditional recording studio, the DAW would be the tape machine—but it’s so much more that.
Your DAW is the perfect environment for every step of your music production workflow.
Many producers prefer to write in their DAW by creating loops and clips of their ideas on the fly.
Structuring isolated fragments into full arrangements is one of the biggest strengths of a DAW-based songwriting workflow.
And mixing has never been easier than with a DAW and plugins.
However you use it, the DAW is where your inspiration and workflow collide, and the production process takes place.
Beat Making Tips: How to Make a Beat In Your DAW
Remixing Guide: How to Remix a Song in 7 Steps
What is DAW Swing? Finding a Better Groove
Mix Automation: How to Automate Your Sound for a Better Mix
Are You Getting the Most Out of Your DAW?
Bouncing Audio: How to Export Tracks From Your DAW
Back to top ⟰
4. Songwriting and composition: create a song
Some songwriters produce. Some producers write songs. The boundary between artist and producer isn’t always a bright line.
That means knowing the basics of songwriting and composition is important for modern producers.
The producer often has to make tough decisions when something isn’t working. Is it the mix? Or the arrangement?
Is it the parts, or the tones? Or the effects? Is this song boring, or does it just have the wrong song structure?
These are the types of questions an experienced producer should be able to answer.
To help you develop these skills, we put together an exhaustive list of resources for producers looking to learn songwriting, arrangement and music theory in general.
How to Write A Song in 6 Simple Steps
How to Start a Song: 7 Ways to Set Your Songwriting In Motion
Hard Truths: Your Arrangement is More Important Than Your Mix
7 Essential Arrangement Tips for Working With Samples
10 Emotional and Sad Chord Progressions Every Producers Should Know
Back to top ⟰
5. Sound design: Build the sound you hear in your head
Headphones are important for any home studio, but mixing on them exclusively can be fatiguing during long sessions.
Most engineers do the majority of their work using near-field monitors.
Studio monitors are specially engineered speakers designed to sound clean, clear, flat and neutral.
Unlike consumer audio speakers, these listening tools are not designed to flatter the music or make it sound more pleasant.
In fact it’s almost the opposite.
Studio monitors reveal every flaw in a sound so you can address it in the mix. That extra detail is the insight you need to make your tracks sound great
Still, all studio monitors sound different and choosing the right ones is a highly personal decision.
Check out our guide to the best studio monitors to find your perfect pair.
Audio Effects: The Beginner’s Guide to Shaping Your Sound
What is Looping and How to Use it In Your Music Production
The Ultimate Synth Glossary: 60 Essential Synthesizer Terms
Types of Synthesis: Wavetable, FM Synthesis and Others Explained
Back to top ⟰
6. Samples, plugins and MIDI: Your digital sound tools
Your DAW is your studio centerpiece. But the digital tools you use inside it are just as important in your music production workflow.
MIDI is the language that lets you communicate music in the digital world. It’s the information you enter in the piano to control your synths, samplers and drum machines.
It’s the data your MIDI controller sends when you hit a key, strike a pad, turn an encoder or press down your sustain pedal.
Plugins are the virtual instruments and effects that create tones and textures in your mix.
Your DAW comes with a completely functional set of built-in plugins, but there’s a whole world of exciting plugins out there. Some are even available completely free.
Building your own unique set of inspiring plugins is part of developing your palette as a producer.
Last but not least, samples are snippets of audio you can use in your productions in any way you see fit.
These audio puzzle pieces can be anything from individual drum hits or short instrumental melodies to entire tracks or rhythmic loops.
Samples are used in almost every genre of music you can think of—they’re one of the most inspiring parts of being a producer.
Sampling Music: The Complete Guide
The 200 Best Free VST Plugins Ever
What is MIDI? How to Use The Most Powerful Tool in Music
MIDI Editing: 6 Essential Tops for Better MIDI Tracks
How to Add Texture to Your Tracks With SFX Samples
26 to Add Texture to Your Tracks With SFX Samples
Back to top ⟰
7. Sound recording: Capture the world around you
Plugins are the software sound tools you use in your DAW for, mixing, synthesis, effects, sampling and more.
Most DAWs come with a capable set of built-in plugins that are more than enough to create a professional sounding track.
But third-party plugins are how you expand your sonic palette and make your sound your own.
Maybe you want to assemble the perfect virtual instrument rig with your synth plugins.
Or maybe you’re an effects junkie always on the hunt for a new reverb plugin.
Whatever your niche, plugins can be incredibly inspiring.
They’re a huge part of what makes producing music so exciting.
Recording Vocals at Home: 9 Big Mistakes and How to Avoid Them
Gain Staging: How to Get Healthy Levels for a Better Mix
Microphone Polar Patterns: How to Use Your Mics Better
Field Recording: 10 Ways to Use Found Sound in Your Production
How to Build a DIY Vocal Booth for Studio Quality Vocals
Back to top ⟰
8. Mixing music: Blend your sounds together
Unless you’re making music exclusively with VSTs or samples, you’ll need to capture your sounds with a microphone to bring them into your DAW.
There’s an enormous number of microphones out there—and not all of them are well-suited to every task.
We put together a special guide for choosing a microphone based on which source you’ll be recording.
But if you just want to get an idea of what’s out there, check out our list of the 30 best microphones.
When it comes to microphones, we know there’s one source that’s on everyone’s mind: vocals.
There’s no easy to way to recommend the perfect mic for every singer, but matching your mic to your singing style is a good way to start.
How to Mix Music: The Simple Guide to Mixing
Audio Compression 101: How to Use a Compressor for a Better Mix
7 Weird Mixing Terms: What They Mean and How to Use Them
Equalization 101: Everything Musicians Need to Know About EQ
15 Dave Pensado Mix Tips Every Producer Should Know
Here’s Every #AskAnEnigneer Video To Date
Back to top ⟰
9. Music mastering: the definitive version of your song
Mastering is the final step in your music production process.
It’s the phase where your mix gets the final polish and presentation for how your listeners will actually experience it.
The purpose of mastering is to balance the sonic elements in a stereo mix and optimize playback across all systems and media formats.
Music has never been available in more formats and devices than today.
It doesn’t matter if you’re mixing in a million dollar studio or tracking in less than ideal conditions, you still need the final quality check of mastering.
This step ensures that your sound will be heard the way you intended it to be.
It also provides the glue that gives an album consistent sound across all tracks. Without mastering, individual songs can sound disjointed in relation to each other.
Mastering is a crucial part of the music production process, but it doesn’t have to be scary.
Check out our suite of resources to learn everything you need to know about mastering.
What is Mastering? The Musician’s Guide
How to Prepare Your Music for LANDR Mastering
How to Choose The Right Mastering Style For Your Mix
Loudness 101: How Mastering Levels Affect Your Sound
Back to top ⟰
Production environment
Music production is more accessible than it’s ever been.
That means that there’s never been a better time to dive in and start learning how to produce music.
Use the resources in this guide to start your journey with music production.
The post Music Production: Everything You Need to Get Started appeared first on LANDR Blog.
from LANDR Blog https://blog.landr.com/music-production/ via https://www.youtube.com/user/corporatethief/playlists from Steve Hart https://stevehartcom.tumblr.com/post/190703856709
0 notes
Text
How to Start a Crypto Podcast
New Post has been published on https://coinmakers.tech/news/how-to-start-a-crypto-podcast
How to Start a Crypto Podcast
How to Start a Crypto Podcast
The idea of starting your own podcast is undeniably appealing. Not only do you get to sound off about a topic that’s close to your heart, but if you opt for the host-and-guest format, you get to engage in stimulating debates with interesting people. But before you rush off to order a USB mic and start booking your crypto heroes, there’s a few things you should know about podcasting.
The Pros and Cons of Podcasting
The podcast’s appeal partially stems from the fact that it can be done without the aid of third parties: if you’re reasonably tech savvy, you can write, record, edit and upload every episode by yourself. This elimination of intermediaries aligns well with bitcoiners, which goes some way towards explaining the proliferation of crypto podcasts.
Some of these factors compelled Matt Aaron to create Bitcoin.com’s very own podcast, which made its debut in February 2018. Since then it’s gone from strength to strength – and for Matt, it remains a labor of love.
“The pros definitely outweigh the cons,” he says. “Hosting a crypto podcast is an excuse to spend an hour picking the brains of someone you admire or can learn from, a person who might otherwise have no interest in speaking with you. On air, and a lot of times off-air, you can glean insights that help inform your thinking about cryptocurrency.” He adds:
Podcasts have become an increasingly popular medium, and many people prefer to learn about blockchain by listening to diverse perspectives rather than toiling through dense books.
“Of course, the cons can’t be ignored,” continues Aaron. “The sheer number of podcasts in this space can be daunting for anyone looking to launch their own. The need for an original angle is becoming stronger too, because there’s only so many times you can interview the founder of “X” coin or that legendary crypto personality and mine new material.”
Recent episodes of Matt Aaron’s Humans of Bitcoin podcast
Find Your Niche
Matt’s right: you need to find a niche. Are you doing a series on the history of bitcoin, focusing on flaws in the current financial system that crypto solves? Perhaps you’re interviewing movers and shakers, from programmers and dapp developers to UX designers and entrepreneurs. The important thing is that you have a good idea what your podcast is all about, and who you’re pitching it to.
While it might be tempting to make no topic or subtopic off-limits, be aware that there is a ton of competition out there. As such, you’ll need to think long and hard about how you differentiate yourself from other crypto-themed podcasts. It might be with a particular brand of humor, in-depth conversations with high-profile guests (how’s your contact book?) or aggressive marketing strategies, but overcoming the saturation is no picnic.
You should also perform due diligence on any potential guest. As Matt Aaron explains, “Many people in crypto end up being exposed as frauds or embroiled in some sort of legal snafu. If that happens and they’ve been a guest on your show, your name will appear next to theirs in a Google search. It’s bad publicity your podcast could do without. So, vet your guests properly and make sure they’re unlikely to be the next crypto meme.”
Write an Episode Outline
Once you’ve decided on your niche, it makes sense to come up with an outline for your first ‘season’ or batch of episodes. Focus on providing your audience with valuable and entertaining content and bringing a fresh perspective to the topic. Ask yourself: what is a crypto-curious listener getting out of subscribing? If you struggle to answer that question, you’re in trouble.
Having a clear episode outline will also prevent a form of mission creep, whereby you wind up losing sight of what it is you’re trying to achieve and resort to simply ranting about the latest happenings in the blockchain space. Having a clear, coherent structure is the best way of engaging listeners.
Essential Tools of the Trade
So what about the practicalities of actually creating and launching a blockchain podcast? How much work is required, and do you need to recruit a producer?
First things first, invest in a good-quality USB microphone – this will save you from having to use your computer’s built-in mic. Thankfully, the explosion of podcasts in recent years has led to the creation of dedicated apps that do a lot of the work for you, from cutting out audio gaps to recording each contributor’s audio on separate tracks, thereby making it easier to edit during the final mix.
One great tool – particularly if your podcast is a question-and-answer format with a remote guest – is Squadcast. You hit record, conduct your interview and end up with a high-quality, lossless audio recording. Video recording also comes as standard with each package so you can upload your podcast to Youtube, and up to three guests can feature on the same episode.
As for editing your recording, there are few better software suites than Hindenberg, which was originally built for radio journalists. Nifty features include automatic audio leveling, sound effects, royalty-free music tracks and noise-reduction capabilities. There’s also a clipboard feature, which is great for organizing audio material. It’s like having a sound engineer sitting by your side the whole time. Hindenburg is offering a 30-day free trial, so it’s worth experimenting to see if it suits your needs.
There is no shortage of options when it comes to online podcasts editors either: Alitu, Audacity, Spreaker and Garageband to name just a few. If you have the time and inclination, there’s no harm in giving each one a go. Sometimes it really does come down to personal preference.
Although Matt Aaron acknowledges the multitude of helpful apps available, he says budding podcast producers should not lose sight of the work required. “Getting the sound quality and editing just right is trickier than it might appear, it requires some trial and error. You want to be on the ball from the first episode, as no-one wants to be known for poor production standards. If there are any faults in the audio, it’s another excuse for the listener to switch off and find one of the many alternatives out there.”
Marketing and Monetizing Your Podcast
Once you’ve completed the fun stuff, it’s time to think about how you’re going to get your podcast out there. The cryptosphere is a hive of activity, and people get their information from various places: blogs and forum threads, Youtube interviews, tweets, Telegram, books. There’s no denying the popularity of podcasts though, so the question is, how are you going to publicize yours?
There are a few traditional marketing strategies of course, like churning out SEO blog content or throwing your money into pay-per-click advertising. Needless to say, you should also get some social media channels up and running to get the word out. Interact with others in this space, leverage guests’ audiences by compelling them to share the podcast with pull-quote images and video/soundbite snippets, run giveaways, and run paid promotions. It’s not a bad idea to also submit your podcast to podcatchers, aggregators, influencers, journalists and bloggers covering your beat.
It takes a lot of work, but busily promoting your podcast is the best way to find an audience. At this stage, you can monetize the endeavor by bringing partner brands on board, identifying possible sponsors using advertising networks like Midroll or Advertisecast. Alternatively, invite listeners to contribute on a pay-what-you-can model using a service like Patreon.
Getting a crypto podcast off the ground and then achieving success with it are two different things. But avoiding common mistakes is a good basis to start from. Despite the saturation, there’s never been a better time to launch a podcast centered on crypto themes, so if you have the passion and commitment coupled with realistic expectations, what are you waiting for? Get out there and start casting.
Source: news.bitcoin
0 notes
Text
Top 10 Best Digital Audio Workstations
Okay so according to wirerealm.com the top 10 best Digital Audio Workstations are as follows... At number one we have Ableton live. Operating on both Windows and Mac, this software is for all levels of people in music from beginners to professionals and everyone in between. It was introduced in 1999 and has been growing quite steadily in popularity since then. It comes with a standard multi-track recording which is an unlimited number of audio and MIDI tracks for songs and cut/paste/splice features. Alongside these features is the seamless MIDI sequencing software and hardware. Another good thing to note about Ableton Live is that it comes with 23 sound libraries so you can start making music right out of the box. All around awesome for all people in the music industry. At number two we got FL studio. As a Windows only operating system designed for music beginners and up it is the best for those wishing to get their feet wet in making music on a digital audio workstation. FL studio has your standard protocol with pitch shifting, correction, time-stretch, cut, paste, and the works. The latest version of FL studio has over 30 synth software for straight out of the box usage. You can also use MIDI keyboards, record into it with a microphone, and do your standard editing and mixing. It is definitely great for beginners. At number three there is Apple Logic Pro X. As a medium to expert level digital audio workstation that is an operating system for Mac only Logic Pro X is for those who wish to take things to the next level. Logic Pro X has an advanced interface that includes track consolidation otherwise known as track stacking, instrument layering, an intuitive mixer for plug-in control, and a “score editor” to allow you to create your own MIDI from nine MIDI plug-ins. Also included is a “virtual drummer” which is an interactive drum set for visual implementation of drums and a programmable arpeggiator. Definitely a wonder for those wanting to step up their game. For number four, Avid Pro Tools. For those wanting to step up to the industry standard of mixing and mastering, Avid Pro Tools for the expert/professional music producer that operates on both Mac or Windows this software is a must. What makes Pro Tools so advanced is that it has the standard ability to compose, record, mix, master, etc. alongside it’s own Avid Audio Engine which is a super fast 64-bit processor so you don’t have to worry about lagging, freezing, etc. It also has it’s own latency input to help with any annoying delay and built-in metering. Combine these features with other features like time-stretch, Elastic Pitch which is like auto-tune, and 70 other effects like reverb, compressors, EQ’s, channel stripping, the works. Definitely a must for those wanting to advance to the professional level of music editing. Number 5 we have Propellerhead Reason. This digital audio workstation is for those kind of in the middle to semi-pro status as music producer. Operating on both Mac and Windows Reason is a pretty solid DAW for people who have a little bit experience in the music production field but aren’t quite professional. Reason has a very solid mixing console alongside being able to cut and splice audio files automatically. Pretty good all around for the middle to semi-pro producers out there. At number 6 there is Apple Garageband. Apple Garageband is a software for music beginners only and only operates on Mac. Garageband is special because of it’s friendly user-interface that helps visualize what you’re making with things like synths, keyboard, and percussion. It also helps those looking to learn how to play piano with a built-in lesson function for both piano and guitar. It also supports your standard USB keyboard and give you some soundloops to mess around with. In addition there’s also “smart controls” which is an interactive control of plug-ins like knobs, buttons, sliders, etc. An awesome digital audio workstation for beginners. For number 7 we got the Steinberg Cubase. This digital audio workstation which operates on both Windows and Mac and is for those who are semi-pro to expert music producers includes a signature key, score, and drum editor included in the workstation right off the bat. You also get your unlimited audio and MIDI tracks, reverb effects, incorporated VST’s, etc. Cubase alongside what has been mentioned also has one of the biggest sound libraries in the digital audio workstation scene straight out of the box. Cubase has what is called the HALion Sonic SE 2 with a ton of synth sounds, 30 drum kits with it’s Groove Agent SE 4, EMD construction kits, LoopMash FX among many more. Great for those for looking for something a bit different while still on the industry standard. Number 8 the Cockos Reaper. Not quite as popular as the others but nonetheless compatible with both Windows and Mac for those semi-pro and up Reaper still holds strength as far as a dedicated digital audio workstation goes. What’s nice about Reaper is that you can download it free for 60 days before you have to buy a license to continue using it. It has the basic essentials like cut, paste, split, and edit tracks. You can drag and drop various VST’s and FX. Reaper is basically an open source, nitty gritty software. Good for producers wishing to get to the nitty gritty of their songs and tracks. At number 9 we have Presonus Studio. For beginners up to semi-pro and compatible for both Windows and Mac this is a very stable digital audio workstation. Featuring drag-and-drop functionality, unlimited tracks, MIDI, VST, buses, FX channels, integration mastering, a Melodyne feature, and some really nice reverb effects. Overall a decent digital audio workstation to hold you by but eventually you will want to go with something a bit more popular. Finally number 10. Acid Pro 8. For beginners and up compatible only with Windows Acid Pro 8 is for the basics. It can record, loop audio tracks, and has MIDI support. It has 3000 soundloops and comes with about 90 VST’s. Very good for the essentials. Well folks there you have it. The top 10 best digital audio work stations according to wirerealm.com
0 notes
Text
The Complete Guide to Content Creation For Realtors
Have you ever wanted to drive thousands of leads to your website for free? That’s exactly what successful content marketing real estate agents are doing.
In fact, website conversion rates in 2019 are expected to be nearly 6x higher for content marketing adopters than non-adopters.
Every day home buyers and sellers are going online to find answers to their questions. If you understand what those questions are, you can be the first person they see. And if you are the person who solves their problem… You can get their business.
In this article we’re going to go through all of the possible content types you can use. We will cover what type of content homeowners are looking for, how to create it and effectively reach them. We want you to optimize your marketing and branding efforts. This involves creating a solid content marketing approach.
Real estate content marketing is a 3 step process:
Determine the problems home buyers and sellers are having.
Propose a solution to those problems through your content.
Get in front of those home buyers and/or sellers.
It’s really that simple! We are also going to cover below what content is performing right now in 2018. With this information you’ll be able to take already performing content and put your own spin on it.
Jump to a section:
What Problems Are Homeowners Having?
What Content Is Best For Real Estate?
Finding Your Personal Voice
Tools for Real Estate Content Creation
Tools For Content Research
Tools For Researching Headlines
Promoting your Content
In Conclusion
What Problems Are Homeowners Having?
We researched the most shared real estate articles of 2015. The content ranged from hundreds to even thousands of shares. What was the content that generated the most shares?
How-to posts
List posts (Top 10 for example)
Tips and tricks
Tackling of common problems
In our top 20 list of the most shared real estate articles, we noticed that content catered towards existing home owners and home sellers dramatically outnumbered that of home buyers and first time home buyers. Opportunity to dominate the space? Maybe.
Specifically, homeowners want to know how to:
Increase home value
Decrease sale time
Pick the right real estate agent
Create a lovely home
Make the right decisions as a home owner
It doesn’t matter what you write about, as long as you are solving a problem. Solve a problem and you’ll be providing value.
Try this. Take out a pen and pad of paper. Remember all of the worries, misconceptions or problems you’ve run into with homeowners during the listing process. Next, think about your area of expertise. Where do you have knowledge where no other agent does? In what ways can you demonstrate your experience and expertise that no one else can?
Use this foundation to build your content.
What Content Is Best For Real Estate?

There are many content types you can use to reach your audience of homeowners. Most marketers will choose these 3 content types for real estate:
Blogs/Articles
Infographics
Videos
Many extremely popular real estate articles in 2015 utilized the article/infographic pair. These articles start with a great infographic and then go into a written article where the information in the infographic is elaborated on. You can also pair video with a long-form article.
Once you’ve chosen your content type and subject matter, you can dive into the creation process.
Blogs/Articles
Articles are one of the most popular content types to produce. 52.1 million new posts are created each month on WordPress. There’s competition, but a lot of content out there is garbage. If you create high quality articles (and promote it well) you’ll be able to stand out.
P.S: Check out the most shared real estate articles of 2015. I think you’ll get a lot of ideas from that post.
Best Practice For Written Content
Here’s some advice I’ve personally taken on how to write. The best way to be a great writer is by reading the greats and emulating their style. Take out all of your fluff. Minimize the word count and condense your ideas. Personalize your stories and write from the first-person.
Here’s the process I use:
Have the total structure and core message of the article figured out before you start to write.
Think hard before writing every line. Minimize text and create more direct statements.
Find facts to back-up your statements. And present complex ideas through stories when possible.
Break up the text blocks. Never write more than 5 sentences in a single paragraph when publishing online.
Further break up the article by using images.
Sleep on the article. Re-read it after stepping away for a few days. Make changes as necessary.
Best Books For Learning How To Write:
Less is more when learning. That’s why I suggest only three books for you to read and fully absorb. The following books are praised by successful writers.
On Writing Well
The Elements of Style
On Writing by Stephen King
Write as much as possible. I try to write every day. So do all of the great authors. Your writing muscle will not develop if you don’t use it.
Infographics
The holy grail of shareable content. Why? You can embed infographics. If someone likes what you created, they can paste your infographic into their article. This works as a lead magnet.
Best Practice For Infographics
Design is crucial here. Your homeowners will be able to tell between a Fiverr project and something professionally made. If you’re on a tight budget, you may want to stick with the other content types. (Or design one yourself, if you have the creative ability.)
Infographics are essentially a mix of quick-facts and statistics. It’s important to focus on the following.
Beautiful design
Valuable and powerful statistics
Quotes from industry experts
Consistent message
Here’s a complete guide to infographics if you want to read more. You may also want to check out these 15 amazing photo resources. They will come in handy when it comes to make your infographic.
Best Social Networks For Sharing Infographics
We all want our content to go viral. You need to be sharing in the right places to make that happen. Pinterest is one of the best. But there are tons of places you can use.
Pinterest
Visual.ly
Infographics Showcase
Visual Loop
Flickr
Daily Infographic
Cool Infographics
Infographics Archive
Infographic Journal
Sharing using the above will help you reach more home buyers and sellers than you would by simply sharing on Facebook and Twitter. You will reach more targeted users if you can find social networks that specialize in the content you are promoting.
Videos (Youtube)
In an increasingly ADHD world, people want to consume their content quickly; they want the cliffnotes. That’s why you see all of those “one secret” and “quick fix” type ads out there. Speed is what people want. Take advantage of that desire with quick, punchy videos.
Best Practice For Videos
Quality is key. Luckily for us, most smartphones now have cameras that are high enough quality to film a decent video. In fact, many Youtubers have started their career with nothing more than an iPhone.
Here’s the process AgentFire uses:
1) Determine the core message of the video.
2) Create a storyboard to summarize your points and information.
3) Decide how you want to be perceived by your audience. (demeanour)
4)��Keep filming until you get it right.
A 5 minute video may take you up to a few hours to film if you have no experience on camera. I myself spent around a month just to plan and record 4 hours of voice-overs for a Udemy Course. Not to mention the audio editing. That was a pain in the ass. (But I learned a lot! Like the fact I stutter and say uhh way too much…)
If you have no public speaking experience, try joining Toastmasters.
Best Social Networks For Sharing Videos
I found a ginormous list that details basically every possible place to share your Youtube videos. No further explanation is necessary.
Finding Your Personal Voice

“You may tell a tale that takes up residence in someone’s soul, becomes their blood and self and purpose. That tale will move them and drive them and who knows that they might do because of it, because of your words. That is your role, your gift.” ― Erin Morgenstern
In order to reach your audience of homeowners, you need to be human. “You need to bleed”, as James Altucher says. I’m going to tell you a little story.
When I was 15, I was obese. I always knew that I had the wrong body – that I deserved better for myself.
I had no one to guide me. Just the will to grow and transform. I held the image of who I wanted to be, and thus started down the path of health and wellness. I didn’t know what it felt like to be successful at dieting. Hell, I didn’t know what it takes to be successful at anything. For a long time, I quit almost everything I did.
But I didn’t give up my goals of transforming my body.
Because I so firmly held the notion, or the image of who I wanted to be, I was able to stick with it and completely change my appearance. I told myself the story of who I would become. I also told it to other people. Doing so made me REMEMBER, and have accountability for the hard-work it took to accomplish my goal.
The same thing is true for your writing. People need to feel like they know you personally. They need to understand who you are. When you accompany your knowledge with a story, it builds a way for people to remember you; to remember what you taught them.
That’s why I told myself the story of who I could be. And told you the story of how that changed my life.
Find your brand. What do you believe in? What motivates you to get up in the morning? Do you want to help people, solve problems or create something? Figure that out so you can speak with authenticity.
You can help people by being funny and bringing a smile to their day. Or giving them actionable advice so they can solve their problems. It doesn’t matter how you do it, as long as your voice is uniquely yours.
Here comes the fun part.
Tools for Real Estate Content Creation
You’ve got the right ideas. Now you want to get cracking. Are there any tools out there to help you create your real estate content? Absolutely!
Tools For Productivity
Make sure you’re in the right environment for creating content. You can’t have distractions if you want to get stuff done. I recommend using these tools while listening to classical music. Productivity reaches new heights with the help of Mozart and Chopin!
Distraction-Free Writing (WordPress)

If you’re blogging, you’re almost guaranteed to be on WordPress. That’s why I wanted to include this first. Distraction free writing will allow you to close out all of the elements of the WP dashboard while you write. I’m using it right now and it’s really helpful.
EverNote

If you want a tool that can help you brainstorm, write and pick-up from anywhere on any device, check out EverNote. Last week I almost lost a two-thousand word article. Luckily I had saved my writing in EverNote or else I would have been S.O.L. This is an especially good tool if you’re like me and have ideas at random times.
Just open your phone and write a note for later, it’ll be saved on your computer too.
Scrivener
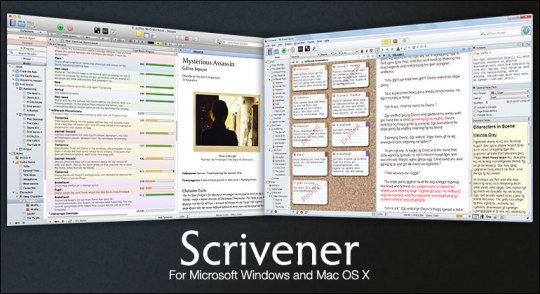
For those who like to write a little more than 500 words. Scrivener helps you set writing goals and stick to them. I know a few people who have written full-fledged books with the help of Scrivener. It’s got a cool system that allows you to build out a structure for your writing.
PomodoroApp

Thanks to Nelson (the head honcho here at AgentFire) I’ve integrated more structured breaks into my work periods. It helps with mental focus. I usually become fatigued after 1000 words of writing. With Pomodoro’s, I’ve found my creativity and production to be much higher.
Newsfeed Eradicator

If you’re anything like me, you’ll find yourself mindlessly scrolling through Facebook. You’re not looking for anything in particular yet just spent 30 minutes sifting through everything your friends and favourite pages posted today.
Get Newsfeed Eradicator. I heard about it through Noah Kagan of BuzzSumo and haven’t been without it since.
Tools For Content Research
We get it. You’re spending precious hours to create your content and want to have an idea of how successful it will be. Thankfully we’ve got content research tools. You can use the following to determine the popularity of articles by how many shares they’re getting.
BuzzSumo

This is the tool we used for the top 20 most shared real estate articles of 2015 article. BuzzSumo allows you to search for real estate content and see what is getting the most shares. You can break down the results by: Date, Country, Content Type and social networks. So if you focus on Facebook, you can determine what is performing the best there instead of everywhere.
Note: You have a limited amount of searches before you have to pay for premium.
Ahrefs

Ahrefs is the same idea as BuzzSumo except they have a whole library of different tools that internet marketers use. Things like Link Building, SEO and Keyword Research. I recommend you focus on one thing at a time. Learn how to write amazing content. Then learn all of the promotional opportunities.
Tools For Researching Headlines
Your headline is the first thing people see before they click through. It has to do one of a few things to your audience:
Intrigue
Excite
Amuse
Shock
Anger
Use one or more of the above emotions to leverage higher opening rates and shareability for your real estate content. If your content doesn’t sound interesting or incite an emotion within the person you’re trying to reach, you probably won’t reach them at all. That’s why we use these tools ourselves. (Just be careful with anger…)
AMI Headline Analyzer
Using this tool I was able to generate 560 shares on one of the very first articles I wrote for my own corporate blog. In short, it can be an effective tool when combined with high-quality content and promotion.
Keep in mind that 89% of content is never shared more 100 times. (And for 560 shares I put exactly ZERO dollars into promotion, just manual labour).
Co-Schedule Headline Analyzer

This is another tool like the AMI Headline Analyzer above. It has a more user friendly platform where you can see some deeper insights than AMI. I like the AMI option more even though it’s just barebones.
A/B Testing With Email
A/B testing is something companies like Buzzfeed use like crazy. Before they promote their new content, they create segmented email lists to try different variations of the same title. This allows them to see what title will get them the most shares.
Sometimes the results are dramatic. The exact same article can get 10x more shares with a different, high-performing title. Use your email provider (we use MailChimp) to A/B test your titles before going live. If you’d like more information, here’s a guide to A/B testing from our friends over at CrazyEgg.
Promoting Your Content
I’m not going to get into how you promote content in this article. Just know it’s important. Successful content marketers (me being one of them) would agree that creating high quality articles, infographics and videos is only the first half of the battle.
If you want homeowners to read your stuff and ultimately list their property with you, you’ll need exposure. The key to getting exposure is a solid content promotion strategy. The good news for you is that most realtors neither produce high-quality content nor know how to promote it.
Want to sell more houses? All you have to do is put in the work.
In Conclusion
Real estate agents just like you are driving thousands of homeowners from their community to their blogs and Youtube to see their content. These views, shares and likes can be worth thousands or millions of dollars of properties a year when combined with your other marketing and promotion efforts.
What are the problems you can solve with your specific real estate knowledge? Provide information, answer questions, and do it with your own unique voice. Put in the work to determine what homeowners in your area are really looking for. Create, optimize your content and then promote the heck out of what you create.
There’s going to be a lot of trial and error. Building your reputation won’t come over night. But with the right content, promotion and course-correction, you’ll be lightyears ahead of other realtors marketing content.
Use this information and all of the tools at your disposal. We know you want your content to give you a voice.
With the right strategy, it’ll be more like speaking through a megaphone.
Recent posts
The Complete Guide to Content Creation For Realtors
July 24, 2018
72 Rock Solid Real Estate Blogging Ideas With Examples
July 24, 2018
Notice of Build Deprecations Jan 1st 2019
July 2, 2018
The New Era of AgentFire is Here: Introducing the AF Visual Editor (and AF Listings 3.0!)
June 26, 2018
The post The Complete Guide to Content Creation For Realtors appeared first on AgentFire | Hyper Local Real Estate Websites.
from RSSMix.com Mix ID 8230801 https://ift.tt/2Af46zw via IFTTT
0 notes
Text
Why blogging is still one of the most powerful music promotion tools
A blog allows you to demonstrate expertise, reach new audiences, boost your website’s search rankings, and stretch your writing muscles.
As a musician, creating a blog may not be on the top of your priority list. But a blog can actually be an incredibly powerful tool in your promotional mix! Let’s take a look at just how versatile a blog can be.
Above all, your blog is a publishing platform that will let you serve your audience with frequent and regular content to tell your story, showcase your music, and expand on your ideas. It also allows you to differentiate yourself and show your fans the person behind the music. It’s a place where you can connect with your fans through music and your interests and even attract new fans.
A blog is also a great way to authentically and creatively link to your offers — the music, merch, and tickets you have for sale — as well as the offers you have to sign up to your email list. The more your fans are exposed to your offers, the more likely they are to go for it.
Obscurity is Your Enemy
As a musician, your number one problem is getting your music in front of new people and potential fans. Obscurity is your enemy. So, the real question you need to be solving is, How are you going to get people to care about your work?
There are so many musicians and bands out there, all vying for attention. How do you break through the noise and get people to even know you exist?
The worst thing that you can do is to constantly push your music in people’s faces. You know, like those musicians who are constantly repeating “listen to my songs,” “check out my new track,” or “buy my music” like a broken record.
Has that ever gotten you, as a fan, interested in someone else’s music? Probably not.
I want you to think of your interactions with your fans like a relationship. Just like a real relationship, it takes time to develop and you can’t just expect to take, take, take. Simply put, people connect with people who have something interesting to say beyond “dig me.”
A blog is a great tool for you to use to connect with people on many different levels. It will let you show the person behind the music, the process behind the song, and the meaning behind the lyrics. It’s a place for longer-form content (compared to social media where you’re usually limited), and that means you have more freedom to express yourself and share your story.
Two Blogging Approaches
As an engagement tool, blogging can serve two different purposes:
Blogging is the chance to get your fans more invested in your career from an emotional standpoint. If you want to lead them down the path to become a superfan you want to give them a really exclusive and personal experience here. Let them in on the process and see the artist behind the music they listen to.
Or on the other side, your blog might be what attracts people to your site in the first place before they even hear your music. Informative blog posts like “How to Mic a Drum Set,” or “How to Make Beats in Logic” might draw new potential fans in and get them interested in your music through that initial touch-point.
Blogging gives you a way to stick out in someone’s mind, a way to frame your music and provide some context to what you do and why. The more people understand about what makes you tick, the more interested they might be in checking out your songs. Your blog gives fans a connection point. It provides context and a method for you to tell your story in ways your music cannot.
Building Your SEO with a Blog
Another good reason to blog is to boost your site’s SEO. The more you blog, the more Google will find you, and the higher in the search results your website will appear based on the keywords, titles, and content of your blog posts.
Google cannot search the content of audio files – at least not just yet. So you need to think of your blog as part of your voice to help provide context for your music, and a way to lead people to you in a way that makes them want to connect. You need all the help that you can get to break through the noise, and well-constructed blog posts can be just the ticket.
4 Blog Post Ideas for Indie Musicians
Here are four ideas that almost any musician can write about to get your mind started and help you think of things that YOU might want to write about.
1. What other musicians inspire you and why?
This can be a good way to attract search traffic by writing about popular artists and songs and then weaving in some references to your music and your songs. They don’t have to be super-famous musicians – they could even be unknown local bands who are producing great music.
This could also be a cool way to unlock collaborations and cross promotions with other musicians and bands as well. Maybe make a Spotify playlist with a good mix of your music and some artists that have inspired those tracks. Not only will this be fun for your fans to listen through, it will also help build up your Spotify presence.
2. Profile and review your gear.
Depending on your audience, you fans may be interested in the technology and gear you use in your music. You may have already received questions from fans on social media about what pedals you’re using, what programs you use, and what amplifiers you use to get your signature sound. Give them what they want and turn it into blog posts! Plus, you’ll be focusing in on key search questions that will funnel new potential fans to your site.
3. Share your interests.
You can also blog about other things you are passionate about that tie into your music. Maybe you’re supporting a charity with profits from a certain song, or the lyrics of one of your songs are raising awareness for a cause you believe in. This can help you build an audience around a joint interest, which can help get people to know about you first as a compassionate person, and then as a musician.
Behind the scenes.
And of course, you can always blog about your recording process, your most recent gig, stories from the road, or how crazy your bandmates are. I think you get the idea.
Harness Your Writing Skills
Now some of you might be thinking… that sounds great, but I’m not good at writing blog posts! But I want to ask you something. Have you ever done any work with lyrics? It’s the same skill set, and you’ve already got it!
And if you’re a performer, or an instrumentalist, or you’re still just not comfortable writing, keep in mind your blog posts can include pictures or can even be videos or podcasts. They don’t have to be pure text. Whatever you are most comfortable with, go for it! When you think about it, a podcast is just audio – and you know how to record, edit, and mix audio!
The important thing is to post new content on your blog on a regular and consistent basis so fans can gain some insight into your career and who you are as an artist. Draw them into your world.
Of course, blogging is just one element of promoting your music. If you want more ideas to raise awareness for your music and stand out online, you can download the How to Promote Your Music ebook. Inside you’ll find tons of examples and ideas of social media posts you can use and 3 music promotion checklists to get you started.
If you want to learn more about promoting your music and building your audience, check out the Music Business Accelerator course. It’s like a musician’s MBA. This crash course is designed especially for musicians to teach all the practical stuff you need to know to promote your music and execute your projects. But unlike an MBA, you can go at your own pace to fit in with your busy life on the road or in the studio or working a day job.
The post Why blogging is still one of the most powerful music promotion tools appeared first on DIY Musician Blog.
0 notes
Text
DJ Dayo Ft. Mavi & Mavenn - City Love
How to Write Rap Songs
Understanding how to write rap music requires an comprehension of the fundamentals. Each rap song has verses, hook, and a beat, but there are additional things. Each song, while it's R&B, hip hop, rap, or a different genre, includes a style or pattern that's common to each tune.
The standard element is the beat. Every rap has a beat. It might vary according to the sort of tune the artist would like to create, and it may be exhausting. Not all raps are angry and full of violent beats and hooks; there are rap tunes which not filled with harsh words and lyrics and are written to many others and dance beats who are joyful. Virtually every rap song has three components - verses, and the hook or chorus, intro. It is these three components that will need to bear in mind when learning how to write a rap song.
There are various ways as to a rap song may begin. Generally when working on the best way to write a rap tune, writers try to experiment with various beginnings to ascertain that will suit the song the best. Raps usually begin with a worthy piece that is followed with a verse or two. But based on the rap artist, the song can start with the hook that then contributes to the instrumental, which can be followed by the first verse. Based on the kind of tune the artist is hoping to compose, the number of these components of poetry and arrangement fluctuates.
On average, most rap tunes consist of three but a few tunes have 32 bars each and four poetry. It is dependent upon the lyrics and beat of this rap. The verse is the part that's the actual rap or lyrics or vocals. This is actually the part that contains the bulk of the lyrics as well as in which the significance of the tune is portrayed to the audience. Normally, the several verses from the song have the exact same length, but this is not a requirement. The length of poetry might differ if the beats of the song varies.
Writing a rap song demands an understanding of the essentials of rap song writing. The core requirements of composing rap creating hook and a strong back beat that maintains the attention of listeners, and include knowledge of rhyming approaches, of original lyrics. Rap consists of both rhymed couplets, which are set drum and beat. Flow and possessing a technique that is rhyming is crucial to writing a rap tune.
Lyrically, the first step to writing a rap song is to choose a topic. The topic serves as the fundamental theme of the rap tune. It might be about just about anything, or pain, love, happiness, greed, racism, justice, partying.
The beat is crucial to writing a rap tune. Many lyricists compose their lyrics into the beat, but the lyrics are written by others first and then create the most track. A bass beat make or can actually crack a rap tune. A musician can produce a good bass beat working with an electronic drum loop or bass guitar. It's this bass beat that pushes the flow along with the entire rap trail. The rapper should keep up with the bass beat.
A catchy hook is imperative to make the chorus of the rap tune. Lyrics should be written with all the bass beat and the chosen rhyming scheme. Lyrics are considered the power of a rap. Lyrics are the distinguishing characteristic of rap, which makes rap tunes stand apart from others, even those that possess exactly the same instrumental beat.
Composing a rap tune requires appropriate structuring after composing the lyrics. This involves interspersing the verses and adding pits or bridges to add thickness. Lyrics are listed over the bass beat, verses, chorus, and bridge. The addition of punch lines can be used to bring an extra level providing humor and entertainment. Drum fills such as additional beats of bass and melody lines may also be added to include depth.
To compose solid rap songs, you will have to customize your rap lyrics and listen to and examine famous rap artists and songs. A perfect Mix of rhyme scheme, melody, word drama, punch lines, and bass beats, will result in a rap song. Rappers and different rappers collaborate and work to compose a draft rap tune.
Writing a rap tune, can be achieved by following some basic writing steps of pattern and construction. Rap as a genre may seem limited by a set of verses and beats, but there's much more that goes to a rap song than these few elements. Each rap song has parts which are common to all songs, regardless of artist or the genre. As an example, each rap has verses, hook, chorus, and a whip; it's the arrangement of those components that differs from song to song and artist to artist.
Usually, when writing a rap song, the artist will begin before composing the lyrics and vocal tracks with working on the beat. This is because once the instrumental defeat is completed, it's typically easier to write lyrics to the beat that than writing the lyrics first and then trying to create a beat that would go with the lyrics. Raps consist of bass line and a drum track which plays along with the beat. Because the principal part of a rap is your track the hook or chorus which plays on repeat between the 31, not parts are needed.
However, rap songs are getting more experimental and collaborative, and artists collaborate with other rappers. This contributes to a last product that is a blend. Furthermore, it forms a style that is fresh and makes the song writing process more manageable and more intriguing as each artist has a unique perspective.
Sometimes along with the tracks and bass lines, a rap song samples loops of tracks by other artists. Samples coating over the instrumental tracks to bring yet another dimension to the song. This brings about a combination of two different rap songs genres which collaborate for writing a rap song that has all of the components of a traditional rap, together with the defeat, hook, and poetry in addition to a looped sample trail that provides a new layer into the rap tune.
Writing a rap tune requires practice and editing. In all likelihood, your first draft will probably be mediocre at best. That is to be expected and is nice. Just rewrite, reorganize, and rework it until you achieve the desired affect. You can employ a rap author and editor to help turn your rough draft into a song.
If you have a skills needed to do so, you can compose your own rap tune. The main skill that you will need is a good imagination or thought process. Other abilities include knowing about rap music having the ability to focus and using a format. To begin with, using an imagination when it comes time to write your own rap song because you'll have to come up with some rap lyrics which people will want to listen to, is important.
There are so many rap music out there on the market nowadays and it is difficult at times to think of something that is fresh and distinctive. You particularly need rap lyrics that will stick out from the remainder. For this, you want to use your creativity. You do not wish to go that everyone else is currently using. The creative and unique your rap lyrics are, the better chance that your rap tune will have of making it to the peak of the music charts. This also involves a idea process that is fantastic.
When you compose your own rap tune, write them and you will have to think out your lyrics. There are lots of ways in which you can produce a format, however, the best way is to write each stage of the tune out according to the sequence that each stage will appear. Starting with the name, you would write your own rap tune from start to finish as if it were an essay. Including your chorus and verses. Write every thing you are not overwhelmed, as you come to it.
You should be Knowledgeable about the hottest rap songs in The audio industry and the artists who made them. This will enable you to know what songs have been successful and which ones have not. Break apart the tunes and consider what has made them popular use your knowledge to write.
Those rappers who pride themselves on writing their own rap songs collaborate with other authors. Whether this means using a rapper compose a verse or even the entire song or bouncing ideas off one another, there is nothing wrong with alliance. Most rappers even use ghostwriters to write records, but the ghostwriters aren't recognized and the rap is performed by the rapper.
Are you interested in learning how to write a rap song? Well if so this article should be able to give you a hand and have you composing rap songs in no time flat. As a producer I am very knowledgeable about the process of composing rap songs. Since I believe that I have some information that others are going to greatly benefit from I chose to share it. Within this article I will go over some steps which will assist anybody who's serious about figuring out how to write a rap tune.
You should bear in mind that there are ways that you can go about studying this procedure. What I am going to share with you are the measures that I use to make rap songs. Use or follow these steps. It's completely your decision.
Get A Issue - Get a notion about what your song will be around. At times the mood that you're in will give some topic ideas to you. For example if you are feeling happy and at a party mood you may choose to write a song along those lines. Maybe you are having. This can provide you with a ton of suggestions for your rap song. It would be only a matter of time before you've got a set subject to write 26, should you let your mood determine your tune subject.
Brain Storm - This is a very important part if not the most important part of learning how to compose a rap tune. Brain storming is a fantastic way to get the juices flowing. I sometimes sit in my chair to get 30-45 minutes before I even pick up a pen. Just let thoughts flow before you start writing anything.
Think Of A Title - Today is a good time. This doesn't imply that the name can not change . Picking on a title will provide you somewhat of a starting point for composing your song.
Write The Chorus/Hook - before I start writing the verses, I personally like to write the song's chorus. I do so because it helps me to ascertain exactly what the lyrics would be. There is a fantastic idea to really feel the beat out and compose your hook to match if you're writing to some beat. You ought to know that in most case the hook is what makes or breaks a tune, so when making yours take your time.
Compose Your Verses - When it comes to writing a rap tune I usually recommend writing 2-3 verses, preferably 3. Your are verses each would normally be, if you are going to utilize 2 poems they should be longer. A verse usually consists of 16 bars (a pair of rhyming sentences = I bar). Ensure that you're currently writing them to fit your chorus, when composing your verses. Your basic song arrangement goes verse, verse, hook, verse, hook, intro and hook. Obviously this arrangement can be altered by you for your liking. Make certain it sounds to out the ordinary.
Twist Up It - Now that your song is totally written you will need to go on it. You truly want to make sure that your lyrics make since and that your hook is ideal for the song. Do not wait your tune on a few times before you record it yourself or promote it. Learning how to write a rap song doesn't have to be tough and hopefully that is hopefully proven by this article.
0 notes
Text
WAV>MP3
(hyperlinks used throughout, click directly to see sources, audio and images)
Some of The 5 W’s of Wav and mp3 Music Files:
Random thoughts on the basics of Waveforms, Analog to Digital Conversion, and Wav to mp3 Conversion So You Can Make the Most Out of Your Music Experience, Equipment and Career
…
In response to many questions I have seen all around the web, in forums, Facebook communities, YouTube comments and arguments (from the keyboard warriors) and questions even directed to me, about which type of file is best and where and when should each file be used (i.e. streaming, DJing, music production, studio recording, listening enjoyment, etc.) I have decided to write up some information about what I have learned over the years about sound waves, bitrates, conversion and compression to help explain the difference in audio formats and how to get the most out of your music.
First just a little background about me, I am no professional or claim to be any type of expert but I have had some sort of music or sound related connection in almost every aspect of my life for quite some time. I have been interested in all things music, sound, electricity and electronics for as long as I can remember. Also, which you may have already or will soon notice I am not a writer, blogger or any other type of professional author by any means. I will try to explain, to the best of my ability, all the technical stuff pertaining to where, when, how and why of Wav’s and mp3’s with as many examples and diagrams as possible, to make everything as easy to understand as possible, while citing as many sources as I can.
I have been a professional electrician in the past and have studied electrical in vocational high school. Moved on to college and studied electronic engineering where I learned all sorts of stuff about analog, digital, signal, processing and components. All whilst being an avid music production hobbyist bringing myself up from recording my friend’s first mixtape on a karaoke machine over 15 years ago to now having my own underground indie experimental electronic influenced hip hop albums commercially released in all digital online music retailers like iTunes and streaming services like Spotify. Way way back in the mid-90’s I delved into onscreen display midi, a process of placing markers along a timeline associated with keys of a piano which represent individual sounds. It was quite mind-blowing the first time I made a basic boom boom clap / kick snare kick kick snare pattern out of little blue rectangles spread across the matrix. From there I could see that working the knobs, pressing the pads and adjusting every little detail of every single note in each individual track of the entire song creation and digital production process was something I wanted to be a part of for the rest of my life. Over time I have moved on up to multiple generations of updates in my DAW (digital audio workstation). Attempted fruity loops back when it was a free download, years before it became one of the most well-known music production software programs, now known as FLstudio. Also stumbled upon Ableton once upon a time, along with a few other lesser known programs, and eventually worked my way from scratch in Maschine to be pretty proficient with that. Although none of them really stuck with me as did that first midi and DAW for ease of use and understanding of what was going on, on the screen, while editing and producing music. Now that I’ve got my background out of the way, on to the most common sound quality question I receive…
…What is the difference between wav and mp3; why not just use the smaller file?
Well first off, if you want highest quality sound output from your music to sound the best no matter where you tend to listen you absolutely need the file which most closely replicates the actual original sound recording. Whether you’re DJing a small club or a stadium, listening on ear-buds, over-ear headphones or house speakers, in the car or in the studio, it is imperative to use the highest quality file and play the best version of the song you can find. If you want the HD equivalent of music you need a lossless file. If your OK with watching a 2 knob Zenith with rabbit ears wrapped in tin foil then maybe lossy, staticy, lacking type files are more your cup of tea. If you’re DJing and you want your clients of the wedding or party to be impressed and be able to really get into the moment and feel the music and not get distracted by low quality sound, definitely go lossless. If you’re listening on headphones or house speakers to your favorite song you want to be able to notice details you probably never noticed before and want to feel like you are right there in the studio with the artist when they made it, then you want lossless. If you’re in the car and you want to be able to put your new system to the limits, rattle the mirror, shake the lug nuts loose, and feel the bass in your soul, then you need a lossless file… why spend extra on a subwoofer and amplifier if you’re only going to end up playing inferior sound files? And if you are into music recording and production and you want the mix to sound professional and be taken seriously, then you can have it no other way. You will be wasting the entire production team’s, and your own, time if you do not use lossless audio files every step of the way. So in any case for the best sound you need the best reproduction, and for that you need the highest quality format.
A wav file or a lossless file is what you are looking for, NOT an mp3. ALL mp3’s are sampled, compressed and down converted from a more superior file, most often from a wav, into an inferior, lossy, degraded file. The only advantage of mp3’s, compressing and converting any file, is saving storage space. So the more storage space you save on an iPod or on your hard drive or in your phone it allows you to be able to save more songs. If you want to be able to have tons and tons of songs, and to NOT be able to listen to them in high quality sound, then mp3’s are the way to go. If you are tone deaf, partially deaf or have a narrow frequency response, then will not be able to hear the whole range of the sound and in turn you will not need the ability to play the whole range of the sound so mp3’s may be for you.
So what’s the big deal anyway…what’s the big difference? Well if you use a lossless format or file you are listening to as close of a representation and reproduction of the actual analog waveform as possible. If it is a converted file that has been compressed to save space by sampling at a low bitrate then it is essentially an ‘estimate’ of the original not an actual reproduction. The result is a tinny, metalic sounding song with less low end and high end frequencies (less bass and treble). The following are some visual and audio examples I put together to better showcase the differences of wav and mp3 and for you to get a better understanding of what is literally happening to the sound wave during the conversion process of audio files.
…
I made a quick one minute song that starts off with a kick drum, clap and hi-hat then layers them to form a full drum loop, Followed by a bass line, a synth and then all three layered over each other, the drums, bass and synth to form an entire arrangement. Sound waves can range from 1Hz maybe up to infinityHz but humans typically hear from 20Hz to 20kHz with some exceptions. For this reason that is why you will find most speakers and headphones only have a frequency range of 20Hz – 25kHz, with higher end models ranging a little further from 1Hz to 50kHz. Low bass notes like kick drums and bass lines are closer to the 20Hz zone of the low end of the human ability to hear. Low end sine wavs can be lower in the 1Hz to 20Hz range and your body will perceive them through movement, as to be felt, rather than heard. And high range sounds are typically bells, whistles and cymbals around 8kHz to 17kHz and are more towards the upper limit of human hearing. So with these basics of sound in mind as a guide to how I would test the difference between file formats at different bitrates I made the song with a well represented range of sound from the low end to the high end of the human audible frequency range.
In this first picture you can see the layout and structure of the song. This is a visible representation of the sound waves used to produce the music. The upper most line with the green wave forms is track 1, it is the drums. Starting with the kick drum farthest to the left and then moving along to the right to the clap and then hi-hats and so on. From left to right time is represented, so far left is 0:00 seconds and far right is about 0:57 seconds. It is relatively short but is just for demonstration purposes. In the next track below the drums is the bass line, which is the blue wave form and then below that in red is the synth. You can hear what this track sounds like HERE. Follow along with your eyes in the picture as you listen to see the different points as you hear them.
PIC 1
To export a sound file means to take it from this visual form and turn it into a playable file such as wav or mp3. The link above is for the wav of this song. When exported it becomes a song or a single track, unlike what is shown here as three separate lines of audio.
In the next image the wav, shown in dark blue, shows how the green, light blue and red have melded into a single song, track and wave form.
PIC 2
Exporting audio as wav takes up around 35MB for a typical song, compared to an mp3 of the same song which could take up far less, around 5MB. Clearly space saving is the advantage to mp3. The lower the quality, the higher the compression then the more space you save, but the worse the sound is. Sound is sacrificed any time a file is compressed and converted to a low resolution, low bitrate, low sample rate file. So the next step I took was to export this same song into many different sample rates from the highest quality available mp3 to the lowest available, ranging from wav at 1411kbps or kilo bytes per second or 1,411,000 down to a 32kbps mp3 or 32,000.
The next image shows the difference in file size to the file type, as the size goes down so does the quality.
PIC 3
As you can see the wav is 9.9MB and the lowest mp3 is a mere 226kB. There is always arguments amongst the people questioning what is the better format or file size. This shows exactly why a low quality mp3 sounds low quality, it is physically impossible to ever store as much of the song’s information into an mp3 as a wav. Yes a wav is sampled and yes there are compressed versions of wavs. But a wav is sampled over 1 million times in each and every second throughout the entire song. The most an mp3 can be sampled is 320,000 times per second, that’s more than 4 times less than a wav file!!!
Here are the audio exports of each of these files so you can listen to them back to back from highest to lowest or vice versa to hear what is missing form each track as you compress it more and more.
Example 1 WAV
Example 1 320
Example 1 256
Example 1 192
Example 1 160
Example 1 128
Example 1 96
Example 1 80
Example 1 64
Example 1 32
You will notice less and less bass and kick. It will be more and more distorted low end as well. Further and further down the list you will notice less and less top side of the hi-hats, they will become more and more robotic and metallic sounding too. The last time I checked no one purposely wanted their music to sound like they were listening to it while stuck on hold or in a dentist’s waiting room, unless said dentist was a hip audiophile with some insane high end speakers for his patients to enjoy their last moments whilst awaiting impending doom. But give those files a good listen, at different volumes, with a concentrated ear, on multiple output devices, your favorite headphones, on the aux cord in your car or computer speakers to truly hear the degradation of the music as you move down the list.
…
This next image shows each of the file types and sample rate changes in the visual graphic display so you can physically see the loss of sound due to the sampling process.
PIC 4
Along the left hand side each track is labeled with the kbps sample rate and each track is displayed in a different color just for higher contrast and visibility. Similarly to the audio image from earlier the wav is the dark blue track. This is the same song from earlier on, and as you can see they look almost identical.
But take a look at the highlighted section outlined in green in the next pic, can you spot what is happening to the audio?
PIC 5
That’s towards the beginning of the song, the kick, then the clap and the outlined part is the hi-hats. If you look closely you can see the height or amplitude is lower. The actual size of the wave form is smaller. This height variance directly correlates to the volume of the song. None of these file were changed or edited or have any special effects on them. I literally just clicked [ file > export ] and changed the sample rate each time over and over again from the original source wav file. So the only change being made is in the actual file conversion process during the exportation of the audio. So without lowering the volume the only reason the sound is visibly smaller is the fact that there is actually less sound and the fact that the sample rate, and location of each sample never actually makes it to the peak or top of each wave in the sound. Remember when I said an mp3 is like estimating the wave form and not reproducing it, this change in amplitude of the hi-hats is a great example. I have more about analog to digital conversion and how sampling works later.
Another thing you can notice in the next screen shot shows what I mentioned about the low end sounding distorted.
PIC 6
Here, on the kick, at the very beginning of the song, you can see the difference from the wav to mp3 is very significant. Compare the outlined areas. Notice on the wav there is plenty of room above the wave form, but on the mp3 the sound is over extended past the limit of the height of the track. This causes distortion and even further audio loss. The height of the kick drum is amplified so far that it literally chops its head off. For example let’s say the total height can be 0 – 100 and a normal amplitude would be around 75 – 80 without any affect on the sound quality. In the picture the amplitude of the mp3 at the bottom is hypothetically 125, over the max of the example of 100. In the case of the sound being too small on the hi-hats and now being too big on the kicks, you can see the music is dramatically affected by the conversion to mp3. When a wav is converted to mp3 it is basically ‘squeezing’ the track into a smaller box, it came shipped like a refrigerator and is now being shoehorned into a deck of cards to save on export fees (PunnyMcPunPun) to get transported all around the world.
Some of what I am talking about may be difficult to see if you are unable to zoom in on these pics so let’s take a closer look.
PIC 7
Now I have zoomed in on just the beginning of the song with the 32kbps mp3 on top in red and the wav in blue on the bottom. All three of the outlined areas show what I was saying about the amplitude differences in both hi and low end of the sound.
Now If we continue from here, to zoom in more and more, you will start to be able to see what sampling does to the individual rise and fall of each sound wave within the song or audio file.
PIC 8
Take a look at the outlined areas showing the fade of the kick also known as the tail, or its release zone. Every note will have an attack, decay, sustain and release. They are like the beginning, middle and end of a sound. The attack is the initial start of the sound, the hit, or pluck if it were an instrument. The decay and sustain are the middle, decay being the initial drop from the attack and the sustain being its ability to prolong or stretch itself. And the release is the final descent of the wave from its volume or amplitude as a musical note to total silence.
When you look closely and compare the wav to the mp3 you will start to see a difference in the shape of the wave form as we zoom in more and more.
PIC 9
Notice here the mp3 is feathering in appearance while the wav is staying true to its original form. Another downside to mp3 conversion now reveals itself when we zoom in to this level. Take a look at the 5th kick drum in the red mp3. There is a gap and it then makes the rest of the remaining kick still within view out of sync with the wav below it. Up to that point they all line up top to bottom. These gaps are another drawback to mp3 conversion. The process tries to be as much time saving as it is space saving. When listened to these are quite noticeable as blips, clicks and squeals and can occur randomly and intermittently along any portion of the song and are nearly impossible to avoid. If I were to export it multiple times from wav to 32kbps it could have a gap in the same spot or in a different spot each time. When I zoomed in on the other image with all the mp3’s aligned above each other this incoherence was noticeable to the eye without zooming in more than 1 – 2 times for all the files at 128kbps and lower. This may have happened on the higher bitrates as well but I did not go over those files with as much scrutiny.
Keep watching as I zoom in even more.
PIC 10
Now we are in far enough that only one single kick drum is within frame.
Zoom in again and see another problem with mp3’s, the waveform has shifted itself off center from the 0 mark of the Y axis.
PIC 11
The more we zoom in the easier it is to see the damaging effects of estimating the wave form.
PIC 12
PIC 13
In the 2 pictures above the ‘step’ as it is aptly named can be seen easily in the red mp3 wave form.
PIC 14
Now zoomed in as far as my program would allow, the digitized look of the mp3 is indisputable. After hearing it in the audio examples above and then to be able to physically see the degradation on the actual structure of the wave form itself I hope it is a little clearer to people asking which is the better choice for music. It served its purpose well as a way to quickly send small files all over the world through slow internet connections to computers and devices with small storage space. But with the ever increasing size of hard drives and the matching blazing (when compared to 56k dial up) speeds of internet nowadays, there should be no excuse as to why you can’t listen to or play for an audience a high quality sound file.
…
To learn more about why that staircase is happening to that kick drum my next few images go over analog to digital conversion and sampling. An analog signal is a purely uninterrupted sound wave, with the finest details in every nook and cranny. If the sound spikes around looking like a lightning strike then the analog wave does too. Like the kick drum displayed earlier the wave form had a familiar hill like flow up and down above and below the x-axis in the y-axis direction of amplitude, spreading left to right along the time of the x-axis in a certain frequency which was the repetitiveness of the up and down of the wave. Now if we were to sample that wave form and try to replicate it quickly by only taking snapshots of the height at intervals along the way during the same amount of time as the original wave we would only be able to come in contact with the wave at those intervals and nowhere in between while were moving along to the next sample. A few ways this can be represented to be more easily envisioned in your head. Imagine you were to get a sample size bag of small chocolate chip cookies. Your bag would be small enough to fit in your hand and would only hold a few cookies. Each cookie would have a different amount of chocolate chips and be a slightly different size. But the picture on the packaging shows a perfect cookie with the same number of chips as all the other cookies in the picture that are all the same size. Aside from the obvious false advertisement for the company to try and depict that they are able to deliver perfection, the reason your cookies are not totally a match is because you only got a sample. If they make 6,000,000 cookies a day, every day, and all you got was 3 measly little cookies it is impossible for your little bag to properly represent with 100% accuracy what every single cookie would become. Your sample may be comprised of cookies from 3 different conveyer belts, from 3 different times of day along the assembly line and conveyer belts of the factory. So if you take a sample here and there you are getting an overall estimation and generalized representation, not an actual identical representation. The only way to accomplish that would be to actually have every one of those cookies in your hand. Damn I must be getting hungry. I have another analogy after a few more basics and images displaying wave characteristics.
Moving on now, to see the waves to get an idea of the basics.
PIC 15
Here we have 2 waveforms shown in blue. The thin red line goes from 0 of the x-axis and travels up to the top and bottom of the wave in (fig a.), this shows the amplitude measured in decibels, dB. This wave is approximately 60 – 70Hz. Here it touches the crest of the wave, the upper most part with the highest amplitude of the wave. If you were to move the red line left or right it would get shorter and would be a different value from the left, in this case anywhere along the 0 to 100 dB range. The frequency, shown by the purple line, is measured from the beginning of the wave to where it starts again. This wave starts at 0db and goes up then back down to 0, then goes below to negative and then back to 0. This above and below motion is one full wave and is called its cycle and is referred to as Hertz, Hz, it takes 1 second for this wave to complete its cycle. Now in (fig b.) all the characteristics are similar except there are more waves within the same 1 second of time along the graph. Therefore it is a faster wave, has more cycles and has a higher frequency. These wave basics will come in handy when viewing a lot of the images anywhere in this article.
PIC 16
In (fig a. and fig c.) we have an analog wave. (Fig a.) is a sine wave similar to a sub bass or 808 sound at 1 Hz, the lowest sounding , smoothest looking and slowest moving of all sound waves. (Fig c.) is more typical of the look of waves in music with multiple instruments layered over each other in an arrangement masking and ducking each other to hide some of the shape and add to each other to form the shape. (Fig b. and fig d.) show the identical wave from above it with a portion of it being sampled. When you look close at (fig b. and fig d.) there is a thin dark blue line over laying the original thick light blue line of the original wave. This thin dark blue line is the wave that is formed when the thick light blue wave is sampled. If you travel along the x-axis over time and in regular intervals go up or down in the direction of the y-axis at each grey line you will come in contact with the wave at some point. You take that as your amplitude at that point in time along the wave. You come back down to the x-axis and travel along it again for the same amount of time and go the same distance until you again go up to where you meet the wave, and you now have a new amplitude. For example in (fig b.) the first wave at the first grey line the amplitude is about 25dB and the next sample at the second grey line is about 50dB and so on. After you get each amplitude at each interval you will have a succession of plots along the wave. If you were to play connect the dots with those samples you would have a nearly identical wave, but when sampling a sound wave each amplitude is held until the next time you sample, it interprets that sample at that amplitude as a flat line between each sample point, to form the steps as seen in the dark blue wave at the tops of the grey lines. The grey lines represent the spot at which each sample is taken and the dark blue line represents the new wave form made by the sampling process. If you look closely you can see little triangle shaped gaps above and below the original wave when compared to the new wave. Every single one of these spots is audio which was never sampled and is thrown away and lost during the sampling and conversion process. The loss of sound is emphasized even more by (fig d.) where the sharp spikes in the wave form are not represented at all by the sampled wave form. This is where the estimations made by sampling are apparent. Once this audio material is lost during conversion it can never be restored! So when we went from the light blue original sound wave to the digitized step wave form it was an analog to digital conversion. Now that we have a step like wave form we can save the file as wav, but it will only be the file name, the number of steps will increase to the standard 1411 for wav but that just means there will be more steps along the flat horizontal steps of the mp3 digital dark blue wave. So in a 320kbps mp3 the number of times the wave is sampled is 320,000 times per second. That means in the example in the image there would be 320,000 grey lines showing where 320,000 samples were taken and there would also be 320,000 flat horizontal step-like surfaces in the wave. This means 320,000 places in every second that at lost. Albeit the more you sample, to say the higher the bitrate is, then the smaller those little lost triangles will be. See more here about why there is loss that is never regained from digital to analog conversion.
…
Well I’m exhausted… 16 pages at size 11 font, nearly 5,000 words later and years and years of development, with hours and hours of fact checking and cross referencing while writing this and producing my own audio and visuals to support it have made for this to be quite a long day. I hope at least I made my original point…hmm – what was it again?
Now nearly midnight as I wrap up I feel I forgot a lot, may have rambled, definitely got spelling and grammar mistakes but will sleep easy knowing that someone may have gained some knowledge from my rantings on the general where, how, when and why on sound! If someone you know is a victim of bad audio quality link them this article. If you enjoyed the article or would like to add anything or have suggestions for what I could possibly write about next time, hit me up almost anywhere on the web at username and artist name Epicstaxis.
Twitter, Instagram, Facebook, Tumblr and more…
One last link to another convincing and interesting piece of audio. In this link you can here each of the kick, clap and hi-hats from the earlier linked audio in decreasing bitrate and really notice the sound quality degradation as the sound travels from wav to 32kbps mp3.
Good night, thank you for your time, if I got time to ever proofread and edit this I might, but don’t count on it, LOL Until next time keep the audio curiosities coming…
p.s. I know I said there was another analogy but as long winded as this article already is I figured I would spare the audience. If you want to see it I posted it as a comment in response to a question on Facebook today which was the inspiration for my writing this piece in the first place.
#music sound audio files wav mp3 science streaming download sampling bitrate samplerate soundwave waveform analog digital#sound#audio#files#wav#mp3#science#streaming#stream#download#sample#sampling#bitrate#kbps#samplerate#soundwave#waveform#analog#digital#epicstaxis#itunes#applemusic#spotify#tidal#googlemusic#distrokid#spinnup#recordunion#crutchfield#acoustics
0 notes