#animationdirection
Explore tagged Tumblr posts
Visit Tumblr Blog
Explore Tumblr blogs with no restrictions, modern design and the best experience.
Last Seen Tumblr Blogs


Fun Fact
Average visit duration of Tumblr.com is 10 mins and 25 secs.
Text
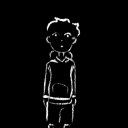
DAy 1
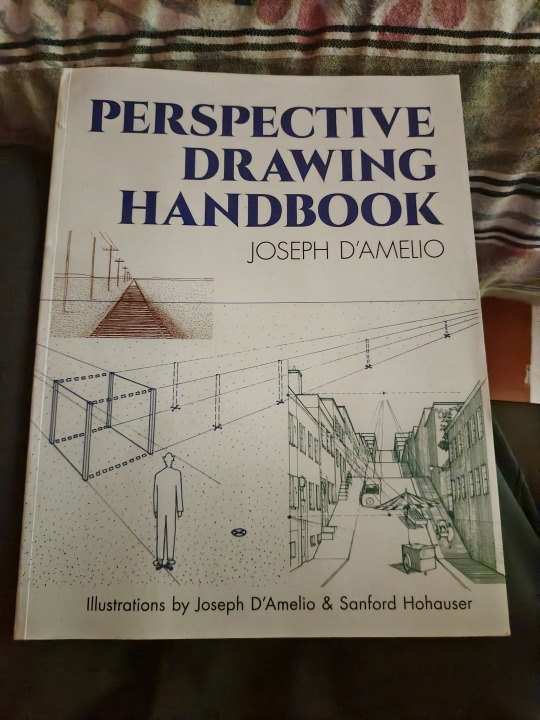
So today is the first of my journey before posting todays work let me tell you about me in short idk how many people will read this still so i am a first year college student I want to become an animator and in future Animation director currently I am at the beginner level I do know how to draw I can draw Characters decently but not that much of good . Today i started with the perspective cause thats the hard part I bought a book shown in the image I will not talk about book yet i will but after 3,4 days I found an image on pinterest and tried to draw that and i know what went wrong with that , which i wiill share in the next post so thats it
#animes#art#artjourney#perspective#drawing#animedrawing#animation#animationdirection#anime character
1 note
·
View note
Text

https://www.williamreiss.com/animationdirection
0 notes
Photo
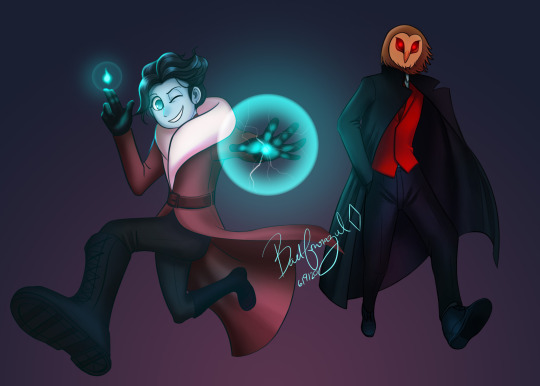
Finally done with my OCs Roisin (Roe-shin) and Halifax. ^_^
0 notes
Video
EA Games | Anthem Trailer
#Vimeo#milland#subwayads#gaming#electronicarts#anthemgame#outdooradvertising#animation#billboards#anthem#bioware#gameengine#3d#gametrailer#real-timerendering#monster#explosion#titan#colossus#animationdirection#emergingtechnology
0 notes
Photo

Looks like Noodle Boy will be hanging out in Italy. "POST NO BILLS" has been selected to be part of the Official Selection of SULMONA INTERNATIONAL FILM FESTIVAL (SIFF) in the INTERNATIONAL SHORT CATEGORY. If you are in Sulmona (AQ), Italy from November 8th through November 12nd, 2017, go heck it out! @robin_hays #directedbywomen #writtenbywomen @andypoondesign #codirector #artdirection #characterdesign #posterdesign #animationdirection #shortfilm #animatedshort #canadian #chinesecanadian #vancouver
#canadian#animatedshort#characterdesign#shortfilm#vancouver#artdirection#posterdesign#directedbywomen#animationdirection#codirector#chinesecanadian#writtenbywomen
0 notes
Video
Shot from the Marvel Heroes opening cinematic I directed. #animation by Titmouse. Which hero is your favorite? I like Thing! #marvel #animated #2danimation #captainamerica #spiderman #ironman #hulk #thor #wolverine #deadpool #jeangrey #phoenix #thething #thing #hawkeye #storm #humantorch #cyclops #squirrelgirl #scarletwitch #lukecage #blackwidow #rocketraccoon #groot #colossus #daredevil #blackpanther #emmafrost #antman #punisher #invisiblewoman #reedrichards #msmarvel #nova #cable #gambit #fantasticfour #avengers #xmen #defenders #artdirection #animationdirection #direction #cinematics #videogame #gamedev #loop #animatedloop #joshbook
#blackwidow#thing#joshbook#2danimation#punisher#daredevil#artdirection#defenders#animatedloop#ironman#jeangrey#antman#humantorch#colossus#marvel#nova#captainamerica#storm#animationdirection#invisiblewoman#scarletwitch#videogame#avengers#deadpool#animated#blackpanther#hulk#thor#lukecage#fantasticfour
0 notes
Link
I am thrilled to share this interview with Matthew Toffolo of WILDsound.@wildsoundmovies
0 notes
Text
JavaScriptを使い、CSS3を使ったanimationの内容を変える方法
from https://qiita.com/lung_humeaw/items/a897cb98dfd497778cca?utm_campaign=popular_items&utm_medium=feed&utm_source=popular_items

はじめに
CSSでは、 ainmation プロパティと keyframes を使ってアニメーションができます。
1つのオブジェクトに対して1つのアニメーション設定をするだけなら、それほど難しいことはありません。 しかし、ボタンの入力内容などに応じてアニメーション内容を切り替えたいという事もあります。
このページでは JavaScriptを使い、CSSのアニメーションを切り替える方法を書いてみました。
まずは1回だけのCSSアニメーション
まずは、ボタンが押されたらアニメーションを1回だけおこなうサンプルを作ってみます。 ここでは、div要素の中にあるspanで作った赤色の箱(id="box")を、transform:translateX で横移動をさせてみます。
<div class="parent"> <span class="child" id="box"></span> </div>
<p> <input type="button" onclick="move();" value=" move! " /> </p>
div.parent { position: relative; border: 1px solid black; width : 400px; height: 100px; } span.child { position: absolute; left: 100px; top: 25px; width : 50px; height: 50px; background-color: red; } @keyframes move { to { transform:translateX(200px); } } .moveToRight { animation-name: move; animation-duration: 1s; animation-iteration-count: 1; animation-fill-mode: forwards; }
function move() { const objBox = document.getElementById("box"); objBox.classList.add('moveToRight'); }
keyframes として 200px 右に動く動きを move という名前で定義しておき、この move を1秒間で1回だけアニメーションさせる定義が .moveToRight です。ボタンが押されたら JavaScript で moveToRight を box の classList に追加してやることでアニメーションが動き出します。
CSSで「animation-fill-mode: forwards」としているので、box は移動終了した場所で止まっています。
アニメーション内容を変更する方法
上のサンプルでは、アニメーションは1回だけしか動作しません(ボタンは何回でも押せますが、押しても何も変化しません)。 もし何回も同じアニメーションをおこなわせたければ、アニメーション終了時に classList から前回のアニメーションを取り除いてやる必要があります。
では、ボタンが押されたら、今度は元の位置までアニメーションで戻るようにしたい場合はどうすれば良いでしょうか? この場合もアニメーション終了時に classList から前回のアニメーションを取り除いた上で、今度は逆向きに移動する transform の keyframes を使ったアニメーションを定義し、それを classList に追加してやれば良さそうですね。 しかし、それだけでは上手くいきません。classList から取り除いた時点で transform の影響が消えるので、box は瞬間的に元の位置に戻ってしまいます。このため、left 位置に transform 後の値を加味した値を書いておく必要があります。left や transform の値は JavaScript からは読めないので、自分で計算して値を書かなければいけません(レンダリングエンジンが知っているはずの値を自分でも別途管理しなければいけないというのはイマイチな感じがしますね。何か良い方法はありますか?)。
あと、classList にアニメーションを追加したり削除したりするっていうのは意外に面倒くさいですね。動かしたいオブジェクトが沢山あると、だんだんと管理できなくなってきます。 この問題は、実は簡単に解決できます。classListは使わず、単にオブジェクトの style.animationName を書けば良いだけなのです。
ボタンを押す度に、box (span.child) が右に行ったり左に戻ったりするサンプルを以下に���します。(html は最初のサンプルと一緒です)
div.parent { position: relative; border: 1px solid black; width : 400px; height: 100px; } span.child { position: absolute; left: 100px; top: 25px; width : 50px; height: 50px; background-color: red; animation-duration: 1s; animation-iteration-count: 1; animation-fill-mode: forwards; } @keyframes moveRight { to { transform:translateX(200px); } } @keyframes moveLeft { to { transform:translateX(-200px); } }
let direct = 0; // 移動方向。0以外なら右へ、0なら左へ
function move() { const objBox = document.getElementById("box"); objBox.style.transform = ''; // 前回移動アニメのtransform を消す
direct ^= 1; if (direct !== 0) { objBox.style.left = '100px'; // 移動開始位置を設定する必要がある objBox.style.animationName = 'moveRight'; } else { objBox.style.left = '300px'; objBox.style.animationName = 'moveLeft'; } }
最初のサンプルと違い、アニメーション設定は予め span の中に書いてしまっています(アニメーション設定だけの CSS 記述 .moveToRight が無くなりました)。 こうすることで、classList を使う事無く、ボタンが押されたら style.animationName を書くだけでアニメーションの切り替えが出来ます(もちろん、duration とかを変化させても良いです)。 また、classList の削除に相当する transform の初期化は、ボタンが押されてからおこなえばOKです。これは空文字をセットするだけで実現できます。
今回の例では横移動だけのアニメーションですが、色や透明度を変化させる場合も考え方は一緒です。
応用例
応用例として、上下左右のボタンに対して、押された方向へアニメーションするサンプルを作ってみました。 このページのサンプルとちょっと違うのは、同じ方向に何回も移動できるようになっている事です。これを実現するために、アニメーション終了時に style.animationName をクリアしています。style.animationName は、値の変化があった時だけアニメーションが開始します。同じ方向へのアニメでは同じ名前をセットしてしまうので、一度クリアしないとアニメが動かないのです。
このことから、style.animationName への代入は、代入に見せかけた演算子のオーバーロードでは無いことが分かります。style.animationName に限らず、left とか transform の値は、JavaScript でセットしてもすぐに状態が反映される訳では無く、描画直前に前回との差分を見て一気に反映しているらしい事が想像できます。
あと余談ぽくなりますが、moveRight と moveLeft の keyframes を作らずに、1つの keyframes でanimationDirection を normal と reverse を JavaScriptで切り替える方法も可能です。ただし reverse では加速の仕方も逆になってしまうので、animationTimingFunction が linear の時以外は使いにくいです。
最後に
ここまでやるんなら、CSS を使ったアニメーションではなくて、全て JavaScript でやった方が制御しやすいのでは? とも思いますね。 しかし、JavaScript ではインターバル割り込みによって処理する関係上、描画フレーム毎に処理してくれる CSS に比べると、どうしても動きがカクカク見えてしまいます。 当たり判定が不要な演出とかは、このページの内容を参考にして動かしてみるのも良いかもしれません。
0 notes
Text
I've been watching a fantastic 4 part documentary on Animation Director Hayao Miyazaki - https://www3.nhk.or.jp/nhkworld/en/ondemand/program/video/10yearshayaomiyazaki/?type=tvEpisode&
Recommend in a blog post from James Gurney (his blog is a great resource for visual storytellers of all stripes)http://gurneyjourney.blogspot.com/2019/06/miyazaki-at-work.html
#hayaomiyazaki #animationdirection #creativedocumentarys #visualstorytelling #creativeprocess #creativestruggle #artwithemotion
0 notes
Link
Boost you business by EYE FLASHING Video Animation - Just Like our Kaulalampur PEAKFREANS Client did. Here Is the Video From our Archive - #video #animation #videomarketing #videoproduction #motiongraphics #boost #business #designstudio #motions #videomaking #motiongraphicsdesign #animationstudio #animationdirection
0 notes
Text
Estação meteorológica doméstica com NodeMCU e OLED
Neste tutorial, desenvolveremos uma estação meteorológica doméstica, onde se exibirá informações tais como temperatura e condições climáticas, tanto para o dia corrente quanto para os próximos 3 dias. Nossa estação também exibirá informações internas da casa, como temperatura e humidade relativa do ar.
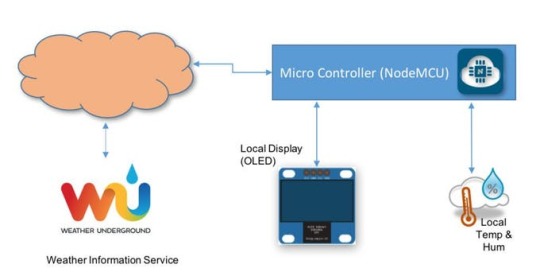
Lista de materiais: Placa NodeMcu Lua Wifi ESP8266 ESP-12F 0.96″ I2C IIC SPI Serial 128X64 White OLED LCD LED Display Module Sensor de humidade e temperatura DHT 22 AM2302 Mini Breadboard Cabos Jumper Macho-Macho Fonte externa de 5V ou bateria
Instalando o OLED no NodeMCU
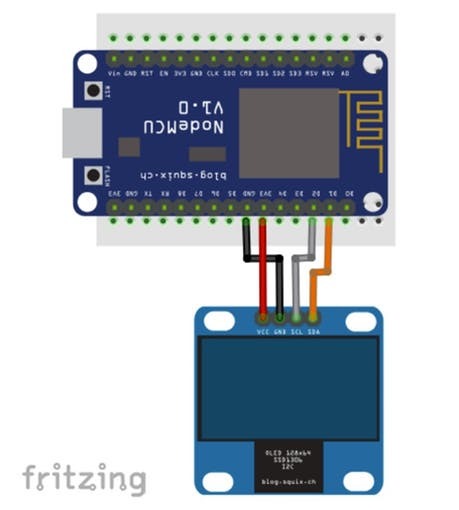
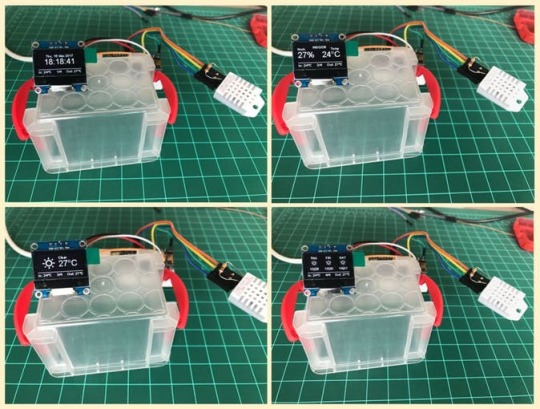
Suponho que já tenha o IDE do Arduino preparado com todas as bibliotecas necessárias para executar o código NodeMCU. Caso não, leia as instruções no tutorial sobre : Do “blink” ao BLYNK, uma viagem pela “Internet das coisas” nas asas do NodeMCU ESP-12E. Agora é hora de instalar nosso velho conhecido, o display OLED SSD1306, cujas principais características são: Tamanho da tela: 0.96 “ Comunicação Serial I2C IIC SPI 128X64 Display de caracteres na cor branca Conecte os pinos do OLED ao NodeMCU, conforme descritos abaixo e no diagrama elétrico acima: SDA ==> D1 (5) SCL * ==> D2 (4) * Também poderá encontrar “SDC” ao invés de SCL VCC ==> 3.3V ou 5V GND ==> GND O SSD1306 pode ser alimentado tanto com 5V (externo) quanto com 3.3V fornecidos diretamente do módulo NodeMCU. Depois de conectar o OLED,devemos fazer download e instalar sua biblioteca no IDE do Arduino. Usamos em projetos anteriores a biblioteca desenvolvida pela ACROBOT, que apesar de fácil de usar, é mais limitada. Desta vez exploraremos a poderosa biblioteca gráfica desenvolvida por Daniel Eichhorn. Entre no link abaixo e faça o downoload da biblioteca, instalando-a no IDE do Arduino: https://github.com/squix78/esp8266-oled-ssd1306 Certifique-se de usar a versão 3.0.0 ou maior! Depois de reiniciado o IDE, a biblioteca já deverá estar instalada. A biblioteca suporta o protocolo I2C para acessar a modulo OLED, usando a biblioteca Wire.h: #include #include "SSD1306.h" SSD1306 display(ADDRESS, SDA, SDC); Listaremos apenas algumas API mais importantes, as quais serão utilizadas com o OLED. A-Controle de exibição do display: void init(); // Initialise the display void resetDisplay(void); // Cycle through the initialisation void displayOn(void); // Turn the display on void displayOff(void); // Turn the display offs void clear(void); // Clear the local pixel buffer void invertDisplay(void); // Inverted display mode void normalDisplay(void); // Normal display mode void setContrast(char contrast); // Set display contrast void flipScreenVertically(); // Turn the display upside down B-Desenho gráfico void setColor(OLEDDISPLAY_COLOR color); // Sets the color of all pixel operations void setPixel(int16_t x, int16_t y); // Draw a pixel at given position void drawLine(int16_t x0, int16_t y0, int16_t x1, int16_t y1); // Draw a line from pos 0 to pos 1 void drawHorizontalLine(int16_t x, int16_t y, int16_t length); // Draw a line horizontally void drawVerticalLine(int16_t x, int16_t y, int16_t length); // Draw a lin vertically void drawFastImage(int16_t x, int16_t y, int16_t width, int16_t height, const char *image); // Draw a bitmap in the internal image format C-Operações com texto: void drawString(int16_t x, int16_t y, String text); // Write the text at given position uint16_t getStringWidth(const char* text, uint16_t length); // Returns the width of the const char* with the current font settings uint16_t getStringWidth(String text); // Convenience method for the const char version void setTextAlignment(OLEDDISPLAY_TEXT_ALIGNMENT textAlignment); // TEXT_ALIGN_LEFT, TEXT_ALIGN_CENTER, TEXT_ALIGN_RIGHT, TEXT_ALIGN_CENTER_BOTH void setFont(const char* fontData); // Sets the current font. // Available default fonts: ArialMT_Plain_10, ArialMT_Plain_16, ArialMT_Plain_24 D. Frames (“Ui Library”) A Ui Library é utilizada para fornecer um conjunto básico de elementos Ui chamados, Frames e Overlays. Um Frame é usado para fornecer informações onde o comportamento padrão é exibir um Frame por um tempo definido e passar para o próximo (como “Paginas”). A biblioteca também fornece um Indicador de qual frame (ou página) está sendo mostrada. Um overlay, por outro lado, é uma informação (por exemplo, um relógio) que é exibido sempre na mesma posição. void init(); // Initialise the display void setTargetFPS(uint8_t fps); //Configure the internal used target FPS void enableAutoTransition(); //Enable automatic transition to next frame void disableAutoTransition(); // Disable automatic transition to next frame. void setAutoTransitionForwards(); // Set the direction if the automatic transitioning void setAutoTransitionBackwards(); // Set the direction if the automatic transitioning void setTimePerFrame(uint16_t time); //Set the approx. time a frame is displayed void setTimePerTransition(uint16_t time); //Set the approx. time a transition will take void setFrameAnimation(AnimationDirection dir); //Configure what animation is used to transition void setFrames(FrameCallback* frameFunctions, uint8_t frameCount); //Add frame drawing functions int8_t update(); // This needs to be called in the main loop Uma vez que o OLED e sua biblioteca estejam instalados, escreveremos um simples programa, o “Hello World” para testá-los. Entre com o código abaixo em seu IDE, o resultado deverá ser algo como mostrado na foto:
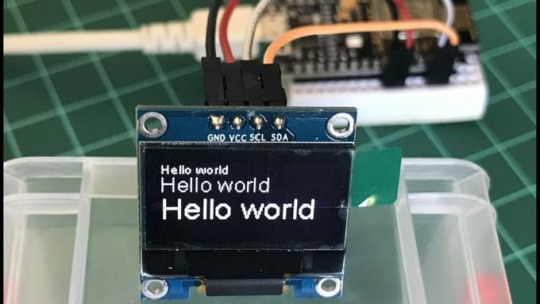
/* Hello World OLED Test */ #include // alias for `#include "SSD1306Wire.h"` SSD1306 display(0x3c, 5, 4); // Initialise the OLED display using Wire library void setup() { Serial.begin(115200); display.init(); // Initialising the UI will init the display too. display.flipScreenVertically(); display.clear(); drawHelloWorld(); display.display(); } void loop() { } void drawHelloWorld() { display.setTextAlignment(TEXT_ALIGN_LEFT); display.setFont(ArialMT_Plain_10); display.drawString(0, 0, "Hello world"); display.setFont(ArialMT_Plain_16); display.drawString(0, 10, "Hello world"); display.setFont(ArialMT_Plain_24); display.drawString(0, 26, "Hello world"); } Agora, carregue a sketch: SSD1306SimpleDemo.ino, a qual faz parte dos EXEMPLOS incluídos com biblioteca. Antes de executar o código, altere a conexão OLED pinos em conformidade: // Initialise the OLED display using Wire library SSD1306 display(0x3c, 5, 4);
Obtendo os dados internos (“Indoor”)
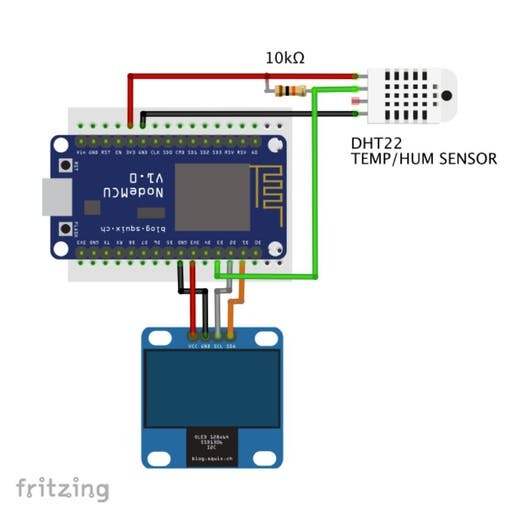
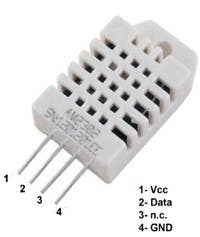
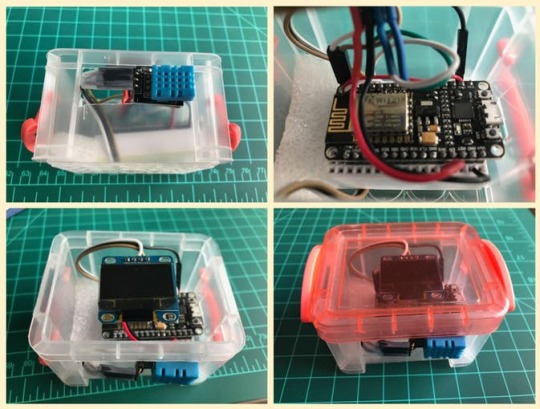
Neste momento, nosso NodeMCU já pode se comunicar com o mundo pelo display! Instalemos agora o sensor de humidade e temperatura DHT 22 AM2302, nosso bom e velho DHTxx (DHT11 ou DHT22). Abaixo tem algumas informações que de devemos saber sobre este sensor: Visão geral Os sensores de temperatura e humidade de baixo custo da família DHT, são muito básicos e lentos, mas ótimos para hobbyists que querem fazer algum registo de dados básico. Os sensores DHT são construídos em duas partes, um sensor de umidade capacitiva e um termistor. Há também um chip muito básico no interior que faz a conversão analógica para digital. O sinal digital gerado é bastante simples de ser lido usando-se qualquer micro controlador. DHT11 vs DHT22 Temos duas versões do sensor DHT, eles se parecem e têm a mesma pinagem, mas possuem algumas características diferentes. Aqui estão as especificações: DHT11 Bom para leituras de 20-80% de humidade com 5% de precisão Bom para leituras de temperatura de 0-50 ° C ± 2 ° C de precisão Não mais de 1 Hz taxa de amostragem (uma vez por segundo) Ultra baixo custo Alimentação: 3 a 5V Consumo: 2.5mA max (durante a conversão de dados) Tamanho do corpo 15.5mm x 12mm x 5.5mm 4 pinos com espaçamento de 0,1 “ DHT22 Bom para leituras de 0-100% de humidade com precisão de 2 a 5% Bom para leituras de temperatura de -40 a 125 ° C Precisão de ± 0,5 ° C Não mais de 0,5 Hz taxa de amostragem (uma vez a cada 2 segundos) Baixo custo Alimentação: 3 a 5V Consumo: 2.5mA max (durante a conversão de dados) Tamanho do corpo 15.1mm x 25mm x 7.7mm 4 pinos com espaçamento de 0,1 “ Como pode ver, o DHT22 é um pouco mais preciso e melhor sobre um intervalo ligeiramente maior. Ambos usam um único pino digital e são “lentos”, pois você não pode consultá-los mais de uma vez a cada segundo (DHT11) ou dois (DHT22). O DHTxx tem 4 pinos (olhando para o sensor, como mostra a foto, o pino 1 é o mais à esquerda): VCC (conectado a 5V externo ou a 3.3V de NodeMCU) Dados Não conectado Terra.
Uma vez que normalmente você usará o sensor em distâncias inferiores a 20m, um resistor de 10K ohms deve ser conectado entre os pinos Data e VCC. O pino de saída será conectado ao pino D3 do NodeMCU (veja o diagrama acima). Uma vez instalado o sensor em nosso módulo, faça o download da biblioteca DHT do repositório GitHub da Adafruit e instale-o no arquivo de bibliotecas do Arduino. Uma vez recarregado o IDE do Arduino, a “biblioteca de sensores DHT” deverá estar instalada. Definamos os parâmetros e variáveis associadas para o sensor (usaremos em primeiro lugar oDHT22): /* DHT22 */ #include #define DHTPIN D3 #define DHTTYPE DHT22 DHT dht(DHTPIN, DHTTYPE); int localHum = 0; int localTemp = 0; Agora criaremos uma função para leitura dos dados: /*************************************************** * Get indoor Temp/Hum data ****************************************************/ void getDHT() { float tempIni = localTemp; float humIni = localHum; localTemp = dht.readTemperature(); localHum = dht.readHumidity(); if (isnan(localHum) || isnan(localTemp)) // Check if any reads failed and exit early (to try again). { Serial.println("Failed to read from DHT sensor!"); localTemp = tempIni; localHum = humIni; return; } } Uma vez de posse dos dados, usemos o OLED para mostrá-los : /*************************************************** * Draw Indoor Page ****************************************************/ void drawDHT() { int x=0; int y=0; display.setFont(ArialMT_Plain_10); display.setTextAlignment(TEXT_ALIGN_LEFT); display.drawString(0 + x, 5 + y, "Hum"); display.setFont(ArialMT_Plain_10); display.setTextAlignment(TEXT_ALIGN_LEFT); display.drawString(43 + x, y, "INDOOR"); display.setFont(ArialMT_Plain_24); String hum = String(localHum) + "%"; display.drawString(0 + x, 15 + y, hum); int humWidth = display.getStringWidth(hum); display.setFont(ArialMT_Plain_10); display.setTextAlignment(TEXT_ALIGN_LEFT); display.drawString(95 + x, 5 + y, "Temp"); display.setFont(ArialMT_Plain_24); String temp = String(localTemp) + "°C"; display.drawString(70 + x, 15 + y, temp); int tempWidth = display.getStringWidth(temp); } A foto abaixo mostra como os dados serão apresentados no display:
Você poderá fazer o download do código completo para operação “indoor” á partir de meu GitHub: Home Weather Station Indoor code
Obtendo os dados externos (“Outdoor”):
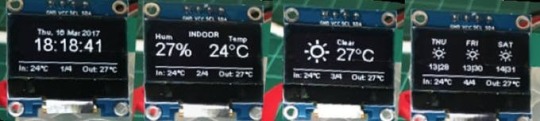
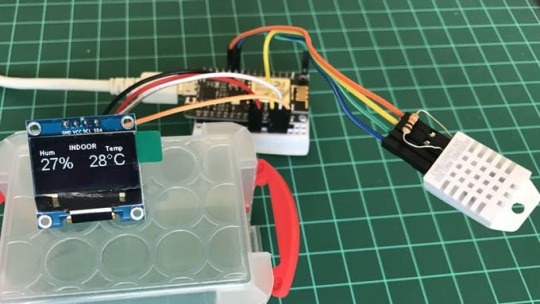
Nossos dados meteorológicos serão fornecidos por um serviço gratuito, o “Weather Underground“. Você precisará criar uma conta em seu site e obter uma chave para poder se utilizar da API. Faça-o, seguindo as instruções no link abaixo: https://www.wunderground.com/weather/api Nossa estação meteorológica doméstica é baseada no extraordinário trabalho desenvolvido por Daniel Eichhorn (@ squix78). Siga as instruções constantes de seu GitHub para obter as bibliotecas apropriadas. Você precisará ao menos, instalar as bibliotecas abaixo: Weather Station by Daniel Eichhorn: https://github.com/squix78/esp8266-weather-station Json Streaming Parser by Daniel Eichhorn: https://github.com/squix78/json-streaming-parser Depois de ter as bibliotecas instaladas e o IDE reiniciado, baixe o programa completo a partir de meu GitHub: MJRoBot Home Weather Station code Depois de ter o código carregado no IDE do Arduino, abra o arquivo stationCredentials.h e entre com seus dados pessoais: /* WIFI */ const char* WIFI_SSID = "YOUR SSID"; const char* WIFI_PWD = "YOUR PASSWORD"; /* Wunderground Settings */ const boolean IS_METRIC = true; const String WUNDERGRROUND_API_KEY = "YOUR KEY"; const String WUNDERGRROUND_LANGUAGE = "EN"; const String WUNDERGROUND_COUNTRY = "CL"; const String WUNDERGROUND_CITY = "Santiago"; Sua estação meteorológica doméstica deverá estar funcionando agora! Nas fotos abaixo, você pode ver meu protótipo funcionando:
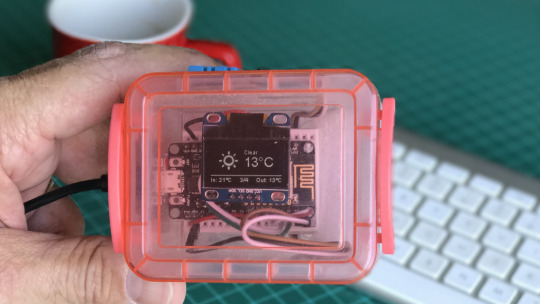
5-Colocando a estação “na caixa”
A última etapa é montar nossa estação numa caixa. Fiz duas montagens diferentes em caixas plásticas.
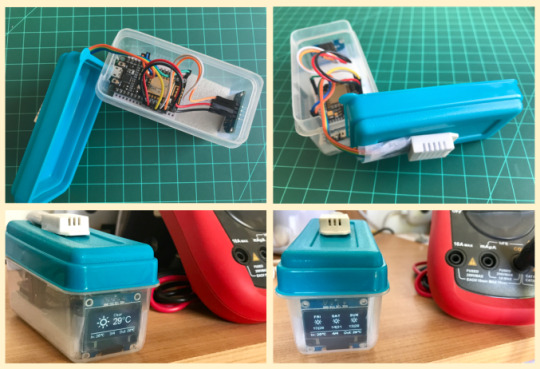
Noutra montagem, aproveitei e também testei a estação com o DHT11. Não se esqueça de alterar os dados do DHT no arquivo “stationDefines.h”.
Artigo gentilmente cedido por: MJRoBot.Org Todos os produtos utilizados neste artigo podem ser encontrados na Loja de Eletrónica e Robótica - ElectroFun. Gostaram deste artigo? Deixem o vosso comentário no formulário a baixo e partilhem com os vossos amigos. Não se esqueçam de fazer like na nossa Página no Facebook. Podem ainda colocar as vossas dúvidas no nosso Forum da Comunidade Arduino em Portugal ou no nosso Grupo no Facebook Arduino Portugal - Qual o teu projeto? Click to Post
0 notes
Text
Quick reference: SVG CSS attributes.
It wasn’t as easy to find full reference of all the CSS attributes supported by SVG elements. Mozilla has documentation on how to use. https://developer.mozilla.org/en-US/docs/Web/Guide/CSS/Getting_started/SVG_and_CSS

But here we go.
alignContent: "" alignItems: "" alignSelf: "" alignmentBaseline: "" all: "" animation: "" animationDelay: "" animationDirection: "" animationDuration: "" animationFillMode: "" animationIterationCount: "" animationName: "" animationPlayState: "" animationTimingFunction: "" backfaceVisibility: "" background: "" backgroundAttachment: "" backgroundBlendMode: "" backgroundClip: "" backgroundColor: "" backgroundImage: "" backgroundOrigin: "" backgroundPosition: "" backgroundPositionX: "" backgroundPositionY: "" backgroundRepeat: "" backgroundRepeatX: "" backgroundRepeatY: "" backgroundSize: "" baselineShift: "" border: "" borderBottom: "" borderBottomColor: "" borderBottomLeftRadius: "" borderBottomRightRadius: "" borderBottomStyle: "" borderBottomWidth: "" borderCollapse: "" borderColor: "" borderImage: "" borderImageOutset: "" borderImageRepeat: "" borderImageSlice: "" borderImageSource: "" borderImageWidth: "" borderLeft: "" borderLeftColor: "" borderLeftStyle: "" borderLeftWidth: "" borderRadius: "" borderRight: "" borderRightColor: "" borderRightStyle: "" borderRightWidth: "" borderSpacing: "" borderStyle: "" borderTop: "" borderTopColor: "" borderTopLeftRadius: "" borderTopRightRadius: "" borderTopStyle: "" borderTopWidth: "" borderWidth: "" bottom: "" boxShadow: "" boxSizing: "" breakAfter: "" breakBefore: "" breakInside: "" bufferedRendering: "" captionSide: "" clear: "" clip: "" clipPath: "" clipRule: "" color: "" colorInterpolation: "" colorInterpolationFilters: "" colorRendering: "" columnCount: "" columnFill: "" columnGap: "" columnRule: "" columnRuleColor: "" columnRuleStyle: "" columnRuleWidth: "" columnSpan: "" columnWidth: "" columns: "" contain: "" content: "" counterIncrement: "" counterReset: "" cssFloat: "" cssText: "" cursor: "" cx: "" cy: "" d: "" direction: "" display: "" dominantBaseline: "" emptyCells: "" fill: "" fillOpacity: "" fillRule: "" filter: "" flex: "" flexBasis: "" flexDirection: "" flexFlow: "" flexGrow: "" flexShrink: "" flexWrap: "" float: "" floodColor: "" floodOpacity: "" font: "" fontFamily: "" fontFeatureSettings: "" fontKerning: "" fontSize: "" fontStretch: "" fontStyle: "" fontVariant: "" fontVariantCaps: "" fontVariantLigatures: "" fontVariantNumeric: "" fontWeight: "" height: "" hyphens: "" imageRendering: "" isolation: "" justifyContent: "" left: "" length : 0 letterSpacing: "" lightingColor: "" lineHeight: "" listStyle: "" listStyleImage: "" listStylePosition: "" listStyleType: "" margin: "" marginBottom: "" marginLeft: "" marginRight: "" marginTop: "" marker: "" markerEnd: "" markerMid: "" markerStart: "" mask: "" maskType: "" maxHeight: "" maxWidth: "" maxZoom: "" minHeight: "" minWidth: "" minZoom: "" mixBlendMode: "" motion: "" objectFit: "" objectPosition: "" offset: "" offsetDistance: "" offsetPath: "" offsetRotation: "" opacity: "" order: "" orientation: "" orphans: "" outline: "" outlineColor: "" outlineOffset: "" outlineStyle: "" outlineWidth: "" overflow: "" overflowWrap: "" overflowX: "" overflowY: "" padding: "" paddingBottom: "" paddingLeft: "" paddingRight: "" paddingTop: "" page: "" pageBreakAfter: "" pageBreakBefore: "" pageBreakInside: "" paintOrder: "" parentRule : null perspective: "" perspectiveOrigin: "" pointerEvents: "" position: "" quotes: "" r: "" resize: "" right: "" rx: "" ry: "" shapeImageThreshold: "" shapeMargin: "" shapeOutside: "" shapeRendering: "" size: "" speak: "" src: "" stopColor: "" stopOpacity: "" stroke: "" strokeDasharray: "" strokeDashoffset: "" strokeLinecap: "" strokeLinejoin: "" strokeMiterlimit: "" strokeOpacity: "" strokeWidth: "" tabSize: "" tableLayout: "" textAlign: "" textAlignLast: "" textAnchor: "" textCombineUpright: "" textDecoration: "" textIndent: "" textOrientation: "" textOverflow: "" textRendering: "" textShadow: "" textSizeAdjust: "" textTransform: "" top: "" touchAction: "" transform: "" transformOrigin: "" transformStyle: "" transition: "" transitionDelay: "" transitionDuration: "" transitionProperty: "" transitionTimingFunction: "" unicodeBidi: "" unicodeRange: "" userSelect: "" userZoom: "" vectorEffect: "" verticalAlign: "" visibility: ""
0 notes
Video
Prada Raw Avenue - Montage Film
#Vimeo#animation#animationdirection#artdirection#compositing#design#fashion#illustration#blairbreitenstein#carlykuhn#judithvandenhoek#meganhess#vidavega#wongping#pradaraw#sunglasses#frames#aprilmilano#acne#milland#musikvernuegen
1 note
·
View note