#apple email backup tool
Explore tagged Tumblr posts
Visit Tumblr Blog
Explore Tumblr blogs with no restrictions, modern design and the best experience.
Last Seen Tumblr Blogs


Fun Fact
Tumblr has 16.74 million mobile monthly users in the US.
Text
I don't know I'm not done talking about it. It's insane that I can't just uninstall Edge or Copilot. That websites require my phone number to sign up. That people share their contacts to find their friends on social media.
I wouldn't use an adblocker if ads were just banners on the side funding a website I enjoy using and want to support. Ads pop up invasively and fill my whole screen, I misclick and get warped away to another page just for trying to read an article or get a recipe.
Every app shouldn't be like every other app. Instagram didn't need reels and a shop. TikTok doesn't need a store. Instagram doesn't need to be connected to Facebook. I don't want my apps to do everything, I want a hub for a specific thing, and I'll go to that place accordingly.
I love discord, but so much information gets lost to it. I don't want to join to view things. I want to lurk on forums. I want to be a user who can log in and join a conversation by replying to a thread, even if that conversation was two days ago. I know discord has threads, it's not the same. I don't want to have to verify my account with a phone number. I understand safety and digital concerns, but I'm concerned about information like that with leaks everywhere, even with password managers.
I shouldn't have to pay subscriptions to use services and get locked out of old versions. My old disk copy of photoshop should work. I should want to upgrade eventually because I like photoshop and supporting the business. Adobe is a whole other can of worms here.
Streaming is so splintered across everything. Shows release so fast. Things don't get physical releases. I can't stream a movie I own digitally to friends because the share-screen blocks it, even though I own two digital copies, even though I own a physical copy.
I have an iPod, and I had to install a third party OS to easily put my music on it without having to tangle with iTunes. Spotify bricked hardware I purchased because they were unwillingly to upkeep it. They don't pay their artists. iTunes isn't even iTunes anymore and Apple struggles to upkeep it.
My TV shows me ads on the home screen. My dad lost access to eBook he purchased because they were digital and got revoked by the company distributing them. Hitman 1-3 only runs online most of the time. Flash died and is staying alive because people love it and made efforts to keep it up.
I have to click "not now" and can't click "no". I don't just get emails, they want to text me to purchase things online too. My windows start search bar searches online, not just my computer. Everything is blindly called an app now. Everything wants me to upload to the cloud. These are good tools! But why am I forced to use them! Why am I not allowed to own or control them?
No more!!!!! I love my iPod with so much storage and FLAC files. I love having all my fics on my harddrive. I love having USBs and backups. I love running scripts to gut suck stuff out of my Windows computer I don't want that spies on me. I love having forums. I love sending letters. I love neocities and webpages and webrings. I will not be scanning QR codes. Please hand me a physical menu. If I didn't need a smartphone for work I'd get a "dumb" phone so fast. I want things to have buttons. I want to use a mouse. I want replaceable batteries. I want the right to repair. I grew up online and I won't forget how it was!
74K notes
·
View notes
Text
Backing up Apple Mail Smartly – A Simple yet Powerful Tool
Every email you’ve kept holds something. Like a client’s request, a friend’s promise, a receipt you’ll need someday. But Apple Mail wasn’t designed to safeguard these threads forever. For Apple Mail users, the mailbox grows organically, accumulating not just messages but layers of context. Yet without careful stewardship, these threads can become fragile, scattered across devices or trapped in formats that don’t adapt as needs evolve. This is the reason why Apple Mail backups are so important and often the essential part of the whole email system.

The true measure of an Apple Mail backup tool lies in how effortlessly it preserves this living archive while respecting the rhythms of your workflow.
Backing up Apple Mail comes down to storage. The emails flow constantly, folders expand, attachments multiply, and soon the archives grow larger than you anticipated. Where exactly you choose to store those backups shapes how effortlessly your backups integrate into your workflow. Mail Backup X understands this deeply, offering diverse storage solutions that adapt naturally to the distinct and varied ways you handle Apple Mail data.
Local Storage: Speed at Your Fingertips
Local storage remains the first choice for many, keeping backups within quick reach. Your Mac’s hard drive presents the simplest option. There's no intermediary, no reliance on network connectivity, and backups remain responsive because retrieval happens without delay. Mail Backup X makes local storage straightforward by giving direct access to any folder on your Mac.
It saves backup archives in a compressed .mbs format, neatly packaged and conveniently navigable. You select your preferred folder directly in the tool's interface, and the backups settle smoothly into place.
Mirrored Backups – Add Another Layer of Safety
For many users, an extra layer of storage safety matters. Mail Backup X addresses this through its mirror feature, allowing multiple copies of your Apple Mail backup to exist simultaneously. One copy could live comfortably on your Mac, another securely in the cloud, and yet another perhaps on an external hard drive. Each mirror syncs independently but consistently.
If one storage location becomes inaccessible or corrupted, your data remains safe within its alternate mirror. You never rely solely on a single copy. Mail Backup X maintains data integrity across multiple mirrors without complication.
Distributed Storage: Growing Without Constraints
Local storage, however, isn't always sufficient on its own. Apple Mail backups can expand without pause. As weeks turn into months and then years, storage limits begin to press.
Here, Mail Backup X offers distributed storage, a sophisticated yet uncomplicated answer. Rather than forcing a decision between multiple locations, the tool lets you combine several spaces into one cohesive storage strategy. Each chosen location holds a portion of your backup. When the primary location fills up, Mail Backup X shifts seamlessly to the next available space. It's an elegant solution for managing ever-growing archives without interrupting your routine.
Cloud Storage: Access Without Boundaries
Cloud storage offers advantages unique to itself. Mail Backup X integrates directly with popular cloud services, including Google Drive, Dropbox, and OneDrive. Cloud integration simplifies accessibility. You're no longer confined by hardware limitations or geographical locations.
Accessing your Apple Mail backup archives from different devices or locations becomes straightforward, providing flexibility beyond traditional storage solutions. The tool's intuitive interface guides you smoothly through selecting and configuring cloud spaces, allowing a painless setup process.
Encryption: Your Backup’s Security
If your emails are confidential or sensitive, Mail Backup X feature for encryption is going to be very important for you. Once you enable ‘Encryption’ in Profile settings, the tool automatically encrypts your backups regardless of storage location.
The encryption happens seamlessly in the background, requiring no technical knowledge from you. Your emails remain completely inaccessible to anyone without authorization, even when stored on third-party cloud platforms. There's no need for manual security checks or constant vigilance. Mail Backup X maintains this protection consistently across all your backup copies.
Portable & Isolated: The USB Snapshot Advantage
Another distinct strength of Mail Backup X emerges in its USB snapshot functionality. While all digital backups exist as data, USB drives offer something unique. It becomes a self-contained, movable copy of your emails that exists entirely on your terms. Mail Backup X's snapshot feature turns any external drive into a disconnected safe-deposit box for your Apple Mail backups.
Choosing Your Strategy: It’s About Your Workflow
Each storage solution within Mail Backup X aligns neatly with the specific needs of Apple Mail users.
Local storage prioritizes speed and convenience.
Distributed storage deftly handles expanding data volumes.
Mirrored copies build redundancy for critical data security.
Cloud integration offers unmatched accessibility and encryption layers.
USB snapshots bridge digital convenience with tangible reliability.
How you choose your storage isn't arbitrary. Mail Backup X presents these options clearly, anticipating rather than dictating your choices. The goal is always intuitive integration, avoiding disruption of the established patterns you've developed in managing Apple Mail. The tool’s approach to storage recognizes individual workflows and provides tailored adaptability instead of a one single solution for Apple Mail backups for everyone.
Ultimately, selecting storage for Apple Mail backups involves understanding your relationship with email management itself. If accessibility matters most, cloud solutions offer clear advantages. If security feels paramount, encrypted storage and mirrored backups stand out. For simplicity and immediacy, local or USB drive options resonate deeply. Distributed storage elegantly handles volume and long-term growth without fuss.
Mail Backup X doesn't dictate your backup storage strategy but rather enhances it. By offering clear, flexible choices, the software adapts naturally to diverse usage scenarios.
The emphasis remains on empowering you to backup Apple Mail effectively, respecting your individual preferences and practical necessities.
Backing up Apple Mail becomes a thoughtful practice but never overwhelming. The right storage spaces ensure backups integrate effortlessly into your workflow. Mail Backup X enables precise, practical management of Apple Mail data, always aligning closely with your evolving needs. Your choice of storage location subtly but meaningfully shapes how smoothly your email backups perform and how confidently you navigate your archive.
Experience It Firsthand with the Free Trial
Before committing, why not see how Mail Backup X fits into your workflow? InventPure, the company behind the software, offers a fully functional free trial without any limitations. Back up real emails from your Apple Mail database, test searches, restore messages, and explore every storage option just as you would with the full version.
It’s designed to give you an honest assessment for how the tool handles your actual Apple Mail backups, not just a demo. If it doesn’t make your backup process simpler and more reliable, you’ll know before spending anything or committing to a subscription.
0 notes
Text
An easy process on how to backup apple email
I want to share my experience on apple email backup because most of the mac users are used to apple mailbox like me. There are various reason to support it however; my favourite reason is configuration of other mail clients in apple.
If you are wondering that apple mail supports other email services as well then you should definitely click below link for more information.
Many people still wonder on the subject ‘apple email backup and restore’, may be because they are confused on how to do it.
So, I thought to introduce an apple email backup tool to provide a perfect apple email backup solution.
So, just follow the easy steps of this apple email backup software.
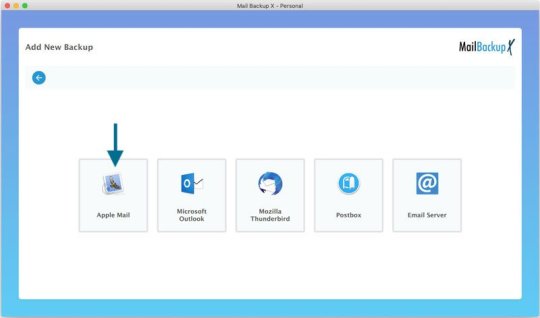
Step 1 Launch the application of Mail Backup X by InventPure, it will display a dashboard on the screen. Select ‘Add new backup’ under Backup Setup for apple mail.
Step 2 After clicking on Add new backup, it will display a list of different IMAP accounts like Office 365, Mozilla Thunderbird, GMAIL, Postbox and so on. Select apple mail from the dialog box.
Step 3 The next step allows the tool to load data from the selected source yahoo mail. The tool will scan through the database and read the email files that are require for archival. It will take few minutesfor the tool to scan the files in your database. In few minutes, you get an actual status of the files and items being scan and procure.
Step 4 The next step is to choose apple email backup folder as the storage and click on done for completion. It allows picking the location where you want to back up the data. You can browse in your folders and choose the right place to store it. You can assign a name to the yahoo backup file to locate it later. You can also choose the option for automatic detection of changes in your database so that they can be sync to the backup. The tool offers this option as an added benefit that can be rarely found in the tool. The tool is loaded with advanced algorithms, which can detect and sync the changes made in the database.
Step 5 The next screen is the Backup confirmation screen which shows the status of the backup that has been completed. It also shows the total number of files that are back up along with a backup log. You can see how many backups being synchronized. This is the final confirmation step that makes yousure that your files have been backed up successfully and with accuracy.
Demo version of the tool eases the selection process

Even if I have produced the steps, it is important to go ahead with the registered version of the tool but not before you test it. It is advised to test the tool with a fifteen days demo version to understand more about the tool and clear your doubts. That is why, I have produced the link of the website below https://www.mailbackupx.com/how-to-backup-apple-mac-mail-mails-on-mac/.
#apple email backup#apple mail#apple mailbox#apple mailbox backup#backup apple mailbox#apple mail tool
0 notes
Text
How VHS to Digital Conversion Works: A Step-by-Step Guide for Alexander Heights Residents
In today’s digital world, many people in Alexander Heights still have old VHS tapes filled with treasured memories. However, VHS tapes are susceptible to deterioration, and VCRs are becoming obsolete. Converting VHS tapes to a digital format is the best way to preserve these precious moments for future generations. Here’s a step-by-step guide on how VHS to digital conversion works and why it’s beneficial.
Step 1: Assess Your VHS Tapes
Before starting the conversion process, gather all your VHS tapes and check their condition. Look for:
Signs of mold, dust, or physical damage.
Faded labels or missing information about the tape’s content.
Signs of tape degradation, such as warping or sticky residue.
If the tapes are in poor condition, professional restoration may be necessary before conversion.
Step 2: Choose a VHS to Digital Conversion Method
There are two primary ways to convert VHS to digital:
DIY Conversion Using VHS-Digital Equipment
Requires a working VCR, a capture device (USB video converter), a computer, and software.
The VHS tape plays on the VCR while the capture device records the video onto your computer.
Requires manual editing and file formatting.
Professional VHS to Digital Services
Professionals use high-quality equipment to ensure better video and audio quality.
They offer additional services such as video enhancement, noise reduction, and cloud storage options.
Ideal for those who lack the technical expertise or equipment.
Step 3: Preparing the Equipment
For DIY conversions, ensure you have:
A VCR in good working condition.
A USB video capture device that connects the VCR to your computer.
Conversion software (e.g., OBS Studio, Roxio, or Elgato Video Capture) to record the video.
Adequate storage space on your computer for digital files.
For professional services, you simply need to drop off or mail your tapes to the service provider.
Step 4: Connecting and Capturing the Video
For DIY conversions:
Connect the VCR to the Computer – Plug the RCA cables (red, white, yellow) from the VCR into the capture device, then connect the device to your computer via USB.
Launch the Capture Software – Open the software and set the video resolution and format (MP4, AVI, MOV, etc.).
Play the VHS Tape – Start playing the tape while the software records the footage in real-time.
Monitor the Process – Ensure the audio and video sync correctly and make adjustments if needed.
Step 5: Editing and Enhancing the Video
Once the video is recorded:
Trim Unwanted Sections – Cut out blank spaces or static noise.
Enhance Quality – Use software tools to adjust brightness, contrast, and color correction.
Remove Background Noise – Some software allows for noise reduction to improve sound quality.
Add Titles or Chapters – Organize videos into sections for easy navigation.
Professional services often provide these enhancements automatically for optimal quality.
Step 6: Choosing a Storage Format
After editing, save your digital files in a preferred format:
MP4 – Best for universal compatibility.
AVI – High quality but larger file size.
MOV – Ideal for Apple devices.
Consider multiple storage options:
USB Flash Drive – Portable and easy to share.
External Hard Drive – Suitable for storing large video collections.
Cloud Storage – Offers remote access and backup security.
DVDs – Traditional but may not be as future-proof as cloud storage.
Step 7: Organizing and Backing Up Files
Create folders labeled by event or year.
Store files in multiple locations for extra security.
Consider cloud services like Google Drive, Dropbox, or OneDrive for remote access.
Why Convert VHS to Digital?
Prevents Tape Degradation – Digital files do not degrade over time.
Saves Space – Eliminates the need for bulky VHS tapes.
Easier Sharing – Share videos with friends and family via email or social media.
Enhances Accessibility – Watch videos on modern devices like smartphones and smart TVs.
Final Thoughts
Converting VHS to digital is a crucial step in preserving your most treasured memories. Whether you choose DIY conversion or professional services in Alexander Heights, ensuring your tapes are digitized will keep your family’s history alive for generations. Don’t wait until your tapes deteriorate—future-proof your memories today!

youtube
#Vhs To Digital Perth#Vhsc To Digital Perth#Convert Vhsc To Digital Perth#Convert Vhs To Digital Perth#Transfer Vhs To Digital Perth#Vhs To Dvd Perth#Vhsc To Dvd Perth#Transfer Cassette To Digital Perth#Convert Audio Cassette To Digital Perth#Convert Audio Tapes To Digital Perth#Youtube
3 notes
·
View notes
Text

Go on Offense with Real-Time Security from Code to Cloud to SOC
Cloud threats are evolving fast. With the majority of security exposures occurring in the cloud and attacks surging, traditional security models just can’t keep up.
Introducing Cortex Cloud, which brings together best-in-class CDR with the next version of Prisma Cloud's leading CNAPP for real-time cloud security. Built on Cortex, organizations can seamlessly adopt natively integrated capabilities as part of the world’s most complete enterprise-to-cloud SecOps platform.
Security teams gain a context-driven defense that delivers real-time cloud security – continuous protection from code to cloud to SOC.
Don’t wait days to resolve security incidents while attackers move in minutes. Stop attacks with real-time cloud security.
Experience Real-Time Cloud Security
CYBERSECURITY
A phenomenal analysis of the cybersecurity market in 2024 from my buddy Mike Privette at Return on Security. I call him the Nate Silver of Cybersecurity Market Analysis. He says cyber investments are getting back to something like normal with over $14B in funding, but with AI and private equity playing much bigger roles than before. LINK
- Total funding: $14B across 621 rounds in 112 product categories
- M&A: 271 transactions worth $45.7B across 59 product categories
- US still dominated with $10.9B (83% of global funding)
A massive leak of Black Basta ransomware gang's internal chats has researchers working to translate and analyze over 500K Russian messages. LINK
Russian hackers are successfully compromising encrypted Signal messages from Ukrainian military by tricking them into scanning malicious QR codes. LINK
Apple dropped Advanced Data Protection in the UK after the government demanded access to encrypted user backups. The UK seems to be committed to being horrible right now. What does this actually do for people? Also I like the way Apple handled it. No, you can’t have a backdoor. LINK
You can trick ChatGPT's Operator feature into leaking private user data through prompt injection. LINK
Australia is joining the US in banning Kaspersky products from government systems due to concerns about foreign interference and data collection. What took them so long? LINK
Some researchers found they could consistently break prompt defenses by feeding models bizarre Indiana Jones-themed adventure stories. LINK | CMU RESEARCH PAPER
A new phishing-as-a-service platform called Darcula v3 has emerged that lets criminals clone any brand's website in under 10 minutes. LINK
A data leak from TopSec, a Chinese cybersecurity company, reveals they're offering censorship-as-a-service to help monitor and control public opinion in China.
OpenAI just banned a bunch of accounts using ChatGPT to help create a Chinese surveillance tool for tracking anti-China protests in the West. LINK
NATIONAL SECURITY
The head of Australia's intelligence agency is saying multiple foreign states have been plotting to murder dissidents on Australian soil. LINK
Continue reading online to avoid the email cutoff
AI
🤩 Anthropic finally dropped their latest model, and it was a 2 point dot release of Sonnet. So it’s Sonnet 3.7.
The benchmark’s look completely insane, but you can’t really go by those. The question is what most AI builders are actually using. Even today—after many releases beyond Sonnet 3.5, the go-to for most is still Sonnet 3.5. So it’ll be interesting to see if the people who know stay locked on Sonnet with 3.7, or if something dethrones it.
I have been mostly using Sonnet 3.5 (it’s my default in Fabric)
I’ve now migrated to 3.7 with all my main tools
I sometimes using Gemini Flash for the 2 million tokens
The other thing being talked about with this release is Claude Code, which is a CLI-based coding agent. Basically does the same as Cursor or Cline or whatever, but all in the terminal. LINK
Google is getting rid of SMS 2FA codes for Gmail in favor of QR codes, to cut down on fraud and scams. LINK
Nathan Young wrote a wonderful letter to future artificial general intelligence about the importance of consciousness and the hope that AIs will understand and seek to develop it. LINK
Humane's AI Pin fell from the sky and hit the ground. Sad. I was signed up. These kinds of failures will also affect the ability for new companies to build this kind of hype, which I guess is a good thing. LINK
Elon has been talking non-stop about how Grok3 isn’t filtered, and it’s super smart, and how xAI’s mission is to pursue truth no matter what. Great goals, which I support him on. But tons of people are pointing out that he’s starting to filter/censor results that are critical of him. He can’t have it both ways. Either Grok3 is smart or he’s being called out for good reason. LINK
TECHNOLOGY
Software engineering job listings have fallen to a five-year low, with Indeed postings at just 65% of January 2020 levels—which is worse than any other tech-adjacent field. LINK
An interesting analysis of how PMs and Engineers are merging because of AI. This shouldn’t be surprising since the primitives here are 1) knowing what you want to build, 2) knowing why you want to build that vs. something else, and 3) pursuing that. LINK
Apple is putting half a trillion dollars into US tech manufacturing, with a huge focus on AI and chip production. LINK
Meta's Ray-Ban smart glasses are quietly crushing it with 2 million units sold, and they're making 10M per year by 2026. LINK
YouTube has officially beaten Spotify and Apple as the top source for podcasts. They now have over 1 billion people watching podcasts every month. LINK
Superhuman just announced a major AI-focused release that integrates AI super deeply into your email workflows. I got invited to early version, and it’s super sick. It auto-labels your emails to help with inbox spam. Also, it does AUTO DRAFTS! And AUTO FOLLOW-UPS. So if I asked someone for something, it’ll write a follow-up email and put it drafts for me to review and send! LINK
Alibaba's CEO Eddie Wu said they’re going all-in on AGI development as their primary focus. LINK
HUMANS
New research says despite saying intelligence matters more, both women and their parents overwhelmingly choose the more attractive guy when forced to pick. LINK
Tech executives are now attending "psychedelic slumber parties" where they use ketamine therapy to reset their minds and escape mental ruts LINK
Gallup says LGBTQ+ identification in the U.S. is now 9.3%, which is nearly triple what it was in 2012 when they started tracking it. LINK
Elon's now asking federal workers to list what they did last week or get fired, which—like many things with him—has me cheering and wincing. I love the efficiency push, and I think it’s how he’s able to innovate. But there’s such a thing as going too far. Especially when you’re not building net-new and instead possibly disrupting services that people need. LINK
The Bureau of Prisons is moving forward with plans to house trans inmates based on birth sex rather than gender identity. LINK
A heart doctor explains how swollen fingertips, leg edema, and changes in eye color can predict an impending heart attack. But my cardiologist buddy Jonathan says it’s important to know that just because you don’t have these signs, doesn’t mean you’re ok. LINK
A 27-year-old woman's viral post about "girlhood FOMO" reveals a widespread loneliness crisis among women in their 20s and 30s who feel they're missing out on close female friendships. LINK
Taylor Swift lost 144K Instagram followers after getting booed at the Super Bowl, while her boyfriend Travis Kelce actually gained followers. Someone show me the Algebra on that. LINK
A look at Edward Abbey's raw, honest writings about how to live fully and die on your own terms. LINK
A neuroscientist argues that extremely high IQs (like 160+) are basically fictional, and even Einstein probably scored around 120-130. This is interesting because I’ve thought a lot about this over the years, and the idea that over like 120 the benefits start to significantly reduce. It starts to become way more about the combination of that intelligence with drive, creativity, and most importantly—curiosity. That’s my view, anyway. And this guy’s analysis seems to rhyme, especially his last paragraph. LINK
A NASA-contracted lunar lander just beamed back some gorgeous shots of the Moon as it enters orbit for next week's landing attempt. LINK
Upgrade to the Member Edition
You’re currently receiving the STANDARD edition. Subscribers to the MEMBER Edition get additional content, including IDEAS, a BI-MONTHLY ESSAY, the DISCOVERY section full of the best content I’ve seen this week, the RECOMMENDATION OF THE WEEK, and the APHORISM of the WEEK.
In addition, you get access to the UL Member Community, which includes private chat with 1000+ of the smartest and kindest members you’ll find anywhere on the internet.
SUBSCRIBE OR UPGRADE
This week’s DISCOVERY
MEMBER EDITION TEASER
2 notes
·
View notes
Text
MBOX File Converter Software – Seamless MBOX to PST Migration
In an increasingly connected digital ecosystem, managing email across platforms and formats is no longer a technical luxury—it’s a necessity. For users transitioning from email clients like Thunderbird, Apple Mail, or Eudora to Microsoft Outlook, converting MBOX files to PST format is often a critical step. Choosing the right MBOX file converter software ensures a smooth transition with no loss of data or structure.
This guide explores the technical background, practical benefits, and key features to expect from professional MBOX to PST converter tools—helping you make an informed, secure, and efficient migration.
Understanding MBOX and PST Formats
Before beginning the conversion process, it’s important to understand what each file format represents:
MBOX (Mailbox Format): A standardized format used by various open-source email clients such as Mozilla Thunderbird, Apple Mail, Eudora, and Entourage. It stores emails as plain text in a single file, appending messages sequentially.
PST (Personal Storage Table): Microsoft Outlook’s proprietary format that stores emails, contacts, calendars, notes, tasks, and attachments in a structured database optimized for Outlook and Exchange environments.
Why Convert MBOX to PST?
Converting from MBOX to PST is essential in multiple scenarios:
1. Transitioning Email Clients
Switching from MBOX-supported clients (e.g., Thunderbird or Apple Mail) to Outlook requires conversion to maintain access to previous mail data.
2. Enterprise Integration
Outlook is the standard in enterprise environments due to its integration with Microsoft Exchange Server and Microsoft 365. PST files are fully supported within these systems.
3. Enhanced Data Management
Outlook offers superior features for managing tasks, scheduling, and organizing emails compared to most MBOX-based clients.
4. Regulatory Compliance and Archiving
PST format supports robust encryption, archiving, and legal compliance features, crucial for business and legal teams.
Drawbacks of Manual MBOX to PST Methods
Manual workarounds like exporting emails to EML format and importing them into Outlook can be unreliable and time-consuming. They often result in:
Loss of formatting or metadata
Broken attachments
Incomplete folder structures
Long processing times
For reliable, scalable, and professional outcomes, a dedicated MBOX file converter software is strongly recommended.
Key Features of Professional ATS MBOX to PST Converter Software
The ATS MBOX to PST Converter Software is engineered to simplify and secure the email migration process from MBOX-supported email clients to Microsoft Outlook. Packed with intelligent features, it ensures high data integrity, speed, and flexibility throughout the conversion journey.
Batch MBOX File Conversion: Convert multiple MBOX files into PST format in a single operation. Ideal for IT admins or users managing large email archives.
Maintains Original Folder Structure: Preserves the original hierarchy of folders and subfolders during migration, ensuring seamless email organization post-conversion.
Complete Metadata & Email Integrity: Complete Metadata & Email Integrity
Preview Before Conversion: Built-in preview panel lets users verify and read email messages before exporting them to PST, ensuring accuracy and transparency.
Selective Export Capability: Choose specific folders, emails, or date ranges to convert—saving time and avoiding unnecessary data transfer.
Supports Multiple MBOX Sources: Compatible with MBOX files generated by Thunderbird, Apple Mail, Eudora, Entourage, PocoMail, and more.
Who Should Use MBOX to PST Converter Software?
This software is ideal for:
Home users switching from open-source email clients to Outlook.
System administrators performing enterprise-scale mailbox migration.
Forensic analysts converting MBOX evidence for legal or investigative review in Outlook.
Backup teams needing to archive MBOX files in a compliant PST format for long-term storage.

Conclusion
Migrating from MBOX to PST doesn’t have to be risky, complex, or time-consuming. By selecting a reliable MBOX file converter software, you can ensure complete data integrity, maintain formatting, and facilitate a seamless move into the Microsoft Outlook environment.
Whether you’re a single user transitioning email platforms or an IT team managing dozens of mailboxes, investing in the right conversion tool is a smart step toward better email management and business continuity.
0 notes
Text
Why Is My Apple Mac Running So Slowly and How Can I Fix It?

If you're using an Apple Mac, you already know how fast and efficient they can be. However, just like any other computer, Macs can slow down over time. Whether you're a professional using a Mac for design work, a student, or someone who just loves their device for casual use, a slow Mac can be incredibly frustrating. In this blog, we’ll explore the common reasons why your Apple Mac might be running slowly and how you can fix it with simple solutions to get your device back up to speed.
1. Too Many Apps Running in the Background
One of the most common reasons for a slow Mac is having too many applications running in the background. Apps such as web browsers, email clients, and music players can consume a lot of system resources. This is especially true if you have several tabs open in your browser or if your apps have automatic updates running.
Solution:
Open Activity Monitor (Applications > Utilities) to check which apps are consuming the most CPU and memory.
Close unnecessary apps and browser tabs to free up resources.
Consider using clean-up apps like CleanMyMac or Onyx to automate the process.
2. Outdated macOS Version
Running an outdated macOS version can contribute to slow performance. Apple regularly releases software updates that fix bugs, improve security, and optimize system performance.
Solution:
Check if there are any pending updates by going to Apple Menu > System Preferences > Software Update.
Install the latest version of macOS to ensure your system is running efficiently.
3. Lack of Storage Space
Your Mac's hard drive (HDD or SSD) plays a critical role in performance. If your Mac is running low on storage space, it can slow down because the system doesn’t have enough room to manage files and virtual memory efficiently.
Solution:
Check your available storage by going to Apple Menu > About This Mac > Storage.
Delete old files, uninstall unused apps, or transfer large files to an external drive or cloud storage.
Consider upgrading to a larger SSD if your storage is consistently running low.
4. Too Many Startup Items
Some apps automatically start when you turn on your Mac, which can cause your system to boot slowly. These apps consume valuable resources even before you're ready to use them.
Solution:
Go to System Preferences > Users & Groups and click on your account.
Select the Login Items tab, and remove any unnecessary apps from the list.
5. System Clutter and Cache Files
Over time, your Mac accumulates a lot of system clutter, including cache files, system logs, and old backups. These files are meant to speed up processes, but when they build up, they can have the opposite effect and slow down your Mac.
Solution:
Use a tool like CleanMyMac or Onyx to clean up old files and caches.
You can also manually clear your browser cache and old iOS backups from iTunes if they are taking up space.
6. Hardware Issues
Sometimes the reason for a slow Mac could be due to hardware problems, such as a failing hard drive, insufficient RAM, or even a faulty battery.
Solution:
Run Apple Diagnostics by turning off your Mac, then turning it back on while holding the D key. This will check for any hardware issues.
If you suspect hardware issues, it may be time for an Apple Mac repair. A professional technician can diagnose and replace faulty hardware components like RAM, hard drives, or even the battery.
7. Old or Incompatible Software
Older software versions or incompatible apps can contribute to a slow Mac, especially if they're not optimized for the latest macOS updates.
Solution:
Make sure your apps are up-to-date by checking the App Store or the app's official website.
If an app is no longer supported, consider finding a more modern alternative.
8. Too Many Browser Extensions
Browser extensions can be helpful, but having too many can slow down your web browsing experience and even affect your Mac’s overall performance.
Solution:
Go to your browser settings and disable or remove any unnecessary extensions.
Consider using fewer browser tabs or using a lightweight browser.
9. Resource-Heavy Programs
Certain programs, especially those used for video editing, 3D rendering, or running virtual machines, can be resource-intensive and slow down your Mac if you're not managing them properly.
Solution:
If you regularly use resource-heavy software, ensure your Mac meets the minimum system requirements for those applications.
Consider upgrading your hardware or utilizing cloud-based software solutions for intensive tasks.
10. Resetting the System Management Controller (SMC) and PRAM
Sometimes, the issue might not be with your software but with your Mac’s hardware settings. Resetting the System Management Controller (SMC) and PRAM can resolve many performance issues, including slowdowns.
Solution:
To reset the SMC, turn off your Mac, and then hold down the Shift + Control + Option keys and the power button for 10 seconds. Release the keys and turn the Mac back on.
To reset the PRAM, restart your Mac and hold down Option + Command + P + R until you hear the startup chime for the second time.
Conclusion
If your Apple Mac is running slowly, don't panic. By following these simple steps, you can troubleshoot and solve the issue on your own. However, if you find that your Mac's performance issues persist, it may be time to seek Apple Mac repairs from a professional. Technicians can help diagnose and repair any hardware problems that might be causing your Mac to slow down.
Remember, regular maintenance, such as keeping your system updated, clearing caches, and managing storage, can go a long way in ensuring your Mac continues to run smoothly for years to come.
If you're experiencing persistent issues, reaching out to an Apple-certified technician for a thorough inspection might be the best course of action. Happy Mac-ing!
0 notes
Text
2025 July Loadout
Wow, July 4th has come and gone (when I wrote this, it was only two days later…I took some time posting this article) and time continues to chug along relentlessly. Below is my current list of items I am using on a day to day basis (some have respective links to Amazon that help defray the hosting costs and get me more funding to purchase cool, new gear). I’ll also be adding a Vision Pro section in next month’s list.
If you all have any questions about the items below, please feel free to reach out as I am always glad to share my thoughts.
The changes plus the detailed list are below:
Added:
Camera – Fujifilm X-T5
International Cell Service – Nomad
Console – 1TB OLED Steam Deck
Desktop – Base Model Mac Mini
AR/XR/VR – Vision Pro
Removed:
Online Backup Service – Backblaze
macOS Applications
Task Manager – Reminders
Text Editor – BBEdit
Terminal App – Ghostty
Automation App – Hazel
Backup Application – Carbon Copy Cloner
Calendar Support Application – ItsyCal
Time Support Application – Clocker
Recording/Streaming – Ecamm Live
iOS/iPadOS Applications
Podcast App – Castro
Camera App – Halide
Video Recording App – Kino
Object Scanning App – Scan Thing
Document Scanning App – Notes.app
iOS/iPadOS/macOS Applications
Password Manager – Apple Passwords
Package Tracking App – Parcel
Calendar App – Calendar.app
Recipe Manager – Mela
RSS Reader – Tapestry
Read Later Application – Goodlinks
Email Application – Mail.app
Note-Taking App – Tot, Apple Notes
Mastodon Application – Ivory
Social Media – Threads
Social Media – Bluesky
Mind-Mapping Software – Mind Node
Remote Control Application – Screens 5 – I am considering on moving back to Jump Desktop.
AI – ChatGPT App
Hardware
Keyboard – HHKB Studio
Dock – OWC Thunderbolt Pro Dock
Laptop – 14″ MacBook Pro
iPad – iPad Mini
3D Printer – Creality K1C
3D Printer – Prusa Core One
Watch – Apple Watch Series 10 Black Aluminum 46mm with Cellular
Phone – iPhone 16 Pro Max
Inkjet Printer – Epson 4850
Charger – Anker MagGo 3-in-1 Charging Stand
Charger – Anker MagSafe Compatible MagGo UFO 3-in-1 Charger
Automation – Elgato Stream Deck Neo
Lighting – Elgato Key Light Neo
Game Capture – Elgato Game Capture Neo
Camera – Fujifilm X-M5
Camera – Fujifilm X-T5 – I need a camera that would survive the rain that seems to randomly come down during events. The X-M5 is still in use (as a webcam and as a ultraportable camera).
Trackball – Ploopy Adept
NAS – UNAS Pro
Tablet – Supernote Nomad
AR/XR/VR – Vision Pro
Desktop – Base Model Mac Mini – These were up to $130 dollars off on Amazon so I had added one to my collection. I am more than likely going to utilize it as a Jellyfin server + some other odds and ends.
Audio Hardware
Microphone – Rode Podcaster White
Speaker – Beats Pill
Speaker – 3x HomePod mini
Microphone – Rode NT-USB Mini
Gaming
Emulator – Retroid Pocket Mini
Gaming with Friends – Helldivers 2 – Still one of the most fun games I have played in a while (when playing with friends).
Universal Controller – 8BitDo Ultimate Bluetooth Controller
Console – 1TB OLED Steam Deck
Storage/Bags/Cases
Daily Carry Backpack – Alpaka Elements Backpack Pro X-Pac VX42
Travel Backpack – Peak Design Travel Backpack
Tech Pouch – Peak Design Tech Pouch
Outdoor Backpack – Peak Design 25L Outdoor
Luggage – Peak Design Roller Pro
Stationary
Pen – Tactile Turn Pens
Pen – Leuchtturm1917 Drehgriffel
Kitchen/Cooking
Indoor Grill – Ninja Foodi Indoor Grill
Pressure Cooker – Ninja Foodi Pressure Cooker
Convection Oven – Ninja Foodi Convection Oven
Coffee Maker – Fellow Aiden
Coffee Grinder – Baratza Fortè AP Coffee Grinder
MISC
Car Error Code Scan Tool – BlueDrive OBDII Scan Tool
Hosting Service – Hetzner
Universal Remote – Sofabaton Remote
Cell Service – US Mobile and T-Mobile
International Cell Service – Nomad
0 notes
Text
What Happens If Your iPhone Gets Stolen and You’re Not Insured

Losing your iPhone to theft can feel like your entire digital life has been hijacked. Not only are you parted from a high-value device, but you also lose access to personal data, apps, and communication tools that play an essential role in your daily life. It becomes even more stressful when you realize you're not insured and have no safety net to fall back on.
This article will explore the real-world consequences of losing an uninsured iPhone, what steps you can take immediately after the theft, and why investing in Theft Insurance For iPhone or choosing to Buy iPhone Protection Plan could be a game-changer for your peace of mind and your wallet.
The Immediate Impact of iPhone Theft
The moment you realize your iPhone is missing, panic often sets in. Was it stolen or misplaced? Should you call your number? Can you track it down using Find My iPhone?
Assuming the worst, a stolen iPhone can cause a ripple effect of problems. The device may hold everything from banking apps and work emails to family photos and confidential notes. And if you're not insured, replacing the device becomes a serious financial burden.
Data Security at Risk
A stolen iPhone means your personal data is now in someone else’s hands. While Apple devices are known for robust security features, no system is entirely foolproof. If your passcode is weak or your device is not set up with Face ID or Touch ID, a determined thief may find ways to access your information.
Apps like Apple Wallet, email clients, and social media platforms may be logged in and accessible. Even though most apps offer a level of security, the potential for misuse exists.
What Happens If You’re Not Insured
If you're not covered by Theft Insurance For iPhone, you're essentially on your own when it comes to replacing the device. Here’s what that could look like:
Out-of-Pocket Costs
Without insurance, replacing a stolen iPhone can be expensive. The latest iPhone models can cost upwards of $1,000, and even older models are not cheap. Many users are caught off-guard by the cost of an immediate replacement, especially if they’re still paying off the stolen phone through a financing plan.
Some may consider downgrading or buying a refurbished model, which may come with limitations and shorter life spans. But if you rely on your phone for work or school, that downgrade can impact your productivity and efficiency.
Limited Support from Carriers
Most mobile carriers will offer little support in the case of theft unless you’ve previously enrolled in a protection plan through them. They may help suspend service or blacklist the device’s IMEI number, but they won’t provide a replacement. This leaves users scrambling for a backup phone or shelling out for a new one.
No Reimbursement for Accessories
If your iPhone was stolen along with accessories like AirPods, a charging case, or a MagSafe wallet, those items are gone for good too. And since these accessories often cost over $100 each, the total value lost can be even more painful.
Steps to Take Immediately After Your iPhone is Stolen
Even without insurance, there are still critical steps you should take right away to secure your data and attempt to recover your device.
Use Find My iPhone
Apple’s Find My iPhone feature is your first line of defense. If the phone is still on and connected to the internet, you can track its location, play a sound, mark it as lost, and even erase the data remotely.
This is a powerful tool that can either help you retrieve your phone or protect your data from falling into the wrong hands. Make sure you enable this feature the moment you get a new device.
Report the Theft to Local Authorities
File a police report with all available information including the iPhone’s serial number, IMEI number, and a description of any identifiable features. While recovery isn’t guaranteed, this report can be helpful if the phone is found or used in a criminal investigation.
It also becomes essential if you plan to file a claim later with your mobile carrier or credit card company, assuming they offer any limited coverage.
Inform Your Carrier
Let your mobile carrier know your phone has been stolen. They can suspend your service to prevent unauthorized usage, blacklist the device so it can’t be activated on other networks, and possibly provide guidance on replacement options.
Change Your Passwords
Since the thief may try to access your apps and data, it’s smart to change the passwords to your Apple ID, email accounts, banking apps, and any other sensitive platforms.
Notify Your Employer or School
If your iPhone was used for work or school and contained confidential or proprietary information, it’s crucial to alert your employer or academic institution immediately so they can take appropriate security measures.
How Theft Insurance for iPhone Could Have Helped
Having Theft Insurance For iPhone turns a potentially devastating situation into a manageable inconvenience. Here's how:
Financial Relief
The biggest advantage of insurance is financial protection. Instead of paying the full retail price for a new iPhone, you only pay a small deductible and receive a replacement device. Depending on your plan, the replacement could be new or refurbished but fully functional and covered under warranty.
Peace of Mind
Knowing that you have a backup plan in place gives you peace of mind. Whether you lose your iPhone during travel, in a public place, or due to a break-in, you’ll be able to recover quickly and resume normal life without a major financial setback.
Coverage Beyond Theft
Many iPhone Protection Plans cover more than just theft. Accidental damage, hardware malfunctions, and even water damage may be included depending on the provider. This makes it a more comprehensive safety net compared to just relying on Apple’s standard limited warranty.
Why You Should Buy iPhone Protection Plan Today
If you don’t currently have any form of theft protection or device insurance, now is the time to take action. Here’s why choosing to Buy iPhone Protection Plan is one of the smartest investments you can make for your device and your peace of mind.
The Risk is Real
Smartphone theft is far more common than most people think. In urban areas and public transportation hubs, thieves often target iPhones due to their high resale value. Even if you’re extremely careful, one moment of distraction can result in a stolen phone.
Plans Are Affordable
Contrary to what many believe, iPhone protection plans are not just for big spenders. You can find affordable plans starting as low as a few dollars per month. When compared to the cost of replacing your phone outright, it’s a small price to pay for significant protection.
Customizable Coverage
Most insurance providers allow you to choose plans based on your needs. Whether you only want theft protection or full coverage including loss and accidental damage, there's an option out there for you.
Quick Replacement Services
Leading protection plan providers often offer fast replacements, sometimes within 24–48 hours. That means less time offline, fewer disruptions to your routine, and minimal stress overall.
What to Look for in a Good Protection Plan
Not all iPhone insurance plans are created equal. When shopping for coverage, consider the following:
Claim Limits: Check how many claims you’re allowed per year.
Replacement Speed: Some providers ship replacement phones overnight.
Coverage Details: Does it include theft, loss, accidental damage, or all of the above?
Deductibles: Compare deductibles and make sure they’re reasonable.
Device Compatibility: Ensure the plan covers your specific iPhone model.
Final Thoughts
An iPhone is more than just a phone—it’s a personal assistant, a camera, a wallet, and a lifeline all in one sleek device. Losing it to theft can feel like a catastrophe, especially if you don’t have insurance.
Without Theft Insurance For iPhone, you're left vulnerable to financial strain, data insecurity, and the hassle of replacing your device on your own. But by choosing to Buy iPhone Protection Plan, you gain not just financial security, but also peace of mind that your digital life is safeguarded.
Don’t wait for the worst-case scenario to play out. Take a proactive step today and invest in a plan that protects what matters most to you—your iPhone, your data, and your daily connectivity.
0 notes
Text
How to Set Up Alerts for Stock Price Movements?

Staying on top of market fluctuations is essential for every investor, whether you're a beginner or a seasoned trader. But monitoring the market every second of the day? That’s not realistic. That’s why learning how to set up alerts for stock price movements is a game-changer—it helps you track important price changes without constantly watching your screen.
In this guide, we’ll show you the best tools and methods to set up price alerts so you never miss an opportunity to buy, sell, or react quickly to stock changes.
Why Set Up Stock Price Alerts?
Stock prices can swing dramatically in minutes. With alerts in place, you can:
React quickly to market shifts
Lock in profits when a target price is hit
Limit losses with early sell notifications
Stay informed on your watchlist stocks
Setting alerts empowers you to trade smarter, not harder.
How to Set Up Alerts for Stock Price Movements
There are several platforms and apps that let you set up real-time price alerts easily. Let’s look at the most popular methods:
1. Using Brokerage Platforms
Most online brokers offer built-in alert tools:
✅ Example Platforms:
Robinhood
Fidelity
TD Ameritrade
E*TRADE
How to Set It Up:
Search for the stock you're interested in
Click on "Set Alert" or "Price Notification"
Choose your target price (e.g., "Alert me when Apple hits $200")
Select how you want to be notified (push, email, SMS)
2. Mobile Apps & Financial Tools
Several standalone apps offer advanced alert options—even if you don't use their brokerage services.
📱 Popular Apps:
Yahoo Finance
TradingView
Stocktwits
Webull
These apps offer more customizations, including:
Alerts for percentage changes
Alerts for volume spikes
Alerts for news events tied to the stock
3. Google Alerts (for News-Based Triggers)
While not price-specific, Google Alerts can help you track news that may affect stock prices.
How to Use:
Go to Google Alerts
Type in the company name (e.g., “Tesla stock news”)
Set notification frequency (daily, real-time, etc.)
This can complement price alerts by giving you early warning on potential catalysts.
Pro Tips for Setting Up Effective Alerts
To make the most of your alerts, consider the following:
Set realistic price targets based on past performance or resistance levels
Use both upper and lower thresholds to cover upside and downside risk
Avoid alert overload—only monitor stocks you’re actively interested in
Pair alerts with technical analysis for better trade timing
➡️ For a step-by-step walkthrough of different platforms and alert customization tips, check out this helpful guide: How to Set Up Alerts for Stock Price Movements?
Best Practices for Stock Alert Management
To avoid missing opportunities or becoming overwhelmed:
Review your alerts weekly to ensure they’re still relevant
Turn off alerts for stocks you no longer follow
Use multiple apps or platforms for backup notifications
Track triggered alerts in a journal or spreadsheet for reference
Final Thoughts
Knowing how to set up alerts for stock price movements can dramatically improve your reaction time and trading decisions. Whether you’re waiting for the right buying opportunity or protecting your gains, automated alerts keep you informed and in control—without the stress of constantly monitoring the market.
0 notes
Text
Apple Mail backup- A must do task with telling ben
Email data can become a causality of data theft and corruption. Apple email backup is an all-seasons ally to loosen the stranglehold of data loss. Those who delay the inevitable (email backup) find themselves cornered in a spot of bother, as irrecoverable data loss is an open invitation to downtime, which can derail the mightiest of businesses. Moreover, there are many situations which may temporarily cut off access to email data. These events include server crashes due to an unusually heavy network traffic and network issues. Even though such situations don't amount to data loss, they are no less disruptive to the work flow.
How to backup mail on mac – Final solution
So, it's absolutely essential to run full backups from time to time to be able to restore data when outside situations become conducive for data loss. Full backups are not sufficient in themselves because what about those fresh mails, which arrive after we have run a full backup session. These also need to be backed up to ensure complete data recovery in the event of data loss. Here regular incremental backups do the needy and create ideal conditions for complete data recovery. We must also let this fact sink deep that single site backups are not sufficient. Multiple-site backups are in dispensible to engender data redundancy, which lays the very foundation for complete data recovery. Both offline and online storage locations must be utilized to backup Apple mail. Resource efficiency should also be given due consideration by opting in favor of partial backups in situations where full backups will lead to overstuffing of unnecessary mails into a limited storage space.
Perfecting the strategy to backup Apple mail even more
Now that we know that selective backups can do the needy in situations that don't require full backups, let's discuss various backup patterns that can be utilized to strengthen data security. Portable backups are handy in situations when one needs to access email data while on the move. Portable backups onto 'plug and play' media can be carried home to perform professional duties in a comfy atmosphere. Portable backups can be easily shared with interested parties when you are collaborating on some important project. Likewise, mirror backups play an important role by creating multiple backup copies which sustain our ties with email data when some backup copies are rendered inaccessible by device failure or data corruption. Cloud backups do away with the limitations of storage space and cut down the data storage cost by providing a cheap alternative for storing backups. Some degree of data compression will also do a world of good to us.
How to backup Apple mail in a convenience-rich manner?
If you want to experience utmost convenience in Apple email backup then manual methods have to be dropped with immediate effect. Those with a past experience of employing the manual approach will second that these techniques aren't fail proof and leave a lot to be desired by making things complex. Running regular backups with manual methods is infeasible because these techniques are too slow to get things moving in the right direction. The profound data security available from professional tools is also missing when you employee a manual technique. This makes it crystal clear why more and more people are veering towards automatic tools for advanced email management,
How to backup mail on Mac by identifying the best tool?
As we can clearly deduce that professional tools are more appropriate alternatives to backup Apple mail we have our work cut out.How to identify the best tool? It is easier said than done, because you are seeking a lot of qualities in a deserving tool like ease of usage, diversity and fail-proof operation. Evaluating a tool from all angles without using it is almost impossible. This is why you should always look for free demos of professional tools, as experiencing a free trial period is the best way forward to test out the abilities of an Apple mail backup tool. If you are convinced, then do download the free demo of Mail Backup X, a tool that has everything in its arsenal that makes email management an ease-affording and highly satisfying exercise.
Here are some qualities that you will uncover while using the free demo of this exceptional Apple email backup application
Experience technical finesse at its very best for this tool is a true all-rounder that works on both Windows and Mac.
This tool will not disappoint you because it is versatile, platform independent and works with all popular email clients.
This is a tool will limitless potential that has been realized by offering that something extra to users in the form of different backup patterns like full backup, partial backup, mirror backup, incremental backup, etc.
You can create multiple site backups with ease, speed and efficiency that you have never experienced before.
No need to become a beast of burden by using tiresome manual methods because this tool is all set to bring you technological convenience in its full avatar.
Availability of flexible subscription packages at pocket friendly price will offer true satisfaction.
Round the clock user support will be at your back to help your navigate the features of this tool without getting engulfed in doubts.
The steps to carry out various tasks such as email backup, migration and restore are so simple in nature that you will become addicted to the flawless design of this ease-affording tool.
Immediately restore mails from backups and archives to keep downtime at bay.
This is an all-inclusive solution that delivers it all, be it ultra smooth mail migration or speedy email import/export.
Additional benefits like 3x data compression, PDF archiving, PST splitting and a comprehensive mail viewer will bring you boundless joy.
A free demo will set the tone for things to come. Avail it right away and enjoy substantial benefits that will make a positive change to your email management strategy.
Follow the Step by Step Guide to backup Apple Mail in this Video.
youtube
#apple mail#apple mail backup#backup apple mail#apple mailbox backup#apple email backup#apple backup tool#apple mail backup guide#Youtube
0 notes
Text
1 note
·
View note
Text
With so much happening while we are on the move, being able to have access to our photos, documents, and email through a cloud service can be a blessing. And Apple devices’ users get for free 5GB of storage linked to their Apple ID with their Macs, iPhone, iPads or iPods. This tool called iCloud make possible not only to have an updated backup but also to keep all devices in sync. But how to make the best of it? To help you out on it, you will find below 15 tips and tricks to get more out of your iCloud service Make sure it will work One of the biggest mistakes of those using iCloud is to think that it will set itself up on all your devices as soon as you turn them on. Unfortunately, this isn’t how it works. You will need to active the service on your Mac or mobile devices, and ensure that the items you want are synced, just for starters. Turn it into a more friendly virtual folder To make iCloud looks like a more friendly virtual folder, follow these steps: go to iCloud System Preferences and turn on Documents & Data. Then, open the Finder and tap Command + Shift + G. Type ~/Library in the dialogue box. Scroll down the Mobile Documents, where you will be able to drop down your own files and folders from now on. Make sure your Reading List works To make sure that your Reading Lists feature is functioning properly, ensure that Safari is checked in your iCloud settings on your Mac, or that Bookmarks is checked in your iPhone or iPad. It will make them all sync correctly. Free up storage space If your 5G storage space is running low, go to Settings >> iCloud >> Storage >> Manage Storage. There you will be able to see what is taking your space and decide what you might want to delete. And this is just one way to free up storage space in your iCloud. Manual backup If you haven’t been away from a power source or of a Wi-Fi connection for a while, you might want to backup your files manually. In this scenario, tap Back Up Now (located below your toggle switch) and your backup will be started as soon as you are connected to a Wi-Fi connection. Understand what is on your backup Not everything that you have in your devices will be backed up, as you can imagine. Here is what will and won't really be saved for you (if you set it correctly): Yes: The most recent 1,000 photos from your Photo Stream, but only for 30 days; No: the music you sync; No: purchased music, movies, TV shows, apps, and books (only a link to them in iTunes Store, App Store, and iBookstore, respectively, is saved) Be also aware that iCloud storage space is used for iCloud Backup, iCloud Drive, iCloud Photo Library beta, iCloud Mail, and data from apps. Remember that there is a limit to the file size It isn’t only on the storage space limit that you need to keep one eye. There is also a limit to the size of the files themselves, which can't be more than 15 GB each. They can be of any kind, though. Use the extra limit to send large files If you are using the Yosemite's version of Mail and need to send an attachment of more than 40 MB that shouldn’t be shrunk (as in a photo that would lose its quality if you do so), now you can do it with iCloud and Mail Drop features. As iCloud can handle files up to 5GB, your attachment will be “temporarily” stored there while you send it. You will get a warning message the first time you do it, but just ignore it, click on Send and you check the Mail Drop button on the display option you will get. Enable two-step verification to increase security Of course, it sounds very concerning that all your precious data is out there in the cloud available to anybody hack it. But it shouldn’t worry you much. Apple has a very secure system, and some of the best security apps for iPhone and iPad in the market, rest assured. Still, the company suggests that you enable a two-step verification process, so you can decrease the chances of having your Apple ID hacked. After following a few steps, every time you try to log in your Apple ID, you will receive a four-digit code on your trusted device for verification.
Managing iCloud Family Sharing Now is possible to link more than one iCloud account to a single payment method and make the app, music or book purchased available to download for the entire family. All you need to do is go to Settings >> iCloud menu, and look for a family section. There, you will be able to manage your family members, so they will all be associated with the main device and payment method. Generating strong passwords with iCloud Keychain If you are running out of ideas for strong passwords and have been unable to do effective research online, you can use iCloud Keychain to get some suggestions. When you are asked to add a password to a website (assuming here that you are navigating on the site with your Safari app), tap on the password field and you will see the option “Suggest a Password” above your keyboard. A pop-up menu will show up with a randomly-generated password for you. How to disable Find My Phone (and Activation Lock) If you need to restore your Apple device, you will need to disable Find My Phone first – it will disable Activation Lock as well. And you still can do it even if you don’t have your iPhone, iPad or iPod on you through iCloud. Just open any web browser and go to icloud.com. Then enter your Apple ID and click on Find My Phone. Now, enter your Apple password again, and click on All devices >> Offline device you want to remove >> Remove from account. Final Thoughts iCloud is a powerful tool offered by Apple for free to their clients. If you learn how to make the best of it, you will have plenty of resources in your hands. And if you feel that 5GB is just not enough, just pay extra space and enjoy the freedom of having access to all your files and data anywhere you go and of syncing all your devices together. Diana Beyer is experienced and self-driven media expert who is passionate about writing. Her purpose is to share values amid those interested. She is always seeking to discover new ways for personal and professional growth. Connect with Diana though Twitter or visit her blog.
0 notes
Text
Methods to Recover Deleted Contacts on iPhone
If you've accidentally deleted contacts on your iPhone, don't worry—there are several methods to recover them. While iPhones don't have a traditional "trash" or "recycle bin" for contacts, you can restore deleted contacts through iCloud, email account synchronization, or third-party recovery tools.
1. Restore Contacts via iCloud.com
If your contacts were synced with iCloud, you can restore them from an earlier archive:
Visit iCloud.com and sign in with your Apple ID.
Click on your account name and select Account Settings.
Scroll down to the Advanced section and click Restore Contacts.
Choose an archive date before the contacts were deleted and click Restore.
Note: Restoring contacts will replace the current contacts on all devices synced with iCloud. The current contacts will be archived and can be restored later if needed.
2. Re-enable iCloud Contacts Sync
Sometimes, toggling the iCloud Contacts sync off and on can help recover missing contacts:
Go to Settings > [Your Name] > iCloud.
Toggle Contacts off and choose Keep on My iPhone.
Toggle Contacts back on and select Merge.
This action may restore contacts that were temporarily missing due to sync issues.
3. Restore from iCloud Backup
If you regularly back up your iPhone to iCloud, you can restore contacts by reverting to a previous backup:
Go to Settings > General > Transfer or Reset iPhone > Erase All Content and Settings.
After your iPhone restarts, follow the setup prompts and choose Restore from iCloud Backup.
Select a backup dated before the contacts were deleted.
Caution: This method will replace all current data on your iPhone with the data from the selected backup.
4. Restore from Finder or iTunes Backup
If you have a backup on your computer:
Connect your iPhone to the computer and open Finder (macOS Catalina or later) or iTunes (earlier macOS or Windows).
Select your device and click Restore Backup.
Choose a backup that predates the deletion of contacts and proceed with the restoration.
Note: This process will overwrite current data on your iPhone.
5. Recover Contacts from Email Accounts (e.g., Google, Yahoo)
If your contacts were synced with an email account:
Visit the web interface of your email provider (e.g., Google Contacts).
Check the Trash or Bin folder for deleted contacts.
Select the contacts you wish to restore and choose the Restore option.
Note: Deleted contacts in Google are stored in the Trash for 30 days.
6. Use Third-Party Recovery Tools
If the above methods don't work, consider using third-party software like Disk Drill:
Download and install Disk Drill on your computer.
Connect your iPhone and allow the software to scan for recoverable data.
Preview and recover the deleted contacts.
Note: Recovery success varies, and some tools may require a purchase.
📌 Tips to Prevent Future Contact Loss
Regularly back up your iPhone to iCloud or your computer.
Avoid using third-party cleaner apps that may delete important data.
Ensure contacts are synced with a reliable account (iCloud, Google, etc.).
1 note
·
View note
Text
Convert JPG to HEIC in Seconds – No Software Needed!
If you’ve ever tried uploading high-resolution photos but hit a storage wall, you’re not alone. With phones and cameras capturing bigger and better images, we’re all looking for smarter ways to save space without losing quality. That’s where HEIC comes in—and the best part? You don’t need to install a thing to make the switch from JPG to HEIC.
Let’s walk through how to do a quick, hassle-free JPG to HEIC conversion using a free online image converter—no downloads, no stress.
Why Convert JPG to HEIC?
Before we jump into the how, let’s look at the why.
HEIC (High Efficiency Image Coding) is a modern photo format used by Apple devices and increasingly supported across platforms. It delivers high-quality images at significantly smaller file sizes compared to JPG.
Here’s what that means for you:
Save storage – HEIC files can be up to 50% smaller than JPGs
Maintain quality – Less space doesn’t mean less sharpness
Faster uploads – Smaller files mean quicker sharing and uploading
So if you’re managing dozens—or hundreds—of images, switching formats can make a real difference.
The Easiest Way to Convert JPG to HEIC (No Software Needed)
You don’t need Photoshop. You don’t even need to install a converter app.
With the A2ZConverter.com, you can convert JPGs to HEIC in seconds using a free online image converter. It’s designed to be simple, fast, and totally browser-based.
Here's how to do it:
Go to A2ZConverter.com
Choose the "JPG to HEIC" tool from the homepage or image converter section.
Upload your JPG file (or drag and drop it into the box).
Click “Convert” – and that’s it!
Download your new HEIC file instantly.
No sign-ups, no software installs, no waiting.

Who Should Use This JPG Converter?
This tool is perfect for:
Photographers who want to optimize storage
iPhone users needing cross-device compatibility
Web designers minimizing image size for faster loading times
Everyday users trying to email or store photos without running out of space
Basically, if you have a JPG and want a smaller, smarter version of it, this online image conversion tool gets the job done.
Key Benefits of A2ZConverter’s Free Online JPG to HEIC Tool
Let’s break it down. Why choose this tool over others?
✅ Free to use – No hidden fees or trials
✅ No installation – 100% web-based
✅ Fast conversion – Get results in seconds
✅ Supports batch uploads – Convert multiple images at once
✅ Safe & secure – Files are deleted after conversion
✅ Mobile-friendly – Works great on your phone or tablet
Whether you’re on a desktop or browsing from your phone, A2ZConverter makes image conversion painless.
Pro Tips for HEIC Conversion
Want to get the most out of your HEIC files? Here are a few things to keep in mind:
Not every platform supports HEIC yet. While modern iPhones, Macs, and some Androids do, older Windows systems or websites might not. Consider keeping a JPG backup if compatibility is a concern.
Use batch conversion when dealing with albums or project folders—it saves tons of time.
Label your files clearly after conversion so you know which versions are HEIC and which are JPG.
This kind of planning can save you headaches later.
What Makes HEIC a Smart Choice?
You might be wondering: is it really worth switching?
The short answer: yes, especially if you handle a lot of images.
A typical 5MB JPG photo might compress down to under 2.5MB as a HEIC—with no noticeable loss in quality. Multiply that by 100 or 1,000 photos and you’ve suddenly freed up gigabytes of space.
That’s a win, whether you’re backing up your vacation pics or managing client files.
Bonus: Other Free Image Tools You Might Love
While you're at it, A2ZConverter offers other handy tools worth exploring:
PNG to JPG
HEIC to JPG (for when you need to go back)
JPG Compressor
WebP Converter
All are available online, and all are 100% free. Think of it like your personal image conversion toolkit—always available, always simple.
Final Thoughts: Convert Smarter, Not Harder
Image conversion shouldn’t be a chore. With a reliable, free online tool like A2ZConverter’s JPG to HEIC converter, you can streamline your photo storage and never worry about bloated file sizes again.
So next time you're running low on space or just want more efficient image handling, give it a try. It only takes a few seconds.
Ready to make the switch? Head over to A2ZConverter.com and try the free online JPG to HEIC converter today. No installs. No fuss. Just smarter images.
#jpg to heic#jpg to heic conversion#online image converter tool#online image conversion#free online image converter
0 notes
Text
Expert Apple Technicians Recover Crashed Mac Drives
A crashed Mac drive can stop everything in its tracks locking you out of your system and making essential files seem permanently lost. Whether it’s your work machine, personal laptop, or a studio Mac with years of creative projects, a drive crash can feel like a digital disaster. The good news? Expert Apple technicians recover crashed Mac drives every day using tools and techniques specifically designed for Apple hardware and macOS.
If your Mac suddenly won’t boot, is stuck on a loading screen, or displays disk errors, now is the time to call in certified professionals who know exactly how to restore your system—and your data.
What Causes a Mac Drive to Crash?
A crashed drive can occur due to a number of issues, often without warning. Some of the most common causes include:
Hardware Issues
Aging or worn-out hard drives (especially HDDs)
SSD corruption due to bad memory cells
Power surges or unexpected shutdowns
Overheating or physical damage (e.g., from drops)
Software Problems
Failed macOS updates or installations
File system corruption (APFS, HFS+)
Malware or third-party software conflicts
Improper shutdown or forced restarts
A crash can make your Mac unbootable, freeze on the Apple logo, or display a flashing folder with a question mark—indicating your system can't locate a valid startup disk.
Why Trust Expert Apple Technicians?
When it comes to recovering data from a crashed drive, not all recovery services are created equal. Apple-certified technicians bring unique advantages:
Trained in Apple-Specific Systems
They have expert knowledge of macOS, Apple’s custom hardware, and unique security features like FileVault and the T2/M1/M2 chips. These systems require precise handling for successful recovery.
Access to Specialized Tools
From proprietary Apple diagnostics to advanced recovery utilities, certified technicians use industry-grade tools to recover data without causing further damage.
Safe Handling of Encrypted Drives
If your Mac uses FileVault or has a security chip, standard data recovery attempts may fail. Apple technicians understand the correct protocols to access encrypted data—securely and legally.
High Success Rate
Thanks to their experience and equipment, Apple experts boast much higher recovery rates than generic repair shops or consumer software solutions.
The Recovery Process, Simplified
Apple technicians follow a structured, step-by-step approach to recover crashed Mac drives:
1. Initial Assessment
Technicians begin by diagnosing the drive using Apple’s diagnostic tools and external recovery systems to determine the nature and extent of the crash.
2. Non-Invasive Cloning
If the drive is still accessible, a bit-by-bit clone is created to preserve the data and prevent further corruption during the recovery process.
3. Deep File Recovery
Using specialized tools for APFS, HFS+, and encrypted volumes, technicians extract data from the cloned image or directly from the original drive.
4. Data Verification
Recovered files are checked for completeness and integrity, ensuring they are usable and error-free before delivery.
5. Data Delivery & Backup Solutions
Your recovered files are returned to you on an external drive, cloud storage, or a replacement Mac. Apple experts can also help set up Time Machine or iCloud for ongoing protection.
What Can Be Recovered?
Depending on the condition of the drive, Apple technicians can often retrieve:
Documents, spreadsheets, and PDFs
Photos, videos, and music libraries
Email files and app data
iMovie, Final Cut, and Logic Pro projects
User profiles, preferences, and settings
Complete drive images or partitions
Even partially corrupted or encrypted files may be recoverable with the right tools and experience.
Warning Signs of a Failing Mac Drive
Don’t wait until your Mac crashes completely. Contact an expert if you notice:
Frequent crashes or freezes
Mac is stuck on the Apple logo
Apps take unusually long to open
Disk Utility reports drive errors
Files mysteriously disappear or won’t open
Clicking or buzzing noises (on older HDDs)
Catching these early can significantly improve the chances of a successful recovery.
Tips to Prevent Future Drive Crashes
After recovery, Apple experts often recommend proactive steps to prevent another data loss event:
Use Time Machine: Apple's built-in backup system can automatically protect your files.
Enable iCloud Syncing: Especially for documents, desktop files, and photos.
Avoid Forced Shutdowns: Always power down your Mac properly.
Keep macOS Updated: Regular updates patch security holes and improve disk management.
Don’t Ignore Disk Utility Warnings: Run First Aid regularly to fix minor errors before they grow.
A crashed Mac drive doesn’t mean all is lost. With the help of certified professionals, Apple technicians can recover data from even the most stubborn drive failures. Their deep knowledge of Apple systems, secure practices, and advanced recovery tools ensure you get the best chance at saving your data—quickly and safely.
If your Mac is showing signs of a crash or has already failed, don’t delay. Reach out to certified Apple experts today and take the first step toward recovery and peace of mind.
#iPhone Battery Replacement#Iphone Repair#Macbook Repair#iPad Screen Repair#macbook battery replacement
0 notes