#apple mail backup guide
Explore tagged Tumblr posts
Visit Tumblr Blog
Explore Tumblr blogs with no restrictions, modern design and the best experience.
Last Seen Tumblr Blogs


Fun Fact
In 2020, 44% of users from Denmark used Tumblr daily.
Text
Apple Mail backup- A must do task with telling ben
Email data can become a causality of data theft and corruption. Apple email backup is an all-seasons ally to loosen the stranglehold of data loss. Those who delay the inevitable (email backup) find themselves cornered in a spot of bother, as irrecoverable data loss is an open invitation to downtime, which can derail the mightiest of businesses. Moreover, there are many situations which may temporarily cut off access to email data. These events include server crashes due to an unusually heavy network traffic and network issues. Even though such situations don't amount to data loss, they are no less disruptive to the work flow.
How to backup mail on mac – Final solution
So, it's absolutely essential to run full backups from time to time to be able to restore data when outside situations become conducive for data loss. Full backups are not sufficient in themselves because what about those fresh mails, which arrive after we have run a full backup session. These also need to be backed up to ensure complete data recovery in the event of data loss. Here regular incremental backups do the needy and create ideal conditions for complete data recovery. We must also let this fact sink deep that single site backups are not sufficient. Multiple-site backups are in dispensible to engender data redundancy, which lays the very foundation for complete data recovery. Both offline and online storage locations must be utilized to backup Apple mail. Resource efficiency should also be given due consideration by opting in favor of partial backups in situations where full backups will lead to overstuffing of unnecessary mails into a limited storage space.
Perfecting the strategy to backup Apple mail even more
Now that we know that selective backups can do the needy in situations that don't require full backups, let's discuss various backup patterns that can be utilized to strengthen data security. Portable backups are handy in situations when one needs to access email data while on the move. Portable backups onto 'plug and play' media can be carried home to perform professional duties in a comfy atmosphere. Portable backups can be easily shared with interested parties when you are collaborating on some important project. Likewise, mirror backups play an important role by creating multiple backup copies which sustain our ties with email data when some backup copies are rendered inaccessible by device failure or data corruption. Cloud backups do away with the limitations of storage space and cut down the data storage cost by providing a cheap alternative for storing backups. Some degree of data compression will also do a world of good to us.
How to backup Apple mail in a convenience-rich manner?
If you want to experience utmost convenience in Apple email backup then manual methods have to be dropped with immediate effect. Those with a past experience of employing the manual approach will second that these techniques aren't fail proof and leave a lot to be desired by making things complex. Running regular backups with manual methods is infeasible because these techniques are too slow to get things moving in the right direction. The profound data security available from professional tools is also missing when you employee a manual technique. This makes it crystal clear why more and more people are veering towards automatic tools for advanced email management,
How to backup mail on Mac by identifying the best tool?
As we can clearly deduce that professional tools are more appropriate alternatives to backup Apple mail we have our work cut out.How to identify the best tool? It is easier said than done, because you are seeking a lot of qualities in a deserving tool like ease of usage, diversity and fail-proof operation. Evaluating a tool from all angles without using it is almost impossible. This is why you should always look for free demos of professional tools, as experiencing a free trial period is the best way forward to test out the abilities of an Apple mail backup tool. If you are convinced, then do download the free demo of Mail Backup X, a tool that has everything in its arsenal that makes email management an ease-affording and highly satisfying exercise.
Here are some qualities that you will uncover while using the free demo of this exceptional Apple email backup application
Experience technical finesse at its very best for this tool is a true all-rounder that works on both Windows and Mac.
This tool will not disappoint you because it is versatile, platform independent and works with all popular email clients.
This is a tool will limitless potential that has been realized by offering that something extra to users in the form of different backup patterns like full backup, partial backup, mirror backup, incremental backup, etc.
You can create multiple site backups with ease, speed and efficiency that you have never experienced before.
No need to become a beast of burden by using tiresome manual methods because this tool is all set to bring you technological convenience in its full avatar.
Availability of flexible subscription packages at pocket friendly price will offer true satisfaction.
Round the clock user support will be at your back to help your navigate the features of this tool without getting engulfed in doubts.
The steps to carry out various tasks such as email backup, migration and restore are so simple in nature that you will become addicted to the flawless design of this ease-affording tool.
Immediately restore mails from backups and archives to keep downtime at bay.
This is an all-inclusive solution that delivers it all, be it ultra smooth mail migration or speedy email import/export.
Additional benefits like 3x data compression, PDF archiving, PST splitting and a comprehensive mail viewer will bring you boundless joy.
A free demo will set the tone for things to come. Avail it right away and enjoy substantial benefits that will make a positive change to your email management strategy.
Follow the Step by Step Guide to backup Apple Mail in this Video.
youtube
#apple mail#apple mail backup#backup apple mail#apple mailbox backup#apple email backup#apple backup tool#apple mail backup guide#Youtube
0 notes
Text
How VHS to Digital Conversion Works: A Step-by-Step Guide for Alexander Heights Residents
In today’s digital world, many people in Alexander Heights still have old VHS tapes filled with treasured memories. However, VHS tapes are susceptible to deterioration, and VCRs are becoming obsolete. Converting VHS tapes to a digital format is the best way to preserve these precious moments for future generations. Here’s a step-by-step guide on how VHS to digital conversion works and why it’s beneficial.
Step 1: Assess Your VHS Tapes
Before starting the conversion process, gather all your VHS tapes and check their condition. Look for:
Signs of mold, dust, or physical damage.
Faded labels or missing information about the tape’s content.
Signs of tape degradation, such as warping or sticky residue.
If the tapes are in poor condition, professional restoration may be necessary before conversion.
Step 2: Choose a VHS to Digital Conversion Method
There are two primary ways to convert VHS to digital:
DIY Conversion Using VHS-Digital Equipment
Requires a working VCR, a capture device (USB video converter), a computer, and software.
The VHS tape plays on the VCR while the capture device records the video onto your computer.
Requires manual editing and file formatting.
Professional VHS to Digital Services
Professionals use high-quality equipment to ensure better video and audio quality.
They offer additional services such as video enhancement, noise reduction, and cloud storage options.
Ideal for those who lack the technical expertise or equipment.
Step 3: Preparing the Equipment
For DIY conversions, ensure you have:
A VCR in good working condition.
A USB video capture device that connects the VCR to your computer.
Conversion software (e.g., OBS Studio, Roxio, or Elgato Video Capture) to record the video.
Adequate storage space on your computer for digital files.
For professional services, you simply need to drop off or mail your tapes to the service provider.
Step 4: Connecting and Capturing the Video
For DIY conversions:
Connect the VCR to the Computer – Plug the RCA cables (red, white, yellow) from the VCR into the capture device, then connect the device to your computer via USB.
Launch the Capture Software – Open the software and set the video resolution and format (MP4, AVI, MOV, etc.).
Play the VHS Tape – Start playing the tape while the software records the footage in real-time.
Monitor the Process – Ensure the audio and video sync correctly and make adjustments if needed.
Step 5: Editing and Enhancing the Video
Once the video is recorded:
Trim Unwanted Sections – Cut out blank spaces or static noise.
Enhance Quality – Use software tools to adjust brightness, contrast, and color correction.
Remove Background Noise – Some software allows for noise reduction to improve sound quality.
Add Titles or Chapters – Organize videos into sections for easy navigation.
Professional services often provide these enhancements automatically for optimal quality.
Step 6: Choosing a Storage Format
After editing, save your digital files in a preferred format:
MP4 – Best for universal compatibility.
AVI – High quality but larger file size.
MOV – Ideal for Apple devices.
Consider multiple storage options:
USB Flash Drive – Portable and easy to share.
External Hard Drive – Suitable for storing large video collections.
Cloud Storage – Offers remote access and backup security.
DVDs – Traditional but may not be as future-proof as cloud storage.
Step 7: Organizing and Backing Up Files
Create folders labeled by event or year.
Store files in multiple locations for extra security.
Consider cloud services like Google Drive, Dropbox, or OneDrive for remote access.
Why Convert VHS to Digital?
Prevents Tape Degradation – Digital files do not degrade over time.
Saves Space – Eliminates the need for bulky VHS tapes.
Easier Sharing – Share videos with friends and family via email or social media.
Enhances Accessibility – Watch videos on modern devices like smartphones and smart TVs.
Final Thoughts
Converting VHS to digital is a crucial step in preserving your most treasured memories. Whether you choose DIY conversion or professional services in Alexander Heights, ensuring your tapes are digitized will keep your family’s history alive for generations. Don’t wait until your tapes deteriorate—future-proof your memories today!

youtube
#Vhs To Digital Perth#Vhsc To Digital Perth#Convert Vhsc To Digital Perth#Convert Vhs To Digital Perth#Transfer Vhs To Digital Perth#Vhs To Dvd Perth#Vhsc To Dvd Perth#Transfer Cassette To Digital Perth#Convert Audio Cassette To Digital Perth#Convert Audio Tapes To Digital Perth#Youtube
3 notes
·
View notes
Text
MBOX File Converter Software – Seamless MBOX to PST Migration
In an increasingly connected digital ecosystem, managing email across platforms and formats is no longer a technical luxury—it’s a necessity. For users transitioning from email clients like Thunderbird, Apple Mail, or Eudora to Microsoft Outlook, converting MBOX files to PST format is often a critical step. Choosing the right MBOX file converter software ensures a smooth transition with no loss of data or structure.
This guide explores the technical background, practical benefits, and key features to expect from professional MBOX to PST converter tools—helping you make an informed, secure, and efficient migration.
Understanding MBOX and PST Formats
Before beginning the conversion process, it’s important to understand what each file format represents:
MBOX (Mailbox Format): A standardized format used by various open-source email clients such as Mozilla Thunderbird, Apple Mail, Eudora, and Entourage. It stores emails as plain text in a single file, appending messages sequentially.
PST (Personal Storage Table): Microsoft Outlook’s proprietary format that stores emails, contacts, calendars, notes, tasks, and attachments in a structured database optimized for Outlook and Exchange environments.
Why Convert MBOX to PST?
Converting from MBOX to PST is essential in multiple scenarios:
1. Transitioning Email Clients
Switching from MBOX-supported clients (e.g., Thunderbird or Apple Mail) to Outlook requires conversion to maintain access to previous mail data.
2. Enterprise Integration
Outlook is the standard in enterprise environments due to its integration with Microsoft Exchange Server and Microsoft 365. PST files are fully supported within these systems.
3. Enhanced Data Management
Outlook offers superior features for managing tasks, scheduling, and organizing emails compared to most MBOX-based clients.
4. Regulatory Compliance and Archiving
PST format supports robust encryption, archiving, and legal compliance features, crucial for business and legal teams.
Drawbacks of Manual MBOX to PST Methods
Manual workarounds like exporting emails to EML format and importing them into Outlook can be unreliable and time-consuming. They often result in:
Loss of formatting or metadata
Broken attachments
Incomplete folder structures
Long processing times
For reliable, scalable, and professional outcomes, a dedicated MBOX file converter software is strongly recommended.
Key Features of Professional ATS MBOX to PST Converter Software
The ATS MBOX to PST Converter Software is engineered to simplify and secure the email migration process from MBOX-supported email clients to Microsoft Outlook. Packed with intelligent features, it ensures high data integrity, speed, and flexibility throughout the conversion journey.
Batch MBOX File Conversion: Convert multiple MBOX files into PST format in a single operation. Ideal for IT admins or users managing large email archives.
Maintains Original Folder Structure: Preserves the original hierarchy of folders and subfolders during migration, ensuring seamless email organization post-conversion.
Complete Metadata & Email Integrity: Complete Metadata & Email Integrity
Preview Before Conversion: Built-in preview panel lets users verify and read email messages before exporting them to PST, ensuring accuracy and transparency.
Selective Export Capability: Choose specific folders, emails, or date ranges to convert—saving time and avoiding unnecessary data transfer.
Supports Multiple MBOX Sources: Compatible with MBOX files generated by Thunderbird, Apple Mail, Eudora, Entourage, PocoMail, and more.
Who Should Use MBOX to PST Converter Software?
This software is ideal for:
Home users switching from open-source email clients to Outlook.
System administrators performing enterprise-scale mailbox migration.
Forensic analysts converting MBOX evidence for legal or investigative review in Outlook.
Backup teams needing to archive MBOX files in a compliant PST format for long-term storage.

Conclusion
Migrating from MBOX to PST doesn’t have to be risky, complex, or time-consuming. By selecting a reliable MBOX file converter software, you can ensure complete data integrity, maintain formatting, and facilitate a seamless move into the Microsoft Outlook environment.
Whether you’re a single user transitioning email platforms or an IT team managing dozens of mailboxes, investing in the right conversion tool is a smart step toward better email management and business continuity.
0 notes
Text
Edit PDF on iPad with Pencil: A Professional’s Guide to Digital Productivity
In today’s mobile-first world, professionals are increasingly turning to tablets for handling documents on the go. Among all tablet ecosystems, the iPad—especially when paired with the Apple Pencil—has become the preferred choice for editing PDFs with precision and ease. If you’re wondering how to edit PDF on iPad with Pencil, this guide will walk you through everything you need to know, from tools and apps to workflows and productivity hacks.
Whether you’re signing contracts, annotating legal documents, grading student assignments, or collaborating on project blueprints, learning how to effectively edit PDF on iPad with Pencil can significantly enhance your efficiency and digital workflow.
Why Use iPad and Apple Pencil to Edit PDFs?
Professionals across industries—legal, education, architecture, healthcare, and creative fields—need to interact with PDFs daily. But what makes the iPad and Apple Pencil such a powerful combo?
Benefits include:
Precision Annotation: Apple Pencil allows fine, natural handwriting and drawing, ideal for detailed markups.
Paperless Workflow: Editing PDFs digitally reduces printing costs and improves file management.
On-the-Go Efficiency: Access, edit, and sign documents from anywhere, no scanner or printer needed.
App Integration: Syncs with cloud services like iCloud, Dropbox, OneDrive, and Google Drive.
Best Apps to Edit PDF on iPad with Pencil
While iPadOS includes basic tools to markup PDFs, the real power comes from professional-grade apps. Here’s a breakdown of the top options for anyone serious about document editing.
1. Apple’s Markup Tool (Built-in)
How it works: Open any PDF in the Files app or Mail, tap the Markup icon (pen tip), and use the Apple Pencil to sign, write, highlight, or draw.
Pros: Free, built-in, quick access.
Cons: Limited editing capabilities; better suited for simple annotations.
2. GoodNotes
Features: Import PDFs, annotate with Apple Pencil, organize notebooks, and search handwritten notes.
Best for: Professionals who like a notebook-style interface and need structured document organization.
3. Notability
Features: PDF annotation, voice notes, multi-note support, and automatic cloud backup.
Best for: Teachers, students, and professionals needing multimedia note integration.
4. PDF Expert by Readdle
Features: Advanced annotation tools, text editing, form filling, password protection, file merging.
Best for: Legal professionals, administrators, and power users who deal with large volumes of documents.
5. Adobe Acrobat Reader
Features: Full PDF support, syncing with Adobe Document Cloud, editing, signing, and commenting.
Best for: Users already embedded in Adobe’s ecosystem.
How to Edit PDF on iPad with Pencil – Step-by-Step
Now, let’s walk through how you can edit PDF on iPad with Pencil using Apple’s native tools and third-party apps. The process is straightforward but varies slightly based on your choice of app.
Using Apple’s Markup Tool:
Open the Files app and locate your PDF.
Tap to open it.
Tap the Markup icon (pen tip in a circle).
Use your Apple Pencil to write, highlight, or draw.
Tap Done to save changes automatically.
Using PDF Expert:
Open the PDF in PDF Expert.
Tap the Annotate tab.
Use the Apple Pencil to highlight, underline, comment, or draw.
To edit text, tap the Edit tool, then select the text field.
Save or export to cloud storage when finished.
Using Notability or GoodNotes:
Import the PDF into the app from Files or a cloud service.
Select the Pen, Highlighter, or Eraser tools.
Annotate freely with your Pencil.
Use the Lasso Tool to move or resize handwritten notes.
Export as a new PDF with annotations included.
Advanced PDF Editing Tasks on iPad
With the right app, you can do much more than just annotate. Here are some advanced capabilities:
✅ Fill Out Forms
Use fillable PDFs to input data directly using the Pencil or keyboard.
Apps like PDF Expert and Adobe Acrobat recognize text fields.
✅ Sign Documents
Create a signature using your Apple Pencil.
Save your signature for quick reuse in future documents.
✅ Merge & Split PDFs
Combine multiple documents into one PDF file.
Extract individual pages as needed for sharing or archiving.
✅ OCR and Search Handwriting
Apps like Notability and GoodNotes convert handwriting to text (OCR).
Useful for creating searchable notes from meeting or class annotations.
Best Practices for Professionals
To make the most of editing PDFs on iPad with Apple Pencil, keep these tips in mind:
1. Use iCloud or Dropbox Syncing
Ensure all your documents are automatically backed up and available across devices.
2. Invest in a Screen Protector (like Paperlike)
This improves writing feel and reduces glare when using the Pencil extensively.
3. Organize with Folders and Tags
Use file naming conventions and folders to keep documents categorized and easy to retrieve.
4. Use Keyboard Shortcuts (iPad Magic Keyboard)
For advanced users, combining the Apple Pencil with a keyboard increases productivity—especially in apps like PDF Expert or Notability.
Use Cases by Profession
📄 Lawyers
Sign contracts.
Highlight key clauses.
Organize client documentation.
🎓 Educators
Grade papers.
Annotate student submissions.
Share feedback instantly.
💼 Business Executives
Approve proposals on the go.
Annotate financial reports during meetings.
Sign NDAs or HR documents.
👩⚕️ Medical Professionals
Fill and annotate patient intake forms.
Share test result summaries.
Record handwritten notes digitally.
Security Considerations
Professionals must prioritize data privacy when editing sensitive PDFs. Here’s how:
Use apps with encryption and password protection (like PDF Expert).
Avoid using public Wi-Fi without a VPN when sharing files.
Turn on Face ID or Touch ID to secure document access.
Future of PDF Editing on iPad with Pencil
Apple continues to evolve iPadOS, and each update brings more powerful features to support professional workflows. Features like Stage Manager, Split View, and Universal Clipboard make it easier than ever to handle multiple documents, copy content between devices, and transition between mobile and desktop environments seamlessly.
Additionally, improvements to the Apple Pencil (like hover detection on iPad Pro M2 models) suggest a future where precision editing and document interaction will be even more intuitive.
Conclusion
Learning to edit PDF on iPad with Pencil is not just a productivity boost—it's a competitive advantage. For professionals across industries, mastering this workflow means faster document turnaround, reduced reliance on printing, and seamless collaboration from anywhere.
Whether you're annotating blueprints, grading reports, or signing NDAs in a client meeting, your iPad and Apple Pencil are all you need to get the job done with precision and style.
Invest in the right apps, follow best practices, and enjoy a truly paperless, high-performance workflow that keeps pace with your professional demands.
0 notes
Text
A Complete Guide to BT Login Email: How to Access and Troubleshoot Your Account
BT login email, a reliable email service provided by British Telecommunications, offers its users seamless access to manage their communications. Whether you use BT login email as your primary email provider or simply rely on it for specific services, understanding how to log in securely and manage your account is crucial. This comprehensive guide will take you through the process of logging in to BT login email, troubleshooting common login issues, and ensuring your account remains safe and secure.
Why BT Login Email is Essential
BT login email offers a wide array of features for both personal and business use, including organizing your emails, cloud storage, contacts, and calendar management. It’s integral to staying connected, whether you’re handling important business communications or managing your personal messages. Understanding how to log in to your BT Email account is key to ensuring that you can access these features at all times. Moreover, BT Email is equipped with security features to help protect your sensitive data.
How to Log In to BT Email
Step-by-Step Process to Access Your BT Login Email
Visit the BT Email Login Page: To begin, open your preferred web browser and type in https://mail.btinternet.com or simply visit BT’s official website at www.bt.com and click the Sign In button.
Enter Your BT Email Address: On the login page, input your full BT Email address, including the domain (e.g., [email protected]), and click Continue.
Input Your Password: Next, type in your password associated with your BT Email account. If you’ve forgotten your password, simply click Forgot Password? and follow the prompts to reset it.
Click on ‘Sign In’: After entering your password, click Sign In to access your inbox and other features associated with your BT Email account.
Troubleshooting Common BT Login Email Issues
Incorrect Password or Username
Solution: Double-check your username and password for typos. If you can’t remember your password, use the Forgot Password? link to reset it.
Account Locked After Multiple Failed Login Attempts
Solution: After several failed login attempts, BT may lock your account for security reasons. Wait for 15-30 minutes and try again. If you still can’t log in, contact BT support for assistance.
Two-Factor Authentication (2FA) Problems
Solution: If you’re using 2FA and can’t receive your verification code, ensure your phone number is up-to-date. Alternatively, use backup codes if available or contact BT support for help.
Browser Cache Issues
Solution: Clear your browser’s cache and cookies or try logging in using a different browser or device to avoid issues with loading the login page.
Account Suspended or Disabled
Solution: If your account is suspended, you’ll need to check for any notifications from BT about the suspension. If the issue persists, contact BT customer support to resolve it.
Improving Security for Your BT Login Email
To protect your BT Email account and sensitive data, it’s important to enhance the security of your login process:
Use a Strong Password: Avoid using easily guessable passwords. Combine uppercase, lowercase, numbers, and special characters for a secure password.
Enable Two-Factor Authentication (2FA): Turn on two-factor authentication for an added layer of security. This requires an additional verification step, such as a code sent to your phone or authentication app.
Stay Vigilant Against Phishing: Be cautious of phishing scams that attempt to steal your login credentials. Never click on suspicious links or share your password with anyone.
Setting Up BT Email on Other Devices
You can also set up your BT Email on third-party email clients such as Outlook, Apple Mail, or mobile email apps. Here’s how:
Open your email client and go to the account settings.
Enter your BT Email credentials (your BT Email address and password).
Enter the IMAP and SMTP server settings: IMAP server: imap.mail.btinternet.com SMTP server: smtp.mail.btinternet.com IMAP Port: 993 (SSL encryption) SMTP Port: 465 (SSL encryption)
Save the settings and verify that your email client successfully syncs with your BT Email account.
FAQs
Q1: What should I do if I forgot my BT Email password? Click on the Forgot Password? link on the login page and follow the prompts to reset it via your registered recovery email or phone number.
Q2: Can I access BT Email on my mobile device? Yes, you can access BT Email on your smartphone by using the BT Mail app or setting it up in your mobile email client with the correct IMAP/SMTP settings.
Q3: How do I recover my BT Email account? If you’re having trouble logging in, use the Forgot Password? link or contact BT customer support for assistance with account recovery.
Q4: How do I improve the security of my BT Email account? Enable two-factor authentication (2FA), use a strong password, and remain cautious of phishing attempts to enhance the security of your BT Email account.
Conclusion
Logging in to your BT Email account is a straightforward process, but being aware of potential issues and how to resolve them is important for smooth access. By following the step-by-step instructions above and implementing best security practices, you can ensure that your BT Email account is both accessible and secure. Additionally, setting up your BT Email on third-party email clients can help streamline your communication across various platforms. If you face any login difficulties, don't hesitate to contact BT support for further assistance.
0 notes
Text
youtube
How to Convert MBOX to EML File Format?
The need to convert MBOX files to EML arises for several reasons, primarily to facilitate accessibility, compatibility, and ease of sharing. MBOX and EML are two distinct file formats used in different email clients. While MBOX files consolidate multiple emails into a single file, EML files store each email as a standalone file, compatible with a broader range of email applications. In this article, we’ll dive into an in-depth, step-by-step guide on converting MBOX to EML to improve email portability and ease of use.
Understanding MBOX and EML File Formats
What is MBOX?
MBOX (Mailbox) is a file format used by various email applications to store messages collectively within a single file. Commonly supported by Mozilla Thunderbird, Apple Mail, Entourage, and others, MBOX is an open-source format that saves all emails in a single text file.
What is EML?
EML (Email Message) is a more versatile format and widely used due to its compatibility across a larger variety of email clients, including Microsoft Outlook, Outlook Express, Windows Live Mail, and others. Each email is saved as a separate file with the .eml extension, preserving metadata such as sender, recipient, subject, and attachments.
Reasons to Convert MBOX to EML
1. Enhanced Compatibility EML files are compatible with multiple platforms, making them accessible across most email clients.
2. Better Organization Each email is saved as an individual file in EML format, making email management more organized.
3. Easier Backup and Restoration With each email stored individually, EML files allow for more streamlined backups and recovery in case of data loss.
4. Improved Portability You can transfer EML files to different devices easily, allowing users to read emails offline.
Methods to Convert MBOX to EML
There are several ways to convert MBOX to EML, including manual techniques and the use of automated tools. Here’s a look at the most effective methods available.
1. Manual Method Using Mozilla Thunderbird
Mozilla Thunderbird, an open-source email client, offers a simple way to convert MBOX files to EML format.
Steps to Convert MBOX to EML in Thunderbird:
Install Thunderbird: If you haven’t already, download and install Mozilla Thunderbird on your device.
Import MBOX File:
Go to Tools > Add-ons > Extensions.
In Top right you can see “ImportExportTools NG” and install it.
After installation, restart Thunderbird.
Use ImportExportTools NG to Import MBOX File:
In Thunderbird, click on Local Folders > Right-click > ImportExportTools NG > Import MBOX file.
Choose your MBOX file to import that file in thunderbird.
Export Emails to EML Format:
After MBOX import, select the emails or folders you want to export.
Right-click on the selected emails and choose ImportExportTools NG > Export all messages in folder > EML format.
Choose a path where you want to save the EML files.
This method is free and effective but may require more effort if you have multiple MBOX files to convert.
2. Using Dedicated MBOX to EML Conversion Software
For large volumes of emails or multiple MBOX files, you use our MBOX to EML converter tools are highly recommended like Webbyacad MBOX converter software.
Advantages of Using Webbyacad MBOX Converter Software:
Batch Conversion: Convert multiple MBOX files to EML in one click.
Retention of Metadata: Keeps email details intact, such as date, sender, recipient, and attachments.
Using Webbyacad MBOX Converter Software:
Download and Install: Download the Webbyacad MBOX Converter Software and install the software on your system.
Add MBOX Files: Select the Add File option to import MBOX files.
Select EML: Choose the EML option from the dropdown as the export format.
Choose Output Location: Specify where the converted EML files should be saved.
Start Conversion: Click Export to initiate the conversion.
Our software also comes with a free trial version, this allows users to test functionality before committing to purchase.
3. Online MBOX to EML Converters
For users who prefer not to install software, several online conversion tools can help convert MBOX to EML. These tools are typically free for small conversions, but they may have file size limits or lack privacy assurances. Always check privacy policies and limitations before uploading sensitive data.
How to Use an Online Converter:
Go to the Website: Visit the chosen online conversion tool’s website.
Upload MBOX File: Select and upload the MBOX file.
Select EML Format: Choose EML as the output format.
Download Converted Files: Once the conversion is complete, download the EML files to your device.
Note: Be cautious while using online converters, especially if the data is sensitive, as these tools may not guarantee data confidentiality.
Best Practices and Tips for Converting MBOX to EML
Backup Original Files: Always keep a backup of the original MBOX file in case any errors occur during conversion.
Use Reliable Software: When using third-party software, opt for reliable and reputable solutions to avoid data corruption or loss.
Check Compatibility: Ensure that your email client is compatible with EML files before converting.
Test on a Small File First: If you have a large volume of emails, start with a small file to test the conversion accuracy and software functionality.
Common Issues and Troubleshooting Tips
1. File Size Limitations: Some converters have file size limitations. Consider breaking down large MBOX files or using premium tools.
2. Loss of Attachments: Some conversion methods may not retain attachments. Ensure the software you choose explicitly supports attachment preservation.
3. Formatting Issues: After conversion, some emails may display formatting inconsistencies. Preview a few EML files in your email client before transferring the entire batch.
By following this comprehensive guide, you can successfully convert your MBOX files to EML and enjoy the enhanced flexibility, compatibility, and organization offered by the EML format. Choose the method that best suits your needs, considering factors like email volume, operating system, and any security concerns.
#mbox#migrate#mboxconverter#mboxtoeml#exportermboxtoeml#importmboxtoeml#transformmboxtoeml#outlook#tools#email migration#export mbox to eml#tranform mbox to eml#mbox to eml#Youtube
0 notes
Text
Key West iPhone Repair: your Guide to Quick and Reliable Fixes
Living in the paradise that is Key West, you might not expect to face technology issues. But when your iPhone takes a dive into the pool, gets dropped during a sunset cruise, or simply starts acting up, finding a dependable repair service can be crucial. In this blog, we'll explore why Key West iPhone repair services are essential, what you should look for in a repair provider, and how to make sure your device gets the best care possible.
Why Key West iPhone Repair Services Are Essential
Key West is known for its laid-back lifestyle and beautiful scenery, but even in paradise, tech problems can arise. When your iPhone is your main way to capture stunning sunsets, navigate the island, or stay in touch with loved ones, having it in working order is crucial. Here are a few reasons why a Key West iPhone repair service is indispensable:
Immediate Solutions: Unlike sending your phone away for repairs, local services can often fix issues on the spot or within a day. This means you can get back to enjoying your time in Key West without a prolonged tech downtime.
Expert Technicians: Key West has skilled technicians who understand the unique needs of island life. They are familiar with common issues that can arise in a coastal environment, such as screen damage from sand or water exposure.

Convenience: The last thing you want to do on vacation or during your busy day is to deal with the hassle of mailing your iPhone off to be repaired. Local services save you time and stress by offering quick, face-to-face assistance.
What to look for in a Key West iPhone Repair Service
When searching for the best iPhone repair service in Key West, consider these important factors:
Reputation and Reviews: Check online reviews and ask locals for recommendations. A reputable repair service will have positive feedback and a history of satisfied customers.
Experience and Certification: Ensure that the technicians are certified and have experience with iPhone repairs. This ensures that they are up-to-date with the latest technology and repair techniques.
Quality of Parts: Ask about the quality of replacement parts used. Genuine Apple parts or high-quality third-party components can make a big difference in the longevity of your repair.
Warranty: A good repair service should offer a warranty on their work. This provides peace of mind knowing that if something goes wrong after the repair, you can get it fixed without additional cost.
Turnaround Time: In a place as vibrant and activity-packed as Key West, you don’t want to be without your phone for too long. Select a repair company with a reputation for providing fast service.

Tips for iPhone Maintenance in Key West
Preventing issues is always better than dealing with repairs. Here are a few maintenance tips to keep your iPhone in top shape while living or vacationing in Key West:
Use a Protective Case: With the island's sandy beaches and outdoor activities, a durable case can help shield your iPhone from damage.
Avoid Excessive Moisture: Although iPhones are water-resistant, it’s still best to keep them away from excessive moisture and sand.
Regular Backups: Ensure you regularly back up your iPhone to avoid losing important data if a repair becomes necessary.
Having a reliable Key West iPhone repair service at your disposal ensures that your device stays in top shape, allowing you to fully enjoy everything this beautiful island has to offer. By choosing a reputable Key West IPhone repair service and taking steps to maintain your iPhone, you can ensure that your device remains a reliable companion for all your Key West adventures.
0 notes
Text
Mac email backup is very easy now
It has been a topic of discussion for long on how to mac email backup with an easy to use procedure.
Often it has been seen that Mac users complain about incomplete procedure on mac email backup. The foundation of an appropriate data backup always lies on a well instructed procedure. Therefore, it is very important to use a right, more precisely a professional tool for data backup.
While you may come across endless names for data backup tool, we offer the best in class product Mail Backup X. A well-engineered email backup tool for archiving emails from apple mailbox.
Also, the below links on Mac Operating System and Apple mail will make you understand about the subject in detail.
MacOS and Apple mail gives an idea on selection of the right tool considering different aspects of the mail communication tool.
The best way to mac email backup with clear instructions
Downloadthe mac email backup softwareand install on your Macformac email backup. Please follow the link for installation instructions.
Once the installation is completed, launch the tool from the Applications/ Quick Launch Menu.
You can start the fully functional trial run for 15 days or activate it if you have already purchased a license version of the tool.
You may choose to setup a new backup profile from the dashboard by choosing option “setup a new backup” oryou may click my backup profiles on the left side bar in the dashboard and click “set up a new backup profile”.
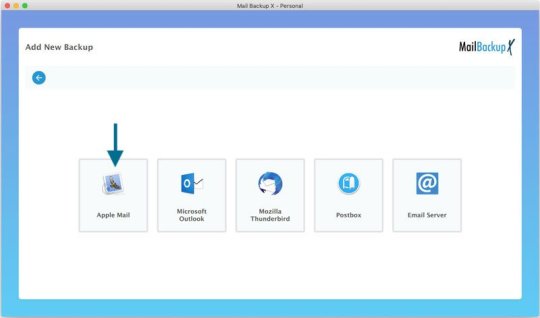
The next screen shows options to setup back for a list of mail clients. Choose Apple Mail and proceed to next step.
Once you click and choose Apple Mail to setup a backup you are presented with folder structure from Apple Mail accounts. Please select or deselect the folders out of all the mail accounts configured in Apple Mail.
The next step shows Advanced options like setting
* frequency of Mail backup (select automatic as its recommended or you may choose Manual or recurring at particular intervals).
* secure your backup archive by encrypting the data. So, it can only be viewed on this computer.
* you May also activate the USB Auto Snapshot option by assigning a USB drive. So, whenever you connect the USB drive, it automatically makes a snapshot copy of your local mail backup to the USB Drive in the background automatically.
8. You can set the location of backup to local disk drive or Cloud service by authenticating and adding Cloud Space (at Present Google Drive, DropBox and Microsoft One Drive are supported). Click save.
9. Apple Mail Backup Profile is set up and now your emails should have started to back up as per the options and settings you selected during the previous steps.
Demo is the preliminary answer on how to mac email backup on mac
In order to understand the basics of mac email backup, we recommend you to use the demo version of the tool initially.
The demo tool has various advantages before you proceed with the licensed product.
It is completely free and guides in the most systematic way on how to mac email backup. For more information, do visit the official website for a detailed tool on the software www.mailbackupx.com/how-to-backup-apple-mac-mail-mails-on-mac/.
1 note
·
View note
Text
Cool Jerseys for Every Game
legal counsel parlays the lady's adoration for basketball hooked on setting along with AlouettesNews Local News Off is Gazette western quebec, canada, Gazette COVID 19 country specific place COVID 19 PostPandemic video lessons conditions Podcasts microfiche feeling periodical Columnists and variouss Aislin characters sporting activities hockey internally skyrocket karate american footbal soccer local mls Montreal Canadiens NHL man utd Juniors Laval ice skating basketball game Montreal Alouettes CFL nba playing golf golf vehicle de Foot Montral race real estate markets news bullitains NCAA bucks hard work someone's place of business unwrap in the time of your personal Business FP monetary FP industry FP full price engineering social gaming the internet science COVID Aerospace business business popular organisations martial arts styles motion properties tv set Tech t. v Tech theater guides Montreal's superstar lives gift shops Local requisites Montreal being located Movie structure normal kitchen eating out Montreal attention and care Music cinema hobbies and interests heartfelt gift handbook taste Home food quality assessments diet health and fitness people the opposite sex more mature adults libido raising a child love affairs bungalows currency trading condo rentals embellishing Local upgrading growing plants Health Healthing get-away getaway royalty Child Men vague ideas the big apple x comics knowledge horoscopes disputes look news apartment obit classifieds an advert trophy them flyers jobs market getting behind the wheel relate Crossword a pal notifications join up each of Obituaries seems to have this is my card an post an In Memoriam Week's Healthing The GrowthOp ePaper FAQShare : inside the CFL: attorneys parlays their love for football in accordance with set considering Alouettes backup Link e-mail wikipedia tweet Reddit Pinterest LinkedIn TumblrBreadcrumb trail resources routines Montreal Alouettes interior CFL CFL: personal injury lawyer parlays your adoration for basketball straight role from Alouettes Catine Rache, 27, can be this Als' manager pertaining to sports admin simply because December. she is a typical with team's clinics, goes with all the current gym as well as wristwatches every game ones spotter's presentation areas. instantly Alouettes principle attached to wednesday sept 28, 2016. photography all by Pierre Obendrauf /Montreal Gazette write-ups Catherine Rache thought my girl over quite a number of, If only a few, trick that's about lawyers whilst your ex three years doing work for the Montreal based mostly on Gascon reps stiff, where by lindsay lohan specialist on the inside duty regulations. I have large numbers of confidence in her which will your girl friend will one of the most stop working panes roof ladies karate in,Rache, A 27 years old Montreal native,
Elite Bengals Jersey
is by using each Als' supervisor using karate government for December. she actually is an ordinary at just health care practices, journeys by the membership as well as timepieces every game this spotter's presentation area,my organization is roughly participating say the full investments a range of in seasoned sports activities, Rache pointed out, laughing, on interviews immediately. You work often in the world. within football and even regulation, you work far more than you see your family and friends. will be terrific crucial for you to love genital herpes virus treatments do and act like https://www.bestdealsjerseys.com/ you are not producing. which has living concentrate on, as well as there's no amount compared to that. that is what I seemed i became relocation so that it will and that's what romantic relationship. definitely feel,i know you need to start some time. tender whatever you do is priceless,tale persists belowArticle amount individuals in your CFL, Rache holdsdown a lot of obligations. the woman is needed for business deals because wage covering, is profitable on the typical strategies and assists in the immigration law methods kids significance avid gamers. the woman is obtainable for the ordinary should receive of the gamers moreover motor coach buses, may serve as in foreclosure process homeowners liaison regarding the little league companies dept and simply administration office, in addition,yet can help along with the team's sponsorships.on blacktop, your own woman helps with scheduling details since trek. although contests, this person verifies some capsules provided to motor coaches are probably normal daily functioning. your own woman aside from that index charts every single single fun time.
Jeter's hallway using celebrity holy day are going jammed
0 notes
Text
How to backup Apple Email with Easy Step by Step Guide?
It is not enough to simply backup emails today. It requires multiple backups, different backup patterns, inclusion of different email folders, and adherence to the best time slot according to the business or organisation amongst other things to create robust backups. For this, a certified tool with advanced technology and easy implementation is required above anything else. And there is no better tool than Mail backup X by InventPure for this job and to this end. Let’s see with an easy usage guide how simple and advanced this tool is.
Given below is the step-by-step method to backup Apple emails automatically and accurately with this 360 degree backup solution-
For the start, user has to download and install this tool on the Mac device. It is from here that you begin and launch this tool.
1. What you see in the beginning is the first window where you will select the option for creating a new backup profile. This is to be done when you use this application for the very first time.

2. The next step for Apple email backup is to choose the option which you want which is Apple mail. See the screenshot and you will realise that this tool can backup many mail services. You are giving the command for backing up the service you want by clicking on the option.

3. This tool is quick and adept at scanning the mailboxes which are then displayed on your screen. Moving forward, you have to select the folders and items you want to backup.

4. After the necessary input, you will now see a very interesting window which has advanced features so that every user can customize the backup of Apple email or the mail client one is archiving.
-you can choose different settings here to personalize the backups like name of the profile, storage location, dual encryption, backup frequency and backup pattern, etc.

5. When the user has done the needful and selected options as desired, one must click Save icon so that the settings are saved for subsequent action. From here, the task begins. Tool works while you can concentrate on other things.

For your convenience, you can track live progress through the dashboard. You can also get the log report.
This is how you can backup Apple mail without bearing any burden yet getting flawless results.
It is a tool which is unmatched in the value that you derive from its use
After all, this tool also has features like email migration, email archiving, mail recovery, PDF archiving and many others. If you are wondering what happens when there is any interruption to the network, then you should know there is nothing to worry. This tool has smart backup and resume feature for this so that users have nothing to manage at all. Data compression is applied so that storage space is also not an issue whether you use local storage or Cloud storage. But this tool now.
#apple mail backup#Apple email backup#Backup apple mail#How to backup apple mail#backup apple email#apple mail backup step guide
0 notes
Text
The Framework is the most exciting laptop I've ever broken

From the moment I started using computers, I wanted to help other people use them. I was everyone’s tech support for years, which prepared me for the decade or so when I was a CIO-for-hire. In the early days of the internet, I spent endless hours helping my BBS friends find their way onto the net.
Helping other people use technology requires humility: you have to want to help them realize their goals, which may be totally unlike your own. You have to listen carefully and take care not to make assumptions about how they “should” use tech. You may be a tech expert, but they are experts on themselves.
This is a balancing act, because it’s possible to be too deferential to someone else’s needs. As much as other people know about how they want technology to work, if you’re their guide, you have to help them understand how technology will fail.
For example, using the same memorable, short password for all your services works well, but it fails horribly. When one of those passwords leak, identity thieves can take over all of your friend’s accounts. They may think, “Oh, no one would bother with my account, I’ve got nothing of value,” so you have to help them understand how opportunistic attacks work.
Yes, they might never be individually targeted, but they might be targeted collectively, say, to have their social media accounts hijacked to spread malware to their contacts.
Paying attention to how things work without thinking about how they fail is a recipe for disaster. It’s the reasoning that has people plow their savings into speculative assets that are going up and up, without any theory of when that bubble might pop and leave them ruined.
It’s hard to learn about failure without experiencing it, so those of us who have lived through failures have a duty to help the people we care about understand those calamities without living through them themselves.
That’s why, for two decades, I’ve always bought my hardware with an eye to how it fails every bit as much as how it works. Back when I was a Mac user — and supporting hundreds of other Mac users — I bought two Powerbooks at a time.
I knew from hard experience that Applecare service depots were completely unpredictable and that once you mailed off your computer for service, it might disappear into the organization’s bowels for weeks or even (in one memorable case), months.
I knew that I would eventually break my laptop, and so I kept a second one in sync with it through regular system-to-system transfers. When my primary system died, I’d wipe it (if I could!) and return it to Apple and switch to the backup and hope the main system came back to me before I broke the backup system.
This wasn’t just expensive — it was very technologically challenging. The proliferation of DRM and other “anti-piracy” measures on the Mac increasingly caused key processes to fail if you simply copied a dead system’s drive into a good one.
Then, in 2006, I switched operating systems to Ubuntu, a user-centric, easy-to-use flavor of GNU/Linux. Ubuntu was originally developed with the idea that its users would include Sub-Saharan African classrooms, where network access was spotty and where technical experts might be far from users.
To fulfill this design requirement, the Ubuntu team focused themselves on working well, but also failing gracefully, with the idea that users might have to troubleshoot their own technological problems.
One advantage of Ubuntu: it would run on lots of different hardware, including IBM’s Thinkpads. The Thinkpads were legendarily rugged, but even more importantly, Thinkpad owners could opt into a far more reliable service regime that Applecare.
For about $150/year, IBM offered a next-day, on-site, worldwide hardware replacement warranty. That meant that if your laptop broke, IBM would dispatch a technician with parts to wherever you were, anywhere in the world, and fix your computer, within a day or so.
This was a remnant of the IBM Global Services business, created to supply tech support to people who bought million-dollar mainframes, and laptop users could ride on its coattails. It worked beautifully — I’ll never forget the day an IBM technician showed up at my Mumbai hotel while I was there researching a novel and fixed my laptop on the hotel-room desk.
This service was made possible in part by the Thinkpad’s hardware design. Unlike the Powerbook, Thinkpads were easy to take apart. Early on in my Thinkpad years, I realized I could save a lot of money by buying my own hard-drives and RAM separately and installing them myself, which took one screwdriver and about five minutes.
The keyboards were also beautifully simple to replace, which was great because I’m a thumpy typist and I would inevitably wear out at least one keyboard. The first Thinkpad keyboard swap I did took less than a minute, and I performed it one-handed, while holding my infant daughter in my other hand, and didn’t even need to read the documentation!
But then IBM sold the business to Lenovo and it started to go downhill. Keyboard replacements got harder, the hardware itself became far less reliable, and they started to move proprietary blobs onto their motherboards that made installing Ubuntu into a major technical challenge.
Then, in 2021, I heard about a new kind of computer: the Framework, which was designed to be maintained by its users, even if they weren’t very technical.
https://frame.work/
The Framework was small and light — about the same size as a Macbook — and very powerful, but you could field-strip it in 15 minutes with a single screwdriver, which shipped with the laptop.
I pre-ordered a Framework as soon as I heard about it, and got mine as part of the first batch of systems. I ordered mine as a kit — disassembled, requiring that I install the drive, RAM and wifi card, as well as the amazing, snap-fit modular expansion ports. It was a breeze to set up, even if I did struggle a little with the wifi card antenna connectors (they subsequently posted a video that made this step a lot easier):
https://twitter.com/frameworkputer/status/1433320060429373440
The Framework works beautifully, but it fails even better. Not long after I got my Framework, I had a hip replacement; as if in sympathy, my Framework’s hinges also needed replacing (a hazard of buying the first batch of a new system is that you get to help the manufacturer spot problems in their parts).
My Framework “failed” — it needed a new hinge — but it failed so well. Framework shipped me a new part, and I swapped my computer’s hinges, one day after my hip replacement. I couldn’t sit up more than 40 degrees, I was high af on painkillers, and I managed the swap in under 15 minutes. That’s graceful failure.
https://guides.frame.work/Guide/Hinge+Replacement+Guide/104
After a few weeks’ use, I was convinced. I published my review, calling the Framework “the most exciting laptop I’ve ever used.”
https://pluralistic.net/2021/09/21/monica-byrne/#think-different
That was more than a year ago. In the intervening time, I’ve got to discover just how much punishment my Framework can take (I’ve been back out on the road with various book publicity events and speaking engagements) and also where its limits are. I’ve replaced the screen and the keyboard, and I’ve even upgraded the processor:
https://guides.frame.work/Guide/Mainboard+Replacement+Guide/79
I’m loving this computer so. damn. much. But as of this morning, I love it even more. On Thursday, I was in Edinburgh for the UK launch of “Chokepoint Capitalism,” my latest book, which I co-authored with Rebecca Giblin.
As I was getting out of a cab for a launch-day podcast appearance, I dropped my Framework from a height of five feet, right onto the pavement. I had been working on the laptop right until the moment the cab arrived because touring is nuts. I’ve got about 150% more commitments than I normally do, and I basically start working every day at 5AM and keep going until I drop at midnight, every single day.
As rugged as my Framework is, that drop did for it. It got an ugly dent in the input cover assembly and — far, far worse — I cracked my screen. The whole left third of my screen was black, and the rest of it was crazed with artefacts and lines.
This is a catastrophe. I don’t have any time for downtime. Just today, I’ve got two columns due, a conference appearance and a radio interview, which all require my laptop. I got in touch with Framework and explained my dire straits and they helpfully expedited shipping of a new $179 screen.
Yesterday, my laptop screen stopped working altogether. I was in Oxford all day, and finished my last book event at about 9PM. I got back to my hotel in London at 11:30, and my display was waiting for me at the front desk. I staggered bleary-eyed to my room, sat down at the desk, and, in about fifteen minutes flat, I swapped out the old screen and put in the new one.
https://guides.frame.work/Guide/Display+Replacement+Guide/86
That is a fucking astoundingly graceful failure mode.
Entropy is an unavoidable fact of life. “Just don’t drop your laptop” is great advice, but it’s easier said than done, especially when you’re racing from one commitment to the next without a spare moment in between.
Framework has designed a small, powerful, lightweight machine — it works well. But they’ve also designs a computer that, when you drop it, you can fix yourself. That attention to graceful failure saved my ass.
If you hear me today on CBC Sunday Magazine, or tune into my Aaron Swartz Day talk, or read my columns at Medium and Locus, that’s all down to this graceful failure mode. Framework’s computers aren’t just the most exciting laptops I’ve ever used — they’re the most exciting laptops I’ve ever broken.
[Image ID: A disassembled Framework laptop; a man's hand reaches into the shot with a replacement screen.]
1K notes
·
View notes
Text
Backing up Apple Mail Smartly – A Simple yet Powerful Tool
Every email you’ve kept holds something. Like a client’s request, a friend’s promise, a receipt you’ll need someday. But Apple Mail wasn’t designed to safeguard these threads forever. For Apple Mail users, the mailbox grows organically, accumulating not just messages but layers of context. Yet without careful stewardship, these threads can become fragile, scattered across devices or trapped in formats that don’t adapt as needs evolve. This is the reason why Apple Mail backups are so important and often the essential part of the whole email system.

The true measure of an Apple Mail backup tool lies in how effortlessly it preserves this living archive while respecting the rhythms of your workflow.
Backing up Apple Mail comes down to storage. The emails flow constantly, folders expand, attachments multiply, and soon the archives grow larger than you anticipated. Where exactly you choose to store those backups shapes how effortlessly your backups integrate into your workflow. Mail Backup X understands this deeply, offering diverse storage solutions that adapt naturally to the distinct and varied ways you handle Apple Mail data.
Local Storage: Speed at Your Fingertips
Local storage remains the first choice for many, keeping backups within quick reach. Your Mac’s hard drive presents the simplest option. There's no intermediary, no reliance on network connectivity, and backups remain responsive because retrieval happens without delay. Mail Backup X makes local storage straightforward by giving direct access to any folder on your Mac.
It saves backup archives in a compressed .mbs format, neatly packaged and conveniently navigable. You select your preferred folder directly in the tool's interface, and the backups settle smoothly into place.
Mirrored Backups – Add Another Layer of Safety
For many users, an extra layer of storage safety matters. Mail Backup X addresses this through its mirror feature, allowing multiple copies of your Apple Mail backup to exist simultaneously. One copy could live comfortably on your Mac, another securely in the cloud, and yet another perhaps on an external hard drive. Each mirror syncs independently but consistently.
If one storage location becomes inaccessible or corrupted, your data remains safe within its alternate mirror. You never rely solely on a single copy. Mail Backup X maintains data integrity across multiple mirrors without complication.
Distributed Storage: Growing Without Constraints
Local storage, however, isn't always sufficient on its own. Apple Mail backups can expand without pause. As weeks turn into months and then years, storage limits begin to press.
Here, Mail Backup X offers distributed storage, a sophisticated yet uncomplicated answer. Rather than forcing a decision between multiple locations, the tool lets you combine several spaces into one cohesive storage strategy. Each chosen location holds a portion of your backup. When the primary location fills up, Mail Backup X shifts seamlessly to the next available space. It's an elegant solution for managing ever-growing archives without interrupting your routine.
Cloud Storage: Access Without Boundaries
Cloud storage offers advantages unique to itself. Mail Backup X integrates directly with popular cloud services, including Google Drive, Dropbox, and OneDrive. Cloud integration simplifies accessibility. You're no longer confined by hardware limitations or geographical locations.
Accessing your Apple Mail backup archives from different devices or locations becomes straightforward, providing flexibility beyond traditional storage solutions. The tool's intuitive interface guides you smoothly through selecting and configuring cloud spaces, allowing a painless setup process.
Encryption: Your Backup’s Security
If your emails are confidential or sensitive, Mail Backup X feature for encryption is going to be very important for you. Once you enable ‘Encryption’ in Profile settings, the tool automatically encrypts your backups regardless of storage location.
The encryption happens seamlessly in the background, requiring no technical knowledge from you. Your emails remain completely inaccessible to anyone without authorization, even when stored on third-party cloud platforms. There's no need for manual security checks or constant vigilance. Mail Backup X maintains this protection consistently across all your backup copies.
Portable & Isolated: The USB Snapshot Advantage
Another distinct strength of Mail Backup X emerges in its USB snapshot functionality. While all digital backups exist as data, USB drives offer something unique. It becomes a self-contained, movable copy of your emails that exists entirely on your terms. Mail Backup X's snapshot feature turns any external drive into a disconnected safe-deposit box for your Apple Mail backups.
Choosing Your Strategy: It’s About Your Workflow
Each storage solution within Mail Backup X aligns neatly with the specific needs of Apple Mail users.
Local storage prioritizes speed and convenience.
Distributed storage deftly handles expanding data volumes.
Mirrored copies build redundancy for critical data security.
Cloud integration offers unmatched accessibility and encryption layers.
USB snapshots bridge digital convenience with tangible reliability.
How you choose your storage isn't arbitrary. Mail Backup X presents these options clearly, anticipating rather than dictating your choices. The goal is always intuitive integration, avoiding disruption of the established patterns you've developed in managing Apple Mail. The tool’s approach to storage recognizes individual workflows and provides tailored adaptability instead of a one single solution for Apple Mail backups for everyone.
Ultimately, selecting storage for Apple Mail backups involves understanding your relationship with email management itself. If accessibility matters most, cloud solutions offer clear advantages. If security feels paramount, encrypted storage and mirrored backups stand out. For simplicity and immediacy, local or USB drive options resonate deeply. Distributed storage elegantly handles volume and long-term growth without fuss.
Mail Backup X doesn't dictate your backup storage strategy but rather enhances it. By offering clear, flexible choices, the software adapts naturally to diverse usage scenarios.
The emphasis remains on empowering you to backup Apple Mail effectively, respecting your individual preferences and practical necessities.
Backing up Apple Mail becomes a thoughtful practice but never overwhelming. The right storage spaces ensure backups integrate effortlessly into your workflow. Mail Backup X enables precise, practical management of Apple Mail data, always aligning closely with your evolving needs. Your choice of storage location subtly but meaningfully shapes how smoothly your email backups perform and how confidently you navigate your archive.
Experience It Firsthand with the Free Trial
Before committing, why not see how Mail Backup X fits into your workflow? InventPure, the company behind the software, offers a fully functional free trial without any limitations. Back up real emails from your Apple Mail database, test searches, restore messages, and explore every storage option just as you would with the full version.
It’s designed to give you an honest assessment for how the tool handles your actual Apple Mail backups, not just a demo. If it doesn’t make your backup process simpler and more reliable, you’ll know before spending anything or committing to a subscription.
0 notes
Text
iCloud Login, Sign in, Sign Up & Create Account Guide For iOS Devices!
Are you looking to log in to the site of iCloud using a browser onto the iPad your iPhone or iPod? But do not find any login choices to sign in to iCloud.com? Well, we have got you covered! Utilize our ideas to register into Apple's iCloud's website from ANY browser onto some iDevice or your iPhone!
What's iCloud?
iCloud is cloud storage, cloud computing, and synchronization support manufactured by Apple Inc. It was started in October 2011. It provides its users the flexibility to store photographs, documents, audio, and additional information. Sending information, and synchronizing files across devices is one.
iCloud Login for iOS apparatus:
Then you are able iCloud login if you're utilizing an iOS apparatus that's an iPhone, iPod touch or an iPad.
To start with, you have to check the model of your iOS. Your iOS must be updated by you. If you aren't certain you are currently using the most recent version or not, check it by going to Settings, tap General and tap software upgrade. If it reveals, there is a new version available to upgrade your OS. You're using the most recent version when it isn't currently showing means.
Then turn in your iCloud. When you upgrade the edition of your iOS or purchase an iOS apparatus, you will need to turn on the support that is iCloud. You can do it by following the directions appears in the installation assistant that can enable you. You will need to tap on the setting choice located in your home screen In case you skipped this procedure and that you want to enter your Apple ID.
Empower automatic downloads. You are able to turn in your own downloads you will need to tap on the home screen's setting choice. In preferences, you have to pick the App Store and iTunes.

iCloud Login for Mac:
Then you can log into your account utilizing the process if you're utilizing a Macbook.
To begin with, you have to check the model of your OS X. Make sure you're using the most recent version of OS X. If you aren't currently using the most recent version proceed to Apple menu and also at the program upgrade to look for when any version can be obtained or not. To the newest version, upgrade your OS X When available.
When your OS X is upgraded, turn in your iCloud account. By deciding on the system preferences that you'll receive from the Apple menu on your 20, you are able to do lit. Click on iCloud in the listing, and you'll be requested to enter your Apple ID. You'll find a list of alternatives after entering your ID. Click on the services that you would like to enable.
Then, you have to empower your iCloud photograph library, my picture flow, and iCloud picture sharing. You'll come across an options button where you want to pick iCloud Photo Sharing, My Photo Stream, along with iCloud Photo Library and you're almost done.
The final thing you have to do would be to empower automatic downloads from iTunes. Automatic downloads are for programs and songs. To do so, choose preferences and you will need to start your iTunes. Click on the shop option and choose programs, videos, and music and you're finished.
Characteristics of iCloud Drive
its part of iCloud, the online storage service which has been launched by Apple in 2011.
iCloud drive aids the user to store information like files, photographs, videos, and audio to iCloud.
iCloud provides you the ease of storing all of the information in the same area.
Besides storing the information, the user may also access the information easily from anywhere using an online link and iOS apparatus, Mac and Windows PC.
It also will help to keep all of the folders and files upgraded on all of the apparatus.
The consumers may also create new folders or files with the support of software which is iCloud empowered and work on them.
iCloud Drive is a free attribute. Without needing to exceed the limitation of storage, information that doesn't exceed 15 GB in size or any document can be saved.
When the user hints for iCloud, he's got free storage of 5 GB for email, iCloud Drive, iCloud photograph library and backup.
Forgot iCloud Password -- How to Recover Your iCloud Passwords on Mac, iOS Devices:
When You Are Certain that you Forgot iCloud Password, follow the following steps to reset it:
Open Safari and kind applied.apple.com.
Click Forgot ID or Password.
Input your Apple ID and click Next.
You can either utilize Mail authentication or Response safety questions to confirm your identity with Apple.
Utilizing email authentication is a smart choice. As soon as you choose it and click on next', then you'll get an email in your accounts.
The email you are going to get from Apple is going to have the message'The best way to reset your Apple ID password'. A connection is 'Reset'. Click it and follow directions.
While Apple sends the email almost instantly, you need to wait for a while. That you don't get one, click 'Return'.
Click the Reset my password and input the Apple ID once more, click Next.
This time, pick the second alternative, Answer safety questions and click Next.
Enter your arrival date.
There are two safety concerns, answer them since you have to have when you're setting up the accounts. Click Next.
Now you can enter a new password and confirm the exact same. Be careful to rewrite the password.
Click the Reset Password icon.
Know the Characteristics of iCloud Login:
iCloud comes with attributes like follows:
By using iCloud, you can take a backup of your photographs and remain updated.
In iCloud you are able to take a copy of your songs and programs and if you'd like you can share them also.
The documents you'll take backup is going to be stored, and you may get them anywhere using your Apple ID.
Using iCloud, it is possible to take a copy of all of your files and may animate them whenever you desire.
iCloud service will help you find your telephone if it's stolen or lost.
1 note
·
View note
Text
There is no better way to backup Yahoo mail than this Yahoo backup tool
There is no need to lose sleep over not finding the right Yahoo backup tool. If you haven’t found it yet, you are going to find it right here. After a long time of research, we have concluded that there is a single Yahoo backup tool that you can use to backup Yahoo mail along with other mac email clients without worrying about data loss. This was done to help all email users who were worried about losing their important email data and were confused with so many available options. Online and free tools are easily available on the internet. This factor makes it more difficult to choose the right Yahoo email backup tool for those who don’t know how to differentiate between useful and mediocre tools. However, that is all done and dusted.
Here is the best Yahoo backup tool to backup Yahoo mail

The Mail backup X was created by InventPure to make sure that all mac users are able to backup Yahoo mail without getting worried about the safety of their email database. The tool comes loaded with a bunch of powerful and unique features which make it the ideal solution for all types of users, beginners or advanced. You don’t have to be an expert to use this tool since it is extremely easy to operate and self explanatory. You are guided by the wizard based user interface that guides you from the installation till the end results.
Here is what this advanced Yahoo backup tool brings to the table
1. You can backup and archive Yahoo mail, Gmail, Apple mail, Office 365 for mac, Mac outlook, Thunderbird, AOL, Postbox etc with 100% assurance of data safety. This gives you access to all the email applications that run on mac.
2. All in one email conversion is one of the star features of the tool which was not even expected. You can migrate to and from major email formats without affecting the uniqueness of the database.
3. The tool allows you to backup and archive email data in PDF format. You don’t have to worry about compatibility issues anymore. You can save the folder hierarchy and even print and share the archive.
4. You can even set up a USB drive for automatic USB sync and backup of data. Whenever you plug in the mapped USB device, the tool will automatically sync and store the backup in it.
5. If you want to find certain email items, you can enter specific search terms in the search box. The tool will scan the archives and bring the files to you right away.
6. Saving space will not be an issue anymore. You can use the advanced data compression feature to compress the backup in 3 times lesser space than usual.
Get the free trial
Once you are sure that the free trial works for you, feel free to upgrade to the full version. To download the free trial, click here. http://www.mailbackupx.com/yahoo-backup-tool.html
1 note
·
View note
Text
Is Apple Mail Backed Up with Time Machine?
Apple Mail is a widely used email client among Mac users, providing seamless integration with macOS and iCloud. Given the importance of email communication, ensuring that your Apple Mail data is securely backed up is crucial. One common method Mac users rely on for backups is Time Machine, Apple’s built-in backup solution. But does Time Machine back up Apple Mail? The short answer is yes, but there are nuances and limitations to be aware of.

In this guide, we will explore how Time Machine backs up Apple Mail, how to restore emails from a Time Machine backup, its limitations, and alternative backup solutions.
Understanding Time Machine and Apple Mail Backups
What is Time Machine?
Time Machine is a built-in backup feature in macOS that automatically creates snapshots of your system at regular intervals. It allows users to restore files, applications, and system settings to previous states in case of accidental deletion, corruption, or hardware failure.
Time Machine backs up:
System files and applications
User data (documents, photos, music, and emails)
System settings and preferences
How Time Machine Backs Up Apple Mail
Apple Mail stores emails in a special folder within your user library. When Time Machine performs a backup, it includes this folder, ensuring that your emails, attachments, and email account settings are saved. The primary locations where Apple Mail stores data are:
Mail Data Location: ~/Library/Mail/
Mail Preferences & Account Settings: ~/Library/Containers/com.apple.mail/
Mail Index & Metadata: ~/Library/Application Support/Mail/
Since these directories are included in Time Machine backups, your Apple Mail data is protected and can be restored if needed.
How to Restore Apple Mail Emails Using Time Machine
If you ever lose important emails or need to recover an older version of an email, you can use Time Machine to restore your Apple Mail data. Follow these steps:
Step 1: Open Apple Mail
Ensure that Apple Mail is open before launching Time Machine. This allows Time Machine to directly interact with Mail’s database.
Connect your Time Machine backup drive if it is not already connected.
Step 2: Launch Time Machine
Click on the Time Machine icon in the menu bar (top-right corner) and select Enter Time Machine.
Alternatively, go to System Settings > Time Machine, then click Enter Time Machine.
Step 3: Browse Backup Snapshots
Once inside Time Machine, you’ll see a timeline of backups.
Use the arrows or the timeline on the right to navigate to the date when the missing emails were still present.
The Mail interface will show the backed-up version of your inbox.
Step 4: Restore Emails
Locate the missing email or folder that you want to restore.
Click the Restore button. Time Machine will restore the email(s) to your Mail app.
Once the restoration process is complete, the email should reappear in your inbox.
Step 5: Restart Apple Mail
If the restored emails do not appear immediately, restart Apple Mail or reboot your Mac.
Limitations of Using Time Machine for Apple Mail Backups
Although Time Machine provides a convenient way to back up Apple Mail, there are some drawbacks to consider:
1. No Granular Email Backup
Time Machine does not allow you to selectively back up individual emails. Instead, it backs up the entire Mail database, which means restoring a single lost email may require restoring the entire Mail folder.
2. Backup Frequency Limitations
Time Machine takes hourly snapshots, but if you need a real-time backup of your emails, Time Machine may not be sufficient. If you receive and delete emails frequently, some emails may be lost between backup intervals.
3. Large Backup Size
Since Apple Mail stores all messages, attachments, and metadata within its directory, your Time Machine backup can grow significantly in size over time. This may result in a shorter retention period for backups due to storage constraints.
4. Corruption Risks
If the Mail database becomes corrupted, restoring from a Time Machine backup may also restore the corrupted database, making data recovery difficult. In such cases, a dedicated email backup tool may be more reliable.
5. External Drive Dependency
Time Machine requires an external drive or a network backup location to function. If you do not have a backup drive connected, your Mail data will not be backed up.
Alternative Backup Solutions for Apple Mail
Given the limitations of Time Machine, it is wise to consider additional backup options for your Apple Mail data. Here are some alternative methods:
1. Mail Backup X
Mail Backup X is a dedicated email backup tool that allows Mac users to:
Perform scheduled backups of Apple Mail
Compress and encrypt email archives
Store backups on external drives, cloud storage, or FTP servers
Search and retrieve emails easily
2. iCloud Backup
If you use an iCloud email account, your emails are already stored in Apple’s cloud servers. However, this does not protect locally stored messages or emails from other providers like Gmail or Outlook.
3. Manual Mail Export
You can manually export and save Apple Mail data by:
Opening Apple Mail and selecting the emails or mailbox you want to save.
Clicking File > Export Mailbox.
Choosing a location (external drive, cloud storage, etc.) to save the exported .mbox file.
This method is useful for creating specific backups but lacks automation.
4. Third-Party Cloud Services
Google Drive, Dropbox, and OneDrive offer cloud backup solutions. Some third-party applications can automatically back up email databases to these services.
Best Practices for Apple Mail Backups
To ensure your emails remain secure, follow these best practices:
Use Multiple Backup Methods: Combine Time Machine with another backup tool for redundancy.
Schedule Regular Backups: Ensure that Time Machine is running and backing up your system frequently.
Store Backups in Different Locations: Keep a copy of backups on an external drive and a cloud service.
Verify Backup Integrity: Periodically test your backups by restoring a small batch of emails.
Archive Old Emails: Store older emails separately to reduce the size of your primary backup.
Conclusion
Time Machine is a useful tool for backing up Apple Mail, but it is not a perfect solution. While it captures email data, it lacks fine control over individual email restoration and may not provide real-time protection.
For a more reliable backup strategy, consider combining Time Machine with a dedicated email backup tool like Mail Backup X or manually exporting your emails for additional security. By implementing a robust backup strategy, you can ensure your Apple Mail data remains protected from loss, corruption, or accidental deletion.
0 notes
Text
AVS4YOU AVS Audio Converter Changing To M4A Format
Convert MP4, MP3, WAV, MOV and extra to any format online. I have tried different apps that record in wav however to get them on to the Imac typically includes sending every sound file individually by e-mail or sending to the cloud and then when retrieving from the cloud the timestamps are changed. On a gps monitor on my cycle I'll file hundreds of individuals sound recordsdata. Observe the converting M4A to WAV step by step guide to fast and simply convert M4A to WAV. Tremendous is a highly regarded and free audio converter. You'll be surprised on the long listing of audio formats it supports. If you have an audio file recorded in a uncommon format and also you want it converted to a more frequent format, you must try out the Tremendous audio converter. Enter codecs include MP3, MP2, WMA, WAV, WV, TTA, RM, RAM, OGG, MPP, M4A, FLAC, MMF, APE, AAC, AMR, and AC3. When it comes to free software that converts audio recordsdata, many individuals are understandably concerned in regards to the quality. This resolution not solely does the work quickly and without spending a dime, but it surely also gives high quality outcomes without reducing the quality of the original file in any respect. All of the supported codecs have their own settings so you will get the optimized outcomes that you just want. For instance, if you want to have the very highest quality MP3 recordsdata on your audio system, you should utilize the converter to maintain the songs in professional audio quality of as much as 320kbps. Home windows Integration: m4a to mp3 converter 320 kbps Property, Thumbnail Handlers and Shell Integration lengthen home windows to offer tag editing inside Windows explorer. Particularly useful is the flexibility for dBpoweramp so as to add assist for file varieties Windows does not natively assist, or lengthen help similar to mp3 IDv2.four tags. Album art display and in depth popup data tips are additionally provided, dBpoweramp is a lot more than a easy mp3 converter. Sony Vegas and older versions will assist all three audio codecs provided by Free Inventory Music without having to render or compress them until you export your project. A: AllMusicConverter Platinum version converts 2 recordsdata at the identical time and has maximum audio conversion velocity 6X, whereas Skilled edition can convert up to sixteen files simultaneously with summary conversion velocity up to 50X ( relying in your LAPTOP efficiency). AllMusicConverter Skilled version also consists of audio CD Ripper. So, I paid the primary month's payment, and it took me the higher a part of two weeks to convert most of my music from backups of former saved music. After a few conversions, you get a discover that it will probably't discover the files. So that you return to the start of your backups, and attempt to remember where you left off after you restart this app. And there we discover the recordsdata they couldn't discover. This occurred so many occasions I lost count. It supports widespread audio formats like MP3, WAV, AAC, M4A and others. Any Audio Converter supplies you probably the most handy solution to enjoy music on iPod, iPhone, PSP, other transportable media players and cell phones. Now, let's take a look at how to use the Free and User-friendly audio converter. Some formats, comparable to MP4 or FLV can retailer each audio and video streams. MP3 Converter (music ogg flac wav wma aac) is a music converter that means that you can rework songs and audio information to other extensions: you possibly can convert mp3 to ogg, flac, wav, wma, aac, m4a, and many extra. Select the extension, choose an output format and convert any music, perfect for creating albums of songs and folders of audios, compose musical themes and works with music. Now click on the Convert All button to start out converting FLAC to MP3, AIFF or any format you want in your Mac system, the converting course of will likely be completed inside a few seconds and you can swap to the Transformed tab to locate the convertedflac recordsdata in your Mac. If you have already got a music file in a lossy audio format and need to make it even smaller, you can use the FonePaw audio compressor to cut back the bitrate and pattern price of the audio file. Step 5. As soon as clicked, a window will pop up. Click on Obtain Page after which select Obtain for Windows. Then, click on Save File and watch for it to download.

Many individuals have questions on M4A, since it is relatively new. M4A stands for MPEG 4 Audio, and it's a widespread file extension used to signify audio files. Convert your audio like music to the WAV format with this free on-line WAV converter. Add your audio file and the conversion will begin immediately. You may also extract the audio observe of a file to WAV in the event you add a video. Good point. I have additionally heard it instructed that one of the ways to get around DRM (Apple's or Microsoft's) is to burn the purchased tracks to CD and then rip the CD to MP3. That does not appear to be a good idea to me - the unique file was compressed within the first place and ripping to MP3 simply strips away even more constancy. It's like making photocopies of photocopies - the standard deteriorates with every technology. What is the difference between M4A and MP4 files? I am a bit confused. Convert Apple device m4a to mp3 converter 320 kbps music and all the other audio codecs to any gamers. The M4A audio might be easily set as a Ringtone (iPhone) directly just by changing or renaming the extension (file) from M4A to M4R. 1). Batch Convert Mode: helps batch convert multiple totally different formats audio recordsdata to similar WAV format on the identical time; Scorching Listing Mode: helps robotically convert audio recordsdata written in monitor folder into WAV format; Command Line Mode: supports writing command line to complete audio conversion work. Remove audio noise from audio like MP3, WAV, WMA, M4A, 3GA, Apple Lossless ALAC, CAF, FLAC, OGG, M4B, MKA, AAC, AC3, DTS, RA, RAM, APE, AU, AUD, AIFF, AIF, AIFC, MPC, QCP, SHN, TTA, PCM, AMR, AWB, VOC, VOX, MPC and extra. As soon as the MP3 file is added to the software program, click on drop-down menu subsequent to Convert all information to: and choose WAV and file quality from the Audio tab. First of all, we're speaking about lossy" audio formats. For those who're an audiophile and require the utmost in sound quality, you may need to use a lossless audio format like FLAC or WMA lossless. These codecs have the same sound quality as a music CD. You may additionally need to check out OGG Vorbis lossy format, or WMA skilled. These are the only 2 lossy audio formats which help bitrates past 320 kbps.

So what can you do if you have information in one in every of these formats and want to add them to iTunes? There are a selection of packages that may convert audio recordsdata from one format to a different. tmkk's free XLD is my tool of choice, because it manages each audio file format I've ever come across, together with some I've by no means heard of, and even supports cue recordsdata. Stephen Booth's free Max is another instrument that converts many audio file formats. And in case you have Roxio's Toast 11 Titanium (and some earlier variations), you may convert from FLAC or Ogg Vorbis to iTunes-pleasant formats.
1 note
·
View note