#autodesk sketchbook mobile also just does not have the tools i like to use
Explore tagged Tumblr posts
Visit Tumblr Blog
Explore Tumblr blogs with no restrictions, modern design and the best experience.
Last Seen Tumblr Blogs


Fun Fact
Tumblr’s website traffic is steadily declining.
Text

leans down over the ledge and glares at you
#rain world#rain world art#slugcat#rw slugcat#rw survivor#eliasart#elias.sona#i haaaatttee drawin with ny finger#i rly want a new tablet/laptop with a pen so i can draw in bed without having to resort to phone shenanigans#autodesk sketchbook mobile also just does not have the tools i like to use
22 notes
·
View notes
Text
@emonewtype

Hey, good question – The sad news is that its not as simple as just drag and dropping a logo onto an image, but the good news is that its still pretty easy, it just takes a little time and patience. I’m self-taught at this and by no means an expert, but I don’t mind walking through my method with a quick and dirty edit.
The only thing you need is an image editor with layers. I’m using Autodesk Sketchbook because its free and what I normally use for art, but you can do this on anything. Glimpse is another free software that’s basically just open-source photoshop, and Ibispaint is decent if you’re on mobile.

First, open the images you’re going to be using as separate layers.
Next, crop the text that you’re going to be taking and figure out where you want it to go. If you want to line it up in a specific way over the original image, it helps to lower the opacity. In this case, I wanted to line up the ‘E’s and get the height roughly equal so I adjusted the scale a little bit. You’ll also probably notice me tweaking the position here and there throughout.
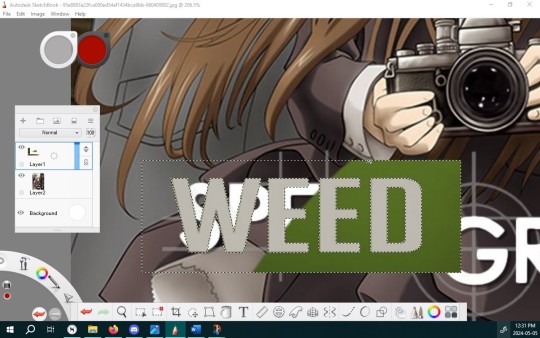
Now you want to erase the background of the text. This example is easy since it’s just a flat colour, so I can use the magic wand to select and erase it, but if the background is more complex you’ll have to spend a little more time isolating the text. You can also use the magic wand to select the text itself (idk why I didn’t do that here) but that can be a little hit and miss sometimes as far as accidentally erasing things like outlines and shadows.

If I turn off the other layer, you can see that the text layer still looks a little dirty, so I’ll go in and erase some of that extra crust.
There – it’s not perfect, but its good enough for what I’m trying to achieve here.
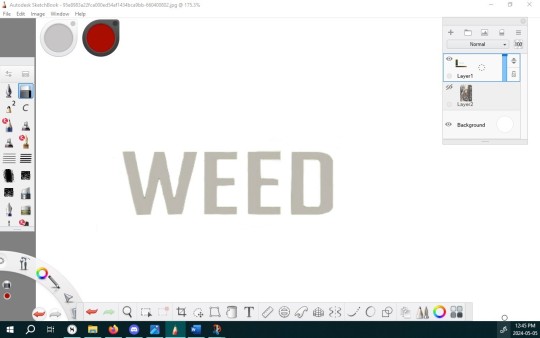
Now for the hardest part – I’m going paint over the logo on the original image. Since people aren’t likely to pay attention to what’s going on behind the text, it doesn’t matter if your digital painting skills are, like mine, mediocre at best.
I usually start with some basic linework on a new layer, between the original image and the test. I keep the text layer on a lower opacity so I can see where it will roughly be - there's no need to paint underneath the new text.
From there, I use a different layer below that to fill in some of the colours, using the colour picker tool to match the original image as closely as I can. Again, this absolutely does not have to be perfect.
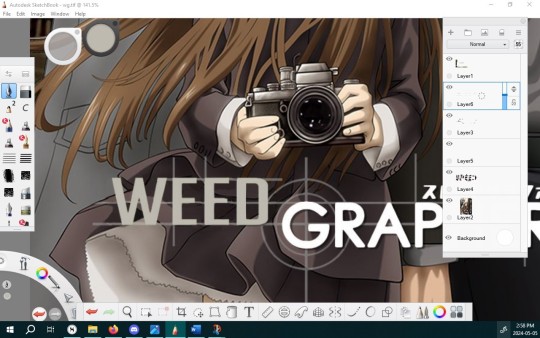
After that, I’ll do a few touch-ups for style (like the crosshair design) and it’s pretty much done.

Hope this helps!
This came to me in a dream, then I spent like 2 hours making it


65 notes
·
View notes
Text
Drawing tablet recommendation!
So a lot of you know I not only write but draw and paint as well. Digital space is my favorite to work in because it’s so forgiving, powerful, and easy to use. For a lot of people, making the move up from paper and pencil to digital is a big, scary leap that is usually also a tad expensive for most to break into.
I don’t usually post random reviews of stuff, but with the holiday season upon us and potentially having people looking for something for themselves or others and this being SUCH a good product already I had to at least drop it for anyone considering something like this. It’s a bit long, so I’ll leave the rest under the cut, but if you’re looking to gift someone the ability to draw digitally or are just trying to try it out without breaking the bank, please give this a read!
Well, good news everyone, Wacom is dead to me and let me introduce you to my new best friend the Huion H640P!
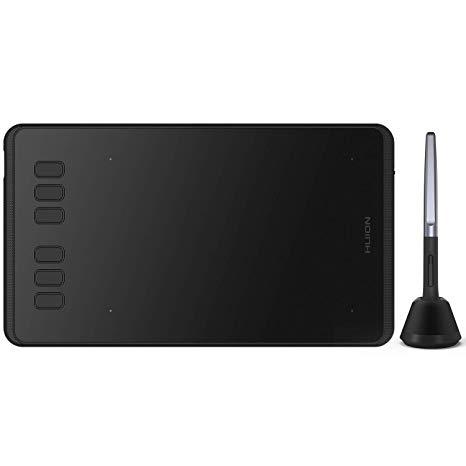
On the website it’s listed at $50, but I nabbed this buddy for $40 off of Amazon (still through the company, just in an Amazon storefront). When you compare that to the $80 Wacom’s lowest level tablet (currently Intuos, I think), it’s a clear bargain, but especially in comparison to the latest versions of the Intuos it has some major advantages!
Pen stand (you don’t know how nice this is until you don’t have it!)
4 More quick buttons than Intuos (once you get the hang of these, they’re indispensable!)
All buttons are on one side of the tablet instead of being on both sides
Android device compatible (I can’t take my laptop everywhere anymore, but now I can neatly pack this little guy and pen in my bag and draw on my phone!)
USB adapters included! (Even a Type C adapter which my phone uses!)
These alone are reasons to me to spend less and get more than going through Wacom. The active area automatically shrinks to match the ratio of the phone screen so drawing flows smoothly (this was the reason I bought it in the first place) and it requires absolutely no installation on phones - just plug and play!
On PC/Mac you will need to install the driver which will require you to go the site and select, download, and install the correct model driver to use properly, but once it’s done installing I didn’t even need to restart to be able to use it.
I have an older model of the Wacom Intuos, a Cintiq 16HD, and my first good tablet was an old Intuos model I ran into the dirt. The H640P more closely resembles the latest Inutuos model which is marketed as a beginner/hobbyist tablet, but frankly for most it’s all you’ll ever need! It draws smoothly with good pressure sensitivity and control. It’s really seamless if you already have experience using a tablet, and if it’s new to you it will take a learning curve to develop the hand-eye coordination, but this is a very friendly tablet to learn on.
If you’re concerned about the size, don’t be. Especially if you’re one to curl up with your drawing tools like I am, this fits neatly and lightly into your lap and is more than enough space to draw since it adjusts to the ratio of your computer screen after the driver is installed. You can also rotate the tablet to put the buttons on the other side if you’re left handed or if you just want to orient the tablet differently. You can use the settings to customize the function buttons, buttons on the pen, pressure sensitivity, as well as the working space.
If this tablet was available years ago I would have abandoned Wacom forever and a day ago. Competitor tablets and tablet displays from companies like Huion and XP Pen offer the same (if not better) functionality and design for literal fractions of the price now. Some people have issues with their drivers or other design choices, but frankly Wacom does not have a great track record with me, either. When all of my gear gives out I’ll be going to these companies to replace them. There’s no reason for Wacom to have such a strangle-hold on the market any more.
Bonus:
If you’re in the mood to continue saving money in terms of drawing programs my first recommendation is:
Autodesk Sketchbook
It’s a completely free program (just create a free Autodesk account) with both desktop and mobile versions, supported by Android, Windows, and IOS. You’ll get the full functionality of a paid program such as fine-tuned brush controls, custom brushes, and unlimited layers but in a layout that is easy to learn and experiment with, which for someone new to digital art can be a godsend!
There are other free programs such as IbisPaint and Krita that will work just fine, but if you’re really and truly new to this world, Sketchbook was my go-to for the longest time as a professional artist before I converted to Clip Studio Paint. I’ll always recommend CSP over anything else now because of how powerful and useful all of its tools are, but for someone just dipping their toes in on a budget, Sketchbook is your best friend.
12 notes
·
View notes
Photo
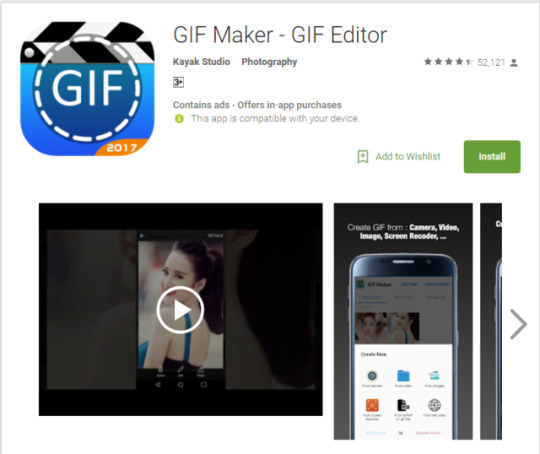
https://play.google.com/store/apps/details?id=com.kayak.studio.gifmaker&hl=en
Animation: There’s quite a few types of animation you can do but one type that’s used on Social media quite often is a gif (Graphics interchange format) which generally is a moving image designed to be posted online for its small size. On the PC/Mac the process of creating gifs can be lengthy so being able to do it with an app can help a lot.
“GIF Maker – GIF Editor By Kayak Studio” is a free program on the Google play store where you can convert video’s into GIF’s, have over 200 images in them, edit and view other gifs on your device and other many aesthetic features such as stickers. It then also allows you post them on your Social media account, so the integration is more seamless than the more manual way of being on the computer. I also chose this app because it has the highest amount of users and a well-received rating. This shows that the app is relatively simple easy to use in terms of interface and performance. A lot of other apps could potentially lag when it comes to interpreting GIFs going off the bases of how PC/Mac’s sometimes perform. Pros: Free, Simple to use, makes editing easier being all in one, connects to social media and has a large following giving it a quality you can trust.
Cons: Has adverts which you have to pay $3.00 USD to remove. Some of the effects can be limiting, remember that these effects are all set prior. Only for Android.

https://itunes.apple.com/us/app/animator-video-and-gif-animation-maker/id1083338559?mt=8
“Animator - Photo and Video Creative Labs, Inc.” is another free app on the ITunes store for IOS, this program allows new comers to animation to get a feel of creating animations through transparent layering and basing off video and imagery in the background as you draw over them. What seems great about this app is its relatively calm approach to garnering the masses of people who might not have the best understanding or talent in terms of animation creation, this app is more focused on having fun and sharing it online, again this program has access to one tap social media posting to which you can either export it as a video or GIF. The drawing might be a bit difficult but the layering that has access to would be more than enough compensation for someone new to this. In other words kids could even use this program as their introductory that they can take wherever they going, eventually leading to having enough practise to be able to use something like Adobe Animate. My self personally would probably not use this program for very long as I feel like it could rather limiting, only having a few drawing options etc. You can however change the frame that these go on and perhaps sitting on the bus with the trees going by you could draw a car or another to keep yourself occupied. All in all this is probably the point of the app is to be simple and fun and nothing to immense to put off someone new.
Pros: Simple to use, great for beginners, quite fun to use, varying controls on app, no advertisements, free to use forever, save as multiple formats and has the ability to integrate video and other opacity layers with the app itself.
Cons: For someone who is new accustomed to animation this might seem rather limiting, even though it’s an app there is still quite a lot of features that could be added onto the drawing field you. For instance from what I saw is that you can only add to the layers you drawing on and not have multiple layers happening in the background. It’s designed for people new to animation. Some people also said it can be rather glitchy.
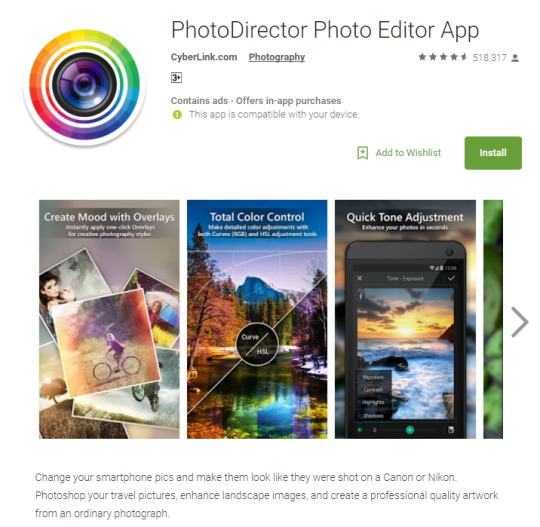
https://play.google.com/store/apps/details?id=com.cyberlink.photodirector&hl=en
“PhotoDirector Photo Editor App – By Cyberlink” – this is a photography app available on the Google store. The great thing about apps like this is that you can have that mobile access to touch up on photos you’ve taken along the way. The app claims to be able to make photo’s you’ve taken to appear like their quality you’d get from a high end camera such as a Nikon or Cannon DLSR. I’d say this would be more catered towards a professional seeking an alternative to using their proper camera, also being a made by Cyberlink a company I’ve known for quite a while you can understand why this app costs money to use some of its features but for the most part it is free, so people who might not have the greatest knowledge can jump right into using it, all depending on the skill of the photographer in the end. Some of its brightness contrast, HDR, colour corrections, live effects etc. Very versatile just like photoshop.
Pros: Professional Quality, lots of tools you can use, is free, made by a trusted and well known company, many users have used this and it’s rating it high giving in indication of quality and it’s great to have a high potency mobile editing platform.
Pros: Very professional quality, the controls are not limited with no presets as you set the parameters, a great alternative to SLR photography, it’s highly regarded receiving many downloads and being designed by a big company means the quality of using this program would be very high.
Cons: Might be hard for people new to photography, advertisements and some content has to be bought.
https://itunes.apple.com/nz/app/photo-editor/id546821797?mt=8
“Photo Editor - By Axiem Systems” is another app for IOS found on the Itunes app store, this is a simple, easy to use app that is very popular. This program is more suited towards the massess, people who don’t nesserarily do photography often and will prefer to rely on presets over manually figuring out what looks right. This is perfectly fine for the target audience though as you want it to be seemless and easy to use for young and old. This program allows filters and other effects but in that regard it’s probably it’s biggest draw back. In saying that, it’s free, it has options and importantly it’s simple. There are in-app purchases though as this program does require you to pay to remove advertisments.
Pros: Simple, perfect for newcomers, easy to use and it’s free.
Cons: This wouldn’t be a tool for professionals as it’s far too limiting, you have to pay to remove adverts and get other presets as well. The photographic effects look tacky in my opinion as well.
https://play.google.com/store/apps/details?id=com.adsk.sketchbook&hl=en
“SketchBook - draw and paint” this is a free app on the Google play store created by Autodesk. The app has features you can buy so it’s not entirely free but I suspect it’s due to it being a competent application considering it’s coming from Autodesk who created ‘Maya’. You would probably need a stylist for drawing apps and this is no exception as there a few small icons here and there which would require more precision. I would say you’d need a powerful device to run this program so running it on mediocre phones could cause slowdowns, it’d be best to use this on a dedicated tablet that has more grunt plus this would be far more convenient in terms of feeling like a notepad.
Pros: Free version has leg room, great for drawing on the go, designers would feel very comfortable, especially those who’ve used Maya products. Adaptable and many features.
Cons: Some features must be paid for. Needs a powerful device. Needs a stylist even for the navigation aspect. Not for beginners, you must have a good understanding of digital design.
https://itunes.apple.com/nz/app/adobe-illustrator-draw/id911156590?mt=8
“Adobe Illustrator Draw” this app is easily trusted simply through the name Adobe; many designers are familiar with this company so they’ll be familiar and have the confidence in its performance. This is a simplified version of the Illustrator Application commonly found on Desktops, like the desktop version this allows you to create Vector based imagery (svg) with simple UI aimed for working on ideas efficiently while you’re on the move. The app allows communication between the desktop application and the mobile so you can transfer works with ease. Again, you’d need a stylist for this as intricate drawing will be immensely difficult with fingers. For a free app from Adobe there’s a lot of features.
Pros: Free to use, transferable data between desktop app of illustrator and the mobile version. Simple UI aimed at getting ideas on a moving device. Simple to use and many people will be accustomed to the product since it’s an Adobe product so designers will know it’s layout somewhat. You can create SVG’s which are very prevalent in today’s world of design for the retainment of quality.
Cons: Once again, be best on a tablet for more power and space, not as many features as the desktop version.
0 notes
Text
Options to Numbers - fine Mac spreadsheet apps
New Post has been published on https://pressography.org/options-to-numbers-fine-mac-spreadsheet-apps/
Options to Numbers - fine Mac spreadsheet apps
If you’ve just sold a brand new Mac, you’ll have Numbers (together with Pages and Keynote) ready for all your productivity needs.
Mac Spreadsheet
Winners of the Powerball
But, they aren’t the best options for digital wide variety-crunching. In addition to the plain desire in Microsoft Excel, there is other programs, apps, and software program for the Mac that you can want to remember relying on your necessities.
We’ve got used all the Options to Numbers here, so examine on for a damage down of your choices on the subject of keeping the books balanced.
wide variety-Crunching: Numbers is a good instance of the way the first-class Apple software program takes difficult obligations and makes them look easy. As soon as you type ‘=’ into a mobile, the Inspector palette on the proper hand facet of the spreadsheet presentations a list of available features, and to assist new users to get started out it even displays causes and examples of the way to use each feature.
Numbers doesn’t have the sheer variety of capabilities that you’ll locate in Excel, or assist for superior functions together with pivot tables, but it offers a terrific simple set of capabilities in order to be beneficial for home users, education and small agencies. And, of the path, Numbers also lets you import and export spreadsheets in Excel format In case you want to.
Graphs And Charts: Apple describes numbers as ‘the most lovely spreadsheet ever’, and it does put numerous emphasis on its pix tools. A Numbers spreadsheet is definitely just a clean page in which you can region statistics tables, textual content, and graphics in any layout that you choose. The program includes tools for fast developing second and three-D graphs and charts, or even interactive charts that could encompass simple animations to illustrate changes in statistics.
Collaboration: you can percentage your spreadsheets on a line with different human beings by means of the usage of the online version of Numbers at www.Icloud.Com, and the net software can provide you with a warning if there are conflicts between modifications made by way of exclusive human beings. However, you can’t tune changes made to a spreadsheet, and Numbers lacks the greater comprehensive collaboration equipment observed in Google Sheets and Microsoft’s Office online.
Replace sixteen September 2016: Given that our assessment, Apple has delivered actual-time collaboration to its iWork suite. We are thrilled to peer an Update to the iWork suite, as real-time collaboration will help the ones running in teams, which includes worldwide teams in organizations and even college students taking part in college group initiatives.
Digital Broadcasters Apple Unveil Mac App Shop
digital broadcasters Apple has maximum these days give you its new desktop app outlet called because the Mac App Shop which gives a risk to the customers to discover extra than one thousand unfastened and paid for apps. Known marketplace manufacturers consisting of ancestry.Com and software program agency Autodesk are those who’re providing apps that are to be had to the customers.
Speaking approximately the outlet, it has facilitated Apple Mac users to download the available apps onto their mac and to pay for the same thru their iTunes account, a method similar to the App Shop for iPhone customers. But, to get right of entry to the Mac App Store the users want to perform snow leopard on their mac and can be attained via a basic software Update. And to add to the generosity, Apple has additionally delivered new apps in conjunction with the cutting-edge favorites, to be had from pinnacle app creators like Autodesk, Ancestry.Com, and Boinx to call a few.
Mac OS Official
Carl Bass, Autodesk CEO turned into quoted saying, “We have seen outstanding fulfillment for the Mac, iPhone, and iPad with multiple apps. We’re excited to offer SketchBook Seasoned on the Mac App Shop so artists can effortlessly create the whole lot from short sketches to artwork on their Macs.”
The apps are categorized and varied in step with their position including schooling, video games, photography layout, lifestyle, productivity, and utilities. And the digital broadcasters have also supplied Apple’s iLife’11 suite which consists of the apps from the likes of iPhoto, iMovie, and GarageBand, to be had to purchasers at a charge of $14.99 (7.50GBP) each from the outlet itself.
Steve Jobs, the Apple CEO, said, “With more than 1,000 apps, the Mac App Save is off to an extraordinary start. We suppose customers will love this revolutionary manner to find out and buy their favorite apps.” And in current news, Steve Jobs changed into entitled to “Person of the 12 months 2010” by means of Economic Times following the fulfillment of the extensively acclaimed iPad.
Michael Shai is a proud contributing writer and writes articles on many topics together with online marketing, website design, social media, e-commerce and plenty of more online techniques. you can view more data on our virtual Organization London or Internet layout London services at digital Broadcasters.
Create Mac Apps With the Mac Automator In case you very own a Mac computer from Apple, and you need to automate some actions which you do on an everyday foundation, but you’re no longer a programmer, there’s a loose application to your computer named Automator that may be simply what you want. The Mac Automator has simply grown right into an effective device over the last few years, and here’s a quick take a look at how you could create your own Mac apps with the Automator.
A simple Mac App – Open Commonplace URLs
As a brief example, let’s say the first component you do each morning is you begin your browser, and you take a look at the news to your favorite three websites. In place of open your browser, create 3 tabs, and kind for your URLs, you can let the Automator do that give you the results you want. With the Automator, you may create your own “workflows”, and once you’ve got create a workflow you like, you could even store it as a Mac utility.
(In this newsletter I won’t display you a way to create a workflow that creates three tabs — that takes a little longer to explain — however I will show you a way to open your desired URLs in new Safari windows.)
To get commenced growing your new Automator workflow, click the Packages icon within the Mac Dock, then click the Automator icon. Whilst the Automator begins, click on the “Custom” icon.
Above the second column at the left side of the Automator window, you’ll see a search area. In that discipline type the word “Safari”, and press [Enter]. That limits the actions in that column to simplest movements that relate to Safari, which is what we need.
Subsequent, click the “Get Distinctive URLs” action and drag it to the open vicinity on the right facet of the Automator window. When you try this, kind within the URLs of the websites you want to be opened robotically. the first URL defaults to Apple’s website, but you can alternate it to whatever you need, then upload your different URLs the use of the add button. (If you have a problem coming into text, ensure you double-click on the existing phrases within the text fields, it’s a little choosy.)
Whilst you’ve completed that, cross returned to that 2d column and drag the “New Safari Documents” motion to the open area at the proper side of the Automator, and drop it into the open location underneath the “Get Distinctive URLs” box. Whilst you try this, the Automator will attempt to show you that the records from the primary box will magically feed into the second one field. That is, the URLs inside the first container can be used as entering to the “New Safari Documents” motion.
To check your workflow, press the Run button at the top-right of the Automator window. This should launch Safari and open the three URLs you entered.
Saving Your Workflow
Now which you have a “workflow” that works, guess what? What you have sincerely done is you’ve got just created a brand new computer application. you may now keep this application as a new workflow, or as a Mac software. (It’s proper, you could keep your program as a Mac utility — you’re a programmer.)
To do that, click on the Document menu, then click on the save As menu item. Name your Record something you would like, store it anyplace you need, however, be sure to alternate the Record layout to “utility” before pressing the save button.
Assuming you named the Record “MyFavorites” and you stored it as a software on your Mac computing device, the application icon ought to appear on your desktop. you could now double-click it just like every other Mac software, and even drag it to the Dock In case you opt for.
Mac Apps – you may Do An awful lot more
Windows App Store
As you could see from the wealth of to be had actions within the Mac Automator, you can create many, many greater varieties of workflows and Packages with the Automator.
0 notes