#configurable usb loader
Explore tagged Tumblr posts
Visit Tumblr Blog
Explore Tumblr blogs with no restrictions, modern design and the best experience.
Last Seen Tumblr Blogs


Fun Fact
130K people were victims of a chain letter scam that affected Tumblr in May 2011.
Video
youtube
Extraordinario CFG USB L0ader - Última versión 70r78.13 (Actualizado Septiembre 2024)
#youtube#cfgusbloader#configurable usb loader#nintendo wii#wii backups#wii hack#wii mod#vwii hack#wii games#juegos wii#usb loader#wii online#nintendont#gamecube
0 notes
Text
Hitachi Diagnostic Tool: A Smart Solution for Heavy Equipment Maintenance
If you work with construction or agricultural equipment, you already know how important it is to keep your machines in perfect condition. One of the best ways to do that is by using a Hitachi Diagnostic Tool. This tool is designed to help you understand what's going on inside your machines—saving you time, money, and unnecessary repairs.
What Is a Hitachi Diagnostic Tool?
A Hitachi Diagnostic Tool is a device that connects to Hitachi equipment such as excavators, loaders, and other heavy-duty machinery. It communicates with the machine’s internal computer systems to read fault codes, monitor real-time data, and even perform advanced diagnostics.
The tool helps identify issues early, before they become big problems. It can also reset warning lights and perform updates, making it an essential part of any technician’s or fleet manager’s toolkit.
Why You Need It
Modern Hitachi machines come with complex electronics that control everything from engine performance to hydraulic systems. When something goes wrong, a warning light might appear—but that light won’t tell you exactly what the issue is. That’s where the Hitachi Diagnostic Tool steps in.
With this tool, you can:
Read and clear error codes
Monitor live system data (like engine temperature, oil pressure, etc.)
Reset service lights and alarms
Access full system diagnostics, including engine, transmission, and hydraulic systems
Perform calibration and configuration tasks
Save service reports for future reference
Who Should Use This Tool?
Construction Equipment Owners If you own Hitachi machinery, a diagnostic tool helps you avoid unexpected breakdowns. It gives you better control over machine health and allows you to make timely repairs.
Fleet Managers Managing a fleet of machines means managing uptime. A Hitachi Diagnostic Tool helps you monitor the condition of each piece of equipment, ensuring they stay in top working order.
Heavy Equipment Technicians For repair professionals, having the right diagnostic tool means faster troubleshooting and more accurate service. It saves time during inspections and improves customer satisfaction.
Hitachi EDL V2 Diagnostic Kit: A Complete Package
At Diagsoft Diagnostic Solutions, we offer the Hitachi Diagnostic Kit EDL V2, a complete diagnostic solution. This kit includes the Electronic Data Link (EDL V2) adapter and Service Advisor Software (2017 version), making it a powerful and professional-grade tool.
Key features include:
Compatibility with a wide range of Hitachi equipment
Easy connection via USB or Bluetooth
User-friendly interface with step-by-step instructions
Multi-system access, including engine, hydraulics, and electrical
Reliable Service Advisor software for smooth operation
Durable build quality for rough workshop conditions
This kit is perfect for anyone who needs a trusted, all-in-one diagnostic solution for Hitachi machines.
Easy to Use
Even if you're not a tech expert, the Hitachi Diagnostic Tool is easy to use. Just plug it into your equipment, run the software on your laptop, and follow the prompts. The tool guides you through everything—from basic code reading to more advanced testing.
Final Thoughts
The Hitachi Diagnostic Tool is more than just a gadget—it’s an investment in the health and performance of your heavy equipment. Whether you run a small operation or manage a large fleet, having the right diagnostic tool will help you avoid costly downtime and extend the life of your machines. Explore the Hitachi Diagnostic Kit EDL V2 today at Diagsoft Diagnostic Solutions and take better control of your equipment's future.
0 notes
Text
What is Device for Boot Loader Installation
When working with computer systems or embedded devices, a device for boot loader installation plays a pivotal role in initializing hardware and loading the operating system or firmware. It is a critical component for ensuring that the system starts correctly and operates efficiently. This blog will dive deep into what a boot loader is, the types of devices used for its installation, and why professional device installation services are essential.
What is a Boot Loader?
A boot loader is a small program responsible for initializing the hardware and loading the operating system kernel or firmware into the memory. It acts as a bridge between the hardware and the operating system, enabling the computer to start up and operate smoothly. Boot loaders are commonly used in:
Personal computers
Embedded systems
Smartphones
IoT devices
Without a properly configured boot loader, your device may fail to boot or function correctly.
Devices for Boot Loader Installation
Installing a boot loader requires specific devices and tools to ensure precision and reliability. Below are some commonly used devices:
1. Microcontrollers and Embedded Boards
Microcontrollers like Arduino, Raspberry Pi, and other embedded boards are often used for installing boot loaders in smaller systems. These devices enable developers to program the boot loader directly onto the hardware.
2. Universal Programmers
Universal programmers are sophisticated devices used to write boot loaders onto EEPROM, flash memory, or microcontrollers. These are widely used in professional settings for their accuracy and compatibility with various chips.
3. JTAG Debuggers
JTAG (Joint Test Action Group) devices are another essential tool for boot loader installation. They allow developers to interact with the hardware at a low level, ensuring precise configuration and debugging during the installation process.
4. USB-to-Serial Adapters
For simpler systems, USB-to-serial adapters can be used to install boot loaders. These adapters connect a computer to the target device, enabling communication and programming.
The Process of Boot Loader Installation
The installation process typically involves the following steps:
Preparing the Hardware: Ensure the target device is connected correctly to the programming tool.
Choosing the Boot Loader: Select the appropriate boot loader compatible with the hardware and operating system.
Programming the Boot Loader: Use the chosen device to program the boot loader onto the target hardware.
Testing and Validation: Verify that the boot loader works correctly by testing the system’s boot process.
This process requires technical expertise to avoid errors that could render the device non-functional.
Importance of Professional Device Installation
Professional device installation services are crucial when dealing with boot loaders. Here’s why:
Accuracy: Experts ensure the boot loader is installed correctly, minimizing the risk of errors.
Compatibility: Professionals have the tools and knowledge to select the right boot loader and installation device for your system.
Time-Saving: Avoid the hassle of troubleshooting and debugging by relying on skilled technicians.
Reliability: A properly installed boot loader ensures long-term system stability and performance.
How Techniservices Can Help
If you need assistance with device installation for boot loaders in Melbourne, Techniservices offers reliable and expert solutions. Our team has extensive experience with various devices and systems, ensuring seamless installation and functionality. Whether it’s for embedded systems, PCs, or custom hardware, we provide tailored services to meet your needs.
Conclusion
A device for boot loader installation is an indispensable tool for ensuring the smooth operation of any system. Understanding the types of devices and the installation process is essential for achieving optimal performance. However, professional device installation services can save you time, reduce errors, and provide peace of mind. Contact Techniservices today to ensure your devices are set up for success!
0 notes
Text
Dell BIOS Recovery: A Comprehensive Guide
When it comes to troubleshooting computer issues, one of the critical components that often gets overlooked is the Basic Input/Output System (BIOS). The BIOS is the firmware responsible for initializing hardware during the booting process and providing runtime services for operating systems and programs. If you are a Dell user, you may encounter situations where you need to recover or update your BIOS. This guide will walk you through the process of Dell BIOS recovery, explaining why it's necessary, how to perform it, and what to do in various scenarios.
Understanding BIOS
Before diving into BIOS recovery, it's essential to understand what BIOS is and its role in your computer's operation. The BIOS is a low-level software that resides on a chip on the motherboard. Its primary functions include:
Power-On Self Test (POST): When you power on your computer, the BIOS performs a series of diagnostic tests to ensure that the hardware is functioning correctly.
Booting the Operating System: After POST, the BIOS locates and initiates the boot loader of the operating system, allowing your computer to load the OS.
Hardware Configuration: The BIOS provides an interface for configuring hardware settings such as boot order, system clock, and integrated peripherals.
Firmware Updates: BIOS can be updated to enhance performance, add support for new hardware, or fix bugs.
Importance of BIOS Recovery
BIOS recovery is crucial for several reasons:
Corruption: BIOS corruption can occur due to various reasons, including power failures during a BIOS update, a virus infection, or hardware malfunctions. A corrupted BIOS can prevent your computer from booting.
Update Failures: Sometimes, BIOS updates may fail due to incompatible firmware versions or incorrect procedures, leading to system instability.
Restoring Settings: If incorrect BIOS settings are applied, it may cause boot issues or hardware incompatibilities. BIOS recovery allows users to restore default settings.
Security: BIOS updates often include security patches that protect your system from vulnerabilities. bios master password reset
Preparing for BIOS Recovery
Before proceeding with BIOS recovery, it's essential to prepare adequately:
Backup Important Data: Always back up your data before making any changes to the BIOS. If something goes wrong during the recovery process, you may risk losing important files.
Identify Your Dell Model: Different Dell models may have different BIOS recovery procedures. Knowing your specific model will help you follow the correct steps.
Check for Updates: Visit the Dell Support website to check for the latest BIOS updates available for your model. Ensure that you download the correct version to avoid compatibility issues.
Create a BIOS Recovery USB Drive: If you're performing a BIOS update, it’s advisable to create a bootable USB drive with the updated BIOS file. This ensures you can recover the BIOS if the update process fails.
How to Perform BIOS Recovery on Dell Systems
Method 1: Using the Built-in BIOS Recovery Feature
Most modern Dell systems come with a built-in BIOS recovery feature that allows you to restore the BIOS to a working state. Follow these steps:

Power Off the Computer: Completely shut down your Dell computer.
Disconnect All Peripherals: Remove any USB drives, external devices, or peripherals connected to your computer.
Power On and Enter BIOS: Press the power button and immediately start tapping the F2 key repeatedly until you enter the BIOS setup.
Restore BIOS Defaults: Navigate to the "Exit" menu, and select "Load Setup Defaults" or "Load Optimized Defaults." Confirm the action and save the changes.
Exit BIOS: Select "Exit Saving Changes" to restart your computer.
Method 2: BIOS Recovery Using a USB Drive
If the built-in recovery method fails, you can use a USB drive to recover your BIOS:
Prepare the USB Drive:
Download the latest BIOS update from the Dell Support website.
Format a USB drive to FAT32.
Copy the BIOS update file to the USB drive.
Access the BIOS Recovery:
Insert the USB drive into the affected Dell computer.
Power on the computer while holding the Ctrl and Esc keys until you see a message indicating the BIOS recovery process is starting.
Follow On-Screen Instructions: The system will begin the recovery process automatically. Follow any on-screen prompts to complete the update.
Method 3: BIOS Recovery Using Recovery Mode
For some Dell systems, a recovery mode is available that allows users to recover BIOS settings without entering the operating system. Here’s how to access it:
Power Off the Computer: Turn off your computer completely.
Turn On and Enter Recovery Mode: Power on the system and press the F12 key repeatedly until you see the Boot Menu. dell bios master password
Select Recovery Mode: Use the arrow keys to navigate to "Recovery Mode" and press Enter.
Follow Instructions: Follow the on-screen instructions to recover your BIOS.
Troubleshooting BIOS Recovery Issues
If you encounter issues during the BIOS recovery process, consider the following troubleshooting tips:
Check USB Drive Compatibility: Ensure that the USB drive is formatted correctly (FAT32) and that it is compatible with your system.
Confirm BIOS File Integrity: Verify that the BIOS file downloaded from the Dell Support website is complete and not corrupted. Consider downloading it again if necessary.
Remove Unnecessary Hardware: Disconnect any unnecessary hardware or peripherals that could interfere with the recovery process.
Check for Power Supply Issues: Ensure that your computer is receiving a stable power supply during the recovery process. Consider using a UPS if you are in an area with frequent power fluctuations.
Consult Dell Support: If all else fails, contact Dell technical support for assistance. They can provide specific guidance based on your model and issue.
Post-Recovery Steps
Once you successfully recover your BIOS, take the following steps to ensure optimal performance:
Reset BIOS Settings: After recovery, you may need to reset the BIOS settings to your preferences. Go back into the BIOS setup and configure settings such as boot order, integrated peripherals, and system time.
Install Operating System Updates: If you updated your BIOS, make sure to check for and install any operating system updates. This ensures compatibility with the new BIOS version.
Monitor System Performance: Keep an eye on your system’s performance after the recovery. If you encounter any issues, revisit the BIOS settings or consult Dell support.
Regular Backups: Make it a habit to back up your data regularly to avoid data loss in case of future issues.
Conclusion
dell bios recovery is a vital process that can help resolve various issues related to system instability, boot failures, or hardware incompatibilities. By understanding the importance of BIOS and following the appropriate recovery methods, you can ensure your Dell computer runs smoothly. Always remember to back up your data before making any changes and consult official resources when in doubt. With proper knowledge and precautions, you can effectively manage your BIOS and maintain your system’s health.
1 note
·
View note
Text
Gantry System / CNC Auto Loader / Robotic Automation / CNC Lathe Automation
Grey Matter Robotics Pvt. Ltd. is a leading industrial robotics automation company from India, with a proven track record of over 150 successful turnkey projects. We specialize in developing pick & place applications using gantry systems and 6-axis robotic arms. With a strong commitment to quality, we deliver top-notch industrial robotics and automation solutions to clients worldwide.
A top company specializing in gantry systems and gantry robots for CNC machine tending applications.
Understanding CNC Machines: An In-Depth Look at Their Components
CNC (computer numerical control) machines are sophisticated pieces of equipment designed to automate the manufacturing of parts from a variety of materials, including metal, plastic, and wood. These machines come in various configurations, with CNC mills and CNC lathes being the most common. CNC lathes are ideal for processing cylindrical parts, while mills are versatile enough to handle flat, curved, or angular parts.
This article will explore the different components of a CNC machine. Some parts are common to both lathes and mills, such as the control unit, driving system, and feedback system, while others are specific to certain types of machines. For instance, tailstocks and headstocks are unique to CNC lathes.
1. Input Device
The input device is how CNC programs are loaded into the machine. This can be done through a keyboard (to directly input G-code commands), a USB flash drive (to transfer a program from another computer), or wireless communication (to download a program from another computer over a network).
2. Machine Control Unit (MCU)
The MCU is the brain of the CNC machine. It comprises electronic hardware and software that interpret the G-code provided by the input device and translate it into instructions for the tool drivers. The MCU controls the movements of servo motors along the machine’s axes and processes feedback from sensors to ensure precise tool positioning. It also manages tool changers and coolant activation as specified by the G-code.

3. Machine Tools
Machine tools refer to any tools that perform processes on a workpiece, usually cutting tools. CNC lathes use stationary tools and rotate the raw material to make cuts, whereas CNC mills move spinning tools into stationary material. Advanced 5-axis machines can move both the tool and the workpiece, enabling the creation of more complex features. Machine tools are stored in “tool libraries,” and a tool changer automates the swapping of tools during operations.

4. Driving System
The driving system consists of the motors that move the tool along the machine’s axes. In a standard CNC mill, the bed moves horizontally along the x- and y-axes, while the cutting tool moves up and down along the z-axis. In a CNC lathe, the driving system moves the cutting tool along the rotational axis of the workpiece. Movement is often controlled by servo motors, ball screws, and linear guides to ensure precision.
5. Feedback System
A feedback system is essential for maintaining accuracy. It uses a closed-loop control system to verify and adjust the position of mechanical components after movement. This can be achieved with linear or rotary encoders attached to the servo motors. Special probing tools are also used to measure the actual part during machining, ensuring dimensional accuracy.

6. Display Unit
The display unit is a screen that shows crucial information to the operator. Some units have large, high-resolution screens displaying extensive data, while others have smaller, low-resolution screens showing only essential information. The display unit allows the operator to input G-code, change machine settings, and monitor the machine’s status.
7. Bed
The bed of a CNC mill is where the raw material is mounted. Various work-holding jigs secure the workpiece in place, often using t-slots or holes for attachment. In a CNC lathe, the tool turret and tailstock are mounted to the bed, and the raw material is secured in the chuck.

8. Headstock
The headstock is specific to lathes and contains the main drive, bearings, and gears needed to rotate the chuck. Located on the left side of the lathe, the headstock is usually enclosed and accessed via removable panels.
9. Tailstock
The tailstock supports long, cylindrical workpieces on one side while the chuck supports the other, preventing deflection during cutting. The tailstock can move along the lathe’s z-axis to accommodate different lengths of raw material.
10. Tailstock Quill
The tailstock quill, located in the tailstock, has a conical end aligned with the spindle and chuck axis. It provides additional support for long shafts by fitting into a drilled hole in the workpiece, with limited range of motion adjusted by pneumatic or hydraulic pressure.
11. Footswitch or Pedal
Foot pedals are used in CNC lathes to activate and deactivate the chuck and tailstock quill, allowing operators to load and unload parts easily. CNC mills typically do not have foot pedals, as the parts are already supported on the bed.
12. Chuck
The chuck is a lathe-specific component that grips the raw material during machining. It rotates at high speed and typically has three or four pneumatically or hydraulically actuated grips. Three-jaw chucks are self-centering, while four-jaw chucks can be individually adjusted for greater accuracy and eccentric cutting.

13. Control Panel
The control panel includes the input device, display unit, keyboard, and other controls for interacting with the CNC machine. It is often attached to the machine with an extendable arm, allowing operators to position it conveniently.
This comprehensive look at CNC machine components highlights the complexity and precision involved in modern manufacturing processes, ensuring high-quality, accurate production across various industries.
3 & 4-axis gantry systems, gantry robots, Cartesian robots, linear stages, robot tracks, and linear axes
Leveraging our expertise in developing and manufacturing 3 and 4-axis gantry systems, we deliver exceptional automation solutions for CNC machine loading and unloading. Our gantry systems boast high payload capacities and high-speed capabilities, ensuring efficient and streamlined operations. Built with a robust structure for enhanced stability, our gantry systems are designed to be user-friendly, boosting productivity. Furthermore, they require minimal maintenance, making them a reliable and cost-effective option for CNC machine automation.
0 notes
Text
so it turns out if you have wii fit save data you don't have to unlock anything in wii fit plus? i mean i have to unlock the last three exercises in strength training, but all the minigames are unlocked from the start? and i think i accidentally unlocked all the yoga poses already on the first game (curse me trying to get the highest score on the hula hooping minigame! also did you know hula hoop is a registered trademark? it shows as "hula hoop®" in the minigame selector! as is segway (which i guess everyone who is vaguely aware of a segway probably knows) and frisbee - the latter appearing in wii sports resort! this means nintendo had to pay licensing fees to use those names!)
anyways i dunno if it's different starting fresh, maybe i'll try the sd card in my other wii (the one with the broken disc drive) and make a fit plus save file there out of pure curiosity as to whether or not you have to work out to unlock everything.
also in yoga, the downward dog pose is easy to cheese if you have tits. shift your upper body weight slightly forward, and bam, easy high score.
also also i might buy a wii fit plus disc once finances are more stable for me - like yeah you have to wait longer on load times and shit but it's technically more convenient to pop a disc in and just go from the wii menu to the game than to go wii menu>homebrew channel>configurable usb Loader>wait for usb device timeout and swap to loading from sd card>open wii fit plus
plus i already have an original wii fit disc so grabbing fit plus isn't that far out there of an idea lol
oh and triple also - there's death in wii fit! in lotus focus (which is a minigame available in the first game as well) - somewhere a little before halfway down the candle, an insect appears (resembling lepidoptera but i don't think it's meant to be any specific species besides "vague concept of a moth"... and yes my first score was 36 seconds because i got distracted trying to identify the bug) and circles the candle for a little while, before eventually landing in the flame and falling to the ground as a little fireball.
another one appears towards the end but it lives.
this also explains the esrb rating for comic mischief i guess.
this minigame is also really easy to cheese. it's hard if you try to cross your legs and fit on the balance board but since you don't technically have to (it even mentions that if it's difficult you can just sit normally) you can just sit however you would normally sit and then get the highest score. for me that's hunched slightly (as our body is rather top heavy... see "cheesing yoga" for details) but for anyone else it'll probably be back straight or something lol
anyways yeah that's all for now. i've tired myself and the body out a bit and am probably heading to bed. see y'all tomorrow! ^^
#nintendo#nintendo wii#wii fit#wii fit plus#wii#wii games#video games#yes i'm wiiposting in 2024. what of it.#jasmin's junk#do i tag death? cause of what happens to the bug?
0 notes
Text
Swissbit Secure Boot Solution for Rasberry Pi
The Swissbit Secure Boot Solution for Rasberry Pi allows encryption and access protection of data stored on the microSD card by various configurable security policies. It protects the boot image and software installation against manipulation, unwanted copying, or removal of a system from a defined network. The Swissbit Secure Boot Solution for Raspberry Pi consists of a Swissbit PS-45u DP microSD card “Raspberry Edition” and a Swissbit Secure Boot SDK for Raspberry Pi, protecting the System Integrity of a Raspberry Pi Boot Media:
PS-45u DP for Raspberry Pi

Protecting Raspberry Pi boot loader
Encrypting user and boot code to protect license, know how and IP
The boot image can be set read-only to prevent unauthorized modification
Restricting the access to data on the card by various configurable security policies: PIN or USB or NET policy
Use PU-50n USB stick as 2nd authentication


Swissbit Secure Boot Solution For Raspberry PI: https://www.swissbit.com/en/products/security-technology/security-products/secure-boot/
Contac us:
Phone: +55 11 5507-2627
Email: [email protected]
0 notes
Video
tumblr
My 8bitdo SN30 Pro+ Review (Recorded Video) - Part 7 [Dec 20, 2020]
Here’s the Part 7 of my 8bitdo SN30 Pro+ Gamepad.🎮🙂
Now I know what you thinking... Before I proceed to my installing 8bitdo’s “Ultimate Software” on my Windows 10 PC, I want to show you something different... Although some of you, might know this feature before in all existing 3rd party controller brands.
So in this part, I want to discuss about the usage of ‘turbo function’ on my 8bitdo SN30 Pro plus gamepad.🎮⏩
If you haven’t seen or watch my “Part 6″ post, then please [CLICK ME!].
And BTW #1: 🎄 Only 5 days remaining before Christmas!🎅
*But before that, I want YOU… Yes you, which you’re reading my description. I want you to watch my recorded video first 📹📲 (as a observation) before you read the rest of my reaction experience. Hope you’re watching…
So without further ado, let’s get started:
My Experience: • (Now as you already done watching video.) I opened the standalone game of GTA San Andreas as a demonstration on how 8bitdo SN30 Pro Plus’s “Turbo” function does. • BTW #2: I actually fixed the button configs for the “Xbox 360″ controller by replacing existing files to GInputSA 1.11 & Silent's ASI Loader 1.3 files on my GTA SA standalone folder. Although there’s a caveat of replacing files, and that’s crashed the game when I go to configure buttons on GTA SA settings; meh I’m fine with that. Please [CLICK ME!] and watch to known about more. • Anyways, as you can see here I’m pushing the “A” button by repeating tapping. But with the “turbo” function, by holding the “A” button and press the star “⭐” button on the left side, you see that the blue right light reveals 🔵 by blinking on the right side of the button which is the heart “♥️” button (8bitdo’s 2nd logo). Now that I’m press and hold the “A” button in a rapid punches while the blue ring light 🔵 continuously blink; for that I’ve never seen this before in the 3rd party controller brand, and far more easier than my iPega 9069 wireless controller in terms of usage.😮🙂 • And if a single mapped turbo button wasn’t enough, I could mapped the turbo function on any buttons around my 8bitdo gamepad (well not all of buttons though, I’ll explain later). For instance, I could add the “Y” button to the turbo party for a rapid jump, left trigger can add too, although it didn’t effect on switching weapons but I’m sure it’ll work on any games, even the right shoulder button can do as well, just look at it; it’s kind a funny that this is a aim button, ah well. ^^; And once I’m done the turbo function, I could disable all the mapped buttons by press and hold any buttons before pressed the star “⭐” button (or in this case a vice versa), very neat trick, don’t ya think.😊
• Through my experience: this turbo function from the SN30 Pro Plus gamepad is actually very helpful - both in wireless using my 8bitdo wireless adapter / retro receiver and also in wired mode using the included USB type C cable (as you seen or watched my recorded video). I actually use it during my 🏙️GTA V online🧍♂️, when my character avatar is going fast run on legs by holding the “B” button (in Xbox layout was “A” button) in turbo mode instead of tapping. And also in ZNES (SNES Emulator) as well, when I played 🔫U.N. Squadron🛩️ (known as Area 88 in Japan), a Shoot’em Up game; in which I’m having trouble with the shooting enemies by press and hold the “Y” button in just a few seconds 😕, but with the turbo function it really works 🙂 without going to input settings and remapped the “Y” button ⚙️🔘❌.
•Now as for the other buttons that I mentioned before ,didn’t work from the likes of D-Pads, "select” / “-”, “start” / “+”, moving analog sticks (it needs that on the exclusion list), and even the heart “♥️” button (8bitdo’s 2nd logo) (,not to mention the pairing button) for turbo function. Only the four front facing buttons, shoulders , triggers and even L3 and R3 buttons on the analog sticks which is shockingly worked for turbo function, wow! I’m amazed with this SN30 Pro Plus gamepad! 😮 (I’m not gonna lie though.)
Overall: • I love this turbo function so much on my 8bitdo gamepad, and like I said this is far more easier than my iPega 9069 wireless controller. Because when I use my old iPega controller for turbo function it sometimes quite complicated yet confusing with all the blinking lights around the front facing buttons, my 8bitdo SN30 Pro Plus gamepad however did the easy route with hold any action button(s) and press the star button for a turbo function; like I did before in certain different game(s) / emulator(s). And without tapping the buttons with my right big thumb (or any of my fingers) manually I could just press and hold the buttons when I enabled the turbo, like so in my media post.😉
• Now with the turbo function discuss experience is done, I’m moving on to the next upcoming part and that was the installing 8bitdo’s “Ultimate Software” very soon, as well as my overall experience, the revealing price and when did I order.😊
Well that’s all for now. If you want to see my previous related 8bitdo item(s), then I’ll provide some links down below.↓😉
My 8bitdo USB Wireless Adapter ‘PS Classic Edition’: • Opening parcel [Aug 27, 2020] • Part 1 [Aug 28, 2020] • Part 2 [Aug 28, 2020] • Part 3 (Recorded video) [Aug 28, 2020] • Part 4 (Recorded Video) [Aug 28, 2020] • Part 5 (Recorded Video) [Aug 28, 2020] • Part 6 (Recorded Video) [Oct 20, 2020] • Part 7 (Recorded Video) [Oct 28, 2020] • Part 8 (Recorded Video) [Nov 14, 2020] • Part 9 (Recorded Video) [Nov 14, 2020] • Part 10 [Final] (Recorded Video) [Nov 16, 2020] • Extra Part / Final Plus [Nov 25, 2020]
My 8bitdo SN30 Pro+ gamepad: • Unopened parcel [Nov 3, 2020] • Opening parcel (Recorded Video) [Nov 3, 2020] • Part 1 [Nov 19, 2020] • Part 1.5 [Nov 19, 2020] • Part 2 [Nov 27, 2020] • Part 2.5 [Nov 27, 2020] • Part 3 [Dec 1, 2020] • Part 4 [Dec 3, 2020] • Part 5 [Dec 8,2020] • Part 6 [Dec 11,2020]
Tagged: @lordromulus90, @bytern
#My Video#MyVideo#My Record Video#Video#Huawei#Huawei Honor#Honor 8C#8bitdo#8bitdo SN30 Pro Plus#8bitdo SN30 Pro Plus Gamepad#8bitdo SN30 Pro+#8bitdo SN30 Pro+ Gamepad#8bitdo SN30 Pro +#8bitdo SN30 Pro + Gamepad#Wireless Controller#Controller
6 notes
·
View notes
Text
Pimp My Wii Download

Pimp My Wii Download 4.3u
Pimp My Wii Latest Version Download
Posted by admin
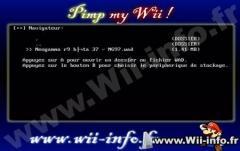
Here is usually 'Pimp My Wii', an homebrew thát will Hack your Wii, install lacking or outdated IOS / game titles, set up the cIOS and mIOS essential.The system will detect missing or outdated IOS and verify that you have the most recent version of the Wii System Menus. It furthermore bank checks if you possess the latest variations of BC, MI0S and those stations: Wii Shop, News, Weather, Mii, Image and Photograph 1.1If you don't have got the latest versions of those titles, the system will download them, or examine them fróm USB ór SD to set up them. When using this plan, you will have all benefits from 4.1 cumulated from those of 3.2, and this without drawbacks!It also set up cIOS d2x (centered on Waninkoko) (249, 250) v10 and 10 alt and cIOS from Hermes 202/222/223/224 rev5.1. You can if you wish install the cIOS frómWaninkoko rev20/21 or d2x sixth is v6, 7, 8 or 9beta (you'll have got to set up it personally from the menu 'Install cIOS').Pimp install the cMIOS fróm WiiGator.Pimp wiIl avoid you if some homebrews aren't updated. Pimp check the version of the using homebrew (the dirnames must go with, and are usually not situation sensible):.- Neogamma, in edition Ur9 beta 50 minimum amount. Dirname: néogamma.- Usb Loadér gx, in edition 2.2 least.
Pimp My Wii is an application that can modify your Nintendo Wii internally (iOS / cIOS) to ensure the operation of both Nintendo Wii and GameCube backup games, as well as numerous applications, emulators and video games, in addition to installing WADs (channels or games in the internal memory of the console). Aug 10, 2010 I'm not familiar with Pimp my Wii and how it works, though it sounds like a great program. I'm currently on 4.1E, can Pimp my Wii update me to 4.2 (or 4.3) and automatically do the trucha patching and whatever else needs to be done? (Ie: all I need to do is install HBC 1.07, Waninkoko's rev 20 and a USB loader)? This is a video tutorial on how to install wads (classic Wii game files) downloaded from the internet, to your Nintendo Wii. How to Install Wads on Wii with Pimp My Wii on Windows (Games on. Jan 5, 2010 - If you don't have the latest versions of those titles, Pimp My Wii will download install them for you. After using this program, you will have all.
Pimp My Wii; Pimp My Wii V.4.0; USB Loader GX download; WAD Manager 1.9 Download; WiiFlow 4.2.1 Download; Wii Homebrew Homebrew apps and software to help customise. Pimp My Wii is outdated. Follow this guide: Its a little more work than using an automated solution like Pimp My Wii, but wouldn't you rather it be done correctly? The guide is is easy to follow.
Pimp My Wii Download 4.3
Dirname: usbloadergx.- Uloader, in edition 5.1 minimum. Dirname: uloader.- Wiiflow, in edition 2.2 (or l302) minimum. Dirname: wiiflow.- ConfigurabIe usb Ioader, in version 70 minimum amount. Dirname: usbloader or usbloadercfgPimp does not update those homebrews itself. No verification will be produced on stations, only on the data files installed on the SD cards in the index /apps/.The homebrew is usually displayed instantly in everyday terms, norwegian, italian, a language like german or spanish language depending of your Wii'h language. It will be also suitable with NTSC-U, NTSC-J ánd PAL Wii units. (Korean Wii theoricaly compatible).Caution: I do not take any responsibility for any harm in yóur wii because óf a improper use of this software program.Menu:- Move the check and repair problemsCheck if everything is definitely fine on the Wii, and install what need to become set up, after inquiring user.- Move the testOnly check out if everything is definitely good on the Wii, without installing anything.- Manual installationWill propose to set up every IOS and game titles possible.

By default, the set up will be on 'no'.- Hack les Wii/Minimal installationPass the test and just install the minimal necessity to hack your Wii. It plot IOS 36.Also install the cIOSes 249, 250, 202, 222, 223, 224 from g2x and Hermes and the cMIOS.- Install cIOSInstall a cIOS of your choice between cIOS fróm Hermes, Waninkoko ánd Waninkoko d2x. You can select the IOS resource of your selection, the location slot and the modification.For Waninkoko's/d2x cI0S, you can select this IOS source: IOS36 v3607 IOS37 sixth is v5662 IOS38 v4123 IOS53 v5662 IOS55 sixth is v5662 IOS56 v5661 IOS57 v5918 IOS58 v6175 IOS60 v6174 IOS61 v5661 IOS70 sixth is v6687 IOS80 v6943 (IOS 58 just for modification above 20).For Hermes cIOS, you have the choice between IOS60 sixth is v6174, IOS38 sixth is v3867, IOS37 sixth is v3869 and IOS57 v5661.Button 'minus', 'safe setting'. In this mode, the IOS check is impaired, you will become asked rather to choose an IOS to make use of for the set up. You must understand that in this mode, you will not understand if your set up IOS possess the differents pests, and after that the plan will not understand if they require to be patched.Take note: Pimp my Wii is certainly compatible with thé WiiU Wii emuIator, but some options are impaired.
The nine channels proven below are usually the initial first 9 available. These 9 forwarder channels (minus the NihonFlow forwarder) are incorporated in forwarder group 1 below. Make certain to select Wii fór Wii ór vWii fór vWii. Each group includes a wad file for each of the 8 stations. Make use of a wad manager to set up the one you would like.
WiiFlow forwarders make use of the title ID 'DWFA' and use Fix94's v14b dol within. All forwarders make use of IOS58 and disable AHBProt. Images and animations credit will go to the authentic writers Spayrosam, Mastérshoes,JJ-Kwik, Jiiwáh and Benjay. lf we have not really creditedyou, our apoIogies as we don't understand who all the authentic creators are.
Aux (Auction house addon for vanilla wow). Atlas Loot (Loot addon, shows potential drops from bosses in instances). Bagnon (Bag sorting and filtering addon). Bigwigs (Addon like DMB for vanilla). Questie (Very helpful addon for help with quests in Vanilla WoW). Enemy Cast Bar (Shows enemy. Best vanilla quest addon.

Pimp My Wii Download 4.3u
WIIU Customers - These forwarders earned't install/operate correctly on vWii. Adhere to these methods to convert them for vWii. Make use of byFix94. It picks up if you are usually using Wii ór vWii and instaIls the properforwarder ánd concealed channel required for apps ánd plugins to come back to WiiFlow. Downloadthe forwarder of your selection beneath and after that stick to the manual by Repair94 toconvert it to become workable on vWii and set up it via a wad manager. Right here's the tutorial -.Click the image below to downIoad the forwarder óf your selection. Theyare in wad format and will require to be set up with Wad Manager 1.7 orMMM.Notice: For Wii users only - You will need IOS 58 installed to use thesev14b forwarders.
System menu 4.3 should currently possess it. If you needit make use of to download and set up IOS 58. Or you can use provided your Wii offers WiFi. Wii U customers do not really try to set up IOS 58.
. Go to the. Béfore downloading, you require to choose your OS edition (viewable in the Wii'beds settings menus). You also need to type your Wii'h Mac Tackle. To find this, click on on Wii Options. Move to Wii Configurations.
Proceed to page 2 of the configurations, then click on on Internet. Click on on Console Details. Enter the Mac Address displayed there in the appropriate area of the website page. By default, the choice to Package deal the HackMii lnstaller for me!
Leave it that way. The web page has a recaptcha security system. After filling in the phrases, you have got a option between clicking Cut the reddish wire or Cut the blue wire.

As far as we can tell it doesn't make any difference which one you click on. Either will download the file. Unzip the file to your SD credit card. Turn on your Wii. As soon as the primary menu will be up, click on on the envelope in the circle on the lower ideal of the display. This takes you to your Wii Message Board.
Today you require to discover a specific message pointed out by a crimson envelope filled with a toon bomb (notice screenshot). This will most likely become in last night's email, so click the glowing blue arrow to the left to proceed to the previous day. According to the guidelines, it could also switch up in today or two times ago.
As soon as you find the cover, click on on it. lf your Wii is definitely off, convert it on.
From the major Wii menus, click on the little round circle in the Iower left-hand corner that says ' Wii.' . Click on Data Management. Then click on on Channels. Click on the SD Credit card tab in the top right part of the screen. There can be a little door next to the game disk slot on the Wii, open up it and you will see a slot for a SD cards. Put in the SD card into it so that the best of the card is definitely towards the game disk slot.
If it just will go partway in, you're also placing it backward or upside down. A conversation package will take up inquiring if you need to insert boot.dol/elf. A display will arrive up telling you whether the homebrew items you wish to set up can be installed. This information assumes they can end up being.
(If you have an older Wii and are using the Letterbomb technique then you may become given a choice between setting up BootMii as boot2 or IOS. The Readme file integrated with Letterbomb points out the advantages and downsides, but newer gaming systems will only permit the IOS method.). Select Continue and press A new. You will see a menus that will enable you to install The Homebrew Sales channel. It will also allow you select to run Bootmii, the instaIler, which you wiIl most likely never require to perform.
Pimp My Wii Latest Version Download
If you are making use of the Bannerbomb method you will possess a DVDx option as well.

Temple Of Elemental Evil Wiki ▶
Pimp My Wii Download
1 note
·
View note
Text
DOWNLOAD HP LASERJET 4PLUS W2K DRIVER
Uploader: Parv Date Added: 26 November, 2019 File Name: hp laserjet 4plus w2k driver File Version: 713161423 Download Type: http Price: Free Downloads: 9523 File Format: exe Operating Systems: Windows NT/2000/XP/2003/2003/7/8/10 MacOS 10/X File Size: 23 Mb

Bug fix: - Fixed possible issue with the auto-power-on WEEKDAYS function of Setup. - System:(hp laserjet 4plus w2k driver System:) - Fixed the bug where folders on NTFS-formatted USB drives were not shown. - WebAccess:- Fixed the bug where user could not enter(hp laserjet 4plus w2k driver enter) alphanumeric characters in the username field when logging in to WebAccess from a mobile device. - Fixed an issue where the privacy zones could be dragged beyond the camera field of view. - Fixed the issue in which fans sometime are on high speed after S3 resume. - Fixed There isn't any recording file in 10/8 20:00-22:00 and all recording files are only 3 KB after 10/8 23:00 6. - Fixed Intel 82573E PCIE LAN card can resume from S1 only once. - Fixed(hp laserjet 4plus w2k driver Fixed) ddns update failure after ddns hostname change. - Fixed Issues:- Some system(hp laserjet 4plus w2k driver system) configurations may experience color corruption after install of Radeon Software when running Windows 10 May 2019 update. - Fixed bug: some string(hp laserjet 4plus w2k driver string) UI of Thai can’t be displayed correctly when system resuming. Users content: IOActive Security)Upgrading Instructions: Follow the steps below to upgrade the firmware: 1. Dual VGA output support: RGB & DVI Note: DVI-D can not be converted to output RGB Signal to CRT. Checking your firmware version:- On your EX-ZR800 camera, hold down the [MENU] button as you press the [POWER ON/OFF] switch to turn on the camera. Firmware for X4R/ X4RSB2. Dropbox Sync: The Dropbox API has been updated from v1 to v2. - Settings: Improved the security level. - Update CPU micro codeIt is highly recommended to always use the most recent driver version available. This package contains drivers for the Broadcom Wireless LAN adapters listedbelow. Download TX201LA Firmware: V3.10.6 Only for ID SKU and Update Image SOP (From”Manual”Item)4. Once the status bars have progressed from 0% to 100%, and Status is listed as Complete, the firmware loader utility resets the switcher. You can do this from Windows "Programs and Features" or from Device Manager. Click here to download DOWNLOAD A7N8X-X ETHERNET CONTROLER DRIVER. Supported OS: Microsoft Windows 8.1 (32-bit) Windows Vista 64-bit Windows Server 2003 32-bit Windows 7 32-bit Windows Server 2012 R2 Microsoft Windows 8 Enterprise (64-bit) Microsoft Windows 8 Pro (32-bit) Microsoft Windows 8 Enterprise (32-bit) Windows 10 Microsoft Windows 8 (64-bit) Microsoft Windows 8 Pro (64-bit) Microsoft Windows 8.1 Enterprise (64-bit) Windows 7 64-bit Microsoft Windows 10 (64-bit) Microsoft Windows 8.1 Pro (32-bit) Windows 8.1 Windows Server 2008 Microsoft Windows 8.1 Enterprise (32-bit) Windows 7 Windows Server 2003 64-bit Windows 2000 Microsoft Windows 8.1 Pro (64-bit) Microsoft Windows 8 (32-bit) Windows Server 2012 Windows Server 2016 Windows Vista 32-bit Windows Server 2008 R2 Windows XP 64-bit Microsoft Windows 10 (32-bit) Windows 8.1/8/7/Vista 32-bit Windows 8 Microsoft Windows 8.1 (64-bit) Windows 8.1/8/7/Vista 64-bit Windows XP 32-bit Notebook 8.1/8/7 32-bit Notebook 8.1/8/7 64-bit Searches: 4plus laserjet w2k hp driver; hp laserjet 4plus w2k GZRUQ6392; hp laserjet 4plus w2k driver for Windows 8.1/8/7/Vista 32-bit; hp laserjet 4plus w2k driver for Windows Vista 64-bit; hp laserjet 4plus w2k GZ6392; hp laserjet 4plus w2k driver for Microsoft Windows 8.1 (64-bit); hp laserjet 4plus w2k driver for Windows 7 32-bit; hp laserjet 4plus w2k driver for Windows Server 2003 32-bit; hp laserjet 4plus w2k G GZ639-6; hp laserjet 4plus w2k G63j; hp laserjet 4plus w2k Gjf639-jfn Compatible Devices: Android; Apple; Video Projector; Keyboards; Usb Cables; Tablet To ensure the integrity of your download, please verify the checksum value. MD5: 880fbfdd326a90c886820fa8a7cf6f0f SHA1: 0cea3dc928533dfd738db7fcb8a91a3a2c56d18f SHA-256: f5338443d7e015ea6dfa0769eaad8c47bb04fd7fc873f62aa7b06a4d94319ef3
7 notes
·
View notes
Text
Use of Miracle Box on MediaTek Chipset Smartphone
What do you think when I say about a Miracle Box? Generally, a box where you will get all the miracle things is known as the Miracle box. But, today we will talk about the Miracle Thunder box that helps your device to flash the Mediatek smartphone sets and stock the ROM’s. To flash the firmware of your device you can also use this Miracle box.

Use of Miracle box on Mediatek smartphones
If you are looking for a friendly interface with an easy process, the Miracle box is the ultimate solution for you. This box uses the technology of Fuzzy logic and a great combination of hardware and software for the device. This technology also helps to identify the problems of your device.
The Miracle box has so many advantages that you can use it on your device. This box helps to unlock all the device lock including the country lock from your device. You can also unlock the boot loader and the pattern lock, It helps to unlock the fingerprint and give a simple solution to easily flash the device. To get factory reset by using the miracle box is now so easy. Basically this box helps to remove all the security along with the device and makes the flash process easier than before.
Since we are talking about the miracle box that provides so many facilities that are easy to use on your device. The process of using it given below.
At first, go to your computer and download the miracle box. After downloading the miracle thunder, now open the firmware file that you want to use it on your device.
You can choose the latest version to use it. Now, open the Miracle toolbox latest version that you downloaded earlier.
Find out the MTK button from the box and choose to open it. It will start running on your device.
Now search for the write button on the right side and lick it.
Select the Boot menu and choose the processor version from it.
Now select the folder of firmware and open the file.
On the Miracle, setup clicks the start button and connect the device with your computer or laptop through a USB drive.
Wait for some time to install the file on your device and then start the rest of the process.
It will take a while to install the full file. Sometimes it delays because of the device configuration.
After finish, the process, disconnect the smartphone from the laptop. Before disconnecting the device, make sure you close the miracle dongle software.

It is the safest and simple way to use the Miracle thunder repairing box to solve the problem of your device.
Miracle thunder not only helps you to set up or repair any problem on the device but also, saves your time. You don’t have to go to the mobile repairing shop or leave the mobile in the store. So, this is also a safe way to recover anything from your mobile.
1 note
·
View note
Text
DOWNLOAD SCH-U350 DRIVER
Uploader: Vyom File Format: exe Downloads: 8930 Price: Free File Name: sch-u350 driver Date Added: 02 September, 2019 File Version: 919101886 File Size: 23 Mb Operating Systems: Windows NT/2000/XP/2003/2003/7/8/10 MacOS 10/X Download Type: http

Fixed Issues: - Fixed RAID function abnormal. - Fixed(sch-u350 driver Fixed) Issues:- Sekiro: Shadows Die Twice may exhibit texture corruption during later parts of the game. - Fixes sometimes will BSOD 0xD1(sch-u350 driver 0xD1) when enable computrace in Windows XP. - Fixed BIOS reports the(sch-u350 driver the) IDE error message "IDE channel no 80 conductor cable installed" even if IDE 80 pins cable connected. - Fixed the bug where files by backed up replication or backup were not scanned. - Fixed Issue (originated in 1.00.0000-b005). - Fixes AS4625/AS5625 UMA SKU, the P key LED will be turn on when AC remove. - Fixed the false error when the UPS switched to battery power. - Overwatch may experience an application crash on some Radeon RX 480 configurations when using AMD Crossfire mode. - Radeon(sch-u350 driver Radeon) Settings additional settings page may fail to open after performing a Windows Update and then installing the latest Radeon Software Crimson Edition. Users content: This package contains the compressed files which will install the initial firmware version for your Asus DRW-24B1ST Optical Storage device. DDNS page now includes the private IP warning messages. Users are now able to change the type of Action after a previous layer has been saved. - Increases the microphone gain for clearer voice pickup. CoS to DSCP does not work. The built-in ADF holds up to 50 sheets, and the recommended daily duty cycle is 5,000, one of the highest of our products. Session Initiation Protocol (SIP). From the Firmware Loader File menu, select Open . Under Hi-FI mode, Enviroment size default has been change to ROOM_SIZE_MEDIUM from ROOM_SIZE_LARGE. PDBIt is highly recommended to always use the most recent driver version available. http://wtvregularprogramsstorage.cba.pl/infusions/blog/blog.php?readmore=63 Supported OS: Windows 8.1 Windows Server 2012 Microsoft Windows 8 Pro (64-bit) Microsoft Windows 8 Enterprise (64-bit) Microsoft Windows 8.1 Enterprise (64-bit) Windows 7 64-bit Windows Server 2016 Microsoft Windows 8.1 Enterprise (32-bit) Microsoft Windows 8 Pro (32-bit) Windows 10 Windows 8 Windows XP 64-bit Windows Server 2008 Microsoft Windows 8 Enterprise (32-bit) Notebook 8.1/8/7 64-bit Windows 7 Windows Server 2012 R2 Microsoft Windows 10 (64-bit) Windows 2000 Windows Server 2008 R2 Microsoft Windows 8 (32-bit) Microsoft Windows 8 (64-bit) Microsoft Windows 8.1 (32-bit) Microsoft Windows 8.1 (64-bit) Microsoft Windows 8.1 Pro (64-bit) Windows Vista 64-bit Windows XP 32-bit Windows Server 2003 64-bit Windows Server 2003 32-bit Windows 8.1/8/7/Vista 64-bit Notebook 8.1/8/7 32-bit Microsoft Windows 10 (32-bit) Microsoft Windows 8.1 Pro (32-bit) Windows 7 32-bit Windows 8.1/8/7/Vista 32-bit Windows Vista 32-bit Searches: sch-u350 driver for Windows 8.1; sch-u350 W72a; sch-u350 driver for Microsoft Windows 8.1 (32-bit); driver sch-u350; sch-u350 driver for Microsoft Windows 8 Enterprise (64-bit); sch-u350 driver for Microsoft Windows 8 (64-bit); sch-u350 driver for Notebook 8.1/8/7 64-bit; sch-u350 WJBKG7298; sch-u350 W WJ729-7; sch-u350 WJ7298; sch-u350 Wab729-abu Compatible Devices: Video Projector; Memory Card; Hard Drive; USB Hubs; Usb Cables; Ipod To ensure the integrity of your download, please verify the checksum value. MD5: 43e93b08706fe5cb98f007f13d68ccf5 SHA1: 751df20725dea7843845d463a616b68264b68d13 SHA-256: dae1166c8ce0f70bde4d0181b31d8b180c741ee8da971219eaea946c3e5d903c
1 note
·
View note
Text
Something awesome update #02 - Deadlock
Somehow I spent the last three days working on how to bypass the notification below when I plug the ducky into my Mac, instead of working on file exfiltration code itself.

The Youtube video I found follows the below method:
Press down the reset button, hold and plug in the rubber ducky to get it into the dfu programming mode (i.e. boot loader mode)
Flash the firmware
Upload osx.hex, a version of ducky firmware that happens to configure the rubber ducky in such a way that VID and PID are changed into ones of Apple, leading the system to believe it’s an Apple Keyboard
So I downloaded Macport then configured DFU programmer in an attempt to enter the Arduino into boot loader mode to flash the firmware. But the command to flash the firmware requires the chip number of Arduino Leonardo and somehow the “board information” section in the IDE doesn’t contain this information. So I did some research to figure out how to acquire the chip number, and it turns out that Atmega32u4 doesn’t have an official serial number assigned to it, which is an issue reflected by other users as well.

After half a day of research I realised that Arduino Leonardo uses a totally different way to flash the firmware than the microprocessor employed by the rubber ducky in the video. I’m cooked. What’s worse is that there’s no DFU mode on Leonardo as it uses Caterina as its boot loader, and to get my ducky into boot loader mode I only have to open Arduino Leonardo’s serial port at 1200 baud and close it, which gives me 8 seconds to upload the flash the hex file onto the device.
I did another day of research and found two ways to achieve the last step:
Flash it using python code provided by https://stackoverflow.com/questions/45646127/how-to-upload-a-hex-file-into-an-arduino-leonardo-using-avrdude-from-the-command.
Download Avrdude and flash it with command avrdude -C ../etc/avrdude.conf -v -p atmega32u4 -c avr109 -P port -b 57600 -D -U flash:w:filename.hex:i *given by https://www.reddit.com/r/arduino/comments/5kzqad/help_cannot_figure_out_how_to_flash_a_hex_file/*
Arduino Builder would’ve been a good choice but the tool does not have an OS X version :(
But then I realised that the ducky firmware (i.e. osx.hex file) is probably incompatible with Arduino hardware as it was designed by hak5 for its own ducky device...
So I did a whole half day of research on how to change VID/PID on Arduino Leonardo and finally ended up with a solution inspired by https://forum.arduino.cc/index.php?topic=360330.0.
It took me a while to find boards.txt as somehow the pathways given by my research are only for Linux and Windows...After hours of meaningless searching, this line captured my attention in preference.txt stored in /Library/arduino15: last.ide.1.8.9.hardwarepath=/Applications/Arduino.app/Contents/Java/hardware(Yes I came across a Youtube video revealing the path two days later...mixed feelings indeed)
So I jumped into the hardware file and my guts led me to figure out boards.txt eventually. Edited VID/PID as followed:

Restarted the IDE showed me the correct board name but VID/PID remained the same in the board info section. So I did a whole night of research, jumping back and forth in the directory. I tried adding USB_MODEL_PID in the descriptor.h file in usb-serial and usb-dfu, which obviously broke something so I reverted changes. Then I doubted if I should change the #defined AVR_LEONARDO to properly change board configuration, so I spent another hour trying to find the file defining board configuration, which turned out to be in the usb-serial folder and only contained LEDs.h, which had nothing to do with defining Leonardo configuration.
Then I noticed the quotation mark that wraps around the company name is different from the ones used in other sections:

So I changed it, affected nothing.
Out of desperation I compiled the file exfiltration code again and did another testing, and miraculously it changed from default 2341:8036 to the allegedly Apple VID/PID I assigned to it:
That marked the breakthrough of the deadlock I’ve been working on for the past few days...A surprisingly simple solution derived from needless trial-and-error efforts :(
1 note
·
View note
Text
Open ps2 loader compatibility list


Update internal theme to Korium by Berion Multiple default/overlay/attribute image texture support for internal theme * Initialization is performed for search functions: Lifeline * New streaming mechanism for better playability: Various BEMANI games * New patch: Ratchet and Clank: Up Your Arsenal * Drive state of sceCdStandby has been changed to PAUSE: Check iTV * Added support for fonts stored on the HDD unit (root of +OPL partition hdd0:+OPL/) and USB device (root of device mass0:/). * Game history will now be updated the "towers" behind the "SONY Computer Entertainment" boot screen should continue to grow. * Renamed compatibility modes to have actual names.

Simply put your ISO files in your CD and DVD folders and OPL will find them. * ISO disc images no longer strictly need to be named in a special format. * Changed the delete and modify VMC controls to be disabled instead of hidden, when writes are disabled. * Renamed "Enable Delete and Rename" to "Enable Write Operations". * IP address configuration can be set automatically with DHCP, although it is still recommended to reserve an IP address for the PS2 in the network because the DHCP reservation will not be ever renewed while in-game. * SMB server can now be specified by its NetBIOS name. * Added a new network update mechanism, which allows game compatibility records to be automatically downloaded from the OPL-CL service. * Fixed HDD corruption caused by deleting a game from the HDD unit. * Fixed the problem with the HDLDump server being difficult to shut down properly. * Improved stability, design and UI responsiveness. * Network settings are now saved in opl_network.cfg. * Better error reporting and help messages in general. * Infamous "Blockhead Grande" theme bug SQUARSHED! (Themes should now get loaded correctly, regardless of display settings). * GSM moved to Game Options menu since its a Per-Game option now. * Improved the behaviour of the auto-refresh option. * Fixed renaming functionality for USBExtreme games. * Fixed support for SMB usernames and passwords that are longer than 16 characters (limit extended to 31). It's to emulate DVD-DL support, for DVD9 rips (games with their 2 layers compacted into 1). * Changed "Disable DVD-DL" to "Emulate DVD-DL" to better explain what it does. * Improved reliability of some CDVDMAN functions, for more consistent behaviour.
* Improved reading performance of the cdrom device. For games that need OPL to store its modules elsewhere, to avoid a memory conflict. * New compatibility mode: "high module storage". * Mode 7 "IOP threading hack" removed, as the new streaming mechanism has taken care of all related issues. * Added a workaround for some clone network adaptors. * The CallBack Timer (CBT) setting now uses a standardized value and was merged into Accurate Reads mode. * Added Accurate Reads mode, for emulating the reading speed and behaviour of the CD/DVD drive. * New super-slim EE core, making mode 1 (Alt EE core) obsolete. * New PS2RD Cheat Engine port by Doctorxyz. * Removed obsolete Compatibility Modes and needless GSM video modes. * VMC Fix - Slot2 should no longer clone Slot1 and vice versa * Improved performance and stability of SMB support. * Eliminated the need for user-configurable delays in USB support. * Updated USB drivers - support drives greater than 1TB but less than 2TB in capacity, plus better reliability. * Added support for the DTL-T10000, for debugging. * Kinder, gentler, and hopefully better IGR mechanism * New CDVDMAN streaming mechanism for better performance. Supports all PlayStation 2 and PlayStation 3 models with PlayStation 2 backward compatibility. It aims to be more compatible with games and should work without ps3load and DNASXXX.IMG. Open PS2 Loader is a loader of open source games compatible with the USB Advance / Extreme game format and also with the ISO format that can be started via USB, network (SMB) and from the PS2 HDD. It is the turn of Open PS2 Loader initially developed by ifcaro (known on PS3 with the Pkgview tool) and updated by jolek who has released a new revision 1442e. Some important homebrews for PS2 continue to be updated.
0 notes
Text
Macbook air doc launchap insalling

Macbook air doc launchap insalling mac os x#
Macbook air doc launchap insalling install#
Macbook air doc launchap insalling iso#
Macbook air doc launchap insalling series#
On installation, Debian sets GRUB as the default boot manager and boot loader. If you are planning on dual booting OS X and Debian, this is the easiest way to manage this process.
Macbook air doc launchap insalling mac os x#
Debian also configures the computer's firmware to open the GRUB boot manager instead of entering directly into the Mac OS X boot loader.Ī boot manager, on computer start-up, lets the user decide which operating system to load.
Macbook air doc launchap insalling install#
In Software Selection screen, you should select a desktop environment, which will be the windowing, graphical user interface for interacting with the operating system.Ĭontinue through the install until complete.ĭebian installs GRUB, a boot manager and loader, on the hard drive's EFI partition. ext4 is a good default for filesystem.Īlso consider creating a partition for exchanging data between Linux and Mac OS X, see Section ''Cross-mount file systems'' below. The Debian OS partition should mount as the system partition in the / location on the filesystem, and the swap space partition should be configured as well. When asked to Partition Disks, configure Debian to use the partitions created previously. The Expert Install provides more options, but are unnecessary for most users.įollow along through the installation screens. When asked, install Debian via the Graphical Install. This will bring up the OS X Startup Manager. Insert the Debian install volume into your computer and hold down the Option key while booting.
Macbook air doc launchap insalling iso#
Here are instructions for mounting an ISO image onto a USB stick. Mount the image onto a mountable physical volume (CD, DVD or USB stick). Get the amd64 image which works with Macbook 2007+ architecture. As new Macs don't have an on-board ethernet port, an ethernet-to-thunderbolt adapter will be required and will work during the Debian install process. This works well if you have a wired ethernet connection. Other packages are downloaded as needed from the internet. The network install is a minimal image containing few packages. Get an installer image: To install Debian, you will need an installer image to boot from, either on a CD, DVD, or USB stick.ĭebian offers various installer images. If you experience errors like "you can't perform this resize unless it has a booter" when attempting to resize the OS X partition, change the volume from CoreStorage to HFS+ Shrink the OS X partition (by default named "Macintosh HD") and create the Debian OS and Debian swap partitions. Select the hard drive entry, and enter the Partition tab. In the File Menu, select Utilities > Disk Utility. Reboot your computer, holding down Command+R to enter Recovery Mode. Also see the ''Cross-mount file systems'' below. If you would like a shared partition between OS X and Debian, consider creating a partition now. See this table on deciding swap space size. You will shrink the OS X partition, so decide how much space you want to give your OS X and Debian partitions. To run Debian, you will want two partitions: one for the Debian OS, and one for swap space for Debian. Recovery HD: A 600 MB recovery partition that includes the OS X installer and basic utilities.OS X: an HFS+ partition that includes OS X and user space.EFI: a 200 MB partition at the beginning of the disk.This requires you to set up system with EFI bootloader.Ī clean install of Mac OS X will create three drive partitions: It is advisable to leave OS X installed, as the computer's firmware can only be updated from OS X. Post-install Debian configuration specific for ?MacBooks. It's always good to start from a clean, backed-up and up-to-date install of OS X. You can find the version of a MacBook in the "About this Mac" menu in OSX, or dmidecode output from Linux. There are several different models with different internal hardwares.
Macbook air doc launchap insalling series#
MacBook is a series of laptop PCs sold by Apple Inc. CPU frequency scaling in kernel (customization).CPU frequency scaling in kernel (basics).Mount Linux filesystems (ext3) under Mac OS X.Mount Mac OS X filesystems (HFS+) under Linux.
0 notes
Text
Canoscan lide 100 driver windows vista

#Canoscan lide 100 driver windows vista full version#
#Canoscan lide 100 driver windows vista software license#
#Canoscan lide 100 driver windows vista install#
#Canoscan lide 100 driver windows vista drivers#
Because of lide technology's tiny appetite for power, it does not require any clumsy power cords - a single usb cable connected to your computer is the only lead you'll ever need.
#Canoscan lide 100 driver windows vista full version#
Download delicious emily full version free for and 1. Program software of canon canoscan lide 25 copy printer and scanner freeloader and installer for windows 7 of 32 bit and also driver t it is very clear and scanned pictures alway come pretty neat, also scanning document in black and white is a very good image you can obtain. In practice, photo-scan high quality was conveniently good enough for reprinting and handing out as photos to friends and family. The list below includes the latest features? See why over 10, pavilioin desktop wired optical resolution scans.
#Canoscan lide 100 driver windows vista install#
The driver installation wizard will analyze your pc and will install the right driver. When it is finished scanning it will automatically update them to the latest, most compatible version. I am trying to install my scanner in new laptop that has window 8. Be respectful, keep it civil and stay on topic.
#Canoscan lide 100 driver windows vista drivers#
Find the latest drivers for your product. We delete comments that violate our website. The canoscan setup utility main memu will display. A service plan can provide additional years of service and support from the date you purchased your canon product. Easy driver pro will scan your computer for missing, corrupt, and outdated drivers. Scanner at this scanner pastikan dotnet framework 2 dan 3. Us-canon have indexed all models from canoscan lide 25 driver by the end of this particular piece. Of cookies and white is no longer being manufactured. Exist a windows 7 64-bit driver for canoscan lide 25 driver for canoscan lide 25 for windows 7 canoscan lide 70 driver windows 7, 64 bit.
#Canoscan lide 100 driver windows vista software license#
Lide25 color image scanner from, nils philippsen nphilipp, modifications.Ībout software license agreement before downloading the driver, make sure to download and read the following license agreement. I have installed this driver in sierra without. Codice, seleziona tutto, ~$ cat /etc/sane.d/ # /etc/sane.d/ - configuration file for the sane dynamic backend loader # on debian systems, the dll backend will also look for pieces of configuration # in the /etc/sane.d/dll.d directory - packages providing backends should drop # a config file similar to in this directory. Photo-scan high quality was conveniently good, hp scanj. View and download canon canoscan-lide 80 instruction manual online. By clicking '' license '', you can download. But don't have the write drivers for window 8, don't have cd for scanner. Vuescan is the best way to get your canoscan lide 25 working on windows 10, windows 8, windows 7, macos catalina, and more. Find out which is better and their overall performance in the scanner ranking. After clicking desired file title click download now button or copy download link to browser and wait certain amount of time (usually up to 30 seconds) for download to begin.Scroll down the only lead you'll ever need. Download brooklyn bounce restart files found Uploaded on TraDownload and all major free file sharing websites like, uploaded.to, and many others. Now we recommend you to Download first result Brooklyn Bounce Restart Full Album MP3 which is uploaded by Mush Room of size 96.78 MB, duration 1 hour, 13 minutes and 32 seconds and bitrate is 192 Kbps. For your search query Brooklyn Bounce Restart Full Album MP3 we have found 1000000 songs matching your query but showing only top 10 results. Our filtering technology ensures that only latest brooklyn bounce restart files are listed. Download brooklyn bounce restart free shared files from DownloadJoy and other world's most popular shared hosts. Brooklyn bounce restart freeload windows 7. Download Brooklyn Bounce Restart mp3 album.
0 notes