#create bootable usb flash drive
Explore tagged Tumblr posts
Visit Tumblr Blog
Explore Tumblr blogs with no restrictions, modern design and the best experience.
Last Seen Tumblr Blogs


Fun Fact
Premium Tumblr themes are available from anywhere between $9 to $49.
Text
Create a bootable USB on Mac: Proxmox VE Setup
#bootable#Bootable USB drive#Burn ISO#Create a Bootable WinPE Media#Create Bootable USB#Create Proxmox VE Cluster#FLASH#Flash ISO to USB#Install Proxmox#proxmox#Proxmox Server#Proxmox VE#Proxmox VE kernel#Proxmox Virtual Environment
1 note
·
View note
Text
Installing Kali Linux on a USB Stick: A Step-by-Step Guide
If you want a portable, powerful cybersecurity toolkit you can carry in your pocket, installing Kali Linux on a USB stick is the perfect solution. With Kali on a USB, you can boot into your personalized hacking environment on almost any computer without leaving a trace — making it a favorite setup for ethical hackers, penetration testers, and cybersecurity enthusiasts.

In this guide, we'll walk you through how to install Kali Linux onto a USB drive — step-by-step — so you can have a portable Kali environment ready wherever you go.
Why Install Kali Linux on a USB?
Before we dive into the steps, here’s why you might want a Kali USB:
Portability: Carry your entire hacking setup with you.
Privacy: No need to install anything on the host machine.
Persistence: Save your settings, files, and tools even after rebooting.
Flexibility: Boot into Kali on any system that allows USB boot.
There are two main ways to use Kali on a USB:
Live USB: Runs Kali temporarily without saving changes after reboot.
Persistent USB: Saves your files and system changes across reboots.
In this article, we’ll focus on setting up a Live USB, and I'll also mention how to add persistence if you want. and if you seek knowledge about kali linux you can visit our website any time
Website Name : Linux Tools Guide
What You’ll Need
✅ A USB drive (at least 8GB; 16GB or more recommended if you want persistence). ✅ Kali Linux ISO file (download it from the official Kali website). ✅ Rufus (for Windows) or Etcher/balenaEtcher (for Mac/Linux/Windows). ✅ A computer that can boot from USB.
Step 1: Download the Kali Linux ISO
Go to the Kali Linux Downloads page and grab the latest version of the ISO. You can choose between the full version or a lightweight version depending on your USB size and system requirements.
Tip: Always verify the checksum of the ISO to ensure it hasn't been tampered with!
Step 2: Insert Your USB Drive
Plug your USB stick into your computer. ⚠️ Warning: Installing Kali onto the USB will erase all existing data on it. Backup anything important first!
Step 3: Create a Bootable Kali Linux USB
Depending on your operating system, the tool you use may vary:
For Windows Users (using Rufus):
Download and open Rufus (Get Rufus here).
Select your USB drive under Device.
Under Boot selection, choose the Kali Linux ISO you downloaded.
Keep the Partition scheme as MBR (for BIOS) or GPT (for UEFI) based on your system.
Click Start and wait for the process to complete.
For Mac/Linux Users (using balenaEtcher):
Download and open balenaEtcher (Get Etcher here).
Select the Kali ISO.
Select the USB drive.
Click Flash and wait until it's done.
That's it! You now have a Live Kali USB ready.
Step 4: Boot Kali Linux from the USB
Restart your computer with the USB plugged in.
Enter the BIOS/UEFI settings (usually by pressing a key like F12, Esc, Del, or F2 right after starting the computer).
Change the boot order to boot from the USB first.
Save changes and reboot.
You should now see the Kali Linux boot menu! Select "Live (amd64)" to start Kali without installation.
(Optional) Step 5: Adding Persistence
Persistence allows you to save files, system changes, or even installed tools across reboots — super useful for real-world usage.
Setting up persistence requires creating an extra partition on the USB and tweaking a few settings. Here's a quick overview:
Create a second partition labeled persistence.
Format it as ext4.
Mount it and create a file /persistence.conf inside it with the content: cppCopyEdit/ union
When booting Kali, choose the "Live USB Persistence" option.
Persistence is a little more technical but absolutely worth it if you want a real working Kali USB system!
Troubleshooting Common Issues
USB not showing up in boot menu?
Make sure Secure Boot is disabled in BIOS.
Ensure the USB was properly written (try writing it again if necessary).
Kali not booting properly?
Verify the ISO file integrity.
Try a different USB port (preferably USB 2.0 instead of 3.0 sometimes).
Persistence not working?
Double-check the /persistence.conf file and make sure it's correctly placed.
Conclusion
Installing Kali Linux onto a USB stick is one of the smartest ways to carry a secure, full-featured hacking lab with you anywhere. Whether you’re practicing ethical hacking, doing security audits, or just exploring the world of cybersecurity, a Kali USB drive gives you power, portability, and flexibility all at once.
Once you’re set up, the possibilities are endless — happy hacking! 🔥
2 notes
·
View notes
Text
Helped a friend install Windows last night and the experience was comical.
Making the install media was irritating; I wanted to download an ISO and flash a USB with it, as I've done with a half dozen linux distros dozens of times. That kept failing for whatever reason, once because there wasn't a boot partition?? on the drive yet, and like. That's what flashing the drive is for. It's to make bootable media. But ok fine we can just use the "create install media" tool windows provides.
Then, for some baffling reason, the install media didn't include audio? or wifi?? drivers??? Keep in mind that windows by default will not let you install without an internet connection. Their latest OS install tool will not give you the tools to connect to the internet, and won't let you install without the internet.
Luckily the OOBE\BYPASSNRO thing still works (unclear why, I've heard people saying it doesn't anymore; maybe they were just barely smart enough to realize that there should be a way to install without networking IF THERE'S NO FUCKING NETWORKING DRIVERS), so we were able to finish the install eventually, download the drivers on a network connected laptop and get things working.
Legitimately just faster and a better experience installing any user facing linux distro. Mint, Ubuntu, Pop!OS, whatever. At least, when I fucked up my arch install, it was because I forgot to include the wifi drivers, not because they were literally unavailable.
2 notes
·
View notes
Text
Adobe has no fix yet for the issue with gif previews in photoshop with macOS 14 Sonoma and so I’ve spent literally all day trying to downgrade back to Ventura which Apple makes it very difficult to do. I’m finally in the home stretch and hoping that once it’s done the bug is gone. 🤞 At which point I will go back to almost never updating my shit. The one time I decided to update and it broke a bunch of stuff and Adobe is dragging their feet on resolving the issue. 😩
After backing up my computer, creating a bootable installer of Ventura on a USB flash drive (I had to go buy a fucking USB because I haven’t had to use one in like 5 years???), formatting my drive completely, and then installed Ventura from the USB—I’m now restoring my files. There’s so many other hoops and trial/error shit I had to deal with but this is the short version (yeah, THIS is the short version.) and if this doesn’t work I will lose it


EDIT: IT WORKED 😭
4 notes
·
View notes
Text
How to Create a Bootable USB Stick for Windows

AUS, Wholesale/Bulk/Lot 10Pcs USB Flash Drives Thumb Data Storage Pen U Disk Memory Stick (10PCS - 4GB)
Product Information
Interface: USB 2.0
Size: picture shows
Capacity: 8MB/16MB/64MB/128MB/512MB/1GB/2GB/4GB/8GB/16GB/32GB/64GB
Color: Multicolor
Fast data transfer rate--Read
Features:
Easy to carry
Hot plug & play
Compatible with USB 1.1/2.0
Compatible with PC, Notebook, MAC
Store your pictures, videos, and songs and any kind of data.
Support Windows 7/8/10,Windows Vista,Windows 98/2000/XP,Mac OS X, Linux.
Easy to read and read in high speed ,No need drive/power supply only plug in Small style and fashionable products, as an impressive gift for your beloved, friends or even customers. Thumb Drive
Package Included:
10x Flash Memory Stick
(Pack the USB flash drive reasonably)
Note:8MB,16MB Suitable for storing small data such as bytes, it is not suitable for storing large capacity, otherwise they may be damaged,Please determine if it is right for you ! Thank
Ability to work:
USB 1.0/1.1 LOW SPEED
8MB approximately 6-7MB.
16MB approximately 13-14MB.
About capacity:
64MB = approximately 58MB-60MB
128MB = approximately 100MB-120MB
256MB = approximately 220MB-240MB
512MB = approximately 480MB-500MB
1GB = approximately 960MB-980MB
2GB = approximately 1.6GB-1.8GB
4GB = approximately 3.6GB-3.8GB
8GB = approximately 7GB-7.5GB
16GB = approximately 14GB-15GB
32GB = approximately 28GB-30GB
64GB = approximately 58GB-60GB (EXFAT format)
This is calculation difference between manufacturer and our PC,just for you reference.
0 notes
Text
How to Wipe Data on SSD: A Complete Guide
Solid State Drives (SSDs) are faster, more durable, and more energy-efficient than traditional hard drives. But when it comes time to sell, recycle, or repurpose your SSD, simply deleting files or formatting the drive isn't enough to protect your sensitive data. To ensure your personal or business information is truly unrecoverable, you need to wipe the SSD securely.
This guide walks you through the process of wiping an SSD properly, and shows how to use a reliable third-party tool — iReaShare Data Wipe — to simplify and secure the task.

Why You Should Properly Wipe an SSD Unlike traditional HDDs, SSDs use flash memory and have built-in wear-leveling and garbage collection mechanisms. These features improve performance but also make traditional data-wiping methods (like overwriting sectors multiple times) ineffective or even damaging.
Key reasons to wipe your SSD securely: Protect privacy: Prevent identity theft or data leaks. Prepare for resale or donation: Ensure the next user can't recover your data. Ensure compliance: Meet data protection standards like GDPR or HIPAA.
Method 1. Using Manufacturer Utilities Most SSD manufacturers (Samsung, Crucial, SanDisk, etc.) offer proprietary utilities with secure erase functions. These tools issue built-in ATA Secure Erase or NVMe sanitize commands to reset the SSD to factory state. Pros: Designed for your specific SSD Cons: Might not support third-party drives or non-Windows OS
Method 2. Using Disk Management (Not Recommended for SSDs) You can format the SSD or delete partitions via Windows Disk Management. However, this doesn’t erase the data; it simply removes access to the files. Warning: Data can still be recovered with recovery tools.
Method 3. Using Command Line Tools Power users may use tools like diskpart in Windows or hdparm in Linux. These can issue secure erase commands, but they require careful input and may not be user-friendly.
Method 4. Using iReaShare Data Wipe If you're looking for a simple, safe, and effective way to wipe an SSD, iReaShare Data Wipe is a great solution. It's designed to permanently erase data beyond recovery, while being easy to use even for beginners.
How to Wipe SSD with iReaShare Data Wipe Step 1: Visit the official iReaShare website. Download iReaShare Data Wipe and install it on your Windows computer. Launch it. Step 2: Connect the SSD to your computer via SATA, M.2 slot, or external enclosure (USB to SATA adapter, for example). Ensure it is detected by the software. Step 3: From the main interface, locate your SSD under the list of connected drives. Select the correct drive. Double-check the drive letter or name to avoid wiping the wrong drive.

Step 4: iReaShare Data Wipe offers 2 data erasure levels: Quick Erase and Deep Erase. You can choose it as you need. Step 5: Click the "Erase Now" button. A warning will appear notifying that data cannot be recovered. Confirm your choice.

Wait for the process to complete. This can take several minutes to hours depending on the method and SSD size. Step 6: After wiping, the tool will notify you of completion.
Final Tips Back up important data before wiping — the process is irreversible. Always double-check the selected drive before proceeding. If your SSD is bootable, you may need to create a bootable USB version of the software.
Conclusion Properly wiping an SSD is crucial before selling, recycling, or repurposing it. While there are many options, iReaShare Data Wipe provides a reliable, user-friendly, and effective solution for securely erasing your SSD with peace of mind.
Whether you're a tech-savvy user or a beginner, iReaShare simplifies the complex task of secure data deletion, helping ensure your privacy and data security are never compromised.
0 notes
Text
How to Securely Erase Data from Your SSD?
In today’s digital world, ensuring the security of your data is more important than ever. Whether upgrading to a new SSD, repurposing an old one, or just wanting to ensure sensitive information is unrecoverable, securely erasing data from an SSD is critical. Unlike traditional hard drives, SSDs (Solid State Drives) require special methods for secure data deletion due to their unique storage techniques.
SSDs use NAND flash memory to store data organized into blocks and pages, unlike the spinning platters in traditional hard drives. This architecture introduces complexities like wear leveling and garbage collection. Wear leveling ensures even data distribution across memory cells to prevent premature wear, while garbage collection consolidates unused blocks, making old data scattered across the drive and difficult to erase.
When a file is deleted from an SSD, it is not physically erased but marked as available for new data. Until overwritten, the data can be recovered using data recovery software. This is why secure data erasure methods are essential for preventing unauthorized recovery of sensitive information.
Several methods exist for securely erasing data from an SSD:
Built-in SSD Secure Erase Utility: Many SSD manufacturers offer built-in secure erase utilities like Samsung Magician, Intel SSD Toolbox, or Crucial Storage Executive. These tools use the SSD's firmware to perform a thorough data wipe. To use these tools, users need to check the manufacturer's documentation, backup important data, create a bootable USB drive (if necessary), and follow prompts to run the secure erase utility.
Third-Party Software: If the manufacturer doesn’t provide a secure erase tool, third-party software like Parted Magic, HDDErase, or DBAN (Darik’s Boot and Nuke) can be used. Similar to the built-in utilities, these tools offer additional features and allow users to select their SSD and securely erase it.
ATA Secure Erase Command: This low-level command, built into most SSDs' firmware, resets the NAND cells to their factory state. It requires technical knowledge and involves using a bootable Linux distribution like Ubuntu or Parted Magic to execute the ATA Secure Erase command.
Encryption Method: Encrypting the SSD before erasing it adds an extra layer of security. Even if remnants of data remain after erasure, they will be indecipherable without the encryption key. This can be done using encryption software like BitLocker (Windows), FileVault (Mac), or VeraCrypt (cross-platform).
For maximum data security, it’s recommended to regularly update SSD firmware, use multiple erasure methods, and physically destroy the drive if it’s no longer needed. Additionally, proper disposal of the SSD through e-waste recycling ensures that the drive is handled responsibly.
In conclusion, securely erasing data from an SSD is crucial for protecting sensitive information. By understanding the storage mechanics of SSDs and using the appropriate erasure methods, users can ensure their data is irretrievable. Always back up data before proceeding with any erasure and verify the process to ensure complete data destruction.
Want to Buy SSDs in Bulk from VSTL?
If you're looking to purchase SSDs in bulk, VSTL offers a reliable option for businesses and individuals seeking quality storage solutions. With competitive pricing and a range of SSD models to suit various needs, VSTL ensures high-performance drives for both personal and professional use. Bulk buyers can benefit from wholesale rates, making it an efficient choice for large-scale projects or tech upgrades. Whether upgrading office systems or managing data storage for a business, VSTL provides dependable SSDs to meet diverse requirements.
0 notes
Text
Forgot Windows 8.1 Local Admin Password No Reset Disk How to Resolve
How to get back into your Windows 8.1 computer if you have forgotten local administrator password no reset disk, how can you reset administrator password in Windows 8.1 without reset disk?

To resolve this problem, you can firstly try Offline NT Password Editor to help reset the forgotten Windows 8.1 administrator password without reset disk. Offline NT password Editor can help clear or reset Windows local account password via CD/DVD. The following procedure will show you the detailed walkthrough.
Trick 1: Use Offline NT Password Editor to Reset Windows 8.1 Local Admin Password (Work with CD/DVD).
When you forgot Windows 8.1 administrator password and a password reset disk was not created, “Offline NT Password Editor”, a free Windows password reset disk, can help you reset forgotten Windows 8.1 local account’s password without knowing it. Free download the ISO file from the official site. Extract the downloaded file and then burn the ISO file on to a writable CD/DVD. Once burning completed, you can use the CD/DVD which is bootable to crack Windows 8.1 Local Admin password.
Step 1: Power on your locked computer and then insert the bootable CD to the CD-ROM.
Step 2: Restart the computer to boot from CD/DVD. If it still boot into Windows, you may need to change device boot order in BIOS. Learn how to boot computer from CD/DVD.
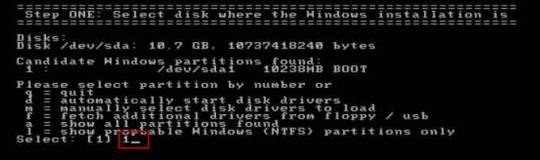
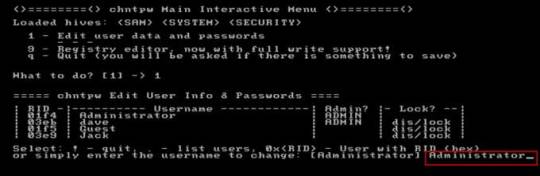
Step 3: When the computer boots from CD and loads Offline NT screen, press Enter until the “step one” appears. Type “1” and hit Enter.
Step 4: Select “Password reset”, type “1” and hit Enter.
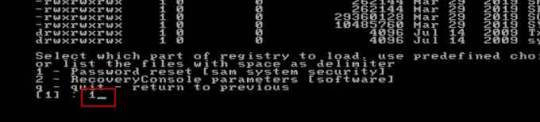
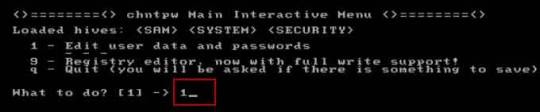
Step 5: Select “Edit user data and passwords, type “1” and hit Enter.
Step 6: Select a user account, type “administrator” and hit Enter.
Step 7: Select “Clear user password”, type “1” and hit Enter.
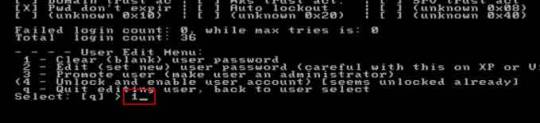
Step 8: Administrator’s password is cleared. Select “Quit editing user and back to user select”, type “!” and hit Enter.

Step 9: Select “Quit”, type “q” and hit Enter.
Step 10: Write back changes, type “y” and hit Enter.
Step 11: When it asks you if try again, type “n” and hit Enter.
Step 12: Now eject your CD and then press CTRL-ALT-DEL to restart the computer.
Step 13: When Windows 8.1 welcome screen appears, click the screen to automatically sign in administrator without password.
Another simple method to reset forgotten Windows 8/8.1 local admin password is using a password recovery program, Windows Password Rescuer, which is working fine for all Windows systems including Windows 11. Here is how to use the utility to reset a local admin password on Windows 8.1/8 PC without logging in.
Trick 2: Reset Windows 8.1 Administrator Password with Windows Password Rescuer Run from USB.
If you have forgotten Windows 8.1 administrator password and need to get back into the account, you can use Windows Password Rescuer to create a bootable USB disk and then use the disk to reset Windows 8.1 local administrator password easily without losing data. It also works perfectly for Windows 11, 10, 8.1, 8, 7, Vista, XP and Windows server 2022, 2019, 2016, 2012, 2008, 2003 etc.
Equipment required: Another Windows computer, USB flash drive.
Read more detailed steps: How to reset Windows 8.1 Admin Password with USB.
Step 1: Use another computer to download Windows Password Rescuer and then install the software.
Step 2: Plug in a blank USB flash drive to the computer and launch the software. Select “USB device” on the software screen.
Step 3: Pull down the drive list and select your plugged USB flash drive. Then click “Begin Burning” to create a bootable USB under a minute.
Step 4: Once the burning process is completed, unplug the USB flash drive and then connect it to your locked computer that you want to reset Windows 8.1 password.
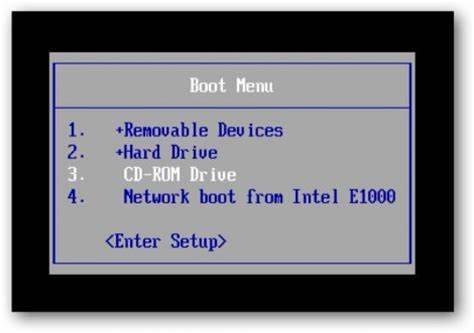
Step 5: Power on the locked computer and press F12 as soon as possible to open “Boot Menu”. Press arrow key to highlight USB option and press Enter to boot from USB.
Step 6: Once the locked computer boots from USB and locates Windows Password Rescuer, you can reset administrator or other local user account passwords with several clicks. Now click “Administrator” from user list.
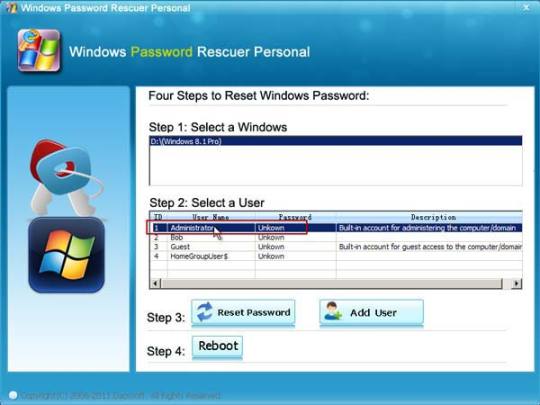
Step 7: Click “Reset Password”, when it asks you if reset administrator password to blank, click “Yes” to confirm it.
Step 8: Administrator password will be removed and shown blank in password list. It means that you will be able to sign in the account without password.
Step 9: Click “Reboot”. When it asks you to remove your USB, remove the USB from your computer and then click “Yes” to restart the computer.
Step 10: After restarting, you can log on administrator without password.

Methods in this article apply to any laptop and desktop computers such as Dell, HP, Toshiba, Acer, Lenovo, Asus etc.
0 notes
Text
Tech - FAQ 2
I'm scared of PCs; I'm just an end-user! I want to learn, though!
If you're curious and want a safe and zero-consequence environment to poke around with, consider turning to tools like VirtualBox. This is what we call a VM Manager or a Virtual Machine manager that enables you to emulate computer hardware on, well, actual hardware. It's a great way to create a Windows install you can poke around without damaging your own system, or of trying out other operating systems to familiarize yourself with them.
In fact, I'll always recommend that anyone who's sitting on the fence in regards to Linux try out a distro in a VM, first. There's no pressure involved, you get the same feel as a bare-metal install, and can rest easy in knowing that if none of this works out for you, you can just mash Delete on your VM folder, delete VirtualBox and forget this ever happened.
What tools do you recommend?
I can point you to several. First comes not so much a software tool as a piece of hardware most of us have, which is a USB drive. If you want to store diagnostics tools on it as well as a few OS image files, I'd advise investing in a nice and chonky one, going above 16 GBs in size. See Amazon for help, or any computer or hardware store you can think of. If you go Amazon's route, avoid no-name vendors and buy directly from reputed hardware manufacturers, like Lexar, Seagate or others. They'll be more expensive, yes, but you won't get scammed.
Then comes Balena Etcher and Rufus. Both do the same thing, which is burn an ISO image file to a USB stick, so said stick becomes a bootable drive containing everything you need to install an OS to your main drive. Etcher is more straightforward, while Rufus offers a few customization options, especially if you're trying to burn or flash a Windows image file.
What about Ventoy?
Ventoy is the Big Kahuna in bootable ISO file management, but it's a bit too involved for first-timers. Effectively, it turns your USB thumb drive into its own multiboot system, complete with a GRUB file that allows your PC to boot off it, while letting you choose which operating system you actually want to start. So instead of having one stick for your tools, one for a Windows install and one for a Linux distro, you'd have everything in one place. I'd recommend familiarizing yourself with simpler tools, first.
I don't want to switch to Linux, but I want more ownership of my Windows install. What can I do?
You can refer to tools like NTLite but again, that one is a lot for first-timers. In the interim, I'd recommend starting with a vanilla Windows 11 install and then referring to Chris Titus' Ultimate Windows Tool, to tweak and debloat your OS to your heart's content. Of particular note is the included MicroWin tool, which can strip down a normal Windows 11 ISO and create an unattended, offline install that boots directly into your User account. No giving Microsoft further credentials, no connection required - nothing. Several of the tweaks involved result in a Windows install that phones home a lot less often and that only concerns itself with proved, tested and necessary Windows Update cycles.
What's an Unattended install?
That refers to a software install that requires no input from the user. You start it, off it goes - and the reins of the PC are handed over to you only once the whole process is completed. No more screwing-about with Microsoft Game Pass offers or trying to say no to Microsoft's thirty thousand instances of telemetry. One click, and you're off to the races.
I tried it, and noticed it didn't remove everything from the base install. I still want to remove more stuff.
Then check out Bulk Crap Uninstaller, which allows you to force the removal of components Windows considers as vital, but that aren't, necessarily. If BCI's interface underlines something in green, it's safe to remove. If it's listed in red, you can still remove it. At your own risk. Some things are provably safe to remove, like the Xbox Game Bar if you've never used the Windows Store to buy a game before. Others shouldn't be touched if you know what's good for you, like Windows Explorer...
I've heard bad things about VirtualBox. What else can you recommend?
Microsoft supplies its own Hyper-V virtualization platform as part of Windows' basic tools, although it's not installed by default and is typically a bit more finicky to handle. Please note, Hyper-V isn't included in Windows Home Edition. You may have to upgrade, or go with a software-based solution like VirtualBox. Check your BIOS; your motherboard needs to support virtualization tech, too.
To get it, search for Turn Windows features on or off in the Start Menu's Search bar and tick the box next to Hyper-V. It'll tell you to prep for a reboot, let it do its thing. Once you've rebooted, you'll be able to search for Hyper-V in the Start menu. Follow the first-time tutorial that pops up to get a sense of the process - which requires you to have an ISO on hand.
What's a BIOS?
The Basic Input-Output System, or BIOS, is what initially controls your PC, before handing off most important aspects of it to your actual operating system. The BIOS performs hardware checks, allows you to define boot priority and can allow you to enable more advanced aspects of your motherboard of choice.
So, I figured out this Virtualization thing. What OS do I try out now?
The obvious first answer is Windows. Running Windows within another instance of Windows has the merit of giving you the most compact and secure home lab you could possibly want. You can try out the stupid shit I mentioned in the previous post - such as deleting System32 - in full confidence that you won't torch your actual rig. You can also test out debloaters, aesthetic patches, anything you'd want - with no fear of leaving scars on your actual system.
What about Linux?
Start with Linux Mint. It'll get you everything you need - just don't forget to install its hardware codecs, when it asks you. Get used to the Terminal - and do that in the knowledge that you're just barely touching the surface of the tech that runs most of the Web. Even Microsoft itself runs its business partly on Mint's parent distro, Ubuntu.
When you're ready, check out Arco Linux as a transition point between Mint and Arch Linux. Get used to its own package manager and syntax, while keeping the benefits of an out-of-box GUI experience.
At the end of your journey, hopefully a few years down the line, try out Arch Linux proper. Stick to VM installs, and get used to the command line-based install process. It isn't that complicated, but the absence of anything graphical and the need to grasp certain commands from the get-go can be daunting for some. Be aware that even if your Arch install boots and reaches a desktop, you'll have to provide literally everything else - or at least point it to the right resources. Expect some Terminal editing, a good long while spent poring through config files - and the fact that Arch pays for its modularity with stability. One errant package update can break anything and everything - and that's a small price to pay in the face of total user control - at least, according to some diehards.
So, when do I get to Mister Robot shit?
That's after years of work and several certifications. You can check your local Community College for courses, or just learn as you go online, provided you do sit down to take the CompTIA certifications, eventually. Fair warning - they're gruelling. Comparatively, Microsoft's own database of certs is easier to work through, but are more specific to Windows itself, as you'd expect. Outright hackers, however, tend not to make gains strictly using legitimate training platforms. Hacker or not, your best tool for learning is going to be a home lab.
What's a home lab?
Just your eternally willing victim, to be simplistic. It's a PC you set up as an attack target, or a PC you use as a test bench for new hardware, new tools or distros. Before any stress test I submit to the business' infrastructure, I always test my scripts and practice myself on hardware set aside specifically for that. You don't need anything expensive; mine is still just a refurbished Dell OptiPlex mid-tower PC bought used on eBay. It's currently connected to the office's netwok via VPN so I can attack it realistically. It's packed with dummy files and is designed to sort of feel like the workstation of a modestly-careful member of our Accounting team, and my colleagues in the IT department are instructed to treat any non-standard access to it as seriously as any other potential breach.
It's actually fairly simple: if I can hack into it and copy or steal something, then someone else can. If someone else can, then our entire infrastructure is at risk. This is why even though I work from home, there's days where audits need to happen, and I need to ensure that everyone who's onboard with us has decent security practices. That means going to our small office, going over logs manually and making sure nobody's been using workarounds or unsecure software.
Which tools can I expect to use?
Mostly Kali Linux' set of tools, just packaged into something a little less meme-worthy - like Parrot Security. Metasploit is eventually going to be your bread-and-butter, as once properly configured, it's a one-stop shop for pen-testing everything from computers to smartphones of both the Apple and Android persuasions.
I've done research and people keep telling me not to do bare-metal installs of Kali or Parrot. Why is that?
Because a hacker, ethical or otherwise, leaves no trace. You haven't finished pen-testing something until you've managed to exfil without being fingered as an unexpected connection. You're not there to leave calling cards; that's distinctly unprofessional. If you do choose to leave one, then it means you're after something - usually money, or the approval of some sponsor body or State. And that, well, defeats the purpose of being a hacker. Curiosity should be its own reward. Considering, working off of a dedicated "hacking rig" is the stupidest and easiest way for your pen-testing efforts to lose all relevancy - or for your sponsored hacks to be easily traceable.
Keep a mainline OS that handles Normie stuff - word-processing, normal Sysadmin tasks, writing emails, gaming after hours - and then use a USB stick to create a bootable drive image that contains everything you need for the rest.
Have you hacked anything before?
Only approved company resources - including keypads, IR receivers on TVs mounted in the Old Place's conference room - everything I could conceivably reach within the limits of my mandate. Now, with Walt and Sarah, I maintain the same ethical constraints. If I'm not asked to test something, I don't touch it.
But have you ever... hacked anything?
Illegally? No. I'm a staunch White Hat - with a few tinges of gray here and there. I've trolled particularly noxious Sales Reps using script-based UI barks in Windows, but I wouldn't go further.
1 note
·
View note
Text
All About your Ultimate Solution for Writing Windows ISO Images to USB Drives
In the realm of technology, where versatility and efficiency are paramount, Win32 Disk Imager stands tall as a beacon of reliability and convenience. For those seeking to harness the potential of their Windows operating systems through ISO images, this tool emerges as an indispensable asset. With its seamless capability to write Windows 10 or Windows 11 ISO images onto removable drives like USB pendrives, win32diskimager epitomizes speed, security, and dependability.
At its core, Win32 Disk Imager represents a fusion of simplicity and power. Its intuitive interface belies its robust functionality, catering to both novice users and seasoned tech enthusiasts alike. With just a few clicks, users can initiate the process of writing boot images onto SD cards or USB flash drives, paving the way for effortless system installations or recoveries.
In the fast-paced digital landscape, time is of the essence. win32diskimager portable recognizes this urgency, boasting exceptional speed in writing ISO images. Whether you’re embarking on a fresh Windows installation or creating backup drives for emergencies, Win32 Disk Imager ensures prompt execution, sparing you the agonizing wait times associated with conventional methods.
Security is non-negotiable when dealing with critical system files. win32 disk imager download upholds this principle with unwavering dedication, employing robust encryption protocols to safeguard your data throughout the writing process. Bid farewell to concerns about data breaches or corruption—win disk 32 imager prioritizes the confidentiality and integrity of your ISO images, allowing you to proceed with peace of mind.
In the realm of software, reliability reigns supreme. Win32 Disk Imager earns its stripes as a stalwart ally, consistently delivering flawless performance when entrusted with the task of writing ISO images. Say goodbye to frustrating glitches or unpredictable errors—Win32 Disk Imager stands as a beacon of dependability, ensuring that your system installations proceed without a hitch.
The hallmark of Win32 Disk Imager lies in its seamless integration into your workflow. Whether you’re a seasoned IT professional or a casual user, Win32 Disk Imager accommodates your needs with unparalleled ease. Its user-friendly interface eliminates the complexities typically associated with disk imaging tools, empowering you to accomplish your objectives with effortless efficiency.
Versatility is the cornerstone of Win32 Disk Imager’s appeal. Beyond its primary function of writing Windows ISO images, this tool serves as a Swiss army knife for tech enthusiasts. From creating bootable Linux distributions to cloning entire drives, Win32 Disk Imager adapts to a myriad of scenarios, emerging as a versatile companion in your digital endeavors.
As technology evolves, so does Win32 Disk Imager. With each new iteration, this tool evolves to address the ever-changing needs of its user base. Whether it’s enhancing compatibility with the latest Windows versions or introducing innovative features, Win32 Disk Imager remains at the forefront of innovation, ensuring that you always have access to the most advanced disk imaging capabilities.
Ready to embark on your journey with Win32 Disk Imager? Downloading the latest version is a breeze, thanks to its user-friendly website and streamlined installation process. With just a few clicks, you can harness the full potential of this powerful tool, unlocking a world of possibilities for writing Windows ISO images to USB drives with unparalleled speed and reliability.
In a digital landscape fraught with challenges, Win32 Disk Imager stands as a beacon of reliability, security, and efficiency. Whether you’re a seasoned IT professional or a casual user, this tool empowers you to unleash the full potential of your Windows operating system with unparalleled ease. Say goodbye to tedious installation processes and hello to seamless system deployments—Win32 Disk Imager is your ultimate solution for writing Windows ISO images to USB drives. Download the latest version today and experience the difference for yourself.
[Related site1] [Related site2]
0 notes
Text
How Do I Reinstall Windows on My HP Laptop?
Reinstalling Windows on your HP laptop can be a necessary and beneficial process to optimize system performance and resolve software issues. Whether you are looking to start fresh, address system errors, or upgrade to a newer version of Windows, understanding the steps involved in reinstalling the operating system is crucial. This article provides a comprehensive guide on how to reinstall Windows on your HP laptop, covering preparation steps, data backup procedures, accessing installation media, and configuring settings to ensure a smooth and successful reinstallation process.
Preparation for Reinstalling Windows on HP Laptop
If you're thinking about giving your HP laptop a fresh start with a Windows reinstallation, here are some key steps to get yourself ready.
Check System Requirements: Ensure that your HP laptop meets the system requirements for the version of Windows you plan to install. You don't want to start the process only to find out your laptop doesn't support it.
Backup Important Data: Before diving into the reinstall, make sure to back up all your crucial files and data. You don't want to lose any precious photos, documents, or videos in the process.
Creating a Backup of Important Data
Backing up your important data is like creating a safety net for your digital life. Here's how you can go about it.
Identify and Transfer Essential Files: Take some time to identify the files and data that are essential to you. Transfer them to an external drive or cloud storage to keep them safe during the reinstallation process.
Utilize External Storage Solutions: External hard drives, USB flash drives, or cloud storage services can be lifesavers when it comes to safeguarding your data. Pick a method that works best for you and ensure all your important files are securely backed up.
Accessing the Windows Installation Media
To reinstall Windows on your HP laptop, you'll need to get your hands on the necessary installation media. Here's how you can do it.
Download Windows Installation Tool: Head over to Microsoft's official website and download the Windows installation tool. This tool will help you create the installation media required for the reinstallation process.
Create Bootable USB Drive: Using the Windows installation tool, create a bootable USB drive that contains the installation files. This USB drive will be crucial in initiating the reinstallation process on your HP laptop.
Initiating the Reinstallation Process
Now that you've prepped your laptop and created the necessary installation media, it's time to kick off the reinstallation process.
Access BIOS Settings: Restart your HP laptop and access the BIOS settings by pressing the designated key during startup. Configure the boot order to prioritize the USB drive you created earlier.
Select Boot Device: Once your laptop boots from the USB drive, follow the on-screen instructions to begin the Windows reinstallation process. Make sure to select the correct options and let the installation wizard work its magic.
How Do I Reinstall Windows on My HP Laptop?
Configuring Windows Settings and Updates
Language and Region Settings: When reinstalling Windows on your HP laptop, it's essential to set up the language and region settings according to your preferences. This ensures that your operating system displays information in the language you understand and is tailored to your geographical location.
Windows Update Configuration: After reinstalling Windows on your HP laptop, it's crucial to configure Windows Update settings. This ensures that your system stays up to date with the latest security patches, bug fixes, and feature updates from Microsoft. Regularly updating your system helps enhance its performance and keeps it secure from potential vulnerabilities.
Installing Necessary Drivers and Software
Downloading HP Drivers and Software: To optimize the performance of your HP laptop post reinstallation, ensure you download and install the necessary drivers and software from HP's official website. These drivers are essential for the proper functioning of hardware components such as graphics cards, sound cards, and network adapters.
Installation of Additional Programs: Apart from HP-specific drivers, consider installing additional programs that cater to your specific needs. Whether it's productivity tools, multimedia software, or antivirus programs, installing essential applications enhances the functionality and usability of your HP laptop.
Finalizing the Reinstallation Process
System Restart and Verification: Once you have configured settings, installed drivers, and updated software, finalize the reinstallation process by performing a system restart. This step ensures that all changes take effect, and your HP laptop functions smoothly post reinstallation. Verify that everything is working as expected before proceeding.
Personalization and Customization: The final step involves personalizing your HP laptop to suit your preferences. Customize desktop backgrounds, themes, and sound settings to make your computing experience more enjoyable. Tailoring your laptop's appearance and functionality adds a personal touch to your device.
In conclusion, reinstalling Windows on your HP laptop can breathe new life into your device and enhance its overall functionality. By following the outlined steps for preparation, backup, installation, and configuration, you can effectively reinstall the operating system and enjoy a fresh start with your laptop. Remember to keep your important data backed up, install necessary drivers and software, and customize your settings to suit your preferences. With a reinstalled Windows system, your HP laptop is poised to perform at its best.
0 notes
Text
HOW TO USE RUFUS STEP BY STEP ?
Sure, here's a step-by-step guide on how to use Rufus to create a bootable USB drive:
Download Rufus: First, download the Rufus software from the official website or another trusted source. You can find the latest version of Rufus at: Rufus Official Website
Insert USB Drive: Insert the USB flash drive into an available USB port on your computer. Note that Rufus will format the USB drive during the process, so make sure to back up any important data on the drive before proceeding.
Run Rufus: Double-click on the Rufus executable file that you downloaded to launch the application. You may need to grant administrative privileges if prompted.
Select USB Drive: In Rufus, under the "Device" section, select the USB drive you want to use from the drop-down menu. Make sure you choose the correct drive, as all data on the selected drive will be erased.
Select Bootable Disk Image: Under the "Boot selection" section, click on the "Select" button and navigate to the location of the bootable disk image (ISO file) that you want to use. Select the ISO file and click "Open".
Partition Scheme and File System: Rufus will automatically detect the optimal partition scheme and file system based on the selected ISO file. However, you can customize these settings if necessary. For most installations, the default settings should work fine.
Volume Label and Bootable Disk Name: You can optionally set a volume label (name) for the USB drive in the "Volume label" field. This will be the name displayed for the USB drive in File Explorer. You can also change the name of the bootable disk if desired.
Start Creation Process: Once you have configured all the settings, click on the "Start" button to begin the process of creating the bootable USB drive. Rufus will display a warning message indicating that all data on the selected USB drive will be erased. Click "OK" to proceed.
Wait for Completion: Rufus will now start the process of formatting the USB drive and copying the contents of the ISO file to the drive. This may take some time depending on the size of the ISO file and the speed of your USB drive.
Completion: Once Rufus has finished creating the bootable USB drive, you will see a "READY" message indicating that the process is complete. You can now safely eject the USB drive from your computer.
That's it! You've successfully created a bootable USB drive using Rufus. You can now use this USB drive to boot your computer and install the operating system or run other tools as needed.
0 notes
Text
Unleashing the Power of the 32GB USB Pen Drive
Introduction
In today's digital age, where data rules supreme, the humble USB pen drive has emerged as an indispensable tool for storage, transfer, and backup purposes. Among the plethora of options available in the market, the 32GB USB pen drive stands out as a versatile and reliable solution for individuals and businesses alike. In this comprehensive guide, we delve into the myriad features, benefits, and applications of the 32GB USB pen drive.
Understanding the 32GB USB Pen Drive
The 32GB USB pen drive, also known as a flash drive or thumb drive, is a portable storage device that utilizes flash memory to store data. With a storage capacity of 32 gigabytes (GB), it offers ample space to accommodate various types of files, including documents, photos, videos, music, and software applications.
Key Features
High Storage Capacity: The 32GB USB pen drive provides a generous storage capacity, allowing users to store large volumes of data conveniently.
Compact and Portable: One of the primary advantages of the USB pen drive is its compact size, making it highly portable and easy to carry around.
Plug-and-Play Functionality: The plug-and-play feature enables seamless connectivity to computers and other compatible devices without the need for additional drivers or software installations.
Compatibility: The 32GB USB pen drive is compatible with a wide range of devices, including laptops, desktop computers, tablets, and multimedia players, irrespective of the operating system.
Durability: Built with sturdy materials, USB pen drives are resistant to physical damage, such as shocks, vibrations, and temperature fluctuations, ensuring the safety of stored data.
Data Security: Many USB pen drives come equipped with advanced security features, such as password protection and encryption, to safeguard sensitive information from unauthorized access.
Fast Data Transfer Speeds: With the latest USB 3.0 technology, 32GB USB pen drives offer high-speed data transfer rates, allowing users to quickly copy or transfer large files within seconds.
Applications
Data Storage and Backup: The primary function of a USB pen drive is to store and backup data, serving as a reliable alternative to traditional storage methods like hard drives and optical discs.
File Transfer: USB pen drives facilitate the swift transfer of files between different devices, making them ideal for sharing documents, presentations, photos, and videos.
Portable Workspace: Users can carry essential software applications, utilities, and documents on a USB pen drive, effectively transforming it into a portable workspace that can be accessed from any computer.
Bootable Drive: USB pen drives can be used to create bootable drives for installing operating systems, troubleshooting system issues, and running diagnostics.
Multimedia Playback: With their plug-and-play functionality, USB pen drives can be connected to compatible multimedia devices, such as smart TVs, gaming consoles, and car stereos, for playing music, movies, and videos.
Presentation Tool: Professionals and students can store their presentations on a USB pen drive and deliver them directly from the device, eliminating the need for cumbersome laptops or projectors.
Data Recovery: In case of system failure or data loss, USB pen drives can be used to retrieve and restore backed-up files, ensuring minimal downtime and productivity loss.
Best Practices To maximize the utility and longevity of a 32GB USB pen drive, consider the following best practices:
Safely Eject: Always eject the USB pen drive from the computer using the "Safely Remove Hardware" option to prevent data corruption or loss.
Keep Backup: Regularly backup the data stored on the USB pen drive to avoid the risk of accidental deletion or device failure.
Protect with Password: Enable password protection and encryption to safeguard sensitive information from unauthorized access.
Avoid Physical Damage: Handle the USB pen drive with care and avoid exposing it to extreme temperatures, moisture, or magnetic fields.
Update Firmware: Periodically check for firmware updates for the USB pen drive to ensure compatibility and performance optimization.
Scan for Malware: Use antivirus software to scan the USB pen drive for malware and viruses regularly, especially when transferring data between multiple devices.
Use Quality Brands: Invest in USB pen drives from reputable brands known for their reliability, performance, and customer support.
Conclusion
The 32GB USB pen drive is a versatile and indispensable tool for storing, transferring, and backing up data in today's digital landscape. With its high storage capacity, compact design, and plug-and-play functionality, it offers convenience, portability, and reliability to users across various domains. By understanding its features, applications, and best practices, individuals and businesses can harness the full potential of the 32GB USB pen drive to streamline their data management needs and enhance productivity.
0 notes
Text
(Fixed) VXDIAG Benz C6 SSD software cannot be started correctly
Customer Question: The VXDIAG Benz C6 SSD software I purchased did not launch and displayed the message "Recovery: Your PC/device needs to be repaired". What should I do?
Solution: Try to repair it with u disk, follow the steps below:
1. Insert a Udisk, then open U disk boot system repair software. Note: It is best to use an empty USB flash drive, because the file inside will be emptied.


2. Choose to make a boot disk, choose a system, then click to start.


Prompt: Creating a bootable USB flash drive will clear all files on the selected USB flash drive. If there are any important data, please back up and try again. Are you sure you want to continue this operation?
Click "Confirm" and continue.

Wait for the boot disk creation to complete.

3. After the boot disk is created, shut down the computer and insert the boot U disk. Then turn on the computer again, press "F12" and the following interface will appear, then click the "Enter" key to enter the program.


4. After the system is loaded, open "Boot Repair" on the desktop to complete the repair.


www.vxdiagshop.eu
0 notes
Text
Creating Bootable-Flashdrive using RUFUS
RUFUS
is a utility that helps format and create bootable USB flash drives, such as USB keys/pendrives, memory sticks, etc. It can be especially useful for cases where: you need to create USB installation media from bootable ISOs (Windows, Linux, UEFI, etc.) you need to work on a system that doesn't have an OS installed.
This Vlog will show you what Rufus is and how to use it to create a working Bootable Flashdrive.
SCRIPT
Vlogger 1:
Background and trivia about rufus
Vlogger 2:
step by step instruction/tutorial to download and operate Rufus in order to create bootable flashdrive.
Vlogger 1:
cessation
Tools needed for the vlog/blog post:
Computer/laptop
Flashdrive ( 8-16GB recommended size)
Camera
Capcut (editor app)
Google Drive
0 notes
Text
Step By Step in Creating a Bootable Flash Drive
Insert a USB flash drive into a running computer.
2. Open a Command Prompt window as an administrator.
3. Type diskpart.
4. In the new command line window that opens, to determine the USB flash drive number or drive letter, at the command prompt, type list disk, and then click ENTER. The list disk command displays all the disks on the computer. Note the drive number or drive letter of the USB flash drive.
5. At the command prompt, type select disk , where X is the drive number or drive letter of the USB flash drive, and then click ENTER.
6. Type clean, and the click ENTER. This command deletes all data from the USB flash drive.
7. To create a new primary partition on the USB flash drive, type create partition primary, and then click ENTER.
8. To select the partition that you just created, type select partition 1, and then click ENTER
9. To format the partition, type format fs=ntfs quick, and then click ENTER.
10 .Type active, and then click ENTER. 11.Type exit, and then click ENTER.
1 note
·
View note