#cricut designspace setup
Explore tagged Tumblr posts
Visit Tumblr Blog
Explore Tumblr blogs with no restrictions, modern design and the best experience.
Last Seen Tumblr Blogs


Fun Fact
Premium Tumblr themes are available from anywhere between $9 to $49.
Text
How to Use Cricut Heat Press: Customize Your Own T-Shirt
Do you want to create your own designer T-shirts? Are you interested in learning how to use Cricut Heat Press? If yes, you have come to the right place! The Cricut Heat Press machine offers a great way to transform plain T-shirts into stylish designer pieces. To achieve this, you will need to understand how to use it.
It is an easy-to-use tool. Cricut offers several heat press machines, with EasyPress and Easy Press 2 being among the most popular for heat transfers. To use these machines, you must know the necessary supplies and the procedure. This blog will guide you through all the required supplies and how to use the heat press.
Tools and Supplies to Start Using Cricut Heat Press
It is important to learn how to use Cricut Heat Press to design your t-shirt. But even more essential is to learn about the materials you will need to use your machine and how you will use those tools. Here are the supplies you will need for the machine.
How to Use Cricut Heat Press: 4 Simple Steps
Once you learn about all the required supplies, you can proceed to make your customized design for your t-shirt. In this process, you will have to do multiple things, like creating your design on the Design Space app, cutting the design, and applying it to your t-shirt. See all these procedures in detail and learn for yourself.
Step 1: Make a Design in Cricut Software
Step 2: Cut Your Design on Your Machine
The next step in learning how to use Cricut Heat Press is to cut your design. Once your design is ready on the app, you can proceed to cut it on the machine.
To cut the design on your machine, you have to put a mat on it and load it inside. Once the material is loaded inside the machine, you will need to open the Design Space app, select the material inside the app, and then click on Make It.
Before you start cutting, you have to mirror your mat. It is important, so don’t forget it.
Step 3: Use a Weeding Tool
Once you have finished cutting the design on your machine, you must unload the material and remove the remnants of the design. To remove the unwanted parts of the design, you should use a weeding tool. It will help you do it precisely.
Step 4: Apply Your Design
Finally, you have to apply the design to the t-shirt with the help of a press machine. To do so, you must follow these steps.
Conclusion
In short, you learned how to use Cricut Heat Press. Using any heat press machine is not very difficult if you follow the instructions well. In the early part of the blog, you learned about the tools and supplies you need to make any customized t-shirts. After that, you saw the process of using the press machine. You have to pick a design, cut it on Cricut, and finally apply it to your t-shirt with the press machine.
FAQs
What Is a Cricut Heat Press Used For?
This machine is mainly used to apply heat to iron-on material to transfer it to any fabric. For example, if you cut a design on an iron-on with any Cricut machine, put it on a t-shirt or any other cloth, and then apply heat to it with the press machine, that design will be printed on the t-shirt.
Can I Use an Iron Instead of a Cricut Heat Press?
Yes, you can! But that will depend on how often you have to use it and what kind of quality you are expecting from the machine. If you only need the press machine once or twice a year and you are not expecting good-quality results, then you can use a regular home iron. But if you need the machine frequently and you want pro results, you should go for the Heat Press machine.
For How Long Do I Have to Press a Shirt on Cricut Heat Press?
It will depend on the temperature of your machine and the fabric you are using. The higher temperature will take less time, while the lower temperature may require a few more seconds. However, depending on the situation, you may have to apply it somewhere between 15 and 30 seconds.
Visit: cricut.com/setup www.cricut.com/setup login
Source: https://cricutdesigncut0.wordpress.com/2025/03/18/how-to-use-cricut-heat-press-customize-your-own-t-shirt/
#cricut setup#cricut.com/setup#www.cricut.com/setup login#cricut design space#cricut designspace setup#cricut design space app#cricut design space login#cricut design space software#cricut design space download#cricut design space setup
1 note
·
View note
Text
How to Make Cricut Stickers: Full Guide for Beginners
Only a crafter can understand the fun of creating stickers with Cricut. In this process, learning how to make Cricut stickers becomes even more important because it gives us more freedom to create unique and perfect stickers instantly. Cricut machines are advanced enough to make anything you want in a few minutes. However, you need proper guidance to create a proper custom sticker using a Cricut machine. In this guide, I will help you through the entire process.
In this tutorial, I’ll show what you’ll need to create a sticker with your favorite font, design, or image in less than 10 minutes. Once you learn the process of making stickers with Cricut, you will have endless opportunities. All you have to do is implement the points mentioned further in the guide.
Supplies Required for Creating Cricut Stickers
Before we begin the guide, gather the supplies outlined below. With all of these items, you will be able to create the best-looking sticker.
Sticker paper or Cricut printable sticker paper
Cricut machine (Preferred that supports Print-Then-Cut )
A computer with the Design Space software installed
Transfer tape
Weeding tool
Scraper
Inkjet printer
Complete guide
Light Grip cutting mat
Step 1: Download the SVG File of the Stickers
I mostly download premade stickers and customize them in the Cricut software. I suggest you download a free SVG file of stickers from somewhere online. Download the file always in .svg format and unzip it.
Step 2: Upload SVG on the Cricut App
To learn how to make Cricut stickers, open the Cricut app and start a New Project.
Next, click the Upload icon in the bottom left toolbar.
Now, browse the downloaded sticker sheet to upload.
After that, select the image type as a Complex from the list.

Also, if the file is absolutely clear, then there is no need to erase click on Next.
Finally, select “Print Then Cut Image,” add the image name and any tags, and then click “Upload.”

Note: Instead of uploading a sticker file, you can access the Cricut Design Space library or create stickers.
Step 3: Customize Your Sticker Design
When the design is uploaded, it is on the canvas of the Cricut app, where it can be modified.
We won’t be making any specific modifications, so simply drag the design and get “Print Then Cut” the maximum size, which is 9.25″ x 6.75″.
Next, double-check the design and click on “Make It.“

Step 4: Select the Printer

From the drop-down menu, choose the printer and then turn on the “System Dialogue,” this will allow you to access your printer.
Step 5: Take a Printout and Place on the Mat

Step 6: Cut Out Your Design
Go back to Design Space and choose the base material as a printable vinyl and pressure default.

Next, load the mat by pressing the Load button on your machine and Design Space. Press Continue and push the flashing Go button on the Cricut machine. Now, the machine will run and cut around each sticker.

Step 7: Unload the Mat and Weed Out Excess Particles
This is the last step in learning how to make Cricut stickers. Once the cut is complete, take the mat off from the Cricut machine and flip the sticker sheet.
If there are any negative particles, then use the weeding tool and remove them.
Now, peel the stickers from the paper and add them to your project and surface.

Step 8: Apply Your Sticker

Final Thought
Most beginner crafters wonder how to make Cricut stickers. In this blog, I have explained the complete process. First of all, we have to upload or create the sticker design on Cricut Design Space. After that, print your sticker design using the Print then Cut function if it is colorful. And you can cut it out with the Cricut machine and start using it for the weeding procedure. Keep making stickers like this to achieve more quality.
Source: how to make Cricut stickers
Visit here for more Information: cricut.com/setup
Cricut explore 3
download Cricut design space
#how to make Cricut stickers#cricut.com/setup#cricut explore 3#download cricut design space#design space cricut#Cricut DesignSpace
0 notes
Photo
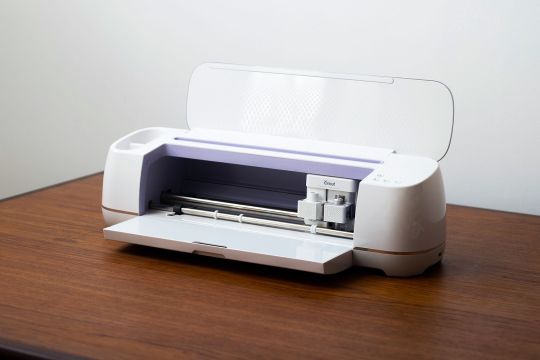
Cricut Maker Machine Review: Ultimate Crafting Tool for Every Project - https://craftideas.blog/craft-supplies-tools/best-craft-products/cricut-maker-machine-review-ultimate-crafting-tool-for-every-project/ Cricut Maker Machine Review Cricut Maker is known for its versatility and power. This review highlights why the Cricut Maker is the ultimate crafting tool for any project, from home decor to sewing. Device that makes it easier to make homemade cards and crafting projects Cricut Maker Machine What We Like Easy-to-use smartphone app Beautiful machine that doesn’t need to be hidden away Fast mode for quicker cutting What We Don't Like Custom design software is cloud-based More of a beginner machine The Bottom Line If you’re a beginner and intimidated by the task of working a die cutting machine, do yourself a favor and start with this one. View On Amazon Cricut Maker Machine Craft Ideas Blog / Erika Owen View On Amazon I have never seen a die-cutting machine firsthand before. I’ve witnessed other people work magic with these tools on reality crafting shows, but I’ve never had the opportunity to play around with one before. I’m a creative person and avid crafter, so the opportunity to review this machine interested me. I’m not going to lie; I was intimidated from the moment I read that you’ll only get the most out of the machine if you hook it up to Cricut’s online design app. Any time I have to transfer files of any kind, I start to sweat a little bit. But, I wanted to explore this cutting machine's functions and determine whether or not it helped me design my projects. I’ll look at the setup, what it is like to use the machine, and the projects you can make with the Cricut Maker Machine. Set-Up Process: Could not be easier Setting up this Cricut machine could not have been easier. You establish a Bluetooth connection to sync and update the machine. I used my iPhone 8. First, I was directed to cricut.com/setup, where I was prompted to download the machine’s DesignSpace app. You’ll be asked to register the machine with your name and email. Then, you connect your smartphone or device with the Cricut machine via Bluetooth. Using this connection, your machine is updated, which I found especially simple and pain-free, given how complicated software updates can be. Craft Ideas Blog / Erika Owen Once the machine is updated, the app prompted me to start the practice project included with the Cricut Maker. The initial set-up was as close to straight-out-of-the-box use as you can get. Any intimidation I felt opening the package was instantly gone. The only downside to the process is that you have to reconnect the Bluetooth connection every time you turn the machine on or off. The machine looks nice. We got the lilac version, and I didn’t feel the need to hide it from sight. Performance: Quick with very little guidance required If you aren’t working on a custom project, then there isn’t much brainwork that goes into working on this device. The iPhone app stepped me through every single aspect of the practice project, which was a cute little greeting card. Despite having no idea what I was doing, my project came out perfectly. There is a bit of noise associated with the machine as it draws and cuts your materials, but it’s nothing the neighbors will call and complain about. The machine comes with two blades, a sharp knifepoint, and a rotary cutter for fabric, but you can purchase other special accessories for more advanced projects. The machine worked quickly on the normal speed mode, and a fast mode kicks the device to work twice as fast. I stood over the machine and watched it—half in awe—not needing to do anything aside from click “continue” and push a button on the navigation. There’s a button for lining up the mat, and the "Go" button on the iPhone while in the app directs the machine to start drawing and cutting. Craft Ideas Blog / Erika Owen The only thing that made me anxious was placing the cardstock evenly on the light grip mat. The mat is sticky, and a crooked placement could mean a crooked card. You need to be precise in your set-up, and if you are, then you’re good to go. Once you’re finished with your practice project, the biggest job you’ll have is making sure you have the correct materials or coming up with your own design if you’re feeling creative. Features: More designs than you’ll know what to do with The DesignSpace app and its software was my favorite feature. It has hundreds of project options—some are free, and others come with a low cost (most around 99 cents). Each project breaks down the necessary materials and any additional Cricut accessories you may need for the task at hand. You can also sort the projects by many categories: ready to make, accessories, cards, free, iron-on, and so on. DesignSpace is compatible with iOS, Android, Windows, and Mac. The machine connects to smart devices via Bluetooth, meaning you can work on custom designs on your phone or laptop and transfer them directly to the machine. You can also work with a ton of different materials, including cotton fabric, vinyl to cardstock, and balsa wood. The machine can cut through more than 300 materials up to 2.4mm thick. If you’re a new Cricut customer, you get a free trial to Cricut Access, which has hundreds of patterns and designs. This resource is not to be confused with DesignSpace, the iCloud-based software that allows you to put together your own custom designs and projects. Think of Cricut Access as a super-user accessory. Design: Simple as could be The machine looks nice. We got the lilac version, and I didn’t feel the need to hide it from sight. It’s relatively compact: The buttons and inner mechanics are hidden by a colored top flap that later serves as the support for your smart device. Once opened, I used the lilac-hued slot to set up my iPhone, so I could follow the app’s directions in real-time as I created my project. Craft Ideas Blog / Erika Owen There are four buttons on the machine's right side: power, pause, go, and a double-arrow button that serves as the mat release. The app told me when to push the buttons, and it didn’t take long to catch on to their uses. There are also two small storage cups on the left side of the machine, perfect for the Cricut marking pen that came with the machine. If your phone or iPad is running low on battery while you’re using the Cricut Maker, there’s a USB cord included in the package that can be used to charge the phone. When not in use, this machine could easily fit on a single shelf. Price: Slightly higher than average You can find a die-cutting machine for less, but if you work a lot from your phone and you want to design your own patterns and projects, the Cricut Maker Machine is perfect for you. The combination of free patterns and projects, easy storage, sleek look, simplistic instructions, and smart device display makes it a great option for first-time cutting machine users. Craft Ideas Blog / Erika Owen If you plan on purchasing a Cricut Access membership once the trial expires, you’ll want to add the $9.99 monthly subscription cost to your pro and con list. Competition: Better than the rest Like the Brother ScanNCut2 CM350e, most newer models of die-cutting machines offer some custom-design options, as well as a large variety of free patterns and designs to use. Unline the Brother machine; the Cricut Maker is sleeker and easier to use. There are a few thoughtful design elements in Cricut Maker that put it above the others: the smart device rest on the top of the machine, the compact design that makes it easier to store or display, and the easy-to-navigate project app. Final Verdict This is a great gift for the crafter in your life. This device is great for all beginning crafters and would make a fantastic gift for someone who loves crafting. This neat gadget for adults is easy and fun to use with great results. Read more: 9 Best Die Cut Machines for Crafters and DIY Projects in 2025
0 notes
Text
How to Setup Cricut Joy: A Beginner’s Guide to Get Started
Do you want to set up Cricut Joy? Congratulations on your new machine! This smart tool is compact and portable, which makes it perfect for crafting on the go. Setting up the machine is simple, and you can learn how to perform it by reading this post till the end.
To start, you need to connect the machine to your device via Bluetooth, as Cricut Joy does not have a USB port. You will also have to download the Design Space software to start working on your DIY projects. So, let’s begin with the unboxing.
Step 1: Unboxing the Cricut Machine
In order to learn how to setup Cricut Joy, the first thing you have to do is unbox the machine. After the unboxing, you need to check for all the items and then begin with the setup process. When you unbox it, these are the things you will get inside the box:
After unboxing the machine and checking for the tools and supplies, you have to proceed further to set up Cricut Joy machine. These are the steps to set up the machine on your computer.
Step 2: Connect Cricut Machine to Your Computer
You saw the process of how to setup Cricut Joy on your computer. Now, the next step is to connect your machine to your computer via Bluetooth. To connect them, you have to follow this procedure:
Step 3: Download Cricut Design Space
Cricut Design Space is very important in order to set up Cricut Joy. It is the software that helps control the machine and cut your designs. The software is also used to create or pick a design for your project. It is an essential part of Cricut, and you will need to download it to your computer or any other device in order to run the app.
This is the procedure for downloading the Design Space on your computer:
Conclusion
You must learn how to set up Cricut Joy in order to start using it for your DIY projects. This tool is easy to use and travel-friendly, which means it is suitable for beginners. To start the process, you will need to unbox the machine and prepare it for the setup. You need the Design Space on an operating system to work with your cutting machine, and you will also have to connect it to your device via Bluetooth. Once you have done all these things, your setup will be complete.
FAQs
What App Can I Use for Cricut Joy?
To use the crafting machine on your device, you have to use the Design Space app, just like any other Cricut machine. Although Cricut Joy has a personalized app for working on it, this app has been discontinued, and you can only use the older version of the app. However, I would recommend you use Cricut Design Space as it will offer features like free design, texts, and pre-made projects.
Can I Connect Cricut Joy With a USB Cable?
No, you cannot! This is a small machine and does not have a wired connection option because it does not have a USB cable. So, if you want to connect any of your devices to this machine, you have the option to connect them via Bluetooth only. With Bluetooth, you can connect the machine to any device and work on your crafts.
How Can I Connect Cricut Joy via Bluetooth?
To use the machine on your phone or computer, you will have to connect them via Bluetooth. This is the process for the connection.
Visit: install cricut design space app
www.cricut.com setup login
Source: https://designspace-cricut.com/how-to-setup-cricut-joy-a-beginners-guide-to-get-started/
#install cricut design space app#www.cricut.com/setup login#www.cricut.com/setup#cricut.com/setup#cricut setup#cricut create connect to computer
0 notes