#cricut maker setup
Explore tagged Tumblr posts
Visit Tumblr Blog
Explore Tumblr blogs with no restrictions, modern design and the best experience.
Last Seen Tumblr Blogs


Fun Fact
Tumblr has a low social media market share in South America.
Text
How to Pair Cricut Maker 3? [Windows & Mac]
Cricut offers two ways to pair your machine with any of your devices: you can use a Bluetooth connection or a USB cable connection. In this step-by-step connection guide, we will learn how to pair Cricut Maker 3 effortlessly with Windows, Mac, or mobile devices.
Before you dive into the detailed guide on pairing the Cricut Maker 3 with your device, you need to set up your machine first. For that, you need to download Cricut Design Space on your device to bring your projects to life and design limitlessly.
This guide provides all the essential information needed to pair your machine, including how to set up your machine before pairing it with your device, the system requirements needed for downloading Design Space, and, of course, the full detailed process of pairing it with USB or Bluetooth.
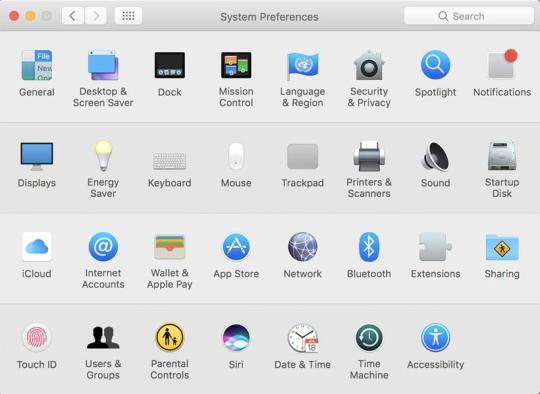
System Requirements to Download Design Space
To pair your crafting machine, ensure your device meets the following system requirements for downloading Cricut Design Space:
For Windows: You will require Windows 10 or later, 2 GB of free disk space, 4 GB of RAM, and a dual-core or equivalent AMD processor.
For Mac: You will require macOS 12 or later, 4 GB of RAM, a CPU with a speed of 1.83 GHz or higher, 2 GB of free disk space, and a broadband connection.
For iOS Devices: You will require iOS 16 or later, iPadOS 16 or later, a minimum download speed of 2-3 Mbps, and a minimum upload speed of 1-2 Mbps.
For Android Devices: You will require Android 10.0 or higher.
Note: Design Space supports Chromebooks via the web app but does not support the desktop application on this device.
Steps to Download & Install Cricut Design Space
Follow the directions in the section below to download and install Cricut Design Space:
Go to http://cricut.com/setup.
On the next screen, you will be asked to enter your machine model in the search bar.
Select the checkbox to agree to the terms and conditions.
Once you’ve finished downloading, double-click the downloaded file to initiate the installation process.
After the installation is complete, open Cricut Design Space and either sign in or create your Cricut account with your email and password.
You will know the setup is complete when you are prompted to make a test cut.
Note: For iOS and Android devices, download Cricut Design Space from the App Store or Google Play Store, respectively. Steps may vary slightly by device.
Proceed with the steps below to set up your cutting machine:
Ensure your machine is powered on, and then place it near the device with which you want to pair.
Go to cricut.com/setup.
Open your Cricut Design Space, click on your account, and navigate to Settings.
Now, click the Machines option.
Then, select the “Set up a cutting machine” or “New Product setup” option.
Select your machine model from the options available.
Now, it will show you a basic setup guide.
Next, you can select either USB or Bluetooth to connect your machine.
How to Pair Cricut Maker 3 With Bluetooth on Windows/Mac?
If you face the Connect to computer via Bluetooth window, especially during the machine setup, it is likely due to your computer’s AMD Ryzen chip causing USB connection issues, according to Cricut. To resolve this issue, you will need to connect your machine via Bluetooth.
Note: Cricut strongly recommends Bluetooth while using Cricut Design Space. If you’re setting up a Maker 3 or Explore 3 on your PC with an AMD Ryzen chip. However, if you are using a USB cable as your main connection, we suggest using this USB hub with your PC.
Follow these steps to pair your machine with your computer through Bluetooth:
Ensure your machine is on and place it within the range of 10-15 feet of your system.
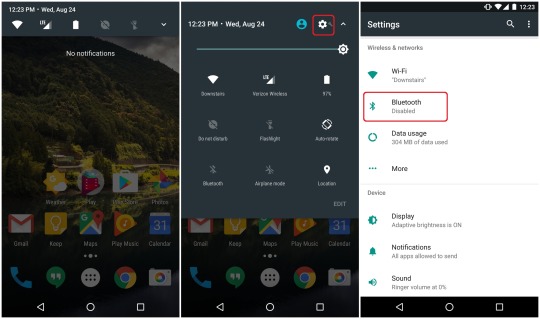
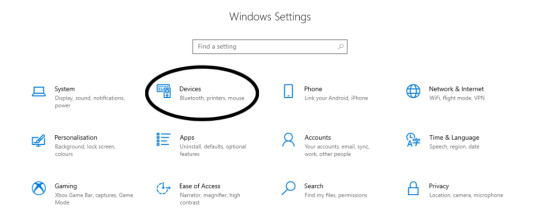
Open the Start menu and select Settings.

On a Windows Settings window, select the Devices option.

Make sure your Bluetooth is enabled, and then click “Add Bluetooth or other device.”
Select Bluetooth and let your computer detect your machine. Choose your machine’s model name from the available list.

Input 0000 as a PIN code. Now, click on the Connect button.
Your crafting machine is now connected to your Windows with the help of a Bluetooth connection!
Note: If you encounter Bluetooth device Discovery Issues on Windows 11, open the Bluetooth settings and select ‘View more devices.’ In Bluetooth device discovery, switch it to the default from Advanced.
How to Pair Cricut Maker 3 With a USB Cable on Windows/Mac?
Your machine comes with a USB cable to connect to your computer. To do so, follow the steps below:
Make sure your machine is powered on.
Connect one end of your USB cable to your computer and the other end to the back of your machine.
Then, return to Cricut Design Space and go to New Product Setup. Now, you will see that your machine will show up as connected during setup.
Important: If your machine name does not show up as an available device to pair via Bluetooth, you can follow these steps:
Connect your crafting machine to the computer using a USB cable.
Then, you need to open the Start menu, type Command Prompt in the search bar, and select Open.
Next, type: cd %HOMEPATH%\AppData\Local\Programs\ “Cricut Design Space” \resources\plugins\device-common\ in the Command Prompt window.

In the Command Prompt, type: .\CricutDevice –fixbluetooth and press Enter.

Now, your machine name will appear in the Devices section of the Cricut Bluetooth Settings.
Frequently Asked Questions (FAQs)
How to Find and Update to Current Design Space?
How To find the current Design Space version and check for updates, follow these steps:
Open the Cricut Design Space app.
In the top-right corner, click on your profile icon or initials, then select “Settings.”
Within Settings, go to “General” and then select “About Design Space.”
Click “Check for updates” to see if a newer version is available.
If an update is available, follow the instructions to download and install the latest version.
Why Won’t My Cricut Connect with USB?
A Cricut machine not connecting via USB can be due to various reasons, including:
If your machine has a micro USB port or a standard USB port, ensure it is not damaged or loose.
To ensure you have the latest Cricut drivers, start by updating Cricut Design Space. If your machine is connected through USB, you must also update the firmware.
If your Cricut Design Space is outdated, it might not be compatible with the machine.
Check for firmware updates for your machine. Outdated firmware can cause connection issues.
Check if the Windows Firewall is blocking communication between your computer and the machine.
Where Do I Find Pairing Code for My Cricut?
You might find it printed or engraved near the serial number on your machine, according to Cricut. Suppose prompted for a PIN or pairing code, type 0000. You don’t need to worry about the code; it can be applied to every device as it is a default code for pairing machines via Bluetooth. Once you’ve entered the code, your computer should connect to your machine via Bluetooth.
Source: how to pair Cricut Maker 3
#how to pair Cricut Maker 3#Cricut Maker 3 Setup#Cricut Maker Setup#cricut design space download#cricut design space app#cricut design space software#Cricut Setup
1 note
·
View note
Text
What Can I Do With a Cricut Machine: A Complete Overview
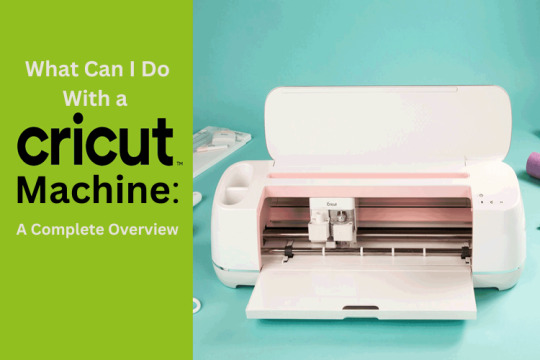
Whether you are an expert or a beginner, one question always comes to mind: “what can I do with a Cricut machine“ It can be clearly said that investing money in buying this craft plotter isn’t a wrong decision. Right from the beginning, this cut-die machine has had the same vision of motivating crafters to make new crafts from its models, tools, and accessories. By operating a Cricut cutting machine, you can make plenty of personalized crafts and projects in just a few minutes.
Before crafting, all DIYers must download Cricut Design Space on their devices (PCs and mobile devices). It is an easy-to-use app that allows them to create projects digitally. You will get the app for free of cost and support all craft plotter models. Besides, it has unlimited images, fonts, and ready-to-use projects for its users. Carry on by reading what Cricut is and how it can be used for various purposes.
What Is a Cricut Machine?
Cricut is an electronic cutting machine known as a cut-die machine or craft plotter. At this point, it is available in four different models that can accurately cut all kinds of fabrics. Its sharp blades and tools can form any design on vinyl, cardstock, paper, and wood. This craft plotter gives proper shape to your design during the cutting process.
On the other hand, this craft plotter can also cut, write, and draw as per the crafter’s need. It also comes with various supplies that make it easier for them to form the project quickly without making any mistakes. Apart from the cutting machine, the company has also launched Heat Presses in various ranges and prices.
What Can I Do With a Cricut Machine?
As the above paragraph of the blog shares, the cut-die machine can cut tons of fabric and comes with various supplies. With such unique features, versions, dimensions, and designing software, it can form uncountable crafts. To make your work easier, look at the names of projects that can be made from this electronic cutting machine.
Leather earrings
Etch glass
Cupcake toppers
Car decals
Stockings
Birthday banner
Wood sign
Custom wine bag
T-Shirt
Organization labels
Wall decals
DIY mugs
Greeting cards
If you want to do any DIY crafts, then collect supplies from Cricut’s official portal. Other than that, you can also buy it from nearby stores at a reasonable price range. You should also be thoroughly knowledgeable about operating and creating projects from a craft plotter without damaging anything.
How to Use a Cricut Machine for Making Paper Flowers?
After collecting essential content, I must learn how to create personalized paper flowers. The following steps will surely help me answer the question of what can I do with a Cricut machine. While going through the process, you should be aware of it without skipping any section. Have a look at the below steps and learn about the process:
Step 1: Cricut App Sign In and Draw a Design
Start your craft by getting Cricut Design Space from Cricut’s official website or Play Store/App Store. After that, create your account by entering the required details and clicking on the New Project option. Now, press the Images toolbar and enter the image you will use inside the Search section. Next, select the image from the gallery appearing in front of your screen and hit the Add to Canvas box.
Open your canvas and resize the flower image as per your choice. Now you need to check whether you’ve chosen the correct machine or not. If you have chosen the wrong machine, then press the Optimize experience for section and choose your machine from the drop box. Take a step further and click the Make It option. Afterward, press the Continue box given at the bottom right of the new page.
Step 2: Pick Your Material and Insert Tools
With the finalization of the flower design, while learning about making customized flowers, choose the material from the list, check the pressure, and then select the tools & materials. After doing that, hit the Go option.
Step 3: Load the Material Into Your Cricut Machine
Now, unbox your Cricut cutting mat and place the material on it using the brayer or scraper tool. After the material is properly stuck on the mat, gently hold the mat and put it inside the Cricut machine. Next, press the Go button on the right side of the machine and hold on until the machine cuts down the material.
After that, stop your Cricut and put the compatible blade inside the Clamp correctly without damaging anything. After loading the blade, hit the Go button again, and your cut-die machine will begin cutting the material. Then, you will see the status on your screen and instantly unload the mat from your Cricut machine.
Step 4: Remove the Material and Peel Off Your Design
At this stage, what can I do with a Cricut machine? You are supposed to fold your cutting mat and slowly remove the material. Now, keep the extra material safe for future purposes. Following this, gently remove the flower design from the mat in a circular manner.
Step 5: Paste Your Flower With Cricut Glue
In the final stage of making custom-made flowers out of the electronic cutting machine, fill in your Cricut gun with strong adhesive. Now, put a small amount of glue on the sides of the flower and stick them gently. Finally, you will get a final custom-made flower made out of Cricut machine & its supplies.
Give yourself a pat on the back. You have become capable of designing various custom-made flowers. With the help of this process, you make this craft by choosing the correct supplies and handling them appropriately.
Conclusion
Summing up what can I do with a Cricut machine blog, it’s crystal clear that you must have understood what exactly a cutting machine is, its capabilities, and how to make a DIY project from it. In order to start this craft plotter, you need to connect with PCs and mobile devices and download the Cricut app. Once it is done correctly, no one can stop you from making various customized crafts.
Frequently Asked Questions
What Supplies Do I Need to Create Flowers With Cricut?
In order to get the perfect formation of flowers, it’s compulsory for all the DIYers to carry certain supplies. It will help them efficiently design the craft, and the list is as follows:
Cricut cutting machine
Design Space software
Cricut Fine Point blade
Cricut cutting mat
Medium Cardstock
Strong adhesive glue
Cricut glue gun
Is It Worth Buying a Cricut Access Plan?
It isn’t a concern whether you are a beginner or an expert in creating customized crafts; it’s going to be best if you get Cricut Access. It is a monthly or yearly plan that offers an ever-growing library with images, fonts, and customized projects. You will also get a specific percent discount while buying any material from Cricut’s official portal. Also, you will get extra benefits after buying its plan.
How Can I Install Cricut Design Space on My Android Device?
In order to get the Cricut software on your Android device, read the below steps:
Start the process by turning on your smartphone and then go to the Play Store app.
Next, search for Design Space & hit the Install button given on the right side.
Now, open the installed app and create your account by filling in your credentials.
Finally, your app will be installed on your device, and you can create projects on your device.
What Are Some Projects That Can Be Made Out of Cricut?
As Cricut can cut 100+ materials with its tools, the crafter can create customized projects easily. The names of the projects are:
Greeting card
Christmas ornaments
Valentines cards
T-Shirts
Sublimation mugs
Stickers
Source: What Can I Do With a Cricut Machine
#cricut machine setup#cricut design space download#cricut design space login#cricut account login#cricut maker setup#install cricut design space#cricut login
3 notes
·
View notes
Text
How to Setup Cricut Machine for Beginners in Easy Steps

Crafting has always been my favorite hobby, so I bought a Cricut machine to create more fascinating projects. As it was delivered to my door, I just got super excited. I unboxed it, pulled out the machine, and placed it on my desk. The box also contained wires, a mat, and a tiny blade.
I was so excited when my new Cricut machine arrived, but my excitement quickly faded when I struggled to set it up. I read the user manual to setup the machine and followed every instruction. But nothing worked even after putting in so much effort, from turning on the machine to connecting cables and downloading Design Space. After some extra effort and thorough research, I successfully set it up. I’ll share with you what worked for me.
If you are a beginner who wants to learn how to setup Cricut machine, follow the steps in this write-up.
Key Considerations Before Setting Up a Cricut Machine
Proper setup is essential to ensure your Cricut machine works efficiently for crafting. But there are certain things you must keep in mind to ensure a smooth process. Let me show you what you need to consider before delving into how to setup a Cricut machine:
Ensure Device Compatibility
You must check that the device you use, whether a computer or smartphone, is compatible with the Design Space software.
Ample Space
It is important to have enough space for the machine to work. Leave space at the front and back of the desk for the mat to move freely during cutting.
Power Requirements
Ensure the power adapter matches the voltage requirements specified for your crafting machine.
Internet Connection
Check your internet connection to see if you are connected properly to a network. You must have a stable internet connection to download and install Design Space.
Materials and Tools
Bring all the essential materials and tools, such as a weeding tool, scraper, mat, and standard scissors. When you have everything, you can enjoy your crafting more.
Setting up a Cricut Machine on MacBook via Bluetooth
The journey from unboxing to your first cut involves a detailed step-by-step setup process. Here is what I’ve learned and have become an expert in “how to setup Cricut machine.”
Step 1: Open a browser on your computer and visit the official Cricut website – design.cricut.com. Step 2: In the search bar, select the model of your machine.
Step 3: Check the box next to “I agree to Cricut Terms of Use & Privacy Policy.”
Step 4: Click Download and then wait for the download process to complete.
Step 5: Open the downloaded file, then drag and drop the Design Space icon into the Applications folder.
Step 6: Double-click on the Design Space file and click Open.
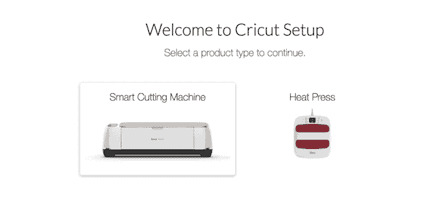
Step 7: In the Design Space screen, click Product Setup and select Smart Cutting Machine.
Step 8: Next, choose your machine model.
Step 9: Now, fill in the information to create a Cricut ID and click Create a Cricut ID.
Step 10: If you already have a Cricut account, click Sign In.
Step 11: Once you’ve created an account or signed in, when you get to the Prepare Workspace screen, follow the instructions and click the next arrow.
Step 12: In the Find an outlet screen, plug the power cable into the machine and the wall outlet.
Step 13: In the Connect to Computer screen, connect the machine to your operating system using a USB cable.
Step 14: Click the drop-down menu and select your machine model, then click Continue.
Step 15: It’ll start loading the updates.
Step 16: Click Update to update your machine to the latest and greatest features, then click Next.
Step 17: When you get the Success screen, click Next.
Step 18: Now, go ahead and perform the test cut following the on-screen instructions.
Setting Up a Cricut Machine on Windows via Bluetooth
You may want to learn the method to connect your machine to your Windows PC via Bluetooth. As a tech expert, I suggest that you follow these steps:
Step 1: Check that your machine is powered on.
Step 2: Click on the Start menu icon and go to Settings.
Step 3: Next, click on Devices and turn on Bluetooth, and you’ll get a list of available devices.
Step 4: If your device does not show up in the list, click on Add Bluetooth or other device.
Step 5: Next, select Bluetooth, and your machine will appear on the list.
Step 6: Click on your device, enter the PIN, and click on Connect.
Step 7: When you get the screen saying Your Device Is Ready To Go! Click Done.
Frequently Asked Questions
Q: Does Cricut Design Space Allow Uploading Custom Images?
Yes, the Cricut Design Space software supports multiple file types, including SVG, JPG, GIF, PNG, DXF, and BMP, which can be used as basic or vector images.
Q: How to Upload an Image in Cricut Design Space?
If you need to upload an image in Design Space, just click the “Upload Images” tab and choose the file you want to upload. Next, click “Open” or drag and drop the file into the Design Space image upload window. You can see your uploaded image on the canvas when you are done.
Q: What Materials Can I Cut With My Cricut Machine?
Whether it is Cricut Maker, Explore, or Joy, you can cut a variety of materials. Some of the most commonly used cut materials are paper, cardstock, vinyl, and iron-on. Faux leather and wood veneer are some specialty materials that a crafting machine can cut, but they are all based on the model type.
Q: What Are Some of the Features of Cricut Design Space?
Once you finish the setup process, you may want to start crafting in Design Space. In Design Space, you can explore a lot of stuff. These include a vast library of various fonts and images, ready-to-make projects, and customization tools. A canvas is the main workspace in which you can create your designs. The Layers panel in Design Space helps customize any image, giving access to features like Weld, Slice, Attach, and Contour.
visit: cricut.com/setup
Source: How to Setup Cricut Machine
#cricut machine setup#how to setup Cricut machine#cricut setup#cricut design space app#cricut design space software#cricut maker setup#cricut explore air 2 setup
0 notes
Text
Cricut Machine Comparison Guide for DIY Projects 2025
If you are still thinking about buying a Cricut but aren’t sure which one to choose, you’re not alone! With several models available, it’s easy to feel overwhelmed. That’s why, in this guide, we will compare popular options like the Cricut Maker, Explore, and Joy to help you make the right choice.
I understand how confusing it can be when each machine comes with its own features, price point, and purpose. The best Cricut machine for you depends on the kind of projects you enjoy most, whether it’s crafting cards, customizing t-shirts, or creating large-scale designs. To simplify things, we have put together this easy Cricut machine comparison guide to explain the key differences between the models.
Whether you are a total beginner or a pro crafter, this guide will help you choose the perfect Cricut that matches your style, budget, and DIY needs. Your ideal crafting machine is just a few scrolls away – so let’s break it all down in the easiest way possible!
Cricut Maker 3 vs Maker 4: Main Differences & Features
The Maker 4 is an upgrade to the Maker 3. While both machines support a wide range of tools and materials, including Smart Materials, the Maker 4 has a faster cutting speed and potentially a slightly quieter operation. They have the same dimensions and weight (22.1 in x 7 in x 5.9 in and 11.1 lbs). Both support a wide range of Cricut tools (13+) and can handle cutting with or without a mat with Smart Materials.
These are the top-of-the-line machines, offering the most versatility and power. They can cut various materials, including fabric (even without backing), wood, leather, and more, thanks to their adaptive tool system and stronger motor.
The Maker 4 is much faster than the Maker 3, especially when using Smart Materials. The Maker 4 can cut at up to 14.1 inches per second, while the Maker 3 cuts at 11.3 inches per second.
The Maker 3 is primarily available in light blue color, while the Maker 4 comes in seashell and sage colors.
The Maker 4 features a 36-watt power supply, while the Maker 3 offers a 50-watt power supply.
The Maker 4 is often more expensive than the Maker 3, especially when purchasing bundles.
Important: Both machines are compatible with the same tools and accessories and offer identical features and functionality.
Cricut Explore 3 vs Explore Air 2: Which One to Buy?

When making a Cricut machine comparison, the two options that often show up are the Explore 3 and the Explore Air 2. While they look similar, many key differences can impact your crafting experience.
The Explore Air 2 is best for beginners. It cuts over 100 materials like paper, vinyl, iron-on, and cardstock. It uses mats for every project and connects via Bluetooth or USB. It’s budget-friendly and gets the job done for most casual crafters.
The Explore 3 is the upgraded version of the Explore Air 2. It can cut Smart Materials without a mat, helping you work faster and with more ease. It also cuts twice as fast as the Explore Air 2 and allows you to perform longer cuts, up to 12 feet in one go. This machine is ideal for bulk projects or large designs. Explore 3 also supports the new roll holder and has better software integration.
In short, if you’re just starting out your journey with Cricut and want something affordable, go for the Explore Air 2. But if speed, matless cutting, and longer designs matter, Explore 3 is worth the upgrade.
Cricut Joy and Joy Xtra Comparison
The Joy and Joy Xtra are both compact cutting machines, but the Xtra offers a larger cut size and the ability to print and cut, while the original Joy is more limited in those areas.
Let’s compare them in detail so you can choose the best fit.
Cricut Joy
The maximum cut size is 4.5 inches wide and 4 feet long.
More compact and lightweight, which makes it highly portable.
Works with different types of materials, including vinyl, iron-on, and cardstock.
The machine can cut, write, draw, and foil.
Suitable for label making, creating greeting cards, small-scale home decor, and personalized gifts.
Important Note: It does not support Print Then Cut functionality.
Cricut Joy Xtra
Supports a wider cut size of 8.5 inches wide and 4 feet long.
Includes a Print Then Cut sensor, allowing users to print full-color stickers and other printable with an inkjet printer and then cut them.
It is larger and heavier than the Joy but is still considered small and easy to carry.
Compatible with various materials, including cardstock, vinyl, iron-on, and printable materials.
This machine can cut, write, draw, and foil, too.
Suitable for all projects the Joy machine can handle, as well as larger projects and Print Then Cut projects, such as stickers and custom cards.
Helpful Tip: If you need a compact and portable machine primarily for basic cutting, writing, and drawing, and don’t require Print Then Cut functionality, the Cricut Joy is a good choice. If you want the flexibility of larger projects, Print Then Cut capabilities, and don’t mind a slightly larger machine, the Cricut Joy Xtra is a better choice.
Key Factors to Consider Before Buying a Cricut Machine
Now that you’ve done a Cricut machine comparison of various models, you have to make sure about the following key points before you hit the Buy button:
Budget: Machines range in price, so determine your spending limit.
Cutting needs: Different machines can handle various materials, from paper and vinyl to fabric and thicker materials like balsa wood. If you plan to work with thicker materials, you’ll need a machine compatible with tools like a knife or rotary blade.
Project size: Consider the size of projects you plan to create.
Speed vs. Control: Some machines prioritize speed for faster cutting, while others offer more precision and control for intricate designs.
Portability: If you need to move your machine easily, consider its size and weight. Smaller machines, such as the Cricut Joy, are more portable than larger ones.
Frequently Asked Questions (FAQs)
What is the main difference between Cricut Maker and Maker 3?
The key difference between Maker and Maker 3 lies in their ability to work with Smart Materials, resulting in faster and more accurate cutting capability. The Maker 3 can cut Smart Materials (vinyl, iron-on, sticker, cardstock, etc.) up to 12 feet long without a mat, offering convenience and potentially faster project completion. It cuts up to twice as fast as the original Maker. Another main difference is their price; Maker 3 is more expensive than the original Maker.
Do all Cricut machines work with Design Space?
Yes, all current Cricut cutting machines (Joy, Explore, and Maker series) are compatible with the Design Space app. It is a free app for desktop (Windows/Mac) and mobile (iOS/Android) devices. It is the software that controls these machines and allows users to design, personalize, and send projects to their cutting machines. Older models, such as the Expression cutting machine, are not compatible with the Design Space software.
Is Cricut Joy worth it for small projects?
Yes, Cricut Joy is considered a worthwhile investment for small crafting projects, particularly for beginners or those who mainly work with vinyl, iron-on, and cardstock. Its compact size, user-friendliness, and ability to handle popular project types, such as labels, cards, and small decals. These features make it a convenient choice for users with limited space or simpler crafting needs.
Source: https://cricutnewmachine.com/cricut-machine-comparison-guide-for-diy-projects-2025/
#Cricut machine comparison#Cricut Setup#cricut machine setup#cricut design space software#cricut design space app#cricut maker setup#cricut explore air 2
0 notes
Text
How to Make Stickers on Cricut? 2025
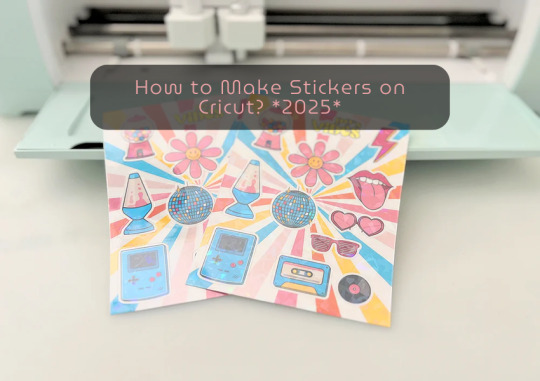
learn ‘how to make stickers on Cricut‘, then you have come to the right place. Stickers are loved by everyone, whether you’re a child or an adult. You do not need a printer to make custom stickers. You can create stickers at home using the crafting machine and some supplies and tools.
Stickers may look like ordinary sheets of paper, but they are a great way to personalize journals or gifts. Whether you are a Cricut user or a beginner, if you have a crafting machine and Cricut Design Space app downloaded to your device, you can make stickers in any shape, color, or size you can imagine.
There are three general types of stickers you can create with your Cricut cutting machine: written labels, vinyl decals, and Print Then Cut stickers. In this blog, you will learn about Print Then Cut stickers.
What Materials Do You Need for Your Project?
Before starting the process of how to make stickers on Cricut the first step is gathering all of the supplies and equipment needed for sticker making.
Cricut Explore, Explore Air 2, and Maker 3
Design Space
LightGrip cutting mat
Inkjet printer
StandardGrip mat
Sticker paper, printable vinyl sticker paper
Making Print Then Cut stickers is a great way to personalize gifts, decorate water bottles, or add stickers to scrapbooks and journals. Creating stickers is fun and easy, but to get started, you need to gather the materials mentioned above and then follow the steps below to proceed with the sticker-making.
How to Make Stickers on Cricut: 6 Simple Steps
Here are the steps you will need to follow for creating stickers on your crafting machine. So, let’s get started right away.
Step 1: Calibrate Your Machine for Print Then Cut
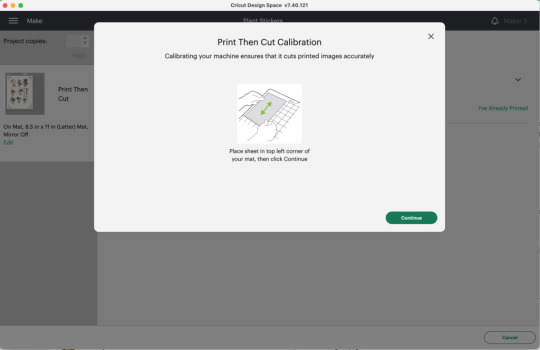
Calibrating your machine can sound optional, but this is the important part of making stickers with Cricut. In the Cricut Design Space app, choose Calibration from the menu, and then choose Print Then Cut. The software will prompt you to print a test sheet and load it into your machine. Tip: If possible, try to use a lightGrip machine mat.
Step 2: Add a Printable Image to Your Canvas
Now, within the Cricut Design Space Software, you can add multiple images to your canvas to make custom stickers. Or you can upload your SVG file. Once you have placed the images on your canvas, select Print Then Cut under the Operation menu and change the design from a Basic cut to a printable design.
Step 3: Format Images With Offset Feature
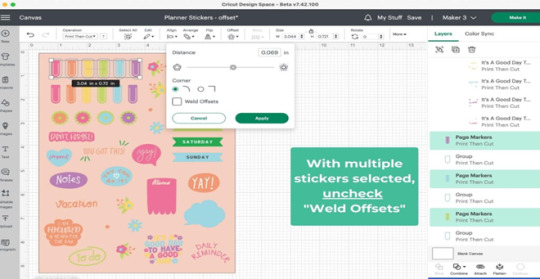
When you are done creating your stickers, you can add a finishing touch. To do this, you need to create a white border around your images. This creates a decorative outline called an offset, adding dimension to your sticker. Choose the design/ image that you want to offset, and then click the Offset option in the toolbar. When you are done selecting the offset feature by default, it can show you dark gray, which you may need to change to white.
Step 4: Attach the Images

Once you are done formatting your stickers, select each with its layers in the layers panel and click Flatten. When you flatten the images, make them into one layer, and to keep your project in order, select all photos and click on the Attach option.
After flattening the design, you cannot change the colors. But you can always Unflatten the images and make changes later.
Step 5: Print Sticker Sheet
Now, you’ve reached the best part of sticker making. Once you click the Make It button, you are ready to print your design. Click on Use System Dialog, and a preview box will appear where you can fix your print settings. Printer settings vary depending on your model, but select the highest-quality print setting if possible. Make sure the sticker paper is compatible with the printer and the paper you have chosen.
Step 6: Cut the Image Using Your Machine
This is the last step of ‘how to make stickers on Cricut‘. Firstly, when your stickers are printed, put them on the Cricut mat, then choose your material settings. After that, load your cutting mat and press start to cut using the standard fine-point blade. Remember to change your custom settings to Sticker paper. They have clear white options, so choose accordingly. When the stickers are done cutting, remove them from the mat, and it is ready to use.
Summary
Making stickers with Cricut is a very fun and creative process. Using your machine, you can make different kinds of stickers in different colors for your journals, scrapbooks, or for your gift hampers. It is a great way to get kids involved in a fun and creative activity. You can create stickers for your journal, notebook, or customized gifts. Not only is it a creative process, but it is also a great way to add a unique touch to your belongings.
In this blog, you explore ‘how to make stickers on Cricut’, and now you can decide which kind of stickers you want to make.
Source: How to Make Stickers on Cricut
#how to make stickers on Cricut#cricut stickers#cricut design space app#cricut design space software#cricut maker setup
1 note
·
View note
Text
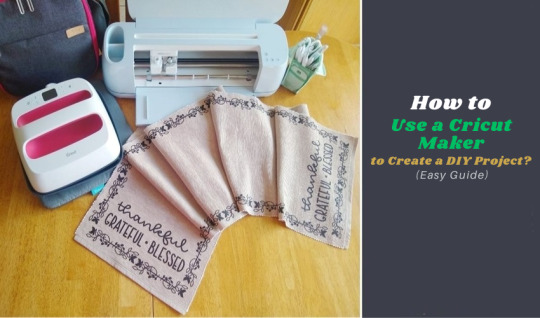
How to Use a Cricut Maker to Create a DIY Project? (Easy Guide)
Are you thinking of buying a Cricut Maker? Or you have just got one and are not sure where to start? This guide will walk you through all the different ways to learn how to use a Cricut Maker without any previous experience.
This cutting machine is advanced and unique from other models, like Explore Air 2 and Joy machine. It delivers a wide range of features, tools, and accessories for crafting projects. With this machine, you can cut fabric, vinyl, cardstock, chipboard, and more precisely.
So, if you are a beginner and don’t know how to use this machine—don’t worry; we are here to help! Read this blog, and you will learn how to use it easily.
How to Use a Cricut Maker: Unboxing and Initial Setup
Once you have got your machine in your hands, it is time to check if you have all the necessary supplies and tools that come with the machine or not. So, in order to do that, you must follow these steps:
Step 1: Unbox Your Machine
Carefully remove the machine from the box, ensuring that all packaging materials are removed. Inside the box, you will find the machine, a power cable, a USB cable, a cutting mat, a fine-point blade, and a welcome guide.
Step 2: Positioning Your Machine
Place the machine on a flat surface, ensuring at least 10 inches of space in front and behind the machine. This space allows the cutting machine to move freely during operation.
Step 3: Connecting to Power
Now that you have unboxed your machine, it’s time to take the most important step: giving it life support. To do that, you must insert the power cable into the back of the machine and plug it into an electrical outlet. Once you finish the connection part, let us look into how to activate your machine.
How to Activate a Cricut Maker: Quick and Easy Steps
The first thing to do is activate the machine. To do so, from your Windows/Mac, you must head over to cricut.com/setup from any browser of your choice. Activating the machine is even easier if you have already used the Design Space app. To set up the machine from the app, go to the Menu icon and then select ‘Cricut New Product Setup.’ After that, follow the prompts that let you choose your machine.
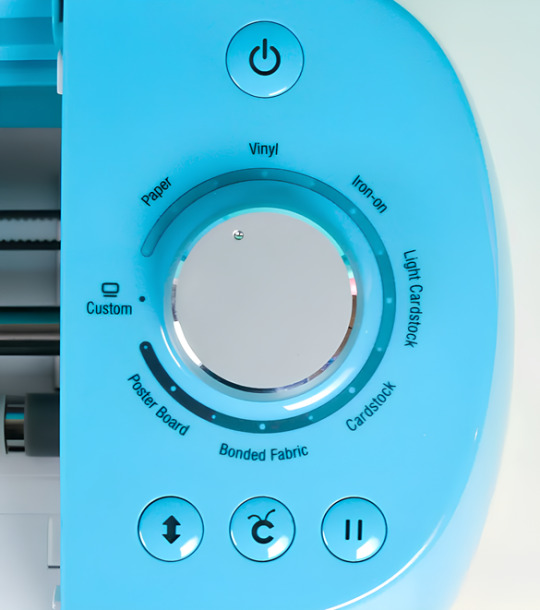
To open the machine, you must lift its lid. This will open the cover of the machine automatically.
Power button: With this button, you can turn the machine on and off.

Feeding switch: This button lets you feed your mat into the machine.

Cricut switch: This is the button with the initial C. Press it when you want to start cutting (it is also called the confirm button).

Pause button: This button gives you the flexibility to pause your machine in between. It’s extremely handy if you’re in the middle of a cut and want to change something or for any other reason.

That’s all in terms of design. In the next section, we’ll look at the steps to create a project.
How to Use a Cricut Maker: 5 Easy-To-Follow Steps
To use a machine, follow these detailed steps from setup to your first project. As the Cricut Maker Setup is a versatile cutting machine, it can handle various materials, making it ideal for crafting projects.
Step 1: Connecting to Your Device
In order to get a hold of the machine, you must connect it to your desktop or computer. This is crucial because, without the connection, the machine cannot communicate with your device. Even though the Design Space app can work offline, you still need a connection at least once to save it on the app.
You can connect your machine to your device via a USB cable or Bluetooth. Connect the square end to the machine and the USB end to your PC via USB. To pair your device with the machine using Bluetooth, turn on the machine and then go to the Bluetooth settings.
Visit the official website or surf design.cricut.com and download the Design Space application. It is essential for project creation and supports various platforms, like Mac, iPad, and iPhone.
Step 2: Setting Up Design Space
This is the most important step after connecting the machine and your device (Mac/Windows). Once you have downloaded the app, you must do these things for a smooth experience:
Open the software and fill out the required fields to create an account. The account allows one to save their projects and access various design features.
In the software, select “New Machine Setup” from your profile. Finish the on-screen steps to choose your machine model and perform the setup process. The app will guide you in connecting your device to the machine.
Step 3: Designing Your DIY Project
Now that you have done all this, let’s start creating your first project. To do so, let’s look at these steps:
Start a New Project: Once your machine is connected, you can start a new project using the software. Select the type of project you want to create, such as a card, decal, or label.
Choose Your Materials: Design Space allows you to select the material. If you use cardstock, set the material type accordingly.
Prepare Your Cutting Mat: Place your chosen material onto the mat. Ensure it is aligned correctly and adheres well to avoid shifting during cutting.
Step 4: Start the Cutting Process
Now that you are familiar with downloading the app and activating the machine, let us look at its main purpose: the cutting process. It happens as described below; follow the steps carefully for a seamless cutting.
Load the Mat: Insert the mat into your crafting machine until it clicks into place. This will automatically feed the mat in for cutting.
Start Cutting: Press the “C” button on the machine to begin cutting. Your device will display a percentage of the cut completion and allow you to monitor the progress.
Completion: Once the cutting is finished, the machine will signal it is done. Carefully remove the mat and peel off your cut material.
Step 5: Post-Cutting Steps
It is equally important to know what to do after you are done with your cutting process.
Removing Your Cut Material: Gently lift the material from the machine mat. If you use delicate materials, such as intricate designs, use a spatula tool to help lift them without curling.
Assemble Your Project: Depending on your project, you may also need to assemble various pieces. Follow any additional steps to add embellishments or complete your design.
Conclusion
Don’t be discouraged if your first project isn’t perfect. The more you use your cutting machine, the more comfortable you will become with the process. Take time to explore the features of Design Space, like templates, images, and fonts. This exploration can inspire new project ideas. Using a crafting machine opens up a world of creative possibilities. Following these steps, you can confidently set up your machine, design your projects, and bring your creative ideas to life. Happy crafting!
FAQs
How do you use a Cricut for beginners?
To use a crafting machine as a beginner, unbox your machine and follow the setup steps. Download the Design Space software on your computer or mobile device for project creation. Familiarize yourself with basic operations like uploading images, selecting materials, and changing settings. Start with modest projects, such as stickers or paper cards, to build confidence. Use online resources and community forums to get more support and inspiration.
What do you use a Cricut Maker for?
A Cricut Maker is a versatile creative gadget that can cut materials like vinyl, paper, and fabric. It’s excellent for making unique designs for home decor, apparel, and more. The machine is capable of cutting a variety of materials, making it appropriate for both simple and intricate crafts. Beginners begin with projects such as greeting cards or decals, gradually discovering their full potential as they gain skills.
Do I need a computer to use a Cricut?
While a computer is not required to use a Cricut, it is suggested for maximum performance. The Design Space software can be accessible from a computer, tablet, or smartphone, making design management easier. Using a computer allows for a wider screen and more accurate control when making complex designs. However, several users have operated their machines using mobile apps, allowing them to create while on the road.
Source: How to Use a Cricut Maker
#how to use a cricut maker#cricut design space download#cricut design space app#cricut design space software#Cricut Maker Setup#cricut new product setup#how to setup cricut maker#cricut new machine setup
1 note
·
View note
Text
How to Pair Cricut Maker: Easy Steps for Connection
Cricut Maker is one of the best crafting machines available for creating stunning projects. In order to use this machine, it is essential to know how to pair Cricut Maker with any device you prefer—whether Windows, iOS, Mac, or Android. In this blog, I will explain how to connect your Cricut machine to each of these devices easily.
You can pair the Cricut Maker with your device using Bluetooth or USB. USB offers a wired connection, which some professional crafters prefer for its reliability. However, Bluetooth is more popular among individual users due to its wireless flexibility. With Bluetooth, you can move around freely without being limited to one place while using the machine.
How to Connect Cricut Maker to Windows?
If you have a Windows computer and want to work with your Cricut cutting machine, you should pair it with your Cricut Maker machine. Here is how you can pair them using Bluetooth:
To start the process, first, plug the Cricut machine into a power source and turn it on.
After that, place your computer within 10-15 feet of the machine.
Then, go to the computer’s home screen and click on the Start menu.
From the Start menu, navigate to Settings and choose the Devices option.
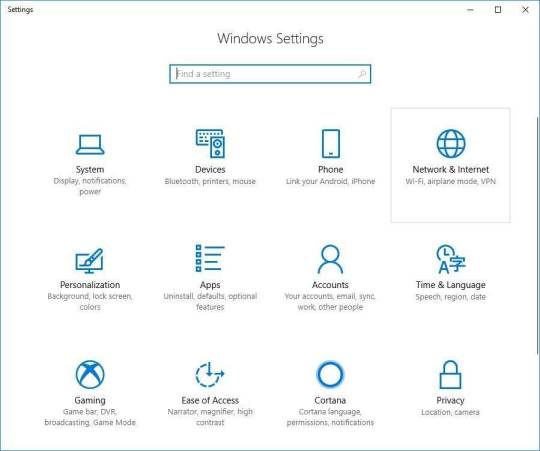
There, you will see Bluetooth; turn it on.
Now, click on Add Bluetooth or other device and select the Bluetooth option.

Your Windows computer will begin detecting available Bluetooth devices.
When you see the Cricut model listed, click on it to connect, and that’s it. Your pairing process is done.
How to Pair Cricut Maker With Mac?
In case you have a MacBook instead of a Windows PC, you can add it to your Cricut cutting machine using the same method. Here is how to pair your MacBook to your Cricut Maker via wireless Bluetooth.
Initially, connect the Cricut product to a power socket and press the power button.
Next, maintain a distance of 10-15 feet between the MacBook and the machine.
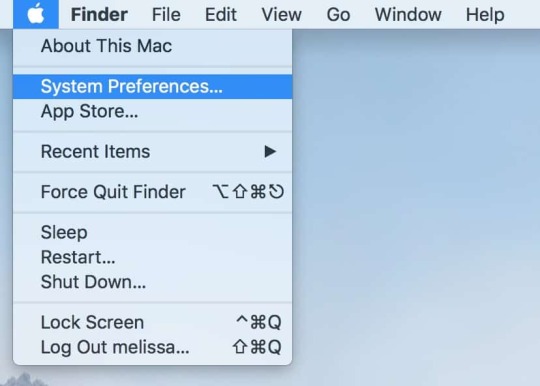
After that, you have to open the MacBook and go to the Apple menu.
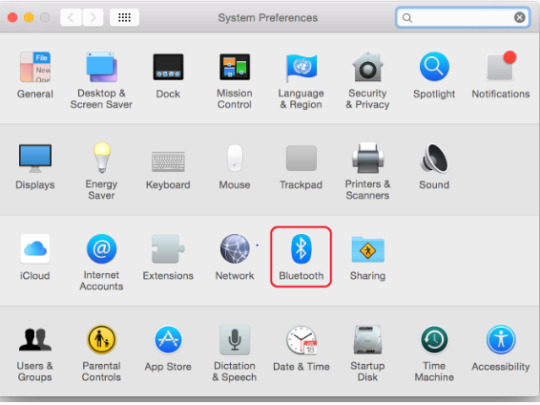
In the Apple menu, open System Preferences and then go to Bluetooth settings.
Now, turn Bluetooth on and wait for the MacBook to detect the machine.
When you see the machine listed, click on it to connect.
You can ensure the connection by returning to the Cricut Design Space app.
If you go to New Product Setup, you will see the connection there.
How to Pair Cricut Maker With iOS?
In case you do not have a computer, you can use a Cricut machine with your smartphone. To connect your iPad or iPhone to Cricut using Bluetooth, follow this procedure.
To start, turn on the Cricut product by plugging it in and pressing the power button.
Then, keep the device within 10-15 feet of the machine.
Next, go to your phone’s Settings and navigate to Bluetooth.
Moreover, you also have to make sure Bluetooth is on.

After that, search for your Cricut model machine.
When it appears on the list, tap on it to connect.
The connection will be completed. You can verify the wireless Bluetooth connection by opening the Cricut Design Space app on your device.
How to Pair Cricut Maker With Android?
In case you have an Android device, you can pair it to your Cricut cutting machine as well. Here is how to connect your Cricut to your Android device using Bluetooth:
First of all, connect the Cricut machine to a power source using a power adapter and press the power button to turn it on.
In addition, ensure the machine and your device are within 10-15 feet of each other.
Next, open the Settings on your phone and navigate to Bluetooth.
After that, you will need to turn Bluetooth on and search for your Cricut model.
When it appears on the list, select it to connect.
You can confirm the Bluetooth connection by checking in the Cricut Design app.
Apart from Bluetooth, you can also use a USB cord to add a Cricut product to your mobile device. To do this, pair one end of the cable to your phone or computer and the other end to the machine. Then, make sure the cable is in good condition; it is better to use a new or less-used cable for a stable connection.
Conclusion
In the blog, you learned how to pair Cricut Maker to your device. Pairing your operating system with the Cricut machine is simple, and once you know how to do it with any of your devices. This connection is important because it allows you to use the Cricut cutting machine with the Cricut Design Space app. Cricut offers two connection options: Bluetooth and USB. Most users prefer Bluetooth for its wireless flexibility.
FAQs
What Should I Do if My Cricut Maker Bluetooth Is Not Connecting?
There are a few things you can do to prevent Bluetooth connection errors. First of all, check if your Cricut machine is on or not. Also, make sure Bluetooth on your device is turned on. Keep the distance between the machine and your device within 10-15 feet. If the issue is still not resolved, try resetting Bluetooth, and the problem should be fixed.
What Is My Cricut Bluetooth PIN?
When connecting your Cricut product, you may need to enter a Bluetooth PIN code. In case prompted, you can input 0000, the default PIN for wireless Bluetooth connection. This is usually required only during the initial setup. Later, the device will remember it, but you may need to re-enter the PIN code if you reset Bluetooth.
Can I Pair My Cricut Maker With a Wired Connection?
Yes, you can use wired and wireless connections with Cricut machines. A wireless Bluetooth connection is more common among Cricut users for its convenience. However, if you want, you can also use a wired USB connection. USB is often preferred by professional crafters who need a more stable connection.
#Cricut Maker Setup#Cricut Maker#cricut maker 3#Easy Steps#Connect Cricut Maker#How to Pair Cricut Maker
0 notes
Text

Cricut Maker Machine is a versatile tool for DIY enthusiasts and crafters, offering precision cutting of various materials including vinyl, fabric, paper, and more. It connects to computers and mobile devices via Bluetooth or USB, allowing users to upload custom designs or choose from a vast library of pre-designed projects through Cricut’s Design Space software. Its adaptive tool system accommodates a range of accessories like rotary blades for fabric cutting and scoring tools for precise folding. With its user-friendly interface and robust capabilities, the Cricut Maker empowers users to create intricate designs, personalized gifts, and professional-quality crafts with ease and precision.
0 notes
Text
How to Connect Cricut Maker 3 to Bluetooth: Beginner’s Guide
Want to connect Cricut Maker 3 to Bluetooth on your phone or computer? Then, you are welcome. In this blog, I will be guiding you through all the details that you require to know. After reading this post, you will have no tension about connecting any device, be it a computer or a mobile device. I will teach you about the basic steps, and then you will be ready to connect any device to your Cricut Maker 3 machine. So, without any further delay, let’s dive into it.
Connecting Cricut Maker 3 to a Windows PC via Bluetooth
Connecting the Cricut machine to your Windows laptop or computer is easy. You can connect it by using these simple steps:
The first thing you are supposed to do is plug the machine in and turn it on.
Then, keep the machine within 10 to 15 feet of range. So your machine will not have to face the connectivity issue.
Next, look for the Start menu on your computer and open it.
Once it opens, go to the Settings tab.
When the Settings open, click on the option Devices.

There, you will find Bluetooth. Then, go to Bluetooth and search for your machine.
Now, start the Cricut machine procedure.
When it is complete, it will show as connected.
That’s it for connecting the Cricut cutting machine to your Windows operating system. Now, you can start making unique designs and stunning projects with your machine.
How to Connect Cricut Maker 3 to Bluetooth on Mac
Like Windows computers, Macs have a similar approach to connecting with the Cricut cutting machine. You can follow these easy steps to connect the Cricut Maker machine.
To start, you have to power on the machine after plugging it in using the power adapter.
Next, keep your Mac computer and the machine within 10-15 feet range.
Open the Apple menu on your Mac computer and go to System Preferences.
You will find Bluetooth over there. Open it.
Look for the machine on the list of Bluetooth devices.
After that, select the machine you want to connect to.
Then, go to the Cricut app and select New Product Setup.
Now, the Cricut cutting machine will be connected.
Isn’t it an easy setup guide? Yes, right. You have successfully connected the Cricut machine to your Mac. Now, download and install the Cricut software and start your crafting journey!
How to Connect Cricut Maker 3 to Bluetooth on Android?
Smartphones have a slightly different approach to connecting to the machine. The phone’s settings and applications are placed in a different way. But these are easy to find, and you can do it as follows:
First of all, switch on your Cricut cutting machine.
Maintain the distance between the machine and your phone, which should not be more than 10-15 feet.
Search for the Settings tab on your phone and open it.
On the following screen, you need to open Bluetooth.
Look for the machine in the list that is displayed on your phone and select it.
Next, the machine is connected. Now, open the Cricut app and select Setup.
In the last step, your machine will appear to be connected.
Connecting Cricut Maker 3 to iOS Devices Using Bluetooth
Like Android phones, iOS phones can also connect to your phone. All you need to do is:
Initially, the Cricut Maker 3 machine should be on and should have a range of 10-15 ft.
Bluetooth will be found in the Settings and should be opened.
Next, open Bluetooth and see the list of devices. You will find your Cricut model in the list.
After that, select the Cricut model machine.
Now, open the Cricut app and then sign in with your username and password.
After you complete the process, the Cricut cutting machine will show up as connected.
Conclusion
Cricut Maker 3 is an amazing cutting machine to get started with your DIY projects. After reading this blog, I am sure you have learned how to connect Cricut Maker 3 to Bluetooth. Wireless Bluetooth connectivity gives you flexibility about keeping your machine anywhere according to your preference. You can now connect your Cricut machine to any operating system, such as Android, Mac, Windows, or iOS that you are using and start your journey in the world of crafting.
FAQs
Why Is Cricut Maker 3 Bluetooth Facing Connection Issues?
A couple of reasons may affect the connection of your Cricut cutting machine to your device. One of them could be that you kept the distance between your operating device and the machine more than 15 feet. It is a very common problem. In this case, you have to bring the device in the reach of your Bluetooth connectivity, and the error will be solved.
What Should I Do if My Cricut Maker 3 Is Not Working?
If your Cricut Maker 3 machine is not working even after connecting it to your mobile/computer, then you can do two things. First, turn off the machine for 10 seconds and turn it on again. The problem should be fixed. If it persists, you can go to the Bluetooth settings, unpair the device, and pair it again. The problem will be solved.
Do I Always Need to Connect Cricut Design Space to the Internet?
Not really! You don’t always need an internet connection in order to use the Cricut app. You can use it without the Internet as well, although there is a limit to the number of features you can use without the Internet. If you want full access to all the features, you will need to connect to the Internet.
#connect cricut maker 3 to bluetooth#Cricut Design Space#cricut design space login#cricut design space app#cricut maker setup#cricut maker bluetooth not working
0 notes
Text
Explore the possibilities with a Cricut cutting machine to make enticing projects. Get the machine from Cricut’s official site and set it up using Setup Cricut.com. For this, navigate to cricut.com/setup. After this, select the Cricut new machine setup you are using and start cutting the material you want. Cricut is capable of cutting various materials up to 300+ uninterruptedly. Use your computer or mobile device to create an alluring design and control all the functions of your Cricut with one click.
#cricut maker setup#cricut maker 3#Cricut Maker Machine#cricut.com/setup pc#cricut.com/setup windows#cricut.com/setup#cricut explore air 2#cricut design space download#cricut software app#cricut new machine setup#cricut project ideas
0 notes
Text
You can unleash your creativity right from the comfort of your home. Wonder how? It's very simple: just use any Cricut machine. Known as the best cutting companion, the Cricut machine produces the power to cut, score, and deboss a variety of materials like paper, vinyl, wood, and engraved metal. Plus, you can create popular DIY projects ranging from greeting cards to everyday items and T-shirts. To use the capabilities of the Cricut new machine setup, make sure you have Cricut Design Space installed on your computer from cricut.com/setup.
#cricut maker setup#cricut maker 3#cricut.com/create#cricut.com/setup#cricut setup#cricut design space app#cricut explore air 2
0 notes
Text
How to Connect Cricut Bluetooth to Mac and Windows?

Have trouble connecting a crafting machine? Here, I answer how to connect Cricut Bluetooth on Mac and Windows computers. During my six-year crafting journey, I faced many challenges. Be it creating a project or setting up the machine, the journey was full of ups and downs.
Nothing can be worse for crafters than setting up this machine. It takes time, and many non-tech-savvy people do not like to do it—no worries; I know your pain😉! In addition, these years of experience have taught me a lot about this exceptional machine.
Hence, believe it or not, these overall steps can be fun. To learn more, delve into this tutorial and check out the blog. I will explain the system specs first, then show you how to connect Cricut to computer via Bluetooth.
System Specifications for Using Cricut Design Space
Alright, we are heading to learn how to connect Cricut Bluetooth. But before you connect, you need to check the system specs. As I said earlier, checking the system steps can prevent your PC from crashing and many other errors. Let’s take a look at a few important points provided below:
Mac
Supported Operating System: macOS 11 or later
RAM: 4 GB
CPU: 1.83 GHz
Display Resolution: 1024px x 768px
Internet: Minimum 2 – 3 Mbps Download & 1 – 2 Mbps Upload
Hard Disk Space: 2 GB required at least
Connection Type: Bluetooth wireless or wired USB
Offline Feature: Yes, it is available for Mac
Windows
Supported Operating System: Windows 10 or later
RAM: 4 GB
CPU: Intel Dual-Core or equivalent AMD processor
Display Resolution: 1024px x 768px
Internet: Minimum 2 – 3 Mbps Download & 1 – 2 Mbps Upload
Hard Disk Space: 2 GB required at least
Connection Type: Bluetooth wireless or wired USB
Offline Feature: Yes, it is available for Windows
How to Connect Cricut Bluetooth to Your Computer?
Here, I am going to connect your machine to Bluetooth devices such as Windows and Mac. By connecting this machine to your compatible device, you will be able to start your crafting journey in one go! Let’s delve into the steps given below:
Mac
Power on your machine and MacBook.
Cutting machine should be within 10-15 feet of your Mac.
After that, you will need to go to the Apple menu given in the upper left corner.
Next, choose System Preferences or System Settings.
Now, search for the Bluetooth option.
Turn on the Bluetooth.
Wait and see if your Mac detects your nearby machine.
When detected, select it and click on the Pair button.
Once done, return to your Design Space app and Cricut New Product Setup.
Then, your machine will show that your device is connected.
Windows
Turn on the PC and place it 10 to 15 feet away from the machine.
After that, press the Start button (Windows logo-like key) on the keyboard and select a gear icon, which is your Settings.
Once the Settings opens, you need to select the Devices option.
Now, you will need to find the Bluetooth option and check if it is on.
If your Bluetooth is off, turn it on.
Then, you have to add your machine by clicking on Add Bluetooth or other device.
On the next pop-up screen, you are required to select the Bluetooth option.
Also, your PC will start looking for the machine nearby.
Once it finds your machine model, click on it to pair.
Finally, you learned how to connect Cricut to computer. Afterward, you can open your Design Space and start setting up the machine. For setup, you will need to follow the on-screen prompts displayed on the Design Space app. Once done, you are all set to craft!
Final Words
So, yeah, that’s all in this blog tutorial. By now, you might have learned how to connect Cricut Bluetooth. Afterward, you are ready to proceed and complete the machine setup. To conclude, I explained the system specs so that you can understand your system’s compatibility before setting it up. After the system specs, I explained the steps for connecting the machine to the PC and Mac separately. Good luck with your crafting journey.
FAQs
How can I connect my Cricut to Bluetooth?
To create your machine to your Bluetooth device, check out the following points:
Go to your mobile device (Android or iOS).
Ensure Bluetooth is turned on.
Also, turn on the heat press.
Then, head to Google Play Store (on Android) or App Store (on iOS).
Search for the Cricut Heat app and download it.
Open the app and select the Cricut Setup button on the screen.
After that, your device will detect your nearby device.
Tap on the Connect button.
Finally, your heat press is paired now.
Which Cricut machine is Bluetooth enabled?
Several Cricut machines are Bluetooth enabled, such as the Maker, Maker 3, Explore Air 2, Explore 3, Joy, and Joy Xtra. These latest and smart cutting machines have built-in Bluetooth and are compatible with iOS, Android, Windows, and macOS. However, they can be connected via USB cable except for the Joy model.
How to install a Bluetooth adapter in Cricut?
In order to install a Bluetooth adapter in your Explore or Explore One machine, delve into the following quick steps:
Turn on the Explore machine.
Grab the Bluetooth adapter and remove its cap.
Insert the adapter into your Explore machine.
Ensure the text on the adapter is facing up
When you notice a blue light flashing, it means you have installed the adapter.
Source: How to Connect Cricut Bluetooth
#how to connect cricut bluetooth#how to connect cricut to computer#cricut design space download#cricut design space app#cricut design space software#cricut explore air 2 setup#Cricut setup on computer#how to setup cricut explore#cricut explore air 2 software#Cricut New Machine Setup#Cricut maker setup
1 note
·
View note
Text
#youtube#youtube channel#youtube shorts#shorts#subscribe#hilarious#funny#cricut#cricut machine set up#cricut maker setup#cricut maker#crafts#projects#birthday present
0 notes
Text
How to Install Cricut Maker 3? (Full Guide)
Have you bought a Cricut Maker 3? Then, you need to install it on your device. I’m a craft expert, and in this guide, I’ll share with you ‘how to install Cricut Maker 3‘ on your operating system.

As an expert, I have been using this machine for 4 years, and now I’m guiding beginners in installing their crafting machine. Now, let’s dive into the steps for installing your ultimate DIY machine to start your creative journey.
A Little Introduction About Cricut Maker 3
Before stepping into the installation process, let’s learn a little about its features and capabilities in detail. So, as we already know, it’s a machine full of wonder and joy. This machine has an extremely impressive range of features that I admire the most. With a sleek design and appearance, it has become the most desired machine in the DIY field.
Talking about its abilities, it can cut a huge number of materials, including delicate and complex ones. For instance, it can cut paper and wood precisely and effortlessly. To install it, you must first unbox it and connect it to a power supply. Once it is connected to the power supply, connect it to your device and proceed with your machine’s installation.
How to Install Cricut Maker 3 on Your Device?
After unboxing and checking all the equipment inside the machine’s box, let’s uncover the easiest way to install your machine on a computer device. Although you can connect it to a smartphone, I’m focusing on the computer connection.
After unboxing, place your cutting machine in a cool, safe place.
Then, connect it to a power supply. Use the power cord you received inside your machine’s box.
Now, hit the power button and switch on your DIY machine.

Thenceforth, connect your machine to the computer via Bluetooth. Otherwise, use the USB cord you received with the package.
Go to your computer and open a browser of your choice.
Next, navigate to design.cricut.com.
After that, click the Download button when you see it.
Also, head over to the Product Setup window.
On the next window, choose the Smart Cutting Machine option.
Proceed with the on-screen instructions.
At last, you can try doing a project with your machine to test its features.
That’s it for installing the crafting machine on your computer device. If you’re a little concerned about its connection to your device, let’s check it, too.
How to Connect Cricut Maker 3 to Your Device via Bluetooth?
After learning how to install Cricut Maker 3, you may have a query about connecting your both devices together. If you’re trying it for the first time, let me guide you through it.
Make your first move by turning on the machine and computer.
Then, head to the Start menu and locate the Devices option.
Now, under the Bluetooth settings, hit the Add Bluetooth or other device option.
After that, your PC will detect the devices that are available nearby.
Once your machine appears, select it and let it connect to your PC.
Finally, go to the Machine Setup option, and you’ll see your machine connected there.
You can connect your devices together using a USB connection, but a wireless connection such as Bluetooth will install your machine effortlessly. When you know everything about the installation, start with your machine and create whatever you want. There are so many projects you can try with it.
Important Note: Don’t forget to check the minimum system requirements before trying to install your machine and connect it with your computer.
FAQs
How to Install Cricut Maker 3 on Mac?
To install your machine on a Mac, follow these steps:
First, unbox your machine and connect it to a power supply.
Then, turn on your machine.
Now, get your computer and connect it to your machine.
Choose either USB or Bluetooth to connect your devices together.
Next, pair your devices together.
Visit cricut.com/setup and download the Design Space app.
Continue installing the app and sign in to it.
Finally, your machine is paired with your Mac.
Is Cricut Design Space a Good Software?
Yes, Design Space is excellent software for your DIY routine. It has several amazing features that work best for beginners—to pro-level crafters. Since this software is absolutely free, you don’t feel it is a heavy investment.
How Can I Connect My Cricut Maker 3 to My iPhone?
To connect your product to an iPhone, use these steps:
First, connect your machine and iPhone with a suitable connection.
You can select from the USB or Bluetooth connection.
Now, download the app on your iPhone using the App Store.
Then, open the app and sign in with your account details.
Finally, your crafting machine will be connected to the iPhone.
Source: How to Install Cricut Maker 3
#cricut maker setup#cricut maker 3 setup#install cricut maker 3#how to install cricut maker 3#cricut machine setup#design.cricut.com#cricut design space app#cricut design space software#cricut design space download
0 notes
Text
Cricut Iron On Vinyl Instructions: Quick & Easy Guide
If you’re new to the world of Cricut and want to upgrade your crafting with iron-on vinyl, then this quick and easy tutorial is for you. Cricut iron on vinyl is a thin, flexible pre-cut sheet or roll of vinyl with an adhesive backing that is activated after heat and pressure. You can create beautiful personalized T-shirts, makeup bags, pillowcases, wine bags, and more from iron-on vinyl.
In this guide, I am going to show you detailed Cricut iron-on vinyl instructions to help you explore other possibilities for the Cricut machine. Don’t worry; I have written this tutorial for beginners in mind — I will walk you through the entire process in depth from start to finish. Plus, I will discuss the essential supplies, how to make a design, how to cut iron on vinyl, and so much more. So, let’s get started.
Essential Tools and Materials for Designing a T-shirt
Gathering enough supplies is the most important instruction for making any Cricut iron-on vinyl project.
A Cricut cutting machine
Weeding tool
Cricut Easy Press
Everyday iron-on vinyl
Base material (T-shirt, tote bag, etc)
Cricut cutting mat
Heat Press mat
Cricut Design Space
Cricut Guide
Butcher paper
Step 1: Create or Upload a Design in the Cricut App
The first thing you need to keep in mind for any Cricut iron-on project is a digital design that allows you to cut iron on vinyl. You use the design and apply it to the desired surface.
First, download a design in SVG format from the internet and make sure it is compatible with Cricut Design Space.
Unzip the SVG file, open the Cricut app, and click on New Project.
Also, hit the Upload button on the left sidebar and upload the file to the canvas.
Next, drag and resize the design to fit the surface. I chose a shirt as the surface to demonstrate the Cricut iron on vinyl instructions.
When the design is ready for iron on vinyl, click the Make It option.
Step 2: Select Your Materials
Now is the right moment to choose the materials and configure the settings one by one in the Design Space.
On the prepare screen, toggle the “Mirror” option and press the Continue button.
Click Browse All Material on the next make-screen and search for iron on vinyl. Note: If you have Cricut Explore Air 2, turn the wheel to custom.
Step 3: Cut & Weed Out Iron On Vinyl
As soon as you select iron as the material, it’s time to cut out the design.
First, place the vinyl on the Cricut cutting mat and insert the mat into the machine.
You have to press the flashing Go button to start cutting your design on the vinyl.
Once the machine stops cutting, remove the mat and the negative parts from the design using the weeding tool.
Step 4: Preparation for Applying Heat
Once your design is ready, it is time to learn Cricut iron-on vinyl instructions and prepare everything to apply the heat.
Initially, visit the Cricut Heat Guide and get accurate timing & temperature info.
Set up the workspace, place the Easy Press mat on a clean surface, and preheat it.
Now, lay down the shirt on the heat press mat and preheat it for 5 seconds to remove the wrinkles.
Step 5: Place the Vinyl on Your Shirt
These are the final Cricut iron on vinyl instructions that need to be followed to complete the process.
First, center the vinyl design on the shirt you just cut out, and be sure to place the shiny vinyl side up.
Now, place butcher paper over the design and apply heat to the vinyl following the Cricut heat transfer guide. I use light pressure at 315F for 30 seconds.
Finally, leave the surface (shirt) until it cools, then peel off the plastic transfer sheet.
Frequently Asked Questions
Question 1: How do I use a Cricut iron on vinyl?
The following are brief step-by-step instructions for using the Cricut vinyl.
Create or upload a design in Cricut Design Space.
Select vinyl as the material and other cut settings.
Cut and weed out the design.
Place the heat press on your design.
Question 2: How long should you leave the Cricut iron on vinyl?
Once you apply heat to the Cricut iron on vinyl, it penetrates the surface, and the time and temperature depend entirely on the Cricut Heat Guide instructions. For better results, apply moderate pressure with the iron for 25 to 30 seconds. As for how long to leave the iron on vinyl, the answer is simple: until the surface has cooled.
Question 3: What materials should you avoid while using Cricut iron on vinyl?
Before deciding how to use Cricut iron on vinyl, it is important to know its compatibility with various materials. Iron on vinyl is suitable for use on cotton, polyester, blends, and burlap canvas. But, it is not compatible with fabrics like nylon and spandex. Therefore, refrain from using iron on vinyl on such fabric surfaces.
Final Words
Crafting with a Cricut machine is both adventurous and challenging, offering many opportunities. One such difficult task is cutting and applying heat iron on vinyl with Cricut to create popular DIY projects like T-shirts, tote bags, cards, banners, keychains, and makeup bags. If you are here, you’ve already navigated through the step-by-step Cricut iron-on vinyl instructions necessary to achieve the desired output.
Source: Cricut iron on vinyl
Cricut iron on vinyl instructions
Visit here for more Information: Cricut.com/setup
Cricut explore 3
#Cricut iron on vinyl#Cricut iron on vinyl instructions#cricut.com/setup#cricut explore 3#design space cricut#cricut maker 3 vs explore 3#2024
2 notes
·
View notes
Text
5 Easy DIY Cricut Halloween Decorations Ideas For 2024

It is the fall season, and Halloween is approaching, so you get a chance to unleash your creativity, so you want to make these Cricut Halloween decorations. Whether you are throwing a party or decorating your own home, it does not matter. Use Cricut to create DIY decor, party projects, and costumes. With Cricut, you get to customize and personalize them with your style.
Here is a great collection of fun and DIY crafts you can make with your Cricut, so read and explore some amazing ideas.
1. Treat Bags
Sometimes, it is not possible to buy treat bags specifically for Halloween. It is important to have treat bags for your candies, but instead of buying them, make them at home with the help of your Cricut machine. Create a spooky and scary design in the Design Space app, cut the iron-on vinyl, and transfer it to the bag with a transfer sheet. Your treat bags will be ready for a Halloween party.
Materials Required
To make the customized treat bags, you will need these materials and tools:
Cricut Machine and Design Space app
Cardstock
Sticky Tape
Iron on vinyl
Transfer sheet
Scoring Tool
Debossing Tool
2. Halloween garland
Grab your Cricut machine and some black cardstock, and start making some freaky and cool spiderweb garland for your home. It’s easy to create. Design as many spiderwebs as you like on your app, cut them out with the help of a Cricut machine, and glue all the pieces together until you have a garland. This is a unique way to add a spooky vibe to your Halloween decorations and decorate your entire staircase railing. What can be a better Cricut Halloween decoration than this?
Materials Required
Halloween garland is one of the easiest projects that you can make with these supplies and with Cricut:
Cricut machine
Cricut Design Space software
Black Cardstock
Glue
3. Costumes
Halloween children like to gear up their looks on the eve of Halloween, and this year, you can use Cricut to make your costume, allowing you to be more creative with your work. Cricut Maker is best for making costumes because it can cut hundreds of materials, ranging from delicate to slightly thick fabrics. The possibilities are endless with Cricut Maker. You can choose a skeleton image using Cricut Design Space software, cut the materials, and place your design on the cloth with the help of EasyPress.
Supplies and Tools
For making costumes, you will need these art supplies and tools:
Cricut Maker
Cricut Iron-on
Cricut Design Space app
Weeding Tool
EasyPress
Blank Cloth
4. Tumblers or drinkware
What is the best way to design your tumbler or drinkware to be spooky? When your guests come over for a Halloween party, you can serve your beverages and scare them. It is a unique project design, an HTV project, and you can stick it to your tumblers. You’ll have to use a scary design from your Design Space and then apply it to your tumblers using heat transfer vinyl.
Supplies and Tools Needed
One of the unique crafts that you can make with your Cricut and with the help of these materials:
Black Cups
Cricut machine
Design Space software
Transfer tape
Cricut permanent vinyl
5. Lanterns
Turn a bunch of jars into amazing spooky lanterns and decorate your house for Halloween. This simple yet impressive craft is easy to do. Choose a ghost as your design in the Design Space app or upload your SVG file, then cut it out. Use the weeding tool to remove the excess part from the design. Then, place your design on the jar with the help of transfer paper. Then, peel off the transfer sheet and put an LED light inside your lantern, which is ready.
Supplies
To make spooky lanterns, get these supplies:
Cricut Maker or Cricut Explore
LightGrip mat
Transfer paper
Colored Cardstock
LED light
Wrap up
In this write-up, you explored all the Cricut Halloween decorations you can make with Cricut. It offers you a variety of features and tools with which you can customize anything and create unique crafts for your Halloween party. You can create all the above projects with your Cricut. It provides so much that you can never get bored of it, and the possibility of making projects is limitless.
So, make this Halloween memorable with Cricut. Unleash your creativity, and surprise your family and friends with these amazing, fun, and spooky projects.
For more information visit: Cricut.com setup mac cricut new machine setup how to setup cricut maker
#cricut halloween decorations#how to setup cricut maker#Cricut Maker Series#Cricut Maker Setup#Cricut Design Space app#Cricut Design Space download#Cricut Design Space Software#cricut new product setup#cricut new machine setup
1 note
·
View note