#cricutinstallsetup
Explore tagged Tumblr posts
Visit Tumblr Blog
Explore Tumblr blogs with no restrictions, modern design and the best experience.
Last Seen Tumblr Blogs


Fun Fact
130K people were victims of a chain letter scam that affected Tumblr in May 2011.
Text
install cricut design space app
Cricut cutting machines come with powerful connecting options to complete their setup via Bluetooth or USB. You can easily set up the machine on a Mac, but first, you need to download the Cricut Design Space app. You can visit the cricut.com setup mac to download the app and complete the setup of your device. However, if you are facing any problems and don’t know the Cricut machine setup process on Mac, then visit cricut.com/setup to get additional help.
install cricut design space app.

#CricutExplore3#cricutcomsetup#installcricutdesignspaceapp#wwwcricutcomsetuplogin#cricutcreateconnecttocomputer#cricutcomsetupmac#cricutnewproductsetup#settingupmycricutmaker#connectingcricutmakertocomputer#cricutsetupcreateaccount#cricutcuttingmachinesetup#cricutsetuponcomputer#settingupnewcricutmaker#cricutsetuplogin#cricutaccountsetup#cricutcomsetupdownload#cricutinstallsetup#cricutprintersetup
0 notes
Text
youtube
cricut.com setup mac
It is common to face some problems during the cricut.com setup mac if you are new. The problem can happen due to many reasons, such as device incompatibility, devices that are far apart from each other, firmware issues, outdated OS of Mac, and plenty of others. As a result, it is necessary to resolve the issue to complete your device setup problem. You can also go to the cricut.com/setup website and follow the step-by-step process to set up the cutting machine you are using. In addition, you can ask for additional help if necessary. go to the cricut.com setup mac.
#cricutcomsetup#installcricutdesignspaceapp#wwwcricutcomsetuplogin#cricutcreateconnecttocomputer#cricutcomsetupmac#cricutnewproductsetup#settingupmycricutmaker#connectingcricutmakertocomputer#cricutsetupcreateaccount#cricutcuttingmachinesetup#cricutsetuponcomputer#settingupnewcricutmaker#cricutsetuplogin#cricutaccountsetup#cricutcomsetupdownload#cricutinstallsetup#cricutprintersetup#Youtube
0 notes
Text
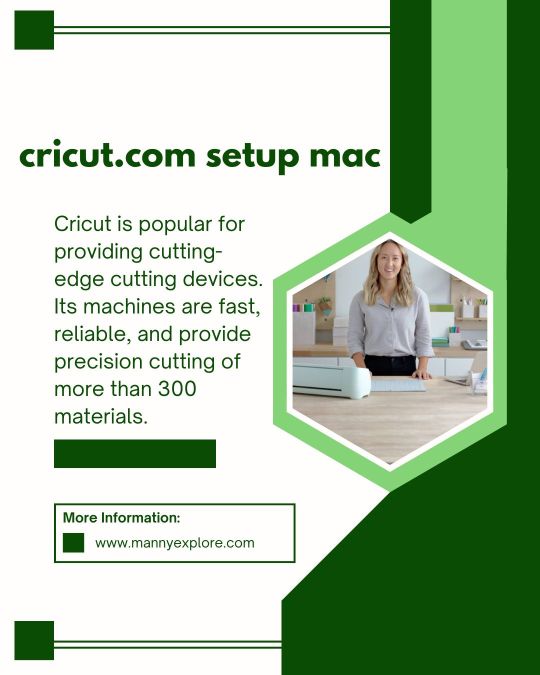
cricut.com setup mac
Cricut is popular for providing cutting-edge cutting devices. Its machines are fast, reliable, and provide precision cutting of more than 300 materials. In addition, these machines come with advanced USB and Bluetooth connectivity options that enable easy connection to Mac, Windows, Android, and iOS devices. If you want to complete the setup of your Cricut machine on a Mac, then you should get deep knowledge about the procedure beforehand. You can also go to the cricut.com setup Mac or cricut.com/setup to get started.
#CricutJoySetup#cricutcomsetup#installcricutdesignspaceapp#wwwcricutcomsetuplogin#cricutcreateconnecttocomputer#cricutcomsetupmac#cricutnewproductsetup#settingupmycricutmaker#connectingcricutmakertocomputer#cricutsetupcreateaccount#cricutcuttingmachinesetup#cricutsetuponcomputer#settingupnewcricutmaker#cricutsetuplogin#cricutaccountsetup#cricutcomsetupdownload#cricutinstallsetup#cricutprintersetup
0 notes
Text
How to Download Cricut App on Computer? (Complete Tutorial)
In this step-by-step guide, we will show you ‘how to download Cricut app on computer‘, whether you’re using Windows or Mac. Cricut Design Space is the essential software needed to design and connect to your Cricut machine. It allows users to create and personalize various projects, from greeting cards to home decor.
Although Cricut Design Space is also available for mobile users, many users still prefer the convenience and ease of working on a computer. It is also free to use, with additional features available through a paid subscription called Cricut Access.
Basic System Requirements for Using Cricut Design Space
Before downloading Cricut Design Space, ensure that your computer meets the system requirements.
Windows
Mac
How to Download Cricut App on Computer?
In this section, you will learn how to download the Cricut app on Windows and Mac, with step-by-step instructions for downloading the appropriate version for your operating system.
So let’s get started!
For Windows
For Mac
Set Up a Cricut Machine
After installing Design Space, it’s time to set up your machine and start designing!
Troubleshooting Tips While Downloading Cricut App
If you encounter any issues while downloading or using the Cricut Design Space software, here are some troubleshooting tips you can try:
Problem 1: Design Space Won’t Open
Problem 2: Design Space Won’t Connect to Machine
Problem 3: Design Space Freezes or Crashes
Conclusion
Now that you’ve successfully learned ‘how to download Cricut app on computer‘, you can explore the world of possibilities for creating and designing with your crafting machine. Whether you’re using Windows or Mac, you can follow this guide to get you started today. It has a larger workspace, enhanced features, and faster performance so that you can create even more intricate designs for all your crafting projects.
Frequently Asked Questions (FAQs)
How to Connect Cricut to Computer with Bluetooth?
Place your machine and device within 10-15 feet of your computer and follow these steps:
How to Update Cricut Design Space on Windows?
It’s important to update Cricut Design Space regularly to ensure you always use the latest features and fixes.
Can I use Design Space offline after downloading it on my computer?
Yes, you can use Design Space offline, but you need to plan ahead. After downloading the app and logging in at least once with an internet connection, you can save projects and fonts for offline use. Here’s how:
Remember, certain features, such as uploading images, browsing the Cricut library, or accessing the latest updates, still require an internet connection.
Visit: cricut.com/setup
Source: https://explorenewmachine.com/how-to-download-cricut-app-on-computer-complete-tutorial/
#DownloadCricutApponComputer#cricutcomsetup#installcricutdesignspaceapp#wwwcricutcomsetuplogin#cricutcreateconnecttocomputer#cricutcomsetupmac#cricutnewproductsetup#settingupmycricutmaker#connectingcricutmakertocomputer#cricutsetupcreateaccount#cricutcuttingmachinesetup#cricutsetuponcomputer#settingupnewcricutmaker#cricutsetuplogin#cricutaccountsetup#cricutcomsetupdownload#cricutinstallsetup#cricutprintersetup
0 notes
Text
youtube
cricut.com/setup
Cricut cutting machines come with powerful connecting options to complete their setup via Bluetooth or USB. You can easily set up the machine on a Mac, but first, you need to download the Cricut Design Space app. You can visit the cricut.com setup Mac to download the app and complete the setup of your device. However, if you are facing any problems and don’t know the Cricut machine setup process on Mac, then visit cricut.com setup to get additional help.
#CricutExplore3#cricutcomsetup#installcricutdesignspaceapp#wwwcricutcomsetuplogin#cricutcreateconnecttocomputer#cricutcomsetupmac#cricutnewproductsetup#settingupmycricutmaker#connectingcricutmakertocomputer#cricutsetupcreateaccount#cricutcuttingmachinesetup#cricutsetuponcomputer#settingupnewcricutmaker#cricutsetuplogin#cricutaccountsetup#cricutcomsetupdownload#cricutinstallsetup#cricutprintersetup#Youtube
1 note
·
View note
Text
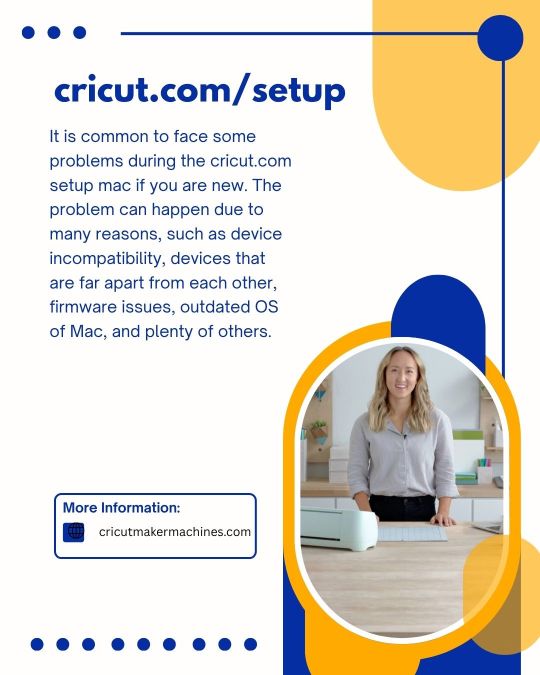
cricut.com/setup
It is common to face some problems during the cricut.com setup mac if you are new. The problem can happen due to many reasons, such as device incompatibility, devices that are far apart from each other, firmware issues, outdated OS of Mac, and plenty of others. As a result, it is necessary to resolve the issue to complete your device setup problem. You can also go to the cricut.com/setup website and follow the step-by-step process to set up the cutting machine you are using. In addition, you can ask for additional help if necessary.
#CricutExplore3#cricutcomsetup#installcricutdesignspaceapp#wwwcricutcomsetuplogin#cricutcreateconnecttocomputer#cricutcomsetupmac#cricutnewproductsetup#settingupmycricutmaker#connectingcricutmakertocomputer#cricutsetupcreateaccount#cricutcuttingmachinesetup#cricutsetuponcomputer#settingupnewcricutmaker#cricutsetuplogin#cricutaccountsetup#cricutcomsetupdownload#cricutinstallsetup#cricutprintersetup
0 notes
Text
youtube
cricut.com setup mac
Cricut is popular for providing cutting-edge cutting devices. Its machines are fast, reliable, and provide precision cutting of more than 300 materials. In addition, these machines come with advanced USB and Bluetooth connectivity options that enable easy connection to Mac, Windows, Android, and iOS devices. If you want to complete the setup of your Cricut machine on a Mac, then you should get deep knowledge about the procedure beforehand. You can also go to the cricut.com setup Mac or cricut.com/setup to get started.
#CricutJoySetup#cricutcomsetup#installcricutdesignspaceapp#wwwcricutcomsetuplogin#cricutcreateconnecttocomputer#cricutcomsetupmac#cricutnewproductsetup#settingupmycricutmaker#connectingcricutmakertocomputer#cricutsetupcreateaccount#cricutcuttingmachinesetup#cricutsetuponcomputer#settingupnewcricutmaker#cricutsetuplogin#cricutaccountsetup#cricutcomsetupdownload#cricutinstallsetup#cricutprintersetup#Youtube
0 notes
Text
cricut.com setup mac
Cricut cutting machines come with powerful connecting options to complete their setup via Bluetooth or USB. You can easily set up the machine on a Mac, but first, you need to download the Cricut Design Space app. You can visit the cricut.com setup Mac to download the app and complete the setup of your device. However, if you are facing any problems and don’t know the Cricut machine setup process on Mac, then visit cricut.com setup to get additional help.
#CricutExplore3#cricutcomsetup#installcricutdesignspaceapp#wwwcricutcomsetuplogin#cricutcreateconnecttocomputer#cricutcomsetupmac#cricutnewproductsetup#settingupmycricutmaker#connectingcricutmakertocomputer#cricutsetupcreateaccount#cricutcuttingmachinesetup#cricutsetuponcomputer#settingupnewcricutmaker#cricutsetuplogin#cricutaccountsetup#cricutcomsetupdownload#cricutinstallsetup#cricutprintersetup
0 notes
Text
How to Use Cricut Mini Press? (Complete Tutorial)
Need a handy press? Cricut has its own EasyPress Mini machine. In this write-up, we will discover the Cricut Mini Press heat guide printable. Its lightweight and compact design makes it unique and accessible. This machine also slides smoothly over any rough surface, and it is created for unusual objects and places that are harder to reach, like pockets, sleeves, tote bags, etc.
For crafters who work with small designs and projects where it is impossible to reach and stick the design, now it will be possible with this press machine. You can work with small designs and hard-to-reach places.
Its ceramic coating and sharp precision tips provide smooth and consistent motion with less pressure. Because it is light in weight, you do not need to exert much pressure. It has only one button with three settings: low, medium, and high.
Key Features of the Cricut Mini Press Heat Guide Printable
Before you start working with the machine, let’s examine its key features, which distinguish it from an iron or other press machine.
Heat Settings
Contrary to other presses, it has one button that works for all three settings: low, medium, and high. These settings are compatible with materials like iron-on designs, patches, and transfers.
It has three different heat settings. When you press it once, it goes low, then on the second tap, it goes medium, and the last is high. When you switch it on and set the temperature, it turns orange, and when it reaches the temperature, it turns green. Also, it has an auto shut-off feature that will automatically switch off if you do not use it for 13 minutes.
Size and Shape
The size is 3.25 x 1.92 inches, and the bottom looks like a little iron. It is easy to use with the comfortable handle provided, and in shape, it is not very different from an iron. But what makes it different is its flat surface, unlike most irons, which have some little holes for the stem to come out.
Heating Plate
This machine has a ceramic coating that helps to heat the base quickly. By applying heat evenly, it can perfectly smooth the surface. It also has high-temperature-resistant materials, which make it more durable.
What Materials Do You Need for Your Project?
To print on a shirt sleeve with your press machine, you will need the following materials:
How to Use Cricut EasyPress Mini to Print on a Shirt Sleeve?
Now that you know the key features of this press machine, follow these steps for your project before you start using it.
Note: Always use a Cricut EasyPress Mini machine at room temperature. Before using the machine, make sure your base material or the project you are working on is dry and moisture-free.
Summary
In conclusion, using a press machine is relatively easy. If you are a crafter working with small iron-on projects and looking for a more convenient and easy-to-use option, then the Cricut EasyPress Mini is perfect for you and worth buying. After reading this blog about the Cricut Mini Press heat guide printable, you will know all the steps and procedures. So, use the press machine today and start your crafting journey with a small and intricate design.
Frequently Asked Questions (FAQs)
How to Connect My Cricut EasyPress Mini to My Phone?
Using the Cricut Heat app, you can connect the press machine to your mobile device. After that, turn on Bluetooth on your phone, then switch on the machine. Now, open the app on your device and sign in with your email ID. If your machine is activated, it will show that the machine is connected. If not, select the Set Up option. Select the machine’s name available from the lists.
What types of projects can you make with Cricut EasyPress Mini?
This machine can create different types of crafting projects, such as stuffed animals, applique designs, shoes, hats, bags, and many more. Its precision tip is great for working with hard-to-reach places like shirt sleeves, pockets, and around zippers. It is an ideal and convenient companion.
What settings should I use for my project if I work with Cricut EasyPress Mini?
There are different temperatures for a variety of materials, depending on which kind of materials you are working with. You can keep the temperature low for delicate fabrics, synthetics, and wool. Keep the temperature medium if the material is iron-on or HTV. You can keep it high if it is for an infusible ink project.
Visit: cricut.com/setup
Source: https://mycricut-design-app.com/how-to-use-cricut-mini-press-complete-tutorial/
#cricutcomsetup#installcricutdesignspaceapp#wwwcricutcomsetuplogin#cricutcreateconnecttocomputer#cricutcomsetupmac#cricutnewproductsetup#settingupmycricutmaker#connectingcricutmakertocomputer#cricutsetupcreateaccount#cricutcuttingmachinesetup#cricutsetuponcomputer#settingupnewcricutmaker#cricutsetuplogin#cricutaccountsetup#cricutcomsetupdownload#cricutinstallsetup#cricutprintersetup#Cricutguide#Cricut Made
0 notes
Text
How to Make Rhinestone Template on Cricut? (Complete Tutorial)
As a Cricut expert, I would like to guide many beginner-level or experienced crafters through creating rhinestone templates. In Cricut, you can easily transform a simple design into an impressive masterpiece. You can create your own rhinestone template and add sparkle to your crafts.
I’ve worked on many rhinestone template projects, and it’s always an exciting and enjoyable process. First and foremost, it is important to be ready with all the necessary tools and supplies to help achieve better results. I will show you how you can show your crafting abilities and get deserved appreciation. Let me share the steps to make a rhinestone template on Cricut, but before that, I want to tell you how you should prepare.
What to Keep in Mind When Making Rhinestone Template?
When you are about to start designing your rhinestone template on Cricut, you may already be excited. However, keep certain key points in mind, which are:
Collect all the essential tools and supplies, such as rhinestones, adhesives, template material, and more. You must also have tweezers and a pick-up tool for handling tiny pieces.
On the Cricut Design Space application, select the right size and effect for the rhinestones according to your design’s requirements. You must also select the correct font or image and see whether it fits perfectly on the material you are using for the template.
Designing the template with precision is crucial. Transfer your pattern or image onto the template material using methods like tracing, iron-on transfer paper, or carbon paper. Check that all the lines are clear and accurate for optimal results.
Secure the rhinestones to the template material. Then, apply adhesive to the rear of all the rhinestones and carefully place them on the template. Let the glue dry before you proceed further.
Always use durable and versatile materials to cut rhinestone templates. The materials should last long, work well with various kinds of stones, and be easy to store. Consider vinyl sheets, as they are durable, flexible, and cost-friendly.
Steps to Make a Rhinestone Template on Cricut
Making a rhinestone template with Cricut can be a fun and exciting DIY project. But you must learn the right steps to get clean, accurate templates for sparkling designs:
If you are not aware of “How to create a rhinestone template on a Cricut Machine“, here are the steps:
Design Rhinestone Template in Cricut App
Step 1: On the Cricut Design Space app, download and install a rhinestone font.
Step 2: Click the Text tool on the left-hand side of the screen.
Step 3: Now, click the font drop-down menu, search for a rhinestone font, and select your preferred font.
Step 4: Next, navigate to the Shapes tool, select a circle, and resize it to match the size of a rhinestone.
Step 5: With the circle selected, click the color watch button in the Operation section and change the color.
Step 6: After that, you must resize the design to match the circle in the design to the rhinestone circle you just created.
Step 7: Zoom in, place the design over the circle, and see whether the size matches.
Step 8: Duplicate the design and place it onto the mat. This way, you’ll double-check the circle’s size.
Adjusting and Preparing a Design for Cutting
Step 1: Click the Shapes icon and select another circle. After that, resize that circle.
Step 2: Place the circle on the corner of the design. Make sure that it covers one dot.
Step 3: Select the duplicated design and the circle you just created. Then, click the “Slice” tool.
Step 4: Go to the Layers tab and click the Delete icon to delete all the slice results excluding the circle. After that, check the size of the circle from the toolbar.
Step 5: Resize the design till the circles are the correct size.
Step 6: If the design is too large for the surface, select it and, at the bottom of the screen, click the Combine and Unite icon. Then, you must edit the design.
Step 7: Once the design is ready, click the Make It button at the top right of the screen. Then, set it to On Mat from the Material Load Type section.
Step 8: Now, reposition the design on the mat and click Continue at the bottom of the screen.
Create Custom Material Settings
Step 1: Click “Browse all Materials” and then click Material Settings to create a new material cut setting for Rhinestone Flock.
Step 2: Scroll down and tap the Add New Material button. Give it a name, and click the “Save” option.
Step 3: Scroll to locate the new material, set the pressure to 275, and turn off multiple passes. Select the Fine-point Blade from the list and click the Save button.
Step 4: Click on “x” at the top to close the Custom Material window. Then, click the “Browse All Materials” option again, find and select the new cut settings, and click the “Done” button.
Step 5: Set the Pressure to More and check the “Remember Material Settings” box to save your preferences.
Step 6: Place the flock material on the LightGrip cutting mat with the liner side facing down.
Step 7: With a brayer tool, smooth it down on the mat.
Step 8: The next step is to load the mat on your machine. Just press the Load/Unload button on the machine and then the Start button to begin cutting.
Weeding, Applying Rhinestones, and Heat Pressing
Step 1: After you are through with the cutting, remove the mat and peel off the material from the mat.
Step 2: Take a piece of strong grip transfer and place it over the flock material. Burnish it down well.
Step 3: After that, peel off the transfer tape to weed out the small circles.
Step 4: Use a weeding tool to weed out the remaining design.
Step 5: From your design, peel the back sheet off. Next, stick it to the felt mat.
Step 6: Sprinkle the rhinestones on top of the design. Brush them all over your design.
Step 7: Carry on brushing until the rhinestone starts filling the circles right-side up.
Step 8: After you have set most of the rhinestones, fill the rest of the circles with a tweezer tool and flip the upside-down rhinestones.
Step 9: After setting all the rhinestones, place a piece of heart transfer mask over the design.
Step 10: Get a scraper tool and lightly scrape over the stone to ensure it sticks to the transfer mask.
Step 11: Remove the transfer mask gently and ensure that the stones stay on the mask.
Step 12: Get the Cricut Heat Press machine and set the heat press settings. Prepare the material.
Step 13: Pre-press the material to get rid of the wrinkles.
Step 14: Press the rhinestones on the surface for a few seconds at a medium-pressure setting.
Step 15: If needed, press once more, and then peel off the transfer mask.
Frequently Asked Questions (FAQs)
What Should I Do If Some Holes Do Not Cut Cleanly?
If some of the holes in your design are not cutting cleanly, it means your blade is dull, or you have entered unfitting material settings. You may also not be using a strong grip mat. To avoid this, you must always test cut before you proceed with the full project.
Are Smart Materials Suitable for Creating Rhinestone Templates?
The short answer is no. Smart materials are not intended to create rhinestone templates. They don’t have the thickness, texture, and adhesive properties required to hold rhinestones in place during application. If you want the most optimum results, stick to recommended materials like flock HTV.
Is It Possible to Reuse the Same Rhinestone Template?
Only if you are using durable flock material can you reuse your template multiple times. This is a great alternative for those looking to create designs in bulk or for small businesses with a minimal budget.
Can I Create a Rhinestone Template Using Cricut Joy?
The answer is yes. Cricut Joy allows you to make “Rhinestone templates“. You can use it to cut permanent adhesive vinyl and apply rhinestones. The Cricut Joy is an appropriate machine for creating rhinestone templates, which involve cutting the template material and then applying the rhinestones.
It is crucial to know that Cricut Joy is incompatible with cutting flock material (a preferred material for traditional rhinestone templates). Also, for excellent results, you must check that the rhinestones are flat back and the vinyl is positioned on a smooth, non-fuzzy surface.
Visit: cricut.com/setup
Source: https://cricutmakermachines.com/how-to-make-rhinestone-template-on-cricut-complete-tutorial/
#cricutcomsetup#installcricutdesignspaceapp#wwwcricutcomsetuplogin#cricutcreateconnecttocomputer#cricutcomsetupmac#cricutnewproductsetup#settingupmycricutmaker#connectingcricutmakertocomputer#cricutsetupcreateaccount#cricutcuttingmachinesetup#cricutsetuponcomputer#settingupnewcricutmaker#cricutsetuplogin#cricutaccountsetup#cricutcomsetupdownload#cricutinstallsetup#cricutprintersetup
0 notes
Text
With an intention to make the Cricut app run on PCs & mobiles, all the DIYers need to know the basic system requirements. Each OS comes with its separate requirements, which should be fulfilled to support the app. Once the app satisfies the requirements, it will start running on the devices without any technical glitches. However, to get the app on the devices, they need to open Visit — cricut.com setup mac.
#CricutExplore3#cricutcomsetup#installcricutdesignspaceapp#wwwcricutcomsetuplogin#cricutcreateconnecttocomputer#cricutcomsetupmac#cricutnewproductsetup#settingupmycricutmaker#connectingcricutmakertocomputer#cricutsetupcreateaccount#cricutcuttingmachinesetup#cricutsetuponcomputer#settingupnewcricutmaker#cricutsetuplogin#cricutaccountsetup#cricutcomsetupdownload#cricutinstallsetup#cricutprintersetup
0 notes
Text
How to Engrave Wood with Cricut Maker? (Easy Steps)
Want to learn “how to engrave wood with Cricut Maker“, keep reading! Woodcarving and engraving have existed as art forms for thousands of years. The Cricut Maker features an engraving tip, allowing for personalized designs on various materials like metals, leather, wood, and acrylic. This tool enables you to add text, monograms, and intricate designs, making it suitable for projects like name plates, jewelry, and keepsakes.
The engraving tip is part of the Cricut Maker’s range of tools, which offers various options for cutting, writing, and adding decorative effects. You can engrave on material up to 2.4 millimeters thick. In this blog, we have listed down everything you need to know about engraving with Cricut.
Let’s get started!
What Type of Material Can Be Engraved With Cricut Maker?
The Cricut Maker, specifically the Maker 3 and Maker 4, is designed with an engraving tool that allows you to create designs on a wide array of materials:
Note: Glass is not a compatible material to be engraved with the Maker machine.
Tools and Supplies Required for Engraving
Before you start the procedure of engraving wood with your cutting machine, ensure you have these essential items ready for a smooth and successful project.
How to Engrave Wood With Cricut Maker: 5 Simple Steps
Follow these easy steps to engrave wood with your crafting machine, from setting up the machine to engraving and cleaning up dust easily.
Step 1: Prepare Your Machine
Listen for a click to confirm the tip is securely in place.
Step 2: Set Up Your Design
Step 3: Prepare Your Wood and Mat
Step 4: Engrave Your Design
Step 5: Clean Up Dust
Congratulations! You’re not a beginner anymore! You have successfully made a cute project on “how to engrave wood with Cricut Maker”.
Tips for Engraving Wood With Cricut
To successfully engrave wood with a Maker, ensure that you are aware of the following points:
Frequently Asked Questions (FAQs)
How Do You Keep Cricut Vinyl From Peeling off Wood?
To prevent Cricut vinyl from peeling off wood, ensure the wood surface is smooth and sealed. Use a suitable vinyl type (permanent is recommended, as it’s specifically designed for surfaces like wood). Apply a clear coat like Polyacrylic (brush or spray) or Mod Podge to protect the vinyl and seal it to the wood, especially if you’re using your design outdoors.
If the vinyl is losing its tackiness, you can revitalize it with a heat gun or hairdryer before applying it.
How to Engrave Wood with Cricut Maker?
Learn “how to engrave wood with Cricut Maker Machine” Read full wood using the Engraving Tips. This tool is designed to create engraved lines on various materials, including wood. This method is suitable for flat wood pieces and can be used to engrave designs, text, or other details onto materials like basswood, balsa wood, or even some wood veneers.
Can I Use My Cricut to Create Designs on Wood?
Yes, you can use a Cricut machine to write on wood, specifically for projects like engraving or applying vinyl decals. The Explore and Maker series can both cut and write with a fine-point pen on materials like balsa wood, allowing for intricate designs by cutting out letters or shapes from vinyl and applying them to your wood project.
Seal the wood to prevent vinyl from lifting, especially on oily stains.
Visit: cricut.com/setup
Source: https://cricutmakermachines.com/how-to-engrave-wood-with-cricut-maker-easy-steps/
#Howto#EngraveWoodwithCricutMaker#cricutcomsetup#installcricutdesignspaceapp#wwwcricutcomsetuplogin#cricutcreateconnecttocomputer#cricutcomsetupmac#cricutnewproductsetup#settingupmycricutmaker#connectingcricutmakertocomputer#cricutsetupcreateaccount#cricutcuttingmachinesetup#cricutsetuponcomputer#settingupnewcricutmaker#cricutsetuplogin#cricutaccountsetup#cricutcomsetupdownload#cricutinstallsetup#cricutprintersetup
0 notes
Text
Cricut Joy Setup: A Stepwise Guide for Beginners
Excited to start crafting with your new Cricut Joy? You’re in the right place! In this updated and beginner-friendly guide, we’ll walk you through the complete Cricut Joy setup process.
This machine is easy to use to create stickers, greeting cards, personalized apparel, labels, and more. Yes, it's small, and it sets up instantly. You can operate the crafting machine using any compatible phone, tablet, or laptop. Let Cricut Joy measure and cut while you tend to other matters.
Here's a quick preview: Connect it with Bluetooth, and you’re ready to start crafting! Once the cut or drawing is finished, remove it from the machine and personalize it. Cricut Joy can cut any image—pick from thousands of images or design your own. Simply load your chosen material into the machine, and let it handle the cutting or drawing for you!
Tools and Compatibility Requirements for Cricut Joy Setup
The Cricut Joy machine can cut smart materials without a machine mat, but other materials may require a mat.
Important Note: Cricut Joy and Joy Xtra can be connected through Bluetooth only.
Cricut Joy Setup Instructions for Windows
To set up your cutting machine with a Windows computer, download and install the Cicut Design Space software, connect your machine via bluetooth, and then follow these steps to complete the setup.
Step 1: Plug Your Machine Into the Power Outlet
Step 2: Connect Cricut Machine via Bluetooth
Ensure your crafting machine is within 10-15 feet of your computer.
Your Cricut cutting machine is now paired for Bluetooth connection.
Step 3: Download and Install Design Space
You can download Design Space to your mobile device or tablet by visiting the Apple App Store (for iOS) and Play Store (for Android), which you'll usually find within your apps.
Finally, you have installed the Design Space application on your device.
Note: It's not compulsory for you to have a Cricut machine to download Design Space. You can simply create your profile, save endless designs, and get to know your way around the app before you open your machine if you want to.
Step 4: Sign In to Your Account
Now, you have successfully installed the Design Space on your device.
Step 5: Set Up and Register Your New Cricut Product
Now, it's time for your Cricut Joy setup.
You will know when the setup is complete when you are prompted to make a test cut.
Frequently Asked Questions
How to Setup Cricut Joy on Mac?
Follow these steps to set up the machine on your Mac:
Do You Need Software for Cricut Joy?
Yes, you need the free Design Space software to use Cricut Joy machines, which are available for computers (Windows/Mac) and phones (iOS/Android). It is free to use, so you won't need to pay extra for the software. You can use Design Space to create your own designs or browse the library of ready-made projects. Once you've designed your project, you can send it to your crafting machine and start making it.
Can a Cricut Joy Engrave?
Yes, with the right tools, you can engrave with a Cricut Joy using an engraving tip specifically designed for the machine and compatible materials. This engraving tip works beautifully on Cricut Joy & Joy Xtra machines. You can engrave on materials like soft metals, brass, leather, acrylic, and plastic. Use Design Space to upload your design and prepare it for engraving.
Visit: cricut.com/setup
Source: https://cricutdesigncom.wordpress.com/2025/06/23/cricut-joy-setup-a-stepwise-guide-for-beginners/
#CricutJoySetup#cricutcomsetup#installcricutdesignspaceapp#wwwcricutcomsetuplogin#cricutcreateconnecttocomputer#cricutcomsetupmac#cricutnewproductsetup#settingupmycricutmaker#connectingcricutmakertocomputer#cricutsetupcreateaccount#cricutcuttingmachinesetup#cricutsetuponcomputer#settingupnewcricutmaker#cricutsetuplogin#cricutaccountsetup#cricutcomsetupdownload#cricutinstallsetup#cricutprintersetup
0 notes
Text
youtube
cricut.com setup mac
Learn “how to make stickers with Cricut“. To do so, you need to download the Design Space app on your device. The sticker creation feature in Cricut Design Space is available exclusively to Cricut Access subscribers. Anyone can preview this tool by clicking on “Make It” on their project. Go to the cricut.com setup mac.
#CricutExplore3#cricutcomsetup#installcricutdesignspaceapp#wwwcricutcomsetuplogin#cricutcreateconnecttocomputer#cricutcomsetupmac#cricutnewproductsetup#settingupmycricutmaker#connectingcricutmakertocomputer#cricutsetupcreateaccount#cricutcuttingmachinesetup#cricutsetuponcomputer#settingupnewcricutmaker#cricutsetuplogin#cricutaccountsetup#cricutcomsetupdownload#cricutinstallsetup#cricutprintersetup#Youtube
0 notes
Text
How to Make Stickers With Cricut? (Easy Steps)
Learn “how to make stickers with Cricut“. To do so, you need to download the Design Space app on your device. The sticker creation feature in Cricut Design Space is available exclusively to Cricut Access subscribers. Anyone can preview this tool by clicking on “Make It” on their project.
Before we dive into the how-to, let’s talk about why. Making your own stickers is not just creative and fun – it’s also a way to save money, personalize gifts, grow your brand, or start a small business. Whether you’re customizing packaging or decorating laptops, Cricut’s Print Then Cut feature gives you full control over every detail, from design to execution.
Essential Supplies for Creating Custom Stickers
Cricut printable sticker materials are compatible only with inkjet printers. Using a laser printer can damage the materials or the printer. You require the following supplies for making your stickers:
Note: The Explore, Maker, Venture, and Joy Xtra machines are compatible with the Print Then Cut feature. The Cricut Joy is the only model that does not support Print Then Cut.
How to Make Stickers With Cricut: Easy Steps
Making stickers with Cricut is the fastest and easiest way ever. To do so, you need to open your Design Space. Then, follow the steps given below:
Step 1: Use any combination of images and text.
Step 2: Select an image from the Design Space library or upload your own.
Step 3: Choose an image on Canvas.
Step 4: On the top edit bar, click on the Create Sticker button (For Windows).
Choose the Edit option and then click the Create Sticker option (For mobile devices).
Step 5: Now, your screen will prompt you to choose your cut style. You can choose to die-cut or kiss-cut, depending on your convenience.
Step 6: It’s time to customize the color and thickness of your sticker’s border.
Step 7: If you have selected Kiss Cut, you will have the option to add a Die-Cut Edge. This will add an easy-peel border that cuts all the way through the liner. This makes it easier to hand out individual stickers, as they can be easily peeled from the liner.
Step 8: Next, click the Apply button when you’ve made all your selections, as shown in the image below.
Step 9: If you make any adjustments, locate and re-enable the Create Sticker tool, now labeled as “Edit Sticker.” Click on it.
Step 10: Select Make and follow the instructions in Cricut Design Space to print your sticker.
Step 11: If you haven’t completed the Print Then Cut calibration yet, you will be prompted to do so at this point. Use regular printer paper and follow the instructions to complete the calibration. Only then can you continue with your stickers project.
Step 12: If you want multiple copies of your sticker, you can use the Project Copies optionon the Mat Preview to increase the number of copies.
Step 13: Select Browse All Materials, then choose the specific material setting that will be listed under the Compatible tab.
If you have a Cricut Explore Air 2 or an older model, first turn the Smart Set dial to the “Custom” setting.
Step 14: Now, it’s time to place your printed sticker material on a LightGrip cutting mat and load it into your machine. Place the printed vinyl and laminating sheet on the LightGrip machine. Ensure that the page is oriented on the mat as it appears in Cricut Design Space.
Step 15: Press Go, and the machine will accurately cut your design. Your machine will scan for the Print Then Cut sensor markings and cut your design out precisely.
Step 16: Press Unload when the cut is complete.
Make sure your project surface is clean and dry. Peel off the sticker from the liner by hand, place it on your project surface, and enjoy!
Now that you have explored the full step-by-step guide, you’re all set to start your own creative journey. Whether it’s for fun, business, or a personal touch to your gifts, knowing how to make stickers with Cricut opens up endless creative possibilities!
Frequently Asked Questions (FAQs)
Which Printer Is Best for Making Cricut Stickers?
Every inkjet printer works best for making stickers, but users have often recommended the Epson EcoTank ET-2800 printer. It is an excellent choice for those living in a small home office environment who want to minimize their operational costs. It also offers a manual double-sided printing feature, along with a Bluetooth wireless capability that enables printing from your phone.
What Is the Main Difference Between a Kiss-Cut and a Die-Cut?
The main difference between a kiss-cut and a die-cut lies in the depth of the cut. Kiss-cuts only cut through the top layer of material (like vinyl on a sticker), leaving the backing paper intact. Due to the intact backing, they are easier to peel and handle. Meanwhile, die-cuts cut through both the top layer and the backing paper, creating a sticker with the exact shape of the design. This is ideal for branding and promotional purposes, where a professional and clean look is desired.
Do I Need a Cricut Access Plan to Use the Create Sticker Feature?
Yes, you need a Cricut Access subscription to use the Create Sticker feature in Cricut Design Space. While anyone can preview and experiment with the Cricut Sticker feature, a subscription is required to cut and use the actual stickers. If you don’t have Cricut Access, start your free trial today – it has features like automatic background removal and premium content.
Visit: cricut.com/setup
Source: https://mycricut-design-app.com/how-to-make-stickers-with-cricut-easy-steps/
#MakeStickersWithCricut#cricutcomsetup#installcricutdesignspaceapp#wwwcricutcomsetuplogin#cricutcreateconnecttocomputer#cricutcomsetupmac#cricutnewproductsetup#settingupmycricutmaker#connectingcricutmakertocomputer#cricutsetupcreateaccount#cricutcuttingmachinesetup#cricutsetuponcomputer#settingupnewcricutmaker#cricutsetuplogin#cricutaccountsetup#cricutcomsetupdownload#cricutinstallsetup#cricutprintersetup
0 notes
Text
youtube
cricut.com/setup
Cricut Joy, Maker, and Explore series are among the most prestigious and sought-after crafting machines available on the market. With their robust build quality and smart design, these machines allow users to work on 50+ to 300+ different types of materials. Even with these machines, you can cut special materials like metals, glass, leather, wood, etc. Before you use these machines, you must complete their setup on a device (Mac, iOS, Android, or Windows). On the cricut.com/setup website, you can learn more about the setup procedure. Visit: cricut.com setup mac.
#installcricutdesignspaceapp#cricutnewproductsetup#wwwcricutcomsetuplogin#designcricutcomsetup#Cricutcomsetup#cricutdesignspace#cricutcreateconnecttocomputer#settingupyourcricutmaker#cricutsetuponcomputer#cricutinstallsetup#cricutsetupmaker#cricutexploreair2setup#cricutnewdevicesetup#cricutmakernewmachinesetup#cricutsetupcreateaccount#cricutdesignspacesetup#cricutsetuplogin#cricutcomsetupmac#Youtube
0 notes