#delete unused tables from your wordpress database
Explore tagged Tumblr posts
Visit Tumblr Blog
Explore Tumblr blogs with no restrictions, modern design and the best experience.
Last Seen Tumblr Blogs


Fun Fact
The most popular pages on Tumblr are about Minecraft, GIFs, and David J. Peterson.
Video
youtube
Speed Up Your WordPress Website: Clean Up Your Database with 2 Essential PluginsIs your WordPress website feeling a bit sluggish? It might be time for a database cleanup! In this step-by-step tutorial, I'll guide you through the process of optimizing your website's performance by cleaning up your database using two powerful plugins: WP-Optimize and Advanced Database Cleaner. First up, we'll dive into WP-Optimize, a versatile plugin designed to streamline your WordPress database effortlessly. I'll walk you through the installation process and show you how to use its intuitive interface to remove unnecessary data, such as post revisions, spam comments, and transient options, all of which can weigh down your website's performance. Next, we'll explore Advanced Database Cleaner, another essential tool in your optimization arsenal. With its advanced features, you'll learn how to identify and eliminate redundant tables and bloated data, ensuring your database runs like a well-oiled machine. But why stop there? As an added bonus, I'll introduce you to the Database Cleaner plugin by Jordy Meow. With its additional optimization and repair capabilities, you'll have everything you need to give your website a comprehensive cleanup. By the end of this tutorial, you'll not only have a cleaner, leaner database but also a faster, more efficient WordPress website that delivers an exceptional user experience. Don't let a cluttered database slow you down 14clean up and optimize with these essential plugins today! Stay tuned for more expert tips and tutorials on optimizing your WordPress website for peak performance. Don't forget to like, share, and subscribe for future updates!
#wordpress#woocommerce#elementor#dropshipping#ecommerce#ecomhardy#wordpress tutorial#clean wordpress database#clean up your wordpress database#wordpress clean database#wordpress optimization#wordpress database cleanup#wordpress database performance#wordpress database plugin#optimize wordpress database#clean up wordpress database#how to cleanup wordpress database#delete unused tables from your wordpress database#delete tables from wordpress database#wp optimize
0 notes
Text
Boost WordPress Speed: How Media Cleaner and DB Optimizer Plugins Help
In today’s digital age, website speed isn't just a luxury — it’s a necessity. A slow-loading WordPress site can hurt your SEO rankings, increase bounce rates, and ultimately drive away potential customers. Fortunately, two powerful plugins — Media Cleaner and a Database Optimizer — can significantly improve your WordPress website performance by removing unnecessary bloat and streamlining operations.
In this comprehensive guide, we’ll dive into how these plugins work, why they matter, and how to use them effectively to supercharge your WordPress site’s speed.

Why WordPress Speed Matters
Before diving into the tools, let’s understand why speed is so crucial:
Better SEO rankings: Google uses site speed as a ranking factor.
Improved user experience: Users expect a website to load in 2 seconds or less.
Higher conversions: Faster websites convert better — even a 1-second delay can reduce conversions by 7%.
Lower bounce rates: Visitors tend to abandon slow-loading sites.
In short, optimizing your site speed is one of the easiest and most cost-effective ways to improve your site’s performance.
What Slows Down WordPress Sites?
Many factors can contribute to a sluggish WordPress website:
Unused or oversized media files (images, videos, PDFs).
Database bloat from spam comments, revisions, transients, and outdated entries.
Poorly coded plugins or themes.
Large post or page content with unnecessary formatting or embeds.
Unoptimized hosting or lack of caching/CDN.
This is where Media Cleaner and Database Optimizer plugins come in.
Introducing Media Cleaner: What It Does
Media Cleaner is a WordPress plugin designed to help you identify and remove unused media files from your WordPress library.
🔍 Key Features:
Scans your WordPress media library to detect unused images and files.
Identifies broken or orphaned media not attached to any post, page, or product.
Deletes unnecessary files, freeing up storage and improving performance.
Compatible with WooCommerce, page builders, and media galleries.
🧠 How It Works:
When you upload an image or file to WordPress, it’s stored in the media library, even if you don’t end up using it. Over time, these unused files accumulate and clutter your site — especially for blogs, eCommerce sites, and portfolio websites with high media usage.
Media Cleaner performs a deep scan of your posts, pages, widgets, and metadata to find files that aren’t being used. Once identified, you can review and safely delete them.
Introducing Database Optimizer Plugins
A Database Optimizer plugin is essential for keeping your WordPress database lean and fast. Popular options include:
WP-Optimize
Advanced Database Cleaner
Optimize Database after Deleting Revisions
WP-Sweep
For this guide, we’ll focus on the functionality more than a specific brand.
Key Features:
Cleans post revisions, spam comments, orphaned metadata, and trash.
Removes expired transients (temporary cached data).
Optimizes database tables to reduce overhead and improve queries.
Scheduled cleanups and automation for ongoing optimization.
Why Your Database Needs Cleaning
Every time you save a draft, approve a comment, or update a plugin, WordPress stores a record in the database. These records accumulate and cause database bloat, which slows down queries and page load times.
Database optimizers eliminate unnecessary data while preserving important content, resulting in a faster and more efficient backend.
How Media Cleaner and DB Optimizer Work Together
While both plugins serve different purposes, using them together delivers synergistic performance gains.
Task
Media Cleaner
DB Optimizer
Deletes unused images/files
✅
❌
Cleans post revisions, spam, etc.
❌
✅
Improves server space
✅
✅
Boosts backend performance
✅
✅
Reduces site bloat
✅
✅
When combined, they reduce the load on your hosting environment, minimize the size of your backup files, and make your site faster and easier to maintain.
Step-by-Step: How to Use Media Cleaner
Here’s how to start cleaning up your WordPress media library:
1. Install the Plugin
Go to Plugins > Add New, search for Media Cleaner, and click Install Now, then Activate.
2. Perform a Scan
Navigate to Media > Media Cleaner and click Scan. The plugin will search for unused files.
3. Review Results
Before deleting, manually review the files to make sure nothing important is incorrectly flagged.
4. Delete Unused Media
Click Delete All or select files to delete individually.
Pro Tip: Always take a backup before deleting any media, especially on a live site.
Step-by-Step: How to Use a Database Optimizer
Let’s use WP-Optimize as an example, although other plugins work similarly.
1. Install and Activate
Go to Plugins > Add New, search for WP-Optimize, install and activate.
2. Go to WP-Optimize Settings
You’ll see a new section under WP-Optimize > Database.
3. Select What to Clean
Check items like:
Clean all post revisions
Remove auto-draft posts
Clean spam and trashed comments
Remove expired transients
4. Run Optimization
Click Run Optimization. The plugin will clear selected data and optimize database tables.
5. Schedule Future Cleanups (Optional)
Enable automated weekly or monthly cleanup under the Settings tab.
Safety Tips When Using These Plugins
Although these plugins are powerful, use them with caution:
✅ Backup your site before making changes.
✅ Test on a staging site if available.
✅ Don’t delete files linked via custom code or plugins.
❌ Avoid deleting media files immediately after scanning; review results first.
❌ Don’t run multiple database optimizers at the same time.
Performance Gains: What to Expect
After using Media Cleaner and a DB Optimizer, you may notice:
Faster page loads
Reduced server resource usage
Lower backup sizes
Improved GTmetrix or PageSpeed Insights scores
Better experience for mobile users
Even small improvements (e.g., reducing page load time from 4s to 2.5s) can result in higher engagement and more conversions.
Alternatives & Honorable Mentions
Here are a few other optimization plugins worth exploring:
Smush or ShortPixel (for image compression)
Asset CleanUp or Perfmatters (for script optimization)
LiteSpeed Cache or WP Rocket (for caching)
Regen. Thumbnails (if you regenerate thumbnail sizes)
Combine these with Media Cleaner and DB Optimizer for a full-stack performance strategy.
Final Thoughts
Your WordPress site doesn’t have to be slow. Often, the issue isn’t your hosting or theme — it’s the unwanted clutter in your media library and database.
By using Media Cleaner and a Database Optimizer plugin, you can:
Reduce load times Free up storage Improve SEO Create a better user experience
Whether you're running a personal blog, an eCommerce store, or a content-heavy site, these tools can make a big impact with minimal effort.
0 notes
Text
Advanced Database Cleaner Pro group buy from Share Tool

Note: You are reading Advanced Database Cleaner Pro group buy from Share Tool. For more details and support, please visit: https://sharetool.net/advanced-database-cleaner-pro/?feed_id=258 Advanced Database Cleaner Pro is essential for maintaining a clean and optimized database on your WordPress website. Unused data left behind by deleted plugins and themes can accumulate over time, affecting site speed and efficiency. What is Advanced Database Cleaner Pro? Advanced Database Cleaner Pro is a WordPress plugin designed to help you clean and optimize your website's database. This plugin ensures your database is free of unnecessary data, which can enhance site performance and reduce backup file sizes. FE: Advanced Database Cleaner Pro Standard clean-up Schedule clean-up View items before clean-up Optimize Database Schedule optimization View & clean cron tasks View & clean options View & clean tables Clean up orphaned options Clean up orphaned cron tasks Clean up orphaned tables Filter & search for items Supporting Multisite #row-181296235 > .col > .col-inner { padding: 10px 20px 2px 20px; } #col-1327583819 > .col-inner { margin: 0px 0px 25px 0px; } Improve your website performance with WordPress Advanced Database Cleaner Pro. Why should use advanced database cleaner plugin? Using the Advanced Database Cleaner plugin is essential for maintaining your WordPress website’s performance and efficiency. This plugin removes leftover data from deleted plugins and themes, such as orphan options, tables, and cron tasks. Cleaning these unnecessary elements reduces database size, enhances site speed, and makes backups quicker and smaller. What are the benefits of Advanced Database Cleaner Pro? Clean up Posts Table Delete old revisions of posts and pages, delete old auto drafts & delete trash posts. This will help reducing the size of your "posts" table Clean up Comments Table Delete pending comments, spam comments, trash comments, pingbacks and trackbacks. This will reduce the number of rows in your "comments" table Clean up Orphaned Metadata Delete orphan post metadata, orphan comment metadata, orphan user metadata, orphan term metadata and orphan relationships Clean up Expired Transients Expired transients are temporary options that should not exist in your database since they are expired! Learn more Display & View Orphaned Items View details about orphaned item before making a database clean-up so you can be sure about what you are going to clean-up Keep Last x Days’ Data You can keep the last x days' data from being cleaned and clean up only data older than the number of days you have specified View & Manage Tables Display tables information such as the number of rows, table size, etc. Optimize tables & repair corrupted ones. You can also empty and delete tables if needed View & Manage Options Display all options list and options information such as name, value, size, autoload, etc. Set options autoload to no/yes and delete options if needed View & Manage Cron jobs Display active cron tasks list (scheduled tasks) with their information such as arguments, next run, etc. Clean and delete scheduled tasks Get and overview The plugin will help you get a clear idea of what is happening in your database. It will report all unused/orphaned items that should be cleaned Scheduling The plugin will automate the process and run a cleanup/optimization automatically based on your settings. No need to do it manually each time Reduce DB size By deleting unused/orphaned items, you will save space in your database and make quicker backups since the file of your backup will be smaller Main features available on PRO version only. Detect & delete orphaned options Your ‘wp_options’ table may be full of orphaned options and therefore can impact the performance of your website. Clean up orphaned options is then important Detect & delete orphaned tables You may have orphaned tables that were created by plugins/themes you are not using anymore. Clean up orphaned tables will increase performances
Detect & delete orphaned cron jobs After you uninstall a plugin/theme, some of its cron tasks may still be active making WordPress calling unknown functions. You should clean them up Scan & Edit Categorization You can scan specific items or all items to verify to which plugin/theme they belong. You can also correct the "belongs to" value Search & Filter Anything You can search and filter options, tables and cron jobs based on several criteria such as the "name", "creator", "value", etc. Technical Support We will provide custom and technical support to help you clean up your database efficiently without losing your important data Who is Advanced Database Cleaner wordpress? Advanced Database Cleaner Pro is ideal for: Website Administrators WordPress Developers Site Performance Optimizers Backup Management Professionals To maintain a well-optimized and efficient WordPress website, Advanced Database Cleaner Pro is a valuable tool. Get Advanced Database Cleaner Pro today to streamline your database maintenance and keep your WordPress site running at its best.
0 notes
Text
What is the best way to maintain a WordPress website?
However, maintaining a WordPress site is one of the tedious tasks, but it will help you know your efficiency, keep you updated with the latest technologies and most importantly, it remains safe and secure. So make sure you follow the right maintenance tactics that will boost the security, performance and functionality of your site to a great extent.
Let’s explain how to maintain wordpress website , here some of tips for maintain your wordpress website

Backup your site regularly
This is the most vital things that you need to do on a regular basis. Although backing up doesn’t keep your site fresh and clean, it helps if something goes wrong as you can revert to a previous version immediately.
I would suggest you to backup your WordPress site on a monthly basis. You can also backup your blogs daily, while, weekly backups are good for corporate sites. You can backup your site via your hosting provider or by downloading a local copy of your site through FTP.
WordPress offers some stunning plugins that will automatically backup your complete site. VaultPress is a nice WordPress plugin that offers the backup and restoration functionalities on the fly.
Keep your site up-to-date
If you want to maintain your site, you should update your core WordPress, installed themes and plugins to its latest version on a frequent basis. Fortunately, WordPress rolls out its latest version 4.6 frequently to offer their users more advanced features and security fixes.
All you need is to log in to your WordPress site on a monthly basis and update the core WP, themes, and plugins.
Delete Unused plugins
WordPress plugins are a great way to extend the functionality of the site. But using too many plugins could affect the performance as well as the security of a website.
If you want a successful site, you need to remove all those plugins that you haven’t used till now. In short, get rid of the plugins that you don’t need.
For that, you first need to deactivate the plugin, and then delete it. But before this, take a look at very plugin you have installed to find out the unused plugins.
Optimize your database
A database is a place where all your site content is stored. It includes your blog posts, pages, images, videos, setting and much more. As your site grows, your database begins to get bloated, which in turn slow down the speed of your site.
If you want to improve the performance of your site, you need to optimize your database. With the help of WordPress plugin (such as WP-Optimize that will automatically optimize your database and clears records that are now not required), you can optimize the database of your site and enhance its speed.
The plugin will also help you remove spam comments; unwanted draft posts, etc. It also optimizes the underlying MySQL database tables.
Focus on your site’s security
Most of the WordPress users overlook the security of their site. But it is one of the crucial factors that need to be considered. If you want to secure your site from hackers and other security threats, you need to install a reliable security plugin. You can use iThemes Security plugin that will protect your site from hackers within a few clicks.
In fact, you should also use a Sucuri service to monitor your site. It will scan your site and detect the malware or virus from your installed themes, plugins or core WordPress. And if any malware is found, it will immediately remove it from your site.
Keep an eye on your site’s speed
If you want to attract more visitors, you need to provide them fast loading pages. This means the speed of a site directly affect the ranking of your site on search engines. In fact, Google prefers fast loading sites. So, you should know the loading speed of your site.
Luckily, there is Google’s Page Speed Insights that offers a tool to grade your site’s load time, and then offers tips to improve it. You can install this tool and improve the performance of your site within a few clicks.
Manage user accounts
The security of your site is also based on the aspect that how you manage your user accounts. Most of the website owners doll out their site’s password and leave it vulnerable. If you are a newbie user, you should avoid giving your login details to your multiple users. Each user should have their own login and password details as it gives more security to the site.
Apart from this, make sure you don’t use “admin” username for your WP account. Try to swap the default username with the new and unique one. You can also use the lengthy and difficult-to-break password. Plus, you can also change the URL of your login page if you want to protect your site from hackers and other security threats.
Conclusion
These are some of the great WordPress maintenance tips that will keep your site fresh, clean and updated. You should follow these tips and enhance the functionality of your site for longer.
About Us
Vardaam, formerly known as Web Mechanic, is 13 years old Company, and has served more than 700 B2B and B2C clients in various industry verticals all over the world. Today, Vardaam operates as a 100% referral base business because of our Benchmark Solutions in the field of Website Design and Development, Custom Web Application Development, Website Support and Maintenance, and Professional SEO Services.
To know more about website visit here:
Custom WordPress Website Development Company Outsourcing our work overseas was a somewhat scary idea, however after my first communication with the Vardaam team that thought was thrown out of the window! We were surprised with the level of talent that the Vardaam developers had; their inputs and suggestions were always a valued addition to us. Vardaam has helped us by giving outstanding Web Development services and truly delivered on their promises. I am extremely happy with the level of professionalism that they maintain and transparency with which they operate. Their website development and SEO skills are second to none. Vardaam is a highly skilled company and will accomplish almost anything that is expected of them and most importantly they add value to their clients! https://www.vardaam.com/custom-wordpress-website-development/
0 notes
Text
How to Increase the Speed of Your WordPress Website With Plugins
How to Increase the Speed of Your WordPress Website With Plugins In this article, we will discuss some of the ways to increase the speed of your WordPress website, including caching, image compression, and database optimization. If these methods aren't enough for you, there are also plugins available for your website that will help you optimize your database and speed up your site. Lazy loading Using a lazy loading plugin will improve the speed of your WordPress website. This simple technique will save server bandwidth and download images only when they are visible. This is useful for reducing website load time and improving your SEO efforts. It can also improve your website's responsiveness. Read on to discover how lazy loading works, and how you can add it to your WordPress website. Adding a lazy loading plugin increases the speed of your WordPress website by delivering content in smaller chunks rather than one large file. It will also help reduce bandwidth usage because the entire page does not need to be downloaded when a visitor scrolls through the page. This will increase engagement and lower your website's loading time. Another way to increase the speed of your website is by using a plugin that optimizes images. The plugin works by optimizing and compressing images. While this may be more complicated than installing a plugin, it can improve your website's speed by as much as 20%. The plugin will help you reduce server response time, and it can also improve the quality of your website's user experience. Caching A caching plugin can improve the speed of your WordPress website by skipping several steps that make the pages load slower. It works by creating a copy of a page after it has been generated and using that copy for subsequent requests. The WordPress CMS is dynamic, and as a result it must continually fetch information from its database. This process can take considerable time and resources, and can make your website extremely slow. A caching plugin can avoid this problem by saving the HTML product of each page on your website's server. One of the most popular caching plugins is WP Super Cache, which has over 5.5 million downloads. It's easy to install and use and gives you a number of useful options. It supports several caching methods, including CDN services and CloudFlare. Optimizing WordPress database tables If your website is not loading fast, there are some basic steps you can take to speed it up. The size of your WordPress database table depends on its data, the number of users, and the age of the site. The more rows you have, the larger the table will become. There are ways to decrease the size of the table without sacrificing website speed, including reducing the number of indexes. The OPTIMIZE command can be used to remove unnecessary data from your tables. However, it cannot be used on tables created with InnoDB. This command is best used for tables created with MyISAM storage engine. It is important to backup your database before attempting to optimize WordPress database tables, since deleting or updating data can corrupt the database. There are two main types of database tables in WordPress. One is the comment table, which stores information about authorized and unauthorized comments. It also stores meta data about the comment author. This table contains the author's name, URL, email address, and comment type. Using a performance booster plugin There are several ways to boost the speed of your WordPress website. One way is to install a performance booster plugin. This plugin will generate static cache pages when your website loads. This can greatly reduce the load time of your site. Another option is to use Cloudflare to connect your site to the Cloud. Another way to boost your WordPress website's speed is to remove unused plugins from your website. These plugins can pose a security risk and detract from the speed of your website. If you're not sure what to remove, run a Google PageSpeed test to see how much impact they have on page speed. Google's PageSpeed Insights tool is an excellent tool to diagnose your site's speed. If your site scores a 75% or higher, you're doing well. However, don't stress out if you don't reach 90% or higher. This isn't realistic for most WordPress sites, depending on their theme and plugins. Read the full article
0 notes
Text
5 Ways to Organize Content on Your WordPress Website
When was the last time you organized your WordPress website? Maybe you’re running a blog, provide cool games like Survivor Game, or share the latest cooking tips. If you’ve been doing it for years, chances are your site is packed with content. Even if you started using WordPress with a clear plan, things could still get pretty disorganized over time. Perhaps you don’t know anymore where all your old blog posts are, or you’re getting confused by your WordPress categories. And guess what? Your visitors will be just as confused as you. And they will probably leave your site before reading anything.
So it’s time to get organized and do some spring cleaning on your WordPress website. And here are our five top ways to do that. But first, let’s go over some more reasons why you should keep your site nice and tidy. Ready?
Why Is It Important to Organize Your WordPress Website
There are two main reasons why your WordPress website content needs to be easy to browse. Firstly, a smooth user experience generates more quality traffic and curbs your bounce rate. It means that if everything looks professional and well-organized, then people who arrive at your site will most likely navigate further into it. Everyone gets frustrated fast if it’s too difficult to find what they need.
Secondly, an organized look also improves your WordPress blog SEO. The bots that scan your site to give it a search engine ranking will rank you lower if the site is difficult to understand.
And now, let’s take a look at some of the best practices to organize your site:
1. Link The Posts
Linking your posts on the WordPress site helps your visitors to navigate. And smooth navigation is crucial to keep the browsers interested in your page. Plus, it helps to make the search engines understand how your posts are related to each other.
So make sure to include links to your older posts in every new post you write. If you haven’t done this already, then you can go through your freshest post and look for opportunities to place the links to your older posts wherever it suits. But don’t try to insert the links arbitrarily. It will make your content seem amateurish. Place the links only where they organically fit the text.
2. Main Menu Optimization
Is your main menu easy to understand, or is it cluttered with unnecessary elements? Sometimes, when starting a WordPress website, people try to fit every page into the main menu. It is not necessary. You should only include the most important links in your main menu. It makes it easier for users to navigate your site.
3. Review Your Categories
Did you know that every piece of media in WordPress is given the label “uncategorized” by default? So if you don’t categorize your posts yourself, it shows “uncategorized” on your pages. Why is this bad? For two reasons. Firstly, it makes your site look unprofessional. And visitors are not going to go through your carefully written content unless you appear to be an experienced expert in your field. But secondly, uncategorized posts will hurt your SEO. It’s important to look at the categories from the website user’s point of view. What helps them to navigate? Maybe you have too many categories and need to remove a few to simplify the browsing experience. The friendlier your site appears to users, the higher it will appear in the search engine results.
But if you’ve heard of WordPress tags, you might wonder if they’re the same thing as categories. The simple answer is no. They’re different in the way you use them. The primary purpose of a category is to specify the genre of a piece of content. So they’re never too lengthy. Tags, however, can go into more detail and describe a post more in-depth. The important thing is to avoid the overlapping of categories and tags because this would confuse your readers. Plus, it would confuse the tools Google uses to scan your site, resulting in a less favorable search engine ranking.
4. Remove Dead Ends
Just imagine a reader going through one of your posts, clicking on a link to get more information, and instead of a new post getting an error message. It doesn’t matter what website you’re running. Users will get frustrated by the 404 errors whether they’re navigating a travel blog or an online casino.
The broken links can exist for numerous reasons. Maybe you’ve moved to another domain, or changed the URL, or the requested page simply doesn’t exist anymore. Whatever the reason for the missing page, the bottom line is this: 404 errors ruin the user experience (and they also ruin the search engine rankings of your site).
So, to avoid users leaving your site irritated by the missing pages, you should change the errors to redirects to existing posts. But doing it by hand would take a long time. You would have to go through every post and every link. Luckily, there are plenty of WordPress plugins that can help you scan and remove the dead ends more efficiently. Here are some of the best tools for the job:
Broken Link Checker
It is a free WordPress plugin that enables you to easily find broken links and mend them on the WordPress dashboard.
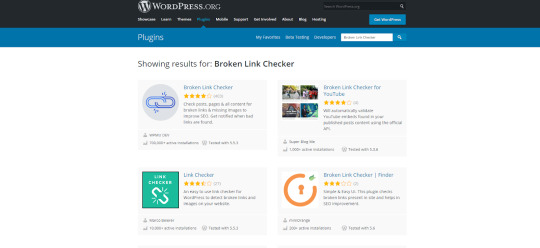
W3C Link Checker
This plugin allows you to simply enter the URL for a quick review via a Check button.
Google Search Console
Google Search Console comes with plenty of tools that will help you make the site more Google-friendly. You most probably already have the search console set up. All you need to do is ask Google crawlers to examine your pages to find all the 404 errors.
5. Database Clean up
As you keep producing new content, your database continues to grow and can become unwieldy. After only a few months, you can have too many tables that can cause problems like crop up during file export/import or slow loading. So what’s the solution? A database clean up. It will speed up the backup and improve your website’s speed and performance. Here’s how to do it:
First, empty the trash.
Then reactivate and delete unused plugins.
Delete spam.

Creating a WordPress-Powered Website for Gaming Content
Gaming is an industry that keeps getting bigger every year. It attracts people from all over the world regardless of their location, sex, or age. And one of the main reasons why gaming has become so popular is the ease of setting up a gaming-related website. Thanks to the easy WordPress setup, nearly anyone can start providing event game reviews, streaming communities, and even e-commerce stores.
Needless to say, even with gaming sites, the content needs to be well organized and optimized. But thanks to numerous gaming-specific WordPress plugins and themes, it’s quite an easy task.
Here are some ways to organize a WordPress site if you want to turn it into a profitable gaming-related online venture:
Community function
You can add the social function of any gaming-related website with a plugin. The forum plugin is the most popular choice, but many people find this solution a bit outdated. You can also go with a plugin called BuddyPress, which gives your site the ability to register user profiles. Plus, it enables you to create discussion walls.
Some theme developers come up with their own plugin for the community function. Some of these self-made plugins can include submission systems, leaderboards, badges, rating systems, user profiles, etc. So you have plenty of options to get the exact plugin that you need for all the functions you plan on having on your website.
The best themes for gaming-related WordPress sites
Boombox: enables you to put together a social magazine with a system for post reactions.
Arcane: Skywarrior’s gaming community theme.
PlayerX: excellent for eSports.
In addition to the community function and neat themes, WordPress provides its users with plenty of other tools to build a website without knowing much about coding. Your main responsibility as a site builder is simply to produce quality content that you can add with only a few clicks.

Conclusion
Look, you can always opt for a full content audit to delete any irrelevant content. But implementing the steps mentioned in this article should be enough to organize your WordPress website and give it a more professional appearance. These little changes make a big difference. Your visitors will stay on the site for longer, and you’ll rank higher in search engine results. And what could be better?
How do you keep your WordPress sites tidy? Share your hacks in the comments.
The post 5 Ways to Organize Content on Your WordPress Website appeared first on Scoop.it Blog.
5 Ways to Organize Content on Your WordPress Website published first on https://wabusinessapi.tumblr.com/
0 notes
Text
5 Ways to Organize Content on Your WordPress Website
When was the last time you organized your WordPress website? Maybe you’re running a blog, provide cool games like Survivor Game, or share the latest cooking tips. If you’ve been doing it for years, chances are your site is packed with content. Even if you started using WordPress with a clear plan, things could still get pretty disorganized over time. Perhaps you don’t know anymore where all your old blog posts are, or you’re getting confused by your WordPress categories. And guess what? Your visitors will be just as confused as you. And they will probably leave your site before reading anything.
So it’s time to get organized and do some spring cleaning on your WordPress website. And here are our five top ways to do that. But first, let’s go over some more reasons why you should keep your site nice and tidy. Ready?
Why Is It Important to Organize Your WordPress Website
There are two main reasons why your WordPress website content needs to be easy to browse. Firstly, a smooth user experience generates more quality traffic and curbs your bounce rate. It means that if everything looks professional and well-organized, then people who arrive at your site will most likely navigate further into it. Everyone gets frustrated fast if it’s too difficult to find what they need.
Secondly, an organized look also improves your WordPress blog SEO. The bots that scan your site to give it a search engine ranking will rank you lower if the site is difficult to understand.
And now, let’s take a look at some of the best practices to organize your site:
1. Link The Posts
Linking your posts on the WordPress site helps your visitors to navigate. And smooth navigation is crucial to keep the browsers interested in your page. Plus, it helps to make the search engines understand how your posts are related to each other.
So make sure to include links to your older posts in every new post you write. If you haven’t done this already, then you can go through your freshest post and look for opportunities to place the links to your older posts wherever it suits. But don’t try to insert the links arbitrarily. It will make your content seem amateurish. Place the links only where they organically fit the text.
2. Main Menu Optimization
Is your main menu easy to understand, or is it cluttered with unnecessary elements? Sometimes, when starting a WordPress website, people try to fit every page into the main menu. It is not necessary. You should only include the most important links in your main menu. It makes it easier for users to navigate your site.
3. Review Your Categories
Did you know that every piece of media in WordPress is given the label “uncategorized” by default? So if you don’t categorize your posts yourself, it shows “uncategorized” on your pages. Why is this bad? For two reasons. Firstly, it makes your site look unprofessional. And visitors are not going to go through your carefully written content unless you appear to be an experienced expert in your field. But secondly, uncategorized posts will hurt your SEO. It’s important to look at the categories from the website user’s point of view. What helps them to navigate? Maybe you have too many categories and need to remove a few to simplify the browsing experience. The friendlier your site appears to users, the higher it will appear in the search engine results.
But if you’ve heard of WordPress tags, you might wonder if they’re the same thing as categories. The simple answer is no. They’re different in the way you use them. The primary purpose of a category is to specify the genre of a piece of content. So they’re never too lengthy. Tags, however, can go into more detail and describe a post more in-depth. The important thing is to avoid the overlapping of categories and tags because this would confuse your readers. Plus, it would confuse the tools Google uses to scan your site, resulting in a less favorable search engine ranking.
4. Remove Dead Ends
Just imagine a reader going through one of your posts, clicking on a link to get more information, and instead of a new post getting an error message. It doesn’t matter what website you’re running. Users will get frustrated by the 404 errors whether they’re navigating a travel blog or an online casino.
The broken links can exist for numerous reasons. Maybe you’ve moved to another domain, or changed the URL, or the requested page simply doesn’t exist anymore. Whatever the reason for the missing page, the bottom line is this: 404 errors ruin the user experience (and they also ruin the search engine rankings of your site).
So, to avoid users leaving your site irritated by the missing pages, you should change the errors to redirects to existing posts. But doing it by hand would take a long time. You would have to go through every post and every link. Luckily, there are plenty of WordPress plugins that can help you scan and remove the dead ends more efficiently. Here are some of the best tools for the job:
Broken Link Checker
It is a free WordPress plugin that enables you to easily find broken links and mend them on the WordPress dashboard.

W3C Link Checker
This plugin allows you to simply enter the URL for a quick review via a Check button.
Google Search Console
Google Search Console comes with plenty of tools that will help you make the site more Google-friendly. You most probably already have the search console set up. All you need to do is ask Google crawlers to examine your pages to find all the 404 errors.
5. Database Clean up
As you keep producing new content, your database continues to grow and can become unwieldy. After only a few months, you can have too many tables that can cause problems like crop up during file export/import or slow loading. So what’s the solution? A database clean up. It will speed up the backup and improve your website’s speed and performance. Here’s how to do it:
First, empty the trash.
Then reactivate and delete unused plugins.
Delete spam.

Creating a WordPress-Powered Website for Gaming Content
Gaming is an industry that keeps getting bigger every year. It attracts people from all over the world regardless of their location, sex, or age. And one of the main reasons why gaming has become so popular is the ease of setting up a gaming-related website. Thanks to the easy WordPress setup, nearly anyone can start providing event game reviews, streaming communities, and even e-commerce stores.
Needless to say, even with gaming sites, the content needs to be well organized and optimized. But thanks to numerous gaming-specific WordPress plugins and themes, it’s quite an easy task.
Here are some ways to organize a WordPress site if you want to turn it into a profitable gaming-related online venture:
Community function
You can add the social function of any gaming-related website with a plugin. The forum plugin is the most popular choice, but many people find this solution a bit outdated. You can also go with a plugin called BuddyPress, which gives your site the ability to register user profiles. Plus, it enables you to create discussion walls.
Some theme developers come up with their own plugin for the community function. Some of these self-made plugins can include submission systems, leaderboards, badges, rating systems, user profiles, etc. So you have plenty of options to get the exact plugin that you need for all the functions you plan on having on your website.
The best themes for gaming-related WordPress sites
Boombox: enables you to put together a social magazine with a system for post reactions.
Arcane: Skywarrior’s gaming community theme.
PlayerX: excellent for eSports.
In addition to the community function and neat themes, WordPress provides its users with plenty of other tools to build a website without knowing much about coding. Your main responsibility as a site builder is simply to produce quality content that you can add with only a few clicks.

Conclusion
Look, you can always opt for a full content audit to delete any irrelevant content. But implementing the steps mentioned in this article should be enough to organize your WordPress website and give it a more professional appearance. These little changes make a big difference. Your visitors will stay on the site for longer, and you’ll rank higher in search engine results. And what could be better?
How do you keep your WordPress sites tidy? Share your hacks in the comments.
The post 5 Ways to Organize Content on Your WordPress Website appeared first on Scoop.it Blog.
5 Ways to Organize Content on Your WordPress Website published first on https://improfitninja.weebly.com/
0 notes
Text
6 Best Practices to Optimize Your WordPress Database
Your WordPress site can be slow for many different reasons; a bloated database running in the background is one of them. A professional WordPress maintenance workflow includes regular database optimization during which you get rid of unnecessary data, and locate and fix errors and inconsistencies in your database.
WordPress database optimization doesn’t require any specific programming knowledge, although you occasionally need to edit the wp-config file. In this article, we will show you a couple of best practices about how to optimize your WordPress database.
Start with a Backup
Before getting started with optimization, always create a backup of your database. In this way, if anything goes wrong, you won’t lose any data and can return to a previous version of your site. There are different solutions to back up a WordPress site, here are the most common ones:
you can create a full site backup from the cPanel of your hosting account,
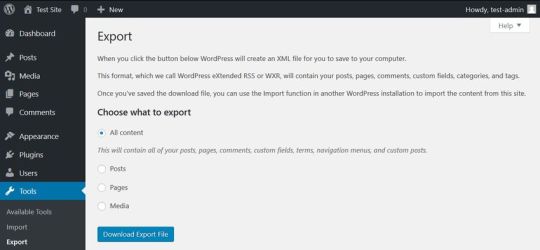
you can export all your content including your posts, pages, comments, and other post types using the Tools > Export menu in your WordPress admin area,
you can use a backup plugin such as BackupBuddy or VaultPress that allows you to create different kinds of custom backups.

Delete the Content You Don’t Need
One of the most important things of database optimization is to get rid of the overhead content on your site. As each post, page, comment, and post revision is an entry in your database, you can free up a lot of space by deleting unused, obsolete, or duplicate content right from your WordPress admin area.
If you have a WordPress site for a while, you can find such content in many different places. First and foremost, it’s worth deleting the Trash folder of your Posts and Pages (even if WordPress automatically deletes trashed posts after 30 days). You can also go through your Drafts and Pending posts to see if you really need all of them.
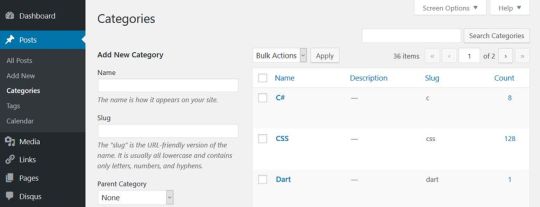
You can also check if you have any taxonomies you don’t use. WordPress has two kinds of taxonomies by default: tags and categories; you can find both of them in the Posts menu. Database optimization is also a good opportunity to think through your taxonomy structure, get rid of duplicate tags and categories, and improve the findability of your posts.

Besides default posts and pages, you can also have custom post types such as calendars, recipes, or affiliate links that might include content you don’t need anymore.
Remove Themes and Plugins You Don’t Use
Although WordPress saves themes and plugins into the wp-content folder instead of the database, it’s still a good idea to delete the ones you don’t use. Many plugins and some of the more complicated themes create extra tables inside your database. Besides, all plugins and themes store their configuration options in the wp-options table.
Plugins and themes developed following WordPress’ coding standards clean up after themselves when you remove them from your site. In this case, you only need to delete them from the WordPress admin area, from the Appearance and Plugins menus. Note, however, that it’s not enough to only deactivate them, you also need to hit the Delete button. If your plugin doesn’t clean up after itself, you can still get rid of the related database overhead using one of the methods below.
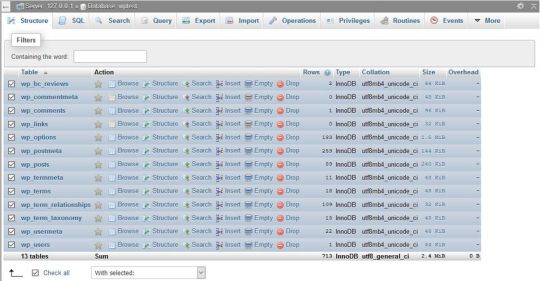
Optimize Your Tables in phpMyAdmin
You can run a database optimization query right from your phpMyAdmin interface. PhpMyAdmin is the application that allows you to access your raw database. You can reach phpMyAdmin from the cPanel of your hosting account, from the Databases menu.
In phpMyAdmin, open the database belonging to your WordPress site and check the tables you want to optimize. You can also choose the Check All option, as you can see on the image below:

Here, scroll down the dropdown list you can find below the tables. From the Table maintenance group, select the Optimize table option and run the query.

The Optimize table option runs the OPTIMIZE TABLE command on your database, which, according to the MySQL documentation:
“reorganizes the physical storage of table data and associated index data, to reduce storage space and improve I/O efficiency when accessing the table.”
Besides OPTIMIZE TABLE, you can also run the REPAIR TABLE query from the same phpMyAdmin menu, which “repairs a possibly corrupted table”.
Run WordPress’ Database Optimization Tool
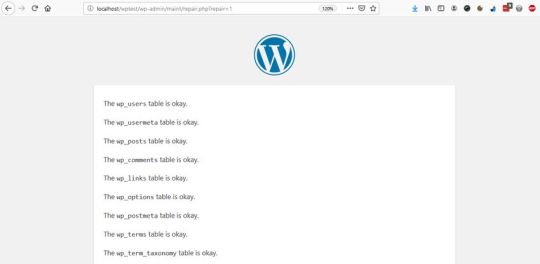
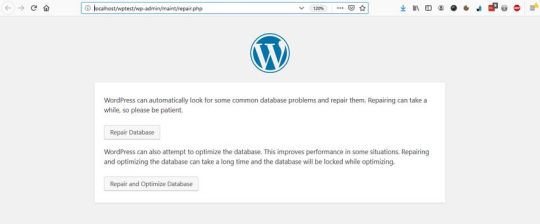
WordPress Core also has a built-in database optimization tool. It’s turned off by default, however, you can activate it by editing your wp-config.php file. You can find wp-config in the root directory of your WordPress install on your server. Open it in your code editor and add the following option to the top of the file:
define( 'WP_ALLOW_REPAIR', true );
You can find the optimization script under the https://ift.tt/2DdDCih URL, where you need to replace your-site.com with your own domain.

Here, you can choose from two options:
Repair Database – it looks for and repairs common database problems,
Repair and Optimize Database – besides all the tasks performed by Repair Database, it also attempts to optimize your database to improve performance.
In most cases, the first option is enough, but if you want an in-depth cleanup, choose the second one. Wait until the tool repairs and/or optimizes your database, then remove the option you have added to your wp-config file (otherwise, anyone on the web can see sensitive information about your database).

Use a Database Cleanup Plugin
If you don’t want (or can’t) access your raw database and your wp-config file, or you want to perform advanced database optimization tasks, you can also put a plugin into use. Below, we have collected the three best database cleanup plugins for you.
Note that you shouldn’t use more than one database optimization plugins at the same time, as these plugins have similar functionalities that can interact with each other in unexpected ways.
1. WP-Optimize

WP-Optimize is a free plugin that takes care of all kinds of optimizations on your WordPress site. Besides cleaning your database, it also compresses your images and caches the content on your site. Its database cleanup feature:
removes all unnecessary data, even expired transients hidden in the wp-options table,
optimizes all your MySQL tables,
lets you run regular automatic cleanups,
shows database statistics,
and more.
The plugin is frequently updated and the support team is responsive, so it’s a good and safe solution if you want to run automated cleanups on a regular basis.
2. Advanced Database Cleaner

Advanced Database Cleaner is another free database optimization plugin that comes with many advanced options. It allows you to remove all kinds of unused, obsolete, and duplicate content types, such as:
old revisions, drafts, and auto-drafts of posts, pages, and custom post types,
pending, spam, and trash comments,
orphan metadata and relationships,
expired transients,
and more.
You can also schedule and run automatic cleanups, view and clean tables, and display and view items before removing them. Besides, Advanced Database Cleaner supports multisite installs, too.
3. Optimize Database after Deleting Revisions

Optimize Database after Deleting Revisions is a database optimization plugin that lets you clean up your database with one single click. If you need a simple solution that doesn’t require much configuration, Optimize Database after Deleting Revisions can be the best choice for you. With this plugin, you can remove:
revisions of posts, pages, and custom post types,
trashed posts, pages, and comments (also spam comments),
orphan postmeta items,
unused tags,
expired or all transients,
pingback and trackbacks,
and more.
It also supports WordPress Multisite and adds an “Optimize DB” link to your admin bar with which you can run a one-click database optimization any time you want.
Conclusion
Database optimization is an essential task you need to perform regularly if you want to maintain good data health on your site. You can either do the optimization manually or make use of a data cleanup plugin that lets you configure and automate the entire process.
Besides, database optimization is also a typical maintenance service you can offer to your clients if you have a WordPress business. If you want to know more about what else to pay attention to when working with clients, have a look at our guide about what your clients need to know about their WordPress site, too.
6 Best Practices to Optimize Your WordPress Database published first on https://brightcirclepage.tumblr.com/
0 notes
Text
6 Best Practices to Optimize Your WordPress Database
Your WordPress site can be slow for many different reasons; a bloated database running in the background is one of them. A professional WordPress maintenance workflow includes a regular database optimization practice during which you get rid of unnecessary data and locate and fix errors and inconsistencies in your database.
WordPress database optimization doesn’t require any specific programming knowledge, although you occasionally need to edit the wp-config file. In this article, we will show you a couple of best practices about how to optimize your WordPress database.
Start with a Backup
Before getting started with optimization, create a backup of your database. In this way, if anything goes wrong, you won’t lose any data and can return to a previous version of your site. There are different solutions to back up a WordPress site, here are the most important ones:
you can create a full site backup from the cPanel of your hosting account,
you can export all your content including your posts, pages, comments, and other post types from the Tools > Export menu in your WordPress admin area,
you can use a backup plugin such as BackupBuddy or VaultPress that allows you to create different kinds of custom backups.
Delete the Content You Don’t Need
One of the most important things of database optimization is to get rid of all the overhead content you don’t need. As each post, page, comment, and post revision is an entry in your database, you can free up a lot of space by deleting unused, obsolete, or duplicate content right from your WordPress admin area.
If you have a WordPress site for a while, you can find such content in many different places. First and foremost, it’s worth deleting the Trash folder of your Posts and Pages menus (even if WordPress automatically deletes posts from the trash after 30 days). You can also go through your Drafts and Pending posts to see if you really need all of them.
You can also check if you have any taxonomies you don’t use. WordPress has two kinds of taxonomies by default: posts and categories. You can find both of them in the Posts menu. Database optimization is also a good opportunity to think through your taxonomy structure, get rid of duplicate tags and categories, and improve the findability of your posts.

Besides default posts and pages, you can also have custom post types such as calendars, recipes, or affiliate links that include content you don’t need anymore.
Remove Themes and Plugins You Don’t Use
Although WordPress saves themes and plugins into the wp-content folder instead of the database, it’s still a good idea to delete the ones you don’t use. Many plugins and some of the more complicated themes create extra tables inside your database. Besides, all plugins and themes store their options in the wp-options table as well.
Plugins and themes developed following WordPress’ coding standards clean up after themselves when you remove them from your site. In this case, you only need to delete them from the WordPress admin area using the Appearance and Plugins menu. Note that it’s not enough to only deactivate them, you also need to hit the Delete button. If your plugin doesn’t clean up after itself, you can still get rid of the related database overhead using one of the methods below.
Optimize Your Tables in phpMyAdmin
You can run a database optimization query right from your phpMyAdmin interface. PhpMyAdmin is the application that allows you to access your raw database. You can reach phpMyAdmin from the cPanel of your hosting account, from the Databases menu.
In phpMyAdmin, open the database belonging to your WordPress site and check the tables you want to optimize. You can also choose the Check All option, as you can see on the image below:

Here, scroll down the dropdown list (with the “With selected: “ label) you can find below the tables. From the Table maintenance group, select the Optimize table option and run the query.
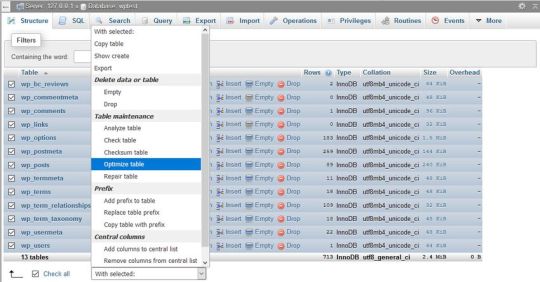
The Optimize table option runs the OPTIMIZE TABLE command on your data, which, according to the MySQL documentation:
“reorganizes the physical storage of table data and associated index data, to reduce storage space and improve I/O efficiency when accessing the table.”
Besides OPTIMIZE TABLE, you can also run the REPAIR TABLE query from the same phpMyAdmin menu, which “repairs a possibly corrupted table”.
Run WordPress’ Database Optimization Tool
The WordPress Core also has a built-in database optimization tool. It’s turned off by default, however, you can activate it by editing your wp-config.php file. You can find wp-config in the root directory of your WordPress install on your server. Open it in your code editor and add the following option to the top of the file:
define( 'WP_ALLOW_REPAIR', true );
You can find the optimization script under the https://ift.tt/2DdDCih URL, where you need to replace your-site.com with your own domain.

Here, you can choose from two options:
Repair Database – it looks for and repairs common database problems,
Repair and Optimize Database – besides all the tasks performed by Repair Database, it also tries to optimize your database to improve performance.
In most cases, the first option is enough, but if you want an in-depth cleanup, choose the second one. Wait until the tool repairs and/or optimizes your database, then remove the option you have added to your wp-config file (otherwise, anyone on the web can see data related to your database).
Use a Database Cleanup Plugin
If you don’t want (or can’t) access your raw database and your wp-config file, or you want to run advanced database optimization tasks, you can also put a plugin into use. Below, we have collected the three best database cleanup plugins for you.
Note that you shouldn’t use more than one database optimization plugins at the same time, as these plugins have similar functionalities that can interact with each other in unexpected ways.
1. WP-Optimize
WP-Optimize is a free plugin that takes care of all kinds of optimizations on your WordPress site. Besides cleaning your database, it also compresses your images and caches the content on your site. Its database cleanup feature:
removes all unnecessary data, even expired transients hidden in the wp-options table,
optimizes all your MySQL tables,
lets you run regular automatic cleanups,
shows database statistics,
and more.
The plugin is frequently updated and the support team is responsive, so it’s a good and safe solution if you want to run automated cleanups on a regular basis.
2. Advanced Database Cleaner
Advanced Database Cleaner is another free database optimization plugin that comes with many advanced options. It allows you to remove all kinds of unused, obsolete, and duplicate content types, such as:
old revisions, drafts, and auto-drafts of posts, pages, and custom post types,
pending, spam, and trash comments,
orphan metadata and relationships,
expired transients,
and more.
You can also schedule and run automatic cleanups, view and clean tables, and display and view items before removing them. Besides, Advanced Database Cleaner supports multisite installs, too.
3. Optimize Database after Deleting Revisions
Optimize Database after Deleting Revisions is a database optimization plugin that lets you clean up your database with one single click. If you need a simple solution that doesn’t need much configuration, Optimize Database after Deleting Revisions can be the best choice for you. With this plugin, you can remove:
revisions of posts, pages, and custom post types,
trashed posts, pages, and comments (also spam comments),
orphan postmeta items,
unused tags,
expired or all transients,
pingback and trackbacks,
and more.
It also supports WordPress Multisite and adds an “Optimize DB” link to your admin bar with which you can run a one-click database optimization any time you want.
Conclusion
Database optimization is an essential task you need to perform regularly if you want to maintain good data health on your site. You can either do the optimization manually or make use of a data cleanup plugin that lets you configure and automate the entire process.
Besides, database optimization is also a typical maintenance service you can offer to your clients if you have a WordPress business. If you want to know more about what else to pay attention to when working with clients, have a look at our guide about what your clients need to know about their WordPress site, too.
6 Best Practices to Optimize Your WordPress Database published first on http://7elementswd.tumblr.com/
0 notes
Text
6 Best Practices to Optimize Your WordPress Database
Your WordPress site can be slow for many different reasons; a bloated database running in the background is one of them. A professional WordPress maintenance workflow includes a regular database optimization practice during which you get rid of unnecessary data and locate and fix errors and inconsistencies in your database.
WordPress database optimization doesn’t require any specific programming knowledge, although you occasionally need to edit the wp-config file. In this article, we will show you a couple of best practices about how to optimize your WordPress database.
Start with a Backup
Before getting started with optimization, create a backup of your database. In this way, if anything goes wrong, you won’t lose any data and can return to a previous version of your site. There are different solutions to back up a WordPress site, here are the most important ones:
you can create a full site backup from the cPanel of your hosting account,
you can export all your content including your posts, pages, comments, and other post types from the Tools > Export menu in your WordPress admin area,
you can use a backup plugin such as BackupBuddy or VaultPress that allows you to create different kinds of custom backups.

Delete the Content You Don’t Need
One of the most important things of database optimization is to get rid of all the overhead content you don’t need. As each post, page, comment, and post revision is an entry in your database, you can free up a lot of space by deleting unused, obsolete, or duplicate content right from your WordPress admin area.
If you have a WordPress site for a while, you can find such content in many different places. First and foremost, it’s worth deleting the Trash folder of your Posts and Pages menus (even if WordPress automatically deletes posts from the trash after 30 days). You can also go through your Drafts and Pending posts to see if you really need all of them.
You can also check if you have any taxonomies you don’t use. WordPress has two kinds of taxonomies by default: posts and categories. You can find both of them in the Posts menu. Database optimization is also a good opportunity to think through your taxonomy structure, get rid of duplicate tags and categories, and improve the findability of your posts.
Besides default posts and pages, you can also have custom post types such as calendars, recipes, or affiliate links that include content you don’t need anymore.
Remove Themes and Plugins You Don’t Use
Although WordPress saves themes and plugins into the wp-content folder instead of the database, it’s still a good idea to delete the ones you don’t use. Many plugins and some of the more complicated themes create extra tables inside your database. Besides, all plugins and themes store their options in the wp-options table as well.
Plugins and themes developed following WordPress’ coding standards clean up after themselves when you remove them from your site. In this case, you only need to delete them from the WordPress admin area using the Appearance and Plugins menu. Note that it’s not enough to only deactivate them, you also need to hit the Delete button. If your plugin doesn’t clean up after itself, you can still get rid of the related database overhead using one of the methods below.
Optimize Your Tables in phpMyAdmin
You can run a database optimization query right from your phpMyAdmin interface. PhpMyAdmin is the application that allows you to access your raw database. You can reach phpMyAdmin from the cPanel of your hosting account, from the Databases menu.
In phpMyAdmin, open the database belonging to your WordPress site and check the tables you want to optimize. You can also choose the Check All option, as you can see on the image below:
Here, scroll down the dropdown list (with the “With selected: “ label) you can find below the tables. From the Table maintenance group, select the Optimize table option and run the query.

The Optimize table option runs the OPTIMIZE TABLE command on your data, which, according to the MySQL documentation:
“reorganizes the physical storage of table data and associated index data, to reduce storage space and improve I/O efficiency when accessing the table.”
Besides OPTIMIZE TABLE, you can also run the REPAIR TABLE query from the same phpMyAdmin menu, which “repairs a possibly corrupted table”.
Run WordPress’ Database Optimization Tool
The WordPress Core also has a built-in database optimization tool. It’s turned off by default, however, you can activate it by editing your wp-config.php file. You can find wp-config in the root directory of your WordPress install on your server. Open it in your code editor and add the following option to the top of the file:
define( 'WP_ALLOW_REPAIR', true );
You can find the optimization script under the https://ift.tt/2DdDCih URL, where you need to replace your-site.com with your own domain.
Here, you can choose from two options:
Repair Database – it looks for and repairs common database problems,
Repair and Optimize Database – besides all the tasks performed by Repair Database, it also tries to optimize your database to improve performance.
In most cases, the first option is enough, but if you want an in-depth cleanup, choose the second one. Wait until the tool repairs and/or optimizes your database, then remove the option you have added to your wp-config file (otherwise, anyone on the web can see data related to your database).

Use a Database Cleanup Plugin
If you don’t want (or can’t) access your raw database and your wp-config file, or you want to run advanced database optimization tasks, you can also put a plugin into use. Below, we have collected the three best database cleanup plugins for you.
Note that you shouldn’t use more than one database optimization plugins at the same time, as these plugins have similar functionalities that can interact with each other in unexpected ways.
1. WP-Optimize

WP-Optimize is a free plugin that takes care of all kinds of optimizations on your WordPress site. Besides cleaning your database, it also compresses your images and caches the content on your site. Its database cleanup feature:
removes all unnecessary data, even expired transients hidden in the wp-options table,
optimizes all your MySQL tables,
lets you run regular automatic cleanups,
shows database statistics,
and more.
The plugin is frequently updated and the support team is responsive, so it’s a good and safe solution if you want to run automated cleanups on a regular basis.
2. Advanced Database Cleaner

Advanced Database Cleaner is another free database optimization plugin that comes with many advanced options. It allows you to remove all kinds of unused, obsolete, and duplicate content types, such as:
old revisions, drafts, and auto-drafts of posts, pages, and custom post types,
pending, spam, and trash comments,
orphan metadata and relationships,
expired transients,
and more.
You can also schedule and run automatic cleanups, view and clean tables, and display and view items before removing them. Besides, Advanced Database Cleaner supports multisite installs, too.
3. Optimize Database after Deleting Revisions

Optimize Database after Deleting Revisions is a database optimization plugin that lets you clean up your database with one single click. If you need a simple solution that doesn’t need much configuration, Optimize Database after Deleting Revisions can be the best choice for you. With this plugin, you can remove:
revisions of posts, pages, and custom post types,
trashed posts, pages, and comments (also spam comments),
orphan postmeta items,
unused tags,
expired or all transients,
pingback and trackbacks,
and more.
It also supports WordPress Multisite and adds an “Optimize DB” link to your admin bar with which you can run a one-click database optimization any time you want.
Conclusion
Database optimization is an essential task you need to perform regularly if you want to maintain good data health on your site. You can either do the optimization manually or make use of a data cleanup plugin that lets you configure and automate the entire process.
Besides, database optimization is also a typical maintenance service you can offer to your clients if you have a WordPress business. If you want to know more about what else to pay attention to when working with clients, have a look at our guide about what your clients need to know about their WordPress site, too.
6 Best Practices to Optimize Your WordPress Database published first on https://deskbysnafu.tumblr.com/
0 notes
Text
WP Cleaner Pro
New Post has been published on https://intramate.com/wordpress-plugins/wp-cleaner-pro/
WP Cleaner Pro
LIVE PREVIEWGet it now for only $19
WP Cleaner Pro is a unique and easy to use plugin that can be used to clean and optimize your WordPress database, making your website much more faster (see here the demo video).
This is the only plugin of this type which can clean 26 types of orphan and obsolete database data, also which can optimize the database, everything at once or in a scheduled event. Clean user interface, no back-end errors, optimized for speed. This plugin is developed for WordPress single-site installations, not for multi-site. Includes Envato Market plugin (for automatic updates).
FEATURES
Instant cleaning to optimize your WordPress website of::
Trash comments
Spam comments
Waiting for moderation comments
Orphan comment meta
Duplicated comment meta
Pingbacks
Trackbacks
Drafts
Auto-drafts
Revisions
Trash posts
Orphan post meta
Duplicated post meta
Orphan term relationships
Unused terms
Duplicated term meta
Expired transients
Orphan user meta
Duplicated user meta
Subscribers with invalid email
Weird characters from posts
Weird characters from comments
Comment agent from comments
oEmbed caches from posts meta
Links in wp_links table
Orphan tables
Scheduled cleaning of the WordPress database.
Background optimization of the WordPress database.
Backup of the WordPress database (create/download/delete backups).
Cleaning process is logged.
Logs can be seen and deleted.
Mobile-friendly admin dashboard.
26 types of data that can be cleaned.
View details of what you clean.
Choose items to clean.
Filter items to clean.
Code checked with PHP CodeSniffer.
Code developed according to WP coding standards.
Automatic updates with Envato Market WP Plugin.
Code optimized for speed.
Mobile-friendly documentation.
Translation ready (English .mo and .po included).
WordPress Admin DEMO
Demo: https://hevada.com/wordpress/wp-cleaner-pro.php Username: Demo Password: uLBwS(tN31WGDGf7BtXxdVx4
DOCUMENTATION
http://hevada.com/wp-cleaner-pro/documentation
CHANGELOG
15 December 2018 (version 3.4) - fixed the bug with some texts not being picked up by translations tools - added option to clean orphan tables - fixed the default charset encoding when creating backup - updated class-envato-market (for automatic updates) - fixed the warnings generated by CodeSniffer according to the new set of WordPress coding standards 15 June 2018 (version 3.3) - added protection to backups directory against public listing/download 28 May 2018 (version 3.2) - optimized the fonts loading - optimized the progress bar 9 May 2018 (version 3.1) - added Envato Market plugin support - ignore coding standards when trying to raise PHP limits - ignore logs size when calculating database size - clean old logs before starting a cleaning - updated translation files 15 March 2018 (version 3.0) - added ignore warnings to ini_get, ini_set and ini_restore (needed for some hosting providers) 6 March 2018 (version 2.0) - added raise of time limits to the main form - extracted raise/restore time limits to an utility method - disabled Pace loader for Ajax requests (as it is not necessary). 7 February 2018 (version 1.0) - first version
LIVE PREVIEWGet it now for only $19
0 notes
Text
How to Easily Deactivate WordPress Plugins (Beginner’s Guide)
Do you want to learn how to deactivate WordPress plugins? One of the best things about WordPress plugins is that you can turn them off temporarily by deactivating them. You can also completely remove WordPress plugins by uninstalling them.
As a WordPress beginner, you need to know how to deactivate one or all of your WordPress plugins. Learning this will help you with troubleshooting and fixing common WordPress errors.
In this article, we will show you different ways to easily deactivate WordPress plugins. Our goal is to help you learn how to better manage WordPress plugins on your website.
Here is an overview of what you’ll learn in this article:
How to deactivate a WordPress plugin
How to bulk deactivate WordPress plugins
How to deactivate all WordPress plugins via FTP
How to deactivate WordPress plugins via phpMyAdmin
Difference between deactivating vs uninstalling a plugin
How to uninstall a WordPress plugin
Should you keep deactivated plugins installed on your site?
How to Deactivate a WordPress Plugin
Let’s start with deactivating a single WordPress plugin.
If you want to temporarily disable or deactivate a WordPress plugin, then you need to simply visit the Plugins » Installed Plugins page inside your WordPress admin area.
From here, you need to locate the WordPress plugin that you want to deactivate. Next, take your mouse to the plugin’s row, and it will show you a link to deactivate that particular plugin.
Clicking on the link will simply deactivate the WordPress plugin right away.
Once you deactivate the plugin, it still remains installed on your website, but WordPress will stop loading it.
If you want to start using the plugin again, then you will just need to click on the Activate link below it.
How to Bulk Deactivate WordPress Plugins
Sometimes you may need to deactivate all WordPress plugins on your website to troubleshoot issues. Instead of deactivating one plugin at a time, WordPress makes it easy to deactivate multiple or all WordPress plugins quickly.
Simply visit the Plugins » Installed Plugins page and check the box next to the plugins you want to deactivate. If you want to deactivate all WordPress plugins, then simply check the box at the top to select all plugins.
Next, you need to select ‘Deactivate’ from the ‘Bulk Actions’ drop-down menu and click the ‘Apply’ button.
WordPress will now deactivate all selected WordPress plugins.
How to Deactivate All WordPress Plugins via FTP
If you have been locked out of your WordPress admin area, then you will not be able to deactivate WordPress plugins from your dashboard.
In such situations, you will need to deactivate plugins using other methods. The easiest of them is to deactivate WordPress plugins via FTP or your WordPress hosting file manager.
Basically, WordPress looks for your installed plugins in the /wp-contents/plugins/ folder. If it cannot find the plugin’s folder, then WordPress will automatically deactivate all plugins.
Instead of deleting the plugin’s folder, we will just rename it.
First, you will need to connect to your WordPress site using an FTP client. Once connected, you need to navigate to the wp-content folder inside your WordPress root directory.
From here, you need to right-click on the plugins folder and then select ‘Rename’. This will bring up a popup where you need to enter a new name for your plugin’s folder such as plugins-deactivated.
Your FTP client will now rename the plugin’s folder. You can now try to login to your WordPress admin area and visit the plugin’s page. You will see notifications about deactivated WordPress plugins.
How to Manually Deactivate WordPress Plugins via PHPMyAdmin
The FTP method is definitely easier in our opinion. However, you can also deactivate all plugins using phpMyAdmin.
First, you will need to login to your web hosting account’s dashboard. Next, click on the phpMyAdmin icon under the ‘Databases’ section.
This will bring you to the phpMyAdmin interface. First, you will need to select your WordPress database from the left menu.
PhpMyAdmin will now load your database tables in the right panel. You need to click on the ‘Browse’ button next to the wp_options table (your WordPress table name may differ depending on your WordPress database table prefix).
Now, phpMyAdmin will load data inside the options table. You need to scroll down to the row where option_name is ‘active_plugins’ and click on the ‘Edit’ button next to it.
PhpMyAdmin will open the row for editing, You need to delete the data inside the option_value field.
After that, click on the ‘Go’ button at the bottom to save your changes.
You can now visit your website and WordPress will see that all plugins have been deactivated.
What is The Difference Between Deactivating vs Uninstalling a WordPress Plugin?
The difference between deactivating vs uninstalling a WordPress plugin is quite simple.
When you deactivate a WordPress plugin, it is simply turned off. However, it is still installed on your website, so you can activate it again if you need to.
On the other hand, uninstalling a plugin completely deletes it from your website. You will not be able to see the plugin on the Plugins » Installed Plugins page.
If you want to reuse that same plugin, then you will have to install it again.
How to Uninstall a WordPress Plugin
WordPress makes it super easy to uninstall plugins from the admin area. Simply log in to your WordPress dashboard and go to the Plugins page.
You will see the list of currently installed plugins on your site. Your active plugins will be highlighted with a blue background.
If you want to uninstall an active plugin, then first you will need to deactivate it. After that, Click on the delete link below the plugin that you want to uninstall.
WordPress will now ask you to confirm that you want to delete the plugin.
You need to click on ‘Yes, delete these files’ button. WordPress will now safely remove the plugin from your web server.
That’s all you have successfully uninstalled a plugin from your WordPress site.
Some WordPress plugins leave traces of data and files even when they are uninstalled.
These items don’t have any significant impact on your WordPress site, but if you want to remove them, then here is how you would do it.
Removing unused shortcodes
Many WordPress plugins use shortcodes to easily add content to your posts or pages. Once you deactivate or uninstall a plugin, those shortcodes will become visible in your posts, and they look quite ugly.
[pluginshortcode]
You can easily disable shortcodes by adding the following code to your theme’s functions.php file or a site-specific plugin.
add_shortcode( 'pluginshortcode', '__return_false' );
This code basically adds the shortcode back and make it display nothing. Don’t forget to replace pluginshortcode with the shortcode tag used by the plugin you want to remove.
It is important to note, that you will need to remove this code if you ever decide to use that plugin again.
Cleaning up plugin traces from WordPress database
Some WordPress plugins create their own tables in the WordPress database. If these tables have too much data in them, then that would increase your WordPress backup size.
To clean these up, you need to launch the phpMyAdmin from your WordPress hosting dashboard.
You need to click on your database and then select the tables you want to delete. Below the tables list, you will see a drop-down labeled ‘With selected’. You need to click on the drop-down, and then select ‘Drop’.
Next, you will see a warning that you are about to delete these tables. You need to click on Yes to confirm the action. Please note that it is irreversible, once deleted you will not be able to restore these tables unless you have a database backup.
PhpMyAdmin will now delete the database tables from your unused plugins.
Clean up unused WordPress plugin files
Often WordPress plugins create files and folders on your hosting server. These files are usually harmless, but can increase your WordPress backup size.
To delete them, you need to connect to your WordPress site using an FTP client. Once connected, you need to go to wp-content folder. You will find files and folders created by plugins inside the uploads and plugins folders.
Make sure that the files you are deleting are created by the plugin that you have uninstalled. After that, simply delete them from your web server.
Should You Keep Deactivated WordPress Plugins Installed on Your Site?
If you are not going to use those plugins, then you should not keep inactive or deactivated WordPress plugins installed on your website.
Inactive plugins don’t have any performance impact on your website. However, plugins contain executable files and can be used by hackers to hide malware or a backdoor.
Apart from security concern, they also increase your WordPress backup size, show up as false positive in security scans, and cause other issues.
This is why we always recommend users to delete inactive plugins from their site.
We hope this article helped you learn how to properly deactivate WordPress plugins. You may also want to see our article on how to choose the best WordPress plugin for your website, and our list of must have WordPress plugins.
If you liked this article, then please subscribe to our YouTube Channel for WordPress video tutorials. You can also find us on Twitter and Facebook.
The post How to Easily Deactivate WordPress Plugins (Beginner’s Guide) appeared first on WPBeginner.
😉SiliconWebX | 🌐WPBeginner
0 notes
Text
WordPress Database Performance Tuning on Linux VPS
New Post has been published on https://seostepbysteplab.com/web-performance-optimization/wordpress-database-performance-tuning-on-linux-vps
WordPress Database Performance Tuning on Linux VPS
As your WordPress site grows, there are more and more posts and comments in your WordPress database, which will become the bottleneck of WordPress site performance. It’s important that you optimize the underlying MySQL/MariaDB database server as much as possible. In this article, I’m going to share with you how I improve the performance of WordPress database.
Prerequites
This article assumes that you have installed WordPress a Linux VPS (Virtual Private Server) or you have root access to the underlying OS. If you use shared hosting, it’s likely that your hosting provider have already done performance optimizations on MySQL/MariaDB database server.
Step 1: Delete Unused Plugins
Plugins will slow down your database and they can have vulnerabilities. You should remove those plugins that you don’t use.
Step 2: Delete Garbage Tables in your WordPress Database
Many plugins will create their own tables in the database when you install them on your WordPress site. However, the table can still reside in the database when you delete the plugin. Deleting garbage tables is helpful to keep a fast database.
You can install the Plugins Garbage Collector plugin to scan garbage tables.
Once it’s installed, go to Tools -> Plugins Garbage Collector to scan the database. Garbage tables are colored in red, which you can delete.
If a garbage table can’t be deleted from the WordPress admin panel (possibly because it uses uppercase), you can log into your MySQL/MariaDB console and enter SQL command to delete that table.
drop table table_name;
If you are not certain if a table belongs to a deleted plugin, you can use the following SQL command to check the content of that table.
describe table_name;
Step 3: Delete Garbage Metadata
There are 4 basic tables for storing metadata in WordPress:
wp_postmeta: metadata for posts
wp_commentmeta: metadata for comments
wp_usermeta:metadata for users
wp_termmeta: metadata for categories and tags
If you have enabled multisite functionality, then there is the wp_sitemeta table. Over time, your database will accumulate orphaned metadata. For example, when you delete a post, a comment, a user, a category or a tag, the metadata is still in the wp_postmeta table, but you don’t need them any more. So you can delete them manually.
You can use the following SQL query to find out if there are orphaned post metadata.
SELECT COUNT(pm.meta_id) as row_count FROM wp_postmeta pm LEFT JOIN wp_posts wp ON wp.ID = pm.post_id WHERE wp.ID IS NULL;
To delete orphaned post metadata,
DELETE pm FROM wp_postmeta pm LEFT JOIN wp_posts wp ON wp.ID = pm.post_id WHERE wp.ID IS NULL;
Query the number of orphaned comment metadata.
SELECT COUNT(*) as row_count FROM wp_commentmeta WHERE comment_id NOT IN (SELECT comment_id FROM wp_comments);
Delete orphaned comment metadata.
DELETE FROM wp_commentmeta WHERE comment_id NOT IN (SELECT comment_id FROM wp_comments);
If you allow user registration on your WordPress site, then it’s likely that there are many spam users. After you delete spam users, the metadata is still there. You can delete them with:
DELETE FROM wp_usermeta WHERE NOT EXISTS ( SELECT * FROM wp_users WHERE wp_usermeta.user_id = wp_users.ID );
Step 4: Clean Up wp_options Table
Many plugins or themes adds options in the wp_options table. However, when you delete a plugin or theme, their options can still be in the wp_options table. For example, I uninstalled the Disqus comment plugin and switched back to the WordPress native comment system. But there are still Disqus related options in the table, which you can find out with teh following SQL query.
select * from wp_options where option_name like '%disqus%';
To delete these options, run
delete from wp_options where option_name like '%disqus%';
You can use the free plugin named Clean Options to find out all possibly orphaned options. Even though this plugin hasn’t updated for 9 years, I find it very useful. Once you install and activate this plugin, go to Tools -> CleanOptions and scan the wp_options table.
Please keep in mind that this plugin isn’t 100% accurate in detecting orphan options. So you should do a Google search about the option name to be certain.
Sometimes, the option value can give you a clue which plugin or theme this option belongs to. You can use the following SQL query. Replace option_name with the real option name.
select * from wp_options where option_name like 'option_name';
If you still are not certain about a particular option, then please keep it in your WordPress database. Better safe than sorry.
0 notes
Text
WordPress Best & Easiest Platform For SEO

Lean/Clean Website Structure
Effortless to create updates/changes
Mobile Responsive
Light Wallpaper with Pleasing Color Scheme
Clear, easy-to-read Font Design
Distinguishable header Styles
If your site is not on WordPress, you have to switch. Hands down.
There are a whole lot of web site platforms and the majority of them are terrible for SEO (cough cough... WIX.) Some are fine, but I guarantee you WordPress is the simplest, cheapest, cleanest, and most manageable site base available.
I've never neglected with WordPress. It might have its follies, but should you approach WordPress with the knowledge and experience it takes to build a web site, you will avoid the drawbacks very readily. Follow this guide and you'll stay on the right track.
Google loves a clean site structure since it can crawl and index your site easily. WordPress is the cleanest template-based site builder available.
Also, if you pay somebody else to create a custom site for you without WordPress, then you are at their mercy for changes, content developments, and a variety of things. It would basically become a giant money fire pit and it will cost at least 6K off the bat once done nicely.
If you are a coder and understand how to build a fresh website and would like to do that, by all means take action. But WordPress is much quicker and will save you countless hours. Unless you enjoy doing things the hard way and wasting money and time, I strongly recommend WordPress.
You want to find a WordPress theme to put in on your own site. I recommend visiting ThemeForest and buying one which seems good there. I have used ThemeForest for several decades, and they offer a vast array of great, clean themes to select from.
Try to stay with simple-looking ones with sufficient functionality for your particular internet presence.
You need a mobile responsive layout or your website will not flourish.
Programmers preload stuff into themes to show you what it's capable of, but it just bogs down your site with a whole lot of crap you never desired in the first place.
Select your colour scheme carefully. Colours have meanings, but in any event, always have a brightly colored background.
There are plenty of studies that show people are more inclined to read your articles and remain on your website when you've got a light background like white; or, I suggest a slightly off-white backdrop.
People today favor seeing white area around words because it makes them feel less cluttered and the page looks less crowded. Purely psychological, but it functions.
I initially used a dark color scheme with light text for a few of my sites. But after studying the research, I changed the color scheme. Instantly I noticed that an increase in the site's functionality and conversion.
Additionally, ensure no HTML or W3C violations exist within your site's coding. I suggest you use an experienced coder throughout this process to check over your website's coding to guarantee everything is kosher. Find a freelancer on Upwork in case you aren't certain the way to do yourself.
As soon as you delete all of the preloaded plugins out of your recently installed WordPress theme, you want to download the essential plugins that will help you in your search engine optimization journey.
Below is a list of WordPress plugins you'll need to install to make your website more functional and to monitor the development of your SEO efforts. Make sure that you enable the plugins once downloaded so that they are operational.
AMP - support for Accelerated Mobile Pages
AMP stands for Accelerated Mobile Pages, and it is a project that provides mobile-optimized site content to customers that loads instantly anywhere on Earth. This plugin is free of charge.
This WordPress plugin will automatically generate AMP versions for every post you produce. You need this, because otherwise your posts will not stand a chance rank against articles obtained from mobile devices that do have AMP versions.
Google Analytics Dashboard for WP
When your Google Analytics account is set up and linked properly to this plugin, it will exhibit real-time data for your site about the WordPress dashboard. This plugin is free.
There have been many times where I created new content, was eager to see how it would function, then later realized I forgot to devote a Google tracking code.
Gravity Types
That is handsdown my favorite plugin. It is SO incredibly powerful. Gravity Types plugin knows no boundaries. It permits you to make powerful forms effortlessly and much, much more. This is a paid plugin, but totally worth it.
In the very least, you will need this plugin for lead contact and captures forms. Gravity Types can (and probably will) revolutionize the way you use your site.
With no coding or programming knowledge whatsoever, you can build job applications, employee review forms, product order forms, and almost anything else that springs to mind.
Ultimate Social
This plugin easily allows your site visitors to share your content on social networking platforms. Sharing and engagement by the website proves to Google that folks like your content and that it is valuable or useful. This is a low-cost plugin.
Throughout the SEO implementation procedure, you will learn why it's so essential for your content to be shared throughout the Internet. Ultimate Social plugin will enable your visitors to discuss your content quickly and easily.
VaultPress
This plugin protects your content, theme customizations, and plugins using real-time backup and automatic security scanning. It costs money, but the peace of mind it generates is invaluable.
Imagine you completed this book, used the guide, and created a bangin' website... just to have it crash and disappear forever... leaving you no alternative but to start from scratch.
VaultPress protects your website from spam, enables you to easily migrate your website, generates real-time automatic backups, and lets you restore your website without having to rely on your hosting supplier.
W3 Total Cache
The best part is it's completely free, and you can pay for superior support, but I have never had to.
Remember, if your website is slow, Google will not rank it highly. Google has a reputation to uphold as the very best search provider on the Internet. They would like to give folks the very best content at the maximum speed.
Google, and other search providers, won't forfeit their standing for your site if your site is slow, even though your articles is your best.
This plugin will reduce the size of the picture files that you upload, which enhances the speed and performance of your site. Large image files put a massive drag on your website's speed. This plugin is free of charge.
WP Smush scans all the images on your site, optimizes them by eliminating all the useless info, and scales down the image to a proper, manageable dimensions.
WP-Sweep
This plugin allows you clean up unused or duplicated data on your WordPress site. It eliminates spam comments, orphaned post metadescription, and all of the stuff you don't consider that bogs down your website functionality.
Additionally, it optimizes your database tables for quicker page rate. The plugin is free and does wonders for your website's speed and functionality.
This is an all-in-one search engine optimization solution for WordPress which offers search-engine content evaluation, XML sitemaps, plus even more. It has a free version, however, I use and recommend the superior paid version, as it is more robust.
This is fundamentally a selection of hints you'll check regularly while optimizing your site during this guide. This will allow you to understand when you're on the right track and help you remain on the right track. It is the ideal SEO WordPress plugin available.
This plugin ensures all of the hard work that you put in optimizing your webpages carries over to your AMP pages. The AMP plugin by itself may not catch all of the metadata you need to boost your pagerank on cellular phones.
This plugin is free and will significantly enhance your content's mobile ranks.
Besides those 11 plugins listed, I use no longer than five extra ones for other specific functions which have less to do with SEO and more to do with conversion goals and online merchant services.
I strongly recommend using the smallest sum of plugins as possible. Do not overload your WordPress site with a bunch of mad plugins or it might bog down your site. 1 poor plugin could do just fine too.
Therefore, be careful and do your own homework before installing plugins or it might be detrimental to your SEO strategy.
0 notes
Link
There are two important components of a typical WordPress installation:
WordPress files stored on your server
WordPress database
It’s an essential for you to clean up your WordPress database and reduce its size from time to time.
Over time, your WordPress database has accumulated many redundant tables, unused records, and many entries which you can remove without affecting your website.
This is a must-do process for every WordPress user to keep the size of their database at a minimum and keep their WordPress blog loading quickly.
This will help reduce the load on your server and your WordPress performance will improve dramatically.
In this tutorial, I will take the example of ShoutMeLoud’s WordPress database which is 286.3 MB and drastically reduce it’s size.
You can follow this guide step-by-step and perform these tasks on your own blog.
Note: A few of the points require a little technical know-how, and if you find yourself questioning, feel free to ask in the comments or skip that step entirely.
Also read: How To Improve WordPress Performance With Advanced Database Cleaner Plugin
Tutorial: How to Reduce WordPress Database Size
Step 1: Take WordPress Database Backup (IMPORTANT)
This is an essential step.
In my case, I have used my hosting company’s backup feature (WPEngine backup) to take a complete backup of the database and all included files.
You can also use the WP-DB Manager plugin to take a backup of your database file. You can find a tutorial over here. I highly recommend the WP-DB Manager plugin because we will be needing to run a few SQL queries, empty, and drop database tables (all of which this plugin can do).
Step 2: Disable AND Delete Unused WordPress Plugins
Go through the active plugin list on your WordPress blog and disable those plugins which you are not using anymore. There might be plugins that you use once in a while, but I suggest you disable them now and re-install them when they’re needed again.
Our goal for today is to completely optimize the database size.
Only disabling unused plugins will not be of much help here, so make sure you also delete those unused plugins.
Speaking of useful plugins:
Basic WordPress Plugins For Every Blog
Must Have SEO WordPress Plugins
List Of Plugins That I Use Here At ShoutMeLoud
Step 3: Delete All Spam Comments, Trash Posts, and Post Revisions
Whatever comments you have in your spam and trash folders, delete them.
Similarly, delete all posts from the trash folder and delete all post revisions.
You can use the Advance WordPress database cleaner plugin to get this done with one click.
Step 4: Find and Clean Orphan Tables
Install the WP Advanced database cleaner WordPress plugin & and follow this tutorial.
This plugin will find orphan and unused tables in your database. Using this plugin will help you clean all such tables.
This is a quite critical step and does it only when you are sure of the table names which you are not using.
If you are confused, skip this step.
Note: Deactivate the plugin after using it.
Step 5: Remove Unused Meta Values From Database
(Caution: Technical knowledge needed)
This is something I do once a year and suggests you do it only if you are accustomed to phpMyAdmin.
If you have used phpMyAdmin before, simply follow this easy tutorial and get rid of all unused meta values from your database.
This won’t bring down your database size significantly, but it is useful if you are highly determined to clean up your WordPress database.
Step 6: Use MySql Queries To Reduce Database Size
One of the tables which are a major cause of increased database size is “wp_commentmeta” due to the Akismet plugin.
Before running the below-mentioned query, my wp_commentmeta size was 146 MB.
After optimizing, it reduced to 16.1 MB.
Here are two queries which you need to run. Use the WP-DB Manager plugin > Run SQL query option to execute these queries from the WordPress dashboard.
Run both SQL commands separately.
DELETE FROM wp_commentmeta WHERE comment_id NOT IN (SELECT comment_id FROM wp_comments); DELETE FROM wp_commentmeta WHERE meta_key LIKE '%akismet%';
Note: For some WordPress installations, there is a chance your database table names might be different from what is used in the above code. It could be something like “wp_commentsmeta”, so don’t forget to check your DB table names and replace them accordingly.
Here are couple more SQL queries which will be useful to reduce database size:
DELETE FROM wp_postmeta WHERE meta_key = "_edit_lock"; DELETE FROM wp_postmeta WHERE meta_key = "_edit_last";
Step 7: Empty and Drop Unused Database Tables
Again, this step is for those WordPress users who have a fair knowledge of WordPress tables.
Under the WP-DB Manager plugin, you will find an option to “Empty/Drop Table” and from there you can see the list of all the tables in your WordPress DB.
Here you can empty those logs which are not useful and drop those tables which were created by any plugins that you are not using anymore.
For example, I removed “wp_roostsettings” which was created by one of the plugins I deleted in Step 2.
Step 8: Optimize Database and Be Amazed
If you have followed all of the above steps as mentioned, it’s now time to optimize your database and see how much size you have freed up.
You can optimize your database using the “Optimize” option of the WP-DB Manager plugin, or you can use the WP-Optimize plugin. I have shared a guide before on database optimization here.
As mentioned above, my WordPress database size was 286 MB before cleaning up, and after all of the above-mentioned steps, my database size dropped to 96.7 MB.
That’s a huge reduction of 189 MB!
Overall, if you have a busy WordPress site, you should clean your WordPress database once every two months, or at least optimize your WordPress database once every two weeks.
Go ahead and start working on reducing your WordPress database size and let me know how much space it was before and how much space it is now.
0 notes
Text
How to Prevent and Remove Malware in WordPress
How to Prevent and Remove Malware in WordPress
WordPress is now the most popular website management software, currently powering more than 70 million websites worldwide. Software by it’s very nature is something that needs to be maintained, as new updates and patches become available. WordPress has been freely available since 2004 to create a website with, and versions remain online from 1.x to the most current (3.3.2).
From the very first version of WordPress, to the latest, there have been hundreds of updates available – some of which patch very big security holes. Over the last few years the term “malware” has been used in conjunction with WordPress websites that have been compromised (hacked) through one of these security holes. While malware is typically a term to describe a virus with a payload on a PC, the term is now more often used to describe a (WordPress) website that’s been infected with SEO spam, or malicious scripts or code.
The best prevention for malware in WordPress is simply keeping it up to date. As new releases become available, perform the upgrade as soon as possible. In addition, also be sure that your installed theme and plugins are up to date as well.
Tips for Malware Prevention
While updating WordPress is great preventative medicine there are multiple additional things that you can do to further protect your website:
Remove old plugins: Be sure to remove any plugins that you aren’t using (that are deactivated). Even unused plugins can be a security risk. Also, be sure to only leave installed plugins that have had an update within the last 12-18 months. If you’re using plugins older than that, they may not be compatible with the latest version(s) of WordPress (or your theme) – and they could have security holes as well.
Review your theme: How old is your WordPress theme? If you purchased it from a developer, check and see if there is a recent update available for you to install. If you have a custom theme (or even one you coded yourself), be sure to have it reviewed by a competent developer or security expert about once per year to ensure it doesn’t have security holes.
Security and Hardening: You should install and configure one or more popular WordPress plugins to secure and harden your website (beyond the ‘out of the box’ setup). While WordPress is a very mature and secure platform, you can easily add multiple additional layers of basic security by changing your admin username, the default WordPress table name, and security against 404 attacks and long malicious URL attempts.
Tips for Malware Removal
If you think your WordPress website has been hacked or injected with malware, malicious scripts, spam links, or code, the first thing you should do get a backup copy of your website (if you don’t already have one). Get a copy of all files in your webhosting account downloaded to your local computer, as well as a copy of your database.
Next install one of the many free malware scanner plugins in the WordPress official free plugin repository. Activate it, and see if you can find the source of the infection. If you’re a technical person, you might be able to remove the code or scripts on your own. Be sure to check all your theme files, and you might also need to reinstall WordPress.
If your WordPress core files are infected one of the best ways to remove the source of the infection is to delete the entire wp-admin and wp-includes folders (and contents) as well as all files in the root of your website. Inside the wp-content folder delete both the themes and plugins folders (keeping the uploads, which has attachments and images you’ve uploaded). Since you have a local copy of your website, you can reinstall the theme and you know what plugins were installed.
The best thing to do at this point is to download a fresh copy of WordPress and install it. Use the local copy of the wp-config.php file to connect to your existing database. Once you’ve done this, before reinstalling your theme and plugins you might want to login one time to your wp-admin dashboard and go to “Tools->export” and export and entire copy of all your content, comments, tags, categories, and authors. Now (if you want) at this point you could drop the entire database, create a new one, and import all your content so you’d have a completely fresh copy of both WordPress and a new database. Then last, reinstall your theme and fresh copies of all plugins from the official WordPress repository (don’t use the local copies you downloaded).
If these steps are too technical for you, or if it didn’t remove the source of the infection, you might need to enlist the help of a WordPress security expert.
Preventive Maintenance Moving Forward
If your website is important to you, or if you use it for business – it’s important that you protect it as if it were your physical business. Would would happen if your website were down or out of commission tomorrow? Would it hurt your business? A little preventative medicine goes a long way:
Backup and Disaster Recovery Plan: Make sure you have a working and tested backup solution in place (this is what most businesses would call a disaster recovery plan). There are many free and paid plugins and solutions to accomplish this for a WordPress website.
Install Basic Security: If you don’t have a WordPress security plugin installed, get a highly rated and recently updated one from the official free plugin repository today to protect your website. If you aren’t comfortable doing this on your own or don’t have a technical website person, then hire a WordPress consultant or security expert to do it for you.
boiler service near me Ata Rehman
0 notes