#double mohawk tutorial
Explore tagged Tumblr posts
Visit Tumblr Blog
Explore Tumblr blogs with no restrictions, modern design and the best experience.
Last Seen Tumblr Blogs


Fun Fact
When “GIF” was named word of the year in 2012, Oxford Dictionaries U.S.A. credited Tumblr for pushing the word.
Text
double mohawk tutorial by b1jlly on tiktok
supplies: hair clippers, head of hair, hair spray, maybe some hair dye
do you guys enjoy punk hair inspiration as well as clothes?
end result:

#punk#diy#punk hair styles#hair inspiration#double mohawk#bihawk#bihawk tutorial#double mohawk tutorial#hair styles#punk hair#hair spray
424 notes
·
View notes
Text
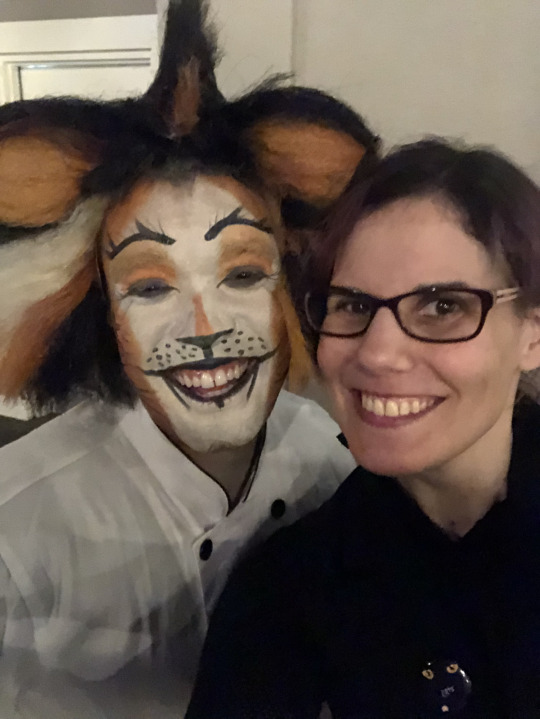
CATS Tied Tail Tutorial
Hi Folks, I know many of you already make these and have tutorials and already make these, but my friend Andre (Mungojerrie/Macavity at Suncoast) asked me how to make a Mungojerrie tail so I thought I'd post my tied-tail tutorial (as opposed to a wrapped tail tutorial) here for convenience. Everyone has their own variations. We also do wrapped tails (for sleeker cats) but mostly tied because we like the way it swishes and cats are all about coming for that booty. NOTE: I'm copying/pasting so this is customized for Mungo and specifically our mohawk Mungo costume shown below. Bonus shoe painting.
For the shoes I painted, his are in the center, bottom, between Cass and Gus--his Macavity are next to his.


TUTORIAL TIME.
What You Need: Different Types/Colors of Yarn including one Acrylic Yarn that’s strong to braid base/core.
Mungo Color Palette: Black, Different Oranges, little Yellow, little Red, OPTIONAL: little bit of White or Gray, can be added later.
WAIST BELT (Option: Get thick cord for around the waist, if nylon burn the end with a lighter so it doesn’t fray).
Directions: Take Black yarn and wrap it around your waist about three times. You probably will shorten it but can always shorten, not lengthen. Cut 6 strands of yarn, 3 Black, 2 Oranges, 1 either red or yellow), and tie at one end. Separate into three pieces of two strands each and braid normally. You might need to tie the end onto a chair or use your toes to hold it taut. As you braid, periodically check it around your waist to see if you can tie a comfortable knot with extra hanging down. At the bottom, tie another knot. You can let the ends be loose and frayed for aesthetic. You can do this with 9 strands as well.
TIED TAIL DIRECTIONS:
Step 1: Take a strand of yarn between your toes and stretch your leg out. Use the distance of leg to hip joint as a guide. You can always shorten a tail but can’t make it longer. Stand up and see where it falls from waist down. *Remember braided it will be a little shorter but yarn will add ~3” length.
Step 2: Take 3 strands of yarn (Black/Orange) and braid normally, checking periodically about length (remember it adds 3”). Tie a thick double knot at the bottom.
Step 3: At the top, fold the tip of the yarn over so it forms a small tail loop. Tie a knot.
Step 4: Wrap yarn around the width of your hand many times then carefully cut one side of it. You should get ~5-6” pieces. Do this for all colors. You will need more than you think, a lot of black and a lot of oranges especially.
Step 5: Take 2-3 strands of yarn, go to the bottom, and just above the knot, tie the yarn in half so both ends dangle down. Single knot should be fine. Continue to do this but change where you tie the knot so there aren’t weird gaps. For stripes, have Big sections of just one color before changing. Mungo is mottled so mostly oranges for the stripes with black, then some reds/yellow mixed in in a few spots for variation. You can optionally have a TINY bit of gray and/or white if you’d like but not necessary.
Step 6: Tie all the way to just above the top knot, then slide the tail loop through. CONGRATS, YOU HAVE A TIED-TAIL and should have extra yarn if you want to make warmers.
#cats the musical#cats musical#cats musical cosplay#cats musical costume#cats cosplay#cats musical suncoast broadway theatre#cats costume tutorial#andre spathelf sanders
23 notes
·
View notes
Text
Paper Gator: sun x moon x monty
sun and moon make monty an origami alligator when he visits the daycare.
glittergolf week event
day 2: Arts and Crafts/ Gifts
story under the read more
Paper Gator (also on ao3)
“Hey! Hey! Friend Monty! Look what I made!“
Said gator glanced away from his incredibly important task of being held captive under a pile of daycare children to look up at his friend.
Sun crouched down, giddy as he placed a tiny origami alligator on the glamrock’s snout. The craft was dabbled with light touches of paint to resemble it’s original version.
“It’s you!“ the space themed animatronic cheered.
“Aaww, thanks, bud.“ Monty shook the children off and stood up, putting the origami in his chest plate. “Gonna keep it on the dresser in my greenroom.“
Sun beamed at him, bouncing back up to wrap the gator in a hug and twirling him around. The taller burst out laughing and returned the hug once the room stopped spinning.
“How’d you make it anyway?” Monty asked, readjusting his shades. “Thought you guys could only do the easy ones.“
“Moonie’s been watching tutorials during his breaks. He insisted on making it once he found a tutorial he liked.“ Sun puffed their chest out. “I added the finishing touches!“
‘Sunny!‘ Moon hissed, tugging his hat over his eyes in embarrassment. ‘You weren’t supposed to tell him, you blabbermouth!‘
“What’s so funny, Sunny?“ Monty raised a brow. The two sat at the craft table, Sun trying to teach him how to make more origami alligators. A few children had started drawing on the glamrock’s casing and he really hoped it wasn’t with permanent marker. Again.
“Noooothing~“ the DA sang. “Moonie’s just telling me how happy he is that you like our gift is all~“
“Really now?“ Monty grinned at his friend, one of the girls started drawing a stick figure Doduo on Sun’s back.
‘Sunny.‘
“Mmmmyep!“ Sun tapped his chin, pretending to have a conversation with Moon. “He also says-“
‘Sun,‘ Moon warned, tugging at the back of their mind. ‘Don’t you dare-‘
“-That he likes your tail and fancy mohawk.“
Moon whined, angrily rolling on the floor of their shared subconscious.
‘Rrrgghh! Just you wait, Sunny. Once it’s naptime I’m gonna tell Monty all about your sticker collection of him!‘
Sun gasped. ‘You wouldn’t!‘
‘Oh, I would!‘
‘Hmph, fine.‘
“Sun?“
Sun’s faceplate stopped rotating as he was pulled from his thoughts, Monty’s hand on his shoulder. “Hmm?“
“I gotta leave for the next concert but tell Moon I’ll be back for naptime, ‘k lil guy?“
Sun gave a mock salute. “You can count on me, Monty!“
The gator started jogging towards the daycare’s double doors, turning around to walk backwards halfway. “Hey, Sun!“ he called out “Y’might wanna get some baby wipes for your casing!“
Sun tilted his head rotating it 360 degrees . Why would he need-OH! Apparently one of the kids had made wobbly drawings of Sun, Moon, and Monty holding hands on the Daycare Attendant’s back
Monty snickered as Sun’s rays stuck straight out in surprise, giving him a double finger guns and a wink before picking up the pace to the main stage.
Steam puffed from Sun’s vents at the gestures. He hastily took a picture of the children’s art (purely to save the art before he had to get rid of it, of course).
Moon cackled in the background as Sun wiped the ink away.
#my words#my fanfic#shapeshiftinterest#theme event#games#five nights at freddy's#fnaf#LGBTQA#montgomery gator#monty#sun#sundrop#moon#moondrop#glittergolf#alligators#animals#robots#origami
28 notes
·
View notes
Photo
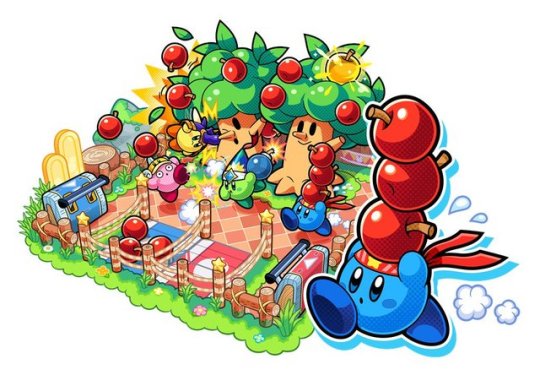
Kirby: Battle Royale - Datamine Findings [Spoilers]
I’m sorry that this is coming out so late! Once I finished collecting things I really had to take a rest, I stayed up all night for this so I was fairly tired by the end of it all. Either way, due to the length of this post and it’s spoiler content, click the “Read More” to continue.
To start off, the following abilities are in the final version of the game:
Sword Cutter Beetle Bomb Spear Fighter Ninja Whip Parasol Hammer Doctor Tornado Ice
King Dedede, Meta Knight and Bandana Waddle Dee are all present in the game as playable characters. It is unknown how they are unlocked normally, but it likely has to do with story mode. Their unlock messages are as follows:
"Meta Knight is now in the Collection Lists! You can use this in Battle Mode and Online Battles after it's unlocked."
"Waddle Dee is now in the Collection Lists! You can use this in Battle Mode and Online Battles after it's unlocked."
"King Dedede is now in the Collection Lists! You can use this in Battle Mode and Online Battles after it's unlocked."
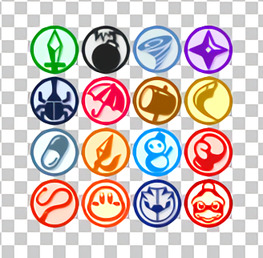
These are all the playable character icons. As it has been pointed out, in the demo, there are 17 ability slots; the last one is the Random select, similar to Smash Bros. and other games. The poll ability isn’t present whatsoever in the retail game, so it’ll likely be added in as a free DLC update.
As previously revealed on the Kirby Twitter account, the game has alternate costumes. Aside from special circumstances, all abilities have their default gear along with three alternates. They are listed as such: Sword: Gigant Helmet Newspaper Hat Dyna Helmet Ultra Sword Hat* Cutter: Sir Kibble Helmet Mohawk Knight Helmet Beetle: Hornhead Helmet Woodpecker Helmet Hydra Helmet Bomb: Foley Cap Bomb Cap Boom Cap Qbby Cap* Spear: Javelin Knight Helm Devil Horns Sectonia Mask
Fighter: Knuckle Joe Hair Wrestling Mask Goriath Hat Ninja: Bio Spark Helmet Topknot Samurai Helmet Whip: Whippy Hat Gymnastics Leotard Daroach Hat Parasol: Bouncy Umbrella Paper Parasol Fancy Umbrella
Hammer: Dedede Hammer Toy Hammer Grand Hammer Replica
Doctor: Chemitory Hat Nurse Cap Sacred Hat
Tornado: Twister Helmet Pinwheel Kracko Hat
Ice: Mr. Frosty Freeze Hood Snow Bowl
---
Bandana Waddle Dee: Sailor Hat Straw Hat Animal Hat Café Cap*
Meta Knight: Dark Meta Knight Mask Party Mask Mecha Knight Mask Galacta Knight Mask*
King Dedede: Knit Cap Gentleman's Hat King's Crown Masked Dedede Mask*
Ultra Sword Hat, Qbby Cap, Café Cap, Galacta Knight Mask and Masked Dedede Mask are all amiibo-locked, so you’ll need the Kirby Series amiibo and the Qbby amiibo to unlock everything.
Here are all of the ability moves. If the move is listed as an aerial move, it can only be used during a jump. If it’s listed as a charged move, you need to hold a charge before it can be used.
Beetle - Horn Upper, Horn Flurry, Back Slash, Spiral Horn (aerial), Rocket Horn (charged), Dive (after Rocket Horn), Forward Lunge, Slamming Drill (after Forward Lunge)
Bomb - Bomb Throw, Big Bomb Throw (charged), Bomb Dunk
Cutter - Cutter Boomerang, Jump Cutter (aerial), Hyper Cutter (charged), Final Cutter
Dedede - Hammer, Hammer Twirl (aerial), Dedede Hammer Throw (charged), Giant Dedede Swing
Doctor - Bouncing Capsule, Flash Spark (charged lv1), Sleeping Gas (charged lv2), Remedy (charged lv3), Clipboard Bash
Fighter - Quick Jab, Vulcan Jab, Rising Break, Sky Kick (aerial), Giga Force Blast (charged), Kick, Spin Kick, Final Spin Kick
Hammer - Hammer, Hammer Twirl (aerial), Hammer Flip (charged, 2 lvl.), Big Hammer Drop (aerial, charged, 2 lvl.), Hammer Swing
Ice - Ice Breath, Ice Sprinkle (aerial), Ice Wall (charged), Ice Ball
Meta Knight - Horizontal Slash, Meta Multithrust, Decisive Slash, Knight Spin (aerial), Dimensional Strike (charged), Piercing Slash
Ninja - Shock, Flurry Swipe, Stealth Slash, Ninja Kick (aerial), Pyrotechnics (charged), Knife Throw, Wind-Up Trick (charged), Ninja Jump (jump while holding button)
Parasol - Parasol Swing, Parasol Dive (aerial), Parasol Shield (hold), Parasol Drill (charged), Circus Throw (after Parasol Drill), Parasol Spin
Spear - Spear Thrust, Multispear Attack, Pinpoint Thrust, Windmill (aerial), Gale Thrust (charged), Spear Throw
Sword - Horizontal Slash, Successive Slash, Cleave, Sword Spin (aerial), Spin Slash (charged), Drill Stab
Tornado - Tornado Attack, Hyper Tornado, Big Tornado (charged), Tornado Dash
Bandana Waddle Dee - Parasol Swing, Parasol Dive (aerial), Aqua Shot (charged), Parasol Spin
Whip - Whip Strike, 100-Whip Slap, Whip Tornado (aerial), Crash Typhoon (charged), Whip Grab
To finish the ability section, there’s an oddity. Axe Knight is a character in the game, but it’s unknown if he’s playable. His data is all labeled as a normal, functioning player character, similar to Kirby’s abilities and the other confirmed unlockables. However, he’s also missing several things. He has no player select icon, lacks some coding for certain modes and has no unlockable text. Several things point to him being a character created solely for the Story Mode (possibly Meta Knight’s partner in the tourney), but there is a chance that he’s just not totally finished. Either way, his moveset is based around Cutter Kirby.
There are ten different game modes in the game overall. To list them out...
Apple Scramble - “Attack Mini Whispy Woods when it has apples to make them fall. After you pick up apples, throw them into your collection area, which is blue. After pulling the lever, you'll score for apples that go down the chute. High score wins!” Maps - Starter Forest, Double-Cross Forest, Bramble Forest, Fenced Forest, Double-Cross Forest (again?)
Slam Hockey - “Try to hit rivals with the puck as many times as you can. High score wins! You can send the puck toward rivals in two ways: give it a smack or throw it! If a rival throws a puck at you, catch it by pressing R at just the right time.” Maps - Normal Arena, Obstacle Arena, Stretch Arena
Battle Arena - “The last one standing when all rivals are KO'd wins! To knock out rivals, attack them until their health hits zero. Press A repeatedly to wake up if KO'd. The more you faint, the longer it takes to recover.” Maps - Deluxe Coliseum, Battle Coliseum
Robo Bonkers - “Attack Robo Bonkers and do more damage than anyone else to win! Throw missiles into cannons to launch them. It's a great way to damage Robo Bonkers! When Robo Bonkers falls, go for multiple attacks. Try for greater amounts of damage per hit.” Maps - Robo Bonkers, Robo Bonkers DX, Robo Bonkers SDX
Coin Clash - “Pick up coins while attacking your rivals for theirs. The one with the most coins wins! You can take even more coins from rivals by doing greater amounts of damage to them. You'll drop coins until you get the ghost off your back. Use B to dash and Y to jump.” Maps - Central Room, Dual Room, Trap Room, Party Room
Flagball - “You'll score when the ball connects with your blue flag. First team to seven points wins! If a flag falls to a lower level, you can grab it and run it around the field! A double flag will appear later in the game. It's worth double points. Great for a comeback!” Maps - Beginner's Beach, Flagger Beach, Footfall Beach, Lopsided Beach
Ore Express - “Toss as much ore as you can into train cars. Get more points than your rivals to win! Throw ore into a gold train car if you see one. You'll get double points for that ore!” Maps - Wayward Plains, Twisty Tunnels, Logjam Pass
Crazy Theater - “You'll enter a series of quick challenges. Hit the max number of wins before your rivals! In a question challenge, knock rivals off the correct answer!” Maps - Dream Theater
Attack Riders - “Attack your rivals to take away their chips. Whoever holds the most chips at the end wins! The more chips a competitor has, the easier they are to take. Greater damage gets more too. When the vehicle's gauge is full, press Y to attack. Avoid taking damage or you'll fall out!“ Maps - Attack Biker, Attack Tanker Rocket Rumble - “Grab as much fuel as you can and throw it into your rocket. The one with the most fuel wins! Attack your rivals' rockets to knock loose blocks of their fuel. Then steal it for your own! Get into your rocket before the 10-second countdown is over. Just jump in, or you won't score!” Maps - Space Center
The final boss in the game is named Dededestroyer Z. He shares some code with the Robo Bonkers battles, so it likely takes place in a similar scenario (circle arena, robot fight, etc.). In this fight, Dededestroyer Z seems to take control of the Kirby Printer and creates mass hordes of enemies for you to fight. The objective of this final fight is "Defeat all rivals before they beat you!". While this all goes on, Dededestroyer Z will also attack you using lasers, fist slamming attacks and more. Bandana Waddle Dee joins in this fight to help you, too; he seems to give you something called the Golden Missile, likely to deal the final blow.
The following NPCs are present in the game:
Groggy Waddle Dee Buddy Waddle Dee Dedede Meta Knight Axe Knight Bat Meta Knight Kirby Printer Waddle Dee A/B/C/D/E/F/P Soldier Waddle Dee L/R/A/B/C/D Spear Waddle Dee A/B Reporter Waddle Dee Camera Waddle Dee AD Waddle Dee TV Waddle Dee Mic Waddle Dee Fake Kirby A/B/C/D/E Waddle Doo A/B/C Guide Board A/B/C Knuckle Joe Elevator Crank Handle
The entirety of the Kirby Twitter news cast is here! Aside from the NPCs, there are characters called Waddle Dee Buddy, Waddle Dee Spear and Sandbag in the game. Compared to Axe Knight, it’s highly unlikely that these characters are anything more than story mode and/or tutorial characters. Sandbag is used in the online waiting room, too.
While we already have a fair bit of the OST in the game’s demo, there’s a lot of files that still aren’t present. This includes two Staff Credits themes, two Meta Knight themes, two Dedede themes, various boss themes, some more minigame themes and a couple things relating to the end of the game. I’ll be uploading the demo’s OST after this post goes live, too, so stay tuned for that!
To finish this off, I’d like to thank the elusive Popcorn for helping me, once again. He managed to snag the demo and send it over, so none of this would be possible without him!
120 notes
·
View notes
Photo
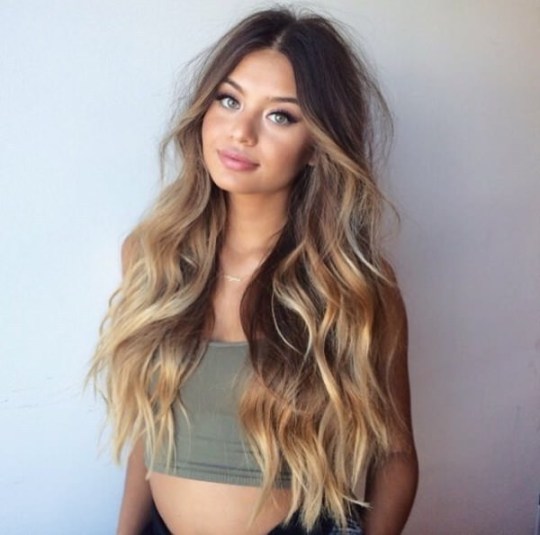
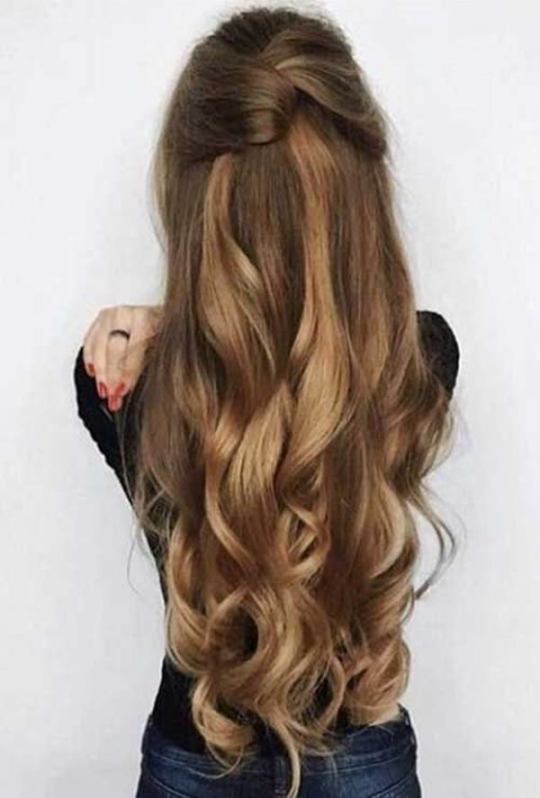
90+ Trendy Long Hairstyles Options For Girls

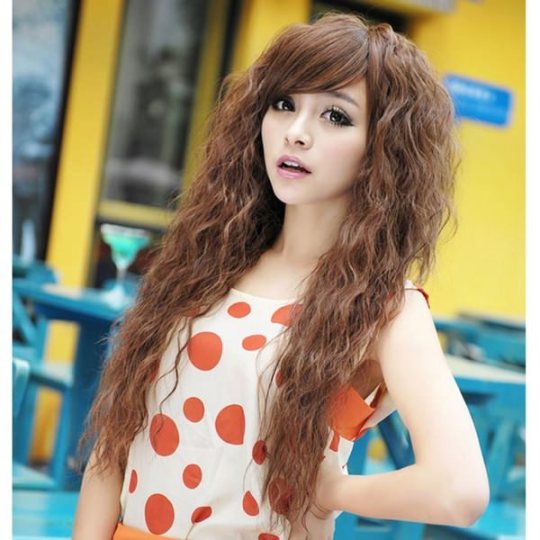
These days the hairstyles are looking messy and casual. There isn’t a whole lot of effort put into style and that’s okay too. We have many options for you to choose from, you can literally have a new style every day of you want. You can add texture to your hair or even layers. The sky is the limit for the colors that you can choose from as well. You can go bright and bold or just have simple highlights. We love all the amazing ideas that you can do with those beautiful long locks.
The great thing about long hair is that you can do so much with it. You can leave it down and straighten it, curl yet or leave it with some beach waves. The sky is the limit for what you can do with long hair. You can put them up in updos, it can be braided, curled or simply put into a ponytail. You can literally do anything that you want.
Have you ever considered a mohawk with long layers because that option is available with long hair as well? You can make any hairstyle dream come true with these long hair options. There are many styles that you can choose from that can take you until the end of the year.
Also Read: Top 10 Selena Gomez Long Hairstyles
These are the types of styles that will make you look fabulous. They are truly unique and you will be feeling like a rock star the moment you get the style done. Go ahead and book that salon appointment, you know you want a fresh new look.
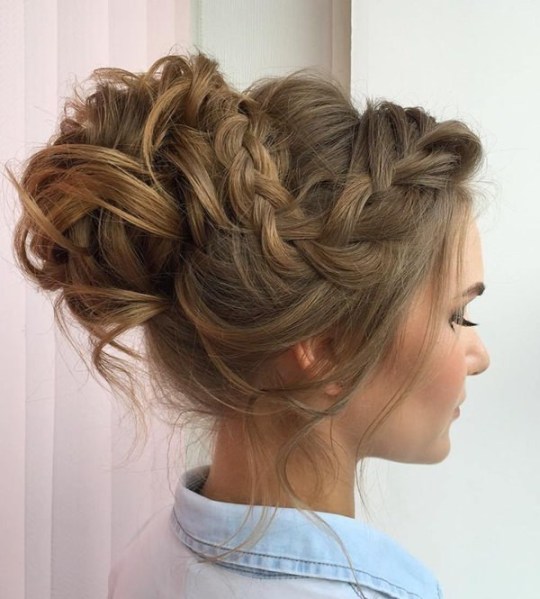
Stylish Buns
This is not your everyday bun, there is so much style and fashion to this design you will love it all night long. It’s a great style that you can use for any event.
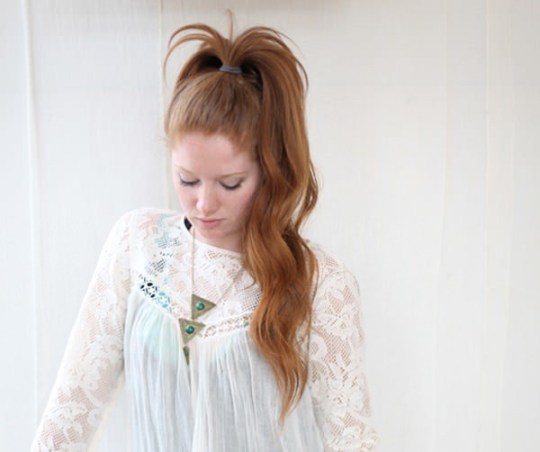
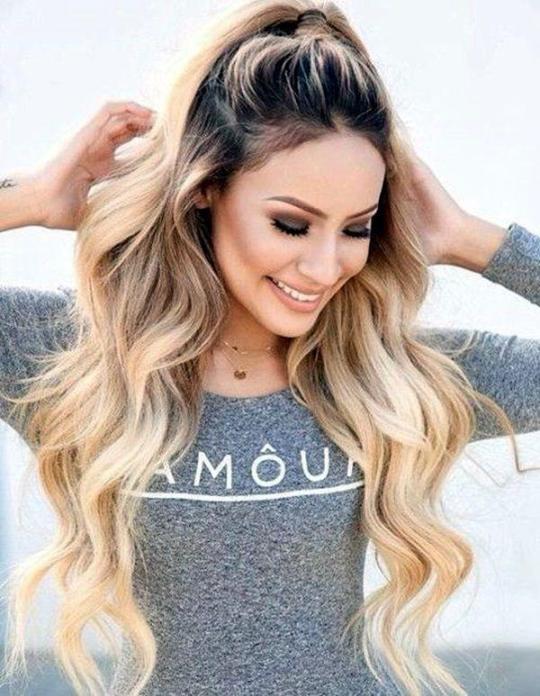
High Ponytail
Nothing is better for long hair than a high ponytail.
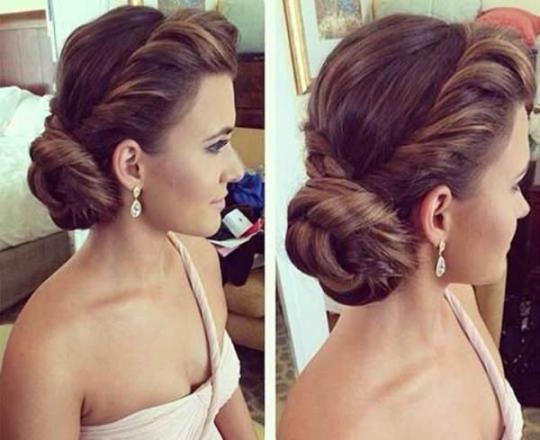
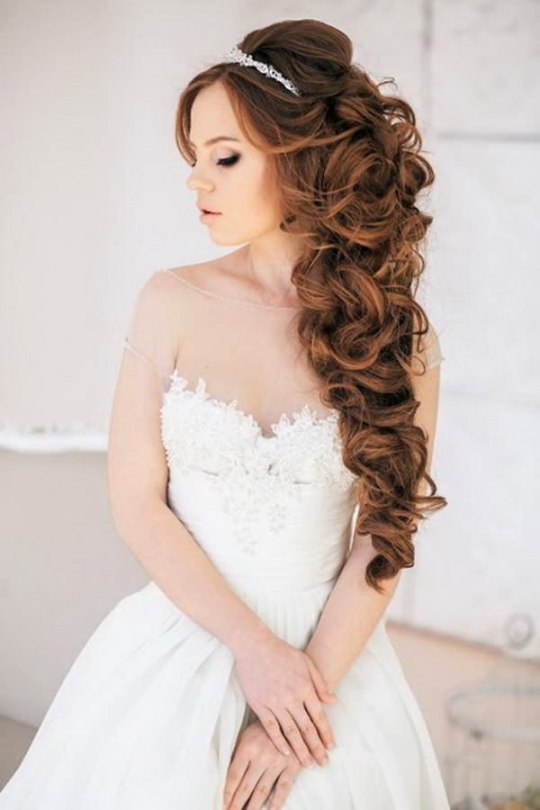
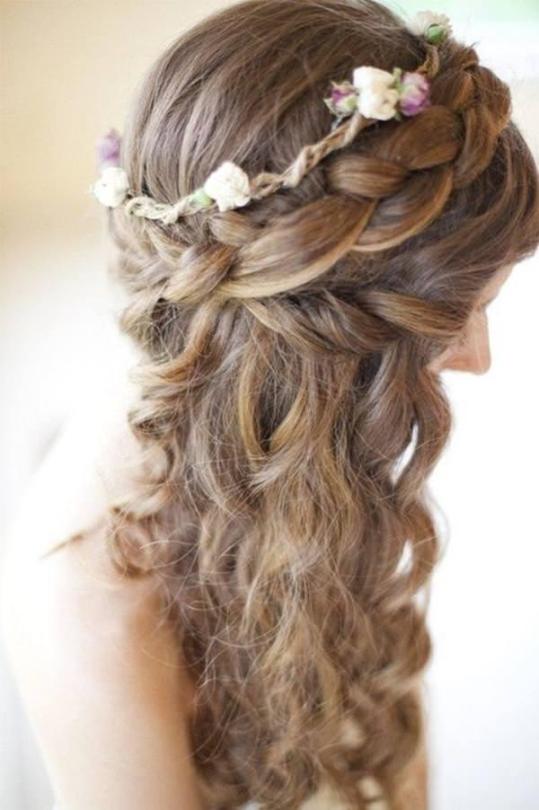
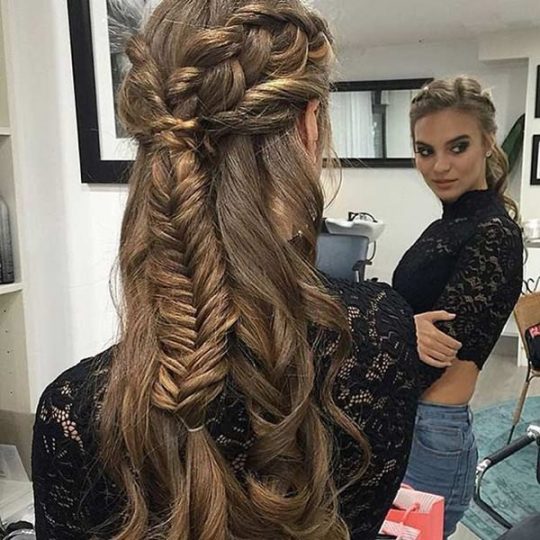
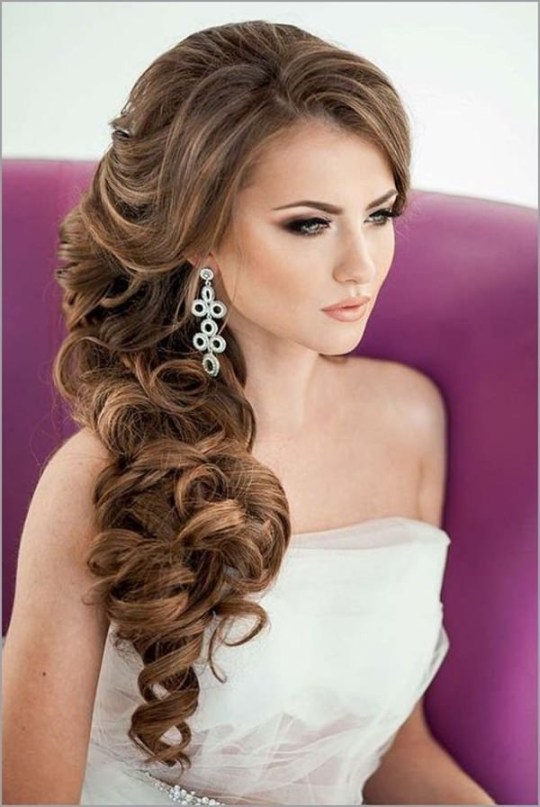
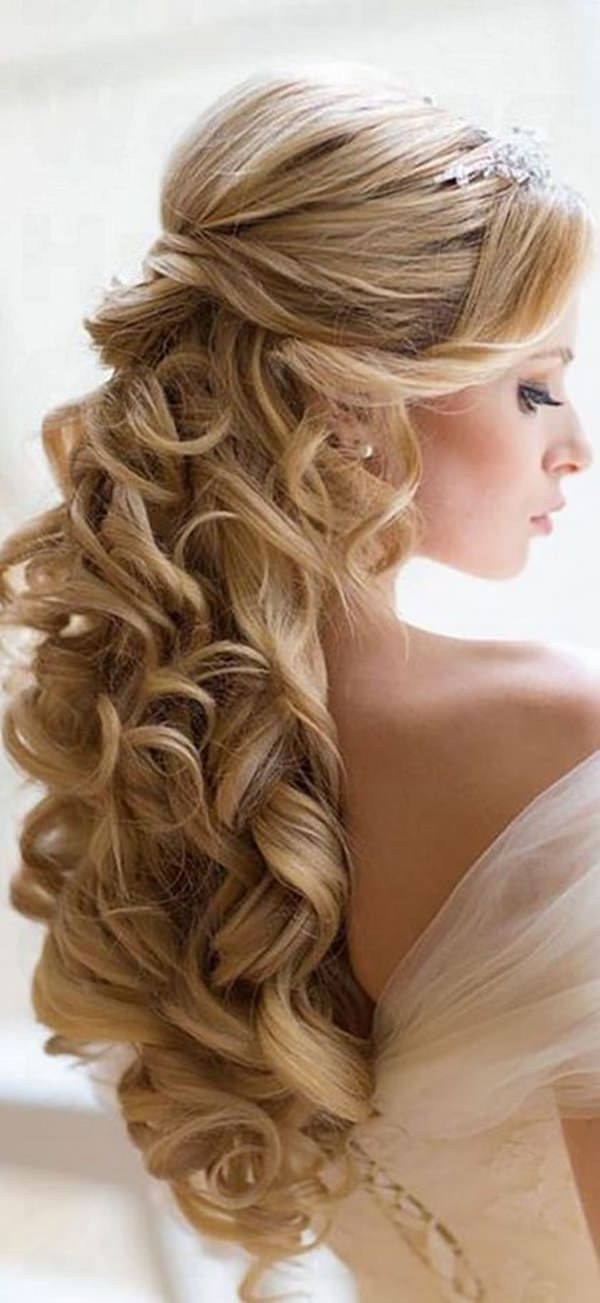
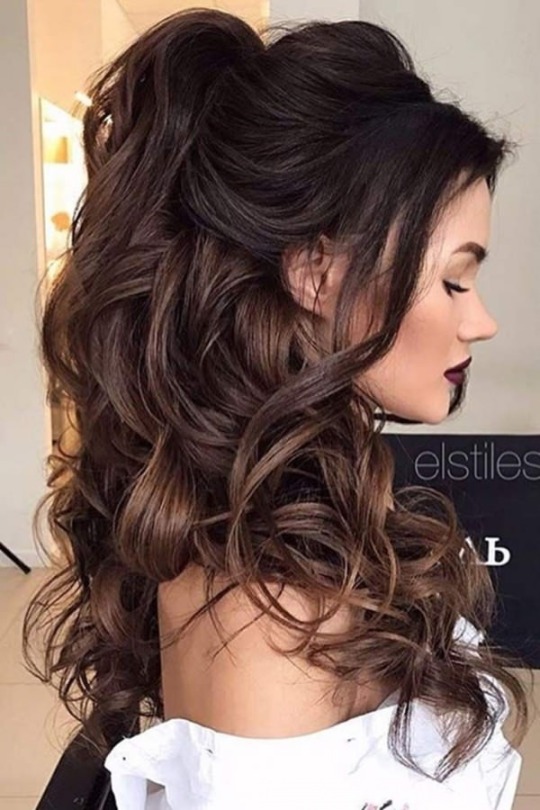
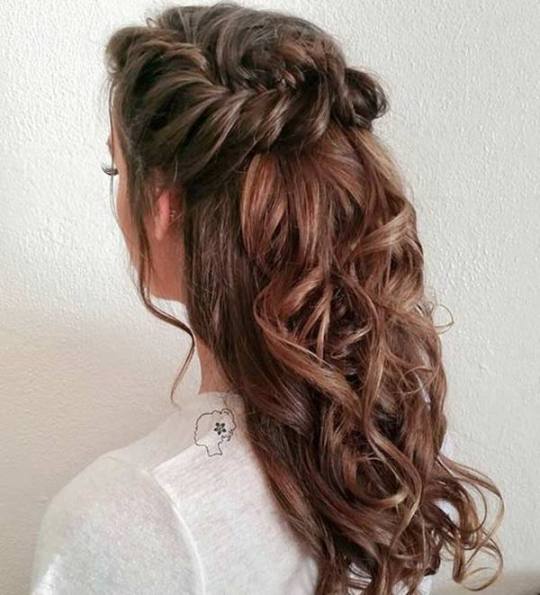
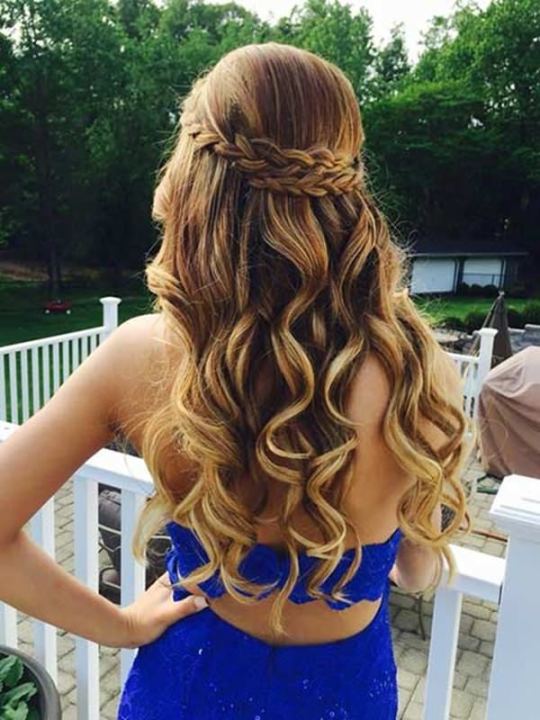
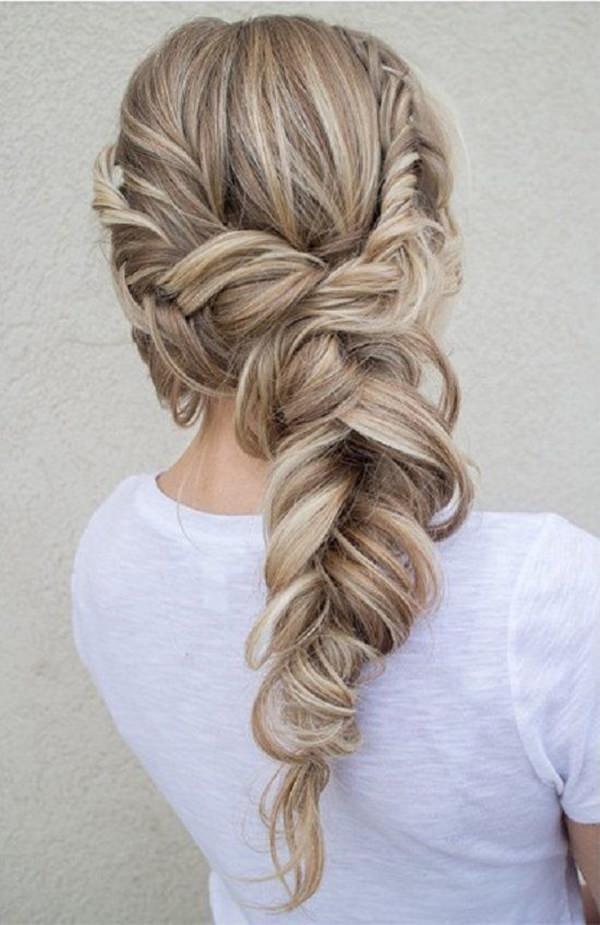
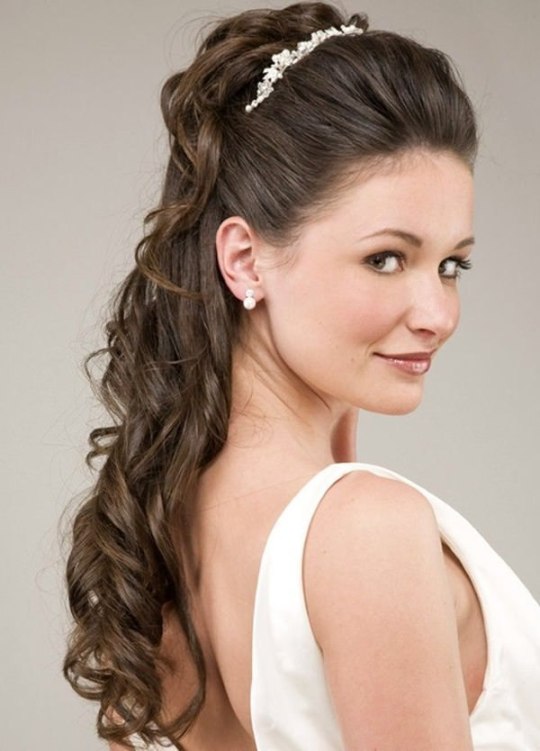
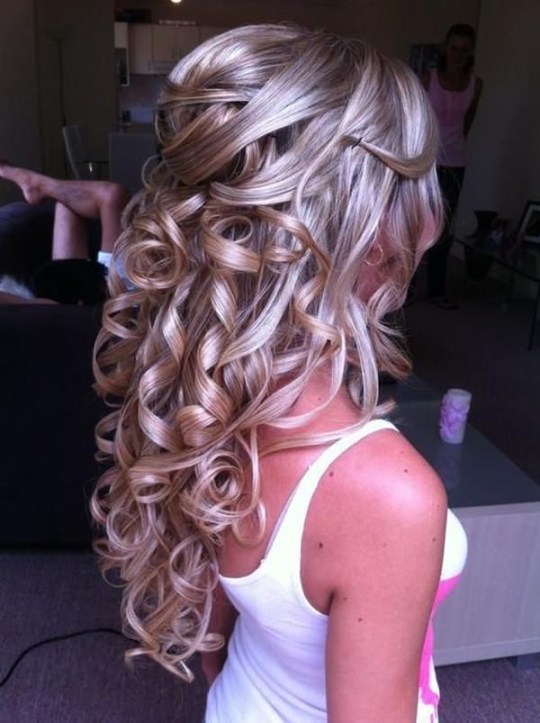
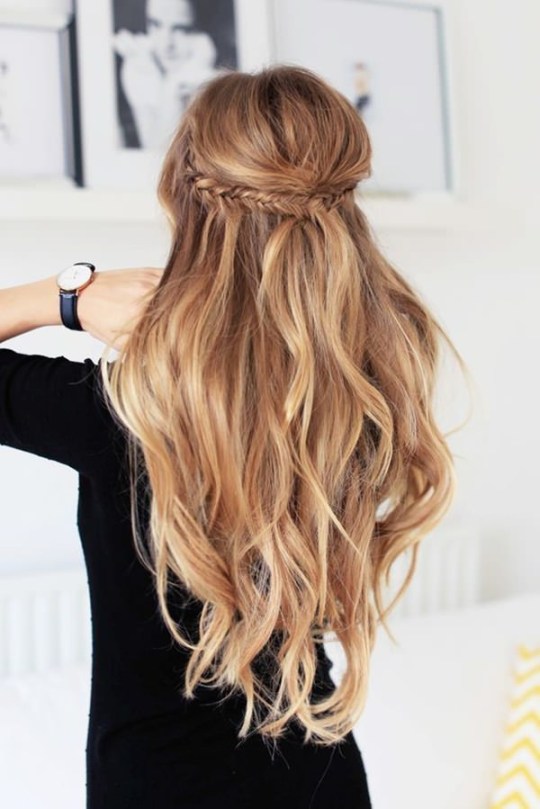
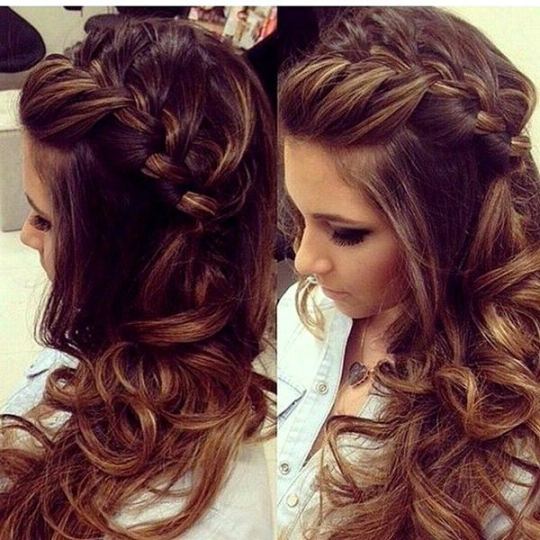
Wedding Styles
This stunning style is a classic look for a wedding. It requires a lot of hair however so you may need to add extensions. Part of it is pulled up to put the crown into. A stunning style that is going to make you feel like a princess.
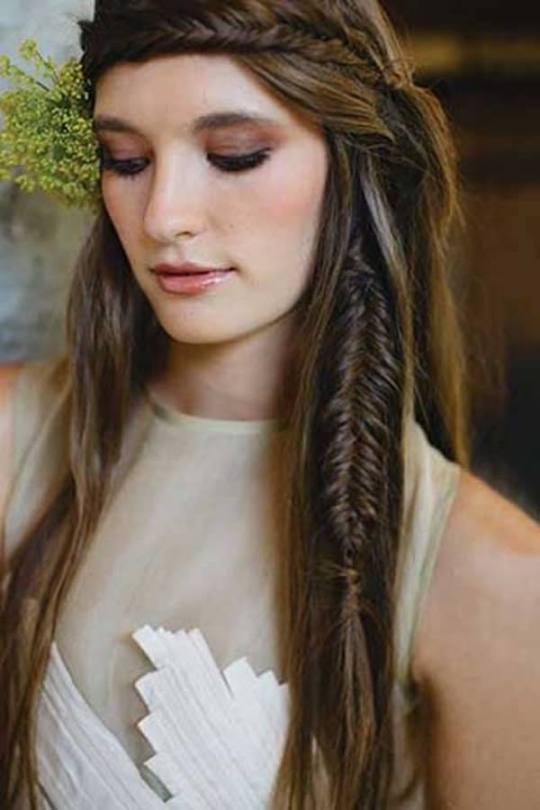
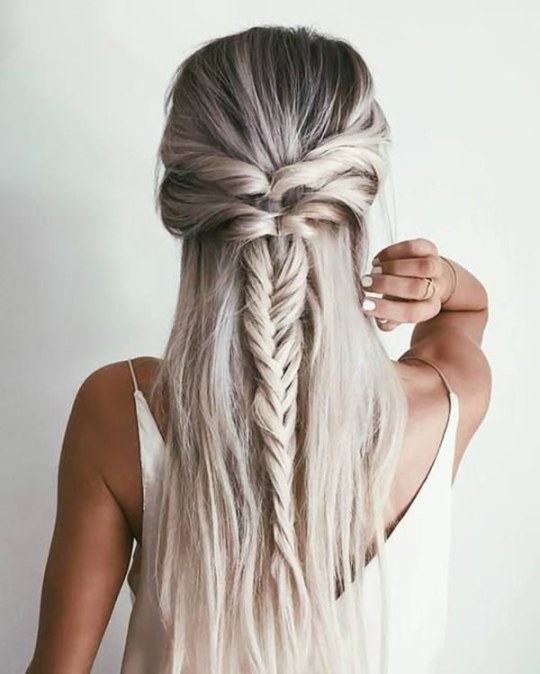
Small Fishtail
All you need is a small fishtail to freshen up your long hairstyle.

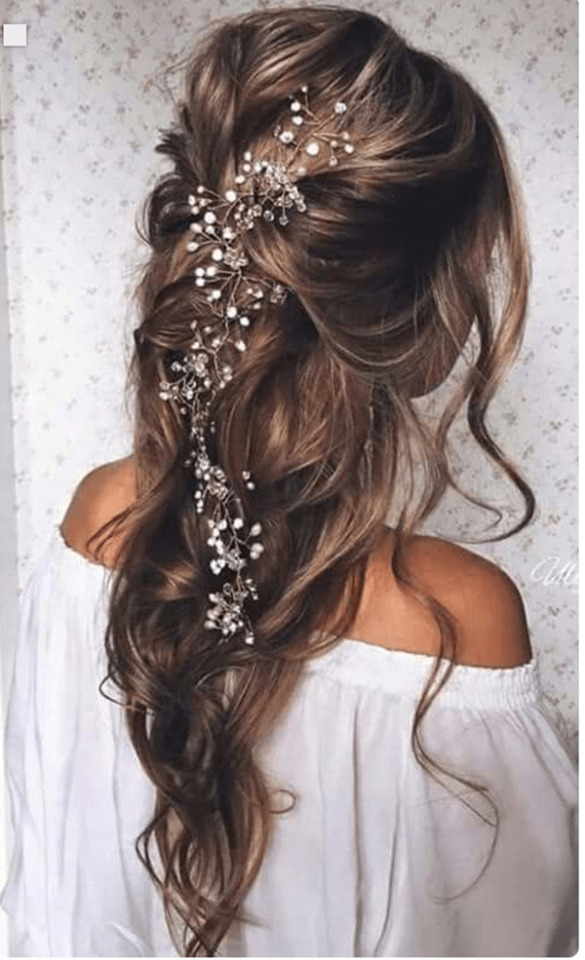
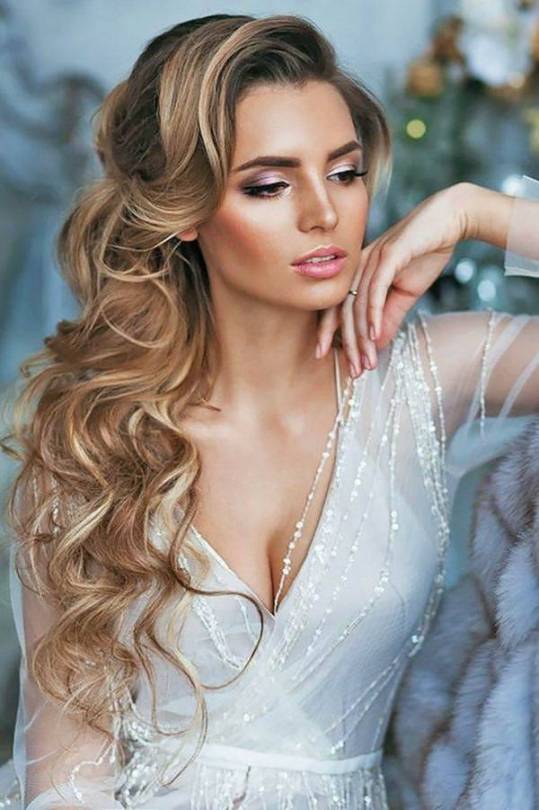
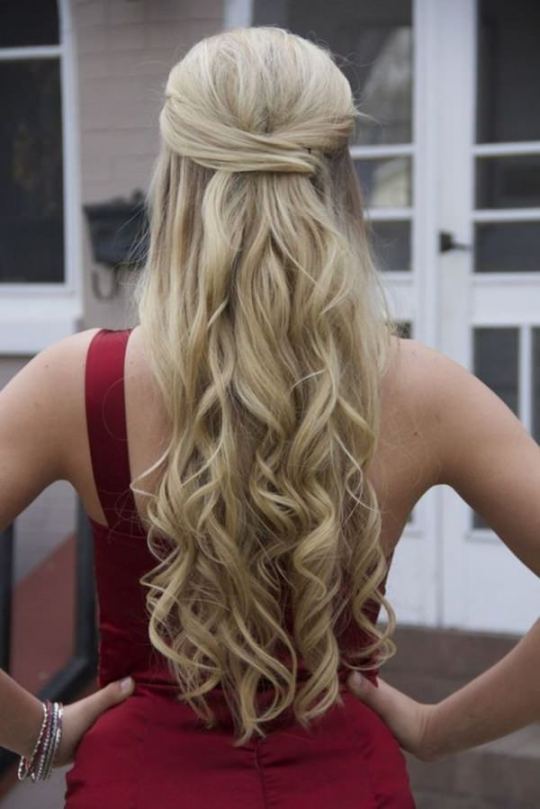
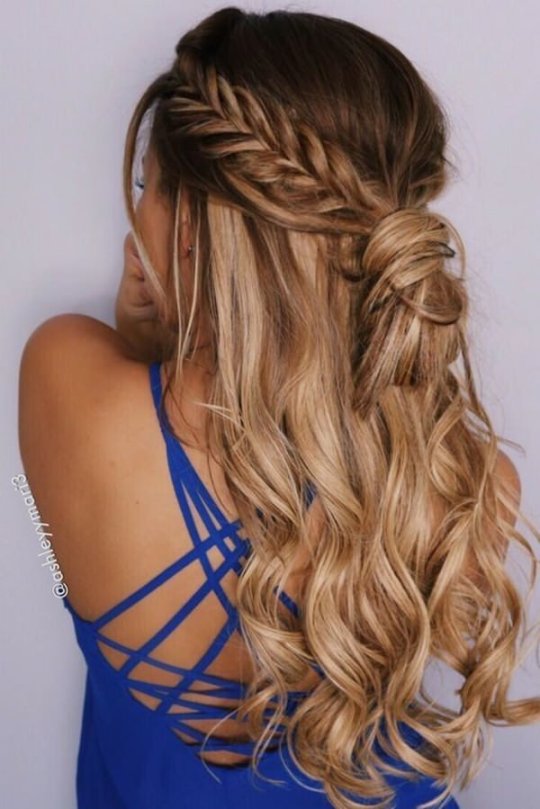
Jeweled Designs
An elegant style that cascades down the back. It’s partially pulled up to create this type of style.
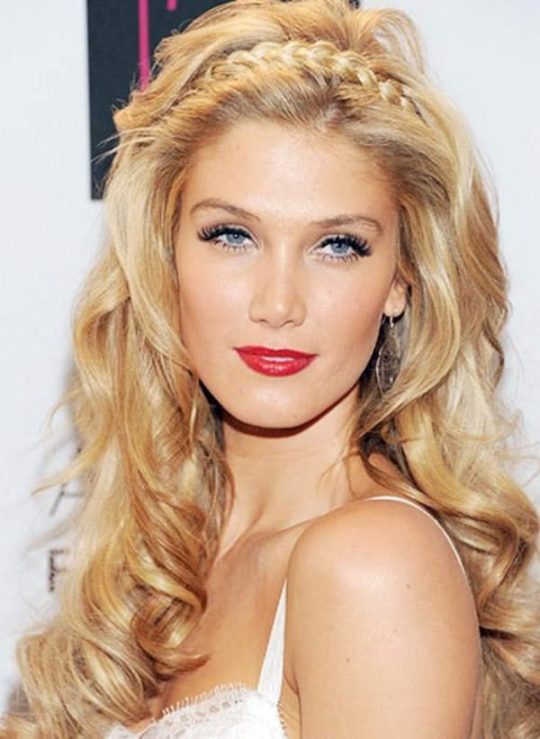
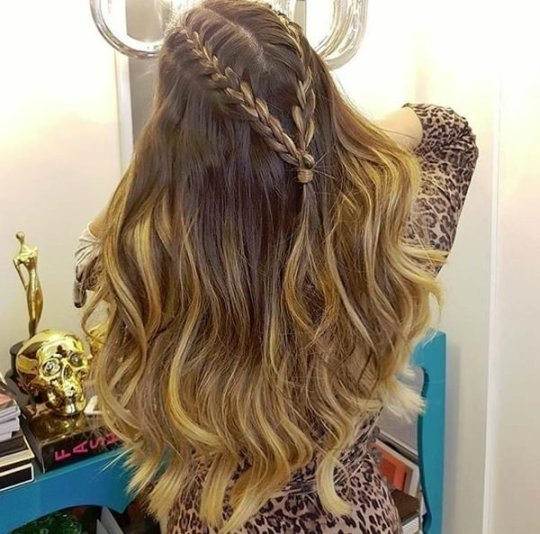
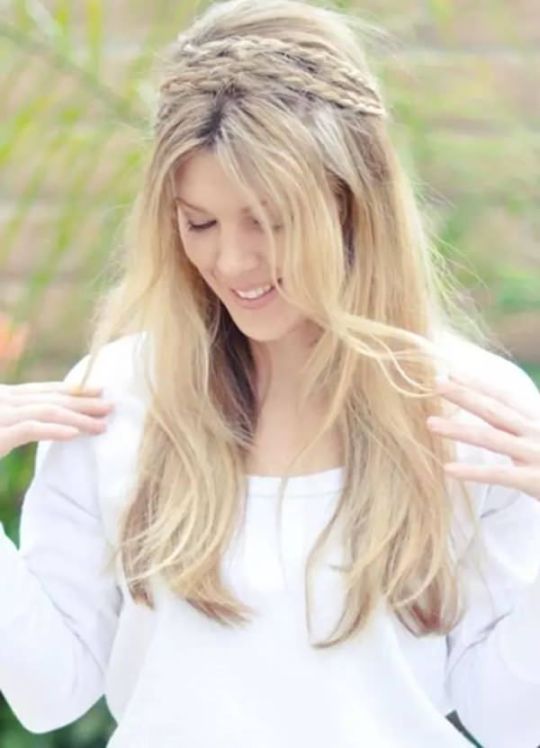
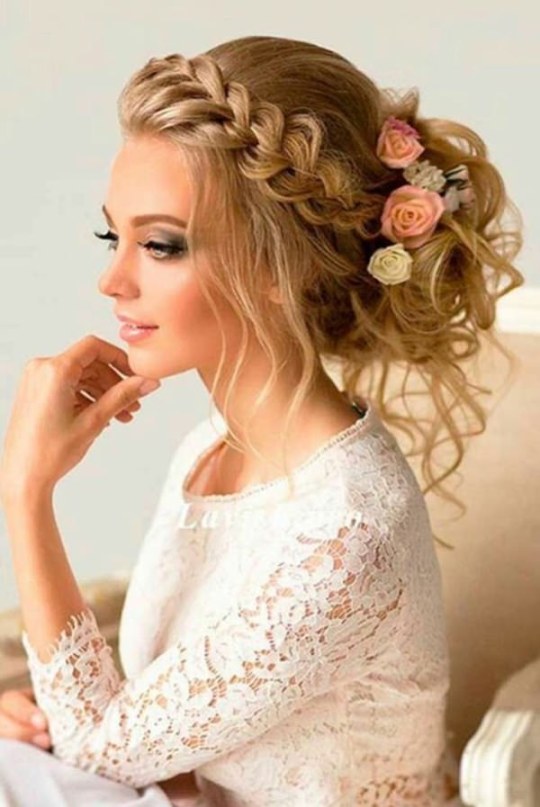
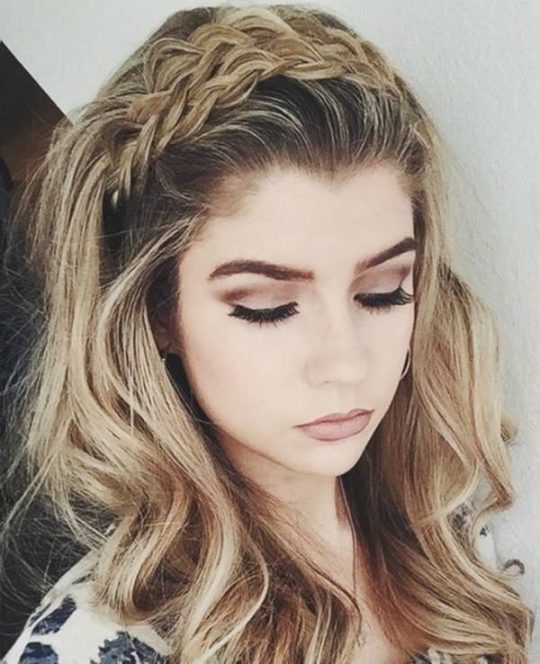
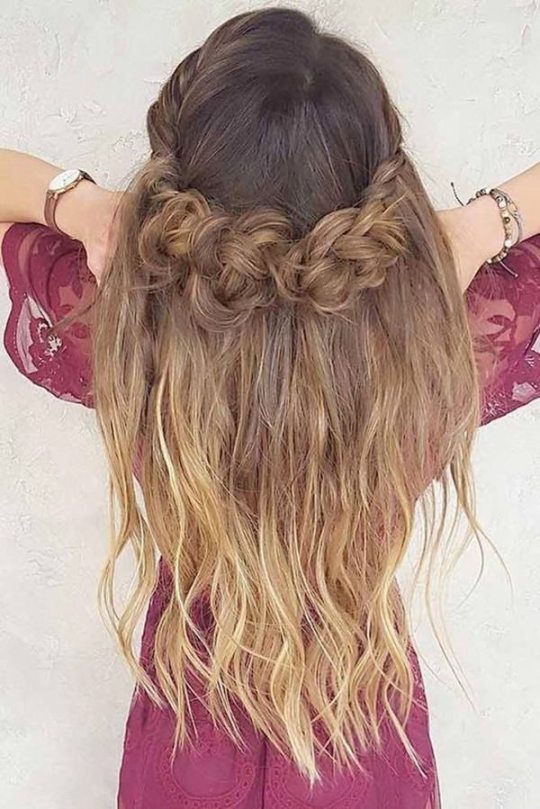
Small Halo Braid
If you are looking for an elegant style for your next event then this is it. Leave the length loose with a few curls and crown that beauty in braids.
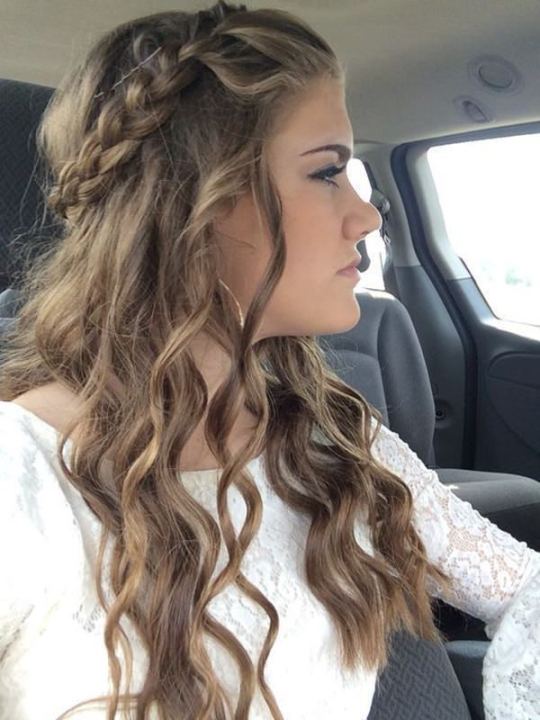
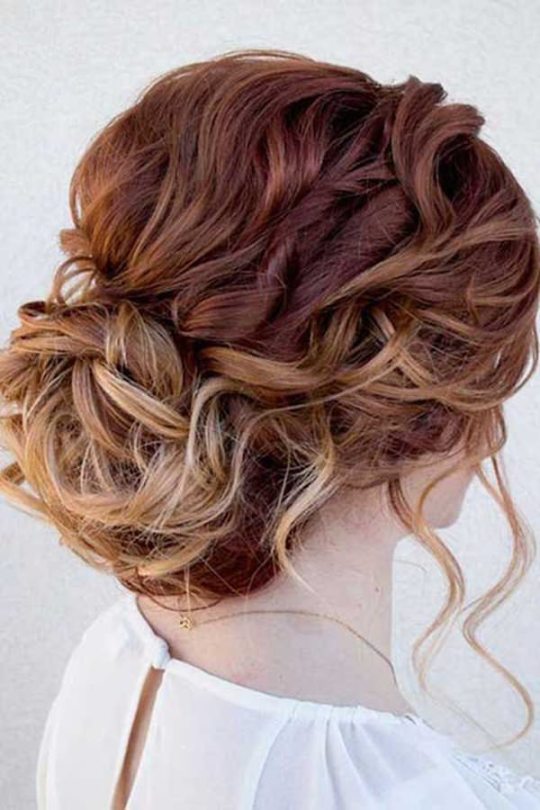
Wavy Designs
A great look that has gorgeous waves and a stunning braided crown.
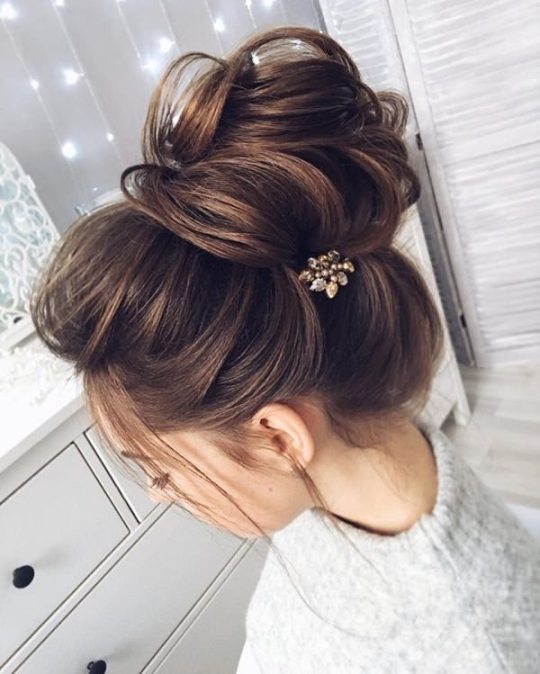
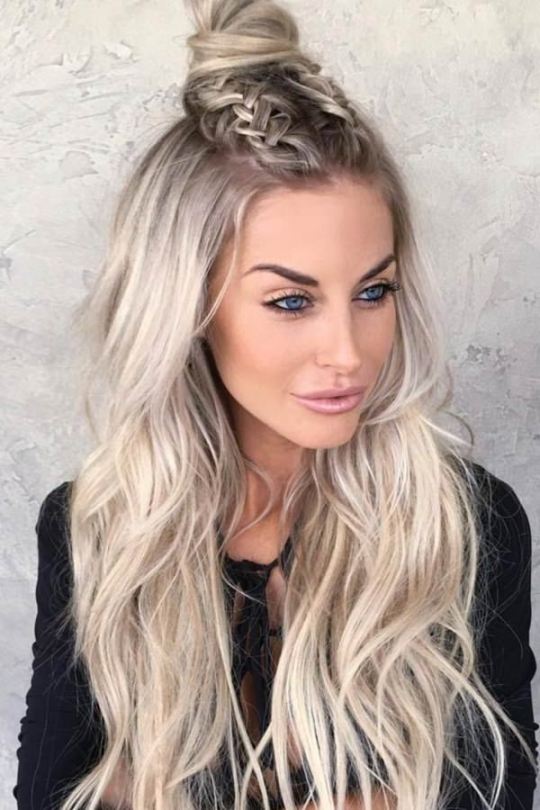
Tiny Bun
A great little bun that sits on top of the head. These long hairstyles are gorgeous because the hair is so long.
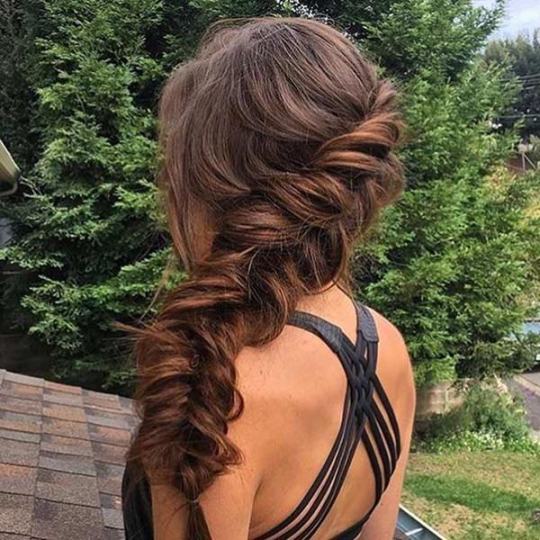
Crowning Fishtail
There are plenty of fishtail braids here that are truly beautiful. It’s a great way to spice up a long that needs some freshening up.
Wavy Looks
This casual style is anything but casual. It has some wavy designs that you will love for your night out.
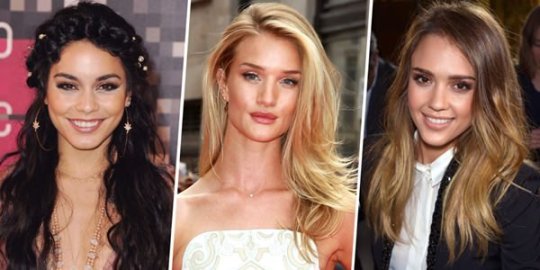
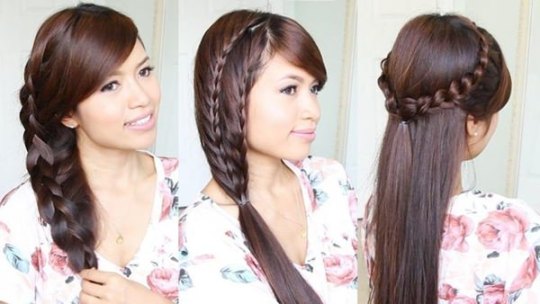
Star Styles
These three styles are very different and no less gorgeous than the other. They are loose and long and have a bit of curl to them. The first photo has a halo crown attached to it. We just love all these amazing long styles.
Sexy Side Parts
The side part has always been a sexy style because it adds a little volume to the style. We love side parts no matter how deep they are. If you want a sexy style then try one of these out.
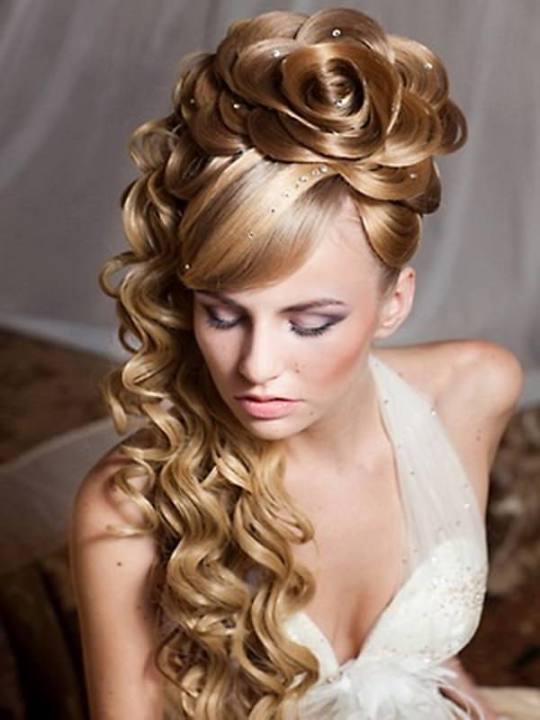
Artistic Styles
If you want to turn some serious heads at your wedding or next event then you need to try this style out. You will need a truly talented hairstylist to pull this one off but if you can you will be remembered for a long time. This style has some long curls as well, all together it’s a stunning hairstyle.
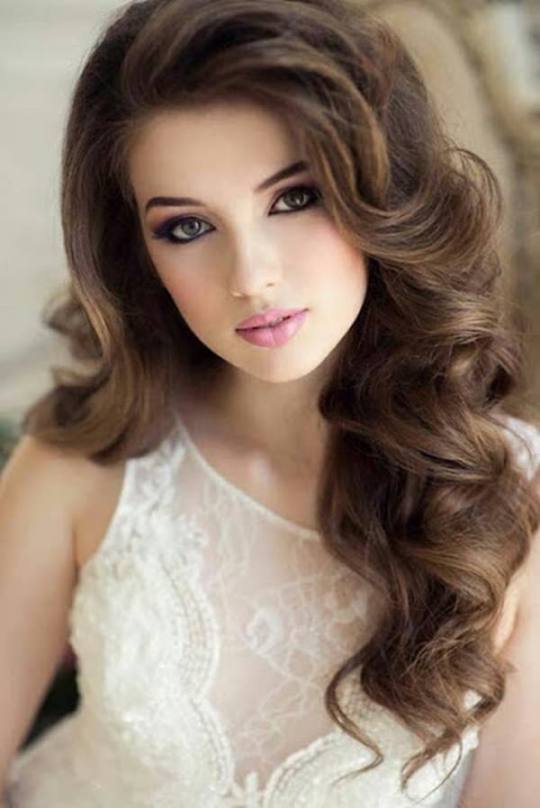
Wavy and Beautiful
If you love this style then give it a shot for your next event.
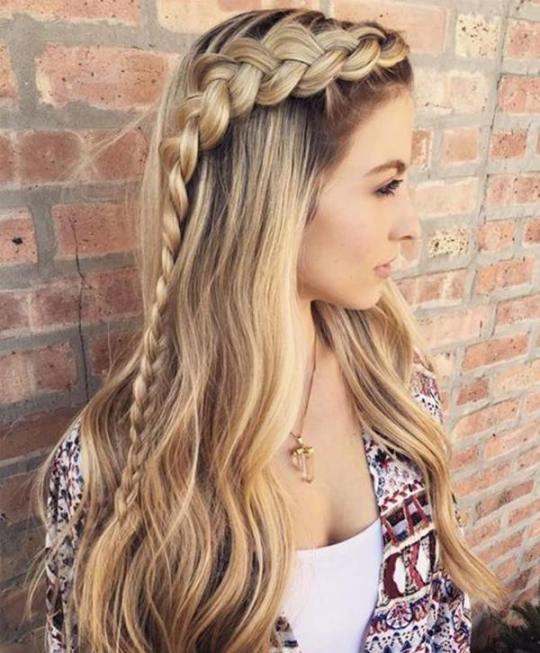
Beautiful Braids
These braids are truly gorgeous and there are a few different kinds here.
Cascading Braid
A gorgeous braid that cascades down the side. It’s long and loose and so beautiful.
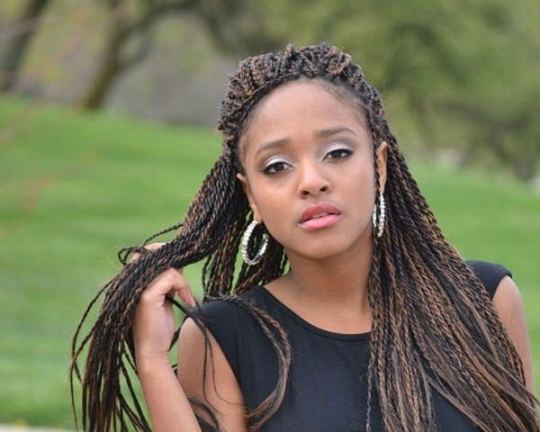
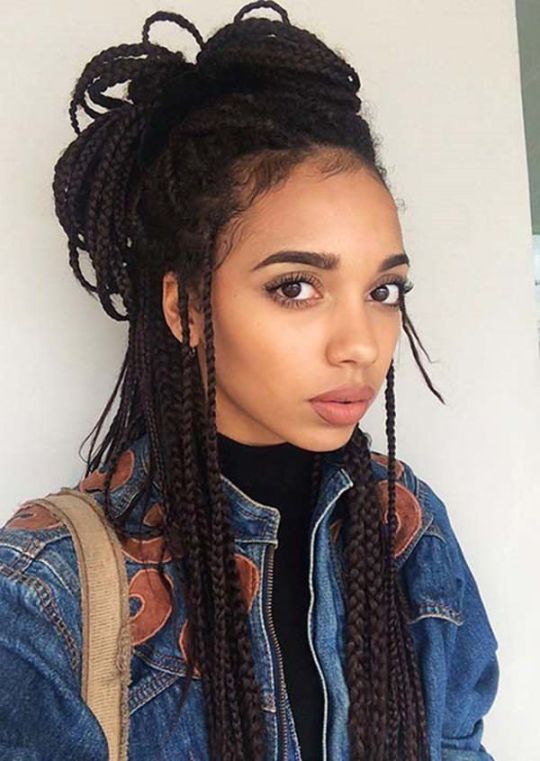
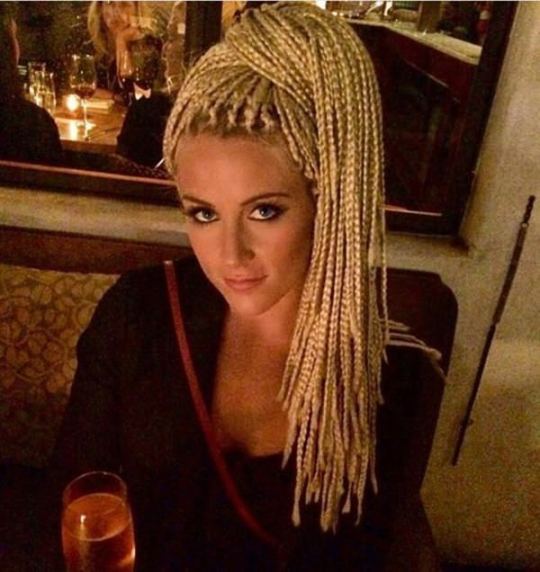
Thin Twirling Braids
If you are looking for a low maintenance style that you can leave in for months then this is the style for you. Just be prepared to sit in a chair for hours. Beauty comes at a price.
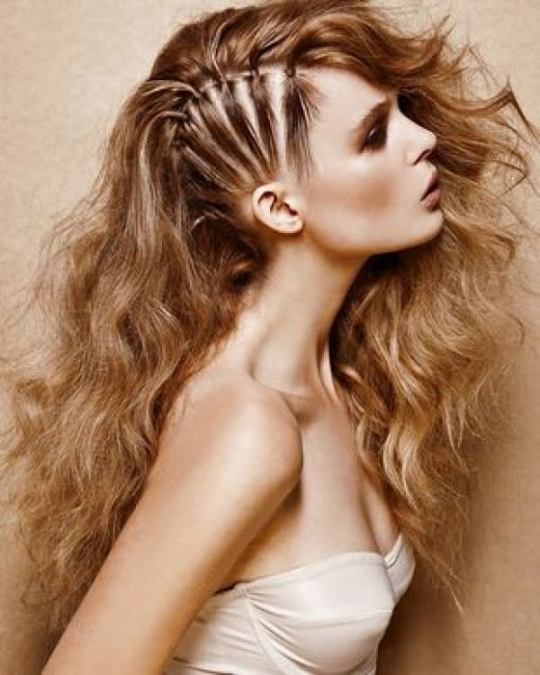
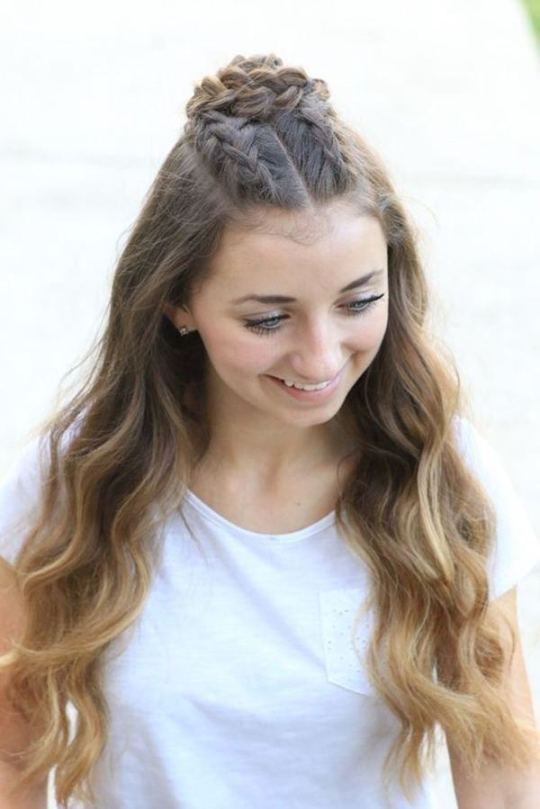
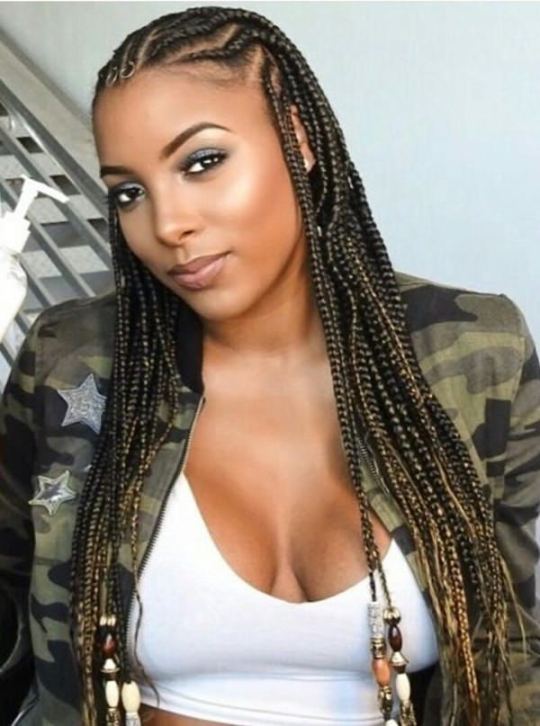
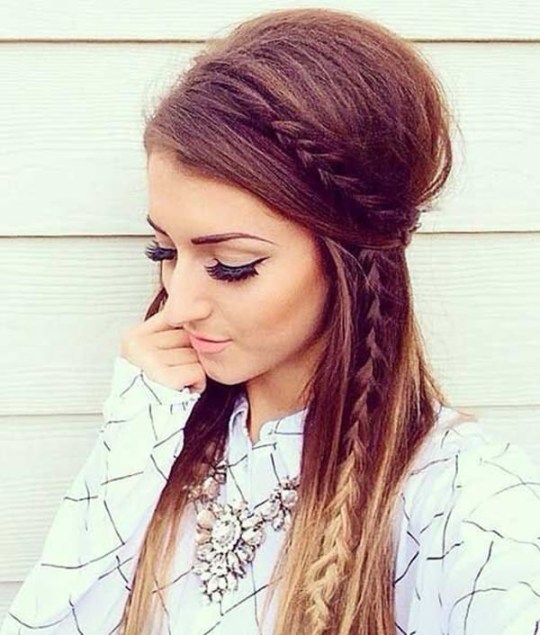
Side Ponytail
This style is truly gorgeous and badass for a few reasons. Instead of doing a side shave this girl did mini ponytails on the side of her head to create the same type of look. The rest of the hair is left loose and curly. It’s a stunning style that is sure to turn some heads.
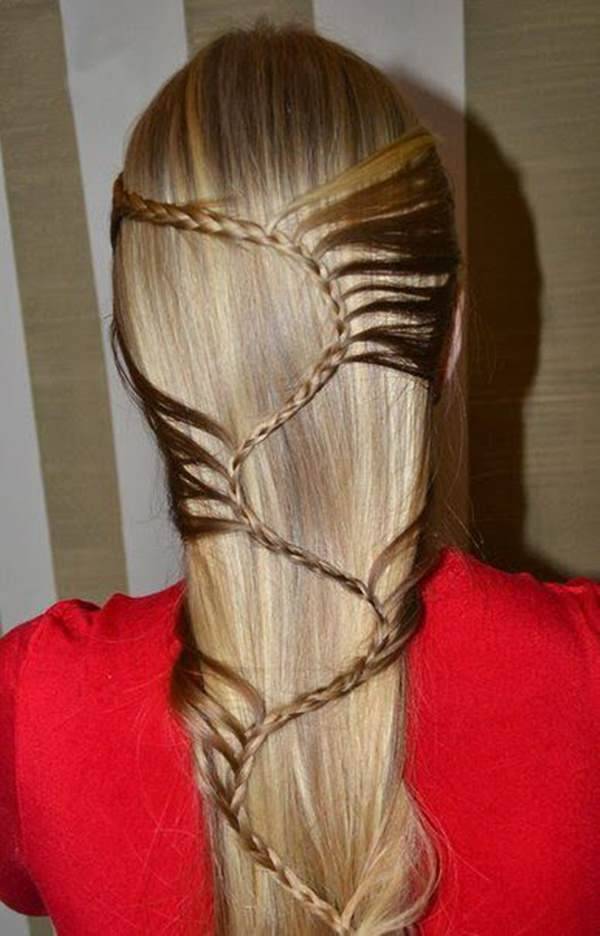
Braided Art
A great style that is truly a work of art. If you are looking for something different than this is the style for you.
Elegant Styles
A stunning partial updo with long cascading curls. It’s a stunning style that anyone would love.
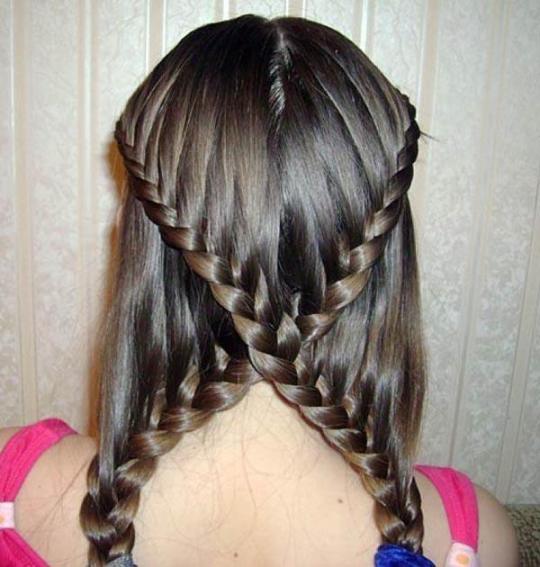
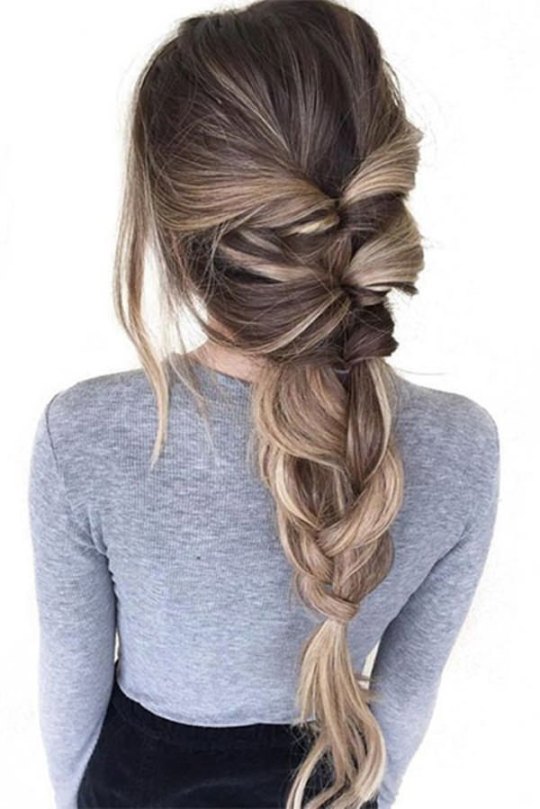
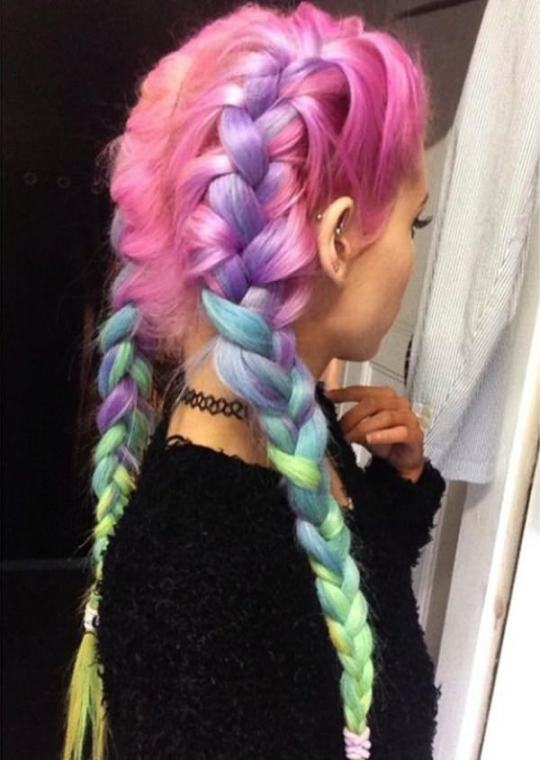
Double Braids
Two braids that come together to create a wonderful style. We love these long waves.
Curls and Braids
A great style filled with curls and braids. If you want a sexy style for your event then this is the one for you.
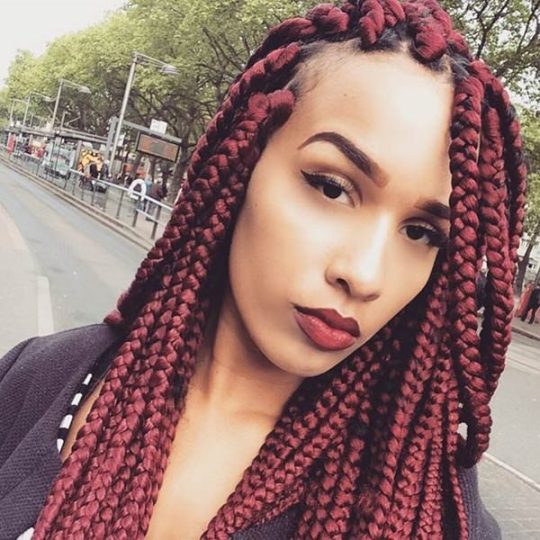
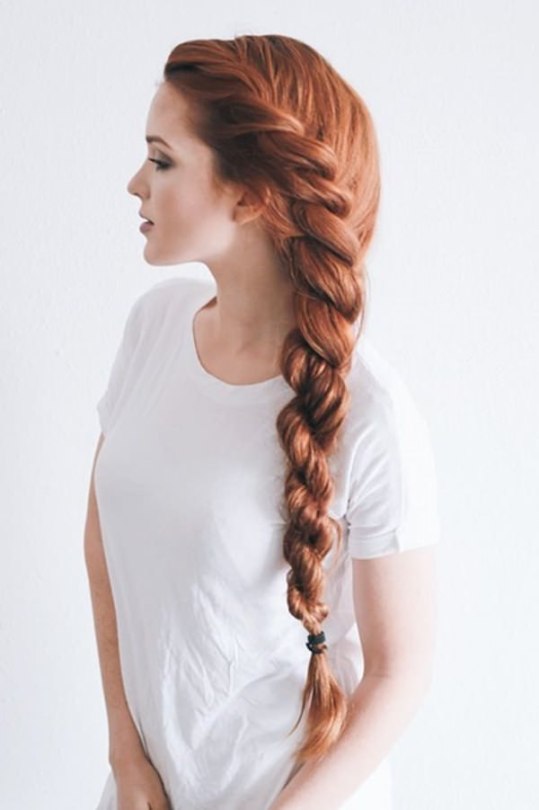
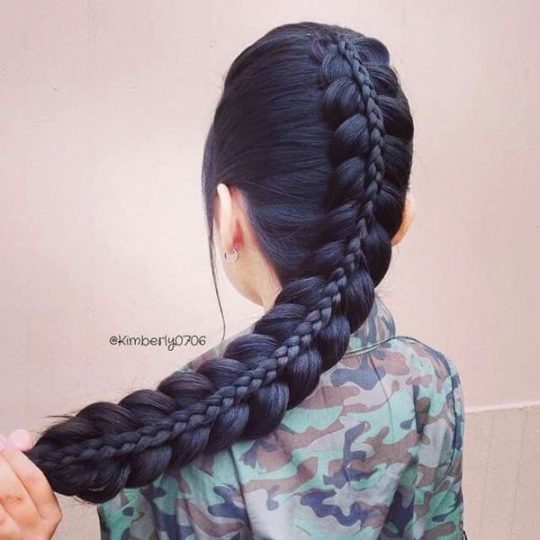
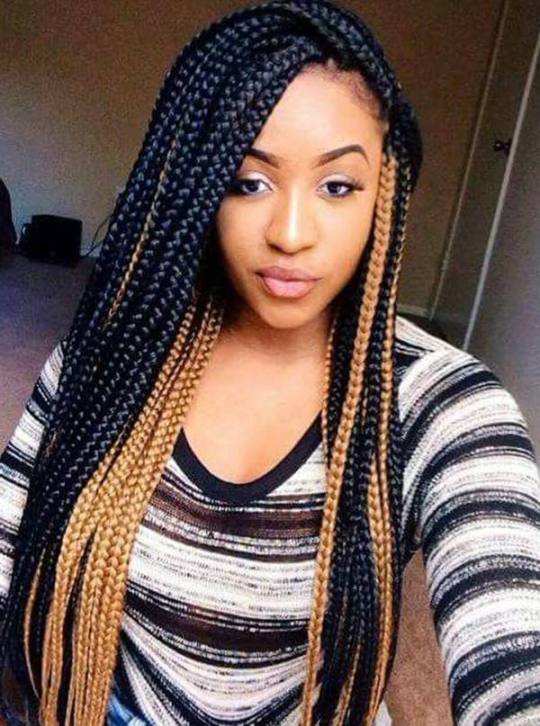
Red Braids
Long braids are truly a classic look and it can be worn for months. If you want a low maintenance style with a lot of pop then this might be the one for you.
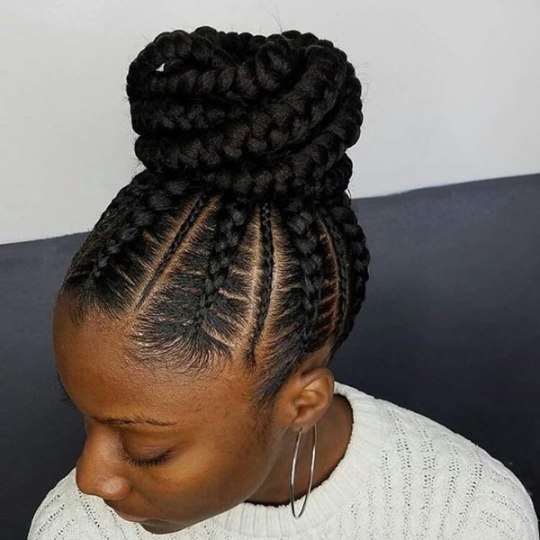
Braided Updo
A great style that is gorgeous. If you are looking for an updo for your next event then you are sure to love this one.

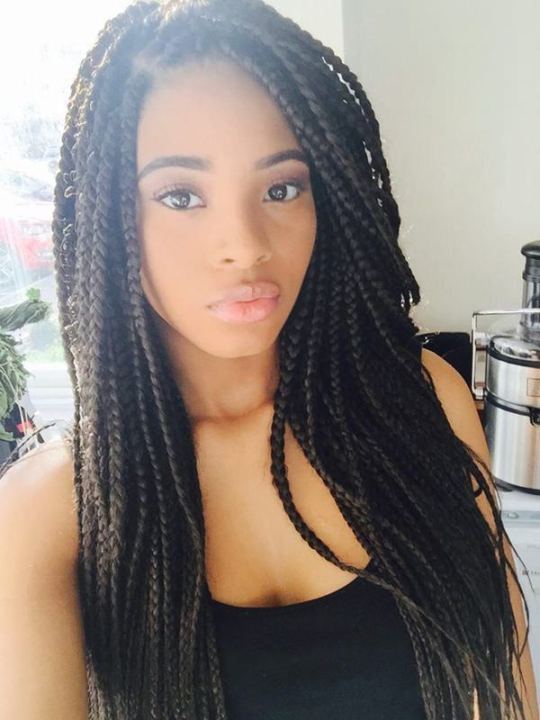
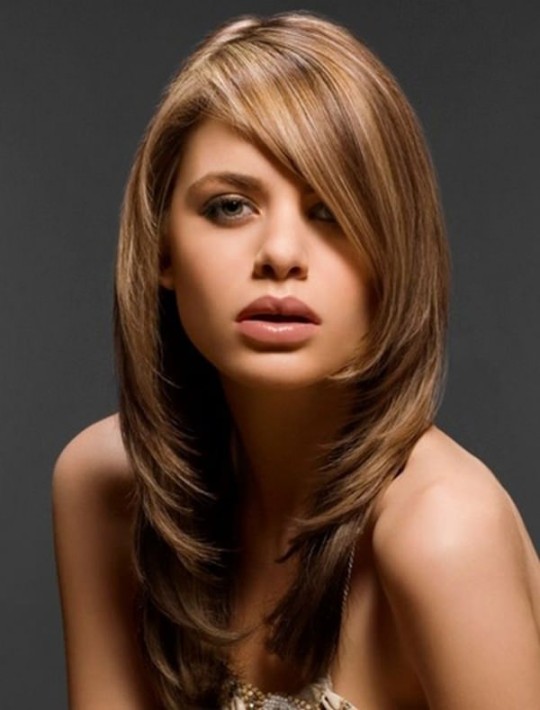
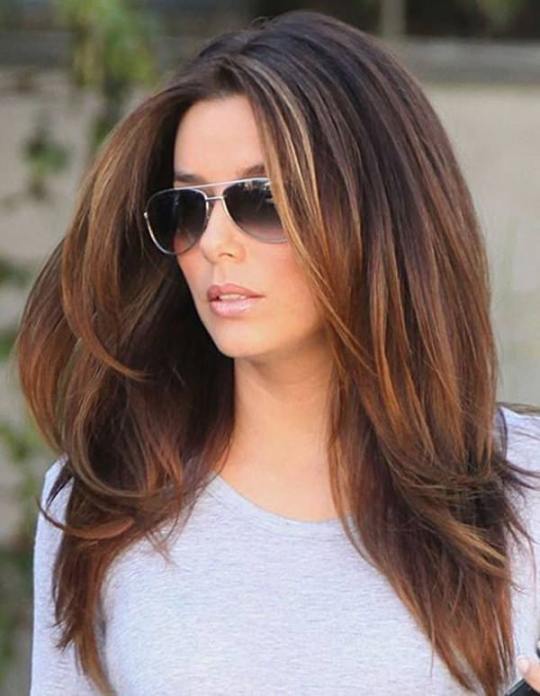
Layered Styles
A sexy style that has some serious layers. Layers can add a boost of volume to a style and freshen up your style.

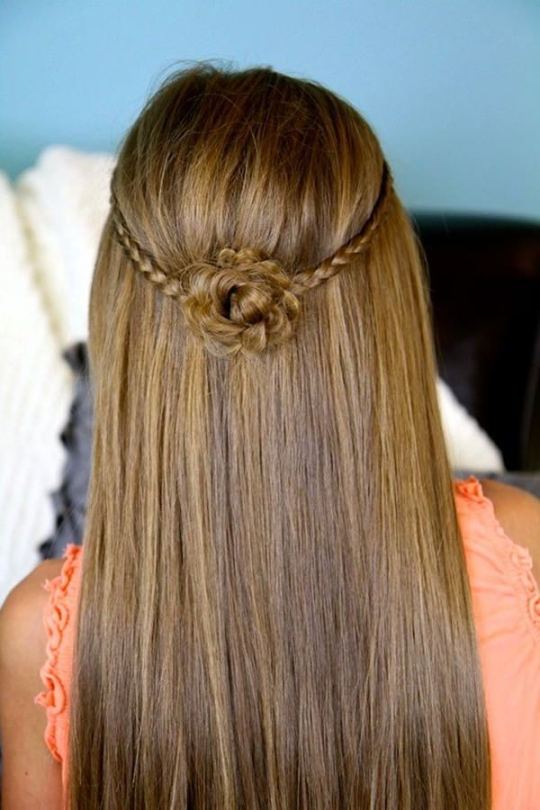
Braided Flower
A gorgeous braided flower that you will love. It’s unique and pretty.
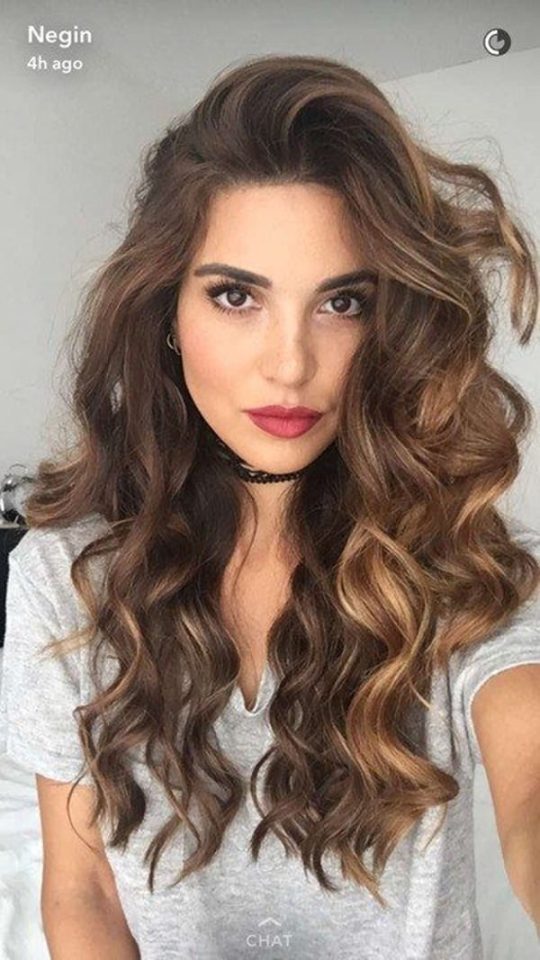
Voluminous Curls
If you love volume then all you need is a bunch of curls.
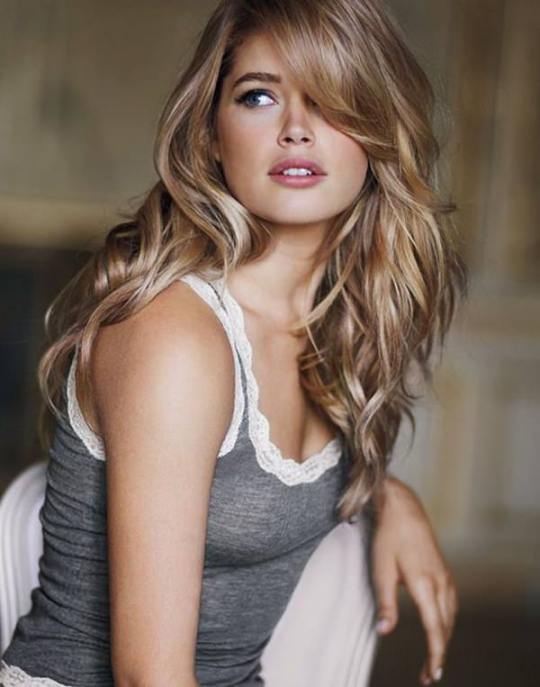
Blonde Layers
A great blonde style full of bouncing layers.
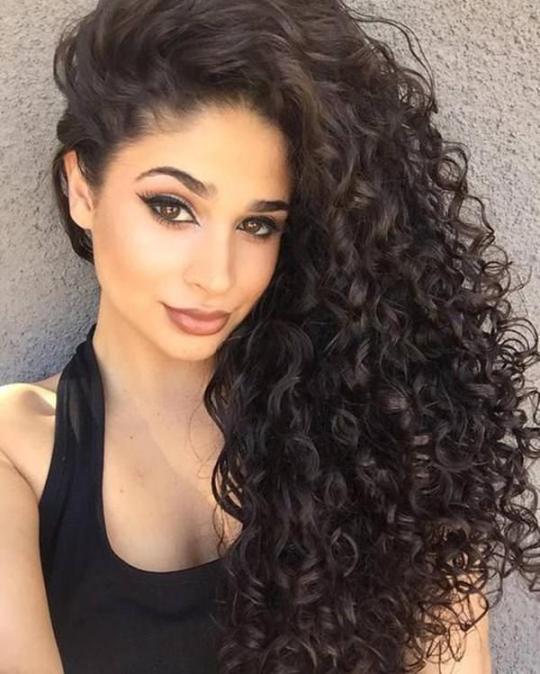
Bouncing Curls
These gorgeous curls and seriously tight and they add a ton of volume to the hair this style is sure to be eye-catching.
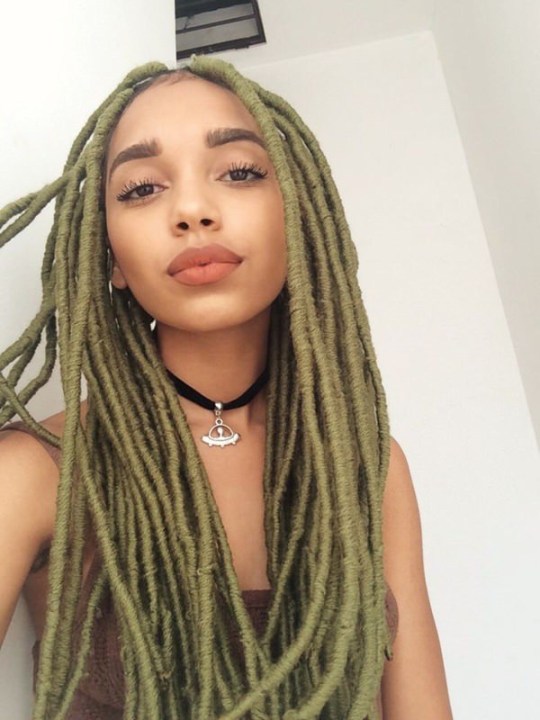
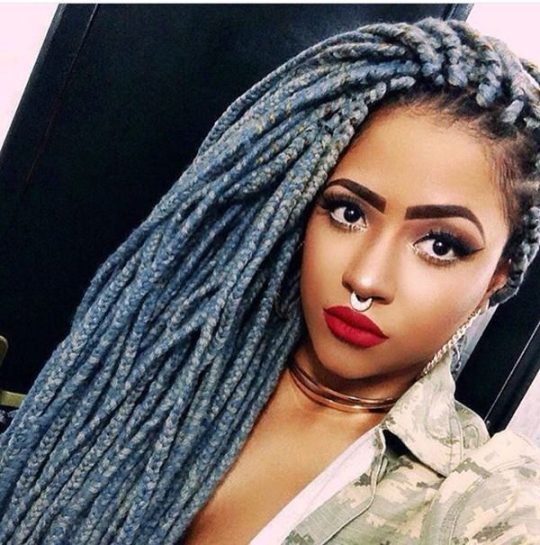
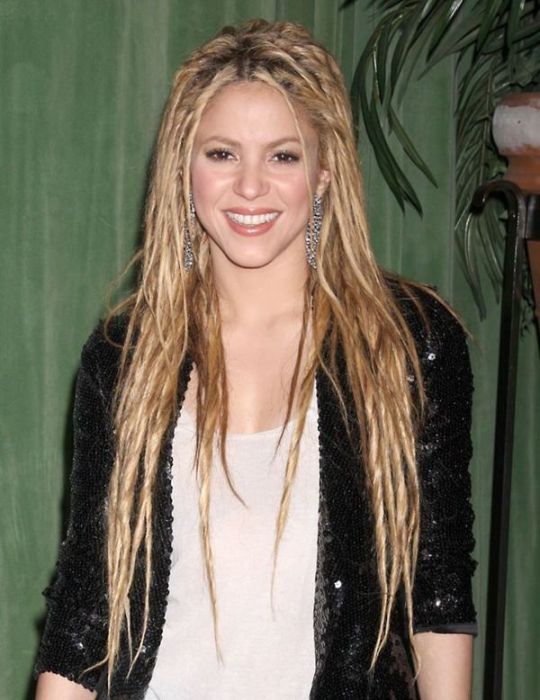
Dreadlocks
These long dreadlocks are truly edgy. The long dreads offer a badass style that will make you really happy.
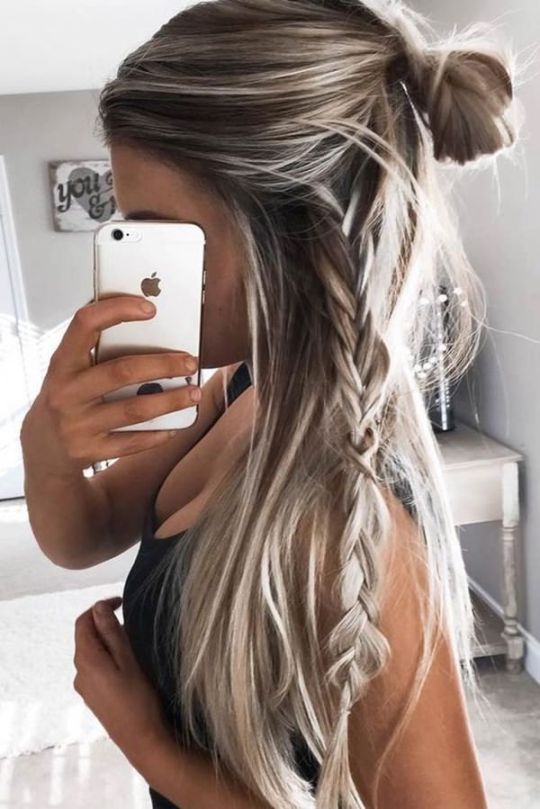
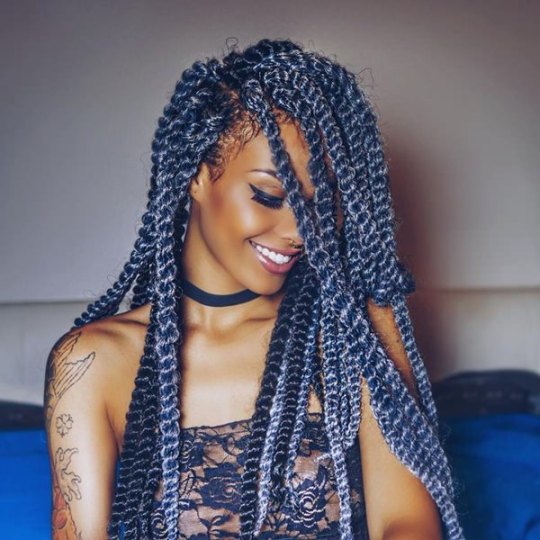
Grey Locks
We can’t help but love this blonde style. The added strands of gray really complete this braided style.
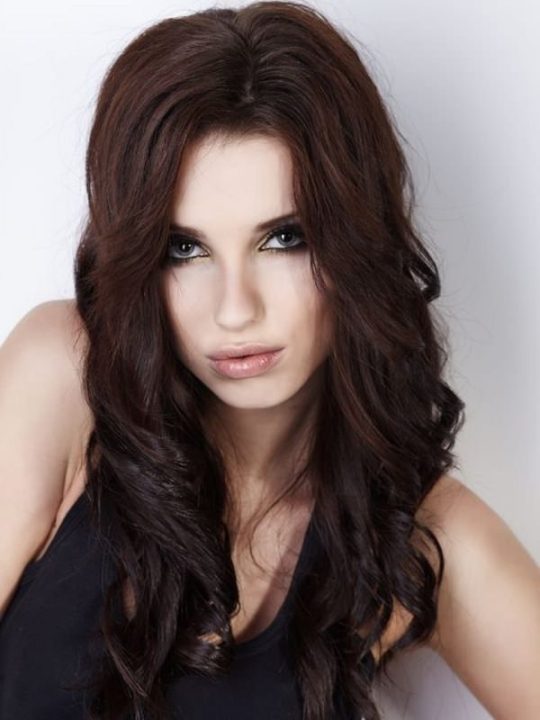
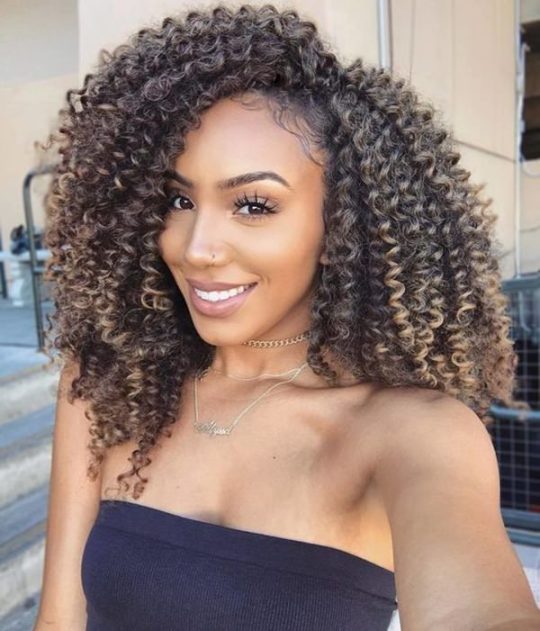
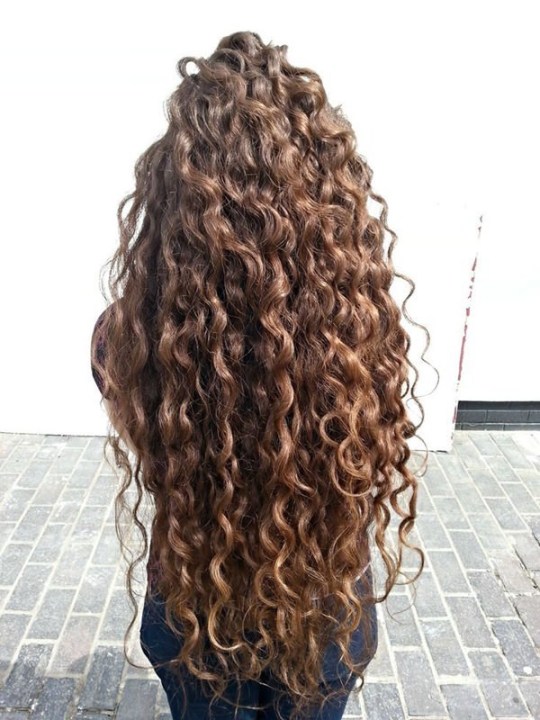
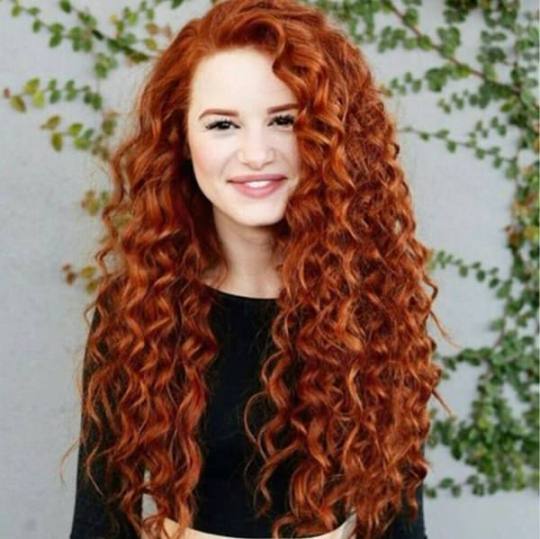
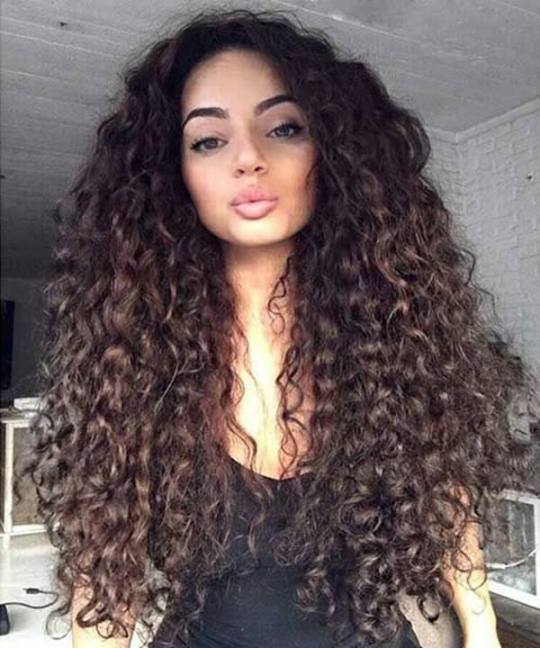
Head of Curls
A great head of curls is truly beautiful. There is a lot of volume here that you are sure to love.
Long and Wavy
A stunning long hairstyle that has some serious waves.
Crowning Braids
Long hair can seem mundane after awhile, so spice up your look with a simple braid to crown the head.

Waistline Curls
If you love curls then you are sure to love this stunning hairstyle. We have more than enough curls to make anyone happy. These curls go all the way down to the waist.
Side Braids
A great braided style that you are sure to love. These braids are elegant and wonderful.

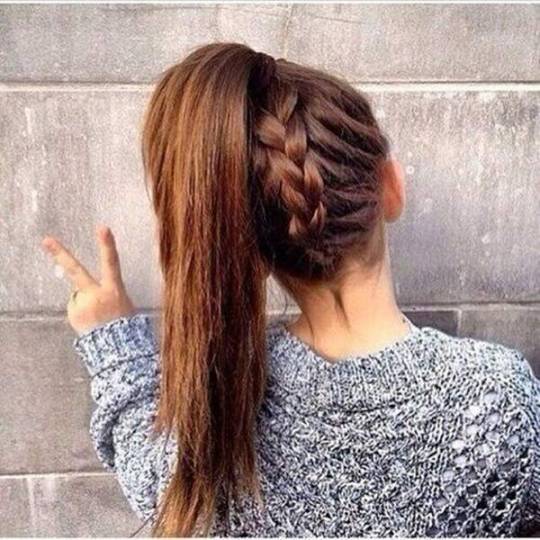
Back Braids
This is truly a one of a kind style. The braid is against the scalp but in the back. The rest is pulled up into a high ponytail. It’s one of the most gorgeous styles that we have ever seen.
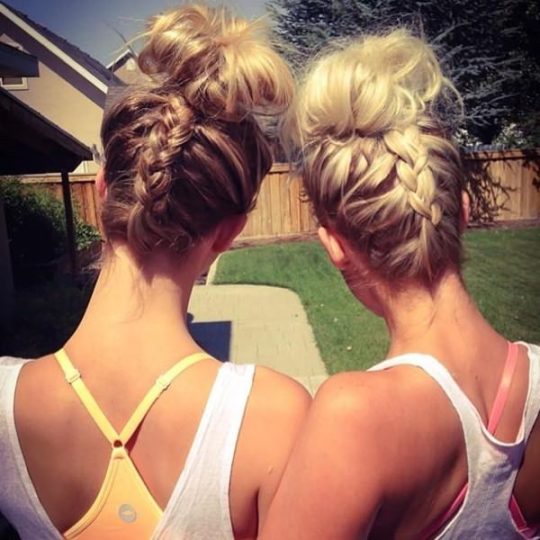
Matching Styles
A great style that is truly beautiful and this is another example of a braided look. Have a matching day with your friend.
Icy Fishtail
A great fishtail braid that will freshen up any style. The icy blonde hair is an added elegant touch.
Colorful Braids
A great style full of braids in a variety of colors. If you love a low maintenance style then you will love these colorful braids.
Gorgeous Curls
A stunning style that you can use for any event. These styles are classic ones for weddings or events. They make you feel like a princess.
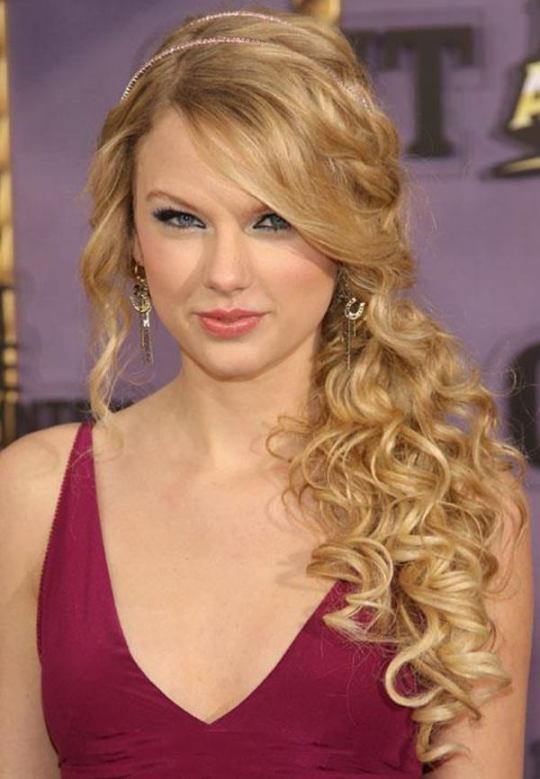
Celebrity Styles
A gorgeous style that Taylor Swift is rocking.
Staircase Brain
You won’t find a more gorgeous braid then this one!
Sexy Ponytail
Who wants a normal ponytail when you could have something like this?
Red Carpet Ready
You too can be ready for any event with a sexy style like this.
Side Fishtail
A great style that is truly sophisticated. A ponytail with a braid is a great way to show your personal style.
Multiple Braids
These waves are truly beautiful and we just love the braids on top.
Goldilocks
A braided style that is truly stunning.
Top Braids
A great bun style that has some great braids.
Gorgeous Braids
A stunning style full of braids.
Crowning Braids
A romantic look with a crown of braids.
Long Braid
Now, this is one long braid and it’s a gorgeous one.
Sexy Style
A great style with a headful of braids.
Bright Blue Braids
Wow! Head will turn for sure with this gorgeous blue inspired look.
A Touch of Curls
A touch of curls is all you need for a beautiful style.

Overboard Curls
If you have thick hair then you are going to want to try this style out.
Evening Hair
Try this style for your next evening out and you won’t regret it.
Layered Look
Layers are always great for framing your face.
Braids Galore
A wedding day look that will make you feel like the princess that you are.
The Updo
This multicolored look is one that you will adore for a long time.
Red Curls
This look is sure to be eye-catching with all those curls.
Classic Updo
A great style that you are sure to treasure for a long time.
Partial Style
The partial updo is always a sophisticated look.
Many Braids
There are so many braids to this style that it’s hard to keep track of them.
Creative Styles
Be creative with your styles and find something to fit your personality.
Celebrity Looks
Try this celebrity style on for size and truly rock it.
Plenty of Volume
This gorgeous style takes almost no effort at all to create.
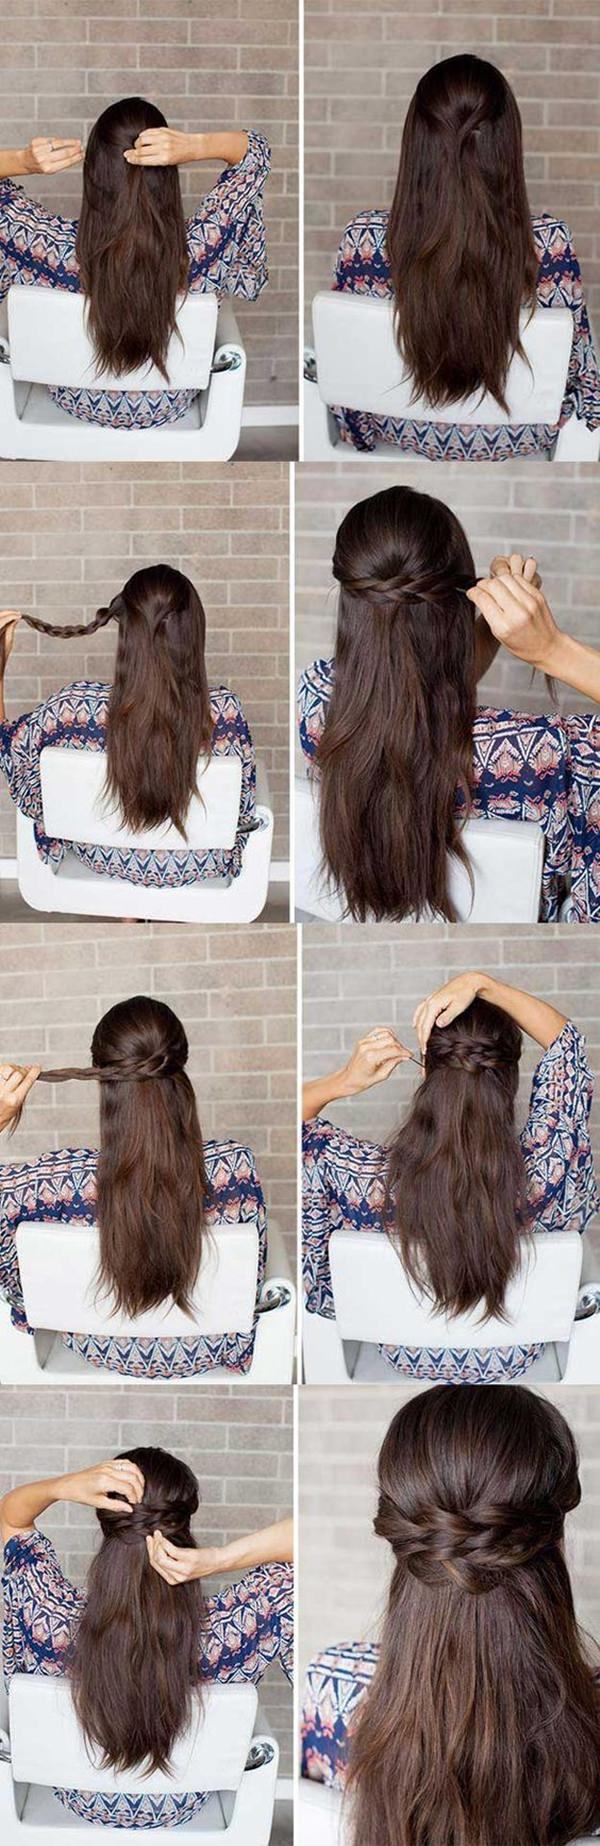
A Braided Tutorial
If you have always wanted to try out the braided look at home then use this step by step tutorial to help you get the style that you want.
Creative Elements
There are so many creative elements that came together to create such a gorgeous style.
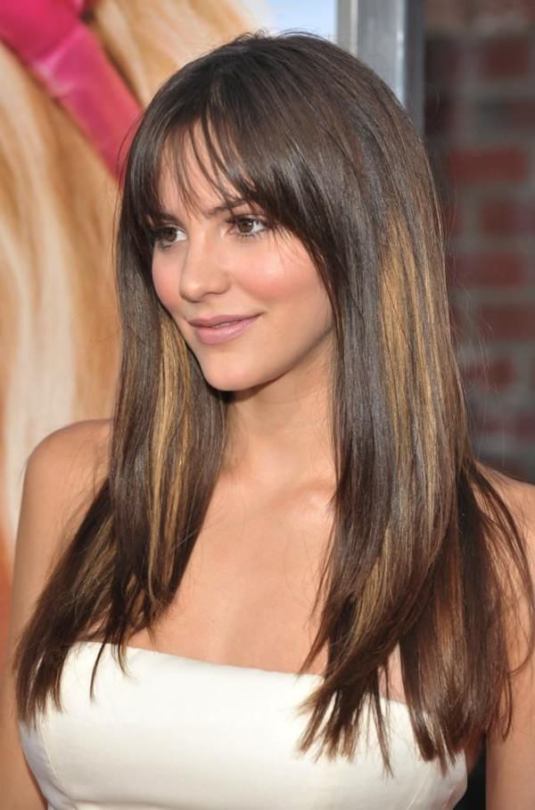
Add Highlights
If you are just looking for a small change then why not try out some highlights or add some bangs.
Long Braids
A great style that will last a long time.
Classic Designs
This is another stunning design that is pretty popular for events.
More Braids
These braids are pulled away from the face.
Sexy Ponytails
A great sexy style that you are sure to love.
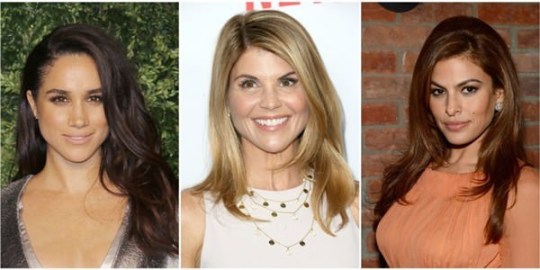
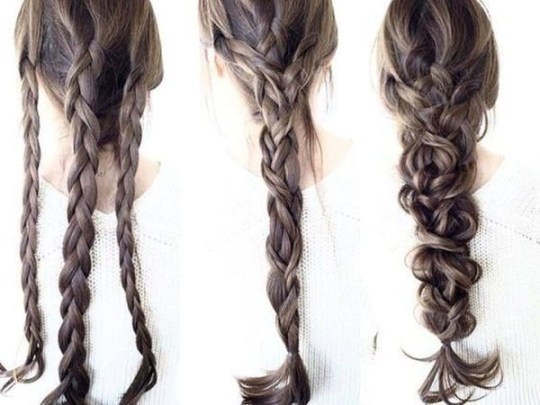
Three Braids
These three styles offer you three different ways that you can add braids to your hair.
Absolutely Divine
A great style that is truly a classic look.
Loose Braids
We love these loose braids because they offer a romantic look.
Bountiful Curls
A great style that is full of beautiful curls.
Stunning Styles
A three step process that gives you one of the most creative and beautiful braided styles out there.
Braid on Top
There is a small braid on top of the large braid. It’s a gorgeous style that you are sure to love.
Beautiful Styles
A great style that is loose and sexy.
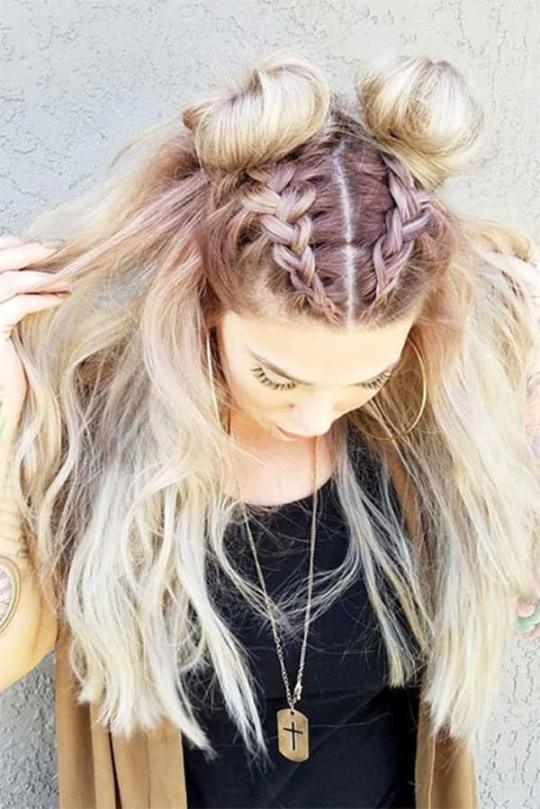
Pink Designs
These double buns are adorable and we love all the pink.
Large Braids
A stunning braid that is loose and lovely.
Event Designs
A great style that is truly eye-catching. If you are looking for a style for your next event then this is the one for you.
Swirling Updo
A great updo that is elegant and gorgeous.

Braided Artwork
A great style that anyone would love. A great braided style is truly a work of art. You won’t find a more creative style.
Braided Elements
A great braided design that has one intersecting with another. We love these gorgeous styles. It’s a simple style that you are sure to love.
Gray Braids
If you are loving the blonde look then take it one step further and add the gray. It’s a gorgeous style with braids and curls. We love the stunning style. I absolutely love the color involved here.
Blonde Braids
The contrasting braids are truly beautiful. We love the black and blonde together. It’s a low maintenance style that you can wear for many months. If you want a new style then this is the one for you.
Rose Braids
A great style that has rose braids in the back. It’s absolutely stunning. If you are looking for a style that is just like artwork then you should try out this style on for size.
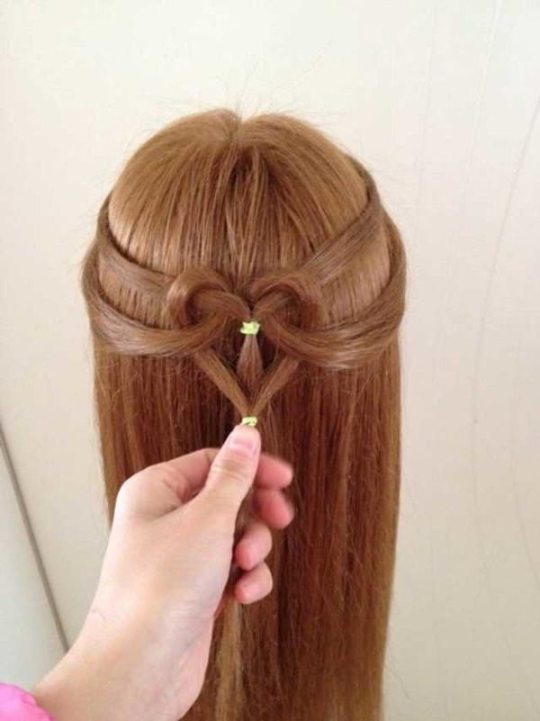
Heart Designs
This heart design is one that you are sure going to love. It’s a very simple style to create and one that is very pretty. You can create this style very easily.
Voluminous Bun
We can’t help but love this gorgeous bun, there is so much life to it. If you want a beautiful style that you can wear to any event then try this one out.

The Great Braid
A gorgeous braid that starts off big and ends small. If you love braids then you are sure to love this style. We just love these blonde braids.
Blonde Designs
This blonde hair almost looks purple in the lighting. It’s a classic look that is popular for weddings. If you want a style for your next event then try this one out.
Long Waves
A great long hairstyle that has a lot of waves to it. We love the deep side bang as well. The whole look is very sexy and one that is very easy to achieve.
Beautiful Designs
Another classic hairstyle that you are sure to love. We can’t get enough of this beautiful style. A stunning braided look that is truly remarkable.
Creative Buns
This is a gorgeous and rather dramatic bun. There are gorgeous braids throughout the bun and this is truly a beautiful style.
Bright Colored Love
These pigtails are bright and beautiful in a rainbow of colors. We just love all these beautiful colors. If you want a look full of drama then this is the one for you. You will surely draw an eye with this stunning style.
Sideways Braid
A stunning braid that makes this whole style completely beautiful.
Fishtail Partials
A great fishtail braid that is part of this partial updo. We love these gorgeous looks because they are breathtaking.
https://nicestyles.ca/beauty/hair/90-trendy-long-hairstyles-options-for-girls/
#Girls Hairstyles#Hair#hairstyles#Hairstyles for Girls#Long#long hairstyles#sexy style#stunning style#Women Hairstyles
0 notes
Photo

New Post has been published on https://www.kurzhaarfrisurenn.com/doppelter-wasserfall-pferdeschwanz
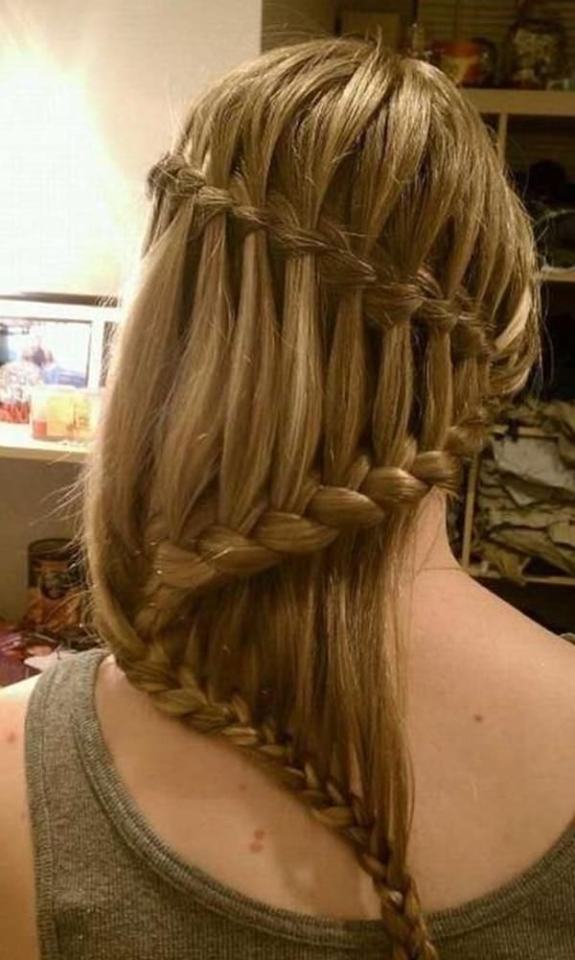
Doppelter Wasserfall Pferdeschwanz
<![CDATA[ #gallery-8 margin: auto; #gallery-8 .gallery-item float: left; margin-top: 10px; text-align: center; width: 50%; #gallery-8 img border: 2px solid #cfcfcf; #gallery-8 .gallery-caption margin-left: 0; /* see gallery_shortcode() in wp-includes/media.php */ ]]>
Wasserfall Zöpfe sind so ein klassischer Stil, dass ich dachte, es wäre lustig zu teilen, wie man einen Pferdeschwanz trägt. Ein einfacher Wasserfall-Zopf ist viel einfacher zu erreichen als man denkt und sieht immer so kompliziert und cool aus. Für dieses Tutorial habe ich mich entschieden, zwei Wasserfall-Zöpfe zu machen, obwohl ich denke, dass dies mit nur einem so schön aussehen würde. Stillen Sie es mit lockigem oder glattem Haar und Sie haben eine spaßige neue Art, Ihre Haare während des ganzen Frühlings und Sommers zu tragen.
youtube
Double Waterfall Pferdeschwanz Zubehör:
Rattailkamm
4 Haarklammern
Haarband
Haarspray
<![CDATA[ #gallery-10 margin: auto; #gallery-10 .gallery-item float: left; margin-top: 10px; text-align: center; width: 50%; #gallery-10 img border: 2px solid #cfcfcf; #gallery-10 .gallery-caption margin-left: 0; /* see gallery_shortcode() in wp-includes/media.php */ ]]>
Double Waterfall Pferdeschwanz Anweisungen:
Um mein Haar für diese Frisur vorzubereiten, benutzte ich ein 1 “Lockenstab, um alle meine Haare in kleinen Abschnitten von meinem Gesicht wegzurollen.
Schritt 1 / Beginnen Sie mit dem Teilen des Haares, wo Sie es normalerweise teilen. Ich stelle meinen auf die rechte Seite.
Schritt 2 / Nehmen Sie einen kleinen Abschnitt auf der linken Seite des Teils und teilen Sie es in drei Abschnitte für das Geflecht.
Schritt 3 / Beginnen Sie, indem Sie den rechten Strang über die Mitte kreuzen. Dann überquere den linken Strang über die Mitte.
Schritt 4 / Jetzt den rechten Strang über die Mitte kreuzen, einen neuen Abschnitt aufnehmen und ihn in den mittleren Strang kreuzen.
Schritt 5 / Nächste Drop Drop den linken Strang und nehmen Sie einen neuen Abschnitt, überqueren Sie es über den mittleren Strang an seiner Stelle.
Schritt 6 / Dann kreuzen Sie den rechten Strang über die Mitte, nehmen Sie einen neuen Abschnitt und kreuzen Sie ihn in den mittleren Strang.
Schritt 7 / Lassen Sie nun den linken Strang fallen, nehmen Sie einen neuen Abschnitt von unten und kreuzen Sie ihn über den mittleren Strang.
Schritt 8 / Wiederholen Sie diese Schritte, indem Sie den Wasserfall-Zopf weiterführen, ihn hoch auf den Kopf halten und langsam auf den Hinterkopf arbeiten.
Schritt 9 / Sobald das Geflecht den Hinterkopf erreicht, hören Sie auf, neue Abschnitte hinzuzufügen und flechten Sie den Abschnitt in einem regelmäßigen dreisträngigen Geflecht nach unten.
Schritt 10 / Dann, so dass es nicht entwirrt, kreuzen Sie eine Haarklammer über den Boden.
Schritt 11 / Wiederholen Sie diese Schritte und erstellen Sie eine zweite Wasserfalllitze auf der rechten Seite des Kopfes.
Schritt 12 / Mit beiden Zöpfen kombinieren Sie alle Haare zusammen zu einem Pferdeschwanz und binden Sie es mit einem Haarband ab.
Schritt 13 / Entfernen Sie die Bobby Pins von den Enden der Zöpfe und entwirren Sie sie.
Schritt 14 / Ziehe eine Haarpartie vom Pferdeschwanz ab, wickle sie um das Haarband und stecke sie mit einer Haarklammer fest.
Schritt 15 / Legen Sie den Stil mit Haarspray fest.
<![CDATA[ #gallery-12 margin: auto; #gallery-12 .gallery-item float: left; margin-top: 10px; text-align: center; width: 50%; #gallery-12 img border: 2px solid #cfcfcf; #gallery-12 .gallery-caption margin-left: 0; /* see gallery_shortcode() in wp-includes/media.php */ ]]>
Teile das:
Facebook
Twitter
Pinterest
Tumblr
Google
Email
Folgen:
Sie können auch genießen:
Fischschwanz und Dutch Braid Pferdeschwanz
Wrapped Mohawk Hochsteckfrisur
Double Dutch Fishtail Zöpfe
Half Up Dutch Fischschwanz und Twist Braid
0 notes
Text
A Dragon Sized Adventure Chapter 26
Chapter 26: In the Beginning...
*Crash and the others are teleported into the lowest section of the Death Head, right inside the Prehistoric Terrarium. These Terrariums have the ecosystem of the time and place the Time Twister connects to in them. Within those Terrariums are buttons, and those buttons connect to the Time Twister, creating an orb in time and space that warps anyone who enters to that specific point that is contained within it...*
Sonic takes a look at their surroundings. "What kind of place is this? Even Eggman has never made something as big as this..."
*Crash whispers something in Crunch's ear.*
Crunch: "Well, this is the second time Cortex and the others have made something like this, which is called a Time Twister. It basically lets anyone go to any time period they wish. Cortex mostly uses it to steal crystals from any time."
Tails: "Wow! A real, working time machine!"
Crunch: "Yep, but the old one was, and this new one probably is too, made by Dr. Nefarious Tropy. He likes making time paradoxes, yet he wants to keep order too. I bet he'll explain himself more once we find him."
Spyro: "So, then, why can't we go find them now?"
*Espio, Charmy, and Vector had left to scout the area and have just returned.*
Charmy: ♪ "Cause it be no use!" ♫ *Silver can be heard face-palming.*
Knuckles: "Why not? It shouldn't be too hard to punch down a door."
Espio: "Well, they don't use doors. They use force fields of electricity."
OMEGA: "THEN I WILL BLAST THE GENERATORS!"
Rouge: "Omega, must that be your answer to everything? I'm pretty sure that they have prevented that too."
Vector: "There does seem to be some way though. It says we need to collect 5 purple crystals in order to drop the field."
Shadow: "That sounds like an absurd requirement."
Crunch: "Not for Cortex, it isn't. I bet he wants us to collect them for him."
Crash: "He thinks he can fool us!" *He immediately covers his mouth.*
Silver: "Then why should we collect them? They seem pretty safe wherever they are."
Crunch: "Well, Aku-Aku, he's our mask deity who has now been taken by Cortex too, has always had us collect them because they have immense energy that can be used for anything."
Crash: "He trusts us, and we should help him!" *Again, he quickly covers his mouth.*
*Amy, Cream and Big had also left to search the area.*
Cream walks up to Crunch. "Um, Mr. Bandicoot?"
Crunch: "Oh! We never told you our names. I'm Crunch, and this is our little bro Crash."
Crash walks up to Cream. "Hello!"
Cream: "Hello, Mr. Crash."
Crunch: "We also have a sister, but Dr. N. Gin, Cortex's right hand man, has taken her. But we bet she's doing a good job fending herself."
Sonic: "We'll keep a watch for your sister." *He smirks.*
Cream: "Mr. Crunch? What's with all the buttons we found in here?"
Big: "Yeah. We found 5 of them. I guess they must have something to do with what we are in?"
Crunch: "Yep. They fire up the Time Twister that's in here and opens a way to a crystal. Come on, we will show you. Now where's the 1st button?"
Amy: "This way." *Team Rose leads them over to the first button.* "Here it is."
Crunch steps on the button and an orb appears.
Tails: "Wow!"
Crunch: "Indeed. Well, let's get started on collecting those crystals. Oh, and if you guys see gems around, can you collect them?"
Spyro: "Gems? Like these?" *He pulls out a gem from his world.*
Crunch: "No. They're bigger and most are a white color. Cortex can use those to harness planetary energy as well, so we should make sure to be the ones to grab them first. They may be laying around, but they mostly come from destroying crates."
*Crash shows one.*
Cynder: "Why?"
Crash decides to answer by saying "They're filled with Wampa Fruit!" *He breaks the crate, revealing some of those apple-like fruits. He immediately eats them.*
Crunch: "We have to eat, you know."
Cynder: "Indeed."
Crunch: "But be careful with TNT Crates and Nitro Crates. They're really explosive."
*Sonic is now impatient and tapping his foot. He can't wait any longer.* "Alright, enough with the explanations, let's go!"
*Crash blabbers in agreement.*
(Whenever you are ready, press those buttons and jump in the Warp Orb. Note that you can take anyone into these. I'll note if there is anyone who needs to enter specifically. For the most part though, Crash or Crunch (And later Coco) will at least be one of the partners.)
-----
Level 1: A Prehistoric Walk
*Cortex, Uka-Uka and Eggman appears as a hologram as they go though the wormhole.* (This happens off and on.)
Cortex: "Crash, why must you always be a thorn in my side?"
Eggman: "Same for you, Sonic, why must you ruin our plans?!"
Cortex: "Well, we decided on a team up."
Eggman: "Let's see you ruin our plan now!"
Uka-Uka: "WE WILL DESTROY YOU!" *They disappear.*
Crates: 78
Time Trial
Sapphire: 1:45.00
Gold: 1:30.00
Platinum: 1:15.00
(Just to note, those crates and Time Trail times are made up to make it sound more like a Crash Bandicoot game. If this were real, those numbers would be different.)
Magmadons To Save: 5
Helping Partner: Sonic
Badniks: Rexon: Robo dinos? What will they think of next? A park to house them? Spiker: It's a spike carrying robot, what more do you want? Sol: Spinning wheels of FIRE! Wave Lab Assistant Pawns: They hide in the swamps, waiting to pounce on Crash and the gang. Thanks to getting a Pawn head, they should be easier to identify thanks to their eyes.
Beasts: Bandifish: Crash's prehistoric ancestor. *SPIN SPIN*
Mutants: Magmadons: Turtle + lava rock hybrids that love to bath in lava.
(Starts headbanging!)
Welcome to the Prehistoric Earth. I hope you don't mind getting your feet wet, since there are feet high swamps everywhere. This first level is here to introduce you to Crash's moves. from his spins (and his Death Tornado), to his Super Belly Flop, his Double Jumping, and even his Wampazooka (with special appearance of Crash's tiptoe and dash power). And you also get an introductions to all the crates you'll see. All the basics in a lovely tutorial that is just a regular level. All the Crystals hide in plain sight around 3/4 in of every level (so I won't keep mentioning it). (And unless stated of a second gem around, there is usually only one for breaking all the crates.)
*About midway through the level, Sonic and Crash encounter and 3 Aku-Aku crates on top of each other.*
Crash whimpers.
Sonic: "What's wrong?"
Crash: "No Aku-Aku to help me!"
Sonic: "Is that bad?"
*Crash whispers in Sonic's ear, telling him that Aku-Aku usually protects him from damage, with invincibility with 3.*
Sonic: "So he protects you. Well, you do look pretty trustworthy. Want these?" *He shows Crash the Chaos Emeralds.*
Crash: "Oh?"
Sonic: "Take them, they'll keep you safe if you collect enough rings."
Crash: "These things?" *He shows the rings he found so far in the level.*
Sonic: "Yep. Here, let me show you." *He takes the rings and uses them to go Super Sonic. A wall of 16 Nitros are ahead and Sonic runs into them and the nearby TNT, making them blow up and leaving Sonic unhurt. He returns to his regular state.*
Crash: "Hooray!" *He smiles his toothy grin.*
Sonic: "Here, take them, Crash."
*Crash takes them and easily goes Super, gaining a yellow aura. His hair turns yellow as well and regains his old mohawk.* "Yahoo!" *He runs off, letting the player finish the level in Crash's super state.*
Achievement Unlocked: Getting Your Shoes Wet
-----
Level 2: Wading Dino
Crates: 95
Time Trial
Sapphire: 1:50.00
Gold: 1:35.00
Platinum: 1:20.00
Magmadons To Save: 5
Helping Partner: Spyro
Badniks: (Except for any new ones I note, all badniks appear in all levels of a Terrarium) Dino Riding Lab Assistant Pawns: They have tamed some baby T-Rexes of their own, albeit the dinos are metal too. Charging the dino and smashing the Pawn will defeat them.
The main feature for this level is that Crash is able to ride his old Baby T-Rex from Warped. He grants Crash an extra hit point and lets Crash jump even higher (Spyro flies for any jumps that are too high.). This level is another walk through the swamps. Usually around the halfway point of the levels, there is a platform that you can jump on to go to a BONUS area, filled with crates and Wampa fruit. It's a great way to earn lives, too.
Achievement Unlocked: Baby T, The Cutest Dino Around
-----
Level 3: Magmadon Magma Runs
*Dingodile appears.*
Dingodile: "G'day, mates. Dingodile's the name. Uka-Uka, Cortex, and Eggman want me to collect those Crystals you're collecting from the Prehistoric. You better give me the goods, and shove off, before I roast yas!"
Crates: 60
Time Trial
Sapphire: 1:40.00
Gold: 1:30.00
Platinum: 1:20.00
Magmadons To Save: 5
Helping Partner: Knuckles
This level has Crash and Knuckles riding Magmadons across lave floes. These mutants that are scattered across the levels and Terrariums are working for Cortex, but if you can break their headsets, they are more than willing to help you. They look big and strong, and they are, but they are big softies that are quite gentle. Cortex's Evolvo-ray is what has made them susceptible to the noise generated by the headsets, but Crash and the others slapping some sense in them helps save them. These mutants can take much more of a beating, having their own health bar and can be easily healed from the Wampa fruit laying around.
Knuckles noticed one of the Magmadons. "Hey, Crash? I know that they do have those headsets that are meant to make them crazy, but why are we helping them? Aren't they dangerous?"
Crash: "Mutants aren't mean! Nor dangerous" *Crash sounds like he is a little offended at the question.*
Knuckles realizes his mistake. "Wait, you're a mutant yourself? I'm sorry, I didn't know..." *Knuckles trails off, a little angry that he made such a mistake.*
Crash shows a smile. "It's okay! You didn't know." *He whispers something to Knuckles.*
Knuckles : "Oh! They are only dangerous and evil thanks to Cortex's evolving."
Crash: "Uh-huh! I help them so they can live their own lives!"
Knuckles: "Maybe you should tell the others that too so they can help."
Crash: "I will!"
Achievement Unlocked: Magmadons, The Hottest Turtles Around
-----
Level 4: Volcanic Vents
Crates: 103
Time Trial
Sapphire: 2:00.00
Gold: 1:55.00
Platinum: 1:50.00
Magmadons To Save: 5
Helping Partner: Tails
Badniks: Fireworm: So fire, much worm.
Well, I got some good news and bad news. Good news is that there is no more swamps underneath you, the bad news is that now you have to climb a volcano. At least it is somewhat dormant, so this no raining of rocks from the sky, but there are some lava flows here and there. And here is where you can get your first taste of a Death Route (Complete with proper music). There's a checkpoint right next to it so you can try as much as your lives allow. Death Routes are usually harder sections of a level, with more traps and Nitros and danger. But this one shouldn't be too hard. It will take you through the center of the volcano, with platforms strewn all across. Should you be able to avoid getting singed, another gem and a quick walk to the exit is your reward. Or you could kill yourself after collecting the gem and continue normally around the volcano. Your choice. Either way, your exit is on the other side of the volcano.
Achievement Unlocked: Feeling the Earth Move
-----
Level 5: Pterodactyl Pterror
Crates: 93
Time Trial
Sapphire: 1:40.00
Gold: 1:30.00
Platinum: 1:20.00
Magmadons To Save: 5
Helping Partner: Cynder
Beasts: Pterodactyls: *SCREECH!*
No prehistoric visit would be complete without a visit of flying dinos, aka Pterodactyls. You're back in the swamps again, but it isn't all that bad. Those birds can easily be dealt with by spinning them away. Nothing much to note here, just avoid being hurt by the beasts and badniks and you'll be fine.
Achievement Unlocked: Not Altering the Course of History
-----
*After returning to the Space Egg / Death Head, the buttons disappear and Crash and the others are lead to the center of the Terrarium. There, they find Dingodile, readying his flamethrower.*
Boss: Dingodile
"Mmm! Deep fried bandicoot and deep fried blue hedgehog sound mighty delicious right now."
(Break out the guitar, we're gonna rock out!)
Dingodile makes a lovely first boss, don't you think? Now, it's not a good idea to go straight into him, lest you want to get burned, rather you should run away and collect the rings scattered about to keep your health (Bosses use rings, since Aku-Aku isn't around to save you, and it makes sense with Sonic here). Now the normal way is to just wait until Dingodile gets tired and drops his flamethrower, letting you hit him. Afterwards, you'd have to run away until he gets tired again. OR, if you really want to kick Dingodile's ass, you can find 50 rings around the place and go Super, and just keep running into him. Either way, about 8 hits will do it.
Achievement Unlocked: No Singed Bandicoot Butt.
*After the 8th hit...*
Dingodile: "Gah! Youse are the worst mates ever! But let's see how tough you are over ICE in the Ice Ages."
*Dingodile gets up and runs off, deactivating the force field and letting you move on to the next Terrarium. Crash and the others give chase...*
Next Time: Try not to become Crash cubes in the Ice Age Terrarium.
2 notes
·
View notes
Text
21 Amazing French Braid Tutorials
New Post has been published on http://healingawerness.com/getting-healthy/getting-healthy-women/21-amazing-french-braid-tutorials/
21 Amazing French Braid Tutorials
Anjali Sayee June 7, 2019
Everything brilliant begins with the word ‘French.’
French fries, French toast, and – most importantly – French braid.
The French braid has transcended time to become one of the most sought-after hairstyles of the past few decades. It is one of the best hairstyles to sport at work or the gym. It is also perfect for a night out or a party. If you want to know more about how to weave a French braid and the different styles you can do with it, keep scrolling!
What Is A French Braid?
A French braid is a three-strand braid in which you cross the middle section under the side sections and add more hair to the side sections with each subsequent stitch of the braid.
What You Need
Hair brush
Elastic band
How To Do
Detangle your hair with a brush.
Pull some hair back as you would in a half ponytail.
Divide this section into three sub-sections: the left, the middle, and the right.
Do one stitch of braid. The middle section always goes under the left and right sections.
Add hair from the side to the left and right sections before flipping them over the middle section.
Keep adding hair to the braid with each subsequent stitch until you reach the nape of your neck.
Simply braid your hair the rest of the way down until you reach the end and tie an elastic band to keep it from unraveling.
Adjust the braid as you like. If you want the braid a bit loose, pancake it carefully.
The Dutch braid has been gaining popularity in recent times, which comes as no surprise because it looks stunning. Though it looks quite similar to the French braid, there are some key differences between the two. Here’s what you need to know.
Difference Between French Braid Vs. Dutch Braid
Shutterstock
The major difference between the French braid and the Dutch braid lies in the way you weave the middle section of the braid. In the French braid, you pass the middle section under the side sections. In the Dutch braid, you pass the middle section over the side sections.
You can tell the difference just by looking at both the braids. The French braid looks like it is underneath your hair while the Dutch braid looks like it is lying on top of it.
To find out how to weave a Dutch braid, check out this article.
Now that you know all about the French braid and how to do a basic one, let’s check out some gorgeous styles you can do with it!
21 Best French Braiding Styles
1. French Braid Pigtails
[embedded content]
What You Need
Hair brush
Elastic bands
How To Do
Brush your hair back, so it falls behind your shoulders.
Divide your hair into half from the front to the back to form two equal sections.
Pick up some hair from the front of one section, near the parting. Divide it into three sections and French braid it.
Once you reach the nape of your neck, secure the braid with an elastic band.
Repeat the same with the other section of hair.
2. Double French Braid
[embedded content]
What You Need
Comb
Elastic bands
Clip
How To Do
Brush your hair back, so it falls behind your shoulders.
Divide your hair vertically into two sections.
Take some hair from the front of one section and right next to the parting.
Divide this section into three parts and French braid it.
Once the French braid reaches the nape of your neck, braid it regularly the rest of the way down. Secure the ends with an elastic band.
Repeat the same with the other section of hair.
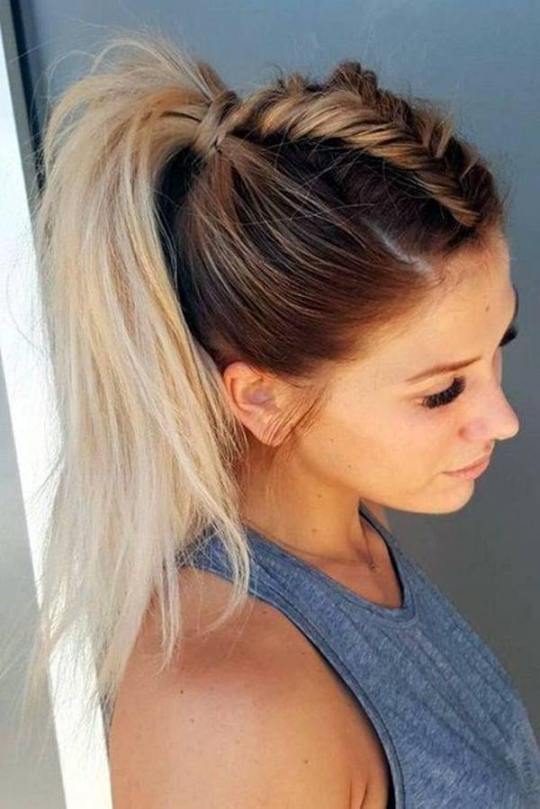
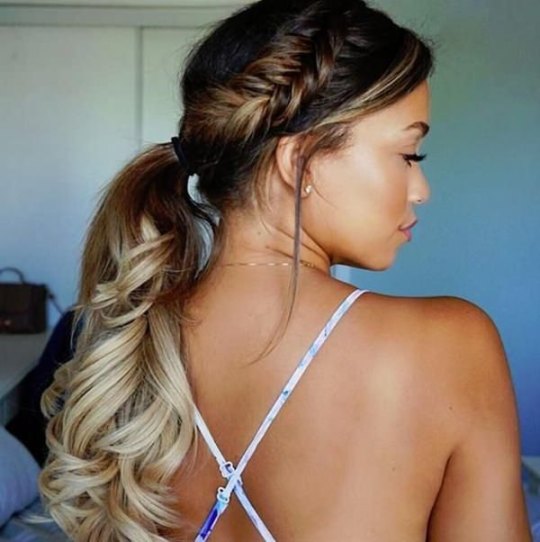
3. French Braid Ponytail
[embedded content]
What You Need
Comb
Elastic bands
How To Do
Brush your hair to remove all tangles and knots.
Gently backcomb the top of your hair to form a slight pouf. Begin weaving a French braid with this section of hair.
Weave around 5 to 6 stitches of the braid. Once you reach near the middle of your head, secure the braid with an elastic band along with the rest of your hair. This creates the high ponytail.
4. Messy French Braid
[embedded content]
What You Need
Elastic band
How To Do
The key to getting a perfect messy braid is not to use a comb. Use your fingers to gather all your hair.
Weave a loose French braid. Allow stray strands of hair to fall freely.
Spritz some hairspray after securing the braid with an elastic band.
5. Mermaid French Braid
[embedded content]
What You Need
Elastic bands
Brush
How To Do
Brush your hair down to remove any knots.
Gather your hair as you would for a half ponytail and weave it into a braid. Secure this braid with an elastic band.
Pick up a little hair from the top right of your head and pass it through the topmost left stitch of the braid.
Pick up some hair from the left side and pass it through the topmost right stitch.
Keep weaving hair into your braid this way until all your hair is in the mermaid braid.
6. Side-Swept French Braided Bangs
[embedded content]
What You Need
Comb
Brush
Bobby pins
Elastic band
How To Do
After brushing your hair, part it on one side.
Leaving out your bangs, gather the rest of your hair and tie it in an elastic band to keep it out of the way.
Gather hair from the front of the side with more hair.
Weave it into a Frech braid, guiding it from the front to the side of your head.
Keep adding hair only from the front to your bangs.
Once the braid is done, secure it with bobby pins.
7. French Braided Updo
[embedded content]
What You Need
Comb
Elastic bands
Bobby pins
How To Do
Part your hair from the front to the crown in a middle or a side parting.
Weave the side with more hair in a French braid until after your ear.
Weave the rest of the way down into a regular braid.
Secure the braid with an elastic band.
Gather the rest of your hair and weave it into a regular braid.
Wrap the braid in a low bun and secure it with bobby pins.
Wrap the first braid around the bun and pin it in place.
8. Faux French Braid
Shutterstock
What You Need
Comb
Bobby pins
How To Do
Brush your hair to remove all knots and tangles.
Gather hair from the top and sides and tie it in a half ponytail.
Tie another half ponytail right under the first one.
Split the second ponytail in half, pull both the sections in front of the first ponytail, tie them together with an elastic band.
Tie a third ponytail under the second one and repeat the above.
Keep doing this until the end. Secure the faux braid with an elastic band. Pancake the braid to make it look voluminous.
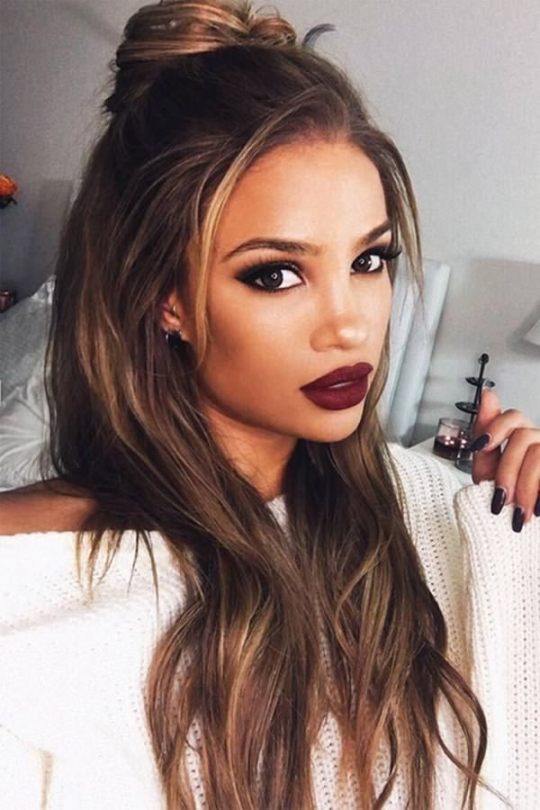
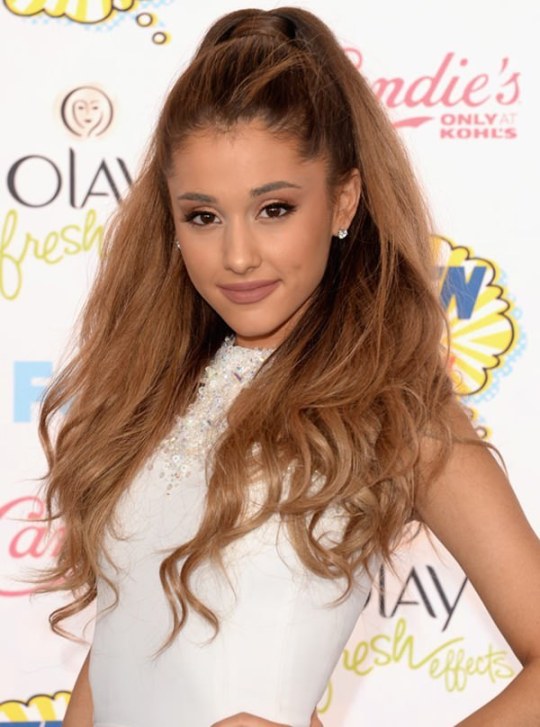
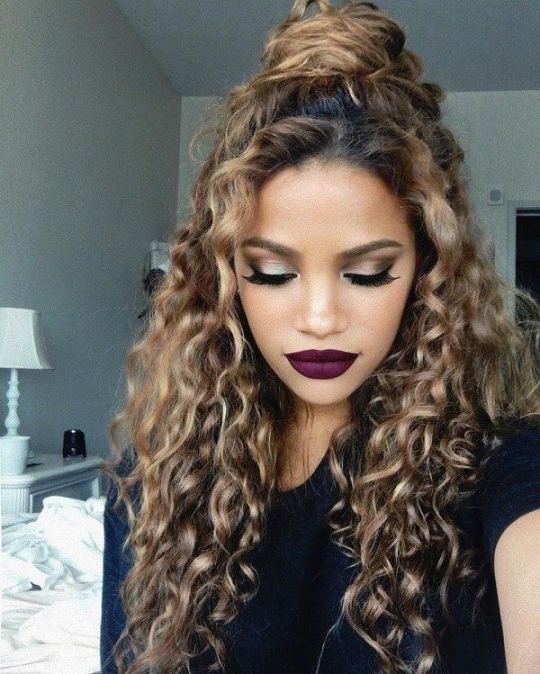
9. French Braid Half Top Knot
Shutterstock
What You Need
Rat-tailed comb
Elastic band
Bobby pins
How To Do
Using the pointed end of the comb, section off the mohawk part of your hair and clip away the rest to keep it out of the way.
Weave a French braid with the mohawk section of hair until you reach the crown. Secure it with an elastic band.
Wrap the tail of the braid into a top knot and secure it in place with the help of bobby pins.
10. Low Side French Bun
Shutterstock
What You Need
Rat-tailed comb
Bobby pins
Thin elastic bands
How To Do
Section your hair in a curve from your left temple to your right ear. Clip the top section up.
Weave the lower section of hair in a French braid by adding hair to only the right side of the braid.
Weave the braid until you reach the opposite side of the back hairline. Secure it with an elastic band.
Gather all your hair and wrap it in a low bun. Secure it with an elastic band and bobby pins.
11. French Knot Tuck Updo
Shutterstock
What You Need
Hair brush
Elastic bands
How To Do
Brush your hair to remove any knots and tangles. Brush your hair back behind your shoulders.
Gather hair from the top and a little from the sides. Divide it into two sections and tie it in a single knot.
Add more hair to each side and tie another knot.
Keep repeating this until you reach the nape of your neck.
Secure the end with an elastic band. Tuck the remaining hair underneath the French knot braid. Use pins to secure it.
12. Double Braided ‘Do
Shutterstock
What You Need
Comb
Bobby pins
Elastic bands
How To Do
Gather some hair from the front and clip it up.
Weave the rest of your hair in a French braid and secure the ends with an elastic band.
Unclip the front section and divide it into two. Twist the sections and intertwine them with each other until the end.
Pin the twisted braid down the center of the French braid.
13. Half French Braid
[embedded content]
What You Need
Comb
Elastic band
How To Do
Gather hair from the mohawk region and clip up the rest of your hair.
With the hair from the mohawk section, weave a French braid until you reach the crown.
Once you reach the crown, secure the braid with an elastic band.
Pancake the braid to make it look bigger.
14. French Braid Wreath
Shutterstock
What You Need
Comb
Bobby pins
Elastic band
How To Do
Comb your hair to detangle it. Part it on one side.
Start weaving a French braid from the front, on one side. Keep the braid parallel to your hairline, curving it around your head as you go.
To make sure that your hair looks neat while you add it in the braid, use a mirror or ask a friend to help.
Once you reach the front again, secure the ends with an elastic band and tuck it within the braid with hair pins.
15. One French Braid
Shutterstock
What You Need
Hair brush
Elastic bands
Bobby pins
How To Do
Brush your hair to get rid of any tangles and knots.
Gather hair from the top and tie it in a half ponytail.
Topsy tail the ponytail a few times.
Pick up some hair from the sides and tie it in a ponytail over the first ponytail.
Topsy tail that ponytail a few times as well.
Keep repeating this until you reach the end.
Weave the lower half of the ponytails in one fishtail braid.
Secure the ends with an elastic band and pancake the braid.
16. Goddess French Braid
Shutterstock
What You Need
Thin elastic bands
Comb
How To Do
Brush your hair to remove all knots and tangles.
Gather hair from the top and a little from the sides. Divide it into two sections and tie it in a single knot. Pin it down with a bobby pin.
Add more hair to each side and knot it again.
Keep repeating this until you reach the back hairline.
Divide the remaining hair into two and keep tying knots. Keep the braid as flat as possible.
Secure the end with an elastic band and pin it underneath the braid.
17. Upside Down French Braid Bun
Shutterstock
What You Need
Comb
Bobby pins
Elastic bands
How To Do
Bend over and flip your hair forward. Brush it down to remove any knots.
Begin weaving a French braid from the back hairline towards the front.
Once you reach the crown, wrap all your hair in a top knot.
Use an elastic band and bobby pins to secure the bun in place.
18. Double Messy French Braid Bun
[embedded content]
What You Need
Comb
Elastic bands
Bobby pins
How To Do
Divide your hair into four sections: top, left, bottom, and right.
Clip up the left and right sections.
Weave the top section in a French braid until the crown. Secure it with an elastic band.
Flip your hair forward and weave the bottom section in a French braid from the nape of your neck until the crown.
Unclip the side sections, gather all your hair at the crown, and wrap it in a bun.
Secure the bun with an elastic band and bobby pins.
19. Celebrity French Braid
[embedded content]
What You Need
Hair brush
Rat-tailed comb
Elastic bands
Bobby pins
How To Do
Divide your hair vertically into two equal sections.
Braid both sections in French braids.
Once you reach the back hairline, weave the rest of the braid in a regular fashion.
Secure the ends with elastic bands.
Wraps the braids in a single bun and secure it to your head with bobby pins.
20. The Fancy French Braid
[embedded content]
What You Need
Comb
Bobby pins
Elastic band
How To Do
The reverse French braid is also known as Dutch braid.
Brush all your hair back and weave it into a reverse French braid. This means that you need to pass the middle section of the braid over the side sections when braiding. You also add hair to the middle section of hair and not the side sections.
Once you reach the nape of your neck and run out of hair to add to your braid, weave a regular braid the rest of the way down.
Secure the ends with an elastic band and use bobby pins to keep your hair in place.
21. Double Side French Braid
[embedded content]
What You Need
Comb
Bobby pins
Elastic bands
How To Do
Part your hair on one side.
Gather some hair from the front and side and clip it up.
Weave the rest of your hair in a side French braid. Secure it at the end with an elastic band.
Unclip the front hair and weave it in a French braid parallel to the first one.
Tuck the end of the second (small) braid under the first one and conceal it with a bobby pin.
Pancake the braid to make it look
Those were our top 21 picks for DIY French braided hairstyles. Let us know which of these picks you love the best and how you would add your own flavor to the hairdo in the comments section below
The following two tabs change content below.
Latest posts by Anjali Sayee (see all)
Anjali Sayee
RELATED ARTICLES
Source: https://www.stylecraze.com/articles/french-braid-tutorials/
0 notes
Photo


Hello guys, my name is Juan but you can call me Spooks. I am a graphic designer at Mohawk College and I was assigned a client based project. In this project I will be working with two other classmates. For this assignment, our client requires graphics for platform 16 bit game development SDK. Originally each of us had to do the project individually but due to the time frame and difficulty of the project we are working as one. For the game dev. sdk we need to provide a title screen, home screen, character designs along with animations, backgrounds for levels, tile sets, and an app icon. Animations include walking, running, idling, climbing, jumping, double jumping, attacking, and special attacks. The way we are approaching this monster is we are dividing tasks as even as possible judging by each individuals strengths. We have taken off at full speed and are determined to create something bad ass. ANYWAYS, Here is the Title screen as well as the app icon I designed for the project. First step was drawing up some thumbnails, we all decided on the motherboard/tech looking one so from there I created a background using Adobe Illustrator. Once I had the background I dragged that vector work into Adobe After Effects. This is where the fun began... I have probably used this program about 2 times in my life for simple animations. Through endless youtube tutorials I found a cool way to make “self writing” text. From there I added a fading transition to the top text and messed around with the settings. There all finished... jk lol I stumbled along a cool lightning preset and from experimenting with the settings I was able to create a cool effect. The last thing I added was a blur and a glow to the lightning and “SDK” to really give off an 80′s retro gaming look. For the icon, the client wanted en elements from his company’s logo so I came up with this simple design on photoshop. This week was fun and challenging but we have a lot of work coming up, stay tuned!
0 notes
Photo

New Post has been published on http://dunnefrisur.com/der-sommer-am-besten-conrow-frisuren/
Der Sommer Am Besten Conrow Frisuren
Hairstyling ist eine Aufgabe, die vielleicht ein wenig Aufmerksamkeit erfordern als andere Teil des Körpers. Vor allem im Sommer, immer eine Frisur, die nicht berührte Ihren Nacken man verschwitzt ist eine Sache. Aus diesem Grund, diejenigen, die längere Haare haben, bevorzugen für die traditionellen afrikanischen Stil flechten, so dass Ihre Haare können organisiert werden ordentlich. Gut, für mehrere Zöpfe Typen, sollten Sie überlegen, conrow Frisuren. Es ist Zöpfe, das kann lange dauern, sogar Monate auf Ihren Sommer-Pause. Conrow selbst hat verschiedene Arten von flechten-Stil, die jede zeigt eine andere Stimmung und Kreativität. Es sind locken, highlights, Muster, Texturen, und vieles mehr sucht conrow. Im folgenden können Sie wählen, welche ist Ihr abgestimmt Stil.Überprüfen Sie Sie heraus unten.
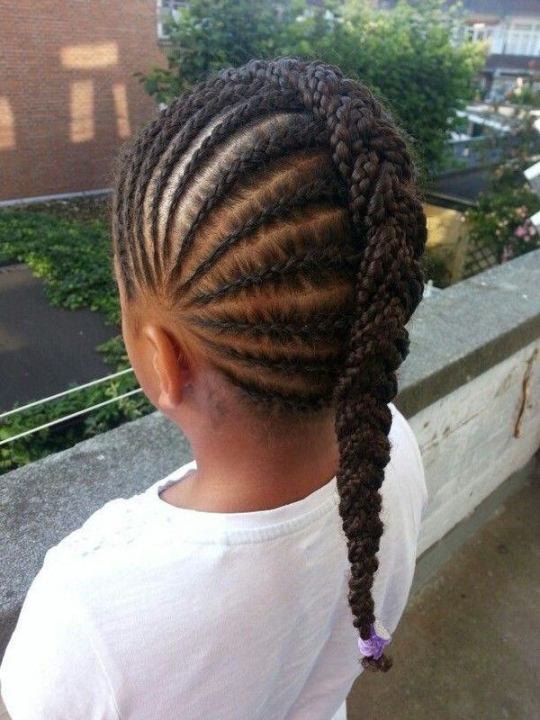
Conrows Mohawk
Sie können conrow Frisuren zu bekommen, ein wenig punkig mit Mohawk-look. Die Zöpfe Muster sind Stil tun wollen, tun Sie das Zentrum bis an den Kopf in eine abgedrehte geschwungene Muster. Die restlichen Haare werden gesammelt in der Mitte des Kopfes. Sie Haar-extensions beginnen befestigt und geformt, um erstellen Sie eine Mohawk. Diese edgy und cool Aussehen bleibt stilvoll, dass niemand es Wagen zu Chaos mit Ihnen.
Quelle: pinterest.com
Conrows Curly Fro Hawk
Sie können tun, geflochten zu bekommen, eine andere Art von hawk. Es ist Fro Hawk, die Unterstützung, die Sie lockiges Haar. Fast das gleiche, müssen Sie flechten Sie Ihr Haar auf jeder Seite der Mitte des Kopfes. Auf diese Weise werden Sie immer noch sexy Aussehen, während Sie kühl zu kämpfen, die Hitze des Sommers. Ausprobieren!
Quelle: pinterest.com
Trendige Conrow Stile
Wenn Sie lange Haare haben, werden Sie noch besser in diesem trendigen conrow Stil. Bekommen Vorderseite des Kopfes als Zentrum der Zopf-Tipps. Von der Mitte der Zöpfe Stil nach unten, bis Sie die Spitze der Haare. Man könnte denken, dass diese conrow Frisuren, die Aussehen wie ein Seestern, nicht wahr? Also, warum Sie nicht versuchen, diese Frisur früher? Auch mit diesem conrow, Sie können halten Sie es für ein paar Monate, so dass Ihr Sommer nicht gestört werden durch Haare Pflege mehr. Das einzige, was Links ist Ihr trendy aussieht.
Quelle: pinterest.com
Conrow Hochsteckfrisur Stile
Wenn Sie nicht möchten, dass die Haare kleben auf Ihren Hals, Haut und machen Sie das Gefühl heiß, dann tut Hochsteckfrisur ist, die richtigen Haarstyling-Wahl. Nicht nur halten Sie Weg von Hitze im Sommer, conrow Frisuren mit Hochsteckfrisur sieht sind die perfekte Künstlerische Weg, um Ihr Haar-styling. Das einzige, was zu tun ist, flechten Sie das Haar auf der Rückseite von Ihrem Kopf, bis die Haare Spitze. Sammeln Sie die geflochtenen Haarsträhnen, die in ein dann roll-up bekommen Sie eine perfekte up tun.
Quelle: pinterest.com
Zuckerwatte Conrow Stile
Wollen heller mit Ihrem conrow Frisuren? Gut, Sie sollten prüfen, färben Sie Ihre geflochtenen Haare mit hellen rosa wie Zuckerwatte rosa. Sie erhalten eine option zum einfügen häkeln flechten ot black box braid extensions in die flechtung. Häkeln flechten lässt Sie mit geringerem box Zöpfe, um Ihre Frisur mehr ausgesetzt und sieht mehr Kontrast. Nun, Sie können lassen Sie alle drehen den Kopf beim Blick auf Ihre stilvolle Frisuren wie ein Zucker-pop-Prinzessin.
Hohe Ponytailed Conrow Stile
Einige können wählen, zu bekommen, Hochsteckfrisur, während einige andere kann lieber zu lassen, Ihre Hochsteckfrisur nach unten. Ja, Sie können Ihr Haar Stil mit geflochtenen Pferdeschwanz, während halten Sie suchen fabelhaften und chic. Einfach flechten Sie Ihr Haar auf den Rücken Mitte des Kopfes, dann binden Sie den geflochtenen Haare zurück. Keine Sorge, wenn Sie vergessen, Ihr Haarband. Sie können mit ein paar Zöpfe zu binden Sie Ihr Haar zurück um zu beenden conrow Frisuren. Einfach und schnell, nicht wahr?
Quelle: pinterest.com
Twisted Bun Conrow Stile
Möchte einen kantigen, aber sehr Edel conrow Stile für Ihr Haar-Pflege? Hier sollten Sie Ihr Haar Stil mit twisted-bun conrow. Dieser Zopf-Frisur-tutorial ist sehr einfach. Sie müssen nur flechten Sie Ihr Haar an den Seiten und bringen Sie zurück zu erstellen ein Pferdeschwanz. Dann verwenden Sie synthetische Haare zu Pferdeschwanz um 2-Strang-twist. Danach erhalten Sie eine sichere und stilvolle conrowbun Frisur.Vor dem Verpacken, können Sie fügen Sie einige Glanz-spray für Glanz. Besonders, wenn Sie Runde oder Ovale Gesicht, diese Frisur gut Aussehen auf Sie.
Quelle: pinterest.com
Fischschwanz Geflecht Stile Conrow
Einer der nächsten empfohlenen conrow Frisuren styling Ihr Haar um einen Fischschwanz Geflecht. Wie Sie sehen für jede Seite, werden Sie spüren, wie herrlich und dennoch halten Sie Ihr girly-style. Diese atemberaubende Haar-Stil erfolgte durch Abstechen Ihr Haar in 2 Abschnitte, Links und rechts. Tun, flechten Sie die Haare auf jedem Abschnitt. Verbinden Sie beide Zöpfe, indem Sie flechten Sie zusammen, um eine lange Fischschwanz Geflecht. Sie können hinzufügen, blonde highlights auf die Zöpfe, Ihr Aussehen verbessern. Look! Ist das nicht der Zentrum-Abschied sieht gut aus auf Sie, ist es?
Quelle: pinterest.com
Cute Double Brötchen Conrow Stile
Möchten süß Aussehen mit Ihren conrow Frisuren? Nun, sollten Sie versuchen, ein doppeltes Brötchen-Stil. Als Sie erwachsen sind, es bedeutet nicht, sollten Sie lassen Sie Ihren Zopf Tage. Hier können Sie bringen Sie zurück in eine nette Weise, dass auch sein kann, sport zusammen mit Ihren dreadlocks. Um diese entzückende Haare Aussehen, müssen Sie ein Teil Ihrer Haare in 4 Abschnitte von der Vorderseite zu der Rückseite. Flechten Sie jeden Abschnitt. Flechten 2 Abschnitte in ein Geflecht auf jeder Seite, drehen und kombinieren Sie bis zu bekommen, ein Brötchen direkt hinter Ihrem Ohr. Diese Frisur ist erstaunlich einfach, die tun können, indem Sie sich zu Hause. Probieren Sie es aus!
Conrow Bob Frisuren
Eine kurze bob Frisur? Mach dir keine sorgen. Sie kann trotzdem toll conrow Ihre Frisuren mit bob. Beginnen Sie zu flechten, die Sie mittellanges Haar in kleine Abschnitt. Auf jeder geflochtenen Abschnitt, binden die Spitze mit einem kleinen Haarband oder etwas ähnliches. Zu verbessern das Aussehen, sollten Sie versuchen mischen Sie Ihren Stil durch färben der Haare mit hellen Farben wie Purpur. Auf diese Weise können Sie Ihren kurzen bob, die auf Feuer.
Quelle: pinterest.com
Gebogene Conrow Brötchen
Sie können sich eine verbesserte conrow Zopf-Stil Weg von geschwungenen bis die Zöpfe. Statt der gemeinsamen geraden Zöpfen, sollten Sie schalten Sie Sie in Kurven. Bringen Sie die Gebogenen Zöpfen nach unten und binden Sie zusammen in einem niedrigen Brötchen. Binden diese Brötchen können Sie in wenigen Minuten. Das Ergebnis, werden Sie sehen chic und dennoch Professionell zu erhöhen, Ihre hübsch aussieht. Auch mit diesem conrow Frisur, können Sie gehen auf eine formale Veranstaltung mit Vertrauen. Sie können pair Ihre Frisur mit einigen gold-Schmuck oder Perlmutt Ohrringe. Bevor Sie bereit sind zu gehen, vergessen Sie nicht, einige der hellen roten Lippenstift, um Ihre grimmigen Blick.
Twisted ConrowUpdo Stile
Twisted conrow Hochsteckfrisur Stil hilft Ihnen, zu beweisen, dass high fashion nicht Bizarr. Auch, es kann getan werden, im täglichen Leben in der Praxis sehr schnell. Hier müssen Sie zur Erstellung von horizontalen cornrows, angeordnet in einer gutsy Hochsteckfrisur. Indem Sie das tun, können Sie erstellen einen bob schneiden illusion, die hilft, verbessern Sie Ihre badass aussieht. Möchten, bringen Sie Sie in eine formale Veranstaltung? Ja, Sie können es tun. Kann man sehen, wie auch twisted conrow Frisuren-look stand-out an der Veranstaltung, als andere.
Conrow Top-Bun Stile
Diese Art von Frisur ist empfohlen für ballerinas, die gehen zu müssen, Erwägungsgrund oder Athleten, die nicht wollen, gestört zu werden, indem Sie Ihren gefallenen Haarsträhnen. Wie Sie verschieben müssen, um aktiv, so dass eine sichere und saubere Frisur wie diese conrown top-bun Stil Wert, ausprobiert zu werden. Sie können startby flechten aus dem Haaransatz, dann gehen Sie in Richtung der Krone. Für diesen Punkt, binden Sie die Zöpfe zusammen in einem top-bun, so können Sie eine schicke und doch mühelose Frisur. Verbessern Sie die Leistung sieht, können Sie versuchen, fügen Sie einige Silber beads, die helfen, zu bling bis Ihre conrow Frisuren.
Conrow Akzentuiert Bun Stile
Anstatt der üblichen top-bun, wie über die es in einem Akzent? Der Schritt auf die Herstellung dieser Frisur ist fast die gleiche mit gemeinsamen top-bun, aber Sie brauchen, um die Brötchen in den Zöpfen. Also, nicht twisted-Brötchen, aber lassen es so Aussehen wie ein stumpfer Kegel. Sie können sich Staub mit etwas Silber glitter auf Sie. Auf diese Weise können Sie schon eine komplette looks, die Aussehen adorable für einige Erwägungsgrund oder Leistung.
Geflochtene Side Pferdeschwanz
Ein weiterer conrow Empfehlung geflochtenen seitlichen Zopf. Diese Haare flechten tutorial ist, starten durch schneiden Sie Ihre Haare ab. Als Nächstes flechten Sie Ihr Haar auf eine Seite und bringen Sie zurück an die Krone im leicht geschwungenen Muster. Als Nächstes ziehen Sie alle Ihre Haare in top-Pferdeschwanz. Um eine enge curl, können Sie Rollen Sie den Pferdeschwanz durch die Verwendung von flexi-Stäben oder-Einstellung-Schaum. Nachdem Sie Ihre Haare vollständig trocknen, verwenden Sie shine gloss Kamm zu Seite. Bei einem heißen Sommer Tag, diese Frisur hilft Sie stilvoll und Niedlich, ohne befürchten zu müssen, wird heiß. Die mit natürlichen Haaren und langen entspannter kann man dies ganz einfach conrow Seite Pferdeschwanz zu Hause.
Quelle: pinterest.com
Seite Gefegt Zöpfe
Lassen Sie sich nicht von jedem langen Haar Strähne stört Sie an heißen Sommertagen? Wenn Sie lange Haare haben, sollten Sie versuchen, diese Seite gefegt conrow. Starten Sie durch flechten Sie Ihre Haare von einem front-side. Weiter flechten Sie wieder nach unten auf die andere Seite, bis die Haare Spitze. Im Gegensatz zu herkömmlichen geraden oder schrägen conrow, diese Art von Frisur sendet verschiedene vibeof Frechheit. Wenn Sie sehen auf jedem Winkel, werden Sie feststellen, wie erstaunlich conrow Frisuren werden kann.
Elegante Conrow Stile
Mach dir keine sorgen, nehmen Sie Ihre Zöpfe, wenn Sie erhalten eine Einladung für formelle Veranstaltungen. Gibt es eine elegante conrow Frisur, die Sie versuchen können, auch für full-time arbeiten oder irgendwelche hektischen Zeitplan. Sie können den Zopf von vorne beginnen Seite etwas großen Abschnitt. Weiter flechten, bis Sie die Rückseite Ihrer Haare Spitzen. Letzten, binden Sie die Zöpfe in einem niedrigen Schwanz und bringen Sie zu Vorderseite über der Schulter. Es wird gut Aussehen zu verbessern Sie Ihre wunderschönen Kleid Aussehen. Ob Sie wollen, zu gehen um die mall, Büro oder party, dieser Stil wird von allen geliebt werden.
Quelle: pinterest.com
Seite Conrow Plus Weben Stile
Eine heiße und charmante conrow Frisuren für den roten Teppich Stil ist Seite conrow plus ein Gewebe. Sie benötigen einige Zeit, um eine Seite der Haare werden geflochten in einem kleinen Abschnitt. Nachdem Sie fertig mit diesem Teil, die Sie benötigen, um weiter Weben der rest der Haare. Wie bringen Sie das Gewebe über der Schulter auf der rechten Seite, können Sie zeigen Sie Ihre conrow auf der linken Seite. Diese atemberaubende Frisur ist auch beliebt unter den top-stars während Ihrer “red carpet show”. Also, warum versuchst du es nicht? Nun, wenn Sie brauchen, um mehr Patienten zu bekommen die Haare gemacht.
Quelle: pinterest.com
Tutorial zu Tun Conrows
Naja, vielleicht haben einige von Euch wollen versuchen dabei die cornrows zu Hause. Es kann sich jedoch viel Zeit nehmen, für Anfänger, die nicht wissen, die richtigen Möglichkeiten, um es getan. Einige von Ihnen, die die Geduld verloren meistens wird aufgeben, bevor Sie die conrow. Um zu vermeiden, dass problem, hier ist eine sehr einfache Haare flechten tutorial können Sie selbst tun.
Wählen Sie eine der conrow Stilen vor, die sich Ihren wie.
Heraus beginnen, indem man etwas Wasser auf die Haare. Vorsichtig kämmen Ihre Haare entfernen Sie alle verheddert. Halten Sie Ihr Haar ein wenig feucht, aber nicht nicht zu nass.
Weiter schneiden der Haare. Sie können clips oder Gummibänder, außer auf dem Abschnitt, Teil, wo Sie wollen, um start flechten.
Holen Sie sich mit Beginn der conrow, die durch Division der erste Abschnitt in 3 Gruppen. Keine Angst, fügen Sie ein wenig Haar, wie Sie gehen zusammen mit den flechten.
Wenn Sie fast bis zum Ende der Haare, vergessen Sie nicht, sichern Sie Sie mit einem elastischen Haarband.
Weiter zur nächsten Zeile, bis Sie fertig sind mit dem rest der Haare.
Gut, einfach, nicht wahr? Jetzt können Sie Ihre conrow Frisuren überall, überall, wie Sie wollen.
Teilen Sie diese:
Verwandte Beiträge:
#AmBesten, #Conrow, #Frau, #Friseur, #Frisur, #Frisuren, #Haar, #HaarDesign, #Haare, #Haaren, #Schön, #Sommer, #Stil, #Stile, #Style, #Trendige, #Trends
#Am besten#Conrow#Frau#Friseur#Frisur#Frisuren#Haar#Haar Design#Haare#haaren#Schön#sommer#Stil#Stile#Style#Trendige#Trends
0 notes
Text
17 of the best video braid tutorials
I’ve rounded up 17 of the best video braid tutorials to save your from wasting hours on YouTube.
Ever go on a YouTube spiral? That’s kind of what inspired this post.
I started watching a braid tutorial and then kept going and going and… you know this story.
Anyway, I realised that I should keep some of my favourite hairstyle tutorials here so I can easily find them again later. You can also bookmark this page so you can find a cool braid tutorial for your next hairstyle.
If you can’t braid, I would really recommend getting a copy of my 30 Braids in 30 Days ebook. It’s your step-by-step guide to all the basic braids and includes over 35 unique tutorials you can do in your own hair.
17 of the best video braid tutorials
Feather waterfall and ladder braid combo
5 strand Dutch braid tutorial
Mohawk braid top knot tutorial
Formal braids
Twisted edge fishtail braid
Twisted crown braid
Fishtail braid tutorial
Zipper braid tutorial
Big loop braid tutorial
Mermaid half braid tutorial
How to braid curly hair
Dutch woven 4 strand braid
Double Dutch braid updo
Dutch infinity braid tutorial
Pull through mohawk braid
Double Dutch braids with extensions
Loop braid and flower rosette braid tutorial
If you’re not already subscribed to my channel, head over to Hair Romance TV now and hit subscribe!
And if you need some more braiding advice, here are 5 tips for better braids.
What are your fave hair or beauty channels on YouTube?
The post 17 of the best video braid tutorials appeared first on Hair Romance.
from Hair Salon http://feedproxy.google.com/~r/HairRomance/~3/_ZQ-d_6KBm0/17-best-video-braid-tutorials.html
0 notes
Photo

New Post has been published on https://www.kurzhaarfrisurenn.com/mohawk-dutch-braid-low-bun
Mohawk Dutch Braid Low Bun


Es ist offiziell Sommer und heiß in Arizona! Für das heutige Tutorial dachte ich, dass es Spaß machen würde, eine Frisur zu teilen, die sowohl für den zweiten als auch für den dritten Tag ohne Wärme ist. Ich weiß nicht wie es euch geht, aber meine Haare scheinen während der Sommermonate öliger zu werden und es ist viel zu heiß um einen Lockenstab oder Föhn zu benutzen. Ich liebe dieses Aussehen, weil es für beide gut ist und würde sogar gut auf nassem Haar arbeiten, wenn Sie am Pool abhängen. Lass mich deine Gedanken wissen und ich würde auch gerne von anderen Frisuren oder Videos hören, die du gerne sehen würdest! xo, Missy
youtube

Mohawk Dutch Braid Low Bun liefert:
Rattailkamm
3 klare elastische Bänder
Haarband
Mittelhaltendes Haarspray

Mohawk Dutch Braid Low Bun Anleitung:
Schritt 1 / Beginnen Sie mit dem Erstellen eines Teils auf der linken Seite in Richtung des Hinterkopfs und dann in den Nacken.
Schritt 2 / Binden Sie die unteren Haare ab, um später damit zu arbeiten.
Schritt 3 / Erstellen Sie einen zweiten Teil auf der rechten Seite bis zum Nacken und binden Sie die unteren Haare ab.
Schritt 4 / Als nächstes nehmen Sie einen Abschnitt in der Nähe der Stirn und teilen Sie es in drei Teile. Ich mag es, wenn der Abschnitt vorne ein Stück ist und dann die anderen beiden direkt hinter dem Vorderteil.
Schritt 5 / Starten Sie das Geflecht, indem Sie den rechten Strang unter dem mittleren Strang kreuzen.
Schritt 6 / Dann kreuzen Sie den linken Strang unter dem mittleren Strang.
Schritt 7 / Jetzt den rechten Strang unter der Mitte kreuzen, eine neue Haarsträhne aufheben und unter und in den mittleren Strang streichen.
Schritt 8 / Dann kreuzen Sie den linken Strang unter der Mitte, nehmen Sie einen neuen Schnitt und kreuzen Sie ihn unter der Mitte, um ihn in den Zopf zu bringen.
Schritt 9 / Flechten Sie die Haare weiter entlang dieses oberen Abschnitts in einen holländischen Zopf, kreuzen Sie die Seitenstränge unter dem mittleren Strang, während Sie neue Abschnitte in den Zopf bringen und den ganzen Weg meinen Hinterkopf bis zu meinem Nacken hinunter arbeiten.
Schritt 10 / Wenn alle Haare eingebracht sind, flechten Sie etwas weiter unten und binden Sie das Ende des Geflechts mit einem klaren Gummiband ab.
Schritt 11 / Lassen Sie den Rest des Haares herunter und kombinieren Sie es im Nacken.
Schritt 12 / Entfernen Sie das Gummiband vom Ende des Geflechts und entwirren Sie es.
Schritt 13 / Für das Brötchen, nehmen Sie ein Haarband und wickeln Sie es halb über das Haar.
Schritt 14 / Fassen Sie die Mitte der Haare mit dem Daumen und Zeigefinger und legen Sie die anderen drei die Haarband greifen.
Schritt 15 / Dann drehen Sie die Hand nach außen. Lass die Haare mit dem Daumen los und stecke sie in das Haarband.
Schritt 16 / Ergreife die Basis des Pferdeschwanzes mit der linken Hand und schiebe mit der rechten Hand das Haarband über die Haare und von der linken Hand.
Schritt 17 / Ziehen Sie an den Rändern des Brötchens, um es größer zu machen.
Schritt 18 / Stecken Sie die Enden zurück in das Haarband, um eine weitere Schleife des Brötchens zu bilden.
Schritt 19 / Ziehen Sie an den Kanten des Geflechts, um es voller zu machen.
Schritt 20 / Besprühen Sie den Stil mit Haarspray und glätten Sie die Seiten.

Teile das:
Facebook
Twitter
Pinterest
Tumblr
Google
Email
Folgen:
Sie können auch genießen:

Französisch & Lace Fischschwanz High Bun
Double Dutch Fishtail Zöpfe
Gemischtes holländisches und holländisches Fishtail Braid 3 Ways
Hoher Brötchen-Bogen-Akzent
0 notes
Photo
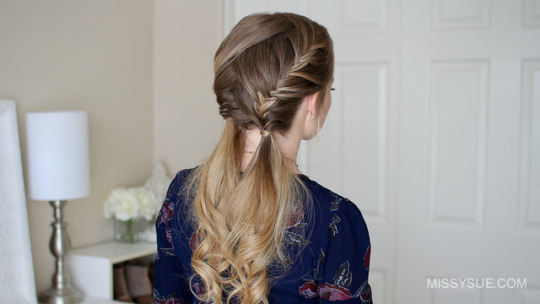
New Post has been published on https://www.kurzhaarfrisurenn.com/doppelte-fischschwanz-franzosisch-zopfe
Doppelte Fischschwanz Französisch Zöpfe


Heute bin ich aufgeregt, das Tutorial für diese doppelte Fischschwanz Französisch Zöpfe zu teilen. Ich liebe diese Frisur für den Sommer und denke, es ist so eine großartige Möglichkeit, Ihre Haare für einen Tag zu verkleiden. Sie können es auch ohne Wärme mit Ihrer natürlichen Textur tragen, wenn Sie möchten. Ich hoffe du versuchst es und lässt mich wissen was du in den Kommentaren findest! Vielen Dank fürs Lesen! xo, Missy
youtube
<![CDATA[ #gallery-4 margin: auto; #gallery-4 .gallery-item float: left; margin-top: 10px; text-align: center; width: 50%; #gallery-4 img border: 2px solid #cfcfcf; #gallery-4 .gallery-caption margin-left: 0; /* see gallery_shortcode() in wp-includes/media.php */ ]]>
Double Fishtail Französisch Braids Supplies:
Rattailkamm
4 Klare elastische Bänder
Mittelhaltendes Haarspray
1 1/4 “Lockenstab

Double Fishtail Französisch Braids Anleitung: Um mein Haar für diese Frisur vorzubereiten, kräuselte ich sauberes Haar mit einem 1 1/4 “Lockenstab.
Schritt 1 / Beginnen Sie mit dem Erstellen eines Teils auf der rechten Seite, obwohl Sie es wo immer Sie möchten platzieren können.
Schritt 2 / Erstellen Sie einen Zickzack-Teil am Hinterkopf und teilen Sie das Haar in eine linke und rechte Seite.
Schritt 3 / Binden Sie den rechten Abschnitt mit einem klaren Gummiband ab.
Schritt 4 / Nehmen Sie einen Abschnitt auf der linken Seite des Teils und teilen Sie ihn in drei Abschnitte auf.
Schritt 5 / Beginnen Sie einen Stich eines normalen Zopfes und kombinieren Sie dann die mittleren und rechten Stränge für den Fischschwanz-Zopf.
Schritt 6 / Nehmen Sie für den Fischschwanz einen kleinen Abschnitt von rechts und kreuzen Sie ihn nach links.
Schritt 7 / Nehmen Sie ein kleines Stück Haar auf und überkreuzen Sie es ebenfalls nach links.
Schritt 8 / Überquere nun einen kleinen Abschnitt von der linken Seite nach rechts und nimm eine neue Haarpartie, die du nach rechts überkreuzst.
Schritt 9 / Dies sind die Schritte, um einen Fischschwanz Französisch Zopf zu machen, so wiederholen Sie einfach diese Schritte weiter den Zopf auf der linken Seite des Kopfes, bis alle Haare von der linken Seite gebracht wird.
Schritt 10 / Jetzt binden Sie das Ende des Geflechts mit einem klaren Gummiband ab.
Schritt 11 / Lassen Sie die Haare auf der rechten Seite herunter und wiederholen Sie die gleichen Schritte, um einen zweiten Fischschwanz französischer Zopf mit dem rechten Abschnitt zu erstellen.
Schritt 12 / Sobald der zweite Zopf den Nacken erreicht hat und alle Haare eingeführt sind, binden Sie ihn ab und wickeln Sie dann ein kleines Stück Haar um das elastische Band. Binden Sie ein zweites Gummiband über das Haar, achten Sie darauf, dass Sie die Enden aus dem gewickelten Teil nehmen. Dieses zweite Gummiband hält das umwickelte Haar an Ort und Stelle, während es auch darunter verborgen bleibt.
Schritt 13 / Wiederholen Sie den gleichen Schritt mit dem linken Zopf, wickeln Sie das Gummiband mit einem Stück Haar ein und binden Sie ein zweites Gummiband über die Enden.
Schritt 14 / Setzen Sie den Stil mit Haarspray und glätten Sie alle Überflüge.
Teile das:
Facebook
Twitter
Pinterest
Tumblr
Google
Email
Folgen:
Sie können auch genießen:

Half Up Double Fischschwanz Französisch Zöpfe
Französisch Braid Low Bun
Viking Warrior Halloween Frisur
Wrapped Mohawk Hochsteckfrisur
0 notes
Photo

New Post has been published on https://www.kurzhaarfrisurenn.com/vier-strand-braid-high-bun
Vier Strand Braid High Bun


Das Wetter erwärmt sich und ich habe viel zu oft ein unordentliches Brötchen getragen!
Für das heutige Tutorial wollte ich eine unterhaltsame Art und Weise teilen, wie du dein Lieblingshochbrötchen kleiden kannst. Ich bin besessen von diesem Look und weiß, dass es in diesem Sommer mein neuer Favorit sein wird! Wenn Sie das Double Lace Braid High Bun vom letzten Jahr geliebt haben, dann sind Sie verpflichtet, dieses auch zu lieben!
Lass mich wissen, was du denkst und ob du diese Frisur in dieser Saison rocken wirst. xo, Missy
youtube

Four Strang Braid High Bun liefert:
Rattailkamm
Clip zum Schneiden von Haaren
Haarklammern
Haarband
Mittelhaltendes Haarspray
<![CDATA[ #gallery-4 margin: auto; #gallery-4 .gallery-item float: left; margin-top: 10px; text-align: center; width: 50%; #gallery-4 img border: 2px solid #cfcfcf; #gallery-4 .gallery-caption margin-left: 0; /* see gallery_shortcode() in wp-includes/media.php */ ]]>
Four Strand Braid High Bun Anleitung:
Schritt 1 / Beginnen Sie, indem Sie die Haare auf der rechten Seite teilen
Schritt 2 / Dann teilen Sie einen Abschnitt der Haare auf der schweren Seite des Teils für den Zopf.
Schritt 3 / Nehmen Sie einen Abschnitt in der Nähe des Teils auf und teilen Sie ihn in vier Teile. Ich mache immer die zweite Sektion die größte, da diese nie Haare hat.
Schritt 4 / Die Nummerierung der Stränge 1 bis 4 beginnt mit der Kreuzung des Strangs 4 unter Strang 3.
Schritt 5 / Dann überstreichen Sie Strang 3 über Strang 2.
Schritt 6 / Faden 1 über Faden 2 stricken.
Schritt 7 / Dann den Strang 2 unter den Strang 3 kreuzen.
Schritt 8 / Wiederholen Sie nun das Muster, indem Sie Haar in die beiden äußeren Stränge, Strang 1 und Strang 4, einarbeiten.
Schritt 9 / Nach 2 weiteren Sätzen des Zopfs hörst du auf, Haar zu Strang 4 hinzuzufügen. Dies hilft dem Zopf, sich in das unordentliche Brötchen am Ende zu biegen.
Schritt 10 / Fügen Sie nun nur noch Haare in den Faden 1 ein und setzen Sie den Zopf bis zum linken Ohr fort.
Schritt 11 / Flechten Sie nun den Rest des Abschnitts zu den Enden in einem viersträngigen Geflecht, ohne zusätzliches Haar hinzuzufügen.
Schritt 12 / Criss kreuzen zwei Bobby Pins über den Boden, so dass es nicht entwirrt. Ich mag das, weil es leichter zu entfernen ist als ein elastisches Band.
Schritt 13 / Weiter bürste alle Haare zu einem hohen Pferdeschwanz und lasse den Zopf weg.
Schritt 14 / Für die Brötchen ein Haarband einmal über den Pferdeschwanz wickeln. Dann drehen Sie das Haarband um die dominante Hand und breiten Sie mit der anderen Hand den Pferdeschwanz um das Haarband, um die Basis des Brötchens zu bilden.
Schritt 15 / Wickeln Sie dann das Haarband zweimal mehr über das Brötchen.
Schritt 16 / Jetzt an den Rändern des Brötchens ziehen, um es größer zu machen.
Schritt 17 / Nimm die Haare, die übrig geblieben sind, und rolle diese zum oberen Ende des Brötchens, stecke es in das Haarband, um eine weitere Schleife zu bilden. Rollen Sie weiter und stecken Sie die Haare in das Haarband, bis keine Enden mehr hervorstehen.
Schritt 18 / Nehmen Sie nun den Zopf und ziehen Sie vorsichtig an den Kanten, bis er wirklich breit ist. Dies wird dazu beitragen, dass der Zopf viel besser zur Geltung kommt und hilft, alle durch den Zopf erzeugten Teillinien zu verbergen.
Schritt 19 / Wickeln Sie das Geflecht um die Basis des Brötchens und stecken Sie es mit Bobby Pins darunter.
Schritt 20 / Besprühen Sie die Frisur mit einem mittelharten Haarspray und glätten Sie das lockere Haar.


Teile das:
Facebook
Twitter
Pinterest
Tumblr
Google
Email
Folgen:
Sie können auch genießen:

Französischer Zopf Pferdeschwanz
Holländische geflochtene Brötchen
Französisch Mohawk Braid
Hoher Brötchen-Bogen-Akzent
0 notes
Photo

New Post has been published on https://www.kurzhaarfrisurenn.com/3-fishtail-braid-frisuren
3 Fishtail Braid Frisuren


Ich liebe es immer, diese Themen Tutorials und heutige Features 3 Fischschwanz Zopf Frisuren zu erstellen. Diese Frisuren sind alle lässig genug, um jeden Tag getragen zu werden, was die Art von Stil ist, die am meisten gefragt ist. Mit einer Kombination aus einem niedrigen Brötchen, einem hohen Brötchen und einem Half-Up-Style hoffe ich, dass diese Ihnen einige großartige Ideen geben werden, um Ihr Haar über das Wochenende und in die nächste Woche zu stylen. Wenn Sie sich entscheiden, einen dieser Stile neu zu erstellen, dann lassen Sie es mich in den Kommentaren unten wissen!
youtube

<![CDATA[ #gallery-10 margin: auto; #gallery-10 .gallery-item float: left; margin-top: 10px; text-align: center; width: 50%; #gallery-10 img border: 2px solid #cfcfcf; #gallery-10 .gallery-caption margin-left: 0; /* see gallery_shortcode() in wp-includes/media.php */ ]]>
Double Fishtail Braids Low Bun Anleitung:
Schritt 1 / Beginnen Sie mit einem Teil auf der linken Seite und erstellen Sie einen Zick-Zack-Teil auf der Rückseite des Kopfes. Dann die rechte Hälfte abbinden.
Schritt 2 / Erstellen Sie einen holländischen Fischschwanz mit den Haaren auf der linken Seite. Beginnen Sie, indem Sie einen kleinen Abschnitt in der Nähe der Haarlinie aufheben und ihn in drei Abschnitte aufteilen. Überkreuzen Sie die Seitenstränge unter der Mitte, um einen normalen Zopf zu beginnen, und kombinieren Sie dann den hinteren und mittleren Strang, so dass nur zwei Stücke für den Fischschwanzzopf vorhanden sind.
Schritt 3 / Beginne kleine Stücke vom rechten Strang unter dem linken Strang zu kreuzen. Nehmen Sie eine neue Haarpartie auf und kreuzen Sie sie unter dem linken Strang.
Schritt 4 / Nimm ein kleines Stück vom linken Strang, überkreuz es nach rechts und bringe eine neue Haarpartie herein.
Schritt 5 / Flechten Sie das Haar weiter, bis das Haar oben auf dem linken Ohr sitzt.
Schritt 6 / Flechten Sie sich etwas weiter unten und kreuzen Sie zwei Haarnadeln über die Enden, um später damit zu arbeiten.
Schritt 7 / Erstellen Sie einen zweiten holländischen Fischschwanz-Zopf auf der rechten Seite des Kopfes und fügen Sie Haare hinzu, bis der Zopf die Oberseite des Ohres erreicht. Dann flechten Sie etwas weiter unten und schieben Sie zwei Haarnadeln über die Enden.
Schritt 8 / Weiter kombinieren alle Haare zusammen und entfernen Sie die Bobby Pins von den Enden der Zöpfe.
Schritt 9 / Wickle einmal ein Haarband über den Pferdeschwanz, drehe es wieder mit der rechten Hand und spreize den Pferdeschwanz nach oben und um das Haarband herum. Wickeln Sie dann das Haarband zweimal mehr über das Brötchen.
Schritt 10 / Nehmen Sie die Enden und stecken Sie sie zurück in das Haarband an der Spitze des Brötchens, um den Stil zu beenden.
<![CDATA[ #gallery-12 margin: auto; #gallery-12 .gallery-item float: left; margin-top: 10px; text-align: center; width: 50%; #gallery-12 img border: 2px solid #cfcfcf; #gallery-12 .gallery-caption margin-left: 0; /* see gallery_shortcode() in wp-includes/media.php */ ]]>
Fishtail Braid High Bun Anleitung:
Schritt 1 / Beginnen Sie, indem Sie den Kopf umdrehen und eine kleine Scheibe nahe dem Haaransatz aufnehmen.
Schritt 2 / Teilen Sie es in die drei Stücke und kreuzen Sie die Seitenstränge unter der Mitte.
Schritt 3 / Kombiniere den mittleren und linken Strang, so dass es zwei für den Fischschwanzzopf gibt.
Schritt 4 / Nehmen Sie einen kleinen Abschnitt von der linken Seite, und nehmen Sie einen neuen Abschnitt, indem Sie beide unter der rechten Seite kreuzen.
Schritt 5 / Nehmen Sie dann einen kleinen Abschnitt von der rechten Seite, nehmen Sie einen neuen Abschnitt und kreuzen Sie beide unten auf der linken Seite.
Schritt 6 / Führen Sie den Zopf bis zum Hinterkopf hinauf, bis die Haare oben in den Ohren sind.
Schritt 7 / Flechten Sie sich etwas weiter unten und binden Sie es mit einem elastischen Band ab.
Schritt 8 / Kombiniere alle Haare für das Brötchen und mache das gleiche Brötchen wie in der vorherigen Frisur beschrieben.
<![CDATA[ #gallery-14 margin: auto; #gallery-14 .gallery-item float: left; margin-top: 10px; text-align: center; width: 50%; #gallery-14 img border: 2px solid #cfcfcf; #gallery-14 .gallery-caption margin-left: 0; /* see gallery_shortcode() in wp-includes/media.php */ ]]>
Half Up Pferdeschwanz Flip und Fishtail Braid Anleitung:
Schritt 1 / Beginnen Sie mit dem Abtrennen eines Haarabschnitts an der Krone und binden Sie ihn mit einem elastischen Band ab.
Schritt 2 / Erstellen Sie eine Lücke direkt über dem elastischen Band und ziehen Sie den Pferdeschwanz durch die Lücke und wieder nach unten, um einen Flip zu erstellen.
Schritt 3 / Wickeln Sie ein kleines Stück Haar um das elastische Band und befestigen Sie es mit einem anderen elastischen Band.
Schritt 4 / Flechten Sie nun den Pferdeschwanz zu einem Fischschwanzzopf, indem Sie ihn in zwei Hälften teilen und kleine Stücke von einer Seite auf die andere Seite kreuzen.
Schritt 5 / Führen Sie den Zopf weiter, bis er etwa in der Mitte des Abschnitts ist und gehen Sie dann zurück und ziehen Sie an den Rändern, um es breiter zu machen.
Schritt 6 / Binden Sie es mit einem elastischen Band ab. Bedecken Sie das elastische Material, indem Sie eine Haarpartie umwickeln und mit einem anderen elastischen Band sichern.
<![CDATA[ #gallery-16 margin: auto; #gallery-16 .gallery-item float: left; margin-top: 10px; text-align: center; width: 50%; #gallery-16 img border: 2px solid #cfcfcf; #gallery-16 .gallery-caption margin-left: 0; /* see gallery_shortcode() in wp-includes/media.php */ ]]>
Teile das:
Facebook
Twitter
Pinterest
Tumblr
Google
Email
Folgen:
Sie können auch genießen:

Doppelgeflecht gewickelt Brötchen
Spitze und Dutch Braid Pferdeschwanz
Doppeltes französisches Braid-Mohawk-Brötchen
Half Up Triple Braid Mini Brötchen
0 notes
Photo

New Post has been published on https://www.kurzhaarfrisurenn.com/instagram-zusammenfassung-2
Instagram Zusammenfassung

Fröhlichen Donnerstag! Mein übliches Tutorial, das heute läuft, wird sich etwas verzögern, es tut mir so leid! Also, bis es fertig ist, wollte ich eine schnelle Instagram-Zusammenfassung teilen! Diese sind alle von den letzten paar Wochen und sind Stile, die ich getragen oder #flashbacks zu vorherigen Tutorials. Ich habe keine Beiträge hinzugefügt, die sich direkt auf ein neues Tutorial beziehen, damit Sie ein wenig sehen können, wie ich meine Haare mehr täglich style (:
Außerdem arbeite ich an einem Tutorial für Haarverlängerungen und wie ich sie für verschiedene Tutorials anklicke. Bitte hinterlassen Sie einen Kommentar unten, wenn Sie sehen möchten, wie ich sie für bestimmte Frisuren einziehe. Danke, liebe dich! (: #fbf zum geflochtenen + verknoteten Hochsteckfrisur ? So glücklich, es ist Fri-Yay!
Noch ein #fbf zum letzten Frühling? Ich kann es kaum erwarten, dass sich das Wetter aufwärmt! – Tuck & Cover Hälfte
Meerjungfrau Side Braid ?
Fischschwänze für Tage ❤️ mein lieblings Stil! (Tutorial hier )
Er macht alles 1000x mehr Spaß? #momlife #ilovehimsomuch
Das heutige Tutorial in den Pull-Through Bun Updo umgewandelt ?
Four Strand Dutch Braid von neulich ? YouTube-Tutorial >> MissySue.com/4sdb
Date Nachtflug mit meinem Liebhaber? Ich schaute hinüber und er war schon festgeschnallt und bereit, wie der Weihnachtsmorgen zu gehen mehr auf Snapchat: Missysueblog >> Haar Tutorial hier
Ein weiteres Bild von unserem Flug heute Nacht. Mehr über Snapchat: Missysueblog
Einfach einer meiner Lieblingsstile, wenn ich nicht Lust habe, meine Haare zu lockern! ? Erfahren Sie, wie Sie dieses Inverted Fishtail Crown Braid herstellen ? indem du auf den Link in meiner Biografie klickst oder MissySue.com/ifcb besuchst, um sie auf YouTube zu sehen!
Ein kleines Wochenende Haarinspo? Fischschwanz verschönert Pferdeschwanz ? eine meiner liebsten Möglichkeiten, ein niedriges Pony anzuziehen und perfekt zum Abendessen zu sein! ? YouTube-Tutorial
Auf einen Mohawk-Kick! ? Wenn du schon heute den verknoteten Mohawk-Tutorialkommentar gesehen hast? Dieses Fischschwanz Mohawk Pony ist ein weiterer Favorit!
Fischschwanz Akzent Braid Hochsteckfrisur ? der perfekte kleine Peek-a-Boo Zopf + unordentliche Brötchen-Combo! Lerne diese Hochsteckfrisur, indem du dir das Video auf meinem YouTube-Kanal ansiehst!
Heutiger Zopf? Vier-Strang Wasserfall Braid ? Wenn du diesen Zopf noch nicht gelernt hast, musst du wirklich, wie gerade jetzt, das Tutorial anschauen? Es ist ein Spiel Wechsler! ?
Glücklicher #internationaler Frauentag? Ich musste mir einen Moment Zeit nehmen, um zu sagen, wie dankbar ich für all die fantastischen Frauen in meinem Leben bin! Besonders dieses Baby, @ emmacristy? von unseren Moab-Abenteuern im letzten Sommer und vielen weiteren!
Wörtlich konnte nicht widerstehen, diesen Stil zu schaffen, nachdem er das holländische Zöpfe Tutorial veröffentlicht hat! ?
Fishtail Top Knot von ” 3 Back to School Frisuren “? das ist einer meiner beliebtesten Frisuren + wenn du es noch nicht gelernt hast musst du es unbedingt! ? Ist der Abschlussball nicht gleich um die Ecke? ? YouTube Tutorial Link in meiner Bio wie immer + Stirnband ist da !
Schönen Samstag! ❤️ Heutiges Tagesgeschäft ist Hausarbeit und Nickerchen, so dass ein halber Knoten mit übrig gebliebenen Locken wie eine perfekte Passform aussah!
Das Tutorial für diese Rope Braid Crown traf einfach auf meinen YouTube-Kanal + MissySue.com! ✨ Es ist wirklich die perfekte Frisur für jeden Tag und natürlich habe ich mich mit einem süßen Goldband angezogen!
Wütend! Das ist ein Wickel; bis zum nächsten Mal!
Teile das:
Facebook
Twitter
Pinterest
Tumblr
Google
Email
Folgen:
Sie können auch genießen:

Viking Warrior Halloween Frisur
Wasserfall Französisch Braid Low Bun
Mini Braid Wrapped hohe Brötchen
Double Dutch Fishtail Zöpfe
0 notes