#dowel bar types
Explore tagged Tumblr posts
Visit Tumblr Blog
Explore Tumblr blogs with no restrictions, modern design and the best experience.
Last Seen Tumblr Blogs


Fun Fact
Tumblr has 4 main sources of revenue.
Text
What Structural Engineers Want in a Bar Dowel—And How Kapila Steel Delivers

Dowel bars are a silent force in construction—unseen but essential.
Right from the start, structural engineers rely on dowel bars, bar dowel systems, and the assurance offered by trusted TMT bar manufacturers to ensure lasting stability in their projects.
Understanding the Role of Dowel Bars in Construction
Dowel bars serve one major purpose—transferring loads across joints while allowing movement. They’re placed in concrete pavements and structural slabs to prevent cracking and ensure longevity.
For engineers, the performance of dowel bars isn’t optional—it’s critical.
It’s here that bar dowel strength, alignment, and corrosion resistance play pivotal roles. These aren't just pieces of metal; they’re stability connectors. And no serious project can afford to compromise on that.
Why Structural Engineers Are So Particular About Their Choices
It’s not just about using a bar dowel—it’s about using the right one. Engineers look beyond the specifications on paper. They consider:
Long-term site performance
Concrete expansion behavior
The climate around the project
Reliable TMT bar manufacturers know this mindset. They know that engineers want consistent quality in every dowel bar, because one faulty connection can compromise the integrity of the entire slab.
Bar dowel systems have to be precise to work, and precision begins with manufacturing.
Bar Dowel Challenges That Demand Smart Solutions
Misalignment
Rust
Inconsistent diameters
These are everyday nightmares for site engineers. A dowel bar that’s off by just a few millimeters can cause stress concentrations that lead to cracks.
And let’s not ignore corrosion. Moisture creeps in over time. If a bar dowel isn’t protected with the right coatings or made from quality material, it becomes a weak point. Structural engineers know this risk all too well, and they expect TMT bar manufacturers to be one step ahead in preventing it.
Engineers Don’t Just Want Quality—They Want Consistency
It’s not enough to meet standards once. Kapila Steel understands this. Their approach is rooted in consistency—each dowel bar matches the next.
Structural engineers value that predictability. It lets them design and build with confidence.
How Kapila Steel Matches Real-World Expectations
When engineers choose Kapila Steel, they’re choosing more than just steel. They’re choosing attention to detail.
Every bar dowel produced is:
Tested to handle load-bearing capacity
Resistant to corrosion
Dimensionally accurate
Kapila’s reputation among leading TMT bar manufacturers isn’t just for strength—it’s for trust. And that trust is built on how well the product performs where it matters most: on-site, under pressure.
Choosing the Right Bar Dowel Isn’t Just a Technical Decision
Engineers don’t only read datasheets. They watch how products behave over time. A project’s durability often rests on small, seemingly invisible choices.
Dowel bars may not be the flashiest part of the structure, but they’re the connectors holding the design together.
That’s why structural engineers return to brands that deliver without fail. Kapila Steel doesn’t oversell—it simply delivers what the professionals need. And that reliability is what earns long-term respect.
Conclusion
The next time a slab holds strong after years of load-bearing traffic, there’s a quiet reason behind it—dowel bars doing their job, day after day.
Structural engineers know this. And that’s why they demand performance, consistency, and integrity from every bar dowel they use.
Kapila Steel delivers just that—without fuss, without fail.
FAQs
1. Why are dowel bars essential in construction?
They help transfer loads across joints, reducing stress and preventing cracks in concrete slabs.
2. What do engineers look for in a bar dowel?
Precision in dimensions, high corrosion resistance, and consistent quality across all units.
3. How do poor dowel bars affect construction?
They can lead to misalignment, structural stress, premature cracks, and eventual slab failure.
#bar dowel use#bar dowel specs#strong bar dowels#TMT bar dowel#Kapila dowels#steel dowel bars#bar dowel guide#dowel bar types#engineer bar pick#dowel bar info#steel bars guide#reinforced bars#dowel bar needs#construction bar#dowel strength#dowel bar size#dowel bar India#Kapila TMT bars#infra bar steel#dowel bar tech
0 notes
Text
When Binding Wire Fails—And What It Means for Structural Joints and Reinforced Rings

The Unsung Heroes of Construction
Binding wire, construction rings, and dowel bars — these three unsung heroes are often overlooked in the spotlight of construction materials. Yet, when binding wire fails, the consequences ripple through the very heart of a structure. It's not a surface issue. It's a core failure, one that compromises the integrity of reinforced joints and weakens the load transfer across construction rings and dowel bars.
The Critical Role of Binding Wire in Reinforced Concrete
In reinforced concrete structures, the purpose of binding wire goes beyond just "tying things together." It secures the steel framework, holding bars in position during casting and vibration. A small gauge wire — yet it bears the massive responsibility of ensuring that construction rings and dowel bars remain precisely aligned under pressure. When it fails, nothing stays where it should. Steel cages shift, spacing gets compromised, and the placement of dowel bars turns inaccurate. The result? Joints that were designed to carry stress now buckle under it.
Visualizing the Impact: Columns, Dowel Bars, and Construction Rings
Imagine a reinforced column rising from a footing. Dowel bars connect the two with precision, while construction rings provide lateral support to resist hoop stresses. The entire setup is stable only if the steel configuration holds its designed shape. Binding wire ensures that. If it snaps, stretches, or corrodes prematurely, that shape begins to deform. Concrete then flows around a flawed frame — one that may look solid on the outside but carries internal weaknesses no eye can see.
Early Warning Signs and Long-Term Consequences
And those weaknesses don’t wait for decades to show. Even before finishing stages, poor-quality binding wire can cause ties to loosen during shuttering or compaction. This leads to uneven distribution of load, unexpected stress zones, and cracking at critical joints. Over time, the lack of reinforcement integrity due to binding wire failure makes even the strongest dowel bars useless, and the construction rings struggle to distribute tension efficiently.
Real-World Lessons: Failures from Neglecting Binding Wire Quality
Contractors often learn this the hard way — not through theory, but through real-world collapse. Slabs that sag. Columns that shear. Beams that settle. And at the root of many such failures lies the underestimation of something as small and seemingly insignificant as binding wire. It doesn’t just hold — it stabilizes. It aligns. It preserves the engineering intent of dowel bars and the reinforcement rhythm of construction rings.
The Cost of Cutting Corners
The temptation to cut corners with cheaper wire is common. But the price paid is often in compromised safety. Good binding wire resists corrosion, retains tension, and doesn’t snap under handling stress. It's tested not just for tensile strength but for its ability to work under field conditions — from wet formwork to prolonged setting times. When construction rings are meant to resist expansion forces and dowel bars must remain locked in shear zones, the reliability of the ties holding them is non-negotiable.
Separating Cost from Value in Construction Materials
This is where discerning construction professionals separate cost from value. The journey from blueprint to standing structure depends on details. Binding wire may be minor in cost, but it’s major in consequence. The strength of reinforced joints is not defined by size or concrete grade alone — it's defined by what holds it all together when stress builds and movement begins.
The Invisible Strength That Holds Structures Together
When structures breathe under load, twist with wind, and shudder with seismic waves, what keeps the steel skeleton from unraveling isn't magic—it's the reliability of the ties that bind. Binding wire may never be visible in the final product, but its failure speaks louder than its presence ever could.
#Binding wire failure#Structural joints#Reinforced rings#Construction safety#Wire strength#Joint integrity#Dowel bar role#Wire corrosion#Wire tension#Structural collapse#Steel binding wire#Wire durability#Reinforcement failure#Construction wire#Safety in construction#Binding wire types#Wire breaking point#Reinforced concrete#Joint stability#Wire quality#Construction defects
0 notes
Text
I have dishonored my ancestors beyond comprehension with this frivolous accessory.
(page 1349-1358; LOWAS walkaround)


JOHN EGBERT IS BACK. HE’S HERE!!!! Damn it is good to see him. His goofy face and glasses and his cool green slime suit appearing on my screen at the start of Act 4 was such a pleasure and a delight. To be honest I would’ve loved a day or two between the end of the Intermission and the start of Act 4. I am so excited to see John again as well as getting a bunch of new land and lore to explore that it’s super hard to concentrate on both things. The end of the intermission is pretty huge too so one thing at a time.


End Intermission
Beneath the barcode scanner door to English’s vault is a bunker of the kind WV and PM have flown to Jade’s island, complete with a command terminal and some similar establishing shots. For sure this is the bunker that Slick (then the Scurrilous Straggler) hung out in when he first arrived in this wasteland, sending commands to a Sburb player who brought about the apocalypse on this pink and green planet. Slick had a similar city building instinct to WV and succeeded in building this town – it’s uncertain whether he used the bunker’s homing function, but that may be how he met up with the rest of the Midnight Crew and Snowman. The Felt’s species and origin remain unknown. For some reason, Lord English – who still has not been seen now the intermission has ended – wanted to cut off this communication. The terminal allows for communication through time (interesting, considering Slick’s distaste for time based powers) so possibly English was researching this as a way to enhance his or his gang’s own powers?
Slick’s command terminal has twelve windows, in place of WV’s four. On page 1355, we see a Creature of some description – a sprite in the same style as the kids, with pale gray skin, yellow eyes and horns, fangs, and a black shirt with a gray symbol. Behind them floats a pincered, crablike sprite(?). They have a gray cruxite dowel and two black captchalogue cards, and there are purple clouds in the window behind them in the same twelve-square pattern as the monitor.
Barring any major twists I think this is probably carcinoGeneticist, a troll Jade talked to on page 859. They write in gray text, with text color often matching cruxite and/or shirt symbol, and the ‘carcino-’ prefix can refer to either crabs or the astrological sign Cancer, which is their shirt symbol. That’s my star sign also so I’m pretty excited about this little guy, even if he sounded like a jackass while trolling Jade and looks really angry with those fangs.
It seems like Trollslum is another intermission in the Midnight Crew MS Paint Adventure that the beta kids are reading? And therefore possibly a future intermission for actual Homestuck? I’m not sure but these pages set up a fun parallel for carcinoGeneticist and John Egbert, in addition to the ‘weird scientist’ format of both their chumhandles. This intermission did a pretty good job of introducing the Felt and giving them distinct appearances and powers despite their large numbers, so I can imagine a future intermission doing this with twelve trolls, and I’m curious what type of genre the story would slip into for them.


ACT 4
We are dropped into Act 4 with no time to prepare; I have been asking for it, but when the moment came I was not prepared. John has passed through the First Gate, which has portaled him down to the Land of Wind and Shade (!), a planet (!!) ‘where the constellations dance beneath the clouds’ (p.885) (!!!) populated by yellow salamanders (!!!!) who have an extensive mail system (!!!!!) which we the reader get to walk around in and explore (!!!!!!). This mirrors ‘YOU THERE. BOY’ (p.253) where we also get to take over as John after he enters a new area of Sburb.
As previously established John Egbert has probably spent his whole life in western Washington, primarily the suburbs. We don’t know if his family even took vacations. This could be the first other place John has ever been, and it is mystical and magical, glowing blue mushrooms and trees (which look kind of like cruxite!!) surrounding him like some sort of bioluminescent cave video game level. After the day John’s had this place is kind of peaceful when he can find a quiet spot away from the imps. What an absolute dream come true to come to a land this beautiful and get to hang out with such cool, friendly locals. I’m personally delighted by all the visuals on this page, and I’m excited for John to keep exploring LOWAS just so I can see more of it.
John in this panel acts very confused and uncertain about his situation, relying on Nanna’s guidance a lot more than he did while in his house, and nervous around the salamanders (personally, I would be thrilled to meet a secret wizard and behold his robes). That’s definitely a John trait but we don’t get to see so much of his whimsy, stubbornness, problem solving, movie recreations, etc, probably because of the format, which makes me glad this is a single panel. I loved playing through this but wouldn’t want the whole story told in this format.
I’m very grateful for the map linked below the panel, to make sure I’ve explored every corner. I did not 100% Gate 1 because combat is fairly slow and not especially engaging, but the concept is super cool and the programming is impressive. Compared to a video game it feels clunky to play (I got trapped in an endless loop of ejecting and re-captchaloguing items in my sylladex), but as part of a webcomic it’s honestly radical. I feel like I’ve read enough other webcomics at this point to understand how far this is pushing beyond what other authors are doing, and how efficiently this is giving miles of exposition where other comics might take weeks to deliver all this lore (or a handful of wall-of-text comics that readers would complain about).
This panel is PACKED with exposition, from the long distance John and Nanna conversations, and the insights from salamanders. Just like ‘[S] Enter’, this feels like a way to move the story on as quickly as possible. Some of the expository lines do feel clunky, but when it’s paired with the cool visuals and presented in such a novel way, it doesn’t bother me, and I’m sure I’ll reference this page loads just like Nannasprite’s previous exposition. Here are some of the most important things we learn, in my opinion:
John is definitely the Heir of Breath. The Heir’s arrival has long been prophesized among LOWAS’ indigenous creatures; the ‘wind’ in the land’s name presumably links to the ‘breath’ in John’s title.
‘Amphibious and reptilian life forms play a special role in your quest, John.’ ‘Underlings’ (presumably imps, ogres, etc) will deface any frog iconography they come across.
‘The Slumbering One’, who was awake and is now asleep, once cast a spell on the land’s fireflies to trap them within the clouds, much like the trapped firefly WV already rescued from a nugget of amber (p.749).
‘The Slumbering One’ also ‘commissioned’ the underlings (hired them? had them created?) and caused some sort of environmental damage using ‘sludge’, which the salamanders are not happy about.
The mail system is an extremely important part of life on LOWAS to the point of being sacred.
The Second Gate is ‘hidden somewhere in the Land’, although it also might be visible above John’s house (p.251), so there could be multiple possible routes for progression(?)
Jaspersprite’s prototyping has affected the imps on John’s land, who have tentacle, princess and cat characteristics, as well as the imps Rose will fight.
Nannasprite knows that Rose has entered the Medium (and what she looks like).
And most important of all, one salamander essentially gives John a major game quest:
‘The spell I'm sure you've heard from a reliable source cannot be broken unless The Slumbering One is first woken up, and then slain. Then the Breeze will again flow through the Pipes and the Fireflies will be released and allowed to go home. But I do not envy the adventurers who will presumably take on this responsibility!’
Clicking John gives the command ‘I am told your name is John. Is that correct?’, which is closer to the Wayward Vagabond’s ‘BOY WHO IS JOHN. DO AS I SAY’ (p.253) than to the regular player’s ‘John: Action’ command format. So this could indicate that a different future construct is talking to John – possibly the Peregrine Mendicant, because this land is very focused on the mail.
And I LOVE the mail system; it might be my favorite thing about this land. I personally looked in a whole bunch of parcel pyxis, and found several rocks, a shoe, a couple of minitablets, a chunk of amber (firefly not included), a cool frog, and best of all, a jar of bugs. I will guard this jar of bugs with my whole life. The carved minitablets moving through the pipes as a system of trade is very fun worldbuilding.
I guess my one issue with this page is the writing of some of the salamanders. Conceptually they’re great, and I love how their distinct personalities and roles within the culture come through – some are really communicative, while others are unhelpful, some have jobs in the society like mushroom farming, some are entrepreneurial (I would sell my suit to a salamander for 1 Boondollar if it was allowed) and some are outcasts (Crumplehat dishonoring their ancestors). Genuinely I think Hussie did a great job quickly showing a diverse society and hinting at its power structures and politics, but they are SO annoyingly selfconscious about making a fantasy society and it kind of makes me want to punch them? Like I’m okay with some nods to the audience and medium but ‘'GLUB' can basically mean anything I want it to mean. It's really cool having a bullshit language’ and ‘Maybe elders or something like that. Man I don't know. Also, isn't it funny how I'm sort of taking your existence here in stride? I'm treating it like it's no big deal’ do cross a line for me. Like it or not, this isn’t an ironic salamander society for a one off gag, this is a legitimate salamander society that’s going to form an important part of the story. That story isn’t going to be everyone’s thing but being all desperate pick-me about it isn’t going to make people take this story seriously who otherwise wouldn’t.
Anyway to finish on a positive note, getting to look up through the telescope and see John’s house feels very jarring, but also very cool. To see the primary location of the first three acts from a totally different vantage point feels like a point of no return for the story, and maybe John as a character. Hey if things get bad enough down here this kid’s gonna WISH he was homestuck.

#homestuck#reaction#im SO SO SO SO excited for act 4 and i wanna devote my full attention to it#but not posting any more until i finally finish eoa3#which should be tomorrow? hopefully?#it is a very normal length post (LYING!!!!)#also we won the super bowl thank you homestuck thank you power of act 4 lowas <3#chrono
23 notes
·
View notes
Note
Recently I’ve been looking for advice on creating a “hospital cage/tank” for my parrotlet in case of an emergency. (She is totally fine rn! I want to be prepared though, especially as she ages.) Have you ever had to make one of these, and what supplies would you recommend?
I have, and what you put in to it really depends on the severity of the issue you end up dealing with
- the cage itself can be a standard travel carrier but for more severe ailments it may be best to use something softer than metal bars like a fabric carrier or a cardboard box. Even acrylic cages with more solid walls might be advised depending on the issue
- respiratory issues would require a cage with ample airflow, other ailments may benefit more from enclosed walls the bird can safely bump in to and will contain warmth nicely
- some form of viewing window is helpful for being able to keep tabs on them but some illnesses might make the bird feel extremely stressed if exposed. An option to lightly cover viewpoints (but not restrict airflow) such as a light, loose, sheet may work
- something to pad the floors with, typically a towel- just ensure it doesn’t have loops that toes can get caught in. Extremely sick birds may not be able to perch or even hold themselves up. You’ll want a material that will soften any falls, provides easy tractions for them to push themselves along the floor, be comfortable, as well as be able to be shaped in to little ledges the bird can prop themselves up against to stay upright. Ensure you have multiple of these things, cleanliness is very important with sick animals you’ll want to be able to replace objects and clean things as quickly and easily as possible.
-with that you may want a container without climbable walls. Birds often want height to feel safe and will try to climb up cage walls even if they repeatedly fall off. Smooth walls will prevent them from causing further harm. To reduce the stress of being on the floor it can help to keep the cage itself up nice and high.
- for less severe ailments the bird may perch just fine, in those cases you’ll want some plain dowel perches a diameter that your bird can easily hold on to. Usually a width that their foot can grip 3/4 the way around. Dowels are best in this case for the consistent width and stability, although you may want to sand one down to create a small bit of texture in it so they’re less slippery.
- in some cases a heating pad may be recommended to be placed underneath 1/4-1/3 of the carrier. Something to help keep their body warm if they get sick during the cold season but you don’t want excessive heat trapping causing the bird to overheat. You may also want a Bluetooth thermometer to be placed inside the carrier to accurately monitor temp. I use sensorpush, you can set temp ranges on the app and have it send a (loud) push notification to your phone when the temp goes above or below your set temp ranges.
- easily digestible food, if your bird is on pellets they may not want them when they’re sick. Keeping some fattier foods on hand (or keeping tabs on where you can get them) can be helpful in quickly engaging their appetite. This also means some birds won’t remove shells from their seeds when too sick so finding de shelled seeds or even hearty baby formulas/ recovery formulas can go a long way within the first 24hrs of treatment. Getting them eating is a hugely important problem
- types of dishes. Some sick birds don’t have good balance, a deep water bowl can be a drowning hazard. You might want to train your bird to drink out of hamster bottles or explore shallower water dishes, ones that are a bit smaller, or explore different setups in your carrier that could keep the dishes lightly raised just to head height so that falling over in to it would be very difficult to do as well as making mobility to those areas easier/ less of a tripping hazard. You’ll also want dishes that don’t tip over easily. A wet bird is an uncomfortable and more likely to get sicker bird/ potentially go in to shock.
- make sure your bird is comfortable with handling, restraint, being weighed, and taking foods from a syringe. Less stress when an actual sickness hits means more likelihood for recovery. The more elements of treatment you can prepare them for the better.
- have a good gram scale on hand (kitchen scales work, preferably down to one to two decimal points if you have a tiny bird). Birds losing weight is a big bad situation, weighing them regularly can tell you how much they’re eating, and whether or not they’re improving or worsening before symptoms change which can get them better treatment sooner.
- keep a first aid booklet nearby, consult with your vet team on what to do, what to look out for, bird cpr, emergency 24hr vet numbers. Ask them every single question you have before you leave. Take notes, better to be as prepared as possible and know what Bad and Worse look like rather than guessing
- familiarize yourself with crop feeding. If you don’t have a 24hr avian vet and your bird refuses to eat you’ll likely need to force feed them. If that’s needed your vet /should/ take the time to show you how to do it. Make sure you have the needed syringes and nozzles at home and are familiar with how to use everything.
I think that covers just about everything, keep tabs on the notes though if I’m missed something hopefully some folks will add on!
As always call your vet team and ask, if it’s not super busy you can just talk over the phone about setting up a hospital cage at home and they should be able to give you some accurate tips and pointers. You can also ask if your vet provides pet first aid booklets for birds, most don’t have them on hand but if they’re certified through the AAV there is a file for AAV members they /might/ be able to print out for you
13 notes
·
View notes
Text
For all the people excited about weaving via my earlier post
tbh you can make a loom out of just about anything. you just need something to hold the warp and something to separate the sheds, a shuttle, and something to beat the weft with (like a really long shuttle or a separate stick) Below is a picture of my great grandmother weaving a chinchorro (hammock). Wayuu weaving is a little different than what you're probably used to, but the basic thing to understand is the same. There's a bar at the top and a bar at the bottom, she's using her hands and small balls of yarn to wind the weft through, and tie warps together to make patterned gaps. No shuttle is involved. But if you wanted to you could easily add pickup bars (basically a long stick and shuttles to this type of setup and weave that way. It'd basically be a tapestry loom setup, but tbh you can weave just about anything, you just have to get creative with how you manage the sheds. I'd look up backstrap looms and translate the way the different bars are set in place for this kind of a setup. All you'd need is dowels or sticks of some sort for it. You could figure out a mini one on a box or a picture frame. Abuela had a floor to ceiling setup on one of the walls that was just basically a frame.

I wish I had photos of some of the chinchorros she made, they were beautiful. My uncle has a video somewhere of her weaving one with a horse on it and the artistry to it was absolutely gorgeous. I wish I'd gotten the chance to learn from her tbh, she was a brilliant artist from the work I've been able to see. I think it was cos of her that I inherited my love of weaving and textiles so much.
26 notes
·
View notes
Text
Lexember 2023 - 14: key "button"
key /ki/ [ki]
button, a fastener for fabric comprising a knob or disc passed through a loop or hole;
toggle, pin, a rod-shaped fastener bound at right angles to a cord
switch, toggle, button, a physical device that is pressed to (de)activate a mechanism (or a virtual representation of such a device);
key, one of several small buttons corresponding to characters on a device for typing text
Etymology: from Old Borlish key, keȝ, caiȝ "toggle, dowel, pin for securing rope or fabric", a dialect form of stanard caiȝle /ke(j)ʎə/ (soon lost). This reflects Vulgar Latin cavicla (cf. French cheville, Venisian caúcia), from Classical Latin clavicula "bolt, bar, small key".
Neleð y gran key roug appoyar. /neˈlɛθ i gran ki ruj ˌa.pɔˈjar/ [nɪˈlɛ‿ði gʀaŋ ki ʀuj ˌa.pʊˈʝɑː] won't-sbj-2p df big button red push-inf Please don't press the big red button.
8 notes
·
View notes
Text
How to Break Down Furniture for Easier Junk Removal

Old furniture often turns into a headache when it’s time to clear space or move out. Oversized sofas, bulky wardrobes, or rickety bed frames don’t easily fit through doors, stairwells, or hallways. Breaking down large pieces can save time, reduce the risk of damage, and make junk removal safer and more efficient. Here’s how to disassemble common furniture items before scheduling a pickup or calling a professional.
1. Gather the Right Tools
Before you begin, collect the basic tools you’ll need. A screwdriver set (both flathead and Phillips), wrench, pliers, hammer, utility knife, and possibly a power drill will come in handy. Having a storage bin or magnetic tray nearby helps you keep track of loose screws and bolts.
2. Start With Sofas and Chairs
Most sofas have removable legs and cushions. Flip the couch over to access bolts or screws that attach the legs. Once removed, detach the arms and back if possible. In some cases, the frame is stapled or nailed together. Use a crowbar or hammer to pull those apart.
If your sofa contains a fold-out bed, remove the mattress and then unscrew the metal bed frame. The remaining shell becomes lighter and easier to manage. This step can significantly reduce the space it occupies in a truck during a junk removal St. Paul service call.
3. Tackle Beds and Mattresses
Start by removing the mattress and box spring. These items don’t break down easily, but they’re usually manageable when separated from the frame. Disassemble the headboard, footboard, and rails by unscrewing brackets. If the bed uses wooden slats, lift those out first.
Platform beds often have additional storage drawers or supports. Remove those to lighten the structure. With the bed fully broken down, you can stack parts neatly for quick pickup by junk removal services St. Paul.
4. Break Down Dressers and Desks
Remove all drawers first. Set them aside or stack them. Check inside each drawer for hidden screws that connect it to runners. Unscrew drawer handles if necessary to flatten them for easier disposal.
Once the drawers are out, examine how the frame connects. Some dressers use cam bolts or locking mechanisms. Unscrew visible connectors and gently tap apart glued joints. If the piece doesn’t come apart easily, work from the back panel with a hammer and pry bar.
Desks follow a similar pattern—start with the drawers and work your way to the top and legs. If your desk has a hutch or shelving, detach that section first.
5. Dealing With Particle Board and IKEA-Style Furniture
Flat-pack furniture often breaks more easily than traditional wood pieces. Remove visible screws and dowels, then pull panels apart by hand or with gentle prying. Be cautious when dealing with laminated surfaces, as they can splinter. Since particle board crumbles easily, place smaller broken pieces in bags to avoid mess during junk removal near me searches and services.
6. Stack and Group Materials
Once everything is disassembled, organize it by type—metal, wood, upholstery. This makes loading faster and safer. Grouping similar materials also helps if your junk hauler separates items for donation or recycling.
Breaking furniture down might take time, but it makes the removal process smoother. When you’re done, reach out to a trusted team offering junk removal near me or contact a provider experienced in junk removal servicesfor hassle-free disposal.
The author is working at a recognized company offering professional junk removal services at competitive prices. He often writes articles on waste management and environmental safety for several online publications. Visit https://www.junkhappens.com/
0 notes
Photo

Replacement of Concrete Floor Slabs at Two Leicestershire County Council Waste Sites
Leicestershire County Council
Published date: 18 February 2025
Open opportunity – This means that the contract is currently active, and the buying department is looking for potential suppliers to fulfil the contract.
Contract summary
Industry
Construction work – 45000000
Location of contract
England
Value of contract
£450,000
Procurement reference
LEICSCC001-DN764179-90974919
Published date
18 February 2025
Closing date
26 March 2025
Closing time
12pm
Contract start date
1 June 2025
Contract end date
31 May 2026
Contract type
Works
Procedure type
Open procedure (below threshold)What is an open procedure (below threshold)?
Contract is suitable for SMEs?
Yes
Contract is suitable for VCSEs?
Yes
Description
The Council as a Waste Disposal Authority for Leicestershire owns and operates a statutory waste service across Leicestershire 13 Recycling and Household Waste Sites (RHWS) and 4 Waste Transfer Stations (WTS). The Council is looking to procure the construction works to replace the concrete floor slab in the lower yard at its Oadby RHWS and the concrete floor slab including the Alfabloc A-frames within the shed at its Whetstone WTS. Lot 1 – Oadby RHWS, Wigston Road, Leicestershire, LE2 5JE. • Existing slab within the lower yard at Oadby RHWS is approx. 18 years old. • Significant deterioration over recent years especially defects around the joints and gullies. • Environmental Agency permit requirement is to ensure the floor slab is a sealed surface. • Environmental Agency permit tonnage allowance for this site is 25,000 tonnes per annum. • Waste is disposed in waste containers and in hook lift open and compaction containers. Lot 2 – Whetstone WTS, Enderby Rd, Leicestershire, LE8 6JL. • Existing slab within the WTS is approx. 12 years old. • Significant deterioration over recent years, with defects as exposed rebar, exposed dowel bars at some expansion joints, cracks in the concrete slab and significant wear to one side. • Environmental permit tonnage allowance for the WTS is 45,000 tonnes per annum. • Composition of waste is mainly residual household waste & trade waste. • Waste is loaded in artic trailer lorries using a loading shovel. Scope of the works The works required include: • Breakout and removal of existing slabs and disposal of materials at licensed tips. • Replacement of floor slabs including drainage in accordance with the scheme specifications and drawings. • For Whetstone WTS to include the removal and replacement of Alfabloc A-frames.
More information
Links
https://procontract.due-north.com/Advert?advertId=6234e10f-08ee-ef11-8134-005056b64545
Advert
How to apply
Follow the instructions given in the description or the more information section.
About the buyer
Contact name
Luke Rawle
Address
County Hall Leicester Road, Glenfield Leicester LE3 8RA England
Telephone
+44 1163052043
Email
Website
https://www.eastmidstenders.org/index.html
Source: Contracts Finder licensed under the Open Government Licence v.1.0.
0 notes
Text

Application and Advantages of Lock Coupler
When it comes to enhancing the structural integrity of reinforcing bars (rebar) in various applications, the lock coupler emerges as a game-changer, thanks to its patented gripping technology. This innovative in-situ reinforcing bar splice not only facilitates the development of full rebar strength but also ensures improved overall structural integrity in tension, compression, stress-reversal, and dynamic applications.
The lock coupler is a versatile solution suitable for a wide range of scenarios including new construction, repair, or retrofit applications. Whether it's column splicing, bridge construction, piling, connecting protruding dowels in concrete, closure pours, beams, chimney construction, or other demanding splicing applications, the lock coupler stands out as a reliable choice.
One of the key advantages of the lock coupler is its ease of field installation. Unlike traditional methods, no bar-end preparation, sawing, or swaging is required. With just a standard wrench or impact wrench, the couplers can be swiftly installed. The innovative design ensures that bolt heads shear off upon reaching the correct installation tightness, enabling complete visual inspection for added assurance.
In terms of versatility, the lock coupler is available in both epoxy and mechanical galvanized coatings, catering to different project requirements. It serves as a seamless one-step transition for ASTM®, Canadian, and metric reinforcing bar (rebar), offering compatibility across various standards.
In conclusion, the lock coupler represents a cutting-edge solution for reinforcing bar splicing, offering unparalleled strength, ease of installation, and compatibility with different bar types. Its patented gripping technology sets a new standard in the industry, making it a go-to choice for professionals seeking reliable and efficient splicing solutions.
1 note
·
View note
Text
"How Portuguese Dowel Bar Manufacturers Ensure Durability and Longevity"
INTRODUCTION

Dowel Bars Manufacturers in Portugal are crucial elements in the construction industry, particularly when it comes to providing reinforcement and enhancing the durability of concrete structures such as pavements, bridges, and highways. In Portugal, dowel bar manufacturers place a high emphasis on quality control and innovative techniques to ensure that their products meet the highest standards for durability and longevity.
1. High-Quality Materials
To ensure that dowel bars withstand the harsh conditions of construction sites and provide long-lasting support, Portuguese manufacturers carefully select high-quality materials for their production. These materials, including steel alloys with enhanced resistance to corrosion, help increase the overall strength and resilience of the dowel bars.
2. Advanced Manufacturing Processes
Manufacturers in Portugal employ cutting-edge manufacturing processes that focus on precision and durability. The use of advanced machinery ensures that dowel bars are produced with exceptional accuracy and consistency. Each dowel bar undergoes rigorous inspection to confirm it meets the specific engineering requirements for a variety of construction applications.
3. Epoxy Coating for Enhanced Protection
One of the key methods used by Portuguese manufacturers to enhance the durability of Dowel Bars Manufacturers in Portugal is applying a high-performance epoxy coating. This coating acts as a barrier, preventing corrosion caused by environmental factors such as moisture, chemicals, and extreme temperatures. Epoxy-coated dowel bars are highly effective in ensuring the longevity of concrete structures, especially in regions with harsh weather conditions.
4. Strict Adherence to Quality Standards
Dowel bar manufacturers in Portugal adhere to stringent national and international standards to guarantee the durability and performance of their products. Certifications and quality marks are often obtained to ensure that the dowel bars meet the highest levels of quality. Manufacturers also conduct thorough testing, including tensile strength and corrosion resistance tests, to verify the reliability of their products in various construction settings.
5. Tailored Solutions for Specific Needs
Each construction project has its unique set of requirements. Portuguese dowel bar manufacturers work closely with engineers and contractors to deliver customized solutions that meet the specific demands of each project. Whether it's adjusting the size, coating type, or design of the dowel bars, this flexibility ensures that the products will provide optimal performance over time.
6. Continuous Innovation
Portuguese manufacturers are committed to staying at the forefront of industry trends and technological advancements. This continuous innovation ensures that dowel bars are made with the latest materials and processes, further enhancing their durability and longevity. The ability to adapt to new challenges and advancements in construction technology enables Portuguese manufacturers to provide products that perform excellently in diverse environments.
7. Rigorous Testing and Quality Control
Before being delivered to construction sites, dowel bars go through a series of rigorous tests and quality control procedures. These tests include stress testing, impact resistance testing, and even simulated environmental exposure tests to ensure that the Dowel Bars Manufacturers in Portugal perform reliably over the long term. Manufacturers in Portugal take pride in their thorough quality assurance process, ensuring that every dowel bar leaving their facility meets the highest standards.
8. Customer Feedback and Continuous Improvement
Feedback from customers is an integral part of the process for Portuguese manufacturers. By actively listening to their clients' experiences and concerns, they can continuously improve the quality and design of dowel bars. This customer-focused approach ensures that the dowel bars meet or exceed expectations in terms of durability and performance.
In conclusion, Portuguese dowel bar manufacturers go above and beyond to ensure that their products are durable, reliable, and built to last. Through high-quality materials, innovative manufacturing techniques, epoxy coatings, strict adherence to quality standards, and continuous improvement, they ensure that their Dowel Bars Manufacturers in Portugal are capable of withstanding the rigors of construction and providing long-term support to infrastructure projects across Portugal and beyond.
0 notes
Text

Concrete pavement road structures?
Concrete pavements, also known as rigid pavements, have a structured design to ensure they can bear heavy traffic loads and provide a durable surface. Here's an overview of the typical structure of a concrete pavement:
1. Subgrade: This is the natural soil prepared and compacted to provide a stable foundation for the pavement. Proper compaction and stabilization are essential to prevent settlement and maintain the pavement's integrity.
2. Sub-base: A layer of granular material, such as gravel or crushed stone, placed above the subgrade. The sub-base layer provides additional support, improves drainage, and helps distribute loads more evenly to prevent stress concentration on the subgrade.
3. Base Course: An optional layer of high-quality granular or stabilized material (e.g., cement or lime-stabilized) that offers additional structural support and further load distribution. This layer is particularly useful in areas with poor subgrade conditions.
4. Separation Layer (optional): In some designs, a separation layer or membrane, such as a geotextile fabric, is placed between the base/sub-base and the concrete slab to prevent moisture movement and enhance load distribution.
5. Concrete Slab: The main structural component of the pavement, made of Portland cement concrete. The slab is designed to bear traffic loads and provide a durable, smooth surface. The thickness of the concrete slab depends on the expected traffic load and environmental conditions. Reinforcement (e.g., steel bars or mesh) may be included to enhance strength and control cracking.
6. Joints: Concrete pavements include various types of joints to control cracking and accommodate expansion and contraction:
- Transverse Joints: Placed at regular intervals to control cracking caused by temperature changes and shrinkage.
- Longitudinal Joints: Used to control cracking along the length of the pavement.
- Expansion Joints: Allow for expansion and contraction due to temperature changes.
- Dowel Bars: Installed across transverse joints to transfer loads between slabs and maintain alignment.
- Tie Bars: Used in longitudinal joints to hold adjoining slabs together and prevent separation.
7. Surface Treatment (optional): A surface treatment or texture, such as a broom finish or grooving, is sometimes applied to the concrete slab to improve skid resistance and reduce surface wear.
### Summary of Concrete Pavement Structure
1. Subgrade
2. Sub-base
3. Base Course (optional)
4. Separation Layer (optional)
5. Concrete Slab
6. Joints (Transverse, Longitudinal, Expansion, Dowel Bars, Tie Bars)
7. Surface Treatment (optional)
Each layer in a concrete pavement serves a specific function to ensure the pavement can handle traffic loads, provide a smooth driving surface, and maintain durability over time. Proper design, material selection, and construction practices are essential for the longevity and performance of a concrete pavement
1 note
·
View note
Text
Why Dowel Bars Deserve More Attention?

In concrete road construction, one small mistake can turn into massive repair costs. And often, that mistake is ignoring dowel bars—the unsung heroes of load transfer. These simple steel rods are often overlooked, but they’re essential in keeping concrete pavements stable, crack-free, and cost-effective in the long run.
If you’re in infrastructure or road projects, understanding the correct use of dowel bars in concrete can make or break your pavement’s durability.
What Are Dowel Bars and What Do They Do?
Dowel bars are cylindrical steel rods placed across transverse joints in concrete pavements. They ensure that loads are transferred from one concrete slab to the next, allowing for smooth traffic movement without putting excessive pressure on any single slab.
This mechanism—known as load transfer in pavements—prevents slab cracking, corner breaking, and uneven surfaces, especially under heavy vehicles.
Technical Specifications of Dowel Bars (India Standards)
In Indian road construction, dowel bars generally follow these guidelines:
Diameter: 25 mm to 38 mm
Length: 450 mm to 600 mm
Spacing: 300 mm to 350 mm center-to-center
Coating: Epoxy or stainless steel to resist corrosion
Placement: Aligned perfectly in the middle of the slab thickness
Standards followed include:
IRC:58 for pavement design
IS:456 for concrete structure practices
Incorrect dimensions or poor alignment can cause joint locking, defeating the purpose of load transfer altogether.
Benefits of Dowel Bars in Concrete Pavements
Reduces edge cracking under load
Minimizes maintenance costs over time
Improves ride quality and surface level
Enhances load-sharing between slabs
Complies with modern engineering codes
For highway projects, industrial zones, airports, and even smart city roads, dowel bars offer both performance and ROI.
Common Mistakes to Avoid in Dowel Bar Placement
Misaligned dowel bars cause joint locking.
Wrong bar size reduces effectiveness.
Inadequate corrosion protection leads to early failure.
Poor concrete compaction around bars leads to voids.
Use dowel bar baskets, proper templates, and level indicators during installation.
Real-World Example: Long-Lasting Urban Roads
A smart city project in central India faced early pavement failures due to missing dowel bars. Upon redesign with proper dowel bar placement in roads, maintenance dropped by 42%, and surface life increased by 5+ years—all by investing a small amount in the right steel rods.
Why Kapila Steel Is the Trusted Choice for Dowel Bars
At Kapila Steel, we manufacture high-precision dowel bars that meet both national and international standards. Here’s what sets us apart:
Precision machining for accurate length and diameter Anti-corrosion coating for extended lifespan Custom specifications based on project requirements Prompt delivery and pan-India supply chain
Whether your project is a national highway or a local township road, we’ve got your back.
Conclusion: It’s Time to Build Roads That Last
In concrete pavement design, dowel bars are not optional—they’re essential. They offer load-sharing, durability, and cost savings you can’t afford to skip. And when you choose Kapila Steel, you get bars engineered for performance, safety, and long-term value.
Frequently Asked Questions (FAQs)
1. What is the main purpose of dowel bars in concrete pavements?
Dowel bars are used to transfer load across joints in rigid concrete pavements, helping prevent cracking and uneven settlement. They allow slabs to expand and contract without damaging the surface.
2. Are dowel bars and tie bars the same?
No, they serve different functions. Dowel bars transfer load across transverse joints, while tie bars hold adjacent slabs together along longitudinal joints to prevent separation.
3. How far apart should dowel bars be placed?
In most road projects, dowel bars are placed at 300 mm to 350 mm center-to-center spacing. However, the exact spacing depends on slab thickness and traffic load conditions.
#dowel bars#bar dowels#load transfer#concrete slabs#joint support#steel dowels#dowel spacing#dowel types#slab cracks#road dowels#epoxy dowels#dowel design#slab support#rigid pavement#bar alignment#crack control#dowel uses#dowel rods#highway slabs#pavement life
0 notes
Text
Why Bar Dowels Are Gaining Popularity in Infrastructure Projects

Bar dowel technology is becoming a staple in modern construction sites across the country. Alongside binding wire and dowel bars, this trio has reshaped how engineers approach long-term strength, load transfer, and joint stability in concrete infrastructure.
What Exactly Is a Bar Dowel?
It’s a simple but powerful reinforcement component: a short steel rod inserted into concrete slabs to allow smooth load distribution across joints. When vehicles or heavy machinery pass over concrete surfaces, bar dowels absorb and transfer the weight evenly, preventing cracks or displacement.
Binding wire is used to keep these dowels precisely aligned during the pouring phase. Meanwhile, dowel bars complement bar dowels by managing thermal expansion and keeping slab sections from shifting under pressure.
The Shift from Traditional Methods
Older techniques relied heavily on expansion joints, which allowed motion but did little to boost structural continuity. This often led to cracked slabs, misaligned joints, and accelerated protection. The bar dowel system offers a smarter solution: movement flexibility and structural strength.
That’s why contractors and engineers working on highways, warehouses, airport runways, and parking structures are shifting toward bar dowel setups. They simply outperform outdated reinforcement methods.
Why This Matters in Infrastructure
Every slab in an infrastructure project is like a puzzle piece. If the pieces shift or fail to align, the entire system becomes vulnerable. Bar dowels provide a link among those slabs—making sure they function collectively as one stable unit. This now not only improves balance but also additionally extends the lifespan of the floor.
Dowel bars offer similar benefits, particularly in pavement applications. But bar dowels are often preferred in applications that involve repetitive loads or require greater resistance to joint faulting.
Installation is Quick, but the Benefits are Long-Term
One reason bar dowels are gaining ground is their ease of installation. They don’t require extensive rebar modification or special equipment. Once inserted and tied in place using binding wire, they’re ready for concrete pour.
This saves contractors both time and labor costs. Better yet, bar dowels reduce the need for long-term repairs, offering significant ROI over the lifecycle of the project.
Custom Options from Trusted Suppliers
As demand increases, manufacturers are responding by offering a wide range of bar dowel sizes, coatings (like epoxy for corrosion resistance), and material grades. Whether a project requires standard diameters or specific lengths, bar dowels are now readily available to match various engineering needs.
Top-quality manufacturers also provide dowel bars and binding wire to complement the system—ensuring optimal performance in all conditions, from coastal humidity to heavy-traffic zones.
Not Just Strong—Smart and Sustainable
Using bar dowels isn't just about performance. It’s also a sustainability move. Fewer joint failures mean fewer repairs. Less repair work means lower material consumption. And that makes bar dowels a smart choice for builders focused on long-term environmental and structural responsibility.
Where They're Used
Bar dowels are already making a difference in:
National highway expansion projects
Airport runway reinforcements
Industrial flooring installations
Railway platform developments
Multi-level parking structures
In each case, bar dowels, dowel bars, and binding wire play interconnected roles in creating surfaces that can endure decades of wear.
Choosing the Right System
The final decision often lies in performance versus cost. But with bar dowels, engineers get both. They offer enhanced load transfer, reduced maintenance, and support sustainable practices. When combined with high-quality dowel bars and reliable binding wire, the entire setup becomes a strong, adaptable foundation for any structure.
#Bar Dowels Use#Dowel Bars Info#Bar Dowels Rise#Dowel Steel Use#Infra Bar Dowels#Bar Dowels Trend#Bar Dowels Role#Dowel Tech 2025#Steel Bars Guide#Road Joint Bars#Bar Dowel Facts#Smooth Bar Use#Bar Dowel Types#Dowel Bars Fit#Pavement Dowels#Bridge Dowel Use#Rebar vs Dowels#Bar Dowels Now#Bar Dowel Boom#Bar Dowels Aid
0 notes
Text
Injection Mold Checklist
Excellence in manufacturing depends on injection frisbee quality. Our injection Mold Checklist simplifies this procedure, walking you through the necessary stages to uphold high standards. This checklist is an essential tool for any injection molding expert, as it includes all the necessary steps to optimize injection molding solutions, reduce errors, and increase productivity from original design to final inspection.
Mold appearance and dimension
Is the kind of water connector correct? Is there sufficient clearance in the hole for the water connector? The hole's outside border must be consistent and chamfered.
Indicate the water lines with "IN," "OUT," and neatly and legibly number them. For instance, INT1, OUT1.
Pneumatic or oil connection numbers must begin with the prefix "O" or "G," for example, G IN1, O IN1.
The gas, oil, and water plugs' screw threads all match the Tooling datasheet.
Are the KO pattern and size up to par?
The Locating ring's diameter and fastening type comply with the Tooling specification.
The tooling datasheet's sprue bushing sphere radius must be met.
The total size of the mold must satisfy the customer's press (tie bar space), and the clamping technique must satisfy the customer's demand.
When installing a mold that requires installation instruction, the cavity or core plate should be etched with an arrow that reads "UP."
Each part must have a unique number. Moreover, the standard mold datum needs to be etched.
It is not permitted to make any of the components within the home.
Using the right steel is important, and the molding injection company must submit the steel certification.
All connection screw threads, including K.O. and eyebolt holes, must be precise.
Wear plates should employ oil grooves whose designs adhere to client specifications.
The shut-off pieces must fulfill customer requirements and have a disparity in hardness.
Does Slide Gib require a dowel pin?
Are side locks properly purchased and installed?
Cycle Installing a counter as per the mold design sketch.
Make a vent opening for the guide bush.
Is a dustproof sheet required?
Are the slides assembled and properly fit the molding injection company?
The PL vent needs to be planned and cut. Is it directly cut to the part location and appropriate for parting?
Clearance space should be designed and created in the region beyond the portion wall. There is no need to invest in a grinding machine.
Sprue bushing should be OK and should not break.
Ejection, Return, Pull system and Removing
Smoothly ejecting, No unique sound, no get stick.
Lifter surfaces must be polished, lubricant slots must be made, and heat or nitride treatment must be applied (depending on the client's needs).
A & B plate guide pins, guide bushings, and ejector plate guide pins must satisfy client requirements.
Uneven ejector pins need to be placed in the molding injection company.
The ejecting plate ought to fully retract.
A flat-surfaced space block must be utilized for the ejecting stroke.
A return spring must be a normal part; it cannot be split or polished.
Does the material for the lifter, wedge block, and gib match the requirements of the customer? It must be heat-treated or nitride-treated.
Install a restricted switch on a hydraulic cylinder or slide.
The lifter stroke or slide must be sufficient to satisfy the requirements.
Both the ejector pin and the ejector plate must have the ejector number stamped on them.
Return pin top surfaces must be level and free of welding; bottom surfaces cannot have pillows or welding. The required hole clearance is 0.07 mm.
Unless otherwise noted, there should be 0.05mm of space between the B plate and the ejector guide pin (Conform to the molding injection company design specification).
With a sufficient stroke, the runner stripper plate moves smoothly.
The steel dimensions must be examined, and a steel check report must be submitted.
Cooling System
Water line seals must be leak-free, and utilize Teflon sealing tape.
Is the flow appropriate for cooling? To determine this, a flow metre must be used and the flow value recorded.
Cooling manifold installation must be done accurately and by client specifications.
The water baffle needs to fit the molding injection company specifications
Cold Runner System
Sprue bushing inside surface must be polished to design specifications.
It is necessary to polish the runner channel to the drawing standard.
For multi-molding injection company, the short-shot has to be tesmolding injection company.
Hot Runner System
Specifying the desired kind and size of sockets and installing safety settings is necessary.
Is there mold protection equipment placed on the outside of the connection box? The wiring must match the shop's given design.
To prevent breakage, wires must be bundled and covered with a plate.
When both connector sizes are the same, they must be carefully marked to prevent incorrect assembly.
Wires that are visible outside of the mold surface are prohibited.
The transition slot that allows the wire to pass through the plate and manifold must be rounded to prevent damage.
Does a mold-insulating plate exist? If not, has the consumer given their approval?
Mold Packing
The steel type, certification, and heat treatment must satisfy the client's needs.
Safety locks (at least two pieces) ought to fulfill the design specification, and a rest hole must be created.
The CD's files are full?
Are there any particular requirements for the outside surface of mold?
Are all the spare components filled up? And it must be supplied with a thorough list.
Mold must be wrapped in a plastic membrane.
After marking the positioning direction, spread mold # with lacquer.
Everything on the packing list must be packed.
Conclusion
In conclusion, obtaining consistent quality and operational efficiency requires the use of an injection mold checklist. You may drastically lower mistakes, raise the caliber of your output, and increase productivity by using this thorough guidance. By putting this checklist into practice, you can revolutionize your cheap injection molding process and make sure every project surpasses customer expectations and industry standards.
#plastic injection mold design#injection molding solutions#best injection molding company#injection frisbee#injection molding maker
0 notes
Text
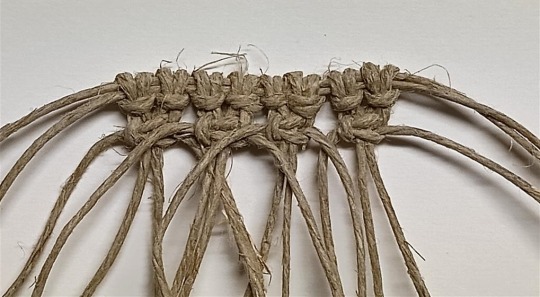
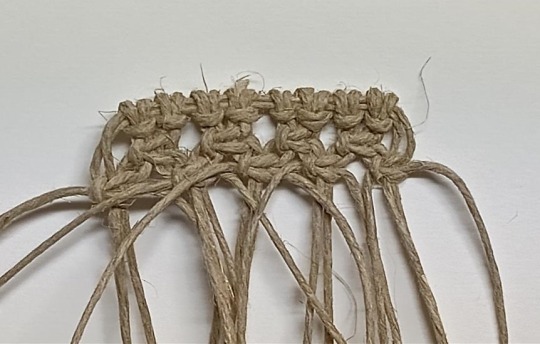
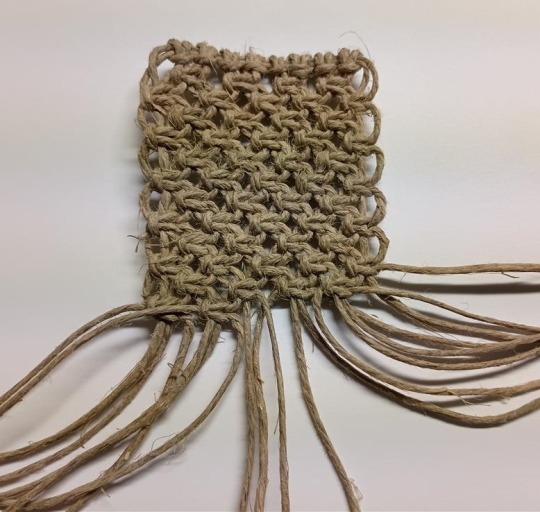
Day 9-10: Alternating square knot
Good for making wide projects and forming the background structure for wide designs. Most 3D projects are also built using this method. An alternating square knot is a row of square knots that switch their base and outside cords each row down:
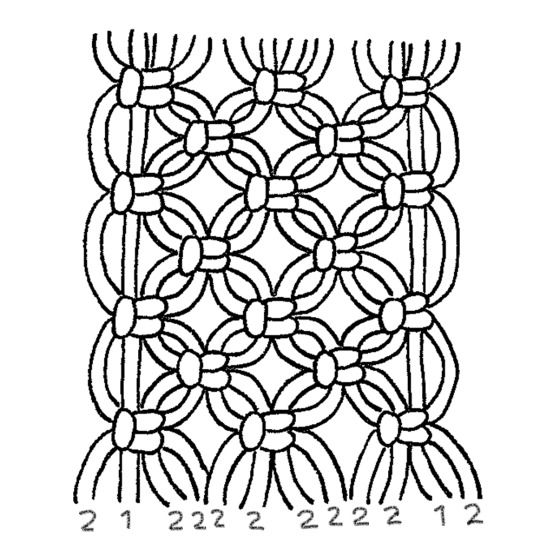
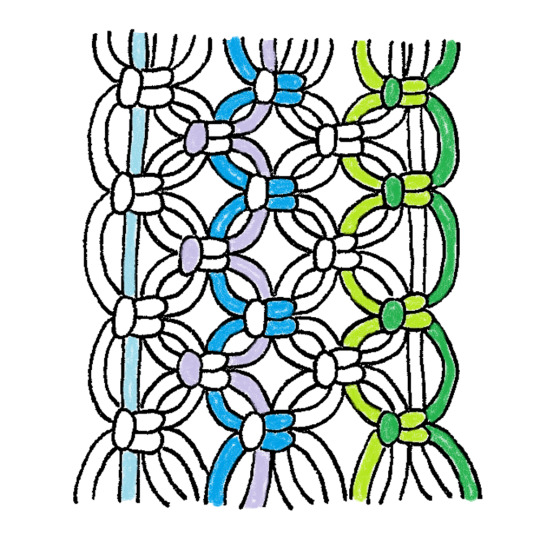
^ On the left, the numbers on the bottom are the PLs of each string. The path of most strings is similar to the outside cord of an open square, but on each side there's one string that doesn't form knots. On the right, various cords are highlighted so you can follow their path.
Keep in mind my diagrams tend to be loose so you can see the structure of the cords, but an actual sample tends to be tighter. I suggest you don't try to build it loose because then you have to work extra hard to maintain the same distance between knots.
I measure the width of my projects in square knots. The above project is three wide. Note that every other row it switches from three square knots and two square knots. On the rows that are two knots, there's two strings, half a knot's worth, on each side shaped like an open square. I'll call these open square loops.
Some projects have an extra half knot in width, and the half knot/open square loop is on every row, alternating on the left and right side.
^ Details of square knot and cord interactions. On the right is a 1 1/2 square knot wide example.
/\/\/\/\/\
Some examples:

^ This one is five square knots wide. I took a bunch of pictures of the building process for this Macre-May prompt.
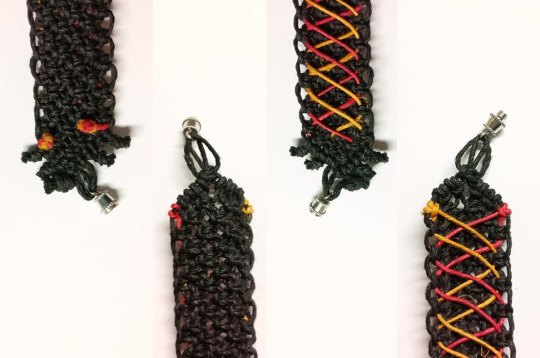
Here's an example of a necklace using alternating square. On the front I used red and yellow cord to create a design:
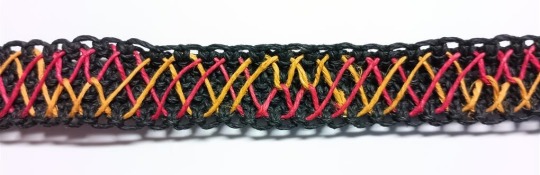
but the wide back is alternating square, 2 1/2 knots wide:
/\/\/\/\/\
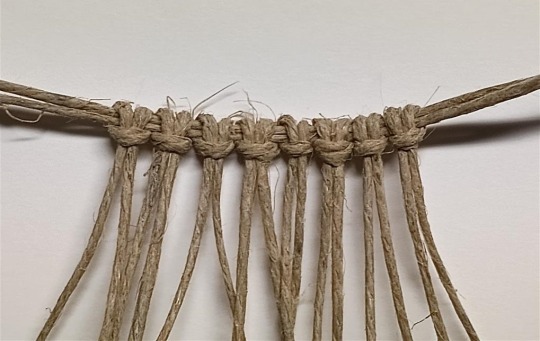
Starting an alternating square:
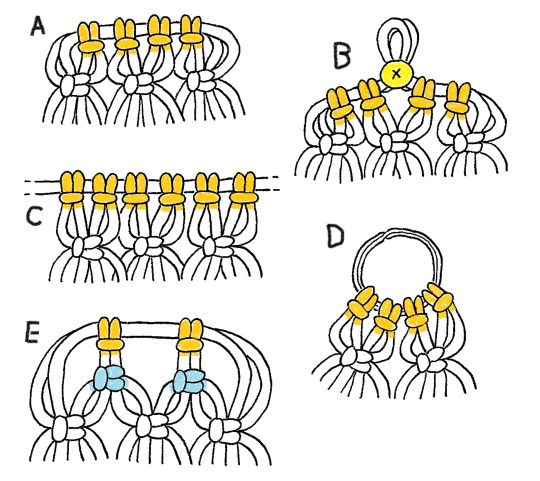
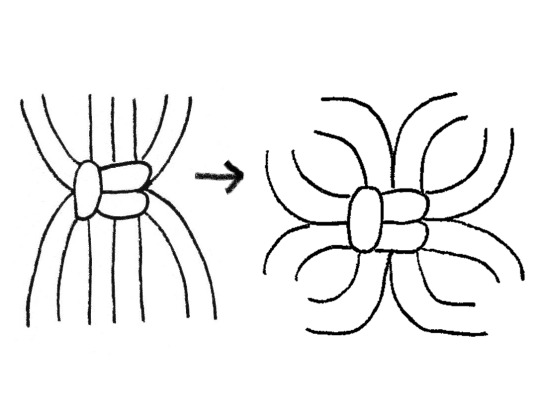
A) A row of lark's heads knots formed over two cords. The two cords bend down to join the project. Good for 3D projects.
B) Start with an overhand knot to form a loop at the top. Then add lark's head knots to the strings coming out of the overhand. Good for jewelry.
C) Lark's heads over a separate string , dowel rod, bar, etc. that is not part of the alternating square knot project. Good for wall hangings.
D) Lark's heads knots added to a keychain. You can't add as many cords as the other options, but you can make it wider later.
E) If you want a lot of space at the top you can add less lark's heads knots, with square knot starters (colored in blue) on their cords.
When you are planning an alternating square knot project, first figure out how wide you want the project. Choose a starter method like one of the ones above and add lark's head knots until you reach that width.
Two cords, folded to create two lark's heads knots, hang down to create four strings for one square knot. To give an extra half knot in width, use an odd number of cords.
/\/\/\/\/\
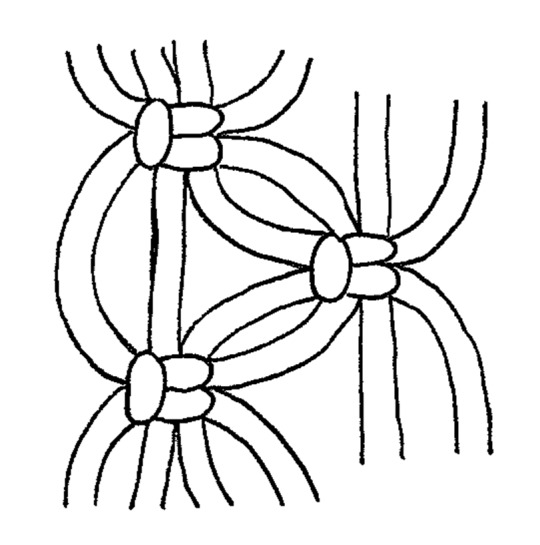
Finishing an alternating square:

Finish with a row of overhand knots to secure the ends and make a neat finish. Sometimes I make a knot every two cords or, as pictured, every four. It depends on the project and preference.
A knot every two cords make smaller overhand knots and can draw less attention to the ends, but when you knot four cords it gives you an extra open square loop on the sides of the bottom.
Four cords also tend to angle downward while two cords angle out.
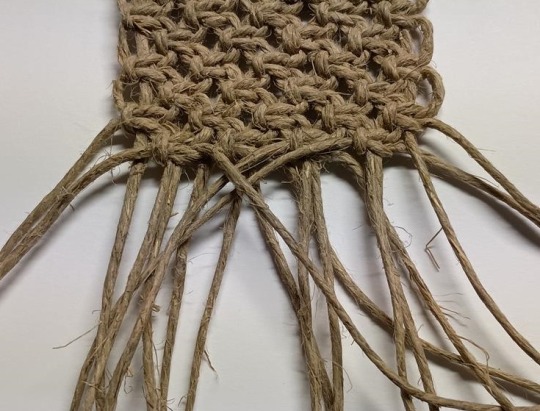
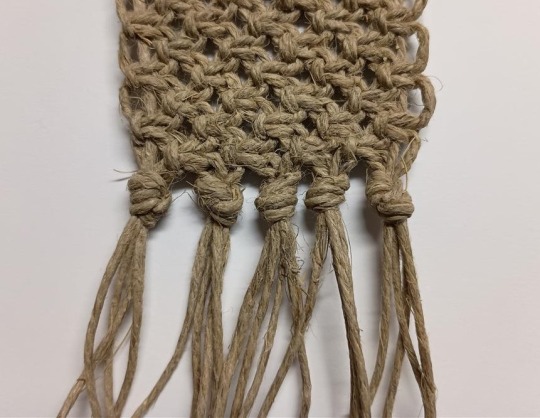
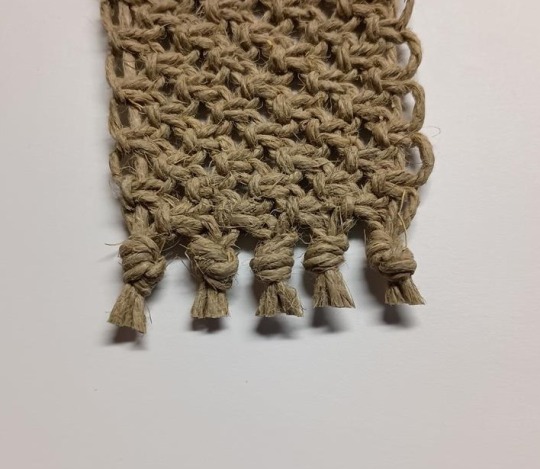
^ Four cord overhand knots
^ Type B starter and two cord overhand knots
(Macre-May Prompt list)
#Macre-May#Macre-May 2024#macrame#art challenge#I'm having so much fun drawing these#and I'm getting better at using my new camera...
0 notes
Text
The Art of Craftsmanship: Exploring the World of Handcrafted Woodworking
In a world filled with mass-produced, cookie-cutter items, the allure of handcrafted woodworking stands as a testament to human creativity and skill. Woodworking, with its rich history and endless possibilities, allows individuals to express their artistic vision by transforming raw wood into functional and aesthetic creations. At the heart of this craft are the woodworking tools – the artisans' loyal companions that bring their ideas to life. In this article, we will embark on a journey into the enchanting world of handcrafted woodworking and introduce you to the essential tools that shape it.
Measuring and Marking Tools
Accurate measurements and precise markings are the foundation upon which every woodworking project is built. The tools used for these tasks are not just rulers and pencils; they are instruments of precision and patience.
Steel Rule: A high-quality steel rule is a woodworker's best friend for measuring small distances and drawing straight lines.
Marking Gauge: This tool is essential for marking precise measurements, ensuring your cuts and joints are as accurate as possible.
Try Square: A try square is used to check the squareness of your workpieces, helping maintain precise angles throughout your project.
Saws and Cutting Tools
Woodworking requires a variety of saws and cutting tools to shape and sculpt wood into the desired form. Each type of saw serves a unique purpose.
Hand Saw: A versatile hand saw is perfect for making straight cuts and crosscuts. Choose a saw with fine teeth for smoother cuts and one with more prominent teeth for rougher cuts.
Japanese Pull Saw: Renowned for its accuracy, it excels in delicate woodworking tasks. Its thin blade reduces waste and ensures finer cuts.
Coping Saw: The coping saw is a fantastic tool for intricate curves and patterns, and it's perfect for cutting out shapes within your wood.
Chisels and Mallets
Chisels and mallets are the sculptor's tools in woodworking. They allow you to carve and shape the wood with precision.
Wood Chisels: Wood chisels come in various shapes and sizes and are used for carving, paring, and creating fine details in your wood.
Mallet: A wooden or rubber mallet is employed to tap the chisel, ensuring control and force during chiseling while protecting the tool from damage.
Planes
Woodworking is a world of creativity and craftsmanship. Woodworking planes are used for smoothing surfaces and creating precise, flat edges. The choice of aircraft depends on the desired outcome of your project.
Jack Plane: A jack plane is your go-to tool for removing excess material quickly and straightening rough surfaces.
Smoothing Plane: The smoothing plane is the final touch, leaving your wood with a glass-smooth finish, ready for finishing touches.
Drilling and Boring Tools
Drilling and boring tools are essential for creating holes, mortises, and dowels in your woodworking projects.
Hand Drill: A hand drill, often called a brace, allows you to drill holes manually, offering better control over depth and precision.
Auger Bits: Auger bits are perfect for boring holes in wood and come in various sizes to suit your project's needs.
Clamps
Clamps are the unsung heroes of woodworking, holding your pieces together during assembly, gluing, or while waiting for joints to set.
Bar Clamps: Bar clamps are versatile and adjustable, suitable for various projects.
Spring Clamps: Spring clamps are perfect for holding small, delicate pieces in place, adding a gentle touch to your work.
Safety Gear
Safety should always be a priority in woodworking. The workshop can be a hazardous place, so equipping yourself with the proper safety gear is essential.
Safety Glasses: Protect your eyes from flying wood chips, dust, and debris.
Dust Mask: Woodworking generates a significant amount of dust, and a good dust mask safeguards your lungs from harmful particles.
Hearing Protection: Prolonged exposure to the noise from power tools can damage your hearing, so wear ear protection.
Workbench
A sturdy workbench is the heart of any woodworking workshop. It offers a stable platform for all your tasks, from cutting and planning to assembly and finishing.
Sanding Tools
Sanding is the process that gives your woodworking project its final, polished look. Sandpaper, sanding blocks, and a random orbital sander are your tools for achieving that smooth finish.
Finishing Tools
Finishing is the icing on the cake. Brushes, stains, varnishes, and sealants enhance the wood's appearance, protect it, and give it character. Your choice of finishing tools and techniques will bring your creation to life.
The essential tools we've explored are just the beginning of a journey filled with learning, patience, and the satisfaction of turning raw wood into something beautiful and functional. Whether you're a beginner looking to start your woodworking adventure or an experienced craftsman seeking to expand your repertoire, these tools will be your faithful companions on your artistic journey. Woodworking is more than a hobby; it's a passion and a profound connection to the past, present, and future of the craft. So, gather your tools, unleash your creativity, and let the world of handcrafted woodworking reveal its magic to you.
0 notes