#edit: I ended up going back and adding a texture to the bg
Explore tagged Tumblr posts
Visit Tumblr Blog
Explore Tumblr blogs with no restrictions, modern design and the best experience.
Last Seen Tumblr Blogs


Fun Fact
Tumblr is used by 21% of adults online aged 18-29 years.
Text
I think about this passage so often I made myself a little poster design with it a few years ago and it felt pertinent to dig it out and share it again.
ID in alt text and under the cut:
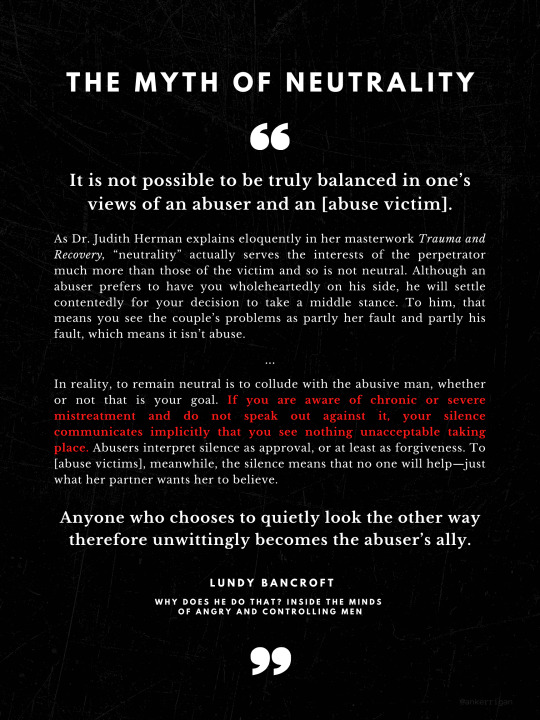
ID: A black poster with the following quoted passage from Lundy Bancroft's book "Why does he do that? Inside the Minds of angry and controlling men" in white text, with one portion highlighted in red. The passage reads as follows:
"It is not possible to be truly balanced in one’s views of an abuser and an [abuse victim]. As Dr. Judith Herman explains eloquently in her masterwork Trauma and Recovery, “neutrality” actually serves the interests of the perpetrator much more than those of the victim and so is not neutral. Although an abuser prefers to have you wholeheartedly on his side, he will settle contentedly for your decision to take a middle stance. To him, that means you see the couple’s problems as partly her fault and partly his fault, which means it isn’t abuse.
"In reality, to remain neutral is to collude with the abusive man, whether or not that is your goal. (Note: Red highlight begins here) If you are aware of chronic or severe mistreatment and do not speak out against it, your silence communicates implicitly that you see nothing unacceptable taking place. (Note: Red highlight ends here.) Abusers interpret silence as approval, or at least as forgiveness. To [abuse victims], meanwhile, the silence means that no one will help—just what her partner wants her to believe.
"Anyone who chooses to quietly look the other way therefore unwittingly becomes the abuser’s ally." End of passage.
#i forgot my art tag#I guess a poster design counts as art sure#feel like I could zhuzh up the background a little but I honestly like the solid black idk#I'm not a very good graphic designer but I try#edit: I ended up going back and adding a texture to the bg#and increasing the transparency on my name cuz I am not the point here lmao!!!#anyway still proud of this#also maybe keep israel and palestine in mind before you read the passage#see if any neurons fire or sm#my art#??? I guess it's art#archive
9 notes
·
View notes
Text
SLAYGROUND TUTORIALS.
[01] We will start off by opening our original image by going to File > Open. I’d recommend you work with a black and white image in order to get the full spectrum of the watercolors to be visible. I haven’t tried this effect with colored pics, it’s up to you if you want to experiment and see how that turns out. Also, your image must have a white background in order for the watercolor splotches to be concentrated on the subject. If you have anything else in the background it’s going to get picked up by the watercolors and it won’t look right.
[02] Now, we want to white out her face a little bit and define some of her features by bring out some of the contrast in the image- this way the watercolor will be better applied to the those certain areas. Go to Image > Adjustments > Brightness/Contrast. Depending on the quality of the picture, the adjustments and the settings are going to be different for every image- here is what my settings are set at http://i.imgur.com/RCvxP.jpg. You may have to play a little with the brightness and the contrast settings to get an effect like I have. Basically, you want her face to be almost ghostly white and the contours of her face and hair to be almost black. After you’ve done that, we will duplicate the layer by going to Layer > Duplicate Layer.
[03] Now, we will apply the Watercolor Filter to your duplicated image. Make sure you have the duplicated layer selected in your Layers Palette (it should be highlighted in blue when you click on it). Go to Filter > Artistic > Watercolor. Leave the settings as they are and press OK. Rename your duplicated layer as ‘Watercolor’.
[04] Select your original/base layer NOT your ‘watercolor’ layer and go toImage > Adjustments > Threshold. My settings can be seen here http://i.imgur.com/BOaYB.jpg. Again, you will have to adjust this setting based on your image by moving the little pointer to the right. Just try to replicate how my image looks like. Click OK and then rename that base layer to ‘Threshold’.
[05] Set your ‘Threshold’ layer to multiply and then Merge both of the layers by going to Layer > Merge Layers. Now we will only have one layer left (and the white background which isn’t visible in this screenshot).
[06] Now, comes the fun part or so I think. We will be using these two textures:ONE, TWO http://i.imgur.com/vAdlX.jpg+ http://i.imgur.com/1J0Lp.jpg (courtesy of this website http://mediamilitia.com/sample-image-pack-25-free-images/). Open both of the textures by going to File > Open. Now create a new file by going to File > New with the same dimensions as the image we are working on (500X673, in this case) and basically all you will be doing is cutting out various areas of the two watercolor textures we opened and pasting them to the new document we created. We want to aggregate all of the watercolor splotches/splatters where Karen’s face is. I used ‘multiply’ as blending mode when I pasted each section and merged the image at the end. So after copying and pasting certain splatters mine looks like this. I hope you see where I am getting at with this. You are kind of creating your own texture in a way and you will use this finished canvas to bring our other black and white picture to color. So, if your subject is positioned on the right you’d want to concentrate majority of the splatters to the right. Try not to have too big of empty spaces between the splatters because there will be a gap in color in your finished product. Once you’re done and have merged your image, copy and paste it on top of your base/original image. Our layers should look like this.
[07] In this step, we will be working with Layer Masking. Select our merged layer and press CTRL+A (select all), followed by CTRL+C. All that is doing is copying our merged layer. Now, select our layer with the watercolors and at the bottom of the layers palette create a Layer Mask by clicking this symbol. This will appear next to our watercolor layer. Now hold ALT and click on the layer mask (the white box next to our layer) http://i.imgur.com/KpX5g.jpg. If you did it right, your whole image will turn white and you’ll notice that the rest of the layers are shaded and not visible. Now, click CTRL+V (paste) and your base image should appear in the white space (layer mask), like so. Now, click CTRL+I (invert colors) and your layers should look like this and your image like this http://i.imgur.com/Q8IQR.jpg. Click back on the watercolor layer to see the image (I added a star to which section you should click on) and your image should be covered in watercolor splatters.
[08] We’re not done, so don’t start packing up your stuff just yet. If you want you can delete the merged layer/the base layer of Karen, I like to keep it and lower the opacity of the layer a bit so it kind of defines the edge of the subject, here are my settings. It’s up to you, you can try it both ways and see which suits you.
[09] In this step, we will be using this paper texture from Bashcorpo. Open it up like we normally would and then copy and paste it on top of our image and select Linear Burn as our blending option, like so. Our image should look something like this.
[10] And the last part is to clean up the watercolor splotches a bit by using the Clone Tool. Select the watercolor layer, then click on the Clone Tool. What the clone tool does is basically it clones/duplicates the section you select and transfers it to the place you want it to be. (For example, say you have a picture of sand and there’s a shell on it but you don’t want the shell to be there, so by using the Clone Tool you can hold ALT click on a section where there is sand and then click where the shell is and it will erase the shell and put sand on that section. So then you’ll have a shell-free sand. lol Ok, that was a stupid way to describe this but I hope you get the point. If you’re still not understanding how to use this tool, let me refer you to two of these Youtube tutorials: one, two http://www.youtube.com/watch?v=i3C9xte9sEg). You’ll find different brushes at the top of your PS under the File, Edit navigation. You can mess around with different brushes to see what the effect is of each. I will be going with this one. Once you click on the Clone Tool, hold ALT and click with your mouse over the area of the watercolor that you want to apply to another place. Let go of the ALT button and just hoover over another place and you should see the brush has picked up that area you selected and start clicking on the section where you want it translated and it should appear there. Keep adding, changing brushes and selecting different sections to clone and you’ll get a hang of it and end up with a more finished product. This is my result. http://i.imgur.com/rn7eS.jpg
[01] To give you an idea of how to work with light backgrounds and what textures work best we will be going from THIS IMAGE -> THIS IMAGE. The textures used for this image are as follows: 1, 2 and 3 (which have all been made by me) http://i.imgur.com/JDerz.png + http://i.imgur.com/dIq9a.png + http://i.imgur.com/wEPyD.png . We’ll start off by opening up all of the textures and the original images I provided as you normally would, by going to File -> Open. The image of Rachel McAdam’s is your base, so what we are going to do it Copy and Paste the1st texture on top of the Rachel McAdams’ image (I have re-sized the texture by going to Image -> Image Size and setting the width to 500px so it’s the exact width as the Rachel photo I’m working with, but you don’t have to do that you can keep the texture the same size). In the bottom right hand corner in the Layers Palette, you’ll see the two layers you are working on, one of them being the Rachel McAdam’s photo and the other the texture you just pasted on top of it. Make sure you click on the texture layer so that it is highlighted and where it says ‘Normal’ click the drop down menu and select ‘Multiply’. Your image should look like this. (Note: I didn’t like the lines all over her face so I used the eraser tool to erase that part of the texture.) Now we will layer the 2nd texture on top of our base image, the same way we did with the first texture but instead of selecting ‘multiply’ we will select ‘Screen’ because the texture is darker. This is our result. And lastly, we will layer the 3rd texture on our base the same way and set it to ‘Darken’. (Note: Moving textures around can give you better positioning.) And we’re done! That’s just providing you with some basic tips of how you can work with lighter bg’s.
[02] In this step we will be going from THIS IMAGE -> THIS IMAGE, using this texture (courtesy of me http://i.imgur.com/Hp9lc.jpg ). It’s simple, open up the Kristen Bell image and the texture we’ll be using. Copy the texture and paste it on top of the KBell image and make sure you’ve clicked on the texture layer in Layers Palette and then select ‘Screen’ like so, then move the texture around to make sure it’s positioned the best.
[03] Let’s try some images with dark backgrounds. We will be going from THIS IMAGE ->THIS IMAGE, using the following textures: 1 and 2 (made by me) http://i.imgur.com/4Yenk.png + http://i.imgur.com/517bm.png . Same technique applies as we used in the above two steps. Copy and paste the 1st texture on top of the photo and in theLayers Palette set the layer of the texture to ‘Screen’ (because it’s a dark texture) and then move it around to position it where you want it. I moved it all the way to the left so mine came out looking like this. Now you do the same thing with the 2nd texture and we get our finished product.
* There are many different ways you can use textures and messing with the Layers Palette and the settings/opacity there I find is the easiest. I mainly use ‘Screen’, ‘Lighten’ settings when using dark textures and ‘Soft Light’, ‘Darken’ and ‘Multiply’ when I work with light textures. That’s not to say that you can’t mix those, it all depends on the texture. Don’t be afraid to experiment, that’s how I learned. Also try messing around with Opacity and Fill settings as well, as they can help with toning down the textures and prevent them from overtaking the image. RESULT-> http://media.tumblr.com/tumblr_likren57mb1qc1btl.png
1 note
·
View note