#ended up with 1 quart and 1 pint jar...the quart has a lot more liquid than tomato solids in it OOPS
Explore tagged Tumblr posts
Visit Tumblr Blog
Explore Tumblr blogs with no restrictions, modern design and the best experience.
Last Seen Tumblr Blogs


Fun Fact
Tumblr has been banned in Indonesia for providing people with access to pornographic content.
Link
#preservation#crushed tomatoes#canned tomatoes#tomatoes#作ってみた!#20180812#ended up with 1 quart and 1 pint jar...the quart has a lot more liquid than tomato solids in it OOPS
1 note
·
View note
Text
mustard pickled vegetables (refrigerator pickle version)

my garden’s going Wild With Produce, so it’s fucking canning time.
yesterday i made these “Mustard Pickled Vegetables - A Winter Delight” from Bossy Kitchen. the original recipe is kind of huge (makes 10 jars) but also is vague about what size those jars are. i halved it, or 40%’d it, and ended up with 3 full pint jars (pint jars hold two cups) and like a half pint jar. half-ish.
however
i also ended up with quite a few air bubbles in these after canning, despite all my poking and prodding to rid the jar of bubbles. bubbles for shelf-stable items aren’t great--air means bacteria, bacteria = problems, so these are going to have to hang out in the fridge sadly. (in the original recipe photo, she has some air bubbles in hers, but i don’t really trust that. it gets hot where i live, and i’m very paranoid about food safety)
this makes me think that they’re much better as refrigerator pickles, which is much easier to do, especially if you’ve never canned or don’t want to fuck around with water bath canning (which can be intimidating and so, so time consuming.)
oh yeah, these are fucking delicious. i should mention that straightaway. i’m eating some of them right now as i type this up. you should want to make them, and i think you should do them as refrigerator pickles.
here’s a very basic recipe to make a single quart, or two smaller pint jars (i would do smaller pints, but you do you) with instructions for refrigerator pickling them. if you want to water bath can, check out the original recipe above.
the recipe is a little odd because of fractions and weights and like, quartering the original recipe. as long as you’re close to this, you’ll be fine.
INGREDIENTS:
1.25 - 1.5 lbs of veggies (see note)
1 cup water
1/2 cup white vinegar (5% acidity, which is standard)
~1/3 cup sugar (or 75 g weighed)
1 TBS salt (pickling salt preferred, i think, or kosher)
a few bay leaves
1-2 tsp peppercorns (however much you like really)
3/4 cup mustard (yes the yellow stuff. i would add in a TBS or two of stone ground/dijon if you have it to give this a little more kick)
~3/4 cup olive or other vegetable oil
TOOLS:
large pot for sterilizing jars & cooking brine & veg
large bowl
jars and lids (i would recommend canning jars despite these not being water bath canned)
knife & cutting board
stirring tool--preferably slotted
and a funnel is really handy for getting this into your jars
note on veggies: you can do whatever you have on hand or is available at the grocery store. the original called for: carrots (shredded, but i’d cut into matchsticks), sweet banana peppers, cubanelles (also a sweet pepper), red bell peppers, onion, green tomatoes and some celeriac (leaves and stems.) i ended up pickling: banana peppers, cubanelles, green bell peppers, red onion and green tomato since that’s what my garden is producing a lot of at the moment.
if you use carrots, matchstick them. cut smaller peppers into rings about 1/4″ thick, and larger peppers into strips. onions can be left in half-moons (and i would so recommend a sweet red onion for this, but it’s up to you). you could add a hot pepper or two in here if you like spicy! if you aren’t growing tomatoes, you probably can’t get any green tomatoes, which is fine. again, just try to get close the right poundage of your favs and you’ll be just fine.
if you’re buying your produce for this from a grocery store, weigh it all together, and get slightly more than this recipe calls for. you’ll be cutting off stems and coring the peppers, so that’s a few ounces of lost weight.
HOW TO:
1. clean and sanitize your jars. wash by hand or run thru the dishwasher, then sterilize them in a large pot with water that covers them entirely. boil the jars and lids and bands for 15 minutes. remove from hot water and place on a clean dish towel.
2. cut up all your veggies (see note above for slicing details.)
3. in a large pot, combine water, vinegar, salt, sugar, bay leaves and pepper. bring to a boil, letting the salt and sugar dissolve completely.
4. add your veggies and cook for about 5 minutes. since these are not getting water bath canned (and therefore cooked longer during that process), you could cook them up to about 10-15 minutes. it’s really up to you as to how crunchy or soft you want them. cook them until they’re a texture you think you’d like!
5. while this is cooking: mix up your mustard and oil in a large bowl.
6. turn the heat off on your veggies. you don’t need the water/vinegar mix after this, so either drain the pot of liquid, or scoop the veggies out with a slotted spoon.
7. mix hot veggies with the mustard/oil mix.
8. put into jars. the funnel is great for this. secure lids and let sit out until the veggies inside are room temp. this will create a heat seal, almost as if they’ve been canned (don’t put these in the pantry tho.)
9. you can eat these right away, but they’re probably best after about 24 hours. i’d say an unopened jar will keep for about 3-4 months, but trust your nose and eyes on this. an open jar you probably want to eat within a week or so.
these are really tasty on their own, or with a pickled egg, or with ... anything? mashed potatoes? some nice beef? on top of toasty buttery bread? go nuts really.
0 notes
Text
Canning corn, Use a pressure canner for safety.
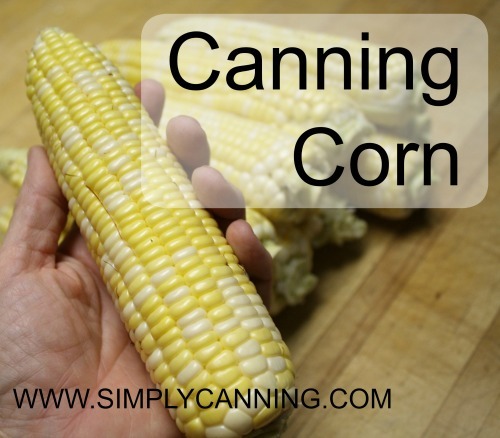
Canning Corn
Canning corn is a great way to preserve your harvest. Some people love it... some don't. Personally, I like the flavor of home canned corn too. Canning corn from your own garden or locally grown is still better than store bought.
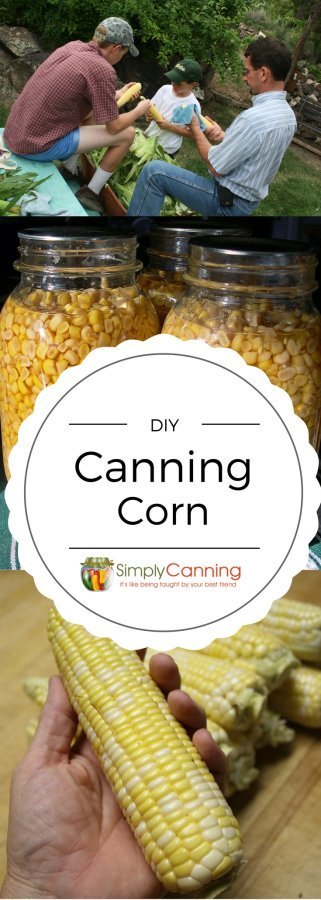
Many people also prefer the taste of frozen corn. For these reasons freezing corn is another great preserving option. I do some of each because my family prefers the frozen over canned. But I love the convenience of canned!
We have a wonderful variety of sweet corn that is grown around here called Olathe Sweet Corn. It is so good and sweet, they have a festival weekend dedicated to corn. This weekend includes concerts and all you can eat corn on the cob. If you are working with a sweet corn don't be surprised if it comes out a deep golden color. This sometimes happens with the sweeter varieties.
Corn does take a bit more work than some other foods. It is not hard, but it has a processing time of 1 hr and 25 minutes for quarts and 55 minutes for pints. Compared to other produce this is a long time.
Prepare
Gather your canning supplies
Corn
Canning Salt - optional
You will need about 32 pounds (in husks) of sweet corn per canner load of 7 quarts; an average of 20 pounds is needed per canner load of 9 pints.
Canning Corn Procedure
Pick your corn. Corn should be fresh picked and ripe.
Get your corn huskers to work! Make sure they do their best to get all the hair off. Games make this task fun. Challenge them to see who can husk the most ears. Here's a tip; for mess control.... husking can be done outside.
While the corn is being husked, start boiling water. Either in a large stockpot or your blancher.
Place in boiling water for 2 minutes and remove with tongs. If you are using a blancher the tongs are obviously not necessary.
Cool immediately in a sink or large bowl of ice-cold water.
A blancher works well or just use a large stock pot.
You do not want to cook the corn just blanch it. I find it easier to cut it off the cob this way. I read that many people skip this blanching step. Since this corn will be processed in a pressure canner you can skip the blanching step if you prefer.
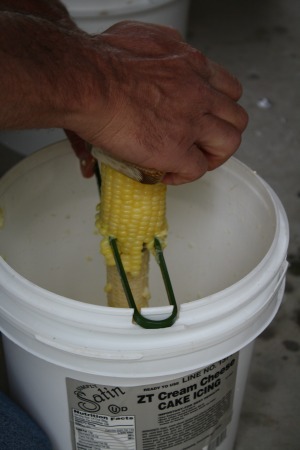
Cut the kernels from the cob.
Let the cobs cool. Set it on end and run your knife down the sides cutting off the kernels.
Try not to cut into the cob. I aim for getting off about 3/4 of the kernel.
The kernels will stick together in little strips and look like this.
I use a large cookie sheet to catch the kernels; a large flat dish like a cake pan would also work.
This can get messy too. The corn tends to squirt. Do it in an area that will be easy clean up. I have a big island in the center of my kitchen that I use. I LOVE easy clean up!
Tips; Use an electric knife; I've never done this but it sounds like a great idea.
Another Tip - Use a Bunt pan, set your corn on end on the centerpiece and let the kernels fall into the pan. I've tried this and it seems awkward to me. I list it here because I have seen others rave about doing it this way. Try it you may just like it.
Here is a video of my husbands cool cutting the kernels off the cob time saver. He is using a tool that is called a corn stripper. I do not have a brand name on ours and it is a vintage tool that has been around for years. If you do a search on Amazon you'll see some that are similar.
Close up of the blade on this corn stripper. Check your local farm store for similar cutters. It is an invaluable tool when canning corn, dehydrating, pickling. Anytime you want to get a lot of cobs stripped use one of these.
While the corn is being husked and the corn is cut off, go ahead and get your canner and canning jars ready.
Optional add salt to the jars. ½ tsp. per pint, 1 tsp. per quart. Salt is for seasoning purposes only.
After the kernels are off the cob, pack into clean canning jars.
When canning corn you can either raw-pack or hot pack. Since I have already blanched my corn, I prefer raw pack. Here are directions for both
Raw pack; pack lightly into hot jars and add boiling water, leaving 1 inch head space.
Hot pack; simmer kernels for 5 minutes, then pack into jars. Top off with cooking water leaving 1 inch head space.
Fill jars, leaving 1-inch head space. Be sure and wipe the rims of your jars clean so there will be no food particles to interfere with the seal.
Place your canning lids on and finally add your screw bands. Place in a pressure canner to process.
Process in a pressure canner.
Always use a pressure canner when canning corn.
pints - process for 55 minutes
quarts - process for 1 hour 25 minutes
Adjustments for Pressure Canner Altitude in FeetDial Gauge CannerWeighted Gauge Canner 0-10001110 1001-20001115 2001-40001215 4001-600013156001-800014158000-10,0001515
Do you like Creamed Corn? Try this.
Here’s a quick easy way to make a cream style corn from regular kernel corn. home canned corn, frozen, or store bought, it doesn’t matter. This is not for canning, rather it is how I make creamed corn when I open the jars.
Heat corn to simmer. Simmer for 10 minutes if you wish. Remove 1/2 of the corn to a blender add 1/2 cup or so of cream. Half and half, evaporated milk or other cream of your choice works. I usually have half and half on hand. Puree.
Add back with corn add butter and salt to taste heat and serve.
Canning Corn Questions from my inbox.
When pressure canning corn, do I really have to process that long?
Canning Corn processing question.
Hello, I'm a long time canner/freezer/preserver type of girl. In the past I've always put my corn up in the freezer, because that's the way mom and gran do it.
But the garden is gang busters this year and even with a new freezer, there isn't going to be room for all of it.
Anyway I called gran and borrowed mom's steam pressure canner and canned up the first few batches of corn. I followed the directions in the Ball Blue Book and let the thing chick-chick for 55 minutes.
However the corn has darkened quite a bit and some of the water in the jar is gone as well. So I've gone on-line to get more info.
Both gran and mom say 55 mins is too long and they only ever steam theirs for 25 minutes.
I'm filding conflicting directions on line too, I've found websites indicating times anywhere from 25 to 55 minutes. I don't want to poison my family, but I would love it if that 25 minute time was a possibility.
This is a hard question. And I have been asked it in a myriad of ways. Can I do it the 'old' way? Many of the questions posed to me point out that either moms or grandmothers did things different. And I certainly don't like contradicting our elders... often they have great wisdom!
However, The answer is: You take a risk by doing it the 'old' way. You have to make that decision yourself. Personally I decided to just follow the recommended guidelines and have that peace of mind. The processing times I give on my site are all taken from safe sources. My most used source is the National Center for Home Preservation. Some directions are from the Ball Blue Book.
The good news is.... it is not unusual for canning corn to turn golden colored. Mine often is a darker color. From my research it is because it is a very sweet variety. My corn never tastes over cooked.
As far as the liquid loss. That is ok too. You want to avoid it, but it will not hurt your corn unless it is extreme. Liquid loss is often caused by taking your jars out of the canner too quickly.
Leave the jars in your canner for a couple of minutes before removing. Open the canner and then wait 3 or 4 minutes. This gives the jars a chance to cool slightly. When it is cooling the contents will be shrinking and not swelling so that may help you keep more liquid in your jars.
Another question on processing time.
Sharon, I was reading canning corn and noticed that it takes 1hr-25min to do a batch. Why does it take so much longer with corn and beans to process. Thank you.
Answer - It all has to do with the acidity of the food. I've used the times recommended by the USDA. They test the foods and determine the length of processing necessary for eliminating the risk of botulism. Corn is more starchy than other vegetables so I'd assume the acidity levels are different as well. Also corn has more natural sugar.
Here are a few pages that might interest you.
Botulism A severe, sometimes fatal food poisoning caused by ingestion of food containing botulin.
Canning methods Which Canning methods to use? Is my food high acid or low acid? Should I process in a water bath canner or pressure canner? Why? That is a common question ~ and a good one....
More ways to preserve corn.
Simply Canning Home › Canning Vegetables › Canning corn
Books and Classes
This content was originally published here.
0 notes
Photo
A new snapshot from http://sagesacre/2020/03/11/how-to-make-awesome-hot-sauce/
How to Make Awesome Hot Sauce
Making truly delicious hot pepper sauce is easy thanks to the magic of fermentation
TL/DR: Click here to skip to recipe
I love a good hot sauce.
Not that crazy “it’s so hot it has to be stored in a liquid nitrogen cylinder” stuff, but the spicy, complex kind that delivers a wave of interesting flavors as well as heat. For me, fermented hot sauces are the best at delivering that combination.
Fermented hot sauce, like yogurt, sourdough bread, Kosher pickles and other fermented foods, gets its unique flavor from a naturally occuring microorganism called lactobacillus. These little critters consume sugar and convert it to lactic acid which both helps preserve the food and creates unique flavors. Based on the type of pepper, the variety of lactobacillus in your surrounds, and the temperature and length of fermentation, you can make sauces that range anywhere in flavor from hot pineapple and vanilla to tangy curry and lemon grass.
Hidden Lake Hot, my pepper of choice.
Every year I make a batch of fermented hot sauce that takes nearly six months, but you can actually produce a pretty dang good batch in just a week. Even over a period that short, the fermentation process will convert the sugars in the peppers into new flavors and aromas you just don’t get with fresh sauces.
If you haven’t ever tried making your own, you definitely should. Here’s my basic and advanced recipes:
Hot Sauce Recipes
QUICK NOTE ABOUT LACTO-FERMENTATION:
These are simple lacto-fermentation recipes using brine. Basically we want a brine salty enough to prevent bad bacteria from taking up residence, but not so salty it prevents the lactobacillus from fermenting the sugars in the peppers.
The proper proportion of salt to water is ½ tablespoon salt for every 1 cup water.
The water should be filtered, not tap, and salt should be iodine free to prevent off flavors or colors. Just remember to keep to those proportions you can scale to larger batches with no problem.
Basic Fermented Hot Sauce Easy, 15 minutes prep, 7 days ferment, makes about 1-½ pints of hot sauce
Ingredients
1 pint ripe hot peppers chopped or sliced (I like the cayenne varieties)
1 pint filtered room temperature water
1 tablespoon (non-iodized) salt
Instructions
Make the brine by mix the water and salt until the salt is dissolved
Place the hot peppers in an empty quart-sized jar
Add the brine to the jar and stir to remove air pockets
Cover the jar loosely and put in a cool place out of sunlight
Stir every so often to prevent white mold from forming on the surface (if it does appear, just scrape it off with a spoon)
In a few days the mixture should become cloudy and the pepper mixture should have a slightly sour aroma (this is the lacto doing its work).
On the 7th day of fermenting, pour your pepper mixture into a blender (or use a stick blender) and puree the mixture until smooth.
Transfer the sauce to clean bottles and cap.
The hot sauce is ready for use.
Because we haven’t stopped the fermentation by heating the sauce or adding a stabilizer like vinegar, this hot sauce will continue to ferment (though more slowly) in the bottle, gradually mellowing the sharp notes and changing the heat profile.
As long as you don’t open the bottle it should keep just fine at room temperature for several months. Once you do open the bottle, just keep it refrigerated.
Long Ferment Hot Sauce Easy, 3-6 months ferment, makes about 1 gallon of hot sauce
I make one batch of this hot sauce every year. I start it in mid-September and finish in mid-March which provides an extended period of fresh pepper additions followed by a long, slow fermentation period over the winter.
Because of the long fermentation, the heat profile on this moves it from an upfront peppery hit, to a lower, slower build with lots of spice, grass and vanilla flavors followed by a smooth, hot finish that really sets the sauce apart from others.
I use my favorite hot pepper (an accidental cayenne/thai cross from 20 years ago), picked fresh from the garden, but you can use whatever variety or varieties of hot peppers you like most.
Ingredients
Ripe hot peppers (you’re going to add about 4-6 ounces each week)
2 whole garlic cloves (peeled)
Filtered water
Non-iodized salt
2 seasoned hardwood staves (oak, hickory, maple, etc.), bark removed
1 cup white vinegar
Instructions
Week 1: Place a handful (4-8 ounces) of whole peppers in a large, non-reactive container (I use a 1 gallon pickle jar). Add enough brine mixture (water and salt at the 1 cup to ½-tablespoon ratio) to cover your peppers. Cover the container loosely and place in a cool dark place.
Week 2: Scrape off any white mold that has formed on the surface and stir the mixture. Add a handful of fresh whole peppers and enough new brine to fully submerge the peppers. If the peppers float, use pickling weights (or a zipper baggy filled with water) to keep them submerged. Again, cover loosely and return the container to a cool dark place.
Week 3: Repeat the steps in week 2, but add two whole cloves of garlic as well.
Week 4: Repeat the steps in week 2. If it’s fermenting well, the mixture should be cloudy and yellowish.
Four weeks of fresh pepper additions has fermentation going well
Week 5-11: Repeat steps in week 2 for as long as you have fresh peppers to add. Cold weather usually kills mine off in late Autumn, so I can add fresh peppers until mid-December. If your season is shorter, just skip to the next step (week 12).
Week 12: Scrape any mold from the surface of the pepper mixture and stir thoroughly. Add your two hardwood staves to the mixture, making sure they’re fully submerged. Return to the cool, dark place.
Week 13-24: Now we’re just going to let the mixture continue to ferment and age. Each week take the mixture out, scrape off any mold and stir before returning to the cool, dark place.
Week 24: Let’s bottle!
Pour your pepper mixture into a large bowl or pot.
Fermented Peppers in the pot (click to watch)
Remove the hardwood staves from your pepper mixture and use blender to puree it into a semi-smooth sauce.
Using a stick blender to puree the peppers
Place a colander on a large, non-aluminum, pot and pour the pepper slurry through the colander to filter out the seeds, stems, and pepper pulp.
Add 1 cup of white vinegar to the pot of sauce and slowly heat and stir it until it begins to boil. Reduce the heat and allow the sauce to simmer for 10 minutes (we’re stabilizing the sauce so it stop fermenting).
Bringing the hot sauce to a boil
Pour your hot sauce into clean, hot jars and seal. (I like to use 5 ounce bottles you can get on Amazon pretty cheap.)
Allow the bottles of hot sauce to cool, then place them in a cool dark place to rest for a couple more days before enjoying.
Batch 19 of Sage’s Fermented Hot Sauce
Because this hot sauce has been stabilized, it will keep for months (possibly years) at room temperature even after the bottle has been opened—no need to refrigerate to prevent fermentation from starting again.
Enjoy!
From the beginning
Check out these posts for the progress on the hot pepper sauce beginning with its start back in September 2019.
September 2019
Hot Sauce Batch 19 – entry 1
Projects
Hot Sauce Batch 19 – entry 2
Projects
October 2019
Hot Sauce Batch 19 – entry 3
Projects
November 2019
Hot Sauce Batch 19 – entry 4
Projects
Hot Sauce Batch 19 – entry 5
Projects
Hot Sauce Batch 19 – entry 6
Projects
Hot Sauce Batch 19 – entry 7
Projects
December 2019
Hot Sauce Batch 19 – entry 8
Photos, Projects
Hot Pepper Sauce Batch 19 – Entry 9
Projects
End of the Line for Hot Peppers 2019
Photos
Hot Sauce Batch 19 – entry 10
Projects
January 2020
Hot Sauce Batch 19 – entry 11
Projects
0 notes
Photo
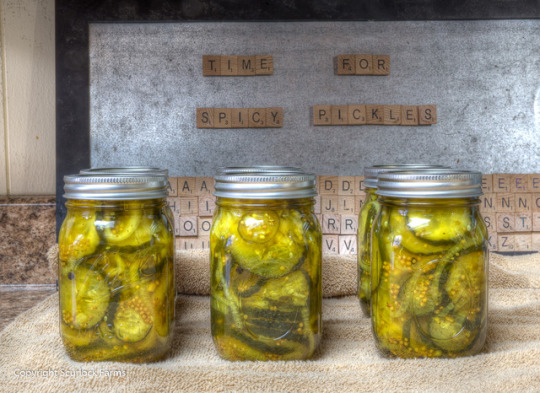
New Post has been published on https://vacationsoup.com/homemade-spicy-bread-and-butter-pickles-yum/
Homemade Spicy Bread and Butter Pickles - Yum!
Spicy and Sweet, So Fun to Eat (and Make)
Howdy howdy howdy - Daniel Jr again. For Christmas this year Sherry got me a Guide to Preserving by Ball, along with some canning supplies. Best. Gift. Ever.
We made up a batch of bread and butter pickles a few days ago, and holy cow are they good! Better than any bread and butter pickle we've ever purchased at the grocery store. By far. By a mile.
We made up another batch today, this time adding some jalapenos for a bit of kick, and will be diving into those in a week or so.
The process is very easy, and if you find yourself with a few hours to kill, why not make up a few pints of these scrumptious goodies?
It took us about 3 hours start to finish to make up 6 pints of these delicious bad boys. If you're wanting to make some, we've got the step by step for you.
I'm not going to go into great detail about prepping your canning supplies here. If you're looking for more information on that please check out Ball's excellent write-up - they literally wrote the book on canning.
Ingredients:
For 6 pints, you will need the following:
4 pounds of cucumbers. We used big honking waxed cucumbers that were on sale, but typically you would use 4 to 6 inch non-waxed kirby cucumbers.
2 pounds of onions, thinly sliced
1/3 cup pickling salt
2 cups sugar
2 tablespoons mustard seed
2 teaspoons turmeric (wear gloves!)
2 teaspoons celery seed
1 teaspoon freshly minced ginger
1 teaspoon whole peppercorn
3 cups vinegar, 5% acidity
1/8 tsp per jar pickle crisp (optional)
2 jalapeno or other spicy pepper (optional)
1 bag ice
You will need 6 pint jars, bands, lids and a large bowl. NOTE - never ever reuse canning lids. They are a one-time use only affair. You can reuse the jars and bands. Replacement lids are cheap. We try and keep an extra dozen on-hand at all times should the canning bug bite us.
Step 1: Cut your onions and hot peppers
Cut the onion crosswise into thin slices, place in a bowl
If using spicy peppers, wash under cold water and cut however you like. I left the seeds in the jalapenos and cut into rings. Add the peppers to the bowl with the onions and cover (optional, but I hate to cry with all the onion fumes)
Step 2: Cut the cucumbers crosswise
Wash the cucumbers under cold running water and drain. For the big honking cucumbers I'll cut a good half inch from both ends. If using the smaller kirby cucumbers you'll remove the stem and 1/16 inch from the blossom end.
Cut the cucumbers crosswise into 1/4 inch slices. This is a LOT of cucumbers to slice up. If you have a mandoline slicer, now is the time to pull it out! With a mandoline you can use a wavy blade that gives the pickles the classic crinkle cut look. It's certainly not necessary, but sure looks groovy.
A mandoline will also allow you to set the thickness of your slice, and provide consistency with the thickness of each piece, along with saving some serious knife time.
These suckers are sharp! Using one of these incorrectly or not paying attention to what you're doing is a real easy way to win a trip to the emergency room after you slice the tip of a finger off. I HIGHLY recommend you use a protective glove when using a mandoline. It can be a real flesh saver.
Step 3: Salt and Chill
In a large bowl, combine the cucumber slices, onions and peppers.
Sprinkle the 1/3 cup of salt over the top and toss well. I've found that digging in with both (clean!) hands and tossing a half dozen times or so does a good job of mixing the salt with the veggies.
Cover the veggies with the bag of ice - told you that you would need a large bowl! I sprinkle a wee bit of salt, maybe a half teaspoon or so, over the ice to keep it super cold.
Let stand for 1 1/2 hours.
Step 4: Prepping the pickle spices
While the future pickles are chilling under ice, combine the the sugar, spices and vinegar in a large saucepan. Do not add the pickle crisp at this time! Do not turn on the burner just yet.
Let's chat about turmeric shall we? Turmeric is an amazing spice, but this stuff stains anything it touches. Fingers and wooden stirring spoons are all fair game. My wife won't let me touch the stuff unless I'm wearing disposable gloves. We have a huge 2 pound bag of the stuff, and it stays inside a large gallon ziplock bag for storage.
Once you have your pickle spices in the saucepan you can begin heating up your canning supplies, which brings us to...
Step 5: Prepping your canning supplies
Wash your jars, bands, lids and canning tools in hot soapy water, rinse well and place in your canning pot, bringing the temp up to 180F. Do not boil yet!
If you have a bbq thermometer it comes in handy to monitor the temperature of the water to ensure it's hot enough, but not too hot.
Depending on the size of your canning pot and the heat output of your stove top it can take quite a while to bring the water up to temp.
We just picked up a 21 quart pot, and takes a good half hour to bring it up to 180F. The lid will help speed things along.
Step 6: Rinse, repeat, repeat
After the future pickles have been under ice it's time to rinse.
You're going to rinse the bejeezus out of these to get rid of the salt. I do three full rinses under cold water, starting with a colander, then back to the large bowl fully submersing under cold water, back to the colander, bowl, colander, bowl, colander. Whew!
Step 7: Time to cook!
Bring your spice mixture in the saucepan to a boil, stirring until sugar dissolves. Add the cucumber mixture to the pot and bring back to a boil. It's going to take a bit as the future pickles are quite cold from the ice bath. Once you have a full boil turn off the burner and remove pan from heat.
You're almost there - now comes...
Step 7: Can the pickles!
A canning funnel is your best friend for this next process. Keeps things MUCH less messy.
Using a ladle, pack the hot pickles and liquid into a hot jar, leaving a 1/2 inch headspace (the space between the top of the jar and the liquid). Don't be stingy with the pickles - fill those jars up!
If you're using pickle crisp now is the time. Add 1/8 teaspoon to a pint jar.
Remove air bubbles.
Clean the jar rim using a damp cloth.
Center lid on jar and adjust band to fingertip-tight, then place jar on the rack elevated over simmering water.
Repeat until all jars are filled.
Lower the rack into simmering water. IMPORTANT: Water must cover jars by 1 inch. Adjust heat and bring to a rolling boil, using lid. Boil pint jars for 10 minutes. Turn off heat and remove cover. Let jars cool 5 minutes.
Remove jars from pot; do not retighten bands if loose. Cool 12 hours, then check the seals.
You'll hear a distinctive 'pop' sound as the lids form seals. It typically starts within 10 to 15 minutes after we've removed the jars from the pot, but can take longer. If they haven't sealed after 12 hours you can place the jar(s) in the fridge.
We've been lucky - we've yet to have a jar that didn't seal. Hoping that trend continues!
The pickles will be ready to eat after 4 days, even better after a week, and fantastic after 2 weeks.
Let me know how yours turn out!
Happy canning, and thanks so much for reading!
Daniel Scurlock Scurlock Farms
0 notes
Text
Canning Chicken (How to do it Safely)
Canning chicken at home is easier than you think and not only stocks your pantry, but can make on-the-fly meal prep even easier. Just grab a jar, pop the top, and you’re ready to add cooked chicken to your favorite recipes (like tacos, pizza, pasta, and more). Gather your pressure canner and equipment, and follow these tips for end up with jars of delicious chicken for your pantry shelf.
Our freezers are currently overflowing with our own farm-raised meat.
And even with 3 personal freezers, and one commercial freezer, there’s only so much room in there…
We’ve recently been delving deeper into raising beef cattle (it’ll be available for purchase soon, by the way!), and while I’m getting super creative in the kitchen with making short ribs recipes, beef shank recipes, and other beef cuts, there’s still a lot of beef to try squeezing into the freezers.
On top of that, we raise meat chickens (because you can’t just eat beef, you guys), so there needs to be space for the chickens in the freezer, too. And when the garden is in full-swing in the summer, I usually try to shove my produce in the freezers too, at least until I have time to can them. So I freeze tomatoes, freeze my green beans…I even freeze my peach pie filling.
I’ve canned other meat before (here are my tips on canning beef, pork, venison, or elk), but chicken is a recent addition to my home-canned meat adventures since I usually prefer to roast whole chickens. (For example, are 30+ whole chicken recipes).
That being said, if you find chicken on sale, or you have a bunch of whole chickens you need to clear out, piecing them out and canning the meat is a perfect back-up.
Here are my tips for canning chicken safely. If you follow these procedures carefully, you can stock your pantry with canned chicken that is super useful for not only emergencies, but also for quick and easy meals.
Why Canning Chicken is an Ideal Pantry Filler
It’s a great preparedness measure for when the power goes out.
Sometimes when we lose power during one of our bajillion blizzards (Wyoming is fun like that), I get a bit nervous about how much food I preserve in the freezers.
It’s perfect for quick and easy meals.
I’m not awesome at meal planning, and sometimes I forget to defrost stuff in time for dinner. This is one of the primary reasons I adore my pressure canner for putting up broths, beans, and meats– no defrosting required.
It saves me freezer space.
I already mentioned this one, but it bears repeating. Anything that relieves my “freezer tetris” situation gets my vote.
A Super-Duper Very Important Warning
You must, must, must use a pressure canner if you plan on canning meat– no exceptions. Since chicken meat is a low-acid food, a regular boiling-water canner will not be able to heat it at a high enough temp to make it safe for storage.
I know pressure canners may seem intimidating at first, but they are actually simpler than you think. I have a full pressure canning tutorial here. It’ll walk you through the process, and teach you how to pressure can without blowing up your house (always a good thing).
For more details on why you need to use a pressure canner, check out my recent article on why canning safety is important.
What You Need to Know Before You Start:
Prep Work before Canning Chicken
If you are butchering your own chickens, you need to dress them out and let them chill for 6-12 hours before you start canning them (more details about that here). If you are using chicken bought from the store, they have already been dressed and chilled and are ready to go. Make sure the chicken(s) are completely thawed before you start the canning process.
Next up, decide which canning method you prefer:
1. Raw Pack or Hot Pack?
There are two options for canning meat: the raw pack or hot pack method. In the raw pack method, you put the raw chicken into a jar and process it. In the hot pack method, you cook the chicken (just a little bit) before you pack it into the jars and you also add some liquid and then process it. According to Clemson State University, both methods are fine, but the hot pack method might give you slightly better canned chicken for long storage. (source).
There is no need to pre-cook your chicken since it cooks in the pressure canner. So I personally prefer the raw pack method. However, I’ll include instructions for both canning methods below.
2. Bones in or bones out?
You get to choose if you keep the bones in or take them out before you can your chicken. This depends on if you are using a recently butchered chicken, a whole chicken from the store, or if you chose to use boneless chicken breasts or whatever else.
You can use any type of chicken parts, boneless or with bones for this canning chicken recipe.
If you choose to keep the bones in, you will have to cut the chicken pieces up before canning and make sure you can get those pieces to fit into the jars. There will also possibly be more wasted room in the jars if you keep the bones in.
If you use boneless chicken breasts or thighs from the store, you can make nice uniformed cubes of chicken for the jars. It’s up to you!
Ingredients and Equipment Needed for Canning Chicken
* TIP* Before you start, clean up your kitchen and prep the area with the proper equipment and ingredients. This the #1 thing I always do that helps to reduce stress during the canning process.
Have the following items ready-to-go before you start:
Pressure Canner (this is the one I have and love!)
Canning jars, lids, and rings (either quarts or pints will work)
Canning utensils (this Lehman’s canning tool set has everything you need)
Salt (optional: for flavor only)
Chicken (bone-in or boneless, specific parts or whole chicken cut in pieces)
You can use either pints or quarts. Pint sized jars are usually the perfect amount for using in one meal, so if you don’t like the idea of leftover chicken, use pint sized jars. I personally don’t mind using quart jars and having chicken ready to use for another meal later that week. (Not to mention my kids eat a LOT of food…)
How to Can Chicken at Home
Directions:
1. Prepare Your Pressure Canner
Fill it with several inches with water, and turn the burner on low so it can begin to heat.
Check out my step by step guide to pressure canners for more instructions if you need them.
2. Prepare Your Chicken
If keeping the chicken with bones, separate the meat at the joints and make sure the pieces will fit into the jars. Cut up boneless chicken into pieces. (Remove the skin from your chicken if you like– I did.)
3. Pack into Jars
If Using the Raw Pack Method: (Although it’s not 100% necessary, I sprinkled my raw chicken pieces with garlic powder, salt, and pepper and lightly browned them in a skillet before I packed them into my jars. They were still technically “raw”, but I wanted the finished product to have a bit more flavor and color.)
Fill the jars with the meat pieces and add salt, if desired (use 1/2 teaspoon fine sea salt for pint jars, and 1 teaspoon for quart jars).
Top off with hot broth or water, leaving 1-inch headspace at the top.
If using the Hot Pack Method:
Boil, bake, to steam the chicken until it is about 2/3 done.
Fill the jars with the meat pieces and add salt, if desired (use 1/2 teaspoon fine sea salt for pint jars, and 1 teaspoon for quart jars).
Top off with hot broth or water, leaving 1-inch headspace at the top.
4. Remove Air Bubbles
A plastic knife, butter knife, or canning utensil works just fine.
5. Affix the Lids
Wipe the rims of the jars to remove any residue, adjust the lids/rings (finger tight only), and process in a pressure canner as follows:
For jars without bones (both hot and raw pack methods), process pints for 75 minutes and quarts for 90 minutes
For jars with bones (both hot and raw pack methods), process pints for 65 minutes and quarts for 75 minutes
For Dial-gauge pressure canners, process jars at 11 pounds pressure (altitudes of 0 to 2,000 ft) or at 12 pounds pressure (altitudes of 2,001 to 4,000 ft).
For Weighted gauge pressure canners, process jars at 10 pounds pressure (altitudes of 0 to 1,000 ft) or at 15 pounds pressure (altitudes above 1,000 ft).
Print
.tasty-recipes-image { float: right; } .tasty-recipes-yield-scale { border: 1px solid #979599; border-radius: 2px; color: #979599; margin-left: 3px; padding: 0 4px; font-size: 0.7rem; } .tasty-recipes-scale-container { float: right; padding: 0 0 1rem; display: -webkit-box; display: flex; } .tasty-recipes-scale-container .tasty-recipes-scale-label { text-transform: uppercase; font-size: 0.6rem; color: #979599; align-self: center; } .tasty-recipes-scale-container button { background: transparent; border: 1px solid #979599; border-radius: 2px; color: #979599; margin-left: 5px; padding: 2px 4px; } .tasty-recipes-scale-container button.tasty-recipes-scale-button-active { color: #353547; border-color: #353547; } .tasty-recipes-scale-container button:focus { outline: none; } .tasty-recipes-video-toggle-container { float: right; padding: 0 0 1rem; display: -webkit-box; display: flex; } .tasty-recipes-video-toggle-container .tasty-recipes-video-toggle-outer-label { text-transform: uppercase; font-size: 0.6rem; color: #979599; align-self: center; margin-right: 5px; } .tasty-recipes-video-toggle-container .tasty-recipes-video-toggle { position: relative; width: 70px; -webkit-user-select: none; -moz-user-select: none; -ms-user-select: none; } .tasty-recipes-video-toggle-container .tasty-recipes-video-toggle-checkbox { display: none; } .tasty-recipes-video-toggle-container .tasty-recipes-video-toggle-label { display: block; overflow: hidden; cursor: pointer; border-radius: 2px; margin: 0; } .tasty-recipes-video-toggle-container .tasty-recipes-video-toggle-inner { display: block; width: 200%; margin-left: -100%; -webkit-transition: margin 0.3s ease-in 0s; transition: margin 0.3s ease-in 0s; } .tasty-recipes-video-toggle-container .tasty-recipes-video-toggle-inner:before, .tasty-recipes-video-toggle-container .tasty-recipes-video-toggle-inner:after { display: block; float: left; width: 50%; height: 30px; padding: 0; line-height: 30px; font-size: 14px; color: white; font-family: Trebuchet, Arial, sans-serif; font-weight: bold; box-sizing: border-box; } .tasty-recipes-video-toggle-container .tasty-recipes-video-toggle-inner:before { content: "ON"; padding-left: 10px; background-color: #89969F; color: #FFFFFF; } .tasty-recipes-video-toggle-container .tasty-recipes-video-toggle-inner:after { content: "OFF"; padding-right: 10px; background-color: #EEEEEE; color: #999999; text-align: right; } .tasty-recipes-video-toggle-container .tasty-recipes-video-toggle-switch { display: block; width: 18px; margin: 6px; background: #FFFFFF; position: absolute; top: 0; bottom: 0; right: 36px; border-radius: 2px; -webkit-transition: all 0.3s ease-in 0s; transition: all 0.3s ease-in 0s; } .tasty-recipes-video-toggle-container .tasty-recipes-video-toggle-checkbox:checked + .tasty-recipes-video-toggle-label .tasty-recipes-video-toggle-inner { margin-left: 0; } .tasty-recipes-video-toggle-container .tasty-recipes-video-toggle-checkbox:checked + .tasty-recipes-video-toggle-label .tasty-recipes-video-toggle-switch { right: 0px; } .tasty-recipes-print-button { background-color: #666677; display: inline-block; padding-left: 1em; padding-right: 1em; padding-top: 0.5em; padding-bottom: 0.5em; text-decoration: none; } a.tasty-recipes-print-button { color: #fff; } a.tasty-recipes-print-button:hover { color: #fff; background-color: rgb(102, 102, 119, 0.6); } .tasty-recipes-equipment { display: -webkit-box; display: flex; flex-wrap: wrap; -webkit-box-pack: space-evenly; justify-content: space-evenly; } .tasty-recipes-equipment > h3 { -webkit-box-flex: 0; flex: 0 0 100%; } .tasty-recipes-equipment .tasty-link-card { -webkit-box-flex: 0; flex: 0 0 50%; padding: 1.5rem 1rem; text-align: center; } @media screen and (min-width: 500px) { .tasty-recipes-equipment .tasty-link-card { -webkit-box-flex: 0; flex: 0 0 33%; } } .tasty-recipes-equipment .tasty-link-card p { font-weight: bold; font-size: 1em; margin-bottom: 0; } .tasty-recipes-equipment .tasty-link-card p a { color: initial; } .tasty-recipes-equipment .tasty-link-card span { font-size: 0.9em; } .tasty-recipes-rating.tasty-recipes-clip-10 { -webkit-clip-path: polygon(0 0, 10% 0%, 10% 100%, 0% 100%); clip-path: polygon(0 0, 10% 0%, 10% 100%, 0% 100%); } .tasty-recipes-rating.tasty-recipes-clip-20 { -webkit-clip-path: polygon(0 0, 20% 0%, 20% 100%, 0% 100%); clip-path: polygon(0 0, 20% 0%, 20% 100%, 0% 100%); } .tasty-recipes-rating.tasty-recipes-clip-30 { -webkit-clip-path: polygon(0 0, 30% 0%, 30% 100%, 0% 100%); clip-path: polygon(0 0, 30% 0%, 30% 100%, 0% 100%); } .tasty-recipes-rating.tasty-recipes-clip-40 { -webkit-clip-path: polygon(0 0, 40% 0%, 40% 100%, 0% 100%); clip-path: polygon(0 0, 40% 0%, 40% 100%, 0% 100%); } .tasty-recipes-rating.tasty-recipes-clip-50 { -webkit-clip-path: polygon(0 0, 50% 0%, 50% 100%, 0% 100%); clip-path: polygon(0 0, 50% 0%, 50% 100%, 0% 100%); } .tasty-recipes-rating.tasty-recipes-clip-60 { -webkit-clip-path: polygon(0 0, 60% 0%, 60% 100%, 0% 100%); clip-path: polygon(0 0, 60% 0%, 60% 100%, 0% 100%); } .tasty-recipes-rating.tasty-recipes-clip-70 { -webkit-clip-path: polygon(0 0, 70% 0%, 70% 100%, 0% 100%); clip-path: polygon(0 0, 70% 0%, 70% 100%, 0% 100%); } .tasty-recipes-rating.tasty-recipes-clip-80 { -webkit-clip-path: polygon(0 0, 80% 0%, 80% 100%, 0% 100%); clip-path: polygon(0 0, 80% 0%, 80% 100%, 0% 100%); } .tasty-recipes-rating.tasty-recipes-clip-90 { -webkit-clip-path: polygon(0 0, 90% 0%, 90% 100%, 0% 100%); clip-path: polygon(0 0, 90% 0%, 90% 100%, 0% 100%); } .tasty-recipes-nutrition ul { list-style-type: none; margin: 0; padding: 0; } .tasty-recipes-nutrition ul:after { display: block; content: ' '; clear: both; } .tasty-recipes-nutrition li { float: left; margin-right: 1em; } .tasty-recipes-plug { text-align: center; margin-bottom: 1em; display: -webkit-box; display: flex; -webkit-box-align: center; align-items: center; -webkit-box-pack: center; justify-content: center; } .tasty-recipes-plug a { text-decoration: none; box-shadow: none; } .tasty-recipes-plug a img { width: 150px; height: auto; margin: 5px 0 0 8px; display: inline-block; } @media print { .tasty-recipes-no-print, .tasty-recipes-no-print * { display: none !important; } }
Canning Chicken (How to do it Safely)
Canning chicken at home is easier than you think, makes meal prep a snap. Just grab a jar, pop the top, and you’re ready to add chicken to your favorite recipes (like tacos, pizza, pasta, and more).
Author: Jill Winger
Prep Time: 30 minutes
Cook Time: 90 minutes
Total Time: 2 hours
Category: preserving
Method: pressure canning
Cuisine: chicken
Ingredients
Pressure Canner
Canning Jars (pints or quarts)
Chicken (both bone-in and boneless work)
Salt (optional: for flavoring)
Instructions
Prepare your pressure canner.
Prepare your chicken. If keeping the chicken with bones, separate the meat at the joints and make sure the pieces fit into the jars. Cut up boneless chicken into pieces. Remove the skin from your chicken if you want.
Raw Pack method: Fill your jars loosely with meat pieces, leaving 1 1/4 inch headspace. Sprinkle 1/4 – 1/2 tsp. salt on top of pints jars, and 1/2 – 1 tsp. of salt on quart jars, if desired. Hot Pack method: Lightly cook your chicken (you can boil or bake it). Fill your jars with lightly cooked chicken, and hot chicken broth or water, leaving 1 1/4 inch headspace. Sprinkle 1/4 – 1/2 tsp. salt on top of pint jars, and 1/2 – 1 tsp. salt on quart jars, if desired.
Remove air bubbles from the jars with a canning utensil or a knife.
Wipe the rims, adjust the lids/rings, and process in a pressure canner as follows: For jars without bones (both hot and raw pack methods), process pints for 75 minutes and quarts for 90 minutes. For jars with bones (both hot and raw pack methods), process pints for 65 minutes and quarts for 75 minutes
For Dial-gauge pressure canners, process jars at 11 pounds pressure (altitudes of 0 to 2,000 ft) or at 12 pounds pressure (altitudes of 2,001 to 4,000 ft). For Weighted gauge pressure canner, process jars at 10 pounds pressure (altitudes of 0 to 1,000 ft) or at 15 pounds pressure (altitudes above 1,000 ft).
Canning Chicken: Your Questions Answered
How Long Does Canned Chicken Last?
It’s recommended that most home-canned items are at their best for about 18 months. However, as long as the seals on the jars are good and they are stored in a cool, dark location, they can safely last much longer than that!
Can You Use a Water Bath Canner for Canning Chicken?
NO. Do NOT use a water bath canner for canning chicken. Chicken is a low-acid food, which is unsafe to can in a water bath canner. You MUST use a pressure canner for canning chicken. Please see my Guide to Canning Safety for more details.
How do You Use Canned Chicken?
Unlike store-bought canned chicken, homemade canned chicken is not gritty or tasteless. I even think it’s better than crockpot chicken, which can often become grainy and dry.
Instead, homemade fresh canned chicken is moist and flavorful and perfect for any meal that needs shredded chicken in it. It’s great for chicken soups, chili, enchiladas and tacos, pasta dishes, pot pies, pizzas (it’s great on my delicious homemade pizza crust), and anything else where you need cooked shredded chicken.
You don’t need to cook it again, just pop it open and it’s ready to go. Perfect for quick and easy dinners!
My Final Thoughts on Canning Chicken…
As I write this post, it feels as though the world is losing their minds buying up toilet paper and bottled water. Learning old-fashioned skills like canning and food preservation suddenly doesn’t seem so crazy, and I am hopeful that more folks will be inspired to take charge of their personal food supply.
Canning is one of the most-fulfilling homestead skills I’ve learned. If you’ve been on the fence to dive in, let this be your year, my friends.
If you’re ready to learn how to can, but never had someone show you the ropes– I’ve got you covered!
I created the Canning Made Easy system to help home-canners start preserving with confidence. This step-by-step eBook covers EVERYTHING you need to know, in a simple, non-confusing way.
Grab your copy of Canning Made Easy and start preserving your harvest today!
More Kitchen Tips:
Cooking From Scratch When You Have Limited Time
What’s in My Everyday Preparedness Pantry
Homestead Kitchen Tools I Cannot Live Without
Heritage Cooking Crash Course (learn to cook nourishing meals without spending your life in the kitchen)
The post Canning Chicken (How to do it Safely) appeared first on The Prairie Homestead.
from Gardening https://www.theprairiehomestead.com/2020/03/canning-chicken.html via http://www.rssmix.com/
0 notes
Text
Pressure Canner or Cooker Best Recipes

When it comes to having a range of emergency situation supermarket up for potential survival purposes meat is traditionally the hardest to build up. You can acquire chicken, ham and turkey in small tuna size cans but trust me they do not in any method compare to the taste nor the quality of house canned chicken breast. If you need information for the best features that you need in cookers, kitchen appliances especially pressure cooker, visit Discounted Portables website here.
If you have never experienced the taste of house canned chicken breast you are missing out on a fabulous treat. Canned chicken is typically more tender and moister than routine chicken and in addition to its tasty taste the ended up item is functional for a large number of soups, stews, salads or just as a hot meal.
Not just is it a good survival method to have actually lots of canned chicken in the pantry but it likewise conserves many a trip to the local supermarket or the inconvenience of having to pay the usual retail price for the cans. I have 3 or four dozen of the commercial variations saved away in my emergency food materials and think me they were not low-cost in the least. The homemade versions are likewise an useful source of chicken when you need to produce an eleventh hour meal in a brief quantity of time.
There are many manner ins which you can prepare your canned chicken varying from utilizing your meat for Chicken Marsala to the ever popular Chicken Noodle Soup. Chicken is a low fat food which has a minimum cholesterol ranking making it an incredibly good choice for those who value their health. If you take place to be on a diet plan then the usage of chicken is certainly in your best interests as it is low in calories and high in protein.
A few hints are in order when you prepare to can your own chicken breasts. First see the paper and supermarket advertisements and buy your chicken when it is on sale. If the bone in chicken is cheaper no problem you can use it for your canning however if you acquire your chicken without the skin you can conserve yourself the problem of skinning the breasts yourself.
Regularly, you can evaluate the yield as one pint jar will hold around 1 1/2 of the medium to plus size chicken breasts. Most modern day pressure canners will easily hold 8 pints per load. Make certain to keep the chicken meat chilled until you are prepared to start your canning session.
Prior to beginning your canning session, wash all the containers, the rings and the lids in a dishwashing machine or in boiling water. Some individuals compete that considering that the temperature level within the pressure cooker will be about 235 degrees there is no requirement for different sanitation to happen nevertheless, I want to err on the side of security when it concerns canning. In either case they should be spotlessly clean. Examine all the containers for chips or nicks. Anything which can possibly hinder a reliable vacuum seal will result in the food ruining.
Add two quarts of water to your pressure canner and make sure that the rack is properly being in the bottom of it. It is finally time to get rid of the chicken from the fridge and start your session. Thoroughly clean the chicken breasts really thoroughly getting rid of the skin as well as any obvious fat. The golden rule for processing meat is that it must be lean without any fat otherwise you will experience interference with appropriate sealing.
To begin, begin by filling a kettle with water and bring it to a boil. Place your pressure canner on the range and rely on a medium heat. When packing the meat in the containers it should be hot. Next location the chicken breasts in a large pot to which a percentage of water has been added. Prepare the breasts till they are nearly done and after that get rid of from the heat and enable them to cool for a few minutes.
At this point you will need to work extremely quickly in order to keep the meat hot. Cut each breast into parts which will fit into the container with a sharp knife and a fork. You can include a little variety by blending both large and little pieces into the very same jar. After placing the pieces of chicken breast into the first container set it aside and advance to the next one till all the containers are completely filled. Do not load the jars too firmly with the chicken as you wish to leave space for the broth to fill the container. Constantly leave a one inch head space in each of the jars for expansion.
After you have actually filled all the jars with the chicken put 1/2 teaspoon of salt within each pint being processed and make sure to even distribute the liquid into the containers. Lastly, take the boiling water and fill each container approximately the one inch mark. Never ever add too much liquid or you will experience a liquid loss. Poke the mixture with a spoon to guarantee that the air bubbles are gotten rid of. With a damp fabric clean around the tops of the containers to wipe any food and than put the lids with rings on the containers ensuring not to over tighten up.
Put your containers into the pressure canner and replace the cover on the device. Process inning accordance with the makes directions and vent the canner for at least 10 minutes after steam begins leaving from the vent. Include the vent cover to the canner and you are almost finished.
Keep a close eye on the pressure gauge to guarantee a steady circulation. Under processing of the chicken meat will lead to putridity while overcooking degrades both the flavor and the texture. Cook for around 75 minutes than switch off the heat and let the pressure drop naturally. Get rid of the containers when the pressure has appropriately drops and permit them to cool.
0 notes
Text
Canning Corn: Better Than Store-Bought Canned Sweet Corn!

with Sharon Peterson
Canning corn is a great way to preserve your harvest. Some people love it, and some don't. Personally, I like the flavor of home-canned corn too. Canning corn from your own garden or another local grower is still better than store-bought canned sweet corn.
Many people also prefer the taste of frozen corn. For these reasons, freezing corn is another great preserving option. I do some of each because my family prefers the frozen over canned. But I love the convenience of canned!
We have a wonderful variety of sweet corn that is grown around here called Olathe Sweet Corn. It is so good and sweet, and they have a festival weekend dedicated to corn. The weekend includes concerts and all-you-can-eat corn on the cob.
If you are working with a sweet corn, don't be surprised if it comes out a deep, golden color. This sometimes happens with the sweeter varieties.
Corn does take a bit more work than some other foods. It is not hard, but it has a processing time of 1 hr and 25 minutes for quarts and 55 minutes for pints. Compared to other produce, canning corn takes a long time.
"Can corn be canned in a water bath?"
No, home-canned corn must be processed in a pressure canner.
Required Preparations for Canning Corn
Gather Your Canning Supplies for Canning Corn:
Ingredients for Canning Corn:
You will need about 32 pounds (in husks) of sweet corn per canner load of 7 quarts; an average of 20 pounds is needed per canner load of 9 pints.
How to Can Corn
Here's how to can corn:
Pick your corn. Corn should be fresh-picked and ripe.
Get your corn huskers to work! Make sure they do their best to get all the hair off. Games make this task fun. Challenge them to see who can husk the most ears. Here's a tip for mess control: husking can be done outside.
While the corn is being husked, start boiling water, either in a large stockpot or your blancher.
Blanch your corn cobs.
Cut the kernels from the cob.
This can get messy too. The corn tends to squirt. Do it in an area that will be easy to clean up. I have a big island in the center of my kitchen that I use. I LOVE easy clean up!
Tips:
Use an electric knife: I've never done this but it sounds like a great idea.
Use a bundt pan: Set your corn on end on the center piece and let the kernels fall into the pan. I've tried this and it seems awkward to me. I list it here because I have seen others rave about doing it this way. Try it, and you may just like it.
Here is a video of my husband's cutting-the-kernels-off-the-cob-time-saver. He is using a tool that is called a corn stripper. I do not have a brand name on ours, and it is a vintage tool that has been around for years. If you do a search on Amazon, you'll see some that are similar.
Video - Tim's Easy Corn Method
Close-up of the blade on this corn stripper. (Check your local farm store for similar cutters. It is an invaluable tool when canning corn, dehydrating, and pickling.) When you want to get a lot of cobs stripped, use one of these.
While the corn is being husked and the corn is cut off, go ahead and get your canner and canning jars ready.
Optional: Add salt to the jars, ½ tsp per pint or 1 tsp per quart. (Salt is for seasoning purposes only.)
After the kernels are off the cob, pack into clean canning jars.
When canning corn, you can either use the raw pack or hot pack method. Since I have already blanched my corn, I prefer raw pack.
Here are directions for both:
Fill jars, leaving 1-inch headspace. Wipe the rims of your jars clean, so there will be no food particles to interfere with the seal.
Place your canning lids on and finally add your screw bands. Place in a pressure canner to process.
If you need more instruction on how a pressure canner works, see this page.
How to Process Corn in a Pressure Canner
Always use a pressure canner when canning corn.
Adjustments for Pressure Canner Altitude in Feet Dial Gauge Canner Weighted Gauge Canner 0-1000 11 10 1001-2000 11 15 2001-4000 12 15 4001-6000 13 15 6001-8000 14 15 8000-10,000 15 15
Do You Like Creamed Corn? Try This.
Here’s a quick, easy way to make a cream-style corn from regular kernel corn--canned sweet corn, frozen corn, or store-bought corn. It doesn’t matter. This is not for canning; rather, it is how I make creamed corn when I open the jars of canned sweet corn.
If you are using home-canned corn, it is a good idea to open the jar and boil your corn for 10 minutes. Read more on why I suggest boiling first here.
Heat corn to simmer. Simmer for 10 minutes, if you wish. Remove 1/2 of the corn to a blender. Add 1/2 cup or so of cream. (Half and half, evaporated milk, or another cream of your choice works, but I usually have half and half on hand.) Puree.
Add back with corn. Add butter and salt to taste. Heat and serve.
Very easy and good too.
Canning Corn Questions
"When Pressure Canning Corn, Do I Really Have to Process It for That Long?
Question:
Canning Corn processing question.
Hello, I'm a long time canner/freezer/preserver type of girl. In the past I've always put my corn up in the freezer, because that's the way mom and gran do it.
But the garden is gang busters this year and even with a new freezer, there isn't going to be room for all of it.
Anyway I called gran and borrowed mom's steam pressure canner and canned up the first few batches of corn. I followed the directions in the Ball Blue Book and let the thing chick-chick for 55 minutes.
However the corn has darkened quite a bit and some of the water in the jar is gone as well. So I've gone on-line to get more info.
Both gran and mom say 55 mins is too long and they only ever steam theirs for 25 minutes.
I'm filding conflicting directions on line too, I've found websites indicating times anywhere from 25 to 55 minutes. I don't want to poison my family, but I would love it if that 25 minute time was a possibility.
Sharon's Answer:
Hi Amy
This is a hard question. And I have been asked it in a myriad of ways. Can I do it the 'old' way? Many of the questions posed to me point out that either moms or grandmothers did things different. And I certainly don't like contradicting our elders... often they have great wisdom!
However, the answer is: You take a risk by doing it the 'old' way. You have to make that decision yourself. Personally, I've decided to just follow the recommended guidelines and have that peace of mind. The processing times I give on my site are all taken from safe sources. My most frequently used source is the National Center for Home Preservation, though some directions are from the Ball Blue Book too.
The good news is that it is not unusual for canning corn to turn golden in color. Mine often is a darker color. From my research, it is because it is a very sweet variety. My corn never tastes overcooked.
As far as the liquid loss, that is okay too. You want to avoid it, but it will not hurt your corn, unless it is extreme. Liquid loss is often caused by taking your jars out of the canner too quickly.
Leave the jars in your canner for a couple of minutes before removing. Open the canner, and then wait 3 or 4 minutes. This gives the jars a chance to cool slightly. When it is cooling, the contents will be shrinking and not swelling, so that may help you keep more liquid in your jars.
Read more on this here: Home canning and liquid loss.
I hope that helps.
Question:
Sharon, I was reading canning corn and noticed that it takes 1hr-25min to do a batch. Why does it take so much longer with corn and beans to process. Thank you.
Sharon's Answer:
It all has to do with the acidity of the food. I've used the times recommended by the USDA. They test the foods and determine the length of processing necessary for eliminating the risk of botulism. Corn is more starchy than other vegetables, so I'd assume the acidity levels are different as well. Also, corn contains more natural sugar.
Here are a few pages that might interest you:
Botulism - A severe, sometimes fatal food poisoning caused by ingestion of food containing botulin.
Canning methods - Which canning methods to use? Is my food high-acid or low-acid? Should I process in a water bath canner or pressure canner? Why? That is a common question ~ and a good one...
More Ways to Preserve Corn
Freezing Corn
This page explains everything you need to know about freezing corn, either on the cob or as sweet corn kernels. Also, learn how to make a cream-style corn.
Canning corn from your own garden or another local grower is still better than store-bought corn.
I decided to try something fun. Corn Cob Jelly sounds weird. But hey, if you add enough sugar, even corn cobs can turn out tasty!
I had all the ingredients for this growing in my garden, so I decided to try a corn relish recipe I found in my Ball Blue Book.
I found that just like most things, dehydrating corn is easy...especially since we were on a roll and already had had corn prepped for freezing, canning, pickling, and sweets.
Page last updated: 7/18/2019.
Members' Extra: Access Your Video Tutorial in Your Members Area
Learn Home Canning
I've been teaching home canning for a long time. I'd love to share what I've learned with you.
This content was originally published here.
0 notes
Text
Canning Beans: How to Can Dry Beans at Home

Canning beans is an easy way to prepare quick weeknight meals in advance. Home-canned beans taste infinitely better than storebought tinned beans, and it takes about the same amount of time to can them as it does to cook them. Make a big batch, and you’ve got dozens of quick meals just waiting in your pantry.
We eat a lot of beans. Like literally bucket loads of beans.
To save money, we started buying pinto beans and black beans in bulk from our local food coop, by the 25 and 50-pound sack. I’d store the dry beans in 5-gallon buckets sealed with airtight gamma seal lids, and stored that way they’ll keep a long time. Years in fact, even decades. But they never last more than a few months at my house.
The problem is, it takes a lot of time and energy to cook dry beans. Every other week I’d cook up a big pot of beans for our meals throughout the week, spending half the day steaming up the house. Then they’d take up half the fridge until we ate them all.
I figured that there had to be a better way, and there is!
Pinto beans in a 5-gallon bucket with a gamma seal lid. The blue rim is to attach a screw-on gamma seal lid.
We already pressure can bone broth on a regular basis, so I’m no stranger to a pressure canner. Given that dry beans store well on their own, it just never seemed to make sense to can them.
After my first batch, I was hooked. It takes about the same amount of time to can beans at home as it does to cook them, and instead of them taking up the whole fridge they’re not neatly stored in meal-sized portions on my pantry shelf!
Home-canned beans cost just pennies a jar, and they taste a lot better than storebought canned beans. Now that I’ve started canning beans at home, that takes care of my families bean habit for next to nothing cost-wise and the process is incredibly simple.
How to Can Dry Beans
The process sounds complicated if you’ve never pressure canned before, but I promise it’s not all that hard.
Here are the basic steps:
Soak the beans overnight (12-24 hours)
Strain and add fresh water to a pot with the beans
Bring to a boil and simmer 30 minutes while you prepare your pressure canner.
Pack the partially cooked beans into canning jars, seal with 2 part canning lids and load into your pressure canner.
Process the beans in the pressure canner for 75 minutes (pints) or 90 minutes (quarts). Pressure will depend on your altitude, and I’ll discuss that shortly.
Turn off the heat and allow the canner to come to room temperature before unloading. Check jar seals, and store sealed jars in the pantry until needed.
Preparing Dry Beans for Canning
The first step in canning beans is soaking the beans.
This serves a couple of purposes. First, it helps to leach out compounds in the beans (indigestible starches) that cause gas. People are divided on this, and many don’t think it helps, but with my bean eating family I can tell you it makes a world of difference.
Even if you don’t believe soaking beans is necessary generally, it is mandatory if you’re canning beans. The beans need to absorb as much water as possible before canning so that they don’t expand too much in the canning jar.
Start with a 12 to 24-hour soak in cool water.
How Many Dry Beans fit in a Canner Batch?
The obvious next question, how many beans do you need to soak for a canner batch?
I’ve found it takes 8 pounds of dry pinto beans to fill a 14-quart canner batch in my 30 Quart All American Canner. That works out to a bit over 1/2 pound of dry beans per quart jar (about 0.6 lbs).
The national center for food preservation recommends 5 pounds for a 7-quart batch, and 10 pounds for a 14-quart batch. I’ve found that’s way too much, and I end up what a huge pot of leftover beans. Not the end of the world, I just keep cooking them on the stove while the pressure canner is running, but then I’ve got about 12-15 cups of cooked beans in the fridge (on top of a full canner batch in the pantry).
If you’re canning beans in pints, the total amount is a bit less. These days, with a family of 4 I tend to can in quarts because it’s a lot more efficient. My canner will hold 19 narrow mouth pints (or 18 wide mouth), but it’ll hold 14-quart jars. Canning in quarts means I can put up a lot more food faster, and we eat a quart per meal anyway.
I’ve written the recipe below for a standard canner batch of 7 quarts. I use a larger canner that can accommodate 14 quarts at a time, so I start with double the beans (8 lbs total). For a standard canner batch of 9 pints, start with roughly 2 3/4 to 3 pounds of beans. In my canner, a pint batch is 19 narrow mouth pints and I use 5 1/2 to 6 pounds of dry beans.
If you don’t have a scale, a pound of beans is roughly 2 cups. That means that you need a heaping cup of dry beans for each quart jar.
Pre-Cooking Beans for Canning
I know what you’re thinking.
Why on earth do you need to partially cook the beans if you’re going to be putting them into a pressure canner?
The pre-cooking step is less about “cooking” and more about getting them to their final cooked size. By first soaking the beans for at least 12 hours, and then simmering them for about 30 minutes, they absorb water and reach their final cooked size.
This will help keep them from expanding too much in the canning jars. Or, more specifically, absorbing all of their canning jar liquid leaving them in a dry jar.
Even still, they’re going to absorb some water inside their canning jars when you take the jars out of the pressure canner the water level will have dropped. Here’s an example…
Unloading a pint of pinto beans from the pressure canner. Note how the liquid level has dropped during canning. This is normal, and the beans will absorb slightly more liquid during canning even if they’re pre-cooked. Without pre-cooking, there’s not quite enough liquid in the jar to fully cook the beans.
That’s some water level drop is perfectly fine in the jar, but a pre-cooking ensures that the beans will be fully cooked during the canning process and that they have enough water in a given jar to finish their cook while canning.
Strain out the soaking water. This will remove the starches they’ve released during soaking and result in higher quality home-canned beans.
Fill a large pot with water and add the soaked beans into the pot. Bring the pot to a boil and simmer the beans for 30 minutes to partially pre-cook them before canning.
Loading the Pressure Canner
While your beans are pre-cooking, prepare the pressure canner.
Follow the instructions that come from the manufacturer, as pressure canners sometimes have slightly different steps required based on the model.
For my All American Pressure Canner, I start by adding a thin coat of oil to the rim of the lid to ensure a good metal on metal seal at the top.
Then I add 2-3 inches of water the bottom, along with the bottom trivet, and bring it to a boil alongside the pot that’s pre-cooking the beans.
I’ll also prepare canning jars, making sure I have enough jars and lids on the counter ready to go.
When the beans have finished their 30-minute pre-cook, use a canning funnel to load them into the canning jars leaving 1-inch headspace. Cover the beans with boiling cooking water before sealing with 2 part canning lids and loading into the pressure canner.
(Sometimes it helps to have a kettle of water boiling on the side just in case there’s not enough cooking liquid to fill the jars.)
Pressure Canning Dry Beans
Once the beans have been loaded into the pressure canner, seal up the lid according to the manufacturer’s instructions.
For mine, I tighten all the bolts and then allow the unit to steam out the vent pipe for 10 minutes before adding the canning weight. This ensures that the chamber is completely filled with steam and will heat to an even temperature (without any colder air pockets).
After steam release, I add the canning weight to the pressure appropriate for my altitude and then process for 75 minutes for pints or 90 minutes for quarts.
Pounds Pressure for Canning Beans
The total pounds pressure required varies based on your altitude, and whether you’re using a weighted gauge or dial gauge pressure canner. I use a weighted gauge, which is much easier to work with, but it only has 3 pressure settings (5, 10, and 15 lbs).
Use the table below to determine the appropriate canning pressure based on your altitude and the canner you’re using.
Checking Seals and Storage
After the processing time is over, turn off the heat, and allow the pressure canner to come to room temperature before opening.
Once cooled, I remove the jars from the canner check their seals and give them a quick rinse in the sink.
Remove the canning rings. They’re no longer holding the lids on the jars because the jars should be completely vacuum-sealed. If a jar’s not sealed to the point where the ring is pointless, then it’s not properly canned. The ring is only there to hold the lid in place during canning, not after during storage.
Leaving the rings on might actually cause trouble, because they may trap water/bean juice underneath which can either mold (nasty) or simply rust the jar lid shut. Either way, while the beans inside may still be perfectly fine, it makes it hard to get to them. Much easier to remove the rings after canning and save yourself frustration later.
How Long do Canned Beans Last?
General recommendations suggest eating home-canned goods within 1 year. Ball canning recently revised those guidelines using their modern lids, and they now suggest quality will be maintained for 18 months.
After 12-18 months, the canned goods will begin to degrade in quality, but they may be safe for much longer than that initial storage period. You’ll have to use your best judgment.
Yield: 7 Quarts
Canning Beans
Canning beans at home saves money compared to store-bought, and they taste better too. All you need is dry beans of your choice (pinto, black, etc), plenty of water, canning, jars and a pressure canner.
Ingredients
4 Pounds Dry Beans (about 8 cups)
Water
Salt (Optional, see note)
Instructions
Pick over dried beans, removing any discolored beans or non-bean debris.
Place the beans in a large pot or bowl and cover with cool water. Allow the beans to soak for 12-24 hours, ensuring that they always stay submerged.
Drain the soaking water.
Place beans in a large stockpot with fresh water. Bring the pot to a boil and cook 30 minutes.
While the beans are cooking, prepare a pressure canner according to the manufacturer's instructions. (This usually means adding the bottom trivet and heating 2-3 inches of water in the bottom.)
Put a kettle of water on and bring to a boil. (This will help top off the liquid in the jars if there's not enough water in the bean pot.)
Hot pack the partially cooked beans into quart or pint jars. Top with boiling water, either from the bean pot or from the kettle. Be sure to leave 1-inch headspace.
If adding salt, use 1/2 tsp per pint or 1 teaspoon per quart (optional, adjust to your taste).
Seal jars with 2 part canning lids and load them into the pressure canner, following the manufacturer's instructions on loading/spacing/etc.
Place the lid on the pressure canner and secure it. Allow the unit to vent steam for 10 minutes before adding the pressure weight to allow it to begin pressurizing.
Process jars at pressure for 75 minutes (pints) or 90 minutes (quarts) for locations under 1000 feet in elevation. Be sure to adjust times based on your elevation. (Wait until the unit is up to pressure before starting a timer.)
Once the processing time is over, turn off the heat and allow the unit to come to room temperature before opening (this can be several hours, I usually let it sit overnight).
Unload the canner and check seals. Store any unsealed jars in the refrigerator for immediate use.
Remove canning bands from sealed jars, and clean off the outsides before storing in the pantry.
Home-canned beans should last 12-18 months in the pantry if properly canned and sealed.
Notes
Dry Bean Quantities ~ I've written this recipe for a standard canner batch of 7 quarts. I use a larger canner that can accommodate 14 quarts at a time, so I start with double the beans (8 lbs total). For a standard canner batch of 9 pints, start with roughly 2 3/4 to 3 pounds of beans. In my canner, a pint batch is 19 narrow mouth pints and I use 5 1/2 to 6 pounds of dry beans.
Water ~ It takes a lot of water for this recipe, first in soaking and then in boiling the beans. Be sure to add plenty of water to the pre-cook pot as you'll need it to fill the jars. It takes more water than you'd think to fill the jars with the beans, so be sure you add plenty of water to the cooking pot. I've found that it should be about 3 inches above the level of the beans before I start cooking them, but having a second kettle boiling ensures you have plenty of water to fill the jars just in case.
Salt ~ Adding salt is optional, and I actually don't add salt when canning beans. Salt toughens bean skins during cooking, and I like the results better when they're canned without salt. We just add salt to the pot when we're actually cooking with the canned beans, which allows for more flexibility anyway. If you do choose to add salt, roughly 1/2 tsp per pint or 1 tsp per quart works for most people's taste. I'd suggest using canning salt or sea salt.
Recommended Products
As an Amazon Associate and member of other affiliate programs, I earn from qualifying purchases.
Pressure Canning Recipes
Looking for more pressure canner recipes to keep your canning weight rocking?
This content was originally published here.
0 notes
Photo
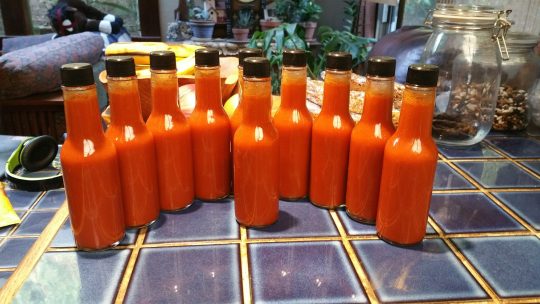
A new snapshot from https://sagesacre.com/2020/03/11/how-to-make-awesome-hot-sauce/
How to Make Awesome Hot Sauce
Making truly delicious hot pepper sauce is easy thanks to the magic of fermentation
TL/DR: Click here to skip to recipe
I love a good hot sauce.
Not that crazy “it’s so hot it has to be stored in a liquid nitrogen cylinder” stuff, but the spicy, complex kind that delivers a wave of interesting flavors as well as heat. For me, fermented hot sauces are the best at delivering that combination.
Fermented hot sauce, like yogurt, sourdough bread, Kosher pickles and other fermented foods, gets its unique flavor from a naturally occuring microorganism called lactobacillus. These little critters consume sugar and convert it to lactic acid which both helps preserve the food and creates unique flavors. Based on the type of pepper, the variety of lactobacillus in your surrounds, and the temperature and length of fermentation, you can make sauces that range anywhere in flavor from hot pineapple and vanilla to tangy curry and lemon grass.
Hidden Lake Hot, my pepper of choice.
Every year I make a batch of fermented hot sauce that takes nearly six months, but you can actually produce a pretty dang good batch in just a week. Even over a period that short, the fermentation process will convert the sugars in the peppers into new flavors and aromas you just don’t get with fresh sauces.
If you haven’t ever tried making your own, you definitely should. Here’s my basic and advanced recipes:
Hot Sauce Recipes
QUICK NOTE ABOUT LACTO-FERMENTATION:
These are simple lacto-fermentation recipes using brine. Basically we want a brine salty enough to prevent bad bacteria from taking up residence, but not so salty it prevents the lactobacillus from fermenting the sugars in the peppers.
The proper proportion of salt to water is ½ tablespoon salt for every 1 cup water.
The water should be filtered, not tap, and salt should be iodine free to prevent off flavors or colors. Just remember to keep to those proportions you can scale to larger batches with no problem.
Basic Fermented Hot Sauce Easy, 15 minutes prep, 7 days ferment, makes about 1-½ pints of hot sauce
Ingredients
1 pint ripe hot peppers chopped or sliced (I like the cayenne varieties)
1 pint filtered room temperature water
1 tablespoon (non-iodized) salt
Instructions
Make the brine by mix the water and salt until the salt is dissolved
Place the hot peppers in an empty quart-sized jar
Add the brine to the jar and stir to remove air pockets
Cover the jar loosely and put in a cool place out of sunlight
Stir every so often to prevent white mold from forming on the surface (if it does appear, just scrape it off with a spoon)
In a few days the mixture should become cloudy and the pepper mixture should have a slightly sour aroma (this is the lacto doing its work).
On the 7th day of fermenting, pour your pepper mixture into a blender (or use a stick blender) and puree the mixture until smooth.
Transfer the sauce to clean bottles and cap.
The hot sauce is ready for use.
Because we haven’t stopped the fermentation by heating the sauce or adding a stabilizer like vinegar, this hot sauce will continue to ferment (though more slowly) in the bottle, gradually mellowing the sharp notes and changing the heat profile.
As long as you don’t open the bottle it should keep just fine at room temperature for several months. Once you do open the bottle, just keep it refrigerated.
Long Ferment Hot Sauce Easy, 3-6 months ferment, makes about 1 gallon of hot sauce
I make one batch of this hot sauce every year. I start it in mid-September and finish in mid-March which provides an extended period of fresh pepper additions followed by a long, slow fermentation period over the winter.
Because of the long fermentation, the heat profile on this moves it from an upfront peppery hit, to a lower, slower build with lots of spice, grass and vanilla flavors followed by a smooth, hot finish that really sets the sauce apart from others.
I use my favorite hot pepper (an accidental cayenne/thai cross from 20 years ago), picked fresh from the garden, but you can use whatever variety or varieties of hot peppers you like most.
Ingredients
Ripe hot peppers (you’re going to add about 4-6 ounces each week)
2 whole garlic cloves (peeled)
Filtered water
Non-iodized salt
2 seasoned hardwood staves (oak, hickory, maple, etc.), bark removed
1 cup white vinegar
Instructions
Week 1: Place a handful (4-8 ounces) of whole peppers in a large, non-reactive container (I use a 1 gallon pickle jar). Add enough brine mixture (water and salt at the 1 cup to ½-tablespoon ratio) to cover your peppers. Cover the container loosely and place in a cool dark place.
Week 2: Scrape off any white mold that has formed on the surface and stir the mixture. Add a handful of fresh whole peppers and enough new brine to fully submerge the peppers. If the peppers float, use pickling weights (or a zipper baggy filled with water) to keep them submerged. Again, cover loosely and return the container to a cool dark place.
Week 3: Repeat the steps in week 2, but add two whole cloves of garlic as well.
Week 4: Repeat the steps in week 2. If it’s fermenting well, the mixture should be cloudy and yellowish.
Four weeks of fresh pepper additions has fermentation going well
Week 5-11: Repeat steps in week 2 for as long as you have fresh peppers to add. Cold weather usually kills mine off in late Autumn, so I can add fresh peppers until mid-December. If your season is shorter, just skip to the next step (week 12).
Week 12: Scrape any mold from the surface of the pepper mixture and stir thoroughly. Add your two hardwood staves to the mixture, making sure they’re fully submerged. Return to the cool, dark place.
Toasted oak ready to be added to the pepper mixture
Hot Pepper sauce with oak wood added and ready to return to aging.
Week 13-24: Now we’re just going to let the mixture continue to ferment and age. Each week take the mixture out, scrape off any mold and stir before returning to the cool, dark place.
Week 24: Let’s bottle!
Pour your pepper mixture into a large bowl or pot.
Fermented Peppers in the pot (click to watch)
Remove the hardwood staves from your pepper mixture and use blender to puree it into a semi-smooth sauce.
Using a stick blender to puree the peppers
Place a colander on a large, non-aluminum, pot and pour the pepper slurry through the colander to filter out the seeds, stems, and pepper pulp.
Straining the pepper pulp and seeds through a colander
Pepper pulp after straining through a colander
Add 1 cup of white vinegar to the pot of sauce and slowly heat and stir it until it begins to boil. Reduce the heat and allow the sauce to simmer for 10 minutes (we’re stabilizing the sauce so it stop fermenting).
Bringing the hot sauce to a boil
Pour your hot sauce into clean, hot jars and seal. (I like to use 5 ounce bottles you can get on Amazon pretty cheap.)
Allow the bottles of hot sauce to cool, then place them in a cool dark place to rest for a couple more days before enjoying.
Batch 19 of Sage’s Fermented Hot Sauce
Because this hot sauce has been stabilized, it will keep for months (possibly years) at room temperature even after the bottle has been opened—no need to refrigerate to prevent fermentation from starting again.
Enjoy!
From the beginning
Check out these posts for the progress on the hot pepper sauce beginning with its start back in September 2019.
September 2019
Hot Sauce Batch 19 – entry 1
Projects
Hot Sauce Batch 19 – entry 2
Projects
October 2019
Hot Sauce Batch 19 – entry 3
Projects
November 2019
Hot Sauce Batch 19 – entry 4
Projects
Hot Sauce Batch 19 – entry 5
Projects
Hot Sauce Batch 19 – entry 6
Projects
Hot Sauce Batch 19 – entry 7
Projects
December 2019
Hot Sauce Batch 19 – entry 8
Photos, Projects
Hot Pepper Sauce Batch 19 – Entry 9
Projects
End of the Line for Hot Peppers 2019
Photos
Hot Sauce Batch 19 – entry 10
Projects
January 2020
Hot Sauce Batch 19 – entry 11
Projects
12Next
Load More Posts
0 notes