#framesandstructures
Explore tagged Tumblr posts
Visit Tumblr Blog
Explore Tumblr blogs with no restrictions, modern design and the best experience.
Last Seen Tumblr Blogs


Fun Fact
12.7% of mobile users access Tumblr.
Text
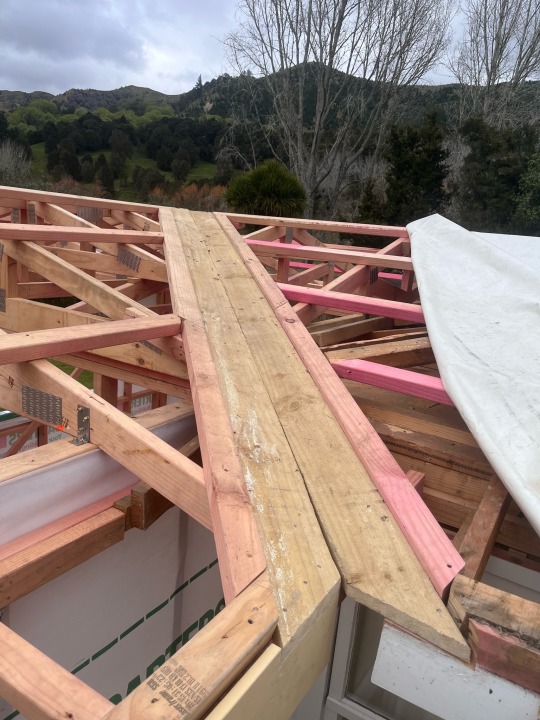
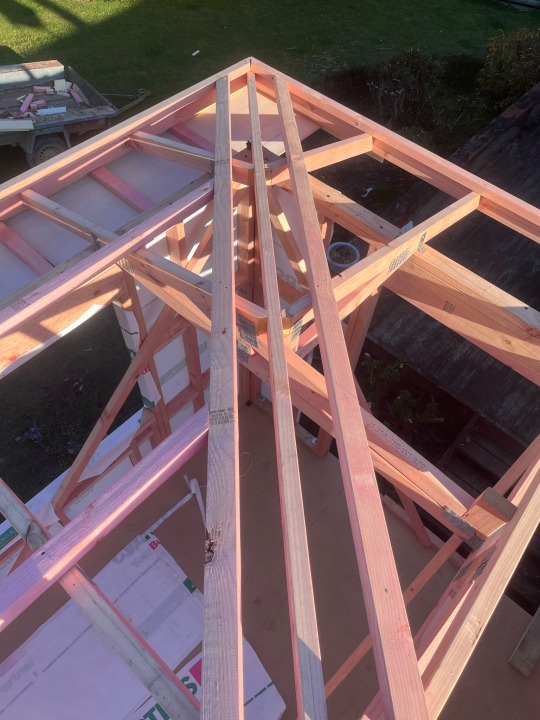

Valley and hip framing detial
0 notes
Text


Lean to seperate to existing dwelling.
No joist hangers, multi grips therefore all joins had to be very accurate. iron sand colour steel and clear-light roofing was used.
Barge flashings and apex flashing installation.
0 notes
Photo


Exterior Envelope / Frames and Structures
Re-framing and straightening exterior, gable-end wall. Preparing to be wrapped in flexible wall underlay (wrap) and clad with fibre-cement weatherboard. Structure is an existing lock wood style build, with battens that cladding is directly fixed too.
New cladding is required to be fixed off at 600mm centres. Existing battens varied in spacings and straightness therefore were removed.
I plumbed and straightened each end ‘stud’ then used string-lines to straighten top and bottom battens. Once window openings were framed up I installed and straightened stud battens at 600mm centres and framed around window openings. I then installed top jack battens and made sure they were straight and plumb.
Health and Safety - Extra caution as working from heights, be aware of people and falling debris.
Materials - h1.2 90x45mm pine, 90mm galv nails, damp proof course (packing)
0 notes
Photo


Frames and Structures / Interior Lining and Finishing
Building an in-situ wing-wall running up to a raking ceiling. Wall was built in relation to kitchen plan to allow for cabinets, etc. to be built around it. Wall also frames around the tight staircase and had a 39° slope to prevent anyone from hitting their head when using stairs. Frame was made using h1.2 treated 90x45mm pine timber with 90mm galv hot dip nails. Once posioton of frame had been worked out and marked in accordance with kitchen plan we used a laser level to plumb a mark up on the ceiling to position our top plate correctly.
Before ceiling was framed we installed extra nogs between ceiling battens for fixing for our top plate. Frame was then lined with untreated 90mm groove ply. Skirting, scotia and beads were then fixed in to position.
0 notes
Photo

Frames and Structures
Roof framing - installing h1.2 70x45mm purlins with strap bracing as required according to roof frame plan.
0 notes
Photo


Frames and Structures
A lot of straightening and adding extra fixing for sheet joins etc. Clients decided on 150mm grooved ply running horizontally along walls with 90mm trim (architraves, scotia, skirting and join batterns). Central internal wall we kept as exisiting only to find out it had a 14mm bow in the middle therefor we had to pack each side out to suit. In hindsight a complete rebuild of wall would have been for sufficient. To straighten I used a laser level to check each 4 corners of wall and pack/plane to suit. Once corners are the same I set up string lines to work my way along the top and bottom plates until they were all straight and plumb. Each stud was then packed and nogs accordingly.
0 notes
Photo


Frames and Structures
Building stringer to attach to exterior house with 15mm packers to allow for any water run off. We also used EPDM washers when coach screwing stringer to wall to seal any potential water leeks. Glulam beam bearers were etched into the side of our piles and then coach bolted on as per required in the plan. 190mmx45mm h3.2 joists were used at 450mm centres to prevent any bounce in floor. 140mm Purple heart decking boards will be used. We used the dumpy laser level to find the height at which to cut the piles so that top of decking floor boards will be flush with rebated slider door.
0 notes
Photo


Frames and structures / Exterior envelope
Installing rafters for rasied pitch roof plane. Pitch was been raised from 15° to 3°. Rafters are all 240mmx45mm h1.2 pine. We used 90x45mm purlins to allow for a longer cantilever span. Strap bracing was installed We laid self supporting roofing underlay horizontally, ensuring laps where at least 150mm and we worked form the bottom up.
0 notes
Photo


frames and structures / demolition work
Rassing pitch of one side of gable roof to allow for verandah roof to fit under We had to build in place a series of prop walls to take the weight of the roof while we built new frames for the new half of the roof. We had to install a large glulam beam to support the gable roof and span the length of the living room space which is all open plan. Connections and hold downs were required as drawn on plans. Frames where built in sections on the flat concrete driveway and then lifted and fixed in place. Raking jack frames were then built in place.
Health and safety: working from heights, ppe, unstable and falling objects/materials, authorised personal only, clear communication - ensure everyone is clear on the plan.
Materials: h1.2 140x45mm pine, glulam pine beam
0 notes
Photo


Preliminary work/demolition / Frames and structures.
Renovation work involves re building front wall and extending out to join up with exiting building line. Also large deck to build out the front. Removing aluminium stacker doors and windows from front facade. Using prop walls to hold existing truss and rafters up while we re-build packer plate from top of concrete wall and boundary joist using 90x45mm h1.2 packer plate and 240x45mm h1.2 for boundary joist.
0 notes
Photo

Frames and structures/subfloor
Installing glulam h3.2 braces. Followed 3604 to locate where to fix brace too. And installled 12Kn anchor plie kits on anchor/brace plies as well as z nails/wiredogs to all ordinary piles.
0 notes
Photo


Frames and structures/subfloor.
Hanging and bracing 125x125mm h5 piles for concrete pour. Using dumpy laser level to check pile heights sufficient. Once piles had set we makred and cut tops of piles. Also priming with metalex and applying DPC to further prevent any moisture drawing up into the bearers. Used x2 H3.2 140x45mm fixed together to create our bearers. 140x45 h3.2 joists with timer flitch plates for joist joins. We doubled up our boundary joists for solid fixing for external walls and framed out around back door entry/exit.
0 notes
Photo


\Frames and Structures - standing and bracing wall frames.
First I set up the building lines and then measured in 90mm and marked on the ply floor all the perimeter/external wall frames. I then used running measurements to mark all internal walls. Once all frames had been marked I then used the wall framing plans to mark where each frame sits on the ply. This helped later on when carrying frames and needing to know where each should go. We stood frames in place then plumbed corners with level and straight edge then braced with 90x45 to internal blocks so braces wont affect scaffold/roofers/cladding. Trusses were marked out on top plates using the roof framing plan. Trusses were then lifted up, fixed and braced accordingly. Once all wall frames were plumbed in fixed off 600 centres (every stud) a second top plate was fixed in place over wall frame joins to tie together. Stud lock screws were fixed through the top plate into each stud.
Health and Safety - PPE, Safe ladder use, clear communication between workers.
Materials - 90x45 h1.2 pine, 90mm bugels.
Tools/equipment - impact, framing gun, skill saw, straight edge, 1200 level, string line, chalk line.
0 notes
Photo


Frames and Structures - trusses
Constructing trusses using certified drawings from engineer. Using h1.2 pine 40x45mm, timber connector nail plates.
0 notes
Photo


Exterior Envelope / Frames and Structures
Helping roofing team by replacing/straightening purlins fro new iron to fix too. South side of existing roof had a big dip in the middle. We ran string lines across purlins to check this. We decided to attach props under the strong back to lift up the rafters to eliminate the dip. We were working on a gable roof and hip roof. We used h1.2 70x45mm timber pine for replacing purlins.
Health and Safety - PPE, Extra precaution when working from heights.
Materials - 70x45mm h1 pine, 90mm hot dip galv nails, 80mm blue purlin screws.
Tools/equipment - framing gun, skill saw, impact, string lines
0 notes
Photo


Exterior Envelope / Frames and Structures
Replacing obvious borer/rot exisiting rusticated weather boards with new weatherboards with similar profiles. Used multitool to square cut weatherboards over existing studs for joins. Frames were brushed with metalex to further protect from any future borer. In some places were larger areas of cladding was replaced we attached building paper to help protect the exterior envelope from any water damage. All weatherboards were primed with oil based primer and all joins were square cut with standard flat weatherboard galv soakers over the joins. We used stainless steel 65mm jolt screws because the site was close to the ocean. Weatherboards around corner windows were tacked in place with an estimated ark cut I used the jigsaw for. Once tacked on I used a 10mm scriber to create a fluid ark that I could then re-cut and fix on. I also constructed baseboard opening. Because of the grounds topography I had to come up with a way to match weatherboards up from either side so decided to do a 45° on the corners of weatherboards to make look a bit nicer.
Health and Safety - PPE, Safe ladder and scaffold platform, Make sure site is safe and tidy at the end of each day - since church was still in use during weekends.
Materials - 140mm rusticated weatherboards, 140mm pine decking timber, 65mm stainless steel jolt screws, galvanised weatherboard soakers, oil based primer, metalex
Tools/equipment - brad gun, drop saw, ladder, portable scaffold, impact, jog saw
0 notes