#gold leaf tutorial
Explore tagged Tumblr posts
Visit Tumblr Blog
Explore Tumblr blogs with no restrictions, modern design and the best experience.
Last Seen Tumblr Blogs


Fun Fact
Tumblr’s website traffic is steadily declining.
Text


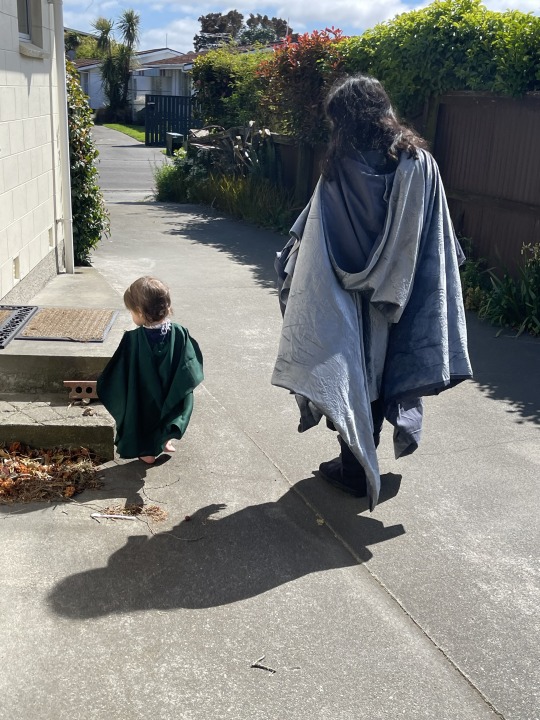


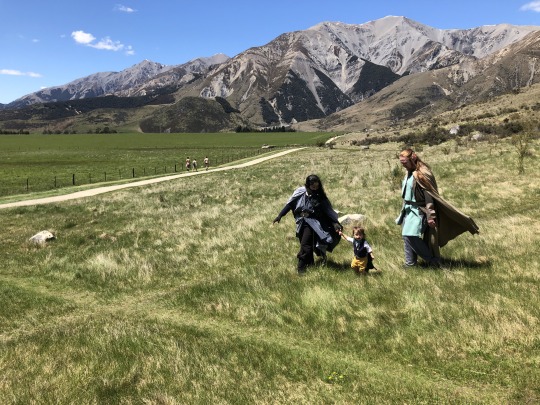
Here is my latest crochet project!! And thrifting, sewing, crafting... I knew from the second we were going to move to New Zealand, my "Halloween" (they don't really celebrate it here, but I feel like these costumes are going to be pretty versatile) costume for the family would be Lord of the Rings inspired! So here's our little fellowship - an elf, a dwarf, and a hobbit!
I of course was excited to crochet / yarncraft an epic beard - there are many examples online, I just sort of winged it.
For the cloaks and robes, I thrifted mostly duvet covers, bedsheets, and pillowcases. There are a bunch of cloak tutorials on youtube, but again, I mostly took some inspiration, and worked with the limitations of what I had. A lot of the rest of the clothes were thrifted / we already had.
I also made the leaf pins, trying to make them look a little like the silverfern that is so prominent here in New Zealand, the beard-rings and One Ring out of foil (the gold foil was off a Whittaker's chocolate bar!), elf bracers out of a thrifted purse, and elf ears from some felt and wire I had in my craft stash!
This was really fun to do! It's not a high quality cosplay or anything like that, but the cloaks have great swish, and I'm gonna get some use from them, I'm sure!
#crochet#yarn#cosplay#costume#lord of the rings#fellowship of the ring#the hobbit#elf#dwarf#hobbit#middle earth#thrifting#crafting#diy#diycostume#sewing#new zealand
106 notes
·
View notes
Text
It's Finally Time. LMK Game Motif.
Spider Queen: "The game is just beginning!"
(1x04 Noodles or Death) (Shout out to Spider Queen for being the first instance of Game Motif)
-

Sun Wukong: "So, you thought you had all the pieces right where you wanted them?" Lady Bone Demon: "There are so many moves I've yet to play."
(2x00 Revenge of the Spider Queen)
-

Lady Bone Demon: "Your destiny has not been changed or diminished! Your enemies have done exactly what we needed. And now, my queen, the real game can begin."
(2x00 Revenge of the Spider Queen)
-

Sleep Bug Game: "Sleep Bug! Download now from the app store!"
(2x01 Sleep Bug)
-

Lady Bone Demon: "With this, you will build your revenge, one piece at a time. Five more items of power must be collected, and then, we shall forge your destiny!"
(2x01 Sleep Bug)
-

Pigsy: "I've seen it all before, games suck up the best years of your life until you're left a hollow bitter old man."
(2x03 Pig Pong Panic)
-

Lady Bone Demon: "Just a piece in a game you can not possible comprehend."
(2x05 Minor Scale)
-


Game Wukong: "After you complete the tutorials, you'll learn how to access-" MK: "Ugh! This is taking forever! How do I...skip."
[...]

Game Wukong: "REMEMBER. NOT EVERY OPPONENT CAN BE BEATEN WITH BRUTE STRENGTH! DO YOU WANT TO LEARN A COUNTER ATTACK?"
(2x06 Game On) (Game Motif the episode fr fr)
-
Huntsman: "Why am I doing all this for you?" Lady Bone Demon: "You're only asking this now? Because, that is you're role to play in this game."
(2x08 To Catch a Leaf)
-

Syntax: "My Queen, we can begin collecting the materials! The update is ready." Spider Queen: "*Breathes in* Good, good! I'm not gonna let that little lady play me!"
(2x09 72 Transformations)
-
Lady Bone Demon: "It would seem the Queen's usefulness is drawing to an end. Time to remove the unnecessary pieces from the game." Mayor: "With pleasure, my lady."
(2x09 72 Transformations)
-

Spider Queen: "I was just a pawn in the game! Like you." MK: "It's not too late, you can run." Spider Queen: "Haven't you figured that out yet, there's no running from what she is."
(2x09 72 Transformations)
-
Gold Fish Demon: "The rules, they are simple: you put up something of value in order to win something of value! Win the game, get the prize!"
(3x03 Smartie Kid)
-

Lady Bone Demon: "The Samadhi Fire is the final piece of the game, a tool destiny has gifted me to complete my work!"
(3x11 This Imperfect World)
-

Red Son: "That's how I know you won't lose control—you can't, because you're the only hope I- the only hope this world has left. But! Only so long as you master all my tutorials."
(3x11 This Imperfect World)
-


MK: "Ugh! Again! Remind me how this 'game' is supposed to convince me I'm not destined to turn into an evil demon monkey thing again? Cause every option I pick takes me to this!"
MK: "Same!"

MK: "Screen!" Macaque: "Hey you're finally getting it! No matter what options it's giving you, you're always gonna end up in the same spot."
(4x10 The Jade Emperor)
-
Macaque: "Alright misery kid, you were supposed to realize by now that the choices the games giving you, aren't the only choices you've got! Life isn't some pre-written thing like a video game where you have to do what the tutorial says!"
(4x10 The Jade Emperor)
-

The Jade Emperor: "How is it you come to stand before me today Azure, was there a point where you questioned it, or where you to oblivious with your own delusion to realize you are a mere piece in someone else's game!"
(4x10 The Jade Emperor)
-
Azure, who gave you that scroll? Because whoever it was, they must have known this would happen, wanted this to happen! And they used you to do it.
#literally been in my drafts for 10 months#anyways here this is!#finally!#all of 4x10 makes me fucking sick actually#lmk game motif#lmk#lego monkie kid#lmk parallels
44 notes
·
View notes
Text

Me, following my own tutorial instructions because I forgot how I was doing these
She’s SO pretty, oh my gosh. I tried a few different color schemes for her too, and I did like a light cape with a dark dress, but decided the contrast with the dark leather skirt over a light dress was too good to pass up. As always, this was drawn by @vagueandominousvibes (here) and simply colored by me :)
As someone who knows several Zelda designs pretty well (two and a half cosplays), it was very cool to see some of those design elements echoed here! I noticed the leaf designs on her crown, her bracers, the stripe on her dress, the gold necklace thingies, and even the cape. It’s fantastic
#four swords#knights lodge au#one of my favorite fics of all freakin time actually the vibes are impeccable#if this fic has no fans I must be dead
39 notes
·
View notes
Text
B is for Beauty: NOT BULLYING

True beauty radiates from the inside out.
It doesn't matter how expensive the attire is...how immaculate the hair-do is...or if you cover yourself in gold leaf....if you are being a straight up nasty, bullying troll....no amount of money will make you shine radiantly like the girl who is kind to others in her bargain finds.
Plain and simple.
I've noticed A LOT of bullying and exclusion happening in the scene.
For something where we preach about showcasing our beauty with others...
Why in the heck are so many still so damn ugly on the inside?
It starts with us. We want change? We must be the change.
I recently was the special guest speaker for a contest that I was part of in the past - where I became an official pinup royalty! - and I knew I just had to bring this up.
The group was FULL of new lovely gals to the pinup scene. I was there to speak to them about my tips and tricks and answer questions (which , by the way...they ROCKED and had very great questions for me! Also, shoutout to a certain few who have read this blog!!) , so I felt that this was a very crucial part of what being a pinup is all about.
Like I said, I can help with the physical component...you can find multitudes of tutorials online...but one thing that is not spoken enough about is the attitude and grace that comes with being a pinup.
Us seasoned folks must use our platforms to help promote awareness for this.
We need to influence others on the right path.
I've seen and heard of different places where girls are being massively cliquey and purposely excluding others and treating others differently.
Ew. Gross non-flex.
PREACHING sisterhood and unity...but in the same breath, they throw in the asterisk where it excludes certain people.
That is NOT being iconic.
That is NOT how one rolls in a sisterhood.
I get it, not everyone is going to get along. But for the love of all that's fluffy and kitten-y, can we at LEAST be decent flippin' human beings?
I don't want to be THAT person...but maybe we need to start including that in the contracts when applying...first bout of evidence that someone is being a twatopotamus to others? Buh-bye, birdy!
See, it hurts me to even say something like that since I am a massive advocate for pinup being for everyone no matter what. But when people are purposely trying to hurt others with good intent? Claws come out.
I realize as well that this behaviour can stem from jealousy. But still...don't exclude and go out of your way to make someone feel bad because you are envious over something that they have or are.
One of the saddest things I've heard from others and have experienced myself is the feeling of not belonging due to people acting like this.
The feeling can make you feel like you just want to give up and pull out of the contest, despite how much effort you've put in. Can I be completely honest here? I feel as if that's part of the desired results from the person bullying.
Instead of working on oneself to become better when overcome with jealousy, they'd much rather try to get rid of the things they are jealous of. In their minds they see it as an easier way to fix that empty void instead of simply learning to accomplish the traits they are desperately wanting.
Wanna know the sad thing? Most of this vile behaviour comes from those of us that have been in the scene for years and SHOULD know better. This behaviour continuing to happen is teaching what exactly to those new to the journey? Not the right things, I can assure you.
How does it affect you?
From a promoter POV, it would be concerning having this happen...people dropping out last minute and thwarting your work you put to make the show run smoothly...less people showing up if the behaviour continues, and eventually bringing an end to the contest if it tanks too hard...it's not a good look and will bite you in the end in the long run.
From a contestant POV, it would make me feel suspish if I saw this happening to others...it would make me question how that person who is bullying others sees me and are they being fake to me...am I next in their destructive path?
As a whole - it's not good for ANYONE to experience.
What are some things you can do to put a halt to this kind of a behaviour?
For Promoters:
Have rules. Have a policy. I give tremendous kudos to True North Pinup Magazine for having an Inclusivity Policy where they do not tolerate any bullying behaviour. THIS IS THE WAY.
Be strict with it. Yeah, sure...being strict it the opposite of fun and good vibes, but to keep the good vibes as that, you must enforce the rules and make sure that this behaviour doesn't get ignored. You show that you're serious about not allowing this behaviour to continue...you are making waves on setting a new dynamic.
Have it in your contract! This kind of combines the two points above. Have it in the written contract that your contestants sign off on, and be sure you enforce this in stone. They know what they're signing up for. If it's not for them being nice and stuff...then let them move on and not dampen your parade.
Have undercover agents! (I had to say it like that - it just sounded so dang flashy!). A lot of contests have people observing the behaviours of the contestants and their interactions. If they see this behaviour, they can report it right away and will result in disqualification, etc.
For Contestants:
If you see someone being or saying something unkind, don't engage in the antics. There is power in numbers. Instead - and if comfortable - bring it up to one of the promoters. You are not being a 'rat'. If they see you as such, then they do not care about the ethics.
Be kind to others! Like...it's simple. Even if you don't get along with someone, you can still act decent when sharing the same stage in a production.
Support one another! If there's posts and whatnot from the event page of the different girls...show the same amount of support for each girl - not cherry pick. That honestly is such a bad look, leaves a sour impression and creates very much unnecessary tension. It costs nothing to give someone a 'like'.
If you feel as if you are a target of bullying, please go to the promoter about it. Do not stay silent. Be part of the change. Love yourself enough to not allow yourself to be treated poorly. You belong here.
Bullying can make us feel down and put a dampen on our glow. It's unnecessary and unchecked emotions that need to be dealt with. The more we let this continue to happen...history will just keep repeating itself and ethics will be lost.
Don't be a bystander.
Make a change. BE the change.
Everyone deserves to feel beautiful and shine like the diamond they are.
Everyone belongs.
Let's do this.

xo Bree Von Tease
#pinup#vonteasevintage#vintage#retro#advice#tips and tricks#tips#pinup girl#be nice#anti bullying#bullying#girl power#sisterhood
5 notes
·
View notes
Text
💀🌳 Ancestor Tree Samhain DIY Tutorial 🌳💀
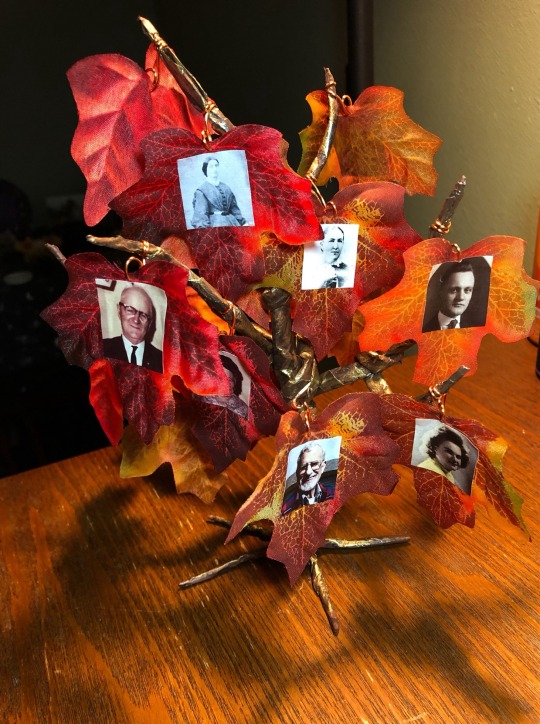
I made this ancestor tree for Samhain years ago and realized I don’t think I ever posted a tutorial on how I made it. If you’d like to try making your own, I’d love to see how they come out!!
(I've typed out the steps below this infographic, I realize they are small and hard to read in the image...)

Materials:
Crafting wire (I used 20g copper jewelry wire)
Wire jewelry pliers (long nose, needle nose, and/or looping pliers work well)
Old newspapers or paper bags
Clear glue or Mod Podge
Paint brushes (for the glue/Mod Podge and also for paint)
Acrylic paint in colors of your choice
Printer & printer paper
Photos of your ancestors (digital copies so you can print them to size, NOT originals!!)
Fabric fall leaves (you can usually find these at craft stores in the autumn seasonal decor, but cardstock or paper cutouts work too!)
Step 1: Make the frame
Cut your wire into lengths between 3 and 10”, you will need several depending on how many branches you want. Then cut some newspaper or a paper bag into strips. Apply some glue or Mod Podge to one end of a paper strip, and twist it around the longest wire, wrapping all your wires in paper. Try to make the middle of the wire thicker than the ends. Begin wrapping the paper-covered wires together to form branches and a trunk. Make sure to leave room at the bottom to make roots for it to stand on. Add extra paper-covered wire to fatten up the trunk if necessary.
Step 2: Paint the tree
Once the glue is dry, you can paint your tree using colors of your choice. I used a bark brown and then some gold to add some interest. Paint in layers if you’re using different colors, wait for one layer to dry, and then paint another layer, depending on how you want your tree bark to look.
Step 3: Add ancestors
Print out photos of your ancestors (please do not cut up originals!!) in little square/rectangle shapes and cut them out. Using clear glue or Mod Podge, attach the photos to fabric leaves (I found mine at a discount art store, but I’m sure you can get them at any craft store or online!). Let them dry flat.
Step 4: Attach the leaves
Using more of the craft wire you used for the tree’s frame, poke a little hole in the top of the fabric leaves, but not too close to the edge, you don't want the leaves falling off later. Make a small loop at the end of about a 2” strip of wire using your pliers, and slide the leaf into the loop so it can wiggle a bit in the breeze. Wrap the remaining length of wire around a branch, dangling the leaf about a half inch or less from the branch. Don’t crowd too many in one place, or you won’t be able to see everyone’s faces. Repeat this step with each ancestor you plan to add to your tree.
Feel free to save this image and share! Happy crafting!
#witchblr#witchy#samhain#Halloween#ancestors#ancestor veneration#ancestor work#ancestor tree#ancestor altar#crafty witch#diy witchcraft
40 notes
·
View notes
Text
Looking for some advice from my fellow bookbinders.
I really want to learn how to do gilded/foiled edges on my next book but I've never done any gilding on anything and it looks...intimidating. Even from the tutorials. I'm tempted to just buy a gold leaf kit for a first try. Anyone done that on a book? Can you use a regular basic kit for that or is regular gold leaf somehow different from what you'd use for a book? I saw a lot of tutorials saying to put talcum powder on the pages before doing this but it looks like everything else I'd need (adhesive, varnish, gold leaf sheets) would come in the kit.
Or is it easier to do foil? I saw a couple of tutorials for foiling the edges with a cricut heat press, which I already have. What kind of foil would you recommend for it, and where do you buy it from?
#i have a lot of questions#i want to get this right and my searches were less than helpful#bookbinding#snek makes books
12 notes
·
View notes
Photo
truebluemeandyou:
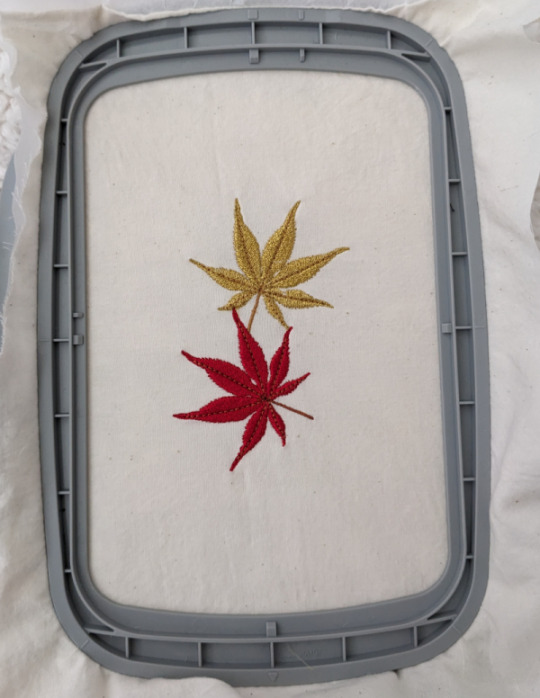
DIY Embroidered Gold Leaf. Tutorial from The idea Room here to make “leaf skeletons”, or you can buy them at your crafts store. Photo found at Susan Elliott’s Plays with Needles here.

1K notes
·
View notes
Text
youtube
Discover Wat Pho: The Temple with Buddha’s Legendary Recline Wat Pho in Bangkok is a treasure trove of Thai culture and history, with the iconic Reclining Buddha at its center. The temple complex is a peaceful oasis amidst the hustle and bustle of the city, offering visitors a chance to soak in stunning art, serene courtyards, and spiritual ambiance. The grandeur of the Reclining Buddha is hard to miss, stretching an impressive 46 meters long and covered in gold leaf. As you wander through the temple grounds, you’ll encounter intricate murals, detailed carvings, and even colorful chedis that represent various historical periods in Thailand. Did you know Wat Pho is also known as the birthplace of Thai massage? This centuries-old tradition is taught here at the temple’s massage school, and visitors can even experience a rejuvenating session after touring the grounds. It’s a perfect blend of culture, relaxation, and beauty. Spend some time here to truly appreciate the depth of Thai heritage. Wat Pho is a must-visit when in Bangkok. #WatPho #RecliningBuddha #BangkokTemples #ThaiCulture #BuddhistHeritage #TempleTour #TravelThailand #PeacefulOasis CYBERTITO – the uncle who loves information technology. From tech tips, web tutorials, poems, OFW life, BPO work, travels, and Catholicism, there's always something new. Explore with CYBERTITO! Subscribe for more videos about Art, Life, Tutorial, Travel, and Catholicism! https://bit.ly/CYBERTITOYouTubeChannel Follow CYBERTITO on social media Facebook Fan Page: https://www.facebook.com/cybertitojj Facebook Profile: https://www.facebook.com/JosephRaymundEvangelistaEnriquez TikTok: https://www.tiktok.com/@cybertitojj Visit CYBERTITO website https://cybertito.com/ Copyright (C) CYBERTITO – All Rights Reserved.
0 notes
Text
🐟🌿 Ready to get started? Check out my blog post for an in-depth tutorial backed up by peer-reviewed research to create a thriving planted aquarium for your White Clouds - https://glassboxdiaries.com/planted-aquarium-setup/
🐟 Welcome to My White Cloud Mountain Minnow Tank Setup! 🌿
In this video, I take you through the complete setup of my beautiful White Cloud Mountain Minnow aquarium. Whether you're a beginner or looking to enhance your current tank, you'll find plenty of tips and inspiration here!
✨ Here's what I did:
Tank Selection: Started with a 12-gallon tank, perfect for these lively minnows.
Backdrop: Applied window privacy film to the back for a clean and sleek look.
Substrate: Used Fluval Stratum substrate, a reliable choice that works wonders in my other tanks.
Decorations:
Added spider wood anchored with Seryu stone.
Attached various Anubias plants, including Anubias Calidifolia, Anubias nana petite, and Bucephalandra Kedagang.
Planted narrow leaf Java fern to add more greenery.
Planting Layout:
Foreground: Helanthium Tenelium Green for a lush carpet effect.
Midground: Siamensis 53B and Limnophila to create depth and texture.
Lighting & Filtration:
Installed a low-powered light to gently illuminate the tank.
Set up a hang-on-back filter with 30ppi foam and filter floss for efficient water filtration.
Temperature Control: No heater needed! The tank maintains a comfortable room temperature for the minnows.
Cycling the Tank: After cycling, I introduced ramshorn snails, Amano shrimp, and vibrant yellow Neocaridina shrimp to keep the ecosystem balanced.
Stocking: Finally, added my stunning gold White Cloud Mountain Minnows, bringing the tank to life!
🌱 Why This Setup Works:
Easy Maintenance: The chosen plants and filtration system make upkeep simple.
Healthy Environment: A well-cycled tank ensures your minnows thrive without the need for constant monitoring.
Aesthetic Appeal: The combination of plants and decorations creates a natural and serene underwater landscape.
Watch the video to see the entire setup process in action and get some ideas for your own aquarium! Don't forget to like, subscribe, and hit the bell icon for more fish tank setups and aquatic tips. 🛎️🐠
1 note
·
View note
Text
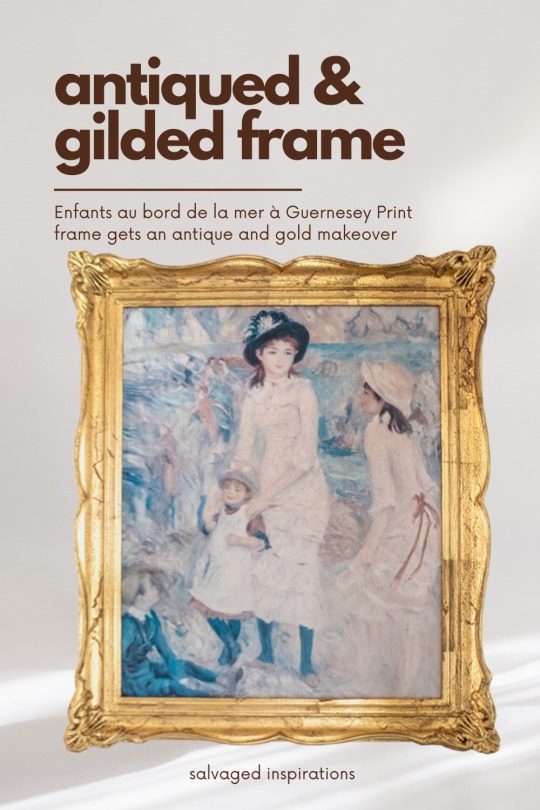
A touch of gold can beautifully transform an old frame into an elegant, timeless piece. With paint, wax, and faux gold leaf, a vintage frame takes on a stunning antique gold finish. Full Makeover Tutorial ~ https://salvagedinspirations.com/how-to-apply-gold-leaf-and-antique-a-thrift-frame/
1 note
·
View note
Text
Fall Nails: Embrace the Season with Style
Autumn is here, and with it comes the perfect opportunity to update your nail game. Fall nails are all about cozy colors, creative designs, and seasonal vibes that reflect the crispness of the season. Whether you're a fan of bold hues or subtle tones, this guide will inspire your next manicure makeover.
1. Why Fall Nails Are the Ultimate Seasonal Statement
Fall nails go beyond mere aesthetics; they’re a celebration of the season. From burnt oranges to deep burgundies, the shades reflect the warm tones of autumn leaves. But it’s not just about the colors—fall nails capture the cozy, layered feel of the season in a single glance.
When you flaunt a fresh set of fall-inspired nails, you’re making a statement. It’s a way to embrace the season without needing to overhaul your entire wardrobe. Plus, they’re conversation starters, especially with intricate designs like pumpkins, leaves, or even cozy sweater patterns.
2. Top Fall Colors to Fall In Love With
Earthy Elegance
Earthy tones are a staple for fall nails. Think olive green, warm taupe, and chocolate brown. These shades exude sophistication and pair beautifully with autumn wardrobes. For a trendy twist, mix matte and glossy finishes for a unique texture.
Bold and Moody
Deep, moody hues like plum, navy blue, and oxblood red add drama to your nails. These colors stand out while complementing fall’s darker aesthetic. Pair them with gold accents or minimalistic nail art to create a high-impact yet elegant look.
3. Trendy Fall Nail Art Designs to Try
Cozy Sweater Patterns
What’s fall without cozy sweaters? Replicate this texture on your nails with embossed designs. These look especially chic in pastel or neutral shades. Pair the pattern with glitter accents for a subtle touch of glamour.
Leafy Inspirations
Capture the beauty of falling leaves on your nails. Use stencils or freehand techniques to create intricate leaf designs in shades of orange, yellow, and red. Adding a gradient background can elevate the look to new heights.
4. Tips for Achieving Long-Lasting Fall Nails
Prepping Like a Pro
The key to perfect fall nails lies in the preparation. Start by cleaning and filing your nails. Apply a quality base coat to ensure smooth application and reduce chipping. This extra step will keep your fall nails looking flawless for weeks.
Choosing the Right Products
Invest in high-quality polishes and top coats. For fall, opt for polishes with creamy textures or gel finishes for a long-lasting shine. If you’re adding intricate designs, a quick-dry top coat can seal the art without smudging.
5. DIY vs. Salon: The Best Route for Fall Nails
The Joy of DIY
If you’re feeling creative, DIY fall nails can be incredibly satisfying. With online tutorials, stencils, and affordable tools, creating seasonal nail art at home has never been easier. Plus, it’s a fun way to spend a cozy autumn afternoon.
The Magic of Professionals
For intricate designs or long-lasting gel applications, visiting a salon might be your best bet. Professional nail artists have the expertise and tools to bring even the most elaborate fall nail ideas to life. Treat yourself—it’s fall, after all!
Conclusion
Fall nails are more than just a seasonal trend; they’re a celebration of autumn’s beauty. With a mix of earthy tones, bold hues, and intricate designs, your nails can become the ultimate accessory. Whether you go DIY or leave it to the pros, embracing fall nails is the perfect way to add a touch of autumn to your style.
0 notes
Text
Knitting Machine Pumpkin
It's that time of year again! You want as many pumpkins for your fall market as possible, and the knitting machine is your most useful tool. If you've never made one before, please allow me to assist you.

Creating pumpkins on the circular knitting machine is so fun! You can make them so many different ways and colors. You can add things to make them unique and beautiful, themed, anything you want! I am currently in the midst of full-on market prep for my first market of the year, and only one of two that I do yearly, so I'm trying to make all I can.
This quick tutorial will show how to do a basic large pumpkin. I've created a video, and I'll also type out what I did as best I can for those (like me) who have a hard time following videos.
So, let's get to it!
To create knitting machine pumpkins, you'll need to know the basics of the circular knitting machine: how to cast on, how to cast off, how to "double-up," which means you fold one half inside the other, as if you're making a beanie. There are many tutorials on how to do all of these things on YouTube, if you're unsure how.
To make the large pumpkin above, I used a thin gold yarn that came in a blanket-making kit years and years ago, so I don't know the exact weight or name of the yarn. I used two strands, however, because it is a thin yarn.
You will also need scissors, a tapestry needle, and stuffing
First, you cast on to your big machine (either an Addi 46 or a Sentro 48), set your yarn into your feeder and tensioner (I used the smallest tension for my pumpkin), and carry on cranking!
Crank out 80 rows
Cast off of your machine with a long tail
pull both ends closed
double your work
tie the tails together to secure and close the pumpkin
turn your work inside out so that the tails are inside now, cut them short and reserve them for later.
Thread the longest tail onto your tapestry needle. Pick up your work and pinch the open end closed, take the needle and weave in and out of every other stitch around the end. This creates a drawstring that will help you close that side.
Stuff the pumpkin, firmly but not too much.
Now, I usually go back through those stitches to double-secure the opening. Tie the tails together 2-3 times. (Be careful not to pull too hard because sometimes yarn breaks and it's frustrating)
DO NOT cut the tails yet.
To create the sections of the pumpkin, you may want to refer to the video because I'm sure I can't explain it in a way where people will understand. But I shall try!
Using your longest tail, wrap the yarn around the ball, lined up with the stitches and rows, put your needle into the middle of the pumpkin from the bottom and pull it through the top. Pull it tight to create a dent in the ball.
Do the same thing several more times, several rows away from each dent.
Tie the tails and hide them.
Now you're done with your Knitting Machine Pumpkin!
That's it! That's all you have to do to make a pumpkin!
Hopefully this helps you out in your market-planning
NOTES
I crocheted the stem and leaf on my pumpkin with just some simple stitches, I didn't write the pattern down, but there are many people with stem and leaf patterns for free all over Pinterest.
Also try creating a green icord with a crochet hook or machine, inserting a wire or pipe cleaner and curling it like a vine. (I have a photos of one below that I made for a finger knit pumpkin)
The small brown pumpkin was made using 40 rows. The same kind of yarn was used, but in brown
The video:
youtube
To create a stack, you need three pumpkins
Pumpkin rows:
40 60 80
Using a long tail or piece of yarn, sew the pumpkins together in the middle. Decorate as you want!
(For my stack, I used cinnamon sticks and E6000 glue)

Now, go out there and get your market prep on!
If you found this helpful in any way, or if you just love the photos and the row counts, please share it with all your creator friends!
Thank you and God bless you in your endeavors!
"He changes times and seasons; He removes kings and sets up kings; He gives wisdom to the wise and knowledge to those who have understanding;"
Daniel 2:21
0 notes
Text
an example of embroidery on the bernette 79. as mentioned in a previous post, the embroidery part has a huge learning curve and my smooth brain struggled with it, but at least i understood the basics after 5 attempts. i went through tutorials on their site, starting from simple to more complex, this is a sampler of one of those. now it's time to learn the finicky details of getting an okayish embroidery to a better one, ugh.
the main downside of embroidery of anything, is that not all fabrics are meant to be embroidered, which seems crazy, like how could people in ancient and pre-industrial cultures embroider such fine or fragile pieces with material limits and lack of technology, but I guess stuff was made differently back then. also the large amount of thread used in embroidery machines, especially if you messed up and had to restart as there is no way to preserve the thread from a bad stitch out. with hand embroidery, you use somewhat less thread depending on the design and could undo at least a few stitches while keeping the thread intact to reuse, because there is no bobbin thread on the underside in the way, just the visible thread stitched in and out of the fabric.
currently my biggest problem is sometimes the tension is off, judging by the bobbin thread looking knotted or sometimes barely visible, i feel like the underside should be smooth and halfway visible, based on other embroideries on store bought items. i think that's due to the tension of the machine and the fragility of the fabric. here i used unbleached muslin cotton with one layer of medium weight stabilizer. but once faqs start mentioning tension my one brain cell turns off. i ain't reading all that.
my next biggest problem is the thread breaking. i have no idea what the thread is tangling over or how it's shredding itself. the gold metallic thread here, while lovely, broke at least 9 times stitching a small maple leaf (12 minutes), while the plain red machine embroidery thread did not break at all, so obviously the shiny foil material is contributing to the tangles and breaks. this i actually knew about based on watching youtube videos of other people talking about their embroidery machines, so at least i was prepared and worked on something else while watching the machine.
now it seems like i'm complaining a lot about technology and I am, but these are known issues for any sewing machine and i knew about them ahead of time. it's just annoying. i work fulltime as a pharmacist which requires precision and accuracy and math at a swift pace, and when i work on my hobbies, i don't wanna overheat my brain by focusing even more on precision and accuracy and math, and yet my two hobbies, art and sewing, are all about precision and accuracy and math!
that's why my friends know better than to ask me what the tip is or calculate percent off a sale price. i don't know!
0 notes
Text
Our Guide to Shop Gold and Silver Bullions
One can't go wrong when investing in gold or silver bullion since it helps in diversifying your portfolio and, at the same time protects you from uncertainties in the economy. Even as an amateur investor, knowing the basics of buying gold and silver gives an edge in making informed decisions. In this all-rounded tutorial, we will walk you through all there is to know if you are considering to buy gold bullions. We will tackle the benefits, types, considerations during purchase, and storage opportunities for such bullions.
Benefits of Investment in Gold and Silver Bullions
Diversification:
Therefore, gold and silver bullions are a hedge against both inflation and economic instability and could be immensely helpful to any investment portfolio. Stock and bond prices are mainly driven by changing market conditions; however, precious metals almost always retain their value as compared to diamond jewelry in Chicago.
Tangible Asset:
Bullions are very literal physical assets that a person can hold in their hands. Thus, they offer a sense of security and stability. They do not bear the risks associated with paper investments and can hold their value when the economy turns sour.
Liquidity:
Gold and silver bullions are globally recognized and thus traded commodities; hence, you can easily sell or buy them in any market around the globe. This feature gives liquidity to these metals and makes them flexible for investment in comparison to diamond jewelry online.
Type of Gold and Silver Bullions
Gold Bullions:
The bullions may come in various forms, such as bars and coins. Gold bars range from small grams to large kilogram bars. Gold coins can be in standard weights such as one-ounce weight. Some of the very famous gold bullion coins include the American Gold Eagle, Canadian Maple Leaf, and South African Krugerrand.
Silver Bullions:
Silver is also minted into bars and coins, both fractional ounces and larger kilogram bars. Besides, coins such as the United States Silver Eagle, Canadian Maple Leaf, and the Silver Philharmonic of Austria are widely collected by coin collectors and significant investment vehicles.
Considerations for Buying
Purity:
Fineness refers, therefore, to a measure expressing the purity of gold and silver bullions. The higher the fineness, the greater the concentration of the precious metal. Gold bullions usually are 99.99%, while silver ranges from .99% to .9999%.
Authenticity:
While buying bullions, ensure that it comes from reputed sellers or mints that provide certification of authenticity. Hallmark stamps and certifications by recognized authorities like the LBMA or the Royal Canadian Mint are a few markers one must look out for.
Market Prices
Prices of gold and silver fluctuate due to geopolitical events, supply, demand, and economic situations. Monitor market trends to buy your bullions during price plunges and realize better value for money.
Storage and Security
Home Storage:
Some investors like storing bullions at home, and for this, one needs to have a safe or vault that is very secure. Ensure protection at your place of storage from theft and natural disasters. You may want to buy some insurance for that added sense of security.
Professional Storage
You can store bullions in professional vaulting facilities or even in a bank's safe deposit box. Such facilities charge a fee for the enhanced security given by them, which includes surveillance and sometimes even insurance coverage.
Conclusion:
Why Choose European Jewelry?
If one wants to invest in gold and silver bullions, then it is a company entrusted to provide quality precious metals: European Jewelry, one of the leading jewelry stores in Chicago. Having built a sterling record in excellence and reliability, European Jewelry offers different gold and silver bullion products—bars and coins alike—from famous mints and suppliers worldwide. Each bullion is meticulously manufactured and guaranteed for purity and genuineness, thus inspiring confidence and peace of mind in investors. It could be the seasoned investor or the first-time buyer of precious metals; European Jewelry's customer satisfaction criterion and ethical business policy make them one of the favored options for gold and silver bullions. They also offer an investment portfolio that has been diversified to stand time with its precious metals. Explore their collection today by opening an account—start investing now. Visit us at https://europeanj.com/.
Original Source:
0 notes
Text

rendering process
"Oh, aye, I'm all luck these days."
(Ahhh I have a lot of feelings about this piece, please indulge me.)
As mentioned in Octavia's card, paperwick's DA card tutorials (part 1, 2) were invaluable in the process.
Card symbolism: This is Rugan at his lowest, after selling out everyone to save his own hide. He still has a job and pay (but well, for how much longer?). Everyone he cared for is dancing a hempen jig. Rugan wears Zhentarim colors; he's showered in gold, but miserable. He can barely touch the coin in his hands. Unlike the man in Four of Pentacles, he's looking away in shame.
Landed on a composition fairly quickly. The original idea was to have him sitting in The Chair, but I felt the pose was strong enough as-is.
I went with a highly rendered face and the classic straight lines and strong angles of the DA cards. The focal points are his expression and the Zhentarim-marked coins.
This is also why we must always remember to use references for faces. (The screenshot I eventually used was of him being beaten up in That Scene.) I also redrew the flying serpent three times lol
The repeated shapes in the background are FR gold pieces.
After blocking in colours, the last stretch of work on this was trying out different texture brushes to figure out how to separate his figure and the background.
Green was chosen as a highlight to make the gold pieces look more sickly. It's also one of the Guild colours, which ties into his arc later in Gods and Monsters, where he becomes Nine Fingers' man. The coin in the middle was given a warm gold-leaf treatment to further draw in the eye.
Total time taken: 18 hours
On a personal note, I am starting to feel like the stuff in my head is slowly beginning to match what's on the page (which probably explains why I'm drawing so manically).
And here they both are, where we meet them at the start of the story, companions in misery:
Thank you for reading! <3

Four of Coins, Rugan
[companion card: Two of Swords]

miserliness, selfishness, fear of change, clinging to the past
The Four of Coins/Pentacles can show times of material security and happiness, and it often marks a time of financial gain, either earned through work or simply acquired from another source, such as inheritance. It is a card of earthly power, but with no accompanying emotional or spiritual gain. (source)
91 notes
·
View notes
Text
Celebrating Milestones: Unique Anniversary Cake Ideas for Parents
Are you on the lookout for the perfect way to celebrate your parents' milestone anniversary? Look no further! In this comprehensive guide, we'll explore a myriad of creative and heartfelt anniversary cake ideas for parents that will make their special day even more memorable.

Introduction
Your anniversary cake for parents is a time to celebrate the love and commitment they've shared throughout the years. What better way to honor this special occasion than with a beautifully crafted anniversary cake? From classic designs to personalized creations, there are endless options to suit every taste and style.
Choosing the Perfect Design
When selecting a design for your anniversary cake for parents, consider their personality and preferences. Do they have a favorite color or theme? Perhaps they have a shared hobby or interest that could inspire the design. Whether it's a simple yet elegant cake or a lavish masterpiece, the key is to choose something that reflects their unique bond.
Personalized Touches
Incorporate their names, wedding date, or a meaningful quote into the design.
Include edible photos of memorable moments or fondant figurines that resemble your parents.
Add small details like symbols of their hobbies or interests.
Consider using colors that hold significance to their relationship.
Personalize the cake to reflect their unique love story.
Opt for decorations that evoke sentimental memories.
Ensure the design aligns with their personalities and preferences.
Use elements that symbolize longevity and enduring love.
Incorporating Their Love Story
One of the most touching ways to celebrate your 25th anniversary cake for parents is by incorporating elements of their love story into the cake design. Perhaps you could recreate the location of their first date or incorporate symbols that hold special meaning to them. By telling their story through cake, you'll create a truly memorable and sentimental centerpiece for their celebration.
Symbolic Elements
Incorporate traditional symbols of love and longevity like hearts, roses, or intertwined rings.
Include elements that represent their journey together, such as a winding path or a blooming tree.
Infuse the cake with depth and significance by adding symbolic touches.
Choose symbols that hold personal meaning to your parents' relationship.
Ensure the symbolism aligns with the overall theme and design of the cake.
Use symbolic elements to tell a story of their enduring love and commitment.
Consider incorporating cultural or religious symbols that are meaningful to your family.
Use symbolism to create a visually stunning and emotionally resonant anniversary cake.
Flavorful Delights
While the design is important, don't forget about the flavor! Treat your parents' taste buds to a delectable array of flavors, from classic vanilla and chocolate to exotic options like red velvet or lemon raspberry. Consider incorporating their favorite flavors or experimenting with unique combinations to surprise and delight their senses.
Elegant Presentation
Presentation is key when it comes to anniversary cakes. Opt for a sleek and sophisticated design that exudes elegance and style. Consider adding decorative elements like edible flowers, gold leaf accents, or intricate piping to elevate the aesthetic appeal of the cake. A beautifully presented cake will not only impress your parents but also serve as a stunning centerpiece for their celebration.
DIY Options
Consider DIY-ing your anniversary cake for parents as a creative endeavor.
With practice and patience, you can create a homemade masterpiece.
Utilize online tutorials and resources to enhance your baking skills.
Aim for a cake that is both delicious and visually appealing.
Embrace the opportunity to personalize the cake to your parents' tastes and preferences.
Experiment with different flavors, decorations, and techniques.
Enjoy the process of creating something special for your loved ones.
Don't be afraid to seek guidance or ask for help if needed.
Hiring a Professional Baker
If baking isn't your forte, fear not! Hiring a professional baker is a surefire way to ensure that your anniversary cake for parents is nothing short of perfection. Look for a baker who specializes in custom cakes and schedule a consultation to discuss your vision. From design to flavor, they'll work with you every step of the way to create a cake that exceeds your expectations.
Conclusion
Your anniversary cake for parents is a momentous occasion that deserves to be celebrated in style. Whether you opt for a classic design, a personalized creation, or something in between, the key is to infuse the cake with love and meaning. With these creative anniversary cake ideas, you'll create a sweet and memorable tribute to your parents' enduring love.
FAQs
1. How far in advance should I order an anniversary cake for my parents?
It's best to place your cake order at least 2-3 weeks in advance to ensure availability, especially if you're opting for a custom design.
2. Can I request specific dietary restrictions for the anniversary cake?
Yes, most professional bakers are able to accommodate dietary restrictions such as gluten-free, dairy-free, or nut-free options upon request.
3. What size anniversary cake should I order for a large gathering?
As a general rule of thumb, plan for approximately one slice of cake per guest. However, it's always a good idea to consult with your baker to determine the appropriate size based on your guest count and serving preferences.
4. How can I transport the anniversary cake to the venue safely?
To ensure that your cake arrives at the venue intact, place it on a flat, sturdy surface in your vehicle and drive with caution. Consider investing in a cake box or carrier to provide additional protection during transit.
5. Can I freeze leftover cake for future enjoyment?
Yes, leftover cake can be stored in an airtight container and frozen for up to several months. Simply thaw it in the refrigerator overnight before serving for best results.
#Anniversary cake for parents#25th anniversary cake for parents#anniversary cake ideas for parents#anniversary cake#25th anniversary cake
0 notes