#had to learn the backend to shine properly
Explore tagged Tumblr posts
Visit Tumblr Blog
Explore Tumblr blogs with no restrictions, modern design and the best experience.
Last Seen Tumblr Blogs


Fun Fact
Tumblr’s website traffic is steadily declining.
Note
Long time no see uncle getbusy back! I heard the music I’m proud of you finally stop being the manager and became the artist

#had to learn the backend to shine properly#thank you#yara’s tunes#yara’s thoughts#ask yara#daya’s🧠docs#i busted my ass!#it’s my time now
4 notes
·
View notes
Text
Working with Microsoft Azure for 20 hours and why I will not use it again
Last weekend I attended a Hackathon at Microsoft. Overall it was an awesome experience and I had a lot of fun, so this post has nothing to do with the event itself and also is not my overall opinion on Microsoft. They do awesome stuff in a lot of fields, but with Azure, they are definitely under delivering.
During the event, I started to get in touch with the Azure platform. Our project Idea was to create a website where you can search for news and then via sentiment analysis this news would be sorted by "happiness". The news search and sentiment analysis are offered via Azures so-called cognitive services that abstract the ML models away and you can simply use an API for accessing that services....so far so good. With this preconditions most of you coders out there will have the thought: "This sounds too easy to fill 24h of programming". Exactly what I thought...already thinking about also coding an Alexa skill and so on to fill the time. With two experienced developers, we thought the backend would be done in about 4h (conservative calculation) as it would only be stitching together three APIs and delivering that info to a JSON REST API for our frontend team. For keeping the fun up and having more learnings during the project we decided to do the backend as a serverless function. But then Azure came into our way...
In the end, it took us ~9h to develop the backend as a serverless function that is mainly a 40 lines JavaScript file we had to develop in the in-browser "editor" that Azure offers as all the other approaches we tried didn't work out and we ended up abandoning them. Once again: 9 hours for 40 lines of JS code stitching together three APIs...that is insane. (Btw. at 3 am we decided to switch to GCP (google cloud platform) and that did the job in about 45 minutes)
So for sure we did things wrong and it could have been done faster, but this blog post is about the hard onboarding and overall bad structure of Azure. Please also keep in mind that Azure is still in a more-or-less early stage and not everything is wrong in there. In the following, I will walk you through the timeline of this disaster and suggestions I would have in mind to fix some of the most confusing steps. Actually, I will try to avoid these mistakes in my own future projects, so thanks Microsoft by showing me a way how not to do things xD
Just a bit more background: My partner in the backend had some experience with GCP and I do most of my current projects with AWS, so we did know how stuff works there...couldn't be too hard to transfer that knowledge to the Azure platform.
Start of the project
So first of all creating a new Azure account, that is not that hard and after entering credit card info you get 100$ of free credit. I actually like how Microsoft solved that here: You have two plans. You start with the 100$ free tier and if you spend all of that money you manually have to change to the pay-as-you-go plan. So that protects you of opening up an account, doing some testing, forgetting about it and then a month later you get a huge bill (happened to me with AWS). So that is nice for protecting new users that just start to test the system. Good job here Microsoft!
After setting up the account I created a new project and added some of the resources we needed. Creating a serverless function I recognized the tag "(Preview)" on the function I created but didn't think more about it...but actually, that sign should be something like Experimental/Do not use/Will most likely not work properly. We created a Python serverless function (apparently Python functions are still beta here) and tried to get some code in there.
There are three ways to get code into an azure function:
Web "editor"
Azure CLI
VS Code
...for full-featured functions. As we selected the experimental/beta/preview functionality Python we only had the latter two options. Not that bad as it is the same for AWS and I am used to deploying my code via the AWS cmd...shouldn't be way harder with Azure.
My suggesting: Do not do publish functionality that is obviously not ready yet. Do internal testing instead of using your users for that task.
Azure plugins for VS code
Microsoft overs a wide range of VS code plugins for Azure. As that is my main editor anyways I wanted to give them a try. So for the functionality of serverless functions, you need the functions plugin and about 9 other mandatory ones that are some sort of base plugins. 500mb and three VS Code crashed later finally the required plugins were installed properly. The recommended login method did not work and I had to choose the method via the browser. Not that big of a deal, but as they recommend the inline method I would think that should work. (Didn't work for the other folks in my team as well...so had nothing to do with my particular machine)
You would think that 500mb should be enough for finally being able to deploy some code...but you still need 200mb more for the Azure cli that is required for the plugins to work properly.
Finally having installed all of it you can see all your Azure functions and resources in VS code. I started to get a bit excited as it looked that the development from now on would be straight forward and easier as I am used to from AWS.
But that 700mb of code did not work properly....the most important function "deploy" did fail without a more in-depth error message...AAAAAAARRRG. Why do I have to install all that crap and then it can't do the most simple task it has to get my code into their cloud.
Keep your tooling modular and try to do fewer things, but do them right
Code templates
A nice idea is, on creating a new serverless function Azure greets you with a basic boilerplate code example showing you how to handle the basic data interfaces.
Maybe also because we selected the alpha functionality "Python" we didn't get Python code here but JavaScript. So your function is prepopulated with code that is not able to run because it is the wrong programming language. We were lucky and recognized that right away, but you could get really confusing error messages here if you then start developing in JS but actually having a Python runtime.
Better no boilerplate code than one in the wrong programming language
But at least it is colorful
So next try with the Azure CLI. The first thing that you recognize is that the CLI has all sorts of different colors...but that does not help if you are annoyed and want to get things done.
That is a thing you also recognize in the Azure web interface...it has quite some UX issues but they do have more than five color themes you can choose from for styling the UI...not sure Microsoft if you set your priorities right here ;)
Also, the CLI did not get us where we wanted....either of our own incompetence or the CLI, no clue. Either way, I would blame Azure as it is their job to help developers onboarding and at least get basic tasks (we still only want to deploy a simple "hello world") done in an acceptable time.
Focus less on making your UI shine in every color of the rainbow and try to improve documentation and onboarding examples
Full ownership of a resource still does not give you full privileges
After finally being able to deploy at least the "hello world" we wanted to go a step further...work concurrently on that project. Yes 'till now we mainly did pair programming on a single machine.
As I was the owner of that resource I wanted to give my teammate also full access to it, so he could work on the resource and add functions if required. I granted him "owner" access rights (the highest that were available) but still, he was not able to work properly with that function. In the web UI it did work more or less but than again in VS code no chance to do anything (adding a function or deploying it). I ended up doing a thing that goes against everything I learned about security: I logged in with my credentials at his machine.
So imagine yourself now already sitting in front of your laptop for about 4 1/2 hours and you did not manage to do anything of your real work.
Ditching Azure Functions and switching to GCP
That was the moment when we did ditch the idea of doing the backend as Azure function. We switched to GCP and started there all over again. As I also never worked with that platform I expected a similar hard start as I already had in the last few hours with Azure. So about 25 minutes later we achieved more on GCP than with azure 'till then.
A thing both Azure and GCP do better than AWS is they have the Logs of a serverless function in the same window as the function itself. AWS has here a different approach and you have to change to the cloud logs when you want to get info about your function and how it worker. Props to both Google and Microsoft for solving this a lot better!
Actually a hint for AWS: Give your user all control and info at a single place
Cognitive services
The prices you could win at the Hackathon were attached to using Azure and thereby we stick to the cognitive services for doing the news search and the sentiment analysis. Overall the API is straight forward: Send your data and get the results back.
One thing we got told in a presentation and that you should keep in mind when using the cognitive services: You do not control the model and it could change at any moment in time. So if you use the cognitive services for productive use, you should continuously check that the API didn't change its behavior in a way that influences your product in a bad way. But most of the time it is still a lot cheaper and better than building the model yourself
The problem that we did have with the services where again authentication issues. Quite confusing some of the cognitive services (e.g. the sentiment analysis) are have different API base URLs depending where you register that cognitive service and others are not. As I assume they need that manual setting of data centers for a particular (unknown to me) reason. Indeed I would propose to have all the cognitive services bound to a location.
The news search, for example, is not bound to a location and so we had two different behaviors of the API base URLs in our so short and easy application:
One URL for all location.
Only a certain location is valid for your resource. If you point to a wrong API location you get an "unauthorized" as the response
Pointing to the wrong location is pure incompetence on the developer side but it would help a lot if there would be a distinct error code/message for that scenario.
Have the same base URL behavior for all cognitive services
Return some sort of 'wrong location'-error if you have a valid API token but you are pointing to the wrong location
Insufficient documented SDKs
Azure offers SDKs for using their services. We gave the JS SDK for the cognitive services a try. Here we stumbled upon two sides of a medal: First props to the developers coding that SDKs they are straight forward and do what they should. Even the code itself looks good...but why the hell do I have to look into the code of the SDKs to get all the options the functions offer? When you stick to the documentation provided via the GitHub readme or NPM you only get a fraction of the functionality. We were confused that the own SKDs of Microsoft seemed not to be API complete. Looking into the code we saw they are actually API complete and do offer a lot more options then documented.
Please Microsoft: Properly document your functionalities!
IMO there must be deep problems with the internal release processes at Azure. It is not acceptable that an IT company already being so long in the industry allows itself such a standard mistake. You should not release your products (and I see the SDKs as such) without proper documentation.
"Code Examples"
During our try and error period for trying to get the JS SDK running, we stumbled upon the quickstart guide for the cognitive services Quickstart: Analyze a remote image using the REST API with Node.js in Computer Vision
Instead of using their own SDK and explaining how to use it they show you how to manually build an HTTP request in JS. Sure that can be helpful for new JS coders, but if you have an SDK for that particular reason...why are you not using it? Looks like the left hand is not knowing what the right-hand does.
Stick to one way of doing things. If you have an SKD, also use it in your quickstart guides for being consistent
Conclusion
In the end, we did port the code back from GCP to an Azure function (again ~1h of work). We selected JS instead of Python and coded completely in the web UI...that did work. I now know how real Microsoft business developers do their daily business...never leave the web UI and just accept that life is hard.
Microsoft failed to deliver a good enough experience here and lost me as a potential customer. How can it be that I was able to do the same stuff in a fraction of the time in GCP? (And keep in mind: it was already 3am in the morning, I was super tired and I also never worked with GCP before)
None of the three major players is perfect and sure I understand it is hard to deliver fast and keeping good quality in this highly competitive market. But maybe actually going the step further will help to win in the end.
Once again: This is me only rating the onboarding experience of Azure in particular! No general opinion on Microsoft.
Last one: The Azure web UI didn't work in Chrome. So if you have issues with that, Firefox did the trick for us ;)
0 notes
Text
A Lovely Spring View: Spring Boot & Vue.js
It´s time to shed some light on the integration of Vue.js with the popular Java Enterprise framework Spring Boot! Both frameworks are shining stars in their respective domain – but how could they be set up together properly? What is a practical project structure and build process? How does the development work locally and how is the app deployed? Let´s elucidate these questions!
Vue.js looks like a great choice!
I have to admit: I am not a frontend developer! I really like to play around with “backend stuff” like Spring Boot, web and microservices, automating whole infrastructures with Vagrant, Packer, Ansible and Docker – while I just wanted to scale my apps with Spring Cloud, Docker Swarm and Traefik…
But wait! Isn´t there a frontend I need to build from time to time?! Yeah, there aren´t that many occasions, but sometimes I have to get my hands dirty with some JavaScript code.

Especially when you are giving lectures at university and try to digitize some old paper processes with your students. And if you ask our CTO, this “backend developer” thing won´t be around much longer…

Alright then, we need to choose the “right” frontend framework – having nearly no clue. The last web app I built was based on Angular 1 – and it felt like a good choice! I loved the coding experience and after a day of training, I felt able to write awesome frontends… But now it’s two years later and I heard rumors that there was a complete rewrite of Angular (2), a new kid in town from Facebook (React) and lots of ES201x stuff, dependency managers, linters and more. Whew! But if I get my colleagues right, Vue.js isn´t the worst choice! Just take a look at all those posts that have been written in our blog this spring (especially if you need a deeper dive into Vue.js):
Rapid prototyping with Vue.js Vue.js – it’s simple until you make it complicated Vue.js & React – JavaScript UI Frameworks im Vergleich
Also, other projects move from one of the other big frameworks like Angular to Vue.js. Some of the main points are Vue.js’ much flatter learning curve and the higher coding speed compared to Angular and React. And the introduction phrase sounds really great:
Vue (pronounced /vjuː/, like view) is a progressive framework for building user interfaces. Unlike other monolithic frameworks, Vue is designed from the ground up to be incrementally adoptable. The core library is focused on the view layer only, and is very easy to pick up and integrate with other libraries or existing projects.
Project setup
So I think it could be a good idea to invest some time into Vue.js. As you may know, I strive to write quite comprehensible blog posts – you can find every bit inside the example project on GitHub. So let´s have a quick look into the project´s structure. The project uses Maven´s Multi Module capabilities to achieve a clean setup:

The pom.xml in the project´s root folder spring-boot-vuejs therefore contains the two modules backend and frontend:
frontendbackend
Spring Boot 2.0.x backend
The easiest way to create a new Spring Boot app is – as Josh Long really likes to emphasize – start dot spring dot io! Just initialize a Spring Boot app with the Web dependency and place the generated zip´s contents into the backend folder. There are only two things I had to change for the Vue.js integration. First the spring-boot-starter-parent has to move to our parent pom.xml in the root directory.
Second – and this is a key concept of our project setup here – we need to copy the generated HTML, JavaScript & CSS to a resources folder where it can be served by Spring Boot´s embedded Webserver later easily. This could be done with the maven-resources-plugin:
maven-resources-plugincopy Vue.js frontend contentgenerate-resourcescopy-resourcessrc/main/resources/publictrue${project.parent.basedir}/frontend/target/diststatic/index.html
It just takes the results from the frontend build process (placed in /frontend/target/dist) and places them into /backend/src/main/resources/public folder. With this a simple java -jar backend-0.0.1-SNAPSHOT.jar will run our Spring Boot App and serve all the frontend assets. But first of all let´s build a frontend to serve!
Just for later needs we also create a simple RESTful Service in BackendController.java and use the great testing tooling from rest-assured together with Spring Boot to test our services inside the BackendControllerTest.class:
@RunWith(SpringRunner.class) @SpringBootTest( classes = SpringBootVuejsApplication.class, webEnvironment = SpringBootTest.WebEnvironment.RANDOM_PORT ) public class BackendControllerTest { @LocalServerPort private int port; @Test public void saysHello() { when() .get("http://localhost:" + port + "/api/hello") .then() .statusCode(HttpStatus.SC_OK) .assertThat() .body(is(equalTo(BackendController.HELLO_TEXT))); }
Vue.js 2.5.x frontend
If you want to reproduce every step mentioned here, you´ll need a working Node.js installation as a prerequisite. Just use your preferred package manager and install it – like brew install node on a Mac. We´ll also need the Vue.js command line interface vue-cli, which could be installed with the help of npm, the Node.js Package Manager:
npm install --global vue-cli
To initialize a project skeleton for Vue.js, we only have to execute the following inside the frontend directory:
vue init webpack frontend
This command results in some questions that require answers:
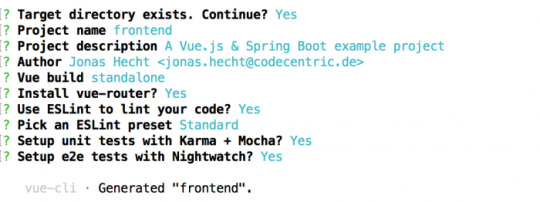
The generated skeleton is a great starting point for your Vue.js experiments. If you want to learn more about installing Vue.js, just head over to the docs.
The frontend-maven-plugin
The easiest way to handle every bit of the quite complex frontend build process with npm, node.js, ESLint, Karma, webpack and so on is to just use the frontend-maven-plugin. If you know Maven, that’s everything you need! Just add the plugin to the frontend’s pom.xml and you can use your well-known Maven commands:
com.github.eirslettfrontend-maven-plugin${frontend-maven-plugin.version}install node and npminstall-node-and-npmv9.11.1npm installnpmgenerate-resourcesinstallnpm run buildnpmrun build
The configuration of the frontend-maven-plugin ensures that the correct Node.js and npm versions are installed – with Node.js version > 4.0.0 the plugin takes care of the corresponding npm version, so you don´t have to explicitly configure it here. Additionally it installs all of our frontend dependencies (via npm install) and runs the full frontend build process with npm run build.
Tell webpack to output build contents to /target
The standard Node.js way is to create a dist directory for builds which contain the minified source code of our web application. But as we use Maven here, we need to have everything in the target directory. Therefore we need to change the generated frontend/config/index.js and replace the following lines:
index: path.resolve(__dirname, '../dist/index.html'), assetsRoot: path.resolve(__dirname, '../dist'),
with
index: path.resolve(__dirname, '../target/dist/index.html'), assetsRoot: path.resolve(__dirname, '../target/dist'),
First app run
Now we already have everything in place to fire up our Spring Boot powered Vue.js application! Just enter the project’s repository and let Maven do its job inside the root spring-boot-vuejs directory:
mvn clean install
This will build our whole app and we can simply do a:
java -jar backend/target/backend-0.0.1-SNAPSHOT.jar
Now let´s open our browser and hit http://localhost:8088/. That´s it, our app should now look like this:

Development process
Although we now have our app successfully running for the first time, we need to take a closer look at how the development process could work with Spring Boot and Vue.js integrated. Because we don´t really want to wait for the full Maven/npm build to complete and wait for our app to be fired up with java -jar until we see a simple frontend element changed in the browser!
We want to get much faster feedback if we change frontend code. Luckily the webpack-dev-server comes to the rescue! This piece of magic will just update and build every change through all the parts of our JavaScript build chain instantly – and is pre-configured in our setup out of the box. The only thing to start the webpack-dev-server is to switch over to the frontend directory and run:
npm run dev
That’s it! Just try it yourself. The command automatically opens your browser. Just enter the Vue.js source in frontend/src and change something. It will instantly be visible
Another neat tool is the Vue.js browser extension. Just install it into your Chrome or Firefox and you should have a deep look into your Vue components inside the Browser´s development tools:
Accessing Spring Boot REST services from Vue.js frontend
As we´re integrating Vue.js with Spring Boot, we for sure want to call some of those nice RESTful web services our Spring Boot backend provides us with. There are many libraries to access web services that one can use with Vue.js. One of them is axios, which is a quite popular Promise API based HTTP client with a huge number of GitHub stars. To use axios in our project, we only have to install the npm dependency:
npm install axios --save
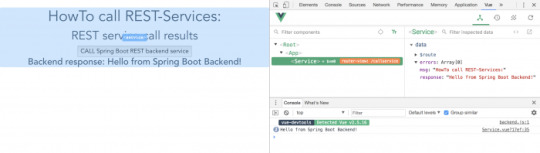
Calling a REST service with Axios is simple. Go into the script area of your component (e.g. in the Service.vue) and add:
import axios from 'axios' data () { return { response: [], errors: [] } }, callRestService () { axios.get(`api/hello`) .then(response => { // JSON responses are automatically parsed. this.response = response.data }) .catch(e => { this.errors.push(e) }) } }
Now inside the template area of your Vue.js component you can request a service call with the callRestService() method – and access the response data accordingly:
CALL Spring Boot REST backend service
Get out of the same-origin policy (SOP) hell
The HTTP calls with axios are working fine – except when we try to use them in our local fast feedback development process with the webpack-dev-server. Why? Because if we start the webpack-dev-server via npm run dev, it will serve our web application on http://localhost:8080. But our Spring Boot REST backend runs on http://localhost:8088! As a core concept of web application security, the same-origin policy (SOP) will then prevent our Vue.js frontend from accessing its Spring Boot backend – resulting in SOP errors.
One way to solve this problem is to use the Cross Origin Resource Sharing Protocol (CORS). Although this isn´t a big deal with both axios and Spring Boot, there´s a much more nifty solution. Thanks to my colleague Daniel who pointed me to the nice proxying feature of webpack-dev-server, we don´t need to configure all the complex CORS stuff!
According to the Vue.js Webpack Template the only thing we need to configure is a Proxy for our webpack-dev-server requests. This can easily be done in the frontend/config/index.js – right inside the dev.proxyTable field:
dev: { ... proxyTable: { // proxy all webpack dev-server requests starting with /api to our Spring Boot backend (localhost:8088) '/api': { target: 'http://localhost:8088', changeOrigin: true } },
With this configuration in place, the webpack-dev-server uses the really handy http-proxy-middleware to proxy all frontend requests with a preceding /api from http://localhost:8080 to http://localhost:8088 – including changing the Origin HTTP header accordingly. Remember that our Spring Boot REST services are configured to serve those requests to /api on class level:
@RestController() @RequestMapping("/api") public class BackendController { @RequestMapping(path = "/hello") public @ResponseBody String sayHello() { return "Hello from Spring Boot Backend!"; }
The proxyTable configuration is finally used in the frontend/build/dev-server.js to configure the proxyMiddleware. We don´t need to change anything here, but I wanted to show the usage of the http-proxy-middleware:
// proxy api requests Object.keys(proxyTable).forEach(function (context) { var options = proxyTable[context] if (typeof options === 'string') { options = { target: options } } app.use(proxyMiddleware(options.filter || context, options)) })
Is the app ready for deployment?
OK, now I can´t really conceal that I love that Continuous Delivery stuff.
So no example project is complete as long as it´s not running anywhere “productively”.
As you may already have found out, the example project has a live deployment configuration for Heroku: With every push into the master branch, our Spring Boot powered Vue.js app is built by TravisCI and deployed to:
https://spring-boot-vuejs.herokuapp.com
In the course of setting up the example project I really fell in love with the great Automatic deploys feature of Heroku and Heroku Pipelines. If the “Wait for CI to pass before deploy” checkbox is selected, we get a fully working pipeline and are able to demonstrate that our example project is also ready for deployment! Thanks again for pointing me to this great platform, Benedikt!
And that´s it!
Now we found a nice way to integrate Vue.js and Spring Boot. As both are really popular frameworks in their respective domain, I hope this introduction is helpful to some of you folks. If you manage to work through all the points shown in this post, you will have a solid project setup that can be used for both local development and deployment – mainly because both Vue.js and Spring Boot bring in such great features. And as “old school” Maven is supported by nearly every platform, this setup is ready for anything you can imagine. Let me know about your great Spring Boot powered Vue.js apps!
Der Beitrag A Lovely Spring View: Spring Boot & Vue.js erschien zuerst auf codecentric AG Blog.
A Lovely Spring View: Spring Boot & Vue.js published first on https://medium.com/@koresol
0 notes